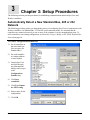
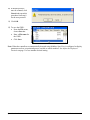
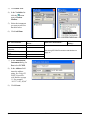
1
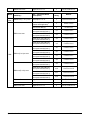
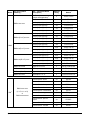
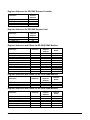
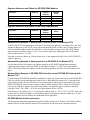
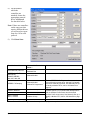
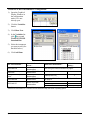
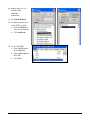
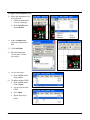
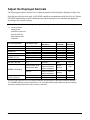
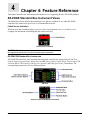
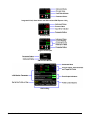
SpecView from WATLOW Addendum to SpecView Manual HMI Software 1241 Bundy Boulevard, Winona, Minnesota USA 55987 Phone: +1 (507) 454-5300, Fax: +1 (507) 452-4507 http://www.watlow.com 0600-0056-0015 Rev.J February 2015 ©2013-2015 Watlow. All rights reserved. TC Table of Contents Chapter 1: Introduction ..................................................................................3 Additional Resources .................................................................................3 Chapter 2: About Setting up Communications ............................................3 Protocol Drivers .........................................................................................3 Automatic and Manual Configuration .........................................................4 Naming Instruments ...................................................................................4 Saving Settings in Non-Volatile Memory ....................................................5 Using EZ-ZONE Controllers with Standard Bus .........................................5 Using EZ-ZONE Controllers with Modbus ................................................ 11 Chapter 3: Setup Procedures ...................................................................... 16 Automatically Detect a New Standard Bus, 485 or 232 Network.............. 16 Manually Set up or Modify an EZ-ZONE Standard Bus Network ............. 19 Manually Set up or Modify a Modbus RTU, 485 or 232 Network.............. 22 Manually Set up or Modify an EZ-ZONE Modbus TCP Network .............. 26 Rename an Instrument............................................................................. 29 Adjust the Displayed Decimals................................................................. 31 Chapter 4: Feature Reference...................................................................... 33 EZ-ZONE Standard Bus Instrument Views .............................................. 33 EZ-ZONE Modbus Instruments ................................................................ 37 ® EZ-ZONE is a registered trademark of Watlow SpecView from Watlow 2 Watlow Addendum 1 Chapter 1: Introduction SpecView is a powerful and easy-to-use Human Machine Interface software package. The purpose of this addendum is to quickly get you up and running using SpecView with Watlow controllers. Chapter 2 provides a brief explanation of concepts that may not be familiar to first time users of SpecView. Basic familiarity with these concepts is assumed in Chapter 3 which provides procedures to walk you through getting Watlow controllers communicating with SpecView. Chapter 4 describes features specific to Watlow controllers. Additional Resources In addition to this addendum the following resources are available for learning about SpecView from and other products available from Watlow: • SpecView User Manual—available on the SpecView installation disk and at Watlow.com in the Download Center’s User Manuals section; Keyword: SpecView. • SpecView Secrets Video Tutorial Series—available at Watlow.com in the Download Center’s Training and Education section. • SpecView Quick Start Guide—and other tutorial documents available at Watlow.com in the Download Center’s User Manuals section; Keyword: SpecView. • SpecView from Watlow Frequently Asked Questions—available at Watlow.com in the Download Center’s Training and Education section; Keyword: SpecView. • SpecView from Watlow Software Download—the latest version of SpecView from Watlow is always available at Watlow.com in the Download Center’s Software and Demos section; Keyword: SpecView. • SpecView from Watlow Field Upgrade Order Form—guides you through the process of adding features to a copy of SpecView you already own. Get the form at Watlow.com in the Download Center’s Software and Demos section; Keyword: SpecView. 2 Chapter 2: About Setting up Communications The following sections provide information to help you understand how to set up communications between SpecView and Watlow controllers. Protocol Drivers SpecView includes support for hundreds of different devices. The protocol drivers included with SpecView tell it how to communicate with specific devices. You will need to choose the appropriate driver whenever you want to automatically or manually set up communications between SpecView and one or more devices. SpecView from Watlow 3 Watlow Addendum There are several protocol drivers that support Watlow products. The table below lists these protocol drivers and the Watlow models supported by each. Protocol Driver Protocol(s) Supported Watlow Models Notes Watlow EZ-ZONE Standard Bus Standard Bus EZ-ZONE PM, EZ-ZONE RM, EZ-ZONE ST Recommended for EZ-ZONE. Watlow Modbus Modbus RTU Modbus TCP EZ-ZONE PM, EZ-ZONE RM, EZ-ZONE ST, SERIES 96, 97, SD MICRODIN, POWER SERIES, 986, 987, 988, 989 SERIES F4 Ramping Watlow F4 Profile Modbus RTU SERIES F4 Ramping Anafaze 16 Loop Anafaze 32 Loop Anafaze 8 Loop Modbus RTU Modbus RTU Modbus RTU Anafaze Ramp/Soak Modbus RTU Anafaze/AB ANAFAZE 16CLS, CLS216, 16MLS, MLS316 32MLS, MLS332 4CLS, CLS204, 8CLS, CLS208 CLS204, CLS208, CLS216, MLS316, MLS332 32MLS Support for basic operation parameters in EZ-ZONE products. See EZ-ZONE Modbus Instruments on page 37. Limited support for programming SERIES F4 profiles. Allows saving profiles as recipes. Requires Series F4 Programmer ordering option. Standard firmware option only Standard firmware option only Standard firmware option only Ramp/Soak Profile programming and operation Proprietary Anafaze protocol Using More than One Protocol Driver All the protocol drivers listed in the table above that support Modbus RTU are compatible with each other. SpecView allows compatible protocol drivers to be used on the same port, but you will need to help SpecView by instructing it when to do so. When there are controllers connected to the same port that require different drivers, you will scan once for each required protocol driver to automatically detect the various devices. If your configuration requires communicating with controllers supported by different protocols, each protocol must have its own network connected to SpecView via a separate communications port. Support for multiple communication ports is an ordering option for SpecView, and is field upgradeable. Automatic and Manual Configuration SpecView can automatically detect and set up communications with controllers. However, in some cases it may be necessary to manually configure SpecView. This method is particularly useful if you want to create screens and configure SpecView prior to receiving your controllers. It is also possible to manually add or remove controllers from any configuration whether it was created automatically or manually. This addendum contains procedures for automatically and manually configuring communications for the various networking options supporting Watlow controllers. SpecView can automatically detect EZ-ZONE controllers using the Standard Bus communications protocol. When using Modbus with EZ-ZONE controllers create the configuration manually. Naming Instruments It is useful to name instruments such that you can easily relate what you see on the screen in SpecView to your equipment and processes. You might want to use a name that: • Indicates the controller’s function in the process SpecView from Watlow 4 Watlow Addendum • Indicates the controller’s location in the panel • Includes network information such as port and address When you add instruments to a configuration manually, you have the opportunity to name them as you wish. When SpecView adds instruments during automatic detection, they are named automatically based on a default name plus one or more numbers. For the Watlow EZ-ZONE Standard Bus driver, the automatic names include the communications port, an instrument name, the controller’s address and for instruments where more than one instance can occur at the same address, the instance number. For example, the first control loop instrument for an EZ-ZONE controller at zone 5 on communications port 7 is named, “C7-EZ-5 Ctlr-1”. You can change an instrument’s name whenever you like. See Rename an Instrument on page 29. Saving Settings in Non-Volatile Memory Watlow controllers can protect their non-volatile memory from being worn out prematurely due to excessive use that may occur when communicating with devices such as a PLC that send the same settings to a controller many times a second. In these controllers, the settings received via communications can be held in volatile memory that is cleared when the controller is turned off. Since SpecView will typically send parameter settings to a controller only when you edit a parameter on the screen, for your convenience you can set the controller to routinely save the parameter settings that come through communications in non-volatile memory. That way the values you set are saved even when the controller is powered down. Consult the controller manual for the appropriate parameter, typically called, “Non-Volatile Save”. Using EZ-ZONE Controllers with Standard Bus When automatically detecting a Standard Bus network with the Watlow EZ-ZONE Standard Bus driver, SpecView reads each device’s part number and adds the appropriate instruments. The table below lists for each instrument with which part numbers it is used and the format of the address string that must be entered when configuring SpecView manually. SpecView Address Strings for EZ-ZONE Devices via Standard Bus The addresses entered into SpecView for each instrument consist of one or two parts. The table below indicates which instruments require the second part. Device addresses consist of: • “z” the Zone number or Standard Bus address (1 to 9, A, B, C, D, E, F, H or J) • A semicolon when an offset is required • The offset or instance number required for some instruments supporting PM and RM controllers. For the individual Function Block instruments the offset is shown as “o” in the Address String; in that case enter the instance number of the function block. For example, for Alarm 7 in an RM at zone 5 the Address String is, “5;7”. SpecView from Watlow 5 Watlow Addendum Model PM RMA RMC For part numbers matching… Add… Instrument Name (Description) Address String Named PMxxxxx-xxxxVxx (V = A, C, D or F) PM Zone (alarm, digital input, output, global and diagnostic) z Cn-EZ-z Zone PMxUxxx-xxxxVxx (U = C, R, B, J, N, E or S) (V = A, C, D or F) Control-Loop (setup and monitor loop 1) z;1 Cn-EZ-z Ctlr-1 PMxxxxx-x(C or J)xxVxx (V = A, C, D or F) Control-Loop (setup and monitor loop 2) z;2 Cn-EZ-z Ctlr-2 PMxxxxx-x(L or M)xxVxx (V = A, C, D or F) Integrated Limit z Cn-EZ-z Limit PMxxxxx-x(R or P)xxVxx (V = A, C, D or F) Auxiliary Input z;2 Cn-EZ-z AI-2 PMxxxxx-xTxxVxx (V = A, C, D or F) Single Current Input z;1 Cn-EZ-z CT-1 PMxxxxx-xxxx(C or F)xx PM Function Blocks z Cn-EZ-z FB PMxUxxx-xxxxVxx (U = L, M or D) (V = A, C, D or F) Stand Alone and RM Limit (not in PM with a control loop) z;1 Cn-EZ-z Limit-1 PMxUxxx-xxxxxxx (U = R, B, N or E) PM Profiling (program and operate ramp-soak profiles) z Cn-EZ-z Prof PMxCxxx-xxxx(B or E)xx PM Express Controller z Cn-EZ-z Ctlr PMxLxxx-xxxx(B or E)xx PM Express Limit_ z Cn-EZ-z Limit PMxTxxx-xxxxxxx PM Timer z Cn-EZ-z Timer RMAx-xxxx-xxxx RMA Zone (global and diagnostic) z Cn-EZ-z Zone RMAx-xYxx-xxxx (Y = 2, 3, 5, or 6) RMA Gateway Z Cn-EZ-z GW RMAx-xxxD-xxxx RM Data Logging z Cn-EZ-z Log RMCxxxxxxxxxxxx RM Zone (alarms, actions globals and diagnostics) z Cn-EZ-z Zone RMCxxxxxxxxxxxx RMC Outputs 1 to 8 z Cn-EZ-z Out z Cn-EZ-z FB 2 1 RMCxxxxxxxxxxxx RM Function Blocks RMCYxxxxxxxxxxx (Y = 1, 2, 3 or 4) Control-Loop (setup and monitor control loop 1) z;1 Cn-EZ-z Ctlr-1 RMCxx(1 or 2)xxxxxxxxx Control-Loop (setup and monitor control loop 2) z;2 Cn-EZ-z Ctlr-2 RMCxxxx(1 or 2)xxxxxxx Control-Loop (setup and monitor control loop 3) z;3 Cn-EZ-z Ctlr-3 RMCxxxxxx(1 or 2)xxxxx Control-Loop (setup and monitor control loop 4) z;4 Cn-EZ-z Ctlr-4 SpecView from Watlow 6 Watlow Addendum Model RMC (cont.) For part numbers matching… Add… Instrument Name (Description) Address String Named RMC(5 or 6)xxxxxxxxxxx Stand Alone and RM Limit (set up and monitor limit 1) z;1 Cn-EZ-z Lim-1 RMCxx(5 or 6)xxxxxxxxx Stand Alone and RM Limit (set up and monitor limit 2) z;2 Cn-EZ-z Lim-2 RMCxxxx(5 or 6)xxxxxxx Stand Alone and RM Limit (set up and monitor limit 3) z;3 Cn-EZ-z Lim-3 RMCxxxxxx(5 or 6)xxxxx Stand Alone and RM Limit (set up and monitor limit 4) z;4 Cn-EZ-z Lim-4 RMC7xxxxxxxxxxx Single Current Input (set up and monitor current input 1) z;1 Cn-EZ-z CT-1 RMCxx7xxxxxxxxx Single Current Input (set up and monitor current input 2) z;2 Cn-EZ-z CT-2 RMCxxxx7xxxxxxx Single Current Input (set up and monitor current input 3) z;3 Cn-EZ-z CT-3 RMCxxxxxx7xxxxx Single Current Input (set up and monitor current input 4) z;4 Cn-EZ-z CT-4 RMCxx(R or P)xxxxxxxxx Auxiliary Input (set up and monitor analog input 2) z;2 Cn-EZ-z AI-2 RMCxxxx(R or P)xxxxxxx Auxiliary Input (set up and monitor analog input 3) z;3 Cn-EZ-z AI-3 RMCxxxxxx(R or P)xxxxx Auxiliary Input (set up and monitor analog input 4) z;4 Cn-EZ-z AI-4 RMCxxxxxxxCxxxx Digital I/O 07 to 12 z Cn-EZ-z DIO 07-12 RMC(3 or 4)xxxxxxxxxxx RMC Profile Operation (setup and operate ramp and soak) z Cn-EZ-z Prof Ops RMC(3 or 4)xxxxxxxxxxx RMC Profiles 1 to 5 (program profiles steps 1 to 50) z Cn-EZ-z Prof 1-5 RMC(3 or 4)xxxxxxxxxxx RMC Profiles 6 to 10 (program steps 51 to 100) z Cn-EZ-z Prof 6-10 RMC(3 or 4)xxxxxxxxxxx RMC Profiles 11 to 15 (program steps 101 to 150) z Cn-EZ-z Prof 11-15 RMC(3 or 4)xxxxxxxxxxx RMC Profiles 16 to 20 (program steps 151 to 200) z Cn-EZ-z Prof 16-20 RMC(3 or 4)xxxxxxxxxxx RMC Profiles 21 to 25 (program steps 201 to 250) z Cn-EZ-z Prof 21-25 RMC(3 or 4)xxxxxxxxxxx RMC Sub Routines 1 to 5 (sub routine steps 1 to 50) z Cn-EZ-z SR-1-5 RMC(3 or 4)xxxxxxxxxxx RMC Sub Routines 6 to 10 (sub routine steps 51 to 100) z Cn-EZ-z SR-6-10 RMC(3 or 4)xxxxxxxxxxx RMC Sub Routines 11 to 15 (sub routine steps 101 to 150) z Cn-EZ-z SR-11-15 SpecView from Watlow 7 1 Watlow Addendum Model RME For part numbers matching… Add… Instrument Name (Description) Address String Named RMEx-xxxx-xxxx RM Zone (alarms, actions globals and diagnostics) z Cn-EZ-z Zone RMEx-xxxx-xxxx RM Function Blocks z Cn-EZ-z FB RMEx-Cxxx-xxxx Digital I/O 01 to 06 z Cn-EZ-z DIO 01-06 RMEx-Vxxx-xxxx (V = J, K, F or L) RM Outputs 1 to 4 z Cn-EZ-z Out 01-04 RMEx-xCxx-xxxx Digital I/O 07 to 12 z Cn-EZ-z DIO 07-12 RMEx-xVxx-xxxx (V = J, K, F or L) RM Outputs 7 to 10 z Cn-EZ-z Out 07-10 RMEx-xxCx-xxxx Digital I/O 13 to 18 z Cn-EZ-z DIO 13-18 RMEx-xxVx-xxxx (V = J, K, F or L) RM Outputs 13 to 16 z Cn-EZ-z Out 13-16 RMEx-xxx(F or L)-xxxx RM Outputs 19 to 22 z Cn-EZ-z Out 19-22 RMEx-xxxC-xxxx Digital I/O 19 to 24 z Cn-EZ-z DIO 19-24 RMHx-xxxx-xxxx RM Zone (alarms, actions 3 globals and diagnostics) z Cn-EZ-z Zone z Cn-EZ-z FB Control-Loop (setup and monitor control loop 1) z;1 Cn-EZ-z Ctlr-1 Control-Loop (loop 2) z;2 Cn-EZ-z Ctlr-2 Control-Loop (loop 3) z;3 Cn-EZ-z Ctlr-3 Control-Loop (loop 4) z;4 Cn-EZ-z Ctlr-4 Control-Loop (loop 5) z;5 Cn-EZ-z Ctlr-5 Control-Loop (loop 6) z;6 Cn-EZ-z Ctlr-6 Control-Loop (loop 7) z;7 Cn-EZ-z Ctlr-7 Control-Loop (loop 8) z;8 Cn-EZ-z Ctlr-8 Control-Loop (loop 9) z;9 Cn-EZ-z Ctlr-9 Control-Loop (loop 10) z;10 Cn-EZ-z Ctlr-10 Control-Loop (loop 11) z;11 Cn-EZ-z Ctlr-11 Control-Loop (loop 12) z;12 Cn-EZ-z Ctlr-12 Control-Loop (loop 13) z;13 Cn-EZ-z Ctlr-13 Control-Loop (loop 14) z;14 Cn-EZ-z Ctlr-14 Control-Loop (loop 15) z;15 Cn-EZ-z Ctlr-15 Control-Loop (loop 16) z;16 Cn-EZ-z Ctlr-16 RM Function Blocks RMHx-(1 or 2)xxx-xxxx RMHx-x(1 or 2)xx-xxxx RMH RMHx-xx(1 or 2)x-xxxx RMHx-xxx(1 or 2)-xxxx 2 2 1 RMHx-xxCx-xxxx Digital I/O 01 to 06 z Cn-EZ-z DIO 01-06 RMHx-xx(J, F or L)x-xxxx RM Outputs 1 to 4 z Cn-EZ-z Out 01-04 SpecView from Watlow 8 Watlow Addendum RMHx-xxxC-xxxx Digital I/O 07 to 12 z Cn-EZ-z DIO 07-12 Model For part numbers matching… Add… Instrument Name (Description) Address String Named RMH (cont.) RMHx-xxx(J, F or L)-xxxx RM Outputs 7 to 10 z Cn-EZ-z Out 07-10 RM Zone (alarms, actions 3 globals and diagnostics) z Cn-EZ-z Zone z Cn-EZ-z FB Stand Alone and RM Limit (set up and monitor limit 1) z;1 Cn-EZ-z Lim-1 Stand Alone and RM Limit (set up and monitor limit 2) z;2 Cn-EZ-z Lim-2 Stand Alone and RM Limit (set up and monitor limit 3) z;3 Cn-EZ-z Lim-3 Stand Alone and RM Limit (set up and monitor limit 4) z;4 Cn-EZ-z Lim-4 Stand Alone and RM Limit (set up and monitor limit 1) z;5 Cn-EZ-z Lim-5 Stand Alone and RM Limit (set up and monitor limit 2) z;6 Cn-EZ-z Lim-6 Stand Alone and RM Limit (set up and monitor limit 3) z;7 Cn-EZ-z Lim-7 Stand Alone and RM Limit (set up and monitor limit 4) z;8 Cn-EZ-z Lim-8 Stand Alone and RM Limit (set up and monitor limit 1) z;9 Cn-EZ-z Lim-9 Stand Alone and RM Limit (set up and monitor limit 2) z;10 Cn-EZ-z Lim-10 Stand Alone and RM Limit (set up and monitor limit 3) z;11 Cn-EZ-z Lim-11 Stand Alone and RM Limit (set up and monitor limit 4) z;12 Cn-EZ-z Lim-12 RM Function Blocks RMLx-xxxx-xxxx RML RMLx-x(5 or 6)xx-xxxx RMLx-xx(5 or 6)x-xxxx 2 1 RMLx-xxCx-xxxx Digital I/O 01 to 06 z Cn-EZ-z DIO 01-06 RMLx-xxJx-xxxx RM Outputs 1 to 4 z Cn-EZ-z Out 01-04 RMLx-xxxx-xxxx Digital I/O 07 to 12 z Cn-EZ-z DIO 07-12 SpecView from Watlow 9 Watlow Addendum Model For part numbers matching… Add… Instrument Name (Description) Address String Named RM Zone (alarms, actions 3 globals and diagnostics) z Cn-EZ-z Zone z Cn-EZ-z FB Auxiliary Input (input 1) z;1 Cn-EZ-z AI-1 Auxiliary Input (input 2) z;2 Cn-EZ-z AI-2 Auxiliary Input (input 3) z;3 Cn-EZ-z AI-3 Auxiliary Input (input 4) z;4 Cn-EZ-z AI-4 Auxiliary Input (input 5) z;5 Cn-EZ-z AI-5 Auxiliary Input (input 6) z;6 Cn-EZ-z AI-6 Auxiliary Input (input 7) z;7 Cn-EZ-z AI-7 Auxiliary Input (input 8) z;8 Cn-EZ-z AI-8 Auxiliary Input (input 9) z;9 Cn-EZ-z AI-9 Auxiliary Input (input 10) z;10 Cn-EZ-z AI-10 Auxiliary Input (input 11) z;11 Cn-EZ-z AI-11 Auxiliary Input (input 12) z;12 Cn-EZ-z AI-12 Auxiliary Input (input 13) z;13 Cn-EZ-z AI-13 Auxiliary Input (input 14) z;14 Cn-EZ-z AI-14 Auxiliary Input (input 15) z;15 Cn-EZ-z AI-15 Auxiliary Input (input 16) z;16 Cn-EZ-z AI-16 RM Function Blocks RMSx-xxxx-xxxx RMSx-x(R or P)xx-xxxx RMS RMSx-xx(R or P)x-xxxx RMSx-xxx(R or P)-xxxx 2 RM 2 1 RMSx-xxCx-xxxx Digital I/O 01 to 06 z Cn-EZ-z DIO 01-06 RMSx-xxJx-xxxx RM Outputs 1 to 4 z Cn-EZ-z Out 01-04 RMSx-xxx(C or B)-xxxx Digital I/O 07 to 12 z Cn-EZ-z DIO 07-12 RMSx-xxxJ-xxxx RM Outputs 7 to 10 z Cn-EZ-z Out 07-10 Function Block: Action z;o EZ Act- Function Block: Alarm z;o EZ Alm- Function Block: Compare z;o EZ Cmp- Function Block: Counter z;o EZ Ctr- Function Block: Linearization z;o EZ Lnr- Function Block: Logic z;o EZ Lgc- Function Block: Math z;o EZ Math- Function Block: Special Output z;o EZ SOF- Function Block: Timer z;o EZ Tmr- Function Block: Variable z;o EZ Var- RMYx-xxxx-xxxx (Y = E, H, L or S) or RMCxxxxxxxxxxxx SpecView from Watlow 10 Watlow Addendum Model For part numbers matching… Add… Instrument Name (Description) STxx-xxxx-xxxx STxx-xxxx-xPxx ST Address String Named ST Controller (setup and monitor control loop and limit) z Cn-EZ-z Ctlr ST Profiling (program and operate ramp-soak profiles) z Cn-EZ-z Prof 1 Notes 1 Instrument names are shown as automatically detected by SpecView where “n” is replaced by the port number and “z” is replaced by the zone number (also known as Standard Bus address). 2 These instruments are not automatically added to configurations. The RM Function Block instrument includes four or eight instances of each type of function block. Several types of EZ-ZONE RM modules support more function block instances than that. To access these additional instances, add the appropriate function block specific instrument for each instance you want to access. 3 The RM Zone instrument includes eight instances of alarms. Several types of EZ-ZONE RM modules support more alarm instances. Add a Function Block: Alarm instrument manually for each additional instance you want to access. Using EZ-ZONE Controllers with Modbus To configure SpecView to communicate with EZ-ZONE products via Modbus you will select and add appropriate instruments manually. For each instrument you must determine the correct address string. The address string depends on the type of network and its configuration. You will add as many instances as needed to allow access to the desired controller features. For example, to access all four analog inputs in an EZ-ZONE RM Control Module, you will add four EZ-ZONE Analog Input instruments. SpecView Instruments Supporting EZ-ZONE Devices via Modbus The tables below list the instruments that may be used with each EZ-ZONE product. Additional tables in the EZ-ZONE Modbus Instruments section on page 37 list each parameter included in these instruments. Review the supported parameters carefully and determine whether they allow you to develop a configuration that meets your requirements. Standard Bus communications provides access to many more EZ-ZONE controller parameters. SpecView Address Strings for EZ-ZONE Devices via Modbus The address strings entered in SpecView for each instrument consist of three parts: • The controller or gateway’s address • A comma followed by the number of decimal places to be displayed • A semicolon followed by the register address offset Controller or Gateway’s Address For Modbus TCP specify the IP address followed by a comma and the controller or gateway’s Modbus address (1 to 247). EZ-ZONE controllers and gateways will respond to any valid setting for the Modbus Address. It is not necessary to set each device to a unique Modbus address, but each must have a unique and appropriate IP address. For Modbus RTU specify the controller or gateway’s Modbus address (1 to 247). This is set in the controller or gateways Setup Communications menu. Each controller or gateway on the network must have a unique Modbus address. SpecView from Watlow 11 Watlow Addendum Decimal Places Specify zero (0) to display whole numbers for parameters such as process variable and set point. Specify one (1) to display these parameters with tenths precision, two (2) to display hundredths and so on. With Modbus TCP networks you must include the decimal setting in the address string. For a Modbus RTU network if the decimal place setting and comma delimiter are omitted, SpecView will display whole numbers. Valid settings range from zero (0) to four (4). Register Address Offset The register address offset is the sum of the First Instance Address for the specific EZ-ZONE product, any applicable Instance Offsets and the Gateway Offset, if any. The tables below give the First Instance Address and Instance Offset for each instrument and product. The Gateway Offset is set by the user when the RUI Gateway or RM Access Module gateway is configured. The First Instance Address and Instance Offsets depend on the controller’s data map setting. Gateway Offset Be careful not to set up instruments that attempt to read Modbus registers that are mapped over by the configuration of the gateway. Register Addresses and Offsets for EZ-ZONE ST Data Map 1 via RUI Only* Data Map 2** First First Instrument Instances Instance Instance Instance Instance Offset Offset Address Address EZ-ZONE Alarm 1 to 2 1480 50 1450 60 EZ-ZONE Analog Input 1 to 2 360 160 360 90 EZ-ZONE Control Loop 1 N/A N/A 1750 N/A EZ-ZONE Communications 1 2418 N/A 2060 20 EZ-ZONE Current 1 1120 N/A 1240 N/A EZ-ZONE Digital I/O 1 to 6 880 30 940 30 EZ-ZONE Limit 1 680 N/A 720 N/A EZ-ZONE Profile (Map 1)** 1 to 4 6070 500 N/A N/A EZ-ZONE Profile (Map 2)** 1 to 4 N/A N/A 4000 1000 EZ-ZONE Profile (ST Map 1) 1 to 4 2870 800 N/A N/A EZ-ZONE Profile Operation 1 2720 N/A 3800 N/A EZ-ZONE Set Points 1 2160 N/A 1890 N/A *Supported only via EZ-ZONE RUI Gateway. **Available with firmware version 4.0 or later. Register Addresses and Offsets for EZ-ZONE PM Instrument EZ-ZONE Alarm EZ-ZONE Analog Input EZ-ZONE Communications EZ-ZONE Control Loop EZ-ZONE Current EZ-ZONE Digital I/O EZ-ZONE Limit EZ-ZONE Profile (Map 1) EZ-ZONE Profile (Map 2) EZ-ZONE Profile Operation EZ-ZONE Set Points SpecView from Watlow Instances 1 to 4 1 to 2 1 or 2 1 to 2 1 1 to 12 1 1 to 4 1 to 4 1 1 to 2 Data Map 1 First Instance Instance Offset Address 1480 50 360 80 2490 20 1880 70 1120 N/A 880 30 680 N/A 2570 500 N/A N/A 2520 N/A 2160 80 12 Data Map 2 First Instance Instance Offset Address 1880 60 360 90 2970 20 2360 70 1360 N/A 1000 30 720 N/A N/A N/A 4500 1000 4340 N/A 2640 80 Watlow Addendum Register Addresses for EZ-ZONE Express Controller First Instance Address* EZ-ZONE Alarm 1480 EZ-ZONE Analog Input 360 EZ-ZONE Control Loop 1880 EZ-ZONE Set Points 2160 *PM Express has only one instance each. Instrument Register Addresses for EZ-ZONE Express Limit First Instance Address* EZ-ZONE Alarm 1480 EZ-ZONE Analog Input 360 EZ-ZONE Limit 680 *PM Express has only one instance each. Instrument Register Addresses and Offsets for EZ-ZONE RMC Modules Instrument EZ-ZONE Alarm EZ-ZONE Analog Input EZ-ZONE Communications EZ-ZONE Control Loop EZ-ZONE Current EZ-ZONE Digital I/O EZ-ZONE Limit EZ-ZONE Profile (Map 2) EZ-ZONE Profile Operation EZ-ZONE Set Points EZ-ZONE Sub Routine Instances 1 to 8 1 to 4 1 1 to 4 1 to 4 1 to 12 1 to 4 1 to 25 1 1 to 4 1 to 15 First Instance Address 1740 360 2830 2220 1380 1020 720 5440 5280 2500 30440 Instance Offset 60 90 N/A 70 50 30 30 1000 N/A 80 860 Register Addresses and Offsets for EZ-ZONE RME Modules Instrument EZ-ZONE Alarms EZ-ZONE Communications EZ-ZONE Digital I/O Instances 1 to 8 1 1 to 24 First Instance Address 1440 2170 360 Instance Offset 60 N/A 30 Register Addresses and Offsets for EZ-ZONE RMH Modules Instrument EZ-ZONE Alarms EZ-ZONE Analog Input EZ-ZONE Communications EZ-ZONE Control Loop EZ-ZONE Digital I/O EZ-ZONE Set Points SpecView from Watlow Instances 1 to 24 1 to 16 1 1 to 16 1 to 12 1 to 16 First Instance Address 2660 380 6510 4100 1820 5220 13 Instance Offset 60 90 N/A 70 30 80 Watlow Addendum Register Addresses and Offsets for EZ-ZONE RML Modules Instrument EZ-ZONE Alarms EZ-ZONE Analog Input EZ-ZONE Communications EZ-ZONE Digital I/O EZ-ZONE Limit Instances 1 to 16 1 to 12 1 1 to 12 1 to 12 First Instance Address 2530 410 3500 1850 1490 Instance Offset 60 90 N/A 30 30 Register Addresses and Offsets for EZ-ZONE RMS Modules Instrument EZ-ZONE Alarms EZ-ZONE Analog Input EZ-ZONE Communications EZ-ZONE Digital I/O Instances 1 to 16 1 to 16 1 1 to 12 First Instance Address 2500 380 3470 1820 Instance Offset 60 90 N/A 30 Address String Example 1: Analog Input 1 in an EZ-ZONE ST via Modbus RTU If an EZ-ZONE ST will communicate with SpecView directly (no gateway) via Modbus RTU, the First Instance Address for an EZ-ZONE Analog Input instrument that will read the value of analog input 1 is 360. If its Modbus address on the 485 network is 2, then the address string for the EZ-ZONE Analog Input instrument could be simply “2;360”. If you want to display the analog input value with tenths precision then make it, “2,1;360”. Note that we must use data map 2 because data map 1 is not supported by SpecView for EZ-ZONE STs without a gateway. Address String Example 2: Analog Input 2 in an EZ-ZONE ST via Modbus RTU For the same network as Example 1 the address string for an EZ-ZONE Analog Input instrument supporting analog input 2 in the EZ-ZONE ST, the address string is “2,1;450” The register address offset is 450 because that’s the address for the first analog input plus the offset 90 to reach the second input. Address String Example 3: EZ-ZONE PM Controllers via an EZ-ZONE RUI Gateway with Modbus TCP Consider three EZ-ZONE PM controllers configured for data map 2 and connected to an EZ-ZONE RUI Gateway with the local/remote gateway offsets set to 0, 4000 and 8000 respectively. To determine the register address offset for an EZ-ZONE Set Points instrument to support the second control loop in the third EZ-ZONE PM, locate the First Instance Address and the Instance Offset. These are 2640 and 80 respectively. Add these together for control loop instance 2 and add the gateway offset for the third controller: 2640 + 80 + 8000 = 10720. So the register address offset is 10720. If the Gateway’s IP address is 10.3.37.105, then the address string is, “10.3.37.105,1,2;10720” where the comma one (,1) after the IP address is the Modbus address of the gateway and the comma two (,2) after that specifies that values be displayed in hundredths where applicable. EZ-ZONE Modbus Profile Instruments The instruments supporting programming profiles include 10 steps each. Therefore, the instance offsets indicated above are ten times the instance offsets indicated for the steps in the controller manuals. SpecView from Watlow 14 Watlow Addendum Old EZ-ZONE Modbus Instruments The following instruments are included in the Watlow Modbus driver, but are no longer described in this document. These instruments were provided in the original release supporting Watlow EZ-ZONE products prior to the availability of support via Standard Bus. These instruments are not maintained or tested for use with later versions. They are provided for backwards compatibility only. • • • • • • • EZ-ZONE PM Controller EZ-ZONE PM Limit EZ-ZONE PM Profiling EZ-ZONE ST Controller EZ-ZONE ST Profiling EZ-ZONE Gateway ST Controller EZ-ZONE Gateway ST Profiling Note: These instruments support data map 1 only. SpecView from Watlow 15 Watlow Addendum 3 Chapter 3: Setup Procedures The following sections provide procedures for establishing communications between SpecView and Watlow controllers. Automatically Detect a New Standard Bus, 485 or 232 Network The following procedure guides you through the process of configuring SpecView to communicate with Watlow controllers via Standard Bus, 232 and 485 serial communications. It is assumed that the controllers are connected correctly to one or more of the computer’s serial communications ports. To add a controller to an existing configuration, see Manually Set up or Modify an EZ-ZONE Standard Bus Network on page 18. To create a configuration automatically: 1) Set all controllers to the same baud rate. (Not necessary for Standard Bus.) 2) Set each controller to a unique address or zone number. 3) Launch SpecView and click through any informational dialogs until you get to the Configurations Found dialog. 4) Click Stop countdown. 5) Click Test Comms for NEW config. 6) Enter a name for the configuration. 7) Click OK. SpecView from Watlow 16 Watlow Addendum 8) For the Port to which the controllers are attached, choose the appropriate protocol driver in Protocol. See the table below. Note: If there are controllers on the same port that require different drivers, you will need to repeat steps 8 to 10 for each protocol. 9) Click Start Scan. For this Controller… Choose this Protocol Driver… EZ-ZONE PM, RM or ST Watlow EZ-ZONE Standard Bus SERIES 96, 97, SD MICRODIN, POWER SERIES, 986, 987, 988, 989 Watlow Modbus SERIES F4 Ramping 16CLS, 16MLS, CLS216, MLS316 32MLS, MLS332 8CLS, CLS208 4CLS, CLS204 Watlow Modbus 1 Watlow F4 Programmer Anafaze 16 Loop Anafaze 32 Loop Anafaze 8 Loop Notes For the SERIES F4 Profiling controller, scan twice, once with each protocol driver. Add the F4 Cascade instrument manually if desired. See Manually Set up or Modify a Modbus RTU, 485 or 232 Network on page 22. CLS200 and MLS300 Standard and Ramp/Soak firmware options. For controllers with Ramp/Soak to add the Anafaze Profile Status and the desired Anafaze Profile instruments. See Manually Set up or Modify a Modbus RTU, 485 or 232 Network on page 22. 32MLS (Anafaze protocol) Anafaze/AB Scan with the Watlow F4 Programmer driver only if the F4 programmer option is enabled. 1 SpecView from Watlow 17 Watlow Addendum 10) If another protocol must be scanned, click Cancel and repeat this procedure from step 8 for the next protocol. 11) Click OK. 12) To save the GDW: • From the File menu, choose Save As. • Enter a File name for the GDW. • Click Save. Note: When the controllers are automatically detected using Modbus, SpecView is configured to display parameters such as set point and process variable as whole numbers. See Adjust the Displayed Decimals on page 31 to use another decimal setting. SpecView from Watlow 18 Watlow Addendum Manually Set up or Modify an EZ-ZONE Standard Bus Network The following procedures guide you through the process of manually creating a configuration for a Standard Bus network and adding devices to this configuration. Use this procedure when the EZ-ZONE controllers are not available to detect automatically or when you want to add a new EZ-ZONE controller to an existing configuration and therefore do not want to automatically create a new configuration. To create a manual configuration: 1) Launch SpecView. 2) Click through any informational dialogs until you get to the Configurations Found dialog. 3) Click New Manual Configuration. 4) Enter a name for the configuration. 5) Click OK. SpecView from Watlow 19 Watlow Addendum To add one or more instruments to a configuration: 1) Open the Graphical Display Window in the configuration mode if it is not already open. 2) Click the Variables button. 3) Click Show New. 4) In the Variables list click to expand Watlow EZ-ZONE Standard Bus. 5) Select the instrument you want to add. (See the table below.) 6) Click Add Item. For This Controller… EZ-ZONE PM EZ-ZONE PM Express 1 Controller EZ-ZONE PM Express 1 Limit EZ-ZONE RM EZ-ZONE ST From this Protocol Driver… Watlow EZ-ZONE Standard Bus Watlow EZ-ZONE Standard Bus Watlow EZ-ZONE Standard Bus Watlow EZ-ZONE Standard Bus Watlow EZ-ZONE Standard Bus Add These Instruments… With Address String… See Using EZ-ZONE Controllers on page 5. PM Express Controller z PM Express Limit_ z See Using EZ-ZONE Controllers with Standard Bus on page 5. ST Controller z 2 ST Profiling z Anafaze MLS32 Channel(1/loop) z,n,1 (n = loop) 1 For PM model numbers of the form PMxxxxx-AAAABxx. Add these instruments for a controller that includes the ramp and soak or profiling option. 2 SpecView from Watlow 20 Watlow Addendum 7) In the Add/Rename Instrument dialog type a Name for the instrument. 8) Select the Port. 9) Enter the Address in the form from the table above where z is the address or zone number set in the controller. 10) Click Create. 11) The first time you add an instrument on a port, SpecView opens the Port Settings Dialog. When this happens: Click OK (for Standard Bus no change is needed). 12) Repeat from step 4 for each instrument to be added. 13) Click Show Defined. 14) To add instrument views to the GDW, for each: • In the Variables list select the instrument. • Click Add Item. SpecView from Watlow 21 Watlow Addendum 15) To save the GDW: • From the File menu, choose Save As. • Enter a File name for the GDW. • Click Save. Manually Set up or Modify a Modbus RTU, 485 or 232 Network The following procedures guide you through the process of manually creating a configuration for a Modbus RTU, 485 or 232 network and adding devices to this configuration. Use this procedure when the controllers are not available to detect automatically, when you want to add a new controller to an existing configuration and for creating configurations that communicate with EZ-ZONE controllers via Modbus RTU. To create a manual configuration: 1) Launch SpecView. 2) Click through any informational dialogs until you get to the Configurations Found dialog. 3) Click New Manual Configuration. SpecView from Watlow 22 Watlow Addendum 4) Enter a name for the configuration. 5) Click OK. To add one or more instruments to a configuration: 1) Open the Graphical Display Window in the configuration mode if it is not already open. 2) Click the Variables button. 3) Click Show New. 4) In the Variables list click the button next to the protocol driver that includes the instrument you want to add. See the table below. 5) Select the instrument you want to add. 6) Click Add Item. For This Controller… From this Protocol Driver… EZ-ZONE PM EZ-ZONE PM Express Controller EZ-ZONE PM Express Limit EZ-ZONE RM EZ-ZONE ST MICRODIN SERIES 96 SERIES 97 Watlow Modbus SERIES SD Watlow Modbus SERIES SD Limit Watlow Modbus SpecView from Watlow Add These Instruments… With Address String… Watlow Modbus Watlow Modbus Watlow Modbus Watlow Modbus Watlow Modbus Watlow Modbus Watlow Modbus See Using EZ-ZONE Controllers with Modbus on page 11. MicroDin Series 96 SERIES 97 Limit SERIES SD Controller 1 SERIES SD Profiling SERIES SD Limit 23 z,0 z,0 z,0 z,0 z,0 z,0 Watlow Addendum For This Controller… From this Protocol Driver… 986, 987, 988, 989 POWER SERIES Watlow Modbus Watlow Modbus Add These Instruments… With Address String… Watlow 988 z,0 Watlow Power Series z,0 Watlow F4 z,0 Watlow Modbus SERIES F4 Ramping F4 Cascade z,0 2 Watlow F4 Programmer Watlow F4 Program z,0 MLS CPU z,1M 16CLS, 16MLS, Anafaze 16 Loop CLS216, MLS316 MLS(16)Ch (1 per loop) z,1M;n (n = loop) MLS CPU z,1M 32MLS, MLS332 Anafaze 32 Loop MLS(32)Ch (1 per loop) z,1M;n (n = loop) MLS CPU z,1M 8CLS, CLS208 Anafaze 8 Loop 4CLS, CLS204 CLS(8)Ch (1 per loop) z,1M;n (n = loop) 1 Anafaze Profile Status z,1M CLS204, CLS208, Anafaze Profile A to Anafaze CLS216, MLS316, Anafaze Ramp/Soak Profile Q (as many as desired to z,1M MLS332 2 program) z,0,1 Anafaze CPU 32MLS (Anafaze protocol) Anafaze/AB Anafaze MLS32 Channel(1/loop) z,n,1 (n = loop) 1 Add these instruments for a controller that includes the ramp and soak or profiling option. 2 Add the Watlow F4 Program instrument only if the F4 programmer option is enabled in the SpecView key. 7) In the Add/Rename Instrument dialog type a Name for the instrument. 8) Select the Port. 9) Enter the Address as directed in Using EZZONE Controllers with Modbus on page 11 or for controllers other than EZ-ZONE, in the form from the table above where z is the address or zone number set in the controller. 10) Click Create. SpecView from Watlow 24 Watlow Addendum 11) The first time you add an instrument on a port, SpecView opens the Port Settings Dialog. When this happens: • Set the Baud Rate for the Port (for Standard Bus no change is needed). • Click OK. 12) Repeat from step 4 for each instrument to be added. 13) Click Show Defined. 14) To add instrument views to the GDW, for each: • In the Variables list select the instrument. • Click Add Item. 15) To save the GDW: • From the File menu, choose Save As. • Enter a File name for the GDW. • Click Save. Note: This procedure configures SpecView to display parameters such as set point and process variable as whole numbers when communicating by Modbus. See Adjust the Displayed Decimals on page 31 to use another decimal setting. SpecView from Watlow 25 Watlow Addendum Manually Set up or Modify an EZ-ZONE Modbus TCP Network The following procedures guide you through the process of configuring SpecView to communicate with EZ-ZONE controllers via Modbus TCP and adding instruments to the configuration. To create a new configuration: 1) Launch SpecView. 2) Click through any informational dialogs until you get to the Configurations Found dialog. 3) Click New Manual Configuration. 4) Enter a name for the configuration 5) Click OK. To add one or more EZ-ZONE PMs to a configuration: 1) Open the Graphical Display Window in the configuration mode if it is not already open. 2) Click the Variables button. SpecView from Watlow 26 Watlow Addendum 3) Click Show New. 4) In the Variables list click the button next to Watlow Modbus. 5) Select the instrument you want to add. See the table below. 6) Click Add Item. For This Controller… EZ-ZONE PM EZ-ZONE PM Express Controller EZ-ZONE PM Express Limit EZ-ZONE RM EZ-ZONE ST From this Protocol Driver… Add These Instruments… With Address String… Watlow Modbus Watlow Modbus Watlow Modbus See Using EZ-ZONE Controllers with Modbus on page 11. Watlow Modbus Watlow Modbus 7) In the Add/Rename Instrument dialog for Port select TCP/IP. 8) In the Address field insert the address string. See Using EZZONE Controllers with Modbus on page 11. For example, “10.3.37.105,1,0;360” 9) Click Create. SpecView from Watlow 27 Watlow Addendum 10) Repeat steps 5 to 9 as needed to add additional instruments. 11) Click Show Defined. 12) To add instrument views to the GDW, for each: • In the Variables list select the instrument. • Click Add Item. 13) To save the GDW: • From the File menu, choose Save As. • Enter a File name for the GDW. • Click Save. SpecView from Watlow 28 Watlow Addendum Rename an Instrument In order to more easily correlate items in SpecView’s Graphical Display Windows (GDWs) with the devices and processes they represent you may want to change an instrument’s name. The following procedures illustrate how to change a controller’s name and how to replace any instrument views with renamed ones. To rename an instrument: 1) With SpecView running, from the File menu choose Configuration Mode. 2) Click to open the Variables list. 3) Select the controller you want to rename. 4) Click Properties. 5) Enter the desired Name. 6) Click Rename Only. Note: Instrument views on screens are not updated automatically, but can be replaced. SpecView from Watlow 29 Watlow Addendum To replace an instrument view: 1) Delete the instrument view to be replaced: • Select the instrument view by clicking it. • From the Edit menu, choose Delete. 2) In the Variables List select the instrument to add. 3) Click Add Item. 4) Drag the instrument view to place it where you want it. 5) To save the GDW: • From the File menu, choose Save. 6) To update another GDW: • From the File menu, choose Open. • Locate and select the GDW. • Click Open. • Repeat from step 1 above. SpecView from Watlow 30 Watlow Addendum Adjust the Displayed Decimals The following procedures describe how to adjust the number of decimal places displayed in SpecView. Note this procedure does not apply to EZ-ZONE controllers communicating with SpecView by Watlow EZ-ZONE Standard Bus because with that protocol the decimal places are automatically displayed according to the controller setting. To make the number of decimal places displayed in SpecView match the controller display: 1) Set the decimal setting in the controller as desired. (See the table for details about each controller. For This Controller… For Sensor Type… EZ-ZONE ST, PM, RM MICRODIN Any Any Thermocouple, RTD Process Any Thermocouple, RTD Process (mA, mV, V) Parameter in SpecView… Parameter in Controller… Available Decimals N/A dEC 0 to 3 Decimal Point (No Display) 0 or 1 Decimal Pt 1 dEC1 0 or 1 SERIES 96 Decimal Pt 1 dEC1 0 to 3 SERIES 97 Decimal 1 dEC1 0 or 1 1 See Note dEC 0 or 1 SERIES SD Controller 2 SERIES SD Limit See Note dEC 0 to 3 POWER SERIES Not available Decimal 1 986, 987, 988, 989 Any dEC1 0 to 3 Decimal 2 Input 1 DecPlaces Choose Thermocouple, RTD, Input 2 DecPlaces 0 or 1 Decimal Wet Bulb-Dry Bulb Input 3 DecPlaces SERIES F4 Ramping Input 1 DecPlaces Choose Process Input 2 DecPlaces 0 to 3 Decimal Input 3 DecPlaces CLS, MLS, Thermocouple, RTD Precision Disp Format 1 CLS200, MLS300 Linear Precision Disp Format 0 to 4 1 For a SERIES SD with a thermocouple or RTD set the Decimals (Ctlr Temp Display Only) parameter, the Decimals (SpecView and Ctlr Prcs Display) parameter and SpecView for the same number of decimals. 2 For a SERIES SD with a process input (mA, mV or V) set the Decimals (SpecView and Ctlr Prcs Display) parameter and SpecView for the same number of decimals. SpecView from Watlow 31 Watlow Addendum 2) With SpecView running, to enter the configuration mode, from the File menu choose Configuration Mode. 3) Click to open the Variables list. 4) Select the instrument. 5) Click Properties. 6) In the Address field set the decimal places corresponding to the controller setting 0 for whole numbers, 1 for tenths, 2 for hundredths, 3 for thousandths 4 for ten-thousandths: • For Modbus RTU protocol set the number after the comma. Modbus RTU: the decimal setting is after the comma • For Modbus TCP or Anafaze/AB protocols set the number after the second comma. 7) Click Rename Only. Modbus TCP: the decimal setting is after the second comma 8) To save the GDW: • From the File menu, choose Save. Note: The possible decimal settings may depend on other controller settings such as the sensor type. Not all parameters are affected by the decimal setting. SpecView from Watlow 32 Watlow Addendum 4 Chapter 4: Feature Reference This chapter describes the instruments and instrument views supporting Watlow EZ-ZONE products. EZ-ZONE Standard Bus Instrument Views The following sections describe the instrument views that are available for use when EZ-ZONE controllers are connected to SpecView via a Standard Bus network. Failed Sensor Indication When the area that normally displays a process value on an instrument view is covered by a red rectangle, the instrument is indicating that the sensor has failed. Failed sensor indication CAUTION: This feature may not be available for all instruments, so take the appropriate precautions to insure fail-safe system operation. EZ-ZONE PM Standard Bus Instruments EZ-ZONE PM controllers, limit controller and integrated controller are supported by the PM Zone, Control Loop, Integrated Limit, Stand Alone and RM Limit, Auxiliary Input, Single Current Input, PM Function Blocks, PM Profiling, PM Express Controller and PM Express Limit_ instruments. The corresponding instrument views are illustrated below. PM Zone Control Loop and PM Express Controller SpecView from Watlow 33 Watlow Addendum Integrated Limit, Stand Alone and RM Limit and PM Express Limit_ Auxiliary Input Single Current Input PM Function Blocks PM Profiling SpecView from Watlow 34 Watlow Addendum EZ-ZONE RM Standard Bus Instruments EZ-ZONE RM control systems are supported by a wide variety of instruments. The PM Timer, RMA Zone, RMA Gateway, RM Data Logging, RMC Outputs 1 to 8, RM Function Blocks, as well as eight instruments for programming profiles and sub routines in RM control modules and four instruments for configuring outputs are supported with the simple parameter button instrument view. Parameter Button instrument View. The RM Zone, Control Loop, Stand Alone and RM Limit, Auxiliary Input, Single Current Input and RMC Profile Operation instruments and a sample of the four Digital I/O instruments are illustrated below. RM Zone Control Loop Stand Alone and RM Limit Auxiliary Input SpecView from Watlow 35 Watlow Addendum Single Current Input RMC Profile Operation Digital I/O EZ-ZONE ST Standard Bus Instruments The EZ-ZONE ST is supported by the ST Controller and ST Profiling instruments. The corresponding instrument views are illustrated below. ST Controller ST Profiling SpecView from Watlow 36 Watlow Addendum EZ-ZONE Modbus Instruments Watlow recommends using Standard Bus communications between SpecView and EZ-ZONE products because there are many advantages including automatic detection. However, there are situations where it may be preferable to use Modbus RTU or Modbus TCP. For these cases the following instruments are offered. The tables below list the parameters supported by these instruments. EZ-ZONE Alarm EZ-ZONE Current State Read High Set Point Reading RMS Low Set Point Error Clear Request Heater Error Silence Request High Set Point Low Set Point EZ-ZONE Analog Input Input Value EZ-ZONE Digital I/O Error Status Input State Cal Offset Output State Clear Latch EZ-ZONE Communications Direction EZ-ZONE Limit Display Units State Non-volatile Save Status Low Set Point High Set Point EZ-ZONE Control Loop Clear Request Control Mode Control Mode Active Heat Prop Band EZ-ZONE Set Points Cool Prop Band Clsd-Loop Set Point Time Integral Open Loop Set Point Time Derivative Clsd-Loop Working SP Dead Band Open Loop Working SP Heat Hysteresis Idle Set Point Cool Hysteresis Ramp Working SP Heat Power Ramp Target SP Cool Power Output Power TRU-TUNE+ Enable Autotune Request Autotune Status SpecView from Watlow 37 Watlow Addendum EZ-ZONE Profile Operation Profile State Profile Start EZ-ZONE Profile (Map 2) This instrument includes the following parameters for each of the ten steps in a profile. Profile Action Request Type Active Step Control Mode 1 Current File Control Mode 2 Active Step Type Control Mode 3 Target SP Loop 1 Control Mode 4 Target SP Loop 2 Target Set Point 1 Target SP Loop 3 Target Set Point 2 Target SP Loop 4 Target Set Point 3 Produced SP Loop 1 Target Set Point 4 Produced SP Loop 2 Hours Produced SP Loop 3 Minutes Produced SP Loop 4 Seconds Step Time Remaining Rate Event 1 Wait For Process Enable 1 Event 2 Wait For Process 1 Event 3 Wait For Process Enable 2 Event 4 Wait For Process 2 Event 5 Wait For Process Enable 3 Event 6 Wait For Process 3 Event 7 Wait For Process Enable 4 Event 8 Wait For Process 4 Jump Count Remaining Wait for Process Instance Wait Event 1 EZ-ZONE Profile (Map 1) This instrument includes the following parameters for each of the ten steps in a profile. Wait Event 2 Wait Event 3 Wait Event 4 Type Day of Week Target Set Point 1 Guaranteed Soak Enable 1 Hours Guaranteed Soak Enable 2 Minutes Guaranteed Soak Enable 3 Seconds Guaranteed Soak Enable 4 Rate Subroutine Step Wait For Process 1 Subroutine Count Wait for Process Instance Jump Step Wait Event 1 Jump Count Wait Event 2 End Type Jump Step Event 1 Jump Count Event 2 End Type Event 3 Event 1 Event 4 Event 2 Event 5 Event 6 Event 7 Event 8 SpecView from Watlow 38 Watlow Addendum EZ-ZONE Profile (ST Map 1) This instrument includes the listed parameters for each of the ten steps in a profile. EZ-ZONE Sub Routine This instrument includes the following parameters for each of the ten steps in a sub routine. Type Type Target Set Point 1 Control Mode 1 Hours Control Mode 2 Minutes Control Mode 3 Seconds Control Mode 4 Rate Target Set Point 1 Wait For Process 1 Target Set Point 2 Wait Event 1 Target Set Point 3 Wait Event 2 Target Set Point 4 Jump Step Hours Jump Count Minutes End Type Seconds Event 1 Rate Event 2 Wait For Process Enable 1 Wait For Process 1 Wait For Process Enable 2 Wait For Process 2 Wait For Process Enable 3 Wait For Process 3 Wait For Process Enable 4 Wait For Process 4 Wait Event 1 Wait Event 2 Wait Event 3 Wait Event 4 Day of Week Guaranteed Soak Enable 1 Guaranteed Soak Enable 2 Guaranteed Soak Enable 3 Guaranteed Soak Enable 4 Event 1 Event 2 Event 3 Event 4 Event 5 Event 6 Event 7 Event 8 SpecView from Watlow 39 Watlow Addendum How to Reach Us Corporate Headquarters Europe Watlow Electric Manufacturing Company 12001 Lackland Road St. Louis, MO 63146 Sales: 1-800-WATLOW2 Manufacturing Support: 1-800-4WATLOW Email: [email protected] Website: www.watlow.com From outside the USA and Canada: Tel: +1 (314) 878-4600 Fax: +1 (314) 878-6814 Watlow France Tour d'Asnières. 4 Avenue Laurent Cély 92600 Asnières sur Seine France Tél: + 33 (0)1 41 32 79 70 Télécopie: + 33(0)1 47 33 36 57 Email: [email protected] Website: www.watlow.fr Latin America Watlow de México S.A. de C.V. Av. Fundición No. 5 Col. Parques Industriales Querétaro, Qro. CP-76130 Mexico Tel: +52 442 217-6235 Fax: +52 442 217-6403 Watlow GmbH Postfach 11 65, Lauchwasenstr. 1 D-76709 Kronau Germany Tel: +49 (0) 7253 9400-0 Fax: +49 (0) 7253 9400-900 Email: [email protected] Website: www.watlow.de Watlow Italy S.r.l. Viale Italia 52/54 20094 Corsico MI Italy Tel: +39 024588841 Fax: +39 0245869954 Email: [email protected] Website: www.watlow.it Asia and Pacific Watlow Ibérica, S.L.U. C/Marte 12, Posterior, Local 9 E-28850 Torrejón de Ardoz Madrid - Spain T. +34 91 675 12 92 F. +34 91 648 73 80 Email: [email protected] Website: www.watlow.es Watlow UK Ltd. Linby Industrial Estate Linby, Nottingham, NG15 8AA United Kingdom Telephone: (0) 115 964 0777 Fax: (0) 115 964 0071 Email: [email protected] Website: www.watlow.co.uk From outside The United Kingdom: Tel: +44 115 964 0777 Fax: +44 115 964 0071 Watlow Singapore Pte Ltd. 16 Ayer Rajah Crescent, #06-03/04, Singapore 139965 Tel: +65 6773 9488 Fax: +65 6778 0323 Email: [email protected] Website: www.watlow.com.sg Watlow Korea Co., Ltd. #1406, E&C Dream Tower, 46, Yangpyeongdong-3ga Yeongdeungpo-gu, Seoul 150-103 Republic of Korea Tel: +82 (2) 2628-5770 Fax: +82 (2) 2628-5771 Website: www.watlow.co.kr Watlow Australia Pty., Ltd. 4/57 Sharps Road Tullamarine, VIC 3043 Australia Tel: +61 3 9335 6449 Fax: +61 3 9330 3566 Website: www.watlow.com Watlow Malaysia Sdn Bhd 1F-17, IOI Business Park No.1, Persiaran Puchong Jaya Selatan Bandar Puchong Jaya 47100 Puchong, Selangor D.E. Malaysia Tel: +60 3 8076 8745 Fax: +60 3 8076 7186 Email: [email protected] Website: www.watlow.com Watlow Electric Manufacturing Company (Shanghai) Co. Ltd. Room 501, Building 10, KIC Plaza 290 Songhu Road, Yangpu District Shanghai, China 200433 China Phone: Local: 4006 Watlow (4006 928569) International: +86 21 3381 0188 Fax: +86 21 6106 1423 Email: [email protected] Website: www.watlow.cn 瓦特龍電機股份有限公司 80143 高雄市前金區七賢二路189號 10樓之一 電話: 07-2885168 傳真: 07-2885568 Watlow Electric Taiwan Corporation 10F-1 No.189 Chi-Shen 2nd Road Kaohsiung 80143 Taiwan Tel: +886-7-2885168 Fax: +886-7-2885568 Your Authorized Watlow Distributor ワトロー・ジャパン株式会社 〒101-0047 東京都千代田区内神田1-14-4 四国ビル別館9階 Tel: 03-3518-6630 Fax: 03-3518-6632 Email: [email protected] Website: www.watlow.co.jp Watlow Japan Ltd. 1-14-4 Uchikanda, Chiyoda-Ku Tokyo 101-0047 Japan Tel: +81-3-3518-6630 Fax: +81-3-3518-6632 Email: [email protected] Website: www.watlow.co.jp TOTAL CUSTOMER CUS SATIS TISF FACT CTIION 3 Year Warranty