1
The iCommunicator
Version 3.0
User Guide
Part No. IC6100002 Rev. E
This document is the copyright of Interactive Solutions, Inc. and is intended
for exclusive use of Interactive Solutions customers. All rights are reserved.
Information in this document is subject to change without notice.
Companies, names, and data used in examples herein are fictitious unless
otherwise noted. No part of this document may be reproduced or transmitted
in any form or by any means, electronic or mechanical, for any purpose,
without the express written permission of Interactive Solutions, Inc.
© 2002 Interactive Solutions, Inc. All rights reserved.
The material in this document has been carefully reviewed; however,
Interactive Solutions, Inc. does not guarantee it to be free of all errors or
omissions and reserves the right to make corrections, changes, updates, or
revisions to the information contained herein.
iCommunicator is a trademark of Interactive Solutions, Inc.
Other than those held by Interactive Solutions, Inc., any other brand and
product names referenced in this manual are trademarks or registered
trademarks of their respective holders and are used here for informational
purposes only.
Part Number: IC6100002 Rev. E
Document Number: X3UG-1207-03
Interactive Solutions, Inc.
6448 Parkland Drive
Sarasota, Florida 34243-4046 USA
Visit our web site at www.isi-iCommunicator.com
INTERACTIVE SOLUTIONS, INC.
SOFTWARE LICENSE AGREEMENT
NOTICE TO LICENSEE: READ THE TERMS AND CONDITIONS OF THIS LICENSE AGREEMENT ("AGREEMENT") CAREFULLY BEFORE OPENING
THE PACKAGE CONTAINING THE PROGRAM DISKETTES, TAPE OR OTHER MEDIA, THE COMPUTER SOFTWARE THEREIN, AND THE
ACCOMPANYING USER DOCUMENTATION (COLLECTIVELY THE "PROGRAM"), OR IF THE COMPUTER SOFTWARE IS PRE-INSTALLED,
BEFORE USING THE PROGRAM. BY OPENING THE PACKAGE CONTAINING THE PROGRAM, OR OTHERWISE USING THE PROGRAM, IF THE
COMPUTER SOFTWARE IS PRE-INSTALLED, YOU, AS THE LICENSEE ("LICENSEE"), ARE ACCEPTING AND AGREEING TO BECOME BOUND BY
THE TERMS OF THIS LICENSE AGREEMENT. IF YOU ARE NOT WILLING TO BE BOUND BY THE TERMS OF THIS LICENSE AGREEMENT,
PROMPTLY RETURN THE PACKAGE IN UNOPENED FORM WITHIN FIVE DAYS OF THE DATE OF PURCHASE TO RECEIVE A REFUND. THIS
LICENSE AGREEMENT REPRESENTS THE ENTIRE AGREEMENT CONCERNING THE PROGRAM BETWEEN LICENSEE AND INTERACTIVE
SOLUTIONS ("LICENSOR"), AND IT SUPERSEDES ANY PRIOR PROPOSAL, REPRESENTATION, OR UNDERSTANDING BETWEEN THE PARTIES.
THE PROGRAM IS NOT SOLD TO THE LICENSEE, BUT IS THE PROPERTY OF THE LICENSOR PROTECTED BY COPYRIGHT LAWS AND
INTERNATIONAL TREATY. ANY USE OF THE PROGRAM IS GOVERNED BY THE TERMS OF THIS AGREEMENT. KEEP THIS AGREEMENT IN A
SAFE PLACE, AS IT IS YOUR PROOF OF PURCHASE AND MAY BE REQUIRED FOR UPGRADE OR SUPPORT SERVICES.
1. License Grant. Licensor hereby grants to Licensee and Licensee accepts a non-exclusive license to use the Program Diskettes and the computer programs
contained therein only in machine-readable, object code form (collectively the "Software"), and the accompanying User Documentation, only as authorized in this
Agreement. The Program may be used only in a manner authorized by the manual, subject to the terms of this Agreement.
If the product configuration for the Software that Licensee has licensed is designated as a "Single Machine License" on the Software packaging, the Software
may be used only on a single computer owned, leased, or otherwise controlled by Licensee at a facility owned or leased by Licensee, or in the event of the
inoperability of that computer, on a backup computer selected by Licensee. Neither concurrent use of the Software on two or more computers nor use in a system,
multiple central processing units, emulations on a local area network or other network, or on a mainframe, micro or other central file or program server computer is
permitted without separate authorization and the payment of additional license fees under a supplementary license.
If the product configuration for the Software that Licensee has licensed is designated as a "Location License" on the Software packaging, the Software may
be used only at one geographic location owned or leased by the Licensee on any number of computers owned, leased, or otherwise controlled by the Licensee,
unless otherwise restricted to a specified number of computers by notice on the packaging.
If the product configuration for the Software that Licensee has licensed is designated as a "Server License" on the Software packaging, the Software may be
used only on a single server computer owned, leased or otherwise controlled by Licensee at a facility owned or leased by Licensee, and in connection therewith may
be used in a related local area network or other intranet for any number of computers within the network, unless otherwise restricted to a specified number of
computers, network users or clients by notice on the packaging.
Certain additional or alternative restrictions may apply to the license of this Software. These restrictions, if any, are printed on the Software packaging, and
when present, form part of this Agreement.
Upon loading the Software into the computers specified by the terms of the product configuration identified on your Software packaging, Licensee may
retain the Program Diskettes that Licensee has received for backup purposes. In addition, Licensee may make one copy of the Software on a second set of diskettes,
CD-Rom disks or cassette tapes for the purpose of backup in the event the Program Diskettes are damaged or destroyed. Licensee may make one copy of the User's
Manual for backup purposes. Licensee shall reproduce and include the trade secret and copyright notices and any other proprietary legends that are on the original
Program in all copies, in whole or in part, of the Program. Except as authorized under this paragraph, no copies of the Program or any portions thereof may be made
by Licensee or any person under Licensee's direction, authority or control. Licensee agrees to not assign, sublicense, transfer, pledge, lease, rent, sell, or share any
rights granted under this Agreement, unless otherwise expressly authorized in writing by Licensor. Licensee will not disassemble, decompile, reverse engineer,
copy, alter, or otherwise use the Software except as expressly authorized by this Agreement.
2. Restrictions. Licensee acknowledges and agrees that the Software and the User's Manual, forms and other information supplied to Licensee by Licensor, and
any copies thereof are proprietary products of Licensor protected under U.S. Copyright Law and International Treaty. Licensee further acknowledges and agrees that
all right, title and interest in and to the Program, including associated intellectual property rights, are and shall remain with Licensor. Licensee agrees to take all
reasonable steps necessary to protect the trade secrets and other property rights of Licensor. This Agreement does not convey to Licensee an interest in or to the
Program, but only a limited right of use which is terminable in accordance with the terms of this Agreement.
3. License Fees. The license fees paid by Licensee are paid in consideration of the licenses granted under this Agreement.
4. Term. This Agreement is effective upon Licensee opening this package and shall continue until terminated. Licensee may terminate this Agreement at any
time by returning the Program and all copies thereof and extracts therefrom to Licensor. Licensor may terminate this Agreement upon the breach by Licensee of any
term hereof, and shall have the right to injunctive relief enjoining such acts or attempts constituting a breach (in addition to other legal remedies, all of which are
non-exclusive). Upon such termination by Licensor, Licensee agrees to return to Licensor the Program and all copies and extracts thereof.
5. Limited Warranty. Licensor warrants solely to the original purchaser, for their benefit alone, that for a period of ninety (90) days from the date Licensee
obtained the Program:
(a) The Program components, including the Software and accompanying documentation, are free from defects in material or workmanship.
(b) The Program is properly recorded upon the Program Diskettes, tape or other media.
Additionally, Licensor warrants solely to the original purchaser, for their benefit alone, that for a period of ninety (90) days from the date Licensee obtained the
Program:
(a) The documentation is substantially complete and contains all the information that Licensor deems necessary to use the Software.
(b) The Program functions substantially as described in the documentation.
The exclusive remedy for breach of this Limited Warranty is replacement of defective product. This Limited Warranty is extended only to the first purchaser of
the Software. To replace a defective disk during the warranty term, send the defective disk and proof of purchase to: Interactive Solutions, Inc., 2150 Whitfield
Industrial Way, Sarasota, Florida, 34243.
DISCLAIMER OF WARRANTIES: THE WARRANTY STATED ABOVE IS THE ONLY WARRANTY APPLICABLE TO THIS PRODUCT. ALL
OTHER WARRANTIES, EXPRESSED OR IMPLIED (INCLUDING, WITHOUT LIMITATION, ALL IMPLIED WARRANTIES OF MERCHANTABILITY
OR FITNESS FOR A PARTICULAR PURPOSE), ARE HEREBY DISCLAIMED. NO ORAL OR WRITTEN INFORMATION OR ADVICE GIVEN BY
INTERACTIVE SOLUTIONS, ITS AGENTS OR EMPLOYEES SHALL CREATE A WARRANTY OR IN ANY WAY INCREASE THE SCOPE OF THIS
WARRANTY OR THE OBLIGATION OF INTERACTIVE SOLUTIONS WITH RESPECT TO THE PROGRAM.
THIS DISCLAIMER OF WARRANTIES AND LIMITED WARRANTY ARE GOVERNED BY THE LAWS OF THE STATE OF FLORIDA.
6. Limitation of Liability. Licensor's cumulative liability to Licensee or any other party for any loss or damage resulting from any claims, demands or actions
arising out of or relating to this Agreement, or in connection with the delivery, use or performance of the Program, shall not exceed the license fee paid to Licensor
for the use of the Program. UNDER NO CIRCUMSTANCES SHALL LICENSOR BE LIABLE FOR ANY SPECIAL, EXEMPLARY, INCIDENTAL, OR
CONSEQUENTIAL DAMAGES BASED UPON BREACH OR WARRANTY, BREACH OF CONTRACT, NEGLIGENCE, TORT, STRICT LIABILITY, OR
ANY OTHER LEGAL THEORY, EVEN IF LICENSOR HAS BEEN ADVISED OF THE POSSIBILITY OF SUCH DAMAGES. SUCH DAMAGES INCLUDE,
WITHOUT LIMITATION, LOSS OF PROFITS, LOSS OF REVENUE, LOSS OF USE OF HARDWARE OR ANY ASSOCIATED EQUIPMENT, COST OF
CAPITAL, COST OF SUBSTITUTE OR REPLACEMENT EQUIPMENT, FACILITIES OR SERVICES, DOWN TIME, PURCHASER'S TIME, THE CLAIMS
OF THIRD PARTIES, INCLUDING CUSTOMERS, AND INJURY TO PROPERTY.
7. Trademark. Interactive Solutions is a trademark of Licensor. No right, license, or interest to such trademark is granted hereunder, and Licensee agrees that no
such right, license or interest shall be asserted by Licensee with respect to such trademark.
8. Governing Law. This Agreement shall be construed and governed in accordance with the laws of the State of Florida.
9. Severability. Should any term of this Agreement be declared void or unenforceable by any court of competent jurisdiction, such declaration shall have no
effect on the remaining terms hereof.
10. No Waiver. The failure of either party to enforce any rights granted hereunder or to take action against the other party in the event of any breach hereunder
unless in writing, and in any event shall not be deemed a waiver by that party as to subsequent enforcement of rights or subsequent actions in the event of future
breaches.
11. Export Controls. None of the Software or any underlying information or technology may be downloaded, used, or otherwise exported or re-exported except
in compliance with all United States and other applicable laws and regulations. In particular, but without limitation, none of the Software or underlying information
or technology may be downloaded, used or otherwise exported or re-exported (i) into (or to a national or resident of) Cuba, Haiti, Iraq, Libya, Yugoslavia, North
Korea, Iran, Syria or any other country to which the U.S. has embargoed goods; or (ii) to anyone on the U.S. Treasury Department's list of Specially Designated
Nationals or the U.S. Commerce Department's Table of Deny Orders. By downloading or using the Software, you are agreeing to the foregoing and you are
representing and warranting that you are not located in, under the control of, or a national or resident of any such country or on any such list.
12. U.S. Government Restricted Rights. The Software and accompanying material are provided with RESTRICTED RIGHTS. Use, duplication, or disclosure by
the Government is subject to subparagraphs (a) through (d) of the Commercial Computer Software - Restricted Rights clause at FAR 52.227-19 and its successors
and counterparts, or in subparagraph (c) of the Rights in Technical Data and Computer Software clause at DFARS 252.227-7013 and its successors and
counterparts, and to similar clauses in the NASA DFAR supplement or other revisions to the FAR sections, as applicable. Contractor/Manufacturer is Interactive
Solutions, Inc., 6448 Parkland Drive, Sarasota, Florida, 34243-4046.
C
Table of Contents
PREFACE ................................................................................................................................III
Customer Support .............................................................................................................iii
Interactive Solutions Customer Service ............................................................................iv
CHAPTER 1: INTRODUCTION ................................................................................................1-1
The iCommunicator Software Program ..........................................................................1-1
Minimum Hardware Specifications ................................................................................1-2
CHAPTER 2: GETTING STARTED ..........................................................................................2-1
CHAPTER 3: USING YOUR ICOMMUNICATOR SOFTWARE PROGRAM ..................................3-1
Parts of the iCommunicator Program Main Screen ........................................................3-1
Using the Menus .............................................................................................................3-3
The Control Window ......................................................................................................3-9
Quick Say Function Keys .............................................................................................3-13
The Signing Window ....................................................................................................3-18
The Text Window .........................................................................................................3-20
Changing the Windows Theme .....................................................................................3-22
Retrieving a Sign for a Word ........................................................................................3-22
Using the Electronic Dictionary....................................................................................3-23
CHAPTER 4: SPEECH RECOGNITION.....................................................................................4-1
Creating and Managing Users.........................................................................................4-2
Run General Training Again.........................................................................................4-14
Correcting Speech Recognition Errors..........................................................................4-18
The Show Results Box..................................................................................................4-19
Archiving and Restoring Speech/Voice Recognition Files ...........................................4-20
INDEX .................................................................................................................................. I-1
i
P
Preface
Interactive Solutions, Inc. (ISI) is a technology company specializing in the
development of assistive educational and communication access software
technology. The iCommunicator software program provides the functions
that let you manage a full range of multimedia types, including full-motion
video with CD-quality sound with a high-end laptop or desktop personal
computer.
This guide gives you all the information you need to know
how to begin
using the program, how to train your computer to recognize voice and
speech patterns, and how to create and control text, sounds, and sign
language videos.
Customer Support
Thank you for purchasing this product. Interactive Solutions is dedicated to
ensuring that you gain the greatest possible value from our products. Please
take a minute to learn about the support and services we offer. Note that the
benefits and services offered by Interactive Solutions are subject to change
without notice.
Training
Interactive Solutions has designed systematic, high-quality training
programs for corporate customers, such as businesses, educational
institutions, healthcare facilities, and government agencies. Online training
is encouraged, particularly for implementation managers.
iii
Interactive Solutions Customer Service
Calll Interactive
x 3300forfor information
information about
Interactive Solutions
Solutionsat 941.753.5000
at 888-463-0474
about
iCommunicator
training
options.
iCommunit
or tr
ning opti
Interactive Solutionsí Customer Service is available to answer your
questions about product availability, upgrades, features, customer
registration, policies, procedures, and other non-technical topics.
The following services are available to registered Interactive Solutions
customers:
Telephone Service
You can call Customer Service for 8:00 AM to 5:00 PM, Monday through
Friday (Eastern Time). The number is 941.753.5000 x 3300
TheTDD/TTY number is 800-362-4584
Registration Status
Customer Service can answer questions about your registration status. Please
have your product serial number ready when you call 941.753.5000 x 3300.
Change of Address
Customer Service handles customer address changes. Send a letter that
includes both your old and new address to:
Customer Service
Interactive Solutions, Inc.
6448 Parkland Drive
Sarasota, FL 34243-4038
ATTN: CHANGE OF ADDRESS
iv
Defective or Damaged Products
Contact Customer Service if your product is damaged or defective. Be sure
to have your product serial number ready when you call. Defective
equipment will be warranted per the equipment manufacturerís warranty
statement. After the warranty period, 90 days from purchase, replacement
parts are available to registered users at a nominal charge.
Send the defective part, a brief explanation, and payment (if necessary) to:
Customer Service
Interactive Solutions
6448 Parkland Drive
Sarasota, FL 34243-4038
ATTN: REPLACEMENT MEDIA
Product Upgrades and Updates
For warranty, upgrades, registration, change of address, and technical
questions, call Customer Service at 941.753.5000 x 3303
v
Notes
vi
information and the way the computer presents that information. You can
also store up to 24 preprogrammed messages and deliver them simply by
pressing assigned function keys. For more information on effective
strategies for using the iCommunicator software program, consult the
professional training manual.
Minimum Hardware Specifications
The iCommunicator software program works with a Pentium III-based
multimedia computing system. The 3.0 software and peripheral kit includes:
iCommunicator Software Kit V 3.0
Dragon NaturallySpeaking 6.0 Preferred
iCommunicator User Guide, Training Manual, and Tutorial CD
Hardware security key (dongle)
Audio Cables (connector cable, Y-cable)
Microphone options
wireless or wired
Professional
LightSPEED LES 360 wireless RF system with TK150 noise canceling microphone (LightSPEED system includes 360R
receiver, 360T transmitter and TK-150 microphone, BC-4 battery
charger & cables, 2 NiMH rechargeable batteries.)
Standard
Parrott Bermuda direct-connect microphone
The iCommunicator software application requires the following minimum
laptop or desktop computer hardware and software:
Processor Pentium III 800MHz
Memory 256 MB RAM
Hard Drive must have 2 GB of available space on Drive C
Video 8MB
Display Resolution
800x600 screen area capability; high quality
Sound/Speakers
SoundBlaster Pro Compatible
CD-ROM
24X (or DVD-ROM)
Software
Word Processing Program
Operating System
Microsoft Windows XP, Windows 2000, or
Windows 98SE (Interactive Solutions recommends Windows XP or
2000 for maximum performance.)
1-2
1
Introduction
Welcome to the iCommunicator, Version 3.0, software program developed
by Interactive Solutions, Inc. The iCommunicator program helps persons
who are deaf, hard-of-hearing, or those with other communication
challenges achieve two-way communication. It is an interactive solution to
communication accessibility needs in educational, workplace, and public
access venues. The iCommunicator is also a teaching tool that helps improve
literacy skills.
The iCommunicator software program converts speech into multiple streams
of data for simultaneous presentation of text, video-sign language, and
computer-generated speech. The iCommunicator software works with
Dragon NaturallySpeaking speech recognition software allowing you to train
your computer to recognize voice and speech patterns. The program stores
these voice files for immediate access.
The iCommunicator Software Program
The iCommunicator software program converts human speech to digitallyimaged sign language, computer-generated speech, and text printed on the
computer screen. Likewise, it lets you type words and phrases that the
program converts to computer-generated speech and then relays to audio
speakers or peripheral hearing devices. For persons with hearing loss, the
iCommunicator program generates speech and sends it to cochlear implants,
FM systems, and hearing aids. It provides a clear audio stream, stripped of
extraneous background noises.
The iCommunicator program lets you choose how you want to deliver your
information. You can choose to activate sign language (with or without
audio) and fingerspelling of words. It lets you control the speed of the
1-1
Before you begin using your iCommunicator software program, please take
a moment to review your computer components. Not all computers operate
the same. Please refer to your computerís hardware guide for detailed
operating procedures.
1-3
Notes
1-4
2
Getting Started
Before you turn on your computer, connect all the hardware and verify that
all the cables are properly secured. Refer to the iCommunicator Installation
Guide sheet included with your software and peripheral kit.
Connect the LightSPEED receiver (professional kit) or the directconnect microphone (standard kit) to the microphone jack on the PC.
Connect the audio Y- cable to the audio output jack.
Connect the AC power cord to your PC.
If your computer is a desktop PC, connect the keyboard, mouse, and
monitor before you turn it on.
Power on the unit.
Verify that the batteries for the transmitter and receiver are fully
charged. Fully charged batteries last for three to four hours of normal
use. ISI recommends that you change the transmitter batteries when the
battery indicator light on the top of the unit shows a low (red LED)
condition.
Install the software using the Installation Guide provided with your
software kit. You will be performing either a new installation or an
upgrade as described below.
New Installation. If you do not have a previous version installed on
your computer, you will be completing a new installation. After
2-1
installation you will be directed to immediately Create a New User,
that is, build a speech/voice recognition file. This is necessary so
that you will be able to speak to your computer and have it
recognize your speech and voice characteristics. Refer to Modules 3
and 4 in the Training Manual for directions.
Upgrade Installation. If you currently have the iCommunicator
software V.2.1.1 installed, follow the iCommunicator V.3.0
Upgrade Procedure. This allows each speaker with a speech/voice
recognition file to continue to use their speaker file with the new
software. In addition to installing the iCommunicator software, you
will upgrade Dragon NaturallySpeaking from Version 5.0 to
Version 6.0. After you complete the upgrade, open the
iCommunicator program. Each speaker must run the Audio Setup
for the program to recognize his/her speech/voice file.
2-2
3
Using Your iCommunicator Software Program
Start the iCommunicator program from the Windows Start button, or doubleclick the icon on your desktop. The program is ready when the microphone
is on.
Note: We recommend that you close all other applications while using
iCommunicator. Opening additional windows can slow your
iCommunicator program.
To begin using the iCommunicator program and peripheral kit after you
properly install the software, you must first select the speech/voice
recognition files you want to use. These are the files created in the New User
Wizard. (Refer to Chapter 4, Voice Recognition). The speech/voice
recognition files contain all the information that Dragon NaturallySpeaking
gathers about the speaker.
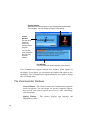
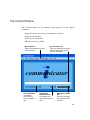
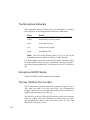
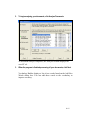
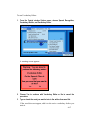
Parts of the iCommunicator Program Main Screen
The following describes the elements of the iCommunicator window that are
your tools for effective communication. Youíll learn more about how to use
window elements throughout this manual. The following illustration shows
the various elements of the iCommunicator screens and includes a brief
explanation of each element.
3-1
Signing Window:
Speech and text are converted to sign language and fingerspelling
in this window. You can change the speed of the signing.
Control
Window:
Use the menu
options to
control the
iCommunicator
program.
You can also
send messages
and note text
from this
window.
Text Window:
Text converted from speech appears in this window.
Your iCommunicator program contains three windows joined together in
one display. If you choose, you can separate the windows and control its size
and display. Your iCommunicator program remembers your window settings
until you change them.
The iCommunicator Windows
Control Window - This window controls the iCommunicator programís
speech recognition. You can change the speech recognition options,
enter text for conversion to speech, enter text as a note, and manage
your microphone.
Signing Window - This window displays sign language and
fingerspelling videos.
3-2
Text Window - This window displays text converted from speech or
text files. You can add your own notes to this window and save it in
.RTF format. You can then later review the contents using
iCommunicator, or edit the contents using a standard word processor.
Using the Menus
The standard iCommunicator screen has pull-down menus on its menu bar.
Examples of these menus are File, Views, Options, Actions, Signing
Options, Font, and Help. To view the selections available in these menus,
click the name of the menu you want to view. Move the mouse pointer down
to highlight the item you want, and then click the left mouse button to select
it.
When you choose the custom mode, the menus function the same, but may
appear on a different window. For example, the Signing Options menu
appears on the Signing Window.
File Menu
Use
To
New
Clear the text window and prepare a new file. When
you select this option, the iCommunicator program
removes the text from the window, but does not save it.
If you want to save any text in this window, you must
do so prior to selecting New.
Open
Open an existing file saved in one of the following
formats: ASCII text (.txt), Microsoft Word (.doc), Rich
Text Format (.rtf), Corel WordPerfect (.wpd), and
Hypertext Markup Language (.htm and .html).
Save
Save the changes to an existing file.
3-3
Use
To
Save As
Name and save the text displayed in the Text window
as a file.
Exit
Close the iCommunicator program and return to your
desktop. You can also click on the X in the upper right
corner of the Control window to exit the
iCommunicator program.
Views Menu
3-4
Use
To
Themes
Change the border display and color themes for
the iCommunicator program windows.
Standard Mode is
selected
Control the window display. A check mark
indicates the iCommunicator is operating in the
standard (three windows joined) mode. Deselect
this menu option to separate and control the three
windows independently.
Options Menu
Use
To
Microphone On
Toggle microphone on or off.
Autosave every (n)
minutes
Select automatic save options or restore the last
auto save. The iCommunicator program saves the
text window every 5 to 60 minutes.
Speak
Incoming Words
Convert recognized words to audible, computergenerated speech and transmit it to the hearing
assistive device.
Set Talking
Voice
Change the tone, pitch, and speed of the
computer-generated voice. Choose between male
or female voices.
Edit Quick
Say keys
Edit the Quick Say phrases assigned to function
keys. The iCommunicator program stores up to
twenty-four Quick Say messages.
Clear Text Window
when starting
Display an empty text window each time you turn
on the program.
Speech Recognition
Change the current speaker, add a new user, save
speech files, run General Training for voice
recognition, run Audio Wizard, delete a speaker,
run Vocabulary Builder, or show Results box.
3-5
Actions Menu
Use
To
Reset
Halt the computer-generated speech, turn off
signing, and reset the microphone.
Pause
Temporarily halts the text window, signing, and
computer-generated speech. Select Pause again to
restart.
Show
Displays sign for a word selected with the cursor.
Sign Text Window
Sign the words in the text window without
generating a voice.
Speak Text Window
Convert the words in the text window to audible
computer-generated speech and send it to the
hearing assistive device (without the Signing
option).
Sign and Speak Text
Window
Sign words in text window and generate audible
computer-generated voice at the same time.
You can choose where an action starts. Place your cursor in the text box and
click where you want the action to begin before you select the Actions menu
command.
TIP: The Action menu commands Reset and Pause also appear on the
top border of the Text Window. Simply click to use the Action
command. When you click Pause, the Text Windowís display changes
to ìCont inueî. Click Continue to restart the action.
3-6
Signing Options Menu
Use
To
Word List
Display a list of words in the signing video library.
Choose a word from the drop-down list, and then click the
check mark to view the associated signing video.
Enable Signing
Start or stop the signing videos.
Fastest
Set the signing speed at the fastest level.
7, 6, 5, 4, 3, 2
Control the speed of signing. The higher the number you
choose, the faster the signing.
Slowest
Set the signing speed at the slowest level.
Font Menu
The font menu lets you choose the font size for text in the text window. The
default size is 16 points; however, you can choose from several options.
Help Menu
Use
To
Contents
Display a list of help topics, view an index, or search the
help system for a topic.
Hot Keys
Display a list of hot keys and their function
About
Display license information about the iCommunicator
program.
3-7
Hot Keys and Shortcuts
You can quickly execute iCommunicator menu commands using keyboard
combinations. The key combination displays on the menu along with the
command. To display a list of all hot keys, select Hot Keys from the Help
menu. Hold the first key down (Ctrl or Alt), then touch the key shown with it
to use the shortcut.
Hot Key
Combination
Menu
iCommunicator
Menu Command
Ctrl+A
File
Save As
Ctrl+B
Actions
Sign and Speak Text Window
Ctrl+D
V
Return to Defaults
Ctrl+E
View
enable Signing Window
Ctrl+G
Actions
Sign Text Window
Ctrl+H
Help
Displays list of Hot keys
Ctrl+I
Options
Speak Incoming Words
Ctrl+K
A
ctions
Speak Text Window
Ctrl+N
F
ile
New
Ctrl+O
F
ile
Open
Options
Toggles microphone on/off
Ctrl + M
3-8
iew
Ctrl+P
A
ctions
Pause
Ctrl+R
Act
ions
Reset
Ctrl+S
F
ile
Save
Ctrl+W
Signing
Option
Word List
Ctrl+Enter
N/A
Notes Say This box
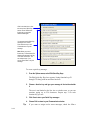
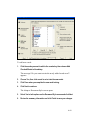
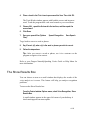
The Control Window
The Control window lets you manage speech options. Use the Control
window to:
change the speaker you want your computer to recognize
manage the microphone
enter text you want spoken
add notes to the text window
Menu Options:
Select menu options to control
iCommunicator.
Current Speaker:
Click here to
select speech
voice recognition
files.
Say This-Note This:
Type your responses in this box.
Click the down arrow to view
previous messages.
Microphone
ON/OFF Button:
Click here to turn
microphone ON and
OFF.
Microphone Status
Bar:
Click here to toggle
the microphone ON
and OFF.
3-9
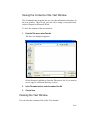
Joining and Separating the Windows
The iCommunicator contains three windows joined together. You can
customize your program by turning off the standard mode. You can then
control and move each of the three window elements independently.
To separate and move a window:
1.
From the Views menu, deselect Standard Mode is selected.
The windows separate.
2.
Click and hold down the left mouse button and drag the window to the
desired location.
3.
Release the mouse button.
To move all windows at the same time:
1.
Position your pointing device on a window border.
2.
Hold down the right mouse button and drag to the desired location.
To return to the standard mode:
From the Control Window Views menu, select Change to Standard
Mode.
3-10
Minimizing and Restoring the iCommunicator Windows
The standard Microsoft Windows buttons located in the upper-right corner
of the iCommunicator title bar provide a quick and easy way to minimize,
maximize, restore, and exit the iCommunicator program. When you choose
the custom (windows separate) mode, icons appear in the upper-right corner
of each window.
Use
To
Reduce (minimize) the iCommunicator program to a
button on the task bar. Click the taskbar button to
open iCommunicator again.
Decrease the Control window size.
Increase the Control window Size.
Exit the iCommunicator program and return to your
desktop.
3-11
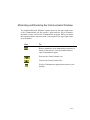
The Microphone Status Bar
The microphone status bar shows how your microphone is working.
Color appears over the background to indicate the current status.
Color
Status_________________________________
yellow
on and ready to receive speech
green
in use and receiving
red
audio level is too high.
black
microphone is off
Note: Run the Audio Wizard option if you see red on the
microphone status bar. (Refer to Chapter 4, Audio Wizard)
Use the microphone status bar to turn the microphone off and on. Move
the mouse pointer directly over the microphone status bar and click it
once to turn the microphone OFF. Click again to turn ON. The default is
ON.
Microphone ON/OFF Button
Click the ON/OFF button to manage the microphone.
The Say This/Note This Text Box
The iCommunicator program enables the computer to speak for you.
Type what you want to say and press Enter. The iCommunicator
program converts the text to computer-generated speech and sends it to
speakers and to hearing assistive devices.
You can also use the Say This/Note This text box to add your own notes
to the text window. Press the Control/Enter to include your note. Notice
that iCommunicator encloses your notes with arrows. The Note This
function does not generate voice.
3-12
The Speaking Status Bar
The speaking status bar shows your program is processing the words
you type in the Say This/Note This text box. Color flashes over the
background to indicate computer-generated voice is transmitting. When
transmission is complete, the speaking status bar disappears.
Speaking Status Bar:
Appears when processing Say This/Note This
text box.
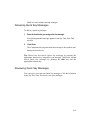
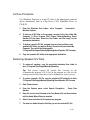
Quick Say Function Keys
You can preprogram up to twenty-four Quick Say messages and
generate audible, computer-generated speech by pressing the function
key assigned to your message. The iCommunicator program converts
the text to a computer-generated voice and relays it to speakers and
hearing assistive devices.
3-13
Click in the check box to view
the second set of Quick Say
buttons. Press Shift and the
function key to speak the
additional messages.
You can enter twelve Quick Say
messages in this screen.
Press a function key to tell
iCommunicator to say that
message.
Note: When you press a
function key, iCommunicator first
displays the message in the Say
This, Note This text box. You
can add more text, if you
choose. Press Enter to say the
message.
To create a quick say message:
1.
From the Options menu, select Edit Quick Say Keys.
The Edit Quick Say Keys box appears, listing function keys F1
through F12 along with an associated text box.
2.
Choose a function key and type your message in the text box beside
it.
The text is not limited to the line size or window area, so you can
continue typing up to 256 characters. Repeat step 2 for each
function key you use.
3.
Click Save to store your Quick Say messages.
4.
Choose Exit to return to your iCommunicator window.
Tip:
3-14
If you want to assign twelve more messages, check the ìSho w
Shiftî box and continue entering messages.
Delivering Quick Say Messages
To deliver a quick say message:
1.
Press the function key you assigned for the message.
Your preprogrammed message appears in the Say This, Note This
text box.
2.
Press Enter.
The iCommunicator program sends the message to the speakers and
hearing assistive device.
Tip: Deliver the first twelve Quick Say messages by pressing the
appropriate function key assigned to your message. Deliver the second
twelve Quick Say messages by pressing the shift key and the
appropriate function key.
Reviewing Quick Say Messages
You can review your last ten Quick Say messages. Click the list button
in the Say This, Note This box to view your messages.
3-15
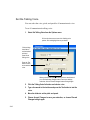
Set the Talking Voice
You can select the voice, pitch, and speed for iCommunicatorís voice.
To set iCommunicatorís talking voice:
1.
Select Set Talking Voice from the Options menu.
Click on the down arrow to see a list of talking voice
options. Click and highlight the one you desire.
Click and drag
the sliders to
set the desired
pitch and
speed of the
talking voice.
Press the Test
button to listen
to the selected
voice.
When youíve finished setting the talking voice to levels that suit
you, click the Accept Changes button to save your settings;
otherwise, click the Discard Changes button and begin again.
3-16
2.
Click the Talking Voice list button and select a voice.
3.
Type a few words in the text box and press the Test button to test the
voice.
4.
Move the sliders to set the pitch and speed.
5.
Choose Accept Changes to save your selection, or choose Discard
Changes to begin again.
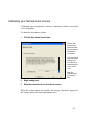
Loading a Speakerís Speech Files
To recognize incoming speech, you must tell the iCommunicator
program which speech files to use. Refer to Chapter 4 for more
information about speech files.
To load speech files:
1.
Click the current speakerís name at the bottom of the Control Window
to display a list of speakers.
or
From the Options menu, select Speech Recognition
Current Speaker.
2.
Change
Select a speaker name from the list.
You will see the message, ì Changing active speech files. Please
wait.î
When the iCommunicator program is ready to receive, the new
speakerís name appears at the bottom of the Control Window.
3-17
The Signing Window
The signing window displays sign language and fingerspelling videos.
To turn on the signing option:
From the Options menu, choose Enable Signing.
A check mark appears on the menu.
To turn signing off:
Click Enable Signing again.
The check mark disappears; indicating the signing option is
disabled.
3-18
To control the speed of signing:
Select Options and choose a signing speed. The higher the number
you choose, the faster the signing.
Locking and Unlocking the Signing Window
You can choose to turn off and lock the signing feature. When you choose
the Signing Locked option, all commands for the signing option disappear
from the iCommunicator menus. A check mark appears on the Options menu
to indicate signing is locked. A user cannot unlock and use the signing
feature unless they enter the correct password.
To lock or unlock the signing window:
1.
From the Control Window Options menu, choose Signing Locked.
The password window appears.
2.
Enter a password in the Password window text box.
Note: defaultpassword is the password when the iCommunicator
program ships from the factory. You must type defaultpassword in the
text box before attempting to lock signing or change the password.
3.
Choose the Enter button to enter a password, the Change button to
change your password, or the cancel button to close the password
window without changes. Follow the instructions on your screen.
IMPORTANT: Remember the password you enter. You will need it to
unlock the signing feature.
3-19
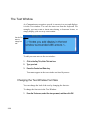
The Text Window
As iCommunicator recognizes speech, it converts it to text and displays
it in the Text window. You can also enter text from the keyboard. For
example, you may want to insert notes during a classroom lecture, or
simply display your two-way conversation.
Use the Font
menu to
change font
size.
To add your own notes to the text window:
1.
Click in the Say This, Note This text box.
2.
Type your text.
3.
Press the Control and Enter key.
Your notes appear in the text window enclosed by arrows.
Changing the Text Window Font Size
You can change the look of the text by changing the font size.
To change the font size in the Text Window:
1.
3-20
From the Font menu, select the size you want, and then click OK.
Saving the Contents of the Text Window
The iCommunicator program lets you save the information it displays in
the text window. Once saved, you can edit it using a word processor,
such as Notepad or Microsoft Word.
To save the contents of the text window:
1.
From the File menu, select Save As.
The Save As dialog box appears.
Select directories and drives from the Directories list, if you want to
save a copy in a different directory or drive.
2.
In the File name text box, enter the name of the file.
3.
Choose Save.
Clearing the Text Window
You can clear the contents of the of the Text window.
3-21
To clear the text window:
1.
Select New from the File menu.
The program will prompt you to confirm your action.
2.
If you are sure you want to clear the text window, choose Yes.
To clear the contents of the text window each time you turn the program on:
Select Clear Text Window when starting from the Options menu.
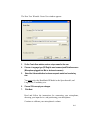
Changing the Windows Theme
You can choose from several preprogrammed themes to change the look and
color of the iCommunicator windows.
To change your windows theme:
1.
From the Views menu, select Themes.
2.
Choose a theme name.
Retrieving a Sign for a Word
There are two ways to retrieve a sign for a word displayed in the text
window. Place the cursor on a word, such as numerous. If the sign is not in
the video sign language dictionary, the program fingerspells the word.
1.
Double click on the word with the left mouse.
2.
Click the Show button on the Text window border. The sign for the word
displays in the Signing window.
Another option for displaying the sign for a word is to select Word List from
the Signing Options Menu. An alphabetical list of words in the signing video
library appears in the dropdown list. Choose a word and then click the check
mark to view the accompanying signing video.
3-22
Using the Electronic Dictionary
You can obtain the definition for a word displayed in the text window by
placing the cursor on the word. Then press Shift+Right click to reveal the
definition. The electronic dictionary will also pronounce the word when you
click on the ìS ayî i con.
3-23
Notes
3-24
4
Speech Recognition
Before the iCommunicator user can have two-way communication, each
speaker must train the program to recognize his or her voice and speech
patterns. Once trained, the iCommunicator program can then match the
speakerís specific sound patterns to words. The following lists important tips
for successful speech and voice recognition training:
Consistent microphone positioning is important to maintain translation
accuracy. Squeeze the foam windscreen over the microphone to help
identify the surface of the microphone.
The LightSPEED boom microphone should be positioned along the
left jaw line, about an inch from the left corner of the mouth. For
maximum performance, the rounded portion of the LightSPEED
microphone element should be positioned in front of the chin and not
directly in front of the mouth. The flat side of the microphone is then
directed away from the face.
The Parrott Bermuda microphone should be positioned along the jaw
line. The flat part of the Parrott microphone should be worn so it is
located one finger-width from the corner of the mouth.
Check the LightSPEED battery indicator light on both the receiver and
transmitter frequently. Red indicates the unit is on and has battery
power. The LED does not illuminate when the battery power is
exhausted.
Speak clearly and continuously. Maintain your normal vocal effort and
volume, and speak all words completely.
Correct recognition mistakes and add words to the vocabulary.
Run General Training again to increase recognition accuracy.
4-1
Creating and Managing Users
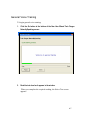
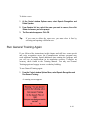
To train the iCommunicator program, begin by using the New User Wizard.
After the software has been installed, it is necessary to Create a New
Speaker in order to use the software program. The New User Wizard
prompts you to create new user voice files. It usually takes about fifteen
minutes to complete the New User Wizard. Begin reading aloud while
Dragon NaturallySpeaking tests your voice for pronunciation, volume, and
speed.
The New User Wizard window has elements that work the same as the
elements in other Windows applications. If you are not familiar with basic
Windows elements, we suggest you refer to your Windows User Guides for a
complete explanation of Windows elements.
To create a new user:
1.
From the Control window Options menu, choose Speech Recognition and
Create New Speaker.
The iCommunicator Info window appears.
4-2
2.
Read the screen information, and then click OK.
4-3
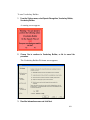
The New User Wizardís Create User window appears.
3.
On the Create User window, enter a unique name for the user.
4.
Choose a Language type (US English most common) and Dictation source
(Microphone plugged into Mic-in Jack most common).
5.
Select the Advanced button to choose a speech model and vocabulary
size.
You must select the BestMatch III Model as the Speech model, and
Large as the Vocabulary size.
6.
Choose OK to accept your changes.
7.
Click Next.
Read and follow the instructions for connecting your microphone,
choosing your input device, and positioning your microphone.
Continue to calibrate your microphoneís volume.
4-4
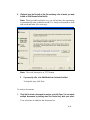
Calibrating your Microphoneís Volume
Calibrating your microphoneís volume is important to achieve successful
voice recognition.
To adjust the microphone volume:
1.
Click the Start Volume Check button.
Click the Start
Volume Check
button and follow
the instructions as
they appear in
your window.
Your computer will
adjust the volume
setting for your
voice. Be sure to
speak clearly and
in your normal
voice.
When the
computer beeps,
the process is
done.
2.
Begin reading aloud.
3.
When the volume level is set, click Next to continue.
When the volume adjusts successfully, the message ì Finished!î appears in
the Volume status area of the adjustment screen.
4-5
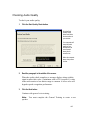
Checking Audio Quality
To check your audio quality:
1.
Click the Start Quality Check button.
Click the Start
Quality Check
button and follow
the instructions in
your window.
Your computer will
check the audio
quality of your
microphone. Be
sure to speak
clearly and in
normal voice.
When the computer
beeps, the process
is done.
2.
Read the paragraph in the middle of the screen.
When the quality check completes, a message displays along with the
signal-to-noise ratio value. A minimum value of 22 is required. A value
in the mid twenties to low thirties range is common. A lower value will
degrade speech recognition performance.
3.
Click the Next button.
Continue with general voice training.
Note: You must complete the General Training to create a new
speaker.
4-6
General Voice Training
To begin general voice training:
1.
Click the Go button at the bottom of the New User Wizard Train Dragon
NaturallySpeaking screen.
2.
Read the text aloud as it appears in the window.
When you complete the required reading, the Select Text screen
appears.
4-7
3.
Select a story from the list box, and click OK.
Each Story takes approximately ten minutes to read. As Dragon
validates your reading, a yellow arrow progresses.
4.
Click the Go button and begin reading aloud.
After completing the General Training portion, the program should know
your voice well enough to accurately recognize what you say. However,
reading additional stories may increase accuracy. We also recommend that
you run Vocabulary Builder to increase recognition accuracy.
Vocabulary Builder
Vocabulary Builder analyzes documents that already exist on your
computer, such as textbook glossaries and chapter summaries, technical
documents, manuscripts, class rosters, and vocabulary lists. It gathers
information about your specific writing style and identifies any new words
so you can add them to the vocabulary.
4-8
To start Vocabulary Builder:
1.
From the Options menu, select Speech Recognition, Vocabulary Builder,
Vocabulary Builder.
A warning screen appears.
2.
Choose Yes to continue to Vocabulary Builder, or No to cancel the
procedure.
The Vocabulary Builder Welcome screen appears.
3.
Read the information screen and click Next.
4-9
4.
(Optional) type the file path to the file containing a list of words you want
to add, or click Browse to find the file.
Note: When you add words this way, you will not have the opportunity
to automatically train unfamiliar words. Use Analyze documents to both
add words and train. (See next step).
Note: The word list must be in .TXT format.
5.
If you specify a file, click Add Words from List and click Next.
To skip this step, click Next.
To analyze documents:
1.
Click Add to select a document to analyze, and click Open. You can select
multiple documents by holding down the Control key while you select.
Your selections are added to the document list.
4-10
2.
To begin analyzing your documents, click Analyze Documents.
As document analysis completes, the Analyzed column displays the
word ìY esî.
3.
When the program is finished processing all your documents, click Next.
Vocabulary Builder displays a list of new words found on the Add New
Words dialog box. You can add these words to the vocabulary to
improve accuracy.
4-11
To add new words:
1.
Click the words you want to add to the vocabulary, then choose Add
Checked Words to Vocabulary.
The message ì Do you want to train the newly added words now?î
appears.
2.
Choose Yes, then click record to voice train the new words.
3.
Click Done when you complete the new word training.
4.
Click Next to continue.
The Adapt to Document Style screen opens.
5.
Select Yes to both options on the Document Style screen and click Next.
6.
Review the summary information and click Finish to save your changes.
4-12
Adding Additional Users
When a new speaker wants to use the program, that person needs to create
his or her own speaker files. Always remember to switch to the appropriate
speaker before using the iCommunicator program; otherwise, the program
may fail to interpret voice accurately.
To add new users, follow the steps described earlier for the New User
Wizard.
Opening Speech Files
When a new speaker begins talking, you must open that speakerís voice file.
To open a speech file:
1.
Click the current speaker name at the bottom of the Control window.
A list appears showing the names of all users.
2.
Select a user name.
You see the message, ì Changing active speech files, please wait.î
or
From the Options Menu select Speech Recognition, Change Current Speaker,
Speakerís speech/voice file name.
When the program is ready to receive the new voice, the speakerís
name appears at the bottom of the Control window.
Deleting a Speaker
If you are certain that you no longer need a speaker file, you can delete it.
Once you delete a speaker file, it is gone forever. Make sure you donít need
it before you remove it. Always use the Delete Speaker menu selection to
delete speaker files. Delete Speaker is the only way to properly remove all
information about a user.
4-13
To delete a user:
1.
At the Control window Options menu, select Speech Recognition and
Delete Speaker.
2.
From Speaker list box, select the name you want to remove, then click
Delete and answer yes to the prompt.
3.
The Done window appears. Click OK.
Tip:
If you want to delete the open user, you must close it first by
selecting and opening a different user.
Run General Training Again
If you followed the instructions in this chapter and still have some speech
and voice recognition errors, the iCommunicator software program may
need additional training. Spend additional time training the program, and
you will see an improvement in its translation accuracy. Complete an
accuracy check found in the Training Manual. You may run General
Training again and engage in more vocabulary building.
To run General Training again:
1.
From the Control window Options Menu, select Speech Recognition and
Run General Training.
A warning screen appears.
4-14
2.
Choose Yes to continue with General Training, or No to cancel the
procedure.
3.
Select a story.
4.
Click the Train Now button to continue.
5.
Click the Go button when you are ready to begin training.
6.
Follow the screen instructions.
The more you read, the more the speech recognition software learns
about your sound patterns. The General Training session typically takes
approximately thirty minutes.
7.
When you are finished reading, click Finish.
For more detailed instructions, refer to General Voice Training described
earlier in this chapter.
Run Audio Wizard
The Audio Wizard sets your microphone and sound system for optimal
speech recognition. If your microphone status bar continually shows red,
you may have an audio problem. Run Audio Wizard to readjust your audio
levels.
You should rerun Audio Wizard any time there is a change in your voice or
the acoustical environment, and when you change microphones. If you voice
train in a different environment from where the iCommunicator is routinely
used, rerun the Audio Wizard in the new environment.
To run Audio Wizard:
1.
From the Control window Options menu, choose Speech Recognition, Run
Audio Wizard.
A warning screen appears.
4-15
2.
Choose Yes to continue to Audio Wizard, or No to cancel the procedure.
When you choose yes, the Audio Wizard Welcome screen appears.
3.
Follow the instructions on the screen.
Refer to Calibrating Your Microphone and Checking Audio Quality for more
detailed instructions.
Using Vocabulary Editor
If the program does not recognize a word or phrase correctly, use
Vocabulary Editor to train the program. Vocabulary Editor lists all words in
your active vocabulary and lets you add, delete, and train the program to
understand your pronunciation.
4-16
To run Vocabulary Editor:
1.
From the Control window Options menu, choose Speech Recognition,
Vocabulary Builder, and Vocabulary Editor.
A warning screen appears.
2.
Choose Yes to continue with Vocabulary Editor or No to cancel the
procedure.
3.
Type or locate the word you want to train in the written form word list.
If the word does not appear, add it to the active vocabulary before you
train it.
4-17
4.
Select the word.
Note: To select more than one word, hold down the Ctrl key while you
select.
5.
Click the Train button.
6.
Choose Record.
The word or phrase appears in the written form column of the Train
Words box.
7.
Speak the word or phrase clearly.
8.
Click Done.
Correcting Speech Recognition Errors
When iCommunicator translates a word or phrase incorrectly, it is important
that you correct its recognition mistake. Correcting mistakes teaches the
program not to make the same mistakes again and makes iCommunicator
more accurate. You can correct mistakes as soon as they happen or go back
and correct them later.
When you see a mistake in your last word or phrase, you can stop and
correct it by saying, ìcorrect thatî.
To correct your last word or phrase:
1.
Repeat the word or phrase once so that it appears (incorrectly translated)
on a line by itself.
2.
Say ìCorrect Thatî, an d then wait until the Correction window appears.
3.
If the correct word or phrase appears on the Correction windowís choices,
select it.
OR
Click on ì Spell Thatî. If the correct word or phrase appears as a choice,
select it. If the correct word or phrase does not appear, type it into the text
box.
4-18
4.
Place a check in the ìTrai n how to pronounce thisî box. Then click OK.
The Train Words window appears with both the correct and incorrect
word. Teach the program how each word sounds as you record them.
5.
Choose ìGoî , speak the first word in the text box, and then speak the
second word.
6.
Click Done.
7.
Save your speech files (Options
Files).
Speech Recognition
Save Speech
To go back to correct a word or phrase:
8.
Say ìCorrect (x)î, wher e (x) is the word or phrase you wish to correct.
9.
Follow the steps above.
Tip: After you correct a word or phrase, use it in a sentence so the
program recognizes it in context.
Refer to your Dragon NaturallySpeaking Userís Guide or Help Menu for
more information.
The Show Results Box
You can choose to turn on a small window that displays the results of the
voice analysis as it occurs. This feature will help you analyze recognition
problems.
To turn on the Show Results box:
From the Control window Options menu, select Voice Recognition, Show
Results Box.
A small window appears in the upper left corner of your desktop. A
check mark appears on menu option.
4-19
To turn off Show Results:
Select Show Results Box again.
The check mark disappears. The option is disabled.
Archiving and Restoring Speech/Voice Recognition
Files
There may be times when it is necessary to backup a speakerís speech/voice
(S/V) file:
a speaker completes S/V recognition training on one computer and
needs to transfer the S/V file to another computer
to remove a speakerís S/V file from a computer and save it for future
use
This file size limits storage to Zip Drives, Local Area Network (LAN), LS120 SuperDisk Drives, or CD-R (W) Drives. Follow the procedures below to
archive and restore a speakerís S/V recognition file. Review each procedure
before initiating the process.
Location
Each speaker who establishes a S/V file in the program has his or her own
named folder inside the Users folder. S/V files for iCommunicator V. 3.0 are
located in C:\Program Files\Dragon\NaturallySpeaking\Users\Speaker S/V
file name.
4-20
Archive Procedure
Use Windows Explorer to copy S/V files to the appropriate external
device destination, such as a Zip Drive, LAN, Superdisk Drive, or
CD-R/W.
1.
From the Windows Start button, select Programs
Windows Explorer.
Accessories
2.
To back up all S/V files on the program, navigate to the User folder (My
Computer, C: Drive, Program Files, Dragon, NaturallySpeaking, Users,
Speaker S/V file name). Select the User folder, and then copy it to the
appropriate destination.
3.
To backup a specific S/V file, navigate down one level and then select
speakerís S/V folder you wish to backup. (From the left panel select My
Computer. Then select the following path:
C:\ProgramFiles\Dragon\NaturallySpeaking\Users\ Speaker S/V file name).
4.
Copy the speakerís S/V folder to the appropriate destination.
Restoring Speaker S/V Files
1.
To restore all speakers, copy the previously backed-up User folder to
drive C:\Program Files\Dragon\NaturallySpeaking.
Tip: This process replaces all speaker files currently on the
iCommunicator program. If S/V files on the program are valid, use the
backup procedure described above before initiating the restore process.
2.
To restore a specific S/V file, copy the speakerís S/V backup file to drive
C:\Program Files\Dragon\NaturallySpeaking\Users\Speaker S/V file name
3.
Start iCommunicator.
4.
From the Options menu, select Speech Recognition
Speaker.
5.
Enter the correct voice file name in the Your Name field, and then continue
until the Audio Wizard Setup is complete.
6.
Select Cancel and close the iCommunicator program.
7.
You must run Audio Setup the first time you use the restored S/V file.
Create New
4-21
Notes
4-22
Index
A
Actions
menu, 3-6
Actions Menu
pause, 3-6
reset, 3-6
sign text window, 3-6
speak and sign text window, 3-6
speak text window, 3-6
Adding
speakers, 4-13
users, 4-13
Adjust
microphone volume, 4-5
Audio Quality
checking, 4-6
Audio Wizard
run, 4-15
C
Calibrating
microphone's volume, 4-5
Calibrating your Microphoneís Volume,
4-5
Changing
windows theme, 3-22
Changing the Font Size
text window, 3-20
Checking
audio quality, 4-6
Clear Text Window When Starting
options menu, 3-5
Clearing
text window, 3-21
Color Overlays
microphone status bar, 3-12, 3-13
Computer-generated Speech
set the talking voice, 3-16
Connecting
hardware, 2-1
Control window, 3-11
ControlWindow
resizing, 3-11
Correct That
speech recognition errors, 4-18
Correcting
speech recognition errors, 4-18
Create a New User
new user wizard, 4-2
Create New Speaker
new user wizard, 4-2
Creating
new users, 4-2
D
Deleting
speaker, 4-13
Delivering
quick say messages, 3-15
E
Elements
iCommunicator program, 3-1
Exit
iCommunicator program, 3-11
F
File
menu, 3-3
Function Keys
quick say messages, 3-13
I-1
G
General Training
run again, 4-14
General Voice Training, 4-7
Getting Started, 2-1
H
Hardware, 1-2
connecting, 2-1
introduction, 1-2
Hot Keys, 3-8
I
iCommunicator Program
exit, 3-11
starting, 3-1
windows, 3-1
iCommunicator Windows
control window, 3-2
elements, 3-1
minimizing and restoring, 3-11
signing window, 3-2
text window, 3-2
Important Tips
speech recognition, 4-1
Introduction
Hardware, 1-2
L
Loading a Speakerís Speech Recognition
Files, 3-17
Lock Signing Window
options menu, 3-5
Locking
signing window, 3-19
file, 3-3
options, 3-5
views, 3-4
Menu Commands
hot keys, 3-8
shortcuts, 3-8
Menus
using, 3-3
Microphone
status, 3-12, 3-13
Microphone Status Bar
color overlays, 3-12, 3-13
turning microphone off, 3-12, 3-13
turning microphone on, 3-12, 3-13
Microphone Volume
adjust, 4-5
Microphoneís Volume
calibrating, 4-5
Minimizing and Restoring
the iCommunicator windows, 3-11
N
New User Wizard
create a new user, 4-2
O
Opening
speech files, 4-13
Options Menu
clear text window when starting, 3-5
edit quick say keys, 3-5
set talking voice, 3-5
signing locked, 3-5
speak incoming words, 3-5
speech recognition, 3-5
P
M
Menu
actions, 3-6
I-2
Parts of the iCommunicator Screen
control window, 3-9
the say this/note this text box, 3-12
windows, 3-1
Password Protect
signing window, 3-19
Pause
computer generated speech, 3-6
signing, 3-6
text window, 3-6
Q
Quick Say Function
function keys, 3-13
Quick Say Messages
deliverying, 3-15
reviewing, 3-15
R
Reset
computer-generated speech, 3-6
microphone, 3-6
signing, 3-6
Resizing
control window, 3-11
Results Box
show, 4-19
Reviewing
quick say messages, 3-15
Run
audio wizard, 4-15
general training again, 4-14
S
Saving
contents of the text window, 3-21
Say This/Note This Text Box, 3-12
Selecting a Speaker
loading speech recognition files, 3-17
Set the Talking Voice
computer-generated speech, 3-16
Shortcuts
hot keys, 3-8
Show
results box, 4-19
Sign
text window, 3-6
Signing Window, 3-18
locking, 3-19
password protect, 3-19
Speaker
deleting, 4-13
Speakers
adding, 4-13
Speech Files
opening, 4-13
Speech Recognition
create new speaker, 4-2
important tips, 4-1
Speech Recognition Errors
correct that function, 4-18
Speech Recognition Files
loading, 3-17
Start
vocabulary builder, 4-8
Starting
iCommunicator program, 3-1
Status
microphone, 3-12, 3-13
T
Talking
computer-generated speech, 3-12
setting the voice, 3-16
Talking Voice
setting, 3-16
Text Window, 3-20
changing font size, 3-20
clearing, 3-21
saving the contents, 3-21
sign, 3-6
speak and sign, 3-6
Training
general voice recognition, 4-7
I-3
U
Users
adding, 4-13
creating and managing, 4-2
Using
menus, 3-3
vocabulary editor, 4-16
Using the Menus, 3-3
V
Views, 3-4
menu, 3-4
Vocabulary Builder
start, 4-8
Vocabulary Editor
I-4
using, 4-16
Voice Recognition
general training, 4-7
W
Window
control, 3-2
signing, 3-2, 3-18
text, 3-3
Window Elements
iCommunicator program, 3-1
Windows
moving and resizing, 3-10
Windows Theme
changing, 3-22