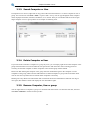
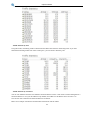
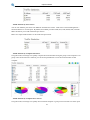
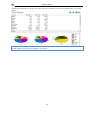
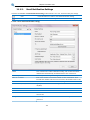
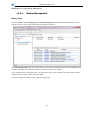
1
SurveilStar Employee Monitor User Manual Last updated: April 10, 2015 http://www.surveilstar.com Contact Us: [email protected] © 2008-2015 SurveilStar Inc., All Rights Reserved. Table of Contents Index of Contents CHAPTER 1. 1.1. 1.2. 1.3. 1.4. OVERVIEW ...................................................................................................................................................................... 3 FEATURES........................................................................................................................................................................ 3 BASIC STRUCTURE............................................................................................................................................................. 4 SYSTEM REQUIREMENTS .................................................................................................................................................... 5 CHAPTER 2. 2.1. 2.2. 2.3. 2.4. 2.5. 2.6. LOGS ........................................................................................................................................................ 43 BASIC EVENT LOGS.......................................................................................................................................................... 43 APPLICATION LOGS.......................................................................................................................................................... 43 WEBSITE LOGS ............................................................................................................................................................... 45 DOCUMENT LOGS ........................................................................................................................................................... 47 SHARED FILE LOGS .......................................................................................................................................................... 49 PRINTING LOGS .............................................................................................................................................................. 50 ASSET CHANGE LOGS....................................................................................................................................................... 52 POLICY LOGS.................................................................................................................................................................. 54 SYSTEM EVENT LOGS ....................................................................................................................................................... 55 CHAPTER 6. 6.1. 6.2. 6.3. 6.4. 6.5. 6.6. 6.7. 6.8. 6.9. 6.10. 6.11. 6.12. 6.13. 6.14. 6.15. 6.16. 6.17. STATISTICS ................................................................................................................................................ 33 APPLICATION STATISTICS................................................................................................................................................... 33 WEBSITE STATISTICS ........................................................................................................................................................ 36 TRAFFIC STATISTICS ......................................................................................................................................................... 39 CHAPTER 5. 5.1. 5.2. 5.3. 5.4. 5.5. 5.6. 5.7. 5.8. 5.9. SURVEILSTAR CONSOLE ............................................................................................................................ 22 LOG ON SURVEILSTAR CONSOLE......................................................................................................................................... 22 SURVEILSTAR CONSOLE BRIEF INTRODUCTION ...................................................................................................................... 23 COMPUTER GROUP AND USER GROUP ............................................................................................................................... 26 BASIC CONTROL ............................................................................................................................................................. 30 AUXILIARY FUNCTIONS..................................................................................................................................................... 31 CHAPTER 4. 4.1. 4.2. 4.3. DEPLOY SURVEILSTAR EMPLOYEE ............................................................................................................... 6 INSTALLING SURVEILSTAR SERVER ........................................................................................................................................ 6 INSTALLING SURVEILSTAR CONSOLE .................................................................................................................................... 11 INSTALLING SURVEILSTAR AGENT ....................................................................................................................................... 12 REGISTER ...................................................................................................................................................................... 17 UPGRADE TO THE LATEST VERSION...................................................................................................................................... 18 UNINSTALLING ............................................................................................................................................................... 18 CHAPTER 3. 3.1. 3.2. 3.3. 3.4. 3.5. INTRODUCING SURVEILSTAR ...................................................................................................................... 3 POLICIES AND ADVANCED POLICIES ......................................................................................................... 56 GERENAL INTRODUCTION OF POLICIES ................................................................................................................................ 56 BASIC POLICY ................................................................................................................................................................. 59 DEVICE POLICY ............................................................................................................................................................... 61 APPLICATION POLICY ....................................................................................................................................................... 64 WEBSITE POLICY ............................................................................................................................................................ 66 SCREEN SNAPSHOT POLICY ............................................................................................................................................... 68 LOGGING POLICY ............................................................................................................................................................ 68 REMOTE CONTROL POLICY ............................................................................................................................................... 70 ALERT POLICY ................................................................................................................................................................ 70 AGENT CONFIGURATION POLICY.....................................................................................................................................71 BANDWIDTH POLICY (ADVANCED) .................................................................................................................................. 72 NETWORK POLICY (ADVANCED) ..................................................................................................................................... 72 EMAIL POLICY (ADVANCED) .......................................................................................................................................... 74 IM FILE POLICY (ADVANCED) ........................................................................................................................................ 75 UPLOAD CONTROL POLICY (ADVANCED) .......................................................................................................................... 76 DOCUMENT POLICY (ADVANCED) ................................................................................................................................... 77 PRINT POLICY (ADVANCED) ........................................................................................................................................... 78 1 Table of Contents 6.18. WATERMARK SETTING POLICY (ADVANCED) ..................................................................................................................... 78 CHAPTER 7. 7.1. 7.2. 7.3. 7.4. 7.5. 7.6. INSTANT MESSAGE MONITORING....................................................................................................................................... 82 EMAIL MONITORING ....................................................................................................................................................... 83 SCREEN SNAPSHOT MONITORING ...................................................................................................................................... 85 MULTI-SCREEN MONITORING ........................................................................................................................................... 85 SEARCH SCREEN HISTORY ................................................................................................................................................. 86 VIEW SCREEN HISTORY .................................................................................................................................................... 87 CHAPTER 8. 8.1. 8.2. CATEGORIES ....................................................................................................................................... 100 APPLICATION CATEGORIES........................................................................................................................................... 100 WEBSITE CATEGORIES ................................................................................................................................................ 101 TIME TYPES CATEGORIES ............................................................................................................................................ 102 IP CATEGORIES ......................................................................................................................................................... 103 PORT C ATEGORIES ..................................................................................................................................................... 103 CHAPTER 11. 11.1. 11.2. 11.3. 11.4. 11.5. 11.6. 11.7. ASSETS ..................................................................................................................................................... 94 ASSETS CLASSES MANAGEMENT ........................................................................................................................................ 94 HARDWARE AND HARDWARE CHANGES .............................................................................................................................. 96 SOFTWARE AND SOFTWARE CHANGES ................................................................................................................................ 99 CUSTOM ASSETS............................................................................................................................................................. 99 CHAPTER 10. 10.1. 10.2. 10.3. 10.4. 10.5. MAINTENANCE ........................................................................................................................................ 89 REMOTE COMPUTER MAINTENANCE .................................................................................................................................. 89 REMOTE CONTROL AND REMOTE FILE TRANSFER .................................................................................................................. 92 CHAPTER 9. 9.1. 9.2. 9.3. 9.4. MONITORING .......................................................................................................................................... 82 SURVEILSTAR TOOLS ........................................................................................................................... 105 EMAIL NOTIFICATION SETTINGS ................................................................................................................................... 105 ACCOUNTS MANAGEMENT .........................................................................................................................................108 COMPUTERS MANAGEMENT ....................................................................................................................................... 110 ALERT MANAGEMENT................................................................................................................................................ 112 SERVER MANAGEMENT ..............................................................................................................................................112 AGENT TOOLS .......................................................................................................................................................... 116 OPTIONS ................................................................................................................................................................. 117 2 Chapter1 Introducing SurveilStar Chapter 1. Introducing SurveilStar 1.1. Overview SurveilStar, powerful IT management software, is used to protect your valuable data, mange employee’s computer usage and online activity, and ease system management. It effectively safeguards intellectual property, improves work productivity, and reduces IT management workload for organizations of all sizes. SurveilStar records and controls all computer and Internet activities - emails, web sites, chats and instant messages, program activities, document operations, removable devices, printers, and many more. Stealth mode, all-around records and reports, real-time multi-screen snapshot monitoring, dynamic PC/Internet control strategies, all these combine to build a complete solution for protecting your intellectual properties and business secrets, reducing slackers, prevent Internet and email abuse and related potential legal liability, and improve productivity. What’s important, SurveilStar puts you in control. Whatever you can monitor, you can control it. You can control certain computer’s access to websites, filter outgoing files via IM, block email attachment, disable movable device drive, cancel unauthorized file sharing, prevent changing system configurations, and many more. You can even lock the target computer if potential sabotage is out there. Protect intellectual property and business secrets Prevent and stop sabotage and data theft Prevent Internet/email abuse Reduce workplace slackers Improve efficiency and productivity 1.2. Features SurveilStar provides unmatched and comprehensive features to help you solve most of the intractable problems which are caused by the extensive use of computers in offices. Features Application Management What you can do with it Blocks specified applications. Records application running. Gets intuitive statistical report. Website Management Records all the details of erery visit. Blocks unwanted websites. Gets accurate statistical report on site visit. Network Management Blocks unauthorized connection. Stops network intrusion/intruder. Gets intrusion notification. Specifies permitted computers or IPs. IM Management Records who they talk to. Records how long they spend on chatting. Shows who chats most. Blocks file transfer via application. Screen Monitoring Real-time screen monitoring. VCR stytle payback. Multi-screen monitoring. 3 Chapter1 Introducing SurveilStar Email Management Document Management Print Management Records emails in and out. Blocks specified attachment sending. Blocks specified users from sending emails. Blocks sending emails to specified domains/recipients. Limits file access. Records all document operations. Backs up files before any changes Controls which printers can be used to print. Specifies who can print. Records print activity and print contents. Device Management Blocks unpermitted devices. Blocks any unrecognized devices. Only authorized devices can be used. Bandwidth Management Gets statistical report on traffic consumption. Allocates bandwidth fully and rationally. Limits incoming and outgoing traffic rate. IT Asset Management Provides IT asset inventory. Manages updates and patches. Centrally distributes software. Detects system vulnerabilities. Remote Management Diagnoses problems for monitored PCs. Gives remote operation demonstration. Makes it easy for remote assistance 1.3. Basic Structure SurveilStar has three components: server, console and agent. Administrators can install different components on the computers they want to manage. Server: It is used to store management policies and the data gathered from agent computers. Console: It is used to set policy, view data and gather statistics. Agent: It is used to collect data and execute management policies. 4 Chapter1 Introducing SurveilStar 1.3.1. SurveilStar Server Server is installed on a computer with high storage capacity and high performance. Monitor agent computers and distribute polices automatically Store the data gathered from agent computers Manage collected data and back up data periodically 1.3.2. SurveilStar Console Console is installed on an administrator or supervisor’s computer. Centrally control and monitor all agent computers View all data and screen snapshots gathered from agent computers Provide statistical and analysis report Create control and surveillance policies 1.3.3. SurveilStar Agent Console is installed on an administrator or supervisor’s computer. Execute management policies Record users' activities on the agent computers Periodically send collected data to server 1.4. System Requirements Components Server OS Minimum Recommended Console OS Minimum Recommended Agent SQL Server OS Minimum Recommended Basic Recommended Requirements Windows 2000 SP4 / XP / 2003 / Vista / 2008 / Win7 (Both 32-bit and 64-bit) Processor: Pentium 4 2G / Memory: 512 MB / Free Disk Space: 20 GB Processor: dual-core or quad-cord / Memory: 4GB /Free Disk Space:120 GB Windows 2000 / XP / 2003 / Vista / 2008 / Win7 (Both 32-bit and 64-bit) Processor: Pentium III 500 / Memory: 256 MB / Free Disk Space: 256 MB Processor: Pentium 4 / Memory: 512 MB / Free Disk Space: 1 GB Windows 2000 / XP / 2003 / Vista / 2008 / Win7 (Both 32-bit and 64-bit) Processor: celeron II 433 / Memory: 512 MB / Free Disk Space: 512 MB Processor: Pentium 4 / Memory: 1 GB / Free Disk Space: 1 GB MSDE SP4 / SQL Server 2005 Express SQL Server 2005 SP1/SP2/SP3 5 Chapter2 Deploy SurveilStar Employee Chapter 2. Deploy SurveilStar Employee 2.1 Installing SurveilStar Server 2.2 Installing SurveilStar Console 2.3 Installing SurveilStar Agent 2.1. Installing SurveilStar Server SurveilStar Employee Monitoring software needs to work with Microsoft SQL Server to store and feed the collected data. Please note that SurveilStar's setup file includes SQL Server 2008 Express Edition as the built-in database engine, it has a 2GB storage capacity limitation. Microsoft® SQL Server® 2008 R2 Express is a powerful and reliable data management system that delivers a rich set of features, data protection, and performance. The SQL Server can be deployed on a dedicated computer or any computer deemed appropriate to be used as a data server. Please make sure you install SQL server and SurveilStar server in the same machine. System Requirements OS Memory Windows 7 / Windows Server 2003 / Windows Server 2008 / Windows Server 2008 R2 Computer with Intel or compatible 1GHz or faster processor (2 GHz or faster is recommended.) for 32-bit systems, 1.4 GHz or faster processor for 64-bit systems. Minimum of 512 MB of RAM (2 GB or more is recommended.) Hard Disk Space 2.2 GB or more. CPU SQL Server Requirement Note: Before installing SQL Server 2008 (R2) Express , you may need to update Windows Installer, .Net Framework and Windows PowerShell. 1. Download and install Microsoft .Net Framework 3.5 SP1 2. Download and install Windows Installer 4.5 3. Download and install Windows PowerShell 1.0 Installation Steps 1. Download SurveilStar Setup file and double-click to launch the setup. SurveilStar Server should be installed in the same computer with the SQL Server application. If it pops up security warning message, please click Yes or Run button to continue. 6 Chapter2 Deploy SurveilStar Employee 2. Choose which components should be installed. SurveilStar V3 Server Kernal Microsoft SQL Server 2008 Express Edition Install Agent Module on Local Computer This option can't be unchecked. It must be installed. Please check the explanation above. Check it or not according to your environment. If you have installed SQL Server 2005 Express or other SQL version, please do not check this option. If you need to monitor the computer where Surveilstar server is installed, please check this option. 7 Chapter2 Deploy SurveilStar Employee SurveilStar V3 Console If you want to install SurveilStar Console on server machine as well, please check this option. Please note that SurveilStar Console can be installed on different computers and should be only accessed by IT manager or supervisor. 3. Check all the information and click Install to continue the installation, or click Back if you want to review or change any settings. 8 Chapter2 Deploy SurveilStar Employee 4. Installing SQL Server 2008 Express automatically. Please do not close the popup. It would take some time, please wait. 5. Please wait while SQL Server 2008 R2 Setup processes the current operation. 9 Chapter2 Deploy SurveilStar Employee 6. Installing SurveilStar on your computer. Please wait for the installation process to complete. 10 Chapter2 Deploy SurveilStar Employee 7. Complete the SQL Server 2008 & SurveilStar setup. Click Finish to exit setup. Other SQL Server Options SurveilStar can also work with free SQL servers including Microsoft SQL Server 2000 Desktop Engine (MSDE 2000), SQL Server 2005 Express Edition and SQL Server 2008 (or R2) Express Edition as well as work with professional SQL Servers including SQL Server 2000 SP4, SQL Server 2005 SP1 or above and SQL Server 2008 (or R2) or above. You can choose the one you need. 2.2. Installing SurveilStar Console The installation of SurveilStar Console uses the same setup file as installing the SurveilStar Server. Select SurveilStar Console when prompted to select components, and then proceed. 11 Chapter2 Deploy SurveilStar Employee 2.3. Installing SurveilStar Agent SurveilStar Agent should be deployed to computers that are required to be monitored and controlled. The Agent can be installed in silence mode and run in stealth mode. There are 3 ways to deploy SurveilStar Agent to computers: Direct Installation, Remote Installation, and Logon Script Installation. Choose the installation method to view details 2.4.1 Direct Installation 2.4.2 Remote Installation 2.4.3 Logon Script Installation 2.3.1. Direct Installation Adopting the Direct Installation method, you need to install the Agent one by one following these steps. 1. Create SurveilStar Agent setup file On the desktop of the server, click "Start > All Programs > SurveilStar > Agent Installation Generator" 12 Chapter2 Deploy SurveilStar Employee Server IP/Name Silent Installation Account info Save Setup File in IP address of the server. Static IP and Dynamic DNS are supported. Check this option to install agent without showing any visible interface. Installing SurveilStar Agent requires administrator privilege. Then you can try the account to run the setup file. Choose a folder to save the setup file, and give it a file name. 2. Copy the setup file to target computers 3. Double-click the setup file to install the Agent 2.3.2. Remote Installation Remote Installation can easily deploy SurveilStar Agent to a massive number of computers in remote and batch mode. 1. Launch the remote installer On the desktop of the server, click "Start > All Programs >SurveilStar > Agent Remote Installer" 2. Scan network to find computers By default, SurveilStar only scans computers from the server’s network segment. If you want to extend the searching area, go to menu "File > Scanning Settings", and specify an IP range. All computers available for remote installation will be listed with host name, domain name, operating system, IP address and install status. 3. Select computers to install SurveilStar Agent Tick the checkbox before the computer host name that you want to install the Agent on it, and then click the menu "Operation > Install" to start remote installation, or click the install icon alternatively. Why does Remote Installation fail, and how to fix it? 1. Administrator privilege needed. If the target computer is protected by password, you need to provide the administrator name and password of 13 Chapter2 Deploy SurveilStar Employee that computer to proceed the installation, or the remote installation would fail. View the Remote Installation Logon Dialogue Box below. 2. The admin account is not shared via network. To see if the admin account (the ADMIN$ folder) is shared, you may use Command Prompt to check out the status. On the desktop of Windows, click "Start > All Programs > Accessories > Command Prompt" , input the command line "net share" , and you will see if the ADMIN$ folder is shared. Below is an example. If the ADMIN$ is not listed, you can input "net share ADMIN$" to activate the account sharing. Below is an example. 14 Chapter2 Deploy SurveilStar Employee 3. There is no shared folder in the target computer. Even though it's remote installation, there should be a file folder that can be used by remote user to store the program files of the Agent. Please make sure the target computer has at least one file folder is shared, or you may need to create one on that computer. Note: Remote Installation only works on Windows NT4.0/2000/XP systems. Remote Installation can fail sometimes due to the Windows NT local security settings. When Remote Installation fails, the best way is adopting the Direct Installation. 2.3.3. Logon Script Installation If the local area network (LAN) of your company has a domain server, you can use this method to deploy the Agent to computers within the LAN. 1. Download Script Manager You can download Script Manger in either .rar or .zip file format. Download Script Manager (in .rar file format) Download Script Manager (in .zip file format) 2. Put the Script Manager file folder to domain server You may unzip the download RAR or ZIP package file, and then copy the Script Manager folder to the domain server. This folder should contain these files and document: LgnManV3.exe, IPGLgnV3.exe, and Readme.txt. 3. Create a setup file of SurveilStar Agent To create such agent, please refer to Direct Installation. The Agent setup file should be saved to the Script Manager folder as described in Step 2. 4. Run LgnManV3.exe Double-click the LgnManV3.exe executable file to open the Script Manager. The Logon Script Manager will automatically scan and show all computer users within the domain. 15 Chapter2 Deploy SurveilStar Employee 5. Select computers Tick the check box before the user name to select computers. You can select multiple users so that the installation can be done at one time. 6. Set installation script to target computers When the selection of target computers is finished, click the Set Scripts button at the bottom of the manager window. 7. Auto-installation When a selected computer logs on to the domain, the preset script will run automatically to install SurveilStar Agent to that computer in stealth mode. 16 Chapter2 Deploy SurveilStar Employee 2.4. Register Step 1: Open the registration form 1. On the server's desktop, right-click on the SurveilStar's Service Controller icon in the task tray, and click 【Tools > Register】. 2. Provide password to log into the registration form. Step 2: Enter serial number In the Serial Number section, you will see the default SN for demo version. You should replace the demo SN with the SN you purchased. 1. Click the Upgrade button. Note: SurveilStar offers 30-day trial for enterprises to experience the software. In the demo version, you will see the days left for trial use, and the serial number for the demo version. 2. Enter serial number into the text box, and click the OK button. Now you will see the “Demo” is replace with the quantity of licenses you purchased for this serial number. Step 3: Complete the registration There are two options to complete the registration: Register Online and Send Email. Please fill in the product registration information with Company Name, Tel, Contact Person and Email Address. Register Online. Click Register Online button, then the Register Code will be returned and displayed in the Register Code [Regcode] field. And the product registration will be processed automatically. Send Email. Click Send Email button, then email will be sent to your registered email address with Register Code. Please copy and paste the Code into Register Code [Regcode] field, then click【Register】button to confirm the registration. 17 Chapter2 Deploy SurveilStar Employee Note: 1. The Email Address is very important. If you need to re-register in the future, new Register Code [Regcode] will be sent to the first registered email address. 2. If your server cannot connect to Internet or other reasons, please email us with your Serial Number [SN] and Computer ID, we will help you process the registration individually. Upgrade License If you are a registered user and now purchase license upgrade for monitoring more computers, please simply repeat the steps above to upgrade license. 2.5. Upgrade to the latest version 2.5.1. Upgrade Server and Console Download SurveilStar Upgrade Package on SurveilStar Server machine, or download it from other computer and copy to SurveilStar Server. Double click the upgrade package. Then SurveilStar Server and SurveilStar Console on server machine (if installed) will be upgraded to latest version. Note: If you can't upgrade, please exit all SurveilStar services at first. You can open Task Manager, click Processes tab and you should be able to find OControl3.exe(if console installed), OGuard3.exe and OServer3.exe, choose them and click End Process. Then run the upgrade package again. 2.5.2. Upgrade Console only Log on to SurveilStar Console and it would track and upgrade to the latest version automatically. 2.5.3. Upgrade Agent SurveilStar agents won’t upgrade automatically after the SurveilStar server has been successfully upgraded. You can upgrade via menu【Tools > Server Management > Agent Update Management】. 2.6. Uninstalling Note: If you want to remove the entire SurveilStar PC/Internet monitoring system, including Agents, Consoles and Server, please delete all SurveilStar Agents first. Otherwise, the deployed SurveilStar Agents will continue to run in those computers, even though the SurveilStar Server is removed. 2.6.1 Uninstall SurveilStar Agent from SurveilStar Console 2.6.2 Uninstall SurveilStar Agent from the Client Computer 2.6.3 Uninstall SurveilStar Console 2.6.4 Uninstall SurveilStar Server 18 Chapter2 Deploy SurveilStar Employee 2.6.1. Uninstall SurveilStar Agent from SurveilStar Console Only IT manager or senior supervisor with administrator access to SurveilStar Console can uninstall SurveilStar Agent. Login to the SurveilStar Console, right-click on any selected computer, or the entire network, and choose Uninstall Agent from the pop-up menu. 2.6.2. Uninstall Agent from the Client Computer Step 1: On client computer - create Operate Code 1. In XP, click "Start > Run", type "agt3tool ocularadv" command into the run box. In Vista or Windows 7, you can click Start and type agt3tool ocularadv directly in "Search program and files" box. 2. Run the command, and you will see the Agent Tool. 3. Select Uninstall Agent, and click the Generate button, you will see the Opcode Validation dialog. This code is used to generate a confirm code from the Console (see next step). 19 Chapter2 Deploy SurveilStar Employee Note: DO NOT close this Check Confirm Code form in this step. You need to return to this form later. Step 2: On SurveilStar Console - create Confirm Code 1. Go to SurveilStar Console, click the menu "Tools > Agent Tool > Confirm-Code Generator", you will see the Confirm Code Generator, enter the Operate Code attained previous step into the Agent Operate Code text area. 2. Click the Parse button, and then click the Generate button, you will see the Confirm Code highlighted in blue colour in a result dialog. Write down this code, and go to the last step. 20 Chapter2 Deploy SurveilStar Employee Step 3: Back to client computer - complete the un-installation Now we are back to the client computer, where the uninstall operation is waiting to be confirmed. Go to the Check Confirm Code dialog, enter the Confirm Code, and then click the OK button. Done. Note: both two ways of uninstalling an Agent do not delete the history data of this computer. The uninstalled Agent will still appear in the Console, marked in dark gray color. To delete an Agent completely, please click the Console menu "Tools > Computers" , select the computer name, and then click the Delete button. 2.6.3. Uninstall SurveilStar Console On the desktop of Windows system, click " Start > All Programs > SurveilStar > Uninstall SurveilStar" , or go to "Control Panel > Add/Remove Program" to uninstall SurveilStar Server. If you have installed SurveilStar Console on multiple computers and want to remove all of them, you may need to uninstall the console one by one. 2.6.4. Uninstall SurveilStar Server Note: Before uninstalling SurveilStar Server, all SurveilStar Consoles should be closed first. On the desktop of Windows system, click " Start > All Programs > SurveilStar > Uninstall SurveilStar" , or go to "Control Panel > Add/Remove Program" to uninstall SurveilStar Server. Uninstalling SurveilStar server doesn't affect Microsoft SQL Server. If you don't need SQL Server any more, you may need to uninstall it manually from Control Panel. 21 Chapter3 SurveilStar Console Chapter 3. SurveilStar Console 3.1. Log on SurveilStar Console Log on SurveilStar Console Click Start > All Programs > SurveilStar > SurveilStar V3 Console to launch SurveilStar console logon dialog. Server Enter SurveilStar Server's IP address or computer name. Account The default administrator account is "admin", and the default auditor account is "audit". IT Manager or supervisor can create multiple accounts and assign different priliveges to meet different requirements. After console logon, you can use menu Tools > Accounts to create accounts. Password Enter password of the account you entered. The default password of "admin" and "audit" are null. Re-logon When you need to reconnect to the server or connect to another server, or need to logon console as another manager, click Tools > Re-logon to launch SurveilStar console logon dialog. Change Password Click Tools > Change Password and enter your personal password. The default password of "admin" and "audit" are null. After valid verification you change your password successfully as the picture below. 22 Chapter3 SurveilStar Console Note: IT manager and supervisor should take care of the password. 3.2. SurveilStar Console Brief Introduction 3.2.1. Basic interface of SurveilStar Console SurveilStar Console is very intuitive and easy-to-use, yet powerful and customizable. It also comes with powerful search functions. 23 Chapter3 SurveilStar Console 1 Menu Entries to all SurveilStar Console's functions. 2 Tool Bar Entries to the most widely used functions in SurveilStar Console. 3 Computer List On the left of the Console window, it will show you all the computers with agent installed as well as basic group information. 4 Computer/User List Switch computer list to user list or vice versa. User list will show you all the logged-in users as well as user group information. 5 Main Menu Navigator Under the tool bar. You can navigate to some main functions quickly. 6 Subordinate Menu Navigator Under Main Menu Navigator. You can navigate to specific functions quickly. 7 Data Display The most important part. All kinds of data will be displayed in this area. 8 Whole Network Information about total online users and server IP address. Typical Signs at Computer List The agent computer is being monitored normally. The agent computer is not monitored. The computer has been shut down, or the computer is offline from internet now. It's also possible that firewall has blocked the communication between agent and server, in this case, please change firewall settings. The agent has been uninstalled from the computer. The agent computer is being monitored normally and the computer is curretnly idle now. Typical Signs at User List The user is online now and being monitored normally. The user is off line from internet now. The user is away from the computer now. 3.2.2. Chart, Search and Property Some of the functions also provides chart, search and property functions and user interface will be a little different. The following example is Application Statistics. 24 Chapter3 SurveilStar Console 1 Chart The chart is only available in Statistics. 2 Search The search functions is available in Statistics, Logs, Instant Messages, Emails, etc. You may specify computer, user, time range, classes, etc. to search. Depending on different functions, you can use different search inquires. 1 Property Property is only available in Policies and Advance Policies. In property area, you can set detailed controlling policy according to your need. Different policies have different options. 25 Chapter3 SurveilStar Console 3.3. Computer Group and User Group 3.3.1. View Basic Information In SurveilStar Console, IT manager can click menu Statistics > Basic Information to view basic information of computer, computer group, user and user group. 1. Computer Basic Information: Select a computer and the status and basic information will be displayed in data display area. Name The name displayed in the computer list. If necessary, change it to your desired name. By default, it's same as computer name. Computer Computer name. IP Address IP address Status Agent computer's running status. It may be Running, Running(Idel), Offline or Uninstalled. Version Version of installed agent. OS Agent computer's operation system. It includes OS type, OS edition, OS bit and system language. Boot Time Agent computer's boot time. It's available only when Status is Running. Last Online The time when agent can communicate with server last time. Last Active Time The time when agent computer is active last time. Installed Time The time when agent is installed on this computer. IP/MAC IP address and MAC address. Last Logon User The username which is used to log on this computer last time. 26 Chapter3 SurveilStar Console 2. Computer Group Basic Information: In computer list, choose a computer group, status of all the computers in this group will be displayed in data display area. If you choose The Whole Network, all the computers will be displayed in data display area. click Expand button, the group will be unfolded. 3. User Basic Information: Select a user name to view user's basic information. 27 Chapter3 SurveilStar Console 4. User Group Information: Select a user group to view the user group's basic information. In the same way, if you choose The Whole Network, you can click Expand button to unfold the user groups and view users information in this group. 3.3.2. Group Operation By default, all computers and users will be listed in Unclassified group. Unclassified group can't be deleted or renamed, sub group can't be created in Unclassified group neither. According to different requirements, IT manager or supervisor can easily sort computers or users into different groups for convenient management. 1. Create New Group In computer list, select The Whole Network or a certain group, right-click and click New Group. Sub group can be created in currently existed group. Then give a name to the group and a computer group will be created. You can create user group in the same way in user list. 2. Move To Desired Group Now you can drag-and-drop desired computer to desired group. Or right-click on selected computer and click Move To..., select target group and click OK. In the same way, you can move a user to another user group. You can use SHIFT or CTRL key to move multiple computers or users at one time. 3. Deleted Group and Unauthorized Group Deleted computer will be listed in Deleted group, you can still use console to view all the data of deleted computer. If you want to restore this computer to original group, simply right-click the deleted group and click restore. If original group doesn't exist any more, the computer will be restored to Unclassified group. If there is no deleted computer, Deleted group won't be displayed. If the number of the agent installed on computers is more than your purchased license, then some of the agents will be listed in Unauthorized group and the computers can't be monitored. If you want to monitor these computers, you may need to upgrade your license. If the license is not yet fully used, Unauthorized group won't be displayed. 28 Chapter3 SurveilStar Console 3.3.3. Search Computer or User In computer list or user list, right-click on any point of the area and click Find... to search computer or user or group. You can also use menu File > Find... or press CTRL + F key. You can type displayed name, computer name, displayed username, username, IP address, etc. to search. Then you can double-click the result to open target computer or user or group. Below is an example of searching users. 3.3.4. Delete Computer or User If you don't want to monitor a computer or a group any more, you can simply right-click on the computer or the group and click Delete. You will be asked to enter password to take this action. After entering password correctly, the selected computer or all the computers in the selected group will be deleted. Please note that deleting the computer or the group will also uninstall the agent in the computer or in the computers of the group, and the license authorizations on deleted computer or group will be also taken back. You can use such recycled license to monitor other computers if necessary. Deleting user only deletes usre information and won't delete the license authorization. When the user log on once again, SurveilStar Console will display the user information again. 3.3.5. Rename Computer, User or group You can right-click on a computer, a group or a username and click rename. Or select the item first, then user menu File > Rename to rename to what you like. 29 Chapter3 SurveilStar Console 3.4. Basic Control SurveilStar's basic computer control functions including notification, computer locking and unlocking, remote power down, remote log off and remote restart. Note: Agent must be running in order to control the computers. And it only works for computers, not for users. 3.4.1. Notify Select a computer, click menu Control > Notify to send messages. If you select a group, all the online computers in the group will receive this message. The message will be displayed on computer's screen and will be always in the front. Users can simply click OK to close this notification. 3.4.2. Lock Computer and Unlock When an IT manager notices that agent computer is abnormal or the user is doing something wrong, he can lock the computer. Once the computer is locked, mouse and keyboard on the locked computer can't be used. And a dialog shown as below will be displayed on the screen of the locked computer. If you need to unlock this computer now, select the computer at first, then use menu Control > Unlock. Please note that both locking and unlocking require password. You can also lock multiple computers or a group of computers. 30 Chapter3 SurveilStar Console 3.4.3. Log Off, Power Down and Restart IT manager can also remotely log off, shut down or restart the agent computers if necessary. Simply use menu Control > Log Off, Control > Power Down or Control > Restart to take the actions respectively. 3.5. Auxiliary Functions You can export any recorded contents like applications logs, documents logs, web logs, assest change logs, application statistics, web statistics, instant messages, emails, etc. as web pages(*.htm, *.html), Microsoft Excel files(*.xls) and CSV(*.csv) files. You can also print those contents. By exporting and printing, you can have a basic review on your employee's behaviors. Besides, Depending on the data you want to export, the supported output file types may be a little different. If you want to export as *.xls files, Microsoft Excel must be installed at first. 1. Export in Import Exporting the recorded data is very simple. Right-click on the data display and choose Export. Then you can choose Records of Current Page or All Matched Records. Or you can menu File > Export. You can also specify search conditions at first, then export the search result. You can also select a certain record and right-click on it to export selected record only. To import policy, choose corresponding policy type at first. Then right-click on data display area and click Import. (1) Statistics including web statistics, application statistics and traffic statistics can be exported to *.html, *.xls, *.csv and *.mht files. (2) Logs including basic event logs, application logs, web logs, document logs, printing logs, shared files logs, assest change logs, policy logs and system logs can be exported to *.html, *.xls and *.csv files. (3) Policies and advanced policies can be exported as *.xml file. Exported policies can be imported to SurveilStar Console again. The policy type must be same as current policy and you need to save it to take affect. Imported policy can be assigned to different computer or group as you like. (4) Real-time snapshot can be save as JPG and BMP pictures. Click Save Current Frame on the upper right to export real-time. 31 Chapter3 SurveilStar Console (5) Instant Messages, Maintanence including applications, processes, performance, etc. and Assest including software, hardware and their change, Classes including application class, time types class, website class, etc. can be exported to *.html, *.xls and *.csv files. (6) Emails can be exported to *.html, *.xls and *.csv files as well as *.eml files. 2. Print and Print Preview If necessary, you can print the recorded data for a future review. You can right-click on data display area and click Print or Print Preview. You can also use menu File > Print or File > Print Preview. 32 Chapter4 Statistics Chapter 4. Statistics SurveilStar provides application statistics, web statistics and traffic statistics. 4.1. Application Statistics Click menu Statistics > Application, then select a computer or a group or entire network, and SurveilStar will analysis all recorded application logs and generate a stastistics immediately. There are three buttons on the upper right corner of data display area. IT manager can select application statistics modes. Currently there are four modes available. They are By Class, By Name, By Detail and By Group. Expand sub classes or computers/users in a group. It's not available to Detail Mode. View all records, top 10 records, top 20 records, or custom display recording numbers. There are four application statistics modes: Application Statistics by Category If you want to generate application statistics by categories, you may need to sort the applications into classes according to your need. Click menu Classes Management > Applications to manage your application classes. There will be 3 columns which are Class, Time and Percent. By default, both time and percent will be listed in descending order. Under the data display area, you will see a chart for the application statistics above. Bar Chart or Pie Chart can be used. 33 Chapter4 Statistics Bar Chart Pie Chart Application Statistics by Name Application statistics by name will show you detailed application names. Using this, you can know the exact application names that your employees used and how much time they spent on it. Below is an example of top 10 applications. 34 Chapter4 Statistics Note: This mode actually records application process names. Application Statistics by Detail This mode is similar to Name mode. However, what it records is application description which may be different from application process name. For example, if two users are using QQ 2010 and QQ 2011, Application Statistics by Details will treat them as different applications while Application Statistics by Name will treat them as same application because the processes name are QQ.exe. Application Statistics by Group Using this mode, IT manager can easily find out the percentage of a certain computer or a group which uses the applications in a specific application class. Application Classes should be selected at first. If you have sorted your applications into classes, you will see something like the picture below. After Application classes are selected, click OK to apply. Then click Search button again to generate your desired application statistics. 35 Chapter4 Statistics 4.2. Website Statistics Click menu Statistics > Web, then select a computer or a group or entire network, and SurveilStar will analysis all recorded web visits and generate a stastistics immediately. There are three buttons on the upper right corner of data display area. IT manager can select web statistics modes. Currently there are three modes available. They are By Class, By Detail and By Group. Expand sub classes or computers/users in a group. View all website visits, top 10 visited websites, top 20 visited websites, or custom display recording numbers. There are three website statistics modes: Web Statistics by Category If you want to generate web statistics by category, you may need to sort the visited websites into classes according to your need. Click menu Classes Management > Websites to manage your website classes. There will be 2 columns which are Website Class and Time. By default, time will be listed in descending order. 36 Chapter4 Statistics Under the data display area, you will see a chart for the web statistics above. Web Statistics by Detail Web Statistics by Detail will display all the visited websites respectively and the duration spent on them in descending order. You can also check top 10 visited website or top 20 visited website to see which websites are visited most. Web Statistics by Group Using this mode, IT manager can easily find out the percentage of a certain computer or a group which visits the websites in a specific websites class. Websites Classes should be selected at first. 37 Chapter4 Statistics If you have sorted the visited websites into classes, you will see something like the picture below. After Website classes are selected, click OK to apply. Then click Search button again to generate your desired web statistics. 38 Chapter4 Statistics 4.3. Traffic Statistics Click menu Statistics > Traffic, then select a computer or a group or entire network, and SurveilStar will analysis all recorded network traffic and generate a stastistics immediately. There are four buttons on the upper right corner of data display area. IT manager can select traffic statistics modes. Currently there are six modes available. They are By IP, By Port, By IP Classes, By Port Classes, By Computer/IP Classes and By Computer/Port Classes. Select network direction, sent or received. Expand sub classes or computers in a group. View all networking traffic, or check top 10 or 20 traffic items. There are six website statistics modes: Traffic Statistics by IP Traffic Statistics by IP will list traffic sum, total TCP traffic and total UDP traffic of each IP. 39 Chapter4 Statistics Traffic Statistics by Port Using this mode, networking traffic of both TCP and UDP will be listed in descending order. If you find abnormal networking traffic from some certain ports, you can block or limit the ports. Traffic Statistics by IP Classes You can sort different IP classes into different Network Address Classes. Click menu "Classes Managements > Network Address" to sort your IP addresses. By default, SurveilStar sort IP address from 192.168.0.1 to 192.168.255.254 as Intranet and other IP addresses as Internet. Below is an example of Intranet network traffic and Internet network traffic. 40 Chapter4 Statistics Traffic Statistics by Port Classes You can sort different port classes into different Network Port Classes. Click menu "Classes Managements > Network Address" to sort the ports. By default, SurveilStar provides ICMP, TCP, UDP, Email, Web, Network Share and allows you to add customized port classes. Below is a simple traffic statistics of TCP and UDP port classes. Traffic Statistics by Computer/IP Classes Using this mode, IT manager can quickly compare the network traffic among the groups or the computers. If a group or the whole network is selected, you can click expand button to view the network traffic of each computer. Traffic Statistics by Computer/Port Classes Using this mode, IT manager can quickly find out which computer or group uses most traffic via certain ports 41 Chapter4 Statistics including TCP and UDP. If a group or the whole network is selected, you can click expand button to view more details. Note: Traffic statistics only works for computers, not for users. 42 Chapter5 Logs Chapter 5. Logs 5.1. Basic Event Logs SurveilStar Employee Monitoring Software can record all kinds of basic events happened on the computers. The recordable event types include Logon, Logoff, startup, Shutdown, Restart, Hang up and Dial up. Operations(Event types), Time, Computer, Group, User will be recorded, and description regarding the operation will be also displayed. Select a computer or a group at first, then specify your search condition including time and range, basic event types and description. Time can be All day, Custom, Rest, Weekend and Working Time. If you choose to custom time, a time matrix dialog will pop up and you can select desired time. Working Time can be changed by menu Classes Management > Time Types depending on your need. Below is an basic event log example of Kevin's computer. 5.2. Application Logs Select a computer or a group at first, then specify your search conditions including time and range, application path or title and applicaiton name. Path/Title: Search application logs using application path or title. 43 Chapter5 Logs Application: Click ... button to import application list, add application process name or specify application classes. There are four buttons in the dialog which are Import, Add, Application Classes List and Delete. Import Add Application Classes List Delete Import an file that includes the application names you want to search. For example, if you want to find the logs of browser applications of Internet Explorer, you can create a text file, type the process name like: iexplore.exe Please add application process name like opera.exe, photoshop.exe. Wild-card(*) can be used, such as *shop.exe. You need to sort your applications into classes by menu "Classes Management > Applications" at first. Once applications Classes are created, you can select an application from selected class or select a class directly. Below is an example of selecting a class. Delete selected application name or application class. After specifying your search conditions, click Search button to view the result. 44 Chapter5 Logs Right-click on an application log and you can view property. And click Previous or Next button to view previous or next log. 5.3. Website Logs SurveilStar Employee Monitoring Software can record all visited websites and detailed information including Visit Time, Computer, Group, User, Caption(HTML Tile) and URL. Even if the users delete website browsing history on their computers, the visited websites will still be recorded. 45 Chapter5 Logs SurveilStar supports monitoring all kinds of web browsers including Internet Explorer(IE), Mozilla Firefox, Google Chrome, Apple Safari, Opera, Maxthon, Avant Browser, K-Meleon, AOL Desktop, Sleipnir and many other browsers. Website Visit Monitoring function can easily help you to find whether your employees spend time on unrelated websites such as online videos, online games, porn websites, shopping websites, etc. Select a computer or a group at first, then specify your search conditions including time and range, URL or windows title. Windows Title: Enter your desired word or phrase to search website title. Any visited websites that include the word or phrase will be listed. Please note that wild-card(*) is not accepted here. URL: Click ... button to import website list, add website address or specify website classes. You will see a setting dialog like this. There are four buttons in the dialog which are Import, Add, Website Class List and Delete. Import Add Website Class List Delete Import an file that includes the website list you want to search. For example, if you want to check whether anyone has visited surveilstar.com, you can create a text file, type the website URLs like surveilstar.com. Please add a website URL. Incomplete URL is also accepted. Wild-card(*) can be also used such as *soft.com and *.net. You need to sort all kinds of websites into classes by menu "Classes Management > Websites" at first. Once Website Classes are created, you can select an website URL from selected website class or select a class directly. Below is an example of selecting a website class. Delete selected website URL or website class. After specifying your search conditions, click Search button to view the result. 46 Chapter5 Logs Right-click on any website, and you can choose to print, open URL and view property. In the property dialog, you can view Time, Computer, User, Website, Browser, URL and Window Title as well as go to previous or next log directly. 5.4. Document Logs Document usage tracking is important to a company, it helps IT manager to know all the document usage logs. Once any confidential documents are leaked out, IT manager can track the leakage source easily using SurveilStar's document logs. 47 Chapter5 Logs SurveilStar has powerful document usage recording functions and can record all operations on documents including Microsoft Office Documents like Word (*.doc, *.docx), Excel (*.xls, *.xlsx) and Powerpoint (*.ppt, *.pptx), Images like JPG, BMP, PNG, GIF, etc, Text(*.txt), PDF(*.pdf), HTML files(*.htm, *.html, *.php, etc.), Ebooks(*.epub, *.chm) and any other kinds of document files. Meanwhile, SurveilStar will record all kinds of operation types including Create, Copy, Move and more. Select a computer or a group at first, then specify your search conditions including time and range, operation type, drive, source file, path, size, application, etc. Operation Type Drive Source File Path SurveilStar's document logs function supports all kinds of operation types including Create, Copy, Move, Rename, Restore, Delete, Access, Modify, Upload, Download and Burn. The type of the drive where the operated documents locate in. Supported drive types include Fixed Drive, Floppy, BD-ROM/DVD-ROM/CD-ROM, Removable Drive and Network Drive. File name of operated document. File extension could be included as well. The datailed location of the operated document. When Operation Type is Copy, Move or Rename, SurveilStar will record original path and target path. Size Specify file size to search the operated documents. Application Search operated documents with specific application which is used to open the documents. Click ... button to open the setting dialog. The settings are same as what is explained in previous chapter of Application Logs. has backup When using document policy or IM file policy, we can enable backing up the operated documents or sent/received files via instant messgeners. Once this option is checked, only files which have backup copy will be displayed. And you can save the backup documents and check the details of the documents. Document policy and IM file policy will be discussed in later chapters. The following pictures indicate that the deleted, modified and uploaded documents have been backed up. After specifying your search conditions, click Search button to view the result. Right-click on a document log and click Property to view detailed information of this document operation. Time, Computer, User, Operation Type, File Name, File Type, Size, Drive, Path, Application and Window Title. If the file has been backed up, you will find a Copy button and you can click it to save the attachment. 48 Chapter5 Logs When operation type is Copy, Move or Rename, both original path and target path will be displayed. 5.5. Shared File Logs Select a computer or a group at first, then specify search conditions including time and range, operation type, source file, path and remote IP/name. Operation Type Source File Path Remote IP/Name Supported shared files operation types are Create, Rename, Delete and Modify. File name of shared files operated by the remote computers. File extension could be included as well. The detailed location of shared files operated by remote computers. Type in remote IP address or remote computer name to search when the computer has operated on any shared files. 49 Chapter5 Logs Right-click on any shared files log and click Property to view detailed information of operation on this shared file. 5.6. Printing Logs Select a computer or a group at first, then specify your search conditions including time and range, printer type, printer name, connected PC, task, pages, application and has backup. Printer Type Printer Connected PC Supported printer types include local printer, shared printer, network printer and virtual printer such as Adobe PDF Converter. Enter name of the printer to search. Wild-card(*) is not accepted. It refers to the PC where the printer is connected. If it's a local printer, then PC itself is the connected PC. If it's a shared printer, then the remote computer with printer shared is the connected PC, ususally you can enter IP address. Task Enter file name of the printed documents to search. Wild-card(*) is accepted. Pages Specify printing page to search. You can check if there is any printing abuse. 50 Chapter5 Logs Application Specify printing application to search. Many applications allow users to print and here you can search the printing logs from your specific applications. Click ... button to open the setting dialog. The settings are same as what is explained in former chapter of Application Logs. Has Backup In printing policy, you can enable recording printed contents. Once printing recording is enabled, there will a backup copy for any printed documents. In printing logs, the printed files which has a backup copy will be displayed sightly different. Below is an example of files printed by a virtual printer. After specifying your search conditions, click Search button to view the result. Right-click on a printing log and click Property to view detailed information including Time, Computer, User, Printer, Connected PC, Task, Paper Size, Orientation, Pages, Recorded Pages, Application and Window Title. Below is an example of printing Any Video Converter homapage to PDF with Adobe PDF Converter's virtual printer. 51 Chapter5 Logs Note: Printing task has a backup copy. You can click copy button to view printed file or save printed file. View Printed File: Click View Printed File to open printing viewer. You can zoom in or zoom out, view slide one by one, and save the picture in the viewer as JPG file. Save Printed File: The printed files are saved as JPG files. Every page will be saved as a JPG picture. So there will be multiple JPG pictures when there are multiple pages in the printed task. 5.7. Asset Change Logs In a company, there may be some software changes and hardware changes. Some changes do not matter, but some changes may bring critical problems. Thus software management and hardware management are very important. It also helps IT manager to better administer company assets including software and hardware. SurveilStar can record all installed software, software change as well as all existed hardware and hardware change. Asset change logs help IT manager to easily find out any abnormal software change and hardware change in earlier time and take actions to prevent any potential harm. Recorded asset change information include Operation Type, Time, Computer, Group, Type and Description. Select a computer or a group at first, then specify your search conditions including assest type, operation type and description. Type Select hardware change or software change or both of them. 52 Chapter5 Logs Operation Type Description Supported operation types are Add, Delete and Change. Software upgrade or downgrade will be displayed as Change. Enter software name or hardware name to search. Enter file name of the printed documents to search. Wild-card(*) is accepted. After specifying your search conditions, click Search button to view the result. Right-click on an asset change log and click Property to view the detailed information of the selected log. 53 Chapter5 Logs 5.8. Policy Logs Working discipline is very important to any companies. However, not everyone in the workplace will fully obey working discipline. SurveilStar can create flexible policies to control and monitor employees' PC and web activities and reduce discipline break maximally. After the policies are applied to the employees' computers, IT manager can easily find out the employees who try to break the policy rules and his intention. SurveilStar can record Alert Level, Time, Computer, Group, User, Policy Type and description. Select a computer or a group, then specify search conditions including lowest level, policy type and content. Lowest Level Policy Type Content Alert level can be Low, Important and Critical. Choose the lowest level that you want to record. If Low Level is chosen, then any alert will be recorded, and if Important is chosen, only Important and Critical alert will be recorded. Select policy type to search. All SurveilStar supported policy types are listed. As to the detailed information of each policy, you may need to refer to policy chapters respectively that will be discussed later. Search operation behaviors on agent computers and the policy types he tries to break. After specifying your search conditions, click Search button to view the result. Right-click on a policy log and click Property to view the detailed information. 54 Chapter5 Logs In the example above, we can find out that the website anvsoft.com is blocked and the user Kevin tried to visit this website. Both alert and warning are enabled, alert will pop on SurveilStar Console while warning message will be sent to the user Kevin when he tried to open the blocked website anvsoft.com. 5.9. System Event Logs Surveilstar Employee Monitoring Software itself is a integrated software system and has various events. SurveilStar system event log function is used to record all Surveilstar system events including server startup, server shutdown, agent IP conflict, serial number identification failure, invalid connection and communication error between server and agent computers. SurveilStar System Event Logs help IT manager to maintain and keep SurveilStar system's health and provide hints for solving problems. Select a computer or a group at first, then specify your search conditions including time and range, event content, etc. SurveilStar System Event Logs works for the whole network and selecting a computer or a user is meaningless. Content You can search system event words such as shutdown, startup, conflict, identificaiton, etc. or simply leave it blank. In the example above, the information indicates that on the agent computer 192.168.18.167, the agent installed on the computer may be created by another server. Then the IT manager can install new agent computer on this PC to solve the problem. 55 Chapter6 Policies and Advanced Policies Chapter 6. Policies and Advanced Policies 6.1. Gerenal Introduction of Policies Administrator can limit the use of computer and network resource on agent computer by setting policies to control staffs’ and childs' computer usage and improve productivity. Basic policies Basic Policy Assgin monitored users operation privileges on Control Panel, Computer Managements, System, Network, IP/Mac, ActiveX and other operations, protect the safety of monitored computers. Device Policy Define what devices can be used or not. Application Policy Define what applications can be used or not. Website Policy Define what websites can be visited or not. Screen Monitoring Decide whether to record screen snapshot and if enabled, set recording interval. Logging Policy Check what logs you need to record. By default, all kinds of logs will be recorded. Remote Control Policy Decide whether remote computers can be controlled and if enabled, set remote controlling method. Agent Configuration Policy Commonly used agent control functions. Alert Policy Set real-time alerts when software change, hardware change or system settings change happens so that IT manager can find any changes and take actions quickly. Advanced policies Bandwidth Policy Control bandwidth including upload and download speed of monitored computers. Network Policy Control communication between agent computer and any invalid computers, ensure network safety. Email Policy Control email sending and receiving by sender, receiver, address, attatchment, etc. and prevent email spams. IM File Policy Control file transfer via instant messengers and back up transferred files. Upload Control Policy Control the network upload behavior by way of HTTP or FTP, including sending webmail, uploading images, forum posting and FTP upload, etc. Document Policy Define document operation privileges and back up documents if necessary. Print Policy Control the usage of various printers. Watermark Setting Policy Add Image/Text watermark to documents printing out. General properties of the policies All the policies have some properties in common. Below we will have a brief introduction on these properties. Name Set the policy name. SurveilStar will automatically add a policy name when a policy is created. You can customize the name to what you want. We recommend you use a brief description of the policy as the policy name. 56 Chapter6 Policies and Advanced Policies Time Actions Specify time range that the policy will take effect. You can select time types in the drop-down list or customize time range by using menu【Categories > Time Types】. Select execution mode when all the conditions of the policy are met. Supported modes include Allow, Block, Ingore and No Action. Allow: Allow to perform an operation. If the policy mode the operation matches is Allow, then the operation is allowed and the coming policies won't be judged. Block: Block a certain operation. If the policy mode the operation matches is Block, then the operation is blocked and the coming policies won't be judged. Ingore: The operation won't be allowed nor blocked, but it can trigger events such as warning or alert. Once the current No Action policy completed, system continues to search the following related policies. For example, the first policy is setting all *.doc with Ignore mode and alert; the second policy is prohibiting copy *.doc files. Whenaccessing the doc files, the first policy matched (i.e. alert popup) and then the following second policy will also be matched too, and determine the accessing action is copy or not. If it is copy, action prohibited. No Action: The operation won't be allowed nor blocked, but it can trigger events such as warning or alert. Once the current Ignore policy completed, the following policies will not be executed. For example, the first policy is setting the mode for USB device as Inaction and the second policy is prohibiting USB device. When USB device is plugged in, the first policy matched. Since the modeis Inaction, it will not be blocked but the following second policy will not be matched. Enable or disable alert to SurveilStar Console and Server. When a user's operation matches a certain policy, agent computer will send alert information to SurveilStar server, and alert will also pop up in SurveilStar console to remind IT manager or supervisor. Meanwhile, this alert will be also recorded in policy logs. Alert & Alert Severity IT manager can use menu 【Tools > Options > Console Settings > Real-time Alert > Popup alert bubble】 to enable or disable alert popup, use menu 【Tools > Alert】 to review real-time alerts. Choose alert severity if <Alert> is enabled. Low, Important and Critical are available. Warning & Warning Message Lock Computer Expiration Time Enable or disable warning message to show on agent PC. Click button and set warning message if <Warning> is enabled. When a user's operation matches a certain policy, warning message will pop up on user's computer screen and warn him that he have done something blocked or deprecated. Check this option to lock agent PC if the policy matched. Then user can't do anything on this client computer. IT manager can unlock the PC via menu 【Control > Unlock】 on SurveilStar Console. Set effective period of the policies. Setting earlier time than current time is not allowed. When the policy has expired, the policy will be displayed in gray. If Always is selected, the policy won't be expired. 57 Chapter6 Policies and Advanced Policies Take effect while offline The agent computer will be treated as offline status when the agent PC can't communicate with the server over 3 minutes due to shutdown, network problem, etc. Check this option if you want the policy to be effective only when the computers are offline. Usually selected when agnet user is for business trip or under network failure conditions. Buttons used in policies Create a new policy. Move up the selected policy. Move down the selected policy. Delete the selected policy. Cancel the newly created policy or cancel policy modification. Apply the newly created or modified policy The policy execution action is set to Allow. The policy execution action is set to Block. The policy execution action is set to Ignore. The policy execution action is set to No Action. <Alert> is enabled. <Warning> is enabled. <Lock Computer> is enabled. <Take effect while offline> is enabled. The policy would only be effective only when the computers are offline. <Expiration Time> is enabled. The policy would be expired and invaild on specified date. Policy priority Usually there will be multiple policies applied to a certain computer or a group and there may be policy conflict problems. Thus there will be a policy priority. Policy adopted mechanism is similar to Firewall, each goal can be combined from a number of policies and then matched in accordance with their relationships. At the same time, different computers (group) or users (group) inherit their parents’ policies. IT manager or supervisor can create user policy, computer policy, group policy and whole network policy. Please note that: User policy has higher priority than computer policy; self policy has higher priority than group priority; policy on top has higher priority than the policy below. When a policy found in higher priority, it will be executed and the policies in lower priority will be ignored. The priority of the policies from high to low is as below: User Policy > User Group Policy > Computer Policy > Computer Group Policy > Whole Network Policy When a policy is inherited from a parent object, it will be displayed in light green background and can't be modified in child object. If the policy can be customized by entering words, then you can use wild-card(*). Multiple strings can be entered and you should use half-size "," or ";" to separate. Up to 3 wild-card(*) is allowed. Show all policies Select a computer, a user or a group, Click menu Policies > Show All Policies to see what policies are applied 58 Chapter6 Policies and Advanced Policies to selected object. Click the Expand or Collapse button to view or hide all policies. 6.2. Basic Policy In SurveilStar Console, click menu Policies > Basic, click Add button to create a basic policy. Then you will see Property settings like the picture below. Basic policy supports: Control Panel, Computers Management, System, Network, IP/MAC Binding, ActiveX and other controls. Control Panel Control Panel Limit all the functions that are available in control panel. Once this option is checked and policy execution action is set to <Block>, user won't be able to open control panel and Control Panel will be removed from start menu. Modify display properties Restrict users to change the theme, desktop, screensaver and appearance. Add printers Limit user to add printers. Delete printers Limit user to delete printer. Fast swithing user in XP Limit multiple users' logon in XP by switching user. This option is effective for Windows XP system only. 59 Chapter6 Policies and Advanced Policies Computers Management Device Manager Restrict user to use Device Manager. Disk management Restrict user to use Disk Management such as adding, deleting or resizing disk volume. Local users and groups Limit access to local users and groups settings in Control Panel. Service management Restrict user to use Service Managemen. Other computer managements Restrict user to use: Event Viewer, Performance Logs and Alerts and Shared Folders which located in Computers Management. System Task Manager Restrict user to use Task Manager. When this option is checked and policy execution action is set to <Block>, Task Manager on agent computers will be hidden. Regedit Restrict user to use Regedit. CMD Limit access to Command Prompt. In Windows 95, 98 and ME, it's command.exe and in NT or later systems, it's cmd.exe. Run applications in the "Run" of registry Run applications in the "RunOnce" of registry When this option is checked and policy execution action is set to <Block>, the process under “Run” will not be run when OS is starting up. Log off or restart is required for effective. “RunOnce” means that the process only run once when OS is starting up, it will not be run again in the next startup. When this option is checked and policy execution action is set to <Block>, the process under “RunOnce” will not be run nextime the OS is starting up. Log off or restart is required for effective. Network Modify network property Restrict user to modify the network property. Display my network places When this option is checked and policy execution action is set to <Block>, My Network Places will be hidden from agent computer. Log off or restart is required for effective. Modify internet options Restrict user to modify Internet Options settings. Default netshare When this option is checked and policy execution action is set to <Block>, Netshare is prohibited. Netshare Add netshare When this option is checked and policy execution action is set to <Block>, users can't share local documents. When this option is checked and policy execution action is set to <Block>, users can't add new netshare for file sharing. IP/Mac Binding Change IP/MAC Property Prohibit user to change IP/Mac settings. When this option is checked and policy execution action is set to <Block>, SurveilStar would record current IP/MAC information. It will be resumed to reserved IP/MAC settings if any modifications are made. You need to disable the policy before you are going to change IP/Mac. 60 Chapter6 Policies and Advanced Policies ActiveX Chat ActiveX Media ActiveX Many IM tools will install chat ActiveX. When this option is checked and policy execution action is set to <Block>, users can't use chat activeX when they are using IM tools to chat. Generally playing music or watching videos online may require installing media Activex. When this option is checked and policy execution action is set to <Block>, it would stop user listening or watching online media. Game ActiveX Some online games may require installing game activeX. When this option is checked and policy execution action is set to <Block>, users can't play such internet games any more. Flash ActiveX This ActiveX is required for playing flash files. When this option is checked and policy execution action is set to <Block>, flash files cannot be played properly. Others PrintScreen keystroke System Restore Windows automatic update When this option is checked and policy execution action is set to <Block>, users can't use PrintScreen key to print screen any more. When this option is checked and policy execution action is set to <Block>, system restore won't be allowed. This can prevent users from uninstalling SurveilStar Agent via system restore. When this option is checked and policy execution action is set to <Block>, Windows automatic updates will be turned off. Basic Policy Example This is an example which can help you better understand basic policy. The requirement is that when the employee is on work in the company, changing his IP/MAC property is not allowed, but when he is off work or on a business trip, changing his IP/MAC property is allowed. To achieve this, you can create two basic policies like below. 1. Create a basic policy and set change IP/Mac property to <Block>. 2. Create another basic policy, set change IP/Mac property to <Allow> and check Only offline option. According to policy priority, the policy 2 is created after policy 1 and will be listed above. Thus policy 2 has higher priority. When the computer is offline, the status matches the policy 2, IP/Mac property can be changed and surveilstar won't judge policy 1 any more. When the computer is online, the status doesn't match the policy 2, and SurveilStar continue to judge policy 1, and the status matches policy 1, thus IP/Mac propery can't be changed. Note: Change IP/MAC Property, System Restore and Netshare are only available to computers and inavailable to users. 6.3. Device Policy In SurveilStar Console, click menu Policies > Device, click Add button to create a device policy. Then you will see Property settings like the picture below. 61 Chapter6 Policies and Advanced Policies The device control policies support the followings: Storage, Communication Interface Device, Dial, USB Device, Network Devices and other devices. Storage Floppy Limit the usage of floppy. If you want to block Floppy, check this option and set Action to <Block>. DVD/CD-ROM Limit the usage of DVD-ROM, CD-ROM and BD-ROM. If you want to block CD/DVD/Blu-ray drives, check this option and set Action to <Block>. Then DVD drive, CD drive or Blu-ray drive will be invisible. This option doesn't work for virtual DVD/BD-ROM created by Deamon Tools or similar software. If you want to block virtual DVD/CD-ROM, refer to Other Devices in this chapter. Burning Device Tape Movable Devices Limit the usage of CD burning, DVD burning or Blu-ray burning. Check this option and set Action to <Block>, and any burning actions will be blocked. However, disc reading is allowed. If you want to block disc reading as well, block DVD/CD-ROM. Limit tape usage. Limit the usage of any movable devices including removable disk, memory stick, IC card, etc. Check this option and set Mode to block if you want to block such devices. 62 Chapter6 Policies and Advanced Policies Non-system Drives Portable Deives (E.g. Smartphone) Limit the usage of any non-system drives. Check this option and set Action to <Block> if you want to block non-system devices. Limit the usage of any portable devices including iPad, iPhone, iPod, PSP, Walkman, Zune, BlackBerry, Nexus One, Samsung Mobiles, Android mobiles, Creative Zen, Archos and more. Check this option and set Action to <Block> if you don't want your employess to use such devices. Communication Interface Device COM COM Ports Control. LPT LTP Ports Control. USB Controller USB Controller Control. SCSI Controller SCSI Controller Control. 1394 Controller 1394 Controller Control. Infrared Infrared device Control. PCMCIA PCMCIA Card Control. Bluetooth Bluetooth device Control. MODEM Modem device Control. Direct lines Direct connection control between two computers using USB cable, COM port or Serial cables. Dial Dial-up Connection Dial-up Connection Control. USB Device USB Keyboard USB Keyboard Control. USB Mouse USB Mouse Control. USB Modem USB Modem Control. USB Image Device USB Image Device Control such as Webcam, Digital Camera and Scanner. USB CDROM USB CDROM Control. USB Storage USB Storage Control. USB Hard disk USB Hard disk Control. USB LAN Adapter USB LAN Adapter Control. Other USB Devices Control other USB devices not mentioned above. Network Devices Wireless LAN Adapter Wireless LAN Adapter control. PnP Adapter (USB, PCMCIA) Virtual LAN Adapter PnP Adapter (USB, PCMCIA) control. Virtual LAN Adapter control. Others Audio equipments Audio, video and game controller control. Vitual DVD/CD-ROM Vitual DVD/CD-ROM control. 63 Chapter6 Policies and Advanced Policies Wireless network Any new devices Wireless network access control. Control access to specified wireless network specified by device description. You can also leave it blank for more wireless net. Device description format: SSID = Wireless Network Name|BSSID = Network Address. SSID and BSSID can set only one or both. Supports wildcards, and multiple network device description can be separated by ";". For example: SSID=teclink_11|BSSID=aa-77-dd-00-88; SSID=teclink_10; BSSID=aa-ee-dd-00-88; Any new devices plug-in. if the Action is set to <Block>, all new devices cannot be used. Device Policy Example 1 Some companies’ policies not allow staff listening music or playing online game during office hours. In this case, System administrator can set a policy to prohibit the use of Audio. 1. Choose computer from the left list and then create a device policy 2. Properties: Time <Working Time>. Action <Block>. Check <Audio equipments> under Others. Then audio equipments of selected computers would be disabled. Device Policy Example 2 The requirement is that the company only allow employees to use the company's internal wireless network and would like to block some other wireless networks. Then you can set the device policy to prohibit connection to these wireless networks. 1. Choose computer from the left list and then create a device policy. 2. Properties: Action <Block>. Check <Wireless network> under Others. 3. Description: Fill in the wireless network information, such as: SSID=teclink_11|BSSID=aa-77-dd-00-88; SSID=teclink_10; BSSID=aa-ee-dd-00-88 After setting is successful, the client can not connect to a) wireless network called teclink_11 while Network Address is aa-77-dd-00-88. b) wireless network called teclink_10. c) wireless network which Network Address is aa-ee-dd-00-88. 6.4. Application Policy In SurveilStar Console, click menu Policies > Application, click Add button to create an application policy. Then you will see Property settings like the picture below. In the following example, you can see that all the applications sorted into Entertainment application class are blocked in all time, alert and warning message are also set for administrator and users. 64 Chapter6 Policies and Advanced Policies Click button to specify application. There are 3 methods. There are four buttons in the dialog which are Import, Add, Application Classes List and Delete. It's just the same as the setting dialog that was previously discussed in Application Logs chapter. Please check Application Logs for more information. 65 Chapter6 Policies and Advanced Policies 1. Direct Input Application Name In the Application Setting windows, click the button to input the application name directly e.g. thunderva.exe. If the user changes the application name to thunder123.exe, it makes the policy not effective anymore because the input only matched with a string. To avoid this problem, use the following method 2. 2. Select from Application Categories In the Application Setting windows, click the button and the Application Categories Selection windows popup. Check the application classes you want to control. If the action is <block>, the policyis still effective even user changes the application name later. (How to customize the Application categories please check Chapter 10.1 Application Categories.) 3. Control applications by running path Click button and add the application path, such as: Block [APPDIR:D:\*.exe], then SurveilStar will block all apps under Drive D:\. And [$UDISK$] stands for U disk, [$CDROM$] stands for CDROM. Such as: APPDIR:$UDISK$:\*.exe: Control applications on U disk. APPDIR:$CDROM$:\*.exe: Control applications on CDROM. Service Control SurveilStar can also control service running on agent PCs. Simply click button and input the service name. Input format: service: ServerName; For example: To disable the service bthserv, then fill in service: bthserv. Note: 1. If the application is sorted into an application class, even if the user change the application process name, the policy will be still effective. 2. If you set <Block> to <All> applications, the majority of the process would be disabled. Please proceed with caution when setting policies. 6.5. Website Policy In SurveilStar Console, click menu Policies > Web, click Add button to create a web policy. Then you will see Property panel on the right as the picture below. In the following example, you can see that all websites are blocked in all day, alert and warning message are also set for administrator and users. 66 Chapter6 Policies and Advanced Policies Website Click ... button to open the settings dialog. You will see a dialog as below. There are four buttons in the dialog which are Import, Add, Application Classes List and Delete. It's just the same as the setting dialog that was previously discussed in Web Logs chapter. Please check Web Logs for more information. Web Policy Example In order to prevent staff from accessing to illegal websites, website browsing policy can be set up to put a ban on or only allow to visit the specified websites. If it is only some specified sites that you need to be allowed to, a set of strategies is a good choice. This is an example which can help you better understand Web Policy. The requirement is that when employee is on work, only some work-related websites are allowed to visit. To achieve this, you can create two web policies like below. 1. Create a web policy and set all websites to Block. 2. Create another web policy, and add specified websites to Allow. Afterwards, only some designated websites are allowed to visit. 67 Chapter6 Policies and Advanced Policies 6.6. Screen Snapshot Policy In SurveilStar Console, click menu Policies > Screen Snapshot, then click Add button to create a screen snapshot policy. Then you will see Property panel on the right as the picture below. In the following example, Screen Snapshot will always record. Application Set applications to record, the default is all, and you can specify what you care to record. Interval Set regular interval for the screen snapshot. It is 15s by default, which means every 15 seconds takes a screen. Only effectively under the Record mode. Set different recording frequency for different applications. Do frequent records on some most used applications and the nonessential programs not record or less. Note: The smaller screen recording time interval, the greater amount of data generated. It’s important to adjust the screen recording interval base on actual need of appropriate time. 6.7. Logging Policy In SurveilStar Console, click menu Policies > Logging, click Add button to create a logging policy. Startup/Shutdown Basic event logs about system startup or shutdown. Logon/Logoff Basic event logs about user logon or logoff. Dial Basic event logs about dial. Policy Control Logs about strategy alarm. Hardware Changes Hardware change logs in the assets change log. Software Changes Software change logs in the assets change log. Application Logs about specified applications. Visible window Set application with visible window to be recorded or not. Application Specify application to record or not, and you can also select a category in the classification of application. Support wildcard. Window Title Change Window title change does not record by default, but can add policy to set record, also for the specified applications. 68 Chapter6 Policies and Advanced Policies Application Specify name of application which window title changes by manually entered or select a category in the classification of the application. Support wildcard. The web browsing logs can set to be not recorded, but also the specified site can set to be recorded or not. Website Manually enter the website address, and can also select the website category from the classification. Support wildcard. Web Document Logs about document operation, meaning that certain documents can set to be not recorded to ensure that all logs recorded are useful. Disk Type Include: hard disk, floppy disk, CD-ROMs, removable disk, network drive, and an unknown letter. For example, files on the hard disk can set to be not recorded. File Name Set name of files need to be recorded or not. Support wildcard. Application Specify application operated to documents. Printing Logs about document printing. Printer Type Select type of printer need to be recorded or not. Application Set application to print documents. Shared File Logs Logs about operation of shared file. File Name Document name of the shared operation. Support wildcard. IP Range IP address range of the computers which remote access to shared documents in the client computer. Some of the machines can set to be not recorded. Email Logs about email content. Can set Not Record to the types of email you do not want to record. Send/Receive Choose direction of email: sent or receive. From Set address of sender, and it will comply with the policy choosing to record the email or not. Support wildcard. To Set address of receiver. Support wildcard. EmailSize[>KB] Set an email size, and the policy will execute if email size greater than or equal to the value. EmailSize[<KB] Set an email size, and the policy will execute if email size less than or equal to the value. Not Record Content Only effective in the "Record" mode. If you check this, content of email will not be recorded. On the console cannot view content of the emails. Unrecord Attachment Only effective in the "Record" model. If you check this, attachments of email will not be recorded. On the console will show with attachment, but not be able to view and save. Instant Message To record some contents of chat tools based on the need. Tools Select chat tools. Not record content Only effective in the "Record" model. If you check this, the chat will not be recorded, so cannot be able to view chat on the console. Application Statistics Logs about application statistics. Web Statistics Logs about web statistics. Traffic Statistics Logs about traffic statistics. 69 Chapter6 Policies and Advanced Policies Note: If you do not need to record some of the logs, you can add a policy, setting Not Record to some certain logs and then save. 6.8. Remote Control Policy In SurveilStar Console, click menu Policies > Remote Control, click Add button to create a remote control policy. Then you will see Property panel like the picture below. In the following example, you can see that only remote control is allowed all day, and authorization is required. Remote Control If you check this, you choose the type to be remote control, and enable administrators have a freedom to control your machine. Remote File Transfer If you check this, you choose the type to be remote file transfer, and enable others transfer files to your machine. Only after selecting at least one of the above two (type of remote control), can be able to set the following attributes: Authorization is required Manager Name Console IP Address Console Name Only effective in the "Allow" mode. If you check this, you choose user authorization as the only method to remote control. If not, user authorization and password authorization are available. To control administrator user logs in to the current console. For example, can restrict method of remote control to the specify client machine of some certain administrator user. Need to force the confirmation. The administrator account can set by Tools > Accounts. Control computer's IP address range on under current console. For example, you can restrict computers which IP on a designated range to remote control function by logging into the SurveilStar console. If the input is from 0.0.0.1 to 255.255.255.255, or do not enter, or is not a valid IP address, system would understand as all IP addresses, and to represent by <All>. To control the name of the computer logs in to the console. Note: Manager Name, Console IP Address and Console Name support a semicolon ";" or comma "," to be as a separator. So multiple setting is available. 6.9. Alert Policy In SurveilStar Console, click menu Policies > Alert, click Add button to create an alert policy. Then you will see Property panel on the right as the picture below. In the following example, you can see that system would alert when hardware changes. Hardware change Set alert or not when any of hardware assets changes, which will facilitate the administrator to maintain computer hardware assets and estimate, debar and repair the failure of computer hardware problem within the network. 70 Chapter6 Policies and Advanced Policies Lock Computer Check this option to lock computer when hardware changes. Plug in Alert when plug in computer peripherals, and will record name of the device. Plug out Alert when plug out computer peripherals, corresponding to plug in. Plug in Storage Device Alert when plug in storage devices, and will record name of the device. Remind the administrator to prevent the illegal use of external storage devices. Plug out Storage Device Alert when plug out storage devices, corresponding to the storage device plug in. Plug in Communication Device Alert when plug in communication device, and will record name of the device. Remind the administrator to prevent the illegal use of external communication devices. Plug out Communication Device Alert when plug out communication device, corresponding to the communication device plug in. Software change Alert when any of software assets changes, which will facilitate the administrator to maintain computer software assets and estimate, debar and repair the failure of computer software problem within the network. System service change Alert when system service of client machine changes, to help administrator to solve problems caused by virus or system. Startup item change Alert when startup item of client machine changes. System time change Alert when system time of client machine changes. Computer name change Alert when computer name of client machine changes. Remind the administrator to prevent the illegal operation on client machine. Network Configuration Change Alert when network configuration of client machine changes, which facilitates the administrator to estimate, debar and repair network problems Please note that: Note: Not only the alarm type but also the specific description will show, to help administrators quickly locate the problem occurred and solve the problem. 6.10. Agent Configuration Policy Agent configuration policy is considered as supplement to other policy settings and contains some commonly used agent control functions. In SurveilStar Console, click menu Policies > Agent Configuration, click Add button, select the target function from the keywords provided to create an agent configuration policy. Please note that different functions have different properties, depending on the specific availability. More details about keyword and content of agent configuration not yet included in the existing categories, please contact us: [email protected]. 71 Chapter6 Policies and Advanced Policies 6.11. Bandwidth Policy (Advanced) In SurveilStar Console, click menu Advanced > Bandwidth, click Add button to create a bandwidth policy. IP Range Set IP address range of the communication computers, which is all by default. You can not only manually add one by one, but also can specify category from the network address classification by {…}. Port Range Set port range used in the communication, which is all by default, including TCP port from 0 to 65535 and UDP port from 0 to 65535 and ICMP. You can not only manually add the port or port range individual, but also can specify category from the port classification by {…}. Enter a specified port should proceeded by "TCP:" or "UDP:" to distinguish TCP port or UDP port, and if not, it will consider to be a TCP port. Direction Direction of network traffic when communicate. Traffic from client computers to other machines is defined as sending traffic, on the contrary as receiving traffic. Limited Speed (<=KB/s) Limit traffic size with KB / s as the unit, which is invalid under the Unlimited Traffic mode. - - - If Limited Traffic mode is selected, when the speed exceeds the limit set to the client in the specified IP and port range or in the specified direction, the client will pause the download /upload until the average flow rate below a specified value, so as to achieve the purpose of limiting traffic. - - - If Ignore mode is selected, limiting the speed is invalid until you set the action (alarm, warning or lock computer). When the speed exceeds the limit set to the client in the specified IP and port range or in the specified direction, it will trigger the action set, but will not limit traffic. Bandwidth Policy Example This is an example which can help you better understand Bandwidth Policy. The requirement is that when employee is on work, ftp download is forbidden. To achieve this, you can create a bandwidth policy like below. 1. Create a bandwidth policy. 2. Select the Limited Traffic mode, set IP Range as all, set Port Range as TCP: 21, set Limited Speed as 0KB/s. Afterwards, ftp download will not be allowed to employees during working time. Note: Bandwidth Policy is available only for the computer, but invalid for the user. 6.12. Network Policy (Advanced) In SurveilStar Console, click menu Advanced > Network, click Add button to create a network policy. Direction Physical communication direction, including bi-directional, outbound and inbound. Client machine actively connects to other computers is defined as outbound, and on the contrary as inbound. 72 Chapter6 Policies and Advanced Policies Port Range IP Range Remote host has agent installed Set port range used in the communication, which is all by default, including TCP port from 0 to 65535 and UDP port from 0 to 65535 and ICMP. You can not only manually add the port or port range individual, but also can specify category from the port classification by {…}. Enter a specified port should proceeded by "TCP:" or "UDP:" to distinguish TCP port or UDP port, and if not, it will consider to be a TCP port. Set IP address range of the communication computers, which is all by default. You can not only manually add one by one, but also can specify category from the network address classification by {…}. To judge whether the remote host is agent or not. It would not judge if not checked. Only after checking this option can be able to set the following attributes: - - - Belong to the group Control communication between client machines belong to the same group. Which means the current group, and not only does not include subgroups but also not contain the upper layer of the group. - - - Belong to selected group(s) Control communication between client machines belong to selected group. Only after checking this can you specify the group of agent below. - - - Group of Agent Specify the group of agent. Only after setting the group can you choose whether to include subgroup or not below. - - - Include subgroup Choose whether to include subgroup in the selected group(s). Network Policy Example There are two examples which can help you better understand Network Policy. First One: The requirement is that when employee is on work, ftp download is forbidden. To achieve this, you can create a network policy like below. 1. Create a network policy. 2. Select the Block mode, set IP Range as all, set Port Range as TCP: 21. Afterwards, ftp download will not be allowed to employees during working time. Second One: The requirement is that computers of some departments across the enterprise should be very important and sector outside is not allowed to connect. To achieve this, a set of strategies is a good choice. For example: 1. Create a network policy and set network block to all IP range. 2. Create another network policy, and add specified agents belong to the same group to Allow mode. Afterwards, only computers within the same department can communicate with each other. Before setting policies such type, computers of the same department should set to be in the same group. And if there are computers do not have agent installed in the department, set a policy and add the IP range to Allow mode. Note: Network Policy is available only for the computer, but invalid for the user. 73 Chapter6 Policies and Advanced Policies 6.13. Email Policy (Advanced) In SurveilStar Console, click menu Advanced > Email, click Add button to create an email policy. Then you will see Property panel on the right as the picture below. In the following example, you can see that emails to "[email protected]" or with attachment are blocked by the software. From Control the address of sender and multiple setting is available by using semicolon ";" or comma "," to be as a separator. To Control the address of receiver, including address about Cc (carbon copy) and BCC (blind carbon copy). Just match a recipient Execute the policy when match any of the receivers or all setting above. Subject Control the subject of sending mail. Input rule is the same as the control of sender. Has Attachment Control whether the sending mail has attachment or not. Check this option if you only want to control emails with attachment. If not, all mails, with or without attachment will be controlled. Attachment Control name of attachment only after selecting "Has Attachment" above. Input rule is the same as the control of sender. Email Size(>=KB) Set an email size, then the policy will execute if email size greater than or equal to the value. Control the size of sending mail, the default is 0, which means all. Email Policy Example 1 There are two examples which can help you better understand Email Policy. In order to protect private information and prevent staff from misusing e-mail to send internal confidential information, an email policy to control attachment with specified keywords is a good choice. You can create an email policy like below: 1. Create an email policy. 74 Chapter6 Policies and Advanced Policies 2. Select the Block mode, then check has attachment and input keywords in Attachment. Afterwards, emails with attachment and match the keywords will be blocked. Email Policy Example 2 The requirement is that companies want to restrict the sender of emails, which only allow employees to use the specified internal mailbox to send mail, but the other mailbox is disabled, so standardize the usage of email, but also control outgoing mail strictly. To achieve this, a set of strategies is a good choice. For example: 1. Create an email policy and set block to all emails. 2. Create another email policy, and add specified sender of email to Allow mode, such as from: *@teclink.com.hk. Afterwards, only email address contains "teclink.com.hk" can be successfully sent. Note: 1. Email policy is available only for the computer, but invalid for the user. 2. Email policy can only support to control email sending but not receiving. And temporarily does not support webmail and Lotus mail sending control. 6.14. IM File Policy (Advanced) In SurveilStar Console, click menu Advanced> IM File, click Add button to create an IM file policy. File Name Limited Size (>=KB) Backup Control name of files when transfer by instant messaging tools and multiple setting is available by using semicolon ";" or comma "," to be as a separator. Support wildcard. Only effective in the Block mode. Set a limited size, then file size greater than or equal to the value is forbidden. The value ranges from 0 to 100000 KB. Choose whether to backup the sending files. IT manager can view or save the backup using menu "Logs > Document" in SurveilStar Console. Only after selecting backup can set the minimum and maximum size below and files will be backed up within this range. Minimum Size (>=KB) The minimum size of backup files. Maximum Size (<=KB) The maximum size of backup files. Tools Choose instant messaging tools to control, such as MSN、YAHOO、 Google Talk、SKYPE、TM、UC、RTX、POPO、ICQ、QQ and so on. You can checking All to control all IM tools. IM File Policy Example The requirement is that when employee is on work, file contains specified keywords cannot be sent via instant messaging tools. To achieve this, a set of strategies is a good choice. For example: 1. Create an IM File policy to allow but make a backup when files sent via IM tools. 2. Create another IM File policy, and add specified keywords for File Name. Afterwards, only flies do not contain specified keywords can be successfully sent and backup. IT manager can check if sending files are legal through document logs. 75 Chapter6 Policies and Advanced Policies 6.15. Upload Control Policy (Advanced) In SurveilStar Console, click menu Advanced > Upload Control, click Add button to create an upload control policy. Transfer Type The default is Upload. No other option. Http protocol Check the option and SurveilStar would control upload via Http protocol. Limit Size(>=Byte) Only enabled under Block mode. Block upload if file exceeds designated size. The default is 102400 Byte. Website Control uploading or submitting files to designated website. By default, it is set to all http sites. Input format is "www.google.com", but not "http://www.google.com/". Support wildcard input. Support ";" or "," as separator for multiple inputs. Ftp protocol Check the option and SurveilStar would control upload via Ftp protocol. Limit Size(>=Byte) Only enabled under Block mode. Block upload if upload file exceeds designated size. The default is 102400 Byte. File Name Specify file name. Support wildcard input. Support ";" or "," as separator for multiple inputs. IP Range Control uploading or submitting files to designated IP Range. By default, it is set <All>. Upload Control Policy Example This is an example which can help you better understand Upload Control Policy. The requirement is that IT manager doesn't allow employees to upload files exceeds 500KB to all http sites. When any PC is trying to break the policy, a warning message would pop up. To achieve this, you can create a Upload Control Policy like below: 1. Choose 【The Whole Network】 from the left computer list, click menu 【Advanced > Upload Control】 to create upload control policy. 2. Set 【Action > Block】. Check Warning option, and input the warning message. Check Http protocol, and set Limite Size to 500. 3. Save the policy. Warning message would pop up if agent PC is uploading files exceeds 500KB. 76 Chapter6 Policies and Advanced Policies 6.16. Document Policy (Advanced) In SurveilStar Console, click menu Advanced > Document, click Add button to create a document policy. Operation Type Type of operation is simply divided into: read, modify and delete. When allow to modify will be able to read, and when allow to delete will be able to read and modify also. Read Read documents. Modify Modify documents, which Contains all operations other than read and delete, such as create, rename, modify, copy, move and restore. Only after checking this option will be effective to set “Backup before modify” and “Backup when copy/cut to” below. Delete Delete documents. Only after checking this option will be effective to set “Backup before delete” below. Disk Type Choose disk type of documents to control, including: Fixed Disk, Floppy Disk, DVD/VCD-ROM, Removable Disk, Network Disk and an unknown letter. File Name Specify name of documents need to control, containing a path such as “C:\Documents\*” is available, then all documents under the folder will be controlled. Multiple setting is available by using semicolon ";" or comma "," to be as a separator. Support wildcard. Back up source documents before modify to prevent important files from malicious or unintentional modification. Backup before modify Backup when copy/cut to Backup when copy or cut documents to specified disk to check if they are copy or move to the illegal drive letter. Backup when copy/cut from Backup when copy or cut documents from specified disk to check if they are copy or move from illegal drive letter. Backup before delete Minimum Size (>=KB) Back up source documents before delete to prevent the loss of important documents because of incorrect operation. Only after selecting backup can set the minimum and maximum size below and documents will be backed up within this range. The minimum size of backup. Maximum Size (<=KB) The maximum size of backup documents. Application Specify the application operated to documents. Document Policy Example This is an example which can help you better understand Document Policy. The requirement is that IT manager would like to specify some important documents to back up before delete or modify by users. To achieve this, you can create a document policy like below: 1. Create a document policy. 2. Select the Allow mode, and check the operation of modify and delete. 3. Specify the File Name and check Backup before modify and Backup before delete. Afterwards, documents contained specified keywords can be normal used, but will be backed up if they are 77 Chapter6 Policies and Advanced Policies modified or deleted. IT manager can view or save the backup using menu "Logs > Document" in SurveilStar Console. Note: Backup may produce large amounts of data. So precise positioning is needed to avoid gobs of useless documents. 6.17. Print Policy (Advanced) In SurveilStar Console, click menu Advanced > Print, click Add button to create a printing policy. Printer type Type of printer is simply divided into: local printer, shared printer, network printer and virtual printer. You can choose the type by checking or choose all by letting them to be blank. Printer description Specified name of printer. Application Specified application to print. Record Mode Control to record content of print or not. Maximum Recorded Pages Only effective if checking Record to the Record Mode above. Control the maximum number of pages to record printing documents. The more pages you record, the greater amount of data generated. And IT manager can view the record using menu 【Logs > print】 in SurveilStar Console. Printing Policy Example This is an example which can help you better understand Printing Policy. The requirement is that IT manager would like to limit the use of all printers and only want printer HP to print documents. To achieve this, a set of strategies is a good choice. For example: 1. Create a printing policy to block all types of printer. 2. Create another printing policy, and set Allow mode to printer HP by specified printer description as HP. Afterwards, only printer HP can successfully print documents. 6.18. Watermark Setting Policy (Advanced) In SurveilStar Console, click menu Advanced > Watermark Settings, click Add button to create a watermark policy. Printer Type All four printer types can be selected: local printer, shared printer, network printer and virtual printer. Check or choose all by letting them to be blank. Printer description Name the selected printer. Printing Task Name the printing task. Application Specify the application used for printing out. 78 Chapter6 Policies and Advanced Policies Watermark Setting Watermark Types Parameters settings Watermark content and display. Only enabled when you set 【Mode > Apply】. Image Watermark or Text Watermark Image Watermark: Simply choose a picture from PC Text Watermark: Set watermark text, font, size and color. Performace: Prior in quality (by default) or Prior in speed. Only enabled when you set【Location】 to be On the top of the content. Transparency: watermark transparency, support 0-100%, default is 80%. Tilt: Horizontal, Tilted to the left or Tilted to the right. Location: Watermark position relative to the content of the document, you can choose Placed under the content or On the top of the content. Layout mode: Mode of segmentation or Area mode to deside the watermark number. Default is Mode of segmentation Mode of segmentation: Set number of watermarks, default number is 3x3. Area mode: Set size of watermark. default size is 3cm x 3cm. Watermark margins: margins between watermark Mode of segmentation: Watermark margin is in percentage display Area mode: Display margin left, right, top and buttom. Page margins Page margins setting when printing. Advanced Settings Advanced Settings allows you to print some additional information Image Watermark Example 79 Chapter6 Policies and Advanced Policies Text Watermark Example Advanced Policy Example 80 Chapter6 Policies and Advanced Policies Watermark Setting Policy Example This is an example which can help you better understand Watermark Policy. The requirement is that IT manager would like to add text watermark to all printing documents except Ann's computer. To achieve this, a set of strategies is a good choice. For example: 1. Choose 【The Whole Network】 from the left computer list, click menu 【Advanced > Watermark Settings】 to create a watermark policy. 2. On the right watermark policy setting panel, slect 【Mode > Apply】 to all types of printer. Then custom the text watermark content and display. Save the policy. 3. Choose Ann's computer from the left computer list, create another watermark policy, and set【Mode > Disable】. Save the policy. Note: Only if you set 【Mode > Apply】 which means that you would like to add watermark while printing, you can make custom watermark settings to deside the content and display. 81 Chapter7 Monitoring Chapter 7. Monitoring 7.1. Instant Message Monitoring SurveilStar Monitoring Software can record detailed instant message of mainstream IM tools including MSN, YAHOO, Google Talk, SKYPE, TM, UC, RTX, POPO, ICQ and QQ .etc. Click menu Monitoring > Instant Message, then select a certain computer or a group and specify search conditions including time and range, IM tool, UserID or Nickname and content. Tool Choose instant messaging tools to control, such as MSN, YAHOO, Google Talk, SKYPE, TM, UC, RTX, POPO, ICQ, QQ and so on. You can checking All to control all IM tools. UserID or Nickname Search chat and content of a specific account according to its User ID or nickname. Content Search chat according to some keywords to quickly locate chats of interest. After specifying your search conditions, click Search button to view the result. Below is a search result example of Instant Message Monitoring. Click Previous or Next button at the right upper corner to view previous or next instant message monitoring records. 82 Chapter7 Monitoring Right-click on an instant message monitoring record and you can view property with information in detail. 7.2. Email Monitoring Click menu Monitoring > Email, then select a certain computer or a group and specify search conditions including time and range, email type, send or receive, email address, subject, content, attachment and size. 83 Chapter7 Monitoring Email Type Type of email is simply divided into: SMTP/POP3 Email, Webmail, Exchange Email and Lotus Notes Email. It’s all by default and you can choose one certain type to quickly search mails you want. Send/Receive Search and scan sending mails or receiving mails only. Email Address Search mails sending and receiving of specified email address. Subject Search mails according to the specified keywords in subject. Content Search mails according to the specified keywords in contents. Attachment Check this option if you only want to search mails with attachment, and you can specify keywords of name of attachment to search mails you want. If not, all mails, with or without attachment will be shown. Set range of email size and search mails according to size of them. Size After specifying your search conditions, click Search button to view the result. Below is a search result example of Email Monitoring. Click Previous or Next button at the right upper corner to view previous or next email monitoring records. Records about sending mails. Records about receiving mails. Has attachment. Click this icon to view or save attachment files. Right-click on an email monitoring record and you can view property with information in detail. 84 Chapter7 Monitoring Note: Email monitoring supports SMTP/POP3 Email, Webmail, Exchange Email and Lotus Notes Email. It will record mails sending and receiving of SMTP/POP3 and Exchange mails, and will only record mails sending but not receiving of Webmail and Lotus Notes Email currently. 7.3. Screen Snapshot Monitoring Click menu Monitoring > Screen Snapshot, then select a certain computer, and SurveilStar will show a picture of the entire screen and display exact actions immediately. Below is a screen snapshot example of monitored computer. Save current frame The current screen snapshot can be saved as JPG or BMP files. Click the button, then give a file name, choose a type and a detailed location for the frame you want to save. Sessions If a computer is logged in two or more users or a user logs on to two or more computers at the same time, the administrator can choose anyone to view a screenshot via the session button. Fit size Display the screen snapshot in an appropriate size to the window. Original size Display the screen snapshot in its original size. Stop track If you click this button and it turns to be , screen snapshots will automatically refresh and display. You can check and modify the interval of tracing frames by Tools > Options > information. Right-click the frame anywhere and you can choose Fit to Window, Original Size, Trace and Full Screen instead buttons above. 7.4. Multi-Screen Monitoring Click menu Monitoring > Multi-Screen, then choose size of the screen matrix, screen snapshots of different monitored computers will automatically refresh and display. You can check and modify the interval of tracing frames by Tools > Options > information. 85 Chapter7 Monitoring Below is a multi-screen monitoring example of monitored computers, showing a screen matrix in 2 x 2. First page of the monitored computers. Previous page of the monitored computes. Next page of the monitored computers. End page of the monitored computers. Auto cycle. Full screen monitoring. Click the icon or double-click the screen of one monitored computer can take full screen. Choose certain computer(s) or computer group(s) to monitor the real-time screen. Close multi-screen monitoring. Right-click on the real-time screen of one certain computer and choose Lock, and you will be able to see the computer screen snapshot on any multi-screen monitoring page. And you can also send message to specified compute via Send notify message. 7.5. Search Screen History Click menu Monitoring > Search Screen History, then specify search conditions including time range and name or IP address and click Search. Records of screen snapshots including ordinal, date, computer, sessions, beginning and ending time will show below and IT managers can quickly find screen history they need. In the following example, screen history records range between March 27, 2012 and March 28, 2012 of computer which IP address is: 192.168.18.125 will display. 86 Chapter7 Monitoring Name or IP address Sessions File name Name: Name of computer you want to search. Support fuzzy query. IP address: A specified IP address or a range of IP addresses are available. Number of computer users. If screen data is stored in SQL database, file name would be <SQL>. If screen data stored in the SCREEN directory, file name would be the same as data of screen. Double-click a certain item or choose one and then click View to view detailed information of certain screen history. 7.6. View Screen History Interface of screen history viewer Double-click a certain item or choose one and then click View button when searching screen history. Screen history viewer is very intuitive and easy-to-use, and comes with powerful search functions. As to screen history viewer's interface, please refer to the picture below. 87 Chapter7 Monitoring 1 Menu Entries to all screen history viewer’s functions. 2 Tool Bar Entries to the most widely used functions in screen history viewer. 3 Search Field Choose search conditions including Application, User and Screen to quickly locate screenshot you need. 4 Time Scales Time scales of screen history. 5 Screen display area Display history of screen snapshot. Click menu Tools > Save As Video Files, and then you can export screen history into video files to your computer. 88 Chapter9 Assets Chapter 8. Maintenance Surveilstar can be used as centralized computer maintenance system to manage and control monitored computers’ hardware and software assets with remote control, having a secure and full remote access to any monitored computer, giving a hand to resolve their computer problems quickly and remotely rather than making long distance suggestions. They also have a freedom to control and manage client through console, including applications, processes, performance, devices, services, disks, shared folders, scheduled tasks, users and groups and software. 8.1. Remote Computer Maintenance 8.1.1. Applications Click menu Maintenance > Applications, then select a certain computer, and SurveilStar will show a list of all running applications with the currently active application displayed in dark blue bold. There are two buttons on the upper right corner of data display area: Sessions. If a computer is logged in two or more users or a user logs on to two or more computers at the same time, administrator can view real-time application list of specified one via this button. Stop track. If you click this button, application list of monitored computer will automatically refresh and display. You can check and modify the interval by Tools > Options > information. End Task IT manager can end application tasks through console remotely. Select application not available and right-click then choose End Task to close specified application. 8.1.2. Processes Click menu Maintenance > Processes, then select a certain computer, and SurveilStar will show a list of all running processes including File Name, PID, Time, Session ID, CPU, CPU Time, Memory, Virtual memory, priority, Handle, Thread Count and Path. There are two buttons on the upper right corner of data display area: Sessions and it is available only in user mode. If a user logs on to two or more computers at the same time, administrator can view real-time processes list of specified one via this button. Stop track. If you click this button, process list of monitored computer will automatically refresh and display. You can check and modify the interval by Tools > Options > information. End Process IT manager can end processes through console remotely. Select process not available and right-click then choose End Process to close specified process. 89 Chapter9 Assets 8.1.3. Performance Click menu Maintenance > Performance, then select a certain computer, and SurveilStar will show a list of its performance including CPU Usage, Memory Usage, Sum, Physical Memory, Commit, and Kernal Memory. There are two buttons on the upper right corner of data display area: Sessions and it is available only in user mode. If a user logs on to two or more computers at the same time, administrator can view performance of specified one via this button. Stop track. If you click this button, performance of specified computer will automatically refresh and display. You can check and modify the interval by Tools > Options > information. 8.1.4. Devices Manager Click menu Maintenance > Devices Manager, then select a certain computer, and SurveilStar will show a list of hardware devices on the client machine including CPU, Disk drives, Keyboards, Network adapters and System devices and so on. There are two buttons on the upper right corner of data display area: IT manager can select modes to display the list. Currently there are two modes available: display by type and display by connection. And you can also choose to display hidden devices or not via this icon. Sessions and it is available only in user mode. If a user logs on to two or more computers at the same time, administrator can view and manage devices of specified one via this button. Enable or Disable Devices IT manager can enable or disable devices through console remotely. Select certain device and right-click then choose Enable or Disable to manage devices of client machines. 8.1.5. Services Click menu Maintenance > Services, then select a certain computer, and SurveilStar will show a list of system services on the client machine including Name, Description, Status, Startup Type, Log on identity and Path. There is one button on the upper right corner of data display area: Sessions and it is available only in user mode. If a user logs on to two or more computers at the same time, administrator can view and manage system services of specified one via this button. Start or Stop Services IT manager can start or stop services through console remotely. Select certain service and right-click then choose Start or Stop to change status of the service of agent machines. You can also right-click and choose a startup type to specified service from the three types: Automatic, Manual and Disabled. 8.1.6. Disk Click menu Maintenance > Disk Management, then select a certain computer, and SurveilStar will show a list of disk partitions and usage of client machine including Volume, File System, Capacity, Free Space 90 Chapter9 Assets and %Usage. There is one button on the upper right corner of data display area: Sessions and it is available only in user mode. If a user logs on to two or more computers at the same time, administrator can view disk condition of specified one via this button. 8.1.7. Shared Folders Click menu Maintenance > Shared Folders, then select a certain computer, and SurveilStar will show folders shared condition of client machine including Folders, Path, Agent Connections and Comment. Shares Sessions Open Files Sessions Display with folders shared by certain monitored and IT manager can stop sharing by right-clicking specified items. Display with detailed information about remote machines which access to shared folders on certain agent computer, including User, Computer IP address, Type of Operating System, Open file Quality, Connected Time, Idle Time and Guest. IT manager can close the session or close all sessions by right-clicking specified items. Display with files opened by remote accessing computers and show detailed information including Name of Open file, Assessed By, Locked and Mode. IT manager can close the open file or close all open files by right-clicking specified items. It is available only in user mode. If a user logs on to two or more computers at the same time, administrator can view and manage real-time shared folders of specified one via this button. 8.1.8. Scheduled Tasks Click menu Maintenance > Scheduled Tasks, then select a certain computer, and SurveilStar will show a list of scheduled tasks of client machine including Name, Schedule, Application, Next Run Time, Last Run Time, status, Last Result and Creator. There is one button on the upper right corner of data display area: Sessions and it is available only in user mode. If a user logs on to two or more computers at the same time, administrator can view scheduled tasks of specified one via this button. Delete Task IT manager can delete illegal scheduled tasks through the console remotely. Select certain item and right-click then choose Delete to manage scheduled tasks of agent machines. 8.1.9. Users and Groups Click menu Maintenance > Users and Groups, then select a certain computer, and SurveilStar will show local users with Name, Full Name, Description and groups of users with Name and Description. There is one button on the upper right corner of data display area: 91 Chapter9 Assets Sessions and it is available only in user mode. If a user logs on to two or more computers at the same time, administrator can check users and groups of specified one via this button. 8.2. Remote Control and Remote File Transfer By setting the remote control policy, client machine can choose whether to be remote controlled and if enabled, select the controlling type. There are two types: Remote Control and Remote File Transfer. 8.2.1. Remote Control Remote control allows IT managers get access to any monitored computer and give a hand to quickly resolve their computer hardware and software problems remotely as if they were standing right there. Once connected, the administrators will be able to view desktop screen of client machines. They then have a freedom to control client through console, viewing the machine malfunctions remotely and fixing the system problem quickly. Select a certain computer, then click menu Maintenance > Remote Control. There are two types to remote control and you can choose one from:User Authorization and Password Authorization. User Authorization Select a computer and click menu Maintenance > Remote Control, then a confirmation dialog box will show and then click yes. Then a dialog box will pop up on the remote desktop and ask for permission. Password Authorization For password authorization you should set a remote control password on the client machine first. The method is to press keybords“shift + alt + ctrl” at the same time and then input “ocularrm”, then a password input box will show then input the password and click OK. Select a certain computer and click menu Maintenance > Remote Control, and then input the password. If it matches, you can control the specified client successfully. Interface of Remote Control If the client machine is being remote controlled, it is "Remote Controlling…" that would show on the upper right corner of the screen. Control the display of color. Lock and unlock keyboard and mouse of client computer being controlled. Control whether to allow clipboard operations between the console and the client computer. Right-click the window title of the remote control interface you can send "Ctrl-Alt-Del", "Ctrl-ESC" or "F12" instruction if you need. 8.2.2. Remote File Transfer Remote file transfer allows IT managers to easily and quickly connect to remote monitored computers and transfer files without other tools. 92 Chapter9 Assets Select a certain computer, then click menu Maintenance > Remote File Transfer. There are two methods the same as remote control: User Authorization and Password Authorization. Interface of Remote File Transfer As to interface of remote file transfer, please refer to the picture below. File Do some simple operations, including new folder, rename and delete. Be at root directory or when the file is transferring cannot make such operations. Transfer Transfer files from local to remote. Transfer files from remote to local. Abort Transferring. Specify path of local and remote machines and choose files need to be transferred, then click Transfer > Local to Remote on menu or click this icon. Files can transfer from local computer to remote one successfully. Specify path of the local and remote machines and choose files need to be transferred, then click Transfer > Remote to Local on menu or click this icon. Files can transfer from certain remote computer to the local one successfully. When transferring you can click menu Transfer > Stop or click this icon to abort and it will display information with file transfer fails. View Support to view as Large Icon, Small Icon, List and Details. Local view and remote view should not be at root directory, or cannot transfer files remotely. Note: Even you have set password on client you can get remote control through User Authorization. But if you have created a remote control policy, and set remote control to allow mode and checked authorization is required, you choose user authorization as the only method to remote control and remote file transfer. 93 Chapter9 Assets Chapter 9. Assets 9.1. Assets Classes Management SurveilStar assets management provides IT manager a better way to administer company assets including software and hardware, providing a comprehensive assets change report to IT manager with the information of Operation Type, Time, Computer, Group, Type and Description and so on. It does help to find out any abnormal change and take actions to prevent any potential harm. 9.1.1. Description of Asset Classes and Asset Properties Asset Classes Asset classes of client machines include class of computer, hardware, software and custom. Computer Hardware Software Some description of client computers, including User, computer name, etc. Hardware classes of client machines including CPU, Memory, Modem, Disk, etc. Software classes of client machines, including Antivirus, Application, Microsoft Patches, OS Windows, etc. Custom Define assets that cannot be automatically monitored, such as switches, routers, desk, etc. Asset Properties Asset properties include class property and instance property. Class property Instance property Statistical properties of certain class of assets. Specific instance properties of an asset class. Note: 1. Computer class only includes class property because there is always only one computer. 2. Software class and hardware include both class property and instance property. 3. Custom class only includes instance property because assets belong to it are user defined. 9.1.2. Asset Classes Management Asset classes management will display all properties of different asset classes. Administrator can view all the attributes of a certain class of asset or manually add asset property. Click menu Assets > Asset Classes Management, then the asset classes management window will show with all assets on the left and a list of properties on the right. Property in the black font is class property and in the blue font is instance property. 94 Chapter9 Assets There are five types of properties showed with different icons. Text. Integer. Decimal. Date. Yes or No. Add Asset Click menu Operation > Add Asset, then Administrators can define assets that would not be automatically monitored. Add Property In addition to system-defined properties for assets, administrators can manually custom attributes Choose specified asset, Click menu Operation > Add Property, then you open the Asset Property window. Choose a property type, give a name to the new adding property and click OK, then you add a new property to the asset successfully. 95 Chapter9 Assets 9.2. Hardware and Hardware Changes 9.2.1. Hardware View Hardware assets information Click menu Assets > Hardware, then SurveilStar will show a list of all monitored computers with information of Computer Name, CPU, Memory, Disk Drive, and Network Adapter. Double-click a certain computer or choose one and then right-click and choose property, then you can get detailed hardware information of specified computer. Choose certain hardware asset you would like to know and its properties will show on the right. You can add new property to custom assets via Operation > Property. You can view other assets via Show > All or Show > Software. Query Hardware Assets Click query button “ ” on the upper right corner of hardware asset display area and specify search conditions including name, range, conditions and result lists to search specific hardware assets. 96 Chapter9 Assets Range Range about compute. It is computers within the whole network by default, and you can click {…} to choose one certain group of computers. Add button. Click this button you open a window for condition setting including properties, logic and value. Delete button. Delete conditions setting. View and modify conditions setting. Match any condition Result Lists If you check this option, results matching any of the condition will display. Choose asset properties you need to display. Save Input a name to the query condition and click Save button, then you can directly choose from the Name drop-down box to find setting you saved before. Delete Delete certain query conditions you saved. Set Default Set the query condition to be a default one and it will only display the default query results next time you open assets management. Note: If you have chose instance properties of a certain asset to the query condition or the result list, you cannot add instance properties of another asset. 9.2.2. Hardware Changes View Hardware Changes Click menu Assets > Hardware Changes, then SurveilStar will show a list of computers which hardware 97 Chapter9 Assets changes with information of Type, Time, Compute, Asset and Description. Double-click a certain computer or choose one and then right-click and choose property, then you can get detailed hardware change information of specified computer. Query Hardware Changes Click query button “ ” on the upper right corner of hardware changes display area and specify search conditions including time, range, asset type, change type and content to search specific hardware changes. 98 Chapter9 Assets 9.3. Software and Software Changes 9.3.1. Software View Software assets information Click menu Assets > Software, then SurveilStar will show a list of all monitored computers with information of Computer Name and its Operating System. Double-click a certain computer or choose one and then right-click and choose property, then you can get detailed software information of specified computer. Query Assets Click query button “ ” on the upper right corner of software asset display area and specify search conditions including name, range, conditions and result lists to search specific software assets. 9.3.2. Software Changes View Software Changes Click menu Assets > Software Changes, then SurveilStar will show a list of computers which software changes with information of Type, Time, Compute, Asset and Description. Double-click a certain computer or choose one and then right-click and choose property, then you can get detailed software change information of specified computer. Query Software Changes Click query button “ ” on the upper right corner of software changes display area and specify search conditions including time, range, asset type, change type and content to search specific software changes. Note: Software and Software Changes is just the same as hardware asset that was previously discussed. Please check last section Hardware and Hardware Changes for more information. 9.4. Custom Assets After defining new asset classes or adding new properties, click menu Assets > Custom, then you can add properties or delete to better manage specified assets. There are three buttons on the upper right corner of custom asset display area. Query button Specify search conditions including name, range, conditions and result lists. Add button Click this button to add properties to custom assets. Delete button Delete properties of certain custom assets. 99 Chapter10 Categories Chapter 10. Categories Sort your applications, websites, time types, network address and network ports into categories. 10.1. Application Categories By default, all applications will be divided into two categories: unclassified and systems, which are all can't be deleted or renamed, and sub group can't be created. According to different requirements, IT manager or supervisor can easily sort applications into different classes for convenient management. Systems Applications which are associated with operating system. In order to avoid serious problems, system related applications are alone in one group to separate from others and IT manager can move them to other categories. Unclassified All applications that are not match to any classification. IT manager can move them to other categories. Click menu Categories > Application, then you will see a window shows detailed application categories information with all the categories on the left and detail information of specific class on the right. You can add, delete, find, move to and show properties if you need to better manage applications. Add Delete Find Choose root directory of application categories and then click the icon or right-click and choose Add to create a new category and enter a name for it. Choose certain category and add sub categories the same as above. If you want to delete specific category, sub category or certain application, click the icon or right-click on the item and then choose Delete. Click the icon to search a specific application and its category via any of these three attributes: name of the application, file name and description. 100 Chapter10 Categories Property Move to Double-click a certain application or choose one and then click this icon, then you can get detailed application information about the application as the picture below. Right-click on selected application or category and click Move To…, select target group and click OK. You can use SHIFT or CTRL key to move multiple applications or categories at one time. 10.2. Website Categories Click menu Categories > Websites, then you will see a window shows website categories information with all the categories on the left and detailed websites on the right. All website categories and website identities should be added manually. You can add, delete, find, move to and show properties if you need to better manage websites. Add new category Add new website identity Delete Find Choose root directory of website categories and then click the icon or right-click and choose Add to create a new category and enter a name for it. Choose certain category and add sub categories the same as above. Choose a certain category and then click this icon or right-click and choose Add > Website; enter a name and the website address to add new website identity. Support wildcard. If you want to delete specific category, sub category or certain website, click the icon or right-click on the item and then choose Delete. Click the icon to search a specific website and its category via any of these three attributes: name of the application, file name and description. 101 Chapter10 Categories Move to Right-click on selected website or category and click Move To…, select target category and click OK. You can use SHIFT or CTRL key to move multiple websites or categories at one time. 10.3. Time Types Categories Click menu Categories > Time Types, then you will see four default time types: All Day, Working Time, Rest and Weekend. The administrator can modify these time types according to business actual working hours. Click on a certain type to view time period and edit the range. Blue shows the time range belongs to specific time class. For example, in the picture above, working time hours are from 9.00 am to 6.00 pm from Monday to Friday. In the time setting area on the right, you choose the time range first and then set it to be blue or white. You can click All to choose the whole day or click Mon to Sat to choose a specific day, or you can choose anytime of all days and then set it to be blue or white. In addition to the system defined categories, the administrator can add and manage additional time categories. Add Delete Click this icon to add an additional time category and enter a name to it. The default time range is all, you can manually edit the time period if you need. Click this icon to delete time categories you added. Note: You cannot delete the four default time types. 102 Chapter10 Categories 10.4. IP Categories Click menu Categories > IPs, then you will see three default IP categories: All, Intranet and Internet. The system will automatically generate the IP address range of Intranet according to the server’s IP, and administrator can modify the range of Intranet and system will automatically generate another IP address range for Internet. IP addresses outside the Intranet are considered as Internet IP In addition to the system defined IP categories, administrators can add and manage additional IP categories and enter an IP address range. Add Delete Click this icon to add an additional IP category and enter a name to it. Click this icon to delete IP categories you added. Note: LAN and Extranet are not showed in the IP categories but do in the Traffic Statistics, Network Advanced Policies and Bandwidth Advanced Policies. 10.5. Port Categories Click menu Categories > Ports, then you will see seven default categories: All, ICMP, TCP, UDP, Email, Web and Network share. 103 Chapter10 Categories You are only allowed to modify and manage the port range of Email, Web and Network share categories but not to the others. In addition to the system defined Port categories, administrators can add and manage additional Port categories and enter a port range. Add Delete Click this icon to add an additional Port category and enter a name to it. Click this icon to delete Port categories you added. 104 Chapter11 SurveilStar Tools Chapter 11. SurveilStar Tools 11.1. Email Notification Settings SurveilStar can send alerts to specific mailbox once setting email notification, helping IT manager to better administer usage of computers and assure their security whitin the enterprise. 11.1.1. Settings of Email Notification Server Before using the email notification function, administrators should set the email notification server first by clicking menu Tools > Options, and then choose Settings of Email Notification Server. There are six buttons on the upper right corner of the list. Add Delete Modify Click this button to create a new mail server. Click this button to delete specific mail server. View and modify specific mail notification server. Sort up Move up the currently selected mail server. Default setting would maintain at the bottom of the list and cannot be moved. Sort down Move down the currently selected server. Default setting would maintain at the bottom of the list and cannot be moved. 105 Chapter11 SurveilStar Tools Make Default Setting Cancle default setting Make the currently selected mail server to be the default one. Once successfully, color of the default mail server would turn blue and the Matched Email would change to <All> automatically. Cancel default setting of specific mail server. Note: From top to bottom to match the mail server settings. And if the rule matches, use this setting to send a mail. If all of the settings do not match, would not send any mail. Create a new mail server: Configuration Name Server IP Port Give a name to the email notification server. The console will add a default name automatically and administrators can customize it. IP Address of the mail server. Port of SMTP. The default one is 25. SMTP Account SMTP account. Password Sender Address Password of the SMTP account. Address of the sender mailbox to send alert messages. Display Name Display name of the sender. Mailbox Collection Mailbox collection used to receive alert messages. Separated with ";". 106 Chapter11 SurveilStar Tools 11.1.2. Email Notification Settings Click the menu Tools > Email Notification Settings, administrators can view, add and modify the settings. Add Delete Click this button to create a new email notification setting. Click this button to delete specific email notification setting. Create a new email notification setting: Name Email Subject Max No. of Alerts Min Alert Level Send Interval (Min) To Send Test Email Send as attachment Unzip Password Give a name to the email notification setting. The console will add a default name automatically and administrators can customize it. Give subject to the report sending mails. Each mail contains a maximum number of alert information. Alert Exceeds the number will be sent in next mail. The default value is 100. Choose one of the three alert level: Low, High and Critical. Specify the time interval for sending mails. The default value is 30(Min). Email address to receive the alert notification. Test the mailbox above can receive alert notification mail or not. Check this to send notification mails as attachment. If not, mails will send as text. Send a zip file as an attachment and the file can unzip it with the password. 107 Chapter11 SurveilStar Tools Alert Type Computer Range Select alert type from the alert type list including Application Policy, Website Policy, and Printing Policy and so on. Specify computer range of email notification. User Range Specify user range. 11.2. Accounts Management System administrators have the highest authorities and can use all the functionality within the system. They can allow other managers to perform certain management functions by creating new administrators. Click menu Tools > Accounts (M)…, then the accounts management window will show with all the currently existed administrators on the left and 4 functional modules on the right. Add administrator accounts. Delete administrator accounts manually added. System administrator “Admin” is not allowed to delete. Change password. The 4 functional modules are General, Authorities, Computer Group and User Groups. 108 Chapter11 SurveilStar Tools General Specify type of administrators and logon conditions. Authorities Specify authorities of non-system administrator accounts. Computer Groups/ User Groups Specify management range of non-system administrator accounts. Only can assign one of Computer Groups and User Groups, which means if you specify the computer groups you are not allowed to select user groups. If you choose all the groups of computers, you choose all the user groups also. Authorities of administrator: File Control Statistics Log Policy Authority to operate computers and users. Including: Add Computer/ User Group, Delete Computer/ User Group, Rename Computer/ User Group, Move Computer/ User Group, Move Computer/ User, and Rename Computer / User and other authorities. Authority to control agents. Including: Notify, Lock/ Unlock, Log Off, and Power Down/ Restart and other authorities. Authority to view statistics results. Including Application Statistics, Website Statistics and Traffic Statistics. Authority to view specific logs. Including Basic Events Log, Application Log, Web Log, Document Operation Log, Printing Log, Asset Changes Log, Policy Log, System Events Log, Backups and Shared File Log. Authority to view and modify policies. Including: Basic Policy, Application Policy, Website Policy, Device Policy, Screen Monitoring Policy, Bandwidth Policy, Logging Policy, Email Policy, IM File Policy and other policies. 109 Chapter11 SurveilStar Tools Monitoring Maintenance Authority to view and export results of monitoring. Including: Screen Snapshot, Email, Instant Message View Screen History, and Export Screen History. Authority of maintenance operation to remote computers. Including: View Remote Information, Remote Operating, Remote Control and Remote File Transfer. Assets Management Authority of assets management. Including Query, Define Asset Property, Modify Asset Property and Software copyright Management. Computer Management All Classes Management Authority of computer management. Authority of categories management. Including: Application Categories, Website Categories, Time Type, IP Categories and Port Categories. Authority to delete specific records. Including Delete Logs, Delete Instant Message and Delete Emails. Delete Backup Authority to backup and review logs. Setting Authority to set agent search range and exclude range of the agent. Generate confirmation code for agent Authority to generate confirmation code for agent. Email Report Agent Update Management Authority to send email report. Authority to update agents. 11.3. Computers Management There would be many agent computers in a company and it would be quite difficult to get information of each one or to control all the agents without computer management function. And sometimes we need to quickly check number of currently used license and the scope. Computer management helps IT management to better control computers within the whole network. Click menu Tools > Computers…, then the computers management window will show with the entire agent installed computers and their detailed information. 110 Chapter11 SurveilStar Tools Administrators can delete or uninstall one or more agents to better manage the licenses. Delete Uninstall Click this button to delete needless agents. Deletion will uninstall the agent while reducing the number of license. Click this button to uninstall needless agents. Uninstallation will not reduce the license quantity. Condition Administrators can quickly locate computer information needed based on the query conditions. All Search all computers installed agent module by default. By IP address Search agent computers by a specific IP range. By last appeared date Set the date range and search agent computers if the last appeared date included in the range. Help to quickly search computers which do not appear for a period of time. By agent ID Search computer by a unique agent ID. By name Search computer by computer name. Support fuzzy query. Offline for days (>=) Search computers which have been offline for certain days. PC Authorization Info This icon indicates that the computer license is authoried. Computers without this icon means outside the license range. Name Computer name showed in console. ID ID number of agent computers. Each computer gets an ID from server to be the only sign of that computer. IP Address IP address of agent computers. MAC Address MAC address of agent computers. Group of Agent Group of agent computers. 111 Chapter11 SurveilStar Tools Last Appeared Last appeared date of agent computers. Version Agent version information of monitored computers. Days Offline Days offline of agent computers. PC Identification Info Detailed information of specific PC includes OS, Hard Disk ID, MAC Address, Computer Name and First Appeared Time. Authorities Check purchased and currently used license quantity. 11.4. Alert Management Computer alert helps IT management to know what happen in the whole network and quickly locate the problem and ensure security within enterprise. Click menu Tools > Alert, then the Alert window will show with detailed alert information, including Alert Security, Time, Computer, Group, User, and Policy Type. Real-time alert would display up to 500 records by default. Administrators can adjust the number of alerts will be displayed via Tools > Options > Real-time Alert > Alert Window. Note: 1. Alert information records real-time alert data, which means that if you turn off the console or re-logon to the console will automatically clear all records. Administrators can query the alert information via Logs > Policy. 2. Administrators can choose pop up alert bubbles when alert occurred via Tools > Options > Real-time Alert > Bubble Settings. Then alert information will pop up on the lower right corner of server computer. 11.5. Server Management SurveilStar Server Management includes Backup Management, Category Sync Management, Server Time 112 Chapter11 SurveilStar Tools Management and Agent Update Management. 11.5.1. Backup Management Backup Task Click menu Tools > Server Management > Backups Management, then the Backup Management window will show with currently existed backup task and detailed information. Click New Backup Task button, then choose data type, date range and backup path and then click OK, backup will start. All backup files will automatically be named according to the end date. As the example below, all data from May 1th to May 6th in 2012 will be backed up to E:\SurveilStar\ with the default name: SurveilStar_DATA_20120605.MDF. If you need a duplicate backup, select a different storage path. 113 Chapter11 SurveilStar Tools Note: You can choose whether to delete original data or not but should be careful enough. Once delete, you cannot check records you deleted on the console unless you load the backup data. Load Administrators can load backup data into database to restore backup data, and will not undermine existing data in SQL server. Load Backup Click menu Tools > Server Management > Backups Management and choose Load, then the Backup Management window will show loaded backup records with date, path and size. Click Load Backup button, then choose path of backup files and select data need to load and then click Load and OK to start loading backups. You can load up to 12 backups at the same time. Remove Backup: Choose one or more backup files do not need and click Remove Backup to delete. 11.5.2. Category Sync Management Click menu Tools > Server Management > Category Sync Management to check synchronize information, including Computer, IP Address, Application Identity, Website Categories, Website Identity, IP Categories, Port Categories and Time Type. 114 Chapter11 SurveilStar Tools There are two buttons on the upper right corner. Category Last Modified. Query 11.5.3. Click the button to check last modified time of all categories and libraries. Click the button and select computer range, category/library, synchronized state and agent state to query specific synchronize information. Server Time Management The stability and security of server will be seriously affected as much functionality depends on the accuracy of server time. If server cannot validate accuracy of server time, click menu Tools > Server Management > Server Time to confirm the current server time is correct, and then click Trust. 115 Chapter11 SurveilStar Tools 11.5.4. Agent Update Management Click menu Tools > Server Management > Agent Update Management, select computer range and update the agent version to the latest or lower version. 11.6. Agent Tools SurveilStar Agent Tools includes Confirm-Code Generator and Agent Offline Utility. 11.6.1. Confirm-Code Generator When the agent computers fail to connect to the server, for example, disable the network card or a business trip, but temporary need to clear policies or uninstall the agent, by now is unable to establish the corresponding strategy through console. Users can directly make use of agent tools to temporary clear all policies, unlock agent, clear security password and uninstall agent through Agent Tools. As to the detailed steps, please refer to the chapter: Uninstall SurveilStar. 11.6.2. Agent Offline Utility When the agent computer is offline and permanently need to uninstall agent or clear all policies for agent, clinking menu Tools > Agent Tools > Agent Offline Utility. 116 Chapter11 SurveilStar Tools 11.7. Options Click menu Tools > Options to view and modify the default values of console and server. 11.7.1. Console Settings Log Viewing Log Query Result Number of records display per page. The default value is 20. Close Settings Choose whether to minimize all windows to the system tray area or close program and whether to prompt box when closing the main window. Real-time Info Screen Monitoring Maintenance Remote Control Set time interval to track frames. The default value is 2 Sec. Set time interval to jump to next monitored computer automatically. The default value is 30 Sec. Set time interval to refresh application list. The default value is 2 Sec. Set time interval to refresh process list. The default value is 2 Sec. Set time interval to refresh performance info. The default value is 2 Sec. Choose whether to lock remote PC’s keyboard and mouse and whether to control remote PC or not by default. Real-time Alert Alert Window Number of alerts will be displayed. The default value is 500. Bubble Settings Choose whether to pop up alert bubble or not when contrary to policies. Specified severity level from one of the three levels: Low, High and Critical. Alert Offline Alert Choose whether to alert when agent offline. If so, specify days to pop up alert message if agent is offline over the specified days. 117 Chapter11 SurveilStar Tools Abnormal Agent Alert 11.7.2. Choose whether to alert when there is abnormal agent. Server settings Data Cleanup Global Setting Custom Settings Management Range Search Range Exclude Range Connection Bandwidth settings between server and agent Active Poling Directory Directory Objects: Directory Settings: Keep all data: All data will keep in the SQL server. Keep all data within the specified number of days. Specify days between 5 and 365. Set different days for keeping for different data type from one of the three settings: Global Setting, All and Custom. Global Setting: Follow the global setting. All: Keep all data of specific data type. Custom: Specify days to certain data type. Specify a search range. When there is agent not actively connected to the correct server, the server would start initiative polling, searching agents in the range. Specify an exclude range. Agents in the range are not allowed to connect to the server. Specify the limit sending and receiving speed between server and agent. Generally use in VPN networks. If enable, the server will take initiative connection to agents within authorized licenses by port 8235. Records including data, cache, emails, screen, backups and print are stored in following default installation path and directories: DATA, ZTEMP, MAIL, SCREEN, DOC and PRINT. Administrators can change the directory, but the previous data will not move to the new one automatically. Need to stop the service first and move manually and then restart the service. In our latest version 3.24, we store many records in SQL Server directly and do not use directories: MAIL、SCREEN、DOC、PRINT any more. Restore default directory: Restore current contents to the default installation path. New directory settings: Click the button and choose a new path to specific data type. Please note that: New settings will not be effective until the server is restarted. Performance Fixed Mode Dynamic Mode Set the process capability of server. The range is between 0 and 100. Server will change the process capability dynamically based on the load. Choose process mode of server from one of the three levels: Normal, Low and High. Normal: The average occupancy rate of the server for the database process is 30%. Low: The average occupancy rate of the server for the database process is 10%. High: The average occupancy rate of the server for the database process is 50%. In General, in the dynamic mode, the better the performance of server is, the more the process capabilities are. 118 Chapter11 SurveilStar Tools Error Log Logs > System Event Automatically Remove Agent 11.7.3. Only when you enable the function can check error logs while agent is being validated in the console by clicking the menu. If enable, choose a lowest level of error message to log from one of the five: All, Low, Moderate, High, and Critical. All: Log all error messages. Low: Log when response from agent is not expected results. Moderate: Log when license is unauthorized. High: Log when Serial Number is wrong. Critical: Log when computer excludes the range and cannot get server verification. The stability and security of server will be seriously affected as much functionality depends on the accuracy of server time. If server cannot validate accuracy of server time, click menu Tools > Server Management > Server Time to confirm the current server time is correct, and then click Trust. Choose whether to remove agents automatically when they not logged on for some days. If enable, choose a lowest level of error message to log from one of the five: All, Low, Moderate, High, and Critical. If so, specify days to remove if agents not logged on over the specified days. Settings of Email Notification Server This part has detailed description in Email Notification Settings. Please check 119