1
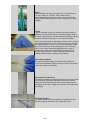
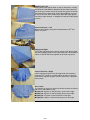
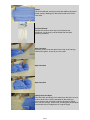
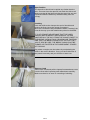
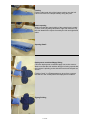
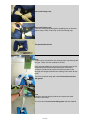
APCO AVIATION
USER MANUAL
Mayday
INDEX
Introduction
Disclaimer & Warranty
Description
Specifications
Maintenance
Packing
Preliminary Notes
Tools and Equipment
Airing, Layout and Folding
Fitting to Deployment Bag
Deployment
Using your Mayday
Introduction
Even pilots flying the safest paragliders or hang gliders, can sometimes find themselves with
their glider damaged, disabled or tangled and out of control. In such cases a reliable
emergency system with a fast opening parachute can make the difference between a simple
scare and a fatal accident. Your emergency system has been designed for a fast opening at a
low air speed. Do not, under any circumstances use this emergency system for free fall
parachuting.
APCO is happy and proud that its emergency systems, developed and perfected over nearly
three decades have saved the lives of many pilots, from beginners to world champions. This
manual describes 6 such emergency systems: three for paragliding and three for hang gliding.
WARNING
Your emergency system has been designed for a fast opening at a low air speed. Do not,
under any circumstances use this emergency system for free fall parachuting.
Disclaimer of Liability and Warranty
In designing and manufacturing the Mayday parachutes and any of its subassemblies or
accessories, our aim has been to create a rescue system that will allow the user to engage in
the sport of paragliding or hang gliding in a safe and confident way.
However, both paragliding and hang gliding are high risk activitie, which may cause or result
in serious injury or death. When you take it upon yourself to participate in one or both of these
sports, you accept the risk inherent therein. You may reduce the risk by receiving proper
instruction and by following the basic safety requirements. The Mayday Reserve Parachute
System is a sensitive device, which may easily be damaged. Before each flight, the container
should carefully be inspected for evidence of damage or wear and propper closure. Any
deviation from the manufacturers specifications concerning maintenance, repair, alterations
and modifications constitutes willful negligence. It is expressly understood and agreed that by
the use hereof by the buyer or any subsequent user that Apco Aviation Ltd. And/or the seller
shall in no way be deemed or held liable or accountable and makes no warranty, either
expressed or implied, statutory, by operation of law or otherwise, beyond that expressed
herein. Paragliding and Hang gliding equipment is sold with all faults and without any warranty
of merchantability or fitness for any purpose, expressed or implied. Apco Aviation Ltd.
1 of 16
Disclaims any liability in tort for damages, direct or consequential, including personal injuries,
resulting from a malfunction or from a defect in design, manufacturing, materials or
workmanship, whether caused by negligence on the part of Apco Aviation Ltd. or otherwise.
By using any Paragliding or Hang gliding equipment manufactured or sold by Apco Aviation
Ltd., or allowing it to be used by others, the buyer and/or user waives any liability on the part
of Apco Aviation Ltd., for personal injuries or any other damages arising from such use.
The liability of Apco Aviation Ltd. is limited to the replacement of defective parts found under
examination by manufacturer to be defective in material or workmanship within 120 days after
purchase, and which has not been caused by an accident, striking, improper use, alteration,
tampering, excessive use, misuse or abuse. The damages of the buyer and/or user shall be
deemed liquidated in the costs of replacement as above.
Description
The Apco Mayday series of parachutes are flat circular pull-down apex reserves. This means
that in addition to the conventional lines around the perimiter (skirt), there is a single line in the
center pulling the apex down to the level of the skirt running from the apex to the bridle. The
main line attachments to the skirt are reiforced with V-Tabs, and the skirt and apex skirt are
reinforced with 1'tape, and sewn with a four needle machine for an exact finish. This proven
design offers the best combination of sink-rate, deployment speed, packing size and weight.
Specifications
Mayday
16
18
20
Bi
25m2
30m2
37m2
47m2
16
18
20
18
Line Length
4700mm
5150mm
6720mm
5875mm
Center Line Length
4700mm
5150mm
7300mm
6310mm
Weight
1.863kg
2.220kg
2.690kg
3.250kg
Sink Rate
6.1 m/s
5.4 m/s
5.4 m/s
5.4 m/s
Max Load
Up to 106kg
75 - 120kg
100 - 160kg
120 - 200kg
DHV
SHV
AFNOR/CEN
AFNOR/CEN
Area
Gores
Certification
Maintainance
The materials we use to manufacture the Mayday range of parachutes are carefully selected
from the best mil. spec. products available on the market today. These materials are however
sensitive to sunlight (UV). The container or harness will protect the canopy from ultra-violet
rays. When storing the parachute it should be kept in a cool dry place. Beware of mildew.
Should your parachute be exposed to any moisture, it must be opened and air dried, out of
direct sunlight, and repacked when completely dry.
Cleaning
If your parachute requires cleaning, it should be soaked in luke warm water with a little mild
soap. No rubbing or scrubing of the canopy fabric! It should then be thoroughly and repeatedly
rinsed with fresh water and allowed to drip dry out of direct sunlight.
Repairs
Should your Mayday parachute require any repairs or you suspect it may be damaged, it must
be refered back to APCO Aviation Ltd. or a professional parachute loft, with a certified
parachute rigger to carry-out the repair.
Periodical Repacks
Even though the Mayday Emergency System should remain in good condition and work
2 of 16
properly over a number of years, we strongly reccomend that the parachute be repacked by a
qualified person once every six months. Packing by a unqualified person is undertaken at the
pilots own risk, and is not recomended by Apco.
Identification
In the corner where the #1 suspension line meets the skirt, there is an Apco stamp, along with
the individual serial number, canopy type and manufacture date. This data is repeated on a
label attached to the bridle in post 1995/6 models. In any correspondence to apco regarding
your Mayday, please quote this information.
Attachment Procedure
There are many different harnesses on the market today, with several diffetent reserve
stowing systems. Make sure your harness is certified and has a adequate instruction manual.
For attaching and fitting your reserve to your harness follow your harness manual instructions
carefully.
Prelimanary Notes on Packing
The following Instructions apply to ALL models of the Mayday Range, unless otherwise stated.
When first delivered, your new emergency parachute system has been inspected and packed
by Apco or an Apco approved dealer and is ready for use. The following set of folding
instructions is intended for a qualified packer familiar with conventional parachute packing, to
guide him/her in packing of these particular types of parachutes.
The Modularity of Apco Emergency Systems
Although the above specifications list eight separate types, with slightly different innier and or
outer containers, the "heart" of the system, the parachute and its bridle, are only a
combination of four different parachutes, and three different types of bridles:
Parachute
The smallest, MD16 parachute, for a maximum hook-in weight (pilot, glider, harness, and
emergency system) of 106kg; the MD20 for a maximum hook-in weight of 120kg; the MD20
for up to 180kg and the MD Bi Tandem parachute for a maximum of 220kg.
Bridle
Short: About 30cm in length, for solo paragliding systems, because of the short distance
between the packed parachute, and its attachment point to the harness (the parachute is
designed to open slightly below the paragliding canopy). Long: About 6 meters in length, for all
hang glider systems, due to the need of clearing the glider frame on opening. V-Bridle: For
Tandem Paragliding systems. This brildle is attached to the top of the spreader system, sothat
both pilot and passenger is suspended at a equal height.
Tools and Equipment
Table
Although the Maday can be folden on the ground, provided it
is smooth and clean, the best arrangement is to use a long
table, or several tables placed end to end, with a smooth
surface, 8m long, 1m wide and about 80 cm high. At each
end of the table there should be a hook-up point for attaching
and tentioning the reserve. Woodwork clamps work well.
3 of 16
Comb
This is a wooden board with a row of two groups of 11 nails
each, which serves to keep the lines separated and in
correct order during folding. The nails protrude about 20mm
above the board. The central gap between the two groups of
nails is 20mm. The general nail spacing is 10mm. The board
measures approximately 30cm long, 7-10cm wide and
around 20mm thick. The board and the nails should be
smooth, without any sharp corners or edges that may
damage the parachute or lines.
Clamps or weights
Six lightly spring-loaded clamps, such as paper clamps are
ideal. It is also possible to use weights, such as small
sandbags, solid weights or even books. Whichever you use,
they should have smooth edges and no sharp corners.
Carabiners
It is usefull but not essential to have two carabiners for
attaching the apex and lines to the table hook-up points.
Some string such as glider lines will also do.
Tie-down Straps (2)
This is also usefull but not necesarry, it is used to tension the
lines. Some rope or line will suffice.
Airing, Layout and Folding
4 of 16
Airing
Before starting the repack procedures it is recomended to
"air" the canopy for 24 hours. This is best done by
suspending the canopy from its apex, from a point on the
ceiling. This should be done in a cool dry place out of direct
sunlight.
Layout
Lay the extended canopy on the table as shown. Attach a
carabiner through all the apex lines and through the loop of
the center apex line (the one that leads to the bridle). clip this
carabiner to the hook-up point on one side of the table.
One of the gores bears an Apco tag in a lower corner, next to
the attatchment point of a line. This is the No.1 line. The first
and Last lines (No.1 and 16, 18 or 20) are numbered in this
way on all parachutes. The remaining lines (no.2 and up)
may or may not be numbered depending on the year of
manufacture. If they are not numbered, count them in a
counter-clockwise fasion, (When standing near the skrit
looking toward the apex, starting at the bottom).
Apex Hook-up Detail
The Apex should be clipped or tied through all the apex
cross-over lines AND the Apex center line (which runs down
inside the canopy to the Bridle).
Suspension Line Hook-up
Clip another carabiner around all the suspension lines except
the central line, as shown and attach it with two tie-down
straps, to the second hook-up point on the opposite end of
the table from the apex. Apply some tension until all the lines
are straight.
The Bridle Position
The bridle should now be somewhere in between the skirt
and the carabiner attached to the suspension lines.
5 of 16
Comb Placement
Place the comb under the lines near the skirt of the canopy.
The purpose of the comb is to ensure that all the lines run
parallel to each other all the way from the skirt to the bridle,
without crossing, twisting or tangling.
Place the Center Line in the wider gap in the center of the
comb.
Line placement into the Comb
Place line No.1 in the first gap imiediatly to the right of the
Center Line, then Line No.2 immiediatly right of line No.1.
and continue in this fasion until half of the lines are used. It is
important to ensure that you use the lines in the correct
order. The easyest way to do this is to flip the gores over
onto the left hand side. The amount will be 8 for the Mayday
16, 9 for the Mayday 18, 10 for the Mayday 20 and 9 for the
Mayday Bi. Now use a strong elastic to secure these lines in
place including the center line, by hooking the elastic over
the first and last nails in the group. Flip all the gores over to
the right hand side and start with the lines on the left hand
side in a similar fasion the the right. Place the last line
(No.16, 18 or 20), in the gap immiediatly left of the Center
Line, then follow it with the line before last, and so on until
you have an equal number of lines on either side of the
comb. Secure the lines with a second strong elastic band or
hair elastic.
Move Comb
Move the comb approximately one meter down the lines
away from the skirt. Flip the left hand-group of gores over the
right-hand group again.
Paging the Left
Flip the left hand-group of gores over the right-hand group.
Bring the flipped gores back one by one, lifting them with one
hand by the point halfway between the two line attachment
points, while holding all the lines down together on the table
with the other hand. Make sure to lift the complete gore up by
applying a little tension with the lifting hand against the apex.
While doing this carefully inspect each panel on both sides
for wear, damage, stains, deterioration, mildew, etc.
6 of 16
Stacking the Left
Neatly place each panel down on top of each other, making
sure that the folds halfway between the two hook-up points
are all lining up at the corner formed by the gores on the left.
Also take time to neatly align all the skirt webbing, one fold
on top of the next. Do not take more than half of the gores!.
Use some paper clamps, or weights to keep the folded gores
in place.
Corner fold-over - Left
Make a fold halfway along the left-hand base at 45o and
clamp it in place.
Paging the Right
Flip all the right hand gores across onto the left. Now repeat
the above paging steps for the right-hand side. Remember to
clamp or hold all the lines together at the hook-up points.
Corner fold-over - Right
Lift the uppermost gore from the right hand side and then
make the 45o corner in a similar fasion as done on the left
(exclude the uppermost gore from the fold-over). Clamp the
fold in place.
Gore count
The number of gores on each side should now be as follows,
with one in the middle on top.
Mayday 16: 8 gores on the left and 7 gores on the right.
Mayday 18: 9 gores on the left and 8 gores on the right.
Mayday 20: 10 gores on the left and 9 on the right.
Mayday Bi: 9 gores on the left and 8 gores on the right.
7 of 16
Clamp
Place two attitional clamps just less than halfway along the
folded canopy. Making sure that all the folds are even on
both sides.
Tension Release
Release the tension at the top and unclip both the
carabiners, on the lines near the bridle and the Apex
fastening carabiner.
Apex Insertion
By hand, gently insert the apex into the top of the canopy,
between the gores, as far as you can reach.
Apex Insertion
Apex Insertion
Pulling down the Apex
Take the bridle and slowly pull it away from the skirt, so as to
tension all the lines. Have a assistant do this while you
ensure that the top end folds neatly as the apex is pulled
down into the canopy. All the lines, including the Center/Apex
Line should now be straight and of a equal length.
8 of 16
Apex Position
The Apex lines should not be pulled any further than the
skirt. On some sizes the apex will not reach the skirt at all.
Make sure that all the lines including the apex line are now
equalized withe the bridle fully extended away from the
canopy.
Combing
Hook the bridle to the clamp at the end of the table and
tension the lines (move the canopy if nesesary)
Move the comb all the way towards the bridle, "combing" the
lines all the way up to their attachment points on the bridle.
IT IS OF UTMOST IMPORTANCE THAT THE LINES
SHOULD RUN STRAIGHT AND PARALLEL TO ONE
ANOTHER ALL THE WAY FROM THE CANOPY SKIRT TO
THE BRIDLE, WITHOUT ANY CROSSING OR TWISTING,
AND THAT THE BRIDLE SHOULD LAY SO THAT THEY
JOIN IT SIDE BY SIDE. THE BRIDLE SHOULD NOT BE
TURNED OR TWISTED IN THE SUBSEQUENT STAGES
OF FOLDING.
Any twists or tangles can be undone by manipulating the
bridle in the correct direction. If not, you have laid some of
the panels incorrectly and you will have to start over.
Remove Comb
Remove the comb and pull the ripstop line attatchment cover
over the lines after inspecting each attatchment carefully.
Make sure there is no wear or unraveling of stitching.
9 of 16
Shape
This is what the partly folded canopy should now look like.
Top Fold
Remove the top clamps and make a fold on each corner as
shown and then replace the clamps to hold the folds.
Continue both the folds along the length of the canopy by
folding over the bottom corners (45o corners) to achieve a
rectangular shape as shown in the next photo.
Center Gore
Pull out the Center gore just a little, from under the folds and
flatten it in its place. It should now be covering the start of the
folds on either side as shown.
Top Fold
Fold the top of the reserve in half. Remove the clamps and
replace one to hold the new fold in place.
Now pull the "opening"/Skirt of the center gore out to the left
as shown.
10 of 16
Folding
Fold the right hand side of the bottom section onto the left.
Place one of the free clamps halfway along the pack.
Check opening
Make sure that the opening/skirt of the central gore is neatly
in place, and lying along the bottom edge and continues up
the side between the layers formed by the left and right hand
sides.
Opening Detail
Deployment container/Nappy Sizing
Place the deployment container/nappy next to the reserve.
Make sure that the side with the bungee is facing up and that
the bungee is pointing to the side the lines leave the pack as
shown.
Fold the "pack" in a Zigzag pattern so as to form a square
that will fit in the center part of the Deployment container.
Zigzag Folding
11 of 16
Zigzag Folding
Lift the pack onto the deployment container.
Zigzag Folding
Zigzag Detail
Closing (Step 1)
Closing (Step 1) Lift flap No.1 (Opposite side of the Bungee)
and thread a loop from the center of the bungee through the
grommet in the flap.
Closing (Step2)
Lift flap No.2 (on the left) and thread the bungee loop through
the grommet in the flap.
Closing (Step 3)
Lift flap No.3 (on the right) and thread the bungee loop
through the grommet in the flap. Now pass a loop of the
suspension lines through the bungee loop to lock the three
flaps in place.The loop of lines should protrude only about
5-6cm through the bungee.
An additional check of the bungee: the loop of the lines
should begin to slip out under a force of not more than
200grams.
Line Stacking (Step 1)
Line Stacking (Step 1) Take four light latex-rubber bands and
inspect them for cracks, wear, and fatigue. It is best to use
special parachute grade elastics obtainable from Apco, or
your Apco dealer. If, however, you must use simple office
rubber bands, they must be approximately 4cm in diameter,
with a square section of 1-1.5mm, fresh and of good quality
and of uniform cross-section.
Attach two elastics to each side of the bungee cord,
approximately 3cm appart, and 3cm away from the end
(attachment point to the deployment bag) of the cord.
12 of 16
Begin to fold the lines into a zig-zag of a width equal to the
width of the folded canopy package. It is easiest to do this
properly by folding them into flattened figure-eights, on top of
one another.
Line Stacking (Step 2)
After using just less than half the tolat line length, stop and
insert the "stack into the lower set of elastics attached to the
bungee.
Line Stacking (Step 3)
The right hand elastic should be to the left of the lines
leading from the skirt to the first closing loop, but to the right
of where the lines lead from the first closing loop to the line
"stack".
Line Stacking (Step 4)
Now make a second "stack" of lines in a simalar fasion to the
first, using all but the last 60-70cm of suspension lines.
Line Stacking (Step 5)
Place this "stack" in the upper set of elastics. The right hand
elastic should be to the right of the lines leading from the
skirt to the first closing loop.
Line Stacking (Step 6)
13 of 16
Line Stacking (Step 7)
Line Stacking (Step 8)
Make sure that all the lines are arranged neatly with out
twists, line-overs, etc.
Line Stacking (Step 9)
Now fold the remaining section of the suspension lines
across the "pack".
Second Closing Loop
Fold the fourth flap of the container over the stacked lines.
Lift the bungee on top of the first closing loop and pass the
loop through the grommet on the flap.
Second Closing Loop
Lock the last flap in place with a loop of the suspension lines
to make the second closing loop.
Second Closing Loop
14 of 16
Second Closing Loop
Second Closing Loop
Pass the closing loop through the webbing loop on the last
flap to keep it clear of the loop of the first closing loop.
The packed Parachute
Test
Test the force required for the closing loop to slip through the
bungee. There are two methods to do this.
Hook a spring balance to a loop in the remaining part of the
suspension lines and hold the bridle down next to the
container. Slowly lift the scale until the lines start to slip
through the bungee and take the reading of the scale at this
point.
The force required using this method should not exceed
400 grams.
Test
Using the second (direct) method one hooks the scale
directly to the bridle.
The force should not exceed 200 grams with this method.
15 of 16
Using Your Mayday
It is ofcourse best if you never have to use it, but even then, flying with an energency system
provides peace of mind and a feeling of security, which make your flights even more
enjoyable.
Some paragliding and Hang-gliding schools and clubs offer courses in the use of emergency
systems, and it is recommended to take such a course. The openings are carried out over
water and the pilot wears a flotation vest. Once in the water a boat picks them and the
equipment out. Such a course provides valuable experience, and adds confidence in your
emergency system.
OPENING YOUR EMERGENCY PARACHUTE
The first step in opening your emergency parachute is the decision to do so. If you have lost
control of your aircraft at a considerable height and there is a chance of regaining it, you still
have time to try. Once you have opened your emergency parachute, you are commited to it,
and where it is going, theres no turning back and you are commited to an emergency landing.
If on the other hand, the emergency arises at a low altitude, you should decide as quickly as
possible. It is generally considered that emergency parachutes should be carried whenever
you intend to fly higher than 50m above ground. There are recorded cases of saves occuring
at even lower altitudes.
Once you have decided to open your emergency parachute, do it in the following steps:
Look for your emergency handle and identify it. This is no time for mistakes.
Grab the handle firmly with your thumb as well as the four fingers.
Give a strong pull. This undoes the velcro covers and pulls the locking pins out of the loops.
The outer container opens and you are now holding the closed inner container attached to the
handle with the canopy and lines stowed inside.
Throw the parachute as strongly as you can in the direction which is A). unobstructed by
your paraglider or hang-glider, and B). which is also preferably the direction of the airsteam
past you, this will help to open your parachute faster.
If you have been flying a paraglider, neutralize it as soon as the emergency parachute
opens, and keep it neutralized. If it re-opens, it will interfere with the emergency parachute.
For landing, keep your knees together slightly bent, landing on your feet, and rolling to one
side over your shoulder in a typical parachutists landing fall.
16 of 16