
1
Sun Storage 16 Gb Fibre Channel PCIe
Universal Host Bus Adapter, Emulex
Installation Guide
For HBA Model 7101684
Part No: E24462-07
July 2015
Part No: E24462-07
Copyright © 2014, 2015, Oracle and/or its affiliates. All rights reserved.
This software and related documentation are provided under a license agreement containing restrictions on use and disclosure and are protected by intellectual property laws. Except
as expressly permitted in your license agreement or allowed by law, you may not use, copy, reproduce, translate, broadcast, modify, license, transmit, distribute, exhibit, perform,
publish, or display any part, in any form, or by any means. Reverse engineering, disassembly, or decompilation of this software, unless required by law for interoperability, is
prohibited.
The information contained herein is subject to change without notice and is not warranted to be error-free. If you find any errors, please report them to us in writing.
If this is software or related documentation that is delivered to the U.S. Government or anyone licensing it on behalf of the U.S. Government, then the following notice is applicable:
U.S. GOVERNMENT END USERS. Oracle programs, including any operating system, integrated software, any programs installed on the hardware, and/or documentation, delivered
to U.S. Government end users are "commercial computer software" pursuant to the applicable Federal Acquisition Regulation and agency-specific supplemental regulations. As
such, use, duplication, disclosure, modification, and adaptation of the programs, including any operating system, integrated software, any programs installed on the hardware, and/or
documentation, shall be subject to license terms and license restrictions applicable to the programs. No other rights are granted to the U.S. Government.
This software or hardware is developed for general use in a variety of information management applications. It is not developed or intended for use in any inherently dangerous
applications, including applications that may create a risk of personal injury. If you use this software or hardware in dangerous applications, then you shall be responsible to take all
appropriate fail-safe, backup, redundancy, and other measures to ensure its safe use. Oracle Corporation and its affiliates disclaim any liability for any damages caused by use of this
software or hardware in dangerous applications.
Oracle and Java are registered trademarks of Oracle and/or its affiliates. Other names may be trademarks of their respective owners.
Intel and Intel Xeon are trademarks or registered trademarks of Intel Corporation. All SPARC trademarks are used under license and are trademarks or registered trademarks of
SPARC International, Inc. AMD, Opteron, the AMD logo, and the AMD Opteron logo are trademarks or registered trademarks of Advanced Micro Devices. UNIX is a registered
trademark of The Open Group.
This software or hardware and documentation may provide access to or information about content, products, and services from third parties. Oracle Corporation and its affiliates are
not responsible for and expressly disclaim all warranties of any kind with respect to third-party content, products, and services unless otherwise set forth in an applicable agreement
between you and Oracle. Oracle Corporation and its affiliates will not be responsible for any loss, costs, or damages incurred due to your access to or use of third-party content,
products, or services, except as set forth in an applicable agreement between you and Oracle.
Documentation Accessibility
For information about Oracle's commitment to accessibility, visit the Oracle Accessibility Program website at http://www.oracle.com/pls/topic/lookup?ctx=acc&id=docacc.
Access to Oracle Support
Oracle customers that have purchased support have access to electronic support through My Oracle Support. For information, visit http://www.oracle.com/pls/topic/lookup?
ctx=acc&id=info or visit http://www.oracle.com/pls/topic/lookup?ctx=acc&id=trs if you are hearing impaired.
Référence: E24462-07
Copyright © 2014, 2015, Oracle et/ou ses affiliés. Tous droits réservés.
Ce logiciel et la documentation qui l’accompagne sont protégés par les lois sur la propriété intellectuelle. Ils sont concédés sous licence et soumis à des restrictions d’utilisation et
de divulgation. Sauf stipulation expresse de votre contrat de licence ou de la loi, vous ne pouvez pas copier, reproduire, traduire, diffuser, modifier, breveter, transmettre, distribuer,
exposer, exécuter, publier ou afficher le logiciel, même partiellement, sous quelque forme et par quelque procédé que ce soit. Par ailleurs, il est interdit de procéder à toute ingénierie
inverse du logiciel, de le désassembler ou de le décompiler, excepté à des fins d’interopérabilité avec des logiciels tiers ou tel que prescrit par la loi.
Les informations fournies dans ce document sont susceptibles de modification sans préavis. Par ailleurs, Oracle Corporation ne garantit pas qu’elles soient exemptes d’erreurs et vous
invite, le cas échéant, à lui en faire part par écrit.
Si ce logiciel, ou la documentation qui l’accompagne, est concédé sous licence au Gouvernement des Etats-Unis, ou à toute entité qui délivre la licence de ce logiciel ou l’utilise pour
le compte du Gouvernement des Etats-Unis, la notice suivante s’applique:
U.S. GOVERNMENT END USERS. Oracle programs, including any operating system, integrated software, any programs installed on the hardware, and/or documentation, delivered
to U.S. Government end users are "commercial computer software" pursuant to the applicable Federal Acquisition Regulation and agency-specific supplemental regulations. As
such, use, duplication, disclosure, modification, and adaptation of the programs, including any operating system, integrated software, any programs installed on the hardware, and/or
documentation, shall be subject to license terms and license restrictions applicable to the programs. No other rights are granted to the U.S. Government.
Ce logiciel ou matériel a été développé pour un usage général dans le cadre d’applications de gestion des informations. Ce logiciel ou matériel n’est pas conçu ni n’est destiné
à être utilisé dans des applications à risque, notamment dans des applications pouvant causer des dommages corporels. Si vous utilisez ce logiciel ou matériel dans le cadre d’
applications dangereuses, il est de votre responsabilité de prendre toutes les mesures de secours, de sauvegarde, de redondance et autres mesures nécessaires à son utilisation dans des
conditions optimales de sécurité. Oracle Corporation et ses affiliés déclinent toute responsabilité quant aux dommages causés par l’utilisation de ce logiciel ou matériel pour ce type
d’applications.
Oracle et Java sont des marques déposées d’Oracle Corporation et/ou de ses affiliés. Tout autre nom mentionné peut correspondre à des marques appartenant à d’autres propriétaires
qu’Oracle.
Intel et Intel Xeon sont des marques ou des marques déposées d’Intel Corporation. Toutes les marques SPARC sont utilisées sous licence et sont des marques ou des marques
déposées de SPARC International, Inc. AMD, Opteron, le logo AMD et le logo AMD Opteron sont des marques ou des marques déposées d’Advanced Micro Devices. UNIX est une
marque déposée d’The Open Group.
Ce logiciel ou matériel et la documentation qui l’accompagne peuvent fournir des informations ou des liens donnant accès à des contenus, des produits et des services émanant de
tiers. Oracle Corporation et ses affiliés déclinent toute responsabilité ou garantie expresse quant aux contenus, produits ou services émanant de tiers, sauf mention contraire stipulée
dans un contrat entre vous et Oracle. En aucun cas, Oracle Corporation et ses affiliés ne sauraient être tenus pour responsables des pertes subies, des coûts occasionnés ou des
dommages causés par l’accès à des contenus, produits ou services tiers, ou à leur utilisation, sauf mention contraire stipulée dans un contrat entre vous et Oracle.
Accessibilité de la documentation
Pour plus d’informations sur l’engagement d’Oracle pour l’accessibilité à la documentation, visitez le site Web Oracle Accessibility Program, à l’adresse http://www.oracle.com/
pls/topic/lookup?ctx=acc&id=docacc.
Accès au support électronique
Les clients Oracle qui ont souscrit un contrat de support ont accès au support électronique via My Oracle Support. Pour plus d’informations, visitez le site http://www.oracle.com/
pls/topic/lookup?ctx=acc&id=info ou le site http://www.oracle.com/pls/topic/lookup?ctx=acc&id=trs si vous êtes malentendant.
Contents
Using This Documentation ................................................................................. 7
1 Universal HBA Overview ................................................................................. 9
Kit Contents ................................................................................................... 9
Universal HBA Features and Specifications ......................................................... 9
Operating System and Technology Requirements ................................................ 11
Boot Support ................................................................................................ 11
System Interoperability ................................................................................... 12
Host Platform Support ............................................................................ 12
Storage Support .................................................................................... 13
Switch Support ..................................................................................... 14
Environmental Requirements ........................................................................... 15
2 Universal HBA Installation, Configuration, and Removal .............................. 17
Observing ESD and Handling Precautions ......................................................... 17
Installing the Hardware .................................................................................. 18
▼ To Install the Universal HBA ............................................................. 18
▼ To Replace the Low-Profile Bracket With a Standard Bracket ................... 19
Changing the Operating Protocol Mode ............................................................. 24
Connecting the Optical and Copper Cables ........................................................ 25
About Connecting Optical Cables ............................................................. 25
▼ To Connect Optical Cables ................................................................ 26
▼ To Connect Copper Cables ................................................................ 28
Powering on the System ................................................................................. 29
▼ To Apply Power to the Server ............................................................ 29
Viewing LEDs .............................................................................................. 29
LED Indicator Combinations ................................................................... 29
POST Results ....................................................................................... 32
Removing the Hardware ................................................................................. 32
▼ To Remove the Universal HBA .......................................................... 32
5
Contents
3 Software Installation ..................................................................................... 35
Driver Software for the Oracle Solaris OS ......................................................... 35
Oracle Solaris Diagnostic Support ............................................................ 35
Installing Software for the Red Hat and SUSE Linux OSes ................................... 36
▼ To Install the Universal HBA Software for the Linux OS ......................... 36
Installing Software for VMware Technology ...................................................... 37
▼ To Install the Universal HBA Software for VMware Technology ............... 37
Installing Software for Windows Server 2008 OS ................................................ 37
▼ To Install the Software for the Windows Server 2008 OS ......................... 38
Configuration and Diagnostic Utilities ............................................................... 38
Upgrading Firmware ...................................................................................... 39
▼ To Upgrade Firmware Using the OneCommand Manager GUI .................. 39
▼ To Upgrade Firmware Using the OneCommand Manager CLI ................... 41
4 Known Issues ................................................................................................ 43
Link Aggregation Control Protocol (LACP) Cannot Be Used In Certain
Conditions .................................................................................................... 43
SAN Boot Fails Via Direct Attached Storage on Oracle SPARC Systems ................. 43
Glossary ............................................................................................................ 45
6
Sun Storage 16 Gb Fibre Channel PCIe Universal Host Bus Adapter, Emulex Installation Guide • July 2015
Using This Documentation
■
■
■
Overview – Describes how to troubleshoot and maintain the universal host bus adapter
Audience – Technicians, system administrators, and authorized service providers
Required knowledge – Advanced experience troubleshooting and replacing hardware
Product Documentation Library
Documentation and resources for this product and related products are available at http://
docs.oracle.com/cd/E24648_01/index.html.
Feedback
Provide feedback about this documentation at http://www.oracle.com/goto/docfeedback.
Using This Documentation
7
8
Sun Storage 16 Gb Fibre Channel PCIe Universal Host Bus Adapter, Emulex Installation Guide • July 2015
1
♦ ♦ ♦ C H A P T E R 1 Universal HBA Overview
This chapter provides a basic overview of Oracle's Sun Storage 16 Gb Fibre Channel (FC)
Peripheral Component Interconnect Express (PCIe) Universal HBA, which is a low-profile
HBA that uses Emulex technology. This chapter also describes the various operating systems,
host platforms, storage, and infrastructure configurations that support the universal HBA, and
lists the universal HBA environmental requirements.
This chapter contains the following topics:
■
■
■
■
■
■
“Kit Contents” on page 9
“Universal HBA Features and Specifications” on page 9
“Operating System and Technology Requirements” on page 11
“Boot Support” on page 11
“System Interoperability” on page 12
“Environmental Requirements” on page 15
Kit Contents
■
■
■
■
Sun Storage 16 Gb FC PCIe Universal HBA, Emulex, with a low-profile bracket installed
Standard PCIe bracket
Accessing Documentation document
China RoHS Material Disclosure
Universal HBA Features and Specifications
Oracle's Sun Storage 16 Gb FC PCIe Universal HBA, Emulex (marketing part number
7101684) is a standalone, PCIe low-profile universal host bus adapter. The HBA is considered
universal because it is a configurable board that changes its operating protocol mode from a
two-port 16 Gb FC HBA to a two-port 10 GbE CNA, based on the optical transcievers and
optical cables that you insert and attach to the HBA.
Chapter 1 • Universal HBA Overview
9
Universal HBA Features and Specifications
The board interfaces an eight-lane PCI Express bus, with eight lanes supporting two
Fibre Channel (FC) or two Fibre Channel over Ethernet (FCoE) optical media ports. Each
independent FC port operates at 16 Gb/sec and features 16/8/4 autonegotiation. Each FCoE port
operates at 10 Gb/sec. You can configure the following three options:
■
■
■
10 GbE FCoE option – The version of the card that provides twin-ax (or, copper) 10 GbE
FCoE ExpressModule Converged Network Adapter functionality. No optic modules are
installed in this Converged Network Adapter.
16 Gb FC optics option – The version of the card that has 16 Gb FC optics installed (optics
marketing part number: 7101686) in the SFP+ connecter of the card, providing short-wave
16 Gb Fibre Channel ExpressModule Host Bus Adapter functionality.
10 GbE FCoE optics option – The version of the card that has 10 GbE optics installed
(optics marketing part number: 7101688) in the SFP+ connector of the card, providing
short-range 10 GbE FCoE ExpressModule Converged Network Adapter functionality.
Table 1-1 lists the features and specifications of the universal HBA. For a list of supported
operating systems, see Table 1-2.
TABLE 1-1
10
Universal HBA Features and Specification
Feature
Description
PCI connector
x8
PCI signaling environment
PCI Express x8 (8 active lanes)
PCI transfer rate (maximum)
PCI Express Generation Three (8 GT/s) x8
PCIe specification compliance
PCI Express Card Version 3.0 Specification
PCIe hot plug and hot swap functionality
Supported
Number of ports
Two
Number of devices supported
126 devices per FC loop (not supported at 16 Gb); 510 devices in Fabric
mode
FCoE full offload in hardware
Meets requirement
FC bus type (external)
Fiber-optic media, short-wave laser, multi-mode fiber (400‐M5-SN-S)
FC topologies
Switched fabric (N_Port), arbitrated loop (NL_Port) [FC-AL support for
4G and 8G only; 16G spec does not support FC-AL] and point-to-point
(N_Port)
Receive Side Scaling
Supported
MSI-X
Supported
Solaris Dynamic Reconfiguration
Supported
Diagnostic support
Provided by Oracle VTS software
Boot support
Ethernet, FCoE, FC, and iSCSI for all supported operating systems. For
more information about boot support for the universal HBA, see Table
1-3.
RAM
1.5 MB, parity protected, per port
BIOS ROM
One 32-MB flash ROM, field-programmable
NVRAM
One 32-KB EEPROM
External connectors
■ Sun Storage 10 Gb FCoE optics, SR, Emulex (part number 7101688)
■ Sun Storage 16 Gb FC optics, SR, Emulex (part number 7101686)
Sun Storage 16 Gb Fibre Channel PCIe Universal Host Bus Adapter, Emulex Installation Guide • July 2015
Operating System and Technology Requirements
Feature
Description
■ SFP+ direct attach copper (DAC) twinaxial (twin-ax) cables
from the supported switch manufacturers listed in “Switch
Support” on page 14
Small form-factor pluggable (SFP+)
Supporting options with short range, short-wave, and twin-ax cabling
Maximum FC cable length
At 16 Gb/s, up to 125 meters using 50/125 mm core OM4 fiber. Longer
lengths are possible at slower data rates.
For 10 GbE, up to 400 meters using 50/125 mm core OM4 fiber.
For more optical cable specifications, see Table 2-1.
LED indicators
Two LEDs per channel (yellow and green) on the front panel as status
indicators
Maximum power consumption
13.3 watts
Form Factor
Standard low-profile form factor
Operating System and Technology Requirements
The universal HBA requires the OS and technology levels listed in Table 1-2, at minimum.
TABLE 1-2
Supported Operating System/Technology Versions
Operating System/Technology
Supported Versions (minimum)
Oracle Solaris OS
■ Oracle Solaris 10 1/13 for the x86 (64-bit) platform (+ Patch ID 149623-02)
■ Oracle Solaris 10 1/13 for the SPARC platform (+ Patch ID 149622-02)
■ Oracle Solaris 11.1 for the x86 (64-bit) and SPARC platforms (+ SRU 6)
Oracle Linux platform
■ Oracle Linux 5.9 (UEK 2.6.39-400.109.4, at minimum)
■ Oracle Linux 6.3 (UEK 2.6.39-400.109.4, at minimum)
■ Oracle VM 2.3.1
Linux OS
■
■
■
■
Microsoft Windows OS
Enterprise and Standard Editions,
WHQL Certified, MS Windows
MPIO
■ Windows Server 2008 SP2+ (64-bit)
■ Windows Server 2008 R2 including SP1 (64-bit)
■ Windows Server 2012 (64-bit)
VMware technology
■ VMware ESXi 5.0, 5.1
Red Hat Enterprise Linux (RHEL) 5.9 (64-bit)
RHEL 6.4 (64-bit)
SUSE Linux Enterprise Server (SLES) 10 U4
SLES 11 U2
Boot Support
FC SAN and FCoE SAN booting through the universal HBA is supported, as listed in Table
1-3.
Chapter 1 • Universal HBA Overview
11
System Interoperability
TABLE 1-3
Universal HBA Boot Support
Operating System/Technology
FC SAN Boot Support
FCoE SAN Boot Support
Oracle Solaris 10 1/13
Yes
No
Oracle Solaris 11.1
Yes
No
Oracle Linux 5.9
No
No
Oracle Linux 6.4
Yes
No
Oracle VM 2.3.1
Yes
No
†
Yes†
†
Yes†
SLES 10 U4
†
Yes
Yes†
SLES 11 U2
Yes†
Yes†
Windows Server 2008 SP2+
†
Yes
Yes†
Windows Server 2008 R2
Yes†
Yes†
†
Yes†
RHEL 5.9
Yes
RHEL 6.4
Yes
Windows Server 2012
Yes
†
While using the Driver Update disk during the installation process. Driver Update is available at the Oracle support area of the Emulex
web site: http://www.emulex.com/downloads/oem-qualified/oracle/
System Interoperability
This section provides information about selected platforms and storage that are compatible with
the heterogeneous FC network design of the universal HBA. This section contains the following
topics:
■
■
■
“Host Platform Support” on page 12
“Storage Support” on page 13
“Switch Support” on page 14
Host Platform Support
The universal HBA is supported by the platforms listed in Table 1-4. For up-to-date
information, see your system Product Notes and web pages.
For information about supported OS/technology versions, see Table 1-2.
TABLE 1-4
Platform Support
Platforms
Supported OS/Technology
Oracle's SPARC Servers
SPARC T4-1
12
Oracle Solaris
Sun Storage 16 Gb Fibre Channel PCIe Universal Host Bus Adapter, Emulex Installation Guide • July 2015
System Interoperability
Platforms
Supported OS/Technology
SPARC T4-2
Oracle Solaris
SPARC T5-2
Oracle Solaris
SPARC T5-4
Oracle Solaris
SPARC T5-8
Oracle Solaris
Oracle's x86 Servers
Netra X3-2 (Legacy BIOS mode only, no
UEFI support)
Oracle Solaris, Windows, Linux, VMware
Sun Server X4-2
Oracle Solaris, Windows, Linux, VMware
Sun Server X4-2L
Oracle Solaris, Windows, Linux, VMware
Storage Support
This section lists the supported arrays and tape storage that can connect to the universal HBA
through a supported switch (see “Switch Support” on page 14). This section contains the
following topics:
■
■
■
■
“Array Support” on page 13
“Storage System Support” on page 13
“Tape Storage Support” on page 14
“Unified Storage” on page 14
Array Support
The universal HBA supports connecting, through a supported switch, to the following arrays:
■
■
■
■
■
■
■
Oracle's Sun Storage 2540 M2
Oracle's Sun Storage 6140
Oracle's Sun Storage 6180
Oracle's Sun Storage 6190
Oracle's Sun Storage 6540
Oracle's Sun Storage 6590
Oracle's StorageTek 6580, 6780 with 8Gb/s FC Host Interface cards
Storage System Support
The universal HBA supports connecting, through a supported switch, to the following storage
systems:
Chapter 1 • Universal HBA Overview
13
System Interoperability
■
■
■
Oracle's Pillar Axiom 600 storage system
Oracle's StorageTek 9980, 9985, 9885V storage system
Oracle's StorageTek 9990, 990V storage system
Tape Storage Support
The universal HBA supports connecting, through a supported switch, to the following tape
storage:
■
■
■
■
■
■
■
■
■
■
■
■
■
Oracle's StorageTek SL24 Tape Autoloader
Oracle's StorageTek SL48 Tape Library
Oracle's StorageTek SL500 Modular Library
Oracle???s StorageTek L1400 Tape Library
Oracle's StorageTek SL3000 Modular Library
Oracle's StorageTek SL8500 Modular Library
Oracle's StorageTek Virtual Tape Library: VTL Value and VTL Value Plus
Oracle's StorageTek T10000B, T10000C
Oracle's StorageTek 9840C tape drive
Oracle's StorageTek 9940B tape drive
Oracle's StorageTek 9840D tape drive
IBM LTO4
IBM LTO5
Unified Storage
The universal HBA supports connecting, through a supported switch, to the following unified
storage:
■
■
Oracle's Sun Storage 7110, 7210, 7310, 7410 System (Target mode only)
Oracle's Sun ZFS Storage 7120, 7320, 7420, 7720 System
Switch Support
The universal HBA supports the following FC switches:
■
■
14
Brocade 8000 (FCoE TOR Switch)
Brocade 300 FC Switch
Sun Storage 16 Gb Fibre Channel PCIe Universal Host Bus Adapter, Emulex Installation Guide • July 2015
Environmental Requirements
■
■
■
■
■
■
■
■
Brocade 5100, 5300 FC Switch
Brocade 6510 FC Switch (16 GB)
Brocade DCX, DCX-4S, DCX8510 FC Switch
Cisco Nexus 5010
Cisco Nexus 5020 (FCoE TOR Switch)
Cisco 5548 FC/FCoE Switch
Cisco 9148 FC switch (8 Gb FC)
Cisco MDS 9513
Note - The universal HBA has been verified to function with Cisco 5xxx switches; however,
Oracle Services does not support customers with questions or issues about these switches.
Direct all inquiries about the use of Cisco 5xxx switches to Cisco Systems.
Environmental Requirements
The universal HBA environmental requirements are listed in Table 1-5.
TABLE 1-5
Universal HBA Environmental Requirements Specification
Operating
Non-Operating
Temperature
0˚ to 55˚C, non-condensing
-20˚C to 85˚C, non-condensing
Relative
Humidity (RH)
10% to 90% RH, non-condensing,
22˚C max wet bulb
5% to 95% RH, non-condensing, 22˚C max wet bulb
Altitude
3200 m
12,200 m
Vibration
0.25 g in all axes, 5-500 Hz sine
1.2 g in all axes, 5-500 Hz sine
Shock
5.5 g, 11 ms half-sine
33 g, 11 ms half-sine
Chapter 1 • Universal HBA Overview
15
16
Sun Storage 16 Gb Fibre Channel PCIe Universal Host Bus Adapter, Emulex Installation Guide • July 2015
2
♦ ♦ ♦ C H A P T E R 2 Universal HBA Installation, Configuration, and
Removal
This chapter describes how to install, configure, and remove the universal HBA. For detailed
instructions, refer to your system documentation.
This chapter contains the following topics:
■
■
■
■
■
■
■
“Observing ESD and Handling Precautions” on page 17
“Installing the Hardware” on page 18
“Changing the Operating Protocol Mode” on page 24
“Connecting the Optical and Copper Cables” on page 25
“Powering on the System” on page 29
“Viewing LEDs” on page 29
“Removing the Hardware” on page 32
Observing ESD and Handling Precautions
Caution - Damage to the universal HBA can occur as the result of improper handling or
electrostatic discharge (ESD). Always handle the universal HBA with care to avoid damage to
electrostatically sensitive components.
To minimize the possibility of ESD-related damage, use both a workstation antistatic mat and
an ESD wrist strap. You can get an ESD wrist strap from any reputable electronics store or
from Oracle as part number 250-1007. Observe the following precautions to avoid ESD-related
problems:
■
■
■
Leave the universal HBA in its antistatic bag until you are ready to install it in the system.
Always use a properly fitted and grounded wrist strap or other suitable ESD protection
when handling the universal HBA, and observe proper ESD grounding techniques.
Hold the universal HBA by the edge of the printed circuit board (PCB), not by the
connectors or heatsink.
Chapter 2 • Universal HBA Installation, Configuration, and Removal
17
Installing the Hardware
■
Place the universal HBA on a properly grounded antistatic work surface pad when it is out
of its protective antistatic bag.
Installing the Hardware
The hardware installation process involves the following general steps, described in this
section:
■
■
“To Install the Universal HBA” on page 18
“To Replace the Low-Profile Bracket With a Standard Bracket” on page 19
To Install the Universal HBA
The universal HBA is shipped with two mounting brackets: a pre-installed, low-profile PCIe
mounting bracket, and a standard bracket, included in the box with the universal HBA. The
low-profile mounting bracket is shorter than the standard bracket; approximately 3.11 in. (7.9
cm) compared to 4.75 in. (12.06 cm). If you need to change the bracket to install the universal
HBA, you must first remove the optical transceivers from their housing. See “To Replace the
Low-Profile Bracket With a Standard Bracket” on page 19. This procedure covers how to
install the universal HBA with the low-profile mounting bracket installed.
1.
Attach an ESD strap to your wrist, as described in “Observing ESD and Handling
Precautions” on page 17.
2.
Perform the following actions, as necessary for your system:
■
■
■
■
Determine an appropriate PCIe slot in which to install the universal HBA.
Power down the system.
Disconnect power from the system.
Remove the necessary covers and bezels from the system.
For detailed instructions on how to perform these actions, refer to your system documentation.
18
3.
Rotate the PCI hold-down bracket (located on the edge of the chassis) 90
degrees so that the chassis edge can accept the universal HBA.
4.
If required by your system, loosen the screw that holds the bracket to the
chassis.
5.
Line up the universal HBA with the PCIe connector on the rear of the
motherboard.
Sun Storage 16 Gb Fibre Channel PCIe Universal Host Bus Adapter, Emulex Installation Guide • July 2015
To Replace the Low-Profile Bracket With a Standard Bracket
6.
Insert the universal HBA into the connector so it is fully seated.
7.
Rotate the PCI hold-down bracket to the closed position and secure the screw on
the bracket.
8.
Perform the following actions, as necessary for your system:
■
■
Replace the necessary covers and bezels onto the system.
Reinstall the server chassis in the rack.
For detailed instructions on how to perform these actions, refer to your system documentation.
The universal HBA is now installed and ready for optical or copper cable attachment.
To Replace the Low-Profile Bracket With a
Standard Bracket
You do not need to perform this procedure if you plan to use the low-profile bracket that
comes installed with the universal HBA. Instead, skip to “Connecting the Optical and Copper
Cables” on page 25.
A standard bracket is included in the ship kit with the universal HBA. This procedure describes
how to install that standard bracket onto the HBA, if you need to do so.
Note - Standard Sun Storage 16 Gb FC PCIe Universal HBAs do not ship with optical
transceivers installed in their cage assemblies. Optical transceivers are sold separately. If optical
transceivers are installed, follow Step 1 and Step 3 below before removing the low-profile
bracket; otherwise, proceed to Step 4 to remove the low-profile bracket.
Note - Only supported transceivers are allowed. If invalid or unapproved transceivers are
installed and the board is booted, the links will not be allowed to come up. For information
about supported transceivers, see “Changing the Operating Protocol Mode” on page 24.
1.
Carefully remove the optical transceiver from its cage assembly by removing the
dust plug from the transceiver, and then pulling the bail (handle) out and down to
release the latch (see Figure 2-1). Do not force it.
Caution - This is a delicate operation. Take care not to damage the optical transceiver.
Chapter 2 • Universal HBA Installation, Configuration, and Removal
19
To Replace the Low-Profile Bracket With a Standard Bracket
Releasing the Latch on an Optical Transceiver
FIGURE 2-1
2.
Slide the optical transceiver out of the cage assembly (see Figure 2-2).
The transeiver will slide out easily.
20
Sun Storage 16 Gb Fibre Channel PCIe Universal Host Bus Adapter, Emulex Installation Guide • July 2015
To Replace the Low-Profile Bracket With a Standard Bracket
FIGURE 2-2
Removing an Optical Transceiver
3.
Observing ESD precautions, store the transceiver in an ESD-safe place.
4.
Remove the mounting bracket screws from the top of the universal HBA.
Figure 2-3 shows the screws that you need to remove from the bracket.
Chapter 2 • Universal HBA Installation, Configuration, and Removal
21
To Replace the Low-Profile Bracket With a Standard Bracket
FIGURE 2-3
22
Removing the Bracket Mounting Screws
Sun Storage 16 Gb Fibre Channel PCIe Universal Host Bus Adapter, Emulex Installation Guide • July 2015
To Replace the Low-Profile Bracket With a Standard Bracket
5.
Remove the low-profile bracket and store it for future use.
Caution - Be careful not to push the bracket past the grounding tabs of the transceiver housing.
Ensure the light emitting diodes (LEDs) are properly aligned with the holes in the bracket.
6.
Re-install the screws that attach the universal HBA to the bracket.
7.
If the universal HBA had optical transceivers installed, do the following:
a. Re-install each transceiver by sliding the transceiver back into the housing.
When the latch engages, it clicks.
b. Push the bail (handle) back into place.
FIGURE 2-4
Typical Optical Transceiver
c. If you do not plan to immediately attach cables to the universal HBA,
reinstall the dust plug into the transceiver.
Chapter 2 • Universal HBA Installation, Configuration, and Removal
23
Changing the Operating Protocol Mode
Changing the Operating Protocol Mode
You can choose to change the operating protocol mode of the Sun Storage 16 Gb FC PCIe
Universal HBA. The operating protocol mode is selected automatically by the firmware, based
on the types of transceivers that you install, following these rules:
Note - The transceivers must be plugged into the HBA before the board is booted. The Sun
Storage 16 Gb FC PCIe Universal HBA does not support changing the operating mode by hot
swapping the transceivers.
■
The two modes of operation are:
■
■
Two-port 16 Gb FC
Or:
■ Two-port 10 GbE CNA (one NIC plus (+) one FCoE function per port)
The board operates with only one valid transceiver plugged into either port, with the
following behavior:
Functions continue to be presented as if the universal HBA were a two-port board.
Functions mapped to the empty transceiver cage will be in link-down condition.
The Sun Storage 16 Gb FC PCIe Universal HBA retains its last known good operating state
when it boots. If an invalid combination of transceivers is plugged into the HBA ports,
and the board is booted, the universal HBA will return to that last known good operating
mode. Thus, the behavior of the board for an invalid configuration depends on the prior
configuration as follows:
■
■
■
■
■
■
■
■
24
The default operating mode is two-port 16 Gb FC. If no valid transceivers are plugged
in, the HBA will remain in this default mode when booted.
If one or two valid 16 Gb FC transceivers are plugged in and the board is booted, the
universal HBA operates in FC mode. If invalid transceivers are then plugged in and the
board is rebooted, the HBA remains in FC mode, but the links are down.
If one or two valid 10 GbE transceivers are plugged in and the board is booted, the
universal HBA operates in Converged Network Adapter mode. If invalid transceivers
are then plugged in and the board is rebooted, the universal HBA remains in Converged
Network Adapter mode.
If the last known good mode of a board was FC and the board is booted with one 16
Gb FC transceiver and one 10 GbE transceiver, the board continues to present two FC
functions, but the only operational link is the link mapped to the port with the 16 Gb
FC transceiver. If the universal HBA is in this mode, you must change the incorrect
transceiver and perform a full power reboot of the board to make the second port
operational. (This must be a full power reboot and not an Oracle Solaris “FAST reboot,”
which is insufficient for this operation.)
If the last known good mode of a board was Converged Network Adapter and the
board is booted with one 16 Gb FC transceiver and one 10 GbE transceiver, the board
continues to present two NIC and two FCoE functions, but only the NIC and FCoE
Sun Storage 16 Gb Fibre Channel PCIe Universal Host Bus Adapter, Emulex Installation Guide • July 2015
Connecting the Optical and Copper Cables
■
functions mapped to the port with the 10 GbE transceiver have an operational link. If
the HBA is in this mode, you must change the incorrect transceiver and perform a full
power reboot of the board to make the second port operational. (This must be a full
power reboot and not an Oracle Solaris “FAST reboot,” which is insufficient for this
operation.)
Only supported transceivers are allowed. If invalid or unapproved transceivers are plugged
in and the board is booted, the links are not allowed to come up. The HBA supports the
following transceivers:
■
■
■
16 Gb FC optical: Short Wave (SW) Optics Module (marketing part number: 7101686)
for Sun Storage 16Gb FC optics, SR, Emulex
10 GbE optical: Short Range (SR) Optics Module (marketing part number: 7101688) for
Sun Storage 10GbE FCoE optics, SR, Emulex
10 GbE copper direct attach cables: Any provided with a switch that is supported
by the universal HBA. For more information about supported switches, see “Switch
Support” on page 14.
Connecting the Optical and Copper Cables
Depending on how you plan to use the universal HBA, you can connect either optical or copper
cables to the HBA. If you plan to change the operating protocol mode of the HBA by installing
a transceiver, connect optical cables. If you plan to use the standard HBA without installing
transceivers, connect copper cables. This section contains the following topics:
■
■
■
“About Connecting Optical Cables” on page 25
“About Connecting Optical Cables” on page 25
“To Connect Copper Cables” on page 28
About Connecting Optical Cables
This section describes how to connect optical cables to the universal HBA. Optical cables
are used with the universal HBA when you choose to install optics modules in the HBA, as
described in “Changing the Operating Protocol Mode” on page 24. If you do not plan to
install an optics module in the HBA, skip to “To Connect Copper Cables” on page 28.
Note - The universal HBA does not allow normal data transmission on an optical link unless it
is connected to another similar or compatible laser product (multimode to multimode).
Note - The universal HBA does not automatically downgrade to the required FC speed based
on cable length, if both links are capable of a higher operating speed. You must downgrade the
speed with the appropriate utility or link errors might occur.
Chapter 2 • Universal HBA Installation, Configuration, and Removal
25
To Connect Optical Cables
When using multimode fiber-optic cables with short-wave lasers, ensure that the cables adhere
to the specifications listed in Table 2-1.
TABLE 2-1
Optical Cable Specifications
Fiber Optic Cable
Maximum Length
Minimum Length
Connector
OM4 - Multi-mode
50/125 micron fiber (4700
MHz*km bandwidth cable)
4 GFC: 0.5 m - 400 m
FC: 0.5 meters
LC
8 GFC: 0.5 m - 190 m
Ethernet: 2.0 meters
16 GFC: 0.5 m - 125 m
10 GbE: 2 m - 400 m
OM3 - Multimode 50/125
micron fiber (2000
MHz*km bandwidth cable)
4 GFC: 0.5 m - 380 m
FC: 0.5 meters
8 GFC: 0.5 m - 150 m
Ethernet: 2.0 meters
LC
16 GFC: 0.5 m - 100 m
10 GbE: 2 m - 300 m
OM2 - Multimode
50/125 micron fiber (500
MHz*km bandwidth cable)
4 GFC: 0.5 m - 150 m
FC: 0.5 meters
8 GFC: 0.5 m - 50 m
Ethernet: 2.0 meters
LC
16 GFC: 0.5 m - 35 m
10 GbE: 2m - 82 m
OM1 - Multimode 62.5
/125 micron fiber (200
MHz*km bandwidth cable)
4 GFC: 0.5 m - 70 m
FC: 0.5 meters
8 GFC: 0.5 m - 21 m
Ethernet: 2.0 meters
LC
16 GFC: 0.5 m - 15 m
10 GbE: 2 m - 33 m
To Connect Optical Cables
1.
Ensure the transceiver cages have optical transceivers installed in them before
connecting optical cables.
Figure 2-5 shows an optical transeiver in the transceiver cage.
26
Sun Storage 16 Gb Fibre Channel PCIe Universal Host Bus Adapter, Emulex Installation Guide • July 2015
To Connect Optical Cables
FIGURE 2-5
2.
Installing an Optical Transceiver
Connect the fiber-optic cables to the LC connectors on the universal HBA.
Figure 2-6 shows how to connect a fiber-optic cable to the universal HBA.
FIGURE 2-6
Connecting an Optical Cable
Chapter 2 • Universal HBA Installation, Configuration, and Removal
27
To Connect Copper Cables
3.
After the fiber-optic cables are connected to the universal HBA, connect the
other end of the cables to FC or FCoE devices.
To Connect Copper Cables
Perform this procedure if you do not plan to install any transceivers in the universal HBA. Use
any SFP+ direct attach twin-ax copper cables to attach devices to the universal HBA.
1.
Insert one end of the copper cables into the empty SFP+ cages on the universal
HBA.
Ensure that the cable s are fully inserted and secured.
Figure 2-7 shows how to connect the universal HBA with a copper cable.
Connecting the Copper Cable
FIGURE 2-7
2.
28
After the copper cables are connected to the universal HBA, insert the other end
of the cables into the empty SFP+ cages on FC or FCoE devices.
Sun Storage 16 Gb Fibre Channel PCIe Universal Host Bus Adapter, Emulex Installation Guide • July 2015
Powering on the System
Powering on the System
This section provides basic instructions on how to apply power to the system. For detailed
instructions, see your system documentation.
To Apply Power to the Server
1.
Verify that the universal HBA is securely installed in the system.
For more information, see “Installing the Hardware” on page 18.
2.
Verify that the correct optical or copper cable is attached to the HBA and to the
FC or FCoE device.
3.
Power on the system, as described in your system documentation.
4.
Observe the light-emitting diode (LED) status for Power On Self Test (POST)
results, as described in “Viewing LEDs” on page 29.
Viewing LEDs
You can view green and yellow LEDs through openings in the mounting bracket of the
universal HBA. Each port has a corresponding set of green and yellow LEDs. See Figure 2-8.
The green LED indicates firmware operation and the yellow LED indicates port activity or link
speed.
This section describes how to interpret LED indicator combinations and power-on self test
(POST) results. The section contains the following topics:
■
■
“LED Indicator Combinations” on page 29
“POST Results” on page 32
LED Indicator Combinations
Figure 2-8 shows the LED indicators on the universal HBA.
Chapter 2 • Universal HBA Installation, Configuration, and Removal
29
To Apply Power to the Server
FIGURE 2-8
Optical Universal HBA LED Indicators
Each port has a corresponding set of LEDs that provide a visual indication of the operating
state.
Table 2-2 summarizes the LED indicator combinations, and their meanings, when the universal
HBA is in FC mode. Refer to Figure 2-8 to determine the location of the LEDs.
TABLE 2-2
30
FC Mode LED Status Green LED
Yellow LED
State
Off
Off
Boot failure (Dead board)
Off
On
POST failure (Dead board)
Sun Storage 16 Gb Fibre Channel PCIe Universal Host Bus Adapter, Emulex Installation Guide • July 2015
To Apply Power to the Server
Green LED
Yellow LED
State
Off
Slow Blink
Boot failure after POST
Off
Fast Blink
Not Defined
Off
Flashing
POST processing in progress
On
Off
Failure in Common Code Module
On
On
Failure in Common Code Module
On
1 Fast Blink
Normal (Link up at 2 GFC) (legacy
compatibility only)
On
2 Fast Blinks
Normal (Link up at 4 GFC)
On
3 Fast Blinks
Normal (Link up at 8 GFC)
On
4 Fast Blinks
Normal (Link up at 16 GFC)
On
Flashing
Not defined
Slow Blink
Off
Normal link down
Slow Blink
On
Not defined
Slow Blink
Slow Blink
Not defined
Slow Blink
Fast Blink
Not defined
Slow Blink
Flashing
Not defined
Fast Blink
Off
Not defined
Fast Blink
On
Not defined
Fast Blink
Slow Blink
Not defined
Fast Blink
Fast Blink
Beaconing
Fast Blink
Flashing
Not defined
Note - In FC mode, for the link rate conditions, there is a 1 second pause when the LED is off
between each group of fast blinks (2, 3, or 4). Observe the LED sequence for several seconds to
be sure you have correctly identified the pattern.
Table 2-3 summarizes the LED indicator combinations, and their meanings, when the universal
HBA is in Ethernet mode. Refer to Figure 2-8 to determine the location of the LEDs.
TABLE 2-3
Ethernet Mode LED Status Green LED
Yellow LED
State
Off
Off
No power or normal link down
Off
On
POST failure or invalid SFP configuration
Off
On
Normal (Link up with no activity on the
link)
Blink
On
Normal (Link up with activity on the link)
Chapter 2 • Universal HBA Installation, Configuration, and Removal
31
Removing the Hardware
Note - In Ethernet mode, in order to tell the difference between a POST failure and a link
up condition with no activity, you must remove the SFP+ transceiver or copper cable. If the
LED pattern persists, it is a POST failure condition. If the yellow LED is indicating a link up
condition with no activity, it will turn off, which indicates a normal link down.
POST Results
Power-On Self Test (POST) is the default mode of self-test for the Sun Storage 16 Gb FC PCIe
Universal HBA. No jumpers or connectors are necessary for this test to run. These tests perform
a quick confidence level check of the universal HBA before running the operational software.
At a minimum, the following tests are performed by POST:
■
■
■
Flash boot image checksum test
Internal ASIC RAM tests for proper ECC and parity operation
NL Port loopback test
Removing the Hardware
The following procedure describes how to remove the universal HBA, if you need to do so for
any reason. For detailed removal instructions, refer to your system documentation.
The hardware removal process involves these general steps:
1. Halt the operating system and remove power from the system.
2. Remove the universal HBA from the system.
To Remove the Universal HBA
1.
Attach an ESD strap to your wrist.
Refer to “Observing ESD and Handling Precautions” on page 17.
2.
32
Perform the following actions, based on your system:
■
Power down the system.
■
Disconnect power from the system.
Sun Storage 16 Gb Fibre Channel PCIe Universal Host Bus Adapter, Emulex Installation Guide • July 2015
To Remove the Universal HBA
If your system documentation states that hot-plug removal is supported for this universal
HBA slot, and Emulex OneCommandManager is in use, you must first stop the
OneCommandManager process prior to attempting hot-plug removal. If you do not stop
the OneCommandManager process first, the hot-plug removal might fail, or a system
panic might occur. To stop the OneCommandManager process, issue the stop_ocmanager
command, which is located in this installation directory:
■
Oracle Solaris - /opt/ELXocm
■
Linux - /usr/sbin/ocmanager
3.
Disconnect all cables.
4.
Remove the necessary covers and bezels from your system, as described in
your system documentation.
5.
Remove the universal HBA mounting bracket from the system by unscrewing the
mounting bracket screw or removing the clip, whichever is being used.
You can now remove the universal HBA.
Chapter 2 • Universal HBA Installation, Configuration, and Removal
33
34
Sun Storage 16 Gb Fibre Channel PCIe Universal Host Bus Adapter, Emulex Installation Guide • July 2015
3
♦ ♦ ♦ C H A P T E R 3 Software Installation
After you have completed the hardware installation and powered on the system, you can install
the universal HBA driver and any other required utilities specific to your operating system, as
described in this chapter.
This chapter contains the following topics:
■
■
■
■
■
■
“Driver Software for the Oracle Solaris OS” on page 35
“Installing Software for the Red Hat and SUSE Linux OSes” on page 36
“Installing Software for VMware Technology” on page 37
“Installing Software for Windows Server 2008 OS” on page 37
“Configuration and Diagnostic Utilities” on page 38
“Upgrading Firmware ” on page 39
Driver Software for the Oracle Solaris OS
Before using the universal HBA, update the universal HBA driver software for the Oracle
Solaris OS with the following SRU version or patches:
■
■
■
Oracle Solaris 11.1 OS for the SPARC and x86 platforms - SRU 6
Oracle Solaris 10 1/13 OS for the SPARC platform - Patch 149622-02
Oracle Solaris 10 1/13 OS for the x86 platform - Patch 149623-02
The latest available SRU versions and patches are located at: http://support.oracle.com/
Oracle Solaris Diagnostic Support
Diagnostic support for the universal HBA is included in the Oracle VTS software. The Oracle
VTS software is available for download at: http://support.oracle.com
For information about the Oracle VTS software, see the Oracle VTS documentation at: http://
docs.oracle.com/cd/E19719-01/index.html
Chapter 3 • Software Installation
35
Installing Software for the Red Hat and SUSE Linux OSes
For information about diagnostic options using the OneCommand Manager utilities, see
“Configuration and Diagnostic Utilities” on page 38.
The emlxtest utility, which is part of the Oracle VTS software, supports the following
functions:
■
■
■
■
Connectivity verification
Firmware version and checksum test
Self-test
Loopback tests
■
■
■
■
External (all universal HBAs (in FC mode only) present in the system)
Internal, single-bit
Internal, 10-bit
Mailbox
Installing Software for the Red Hat and SUSE Linux OSes
Before using the universal HBA, check for the latest drivers at the Oracle support area of the
Emulex web site.
For diagnostic support, you might need to rebuild the Linux driver. Before rebuilding the
drivers for Linux, you must have the required Linux OS installed on the hard disk. The driver
and utilities are available for download at the Oracle support area of the Emulex web site.
To Install the Universal HBA Software for the
Linux OS
36
1.
Go to the Oracle support area of the Emulex web site at:
http://www.emulex.com/downloads/oem-qualified/oracle/
2.
Click the model number (7101684) for the universal HBA for which you want to
install Linux driver software.
3.
Click the link to the Linux Driver section, locate the driver you want to install,
and click the driver you want to install.
4.
Click the driver kit Download icon to copy the driver to a local file system.
5.
Click the applications kit Download icon to copy the management utilities to a
local file system.
Sun Storage 16 Gb Fibre Channel PCIe Universal Host Bus Adapter, Emulex Installation Guide • July 2015
Installing Software for VMware Technology
6.
Click each of the manual icons to open the associated user manual.
7.
Install the driver and management applications for Linux, as described in the
Emulex documentation.
Installing Software for VMware Technology
The universal HBA management applications for VMware technology are available for
download at the Oracle support area of the Emulex web site. However, you must obtain the
drivers from the VMware web site.
To Install the Universal HBA Software for VMware
Technology
1.
Go to the Oracle support area of the Emulex web site at:
http://www.emulex.com/downloads/oem-qualified/oracle/
2.
Click the model number (7101684) of the universal HBA for which you want to
install VMware driver and management application software.
3.
Click the link to the VMware Driver section and click the link to the driver for the
appropriate version of VMware.
4.
From the Description column, click the link to the VMware web site and
download the driver to a local file system.
5.
Return to the Oracle support area of the Emulex web site and, from the
Download column, click the applications kit link to copy the management
applications to a local file system.
6.
From the Documentation column, click each of the manual links to open the
associated user manual.
7.
Install the driver and management applications for VMware, as described in the
Emulex documentation.
Installing Software for Windows Server 2008 OS
The universal HBA driver and applications kits for the Windows Server 2008 OS are available
for download at the Oracle support area of the Emulex web site.
Chapter 3 • Software Installation
37
To Install the Software for the Windows Server 2008 OS
To Install the Software for the Windows Server
2008 OS
1.
Go to the Oracle support area of the Emulex web site at:
http://www.emulex.com/downloads/oem-qualified/oracle/
2.
Click the model number (7101684) for the universal HBA you want to install.
3.
Click the link to the Windows Driver section and do one of the following:
4.
■
Locate the driver kit and applications kit for the appropriate version of
Windows.
■
If available, locate the OneInstall package, which contains all drivers and
applications for Windows.
Do one of the following:
■
Click Download next to the driver kit to copy the driver to a local file system.
■
Click Download next to the OneInstall package to copy the OneInstall
package to a local file system, and skip to Step 6.
5.
Click Download next to the applications kit to copy the management application
to a local file system.
6.
Click each of the manual icons to open the associated user manual.
7.
Install the driver and management applications for the Windows OS, as
described in the Emulex documentation.
Configuration and Diagnostic Utilities
For Oracle Solaris, Linux, VMware, and Windows systems, use the OneCommand Manager
application graphical user interface (GUI) or the OneCommand Manager application commandline interface (CLI) applications to configure the universal HBA. These applications provide
support to do the following:
■
■
38
Discover local and remote hosts, HBAs, targets, and LUNs.
Reset HBAs.
Sun Storage 16 Gb Fibre Channel PCIe Universal Host Bus Adapter, Emulex Installation Guide • July 2015
Upgrading Firmware
■
■
■
■
■
■
Set HBA driver parameters.
Update firmware.
Enable or disable the system BIOS.
Run diagnostic tests on HBAs.
Manage out-of-band HBAs.
Manage local and in-band remote HBAs.
For detailed information about performing any of these functions through the OneCommand
Manager applications, see the Emulex OneCommand Manager application documentation,
located at the Oracle support area of the Emulex web site: http://www.emulex.com/
downloads/oem-qualified/oracle/
Upgrading Firmware
This section provides basic instructions on how to update universal HBA firmware using the
OneCommand Manager graphical user interface (GUI) and command-line interface (CLI).
For detailed information, see the Emulex OneCommand Manager application documentation,
located at the Oracle support area of the Emulex web site: http://www.emulex.com/
downloads/oem-qualified/oracle/
If the universal HBA is in the CNA operating protocol mode and is installed in a system
running the Oracle Linux UEK or Oracle VM operating systems, you must use the elxflash
toolkit to update firmware. This toolkit and instructions are available at the Oracle support area
of the Emulex web site: http://www.emulex.com/downloads/oem-qualified/oracle/
If the universal HBA is in a configuration that allows multiple virtual functions, note that
firmware can only be upgraded in the primary function domain. Any attempt to do so in a
virtual function domain might cause the system to hang.
This section contains the following topics:
■
■
“To Upgrade Firmware Using the OneCommand Manager GUI” on page 39
“To Upgrade Firmware Using the OneCommand Manager CLI” on page 41
To Upgrade Firmware Using the OneCommand
Manager GUI
From the Maintenance or Firmware tab of the OneCommand Manager GUI, you can update
firmware on local and remote HBAs.
Chapter 3 • Software Installation
39
To Upgrade Firmware Using the OneCommand Manager GUI
Before You Begin
Before performing this procedure, ensure the following is true:
■
■
■
■
The universal HBA driver is installed, as described earlier in this chapter.
The OneCommand Manager application is installed and the application is NOT running in
read-only mode.
The HBA firmware zip file is downloaded from the Oracle support area of the Emulex web
site, unzipped, and extracted to a folder on a local drive.
If the universal HBA is already connected to a boot device, the system is in a state in which
this type of maintenance can be performed:
■
■
I/O activity on the bus is stopped.
Cluster software, or any other software that relies on the universal HBA to be available,
is stopped or paused.
1.
From the OneCommand Manager GUI, select Host or Fabric view.
2.
In the discovery-tree, select the universal HBA for which you want to upgrade
firmware.
3.
Select the Maintenance or Firmware tab and click Download Firmware.
4.
If the warning screen appears, click Yes.
The Firmware Download dialog box is displayed.
FIGURE 3-1
5.
40
Firmware Download Dialog Box
From the Firmware Download dialog box, navigate to the unzipped, extracted
firmware file you want to use for the upgrade.
Sun Storage 16 Gb Fibre Channel PCIe Universal Host Bus Adapter, Emulex Installation Guide • July 2015
To Upgrade Firmware Using the OneCommand Manager CLI
You can navigate to the firmware image by clicking Browse or by typing the path to the file in
the Firmware File field in the dialog box.
6.
After you have found the file and it is populated in the Firmware File field, click
Start Download.
A warning dialog box is displayed.
7.
On the warning dialog box, click Yes.
A status bar shows the progress of the download, and the HBA in the discovery tree is
displayed in black text when the update is complete.
Note - If the HBA is offline, the HBA is displayed in red text in the discovery tree.
8.
Click Close.
The Firmware tab displays the upgraded firmware information for the selected HBA.
Note - If the state of the boot code on the board has changed, this change is reflected
immediately on the Port Information tab.
To Upgrade Firmware Using the OneCommand
Manager CLI
This section describes how to update firmware using the OneCommand Manager noninteractive
and interactive command-line interface (CLI). Before performing this procedure, ensure the
prerequisites are met, as described in “To Upgrade Firmware Using the OneCommand Manager
GUI” on page 39.
Do one of the following:
■
From the noninteractive OneCommand Manager CLI, type the following
command:
hbacmd Download <the-WWPN-of-the-HBA> <full-path-and-name-of-firmware-file>
■
From the interactive OneCommand Manager CLI (for the Oracle Solaris OS),
follow these steps:
a. Navigate to the directory containing the emlxadm file (path: /opt/
EMLXemlxu/bin), and run the emlxadm utility.
For example:
Chapter 3 • Software Installation
41
To Upgrade Firmware Using the OneCommand Manager CLI
root@<host-name>:/opt/EMLXemlxu/bin# ./emlxadm
The available HBAs are listed.
b. Select the HBA you want to upgrade (you need to do this only once per
device).
EMLXADM Device Management Utility, Version: 1.08.4.0
Copyright (c) 2004-2012 Emulex. All rights reserved.
Available Emulex HBA's:
1. SFS:emlxs0 : /devices/pci@78,0/pci8086,3c04@2/pci10df,e20e@0/fp@0,0 (CONNECTED)
2. SFS:emlxs1 : /devices/pci@78,0/pci8086,3c04@2/pci10df,e20e@0, 1/fp@0,0
(CONNECTED)
3. SFS: emlxs10 : /devices/pci@78,0/pci8086,3c0a@3,2/pci10df,e20e@0/fp@0,0
(CONNECTED)
Enter an HBA number or zero to exit: 1
c. Upgrade the firmware on the selected HBA by issuing the following
command:
emlxadm> download_fw <full-path-and-name-of-firmware-file>
d. At the prompt, type y to confirm you want to upgrade the firmware.
A message is displayed upon completion of the upgrade.
Download may take several minutes. Do not interrupt.
Downloading...
Done.
e. Type q to quit, or type hba to select a different universal HBA to update.
f. After you have updated all HBAs, type q to quit the emlxadm utility, and
perform a full power reboot of the system.
42
Sun Storage 16 Gb Fibre Channel PCIe Universal Host Bus Adapter, Emulex Installation Guide • July 2015
4
♦ ♦ ♦ C H A P T E R 4 Known Issues
This chapter provides supplementary and workaround information about the universal HBA.
Specific bug identification numbers are provided for service personnel.
This chapter contains the following topics:
■
■
“Link Aggregation Control Protocol (LACP) Cannot Be Used In Certain
Conditions” on page 43
“SAN Boot Fails Via Direct Attached Storage on Oracle SPARC Systems” on page 43
Link Aggregation Control Protocol (LACP) Cannot Be Used
In Certain Conditions
Bug 18707752
Conditions:
■
■
■
System Platform: All supported systems using the Oracle Solaris driver
Operating Protocol Mode of Universal HBA: FC, CNA
Environment: Universal HBA connected directly to supported storage
Issue:
LACP cannot be used on the same port as FCoE or iSCSI.
Workaround:
None.
SAN Boot Fails Via Direct Attached Storage on Oracle
SPARC Systems
Bug 15809064
Chapter 4 • Known Issues
43
SAN Boot Fails Via Direct Attached Storage on Oracle SPARC Systems
Conditions:
■
■
■
■
System Platform: Oracle SPARC systems
Operating Protocol Mode of Universal HBA: FC
Environment: Universal HBA connected directly to supported storage
Boot Method: SAN boot via the universal HBA
Issue:
When the universal HBA is in Fibre Channel (FC) mode in an Oracle SPARC Enterprise T4-1
or T4-2 system, and a direct connection is made with a fiber-optic cable from the universal
HBA to a storage device, the system might not detect any bootable volume on that storage
device. When you attempt to boot using the storage device, an error message is displayed.
ERROR: boot-read fail
Workaround:
Do not boot from a bootable volume on a storage device if that storage device is directly
connected to the universal HBA. Instead, if you want to boot using the storage attached to the
universal HBA, use a SAN topology that includes one or more FC switches connected in the
path between the universal HBA and the target storage device.
You can use a direct connection to storage as long as the system is booting the Oracle Solaris
operating system from a boot device that is not connected directly to the universal HBA.
44
Sun Storage 16 Gb Fibre Channel PCIe Universal Host Bus Adapter, Emulex Installation Guide • July 2015
Glossary
A
ASIC
application-specific integrated circuit
B
BIOS
Basic Input Output System
C
CENELEC
European Committee for Electrotechnical Standardization
CLI
command line interface
CNA
converged network adapter
D
DAC
direct-attach copper
DAS
direct-attached storage
DCR
direct connecting receptacle
DHHS
Department of Health and Human Services
Glossary
45
ECC
E
ECC
Error Checking and Correction
EE
Enhanced Ethernet
EEPROM
electrically erasable programmable read-only memory
ESD
electrostatic discharge
F
FC
Fibre Channel
FCoE
Fibre Channel over Ethernet
G
Gb
gigabit
GbE
gigabit Ethernet
GUI
graphical user interface
H
HBA
host bus adapter
I
IEEE
Institute of Electrical and Electronics Engineers
IP
internet protocol
iSCSI
internet Small Computer System Interface
L
LED
46
light emitting diode
Sun Storage 16 Gb Fibre Channel PCIe Universal Host Bus Adapter, Emulex Installation Guide • July 2015
RoHS
LP
low-profile
LUN
logical unit number
M
MAC
media access control
MSI-X
message signaled interrupts - extended
N
NIC
networking interface card
O
OFC
optical fiber cable
OS
operating system
P
PCI
Peripheral Component Interconnect
PCIe
Peripheral Component Interconnect Express
POST
power-on self test
R
RAM
random access memory
RH
relative humidity
RoHS
Restriction of Hazardous Substances Directive
Glossary
47
SAN
S
SAN
storage area network
SFP+
enhanced small form factor pluggable transceiver
SR
short range
SW
short wave
T
TOR
top of rack
U
UCNA
universal converged network adapter
V
VLAN
virtual local area network
W
WWN
world wide name
WWPN
world wide port name
48
Sun Storage 16 Gb Fibre Channel PCIe Universal Host Bus Adapter, Emulex Installation Guide • July 2015


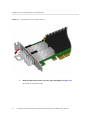

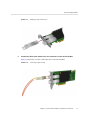


![[1]StorageTek T10000C](http://vs1.manualzilla.com/store/data/005701279_1-def8e2b4b691d6a17c8293fd164d2b7c-150x150.png)


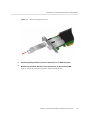
![[1 ] StorageTek SL8500](http://vs1.manualzilla.com/store/data/005684950_1-d7f31af8d49e38e9e4476c8a63e026d0-150x150.png)