1
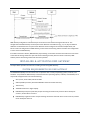
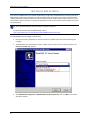
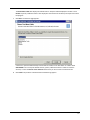
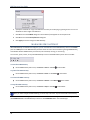
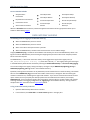
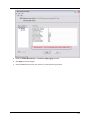
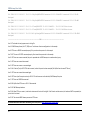
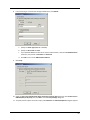
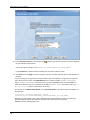
® GlobalSCAPE DMZ Gateway, v.2 User Guide Updated for Module for EFT Server EFT Server 6.0 6.0 GlobalSCAPE, Inc. (GSB) Address: 4500 Lockhill-Selma Road, Suite 150 San Antonio, TX (USA) 78249 Sales: (210) 308-8267 Sales (Toll Free): (800) 290-5054 Technical Support: (210) 366-3993 Web Support: http://www.globalscape.com/support/ © 2005-2009 GlobalSCAPE, Inc. All Rights Reserved Last Updated: April 6, 2009 Table of Contents Introduction to GlobalSCAPE® DMZ Gateway ...................................................................................... 5 Peer Notification..................................................................................................................................... 5 Client Impersonation .............................................................................................................................. 6 DMZ Gateway Packet Forwarding .......................................................................................................... 6 Securing DMZ Gateway Data .................................................................................................................. 6 Installing & Activating DMZ Gateway ................................................................................................... 7 System Requirements for DMZ Gateway ............................................................................................... 7 Installing DMZ Gateway ......................................................................................................................... 8 Activating DMZ Gateway ...................................................................................................................... 14 Configuring DMZ Gateway .................................................................................................................... 15 The DMZ Gateway Interface................................................................................................................. 15 Configuring DMZ Gateway ................................................................................................................... 16 Creating and Managing Profiles ........................................................................................................... 17 Controlling Access by IP Address .......................................................................................................... 19 Managing DMZ Gateway ...................................................................................................................... 20 DMZ Gateway Status ............................................................................................................................ 21 DMZ Gateway Logging .......................................................................................................................... 22 Log Example.......................................................................................................................................... 24 DMZ Gateway and EFT Server Communication................................................................................. 27 Enabling DMZ Gateway in EFT Server .................................................................................................. 27 Troubleshooting DMZ Gateway Communication ................................................................................. 28 Routing AS2 Traffic through DMZ Gateway ......................................................................................... 29 Using DMZ Gateway as an Outbound Proxy ........................................................................................ 29 DMZ Gateway EULA.............................................................................................................................. 37 iii DMZ Gateway User Guide iv INTRODUCTION TO GLOBALSCAPE ® DMZ GATEWAY GlobalSCAPE DMZ Gateway is designed to reside in the demilitarized zone and provide secure communication with EFT Server behind intranet firewalls without requiring any inbound firewall holes between the internal network and the DMZ. ® DMZ Gateway (single-Site) supports connections from EFT Server or EFT Server - Enterprise. DMZ Gateway Enterprise (multi-Site) connects to EFT Server Enterprise only. DMZ Gateway Enterprise supports multiple simultaneously connected Sites. DMZ Gateway Enterprise can listen at the same IP address to one or more Sites on EFT Server, as long as the Sites that are connected each request a different port. If you want multiple Sites to use the same port, for example, if you want Site A listening on port 80 for plaintext HTTP connections and Site B listening on port 80 for WTC connections, then a 1-to-1 mapping is required to avoid port conflicts. You can do this with DMZ Gateway Enterprise by creating one or more Profiles in DMZ Gateway that can each map to one or more Sites. PEER NOTIFICATION EFT Server establishes peer notification channels with DMZ Gateway, and then DMZ Gateway sends all data only through these channels. The peer notification channel (PNC), the outbound-initiated two-way socket connection used for communication, by default on port 44500 on the DMZ Gateway, acts as a proxy for all transmissions through DMZ Gateway; the result is that EFT Server behaves just as if it were in the DMZ, but it is actually safely behind the internal network firewall. The peer notification channel replaces the traditional inbound socket connection method for socket communications. EFT Server and DMZ Gateway communicate over a peernotification channel using a proprietary protocol. Requests for client connectivity to DMZ Gateway are forwarded to EFT Server; EFT Server then opens connections to DMZ Gateway using a raw socket connection; the DMZ Gateway then pipes all data to the internal server using this socket without any translation. Thus, if the client is using HTTPS, then HTTPS traffic goes over that pipe. There is no forwarding of client requests. The port that EFT Server and DMZ Gateway use to communicate with each other is used for PNC communication and EFT Server -> DMZ Gateway sockets for the brokering of client connections. EFT Server specifies which ports on DMZ Gateway are used for the various protocols. For example, you could use port 21 for plaintext in the back end Server using local traffic, but configure DMZ Gateway to listen to port 2112 for FTP traffic. You could also enable ports and protocols on the backend Server, but disable them on DMZ Gateway. After restart or settings change, EFT Server determines whether a DMZ Gateway is configured. If so, EFT Server tries to establish a connection. After it connects, EFT Server assumes that DMZ Gateway exists and works correctly. In case of any error (e.g., connection refused, connection reset by peer, PNC protocol error) EFT Server reconnects. It does not matter whether such errors occurred during connection initialization or later when transfers are taking place. That is, any connection error or PNC protocol error causes EFT Server to remove any existing connection objects and attempt to create a new PNC connection. This allows EFT Server to be independent of DMZ Gateway configuration. EFT Server starts working with DMZ Gateway as soon as DMZ Gateway is running and configured properly. EFT Server polls DMZ Gateway using the Connect() function while trying to maintain the PNC connection in a proper state. Any error causes a reconnect. 5 DMZ Gateway User Guide CLIENT IMPERSONATION DMZ Gateway performs client impersonation, which means it replaces EFT Server's socket IP addresses and port settings with values taken from the connecting client socket. None of the sockets created through DMZ Gateway have the DMZ Gateway IP address and port; instead, all sockets created through DMZ Gateway have the IP address and port of the client connection. All information stored in logs or shown in the Administrator status pane have the actual connecting client IP addresses and ports. Authentication is delegated to the back end EFT Server, as if the client were logging in directly to EFT Server from the internal network. DMZ Gateway essentially acts as a Layer 3 router and simply routes data from the client to EFT Server. Shown below is the general sequence. This sequence assumes that EFT Server has already established the Peer Notification Channel (PNC) to the DMZ Gateway. 1. Client makes socket connection to DMZ Gateway. 2. DMZ Gateway sends notification message to EFT Server using PNC. 3. EFT Server opens a new outbound connection to DMZ Gateway Server. 4. DMZ Gateway "glues together" the client socket with EFT Server socket established in step 3. 5. DMZ Gateway routes data between client and EFT Server. 6. Client and EFT Server proceed as if the client were connected directly to EFT Server. DMZ GATEWAY PACKET FORWARDING DMZ Gateway is not a network hardware device like a bridge/router, so it does not "pass through" modified packets. The DMZ Gateway application (at the application layer) reads in a buffer full of data from the client TCP/IP stream (~4KB) and then sends that data over EFT Server's TCP/IP socket. They are completely different TCP/IP packets, with different source and destination locations. The headers, therefore, are different; depending upon the routes, the packet fragmentation, window size, and so on might be different, however, the payload is NOT changed at all. SECURING DMZ GATEWAY DATA DMZ Gateway allows or restricts incoming EFT Server Peer Notification Channel (PNC) connections based upon IP address. No username/password credentials are sent over the channel to establish the connection. The data over this channel is a binary header/payload message system with name/value pairs and serialized data. There is nothing sensitive contained in the PNC notifications that requires encryption. The brokered sockets that "glue together" client connections to EFT Server are not encrypted unless you are using SSL- or SSH-based protocols. You should use SSL- or SSH-based protocols to encrypt sensitive information. If a client is using a plain text protocol to communicate to EFT Server, then the path from the client to DMZ Gateway is in clear text, and the data traveling over the WAN is vulnerable to malicious users. Securing the data on the short path from DMZ Gateway to EFT Server provides little added security, because the route from the DMZ Gateway to EFT Server is owned by the same enterprise, and not likely to have threats; however, if the client is connecting to EFT Server using SFTP or an SSL-based protocol (FTPS or HTTPS), then the data is encrypted when it is sent to the DMZ Gateway, and the bytes are passed through to EFT Server and to the WAN in that same encrypted format. 6 DMZ Gateway configuration is obtained only from EFT Server and used until changed at EFT Server. The configuration tells DMZ Gateway on which ports and IP addresses it should listen (e.g., 21, 22, 80), and which IP addresses are allowed access. The ports and IP addresses can be configured for each Site independently. EFT Server sends new configuration to DMZ Gateway, which restarts the listening sockets if needed. The configuration is never stored on DMZ Gateway. If the PNC connection is broken, DMZ Gateway stops listening on all sockets and waits until EFT Server reconnects to the PNC. All existing sockets are open and continue working normally. Once EFT Server reconnects, DMZ Gateway restarts all listening sockets and continues operation. INSTALLING & ACTIVATING DMZ GATEWAY The topics below provide instructions for installing and activating DMZ Gateway. SYSTEM REQUIREMENTS FOR DMZ GATEWAY The GlobalSCAPE Quality Assurance team tests our products with a variety of operating systems, software, and hardware. It is possible for DMZ Gateway to function with other operating systems, software, and hardware, but is only tested and approved for use with the following: XP Pro, Vista, Server 2003, and Server 2008 x86 compatible processor (tested with 600 MHz dual zeon to 3Ghz dual core) 1GB memory 1024x768 resolution or higher display DMZ Gateway Enterprise (multi-Site) accepts incoming connections only from EFT Server Enterprise version 6, and EFT Server version 5. DMZ Gateway single-Site version accepts incoming connections from EFT Server versions 5 and 6, and EFT Server Enterprise version 6. 7 DMZ Gateway User Guide INSTALLING DMZ GATEWAY Two versions of DMZ Gateway are available: DMZ Gateway (single Site) and DMZ Gateway Enterprise (multi-Site). DMZ Gateway (single Site) is available as an add-on module to EFT Server (basic) or EFT Server Enterprise. DMZ Gateway Enterprise is available only with EFT Server Enterprise edition. Neither edition requires the use of a trial serial number, however, both have a 30-day trial period after which you must provide a serial number to continue using the product. EFT Server and DMZ Gateway must be installed on separate computers. For details of clustering with the DMZ Gateway, refer to http://help.globalscape.com/help/guides/InstallingDMZGatewayInCluster.pdf. To install DMZ Gateway (single or multi-site) 8 1. Close all unnecessary applications so that the installer can update system files without rebooting the computer. 2. The DMZ Gateway is installed with the same installer used to install EFT Server. Start the installer. The Choose an installer page appears. 3. Click DMZ Gateway (single site) or DMZ Gateway Enterprise (multi-site), then click Next. The installer description appears. 4. Click Next. The Welcome page appears. 5. Click Next. The License Agreement appears. 9 DMZ Gateway User Guide 6. 10 Read the license then click I Agree. The Choose Install Location page appears. The Destination Folder box displays the default location. Keep the default displayed in the box or click Browse to specify a different location. Also displayed is the amount of hard drive space required to install the program. 7. Click Next. The shortcuts page appears. A shortcut to open the DMZ Gateway interface will be installed on the Start Menu in a folder called GlobalSCAPE. You can keep this default location, specify a different location in which to install the shortcut, or select the Do not create shortcuts check box if you do not want to create shortcuts. 8. Click Install. The product is installed and the installation log appears. 11 DMZ Gateway User Guide 9. 12 Click Next. The completed page appears. The Launch Administrator Interface and Show Readme check boxes are selected by default. Clear the check boxes if you do not want to read the release notes or launch the interface to configure DMZ Gateway. (You can also access the release notes, notes.txt, in the installation folder.) 10. Click Finish. If you left the Show Readme check box selected, the release notes appear. If you left the Launch Administrator Interface check box selected, the Welcome page appears. 11. Activate DMZ Gateway or start the trial evaluation. 12. If a message appears asking if you want to start the DMZ Gateway service, click Yes. The DMZ Gateway Administrator interface appears. If you have already provided the DMZ Gateway computer's IP address to EFT Server, the interface should show that you are connected. If not, connect to EFT Server and provide the DMZ Gateway's IP address on the Gateway node of the Site and Configure DMZ Gateway to connect to EFT Server. 13 DMZ Gateway User Guide ACTIVATING DMZ GATEWAY To continue using DMZ Gateway after the 30-day trial has expired, you must activate it by registering the serial number. To activate online, you must be connected to the Internet, and registration must be performed through EFT Administrator on the EFT Server computer. You cannot activate through a remote installation of EFT Administrator. You can also e-mail the manual registration information to GlobalSCAPE Technical Support. GlobalSCAPE will confirm your registration and send you a .reg file. You can send the e-mail from any computer with Internet access, and then transfer the .reg file to the computer on which you are installing the software. If you are moving a Server from one computer to another, contact the GlobalSCAPE customer service team or your account manager so that we can adjust your account on our activation and registration server. Activation on the new computer will not be possible until the adjustment is made. If you are upgrading a Server residing in a clustered environment, contact GlobalSCAPE technical support for assistance. If EFT Server is installed on Windows 2003, log in to EFT Server as a user with an account having administrator privileges instead of "Local System" privileges to write the .reg file to the registry. 14 To activate DMZ Gateway 1. Open the DMZ Gateway Administrator Interface and click Enter Serial Number. The Online Registration dialog box appears. 2. In the Serial Number field, provide your serial number. 3. In the Name field, provide your name and/or your company name. 4. (Optional) If you have changed the name on the account since registering the trial or previous serial number, select the Update user information check box. 5. If you are behind a proxy, click Proxy and configure the proxy settings. If a firewall or a proxy server is in use, your network administrator should ensure that outbound port 80 is open during the registration process. 6. Click Register. You should receive a message confirming registration. 7. Click OK. Registration is complete. If you have any problems with activation, visit GlobalSCAPE Customer Support, at http://www.globalscape.com/support/customerservice.aspx. CONFIGURING DMZ GATEWAY The topics below provide instructions for configuring DMZ Gateway. THE DMZ GATEWAY INTERFACE The DMZ Gateway Enterprise interface is used for mapping and viewing DMZ Gateway connections. The group of configuration settings is called a Profile. The interface displays the configuration for the last Profile modified or viewed the last time the interface was opened or the first (default) Profile if no "last viewed" profile value is available. The DMZ Gateway service status appears in the Status area with the status of the Profile selected in the tree. A red icon indicates that the DMZ Gateway Service is not running. A warning icon indicates that the DMZ Gateway Service is running, but one or more profiles have errors or the profile is ready and listening, but no Servers are connected. A green icon indicates that the DMZ Gateway Service is running and connected to EFT Server. When a Profile is selected in the Profile tree, its status appears in the Status area (e.g., "Connected to EFT Server"), and the right pane displays its configuration. 15 DMZ Gateway User Guide When the Profile node is selected in the Profile tree, the mapping box in the right pane displays the port assignments used by DMZ Gateway to connect to EFT Server. (The ability to create new profiles, rename profiles, and delete profiles is available in DMZ Gateway Enterprise only.) CONFIGURING DMZ GATEWAY Configuring DMZ Gateway includes specifying the listening IP address for incoming clients, specifying the listening IP address and port for EFT Server, and specifying the IP addresses that are allowed or denied access. To configure DMZ Gateway 1. 16 In the Profiles tree, click the default Profile or click New to create a new profile. (Creating a new Profile is available only in DMZ Gateway Enterprise.) 2. In right pane, in the Listening IP for incoming clients box, specify the IP address on which DMZ Gateway listens for connections or click All Incoming. 3. In the Listening IP for EFT Server and Port boxes, specify the IP address and port on which DMZ Gateway communicates with EFT Server, or click All Incoming. The connection will be refused if the port is being used by another DMZ Gateway/Site or if the IP address is on the IP address ban list. 4. (Optional) All IP addresses are granted access by default. To grant or deny access to specific IP addresses, click IP Ban/Allow List. The IP Ban/Allow List dialog box appears. Refer to Controlling Access by IP Address for the procedure. 5. Click Apply to save the changes on DMZ Gateway. When you make changes to DMZ Gateway Server, you must stop and restart any Site connected to DMZ Gateway. CREATING AND MANAGING PROFILES DMZ Gateway has a default Profile for which you define the listening IP address and port of EFT Server and the IP address ban list. When DMZ Gateway (single-Site) connects, only the default Profile is displayed. DMZ Gateway Enterprise allows you to define multiple Profiles. The graphic to the right of the Profile list illustrates the mapping between systems. 17 DMZ Gateway User Guide When you open the DMZ Gateway Enterprise interface, it displays the configuration for the last profile modified or viewed the last time the interface was open. You can only create, rename, and delete Profiles in DMZ Gateway Enterprise. When you create a profile, you assign the Listening IP address for the incoming clients and the Listening IP address and port for EFT Server. If an IP address is specified in the Profile's configuration settings (instead of All Incoming), and that IP address is not present on the system (e.g., the IP addresses are dynamic), the Profile is loaded in error, and the error is sent to the DMZ Gateway log and the Windows Event log. To create profiles 1. Open the DMZ Gateway interface. 2. In the Profiles tree, click New. A new Profile appears in the tree. 3. Provide a name for the Profile. The name is limited to 128 characters, but only approximately the first 8 characters will be displayed without scrolling 4. Click Apply. 5. The DMZ Gateway interface automatically increments the port number by one. If you change it back to the same port and IP address as another profile, an error prompt appears. Click OK and then adjust the settings. To rename a profile 18 1. Open the DMZ Gateway interface. 2. In the Profiles tree, click the Profile that you want to rename, then click Rename. The name becomes editable. 3. Provide a new name for the Profile, then press ENTER. The name in the tree updates and the name in the right pane after Configuration Settings for updates. 4. Click Apply. To delete a profile You cannot delete the Profile if it is the only Profile configured. 1. Open the DMZ Gateway interface. 2. In the Profiles tree, click the Profile that you want to delete, then click the delete icon message appears. 3. Click Yes. The Profile is removed from the tree. 4. Click Apply. . A confirmation CONTROLLING ACCESS BY IP ADDRESS By default, all IP addresses are granted access to DMZ Gateway. You can grant access to only one specific IP address or a range of IP addresses, or deny access to one specific address or a range of addresses. To grant/deny access by IP Address 1. In the Profile tree, click the default Profile or click New to create a new profile. (Creating a new Profile is available only in DMZ Gateway Enterprise.) 2. Click IP Ban/Allow List. The IP Ban/Allow List dialog box appears. 3. The dialog box displays the IP addresses that are granted or denied access. By default, all IP addresses are granted access, so when Granted access is selected, no exceptions are displayed below. 4. Click Granted access or Denied access. If most IP addresses are allowed access, click Granted access, then add the exceptions. If most IP addresses are denied access, click Denied access, then add the exceptions. 5. Click Add. The IP Mask dialog box appears. 19 DMZ Gateway User Guide 6. Specify the IP address or range of IP addresses to which you are denying or granting access. You can use wildcards to select ranges of IP addresses. 7. Click OK to close the IP Mask dialog box. The IP address/mask appears in the exceptions list. 8. Click OK to close the IP Access/Ban List dialog box. 9. Click Apply to save the changes on DMZ Gateway. MANAGING DMZ GATEWAY After DMZ Gateway is installed and configured, you can view statistics of the DMZ Gateway service in the Status pane. The Status pane in the DMZ Gateway interface shows the size of items transferring through DMZ Gateway, and indicates whether DMZ Gateway is connected, not connected, running, or not running. You can start, pause, restart, or stop the DMZ Gateway service on the DMZ Gateway main menu or toolbar. To start the DMZ Gateway On the DMZ Gateway main menu, click Action > Start or click Start on the toolbar. To pause the DMZ Gateway On the DMZ Gateway main menu, click Action > Pause or click Pause on the toolbar. To restart the DMZ Gateway On the DMZ Gateway main menu, click Action > Restart or click Restart on the toolbar. To stop the DMZ Gateway On the DMZ Gateway main menu, click Action > Stop or click Stop on the toolbar. When you make changes to DMZ Gateway, you must stop and restart any Site connected to the Gateway. In the Windows Services dialog box, the service is called GlobalSCAPE Gateway, and in the Task Manager, it is called GWService.exe. The DMZ Gateway interface is called GWAdmin.exe in the Task Manager. 20 DMZ GATEWAY STATUS The top pane of the DMZ Gateway interface displays the DMZ Gateway service status and the selected profile's status. The pane displays: When DMZ Gateway service is stopped. When DMZ Gateway service is running but no Site is connected to the selected profile. When DMZ Gateway service is running and there is a Site connected to the profile and a port is assigned. When DMZ Gateway service is running and there is a Site connected to the profile, but no port is assigned. When the All Profiles node is selected, as shown below, the Server Status area displays the size of items transferring through DMZ Gateway. (Because All Profiles is selected, no status appears in the Selected profile status area.) 21 DMZ Gateway User Guide Server statistics include: Accepted Client Connections Rejected Client Connections Connections Closed Active Client Connections Client Bytes Read Client Bytes Read/s Client Bytes Written Client Bytes Written/s EFT Server Bytes Read EFT Server Bytes Read/s EFT Server Bytes Written EFT Server Bytes Written/s When the All Profiles node is selected, a check box appears at the bottom of the right pane that allow you to enable or disable debug logging. DMZ GATEWAY LOGGING The following events are logging to the Windows Event log: When the DMZ Gateway service is started. When the DMZ Gateway service is started. When an EFT Server attempt to bind to a port fails. When the DMZ Gateway is unable to start the listener due to an IP address change. A log file, DMZActivity.log, is created in the installation root directory for the current DMZ Gateway session. The log file records the DMZ Gateway service starting and stopping time (the time on EFT Server computer) and EFT Server connection requests. The DMZ Gateway <-> EFT Server connection activity can be logged in the log file if the registry entry of DMZ_ROOT/Settings/Use activity log exists with a value of yes. This registry setting can be changed in the DMZ Gateway Administrator interface by selecting the Enable DMZ Gateway <-> EFT Server debug logging. You can also configure the registry setting manually by running the scripts DMZActivityLogSetting_ON.reg or DMZActivityLogSetting_OFF.reg, found in the installation directory: By default, each log file has maximum size of j1024*1024, and 10 rotation files are used for archiving. The rotation files are named DMZActivity.log_# where # is the number of the archive, 1 through 10. After the 10th log file reaches its maximum size, numbering starts again with number 1. If you want to create EFT Server Rules to clean up the archives, be sure you specify the cleanup by date and use a wildcard for the number. (For example, DMZActivity.log_*) You can edit the log file name and location, maximum file size, number of files to be used for archiving, and so on in the logging configuration file, logging.cfg in the installation directory. The log content is compliant with W3C convention. See the Log Example, below. To log connection activity to the file 22 1. Open the DMZ Gateway Administrator interface. 2. In the Profile list, click All Profiles. The Server Status appears in the right pane. 3. Select the Enable DMZ Gateway <-> EFT Server debug logging check box. 4. Click Apply to save the changes. 5. Stop the DMZ Gateway service, then restart it to verify that the log is created. 23 LOG EXAMPLE The following is a capture of DMZ Gateway session. The number in front of each line is not part the of log, but is for commenting purposes. Refer to the description of each line below the log. The fields displayed in the log (as shown in line 3 of the log) are: time status 0 = failure 1=success rs-ip = remote EFT Server IP:Port rs-comment = remote EFT Server comments s-ip = Gateway IP:port s-comment = Gateway comments c-ip = Client facing (in Gateway) IP:Port c-comment = Client facing (in Gateway) comments ---------------------------------------- Start -----------------------------1: #Version: 1.0 2: #Date: 15-Dec-2008 3: #Fields: time status rs-ip rs-comment s-ip s-comment c-ip c-comment 4: 2008-12-15 15:19:22 1 - - 10.0.0.159:44500 Listener+started - 5: 2008-12-15 15:19:22 1 - - 10.0.0.138:44501 Listener+started - 6: 2008-12-15 15:19:22 1 10.0.0.159:0 MySite@gs0022+Connected 10.0.0.159:44500 Connected 10.0.0.138:8080 Assigned 7: 2008-12-15 15:19:23 1 10.0.1.5:0 MySite@XPP-EFT6+Connected 10.0.0.138:44501 Connected 10.0.0.159:21 Assigned 8: 2008-12-15 15:19:23 1 10.0.1.5:0 MySite@XPP-EFT6+Connected 10.0.0.138:44501 Connected 10.0.0.159:80 Assigned 24 9: 2008-12-15 15:19:23 1 10.0.1.5:0 MySite@XPP-EFT6+Connected 10.0.0.138:44501 Connected 10.0.0.159:443 Assigned 10: 2008-12-15 15:21:02 1 10.0.0.174:0 MySite@rename 10.0.0.159:44500 Outbound-only+proxy - - 11: 2008-12-15 15:21:41 1 10.0.0.174:0 MySite@rename+Outbound-only+connection+deleted 10.0.0.159:44500 Connection+deleted - 12: 2008-12-15 15:22:15 1 10.0.0.174:0 [email protected]:44500 Outbound-only+proxy - 13: 2008-12-15 15:23:51 0 10.0.1.5:0 [email protected]:44501 - 10.0.0.159:21 Port+in+use 14: 2008-12-15 15:23:51 0 10.0.1.5:0 [email protected]:44501 - 10.0.0.159:80 Port+in+use 15: 2008-12-15 15:26:04 1 10.0.0.174:0 MySite@rename+Outbound-only+connection+deleted 10.0.0.159:44500 Connection+deleted - 16: 2008-12-15 15:34:55 0 10.0.0.174:0 Request+from+site+MySiteSMB+on+computer+rename+is+denied!+Baseline+EFT+Server+tried+to+connect+to+Enterprise+DMZ. Failed - - 10.0.0.159:44500 17: 2008-12-15 15:36:08 1 10.0.0.159:0 MySite@gs0022+Deleted 10.0.0.159:44500 Connection+deleted 10.0.0.138:8080 Deleted 18: 2008-12-15 15:36:08 1 10.0.1.5:0 MySite@XPP+Deleted 10.0.0.138:44501 Connection+deleted 10.0.0.159:21 Deleted 19: 2008-12-15 15:36:08 1 10.0.1.5:0 MySite@XPP+Deleted 10.0.0.138:44501 Connection+deleted 10.0.0.159:80 Deleted 20: 2008-12-15 15:36:08 1 10.0.1.5:0 MySite@XPP+Deleted 10.0.0.138:44501 Connection+deleted 10.0.0.159:443 Deleted 21: 2008-12-15 15:36:08 1 - - - DMZ+Gateway+Server+Closed. - 22: 2008-12-15 15:36:08 1 - - - DMZ+Gateway+Shutdown. - - 23: 24: 25: 2008-12-15 15:36:12 1 - - 10.0.0.159:44500 Listener+started - 26: 2008-12-15 15:36:12 1 - - 10.0.0.138:44501 Listener+started - 27: 2008-12-15 15:36:12 1 10.0.1.5:0 MySite@XPP-EFT6+Connected 10.0.0.138:44501 Connected 10.0.0.159:21 Assigned 25 DMZ Gateway User Guide 28: 2008-12-15 15:36:12 1 10.0.1.5:0 MySite@XPP-EFT6+Connected 10.0.0.138:44501 Connected 10.0.0.159:80 Assigned 29: 2008-12-15 15:36:12 1 10.0.1.5:0 MySite@XPP-EFT6+Connected 10.0.0.138:44501 Connected 10.0.0.159:443 Assigned 30: 2008-12-15 15:36:12 0 10.0.1.5:0 Test@XPP-EFT6 10.0.0.138:44501 - 10.0.0.159:21Port+in+use 31: 2008-12-15 15:36:12 0 10.0.1.5:0 Test@XPP-EFT6 10.0.0.138:44501 - 10.0.0.159:80Port+in+use 32: 2008-12-15 15:36:13 1 10.0.0.159:0 MySite@gs0022+Connected 10.0.0.159:44500 Connected 10.0.0.138:8080 Assigned ----------------------------------------------END--------------------------------Line 1-3: The header that only appears once in the log file Line 4-5: DMZ Gateway listener (for EFT, PNC) starts. Two listeners from two configurations in this example Line 6: EFT Server on GS0022 connected properly; Only one site and one protocol in this example Line 7-9: EFT Server on XPP-EFT6 connected properly; One site and three protocols in this example Line 10: EFT Server on rename connected; No port is requested and so DMZ Gateway acts as outbound-only proxy Line 11: EFT Server on rename disconnected Line 12: EFT Server on rename re-connected again Line 13-14: A 2nd site (Test) in XPP-EFT6 tried to connect, but both the ports has been occupied [Site MySite from the same EFT Server] Line 15: EFT Server on rename disconnected again Line 16: EFT Server (non-Enterprise version) on 10.0.0.174 tried to connect and is denied by DMZ Gateway Enterprise Line 17: EFT Server on GS0022 disconnected Line 18-20: MySite from EFT Server on 10.0.1.5 disconnected Line 21-22: DMZ Gateway shutdown Line 23-24: When EFT Server restarts, it checks the existence and the size of the log file. If the file exists and has content, the header will NOT be repeated, but print a blank line instead Line 25-32: The restarted DMZ Gateway connects to EFT Servers For detailed information about W3C Extended Log File Format, refer to http://www.w3.org/TR/WD-logfile 26 DMZ GATEWAY AND EFT SERVER COMMUNICATION The topics below provide details of DMZ Gateway and EFT Server Communication and special configurations. ENABLING DMZ GATEWAY IN EFT SERVER You can enable DMZ Gateway when you create the Site or enable it later in the EFT Server Administrator. In the Site Setup wizard for both standard and High Security Sites, EFT Server displays the Perimeter Security configuration page that asks whether you will be using DMZ Gateway Server, and allows you to enter the DMZ Gateway IP address and port number. If Connect this site to EFT Server's DMZ Gateway is selected when you are creating a Site in the Site Setup wizard, EFT Server attempts to establish a socket connection to DMZ Gateway when you click Next. If the socket connection fails, a message appears in which you are allowed to provide the DMZ Gateway information again or disable DMZ Gateway and continue without it. (You can attempt to configure it again later.) If the socket connection is successful, EFT Server applies the settings and continues with Site setup. If you attempt to connect DMZ Gateway Enterprise to EFT Server (basic), an error message will appear stating that you are using the wrong edition of DMZ Gateway. To enable DMZ Gateway in EFT Server Administrator 1. In EFT Server Administrator, connect to EFT Server and click the Server tab. 2. Click the node of the Site you want to connect with the DMZ Gateway, then click the Gateway node. 3. In the right pane, the DMZ Gateway tab appears. 4. Select the Enable the DMZ Gateway as a proxy check box. 5. Specify the IP address and the port number of the DMZ Gateway to which you are connecting. The default port is 44500. The connection will be refused if the port is being used by another DMZ Gateway/Site or if the IP address is on the IP address ban list.) 6. In the Protocols area, select the check boxes for the protocols and the ports that DMZ Gateway will use. This is a separate configuration from the ports that EFT Server uses. For example, you could use port 21 for FTP traffic for EFT Server, but port 14421 for FTP traffic through the DMZ Gateway. 7. If you are using DMZ Gateway with a PASV mode IP address, click PASV settings. The Firewall/NAT Routing dialog box appears. a. Select the Assign PASV mode IP address check box, then specify the IP address and port range. b. Click OK. 27 DMZ Gateway User Guide 8. Click Apply to save the changes on EFT Server. 9. Establish a new connection with EFT Server by stopping and restarting connected Sites. a. In the left pane, click the Site node. b. In the right pane, click the General tab. c. Click Stop. The Site Status area displays "Stopped" with a red ball icon. d. Click Start. The Site Status area displays "Running" with a green ball icon. TROUBLESHOOTING DMZ GATEWAY COMMUNICATION There are a variety of configurations that can prevent the EFT Server and DMZ Gateway from communicating. For example, if the DMZ Gateway computer's firewall is blocking connections, EFT Server will not be able to connect to DMZ Gateway. If the status icon in DMZ Gateway does not change color to green indicating a successful connection, verify the following: 1. Verify that the services for both EFT Server and DMZ Gateway are started. (Look in the Services dialog box in the Windows Control Panel or the Task Manager.) 2. If you make changes in DMZ Gateway, make sure to click Apply. Stop and then restart the service and/or the Site after making changes. 3. Verify that the IP address for EFT Server is not blocked in DMZ Gateway's IP Access Exception list. By default all IP addresses are granted access until you block or allow specific addresses. (Refer to Configuring DMZ Gateway for the procedure for blocking/unblocking IP addresses.) 4. Verify that EFT Server can reach the IP address that DMZ Gateway is listening on. 5. If you made configuration changes in EFT Server, especially connection settings (protocols allowed, ports, etc.), make sure to stop and then restart EFT Server service. Once restarted, make sure EFT Server is running (listening for new connections) and that the Gateway remains enabled. 6. Verify that the DMZ Gateway settings in EFT Server have the proper IP address and port for the Gateway and that the allowed protocols and ports have been defined for allowed incoming client connections to the Gateway. 7. Try pinging from EFT Server computer to the DMZ Gateway computer and from the DMZ Gateway computer to EFT Server computer. If you cannot connect, verify that there is no firewall that would block connections. If a connection between EFT Server and DMZ Gateway is indicated, but clients cannot connect to EFT Server through the Gateway, verify that you can connect to EFT Server using a client account from within your network. If you can connect to EFT Server using a client account from within your network, it indicates something is not configured properly in the DMZ Gateway settings, either in DMZ Gateway or in EFT Server. Verify that EFT Server and DMZ Gateway are connected (see above) and that, in EFT Server<--> Gateway configuration settings, the correct protocols and ports are specified for incoming client connections to the Gateway. These are the ports on which external clients will connect to the Gateway. If no protocol is enabled or the wrong port is defined, clients will not be able to connect to the Gateway. If you can connect to EFT Server using a client account from within your network, then there is a configuration issue in EFT Server. Review your configuration of user accounts and connection settings. 28 ROUTING AS2 TRAFFIC THROUGH DMZ GATEWAY Using the DMZ Gateway as proxy is available only in the Enterprise version of EFT Server. You can configure Event Rules to cause AS2 traffic to route through the DMZ Gateway using the AS2 Send file to host Action. (Available in EFT Server Enterprise) You can use the AS2 Send File to host Action in the Folder Monitor, Timer, and all file-based Events. To route AS2 traffic through DMZ Gateway 1. Create a new Event Rule, such as a File Uploaded event. (If necessary, refer to Creating Event Rules in the EFT Server documentation.) 2. Add the AS2 Send file to host Action to the Rule, then click the file or host link. The AS2 Send File dialog box appears. 3. In the AS2 Send File dialog box, specify trading partner profile to use or define the trading partner options. 4. Add the Copy/Move File to Host Action to the Rule. 5. In the Rule pane, click one of the undefined parameters (e.g., '%FS.PATH%'). The Offload Action Wizard appears. 6. Follow the instructions in Using DMZ Gateway as an Outbound Proxy to define the Rule. USING DMZ GATEWAY AS AN OUTBOUND PROXY Using the DMZ Gateway as proxy is available only in the Enterprise version of EFT Server. DMZ Gateway's primary use is as an inbound proxy. Outbound connections that originate from EFT Server Enterprise will route through normal network mechanisms to reach the destination; however, it is possible to configure EFT Server's Event Rules using the Copy/Move file to host Action to use the DMZ Gateway Enterprise as an outbound proxy. To configure an Event Rule to use DMZ Gateway Enterprise as an outbound proxy 1. Follow the procedure in Creating Event Rules, or select the rule to which you want to add the Action. For example, create a Scheduler (Timer) Event. 2. In the right pane, in the Actions list, click Copy/Move (push) file to host. 3. In the Rule pane, click one of the undefined parameters (e.g., '%FS.PATH%'). 29 DMZ Gateway User Guide The Offload Action Wizard appears. 30 4. On the Offload method box, specify a protocol type for the connection: Local (Local File or LAN), FTP (standard File Transfer Protocol), FTP SSL/TLS (AUTH TLS), FTP with SSL (Explicit encryption), FTP with SSL (Implicit encryption), SFTP using SSH2 (Secure Shell), HTTP (HyperText Transfer Protocol), HTTPS (Secure HTTP access). 5. If you chose anything but Local do the following; otherwise, skip to step 12. a. In the Host address box, type the IP address. b. The Port number for the selected protocol changes automatically based on the offload method. Provide a different port number, if necessary. c. Provide the Username and Password needed to establish the connection. 6. Select the Use connected client's login credentials to authenticate check box if you want to use the local system account to authenticate. 7. If you chose SFTP: a. In the SFTP Public Key File Path box, type the path or click the open icon to browse to and select the path. b. In the SFTP Private Key File Path box, type the path or click the open icon to browse to and select the path. c. In the SFTP Key Passphrase box, provide the key's passphrase. 8. 9. If are connecting to a remote host through a SOCKS server, click SOCKS. a. Specify the Socks Type (SOCKS4 or SOCKS5). b. Specify the Host name and Port. c. If you specified SOCKS5 and EFT Server requires authentication, select the Use Authentication check box, then provide a Username and Password. d. Click OK to return to the Offload Action Wizard. Click Proxy. 10. Select the Use proxy settings below when connecting to remote host check box, click Use EFT Server's DMZ Gateway as the proxy, then click OK to close the Proxy Settings dialog box. 11. To specify transfer options and time stamps, click Advanced. The Advanced Options dialog box appears. 31 DMZ Gateway User Guide 32 a. In the General transfer options area, you can provide more control over Max concurrent transfer threads, Connection timeout, Connection retry attempts, and Delay between retries. When files are being transferred with Event Rules (copy/move), if there are connection problems (e.g., the network is unavailable), EFT Server will attempt to establish a connection the number of times specified in Connection retry attempts. When EFT Server is able to re-establish the connection, it continues to transfer the file even if there are multiple interruptions. b. Select the Validate file integrity after transfer check box to specify that EFT Server should double check binary files to ensure the files downloaded completely and correctly. c. In the Data port mode box, click the drop-down list and select one of the following: Auto - (selected by default) EFT Server initially makes connections in PASV mode. If the PASV connection fails, EFT Server attempts to connect in PORT mode automatically. PASV - Helps avoid conflicts with security systems. PASV support is necessary for some firewalls and routers, because with PASV, the client opens the connection to an IP Address and port that EFT Server supplies. PORT - Use PORT when connections or transfer attempts fail in PASV mode, or when you receive data socket errors. When a client connects using PORT, EFT Server opens a connection to an IP address and port that the client supplies. If you select Port, specify the Port range. d. In the ASCII transfer mode area, specify the file types that can be transferred. TXT, INF, HTML, and HTM are specified by default. e. In the Time stamps area, select one of the following: Select the Preserve remote time stamp for downloaded files check box to keep a downloaded file's time stamp the same on the local computer as it is on EFT Server. Select the Preserve the local time stamp for uploaded files if EFT Server allows MDTM check box to keep an uploaded file's time stamp the same on EFT Server as it is on the local computer. f. Click OK. 12. Click Next. The Source File Path page appears. 13. In the Source path box, provide the path to the file(s) that you want to offload. (No validation is performed.) For example, type: /pub/usr/jsmith/file.txt or \\mydomain\common\jsmith\file.txt 14. If you want to Delete source file after it has been offloaded, select the check box. 15. Click Next. The Destination File Path page appears. 33 DMZ Gateway User Guide 16. In the Destination path box, click the open icon file. (No validation is performed.) and specify the location in which to save the offloaded You can also specify variables, such as \pub\usr\%USER.LOGIN%\%FS.FILE.NAME%. In the Variables box, double-click the variable(s) that you want to add to the path. 17. Click Finish then click Apply to save the changes on EFT Server and/or add other Actions and Conditions to the Rule. If you are copying or moving the file to another location, and the file upload is a regularly occurring event with a file of the same name, in the Offload Action wizard, add the variables %EVENT.DATESTAMP% and/or %EVENT.TIMESTAMP% to the path so that the date (YYYYMMDD) and/or time (HHMMSS) are added to the filename when it is moved/copied. Do not use %EVENT.TIME%, because the colon (e.g., 28 Aug 07 10:01:56) makes it unsuitable for file naming. For example, in the Offload Action wizard, in the Destination path box, provide the path and variables. For example, type: C:\Documents and Settings\Administrator\My Documents\upload/%EVENT.DATESTAMP%_%EVENT.TIMESTAMP%_%FS.FILE_NAME% With this path and variables, when a file is uploaded to the monitored folder, the file is moved to \My Documents\upload and the date and time are prepended to the filename. For example, 20080422_101212_mydailyprogress.doc. 34 To create a custom authentication method for a proxy server 1. In the Advanced Proxy Settings dialog box, click Custom, then specify the login sequence in the text box using the following variables: %host% - sends the host name you typed in the Proxy server options dialog box. %user% - sends the user name you typed in the Proxy server options dialog box. %pass% - sends the password you typed in the Proxy server options dialog box. %port% - sends the port number you typed in the Proxy server options dialog box. %fire_pass% - sends the password you typed in the Proxy server options dialog box as authentication for the firewall. %fire_user% - sends the user name you typed in Proxy server options dialog box as authentication for firewall. 2. Type each variable with percent signs before and after. 3. Press ENTER to separate commands. 4. Type any other commands and variables, separating commands with a line break (press ENTER). 5. Click OK. Contact your system administrator for the proper Host name, Port, User name, Password, and proxy type, as well as any required advanced authentication methods. 35 DMZ Gateway User Guide 36 DMZ GATEWAY EULA GlobalSCAPE, Inc. ("GlobalSCAPE") DMZ Gateway Version 2 License and Support Agreement This Software is licensed, not sold. You may use this Software only as described in this agreement. If you do not agree to the terms of this agreement, do not install the Software or use any registration number that was provided with the Software. You may return the Software to the place of purchase for a refund if you have not used the registration serial number. 1. SOFTWARE. The capitalized term "Software" refers to the object code for the computer program known as DMZ Gateway Version 2, any updates, supplemental code or programs provided to you by GlobalSCAPE with or in connection with DMZ Gateway Version 2, such as the user's manual and help file, any components, any related media and printed materials, and any related "online" or electronic documentation. The Software includes two basic components, the Server Program and the Administrator Interface. 2. GRANT OF LICENSE. A. Evaluation License. If you acquired the license for any component of the Software on an evaluation or trial basis, you may use the Software without charge for the evaluation period. Your evaluation period begins on the day you install the Software. You must pay the license fee and activate your copy in the manner required below to continue to use the Software after the evaluation period. An evaluation license for the Software may not be transferred to any other person. B. Standard License. i) Server Program. You may use one copy of the Server Program on that number of server computers for which you have purchased a separate license as indicated on your invoice or sales receipt. ii) Administrator Interface. For so long as you are licensed to use the Server Program, you may copy, install and use the Administrator Interface on as many computers as you wish. C. Standby License. If you have purchased a license to use the Server Program on a non-production basis, then you may use the Server Program so licensed only as follows: i) On a standby computer that is not processing inbound traffic or doing work of any kind except in the event that, and only for so long as, the primary production server with which it is associated is offline; or ii) On a server used solely for testing or evaluation that does not process actual inbound traffic. D. Activation. You must activate the evaluation or standard license for the Software by entering the evaluation or registration serial number as prompted by the Software and as otherwise instructed by GlobalSCAPE. Your failure to correctly follow activation procedures is a breach of this license. 37 DMZ Gateway User Guide E. Term. The term of the license for any component of the Software is perpetual unless you purchased a limited term license as indicated on your invoice or sales receipt. 3. RIGHT TO COPY OR BACKUP. You may make one copy of the Software or the installation media for the Software for back-up or archival purposes at no additional charge. 4. UPGRADES. To use Software identified as an upgrade, you must first be licensed for the software identified by GlobalSCAPE as eligible for the upgrade. After upgrading, you may no longer use the software that formed the basis for your upgrade eligibility and the license for that software terminates. 5. TRANSFER. You may not rent, lease, lend, or sublicense the Software. You may, however, make a one-time permanent transfer of all of your license rights to the Software to another party, provided that: (a) the transfer must include all of the Software, including all component parts, programs, media, printed materials, all registration serial numbers, and this license; (b) you do not retain any copies of the Software, full or partial, including copies stored on a computer or other storage device, and (c) the person to whom you transfer the Software agrees to be bound by the terms of this license. If you purchased the license for the Software on a multi-computer basis - that is, one registration serial number valid for the number of computers indicated on your invoice - you may permanently transfer your rights to one person only. 6. INFORMATION COLLECTION AND PRIVACY. The Software includes a feature that assigns a unique identifier to your computer based on system information. The Software reports this identifier to GlobalSCAPE when you install the Software or enter your registration serial number. During the evaluation period, the Software will contact our registration and activation servers periodically to verify that the Software is still eligible for use on an evaluation basis. The Software may also identify and report to us your Windows language identifier setting, IP address, and the date and time of installation and/or activation. GlobalSCAPE uses this information to count installations, detect piracy of the Software, and develop rough statistical data regarding the geographic location of the Software users. GlobalSCAPE may tie this information to personally identifiable information it has about you. GlobalSCAPE may use any non-proprietary information you provide as part of obtaining support services for GlobalSCAPE's business purposes, including product support and development. 7. RESTRICTIONS. You may not reduce the Software to human readable form, reverse engineer, decompile, disassemble, merge, adapt, or modify the Software, except and only to the extent that such activity is expressly permitted by applicable law notwithstanding this limitation. You may not use the Software to perform any unauthorized transfer of information, such as copying or transferring a file in violation of a copyright, or for any illegal purpose. 8. MAINTENANCE AND TECHNICAL SUPPORT SERVICES. If you purchased a maintenance and support plan ("M & S Plan"), GlobalSCAPE shall provide the support services at the level agreed to by you and GlobalSCAPE and as defined in the GlobalSCAPE Maintenance and Support Guide (the "Guide"), http://www.globalscape.com/files/GS_Support_Guide.pdf, as of the date of your acceptance of this Agreement. The term of the M & S Plan may vary and is specified on your invoice. 38 9. PAYMENT TERMS. If GlobalSCAPE has agreed to invoice you for license fees or support services, invoices shall be transmitted on the date of issuance via electronic or postal mail to the primary or billing contact listed on your account. Unless otherwise agreed to in writing, full payment is due within thirty (30) days from invoice date. Amounts not paid when due shall bear interest at 1.5% per month, or the highest non-usurious rate permitted under applicable law, whichever is less. If GlobalSCAPE is required to take legal action to collect any overdue amount, you shall also pay GlobalSCAPE's reasonable costs of collection, including reasonable attorney fees. 10. SECURITY. The Software creates a means for others to gain access to your computer. Although we have taken reasonable measures to prevent unauthorized persons from gaining access to your computer via the Software, we cannot foresee or control the actions of third parties. Therefore, use of the Software will make you vulnerable to security breaches that you might not otherwise face and could result in the loss of your privacy or property. You agree that GlobalSCAPE is not liable to you for security breaches resulting from your use of the Software or otherwise. Use of secure passwords and keeping passwords confidential are not the responsibility of GlobalSCAPE or the Software. 11. AUDIT. You agree that on GlobalSCAPE's request you will certify in writing your compliance with the terms of this agreement, including your use of the Software only on or in connection with the number of computers licensed. 12. TERMINATION. This agreement terminates if you fail to comply with its terms and conditions. If your agreement terminates, you must destroy all copies of the Software. The termination of this agreement does not limit GlobalSCAPE's other rights it may have by law. 13. INTELLECTUAL PROPERTY. You acknowledge that you have only the limited, non-exclusive right to use and copy the Software as expressly stated in this agreement and that GlobalSCAPE retains title to the Software and all other rights not expressly granted. You agree not to remove or modify any copyright, trademark, patent, or other proprietary notices that appear, on, in or with the Software. The Software is protected by United States copyright, patent and trademark laws and international treaty provisions. 14. EXPORT RESTRICTIONS. You may not export or re-export the Software in violation of the export laws of the United States, or the applicable laws of any other jurisdiction. Among other things, U.S. laws provide that the Software may not be exported or re-exported to certain countries that are embargoed or restricted, or to certain restricted persons. Embargoed and restricted countries currently include Cuba, Iran, Libya, North Korea, Syria and Sudan. THE SOFTWARE CONTAINS ENCRYPTION TECHNOLOGY THAT IS CONTROLLED FOR EXPORT BY THE U.S. GOVERNMENT UNDER THE EXPORT ADMINISTRATION ACT. In addition to other restrictions described in this section, you may not use the Software, or export the Software to any destination where you know or have reason to know that the Software may be used, in connection with the proliferation of nuclear, chemical, or biological weapons or missiles. 15. NO WARRANTIES. TO THE EXTENT PERMITTED BY APPLICABLE LAW, THE SOFTWARE AND ANY SUPPORT SERVICES ARE PROVIDED "AS IS" WITHOUT WARRANTY OF ANY KIND, EITHER EXPRESS OR IMPLIED, INCLUDING, WITHOUT LIMITATION, THE IMPLIED WARRANTIES OF MERCHANTABILITY, FITNESS FOR A PARTICULAR PURPOSE AND NONINFRINGEMENT. IF APPLICABLE LAW REQUIRES A WARRANTY, THE REQUIRED WARRANTY 39 DMZ Gateway User Guide IS LIMITED TO NINETY (90) DAYS FROM YOUR RECEIPT OF A COPY OF THE SOFTWARE. COMPUTER PROGRAMS ARE INHERENTLY COMPLEX, AND THE SOFTWARE MAY NOT BE FREE OF ERRORS. THE SOFTWARE IS PROVIDED WITH ALL FAULTS AND THE ENTIRE RISK AS TO SATISFACTORY QUALITY, PERFORMANCE, ACCURACY, AND EFFORT IS WITH YOU. 16. LIMITATION OF LIABILITY. GLOBALSCAPE IS NOT LIABLE TO YOU FOR ANY PUNITIVE, CONSEQUENTIAL, SPECIAL, INCIDENTAL, OR INDIRECT DAMAGES OF ANY KIND ARISING OUT OF THE DELIVERY, PERFORMANCE, OR USE OF THE SOFTWARE, EVEN IF GLOBALSCAPE HAS BEEN ADVISED OF THE POSSIBILITY OF SUCH DAMAGES. UNLESS APPLICABLE LAW PROVIDES OTHERWISE, GLOBALSCAPE'S LIABILITY FOR ANY CLAIM RELATED TO YOUR PURCHASE OF A LICENSE FOR OR USE OF THE SOFTWARE AND RELATED SUPPORT SERVICES, WHETHER IN CONTRACT, TORT, OR ANY OTHER THEORY OF LIABILITY WILL NOT EXCEED THE GREATER OF U.S. $5.00 OR THE FEES PAID BY YOU UNDER THIS AGREEMENT. 17. U.S. GOVERNMENT. The Software is commercial computer software developed solely at private expense. The rights of civilian and non-civilian agencies of the U.S. Government to use, disclose, and reproduce the Software are governed by the terms of this agreement. Publisher is GlobalSCAPE, Inc., 4500 Lockhill Selma, Suite 150, San Antonio, Texas, 78249, USA. 18. MISCELLANEOUS. This agreement is governed by the laws of the State of Texas, and the laws of the United States of America, as applicable. This agreement is not governed by the United Nations Convention on Contracts for the International Sale of Goods. You agree to submit to the jurisdiction of courts sitting in the State of Texas for all purposes. SOLE AND EXCLUSIVE VENUE FOR ANY DISPUTE ARISING UNDER OR RELATING TO THIS AGREEMENT SHALL BE IN A COURT SITTING IN BEXAR COUNTY, SAN ANTONIO, TEXAS. This agreement constitutes the complete and exclusive agreement between us, notwithstanding any provision in any purchase order or other written document, except for: (i) the definition of any evaluation period, limited license term, and fees and terms for maintenance or support services or additional software components that may appear on the GlobalSCAPE Web site or other documentation provided to you, and (ii) the statement of the number of separate computers or concurrent users for which you have paid a license fee as described in Section 2, above. Notwithstanding anything else in this agreement to the contrary, a license for the Software provided on a free, promotional, or "not-for-resale" (NFR) basis may be used only for testing, demonstration or evaluation and may not be sold or transferred to another person in any manner. This agreement may only be modified by a written document signed by GlobalSCAPE. No GlobalSCAPE dealer or distributor is authorized to change the terms of this agreement. If any provision of this agreement is held to be unenforceable, the remainder of the agreement shall not be affected, and the unenforceable provision shall be reformed to the extent necessary to make the provision enforceable. If you are located outside the United States, then the following provision applies: Les parties aux présentés conferment leur volonté que cette convention de même que tous les documents y compris tout avis qui s'y rattaché, soient redigés en langue anglaise. (Translation: "The parties confirm that this agreement and all related documentation is and will be in the English language.") Should you have any questions concerning this agreement, or if you desire to contact GlobalSCAPE for any reason, please contact GlobalSCAPE by mail at: 4500 Lockhill-Selma, Suite 150, San Antonio, Texas, 78249, USA, by telephone at: +1 (210) 308-8267, or by electronic mail from: http://www.globalscape.com. Rev. 10.09.2008 40