1
v3
User Guide
GlobalSCAPE, Inc. (GSB)
Corporate Headquarters
Address:
4500 Lockhill-Selma Road, Suite 150
San Antonio, TX (USA) 78249
Sales: (210) 308-8267
Sales (Toll Free): (800) 290-5054
Technical Support: (210) 366-3993
Web Support: http://www.globalscape.com/support/
© 2004 GlobalSCAPE, Inc. All Rights Reserved
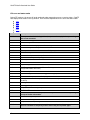
Table of Contents
Getting Started with CuteFTP Mac 3 Professional ..................................................................................7
Customer Service .............................................................................................................................7
Lost Serial Number ...........................................................................................................................7
Comprehensive Support Programs ....................................................................................................7
About FTP (File Transfer Protocol) ....................................................................................................7
About CuteFTP Mac ..........................................................................................................................7
CuteFTP Mac's Features: ..................................................................................................................8
About FTP (File Transfer Protocol) ....................................................................................................8
System Requirements .......................................................................................................................9
Installing CuteFTP Mac .....................................................................................................................9
Registering CuteFTP Mac ..................................................................................................................9
Interface .......................................................................................................................................... 11
CuteFTP Mac's Main Screen ............................................................................................................ 11
Context menus and keyboard shortcuts ........................................................................................... 11
Logs and raw listings ...................................................................................................................... 11
Changing fonts .............................................................................................................................. 12
Selecting items .............................................................................................................................. 12
Quick connect bar .......................................................................................................................... 13
Error prompts ................................................................................................................................ 13
General navigation ......................................................................................................................... 13
Change window sizes ..................................................................................................................... 14
Connect............................................................................................................................................ 15
Connecting to an FTP server using the Site Manager ........................................................................ 15
Connecting to an FTP server using Quick Connect ............................................................................ 15
Connection to an FTP server using Bonjour ...................................................................................... 16
What is Bonjour? ........................................................................................................................... 16
Working with sites in the Site Manager ............................................................................................ 16
Importing sites into the Site Manager .............................................................................................. 17
Editing Sites in the Site Manager ..................................................................................................... 17
Site Properties ............................................................................................................................... 17
Remote folder ............................................................................................................................. 17
Local folder................................................................................................................................. 17
Account ...................................................................................................................................... 18
Transfer Type ............................................................................................................................. 18
Data Connection ......................................................................................................................... 18
File name encoding ..................................................................................................................... 18
User Proxy (firewall) server ......................................................................................................... 18
Set as default login site ............................................................................................................... 18
Show hidden files and folders ...................................................................................................... 18
Convert %NN in filename to the representative character .............................................................. 18
iii
CuteFTP Mac Professional User Guide
Keep connection alive sending NOOP command every N seconds ................................................... 18
Set file upload permissions mask to NNN ...................................................................................... 18
Disconnecting from an FTP server ................................................................................................ 19
Reconnecting to an FTP server .................................................................................................... 19
Automatically connecting to a site ................................................................................................ 19
Multiple concurrent connections ................................................................................................... 19
Connecting through a proxy server or firewall .................................................................................. 19
Maintaining connections (Keep Alive, Anti-idle) ................................................................................ 20
Setting default folders .................................................................................................................... 20
Bookmarking favorite folders .......................................................................................................... 20
Back up your Site Manager ............................................................................................................. 21
Transfer ........................................................................................................................................... 23
Transferring files ............................................................................................................................ 23
Transferring files ............................................................................................................................ 23
Stopping transfers .......................................................................................................................... 23
Making multiple concurrent transfers ............................................................................................... 23
Accelerated (multi-part) transfers .................................................................................................... 24
Site-to-site (a.k.a. FXP) transfers .................................................................................................... 24
Manual transfers ............................................................................................................................ 24
Using the transfer queue ................................................................................................................ 24
Preserving remote time stamps ....................................................................................................... 26
Manage ............................................................................................................................................ 27
Synchronizing local and remote directories ...................................................................................... 27
File operations (edit, rename, delete, view) ..................................................................................... 27
Viewing and modifying details & permissions ................................................................................... 28
Setting file permissions automatically .............................................................................................. 28
Creating a new folder ..................................................................................................................... 29
Copying or moving a file or folder ................................................................................................... 29
Manually inputting a command to an FTP server. ............................................................................. 29
Searching for items on a site .......................................................................................................... 29
Virtual Folders ............................................................................................................................... 30
Security ............................................................................................................................................ 31
SSL sessions .................................................................................................................................. 31
Troubleshooting Secure Connections ............................................................................................... 31
SSL Connection Checklist ................................................................................................................ 31
SSL details ..................................................................................................................................... 31
Typical Implementations: ............................................................................................................... 31
Implicit TLS/SSL.......................................................................................................................... 31
Explicit "AUTH SSL" ..................................................................................................................... 31
Explicit “AUTH TLS” ..................................................................................................................... 31
SSH2 (SFTP) sessions ..................................................................................................................... 32
Troubleshooting Secure Connections ............................................................................................... 32
SFTP Connection Checklist .............................................................................................................. 32
iv
Table of Contents
SSH details .................................................................................................................................... 33
Preferences ...................................................................................................................................... 35
General ......................................................................................................................................... 35
Connection .................................................................................................................................... 35
Transfer ........................................................................................................................................ 36
Navigation ..................................................................................................................................... 36
Prompts ........................................................................................................................................ 37
Display .......................................................................................................................................... 37
Advanced ......................................................................................................................................... 39
Xbox connectivity ........................................................................................................................... 39
Scripting ........................................................................................................................................ 39
browse ....................................................................................................................................... 39
upload ........................................................................................................................................ 39
Sample Apple scripts: .................................................................................................................. 39
browse ....................................................................................................................................... 39
upload ........................................................................................................................................ 39
Troubleshooting ................................................................................................................................ 41
Saving a log................................................................................................................................... 41
Tooltip Help ................................................................................................................................... 41
FTP error and status codes ............................................................................................................. 42
Registration issues ......................................................................................................................... 44
CuteFTP Mac still shows it's unregistered ...................................................................................... 44
How to register with a serial number ............................................................................................ 44
Registration Errors ......................................................................................................................... 44
Find a lost serial number ............................................................................................................. 45
Registration limit exceeded message ............................................................................................ 45
"Unable to Recognize Server Response" ....................................................................................... 45
Unable to register because "Enter your serial number" is gray ....................................................... 46
Purchasing CuteFTP Mac ................................................................................................................... 47
General Purchase Information ......................................................................................................... 47
International orders ....................................................................................................................... 47
Serial numbers ............................................................................................................................... 47
How to order .............................................................................................................................. 47
Tax Information ............................................................................................................................. 47
Find a lost serial number ............................................................................................................. 47
Trial Information ............................................................................................................................ 47
What is disabled after 30 days? ................................................................................................... 47
Files and folders............................................................................................................................. 48
"File permission denied" message ................................................................................................ 48
Copy and Paste of remote items removes original file .................................................................... 48
File size and date issues .............................................................................................................. 48
ASCII or Binary file types ............................................................................................................. 48
Extended folder paths in host addresses ....................................................................................... 49
v
CuteFTP Mac Professional User Guide
File and folder names .................................................................................................................. 49
Web site issues .............................................................................................................................. 49
Images are not showing up ......................................................................................................... 49
Unable to see changes to a Web site ............................................................................................ 50
Web page problems .................................................................................................................... 50
Connection problems ...................................................................................................................... 51
Common connection problems ..................................................................................................... 51
Cannot resolve host name message ............................................................................................. 51
Anonymous v. normal login ......................................................................................................... 51
HTTP:// addresses ...................................................................................................................... 52
"Password not accepted" error message ....................................................................................... 52
Waiting on welcome message ...................................................................................................... 52
Transfer problems .......................................................................................................................... 52
Auto-detect transfers my files in the wrong mode ......................................................................... 52
Copy and Paste of remote items removes original file .................................................................... 53
"Disk quota exceeded" ................................................................................................................ 53
Slow transfers ............................................................................................................................. 53
End-User License Agreement ............................................................................................................. 55
vi
Getting Started with CuteFTP Mac 3 Professional
Customer Service
If you are having trouble downloading, installing or registering our products, customer service
representatives are available to assist you by telephone at 210-308-8267 or send them an e-mail.
Lost Serial Number
If you are having problems registering your product because of a lost serial number and would like it resent, please click here, and your serial number will automatically be sent to you by e-mail!
Comprehensive Support Programs
If you would like ongoing technical support, GlobalSCAPE offers programs to help you get the most out of
your investment.
About FTP (File Transfer Protocol)
One of the oldest Internet protocols still in use today is the File Transfer Protocol, known as FTP. It was
first developed in 1971. FTP is a standard Internet protocol and the simplest way to exchange files
between computers on the Internet.
FTP is commonly used to transfer Web page files from the computer where they are created to the
computer that shows them on the Web. FTP is also commonly used to download programs and other files
to a local computer from remote computers.
About CuteFTP Mac
CuteFTP Mac is a program that allows you to move and manage files using FTP (File Transfer Protocol)
without having to know all the details of the protocol itself. CuteFTP Mac offers a user-friendly interface,
and gives you the ability to upload, download, and edit files on remote FTP servers around the world.
7
CuteFTP Mac Professional User Guide
CuteFTP Mac's Features:
Security
Connectivity /Navigation
SSL Connections
Simultaneous Connect & Navigate
SFTP (SSH) Connections
Site Manager (Address Book)
Store Passwords in Key Chain
Standard Rename, Delete, Edit, and
View Support
Transfer
Search Sites in Address Book
Simple drag „n drop transfers
Bookmarks "Favorite" Folders
Resume transfers
On Connect Default Folder
Accelerated Transfers
Auto-Connect to Default Site
Simultaneous Transfers
Account Support
Auto-detect ASCII/Binary/MacBinary mode
Proxy/Firewall Support
Transfer Queue
Keep Alive (anti-idle)
Server to Server File Transfer (FXP)
On Startup Events
After Transfer Event Sounds
Connection Retry/Delay Options
Default Download Folder
Link Resolution Options
Preserve Remote Time Stamp(s)
Various Sorting Options
OS X Server support
OS/400 FTP server support
Tools / Advanced
Interface / Compatibility
Side by side panes
Detailed Log View
Folder Synchronization
Raw Listing View
Auto-UMASK on upload
Font and Display Options
Rendezvous Support
Quick Connect Bar
Plugins for Internet Browsers (Helper)
Context Menus
Extended GetInfo
Full Drag & Drop Support
Remote File Edit w/BBEdit, Hydra
Tiger OS ready
Site Search (Multi-Directory)
International Font Support
Raw FTP Command Input
Multi-part Progress Indicators
Virtual Folders
File/Folder Group Select
Default Startup Folder
Error Prompts
Tooltips (Balloon Help)
About FTP (File Transfer Protocol)
One of the oldest Internet protocols still in use today is the File Transfer Protocol, known as FTP. It was
first developed in 1971. FTP is a standard Internet protocol and the simplest way to exchange files
between computers on the Internet.
8
Getting Started with CuteFTP Mac 3 Professional
FTP is commonly used to transfer Web page files from the computer where they are created to the
computer that shows them on the Web. FTP is also commonly used to download programs and other files
to a local computer from remote computers.
System Requirements
A Mac running OS 10.2 or higher.
At least 16 MB of free memory.
A connection to the Internet.
Installing CuteFTP Mac
1.
Download the installer.
2.
Double-click the installation file.
3.
CuteFTP Mac installs on your computer.
Notes
CuteFTP Mac runs on Mac OS 10.2 or higher.
If you are installing from a CD, put the CD in your CD-ROM drive and the installation process will
start automatically.
Registering CuteFTP Mac
When you purchase CuteFTP Mac you will receive a serial number. You must enter the serial number
into the program for it to work beyond the trial period.
To register CuteFTP Mac
1. Make sure you are connected to the Internet.
2. Start CuteFTP Mac. The Welcome window opens.
3. Click Enter Serial Number. The Enter Serial Number window opens.
4. Enter your serial number into the Serial Number box.
5. Enter you name into the Name box. The rest of the boxes are optional, but the information will
assist us if you need our help resolving problems.
6. Click Register Online. In a few moments you will see a message congratulating you for
registering CuteFTP Mac.
To register if CuteFTP Mac is already open
1. Make sure you are connected to the Internet.
2. On the menu bar, choose Help > Enter Serial Number. The Enter Serial Number window
opens.
3. Enter your serial number into the Serial Number box.
4. Enter you name into the Name box. The rest of the boxes are optional, but the information will
assist us if you need our help resolving problems.
5. Click the Register Online. In a few moments you will see a message congratulating you for
registering CuteFTP Mac.
9
CuteFTP Mac Professional User Guide
10
Interface
Interface
CuteFTP Mac's Main Screen
The main screen is used to transfer files to and from remote servers and is divided into three windows:
an upper window and two lower windows. The two lower windows represent files available on local and
remote drives.
Upper (Log) pane: The Log Window displays the commands CuteFTP Mac sends and the
server's responses. CuteFTP Mac logs this information to inform you of completed transactions
or to assist in troubleshooting.
Lower panes: When you start CuteFTP Mac, both left and right middle panes will display your
local drive contents. When you connect to an FTP server, its drive contents are displayed in the
pane that has the focus (is selected). In fact, you can connect to one server in one pane, change
focus to the other pane, connect to another server and then transfer files between remote
servers by dragging the selected files between both panes.
To change the size of the windows
1. move your mouse cursor over any border between two windows until the cursor becomes a
double-headed arrow.
2. Click and drag the border until the windows are the size you want. Next time you launch CuteFTP
Mac, the windows will be the same size as when you last quit.
Context menus and keyboard shortcuts
CuteFTP Mac's context menus allow you to access frequently used commands without having to navigate
the main menu.
To access context menus
1. Left-click in either the local, remote, or log pane to place the focus on that pane
2. Hold down the Control key on your keyboard and left click
or if you have a two button mouse,
Right-click (click on the opposite mouse button from the normal one you use)
3. Now left-click on the desired menu choice provided by the context menu
To access keyboard shortcuts
1. Make note of the main menu command you want to reference and the shortcut assigned to it.
2. Hold the Apple key down and type the shortcut key assigned. For example, holding down the
Apple key and typing the number 1 will cause the quick connect bar to display (or hide)
Logs and raw listings
The log window is displayed above the local and remote panes and allows you to view basic and
extended log information, including unaltered (raw) directory listings provider by the server.
Choosing the type of log to display in the log view
1. Click CuteFTP Mac > Preferences > Connection
2. Next to the Logging: label, choose from None, Basic, Standard, or Full.
None = no logging
Basic = log RETR and STOR command sequences
11
CuteFTP Mac Professional User Guide
Standard = log all commands except for raw directory listings, multi-part segments, file
size calculations and searches.
Full = log everything except raw directory listings
To view raw directory listings
1. Click on View > Show Raw Listing
To select and copy log output
1. Highlight the portion of the log to copy
2. Click Edit > Copy
or
Click Edit > Copy Log to copy the entire log
Note: CuteFTP Mac's log displayed in the main GUI automatically scrolls so that most recent data is displayed at the bottom of the
log. In addition, if you place your cursor somewhere in the log, the log will stay at the currently selection position and not auto-scroll.
Once you manually scroll down to the most recent entry or remove the cursor focus by placing the focus somewhere else, the log
will go back to auto-scroll mode.
Log output colors
BLUE = Actions performed by the client (Connecting, Socket Connected, Authenticating, etc.)
GREEN = Commands sent by the client (USER anonymous, PWD, CWD, etc.)
BLACK = Server response (226 Data Connection Opened, etc.)
RED = Errors reported by the server (5xx errors)
When connecting to two sites concurrently (one in each pane), the second connection will precede its log
entries with a "1". For example: 1: RETR filename.exe
Changing fonts
You can change the fonts used for various panes in CuteFTP Mac
To change the fonts used:
1. Click CuteFTP Mac > Preferences > Display
2. Click on the Set... button next to the pane you wish to change the font for
3. Select a new font in the font window that appears
4. Close the font window
5. Click OK
Selecting items
You can select files and folders in the local or remote panes using one or more of the following methods
Click on an item
Hold the Control key down and click on multiple items to select more than one item
Hold the Shift key down and click on multiple items to select multiple items in sequence
Click Edit > Select All to select all items in the focused pane
Click Edit > Unselect All to deselect any selected items
Click Edit > Select Group to select items using a filter (mask)
12
Interface
Click Edit > Unselect Group to deselect items from a previous selection using a filter
Click Edit > Invert Selection to select all items except for those currently selected
Quick connect bar
Use the quick connect bar to connect to different sites without entering them into the Site Manager. Also
modify quick connect site settings, add a quick connect site to the site manager, and toggle the quick
connect bar on and off. Turning it off increases screen real estate.
To toggle the quick connect bar
Click on File > Quick Connect
To add a quick connect site to the site manager
1. Turn the quick connect bar on (see above)
2. Enter the site information in the Host, User, and Password fields
3. Click on the Add to Site Manager (book icon) to the right of the quick connect bar
4. Modify advanced properties if desired when prompted and click OK
The site will now be shown in the Site Manager. You can optionally change the Label used for identifying
from the Site Manager dialog
To modify a quick connect site's properties
1. Turn the quick connect bar on (see above)
2. Enter the site information in the Host, User, and Password fields
3. Click on the Site Properties (checkmarked paper icon) to the right of the quick connect bar
4. Modify advanced properties if desired when prompted and click OK
The properties entered will be applied once you connect (lightning icon) to the site.
Error prompts
You will see an error prompts appear when you attempt to perform an action that is either not supported
by CuteFTP Mac or the server you are connecting to
To disable error prompts
1. Click CuteFTP Mac > Preferences > Prompts
2. Select or deslect the prompts you want to see
Note When you receive an error, consult the Log Window for more details. Usually CuteFTP Mac or the remote FTP server will
provide enough details in the log to help determine the exact cause of the error.
General navigation
There are many ways to navigate local and remote drives.
Double-click on a folder to change into that folder and view its contents
Control+click or shift+click to select multiple files or folders
Use the drop down box just above the local and remote dirve panes to visit any previously visited
folder during the same session
Quickly jump to bookmarked (saved) folders using the bookmark feature
Configure general navigation settings, such as cached folder duration, default double-click action
and more.
Use the mouse to drag files or folders within panes or between panes
13
CuteFTP Mac Professional User Guide
Click on the up-arrow located at the top of the local and remote drive panes to visit the parent
folder to the one you are currently in
Note : When navigating through folder links, when you click on the up-arrow to go back up, you are taken to the physical parent
folder (the actual folder containing the folder you are current in) as opposed to the logical parent (the originating folder that linked
you to the current folder).
Change window sizes
To change the size of the log, remote, and local windows
1. Move your mouse cursor over any border between two windows until the cursor becomes a
double-headed arrow.
2. Click and drag the border until the windows are the size you want. Next time you launch CuteFTP
Mac, the windows will be the same size as when you last quit.
14
Connect
Connect
Connecting to an FTP server using the Site Manager
The Site Manager is like an address book, allowing you to store information you need to connect to FTP
servers such as IP addresses, user names and passwords. The most common way to connect to an FTP
server is by accessing it through the Site Manager.
To connect to an existing site using the Site Manager
1. From the menu bar choose CuteFTP Mac > Site Manager.
2. Select a site from the list in the Site Manager window.
3. Click the Connect button to connect to the FTP server.
To add a new site to the Site Manager
1. From the menu bar, select CuteFTP Mac> Site Manager.
2. Select an existing folder from the list on the left, or create a new folder for the site. To create a
folder, click New Folder.
3. Click New Site. Enter a name for your site in Label for site. This is just a name you choose to
help you remember the site.
4. Enter the FTP server address in the FTP host address field. This is the address of your FTP
server, i.e. ftp.cuteftp.com. If you do not know the address, contact the administrator of the site
or your Internet Service Provider. Do not type in "ftp://" or "http://" before the server address.
5. Enter your user name (or user ID) in the FTP site user name field. Your user name is provided
by your Service Provider and may be case sensitive.
6. Enter your password in the FTP site password field. The password is provided by your Service
Provider and is case sensitive. If Keychains are available and enabled on your computer, the
password will be stored securely in a Keychain.
7. If the site requires a port other than 21 to establish a connection (almost all FTP sites use 21),
enter it in the FTP site port field.
8. Select FTP (SSL), SFTP (SSH) or standard FTP (plain-text) for the FTP connection mechanism
from the Security list. The remote server must also support SSL or SSH in order for CuteFTP to
connect in those modes. More details here.
9. Select the Login Type. Two types are available:
Normal: used if a user name and password are required.
Anonymous: used to connect to FTP sites that do not require a password.
10. To connect to your new site, select the site in the left window and click Connect.
Note: If Keychains are not available or enabled on your computer, your password will be stored in a file in the Preferences folder,
and it will be stored in clear text.
Connecting to an FTP server using Quick Connect
CuteFTP Mac includes an address bar much like a browser. You can type the address, user name and
password for an FTP site into the Quick Connect bar.
To connect normally using the Quick Connect bar
1. On the menu bar, choose File > Connect. The Quick Connect bar will appear below the toolbar.
2. Enter the FTP site address in Host, then enter a User Name and Password.
3. Press the Enter button on your keyboard to connect.
15
CuteFTP Mac Professional User Guide
Note If you connect to a site that uses a port other than 21 for FTP connections, enter the appropriate number in Port.
To connect anonymously using the Quick Connect bar
1. On the menu bar, choose File > Connect. The Quick Connect bar will appear below the toolbar.
2. Enter the FTP site address in Host.
3. Press Enter on your keyboard to connect.
Note: If you connect to a site that uses a port other than 21 for FTP connections, enter the appropriate number in Port.
Connection to an FTP server using Bonjour
You can use Bonjour to locate servers inside your LAN or WAN and connect to them.
To connect to a server using Bonjour
1. From the menu bar choose CuteFTP Mac > Bonjour.
2. Select FTP Servers from the drop down list
3. Allow some time for CuteFTP Mac to locate published servers
4. Select the desired server from the list and double-click to connect to it
Notes
The server will be added to your site manager.
You may need to supply a username and password for the connection.
The FTP server must support Bonjour in order for it to appear in the search list. For example,
Crocodile FTP Server, Pure FTP Server, Pure-FTPd support Bonjour.
What is Bonjour?
Bonjour is a mechanism for achieving "Zero Configuration" networking, and is the successor to Apple
Talk. As stated on the Apple's web page, "Bonjour enables automatic discovery of computers, devices,
and services on IP networks." Click here for more details.
Bonjour is a Trade Mark of Apple Computer Inc.
Working with sites in the Site Manager
The Site Manger stores your frequently used sites much like an address book. You can perform a variety
of tasks in the site manager.
Add a new site and connect to it
Search for site in your site list
Import sites from other FTP clients
Modify a site's properties
Delete a site
Rename a site
To delete a site
1. Select the site in the Site Manager.
16
Connect
2. Right-click (or command click) to bring up the context menu.
3. Select Delete.
To rename a site
1. Select the site in the Site Manager.
2. Right-click (or command click) to bring up the context menu.
3. Select Rename.
To find a site in your site list
1. Select the site in the Site Manager.
2. Right-click (or command click) to bring up the context menu.
3. Select Find...
4. Type in the word to search for.
5. The matching site will be highlighted.
Importing sites into the Site Manager
You can import sites from other FTP clients into your CuteFTP Mac Site Manager.
To import FTP sites from third party FTP clients
1. Launch CuteFTP Mac
2. Open the Site Manger (File > Site Manager)
3. Click on the Import button
4. Select a 3rd party FTP client from the Import from list
5. CuteFTP Mac will automatically detect and import sites from the selected client.
Note: Depending on the client, CuteFTP Mac may not be able to import the password list. You may have to re-enter the passwords
for imported sites.
Editing Sites in the Site Manager
You can configure advanced options in the Site Manager for each site entered.
To edit a site's advanced options
1. Open the Site Manger (File > Site Manager).
2. Highlight the site to be edited in the left pane.
3. Click on the Edit button.
4. Modify the Site Properties for the particular site.
Site Properties
Remote folder
Specify a default folder on the remote server that CuteFTP should navigate to as soon as you connect.
Local folder
Specify a default local folder on your hard drive that CuteFTP should navigate to as soon as you connect.
17
CuteFTP Mac Professional User Guide
Account
Supply an account name (or keyword) for servers that require the ACCT command for logging in, post
login, or for access to certain folders.
Transfer Type
Choose whether files should be transferred in ASCII, binary, Mac binary or if CuteFTP should auto-detect
the correct transfer mode, or use the mode specified under Global Preferences.
Data Connection
Choose whether CuteFTP should use PORT or PASV mode when establishing the data connection with the
server. PASV mode is the preferred method and the default one used when you choose to use "Global
Preferences".
File name encoding
Choose between standard encoding (ISO 8859-1), Unicode or Double-byte encoding for international
character support in CuteFTP Mac.
User Proxy (firewall) server
Specify whether CuteFTP Mac should use your system proxy settings to negotiate a connection past your
firewall (if applicable). You will have to specify the proxy host address when requested by CuteFTP Mac.
You can obtain this information from your system administrator.
Set as default login site
Specify whether CuteFTP Mac should automatically connect to this site upon session startup.
Show hidden files and folders
Specify whether CuteFTP Mac should display "hidden" items i.e. files or folders beginning with a "."
(period), such as .htacces.
Convert %NN in filename to the representative character
Specify whether CuteFTP Mac should character sequences such as %20 to its representative character. In
this case, %20 is the same as a "space".
Keep connection alive sending NOOP command every N seconds
Specify whether CuteFTP Mac should attempt to keep an idle connective active by sending a NOOP (no
operation) command every few seconds.
Set file upload permissions mask to NNN
Automatically apply a defined CHMOD sequence to a transferred item.
18
Connect
Disconnecting from an FTP server
To disconnect from an FTP server, select File > Disconnect from the menu bar.
You can easily reconnect after disconnecting.
Reconnecting to an FTP server
If you disconnect from an FTP server and want to reconnect, select File > Reconnect from the menu
bar.
Automatically connecting to a site
You can automatically connect to a site stored in your Site Manager upon session startup.
To automatically connect to a site
1. Click on CuteFTP Mac > Site Manager from the menu bar
2. Select a site from the left pane
3. Click on the Edit button
4. In the Site Properties page, select the Set as default login site checkbox
Multiple concurrent connections
You can connect to more than one site at the same time. This is useful for performing site-to-site
transfers or when you are downloading a file from one site and want to browse or download a file from
another site simultaneously.
You can accomplish this using two different methods:
Using a complete new session of CuteFTP Mac
1. Connect to one site as normal in the active session.
2. On the menu bar, choose Window > New Window.
3. Open the Site Manager in the new window (session) that appears.
4. Select a site and click Connect.
Using the active session of CuteFTP Mac
1. Highlight the left or right pane.
2. Open the Site Manager
3. Select a site and click Connect.
4. Now highlight the opposite pane.
5. Open the Site Manager again.
6. Select a site and click Connect.
Connecting through a proxy server or firewall
To connect using a proxy server
1. Open the Site Manger (File > Site Manager)
2. Highlight the site to be edited in the left pane
3. Click on the Edit button
4. In the Site Properties dialog, check the User Proxy (firewall) server checkbox
19
CuteFTP Mac Professional User Guide
5. Enter the Host address for the Proxy
CuteFTP Mac will then attempt the connection using the following format:
USER ftp_user@ftp_address
Note: Firewall password based authentication is not supported at this time. The type of connection supported is called: USER with
no login or user@host port
Maintaining connections (Keep Alive, Anti-idle)
You can set a Keep Alive (Anti-idel) value to maintain your connection open and avoid idle timeouts.
To avoid idle timeouts on a per site basis
1. Click on CuteFTP Mac > Site Manager from the menu bar
2. Select a site from the left pane
3. Click on the Edit button
4. In the Site Properties page, specify a value for the Keep connection alive sending NOOP
command every N seconds field and make sure the check box is checked.
Setting default folders
You can tell CuteFTP Mac to automatically switch to a certain folder upon session startup and upon
connect, and the default download folder.
To switch to a local folder automatically upon session startup
1. Click on CuteFTP Mac > Preferences... from the menu bar
2. Select General from the left pane
3. In the right pane, select a folder in the drop down next to Startup folder or define one by
clicking on the Choose... button directly beneath it
Tip: You can also choose "Last used" which will cause CuteFTP Mac to switch to the local folder you last
visited prior to exiting your last session.
To switch to a local or remote folder upon connecting to a site.
1. Click on CuteFTP Mac > Site Manager from the menu bar
2. Select a site from the left pane
3. Click on the Edit button
4. In the Site Properties page, specify a folder name for the default Remote or Local folder fields
To specify a default download folder
1. Click on CuteFTP Mac > Preferences... from the menu bar
2. Select General from the left pane
3. In the right pane, click on the Choose... button next to Default download folder
Bookmarking favorite folders
You can bookmark frequently visited folders for quick retrieval and access.
To create a new bookmark
1. Connect to a site
2. Navigate to the folder you want to bookmark
3. Click on the bookmark icon next to the path menu in the remote or local pane
20
Connect
4. Select Bookmark Current Folder from the context menu
5. Type in a name to help identify the new bookmark
Next time you connect to this site, you can jump straight to the bookmarked folder by using the
bookmark.
To use an existing bookmark
1. Connect to a site
2. Click on the bookmark icon next to the path menu in the remote or local pane
3. Select the bookmark from the context menu. You will be taken directly to the bookmarked folder
Back up your Site Manager
You can save a copy of your Site Manager as a backup or for transfer to a different computer. All of your
sites and site preferences will be saved in the backup.
To backup the Site Manager
1. Double-click the hard drive icon, then the Users folder, then your folder, and go to
Library:Preferences.
2. Copy the file named CuteFTP AddressBook.plist.
3. Save your copy on a removable disk or to some other location.
21
CuteFTP Mac Professional User Guide
22
Transfer
Transfer
Transferring files
Select either the left or right middle pane and connect to a remote server. Then use one of the following
methods to transfer files and folders:
Drag-and-Drop: Place your mouse cursor over a file or folder, click and hold the mouse button,
drag the item to the opposite window, and release your mouse button.
Upload from the Menu: Select files in the left or right pane (whichever pane is currently
displaying your local drive contents) and on the menu bar choose, File > Upload.
Download from the Menu: Select files in the left or right pane (whichever pane is currently
displaying the remote drive contents) and on the menu bar choose, File > Download.Control-click Upload: Select files in the left or right pane (whichever pane is currently
displaying your local drive contents), hold down the control key click and choose Upload.
Control-click Download: Select files in the left or right pane (whichever pane is currently
displaying the remote drive contents) and on the menu bar choose, hold down the control
key, click and choose download.
Context-menu Transfers: Select the desired item(s), right-click and select upload or download
as appropriate.
Stopping transfers
When transferring via the main interface, simply using the toolbar Stop button to abort a transfer
When using the transfer queue, select one or more items and click on the Stop icon located in
the transfer queue toolbar
Making multiple concurrent transfers
You can transfer many files simultaneously with CuteFTP using the Transfer Queue
1. Click on View > Transfer Queue
23
CuteFTP Mac Professional User Guide
2. Connect to your FTP site
3. Locate and select the files to transfer
4. Drag the files into the Transfer Queue window
5. If Auto is turned on, the transfers will automatically start, if Auto is turned off, select one or
more files in the transfer queue and click Start
Accelerated (multi-part) transfers
You can split apart large files into smaller segments, transfer each segment simultaneously and later
reunite them upon receipt using CuteFTP Mac.
1. Click CuteFTP Mac > Preferences > Transfer
2. Select the checkbox titled Perform multi-part downloads for files bigger than (MB)
3. If desired, specify a minimum size threshold in order for multi-part transfers to occur
4. Click OK to exit the Preferences dialog
5. Connect and transfer files as normal. Files larger than the minimum size you defined will be
transferred in multi-part mode. Note the progress bar is split into multiple parts and will track
each part individually.
Note: The FTP site you are connecting to must support the resume (REST) command. throughput gets are dependent on many
factors, such as your network speed, the server's bandwidth output per connection and more. CuteFTP Mac automatically
determines whether to use 2, 3, or 4 parts for the multi-part transfer. The formula for determining how many parts to use is:
number_of_segments = MIN((int)((file_size_in_MB) / (min_size_for_seg / 2)), 4)
Site-to-site (a.k.a. FXP) transfers
You can transfer files and folders from one FTP server to another using CuteFTP Mac.
To perform Site-to-site transfers
1. Select either the left or right pane and connect to site A
2. Select the opposite pane and connect to site B
3. Locate the items to transfer in either site A or B
4. Drag the selected items from one pane to the opposite pane
Note: Many servers consider site-to-site transfers a security vulnerability and won't allow it. Check with your system administrator or
refer to the server's documentation to see if the server supports this feature.
Manual transfers
You can download files or folders from a folder without directory listing permissions provided you have
download permissions to the same.
To download manually
1. Click Tools > Download Manually
2. Enter the remote path (relative from your current position) and filename for the file you want to
download
3. Click Browse... in the manual download prompt to specify an alternate destination location
Using the transfer queue
24
Transfer
Manage your file transfers using CuteFTP Mac's transfer queue.
To add items to the transfer queue
1. Click on View > Transfer Queue
2. Connect to your FTP site
3. Locate and select the files to transfer
4. Drag the files into the Transfer Queue window
To remove items from the transfer queue
1. Click on View > Transfer Queue
2. Locate and select the items to remove from the queue window
3. Click Delete on the transfer queue toolbar
To stop and resume transfers in the transfer queue
1. Click on View > Transfer Queue
2. Locate and select the items to stop (pause) in the queue window
3. Click Stop to pause the selected item(s).
4. Click Start to resume transfer where you left off
To specify the default folder for storing items downloaded using the transfer queue
1. Click CuteFTP Mac > Preferences > General
2. Click the Choose... button underneath the label Default download folder when transferring
via the Queue
3. Select a location
4. Click Set
5. Click OK
To automatically transfer items added to the transfer queue
1. Click on View > Transfer Queue
2. Click on Auto in the transfer queue toolbar to toggle Auto Transfer on and off
Transfer queue icons and states
State
Icon
Meaning
Waiting
Status of newly added items
Connecting
Logging in or navigating folders
Connection Postponed
Server rejected connection for various
reasons. The transfer queue will retry
the connection
Transferring
Transfer in progress
Transfer Postponed
Transfer failed. Wait a while and try
again
Stopped
Transfer has been stopped by the user.
Click on the Start button to restart the
transfer
Finished
Transfer completed successfully
Error
Transfer failed, fatal error
(server/network down, etc.)
Calculating
Calculating folder size prior to download
25
CuteFTP Mac Professional User Guide
Toolbar button behavior
Auto button toggles the transfer queue mode between Auto Start and Manual Start. When in Auto
Start, any item added to the queue will begin to transfer immediately. When in Manual Start, items added
to the queue must be started manually by clicking on the Start button.
Start button starts transferring selected item(s) manually. You can start transferring item(s) manually
which are in the following state: WAITING, STOPPED, ERROR, CONNECTION POSTPONED, TRANSFER
POSTPONED, or FINISHED.
Stop button stops (pauses) selected transfers currently in progress.
Delete button deletes selected item(s) from the transfer queue window. If the item is in a
TRANSFERING state, it will be stopped, removed from the queue, and the connection closed.
Stay on Top button causes the transfer queue window to stay on top of any other open windows.
Setting the transfer type (ASCII/Binary/Mac Binary) CuteFTP Mac is programmed to automatically select
the proper transfer type.
To manually specify a file transfer type
1. On the menu bar, select File > Transfer Type.
2. Select from Mac Binary, Auto-detect (Your Mac chooses the transfer type), ASCII, or Binary.
Note: When you select a transfer type from the File > Transfer Type menu, it will only use the specified
value for the duration of the session.
Preserving remote time stamps
To keep the remote time stamp of a downloaded file
1. Click on CuteFTP Mac > Preferences > Transfer page
2. Enable the Preserve remote time stamp for downloaded files option
26
Manage
Synchronizing local and remote directories
To mirror your remote folder (make the local side look exactly like the remote)
1. Connect to your FTP site
2. Highlight the pane containing the remote FTP sever listing
3. Click Tools > Synchronize Folders... from the main menu
4. The synchronize direction shown in the resulting prompt should be Download. Choose whether
to include sub-folders and whether to ignore or consider dates when comparing files.
5. Click OK
To mirror your local folder (make the remote side look exactly like the local)
1. Connect to your FTP site
2. Highlight the pane containing the local listing
3. Click Tools > Synchronize Folders... from the main menu
4. The synchronize direction shown in the resulting prompt should be Upload. Choose whether to
include sub-folders and whether to ignore or consider dates when comparing files.
5. Click OK
To synchronize local and remote directories (full mirroring)
This option allows you copy to or from the FTP server only those files whose content differs from the
ones on local/remote Host. The following logic determines how the directories are synchronized:
If there is no file in destination folder, the source file is copied.
If destination and source files have the same name but differ in size, the source file is copied.
When Ignore date is not checked and the destination and source files have the same name and
size but different date, the source file is copied. The local file's date is set to the remote file's
date.
When Ignore date is checked and the destination and source files have the same name and size
but different date, the source file is not copied.
In all other situations, the source file is not copied.
When the synchronization process begins the Visual Synchronization browser window opens automatically
showing what is being synchronized, and highlights any files that have differences.
File operations (edit, rename, delete, view)
To delete a file
1. Locate a file or folder you want to delete
2. Select one or more items for removal
3. On the menu bar, choose File > Delete. A message appears, asking if you are sure you want to
delete the item(s) you selected
4. Click Yes
To rename a file
1. Locate the file or folder you want to rename
2. On the menu bar, choose File > Rename. A message appears, asking you for the new name
3. Type a new name
27
CuteFTP Mac Professional User Guide
4. Click OK
To view text (ASCII) files
1. Locate the file you want to view and select it
2. On the menu bar, choose File > View
To edit files on your FTP server
1. Locate the file you want to edit and select it
2. On the menu bar, choose File > Edit
3. Make the necessary changes
4. In your Editor, select Save As... from the menu bar
5. Save the file to a known location on your computer
6. Transfer the file you just saved back to the original folder on the remote computer, overwriting
the existing one
Note: You can change the text editor used to view files in CuteFTP Mac's Preferences.
Viewing and modifying details & permissions
To view and modify file and folder details and permissions for a local file
1. Locate the file or folder in CuteFTP Mac and select it
2. From the context menu (control+click or right-click), select Get Info...
3. Click on General to see general information about the item
4. Click on Owner to see the item's group and owner
5. Click on Permissions to view and modify the item's permissions (UMASK)
6. Click on Preview to view a thumbnail version of the selected item
To view and modify file and folder details and permissions for a remote file
1. Connect to the remote site
2. Locate the file or folder in the remote pane and select it
3. From the context menu (control+click or right-click), select Get Info...
4. Click on General to see general information about the item
5. Click on Owner to see the item's group and owner
6. Click on Permissions to view and modify the item's permissions (UMASK)
Setting file permissions automatically
To automatically set (CHMOD) the permission (UMASK) of an uploaded file or folder
1. Launch the Site Manager
2. Select a site in the Site Manager
3. Click Edit
4. Add a UMASK value next to the Set uploaded file permissions mask to: field and check the
box to the left of the label to enable it.
5. Click OK
Next time you connect to the site and upload a file, its UMASK value will be set to the value you
specified.
Note : Applies to server's with UNIX type permissions only
28
Manage
To automatically set the UMASK of a downloaded file or folder to rw-r-r
1. Click CuteFTP Mac > Preferences > Transfer
2. Check the box next to Set download file permissions to rw-r-r
3. Click OK
Next time you download a file, its UMASK value will be set to rw-r-r.
Creating a new folder
1. Connect to an FTP site and navigate to where you would like a new folder.
2. On the menu bar, choose File > New Folder.
3. Type in the new folder name.
4. Click Create.
Copying or moving a file or folder
To copy a file or folder
1. Click the file or folder you want to copy
2. On the menu bar choose, Edit > Copy
3. Open the folder where you want a copy of the item
4. On the menu bar, choose Edit > Paste
Notes
FTP servers do not support copying. If you select a remote file or folder, choose Copy and then
choose Paste to a different remote folder, you will move the item rather than copy it
If you need to copy a file on an FTP server you must first download it, then re-upload it to its
new location
You can copy items from one local folder to another or from a local folder to a remote folder
To move a file or folder
1. Click the file or folder you want to move
2. On the menu bar, Edit > Cut
3. Open the destination folder for the item
4. On the menu bar, choose Edit > Paste
Manually inputting a command to an FTP server.
You can manually enter any command to an FTP server.
To manually enter an FTP command
1. Connect to an FTP server.
2. On the menu bar, choose Tools > Enter Raw FTP Command.
3. Type a command.
4. Click OK.
Note : High-level commands such as DIR and MGET are not supported. Only raw FTP commands defined
by RFC 959 are supported.
Searching for items on a site
29
CuteFTP Mac Professional User Guide
To search for files on a remote site
1. Connect to the site
2. Click Tools > Search... from the menu bar
3. In the Search dialog > File name, type the exact name you wish to search for or use
wildcards (i.e. *.txt) if desired.
4. Specify a path in the Search in field if desired
5. Specify whether to search in subfolders if desired
6. Click Start to begin searching
Resulting files or folders will be displayed in the search pane. Double-click on a matching result to go
directly to that folder in CuteFTP Mac. You can then transfer the item using drag & drop.
Virtual Folders
Virtual Folders represent folders on your remote FTP server. With this option you can easily upload files
and folders by dragging them onto the Virtual Folder icon. Below you can see how to create and use
Virtual Folders.
1. Connect to the FTP server and open the folder you want to save as a Virtual Folder.
2. Ctrl & click on remote browser (it doesn't matter which file you click on):
3. From the popup menu choose "Create Virtual Folder."
4. Choose the destination of the Virtual Folder on your computer.
5. You can enter the name for the Virtual Folder (by default the name of the remote folder is assumed)
6. Press the "Save" button and the Virtual Folder icon will appear in the desired location.
7. You don't have to run CuteFTP Mac if you want to upload some files to your Virtual Folder. Just drag
and drop desired item onto the Virtual Folder icon and CuteFTP Mac will start to quickly perform your
request.
8. You can also double click on the Virtual Folder to open its content in the CuteFTP Mac browser.
30
Security
SSL sessions
To establish an SSL session
1. Create a new site in the Site Manager
2. Choose FTPS (SSL FTP) from the Security drop down in the right pane
3. Connect to the site
Troubleshooting Secure Connections
If you are having difficulty connecting to your FTP server over SSL, refer to the following checklist below
for help.
SSL Connection Checklist
1. Not all FTP servers support secure FTP connections using SSL. Check with your server
administrator before you attempt to connect securely.
2. Verify the port being used. Some servers require that SSL connections use a dedicated port other
than port 21.
3. Verify that the server isn't requiring a client certificate, as CuteFTP Mac does not provide one.
4. Does the server you are connecting to support SSL v3.1 (AUTH TLS) or a properly implemented
version of AUTH SSL? Click here for more.
Related topics
SSL details
SSL details
Not all FTP servers that support SSL connections do so correctly or in strict compliance to proposed or
approved standards.
Various FTP over SSL implementations have been proposed over the last few years. Most do not conform
with RFC–2228 or are at odds with the latest IETF (Internet Engineering Task Force) drafts.
Typical Implementations:
Implicit TLS/SSL
SSL connection over a dedicated port (990) registered with the IANA. This approach, while quite
common, is not favored by the IETF and is not supported by CuteFTP Mac.
Explicit "AUTH SSL"
SSL connection over a standard port (21) using “AUTH SSL” or “AUTH TLS-P” to negotiate the protection
mechanism. AUTH TLS-P implicitly sets the protection mechanism and is therefore in direct disagreement
with RFC 2228. CuteFTP Mac does support AUTH SSL, and subsequently sets the protection mechanism
explicitly using the PROT command and its approved arguments.
Explicit “AUTH TLS”
31
CuteFTP Mac Professional User Guide
SSL v3.1 connection over a standard port (21) and explicitly setting the protection mechanism. This is the
version that best adheres to RFC 2228 and is favored by the IETF in its latest FTP over SSL draft (draftmurray-auth-ftp-tls-13.txt). This version is supported by CuteFTP Mac.
Notes
CuteFTP Mac will attempt to connect using AUTH TLS and if that fails, it will attempt to connect using
AUTH SSL.
CuteFTP Mac will not connect to servers requiring “AUTH TLS-P” or other deprecated SSL connection
mechanisms aside from those mentioned above.
CuteFTP Mac's key exchange algorithms, authentication algorithms, and data encryption ciphers are
based on the OpenSSL library as employed by the Mac OS.
To see what OpenSSL version you are running,
from the Mac terminal, type:
OpenSSL <enter>
version <enter>
Related topics
SSL sessions
SSH2 (SFTP) sessions
To establish an SSH2 (SFTP) session
1. Create a new site in the Site Manager
2. Choose SFTP (SSH2 FTP) from the Security drop down in the right pane
3. Connect to the site
Troubleshooting Secure Connections
If you are having difficulty connecting to your FTP server over SSH2, refer to the following checklist
below for help.
SFTP Connection Checklist
1. Verify that the server you are connecting to supports SFTP connections (see Note below).
2. Verify the connection port. SFTP usually occurs over port 22.
3. Verify the authentication mechanism supported and required by the server. It may be requiring a
public key (identity file). CuteFTP Mac only supports password based authentication.
4. When prompted to accept the server's identity file, you must accept in order to continue
connecting. The identity file is stored under HOME/.ssh/known_hosts
Note
CuteFTP Mac supports SFTP, which is a secure service provided by the SSH2 host, in which the server
both encrypts the data and handles the file transfer. This should not be confused with FTP over SSH2, in
which the SSH2 uses it's "port forwarding” capabilities to forward standard FTP transactions over an
encrypted tunnel, with the actual file transfer being handled by a separate (and non-secure) FTP server.
Related topics
SSH2 details
32
Security
SSH details
CuteFTP Mac's key exchange algorithms, authentication algorithms, and data encryption ciphers are
based on the OpenSSH library as employed by the Mac OS.
You can configure various SSH settings from the UNIX command prompt (terminal) by editing the
following file:
$HOME/.ssh/config
/etc/ssh_config
Click here for more information on configuring SSH settings.
Related topics
SSH2 sessions
33
CuteFTP Mac Professional User Guide
34
Preferences
General
To access preferences, click CuteFTP Mac > Preferences from the menu bar.
General Preferences page
On startup: Select whether to launch the Site Manager (address book), or automatically connect to the
default site (selected in the site manager) or to not do anything upon application startup.
Startup folder : Select which folder should be shown in the local pane upon application startup.
Whether the last one used, your computer view, or a folder you define. Click on the Choose... button to
define a custom startup folder.
Default download folder when transferring via the Queue: Select a folder in which to place files or
folders downloaded using the transfer queue.
Always show Quick Connect bar on startup: Select whether to display the Quick Connect address bar
in the main window upon application startup.
Store site passwords in the Key Chain: Select whether CuteFTP Mac should store your site
passwords in the Mac OS Key Chain for extra security.
Set CuteFTP Mac as the default FTP client: Select whether your operating system should always call
CuteFTP Mac when dealing with FTP URLs.
File editor: Select the editor to use for performing file edits. Note: choose a ODB Editor Suite protocol
compliant editor such as BBEdit or AlphaX to perform remote file editing (Saves changes back to remote),
or any other text editor, such as Text Edit.
Force to ASCII all files requested with the view command: Select this option to force all files
selected for remote edit to be transferred in ASCII before opening them in the editor. Note: Forcing true
binary files into ASCII for editing will show garbled text in the editor.
Connection
To access preferences, click CuteFTP Mac > Preferences from the menu bar.
Connection Preferences page
E-mail address for anonymous logins: Specify the e-mail address to use when connecting to
anonymous FTP sites.
Data connection type: Specify whether to use PASV or PORT mode for the data connection. PASV is
the default mode used. Switch to PORT mode if you are having trouble connecting to a site using PASV
mode.
Store Quick Connect history: Select whether CuteFTP Mac should remember the Quick Connect
information you enter between application sessions.
Connection retry attempts: Specify the amount of times CuteFTP Mac should attempt a connection to
a non-responding site.
Delay between retries in seconds: Specify the amount of seconds CuteFTP Mac should delay
between reconnect attempts.
Logging: Specify the type of logs CuteFTP Mac should display in the log view.
None = no logging
Basic = log RETR and STOR command sequences
Standard = log all commands except for raw directory listings, multi-part segments, file
size calculations and searches.
35
CuteFTP Mac Professional User Guide
Full = log everything except raw directory listings
Transfer
To access preferences, click CuteFTP Mac > Preferences from the menu bar.
Transfer Preferences page
Transfer method: Specify whether CuteFTP Mac should automatically detect the transfer mode based
upon the file type or force a particular mode, such as binary, ASCII, or MacBinary.
ASCII (text) file extensions: Specify file extensions for files that should be transferred in ASCII mode.
Examples are .html, .htaccess, .txt, etc.
Perform multi-part downloads for files bigger than: Specify whether files should be split apart,
transferred simultaneously, and later recombined upon receipt and the minimum size before a multi-part
transfer should occur.
Allow up to N simultaneous transfers (when transferring via the Queue): Specify the amount of
concurrent transfers allowed.
Preserve remote time stamp for downloaded files: Specify whether CuteFTP Mac should write the
time stamp of downloaded files to match the modified time for the same file(s) that exists on the server.
Calculate folder size prior to download: Specify whether CuteFTP Mac should recursively analyze a
folder prior to download to determine whether enough space is available and to help track download
progress.
Prompt to overwrite file and folders with same name: Specify whether CuteFTP Mac should
prompt you when a matching filename is encountered during a transfer. If not selected, CuteFTP Mac will
always overwrite the matching file.
Set downloaded file permissions to rw-r-r (default): Specify whether CuteFTP Mac should modify
the permission of downloaded files to always be read-write, read, read, regardless of the file's permission
on the server.
Set text files Creator to: [
] and Type to: [
]: Select the creator code and file type for a
particular extension. The creator code identifies what application is responsible for a particular file type.
The file type describes what kind of file it is, as interpreted by it's creator application. You would only
need to set this if the default creator and type for a particular binary file hasn't been set by your OS.
Use binary mode when transferring ASCII files between UNIX hosts: Specify whether CuteFTP
Mac should ignore the file type when transferring between UNIX hosts, always transferring in binary.
Always attempt to resolve links: Specify whether CuteFTP Mac should attempt to resolve all links
encountered (figure out if they link to files or folders). This is recommended, however it can take some
time when there are a lot of links in a particular folder.
Navigation
To access preferences, click CuteFTP Mac > Preferences from the menu bar.
Navigation Preferences page
Enable case-sensitive sorting: Specify whether CuteFTP Mac should consider file case when sorting
items displayed in the local and remote pane.
Sort files and folders separately: Specify whether CuteFTP Mac should sort folders followed by files
or both together.
Cache folders contents indefinitely (default is 24 hrs.): Specify whether CuteFTP Mac should
remember visited folder contents past 24 hours. If not selected, CuteFTP will always refresh the cache for
a folder you are visiting if it has been 24 hours since you last visited it.
36
Preferences
Quit CuteFTP Mac when last window is closed: Specify whether CuteFTP Mac should shutdown
once you've closed the last open connection.
Launch new session (window) when connecting to Site Manager site: Specify whether CuteFTP
Mac should open an entire new application session when you connect to a site from the Site Manger.
After downloading a file, perform default action for files of type: Specify whether the default
action associated with a file extension should be performed once the file is downloaded.
Remove successful transfer items from the Queue automatically: Specify whether CuteFTP Mac
should automatically remove finished transfers from the transfer queue.
Delete items to Trash when Command+Backspace is used: Specify whether CuteFTP Mac should
delete items to the Trash as opposed to permanently deleting them when using the
Command+Backspace shortcut key.
Double click local/remote file action: Select the action to occur when double-clicking on an item.
Choose whether to transfer, open or edit the item that is double-clicked.
Prompts
To access preferences, click CuteFTP Mac > Preferences from the menu bar.
Prompt Preferences page
Show error prompts: Specify whether CuteFTP Mac should display fatal errors in a separate window,
requiring user interaction.
Prompt before deleting files: Specify whether CuteFTP Mac should confirm a delete item request,
requiring user interaction.
Prompt prior to reconnect: Specify whether CuteFTP Mac should confirm when a reconnect request is
made, requiring user interaction.
Beep upon transfer completion: Specify whether CuteFTP Mac should perform a system sound event
upon successfully completing a transfer.
Display
To access preferences, click CuteFTP Mac > Preferences from the menu bar.
Display Preferences page
Show file size: Specify whether CuteFTP Mac should display file sizes in the local or remote panes.
Show file date/time: Specify whether CuteFTP Mac should display file and folder time and date in the
local or remote panes.
Show date, Show time, Show seconds: Tailor your date/time display to include any combination of
date, time and/or seconds for files and folders.
Show remote hidden files and folders: Select this option to sends the -a list parameter in order to
view hidden files and folders on the server.
Show local hidden (system) files and folders: Select this option to view hidden files and folders on
your system.
Show links: Specify whether CuteFTP Mac should display file and folder links in the remote pane.
Show new remote connection in: Select the pane in which to display new connections, either always
left, right or the active pane (whichever one has the focus).
Font Controls: Choose the log, left/right pane and status bar fonts by clicking the Choose button and
selecting a font.
37
CuteFTP Mac Professional User Guide
38
Advanced
Xbox connectivity
To connect to the Xbox, install FTP server on the Xbox. Then configure it and connect from your
computer using CuteFTP Mac. See http://www.xbox-scene.com.
Scripting
CuteFTP Mac Pro supports the following AppleScript commands:
browse
This command opens Captain FTP main window, connects to the specified server and lists its directory
content.
browse [reference]
List of references:
change folder “Unicode text” -- The argument specifies the remote folder on the server.
server “Unicode text” -- The argument specifies the host name (URL based format).
using addressbook session “Unicode text” -- The argument specifies the address book session name.
upload
This command uploads files/folders list onto server.
upload [reference]
List of references:
into folder “Unicode text” -- The argument specifies the remote folder on the server.
onto server “Unicode text” -- The argument specifies the host name (URL based format).
elements list -- The argument specifies the list of files/folders to be uploaded.
using addressbook session “Unicode text” -- The argument specifies the address book session name.
Sample Apple scripts:
browse
launch application "Captain FTP"
tell application "Captain FTP"
browse server "user:password@hostname"change folder "~/aFolder"
end tell
upload
launch application "Captain FTP"
tell application "Captain FTP"
upload elements {"/TestFile.txt"} using addressbook session "Remote
server"
end tell
39
CuteFTP Mac Professional User Guide
40
Troubleshooting
Saving a log
The Log Window, visible in the upper portion of the CuteFTP Mac screen, shows every action CuteFTP Mac
performs and the server's responses. Many error codes and problems will show up here. You can save
the contents of the log window to a file for review, and to help with troubleshooting.
To save the contents of the log window
1. On the menu bar, choose Edit > Copy Log.
2. Open a blank document in TextEdit, or some other text editing application.
3. On the text editor menu bar, choose Edit > Paste. Your log text will appear.
4. On the text editor menu bar, choose File > Save and save the document. Your log will now be
in a text file you can review, or that you can send via email for others to review.
Tooltip Help
CuteFTP Mac utilizes Tooltip help to provide a brief description of controls located in the Preferences
page.
To access balloon help
1. On the menu bar, choose CuteFTP Mac > Preferences
2. Place your mouse over a control in one of the preference pages and leave it there. After a couple
seconds, a small tip will display providing a brief description of the highlighted control.
41
CuteFTP Mac Professional User Guide
FTP error and status codes
During FTP sessions, the server will send numbered codes representing errors or session status. CuteFTP
Mac displays these codes in the log window. Here are brief explanations for the error and status codes.
100's
200's
300's
400's
500's
10000's
Code
Description
100 Series
The requested action is being initiated, expect another reply before proceeding
with a new command.
110
Restart marker reply.
120
Service ready in nn minutes.
125
Data Connection already open, transfer starting.
150
File status okay, about to open data connection.
200 Series
The requested action has been successfully completed.
200
Command okay.
202
Command not implemented, superfluous at this site.
211
System status, or system help reply.
212
Directory status.
213
File status.
214
Help message.
215
NAME system type. (Where NAME is an official system name from the list in the
Assigned Numbers document.)
220
Service ready for new user.
221
Service closing control connection. Logged out if appropriate.
225
Data connection open; no transfer in progress
226
Closing data connection. Requested file action successful (for example - file transfer or
file abort).
227
Entering Passive Mode.
230
User logged in, proceed.
250
Requested file action okay, completed.
257
"PATHNAME" created.
300 Series
The command has been accepted, but the requested action is on hold, pending
receipt of further information.
331
User name okay, need password.
332
Need account for login.
350
Requested file action pending further information.
400 Series
The command was not accepted and the requested action did not take place, but
the error condition is temporary and the action may be requested again.
42
Troubleshooting
421
Service not available, closing control connection. This may be a reply to any command if
the service knows it must shut down.
425
Can't open data connection. Try changing from PASV to PORT mode.
426
Connection closed; transfer aborted.
450
Requested file action not taken. File unavailable (e.g., file busy).
451
Requested action aborted: local error in processing.
452
Requested action not taken. Insufficient storage space in system.
500 Series
The command was not accepted and the requested action did not take place.
501
Syntax error in parameters or arguments.
502
Command not implemented.
503
Bad sequence of commands.
504
Command not implemented for that parameter.
530
Not logged in. Your password is being rejected, contact the server administrator.
532
Need account for storing files.
550
Requested action not taken. File unavailable (e.g., file not found, no access). Contact
the server administrator.
552
Requested file action aborted. Exceeded storage allocation (for current directory or data
set). Contact the server administrator.
553
Requested action not taken. File name not allowed. Try changing the file name, or
getting rid of spaces in the file name.
10,000
series
Winsock error codes
10054
Connection Reset by Peer - The connection was forcibly closed by the remote host.
10060
Can't connect to remote server (Generally a time-out error). Try switching from PASV to
PORT mode.
10061
Can't connect to remote server. The connection is actively refused by the server. Try
switching from PASV to PORT mode.
10066
Directory not empty. The server will not delete this directory while there are files/folders
in it.
10068
Too many users, server is full. Contact the server administrator.
43
CuteFTP Mac Professional User Guide
Registration issues
CuteFTP Mac still shows it's unregistered
CuteFTP Mac uses a serial number registration process. When you purchased CuteFTP Mac, you should
have received a serial number. To register, you need to enter this serial number in CuteFTP Mac.
To register CuteFTP Mac
1. Make sure you are connected to the Internet.
2. Start CuteFTP Mac. A window appears asking you to enter your serial number.
3. Click Enter Serial Number. The Enter Serial Number window appears.
4. In the Serial Number box, type or paste your serial number.
5. In the Name box, type in your name.
6. In the Email box, type your email address.
7. Enter your information into the rest of the boxes. We use this information to help you if you lose
your serial number.
8. Click Register Online. You should see a message telling you the registration was successful.
How to register with a serial number
To enter your serial number
1. Connect to the Internet as you normally would.
2. Start CuteFTP Mac. If the Site Manager appears, click Exit to close it.
3. On the menu bar, choose Help > Enter Serial Number. An Enter Serial
Number window will appear.
4. In the Serial number box, type in or paste your unique serial number.
5. In the Name box, type in your name or the name of your company. The rest of
the boxes are optional, but the information will assist us if you need our help
resolving problems.
6. Click Register Online.
7. You should receive a message that says something like, "Congratulations! You have now
registered your copy of CuteFTP Mac."
Registration Errors
Since all serial numbers are verified through the Internet, the potential for errors exists during the
process. If you are receiving errors while attempting to register CuteFTP Mac, you may manually register
the program by submitting your registration information to us by email.
1. Choose Help > Enter your serial number.
2. Enter your Serial Number and Name in the appropriate boxes. Fill out the remainder of the
boxes.
3. Click Register By E-mail. A Register By E-mail window opens.
4. Click Copy Text.
5. Create an email to
[email protected]
6. Click in the body of the message and Paste.
7. Send the message. Please do not modify the format of the text.
44
Troubleshooting
8. We will process your email and send you a registration file with instructions.
9. When you receive the email, copy the registration key.
10. Reopen the Register By Email window.
11. Paste the registration key into the bottom box of the Register By E-mail window.
12. Click OK.
Find a lost serial number
If you cannot locate your serial number, access your serial number from our Web site. Just give
us the original e-mail address you supplied at the time of your order, and we will be able to respond with
your ordering information.
After you request your registration information, you will receive:
Your original invoice.
Your registration number (with instructions for your records).
Note
The invoice which we e-mail to you is your original; you have not been double-billed. If you have any
other questions, feel free to contact us.
Registration limit exceeded message
The "Registration Limit Exceeded" message you are receiving indicates that you have attempted to
register the software on multiple computers.
According to the license agreement, " ...you are licensed to copy the SOFTWARE only into the memory of
the number of computers corresponding to the number of licenses purchased. The primary user of the
computer on which each licensed copy of the SOFTWARE is installed may make a second copy for his or
her exclusive use on a portable..."
We understand that hard drives "crash," system upgrades occur and other problems arise that may
indicate the need to install the software on a system other than the original. Before we are able to
increase your registration limit, we need more details as to the steps you took when you installed and
registered the product, including any major changes you made to your operating system or your
hardware. Please contact GlobalSCAPE technical support and be as detailed and specific as
possible.
If you wish to install and use the software on more than one machine, you will need to purchase a
license for each computer.
"Unable to Recognize Server Response"
If this error occurs while trying to register, register your software manually.
To register manually
1. Choose Help > Enter your serial number.
2. Enter your Serial Number and Name in the appropriate boxes. Fill out the remainder of the
boxes.
3. Click Register By E-mail. A Register By E-mail window opens.
4. Click Copy Text.
5. Create an email to [email protected].
6. Click in the body of the message and paste.
7. Send the message. Please do not modify the format of the text.
45
CuteFTP Mac Professional User Guide
8. We will process your email and send you a registration file with instructions.
9. When you receive the email, copy the registration key.
10. Reopen the Register By Email window.
11. Paste the registration key into the bottom box of the Register By E-mail window.
12. Click OK.
Unable to register because "Enter your serial number" is gray
If the option to Enter Serial number is grayed out, then your software has been registered. No further
action is necessary. Under CuteFTP Mac > About CuteFTP Mac, you should see the serial number
used to register.
46
Troubleshooting
Purchasing CuteFTP Mac
General Purchase Information
You can find the current price for
for more information.
CuteFTP Mac on our Web site. Please contact our sales team
International orders
International customers may prefer to purchase locally. A complete list of our international resellers is
located at our Web site.
Serial numbers
After you purchase, you will be e-mailed a registration serial number. Enter the serial number into your
trial copy of the program, and it will be fully operational. Please keep and print your serial number. You
will need it for future installations, updates or upgrades to the program.
If you have purchased a license for GlobalSCAPE software and you lose your serial number, you can
request that we e-mail it to you.
How to order
If you would like to purchase a license for GlobalSCAPE software, you have several ordering options.
Ordering and purchase options are outlined at http://ww.globalscape.com/store/. You can also contact
our sales team.
Tax Information
The GlobalSCAPE Tax ID number in the CuteFTP Mac v1 help file is wrong.
Contact our sales team for correct and current tax and discount information.
You can also find purchase and tax information at www.globalscape.com/store/.
Find a lost serial number
If you cannot locate your serial number, access your serial number from our Web site. Just give us the
original e-mail address you supplied at the time of your order, and we will be able to respond with your
ordering information.
After you request your registration information, you will receive:
Your original invoice.
Your registration number (with instructions for your records).
Note: The invoice we e-mail to you is your original; you have not been double-billed. If you have any
other questions, feel free to contact us.
Trial Information
What is disabled after 30 days?
47
CuteFTP Mac Professional User Guide
The trial version of CuteFTP Mac works just like the full version. To continue using CuteFTP Mac after the
trial ends, you must register the software by paying a one-time fee. Registering your software converts
your trial copy to a full copy.
If you do not purchase a license and register the software before the trial expires, CuteFTP Mac will
cease to function, but you will still have the option to register the software.
Even if you register the software after the trial has expired, CuteFTP Mac will function properly, and all of
your Site Manager and other custom information will still be available.
Files and folders
"File permission denied" message
This error comes from the server you are connected to. It means that you are not permitted to download
the particular file you have selected. This is not something that CuteFTP Mac can control. You will need
to contact the server's administrator to request permission to download the file.
Copy and Paste of remote items removes original file
FTP Servers do not support a Copy command. If you try to Copy then Paste an item from one remote
folder to another, the item will simply move to the new location on the server. You can Cut and Paste
the file back if you need to restore the original file. This is a limitation of the FTP protocol.
You can use Copy and Paste to copy files from a remote site to a local folder, from a local folder to a
remote folder, or from one local folder to another local folder.
To copy and paste items from one remote folder to another remote folder
1. Connect to an FTP site
2. Download the item you want to copy.
3. Open the folder on the remote site where you want a copy of the item.
4. Upload the item to the new folder.
File size and date issues
If you transfer files with CuteFTP Mac and they show up on the server side as having a slightly different
file size than what is shown on your computer, or if the date on the file is displayed differently than what
is on your computer, please keep in mind that CuteFTP Mac does not change the file size and date
information supplied by the FTP server.
A remote file's size and date are sent to CuteFTP Mac from the FTP server, and CuteFTP Mac simply
relays this information to you. The server may report a file as having a different size or date, but it is very
likely that the file is indeed the exact same as the one on your local drive, only that it is being reported as
having a different size or date by the server. This issue is most common when transferring files to a
server that uses a different operating system (Linux, Windows, Sun servers) or is in a different time zone.
To be absolutely sure, try downloading the file from the FTP server. The file should be exactly the way
you sent it to the server. If it is not, you will need to contact the administrator of the server in order to
resolve the issue.
ASCII or Binary file types
CuteFTP Mac uses the same list that Web browsers and other applications use to determine if a file is
ASCII or Binary. File types are determined by the default Mac OS file type list and by the ASCII file types
list under general Preferences.
48
Troubleshooting
If a certain extension is not in the file type list, CuteFTP Mac will transfer files with that extension in
binary (default) mode.
On Mac OS 8-9, you can go to the internet control panel to view, modify or add to the file type list.
Extended folder paths in host addresses
You can enter a host address that includes the path to a specific folder on the remote host. CuteFTP Mac
considers the path "relative" by default.
For example: If you log into an FTP server "ftp.myserver.com" as user "joeuser", the initial remote folder
will be the home folder for that user (presumably /home/joeuser). If you want your "Documents" folder
inside your home folder to be the initial remote folder, you enter the host address as
"ftp://ftp.myserver.com/Documents". This connects you automatically to home/joeuser/Documents.
You can also specify an absolute path, you would do that by adding an extra slash:
"ftp://ftp.myserver.com//some/absolute/path".
For example, if your default home folder is users/home/joeuser, but you want to open a connection to
users/Documents, you would enter this host address: "ftp://ftp.myserver.com//users/Documents".
File and folder names
You can use up to 255 characters to name files and folders in Mac OSX. Volume names are limited to 27
characters.
For all Mac operating systems, names cannot include the colon (:) character. This character is reserved
by Mac OS to denote catalog hierarchy. A colon typed in a character name will be replaced by a dash (-)
automatically by Mac OS.
You can find more details on files and folders on the Apple Web site at:
http://docs.info.apple.com/article.html?artnum=25010.
Web site issues
Images are not showing up
Here are some reasons why your images may not be displayed correctly on your Web page.
Image files were not uploaded to the server
To upload your image files to the server:
1. Open CuteFTP Mac and locate the image files in the left window.
2. Upload the image files to the server. You should see the files in the right window after the
upload.
3. Go back to your browser and click the reload or refresh button. The images should now be
displayed.
Image file names are referenced incorrectly
It is possible that your image files were uploaded correctly to the server, but the server is looking for a
different image file name. When you created your Web page, you set up a path and a file name that the
server uses to look for the image. In your HTML source code, make sure that image file names are
correct in all respects, including letter case.
For example, the Web page calls an image with the following tag: <IMG SRC="my_image.gif">.
When you look at the file you uploaded to the server, you notice the file name is MY_IMAGE.GIF. It is all
in upper case. Therefore the Web page is referencing an image file that doesn't exist.
49
CuteFTP Mac Professional User Guide
You need to either retype your HTML code in upper case: <IMG SRC="MY_IMAGE.GIF"> or you need to
rename the file on the server to lower case to coordinate with the HTML page.
Image paths are not referenced correctly
It is possible that your image files were uploaded correctly to the server, but the server's path to the
image is incorrect. When you created your Web page, you set up a path for the server to look for the
image as well as the exact file name of the image. In your HTML source code, make sure that all paths
are directed properly. Make sure your path is not something like: <IMG
SRC="file://c/Web_editor\Html\Graphics\my_image.gif">, which would be referencing your hard drive
instead of the server.
The server cannot find an image stored in a subfolder
Another problem could be that your server cannot find an image located in a subfolder. If your HTML file
is looking for the image in the main folder instead of in a subfolder on the server, your image will not be
displayed. For example, you may have uploaded your images to a subfolder called Graphics in the main
folder, but your HTML IMG tag looks like this: <IMG SRC="my_image.gif">
Because the Graphics subfolder is not referenced in the HTML IMG tag, the server looks in the main
folder (or /) but does not see my_image.gif there. The server should be looking for my_image.gif in the
subfolder /Graphics (folder names are also case sensitive on the server). To direct the server to the right
folder, your IMG tag needs to read <IMG SRC="/Graphics/my_image.gif">. The server would then find
and display my_image.gif.
Unable to see changes to a Web site
If you are editing a Web page and you do not see any changes after the page is uploaded, please try the
following suggestions:
Make sure the file that you are uploading has the same file name and case as it appears on the
remote server.
If you are still unable to see changes to your Web site, please clear the History and Cache of
your Web browser and then refresh or reload your Web page. Whenever you visit a Web site
your browser will save this page as a cached file. If you decide to visit this Web site again, your
browser will try to read the cached file first to display it more quickly.
If none of these work, contact your web host provider. Hosts are responsible for publishing Web
page information.
Web page problems
The most common mistake that beginners make is with the main page of a Web site, also called the
index. When you type in your URL or Web page address, the server automatically looks for a file in your
main folder called index.html, default.html, or index.htm. Make sure that your main Web page is in one
of these formats. If you are not sure which format you are supposed to use, contact your service provider
for assistance.
If you did upload a file named index.html (preferably in lower case) to your main folder, and you still do
not see this page in your browser, another factor could be causing the problem. Sometimes Internet
Service Providers (ISP's) or service administrators create a subfolder called "Public_html" or "web" in your
main folder. You can see this directory in CuteFTP Mac's right window when you log into the server. If
this is the case, you need to store your Web pages (including index.html) in that subfolder (subdirectory)
rather than in the main folder.
To store your Web pages (including index.html) in the Public_html subfolder (subdirectory) rather than in
the main folder
1. Double-click the Public_html folder to display the contents of that folder.
50
Troubleshooting
2. Upload your index.html page again. It should now be stored in the correct folder.
3. Reload (or refresh) your browser. This should correct the problem.
Connection problems
Common connection problems
Here are some solutions to solving connection problems from within CuteFTP Mac:
Make sure you are connected to the Internet before you launch CuteFTP Mac.
Go to the Site Manager and select the problem site. Check the FTP host address. If you are
not sure that this is the correct host address, you will need to contact your ISP/Web Hosting
Service for the FTP host address. If they give you an address like: ftp://ftp.example.com,
leave off the ftp:// part of the address.
Verify that you are using the correct user name. Again if you are not sure, please contact your
ISP/Web Hosting Service for the correct user name.
Verify that you are using the correct password. Re-enter the password. It is easy to type in a
wrong letter or number in this field because of the encryption. If it will still not connect, verify the
password with your ISP/Web Hosting Service.
Note: The reason you need to verify information with your ISP/Web Hosting Service is because they
generate this information when they create your account with them, and their servers have to verify and
accept this information. CuteFTP Mac only sends the information to your ISP/Web Hosting Service.
Cannot resolve host name message
The Cannot Resolve Host Name message is displayed when CuteFTP Mac cannot make a connection
to the FTP Host Address that you specified when you set up the connection. It could be compared to
browsing to a web site that either is not up at the moment, or does not exist. There are several ways to
approach this situation:
Make sure you are connected to the Internet. If you are not connected to the Internet, you will
need to connect before you can connect to any FTP sites.
Make sure you typed the FTP host address correctly. This would be just the host address of the
server. For example, if you were given an FTP host address in the format: ftp://ftp.yourhost.com,
you would only type in ftp.yourhost.com. Also be sure there is nothing after the host address,
especially slashes ("/") indicating subfolders. If the server does not automatically put you in your
default folder when you log in to it, then you can add the folder into the Default Remote
Folder box when configuring this site.
Make sure you are not trying to connect to an HTTP server such as http://www.cuteftp.com. You
cannot connect to an HTTP (web) server with CuteFTP Mac. If you do not know the FTP host
address for your site, you will need to contact your server administrator for more information.
GlobalSCAPE does not know or keep track of FTP host addresses.
If you have a firewall, it must be properly configured for FTP access. If the Firewall is on a
network, you will need to contact your network or system administrator for help.
If all of these options fail and you still have the same results, you will need to contact the server
administrator of the site you are connecting to, in order to resolve the problem.
Anonymous v. normal login
There are two ways that you can log in to an FTP site, anonymously and normally.
Anonymous
51
CuteFTP Mac Professional User Guide
When you log in anonymously, you do not use a specific user name or password. If you are connecting
anonymously to a site, you need to leave User name and Password blank, and make sure you select
the Anonymous option.
Normal
If you want to connect to an FTP site that your ISP (Internet Service Provider) or Web Hosting service set
up for you, you will use a normal login. The ISP will provide you with the Host Address, User name, and
Password. Use this information to take advantage of special permissions and privileges not available
when you log in anonymously.
HTTP:// addresses
CuteFTP Mac is not a Web browser. The http:// addresses are for programs like Netscape Navigator,
Internet Explorer or Safari. For CuteFTP Mac, you need to use addresses that start with FTP://.
"Password not accepted" error message
If you are getting an error message about your password not being accepted, you will need to contact
the administrator of the server that you are trying to connect to, and confirm that you have the correct
user name and password.
Confirm that:
You are using the correct user name and password.
You have entered your user name and password correctly. Keep in mind that the password is
always case sensitive, and the user name may be case sensitive as well.
Note: If you confirm that you are using the correct information and entering it accurately, then there
may be a problem with the server itself that the administrator should resolve.
Waiting on welcome message
Waiting on welcome message... means that CuteFTP Mac is waiting for the server to start an FTP
connection. Until the connection is made, CuteFTP Mac will continue to wait for the welcome message.
If you keep getting this message, contact the server and verify the following:
Host name (The name of the server you should be connecting to).
User name (the user name for that server).
Password (the password for that server).
Transfer problems
Auto-detect transfers my files in the wrong mode
When you set CuteFTP Mac to use Auto-detect for the transfer type, CuteFTP Mac will use file definitions
created in your Mac OS or in CuteFTP Mac's general preferences to determine if a file should be
transferred in Binary or ASCII mode. Undefined file types will be transferred in Binary mode by default.
Defining files in OS X
Defining files in CuteFTP Mac Preferences
To define files as ASCII in OS X
1. Open Internet Explorer.
2. On the menu bar, choose Explorer > Preferences. The Internet Explorer Preferences
window appears.
52
Troubleshooting
3. In the left pane, expand Receiving Files.
4. Select File Helpers.
5. In the right pane, click Add. The Edit File Helper window appears.
6. In Description, type a description of the file type.
7. In Extension, type the three letter file extension.
8. In MIME type, type the appropriate MIME type (Text) followed by a forward slash (/) and subtype. For example, HTML files would be Text/HTML. Other text types include Text/ASP, and
Text/PHP. For a complete list of MIME types go to ftp://ftp.isi.edu/innotes/iana/assignments/media-types/media-types.
9. In File type, type Text.
10. In File creator, click Browse, and select the application file for the program that you would use
to open this type of file.
11. In Encoding, choose Plain Text. You can leave the remainder of the options as they are.
12. Click OK. The Edit File Helper window disappears.
13. Click OK again to close the Internet Explorer Preferences window.
To define files as ASCII in CuteFTP Mac's Preferences
1. On the menu bar, click CuteFTP Mac > Preferences > Transfer page
2. Add an extension to the list next to the label "ASCII (text) file extensions.
Copy and Paste of remote items removes original file
FTP Servers do not support a Copy command. If you try to Copy then Paste an item from one remote
folder to another, the item will simply move to the new location on the server. You can Cut and Paste
the file back if you need to restore the original file. This is a limitation of the FTP protocol.
You can use Copy and Paste to copy files from a remote site to a local folder, from a local folder to a
remote folder, or from one local folder to another local folder.
To copy and paste items from one remote folder to another remote folder
1. Connect to an FTP site
2. Download the item you want to copy.
3. Open the folder on the remote site where you want a copy of the item.
4. Upload the item to the new folder.
"Disk quota exceeded"
This error occurs when files take up more space than allowed on an FTP server.
To correct the problem
Delete files from the FTP server.
OR
Arrange for more space with the server administrator.
Slow transfers
CuteFTP Mac will transfer files at the fastest speed your computer will allow. Some issues that may
affect transfer speeds:
53
CuteFTP Mac Professional User Guide
Speed of your modem/Internet connection
Speed of your Internet Service Provider's (ISP) connection to the web
Downloading or uploading other files (like files from Web sites)
Traffic on the server
Traffic on the network
54
End-User License Agreement
GLOBALSCAPE, Inc.
CuteFTP® Mac VERSION 3 LICENSE
This Software is licensed, not sold. You may use this Software only as described in this
agreement.
If you do not agree to the terms of this agreement, do not install the Software or use any
registration number that was provided with the Software. You may contact the Web site or
store where you purchased the license for a refund if you have not used the registration
number.
1. SOFTWARE. The capitalized term “Software” refers to the object code for the computer program
known as CuteFTP Mac Version 3, any updates, supplemental code or programs provided to you by
GlobalSCAPE with or in connection with CuteFTP Mac Version 3, the user's manual and Help file, any
components, any related media and printed materials, and any related "online" or electronic
documentation.
2. GRANT OF LICENSE.
Evaluation License. If you acquired the license for the Software on an evaluation or trial basis, you
may use the Software without charge for thirty (30) days from the day that you install the Software. You
must pay the license fee and register your copy to continue to use the Software after the thirty (30) day
evaluation period. To pay the license fee and register your copy, you should visit www.globalscape.com
or an authorized sales agent. For so long as the Software is the most current version of CuteFTP Mac
distributed by GlobalSCAPE, you may give exact copies of the evaluation Software to anyone. You may
not charge any fee for the copy or use of the evaluation Software itself, but you may charge a
distribution fee that is reasonably related to any cost you incur distributing the evaluation Software (e.g.
packaging). You must not represent in any way that you are selling the Software itself. Your distribution
of the evaluation Software will not entitle you to any compensation from GlobalSCAPE. You must
distribute a copy of this license with any copy of the Software and anyone to whom you distribute the
Software is subject to this license. You may not remove any copyright, trademark or reservation of rights
language displayed on, in or with the Software.
Registered License. When you purchase a license, you will be provided with a registration number.
You must enable the registered license for the Software by entering the registration number as
prompted by the Software. You may use the registered Software on that number of computers for which
you have purchased a separate license as indicated on the invoice or sales receipt. If the Software is
installed on a network server or other storage device, you must purchase a license for each separate
computer on which the Software is used. A license for the Software may not be shared by alternating
use of the Software between different computers. If you acquired the Software for a reduced price as an
upgrade from a previous version of the Software, you may no longer use the previous version. The
primary user of a computer for which a license has been purchased may make and use one copy of the
Software on his or her portable computer. You may also make one copy of the Software for back-up or
archival purposes. Otherwise, you may not copy the Software in whole or in part. You may permanently
transfer all of your rights under this license if the recipient agrees to the terms of this license, you destroy
any copy of the Software not transferred to the recipient, and, if the Software was licensed to you at a
reduced price as an upgrade from a previous version, you destroy any copy of any previous version that
is not transferred to the recipient. If you purchased the Software on a multi-user basis, you may
permanently transfer your rights to one person only, but that person may use the Software on that
number of computers for which you purchased a license.
3. RESTRICTIONS. You may not reduce the Software to human readable form, reverse engineer, decompile, disassemble, merge, adapt, or modify the Software, except and only to the extent that such
activity is expressly permitted by applicable law notwithstanding this limitation. You may not rent, lease,
55
CuteFTP Mac Professional User Guide
or lend the Software. You may not use the Software to perform any unauthorized transfer of information,
such as copying or transferring a file in violation of a copyright, or for any illegal purpose.
4. SUPPORT SERVICES. GlobalSCAPE may provide you with support services related to the Software. Use
of support services is governed by the user‟s manual, online documentation, and other GlobalSCAPE
materials, as they may be modified from time to time. GlobalSCAPE may use any information you
provide as part of obtaining support services for its business purposes, including product support and
development.
5. INFORMATION COLLECTION. The Software includes a feature that assigns a unique number to your
computer based on system information. The Software reports this number to us when you enter your
registration number. We use this information to detect piracy of the Software. This number is tied to
personally identifiable information that we have about you.
6. TERMINATION. This license terminates if you fail to comply with its terms and conditions. If your
license terminates, you must destroy all copies of the Software. The termination of this license does not
limit GlobalSCAPE‟s other rights it may have by law.
7. INTELLECTUAL PROPERTY. You acknowledge that you have only the limited, non-exclusive right to
use and copy the Software as expressly stated in this license and that GlobalSCAPE retains title to the
Software and all other rights not expressly granted. You agree not to remove or modify any copyright,
trademark, patent or other proprietary notices that appear, on, in or with the Software. The Software is
protected by United States copyright, patent and trademark laws and international treaty provision.
8. EXPORT RESTRICTIONS. You may not export or re-export the Software in violation of the export laws
of the United States, or the applicable laws of any other jurisdiction. Among other things, U.S. laws
provide that the Software may not be exported or re-exported to certain countries that are embargoed or
restricted or to certain restricted persons. Embargoed and restricted countries currently include Cuba,
Iran, Iraq, Libya and Sudan.
9. NO WARRANTIES. To the extent permitted by applicable law, the Software and any support
services are provided "as is" without warranty of any kind, either express or implied,
including, without limitation, the implied warranties of merchantability, fitness for a
particular purpose, or noninfringement. If applicable law requires a warranty, the required
warranty is limited to ninety (90) days from your receipt of a copy of the Software.
Computer programs are inherently complex, and the Software may not be free of errors.
The Software is provided with all faults and the entire risk as to satisfactory quality,
performance, accuracy and effort is with you.
10. LIMITATION OF LIABILITY. GlobalSCAPE is not liable to you for any consequential, special,
incidental, or indirect damages of any kind arising out of the delivery, performance, or use of
the Software, even if GlobalSCAPE has been advised of the possibility of such damages.
Unless applicable law provides otherwise, GlobalSCAPE’s liability for any claim related to
your purchase of a license for or use of the Software, whether in contract, tort, or any other
theory of liability will not exceed the greater of U.S. $5.00 or the license fee paid by you.
11. AUDIT. You agree that on GlobalSCAPE‟s request you will certify in writing your compliance with the
terms of this license, including your use of the Software and Service only on or in connection with the
number of computers/servers licensed.
12. U.S. GOVERNMENT. The Software is commercial computer software developed solely at private
expense. The rights of civilian and non-civilian agencies of the U.S. Government to use, disclose and
reproduce the Software are governed by the terms of this License. Publisher is GlobalSCAPE, 6000
Northwest Parkway, Suite 100, San Antonio, Texas, 78249, USA.
13. MISCELLANEOUS. This license is governed by the laws of the State of Texas, U.S.A. This license is
not governed by the United Nations Convention of Contracts for the International Sale of Goods. You
agree to submit to the jurisdiction of courts sitting in the State of Texas for all purposes. Sole and
exclusive venue for any dispute arising under or relating to this agreement shall be in a court sitting in
56
End-User License Agreement
Bexar County, San Antonio, Texas. This license constitutes the complete and exclusive agreement
between us, notwithstanding any provision in any purchase order or other written document, except for
our statement of the number of separate license fees for which you have paid as described in Section 2,
above. This license may only be modified by a written document signed by GlobalSCAPE. No
GlobalSCAPE dealer or distributor is authorized to change the terms of this license. If any provision of
this license is held to be unenforceable, the remainder of the license shall not be affected, and the
unenforceable provision shall be reformed to the extent necessary to make the provision enforceable. If
you are located outside the United States, then the following provision applies: Les parties aux présentés
conferment leur volonté que cette convention de même que tous les documents y compris tout avis qui
SHY rattaché, soient redigés en langue anglaise. (Translation: “The parties confirm that this Agreement
and all related documentation is and will be in the English language.”)
Should you have any questions concerning this license, or if you desire to contact GlobalSCAPE for any
reason, please contact GlobalSCAPE by mail at: 6000 Northwest Parkway, Suite 100, San Antonio,Texas,
78249, USA, by telephone at: (210) 308-8267, or by electronic mail at: http://support.globalscape.com.
57