1
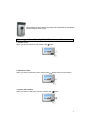
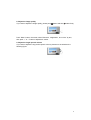
HSOINTKIT
Video Intercom Kit
Installation Guide
Contents
Introduction
Package Contents
Technical Specifications
Installation Tips
Operating your Home Security Online Video Intercom
2
2
3
4-6
6-8
1
Introduction
This Home Security Online Video Intercom Kit is a DIY easy to install kit with plug
and play connection. It is ideal for your family home, office, shop or business
premises. It features hand free operation and intercommunication between up to
four indoor stations and four outdoor stations. Its electronic lock door release
feature enables you to open the door via a quick touch of the button.
The kit contains all components for one intercom set and can expanded to 4 door
stations and 4 indoor stations.
Package Contents
•
Home Security Online Indoor Phone Station
•
Home Security Online Door station
•
Separate Connections
•
20m ready terminated cable
•
1 Amp Power supply
•
User’s Manual (Refer in box)
2
Technical Specifications
3
Installation Tips
INSTALLATION OF THE DOOR STATION:
The kit shown below is supplied with each door station.
Door station gasket
Hardware kit
Rain shield
Rain shield gasket
Select a height for the door station where the camera is positioned at approximately
eye level for the visitor. Using the rain shield as a template, mark the 4 mounting hole
locations on the wall and the large square hole location on the wall. In the large
square you will need to drill a hole to bring the wires from inside the wall into the door
station. In the 4 mounting hole locations, place 4 anchoring devices suitable for the
specific wall material.
Mount the rain shield to the wall with the rain shield gasket between the wall and the
plastic rain shield. Place one of the rubber rings on each screw before installing
between the wall and the plastic rain shield. Place one of the rubber rings on each
screw before installing the screw. These help prevent water leakage getting behind
the camera.
Rain shield gasket
4
Using the allen key provided, remove the screws on the top and bottom of the door
station. This allows you to remove the door station cover. Next wire the provided 4
conductor cable connector to the end of the 4 conductor cable in the wall. Plug the
cable into the input jack JP1 on the back of the door station. If there is a second door
station, the cable from this station plugs into JP2. Insert the door station gasket as
shown.
Door station gasket. Note 3 relief cut outs
are on the bottom
4 pin connector attached to
in-wall cable with wire nuts
Connector plugged into the
Back of the door station
Next using the 4 screws and rubber seal rings provided, attach the
Door station to the rain shield.
Caution, there is a soft rubber protector on the call button. Take care not to
loose this protective cover when removing the door
Station front cover.
5
Next reattach the door station face plate and reinstall the top and bottom
screws using the allen wrench.
Operating you Home Security Online Video Intercom kit
1. Answer a call
When you want to answer a call, please push
button.
2. Release the door
When you want to release the door, please push
3. Inspect the entrance
When you want to inspect the entrance, please push
button during communication.
button.
6
If there are two or more door stations and before the screen shuts off, you can
button and surveil the different entrances by turn. During
Continue to push
Surveillance you can push button to talk with somebody outside, and then push
button to release the door.
4. Call other indoor phones
When you want to call other family members nearby the other indoor phones, please
push button, and then keep pushing button for 2 seconds.
5. Call transfer
When you answer a call and want to transfer to another indoor, please push button
to ring. After somebody answers there, your indoor phone will shut off automatically.
6. Broadcast
When you need to speak to other family members nearby other indoor phones,
button and then speak.
please push
Function 4, 5 and 6 are available only for houses where there are two or more
indoor phones.
7. Change the ring tone
If you want to change the ring tone, please keep pushing button for 2 seconds
when the indoor phone is idle. Then push the button again and again until you get a
favorite ring tone. Then push button to confirm and stop the ring.
7
8. Adjust the image quality
If you want to adjust the image quality, please push
button and then
button firstly.
Push “Menu” button, the screen shows”Contrast”, “Brightness”, and “Color” by turn,
then push “+” or “-“ button to adjust their scales.
9. Adjust the ring & speech volume
If you want to adjust the ring and/or speech volume, please turn the wheel as the
following figure.
8