1
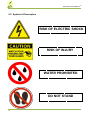
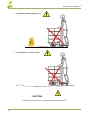
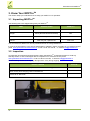
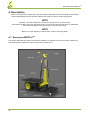
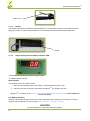
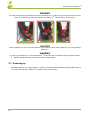
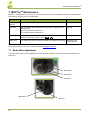
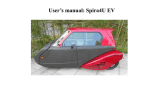
User Manual for MOPTro www.greendzine.in 5/9/2015 User Manual for MOPTroTM This is a controlled document. Any unauthorized access, redistribution, reposting and reproduction will be strictly prohibited. This document must not be copied in whole or in part, without the written permission from Greendzine Technologies Pvt. Ltd. 2 User Manual for MOPTroTM Contents 1. Introduction ................................................................................................................................................. 7 2. Safety Information ...................................................................................................................................... 8 3. 4. 2.1 General Safety Information ................................................................................................................ 8 2.2 Symbols & Description ....................................................................................................................... 9 Know Your MOPTroTM .............................................................................................................................. 14 3.1 Unpacking MOPTroTM ...................................................................................................................... 14 3.2 Inspection......................................................................................................................................... 14 3.3 Handling MOPTroTM ......................................................................................................................... 15 Description ................................................................................................................................................ 16 4.1 5. Know your MOPTroTM ...................................................................................................................... 16 4.1.1 Handle Bar ................................................................................................................................... 17 4.1.2 Rider platform .............................................................................................................................. 19 4.1.3 Rear Wheel with Disc Brake ........................................................................................................ 19 4.1.4 Front Wheel ................................................................................................................................. 19 4.1.5 Charging Port ............................................................................................................................... 19 4.1.6 Charger ........................................................................................................................................ 20 Start-up Procedure ................................................................................................................................... 21 5.1 Battery Charging .............................................................................................................................. 21 5.2 Standing on MOPTroTM.................................................................................................................... 22 5.3 Powering-up ..................................................................................................................................... 23 6. Riding MOPTroTM ..................................................................................................................................... 24 7. MOPTroTM Maintenance ........................................................................................................................... 25 7.1 8. 9. 3 Brake Wire Adjustment .................................................................................................................... 25 Trouble Shooting ...................................................................................................................................... 27 8.1 MOPTro not running after waking up ............................................................................................... 27 8.2 MOPTro not charging ...................................................................................................................... 27 8.3 Brake is not effective ....................................................................................................................... 27 Customer Service Portal .......................................................................................................................... 28 9.1 The Home Screen ............................................................................................................................ 28 9.2 The Search Box ............................................................................................................................... 28 9.3 Product Search ................................................................................................................................ 29 9.4 Reporting an Issue ........................................................................................................................... 29 9.5 Issue Status Tracking ...................................................................................................................... 32 User Manual for MOPTroTM About this Manual The purpose of this user manual is to help ride MOPTroTM. It is important that you read and adhere to all the safety instructions, warnings and cautions contained in this manual prior to using MOPTroTM. 4 User Manual for MOPTroTM LIMITED WARRANTY – Terms and Conditions Greendzine Technologies Standard Limited Warranty Terms and Conditions for Its product – MOPTroTM Smart Electric Trolley 1. Definitions: Unless the context otherwise requires, the following terms would have the prescribed meanings: GDTPL: Greendzine Technologies Private Limited , a company duly registered under the Companies Act having its Registered Office at #387, 8th Main 7th Cross BTM 2nd Stage Bangalore 560 076 , Karnataka Product(s): MOPTroTM-EPMS: Motorised Order picking Trolley Designed and Manufactured solely by GDTPL in India. MOPTroTM purchased from any Dealer or Reseller is not covered under Product definition and accordingly not eligible for GDTPL Limited Warranty. Customer : An end-user (firm, company or the legal entity) who is the Original purchaser of the Product(s) Directly from GDTPL GDTPL Provides this limited Warranty to the customer (NOT Transferable) of the New Product(s) (MOPTroTM), Replacement Part and Accessories purchased in and Situated in Bangalore 2. Warranty Period: Product(s) is covered under One (1) year Limited Warranty from the date of delivery to the Product to the customer. If a Customer transfers the ownership of product(s) to another end user, the Limited warranty from the date of transfer stands cancelled. Customer shall be required to provide proof of purchase including, Invoice, Warranty Card of the Product(s), as a pre-condition for availing the warranty of the Product(s). 3. Warranty Type: Onsite Warranty: Onsite Warranty will be provided at the Customer’s location. Onsite warranty is limited to the location(s) which is within South India 4. Warranty Terms: Subjected to the Exclusions, Limitation and Conditions, GDTPL’s Warrants following listed components, Assemblies of the Product(s) only against any defects in the manufacturer's material or workmanship, for a period of ONE (1) year (But not the attachments thereto listed under the ninety (90) day warranty below) from the date of delivery to the customer: Chassis, Gearbox, Batteries, Rear Drive Shafts Assembly, Front Steering Shaft Assembly, Motor, Control Electronic Board & Internal Wiring Subjected to the Exclusions, Limitation and Conditions, GDTPL’s Warrants all other parts, components of the Product(s), Plastic parts; Handle Grip; Mat; Handlebar; Chargers; Tyres; Electronic Lock; clamps; Wheel guards; Brake Assembly; LED’s; Throttle; Replacement parts and Accessories; for a period of ninety (90) day from the date of delivery to the customer: Subjected to the Exclusions, Limitation and Conditions, Within Limited warranty period, GDTPL will repair or replace any defective part(s) of the Product(s), if required, to rectify the problem in the Product(s). GDTPL reserves the right to use re-engineered part(s) with performance parameter equivalent to the similar new part(s), for performing the warranty services. The replaced part(s) shall become the property of GDTPL. In the event of repairs or replacement of any part(s), during the warranty period, the warranty shall thereafter continue only for the unexpired period of original Limited warranty. 5. The Warranty of the product(s) shall be rendered null and void if: This Limited Warranty does not cover damages caused to the product(s), Replacement part, or Accessories caused by any of the following : All external and physical damages without limiting to dropping , accident, collision, fire , short-circuit, immersion in water , overloading , racing, or using the product(s) contrary to the training /Instruction given by GDTPL, alteration or modification of the product, or otherwise accessing the parts within the chassis (Motor, Battery, Control Electronics Board, Mechanical Drive),tamper quality seal, disassembly of the product, deterioration of paints , plastic parts & appearance items that results from use and/or exposed to the elements. Cleaning with high pressure wash, abrasives, acids, solvents; exposing to environmental condition beyond the limits stated by GDTPL; Failure to properly maintain, use or carryout 5 User Manual for MOPTroTM improper servicing of the product(s), use of non –GDTPL specified /Manufactured parts , replacement parts or accessories 6. Limitation of Liability: GDTPL makes no other express warranty either in writing or otherwise and expressly disclaims all warranties and conditions not stated in this limited warranty. GDTPL does not warrant that the operation of the product(s) will be uninterrupted or error-free. GDTPL’s maximum liability under this warranty is limited to defects in component, Replacement parts or accessories. The warranty is limited to repair, repair cost or replacement cost of the defective part with in the warranty period. Except as indicated above, in no event will GDTPL be liable for. Indirect damage caused due to improper functioning of the product, including but not limited to lost profits or savings, business interruption, loss of brand, lost revenue, loss of use, or any other commercial or economic loss of any kind, or special, incidental, or consequential damages This limitation of liability applies in all circumstances i.e. when damages are sought, a claim made under this limited warranty or any other claim. This limitation of liability cannot be waived or modified by any person. 7. Governing Laws: Any disputes arising in connection with this Limited Warranty shall be governed by the laws of India. The courts of Bangalore shall have the exclusive jurisdiction over disputes arising hereunder. 8. Extended warranty: One Year Extended Warranty: At an additional cost Customer can buy a one –year warranty extension at the time of the purchase of the product(s). The Extended warranty shall cover only Chassis, Motor Control Electronic Board and Mechanical drive. ----------------------------------------------------------------------------------------- -------------------------------------------------I / We hereby declare that we have gone through the Warranty clause and are clear about the terms and condition to avail warranty on the product MOPTro, supplied by Greendzine Technology. I/We hereby agree to the warranty terms & condition as stated above Signature: Date Place 6 User Manual for MOPTroTM 1. Introduction MOPTroTM is an Electric Vehicle (EV) used for short distance, point-to-point and In-Campus mobility. Before using MOPTroTM read through this manual and follow all the instructions carefully. All warnings and cautions must be read with care to avoid any untoward incidents. In case of more information visit our website www.greendzine.in, www.MOPTro.com or mail to [email protected] NOTE MOPTroTM has been designed to be used for people above 16 years of age. The minimum weight of the rider must not be less than 50 Kg, so as to ensure that the rider’s safety is maintained. The maximum weight of the rider should not be more than 90 Kg. WARNING If the rider is below the minimum rider weight limit, riding MOPTroTM will result in serious injury. 7 User Manual for MOPTroTM 2. Safety Information This section provides safety and warning information which you must be aware of before you use your MOPTroTM. WARNING Indicates action that may result in personal injury or death. CAUTION Indicates actions that may result in minor injury or physical damage to MOPTroTM. NOTE Indicates important points, useful information to be kept in mind during operation. 2.1 General Safety Information NOTE MOPTroTM has been designed to be used for people above 16 years of age. The minimum weight of the rider should be 50 Kg so as to ensure that the rider safety is maintained. The maximum payload that the trolley can carry should not be more than 60 Kg. MOPTro is designed for indoor use ONLY WARNING If the below instructions are not followed it will lead to serious injury. 8 The user must wear safety shoes when riding MOPTroTM. The user must wear Safety apron while riding MOPTroTM. Ride MOPTroTM within warehouse ONLY. User Manual for MOPTroTM 2.2 Symbols & Description RISK OF ELECTRIC SHOCK RISK OF INJURY WATER PROHIBITED DO NOT STAND 9 User Manual for MOPTroTM MOPTRO – Do’s & Don’t Do’s 1. Vacuum clean the vehicle once a week 2. Spray clean using Colin & 3M mop cloth once a week 3. Tighten the disc brake regularly 10 User Manual for MOPTroTM 4. Tighten loose nuts and bolts regularly Don’ts The following are some of the Safety instructions which have to be followed: 11 Do not pressures wash MOPTroTM. Do not expose MOPTroTM to Rain & Dust. User Manual for MOPTroTM XX 12 Do not ride on slopes XX Do not ride on humps XX XX User Manual for MOPTroTM Do Not Ride On Wet slippery floor Do Not Ride On uneven surface CAUTION If the above instructions are not followed it will damage MOPTroTM. 13 User Manual for MOPTroTM 3. Know Your MOPTroTM This section helps you understand how to setup your MOPTroTM for operation. 3.1 Unpacking MOPTroTM The following items are shipped along with your MOPTroTM. ITEM SPECIFICATION QUANTITY Basic One 230 V (Normal Household socket) One Plastic pouch One Allen Key set , Spanner set One each MOPTroTM Charger Scanner holder Tool Kit The accessories for MOPTroTM can be purchased online on www.greendzine.in. In case of any discrepancy in the above Specification or Quantity, raise a complaint on our customer service portal www.greendzine.in/customerservice or call +91 80 414 724 28, or email to [email protected] 3.2 Inspection An Inspection is important and should be done when the MOPTroTM is delivered at place to avoid any warranty issues. In case of damages raise a complaint on our customer service portal www.greendzine.in/customerservice or call +91 80 414 724 28, or email to [email protected] Do the following checks to identify any damages done if any during shipping. INITIAL CHECKS Check for any external damages (Scratches/Dents/Paint Peeling) on the MOPTroTM Check for any loose hanging parts on the MOPTroTM Product ID & QR Code MOPtro_000 14 STATUS User Manual for MOPTroTM 3.3 Handling MOPTroTM MOPTroTM should be lifted only at its specific lifting points as shown in the below figure: CAUTION Lifting MOPTroTM by holding other points will damage MOPTro and will not be covered under warranty. 15 User Manual for MOPTroTM 4. Description MOPTroTM is an Electric Vehicle (EV) primarily used for transporting non-bulk material on flat terrains. The five wheel design ensures smooth, balance free riding for Users of various age groups. NOTE MOPTroTM has been designed to be used for people above 16 years of age. The minimum weight of the rider should be 50 Kg so as to ensure that the rider safety is maintained. The maximum weight of the rider should not be more than 90 Kg. NOTE MOPTroTM range depends on the Payload, Terrain, and riding habits. 4.1 Know your MOPTroTM This section describes the various components of MOPTroTM required for the User to ride the MOPTroTM. The following figure depicts the various components of MOPTroTM. 16 User Manual for MOPTroTM Handle Bar Rider Platform Rear Wheel with Disc Brake Front Rubber wheels Charging Port Charger 4.1.1 Handle Bar The handle bar is used for navigating MOPTroTM. The User should hold the handle bar at the appropriate location at all times when standing on MOPTroTM. WARNING To avoid any possible injury, do not stand or ride MOPTroTM without holding the handle bar. To avoid any possible injury, do not ride MOPTroTM with one hand or without holding the handle bar. The handle bar contains the following components: Brake Lever Throttle Push Button Range Display The above components are described in detail in the below sections: 4.1.1.1 Wake up Button The Wake up push button is a feature customized for every MOPTroTM to ensure smooth switching on the vehicle. The Push button is positioned on the handle bar. By pressing the push button, the vehicle can be started Wake up Button 4.1.1.2 Brake Lever The brake lever on MOPTroTM has two functionalities. When the brake lever is pulled, the following happens: The Rear disc brake is activated thereby bringing MOPTroTM to a halt The electronic switch on the brake lever cuts off the power to the system thereby slowing the vehicle Both of the above provide adequate braking to MOPTroTM and enhance the rider safety. 17 User Manual for MOPTroTM Brake Lever 4.1.1.3 Throttle The throttle is provided to control the speed of MOPTroTM. Positioning the thumb on the throttle lever and applying pressure on it will accelerate MOPTroTM and releasing the thumb will decelerate MOPTroTM. Throttle 4.1.1.4 Range Display and Low Battery Indication LED LED display will indicate the remaining range in Kms The Battery Status indicate System Status The following are the two system status: 1. When the LED display glows continuously it indicates that the system is ON 2. When the LED does not glow it indicates that MOPTroTM is in Sleep mode note If MOPTroTM is in Sleep mode Refer to Section Error! Reference source not found. Error! Reference source not found.. Low Battery Indication When the LED starts blinking & the buzzer is ON, it indicates that the battery is low. MOPTroTM must be stopped, and the batteries must be charged. Refer to Section 5.1 Battery Charging CAUTION Do not ride MOPTroTM when the LED Display Blinks. 18 User Manual for MOPTroTM 4.1.2 Rider platform The rider platform is the place where the Rider has to stand appropriately to ensure a safe ride. Rider Platform Rear Wheel 4.1.3 Front Wheels Rear Wheel with Disc Brake The Rear wheel is a 4” solid rubber wheel which is coupled with a disc brake. Disc Brake 4.1.4 Front Wheel The Front wheels are 10” rubber moulded tyres. All the wheels are positioned so as to provide appropriate stability for MOPTroTM. 4.1.5 Charging Port The charging port is provided on MOPTroTM to charge the batteries. 19 User Manual for MOPTroTM Charging Port CAUTION Do not insert any metal objects in the Charging port as it will Damage the product WARNING Do not use any third party charger, as it may lead to permanent damage to the Battery and On Board electronics. 4.1.6 Charger A charger is provided with every MOPTroTM to charge the batteries. The charger can be connected to any house hold 220V, 50Hz supply. WARNING Do not touch charger when charging or immediately after switching off. The charger will be hot. Do not use the charger if the wires/connectors are damaged. 20 User Manual for MOPTroTM 5. Start-up Procedure The Start-up procedure is done in order to ensure that MOPTroTM’s performance is optimized and also to assist the user for first time use of MOPTroTM. Setting up of MOPTroTM will familiarise the user with MOPTroTM and do the necessary prerequisites for the first ride. This is very important and has to be done cautiously. 5.1 Battery Charging Before the first operation, MOPTroTM must be charged for a minimum duration of 8 hours and up to a maximum duration of 12 hours. To charge the batteries, perform the following steps: 1. Connect the 3-pin plug of the charger to a socket which is of Indian standard compliance (220V, 50Hz). 2. The connecter on the other end of the charger should be inserted into the connector in the MOPTroTM’s charging port. The connector is designed to engage in one position only. 3. Push the connector into the connector socket. Refer figure below for connecting the connector. CAUTION To avoid any possible damage to MOPTroTM, do not force the connector if it does not fit. Use only the charger supplied with your vehicle. Ensure that the charger is unplugged from the vehicle before operation. Operation is possible only if the charger is unplugged from the vehicle. WARNING To avoid any possible electric shock do not force the connector if it does not fit. To avoid any possible shock do not spray water on the charger. To avoid any possible shock do not submerge the charger in water. Proper ventilation has to be there when MOPTroTM is charged. DONOT overcharge the batteries 4. Switch on the power supply. NOTE The Charger is provided with an LED which emits Red or Green light. Red light indicates that the Batteries are getting charged. Green light indicates that the Batteries are fully charged. 21 User Manual for MOPTroTM 5. Switch off the charger once the Green light glows or after 8hrs of charging. NOTE In case the Red light continues to glow for more than 8 hours, switch off the charger and call nearest service personnel or log a complaint on our company service portal. MOPTroTM does not power up when the charger is connected. MOPTroTM is now ready for use. 5.2 Standing on MOPTroTM The rider should always stand at the appropriate position on the MOPTroTM. 1. The rider should stand on the mat towards the front of MOPTroTM only. Refer figure below: \ 22 User Manual for MOPTroTM WARNING The rider should never stand towards the back of the MOPTroTM or with one leg in front and other leg in the back. Do not lift one leg while standing/riding on MOPTroTM. This will lead to serious injury. CAUTION Stand on MOPTroTM only on the rider platform. Do not stand on other parts of MOPTroTM as it may damage MOPTroTM. WARNING To avoid any possible injury, do not ride MOPTroTM unless the rider is standing at the appropriate position. 2. Hold the handle bar with both hands as shown in figure below. 5.3 Powering-up By default, MOPTroTM is in sleep mode. To power-up, press and Hold the Wake-up button (Red color) for a 1 second and release it. MOPTroTM is ready to move using Throttle. 23 User Manual for MOPTroTM 6. Riding MOPTroTM To ride MOPTroTM it must be powered up Refer to Section 5.3 Powering-Up. Once MOPTroTM is powered-up do the following to ride MOPTroTM: 1. Stand on the Rider platform and hold the handle bar. Refer to Section 5.2 Standing on MOPTroTM. 2. Press the wake-up button and release after a second, to switch on the vehicle 3. Press the throttle with the thumb. MOPTroTM will move forward. 4. Steer MOPTroTM in the required direction. 5. To stop MOPTroTM pull the brake lever. NOTE The Throttle will not work when the brake lever is pulled. NOTE The braking distance for MOPTroTM at a top speed of 15 KMPH is 0.5 Meters (approx). MOPTro will automatically switch off if the vehicle is not used for more than 60 Seconds. 24 User Manual for MOPTroTM 7. MOPTroTM Maintenance MOPTroTM is designed in such a way so as to ensure minimum or no maintenance. MOPTroTM maintenance must be done by the user on a regular basis. TASK SPECIFICATION DURATION Dry-Wash & Vacuum Wipe with a duster cloth & Vacuum clean the vehicle Daily Wet-Wash Dip the duster cloth in water and then squeeze it. Wipe MOPTroTM with the cloth. Do not pour water on MOPTroTM Do not spray water on MOPTroTM Weekly Tyre Check for tyre ware out and any damage to the rubber Swap the Front tyres once in every Fortnightly Brake Wire The brake wire tension must be checked and adjusted accordingly Weekly/As and when required For any other queries or maintenance issues log a complaint in our customer service portal or call the service personnel on +91 80 414 724 28 or email to [email protected]. 7.1 Brake Wire Adjustment The brake wire tension must be adjusted on a weekly basis or whenever the user feels that the brakes are ineffective. Brake Wire Disc Brake Allen Nut Brake Wire Allen Nut 25 User Manual for MOPTroTM To adjust the brake wire, do the following: 1. Pull the brake lever. 2. Loosen the nut with an allen key. 3. Hold the brake wire with cutting pliers and pull it. 4. Tighten the nut. 5. Release the brake lever. 26 User Manual for MOPTroTM 8. Trouble Shooting 8.1 MOPTro not running after waking up When MOPTro is not moving on pushing the throttle, check for below points. Any of the Tyres are Jammed Brake shoe is broken or Jammed Brake wire is Cut Throttle wire is Cut Brake lever is in pulled position or struck in pulled position. “Refer pictures in Section 7.1 Brake wire Adjustment”. LED display is OFF Please raise a request in Greendzine “Customer Service Portal” stating above issue. 8.2 MOPTro not charging When there is a problem with charging follow below steps: Take a unconnected charger and connect to power socket (make sure not connected to MOPTro) Turn ON power switch and observe green LED is glowing in Charger Turn OFF power. Connect charger to MOPTro (Refer section “5.1 Battery charging”) Turn ON power switch. Observe Red LED is glowing. Please raise a request in Greendzine “Customer Service Portal” stating which of the above step failed. 8.3 Brake is not effective Disc brake requires regular maintenance. When rider finds the brake not effective, follow below steps. 27 Check if brake wire is cut. If yes, raise a Service request in “Service portal”. Adjust the brake shoe for appropriate brake effectiveness. “Refer Section 7.1 Brake wire Adjustment” User Manual for MOPTroTM 9. Customer Service Portal You can look up all the information related to MOPTro with its product-ID (present on the vehicle). You can also track or raise issues on the portal. 9.1 The Home Screen 9.2 The Search Box The home page has a search box where you can search information for a vehicle using its Product-ID as the search term. You can also track the status of an issue using the issue reference number with the same search box. 28 User Manual for MOPTroTM 9.3 Product Search The search result for a Product-ID includes warranty status, dispatch date and pending issues (if any). An issue reporting section is also there. 9.4 Reporting an Issue If you need technical assistance with your MOPTro, you can raise an issue in the ‘report an issue’ section. Select the option which best explains the problem and submit. You can also provide additional details of the issue. The information will be used to provide better service. 29 User Manual for MOPTroTM You will get an ‘Issue Reference Number’ after reporting the issue, please note it down for future reference. 30 User Manual for MOPTroTM 31 User Manual for MOPTroTM 9.5 Issue Status Tracking You can track the service status of issues for your MOPTro using the search box 32