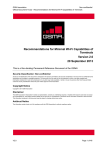
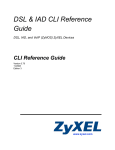
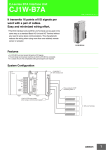
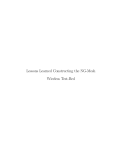
1
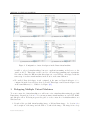
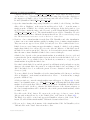
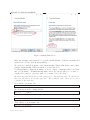
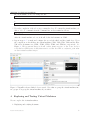
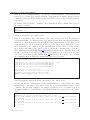
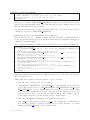
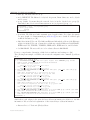
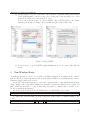
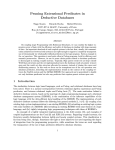
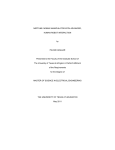
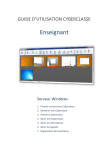
Setting up Virtual Machines for Network Programming and
Experiment
Hui Chen
Computer Science
Virginia State University, Virginia 23806
E-mail: huichen (AT) ieee.org
Written on September 14, 2015
Lastly revised on October 13, 2015
Revision: 134:7b0b97d898ad
The purpose of this manual is to guide readers to create an environment for network programming and experiments using Virtual machines.
1
Assumption and Requirement
We prepare this manual and test the steps in this manual using a Microsoft Windows 10 computer
that has an Intel(R) Core(TM) i5-2520M CPU, 8 GB of RAM, and 20 GB free disk space. In
this document, we refer this computer as the host computer as we run virtual machines using a
virtualization software installed in the computer. Be aware that if your computer has 4GB or less
RAM or a much older CPU, you may find it is too slow to run the virtual machine guests. In
addition, the steps presented below should work on other versions of Microsoft Windows operating
sytem.
Section 5 is a brief discussion on non-windows hosts. If you use a host computer of different
operating system, such as, Apple’s Mac OS X or Linux, you may refer to the section.
We chooses Oracle VirtualBox as the virtualization software because it is freely available as
Open Source Software under the terms of the GNU General Public License (GPL) version 2 [18],
runs on Windows, Linux, Macintosh, and Solaris hosts, supports a large number of guest operating systems [18], and supports multiple virtual Ethernet cards (e.g., 8 in VirtualBox 4+) in
multiple networking modes (i.e., “not attached”, “network address translation”, “NAT network”,
“bridged networking”, “internal networking”, “host-only networking”, and “generic networking” in
VirtualBox 4+) [5].
The guest operating systems is Debian Linux. We choose a Debian Linux because it is a basis
for many Linux distributions, has installation images for for multiple architectures, and can be
installed on systems with small amount of RAM and disk space. The supported architectures
include amd64, arm64, armel, armhf, i386, mips, mipsel, powerpc, ppc64, and els390x.
In addition, we recommend using a Secure Shell client (SSH client) to access the virtual machine
guests. We recommend PuTTY because you can download and use it freely [22]. PuTTY is a
Windows application.
1
SETTING UP VIRTUAL MACHINES
We use the 7-zip file archiver [19] to compress the pre-built Debian Linux guest image described
in Section 2.
To recap, the following software should have been installed on the host before you proceed,
• Oracle VirtualBox(R) 4+
• PuTTY
• 7-zip file archiver
2
Linux Guest Image
We created a Debian Linux guest image and the image is available to download from either Dropbox
or OneDrive. An incomplete but essential summary of the configuration of the virtual machine is
in Table 1.
Table 1: Configuration of Pre-built Linux Virtual Machine
Item
Operating System
RAM
Network Adaptor 1
Network Adaptor 2
Network Adaptor 3
Network Adaptor 4
Description
Debian Linux 8.x
64 MB
NAT
Host-only Adaptor
Internal Network dVMen1
Internal Network dVMen1
We configured the Virtual machine with 4 Ethernet adaptors. Figure 1 shows the configuration
of the 4 virtual Ethernet adaptors. Note that all adaptors must have different Ethernet addresses.
• We enabled Network Adaptor 1 and configured it in the Network Address Translation (NAT)
mode as shown in Figure 1(a). This mode allows you to access the outside network from
within the virtual machine. Therefore, the traffic between the virtual machine and the outside
network (e.g., the Internet) is via this adaptor. However, from the host, you cannot connect
to, e.g., establish a Secure Shell connection to, this adaptor on the virtual machine without
setting up a port forwarding in VirtualBox on the host [6].
• We enabled Network Adapter 2 and configured it in the Host-only Adaptor mode as shown
in Figure 1(b). In this mode, the adaptor, other adaptors in the Host-only Adaptor model in
this virtual machine and other virtual machines in the same host, and the host are on the
same internal network. This internal network is similar to a lookback interface without the
need of the host’s physical network interface, and importantly it provides connectivity among
virtual machines and the host [5]. Therefore, from the host or other virtual machines, we can
use a Secure Shell client to connect to a virtual machine via the IP address of the Host-only
Adaptor, which saves the effort of setting up port forwarding for multiple virtual machines.
• We enabled Network Adapter 3 and configured it in the Internal Network mode as shown
in Figure 1(c). This mode is for creating a different kind of software-based network which
Revision:134:7b0b97d898ad
2
SETTING UP VIRTUAL MACHINES
(a) Virtual Network Adaptor 1
(b) Virtual Network Adaptor 2
(c) Virtual Network Adaptor 3
(d) Virtual Network Adaptor 4
Figure 1: Configuration of network adaptors in the Linux virtual machine
is visible to selected virtual machines, but not to applications running on the host or to the
outside world [5]. This adaptor will be used for our networkprogramming and experiments.
Note that we name the Ethernet that this adapter is on as dVMen1. An adaptor with the
same setup of another virtual machines in the host is on the same Ethernet.
• We enabled Network Adaptor 4 and configured it the same as Network Adapter 3, i.e.,
configured it in the Internal Network mode as well. This adaptor and Network Adaptor 3 are
on the same Ethernet, i.e., dVMen1. See Figure 1(d)
3
Delopying Multiple Virtual Machines
To create a network of virtual machines, we will create a few virtual machines using the pre-built
Linux image discussed in Section 2. You can run as many virtual machines as your CPU, RAM,
and disk space allow. Following steps are the guide to create a network of 4 virtual machines on a
Windows host.
1. Download the pre-built virtual machine image, a Debian Linux image. See Section 2 for
the description of the image and the URL to download the image. The image is in a 7-zip
Revision:134:7b0b97d898ad
3
SETTING UP VIRTUAL MACHINES
compressed archive file, i.e., “VM Base Debian 8.x en.7z”. Then extract the image to folder
of your choice, e.g., “%UserProfile%\VirtualBox VMs” using 7-zip. Upon the completion of
the extraction, we shall be able to locate the image under the selected folder, e.g., “%UserProfile%\VirtualBox VMs\VM Base Debian 8.x en”.
2. Open the virtual machine image using VirtualBox, for which, do the following. On VirtualBox, click on “Machines” on the menu bar and then select “Add. . . ” from the menu, or
simply press the “CTRL-A” key. A dialog window will appear. In the dialog window, open
the folder that contains the image, and select and open the Virtual Machine Definition file,
“VM Base Debian 8.x en.vbox”. The virtual machine is now added to VirtualBox. We refer
this virtual machine as Base VM in the discussion that follows. We recommend that you keep
this VM intact because we want to use it as the base to create clones.
3. Next is to clone a virtual machine from the Base VM. VirtualBox and other virtualization
software can create virtual machines quickly by making clones of existing virtual machines.
They can create two types of clones, linked clone and full clone. We recommend linked clones.
Linked clones are created using an approach similar to “snapshot”, which, loosely speaking,
implies that a linked clone only needs to store the delta, the difference of disk data between
the linked clone and its parent [13]. Therefore, if clones and their parent virtual machines
share the same software installation, linked clones conserves disk space.
A linked clone depends on the parent virtual machine from which the clone is copied and
requires that the parent virtual machine is present in the host with the linked clone, i.e., if
we want to move or copy a linked clone to another host, we must move or copy the parent
virtual machine along with the linked clone.
Note that both the linked clone and the parent clone will function independently as ongoing
changes to the virtual disk of the parent do not affect the linked clone, and changes to the
disk of the linked clone do not affect the parent. For more discussion on the two types of
clones, see [3, 12].
To create a linked clone in VirtualBox, select the virtual machine added in step 2, and then
click on “Machines” on the menu bar and then select “Clone. . . ” from the menu, or simply
press the “CTRL-O” key.
A dialogue window to enter the virtual machine name will appear. See Figure 2(a). Set the
name to an identifiable name, e.g., “VM 1 Debian 8.x en” indicating this is the first virtual
machine cloned from the Base VM. Do not forget to check the “Reinitialize the MAC address
of all network cards” checkbox; otherwise, the MAC addresses of the ethernet adapters on
the cloned virtual machines will be identical to those in the parent virtual machines, which
we want to avoid.
Now click on the “Next” button. We can now choose the type of clones to create. In the
dialogue window that follows, choose the ”Linked Clone” radio button. See Figure 2(b).
The linked clone will be created and appear in VirtualBox, when we click on the ”Next”
button. We will call this virtual machine VM2 in the discussion that follows.
4. We now need to change the hostname of the virtual machine VM1. In VirtualBox, select
VM1 and click on the “Start” button from the toolbar.
Revision:134:7b0b97d898ad
4
SETTING UP VIRTUAL MACHINES
(a) Name the clone and reinitialize MAC addresses
(b) Create linked clone
Figure 2: Making linked clone
Enter the username and password to log in the virtual machine. Both the username and
password are “debian” (less quotation marks).
We can now see that the hostname of the virtual machine VM2 is VM1 that we may confuse
with the virtual machine VM1 from which we created this clone.
For Ubuntu Linux, to change the hostname, we need to edit two configuration files, “/etc/hosts”
and “/etc/hostname”. Ubuntu Linux has many editors. We can use either “vi” or “nano” to
edit files. If you have no experience with “vi”, you may elect to use “nano”.
Be aware that user debian does not the permission to change the two files. To edit the two
files, you will need to become the super user. The command “sudo” allows you to run a
command as the super user.
Now edit the “/etc/hosts” file.
sudo nano / e t c / h o s t s
In /etc/hosts, we need to change the line
127.0.0.1
dVMbase
to
127.0.0.1
dVM1
Then edit the “/etc/hostname” file.
sudo nano / e t c / hostname
Revision:134:7b0b97d898ad
5
SETTING UP VIRTUAL MACHINES
In /etc/hostname, we need to change the line
dVMbase
to
dVM1
5. Upon the completion of the above step, restart the clone. To restart the virtual machine, we
issue a ”reboot” command from the command line on the terminal as follows,
sudo r e b o o t
After the virtual machine reboots, it should declare its hostname as dVM1.
6. Repeat steps 3 - 5 to make and configure the second, the third, and the fourth clone. Upon
the completion, we should have five virtual machines, VM1, VM2, VM3, VM4, and the Base
VM, whose hostnames are dVM1, dVM2, dVM3, dVM4, and dVMbase, respectively. See
Figure 3. We recommend that you should conduct future exercises on the clones and not
touch the base VM because in the future want to use the base VM as a reference point when
we share virtual machine images.
Figure 3: VirtualBox shows 4 linked clones created. Note that we group the virtual machines into
two groups. You group the virtual machines if you wish to.
4
Exploring and Testing Virtual Machines
Now we explore the 4 virtual machines.
1. Displaying and verifying hostname.
Revision:134:7b0b97d898ad
6
SETTING UP VIRTUAL MACHINES
Start all 4 cloned virtual machines. Log in the 4 virtual machines. The username and
password are “debian” (less quotation marks). Verify that the hostnames displayed in the
command prompt are dVM1, dVM2, dVM3, and dVM4 on each of the 4 virtual machines,
respectively.
In addition, issue “hostname” command to show hostname from the command line. Below is
an example on dVM3.
debian@dVM3 : ˜ $ hostname
dVM3
debian@dVM3 : ˜ $
2. Testing connectivity to the outside world.
First, we verify that we have connectivity to the outside world on the host. Recall that on
each virtual machine, one Ethernet adaptor is configured in the Network Address Translation
(NAT) mode, which means, all network traffic from the virtual machine to the outside world
is via this adaptor to the host, and then via the host to the outside world. If the host does not
have connectivity to the outside world, the virtual machine will not either. To verify whether
the host has connectivity to the outside world, we can use the command “ping” on the host.
The command ping sends ICMP ECHO REQUESTs to another host. Typically, if the host
has the connectivity to the other host, ping will reports that it receives replies from the other
host. Below shows that we send 3 ICMP ECHO REQUESTs to host www.google.com using
the command ping from Windows command line and receives 3 replies,
C:\ > p i n g −n 3 www. g o o g l e . com
P i n g i n g www. g o o g l e . com [ 1 7 3 . 1 9 4 . 1 2 3 . 5 0 ] with 32 b y t e s o f data :
Reply from 1 7 3 . 1 9 4 . 1 2 3 . 5 0 : b y t e s =32 time =20ms TTL=50
Reply from 1 7 3 . 1 9 4 . 1 2 3 . 5 0 : b y t e s =32 time =21ms TTL=50
Reply from 1 7 3 . 1 9 4 . 1 2 3 . 5 0 : b y t e s =32 time =18ms TTL=50
Ping s t a t i s t i c s f o r 1 7 3 . 1 9 4 . 1 2 3 . 5 0 :
P a c k e ts : Sent = 3 , R e c e i v e d = 3 , L o s t = 0 (0\% l o s s ) ,
Approximate round t r i p t i m e s i n m i l l i −s e c o n d s :
Minimum = 18ms , Maximum = 21ms , Average = 19ms
C:\ >
which demonstrates that the host has connectivity to the outside world.
Now we can use the command ping on the virtual machines to verify whether the virtual
machines have connectivity to the outside world. Log in a virtual machine and issue a ping
command. The following example is an example on dVM4; however, we must repeat it on
all virtual machines to verify whether each virtual machine has connectivity to the outside
world.
debian@dVM4 : ˜ $ p i n g −c 3 www. g o o g l e . com
PING www. g o o g l e . com ( 2 1 6 . 5 8 . 2 1 7 . 1 3 2 ) 5 6 ( 8 4 ) b y t e s o f data .
64 b y t e s from i a d 2 3 s 4 3 −in −f 1 3 2 . 1 e100 . n e t ( 2 1 6 . 5 8 . 2 1 7 . 1 3 2 ) : icmp \ s e q =1 t t l =128 time
=14.1 ms
64 b y t e s from i a d 2 3 s 4 3 −in −f 1 3 2 . 1 e100 . n e t ( 2 1 6 . 5 8 . 2 1 7 . 1 3 2 ) : icmp \ s e q =2 t t l =128 time
=15.5 ms
64 b y t e s from i a d 2 3 s 4 3 −in −f 1 3 2 . 1 e100 . n e t ( 2 1 6 . 5 8 . 2 1 7 . 1 3 2 ) : icmp \ s e q =3 t t l =128 time
=15.3 ms
Revision:134:7b0b97d898ad
7
SETTING UP VIRTUAL MACHINES
−−− www. g o o g l e . com p i n g s t a t i s t i c s −−−
3 p a c k e t s t r a n s m i t t e d , 3 r e c e i v e d , 0\% p a c k e t l o s s , time 2004ms
r t t min/ avg /max/mdev = 1 4 . 1 6 1 / 1 5 . 0 4 4 / 1 5 . 5 7 7 / 0 . 6 2 8 ms
debian@dVM4 : ˜ $
In the above, we send 3 ICMP ECHO REQUESTs to host www.google.com and receives 3
replies on the virutal machine VM4. Note that although the ping command exists in both
Windows and Linux, the usage is different.
You may try different hosts of hosts other than www.google.com as long as the hosts are
configured to response to ICMP ECHO REQUESTs.
3. Listing network devices and displaying network configuration.
We now introduce the “ip” command, a utility of the iproute2 suite on Linux systems [11,
15, 16]. We first list all network devices and then display network configuration using the ip
command on a virtual machine.
The following is an example on VM2 to show network devices via command “ip link show”,
debian@dVM3 : ˜ $ i p l i n k show
1 : l o : <LOOPBACK, UP,LOWER UP> mtu 65536 q d i s c noqueue s t a t e UNKNOWN mode DEFAULT group
default
l i n k / l o o p b a c k 0 0 : 0 0 : 0 0 : 0 0 : 0 0 : 0 0 brd 0 0 : 0 0 : 0 0 : 0 0 : 0 0 : 0 0
2 : e th 0 : <BROADCAST,MULTICAST,UP,LOWER UP> mtu 1500 q d i s c p f i f o f a s t s t a t e UP mode
DEFAULT group d e f a u l t q l e n 1000
l i n k / e t h e r 0 8 : 0 0 : 2 7 : 0 4 : dc : c e brd f f : f f : f f : f f : f f : f f
3 : e th 1 : <BROADCAST,MULTICAST,UP,LOWER UP> mtu 1500 q d i s c p f i f o f a s t s t a t e UP mode
DEFAULT group d e f a u l t q l e n 1000
l i n k / e t h e r 0 8 : 0 0 : 2 7 : c6 : 5 c : 4 0 brd f f : f f : f f : f f : f f : f f
4 : e th 2 : <BROADCAST,MULTICAST> mtu 1500 q d i s c noop s t a t e DOWN mode DEFAULT group
d e f a u l t q l e n 1000
l i n k / e t h e r 0 8 : 0 0 : 2 7 : 1 2 : d4 : 8 d brd f f : f f : f f : f f : f f : f f
5 : e th 3 : <BROADCAST,MULTICAST> mtu 1500 q d i s c noop s t a t e DOWN mode DEFAULT group
d e f a u l t q l e n 1000
l i n k / e t h e r 0 8 : 0 0 : 2 7 : 1 a : 7 8 : f d brd f f : f f : f f : f f : f f : f f
debian@dVM3 : ˜ $
which shows that the virtual machine has 4 Ethernet adaptors, i.e., eth0, eth1, eth2, and eth3,
and a loopback device, lo.
Taking eth0 as an example, we interpret what we observe as follows,
• eth0. The name of the network device is eth0.
• <BROADCAST, MULTICAST, UP, LOWER UP>. It means that 4 bits of the flag
word of the network device, i.e., IFF BROADCAST, IFF MULTICAST, IFF UP, and
IFF LOWER UP are set. See Linux manual page netdevice(7) for more details. What
they mean can be summarized as follows. The network device supports broadcast and
multicast. It is up. Its lower layer is also up, which means the cable is likely connected
to the adaptor since the lower layer is layer 1 (L1) or physical layer.
• mtu 1500. The Maximum Transmission Unit (MTU) is 1500 bytes.
• qdisc pfifo fast. The packet scheduler is pfifo fast, the default qdisc of each interface.
Note that qdisc stands for queueing discipline and is a packet scheduler. See Linux
manual page PFIFO FAST(8) for more details and [4].
Revision:134:7b0b97d898ad
8
SETTING UP VIRTUAL MACHINES
• state up. The network device is up.
• mode DEFAULT. The link mode is default. At present, Linux defines two mode, default
and dormant.
• group default. It means that the network device is in the default device group [9].
Currenlty defined devices in a Linux system are in /etc/iproute2/group, e.g.,
debian@dVM3 : ˜ $ more / e t c / i p r o u t e 2 / group
# d e v i c e group names
0
default
debian@dVM3 : ˜ $
• qlen 1000. The Ethernet buffer transmit queue length is 1000. Note that qlen stands
for queue length. See Linux manual page netdevice(7) for more details. For an in-depth
technical discussion, see [11].
• link/ether 08:00:27:7d:6e:a0. The link is an Ethernet link and the address of the Ethernet
adaptor is 08:00:27:7d:6e:a0. Commonly seen link types include Ethernet, LOOPBACK,
IEEE 1394, PPP, TUNNEL, TUNNEL6, IEEE 802.11, IEEE 802.15.4, and Net Link.
• brd ff:ff:ff:ff:ff:ff. The network device’s broadcast address is ff:ff:ff:ff:ff:ff.
For more comprehensive discussion on link devices attributes and settings, see [14].
The following is an example on dVM3 to show network configuration via command “ip address
show”,
debian@dVM3 : ˜ $ i p a d d r e s s show
1 : l o : <LOOPBACK, UP,LOWER UP> mtu 65536 q d i s c noqueue s t a t e UNKNOWN group d e f a u l t
l i n k / l o o p b a c k 0 0 : 0 0 : 0 0 : 0 0 : 0 0 : 0 0 brd 0 0 : 0 0 : 0 0 : 0 0 : 0 0 : 0 0
i net 127. 0. 0. 1/8 scope host l o
valid l ft forever preferred lft forever
i net6 : : 1/128 scope host
valid l ft forever preferred lft forever
2 : e th 0 : <BROADCAST,MULTICAST,UP,LOWER UP> mtu 1500 q d i s c p f i f o f a s t s t a t e UP group
d e f a u l t q l e n 1000
l i n k / e t h e r 0 8 : 0 0 : 2 7 : 0 4 : dc : c e brd f f : f f : f f : f f : f f : f f
i n e t 1 0 . 0 . 2 . 1 5 / 2 4 brd 1 0 . 0 . 2 . 2 5 5 s c o p e g l o b a l e th 0
valid l ft forever preferred lft forever
i n e t 6 f e 8 0 : : a00 : 2 7 f f : f e 0 4 : d c c e /64 s c o p e l i n k
valid l ft forever preferred lft forever
3 : e th 1 : <BROADCAST,MULTICAST,UP,LOWER UP> mtu 1500 q d i s c p f i f o f a s t s t a t e UP group
d e f a u l t q l e n 1000
l i n k / e t h e r 0 8 : 0 0 : 2 7 : c6 : 5 c : 4 0 brd f f : f f : f f : f f : f f : f f
i n e t 1 9 2 . 1 6 8 . 5 6 . 1 0 3 / 2 4 brd 1 9 2 . 1 6 8 . 5 6 . 2 5 5 s c o p e g l o b a l e th 1
valid l ft forever preferred lft forever
i n e t 6 f e 8 0 : : a00 : 2 7 f f : f e c 6 : 5 c40 /64 s c o p e l i n k
valid l ft forever preferred lft forever
4 : e th 2 : <BROADCAST,MULTICAST> mtu 1500 q d i s c noop s t a t e DOWN group d e f a u l t q l e n 1000
l i n k / e t h e r 0 8 : 0 0 : 2 7 : 1 2 : d4 : 8 d brd f f : f f : f f : f f : f f : f f
5 : e th 3 : <BROADCAST,MULTICAST> mtu 1500 q d i s c noop s t a t e DOWN group d e f a u l t q l e n 1000
l i n k / e t h e r 0 8 : 0 0 : 2 7 : 1 a : 7 8 : f d brd f f : f f : f f : f f : f f : f f
debian@dVM3 : ˜ $
which shows each adaptor’s the network layer address information in addition to its link
information. Below is an brief explanation on the network layer address information.
• Internet Protocol Version 4 (IPv4) address.
Revision:134:7b0b97d898ad
9
SETTING UP VIRTUAL MACHINES
For each adaptor, the line headed with inet is the IPv4 address and network assignment
in the format of ipv4 address/prefix length, e.g., 127.0.0.1/8 for device lo, 10.0.2.15/24
for device eth0, and 192.168.56.103/24 for device eth1.
Following the address and network assignment is the scope of the address. Table 2 lists
4 possible values of the scope. See [1, 2, 10] for the definition of the 4 values.
Table 2: IP Scope under IP Address [7]
Scope
global
site
link
host
Description
valid everywhere
valid only within this site (IPv6)
valid only on this device
valid only inside this host (machine)
Next line specifies two lifetime values of the address. The value of valid lifetime follows
valid lft and that of preferred lifetime preferred lft. In the above example, the values
of the two lifetimes are forever, which simply means the lifetimes of the addresses are
infinity, in other words, the assignments of the addresses are not temporary. See [17] for
more detail.
• Internet Protocol Version 6 (IPv6) address.
Following IPv4 address information is IPv6 address information that is headed by inet6.
The IPv6 addresses have different length and are expressed in a different human-friendly
notation. See [10] for IPv6 address structure.
Note that we should repeat the above for every virtual machine and make sure that all
Ethernet adaptors have different Ethernet addresses.
4. Logging in VMs using a Secure Shell client from the host.
One particular situation of working with the virtual machines we created is that we cannot
copy and paste on the terminal window. Switching between virtual machines can be sluggish
if the host computer is short of RAM.
To alienate the situation, we can use a Secure Shell client to connect to the virtual machines.
We recommend PuTTY and discuss 3 tips.
(a) To connect to a host using PuTTY, we need to know the host’s IP addresses and to which
IP address we can establish connection since the host has more than one IP addresses.
In Section 2, we discuss the modes of the Ethernet adaptors in the virtual machines. In
Section 4, we use the ip command to show address information of each network device.
From the above, we conclude that we can only establish a Secure Shell connection to
the address assigned to the network adaptor in the Host-only mode. Using VM3 as an
example, the IPv4 address we should connect to is 192.168.56.103.
See Figure 4(a) for a hint and [21] for the detail to connect to the virtual machine. Note
that the “hostname” field we are to fill is the IPv4 address.
Revision:134:7b0b97d898ad
10
SETTING UP VIRTUAL MACHINES
(b) We may want to keep the connection to the host alive. Typically, without any activity
on the SSH terminal to a host for some period of time, the connection will be tore down
by the host, which can be inconvenient to some.
To keep the connection alive, we can let PuTTY send a NULL packet to the virtual
machine periodically. See Figure 4(b) for a hint and [20] for the detail setup.
(a) Create a new session in PuTTY
(b) Keep connection alive in PuTTY
Figure 4: Using PuTTY
(c) To select text to copy in PuTTY, simply highlight the text. To paste, right-click the
mouse.
5
Non-Window Hosts
To make the discussion concrete, we use Microsoft Windows system as an example host computer
system. The above steps with minor revision work with non-Windows operating systems, such as,
Linux and Apple’s Mac OS X as well.
We use the 7-zip archive manager to create the compress archive of the Linux virtual machine
image. Builds of the 7-zip archive manager are available on Linux and Mac OS X. See p7zip and
pzX. A little inconvenience to some is that p7zip and 7zX are command line tools and do not
provide a graphical user interface.
Below is a guide for Linux hosts. To install p7zip on a Linux using apt-get, issue
sudo apt−g e t −y i n s t a l l p 7 z i p − f u l l
To extract the virtual machine from the compressed archive, issue a command similar to the
below,
7 z x ”/home/ d e b i a n / Downloads / VM Base Debian 8 . x e n . 7 z ”
Revision:134:7b0b97d898ad
11
SETTING UP VIRTUAL MACHINES
where we assume that the compressed archive is downloaded to the Downloads directory under
user debian’s home directory, i.e., the archive is downloaded to /home/debian/Downloads.
PuTTY is a Windows application. In Linux and Mac OS X, we use the command ssh instead.
The command ssh is also a command line tool. We can connect to a Virtual Machine, e.g., VM3
as follows,
ssh −l debian 1 9 2 . 1 6 8 . 5 6 . 1 0 3
It is likely that the version of the ssh command also supports IPv6. In other words, we can
connect to a virtual machine, e.g., VM3 via its IPv6 adderss as follows,
s s h − l d e b i a n f e 8 0 : : a00 : 2 7 f f : f e 7 f : 4 3 dd%e th 1
6
Summary
We gain familiarity to VirtualBox and now have 4 virtual machines running in the host. We may
run as many virtual machines as CPU, RAM, and disk space allow.
In addition, we gain familiarity to the following Linux commands or tools,
• ping
• ip
• hostname
• vi or nano
and to the following software on Windows,
• ping
• PuTTY
This manual also provides a list of technical references. In particular, we would like to point
eager readers to [1, 11, 15, 16] and the IETF RFCs among which this manual cites RFCs 4291 and
4941 [10, 17].
References
[1] Christian Benvenuti. Understanding Linux Network Internals. O’Reilly Media, Inc., 2005.
[2] Serverfault.com Contributors. ip address scope parameter. https://serverfault.com/
questions/63014/ip-address-scope-parameter, retrieved on September 28, 2015.
[3] Serverfault.com Contributors. When shall i use linked vs full vm clones?
serverfault.com/a/526952, retrieved on September 28, 2015.
http://
[4] Oracle Corporation, editor. 4. Components of Linux Traffic Control. In Corporation [8],
2014-2015. http://linux-ip.net/articles/Traffic-Control-HOWTO/components.html,
retrieved on September 28, 2015.
Revision:134:7b0b97d898ad
12
SETTING UP VIRTUAL MACHINES
[5] Oracle Corporation, editor. 6.2. Introduction to networking modes. In Corporation [8],
2014-2015. https://www.virtualbox.org/manual/ch06.html#networkingmodes, retrieved
on September 28, 2015.
[6] Oracle Corporation, editor. 6.3.1. Configuring port forwarding with NAT. In Corporation
[8], 2014-2015. https://www.virtualbox.org/manual/ch06.html#natforward, retrieved on
September 28, 2015.
[7] Oracle Corporation, editor. Appendix C. IP Address Management. In Corporation [8], 20142015. http://linux-ip.net/html/tools-ip-address.html, retrieved on September 28,
2015.
[8] Oracle Corporation, editor. Oracle VM VirtualBox(R) User Manual. Oracle Corporation,
2014-2015. https://www.virtualbox.org/manual/UserManual.html, retrieved on September 28, 2015.
[9] Vlad Dogaru, Octavian Purdila, and Nicolae Tapus. Network interface grouping in the linux
kernel. In Jaime Lloret Mauri, Steffen Fries, Mary Luz Mouronte Lpez, and Ron J. Kovac,
editors, Proceedings of the Seventh International Confe rence on Networking and Services,
pages 131–135. IARIA, 2011.
[10] R. Hinden and S. Deering. Ip version 6 addressing architecture. RFC 4291, RFC Editor,
February 2006. http://www.rfc-editor.org/rfc/rfc4291.txt.
[11] Bert Hubert, Thomas Graf, Gregory Maxwell, Remco van Mook, Martijn van Oosterhout,
Paul B Schroeder, Jasper Spaans, and Pedro Larroy. Linux Advanced Routing & Traffic Control
HOWTO. http://lartc.org/howto/, retrieved on September 28, 2015.
[12] VMware Inc. Types of clone: Full and linked. https://www.vmware.com/support/ws5/doc/
ws_clone_typeofclone.html, retrieved on September 28, 2015.
[13] VMware Inc.
Understanding virtual machine snapshots in vmware esxi and esx
(1015180).
http://kb.vmware.com/selfservice/microsites/search.do?language=en_
US&cmd=displayKC&externalId=1015180, retrieved on September 28, 2015.
[14] Matthew G. Marsh. ip link - network device configuration. In [15]. http://www.
policyrouting.org/iproute2.doc.html#ss9.1.1, retrieved on September 28, 2015.
[15] Matthew G. Marsh. IPROUTE2 Utility Suite Howto. http://www.policyrouting.org/
iproute2.doc.html, retrieved on September 28, 2015.
[16] Matthew G Marsh. Policy routing using Linux. Sams, 2001.
[17] T. Narten, R. Draves, and S. Krishnan. Privacy extensions for stateless address autoconfiguration in ipv6. RFC 4941, RFC Editor, September 2007. http://www.rfc-editor.org/rfc/
rfc4941.txt.
[18] Oracle. Welcome to virtualbox.org! https://www.virtualbox.org, retrieved on September
28, 2015.
Revision:134:7b0b97d898ad
13
SETTING UP VIRTUAL MACHINES
[19] Igor Pavlov. 7-zip. http://7-zip.org, retrieved on September 28, 2015.
[20] Simon Tatham. 4.13 The Connection panel. In [23]. http://the.earth.li/~sgtatham/
putty/0.65/htmldoc/Chapter4.html#config-connection, retrieved on September 28, 2015.
[21] Simon Tatham. Chapter 2: Getting started with PuTTY. In [23]. http://the.earth.li/
~sgtatham/putty/0.65/htmldoc/Chapter2.html#gs, retrieved on September 28, 2015.
[22] Simon Tatham. Putty: A free telnet/ssh client. http://www.chiark.greenend.org.uk/
~sgtatham/putty/, retrieved on September 28, 2015.
[23] Simon Tatham. PuTTY User Manual. http://the.earth.li/~sgtatham/putty/0.65/
htmldoc/, retrieved on September 28, 2015.
Revision:134:7b0b97d898ad
14