1
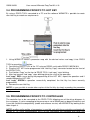
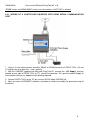
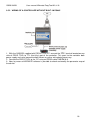
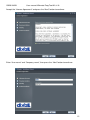
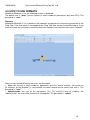
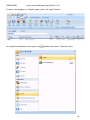
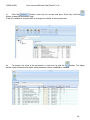
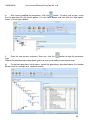
User Manual
ver 1.0
1592010420
BEWARE
!
User manual Wizmate Prog Tool Kit v1.0
Dixell S.p.A. reserve to itself the right to modify this instruction manual
without any warning. Last available can be downloaded from the internet
site.
Carefully read this manual before to install and operate the Wizmate and follow the instruction
exactly. We recommend to keep it handy for quick reference.
SAFETY PRECAUTIONS – READ BEFORE TO PROCEEDE IN THE USE OF THIS MANUAL
Symbols
Installation and wiring
This symbol indicates a potentially hazardous operation/situation that can result in injuries for the pe
This symbol indicates high voltage and is used to call you attention on operations that
could be dangerous to you and other persons.
2
1592010420
User manual Wizmate Prog Tool Kit v1.0
INDEX
1
PACKAGE CONTENTS ............................................................................................................ 4
2
minimum system Requirements................................................................................................ 5
3
UsE OF PROG TOOL ............................................................................................................... 6
3.1 WIRING DIAGRAMS ........................................................................................................................................... 6
3.2 MEANING OF THE LEDS.................................................................................................................................... 7
3.3 PROGRAMMING FROM HOT KEY TO HOT KEY ............................................................................................. 7
3.4 PROGRAMMING FROM PC TO HOT KEY ........................................................................................................ 8
3.5 PROGRAMMING FROM PC TO CONTROLLER ............................................................................................... 8
3.5.1 WIRING OF A CONTROLLER EQUIPPED WITH RS485 SERIAL COMMUNICATION PORT .................. 9
3.5.2 WIRING OF A CONTROLLER without built- in RS485 .............................................................................. 10
4
Wizmate .................................................................................................................................. 11
4.1 HOW TO INSTALL WIZMATE........................................................................................................................... 11
4.2 HOW TO USE WIZMATE .................................................................................................................................. 15
4.3 CONFIGURATION ............................................................................................................................................. 18
4.3.1 configuraTION MENU ................................................................................................................................. 18
4.3.2 Language configuration .............................................................................................................................. 18
4.3.3 MODBUS CONFIGURATION..................................................................................................................... 19
4.3.4 IMPORT/EXPORT MAPS and libraries ...................................................................................................... 21
4.3.5 How to create A NEW USER...................................................................................................................... 24
4.4 HOW TO USE WIZMATE .................................................................................................................................. 26
4.4.1 Main menu: “Map”....................................................................................................................................... 26
4.4.2 Main menu: “NETWORK” ........................................................................................................................... 31
4.4.3 Main menu: “WIZARD”................................................................................................................................ 32
4.4.4 Main menu: “custom description”................................................................................................................ 38
4.4.5 Main menu: “MAP COMPARE”................................................................................................................... 40
4.5 Other commands .............................................................................................................................................. 42
4.6 Error message .................................................................................................................................................. 43
4.7 List of devices compatible with WIZMATE .................................................................................................... 44
3
1592010420
User manual Wizmate Prog Tool Kit v1.0
1 PACKAGE CONTENTS
In the Wizmate Prog-tool kit are contained the following items:
A 1 PROG TOOL unit
B 1 CD-ROM with Wizmate software and the instruction manual
C 1 CAB/PTK2 cable (2 meters length)
D 1 CAB/PTK485 (2 meters length)
E 1 CAB/SW 9-9 (1.8 meters length)
F 1 PROG TOOL power supply cable
4
1592010420
User manual Wizmate Prog Tool Kit v1.0
2 MINIMUM SYSTEM REQUIREMENTS
Hardware requirements:
Processor
Minimum:
1.6 gigahertz (GHz) Pentium processor
Recommended:
2.2 gigahertz (GHz) Pentium processor recommended
On Vista minimum
2.4 gigahertz (GHz) Pentium processor recommended
RAM:
Minimum:
500 megabytes (MB)
Recommended:
1024 MB
On Vista minimum
786 megabytes (MB)
HARD DISK:
25 Mbyte to install the program, the libraries and the parameter map
SERIAL PORT:
Hardware rs232 communication port
Software requirements:
Microsoft® Windows® 2000 Professional SP4
Microsoft® Windows® 2000 Server SP4
Microsoft® Windows® 2000 Advanced Server SP4
Microsoft® Windows® 2000 Datacenter Server SP4
Microsoft® Windows® XP Professional x64 Edition (WOW)
Microsoft® Windows® XP Professional SP2
Microsoft® Windows® XP Home Edition SP2
Windows® Vista
5
1592010420
User manual Wizmate Prog Tool Kit v1.0
3 USE OF PROG TOOL
PROG TOOL unit can be used to program an HOT KEY and to interface Dixell controllers to a
PC in order to modify their parameter map.
3.1 WIRING DIAGRAMS
6
1592010420
User manual Wizmate Prog Tool Kit v1.0
3.2 MEANING OF THE LEDS
PROG Tool is equipped with 3 LEDS used to signal its working status.
3.3 PROGRAMMING FROM HOT KEY TO HOT KEY
This function allows to create copies of any HOT KEY already programmed.
Connect the power supply and check that the “Power” Led is on.
1. Insert the origin HOT KEY into the connector located on the side of the PROG TOOL
2. Insert HOT KEY to be programmed into the connector “Hot-Key Copy” on the front of the
PROG TOOL
3. Push the “Copy” button to start the transfer of data from the origin HOT KEY to the new one.
During this operation Led “Copy” is blinking
4. After few seconds Led “copy” stops blinking giving the result of the operation:
Led “copy” RED = error during the programming of the HOT KEY, repeat the operation and if
needed replace the HOT KEY.
Led “copy” GREEN = operation successfully completed; the Hot Key has been correctly
programmed.
5. Remove the new Hot Key. Is possible to create more copies by plugging other new Hot Key.
7
1592010420
User manual Wizmate Prog Tool Kit v1.0
3.4 PROGRAMMING FROM PC TO HOT KEY
By using a PROG TOOL connected to a PC and the software WIZMATE is possible to create
new Hot Key to match our requirements.
1. Using WIZMATE create a parameter map with the desired values and copy it into PROG
TOOL by pusching
button.
2. Connect the PROG TOOL to the PC using an RS232 serial cable RS232 CAB/SW 9-9.
3. Plug the HOT KEY to be programmed into “Hot-Key Copy” connector located on the front of
the PROG TOOL.
4. Push button “Copy” on the front of PROG TOOL; Led “copy” starts blinking.
5. After few seconds Led “copy” stops blinking giving the result of the operation:
Led “copy” RED = error during the programming of the HOT KEY, repeat the operation and if
needed replace the HOT KEY.
Led “copy” GREEN = operation successfully completed; the Hot Key has been correctly
programmed
6. Remove the new Hot Key.
NOTE: is now possible to create other copies of the Hot Key by simply repeating the procedure
from point 2 to 6
3.5 PROGRAMMING FROM PC TO CONTROLLER
The controller has to be connected to the PROG TOOL following one of the wiring diagrams in
the next pages (it varies according to the presence or not of RS485 port on board the device) and
it must be verified the compatibility (model and software version) with WIZMATE by looking to the
table chap.4.4.
NOTE: reading and/or writing of parameters is possible only with those controllers equipped with
RS485 or TTL serial communication port. For the instruments not equipped with serial port
8
1592010420
User manual Wizmate Prog Tool Kit v1.0
(PRIME series and WING BASIC series) only the creation of HOT KEY is allowed.
3.5.1 WIRING OF A CONTROLLER EQUIPPED WITH RS485 SERIAL COMMUNICATION
PORT
1. Using a 2 wire cable connect controller RS485 to RS485 terminals of PROG TOOL (16 and
17) taking care to respect the + and – polarity
2. With the CAB/RS2 supplied with Wizmate Prog Tool Kit connect the “+5V Supply” terminal
located on one side of PROG TOOL to TTL port of the controller. This grant the power Supply to
the controller without any additional wiring being required.
3. Connect PROG TOOL to the PC by using an RS232 cable CAB/SW 9-9.
4. Now, by means of WIZMATE software is possible to check and modify the parameter map of
the device.
9
1592010420
User manual Wizmate Prog Tool Kit v1.0
3.5.2 WIRING OF A CONTROLLER WITHOUT BUILT- IN RS485
1. With the CAB/RS2 supplied with PROG TOOL KIT connect the “TTL” terminal located on one
side of PROG TOOL to TTL (Hot Key) port of the controller. This grant to the controller both
power supply and serial communication without any other wiring being necessary.
2. Connect the PROG TOOL to the PC using an RS232 cable CAB/SW 9-9.
3. Now, by means of WIZMATE software is possible to check and modify the parameter map of
the device.
10
1592010420
User manual Wizmate Prog Tool Kit v1.0
4 WIZMATE
WIZMATE software, used in combination with the PROG TOOL, allows the managing of the
parameter map of DIXELL controllers.
4.1 HOW TO INSTALL WIZMATE
Insert the CD in the CD drive and click the “Wizmate.exe” file to start the guided process; press
the “Next” button:
11
1592010420
User manual Wizmate Prog Tool Kit v1.0
Accept the “Licence Agreement” and press the “Next” button to continue:
Enter “User name” and “Company name”, then press the “Next” button to continue:
12
1592010420
User manual Wizmate Prog Tool Kit v1.0
Select the path where you want to install the Wizmate; default path is
“C:\Programs\Dixell\Wizmate”; press the “Next” button:
Press the “Next” button:
13
1592010420
User manual Wizmate Prog Tool Kit v1.0
To finish the installation press “Next” button.
To exit the installation press “Finish” button.
14
1592010420
User manual Wizmate Prog Tool Kit v1.0
4.2 HOW TO USE WIZMATE
Whenever Wizmate is run, the following screen is displayed.
The default user is “User”; he can see only a small number of parameters (only level PR1). The
password is: “user”.
Warning:
Whenever Wizmate is run, it performs the automatic recognition of instruments connected to the
Prog Tool; if the instrument is connected to the Prog Tool after having started Wizmate or if you
want to change the instrument, manually restart the network scan from the main menu "Network”.
After having installed Wizmate, two users are managed:
• User: can see only a small number of parameters (only Pr1 level of visibility); he cannot use
all functions of the program (is not possible to create wizard and to create new users). The
password is: “user”
• Administrator: can see all the parameters (Pr1, Pr2 and Pr3 level of visibility); the
“Administrator” can use all the functions of the program. The password is: “admin”
15
1592010420
User manual Wizmate Prog Tool Kit v1.0
To access the program as “Administrator”, press the “Login” button:
or using the configuration menu (press the
button) and select “Security” menu:
16
1592010420
User manual Wizmate Prog Tool Kit v1.0
Enter the user name “Administrator” and password “admin”, then press “Login” button.
17
1592010420
User manual Wizmate Prog Tool Kit v1.0
4.3 CONFIGURATION
4.3.1
CONFIGURATION MENU
It is used to configure the language, the communication port (COM), etc.
4.3.2
Press
LANGUAGE CONFIGURATION
button, select “Multilanguages” menu and choose the language:
18
1592010420
4.3.3
Press
User manual Wizmate Prog Tool Kit v1.0
MODBUS CONFIGURATION
button and select “Modbus Configuration” menu:
19
1592010420
User manual Wizmate Prog Tool Kit v1.0
From the “Modbus configuration” box that is displayed, choose:
• COM: choose the serial port used to connect the Prog Tool
• Speed: select the baud rate of the device connected to the Prog Tool (typically 9600)
• Receive timeout: 200 is the standard value (contact Dixell Customer Service office in case of
communication problem).
20
1592010420
User manual Wizmate Prog Tool Kit v1.0
4.3.4
IMPORT/EXPORT MAPS AND LIBRARIES
When an instrument is not included in the list of the models supported by Wizmate, is necessary
to add the new library (contact the Dixell Customer Service department to verify the availability).
“Export/Import libraries and maps” allows the user to import the new library or import new maps;
select the command “Export/Import maps and libraries”, then select “Export libraries and maps”.
21
Search the maps to export, select them then press “Export” button:
Select the path to save the file and enter the name of the file:
To import the maps or libraries contained in a *.WME file, select the command “Export/Import
maps and libraries”, then select “Import libraries and maps”:
Search the path where the file is saved, then select “Open:
• If the *.WME file was generated starting from the maps contained in the folder “Maps”
(folder contained in the directory of the Wizmate installation), the maps will be
automatically saved in the same directory
• If the *.WME file was generated starting from the maps contained in the custom folder
(folder not contained in the directory of the Wizmate installation), it is possible to choose
where to save the maps
4.3.5
HOW TO CREATE A NEW USER
Only the “Administrator” user can create a new user.
Press
button, select “Security” and then “User management”:
1592010420
User manual Wizmate Prog Tool Kit v1.0
From the configuration menu, click “Security” “User Management” to display the following
window:
A new user can be entered clicking “Add user”:
• enter the user name
• enter the password
• confirm the password
• enter the security level:
o
level 5= “user” level (it is not possibile to generate wizard);
o
level 100= “administrator” right (it is possibile to generate wizard)
• enter the maximum level of visibility of the parameters
• to confirm, click the “Ok” button
25
1592010420
User manual Wizmate Prog Tool Kit v1.0
4.4 HOW TO USE WIZMATE
4.4.1
MAIN MENU: “MAP”
Click the “Open map” button to open a parameter map previously created and saved in the
PC.
The default folder to save the parameter map is “Maps”, contained in the directory of Wizmate
installation.
Click the “Save map” button to save the parameter map.
Click the “Upload device” button to read the parameter map of the controller connected to
26
1592010420
User manual Wizmate Prog Tool Kit v1.0
the Prog Tool.
Click the “Download device” button to transfer the parameter map of the controller
connected to the Prog Tool.
Click the “Download hotkey” button to transfer the map in the Prog Tool, then plug the
empty HOT KEY in the “Hot-Key Copy” connector located on the front of the PROG TOOL and
push the “Copy” button; led “copy” starts blinking.
After few seconds Led “copy” stops blinking giving the result of the operation:
Led “copy” RED = error during the programming of the HOT KEY, repeat the operation and if
needed replace the HOT KEY.
Led “copy” GREEN = operation successfully completed; the Hot Key has been correctly
programmed.
Remove the new Hot Key.
NOTE: is now possible to create other copies of the Hot Key by repeating the above procedure.
Plug the HOT KEY in the “Programmed Hot Key” connector located on the side of the
PROG TOOL and push the “Copy” button; led “copy” starts blinking.
After few seconds Led “copy” stops blinking giving the result of the operation:
Led “copy” RED = error during the reading of the HOT KEY, repeat the operation and if needed
replace the HOT KEY.
Led “copy” GREEN = operation successfully completed; the Hot Key has been correctly read.
Click the “Upload hotkey” button to read the map contained in the Hot Key.
Click the “Run wizard” button to run a wizard previously created.
A new window allows the user to choose the wizard.
27
1592010420
User manual Wizmate Prog Tool Kit v1.0
The following window shows an example of a wizard; using dialog boxes, the user is led through
a series of steps to generate a simplified parameters map (parameters not involved with the
application are hidden).
As showed in the following window, the application of the Ichill 261L is for a chiller without heat
pump; the parameters related to the heat pump are hidden (St04, St05,….).
28
1592010420
User manual Wizmate Prog Tool Kit v1.0
Click the “Save excel” button to save the parameter map in excel file.
Click the “Print map” button to print the parameter map.
Selection button:
•
From the “Selection” menu, select “Group” to visualize
only the parameters involved in a specific function (configuration, defrost,…)
•
From the “Selection” menu select “Parameters with error”
to visualize only the parameters that have some errors.
E.g. when the unit of measure of the temperature is changed, is possible that the conversion has
made some errors on the value of the parameters (typically value over the maximum limit).
•
From the “Selection” menu select “Parameters +
relations” to visualize the selected parameter (it is necessary to select it) and all the parameter
29
1592010420
User manual Wizmate Prog Tool Kit v1.0
directly linked to the parameter (e.g. the set point and the maximum/minimum limit).
“Multilanguage Description” / “Custom Description”
From the “Selection” menu select “Multilanguage
•
Description” to choose the language of the description of the parameters (typically Italian or
English)
•
From the “Selection” menu select “Custom
Description“ to choose the custom description of the parameters. To personalize the parameter
description and generate a new custom description see chap. 4.3.4. Whenever Wizmate is run,
the description of the parameters is always the standard description.
30
1592010420
4.4.2
User manual Wizmate Prog Tool Kit v1.0
MAIN MENU: “NETWORK”
The “Network” menu allows the user to verify the devices connected to the Prog Tool; for each
instrument are showed the Modbus address, the name of the model, the firmware version.
Whenever Wizmate is started, the network scan starts automatically; if an instrument is
connected to the Prog Tool after having started Wizmate, is necessary to click the
restart the network scan.
button to
In case of communication problems, a message appears at the bottom of the window; please
check all the connection (device <–> Prog Tool, Prog Tool <–> PC, Prog Tool power supply).
31
1592010420
4.4.3
User manual Wizmate Prog Tool Kit v1.0
MAIN MENU: “WIZARD”
The Wizmate allows the user (only the “Administrator” user) to generate, modify an save a
wizard.
Using dialog boxes, the user is led through a series of steps to generate a simplified parameters
map (parameters not involved with the application are hidden).
During the wizmate creation, for every answer the parameter map has to be configured modifying
the value and the visibility of the parameters.
E.g. if the answer to the question “Defrost presence” is “No”, the parameter that enable the
defrost has to be configured properly and all the parametrs relating to this feature may be
hidden.
4.4.3.1
HOW TO GENERATE THE WIZARD
To start generating a wizard for a specific device is necessary to open a map of the device from
the main menu “Map”.
After having opened the map, click the “Wizard” botton in the main menu.
a)
Click the
button to start creating the wizard; the following window is showed. Enter the
name of the new wizard and the model of the device.
32
1592010420
b)
Click the
User manual Wizmate Prog Tool Kit v1.0
button, enter the first question and press Enter key (by PC keyboard).
33
1592010420
User manual Wizmate Prog Tool Kit v1.0
c)
Click the
button, enter the first answer and press Enter key; click the
button to load the parameter map.
From this window is only possible to change the visibility of each parameter.
d)
To change the value of the parameter is necessary to click the
button. The figure
below shows the parameter table; each parameter can be modified as needed.
34
1592010420
User manual Wizmate Prog Tool Kit v1.0
e)
After having modified the parameters, click the
button. To add a new answer, select
the first question with the mouse pointer (1 in the figure below) and then click the “Add replay”
button (2 in the figure below).
f)
Enter the new answer and press Enter key; click the
button to load the parameter
map.
Repeat the procedure described above (points d) and e)) to modify the parameter map.
g)
To add new questions and answers, repeat the procedures described above; the window
below shows an example of a complete wizard.
35
1592010420
4.4.3.2
User manual Wizmate Prog Tool Kit v1.0
WIZARD COMMANDS
Click the “Run Wizard” button to start running a wizard.
Click the “New Wizard” button to start generating a new wizard.
Click the “Open Wizard” button to open a wizard previously created.
Click the “Save Wizard” button to save the new or modified wizard.
Click the “Save as New” button to save an opened and modified wizard as new wizard;
take care to change the wizard name in the field “Wizard name” before clicking “Save as New”
button.
Click the “Close Wizard” button to close the wizard.
Click the “Delete Wizard” button to delete a wizard previously created.
Click the “Add Question” button to add a new question.
Click the “Insert Question” button to insert a new question between questions
and answers already generated.
Click the “Delete Question” button to delete a question previously generated.
Click the “Add Replay” button to add a new answer.
Click the “Delete Replay” button to delete the selected answer.
36
1592010420
User manual Wizmate Prog Tool Kit v1.0
Click the “Edit replay data” button to visualize the parameter map and modify it.
Click the “Save in Wizard” button to save the map and return to the window
of wizmate generation.
37
1592010420
4.4.4
User manual Wizmate Prog Tool Kit v1.0
MAIN MENU: “CUSTOM DESCRIPTION”
The “Custom description” menu allows the user to personalize the description of each parameter.
Click the “Save Custom Descriptions” button to save the new custom description
column.
Click the “Print Custom Descriptions” button to print the custom description table.
Click the “Add new Custom Description” button to add a new
column with a custom description of the parameters.
It is possible to type the description for each parameter or only for some parameters; the
parameters that doesn’t have a custom description (cells not typed) are visualized with standard
description.
Whenever Wizmate is run, the description of the parameter is always the standard description.
To recall a custom description:
from the Main menu “Map” Selection Custom description name of the custom
description.
38
1592010420
User manual Wizmate Prog Tool Kit v1.0
After having selected a cell of the custom description, click the
“Remove Custom Description” button to remove it.
Click the “Rename Custom Description” button to rename the column
of the custom description.
39
1592010420
4.4.5
User manual Wizmate Prog Tool Kit v1.0
MAIN MENU: “MAP COMPARE”
Wizmate allows the user to compare some maps and highlight the differences (red = different
value, yellow = different visibility / changeability).
It is possibile to compare:
•
maps previously created and saved in the PC
•
maps previously created and saved in the PC and the map contained in the instrument
connected to the ProgTool
The first map to be opened is the reference map; it is possible to change the order of the maps,
then change the reference map.
Drag and drop the new reference map.
40
1592010420
User manual Wizmate Prog Tool Kit v1.0
Click the “Load/Compare Map” button to select the maps to compare.
Click the “Load/Compare Device Map” button to load the map contained in the
device connected to the Prog Tool.
Click the “Close All” button to close the comparison.
Click the “Print comparison” button to print the comparison.
The printing comparison will be done in black and white; it is not possible to highlight the
parameters that have different value or visibility.
From the window of the maps comparison click the right mouse button; the following commands
are available:
•
“Remove map’s column”: allows to eliminate a map from the comparison
•
“Group”: allows to visualize only the parameters involved in a specific function (CF, dF,
etc).
•
“Filter by difference”: allows to visualize only the parameters with different value or visibility
•
“Reset filter”: allows to reset the “Filter by difference” command
41
1592010420
User manual Wizmate Prog Tool Kit v1.0
4.5 Other commands
Clicking the right mouse botton during a parameter map visualization, some commands are
available (not available directly by botton icon).
42
1592010420
User manual Wizmate Prog Tool Kit v1.0
: the position of the column can be modified as needed (drag and
•
drop command); to return to the standard position of the column click the “Standard column
order” button.
•
Allows to send to the controller only the selected parameters.
Below is the description of how to select some parameters:
•
Group of adjoining parameters: select with the mouse pointer the first and last parameter
holding down the
•
key
Parameters: select with the mouse pointer the parameters holding down the
key
Allows to send only the parameters that have changed
•
(displayed in green)
4.6 Error message
When the Wizmate shows the message below, click the “save bug report” to create a file that
helps Dixell to analyze and solve the problem; the report can be sent to Dixell Customer Service.
Select one of the options to continue to use, to restart or exit the application.
43
1592010420
User manual Wizmate Prog Tool Kit v1.0
4.7 List of devices compatible with WIZMATE
Visit the Dixell Web site or contact the Customer Service office to verify the availability of new
instruments compatible with Wizmate.
Family
FW
Version
1.5
(Fam. 23)
IC100C/L
Model
IC110C
IC111C
IC120C
IC121C
IC120L
IC121L
IC110C
Family
FW
Version
1.2
Model
XC706M
XC807M
XC811M
XC907M
XC911M
XC1008D
XC1011D
(Fam. 46)
XC1015D
XEV22D
0.5
XEV22D
XEV11D/12D
0.4
XEV11D
XEV12D
XJP30D
XJP60D
XJP40D
PT100
XC
700M
800M
900M
XC1000
1.4
(Fam. 15)
IC111C
3.0
(Fam. 23)
IC100CX
1.0
(Fam. 51)
0.3
IC200L/D (Fam. 32)
440C
440D
2.1
460D (Fam. 03)
XC
650C
IC120C
IC121C
IC120L
IC121L
IC111CX
IC120CX
IC121CX
IC260L
IC261L
IC260D
IC261D
30D
60D
40D
XJP PT100
(Fam. 40)
1.4
(Fam. 14)
2.0
(Fam. 14)
XLR130/170
4.5
(Fam. 16)
XLR130
XLR170
XC440C
XC440D
XC460D
44
1592010420
Family
User manual Wizmate Prog Tool Kit v1.0
FW
version
0.2
XM400
0.3
0.7
1.0
1.2
1.4
1.5
XM600
(Fam. 18)
1.3
(Fam. 50)
XR01CX/30CX
1.7
(Fam. 44)
1.0
XR01CX/06CX (Fam. 47)
XR02CX
1.1
1.2
1.5
(Fam. 47)
Model
XM440K
XM460K
XM463K
XM470K
XM463K
XM464K
XM244L
XM466K
DR
XM470K
ISA
XM464K
CLABO
Family
XR10CX/70CX
FW
version
1.0
(Fam. 44)
XR70CX
XR71CX
XR72CX
XR110C
XR120C
XR130C/D
XM670K
XM679K
XR01CX
XR30CX
XR01CX
XR02CX
XR03CX
XR04CX
XR06CX
XR02CX
XR02CX
XR02CX
Model
XR10CX
XR20CX
XR30CX
XR40CX
XR50CX
XR60CX
XR64CX
XR110/570
XR100/500
2.0
XR140C/D
(Fam. 16) XR150C/D
XR160C/D
XR170C/D
XR530C
XR570C
XR160C
2.1
XR170D
(Fam. 16) XR570C
XR570D
45
1592010420
Family
XR160C/170C
XR570D
User manual Wizmate Prog Tool Kit v1.0
FW
version
5.3
(Fam. 16)
8.2
(Fam. 16)
Model
XR160C
XR170C
XR570D
Model
XW220K
XW20L/70L
XW 220/570
XW60L
XW62K
(Fam. 44)
1.5
(Fam. 16)
7.4
(Fam. 16)
1.1
(Fam. 44)
Model
XW220K
XW220K
1.0
XW240K
XH240L
XH240V
XW60L/W
1.1
XH260L
XW20L
1.2
XH260V
XW40L
XW60L
XW70L
XW220L
1.7
(Fam. 26)
XH340L
XH360L
XH360V
XH460L
1.4
XLH260
XLH360
XW260L
XW271L
XW270K
XW271K
XW260L
XW10L/W
(Fam. 16) XW20L/W
XW40L/W
1.8
FW
version
6.9
(Fam. 16)
7.5
(Fam. 16)
XH
240/460
2.0
XV 10/60
Family
XW220K
XW230L
XW260L
XW263L
XW264L
XW270L
XW271L
XW563L
XW570L
XW60L
XW62K
XW220K
XW230K
XW260K
XW264K
XW270K
XW271K
XW272K
XW570K
(Fam. 26)
6.7
XW260/271 (Fam. 16)
XW260L
XW264K
XW260K
XW270K
7.8
(Fam. 16)
5.1
(Fam. 16)
5.9
(Fam. 16)
6.3
(Fam. 16)
XW264K
XW260K
XW270K
46