1
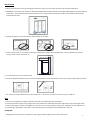
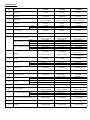
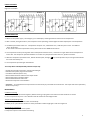
Operation Manual
Display Chiller
Thank you for purchasing our product. Please read this
operation manual carefully before operating the product.
Please keep this manual in a safe place for future reference.
Contents : - Installation ……………………………………..
- Safety Precautions And Warnings ………….
- Important Warnings ………………………………
- Explosive Drawings ………………………………
- Components Lists ……………………………….
- Circuit Diagram ……………………………….
- Maintenance ……………………………………
- Before Calling For Service ……………………
- Memo ……………………………………………
2
3
3
4
5
5
6
7
7
INSTALLATION
1- Select a good location. Place your refrigerator where it is easy to use. Do not tilt more than 45° during transportation.
2- WARNING: 2 door and 3 door chillers are fitted with Bullet Feet to provide stability. It should be adjusted before using and opening
all the doors. Screw down the bullet feet clockwise until it is firmly contact with the floor. Make sure ALL Bullet Feet are firmly
contact with the floor”.
3- Avoid placing the unit near heat sources, direct sunlight or moisture.
4- There must be proper air circulation around your refrigerator to keep it operating efficiently. The space between the cabinet
and any wall should be at least 10 cm.
100mm
200mm
5- To avoid vibrations, the unit must be level.
6- Install this appliance between 10°C and 32°C. If the temperature around the appliance is too low or high, cooling ability may lessen.
7- Unit is tested according to MEPS Standard under Climate Class 3 – which have an Ambient Temperature of 25:C and 60% Rh.
NEXT
1- Clean your refrigerator thoroughly and wipe off all dust accumulated during transportation.
2- Connect the power supply cord (or plug) to the supply outlet. Don’t double up with other appliances on the same supply outlet.
3- Prior to storing food, leave your refrigerator on for 2 or 3 hours to ensure proper cooling. Your refrigerator is now ready for use.
4- The shelving is adjustable in multi-steps. So the shelf spacing can be adjusted to the food stored in the case.
OPERATION
- The digital thermometer is pre-set by factory. Any changes required, please refer to Dixell instruction.
2
CLEANING
- It is important that your refrigerator be kept clean to prevent undesirable odors. Spilled food should be wiped off immediately,
since acidity can stain plastic surface. Never use metallic scouring pads, brushes, coarse abrasive cleaners of strong alkaline
solutions on any surface.
Exterior - Use a lukewarm solution of mild soap or detergent to clean the external of your refrigerator.
Wipe with a clean, damp cloth and then dry.
Interior - Regular cleaning of the interior parts is recommended. Wash compartment shelves, door
racks, storage trays and magnetic door seals etc, with a baking soda solution or mild detergent and
warm water. Then rinse and dry them.
SAFETY PRECAUTION
Always remove power cord from the wall outlet prior to cleaning in the vicinity of electrical parts (lamps,
switches, controller etc.) Wipe up excess moisture with a sponge or cloth to prevent water or liquid
from getting into any electrical part and causing an electric short circuit. Do not use flammable or
toxic cleaning liquids. Never spill water directly into the unit.
Avoid overload the shelves. Attach and secure properly to avoid collapse and cause injury. Maximum
load capacity of each shelve is 30kg (66 lbs).
Ensure the shelving stoppers are locating at the rear of the internal cabinet in order to allow proper air circulation during operating.
IMPORTANT WARNINGS
Do Not Use Extension Cord
If possible, connect the refrigerator to its own individual electrical supply outlet to prevent it and other
appliance or household lights from causing on overload that could cause a power failure. Disassembling,
repairing or modifying the product by any unqualified person is prohibited.
Power Cord Replacement
If the supply cord is damaged, it must be replaced by a special cord or assembly from the
manufacturer or its service agent.
* This appliance must be
grounded (earthed). DO
NOT WAIT!! DO IT NOW!
About Grounding (Earthing)
In the event of an electric short circuit, grounding (earthing) reduces the risk of electric shock by
providing an escape wire for the electric current. In order to prevent possible electric shock, this
appliance must be grounded. Improper use of the grounding plug can result in an electric shock.
Consult a qualified electrician or service person if the grounding instructions are not completely
understood, or if you have doubts on whether the appliance is properly grounded.
Do not place the appliances nearby the gas cylinder, it may cause explosion.
If there is a power failure, switch on the power 5 minutes later to avoid damaging the compressor.
3
“Note : If supply voltage fluctuates beyond +10%, a stabilizer is required. The input voltage of stabilizer is recommended to
be +25% and output voltage to +5%.”
FOOD HANDLING
Ways of storing food before putting into refrigerator
1- All packaging’s are to be wiped with cloth.
2- All perishable food is to wrap with plastic bags or stretch film. This is to keep food clean and moisture evaporation.
3- All temperature hot food is to be cooled outside.
4- Vegetables and fruits are to be put at higher shelves and non-perishable food at lower shelves.
5- Allow ample space for ventilation and heat transfer.
PRODUCT TEMPERATURE REFERENCE
Products
Temperature
Duration (Day)
Vegetables & Fruits
6 - 10˚C (43˚F - 50˚F)
6
Can Drinks
4 - 8˚C (39˚F - 46˚F)
Durable Days
Milk
2 - 6˚C (36˚F - 43˚F)
Durable Days
EXPLOSIVE DRAWING
5
6
4
18
2
1
7,17
1
Compressor
2
Fan Motor
3
Door Gasket
4
Condenser
5
Cooling Coil
6
A/C Cooling Fan
7
Digital Thermometer - Dixell
8
Door Glass Only (Anti-Mist)
8
Door - Complete Set - Gold
8
Door - Complete Set - Silver
9
Shelving
10
Handle
11
Light Box
12
Shelving Clips
13
Door Spring
14
Lower Fulcrum Bolt
15
Door Hinges L & R
16
Wheel
17
Digital Thermometer - Carel
18
PVC Acrylic Sheet
19
Display Chiller Digital Frame
20
Display Down Panel C/B - Complete Set
19
11
12
15
9
10
13
8
20
3
14
21
Fan Cover - Complete Set
16
22
LED Light
** Light Box - no inclusive of lighting accessories and wiring **
4
COMPONENT LIST
No
Model
Parts
1
Compressor
2
Fan Motor
3
Door Gasket
4
Condenser
5
Cooling Coil
6
A/C Cooling Fan
7
Digital Thermometer - Dixell
Standard
High Humidity
Door Glass Only - Anti-Mist
8
9
Left
Right
Dimension
Left
Door - Complete Set - Silver Right
Dimension
Door - Complete Set - Gold
UC0500LF
UC01000LF
UC01500LF
(1/4 HP)
(2/5 HP)
(1/2 HP)
FE-VDE18W
FE-VDE18W
FE-VDE18W
GS-562X1397DC
565mm X 1400mm
GS-562X1397DC
565mm X 1400mm
GS-562X1397DC
565mm X 1400mm
CD-033
CD-060
CD-075N-1
CC-14UR
CC-16HH
CC-24UR
CC-24HH
CC-24UR
CC-34HH
CS-AC8-P
CS-AC8-P
CS-AC8-P
TM-XR30CX-B
TM-XR30CX-B
TM-XR30CX-B
GL-CHL
555mm X 1390mm
GLC-D-GDC-L
GLC-D-GDC-R
603mm X 1438mm
GLC-D-SDC-L
GLC-D-SDC-R
603mm X 1438mm
GL-CHL
555mm X 1390mm
GLC-D-GDC-L
GLC-D-GDC-R
603mm X 1438mm
GLC-D-SDC-L
GLC-D-SDC-R
603mm X 1438mm
NT-DC-1D
NT-DC2/3D-S
501mm X 475mm
546mm X 475mm
GL-CHL
555mm X 1390mm
GLC-D-GDC-L
GLC-D-GDC-R
603mm X 1438mm
GLC-D-SDC-L
GLC-D-SDC-R
603mm X 1438mm
NT-DC2/3D-S
546mm X 475mm
NT-DC-3D-M
475mm X 597mm
HL-R001
HL-R001
HL-R001
OP-PN-1C-LB-G
OP-PN-1C-LB-S
OP-PN-1C-LB-B
OP-PN-2C-LB-G
OP-PN-2C-LB-S
OP-PN-2C-LB-B
OP-PN-3C-LB-G
OP-PN-3C-LB-S
OP-PN-3C-LB-B
HW-BSP14W
HW-BSP14W
HW-BSP14W
DR-12
DR-12
DR-12
DR-04L-BOLT
DR-04L-BOLT
DR-04L-BOLT
DR-08HGRH
WL-PUS4-BLK
WL-PUB4-BLK
DR-07HGLHD
DR-08HGRH
WL-PUS4-BLK
WL-PUB4-BLK
DR-07HGLH
DR-08HGRH
WL-PUS4-BLK
WL-PUB4-BLK
TM-IR33-CHL
TM-IR33-CHL
TM-IR33-CHL
PVC-AS1D/C
625mm X 300mm
OP-AP-1C-DF-G
OP-AP-1C-DF-S
OP-AP-1C-DF-B
PVC-AS2D/C
1860mm X 300mm
OP-AP-2C-DF-G
OP-AP-2C-DF-S
OP-AP-2C-DF-B
PVC-AS3D/C
1250mm X 300mm
OP-AP-3C-DF-G
OP-AP-3C-DF-S
OP-AP-3C-DF-B
OP-PN-D1D-DP
OP-PN-D2D-DP
OP-PN-D3D-DP
CS-FC-8X1-CB
CS-FC-8X1-CB
CS-FC-8X2-CB
LE-LED-AC1200
LE-LED-AC1200
LE-LED-AC1200
Shelving
10
Handle
11
Light Box
12
Shelving Clips
13
Door Spring
14
Lower Fulcrum Bolt
15
Door Hinges
16
Wheel
17
Digital Thermometer - Carel
18
PVC Acrylic Sheet
19
Gold
Display Chiller Digital Frame Silver
Black
20
Display Down Panel C/B - Complete Set
21
Fan Cover - Complete Set
22
LED Light
Gold
Silver
Black
Left
Right
Swivel
Brake
5
CIRCUIT DIAGRAM
Digital Thermometer
Dixell - Without Relay
Carel - Without Relay
XR 30CX
1
2
3
4
5
6
7
8
IR33-CHL
9 10 11 12
1
2
3
4
5
6
7
8
9
10 11 12
Room
Probe
Power
Power Switch
Supply
L
E
N
Ballast
Body
Heater
Glass
Heater
Evep.
Fan
Motor
Drain
Heater
Light
Power
Supply
Cond.
Fan
Motor
Overload
Power
Switch
L
E
N
Ballast
Body
Heater
Glass
Heater
Overload
Drain
Heater
Evep.
Fan
Motor
Light
Compressor
Cond.
Fan
Motor
1
2
1
Probes
D1
Compressor
CHILLER OPERATION
1- Switch on the power supply. The red light (*) on. LED display is blinking for 60 sec with the unit’s temperature.
2- After 1 minute, the light will be on, the compressor starts operating, and the digital controller displays the unit temperature.
3- The default parameter values are - ‘Temperature Set point: 2°C’, ‘Differential: 4°C’, ‘Defrost Cycle: 6 hours’ and ‘Defrost
' time : 30 minutes’.
If user wants to alter these parameter values, please refer to the “XR30CX Instructions”.
4- The compressor will stop running when the unit temperature downs to 2°C’, and it will run again when the unit temperature
rises to 8°C. The compressor operates between 2°C and 8°C. Any temperature lower than 2°C, please use freezer.
5- After the compressor operates 6 hours, defrost will take place, the light
fan is still continuously run.
on, the compressor stops running. But the blower
6- The compressor operates again after defrost.
The Lamps Have To Be Replaced By Identical Lamps Only
- Unplug the unit before removal or replacing of LED Light
- Disconnect the power plug from the socket.
- Cut off the cable ties (if there are).
- Remove the fluorescent tube from the lamps holder.
- Remove the upper and lower holders.
- Remove the fluorescent tube cover.
- Reverse the sequence to reassemble it.
* WARNING : - The repalcement of lamp must be carried out only by a licensed service technican. The lamps have to be replaced by
identical lamps only. *
MAINTENANCE
Condenser Cleaning
a- Condenser needs to be cleaned regularly. Before cleaning, unplug the unit and wait until the condenser is cooled.
b- Use a compressed air jet or a non-metallic brush. Be careful not to damage the fins.
Temporary Suspending Usage
a- Attach a Styrofoam between the door and the body.
b- Never put in a place where children are easily accessible. Children might get in and cannot get out!
Unused For A Long Period
a- Empty all goods and disconnect power.
b- Keep door open to avoid mould and stinking.
6
IMPORTANT INFORMATION FOR CORRECT DISPOSAL OF THE PRODUCT IN ACCORDANCE WITH EC DIRECTIVE 2002/96/EC
At the end of its working life, the product must be not disposed of as urban waste. It must be taken to a special
local authority differentiated waste collection centre or to a dealer providing this service. Disposing of a household
appliance separately avoids possible negative consequences for the environment and health deriving from
inappropriate disposal and enables the constituent materials to be recovered to obtain significant savings in
energy and resources. As a reminder of the need to dispose of household appliances separetely, the product is
marked with a crossed-out wheeled dustbin.
BEFORE CALLING FOR SERVICE
Service calls can often be avoided! If you feel your refrigerator is not operating properly, check these possible causes first : PROBLEM
POSSIBLE CAUSES
Refrigerator Does Not Operate
- Has a fuse blown or circuit breaker tripped?
- Has the power cord plug been removed or loosed?
Under Achieve The Set Temperature
Of The Unit
- The external temperature is too high, more external ventilation needed.
- The condenser is clogged by heavy oil stains & dust, resulting in bad ventilation, cleaning
needed.
- The door is not closed properly or some tiny gap occur between the door and body.
- Something blocks the ventilation passage accidentally.
- Too much food stuffed inside or too high the food temperature exceeds the cooling load.
Abnormal Noise
- Refrigerator is installed in a weak or uneven place or leveling screw needs adjusting.
- Unnecessary objects placed in the back side of the refrigerator.
Unit Has Odor
- Foods with strong odors should be tightly covered or wrapped.
- Interior needs cleaning.
De-Forms On The Cabinet Surface
- Not unusual during periods of high humidity.
- Door may have been left ajar.
MEMO
Please fill in the following at the purchasing time for future service reference.
Model Number :
Purchasing Date :
Dealer's Name :
Address :
Contact Number :
Home :
Handphone :
Comment :
The manufacturer reserves the right to change in design, equipment and technical features at any time. Accordingly, no claims
based on data, illustration or descriptions in this operation manual will be admitted. English version is to be referred for any
ambiguity.
This operation manual is for usage guideline. The technical data details and usage instructions are given with our best knowledge
of product and with good faith. It should not bind the sales agent or manufacturer to attendance in court or to appear in any enquiry
before any government or statutory bodies.
7