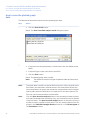
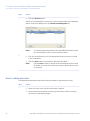
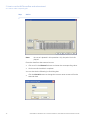
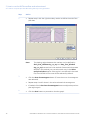
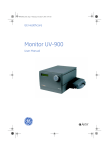
1
GE Healthcare
Life Sciences
UNICORN™ 5.31
Evaluation for Cross Flow Filtration / User Reference Manual
Table of Contents
Table of Contents
1
Introducing UNICORN for evaluation of cross flow filtration ......................
1.1
1.2
1.3
1.4
2
5
About ÄKTAcrossflow ..........................................................................................................................
About UNICORN .....................................................................................................................................
ÄKTAcrossflow concepts ...................................................................................................................
Help functions ........................................................................................................................................
6
8
11
14
How to use the ÄKTAcrossflow evaluation wizard .........................................
17
2.1
2.2
2.2.1
2.2.2
2.3
2.4
2.5
2.6
2.6.1
2.6.2
2.6.3
How to compare process data using the process optimization operation ...............
How to calculate Normalized Water Flux values ...................................................................
How to make a Normalized Water Flux analysis .................................................................
How to manage the temperature correction table .............................................................
How to perform a Diafiltration time optimization .................................................................
How to make a Capacity plot ..........................................................................................................
How to compare process data using the Any vs any operation ....................................
How to format the graphs ................................................................................................................
How to format Normalized Water Flux graphs ....................................................................
How to format other ÄKTAcrossflow graphs .........................................................................
How to export the graphs ..............................................................................................................
18
32
33
45
50
60
74
84
85
97
108
Index ....................................................................................................................... 114
UNICORN 5.31 Evaluation for Cross Flow Filtration / User Reference Manual 28-9972-42 AA
3
1 Introducing UNICORN for evaluation of cross flow filtration
1
Introducing UNICORN for evaluation
of cross flow filtration
Introduction
Results from the ÄKTAcrossflow™ systems can be evaluated using a special evaluation
wizard that is available in the UNICORN software.
This chapter contains:
•
A general presentation of the UNICORN software.
•
A general description of the software functions and concepts that are specific for
ÄKTAcrossflow.
•
A description of the software help functions.
In this chapter
This chapter contains these sections.
Section
See page
1.1 About ÄKTAcrossflow
6
1.2 About UNICORN
8
1.3 ÄKTAcrossflow concepts
11
1.4 Help functions
14
UNICORN 5.31 Evaluation for Cross Flow Filtration / User Reference Manual 28-9972-42 AA
5
1 Introducing UNICORN for evaluation of cross flow filtration
1.1 About ÄKTAcrossflow
1.1
About ÄKTAcrossflow
What is ÄKTAcrossflow?
ÄKTAcrossflow is an ÄKTA membrane filtration system for cross flow filtration applications.
A comprehensive description of the system and its applications can be found in the ÄKTAcrossflow User Manual.
Controlling software
ÄKTAcrossflow systems can be controlled and monitored by UNICORN software from
GE Healthcare. The results can also be evaluated using the UNICORN Evaluation module.
UNICORN is a trademark of GE Healthcare.
Note:
The ÄKTAcrossflow control strategy is designed to operate using the UNICORN
software version that is designed for general liquid chromatography applications as a framework.
6
UNICORN 5.31 Evaluation for Cross Flow Filtration / User Reference Manual 28-9972-42 AA
1 Introducing UNICORN for evaluation of cross flow filtration
1.1 About ÄKTAcrossflow
System networks
UNICORN can be installed on a stand-alone computer to control and monitor only a
single, locally attached system. However, a stand-alone computer can control up to a
maximum of four separate locally attached systems depending on the installed controller
interface. Please refer to the UNICORN Administration and Technical Manual for information about the controller options.
In a network installation each computer workstation can operate many systems regardless if they are locally connected or not. Each system can only be operated by one
workstation at a time, but several may view the output data. A workstation that is set
up to monitor an ÄKTAcrossflow system may also control one or more liquid chromatography systems, e.g. an ÄKTAexplorer™ system.
UNICORN 5.31 Evaluation for Cross Flow Filtration / User Reference Manual 28-9972-42 AA
7
1 Introducing UNICORN for evaluation of cross flow filtration
1.2 About UNICORN
1.2
About UNICORN
What is UNICORN?
UNICORN is a complete package for control and supervision of biotechnical systems. It
consists of control software, and when applicable a controller card or interface unit for
interfacing the controlling PC to the liquid handling module.
Operating environment
UNICORN runs on a PC using the following operating systems:
•
Microsoft™ Windows™ XP Professional (32-bit)
•
Microsoft Windows 7 Professional (32-bit)
•
Microsoft Windows 7 Professional (64-bit)
It is designed to run under English keyboard settings.
Software installation
The UNICORN software version for ÄKTAcrossflow is available as a selection on the
general UNICORN software installation CD from version 5.10. The installation procedure
is described in detail in the UNICORN Administration and Technical Manual, which is included in the user documentation package.
Note:
The examples in the text are based on a different application of UNICORN.
However, all steps in the procedure are similar for an ÄKTAcrossflow installation.
Windows functions
Most Windows functions are also available in UNICORN, including
•
cut and paste
• right-click short-cut menus
Note:
Drag and drop is not available. File and folder handling in UNICORN also differ
from the general Windows file manager standard.
8
UNICORN 5.31 Evaluation for Cross Flow Filtration / User Reference Manual 28-9972-42 AA
1 Introducing UNICORN for evaluation of cross flow filtration
1.2 About UNICORN
UNICORN user documentation
UNICORN can be used with a number of systems including ÄKTA design liquid chromatography systems. For practical reasons the user documentation for ÄKTAcrossflow also
include the user reference manuals for the UNICORN general liquid chromatography
version. ÄKTAcrossflow shares many of the functions with this version, e.g. file and folder
handling etc.
The examples in the UNICORN User Reference Manual are based on an ÄKTAexplorer
100 system operating with the E100F400 strategy. Certain parts of the manuals that are
specific for liquid chromatography are not applicable for cross flow filtration users.
Software modules
The control software consists of four integrated modules:
Module
Function
UNICORN Manager
File handling and administration, e.g. definition of systems
and user profile etc.
Method Editor
To create and edit methods for pre-programmed system
control.
System Control
To monitor processes online.
Evaluation
To evaluate and present stored results.
Note:
All modules are active when the program is operating, and are not closed
when they are minimized. All modules will normally open when the program
is started. However, a user profile may be set up so that not all modules are
available. Only the available modules will be displayed. The modules and
their functions are described in more detail in the UNICORN User Reference
Manual. However, not all functions are applicable for ÄKTAcrossflow users.
UNICORN 5.31 Evaluation for Cross Flow Filtration / User Reference Manual 28-9972-42 AA
9
1 Introducing UNICORN for evaluation of cross flow filtration
1.2 About UNICORN
Work flow
The work flow for ÄKTAcrossflow can be divided into three distinct stages. This manual
only describes the final stage, the Evaluation. The first two stages are described in the
User Manual for the ÄKTAcrossflow instrument. The flow chart below shows the work
flow stages.
Security
The table below describes the main security functions in UNICORN for ÄKTAcrossflow:
10
Feature
Function
Access Security
Only authorized users can access UNICORN. Each user is assigned an access level, which defines the functions that the
user is permitted to use.
Data Security
Result files from an ongoing run can be saved automatically
at preset intervals to minimize data loss if the system fails.
The results are saved locally if the network communication
fails.
Electronic Signatures
Method and result files can be signed electronically for enhanced security and accountability.
UNICORN 5.31 Evaluation for Cross Flow Filtration / User Reference Manual 28-9972-42 AA
1 Introducing UNICORN for evaluation of cross flow filtration
1.3 ÄKTAcrossflow concepts
1.3
ÄKTAcrossflow concepts
Introduction
This section contains explanations and definitions of a number of concepts that are used
in this manual. Concept definitions that are common with other ÄKTA systems are, for
the most part, explained and defined in the corresponding section of the UNICORN User
Reference Manual.
The concepts are organized in alphabetical order.
Chromatogram
A chromatogram is a collection of data represented by a number of curves that have
been created during a filtration run, including cross flow, flux, UV etc. The original raw
data curves cannot be deleted or modified. They can be used as a basis for evaluation
procedures in the ÄKTAcrossflow Evaluation Wizard.
A chromatogram can also contain other curves that have been created and saved using
other operations that are available in the UNICORN Evaluation Module.
Cross flow
Cross flow is the flow that passes the membrane surface, typically a denoted retentate
flow.
Curves
The monitor signals from the run are displayed graphically as curves.
Delta P
The Delta Pressure is defined as the difference between the feed pressure and the retentate pressure.
Flux
The Flux is the permeate or filtrate flow that passes through the membrane area during
a given time period, typically expressed as LMH (Liter/M2/Hour).
UNICORN 5.31 Evaluation for Cross Flow Filtration / User Reference Manual 28-9972-42 AA
11
1 Introducing UNICORN for evaluation of cross flow filtration
1.3 ÄKTAcrossflow concepts
Membranes
Porous materials used for separating molecules by size sieving.
Method
The program instructions for a run are defined in a Method. A Method can be divided
into blocks that represent steps in the process. Each block consists of a series of instructions that request specific operations in the system.
Method Wizard
The Method Wizard is a user-friendly tool to create new methods. The Wizard takes the
user step-by-step through the creation process.
Method Wizards are supplied with UNICORN installations for ÄKTAdesign systems.
Permeate
The volume of liquid passing through the membranes (also called the filtrate).
Result files
UNICORN creates Result files when a method is run. The Result files contain run data
from the monitors in the system.
Example: Ret_Flow, flux etc.
The Result files may also contain additional documentation from the run, e.g. text method,
and saved evaluation results.
The latest ten results from manual runs are automatically saved in a special folder
Manual runs and can be opened and saved permanently if desired.
Note:
Edited evaluations from filtration runs are saved using a special file format
(.emr)
Retentate
The volume of liquid exiting a membrane system after flowing over the membrane, not
through it. It is expressed as feed flow minus permeate flow. It is also called concentrate.
12
UNICORN 5.31 Evaluation for Cross Flow Filtration / User Reference Manual 28-9972-42 AA
1 Introducing UNICORN for evaluation of cross flow filtration
1.3 ÄKTAcrossflow concepts
Strategy
Part of the UNICORN software is specific for the system that it is set up to operate. The
system specific part is usually referred to as the Strategy. The Strategy defines available
method and manual instructions, system settings, run data, curves and wizards.
TMP
TMP is an acronym for the Transmembrane pressure.
UNICORN 5.31 Evaluation for Cross Flow Filtration / User Reference Manual 28-9972-42 AA
13
1 Introducing UNICORN for evaluation of cross flow filtration
1.4 Help functions
1.4
Help functions
Introduction
There are three different ways to get help and instructions specific for ÄKTAcrossflow in
UNICORN:
•
From the context-sensitive help button in each dialog box
•
By selecting the Online Manual from the Help menu (this toolbar menu is not available
when the ÄKTAcrossflow evaluation wizard is open)
• By pressing the <F1> key while the ÄKTAcrossflow evaluation wizard is open.
Note:
The Help index that is available in other UNICORN modules or accessed from
the Help menu and the <F1> key in the Evaluation module when the ÄKTAcrossflow evaluation wizard is NOT open will not include the specific
crossflow instructions. This help index only contains general UNICORN information.
Manuals
Manuals covering both the software and selected instruments may be selected for installation when the UNICORN software is installed. However, the ÄKTAcrossflow manuals
are installed and added to the Manuals menu when the ÄKTAcrossflow software is installed. The installed ÄKTAcrossflow manuals include the online HTML-manual for the
UNICORN software and ÄKTAcrossflow application, as well as manuals for the instrument
in PDF-format.
How to open a manual
To open a manual:
•
choose Help:Manuals
Result: The Manuals dialog box is opened.
•
Select the manual and click the OK button.
The Help menu
•
From the Help menu in each module you can access the general UNICORN Help file.
•
From the Help menu you can also access the installed manuals.
The illustration below shows the Help menu of the Evaluation module:
14
UNICORN 5.31 Evaluation for Cross Flow Filtration / User Reference Manual 28-9972-42 AA
1 Introducing UNICORN for evaluation of cross flow filtration
1.4 Help functions
Note:
The link to the Help index will open only the general UNICORN Help index and
not the specific ÄKTAcrossflow Help index.
Context-sensitive help
In each dialog box in the ÄKTAcrossflow evaluation wizard there is a Help button. If you
press that button, the following will be displayed:
•
The Help file, with relevant information displayed in the right pane.
If you right-click in the graph pane of the wizard, a menu containing specific help dialog
for the graph functions will open. This information is also available in the general Help
file under the heading How to format the graphs. This information is also available in
the manual section Section 2.6 How to format the graphs, on page 84.
How to search the Help file
The table below describes how to open and search for a topic in the Help file in the ÄKTAcrossflow evaluation wizard:
Step
Action
1
Click a Help button or press the <F1> key.
Result: The Help file is displayed
2
•
Type a word you want help on in the text box in the left pane.
Result: The closest matches are displayed in the list.
•
Select a match and click the Display button.
Result: The associated help text is displayed in the right pane.
UNICORN 5.31 Evaluation for Cross Flow Filtration / User Reference Manual 28-9972-42 AA
15
1 Introducing UNICORN for evaluation of cross flow filtration
1.4 Help functions
Step
Action
3
•
You can also click the Contents tab to view the contents of the Help file
divided into sections.
•
Click the plus signs to expand the tree structure.
•
Click a topic to read the associated help text.
Note:
16
The ÄKTAcrossflow help file contains information for both the ÄKTAcrossflow
application and general UNICORN functions. Information matches found in
the general UNICORN material may sometimes be valid only for liquid chromatography applications. The search functions in the general UNICORN help
file that is available in the other software modules works as described in the
table above, but items specific for crossflow evaluations are not available.
UNICORN 5.31 Evaluation for Cross Flow Filtration / User Reference Manual 28-9972-42 AA
2 How to use the ÄKTAcrossflow evaluation wizard
2
How to use the ÄKTAcrossflow
evaluation wizard
Introduction
This chapter describes the alternative options that are available in the ÄKTAcrossflow
evaluation wizard and how to use them.
In this chapter
This chapter contains these sections.
Section
See page
2.1 How to compare process data using the process optimization operation
18
2.2 How to calculate Normalized Water Flux values
32
2.3 How to perform a Diafiltration time optimization
50
2.4 How to make a Capacity plot
60
2.5 How to compare process data using the Any vs any operation
74
2.6 How to format the graphs
84
UNICORN 5.31 Evaluation for Cross Flow Filtration / User Reference Manual 28-9972-42 AA
17
2 How to use the ÄKTAcrossflow evaluation wizard
2.1 How to compare process data using the process optimization operation
2.1
How to compare process data using the process optimization operation
Introduction
This section describes how to use the Process Optimization option of the ÄKTAcrossflow
evaluation wizard.
Process Optimization is used to analyze a special type of process characterization experiment where a series of setpoints are tested. The most common experiments are
excursions of TMP at different Ret_Flow rates and protein concentrations.
Process Optimization makes a new plot from user-identified points along original data
curves (i.e. flux vs. TMP). Process Optimization also allows the user to overlay multiple
plots (i.e. flux vs. TMP at different Ret_Flow rates or protein concentrations). This capability can be used for any process parameter.
18
UNICORN 5.31 Evaluation for Cross Flow Filtration / User Reference Manual 28-9972-42 AA
2 How to use the ÄKTAcrossflow evaluation wizard
2.1 How to compare process data using the process optimization operation
How to start the wizard and
select the operation
The table below describes how to select the Process Optimization operation.
Step
Action
1
Click the Evaluation Wizard icon in the Evaluation module or choose
File:Membrane System Evaluation.
Result: The Evaluation Wizard dialog box appears.
2
•
Select the Process optimization operation.
• Click the Next button.
Note:
The Open Previous Analysis button is used to open results that
already have been evaluated once and saved using the wizard.
Note:
You can use the Back button in each step of the wizard to return
and change selections in the previous steps.
UNICORN 5.31 Evaluation for Cross Flow Filtration / User Reference Manual 28-9972-42 AA
19
2 How to use the ÄKTAcrossflow evaluation wizard
2.1 How to compare process data using the process optimization operation
How to locate and select curves
to compare
The table below describes how to locate and select result curves for the process optimization in the evaluation wizard.
Step
Action
1
Select search criteria to locate the curves to compare:
•
Select a result folder
•
Select a result file
• Select a chromatogram
Note:
The default selection for result files and chromatograms is the
wildcard character *, which will display all files in the selected
folder and all chromatograms in the located files. The All button
will restore the wildcard character if desired.
2
20
• Select default curves to compare
Note:
The first selected parameter will be plotted as the Y-axis in the
Graph View.
Note:
You can select other curves than the default curves listed in the
selection text boxes. See the instruction topic "How to select
other curves" for information about how to use the Advanced
selections.
UNICORN 5.31 Evaluation for Cross Flow Filtration / User Reference Manual 28-9972-42 AA
2 How to use the ÄKTAcrossflow evaluation wizard
2.1 How to compare process data using the process optimization operation
Step
Action
3
•
Click the Search button.
Result: All chromatograms containing curves corresponding to the selected
search criteria are displayed in the Found chromatograms list.
Note:
4
Note:
Curves that have been edited in the UNICORN Evaluation module
are not available until the result has been saved.
•
Click the check boxes to select the data that you want to include in the
comparison.
•
Click the Next button to proceed to define the plot data.
Use the Clear button to remove all chromatograms from the list if needed.
You must do this first if you want to select other curves to compare.
UNICORN 5.31 Evaluation for Cross Flow Filtration / User Reference Manual 28-9972-42 AA
21
2 How to use the ÄKTAcrossflow evaluation wizard
2.1 How to compare process data using the process optimization operation
How to create data groups
If data points, e.g. flux and TMP, are stored in several chromatograms, these can be
combined into a group to be displayed together. This will typically be the case when the
method includes a New Chromatogram instruction or if a New Chromatogram instruction
is entered in a manual run. The table below describes how to create data groups from
these chromatograms.
Step
Action
1
•
Click the Bundle chromatograms check box.
•
Click the check boxes to select the chromatograms that you want to include in the group.
•
Click the New data group button to create a group of the selected
chromatograms.
•
Select more chromatograms if desired.
•
Click the Add to data group button to include the selected chromatograms in the group
2
or
3
22
•
Click the New data group button to create a new group.
•
Click the Next button to proceed to define the plot data.
UNICORN 5.31 Evaluation for Cross Flow Filtration / User Reference Manual 28-9972-42 AA
2 How to use the ÄKTAcrossflow evaluation wizard
2.1 How to compare process data using the process optimization operation
Note:
Note:
The Remove button deletes the selected group or chromatogram from the
list of groups, but the chromatograms are still available for selection in the
search result list.
The group window and the selection buttons are not displayed until the
Bundle chromatograms check box is selected.
How to select other curves
Other curves than the default combinations may be selected for comparison. The table
below describes how to do this:
Note:
The Advanced selections are only available if the Found chromatograms
field is empty. Click the Clear button to remove all chromatograms before
proceeding with the instructions below.
Step
Action
1
•
Click the Advanced button.
Result: The Advanced Process optimization dialog box opens.
•
Select any combination of the available curves in the drop lists.
Note:
The search through all folders to determine the available curves
and populate the menus may take a long time.
UNICORN 5.31 Evaluation for Cross Flow Filtration / User Reference Manual 28-9972-42 AA
23
2 How to use the ÄKTAcrossflow evaluation wizard
2.1 How to compare process data using the process optimization operation
Step
Action
2
•
If needed, e.g. to reduce noise levels, drag the slide control to adjust the
Average calculation window length.
Note:
3
Note:
24
•
The window length will be calculated for the selected time before
the marker point. The default value is 15 seconds.
Click the OK button.
When a curve has been selected once it will be added to the default curve
menus.
UNICORN 5.31 Evaluation for Cross Flow Filtration / User Reference Manual 28-9972-42 AA
2 How to use the ÄKTAcrossflow evaluation wizard
2.1 How to compare process data using the process optimization operation
How to define plot data
All sample points in the selected result files are detected and listed in a data table as
shown in the illustration below.
Note:
Note:
Note:
The tab for the displayed curve and the table cells for the data points in the
displayed curve are marked in yellow. The cells for the selected marker point
is highlighted in blue.
The values at the marker position are shown in the Marker position pane to
the right of the curves. The values are expressed as averages for the defined
Average calculation window, with the exact value at the marker point
within brackets. The run time is also displayed.
It is best to place the marker after a period of baseline stability to perform
this calculation.
The table below describes the available actions in this wizard dialog box:
When you want to...
...do this:
...display the data table
for a curve,
•
Click the tab with the name of the curve
...display the next chromatogram in a group,
•
Click the Next chromatogram button
...display the previous
chromatogram in a
group,
•
Click the Previous chromatogram button
UNICORN 5.31 Evaluation for Cross Flow Filtration / User Reference Manual 28-9972-42 AA
25
2 How to use the ÄKTAcrossflow evaluation wizard
2.1 How to compare process data using the process optimization operation
When you want to...
...do this:
...add a data point,
•
Select the desired chromatogram
•
Move the cursor to the data point in the chromatogram (the average and exact data values at the
marker position are displayed in the Marker position
boxes)
• Click the Add Point button
Note:
Data points are available if a Set_Eval_Mark
was used with the parameter ProcessOptimisation in the method. If not, data points must
be added manually.
...delete a data point,
•
Select a table cell in the row for the data point
•
Click the Delete point button
•
Select a table cell in the row for the data point
•
Move the cursor to the data point in the chromatogram (the average and exact data values at the
marker position are displayed in the Marker position
boxes)
•
Click the Replace point button
...add a point at the
same run time for all
chromatograms in the
group,
•
Move the cursor to the desired run time position in the
chromatogram
•
Click the Add point from all chromatograms button
...rename the selected
point list,
•
Click the tab to display the desired point list
•
Click the Rename point list button
...replace a data point,
Result: The Rename Point List dialog box opens.
26
•
Type a new name in the text box
•
Click OK
UNICORN 5.31 Evaluation for Cross Flow Filtration / User Reference Manual 28-9972-42 AA
2 How to use the ÄKTAcrossflow evaluation wizard
2.1 How to compare process data using the process optimization operation
When you want to...
...do this:
...export all point tables
to an Excel file,
•
Click the Export to Excel button
Result: The Export to Excel dialog box opens.
•
Navigate to the folder where you want to save the file
•
If desired, type a new filename in the File name text
box.
• Click the Save button
Note:
The point tables for all groups or curves will
be exported to the same file.
...display the plotted
graphs for all curves,
•
Click the Next button
Actions in the Graph View
The plotted data points for all curves are now presented in a graph as shown in the illustration below:
Note:
Only a maximum of 14 selected curves can be displayed in the graph.
The following actions can be performed in the Graph View dialog box:
•
rename the Curve labels (if more than one curve was plotted)
UNICORN 5.31 Evaluation for Cross Flow Filtration / User Reference Manual 28-9972-42 AA
27
2 How to use the ÄKTAcrossflow evaluation wizard
2.1 How to compare process data using the process optimization operation
•
copy the graph via the Windows clipboard to other applications
•
print the graph
• save the plotted results
Note:
The graph formats (f.ex. changing scale, switching from linear to logarithmic
etc.) can also be edited in this dialog box by double-clicking in the graph area.
The available formatting options are described in detail in the section Section 2.6 How to format the graphs, on page 84.
How to rename the Curve labels
The default curve label names are the file names (for a group, the group name). The label
name that is currently displayed in the top text box of the Curve labels pane can be replaced with a new text. This pane is only available if more than one curve or group was
selected for plotting.
•
Click the droplist arrow by the top text box to select another label name for editing.
•
Type the new label text in the lower text box.
•
Click the Rename button.
Result: The label is renamed.
Note:
Only the label name is changed. The result file name is not changed. The label
name can also be changed by renaming the group or curve point list in the
Define plot data dialog box.
How to copy the graph to the
clipboard
The graph can be copied to the Windows clipboard and then pasted into other applications, e.g. Excel, Word etc. The graph is exported as a bitmap image.
•
Click the Copy to clipboard button.
Result: The graph is copied and available on the clipboard.
28
UNICORN 5.31 Evaluation for Cross Flow Filtration / User Reference Manual 28-9972-42 AA
2 How to use the ÄKTAcrossflow evaluation wizard
2.1 How to compare process data using the process optimization operation
How to print the graph
The graph can be printed directly on a selected printer without first being exported to
another application. This option can also be used to create a pdf-file of the graph provided
a suitable printer driver is installed.
The table below describes how to print the graph:
Step
Action
1
•
Click the Print Graph button.
Result: The Print dialog box opens with the default Windows printer selected.
2
•
Select a printer if the default printer is not to be used.
•
Click the Setup button to adjust the printer settings if needed.
•
Click the OK button.
Result: The graph is printed on the selected printer.
UNICORN 5.31 Evaluation for Cross Flow Filtration / User Reference Manual 28-9972-42 AA
29
2 How to use the ÄKTAcrossflow evaluation wizard
2.1 How to compare process data using the process optimization operation
How to save the plotted graph
data
The table below describes how to save the plotted graph data:
Step
Action
1
•
Click the Save Result button.
Result: The Save CrossFlow analysis result dialog box opens.
2
•
If required, save the graph data in a folder other than the default home
folder.
•
If required, type a new name for the result file.
•
Click the Save button.
Result: The plotted graph data is saved.
Note:
The default file name is the type of operation/date and time when
saved.
Note:
30
The graph data is saved in a special file format (.emr). All the original result
files used in the evaluation must be stored in the same folder where they
were stored when the graph was created to avoid problems with changed
search paths when the evaluation is re-opened. For the same reason, the
files may not be renamed after the evaluation.
UNICORN 5.31 Evaluation for Cross Flow Filtration / User Reference Manual 28-9972-42 AA
2 How to use the ÄKTAcrossflow evaluation wizard
2.1 How to compare process data using the process optimization operation
Note:
Note:
Click the Open Previous Analysis button in the evaluation wizard to locate
and open saved data files for editing. Only .emr-format files can be opened
using this button. The Open Previous Analysis button is also the only way to
access and open a saved analysis result. The .emr analysis files are not displayed in the UNICORN Manager Result window or in the File Navigator of
the Evaluation module.
Changes in the graph formatting are not saved.
UNICORN 5.31 Evaluation for Cross Flow Filtration / User Reference Manual 28-9972-42 AA
31
2 How to use the ÄKTAcrossflow evaluation wizard
2.2 How to calculate Normalized Water Flux values
2.2
How to calculate Normalized Water Flux values
Introduction
This section describes the steps to calculate normalized water flux values to measure
the membrane permeability and monitor the effectiveness of the cleaning and the lifetime
of the filter.
In this section
This section contains these sub-sections.
Section
32
See page
2.2.1 How to make a Normalized Water Flux analysis
33
2.2.2 How to manage the temperature correction table
45
UNICORN 5.31 Evaluation for Cross Flow Filtration / User Reference Manual 28-9972-42 AA
2 How to use the ÄKTAcrossflow evaluation wizard
2.2 How to calculate Normalized Water Flux values
2.2.1 How to make a Normalized Water Flux analysis
2.2.1
How to make a Normalized Water Flux analysis
Introduction
The membrane permeability can be tested using the Normalized Water Flux operation.
This test is used to ensure that the cleaning process is still effective and to determine
the lifetime of a filter. The Normalized Water Flux is calculated using the following formula:
Normalized Water Flux [Lm-2h-1bar-1] = (flux x temperature correction factor)/TMP
Normalized Water Flux enables the user not only to automatically calculate the normalized water flux from a result file, but also to plot results from multiple filter cycles on a
single plot.
This section describes how to use the ÄKTAcrossflow evaluation wizard to make a
Normalized Water Flux analysis.
UNICORN 5.31 Evaluation for Cross Flow Filtration / User Reference Manual 28-9972-42 AA
33
2 How to use the ÄKTAcrossflow evaluation wizard
2.2 How to calculate Normalized Water Flux values
2.2.1 How to make a Normalized Water Flux analysis
How to start the wizard and
select the operation
The table below describes how to select the Normalized Water Flux operation.
Step
Action
1
Click the Evaluation Wizard icon in the Evaluation module or choose
File:Membrane System Evaluation.
Result: The Evaluation Wizard dialog box appears.
2
•
Select the Normalized Water Flux operation.
•
Click the Next button.
Result: The Data selection dialog box opens.
Note:
The Open Previous Analysis button is used to open results that
already have been evaluated once and saved using the wizard.
Note:
You can use the Back button in each step of the wizard to return
and change selections in the previous steps.
34
UNICORN 5.31 Evaluation for Cross Flow Filtration / User Reference Manual 28-9972-42 AA
2 How to use the ÄKTAcrossflow evaluation wizard
2.2 How to calculate Normalized Water Flux values
2.2.1 How to make a Normalized Water Flux analysis
How to locate and select curves
for the analysis
The table below describes how to locate and select the curves for the the analysis.
Step
Action
1
Select search criteria to locate the curves to compare:
•
Select a result folder
•
Select a result file
• Select a chromatogram
Note:
The default selection for result files and chromatograms is the
wildcard character *, which will display all files in the selected
folder and all chromatograms in the located files. The All button
will restore the wildcard character if desired.
UNICORN 5.31 Evaluation for Cross Flow Filtration / User Reference Manual 28-9972-42 AA
35
2 How to use the ÄKTAcrossflow evaluation wizard
2.2 How to calculate Normalized Water Flux values
2.2.1 How to make a Normalized Water Flux analysis
36
Step
Action
2
The temperature curve will normally be selected by default. However for
some systems, e.g. process systems, the curve must be selected. If your
system uses the standard ÄKTAcrossflow strategy, proceed with step 3.
Continue with this step to select the curve manually.
•
Click the Advanced button and select a temperature curve.
•
Click the OK button.
Note:
Temperature correction will be applied using the default temperature correction table, if the option isn’t de-selected in this dialog
box. The temperature table is always displayed and saved in
Celsius. For instructions how to edit the table and set a new default table, see Section 2.2.2 How to manage the temperature
correction table, on page 45.
Note:
The search through all folders to determine the available curves
and populate the menus may take a long time.
UNICORN 5.31 Evaluation for Cross Flow Filtration / User Reference Manual 28-9972-42 AA
2 How to use the ÄKTAcrossflow evaluation wizard
2.2 How to calculate Normalized Water Flux values
2.2.1 How to make a Normalized Water Flux analysis
Step
Action
3
•
Click the Search button.
Result: All chromatogram containing curves corresponding to the selected
search criteria are displayed in the Found chromatograms list.
Note:
4
•
Curves that have been edited in the UNICORN Evaluation module
are not available until the result has been saved.
Click the check boxes for all chromatograms that you want to include
in the comparison.
• Click the Next button to proceed to define the plot data.
Note:
Use the Clear button to remove all chromatograms from the list
if needed. You must do this first if you want to select other curves
to compare.
Note:
You may also select to add Snapshots from other curves in this dialog box.
See "How to add snapshots" below in this section.
UNICORN 5.31 Evaluation for Cross Flow Filtration / User Reference Manual 28-9972-42 AA
37
2 How to use the ÄKTAcrossflow evaluation wizard
2.2 How to calculate Normalized Water Flux values
2.2.1 How to make a Normalized Water Flux analysis
How to define plot data
All sample points in the selected result files are detected and listed in a data table as
shown in the illustration below.
Note:
Note:
The table cells for the data points in the displayed chromatogram are marked
in yellow. The cells for the selected marker point is highlighted in blue.
The values at the marker position are shown in the Marker position pane to
the right of the curves. The values are expressed as averages for the defined
Average calculation window, with the exact value at the marker point
within brackets. The default value for the calculation window is 15 seconds
before the marker position. This value can be changed in the Advanced
Normalized Water Flux dialog box. The run time is also displayed.
The table below describes the available actions in this wizard dialog box:
38
When you want to...
...do this:
...display the next chromatogram in a group,
•
Click the Next chromatogram button
...display the previous
chromatogram in a
group,
•
Click the Previous chromatogram button
UNICORN 5.31 Evaluation for Cross Flow Filtration / User Reference Manual 28-9972-42 AA
2 How to use the ÄKTAcrossflow evaluation wizard
2.2 How to calculate Normalized Water Flux values
2.2.1 How to make a Normalized Water Flux analysis
When you want to...
...do this:
...add a data point,
•
Select the desired chromatogram
•
Move the cursor to the data point in the chromatogram (the exact data values at the marker position is displayed in the Marker position boxes)
• Click the Add Point button
Note:
Data points are available if a Set_Eval_Mark
instruction was used with the parameter NormalisedWaterflux in the method. If not, data
points must be added manually.
...delete a data point,
...replace a data point,
...rename the point list,
•
Select a table cell in the row for the data point
•
Click the Delete point button
•
Select a table cell in the row for the data point
•
Move the cursor to the data point in the chromatogram (the average and exact data values at the
marker position are displayed in the Marker position
boxes)
•
Click the Replace point button
•
Click the Rename point list button
Result: The Rename Point List dialog box opens.
...export the point list to
an Excel file,
...display the plotted
graph,
•
Type a new name in the text box
•
Click OK
•
Click the Export to Excel button
Result: The Export to Excel dialog box opens.
•
Navigate to the folder where you want to save the file
•
If desired, type a new filename in the File name text
box.
•
Click the Save button
•
Click the Next button
UNICORN 5.31 Evaluation for Cross Flow Filtration / User Reference Manual 28-9972-42 AA
39
2 How to use the ÄKTAcrossflow evaluation wizard
2.2 How to calculate Normalized Water Flux values
2.2.1 How to make a Normalized Water Flux analysis
Actions in the Graph View
The plotted curves are now presented in a graph as shown in the illustration below:
Note:
Only a maximum of 14 selected curves can be displayed in the graph.
The following actions can be performed in the Graph View dialog box:
•
copy the graph via the Windows clipboard to other applications
•
print the graph
•
save the plotted results
• create and print a report
Note:
The graph formats (f.ex. changing scale, switching from linear to logarithmic
etc.) can also be edited in this dialog box by double-clicking in the graph area.
The available formatting options are described in detail in the section Section 2.6 How to format the graphs, on page 84.
How to copy the graph to the
clipboard
The graph can be copied to the Windows clipboard and then pasted into other applications, e.g. Excel, Word etc. The graph is exported as a bitmap image.
•
Click the Copy to clipboard button.
Result: The graph is copied and available on the clipboard.
40
UNICORN 5.31 Evaluation for Cross Flow Filtration / User Reference Manual 28-9972-42 AA
2 How to use the ÄKTAcrossflow evaluation wizard
2.2 How to calculate Normalized Water Flux values
2.2.1 How to make a Normalized Water Flux analysis
How to print the graph
The graph can be printed directly on a selected printer without first being exported to
another application. This option can also be used to create a pdf-file of the graph provided
a suitable printer driver is installed.
The table below describes how to print the graph:
Step
Action
1
•
Click the Print Graph button.
Result: The Print dialog box opens with the default Windows printer selected.
2
•
Select a printer if the default printer is not to be used.
•
Click the Setup button to adjust the printer settings if needed.
•
Click the OK button.
Result: The graph is printed on the selected printer.
UNICORN 5.31 Evaluation for Cross Flow Filtration / User Reference Manual 28-9972-42 AA
41
2 How to use the ÄKTAcrossflow evaluation wizard
2.2 How to calculate Normalized Water Flux values
2.2.1 How to make a Normalized Water Flux analysis
How to save the plotted graph
data
The table below describes how to save the plotted graph data:
Step
Action
1
•
Click the Save Result button.
Result: The Save CrossFlow analysis result dialog box opens.
2
•
If required, save the graph data in a folder other than the default home
folder.
•
If required, type a new name for the result file.
•
Click the Save button.
Result: The plotted graph data is saved.
Note:
The default file name is the type of operation/date and time when
saved.
Note:
Note:
42
The graph data is saved in a special file format (.emr). All the original result
files used in the evaluation must be stored in the same folder where they
were stored when the graph was created to avoid problems with changed
search paths when the evaluation is re-opened. For the same reason, the
files may not be renamed after the evaluation.
Click the Open Previous Analysis button in the evaluation wizard to locate
and open saved data files for editing. Only .emr-format files can be opened
using this button. The Open Previous Analysis button is also the only way to
access and open a saved analysis result. The .emr analysis files are not displayed in the UNICORN Manager Result window or in the File Navigator of
the Evaluation module.
UNICORN 5.31 Evaluation for Cross Flow Filtration / User Reference Manual 28-9972-42 AA
2 How to use the ÄKTAcrossflow evaluation wizard
2.2 How to calculate Normalized Water Flux values
2.2.1 How to make a Normalized Water Flux analysis
Note:
Changes in the graph formatting are not saved.
How to print a report
You can print a compiled report of the Normalized Water Flux analysis on your default
Windows printer by clicking the Print Report button. This report will include the plotted
graph and a table containing the following items for all data points:
•
The result file names
•
The filter area
•
The normalized water flux values
•
The transmembrane pressure values
•
The Flux values
•
The temperatures
•
The corresponding snapshot values, if selected (see "How to add snapshots" below)
The report is sent straight to the printer and cannot be edited.
How to add snapshots
The data selection for the Normalized Water Flux analysis can include snapshots of
other curve data. This data is included in the point lists and reports. The table below
describes how to add snapshots.
Step
Action
1
•
Click the Advanced button in the Data Selection dialog box.
Result: The Advanced Normalized Water Flux dialog box opens.
UNICORN 5.31 Evaluation for Cross Flow Filtration / User Reference Manual 28-9972-42 AA
43
2 How to use the ÄKTAcrossflow evaluation wizard
2.2 How to calculate Normalized Water Flux values
2.2.1 How to make a Normalized Water Flux analysis
Step
Action
2
•
Select a curve in the Snapshot parameters pane.
•
Repeat selecting to add more snapshot curves if desired.
•
Click the OK button to close the dialog box.
•
Select the Snapshot check box.
3
Result: A list of the selected curves is displayed and snapshots from these
curves will be added to the point lists and reports, corresponding to the selected data points in all chromatograms.
44
UNICORN 5.31 Evaluation for Cross Flow Filtration / User Reference Manual 28-9972-42 AA
2 How to use the ÄKTAcrossflow evaluation wizard
2.2 How to calculate Normalized Water Flux values
2.2.2 How to manage the temperature correction table
2.2.2
How to manage the temperature correction table
Introduction
This section describes how to open saved temperature correction tables, create new
tables, e.g. for use with different liquids, and how to set the default table for the normalized water flux calculations.
How to open a saved table
The table below describes how to open a saved Temperature correction table in the
Normalized Water Flux evaluation wizard.
Step
Action
1
Click the Evaluation Wizard icon in the Evaluation module or choose
File:Membrane System Evaluation.
Result: The Evaluation Wizard dialog box opens.
2
•
Select the Normalized Water Flux operation.
•
Click the Next button.
Result: The Data Selection dialog box opens.
UNICORN 5.31 Evaluation for Cross Flow Filtration / User Reference Manual 28-9972-42 AA
45
2 How to use the ÄKTAcrossflow evaluation wizard
2.2 How to calculate Normalized Water Flux values
2.2.2 How to manage the temperature correction table
Step
Action
3
•
Click the Advanced button.
Result: The Advanced Normalized Water Flux dialog box opens.
Note:
46
The search through all folders to determine the available curves
and populate the menus may take a long time.
UNICORN 5.31 Evaluation for Cross Flow Filtration / User Reference Manual 28-9972-42 AA
2 How to use the ÄKTAcrossflow evaluation wizard
2.2 How to calculate Normalized Water Flux values
2.2.2 How to manage the temperature correction table
Step
Action
4
•
Click the Open button in the Temperature correction table pane.
Result: The Open temperature correction table dialog box opens.
5
•
Select the temperature correction table.
•
Click the Open button.
Result: The values from the selected temperature correction table are entered
in the table in the Advanced Normalized Water Flux dialog box.
Note:
The temperature correction table can be displayed either in Celsius or
Fahrenheit by selecting the corresponding radio button, but the table is saved
and re-displayed in Celsius by default. A Temperature correction check box
is selected by default. De-select this check box if temperature correction is
not to be applied.
How to create a new table
The table below describes how to create a new temperature correction table.
Step
Action
1
•
Click the New button in the Temperature correction table pane.
Result: The table is cleared of all correction values and reset with a range
from 1 to 60 degrees Celsius in 1 degree steps.
UNICORN 5.31 Evaluation for Cross Flow Filtration / User Reference Manual 28-9972-42 AA
47
2 How to use the ÄKTAcrossflow evaluation wizard
2.2 How to calculate Normalized Water Flux values
2.2.2 How to manage the temperature correction table
48
Step
Action
2
•
Double-click a correction value in the table and type in the correct new
value.
•
Repeat this step until the table is complete.
UNICORN 5.31 Evaluation for Cross Flow Filtration / User Reference Manual 28-9972-42 AA
2 How to use the ÄKTAcrossflow evaluation wizard
2.2 How to calculate Normalized Water Flux values
2.2.2 How to manage the temperature correction table
How to save the table
The table below describes how to save the new temperature correction table:
Step
Action
1
•
Click the Save button.
Result: The Save temperature correction table dialog box opens.
2
•
Type a name for the table in the Temperature correction table name
text box.
3
•
Click the Save button.
Result: The table is saved in the special format for temperature correction
tables, .emx. The saved tables can only be accessed by using the Open
button.
How to set a default correction
table
When a new table is saved, or a saved table has been opened, it can be defined as the
default temperature correction table.
• Click the Set as default button.
Note:
When the default temperature correction table is open, or before a new table
has been saved, this button is grayed out and not available.
UNICORN 5.31 Evaluation for Cross Flow Filtration / User Reference Manual 28-9972-42 AA
49
2 How to use the ÄKTAcrossflow evaluation wizard
2.3 How to perform a Diafiltration time optimization
2.3
How to perform a Diafiltration time optimization
Introduction
For a given UF process, Diafiltration Time Optimization allows the user to identify the
factor of volume concentration where the least time is required to complete the diafiltration. This is a function of the increase in concentration versus the subsequent decrease
in flux.
Diafiltration Time Optimization creates a plot of the diafiltration time optimization parameter (concentration factor X flux) versus concentration factor. The concentration
factor that corresponds to the highest value of the DF time optimization parameter (y)
along the plot is the optimal concentration factor to perform diafiltration (for the conditions tested).
This evaluation protocol is performed on a result file from a concentration process which
was run to the desired maximum concentration factor.
This section describes how to use the Diafiltration Time Optimization operation of the
ÄKTAcrossflow evaluation wizard to find the optimal diafiltration time.
50
UNICORN 5.31 Evaluation for Cross Flow Filtration / User Reference Manual 28-9972-42 AA
2 How to use the ÄKTAcrossflow evaluation wizard
2.3 How to perform a Diafiltration time optimization
How to start the wizard and
select the operation
The table below describes how to select the Diafiltration time optimization operation.
Step
Action
1
Click the Evaluation Wizard icon in the Evaluation module or choose
File:Membrane System Evaluation.
Result: The Evaluation Wizard dialog box appears.
2
•
Select the Diafiltration time optimization operation.
• Click the Next button.
Note:
The Open Previous Analysis button is used to open results that
already have been evaluated once and saved using the wizard.
Note:
You can use the Back button in each step of the wizard to return
and change selections in the previous steps.
UNICORN 5.31 Evaluation for Cross Flow Filtration / User Reference Manual 28-9972-42 AA
51
2 How to use the ÄKTAcrossflow evaluation wizard
2.3 How to perform a Diafiltration time optimization
How to locate and select curves
to optimize
The table below describes how to locate and select result curves to use for the optimization in the evaluation wizard.
Step
Action
1
Select search criteria to locate the curves to compare:
•
Select a result folder
•
Select a result file
• Select a chromatogram
Note:
The default selection for result files and chromatograms is the
wildcard character *, which will display all files in the selected
folder and all chromatograms in the located files. The All button
will restore the wildcard character if desired.
52
UNICORN 5.31 Evaluation for Cross Flow Filtration / User Reference Manual 28-9972-42 AA
2 How to use the ÄKTAcrossflow evaluation wizard
2.3 How to perform a Diafiltration time optimization
Step
Action
2
The ConcFactor curve will normally be selected by default. However for
some systems, e.g. process systems, the curve must be selected. If your
system uses the standard ÄKTAcrossflow strategy, proceed with step 3.
Continue with this step to select the curve manually.
•
Click the Advanced button and select the ConcFactor curve in the Diafiltration time optimization dialog box.
Note:
Note:
The search through all folders to determine the available curves
and populate the menus may take a long time.
The Advanced selections are only available if the Found chromatograms field is empty. Click the Clear button to remove all
chromatograms before clicking the Advanced button.
UNICORN 5.31 Evaluation for Cross Flow Filtration / User Reference Manual 28-9972-42 AA
53
2 How to use the ÄKTAcrossflow evaluation wizard
2.3 How to perform a Diafiltration time optimization
Step
Action
3
•
Click the Search button.
Result: All chromatogram containing curves corresponding to the selected
search criteria are displayed in the Found chromatograms list.
Note:
4
•
Curves that have been edited in the UNICORN Evaluation module
are not available until the result has been saved.
Click the check boxes for all chromatograms that you want to include
in the comparison.
• Click the Next button to proceed to define the plot data.
Note:
Use the Clear button to remove all chromatograms from the list
if needed. You must do this first if you want to select other curves
to compare.
How to define plot data
The table below describes how to define the plot data for the selected curves.
54
Step
Action
1
•
Place the cursor over the left red boundary marker.
•
Press the left mouse button and drag the boundary marker to where
you want the plot data to begin.
UNICORN 5.31 Evaluation for Cross Flow Filtration / User Reference Manual 28-9972-42 AA
2 How to use the ÄKTAcrossflow evaluation wizard
2.3 How to perform a Diafiltration time optimization
Step
Action
2
•
Repeat step 1 with the right boundary marker to define the end of the
plot data.
3
•
Click the Next chromatogram button (if more than one chromatogram
was selected).
•
Repeat steps 1 and 2 above in the other selected chromatograms.
•
If needed, click the Previous chromatogram button to adjust the previous
plot region again.
•
Click the Next button to proceed to view the graph.
4
Note:
The plotting region between the markers can be defined by start and end
Eval Window instructions in the method. If several windows were defined in
the method you can select each one in the Select analysis window droplist.
If the region is not defined in the result file, the mid 50% of the curve will be
selected.
UNICORN 5.31 Evaluation for Cross Flow Filtration / User Reference Manual 28-9972-42 AA
55
2 How to use the ÄKTAcrossflow evaluation wizard
2.3 How to perform a Diafiltration time optimization
Actions in the Graph View
The plotted curves are now presented in a graph as shown in the illustration below:
Note:
Only a maximum of 14 selected curves can be displayed in the graph.
The following actions can be performed in the Graph View dialog box:
•
rename the Curve labels (if more than one curve was selected for plotting)
•
copy the graph via the Windows clipboard to other applications
•
print the graph
• save the plotted results
Note:
The graph formats (f.ex. changing scale, switching from linear to logarithmic
etc.) can also be edited in this dialog box by double-clicking in the graph area.
The available formatting options are described in detail in the section Section 2.6 How to format the graphs, on page 84.
56
UNICORN 5.31 Evaluation for Cross Flow Filtration / User Reference Manual 28-9972-42 AA
2 How to use the ÄKTAcrossflow evaluation wizard
2.3 How to perform a Diafiltration time optimization
How to rename the Curve labels
The default curve label names are the group names (for a single curve, the file name).
The label name that is currently displayed in the top text box of the Curve labels pane
can be replaced with a new text. This pane is only available if more than one curve or
group was selected for plotting.
•
Click the droplist arrow by the top text box to select another label name for editing.
•
Type the new label text in the lower text box.
•
Click the Rename button.
Result: The label is renamed.
Note:
Only the label name is changed. The result file name is not changed. The label
name can also be changed by renaming the group or curve point list in the
Define plot data dialog box.
How to copy the graph to the
clipboard
The graph can be copied to the Windows clipboard and then pasted into other applications, e.g. Excel, Word etc. The graph is exported as a bitmap image.
•
Click the Copy to clipboard button.
Result: The graph is copied and available on the clipboard.
How to print the graph
The graph can be printed directly on a selected printer without first being exported to
another application. This option can also be used to create a pdf-file of the graph provided
a suitable printer driver is installed.
The table below describes how to print the graph:
UNICORN 5.31 Evaluation for Cross Flow Filtration / User Reference Manual 28-9972-42 AA
57
2 How to use the ÄKTAcrossflow evaluation wizard
2.3 How to perform a Diafiltration time optimization
Step
Action
1
•
Click the Print Graph button.
Result: The Print dialog box opens with the default Windows printer selected.
2
•
Select a printer if the default printer is not to be used.
•
Click the Setup button to adjust the printer settings if needed.
•
Click the OK button.
Result: The graph is printed on the selected printer.
58
UNICORN 5.31 Evaluation for Cross Flow Filtration / User Reference Manual 28-9972-42 AA
2 How to use the ÄKTAcrossflow evaluation wizard
2.3 How to perform a Diafiltration time optimization
How to save the plotted graph
data
The table below describes how to save the plotted graph data:
Step
Action
1
•
Click the Save Result button.
Result: The Save CrossFlow analysis result dialog box opens.
2
•
If required, type a new name for the result file.
•
Click the Save button.
Result: The plotted graph data is saved.
Note:
The default file name is the type of operation/date and time when
saved.
Note:
Note:
Note:
The graph data is saved in a special file format (.emr). All the original result
files used in the evaluation must be stored in the same folder where they
were stored when the graph was created to avoid problems with changed
search paths when the evaluation is re-opened. For the same reason, the
files may not be renamed after the evaluation.
Click the Open Previous Analysis button in the evaluation wizard to locate
and open saved data files for editing. Only .emr-format files can be opened
using this button. The Open Previous Analysis button is also the only way to
access and open a saved analysis result. The .emr analysis files are not displayed in the UNICORN Manager Result window or in the File Navigator of
the Evaluation module.
Changes in the graph formatting are not saved.
UNICORN 5.31 Evaluation for Cross Flow Filtration / User Reference Manual 28-9972-42 AA
59
2 How to use the ÄKTAcrossflow evaluation wizard
2.4 How to make a Capacity plot
2.4
How to make a Capacity plot
Introduction
The analysis of experimental results in cell processing often includes the plotting of
process parameters versus the membrane capacity. The formula for capacity is:
Capacity = accumulated permeate volume / surface area
Capacity plots allows the user to plot any process parameter versus the accumulating
permeate volume normalized to the surface area (capacity).
Capacity plots also accepts input of a system-external result from sampling during a
run (i.e. activity assay results and its corresponding permeate volume) and can plot the
external result versus capacity.
This section describes how to use the Capacity plots operation of the ÄKTAcrossflow
evaluation wizard to get a graphical analysis of the filter capacity.
60
UNICORN 5.31 Evaluation for Cross Flow Filtration / User Reference Manual 28-9972-42 AA
2 How to use the ÄKTAcrossflow evaluation wizard
2.4 How to make a Capacity plot
How to start the wizard and
select the operation
The table below describes how to select the Capacity plots operation.
Step
Action
1
Click the Evaluation Wizard icon in the Evaluation module or choose
File:Membrane System Evaluation.
Result: The Evaluation Wizard dialog box appears.
2
•
Select the Capacity plots operation.
• Click the Next button.
Note:
The Open Previous Analysis button is used to open results that
already have been evaluated once and saved using the wizard.
Note:
You can use the Back button in each step of the wizard to return
and change selections in the previous steps.
UNICORN 5.31 Evaluation for Cross Flow Filtration / User Reference Manual 28-9972-42 AA
61
2 How to use the ÄKTAcrossflow evaluation wizard
2.4 How to make a Capacity plot
How to select a curve for the
capacity plot
The table below describes how to select a result curve for plotting.
Step
Action
1
Select search criteria to locate the curves to compare:
•
Select a result folder
•
Select a result file
• Select a chromatogram
Note:
The default selection for result files and chromatograms is the
wildcard character *, which will display all files in the selected
folder and all chromatograms in the located files. The All button
will restore the wildcard character if desired.
62
UNICORN 5.31 Evaluation for Cross Flow Filtration / User Reference Manual 28-9972-42 AA
2 How to use the ÄKTAcrossflow evaluation wizard
2.4 How to make a Capacity plot
Step
Action
2
Select the curve for the capacity plot:
•
Select one of the default curves
or
Click the Advanced button and select any of the available curves in the
Advanced Capacity dialog box.
Note:
The Advanced selections are only available if the Found chromatograms field is empty. Click the Clear button to remove all
chromatograms before proceeding.
•
Note:
Note:
Note:
The search through all folders to determine the available curves
and populate the menus may take a long time.
When a curve has been selected once it will be added to the
default curve menus. The first selected parameter will be plotted
as the Y-axis in the Graph View.
See How to compare external vs capacity in this section for information about this option.
UNICORN 5.31 Evaluation for Cross Flow Filtration / User Reference Manual 28-9972-42 AA
63
2 How to use the ÄKTAcrossflow evaluation wizard
2.4 How to make a Capacity plot
Step
Action
3
•
Click the Search button.
Result: All chromatogram containing curves corresponding to the selected
search criteria are displayed in the Found chromatograms list.
Note:
4
•
Curves that have been edited in the UNICORN Evaluation module
are not available until the result has been saved.
Click the check boxes for all chromatograms that you want to include
in the comparison.
• Click the Next button to proceed to define the plot data.
Note:
Use the Clear button to remove all chromatograms from the list
if needed. You must do this first if you want to select other curves
to compare.
How to define plot data
The table below describes how to define the plot data for the selected curves.
64
Step
Action
1
•
Place the cursor over the left red boundary marker.
•
Press the left mouse button and drag the boundary marker to where
you want the plot data to begin.
UNICORN 5.31 Evaluation for Cross Flow Filtration / User Reference Manual 28-9972-42 AA
2 How to use the ÄKTAcrossflow evaluation wizard
2.4 How to make a Capacity plot
Step
Action
2
•
Repeat step 1 with the right boundary marker to define the end of the
plot data.
Note:
3
The plotting region between the markers can be defined by the
instructions Start_Eval_Window in combination with
Stop_Eval_Window, with the parameter Capacity, in the method.
If several windows were defined in the method you can select
each one in the Select analysis window droplist. If the region is
not defined in the result file, the mid 50% of the curve will be selected.
•
Click the Next chromatogram button (if more than one chromatogram
was selected).
•
Repeat steps 1 and 2 above in the other selected chromatograms.
•
If needed, click the Previous chromatogram button to adjust the previous
plot region again.
4
•
5
•
If needed, type the filter area for the filter used for the run in the Filter
area text box.
Note:
This value is not retrieved automatically from the result file. It
must be entered manually. The default value that is entered by
the system is 45 cm2.
Click the Next button to proceed to view the plotted graph.
UNICORN 5.31 Evaluation for Cross Flow Filtration / User Reference Manual 28-9972-42 AA
65
2 How to use the ÄKTAcrossflow evaluation wizard
2.4 How to make a Capacity plot
Actions in the Graph View
The plotted regions of the selected curves are now presented in a graph as shown in
the illustration below:
Note:
Only a maximum of 14 selected curves can be displayed in the graph.
The following actions can be performed in the Graph View dialog box:
•
rename the Curve labels (if more than one curve was selected for plotting)
•
copy the graph via the Windows clipboard to other applications
•
print the graph
• save the plotted results
Note:
The graph formats (f.ex. changing scale, switching from linear to logarithmic
etc.) can also be edited in this dialog box by double-clicking in the graph area.
The available formatting options are described in detail in the section Section 2.6 How to format the graphs, on page 84.
How to rename the Curve labels
The default curve label names are the search path and file name of the original result
file. The label name that is currently displayed in the top text box of the Curve labels
pane can be replaced with a new text. Click the droplist arrow by the top text box to select
another label name for editing. This pane is only available if more than one curve was
selected for plotting.
•
66
Type the new label text in the lower text box.
UNICORN 5.31 Evaluation for Cross Flow Filtration / User Reference Manual 28-9972-42 AA
2 How to use the ÄKTAcrossflow evaluation wizard
2.4 How to make a Capacity plot
•
Click the Rename button.
Result: The label is renamed.
Note:
Only the label name is changed. The result file name is not changed.
How to copy the graph to the
clipboard
The graph can be copied to the Windows clipboard and then pasted into other applications, e.g. Excel, Word etc. The graph is exported as a bitmap image.
•
Click the Copy to clipboard button.
Result: A dialog box opens and the graph is copied and available on the clipboard.
How to print the graph
The graph can be printed directly on a selected printer without first being exported to
another application. This option can also be used to create a PDF-file of the graph provided a suitable printer driver is installed.
The table below describes how to print the graph:
UNICORN 5.31 Evaluation for Cross Flow Filtration / User Reference Manual 28-9972-42 AA
67
2 How to use the ÄKTAcrossflow evaluation wizard
2.4 How to make a Capacity plot
Step
Action
1
•
Click the Print Graph button.
Result: The Print dialog box opens with the default Windows printer selected.
2
•
Select a printer if the default printer is not to be used.
•
Click the Setup button to adjust the printer settings if needed.
•
Click the OK button.
Result: The graph is printed on the selected printer.
68
UNICORN 5.31 Evaluation for Cross Flow Filtration / User Reference Manual 28-9972-42 AA
2 How to use the ÄKTAcrossflow evaluation wizard
2.4 How to make a Capacity plot
How to save the plotted graph
data
The table below describes how to save the plotted graph data:
Step
Action
1
•
Click the Save Result button.
Result: The Save CrossFlow analysis result dialog box opens.
2
•
If required, save the graph data in a folder other than the default home
folder.
•
If required, type a new name for the result file.
•
Click the Save button.
Result: The plotted graph data is saved.
Note:
The default file name is the type of operation/date and time when
saved.
Note:
The graph data is saved in a special file format (.emr). All the original result
files used in the evaluation must be stored in the same folder where they
were stored when the graph was created to avoid problems with changed
search paths when the evaluation is re-opened. For the same reason, the
files may not be renamed after the evaluation.
UNICORN 5.31 Evaluation for Cross Flow Filtration / User Reference Manual 28-9972-42 AA
69
2 How to use the ÄKTAcrossflow evaluation wizard
2.4 How to make a Capacity plot
Note:
Note:
Click the Open Previous Analysis button in the evaluation wizard to locate
and open saved data files for editing. Only .emr-format files can be opened
using this button. The Open Previous Analysis button is also the only way to
access and open a saved analysis result. The .emr analysis files are not displayed in the UNICORN Manager Result window or in the File Navigator of
the Evaluation module.
Changes in the graph formatting are not saved.
How to compare External vs
Capacity
The table below describes how to plot an external result versus capacity.
Note:
The method or the manual run must include the instruction Set_Eval_Mark
with the parameter ExtData_vs_Capacity to enable input of external data.
Step
Action
1
•
2
Select search criteria to locate the curves to compare:
Select External from the Curves menu.
•
Select a result folder
•
Select a result file
•
Select a chromatogram
•
Click the Search button.
Result: All chromatogram containing curves corresponding to the selected
search criteria are displayed in the Found chromatograms list.
70
UNICORN 5.31 Evaluation for Cross Flow Filtration / User Reference Manual 28-9972-42 AA
2 How to use the ÄKTAcrossflow evaluation wizard
2.4 How to make a Capacity plot
Step
Action
3
•
Click the check boxes for all chromatograms that you want to include
in the comparison.
•
Click the Next button to proceed to define the plot data.
UNICORN 5.31 Evaluation for Cross Flow Filtration / User Reference Manual 28-9972-42 AA
71
2 How to use the ÄKTAcrossflow evaluation wizard
2.4 How to make a Capacity plot
Step
Action
4
Note:
No curve is plotted in this operation. Only the point list is displayed.
Enter the data from the external source:
•
Click a cell in the External column and enter the corresponding value.
•
Continue until the table is complete.
You can also do the following in this dialog box:
•
72
Click the Set Unit button to change the name or enter a new unit for the
external data.
UNICORN 5.31 Evaluation for Cross Flow Filtration / User Reference Manual 28-9972-42 AA
2 How to use the ÄKTAcrossflow evaluation wizard
2.4 How to make a Capacity plot
Step
5
Action
•
Select a cell in the table and click the Delete Point button to remove a
data point.
•
Click the Rename point list button and type a new name for the list.
•
Click the Export to Excel button to save the list in Excel-format.
•
Click the Next button to proceed to view the plotted graph.
The following actions can be performed in the Graph View dialog box:
•
copy the graph via the Windows clipboard to other applications
•
print the graph
•
save the plotted results
UNICORN 5.31 Evaluation for Cross Flow Filtration / User Reference Manual 28-9972-42 AA
73
2 How to use the ÄKTAcrossflow evaluation wizard
2.5 How to compare process data using the Any vs any operation
2.5
How to compare process data using the Any vs any
operation
Introduction
This section describes how to use the Any vs any operation of the ÄKTAcrossflow
evaluation wizard to compare process data.
Any vs any is used to analyze results from routine concentration/diafiltration and cell
processing runs. It provides the capability to plot any process parameter captured as a
curve in a given result file on either the X axis or the Y axis. It also allows scaling of the
X or Y axis to be linear or logarithmic.
How to start the wizard and
select the operation
The table below describes how to select the Any vs any operation.
Step
Action
1
Click the Evaluation Wizard icon in the Evaluation module or choose
File:Membrane System Evaluation.
Result: The Evaluation Wizard dialog box appears.
74
UNICORN 5.31 Evaluation for Cross Flow Filtration / User Reference Manual 28-9972-42 AA
2 How to use the ÄKTAcrossflow evaluation wizard
2.5 How to compare process data using the Any vs any operation
Step
Action
2
•
Select the Any vs any operation.
•
Click the Next button.
Note:
Note:
The Open Previous Analysis button is used to open results that
already have been evaluated once and saved using the wizard.
You can use the Back button in each step of the wizard to return
and change selections in the previous steps.
How to locate and select curves
to compare
The table below describes how to locate and select result curves for comparison in the
evaluation wizard.
Step
Action
1
Select search criteria to locate the curves to compare:
•
Select a result folder
•
Select a result file
• Select a chromatogram
Note:
The default selection for result files and chromatograms is the
wildcard character *, which will display all files in the selected
folder and all chromatograms in the located files. The All button
will restore the wildcard character if desired.
UNICORN 5.31 Evaluation for Cross Flow Filtration / User Reference Manual 28-9972-42 AA
75
2 How to use the ÄKTAcrossflow evaluation wizard
2.5 How to compare process data using the Any vs any operation
Step
Action
2
Select the curves to compare:
•
Select default curves to compare
or
Click the Advanced button and select any combination of the available
curves in the Advanced Any vs. any dialog box.
Note:
The Advanced selections are only available if the Found chromatograms field is empty. Click the Clear button to remove all
chromatograms before proceeding.
•
Note:
Note:
76
The search through all folders to determine the available curves
and populate the menus may take a long time.
When a curve has been selected once it will be added to the
default curve menus. The first selected parameter will be plotted
as the Y-axis in the Graph View.
UNICORN 5.31 Evaluation for Cross Flow Filtration / User Reference Manual 28-9972-42 AA
2 How to use the ÄKTAcrossflow evaluation wizard
2.5 How to compare process data using the Any vs any operation
Step
Action
3
•
Click the Search button.
Result: All chromatogram containing curves corresponding to the selected
search criteria are displayed in the Found chromatograms list.
Note:
4
•
Curves that have been edited in the UNICORN Evaluation module
are not available until the result has been saved.
Click the check boxes for all chromatograms that you want to include
in the comparison.
• Click the Next button to proceed to define the plot data.
Note:
Use the Clear button to remove all chromatograms from the list
if needed. You must do this first if you want to select other curves
to compare.
How to define plot data
The table below describes how to define the plot data for the selected curves.
Step
Action
1
•
Place the cursor over the left red boundary marker.
•
Press the left mouse button and drag the boundary marker to where
you want the plot data to begin.
UNICORN 5.31 Evaluation for Cross Flow Filtration / User Reference Manual 28-9972-42 AA
77
2 How to use the ÄKTAcrossflow evaluation wizard
2.5 How to compare process data using the Any vs any operation
Step
Action
2
•
Repeat step 1 with the right boundary marker to define the end of the
plot data.
Note:
3
4
78
The plotting region between the markers can be defined by
Start_Eval_Window Any_vs_any and Stop_Eval_Window
Any_vs_any instructions in the method. If several windows were
defined in the method you can select each one in the Select
analysis window droplist. If the region is not defined in the result
file, the mid 50% of the curve will be selected by default.
•
Click the Next chromatogram button (if more than one chromatogram
was selected).
•
Repeat steps 1 and 2 above in the other selected chromatograms.
•
If needed, click the Previous chromatogram button to adjust the previous
plot region again.
•
Click the Next button to proceed to view the graph.
UNICORN 5.31 Evaluation for Cross Flow Filtration / User Reference Manual 28-9972-42 AA
2 How to use the ÄKTAcrossflow evaluation wizard
2.5 How to compare process data using the Any vs any operation
Actions in the Graph View
The plotted regions of the selected curves are now presented in a graph as shown in
the illustration below:
Note:
Only a maximum of 14 selected curves can be displayed in the graph.
The following actions can be performed in the Graph View dialog box:
•
rename the Curve labels (if more than one curve was selected for plotting)
•
copy the graph via the Windows clipboard to other applications
•
print the graph
• save the plotted results
Note:
The graph formats (f.ex. changing scale, switching from linear to logarithmic
etc.) can also be edited in this dialog box by double-clicking in the graph area.
The available formatting options are described in detail in the section Section 2.6 How to format the graphs, on page 84.
How to rename the Curve labels
The default curve label names are the search path and file name of the result file. The
label name that is currently displayed in the top text box of the Curve labels pane can
be replaced with a new text. This pane is only available if more than one curve or group
was selected for plotting.
•
Click the droplist arrow by the top text box to select another label name for editing.
•
Type the new label text in the lower text box.
UNICORN 5.31 Evaluation for Cross Flow Filtration / User Reference Manual 28-9972-42 AA
79
2 How to use the ÄKTAcrossflow evaluation wizard
2.5 How to compare process data using the Any vs any operation
•
Click the Rename button.
Result: The label is renamed.
Note:
Only the label name is changed. The result file name is not changed.
How to copy the graph to the
clipboard
The graph can be copied to the Windows clipboard and then pasted into other applications, e.g. Excel, Word etc. The graph is exported as a bitmap image.
•
Click the Copy to clipboard button.
Result: The graph is copied and available on the clipboard.
How to print the graph
The graph can be printed directly on a selected printer without first being exported to
another application. This option can also be used to create a pdf-file of the graph provided
a suitable printer driver is installed.
The table below describes how to print the graph:
80
UNICORN 5.31 Evaluation for Cross Flow Filtration / User Reference Manual 28-9972-42 AA
2 How to use the ÄKTAcrossflow evaluation wizard
2.5 How to compare process data using the Any vs any operation
Step
Action
1
•
Click the Print Graph button.
Result: The Print dialog box opens with the default Windows printer selected.
2
•
Select a printer if the default printer is not to be used.
•
Click the Setup button to adjust the printer settings if needed.
•
Click the OK button.
Result: The graph is printed on the selected printer.
UNICORN 5.31 Evaluation for Cross Flow Filtration / User Reference Manual 28-9972-42 AA
81
2 How to use the ÄKTAcrossflow evaluation wizard
2.5 How to compare process data using the Any vs any operation
How to save the plotted graph
data
The table below describes how to save the plotted graph data:
Step
Action
1
•
Click the Save Result button.
Result: The Save CrossFlow analysis result dialog box opens.
2
•
If required, save the graph data in a folder other than the default home
folder.
•
If required, type a new name for the result file.
•
Click the Save button.
Result: The plotted graph data is saved.
Note:
The default file name is the type of operation/date and time when
saved.
Note:
82
The graph data is saved in a special file format (.emr). All the original result
files used in the evaluation must be stored in the same folder where they
were stored when the graph was created to avoid problems with changed
search paths when the evaluation is re-opened. For the same reason, the
files may not be renamed after the evaluation.
UNICORN 5.31 Evaluation for Cross Flow Filtration / User Reference Manual 28-9972-42 AA
2 How to use the ÄKTAcrossflow evaluation wizard
2.5 How to compare process data using the Any vs any operation
Note:
Note:
Click the Open Previous Analysis button in the evaluation wizard to locate
and open saved data files for editing. Only .emr-format files can be opened
using this button. The Open Previous Analysis button is also the only way to
access and open a saved analysis result. The .emr analysis files are not displayed in the UNICORN Manager Result window or in the File Navigator of
the Evaluation module.
Changes in the graph formatting are not saved.
UNICORN 5.31 Evaluation for Cross Flow Filtration / User Reference Manual 28-9972-42 AA
83
2 How to use the ÄKTAcrossflow evaluation wizard
2.6 How to format the graphs
2.6
How to format the graphs
Introduction
This section describes the different available graph objects and how to use the formatting
options. The graph objects that are available in the embedded plotting application are
•
General format graphs
•
Scientific graphs
•
3D scientific graphs
•
Pie charts
Most of the ÄKTAxflow evaluation operations are plotted in Scientific graphs. The Normalized Water Flux analysis is plotted in a general graph format. The 3D scientific graphs
and pie charts are not applicable for ÄKTAxflow evaluations. The formatting options that
are specific for these graphs and charts are not described here. However, the options
are presented in the help functions for the plotting application, which is available from
a shortcut menu that can be opened by right-clicking in the graphs.
This section also contains a sub-section about how to export the graphs directly from
the plotting application.
In this section
This section contains these sub-sections.
Section
See page
2.6.1 How to format Normalized Water Flux graphs
85
2.6.2 How to format other ÄKTAcrossflow graphs
97
2.6.3 How to export the graphs
84
108
UNICORN 5.31 Evaluation for Cross Flow Filtration / User Reference Manual 28-9972-42 AA
2 How to use the ÄKTAcrossflow evaluation wizard
2.6 How to format the graphs
2.6.1 How to format Normalized Water Flux graphs
2.6.1
How to format Normalized Water Flux graphs
Introduction
This section describes how to format the general graphs, which are used for the Normalized Water Flux analysis.
Note:
In this section the formatting options are described as they are arranged in
the Customization dialog box.
Note:
Formatting changes are not saved when a result is saved. However, the
changes will effect the printed output and also when the graph is copied to
the clipboard.
The Customization dialog box
and the formatting menu
The Customization dialog box is opened by double-clicking in the graph object.
The dialog box contains a number of tab panes and a row of function buttons. There is
also a link from the dialog box to an Export dialog box.
The formatting menu is accessed by right-clicking in the graph object. The contents of
the menu is determined by the type of graph object that is displayed.
UNICORN 5.31 Evaluation for Cross Flow Filtration / User Reference Manual 28-9972-42 AA
85
2 How to use the ÄKTAcrossflow evaluation wizard
2.6 How to format the graphs
2.6.1 How to format Normalized Water Flux graphs
The menu contains a list of many of the formatting options from the Customization dialog box, as well as links to this dialog box, the export function and the help function for
the graph application: All descriptions of the formatting options in the Customization
dialog box are also valid for the corresponding commands in the shortcut menu, but the
options are limited to a few parameters that are effected immediately when they are
selected.
Basic functions in the
Customization dialog box
The following functions are common for all tabs in the Customization dialog box:
86
•
Click the OK button to apply the selected changes and close the dialog box.
•
Click the Cancel button to close the dialog box without applying any changes to the
graph.
•
Click the Apply button to apply the selected changes and leave the dialog box opens
for further editing.
•
Click the Help button to open the specific Help file for the graph application. This
Help file is not an integrated part of the UNICORN Help.
•
Click the Original button to restore the graph to its original state, with the default
formatting selections.
•
Click the Export... button to open the Export dialog box. See section Section 2.6.3
How to export the graphs, on page 108 for information of how to use the Export options.
UNICORN 5.31 Evaluation for Cross Flow Filtration / User Reference Manual 28-9972-42 AA
2 How to use the ÄKTAcrossflow evaluation wizard
2.6 How to format the graphs
2.6.1 How to format Normalized Water Flux graphs
• Click the Maximize button to display the graph in full screen size.
Note:
Changes that are made while the graph is maximized are restored to the
settings made in the regular Graph View dialog box when the graph is reset
to the Graph View display.
General formatting options
The table below describes the formatting functions available in the General tab of the
Customization dialog box.
Select this function...
...to do this:
Main Title
Type a new title for the graph in the text box.
Sub Title
Type a title that will be displayed in a smaller font beneath
the main title.
Viewing Style
Choose one of the following style options:
•
Graph elements in color
•
Monochrome graph elements
• Monochrome graph elements and symbols
Note:
You can choose to fill monochrome elements
with color in the Color tab and use this as an
alternative color scheme.
Font Size
Show annotations
Choose one of the following sizes:
•
Large
•
Medium
•
Small
Select this checkbox to show annotations, if available.
However, this function is not used in ÄKTAcrossflow evaluations.
UNICORN 5.31 Evaluation for Cross Flow Filtration / User Reference Manual 28-9972-42 AA
87
2 How to use the ÄKTAcrossflow evaluation wizard
2.6 How to format the graphs
2.6.1 How to format Normalized Water Flux graphs
Select this function...
...to do this:
Numeric Precision
Choose to display the number of decimals to be displayed
when the graph is exported:
Grid Lines
•
None
•
One
•
Two
•
Three
Choose how to display grid lines in the graph:
•
For both axes
•
For the X-axis
•
For the Y-axis
•
None
Select if the grid lines are to be displayed in front of the
data.
Display
Choose the objects to display in the graph area:
Subsets to Table
88
•
Only a graph
•
Only a table
•
Both a graph and a table
Not applicable for Normalized Water Flux graphs.
UNICORN 5.31 Evaluation for Cross Flow Filtration / User Reference Manual 28-9972-42 AA
2 How to use the ÄKTAcrossflow evaluation wizard
2.6 How to format the graphs
2.6.1 How to format Normalized Water Flux graphs
Plotting formatting options
The table below describes the formatting functions available in the Plot tab of the Customization dialog box.
Select this function...
...to do this:
Axes
Select the axis to be edited. This option will be selectable
only if more than one Y-axis is plotted. The plotting style
for the selected axis can be chosen in the Plot Style pane.
3D
Select how the objects in the graphs are to be presented:.
•
With no shadows or depth dimensions
•
With a simple shadow
•
With a depth perspective (only bars and area charts)
UNICORN 5.31 Evaluation for Cross Flow Filtration / User Reference Manual 28-9972-42 AA
89
2 How to use the ÄKTAcrossflow evaluation wizard
2.6 How to format the graphs
2.6.1 How to format Normalized Water Flux graphs
Select this function...
...to do this:
Plot Style
Choose one of the following style options:
•
Area
•
Bar
•
Histogram
•
Line
•
Points
•
Points and Best Fit Curve
•
Points and Best Fit Curve 2
•
Points and Best Fit Line
•
Points and Best Fit Line 2
•
Points and Line
•
Points and Spline
• Spline
Note:
The "Best Fit" calculations are made from a
least squares approximation of the data set.
The "Best Fit" calculations will consider all
points in the graph regardless if they are visible
or not. The "Best Fit...2" calculations will only
consider visible points, e.g. when a portion of
a curve is zoomed in.
90
Comparison Plot Style
Choose a style option for a secondary data set for comparison, if available.
Mark Data Points
Select this checkbox to display small circular marks at the
data point locations.
UNICORN 5.31 Evaluation for Cross Flow Filtration / User Reference Manual 28-9972-42 AA
2 How to use the ÄKTAcrossflow evaluation wizard
2.6 How to format the graphs
2.6.1 How to format Normalized Water Flux graphs
Subset selection
The subset selection options available in the Subset tab of the Customization dialog
box is not applicable for the Normalized Water Flux graphs since only one curve is plotted.
Point selection
The table below describes the point selection options available in the Points tab of the
Customization dialog box.
Select this function...
...to do this:
...Sequential in the
Points to Graph pane
and scroll to the desired
end point in the scroll
bar box...
Display all data points from the first to the selected end
point.
Note:
Subsequent points are not visible but can be
displayed by dragging the scroll bar under the
graph pane. This scroll bar is only present
when a limited number of data points are selected for display.
UNICORN 5.31 Evaluation for Cross Flow Filtration / User Reference Manual 28-9972-42 AA
91
2 How to use the ÄKTAcrossflow evaluation wizard
2.6 How to format the graphs
2.6.1 How to format Normalized Water Flux graphs
Select this function...
...to do this:
...Selected in the Points
to Graph pane and
choose two or more data points...
Display only the selected data points in the graph.
...an option in the Point
Label Orientation
pane...
92
•
Click the first point to be displayed, hold the mouse
button and drag to the last point to select a sequence.
•
Press the Ctrl key and click each point to select individual points out of sequence.
Choose how the point labels are displayed in the graph:
•
Auto - either horizontal or vertical
•
Vertical
•
Horizontal
•
Slanted
UNICORN 5.31 Evaluation for Cross Flow Filtration / User Reference Manual 28-9972-42 AA
2 How to use the ÄKTAcrossflow evaluation wizard
2.6 How to format the graphs
2.6.1 How to format Normalized Water Flux graphs
Y-axis formats
The table below describes the Y-axis formatting options available in the Axis tab of the
Customization dialog box.
Select this function...
...to do this:
Linear
Display the Y-axis data on a linear scale.
Log
Display the Y-axis data on a logarithmic scale.
Auto
Define the minimum and maximum Y-axis scale values
automatically.
Min
Type a minimum scale value for the Y-axis in the Min text
box.
Max
Type a maximum scale value for the Y-axis in the Max
text box.
Min/Max
Type minimum and maximum scale values for the Y-axis
in the Min and Max text boxes.
UNICORN 5.31 Evaluation for Cross Flow Filtration / User Reference Manual 28-9972-42 AA
93
2 How to use the ÄKTAcrossflow evaluation wizard
2.6 How to format the graphs
2.6.1 How to format Normalized Water Flux graphs
Font selections
Fonts can be selected and formatted in the Fonts tab of the Customization dialog box,
for the following text items:
•
Main Title
•
Sub Title
•
Subset, Point and Axis labels
•
Table Data
Only scalable True Type fonts can be used. A sample of the text with the selected font
and formatting is shown in the dialog box.
Color selections
The graph application features two alternative color sets that can be selected on the
General tab, the Color set and the Monochrome set. Primarily, the Monochrome color
set is used for printing on monochrome printers while the Color color set is used for
screen display. You can toggle between the sets while keeping the selected colors in
each set.
The Monochrome color set can also be edited so that elements are colored in the same
way as in the Color set, as an alternative color scheme.
Follow the steps below to color a graph element:
•
94
Select a graph element
UNICORN 5.31 Evaluation for Cross Flow Filtration / User Reference Manual 28-9972-42 AA
2 How to use the ÄKTAcrossflow evaluation wizard
2.6 How to format the graphs
2.6.1 How to format Normalized Water Flux graphs
•
Select a color in the palette
•
Click the Apply button
The table below describes what the graph elements are that can be colored using the
selections that are available in the Color tab of the Customization dialog box.
Graph element
Description
Desk Foreground
The color used for all text in the Desk Background area
Desk Background
The color of the area immediately surrounding the outside
borders of the graph’s grid
Shadow Color
The graph’s grid and the table is displayed with a shadow
outline. Choose the same color for the shadow and the
desk background if you want to remove the shadow.
Graph Foreground
The color used for all the borders, grid-lines and other
boundary lines in the graph area
Graph Background
The color of the area inside the graph’s borders
Table Foreground
The color used for the table borders and for all text inside
Table Background
The color of the area inside the table’s borders
UNICORN 5.31 Evaluation for Cross Flow Filtration / User Reference Manual 28-9972-42 AA
95
2 How to use the ÄKTAcrossflow evaluation wizard
2.6 How to format the graphs
2.6.1 How to format Normalized Water Flux graphs
How to edit line and point colors
and style
The table below describes how to edit the color and style of graph lines and data point
markers in the Style tab of the Customization dialog box.
Step
Action
1
• Select a data subset from the subset pane.
Note:
All changes will effect this subset only. The line and point style
and colors that presently corresponds to this subset will be displayed and highlighted.
2
•
Select a color for the lines and points by clicking on one of the colored
boxes in the palette.
Result: The selected color is outlined and the point marker and line example
colors are changed.
3
4
96
•
Choose a style for the data point markers from the Point Type droplist.
•
Choose a line type from the Line Type droplist.
•
Click the Apply button to apply the changes.
UNICORN 5.31 Evaluation for Cross Flow Filtration / User Reference Manual 28-9972-42 AA
2 How to use the ÄKTAcrossflow evaluation wizard
2.6 How to format the graphs
2.6.2 How to format other ÄKTAcrossflow graphs
2.6.2
How to format other ÄKTAcrossflow graphs
Introduction
This section describes how to format scientific graphs, which are used for the following
operations:
•
Process optimization
•
Diafiltration time optimization
•
Capacity plots
• Any vs. any
Note:
In this section the formatting options are described as they are arranged in
the Customization dialog box.
Note:
Formatting changes are not saved when a result is saved. However, the
changes will effect the printed output and also when the graph is copied to
the clipboard.
The Customization dialog box
and the formatting menu
The Customization dialog box is opened by double-clicking in the graph object.
The dialog box contains a number of tab panes and a row of function buttons. There is
also a link from the dialog box to an Export dialog box.
UNICORN 5.31 Evaluation for Cross Flow Filtration / User Reference Manual 28-9972-42 AA
97
2 How to use the ÄKTAcrossflow evaluation wizard
2.6 How to format the graphs
2.6.2 How to format other ÄKTAcrossflow graphs
The formatting menu is accessed by right-clicking in the graph object. The contents of
the menu is determined by the type of graph object that is displayed.
The menu contains a list of many of the formatting options from the Customization dialog box, as well as links to this dialog box, the export function and the help function for
the graph application: All descriptions of the formatting options in the Customization
dialog box are also valid for the corresponding commands in the shortcut menu, but the
options are limited to a few parameters that are effected immediately when they are
selected.
Basic functions in the
Customization dialog box
The following functions are common for all tabs in the Customization dialog box:
98
•
Click the OK button to apply the selected changes and close the dialog box.
•
Click the Cancel button to close the dialog box without applying any changes to the
graph.
•
Click the Apply button to apply the selected changes and leave the dialog box opens
for further editing.
•
Click the Help button to open the specific Help file for the graph application. This
Help file is not an integrated part of the UNICORN Help.
•
Click the Original button to restore the graph to its original state, with the default
formatting selections.
UNICORN 5.31 Evaluation for Cross Flow Filtration / User Reference Manual 28-9972-42 AA
2 How to use the ÄKTAcrossflow evaluation wizard
2.6 How to format the graphs
2.6.2 How to format other ÄKTAcrossflow graphs
•
Click the Export... button to open the Export dialog box. See section Section 2.6.3
How to export the graphs, on page 108 for information of how to use the Export options.
• Click the Maximize button to display the graph in full screen size.
Note:
Changes that are made while the graph is maximized are restored to the
settings made in the regular Graph View dialog box when the graph is reset
to the Graph View display.
General formatting options
The table below describes the formatting functions available in the General tab of the
Customization dialog box.
Select this function...
...to do this:
Main Title
Type a new title for the graph in the text box.
Sub Title
Type a title that will be displayed in a smaller font beneath
the main title.
Viewing Style
Choose one of the following style options:
•
Graph elements in color
•
Monochrome graph elements
• Monochrome graph elements and symbols
Note:
You can choose to fill monochrome elements
with color in the Color tab and use this as an
alternative color scheme.
Font Size
Show annotations
Choose one of the following sizes:
•
Large
•
Medium
•
Small
This checkbox is selected to show annotations, if available.
However, this function is not used in ÄKTAcrossflow evaluations.
UNICORN 5.31 Evaluation for Cross Flow Filtration / User Reference Manual 28-9972-42 AA
99
2 How to use the ÄKTAcrossflow evaluation wizard
2.6 How to format the graphs
2.6.2 How to format other ÄKTAcrossflow graphs
Select this function...
...to do this:
Numeric Precision
Choose the number of decimals to be displayed when the
graph is exported:
Grid Lines
•
None
•
One
•
Two
•
Three
Choose how to display grid lines in the graph:
•
For both axes
•
For the X-axis
•
For the Y-axis
•
None
Select if the grid lines are to be displayed in front of the
data.
100
UNICORN 5.31 Evaluation for Cross Flow Filtration / User Reference Manual 28-9972-42 AA
2 How to use the ÄKTAcrossflow evaluation wizard
2.6 How to format the graphs
2.6.2 How to format other ÄKTAcrossflow graphs
Plotting formatting options
The table below describes the formatting functions available in the Plot tab of the Customization dialog box.
Select this function...
...to do this:
Axes
Select the axis to be edited. This option will be selectable
only if more than one Y-axis is plotted. The plotting style
for the selected axis can be chosen in the Plot Style pane.
3D
Select how the objects in the graphs are to be presented:.
Plot Style
•
With no shadows or depth dimensions
•
With a simple shadow
•
With a depth perspective (only bars and area charts)
Choose one of the following style options:
•
Area
•
Bar
•
Line
•
Points
•
Points and Best Fit Curve
•
Points and Best Fit Line
•
Points and Line
•
Points and Spline
• Spline
Note:
The "Best Fit" calculations are made from a
least squares approximation of the data set.
Comparison Plot Style
Choose a style option for a secondary data set for comparison, if available.
Mark Data Points
Select this check box to display small circular marks at
the data point locations.
UNICORN 5.31 Evaluation for Cross Flow Filtration / User Reference Manual 28-9972-42 AA
101
2 How to use the ÄKTAcrossflow evaluation wizard
2.6 How to format the graphs
2.6.2 How to format other ÄKTAcrossflow graphs
Subset selection
The table below describes the subset selection options available in the Subset tab of the
Customization dialog box.
102
Select this function...
...to do this:
...no subset selected in
the Subset to Graph
pane and 0 in the
Scrolling Subsets box...
Display all subsets.
...one or more subsets
selected in the Subset
to Graph pane and 0 in
the Scrolling Subsets
box...
Only the selected subsets are displayed.
...no subsets selected in
the Subset to Graph
pane and the Scrolling
Subsets box set to 1 or
higher...
Scroll through all subsets using a vertical scroll bar that
is displayed to the right side of the graph. The number of
subsets displayed in each panel is determined by the
number in the box.
UNICORN 5.31 Evaluation for Cross Flow Filtration / User Reference Manual 28-9972-42 AA
2 How to use the ÄKTAcrossflow evaluation wizard
2.6 How to format the graphs
2.6.2 How to format other ÄKTAcrossflow graphs
Select this function...
...to do this:
...one or more subsets
selected in the Subset
to Graph pane and the
Scrolling Subsets box
set to 1 or higher...
Display the selected subsets permanently, scroll through
the remaining subsets. The selected subsets are displayed
in all panels together with the number of the remaining
subsets that have been selected in the box.
Axis formats
The table below describes the X-axis and Y-axis formatting options available in the Axis
tab of the Customization dialog box.
Select this function...
...to do this:
Linear
Display the axis data on a linear scale.
Log
Display the axis data on a logarithmic scale.
Auto
Define the minimum and maximum axis scale values automatically.
Min
Type a minimum scale value for the axis in the Min text
box.
UNICORN 5.31 Evaluation for Cross Flow Filtration / User Reference Manual 28-9972-42 AA
103
2 How to use the ÄKTAcrossflow evaluation wizard
2.6 How to format the graphs
2.6.2 How to format other ÄKTAcrossflow graphs
Select this function...
...to do this:
Max
Type a maximum scale value for the axis in the Max text
box.
Min/Max
Type minimum and maximum scale values for the axis in
the Min and Max text boxes.
Font selections
Fonts can be selected and formatted in the Fonts tab of the Customization dialog box,
for the following text items:
•
Main Title
•
Sub Title
•
Subset, Point and Axis labels
•
Table Data
Only scalable True Type fonts can be used. A sample of the text with the selected font
and formatting is shown in the dialog box.
104
UNICORN 5.31 Evaluation for Cross Flow Filtration / User Reference Manual 28-9972-42 AA
2 How to use the ÄKTAcrossflow evaluation wizard
2.6 How to format the graphs
2.6.2 How to format other ÄKTAcrossflow graphs
Color selections
The graph application features two alternative color sets that can be selected on the
General tab, the Color set and the Monochrome set. Primarily, the Monochrome color
set is used for printing on monochrome printers while the Color color set is used for
screen display. You can toggle between the sets while keeping the selected colors in
each set.
The Monochrome color set can also be edited so that elements are colored in the same
way as in the Color set, as an alternative color scheme.
Follow the steps below to color a graph element:
•
Select a graph element
•
Select a color in the palette
•
Click the Apply button
The table below describes what the graph elements are that can be colored using the
selections that are available in the Color tab of the Customization dialog box.
Graph element
Description
Desk Foreground
The color used for all text in the Desk Background area
Desk Background
The color of the area immediately surrounding the outside
borders of the graph’s grid
UNICORN 5.31 Evaluation for Cross Flow Filtration / User Reference Manual 28-9972-42 AA
105
2 How to use the ÄKTAcrossflow evaluation wizard
2.6 How to format the graphs
2.6.2 How to format other ÄKTAcrossflow graphs
Graph element
Description
Shadow Color
The graph’s grid and the table is displayed with a shadow
outline. Choose the same color for the shadow and the
desk background if you want to remove the shadow.
Graph Foreground
The color used for all the borders, grid-lines and other
boundary lines in the graph area
Graph Background
The color of the area inside the graph’s borders
How to edit line and point colors
and style
The table below describes how to edit the color and style of graph lines and data point
markers in the Style tab of the Customization dialog box.
106
Step
Action
1
• Select a data subset from the subset pane.
Note:
All changes will effect this subset only. The line and point style
and colors that presently corresponds to this subset will be displayed and highlighted.
UNICORN 5.31 Evaluation for Cross Flow Filtration / User Reference Manual 28-9972-42 AA
2 How to use the ÄKTAcrossflow evaluation wizard
2.6 How to format the graphs
2.6.2 How to format other ÄKTAcrossflow graphs
Step
Action
2
•
Select a color for the lines and points by clicking on one of the colored
boxes in the palette.
Result: The selected color is outlined and the point marker and line example
colors are changed.
3
4
•
Choose a style for the data point markers from the Point Type drop list.
•
Choose a line type from the Line Type drop list.
•
Click the Apply button to apply the changes.
UNICORN 5.31 Evaluation for Cross Flow Filtration / User Reference Manual 28-9972-42 AA
107
2 How to use the ÄKTAcrossflow evaluation wizard
2.6 How to format the graphs
2.6.3 How to export the graphs
2.6.3
How to export the graphs
Introduction
The graph can be exported directly from the graph application either as an image in
bitmap or MetaFile format, or as text and data. The graph data can either be copied to
the clipboard, saved as a file or sent to the printer.
The illustration below shows the Exporting... dialog box:
How to export a MetaFile
The table below describes how to use the different export options for a Windows MetaFile
(.wmf format).
Destination
How to use the option
Clipboard
1
Select ClipBoard in the Export Destination pane.
2
Select a unit to define the image size in the Object Size
pane; in millimeters, inches or points, or leave the size
unspecified.
3
Type measurements in the Width and height boxes.
4
Click the Export button.
Result: The file is exported and the dialog box closes.
108
UNICORN 5.31 Evaluation for Cross Flow Filtration / User Reference Manual 28-9972-42 AA
2 How to use the ÄKTAcrossflow evaluation wizard
2.6 How to format the graphs
2.6.3 How to export the graphs
Destination
How to use the option
File
1
Select File in the Export Destination pane.
2
Click the Browse button and navigate to the destination folder in the Save As dialog box.
3
Type a name in the File name text box and click Save.
4
Select a unit to define the image size in the Object Size
pane; in millimeters, inches or points, or leave the size
unspecified.
5
Type measurements in the Width and height boxes.
6
Click the Export button.
Result: The file is saved in .wmf format and the dialog box
closes.
Printer
1
Select Printer in the Export Destination pane.
2
Select Full Page in the Object Size pane or define a
size for the print in millimeters, inches or points.
3
Click the Print button.
Result: The Printing dialog box opens.
UNICORN 5.31 Evaluation for Cross Flow Filtration / User Reference Manual 28-9972-42 AA
109
2 How to use the ÄKTAcrossflow evaluation wizard
2.6 How to format the graphs
2.6.3 How to export the graphs
How to export as a bitmap file
The table below describes how to use the different export options for bitmap files (.bmp
or .dib format).
Destination
How to use the option
Clipboard
1
Select ClipBoard in the Export Destination pane.
2
Define the image size expressed in pixels in the Object
Size pane.
3
Click the Export button.
Result: The file is exported and the dialog box closes.
File
1
Select File in the Export Destination pane.
2
Click the Browse button and navigate to the destination folder in the Save As dialog box.
3
Type a name in the File name text box and click Save.
4
Define the image size expressed in pixels in the Object
Size pane.
5
Click the Export button.
Result: The file is saved in .bmp or .dib format and the dialog box closes.
110
UNICORN 5.31 Evaluation for Cross Flow Filtration / User Reference Manual 28-9972-42 AA
2 How to use the ÄKTAcrossflow evaluation wizard
2.6 How to format the graphs
2.6.3 How to export the graphs
How to export text and data
The table below describes how to use the different export options for text and data only
(.txt or .dat format).
Destination
How to use the option
Clipboard
•
Select ClipBoard in the Export Destination pane.
•
Click the Export button.
Result: The Export... dialog box opens.
•
Select the appropriate export options. See Actions in
the Export dialog box below for detailed information.
•
Click the Export button.
Result: The data is exported to the Windows clipboard and
the dialog box closes.
File
•
Select File in the Export Destination pane.
•
Click the Browse button and navigate to the destination folder in the Save As dialog box.
Result: The Save As dialog box opens.
•
Navigate to the destination folder.
•
Type a name in the File name text box and click Save.
Result: The Save As dialog box closes.
•
Click the Export button.
Result: The Export... dialog box opens.
•
Select the appropriate export options. See Actions in
the Export dialog box below for detailed information.
•
Click the Export button.
Result: The file is saved in .txt or .dat format and the dialog
box closes.
UNICORN 5.31 Evaluation for Cross Flow Filtration / User Reference Manual 28-9972-42 AA
111
2 How to use the ÄKTAcrossflow evaluation wizard
2.6 How to format the graphs
2.6.3 How to export the graphs
Actions in the Export dialog box
The table below describes the options in the Export... dialog box.
Use this field...
...to do this:
Select Subsets and
Points
•
Click the All Data radio button to export all curves and
points.
or
1
Click the Selected Data radio button.
2
Select one or more curves in the Subsets to Export
field.
3 Select one or more points in the Points to Export field.
Note:
To select several items in sequence, click the
first item, press and hold the shift key and click
the last item. To select several items not in
sequence, click the first item, press and hold
the Ctrl key and click each subsequent item.
Export What
Select to export
•
only the data points
or
•
Data to Export
both the data points and the labels.
Select to export
•
only the Y-axis values
or
•
Export Style
both the point numbers and the Y-axis values.
Select to export
•
a list, choose a tab or comma delimited list
or
•
112
a table, choose the order of column vs row data.
UNICORN 5.31 Evaluation for Cross Flow Filtration / User Reference Manual 28-9972-42 AA
2 How to use the ÄKTAcrossflow evaluation wizard
2.6 How to format the graphs
2.6.3 How to export the graphs
Use this field...
...to do this:
Numeric Precision
Select to export the values with the
•
Current Precision, i.e. the number of decimal positions
specified in the General tab of the Customization dialog box
or
•
Maximum Precision, i.e. up to seven decimal positions.
The illustration below shows the Export... dialog box.
UNICORN 5.31 Evaluation for Cross Flow Filtration / User Reference Manual 28-9972-42 AA
113
Index
Index
C
Capacity plots
How to create a capacity
plot using the capacity plots
wizard, 61
Comparing process data
How to compare data using
the Any vs any wizard, 74
Curves
How to group several data
curves for process optimization analysis, 22
How to select a curve for a
capacity plot, 62
How to select curves for
Normalized Water Flux
analysis, 35
How to select curves for
process optimization, 20
How to select curves freely
for comparison, 75
How to select curves to optimize diafiltration time, 52
D
Diafiltration
How to optimize the time
using the wizard, 51
G
Graph options
Any vs any operation, 79
Capacity plots operation, 66
Copy to clipboard, 28, 40,
57, 67, 80
Diafiltration time optimization operation, 56
Direct printing, 29, 41, 57,
67, 80
How to create a Normalized
Water Flux report, 43
How to save a plotted
graph, 30, 42, 59, 69, 82
Normalized Water Flux operation, 40
114
Process optimization operation, 27
Graphs
How to export as a
bitmap, 110
How to export as Windows
MetaFiles, 108
How to export text and data
only, 111
The Customization dialog
box, 85, 97
The formatting menu, 85, 98
H
Help functions
How to open the help file, 15
N
Normalized Water Flux
How to analyze the water
flux, 34
How to create a new temperature correction table, 47
How to manage the temperature correction table, 45
P
Process optimization
How to optimize settings
using the Process optimization wizard, 19
W
Wizard operations
Any vs any, 74
Capacity plots, 61
Diafiltration time optimization, 51
Normalized Water Flux, 34
Normalized Water Flux,
manage temperature correction tables, 45
Process optimisation, 19
UNICORN 5.31 Evaluation for Cross Flow Filtration / User Reference Manual 28-9972-42 AA
For local office contact information, visit
www.gelifesciences.com/contact
GE Healthcare Bio-Sciences AB
Björkgatan 30
751 84 Uppsala
Sweden
www.gelifesciences.com/unicorn
GE, imagination at work and GE monogram are trademarks of General Electric
Company.
UNICORN, ÄKTAcrossflow, ÄKTAexplorer and ÄKTA are trademarks of GE
Healthcare companies.
All third party trademarks are the property of their respective owners.
© 2009-2011 General Electric Company – All rights reserved.
First published May 2011
All goods and services are sold subject to the terms and conditions of sale of
the company within GE Healthcare which supplies them. A copy of these terms
and conditions is available on request. Contact your local GE Healthcare representative for the most current information.
UNICORN: Any use of this software is subject to GE Healthcare Standard Software
End-User License Agreement for Life Sciences Software Products.
GE Healthcare Europe GmbH
Munzinger Strasse 5, D-79111 Freiburg, Germany
GE Healthcare UK Limited
Amersham Place, Little Chalfont, Buckinghamshire, HP7 9NA, UK
GE Healthcare Bio-Sciences Corp.
800 Centennial Avenue, P.O. Box 1327, Piscataway, NJ 08855-1327, USA
GE Healthcare Japan Corporation
Sanken Bldg.3-25-1, Hyakunincho Shinjuku-ku, Tokyo 169-0073, Japan
imagination at work
28-9972-42 AA 05/2011