1
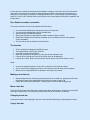
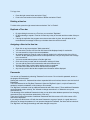
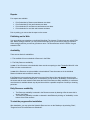
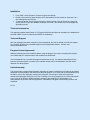
Universal Resource Scheduler
Introduction
•
•
"Universal Resource Scheduler", is an easy to use visual, three dimensional scheduler.
The purpose of the program is to assign a User to a Resource for a specific amount of time.
The Main components are:
•
•
•
•
•
•
•
•
•
•
Resources that needs to be scheduled.
These Resources can be persons or things.
You can give Resources a name, Physician, Technician, Classroom, Boat etc.
Assign features that belong to a Resource.
Resources can have multiple properties can have names like: Specialty, Size, Skills, Max number
of people, Equipment.
An Action is applicable to a Resource. You can name Actions, like Reservation, Appointment, and
Schedule.
The User is the User of a Resource.
Name the User, like Customer, Patient, Teacher (For classrooms), Renter, Assignment etc.
You can name any of the above under "Options" while in any of the two Editors.
To make things easy, this manual will generically refers to: Resources, Features or Properties,
Reservations and Users.
Equipment needed
You will need;
•
•
•
•
•
•
An IBM or compatible PC
At least one fixed (hard) disk and CD-Rom.
Microsoft Windows/98 or later.
A mouse or pointing device must be attached.
A Super VGA or higher pixel count Monitor.
A printer to print reports and schedules.
Mouse Tracking
Since most functions are directed through mouse action, some customers prefer to slow the pointer
movement on the screen. To slow down the Mouse Tracking:
•
•
•
•
•
Select "Start" and "Control Panel"
Click on Mouse.
Move the Mouse tracking speed towards Slow.
Move the mouse and see if the move feels comfortable.
Click on Ok to save the setting.
Using the Menus
The "Universal Resource Scheduler" uses drop-down menus. Just point at the heading and press the left
mouse button and a further selection can then be made.
The Opening Screen
The purpose of the Opening screen is to:
•
•
•
Select a database (.mdb) or make a new database.
Enter a Password if the password function is set up.
Get help if needed.
The Editors
Entering and changing schedules is performed in the Editors.
There are two Editors;
•
•
All Resources for one day.
One Resource for the number of dates that will fit on your screen.
To become familiar with the application, some files are added during the installation process. The file
created is the "Example room.mdb" file with fictitious names for Resources and Schedules based on the
date of installation.
Make it a habit to back up you current database by selecting "File" and "Save as..." and giving it a name
that is meaningful to you.
•
•
To look at one resource for as many dates as will fit your screen, click on the Resource name, in
the above case, click on "Pool room" and the Resource Editor will appear.
By clicking on <<Hours>> the Editor will return to the default starting hour.
Note, if more than a single day is shown, the day of the week colors cover halve of both days.
•
•
To navigate in the Editors, you can click on any weekday or tabs on the above navigation bar.
Click on <<Days>> and return to the current day.
"Goto" will provide a calendar for choosing a particular date.
Edit controls
•
•
•
•
The screen size will determine how many Resources will fit on a screen.
The vertical scroll bar will only be displayed if you have more Resources that will fit on the screen.
You can navigate forwards and backwards through time by Hour, Day and Week.
Weekends are marked with a light background color.
Flash
With many reservations in place, it may sometimes be difficult to see if there are any available spaces
between Time bars. By clicking on the “Flash” button on the bottom of the screen, the available areas will
be shown in white.
Refresh
If more than one workstation has access to the database, changes in one Editor will not be reflected for
other users. Their screens only reflect the latest change while other reservations were completed. If a
contention for open space is contested, a message will be shown. To prevent most of those messages
press F2 or click on the "Refresh" button on the bottom of the screen and the Editor will be updated to the
current status.
Do a Search to make a reservation
You can do a search to look for time available for Reservations.
•
•
•
•
•
•
You can search all Resources and specify Features or Properties.
You can search selected Resources for available time.
Specify the Hours and Minutes needed.
Specify the start date, the start date time and the number of days to search.
Searches are based on the Resource availability set in the Resource record unless marked
"Ignore availability".
You can limit the search results for each Resource.
The time bar
•
•
•
•
•
•
Time is entered and changed in the Editor screen.
The representation of time is the "Time bar".
A new bar is initially colored WHITE.
When the reservation is completed you can give the bar a different color.
If the bar is long enough, the name of the current User will be displayed.
If the bar is too short, point to the bar with the mouse and the User will be shown in a box.
Notes:
•
•
•
An arrow is displayed under the "Hour-ruler" to show the current mouse position.
As you enter time by dragging the mouse, a bar under the ruler will show you the progress.
After the bar is completed the bar is adjusted to the nearest 15 minutes.
Making a new time bar
•
•
Start and stop times are entered by pointing the mouse at an editor line, pressing the left button
and holding it down while dragging the mouse from left to right or right to left.
Initially all bars will be colored WHITE, indicating that no User has been assigned yet.
Move a time bar
Pointing to the bar, away from either end or while holding down the left button, will allow movement from
left to right, up and down. If the new position does not fit, the bar will resume it old location.
Changing a time bar
Pointing the mouse to the beginning or the end of a bar will allow stretching or decreasing the bar size.
Copy a time bar
To Copy a bar:
•
•
Press the right mouse button and select "Copy".
Point to the new location for the left side of the Bar and select "Paste".
Deleting a time bar
To delete a bar, press the right mouse button and select "Cut" or "Delete".
Replicate a Time bar
•
•
•
By right clicking the mouse on a Time bar, you can select "Replicate".
By then selecting to repeat a Time bar for each day or day of the week and the number of days or
weeks.
If during the replication the program encounters a reservation in place, the replication will be
terminated and a message will show you the date where the conflict occurred.
Assigning a User to the time bar
•
•
•
•
•
•
•
•
•
•
Right click on any bar and select "Make reservation".
You can select "List first 100" the first 100 Users will be displayed ready for a selection.
You can search for a User in the current database.
An example search is: Enter all or part of a phone number in the yellow text box, then click on
"Phone". All the qualifying Users will be on the spread sheet, now you can pick the one to assign
to the current bar.
You have several search options to find the right User.
Click on the User you want and the conformation window will show.
You can add any notes for this reservation and select different color.
Click the Save button on the bottom and the routine is completed.
The name of the User will now be on the Bar if there is space.
Any time you point to the bar the complete User information will be displayed.
Passwords
You can set up Passwords by selecting "Password" on the menu. Do not lose this password; access to
the program will be blocked.
Starting with version 2.3, Passwords have been expanded with new functions; there are now two levels of
Passwords.
The initial Password is the "Big Boss" Password. When the "Big Boss" signs in, only the Password is
needed to access the database, no Nick name or ID is needed.
The "Big Boss" is allowed to set up additional Passwords with "Nick names". These additional Passwords
can be assigned curtain authority, like "Allowed to change reservations" or "Allowed to set up new
reservations" etc.
The advantage of the additional Passwords is that you can allow other database operators from changing
reservations; they may have been authorized to "Look only".
There are no limits to the number of additional Passwords with Nick names or IDs. Nick names or IDs
cannot have duplicates.
If you assign one Nick name or ID with the same Password to a group of people, is a good idea not to
allow them to change the password. If one operator changes the Password, the others will be locked out.
The "Big Boss" can change the settings and make changes at any time.
Reports
Four reports are available:
•
•
•
•
Print Schedules by Resource and between two dates.
Print Schedules by User and between two dates.
Print schedules for one Resource and between two dates.
Print schedules for one User and between two dates.
Prior to printing, you can review the report on the screen.
Publishing on the Web
You can publish your schedules on the World Wide Web (The Internet). File structures are called HTML
files. Before saving a schedule, you can preview these files just as you do before printing a schedule.
When saving these files you need to give them a name. The file extensions will be .HTM like "August
schedule.HTM".
Availability
There are two kinds of availabilities.
1 - The available of time to schedule a Resource in the Editor.
2 - The Daily Resource availability.
In case 1, for a Resource to be scheduled, there must be an opening to draw TimebarScribble110 in the
Editor to make a reservation etc..
In case 2, the Resource must be available to be scheduled. These times are set in the individual
Resource window and can differ for each day.
If the Resource is an employee, that person may work from 8Am to 5pm and therefore should not be
scheduled to work outside of these hours. In the Editors, you can click on "Availability" on the bottom of
the screen and the area marked in Red shows the limits of the Resource Daily availability. A conference
room however is available almost any day and time with the a possible exception of a setup or cleaning
period etc.
Daily Resource availability
•
•
The Resource availability is entered in the Resource screen by drawing a Bar the same this is
done in the Editors.
The Resource availability is visible on demand in both Editors by clicking on "Availability" on the
bottom of the Editor screens.
To start the program after installation
After installation, you may select the Schedule Resource Icon on the Desktop or by selecting "Start",
"Programs" and "Universal Resource Scheduler".
Installation
•
•
•
From "Start", select "Explorer" (Press the right mouse button).
Double click on the File name setupurs.exe if downloaded from the website or Setup.exe if you
are installing from the CD-Rom.
To become familiar with the program's function without having to set up Resources, Users and
options, select to open the database "Example room.mdb". This will allow you to investigate the
application quickly.
Technical information
This application default install Folder is "C\:Program files\Universal Resource Scheduler" the database file
ends with .MDB. This file is a Microsoft ACCESS Jet 3 database.
Technical Support
After the registration has been received by Guia International, the User is entitled to free E-mail support
for a period of 90 Days. Any extended support may be negotiated thereafter. Contact us at
www.workschedules.com
Program License Agreement
Read the following terms and conditions before using the program. By using or accepting this program,
you indicate that you accept the terms and conditions set forth below.
Guia International Corp. provides this program and licenses its use. You assume responsibility for the
selection of these programs to achieve your intended results, and for the installation, use and results
obtained from the programs.
Limited warranty
The programs are provided without warranty expressed or implied, including but not limited to the implied
warranties of merchantability and fitness for a particular purpose. In no event, will Guia International Corp.
be liable to you for any damages, including any lost profits, lost savings or other lost incidental or
consequential damages arising out of the use or inability to use such programs even if Guia International
Corp. or any of its agents or dealers had been advised of the possibility of such damages. You
acknowledge that you have read this agreement, understand it and agree to be bound by its terms and
conditions.
05-17-07