1
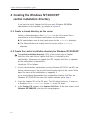
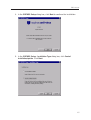
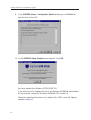
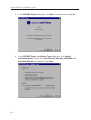
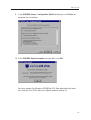
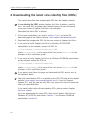
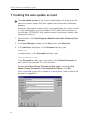
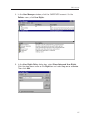
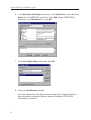
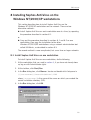
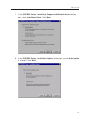
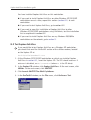
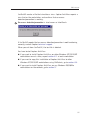
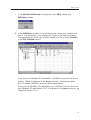
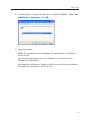
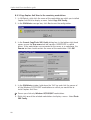
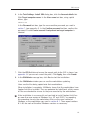
Unix server
Installation guide
For networks with
Servers
Unix
Workstations
Windows NT/2000/XP
Windows 95/98/Me
About this guide
This guide tells you how to
install Sophos Anti-Virus on a Unix server
scan the server for viruses
eliminate viruses
install Sophos Anti-Virus on Windows NT/2000/XP workstations
install Sophos Anti-Virus on Windows 95/98/Me workstations.
The instructions for installation on Windows XP workstations apply only to
Windows XP Professional (not Windows XP Home) networked computers.
You can find details of all other configuration options in the Sophos
Anti-Virus Unix user manual.
To find out how to update Sophos Anti-Virus on Unix, see the Sophos
Anti-Virus Unix server update guide.
To find out how to install Sophos Anti-Virus on Mac OS 8 or 9 workstations
connected to the Unix server, see the Sophos Anti-Virus Mac OS 8 or 9 on
a network installation guide.
To find out how to install Sophos Anti-Virus on Mac OS X workstations
connected to the Unix server, see the Sophos Anti-Virus Mac OS X on a
network installation guide.
Sophos documentation is published on the Sophos CD each month and at
www.sophos.com/support/docs/
Sophos Anti-Virus installation guide
Technical support
UK (24 hours):
(+44) 1235 559933
[email protected]
USA (24 hours):
(+1) 888 767 4679
[email protected]
Australia (24 hours): (+61) 2 9409 9111
[email protected]
France:
[email protected]
(+33) 1 40 90 20 90
Germany (24 hours): (+49) 6136 91193
[email protected]
Italy:
(+39) 02 662810 0
[email protected]
Japan (24 hours):
(+81) 45 227 1800
[email protected]
Singapore (24 hours): (+65) 6776 7467
[email protected]
FAQs and virus information are available on the Sophos website
www.sophos.com
If you contact technical support, provide as much information as possible,
including Sophos software version number(s), operating system(s) and patch
level(s), and the exact text of any error messages.
Copyright © 2002, 2003 by Sophos Plc
All rights reserved. No part of this publication may be reproduced, stored in a
retrieval system, or transmitted, in any form or by any means, electronic, mechanical,
photocopying, recording or otherwise without the prior permission in writing of the
copyright owner.
Any name should be assumed to be a trademark unless stated otherwise. InterCheck
and Sophos are registered trademarks of Sophos Plc.
2
Unix server
Contents
Installation on the Unix server
1 Installing Sophos Anti-Virus on the server
6
2 Scanning the server for viruses
11
3 Eliminating viruses
12
Creation of central installation directories
4 Creating the Windows NT/2000/XP central installation directory
14
5 Creating the Windows 95/98/Me central installation directory
19
6 Downloading the latest virus identity files (IDEs)
24
Installation on Windows NT/2000/XP workstations
7 Creating the auto-update account
26
8 Installing Sophos Anti-Virus on the Windows NT/2000/XP workstations 29
Installation on Windows 95/98/Me workstations
9 Installing Sophos Anti-Virus on the Windows 95/98/Me workstations
44
Appendices
Appendix 1 Installing on multiple Unix computers
50
Appendix 2 Installing central reporting
51
Appendix 3 Options for non-default installation
52
Appendix 4 Notes about the installation
54
3
Sophos Anti-Virus installation guide
4
Installation on the Unix server
Sophos Anti-Virus installation guide
1 Installing Sophos Anti-Virus on the server
You must uninstall any other anti-virus software before installing Sophos
Anti-Virus.
If you have multiple, networked Unix computers, and you want to install
and update Sophos Anti-Virus from a central directory, rather than carrying
out installation at each computer separately, go to appendix 1.
Before you begin, make a note of the name of the Unix server in appendix 4
of this installation guide. To check the name, go to the server and enter
hostname
InterCheck Server is a daemon that runs on the Unix server, and processes
virus alerts sent from Windows, Macintosh and OS/2 workstations. It is not
vital to the running and updating of Sophos Anti-Virus. To use it you need to
set up a user and group for the daemon and set permissions on a common
directory. Refer to appendix 2.
There are four steps in the Sophos Anti-Virus for Unix installation process:
Extract the installation files (section 1.1).
Install Sophos Anti-Virus (section 1.2).
Check the system settings (section 1.3).
Add the latest virus identity files (section 1.4).
6
Unix server
1.1 Extract the installation files
To extract the installation files, do as follows:
1. Ensure you are logged on to the server with root privileges or are superuser.
If you have downloaded a Sophos Anti-Virus archive file from the Sophos
website, go straight to step 5.
2. Insert the Sophos CD. Mount the CD and list the contents of the unix
directory.
3. Select the archive file that corresponds to your Unix platform.
4. Copy the archive file to the /tmp directory.
5. Untar the archive file into /tmp as follows:
cd /tmp
tar -xvf [dist].tar
where [dist].tar is the archive for your platform.
A directory called sav-install is created in the /tmp directory and the
installation files are extracted to it.
The sav-install directory also contains readmes and man pages,
including the following:
Readunix.txt
Readme file, including late news.
Install.txt
Installation instructions, with details of all options.
sweep.1
man page for SWEEP (the virus scanning program).
Now you are ready to install Sophos Anti-Virus (section 1.2).
7
Sophos Anti-Virus installation guide
1.2 Install Sophos Anti-Virus
To install Sophos Anti-Virus without InterCheck Server (recommended), run
the installation script with the -ni option:
cd sav-install
./install.sh -ni
To install Sophos Anti-Virus with InterCheck Server, run the installation
script without the -ni option (you must have already followed the
instructions in appendix 2.1):
cd sav-install
./install.sh
For information on all the options with which you can run the installation
script, see appendix 3.
You may now see a warning about the MANPATH environment variable.
However, the installation will be made correctly.
The installation script places
binaries in /usr/local/bin
shared library in /usr/local/lib
virus data in /usr/local/sav
manual pages in /usr/local/man
If your installation included InterCheck Server, the script also sets up
a directory to which non-Unix workstations can send virus reports at
/var/spool/intercheck
Now check your system settings (section 1.3).
8
Unix server
1.3 Check the system settings
In this section you ensure that the environment variables in your login script
or profile include the directories that Sophos Anti-Virus uses.
PATH should include /usr/local/bin
MANPATH should include /usr/local/man
LD_LIBRARY_PATH should include /usr/local/lib.
In AIX, the library environment variable is LIBPATH, and in HPUX it is
SHLIB_PATH.
On some systems, such as FreeBSD and Linux, you can enable Sophos
Anti-Virus to use the Sophos Anti-Virus shared libraries by running ldconfig.
This may require editing of /etc/ld.so.conf.
If any of these variables are not included, add them to the environment
variable(s) as shown in the examples below. Do not alter any of the existing
settings.
If you are running the sh, ksh or bsh shell, enter
PATH=$PATH:/usr/local/bin
export PATH
If you are running the csh or tsh shell, enter
setenv PATH [values]:/usr/local/bin
where [values] are the existing settings.
You should make these variables system-wide. To do this, amend
/etc/login or /etc/profile.
If you do not have a login script, you will need to reset these values every
time you restart the server.
Now add the latest virus identity files to the server (section 1.4).
9
Sophos Anti-Virus installation guide
1.4 Download the latest virus identity files (IDEs)
This section describes how to download IDEs from the Sophos website.
A virus identity file (IDE) enables Sophos Anti-Virus to detect a specific
virus. You need IDEs to protect your server against viruses discovered since
your version of Sophos Anti-Virus was compiled.
Download the latest IDEs as follows:
1. Go to the IDE download page of the Sophos website (www.sophos.com/
downloads/ide).
2. Download the compressed IDEs file for your version of Sophos Anti-Virus.
3. Extract the IDEs to usr/local/sav.
If you prefer, scroll down the page and download the IDEs one by one, to
the location above.
Help with downloading IDEs is available on the IDE FAQ page of the Sophos
website (www.sophos.com/support/faqs/ide.html).
If you need further help with downloading IDEs, please contact Sophos
technical support.
Sophos Anti-Virus is now installed and up to date on the Unix server.
If you installed InterCheck Server, you now activate it (appendix 2.2).
Section 2 describes how to scan the server for viruses.
Section 3 describes how to eliminate a virus.
Sections 4 to 9 describe how to install Sophos Anti-Virus on Windows
workstations connected to the Unix server.
Remember to update Sophos Anti-Virus every month. In addition, you
must update Sophos Anti-Virus whenever there is a significant new virus
threat. Updating is described in the Sophos Anti-Virus Unix server update
guide.
10
Unix server
2 Scanning the server for viruses
2.1 Scanning the local computer
To scan the local computer, enter
sweep /
2.2 Scanning a particular directory or file
To scan a particular item, use the path to that item, for example
sweep /usr/mydirectory/myfile
2.3 Scanning a filesystem
To scan a filesystem, use the name of the filesystem, for example
sweep /home
2.4 Finding a virus
After the scan, you will see a message similar to that shown below.
If Sophos Anti-Virus has found a virus, it reports it in the line which starts
with >>> and is followed by either Virus or Virus fragment. For
information on disinfection, see section 3.
SWEEP virus detection utility
Version 3.56, April 2002 [Linux/Intel]
Includes detection for 73079 viruses, trojans and worms
Copyright (c) 1989,2002 Sophos Plc, www.sophos.com
System time 10:23:49, System date 07 May 2002
Quick Sweeping
>>> Virus 'EICAR-AV-Test' found in file /home/source/eicar.src
33 files swept in 2 seconds.
1 virus was discovered.
1 file out of 33 was infected.
Please send infected samples to Sophos for analysis.
For advice consult www.sophos.com, email [email protected]
or telephone +44 1235 559933
2.5 For further help
For help with using Sophos Anti-Virus, enter
sweep -h
11
Sophos Anti-Virus installation guide
3 Eliminating viruses
This section describes how to disinfect infected items on a Unix server. For
information on disinfecting non-Unix workstations, see the Sophos
Anti-Virus documentation for that platform.
The method you use for disinfection depends on whether you want to
disinfect a data file or a program.
3.1 To disinfect a data file
To disinfect a specific data file (e.g. a document or spreadsheet), enter
sweep [data file path] -di
Alternatively, to detect and remove viruses in any data file or program on the
system, enter
sweep / -di
In either case, Sophos Anti-Virus asks for confirmation before it disinfects.
Check disinfected files carefully afterwards. Sophos Anti-Virus can remove
the virus, but cannot reverse any side-effects. Check the analysis of the
virus on the Sophos website for information about its possible side-effects.
3.2 To disinfect a Windows program
You can eliminate viruses in program files in two ways.
To disinfect a program file, enter
sweep [program filename] -di
This ensures that the virus cannot spread. However, the program file may be
corrupted. You should subsequently delete it and replace it from a backup.
To remove an infected program file, enter
sweep [program filename] -remove
Alternatively, to remove all infected programs, enter
sweep / -remove
In either case, Sophos Anti-Virus asks for confirmation before it removes the
program(s).
12
Creation of central installation directories
Sophos Anti-Virus installation guide
4 Creating the Windows NT/2000/XP
central installation directory
If you want to install Sophos Anti-Virus on only Windows 95/98/Me
workstations on the network, go straight to section 5.
4.1 Create a shared directory on the server
Create a shared directory called InterChk on the Unix server that is
accessible to all the Windows workstations on the network.
All workstations need at least read access to the InterChk directory.
The Administrator user should have full access to the InterChk
directory.
4.2 Create the central installation directory for Windows NT/2000/XP
The central installation directory (CID) is the central copy of Sophos
Anti-Virus files from which Sophos Anti-Virus is installed on the
workstations. Whenever you update the CID, Sophos Anti-Virus is updated
on the workstations automatically.
Create the CID as follows:
1. At any Administrator's workstation running Windows NT/2000 (not XP) and
having internet access, log on with Administrator rights to the server. Write
down the name of the workstation in appendix 4.
If you have already downloaded and unzipped the Sophos Anti-Virus for
Windows NT/2000/XP files from the Sophos website, go to step 4.
2. Insert the Sophos CD in the CD drive. The CD should auto-run. If auto-run
is disabled, run D:\Launchcd (where D: is the CD drive).
3. In the Sophos CD window, click Sophos Anti-Virus. At the next screen, click
Windows NT/2000/XP, and start the setup program.
14
Unix server
4. In the SOPHOS Setup dialog box, click Next to continue the installation.
5. In the SOPHOS Setup - Installation Type dialog box, click Central
installation/update. Click Next.
15
Sophos Anti-Virus installation guide
6. In the SOPHOS Setup - Folder Selection dialog box, you tell Sophos
Anti-Virus to use the InterChk directory you created on the Unix server.
Click the lower Browse button.
In the Browse for Folder dialog box, browse to the shared InterChk
directory on the Unix server (called Securion in the example below).
Highlight the directory and click OK.
At the end of the path to the InterChk directory, type
\NTInst\i386
Click Next.
16
Unix server
7. In the SOPHOS Setup - Installation Options dialog box, ensure Auto-update
is selected. Click Next.
8. In the SOPHOS Setup - Auto-Update Mode dialog box, click
Non-interactive. Deselect Allow users to postpone auto-update, and ensure
the Auto-update check frequency is set to 60 minutes. Click Next.
17
Sophos Anti-Virus installation guide
9. In the SOPHOS Setup - Configuration Details dialog box, click Finish to
copy the files to the CID.
10. In the SOPHOS Setup Complete message box, click OK.
You have created the Windows NT/2000/XP CID.
If you want to install Sophos Anti-Virus on Windows 95/98/Me workstations
on the network, create the Windows 95/98/Me CID (section 5).
Otherwise, download the latest virus identity files (IDEs) from the Sophos
website (section 6).
18
Unix server
5 Creating the Windows 95/98/Me
central installation directory
5.1 Create a shared directory on the server
If you have not already done so, create a shared directory called InterChk
on the Unix server that is accessible to all the Windows workstations on the
network.
All workstations need at least read access to the InterChk directory.
The Administrator user should have full access to the InterChk
directory.
5.2 Create the central installation directory for Windows 95/98/Me
The central installation directory (CID) is the central copy of Sophos
Anti-Virus files from which Sophos Anti-Virus is installed on the
workstations. Whenever you update the CID, Sophos Anti-Virus is updated
on the workstations automatically.
Create the CID as follows:
1. At any Administrator's workstation running Windows NT/2000 (not XP) or
Windows 95/98/Me and having internet access, if you have not already
done so, log on with Administrator rights to the server. Write down the
name of the workstation in appendix 4.
If you have already downloaded and unzipped the Sophos Anti-Virus for
Windows 95/98/Me files from the Sophos website, go to step 4.
2. If you have not already done so, insert the Sophos CD in the CD drive. The
CD should auto-run. If auto-run is disabled, run D:\Launchcd (where D:
is the CD drive).
3. In the Sophos CD window, click Sophos Anti-Virus. At the next screen, click
Windows 95/98/Me, and start the setup program.
19
Sophos Anti-Virus installation guide
4. In the SOPHOS Setup dialog box, click Next to continue the installation.
5. In the SOPHOS Setup - Installation Type dialog box, click Central
installation/update. Ensure that InterCheck for Windows 95/98/Me and
InterCheck Monitor are selected. Click Next.
20
Unix server
6. In the SOPHOS Setup - Folder Selection dialog box, you tell Sophos
Anti-Virus to use the InterChk directory you created on the Unix server.
Click the lower Browse button.
In the Browse for Folder dialog box, browse to the shared InterChk
directory on the Unix server (called Securion in the example below).
Highlight the directory and click OK.
At the end of the path to the InterChk directory, type
\W95Inst
Click Next.
21
Sophos Anti-Virus installation guide
7. In the SOPHOS Setup - Central Installation Options dialog box, select
Auto-update and Prevent removal. Click Next.
8. In the SOPHOS Setup - Auto-Update Mode dialog box, click
Non-interactive. Click Next.
22
Unix server
9. In the SOPHOS Setup - Configuration Details dialog box, click Finish to
complete the installation.
10.In the SOPHOS Setup Complete message box, click OK.
You have created the Windows 95/98/Me CID. Now download the latest
virus identity files (IDEs) from the Sophos website (section 6).
23
Sophos Anti-Virus installation guide
6 Downloading the latest virus identity files (IDEs)
This section describes how to download IDEs from the Sophos website.
A virus identity file (IDE) enables Sophos Anti-Virus to detect a specific
virus. You need IDEs to protect your network against viruses discovered
since your version of Sophos Anti-Virus was compiled.
Download the latest IDEs as follows:
1. At the same workstation you used in sections 4 or 5, go to the IDE
download page of the Sophos website (www.sophos.com/downloads/ide).
2. Download the compressed IDEs file for your version of Sophos Anti-Virus.
3. If you want to install Sophos Anti-Virus on Windows NT/2000/XP
workstations on the network, extract the IDEs to
\\[servername]\InterChk\NTInst\i386
where [servername] is the name of the Unix server (Securion in the
examples in this installation guide).
4. If you want to install Sophos Anti-Virus on Windows 95/98/Me workstations
on the network, extract the IDEs to
\\[servername]\InterChk\W95Inst
where [servername] is the name of the Unix server (Securion in the
examples in this installation guide).
If you prefer, scroll down the page and download the IDEs one by one, to
the locations above.
Help with downloading IDEs is available on the IDE FAQ page of the Sophos
website (www.sophos.com/support/faqs/ide.html). If you use Internet
Explorer 5.0, read the note on why IDEs may acquire an extra file extension
when you download them.
If you need further help with downloading IDEs, please contact Sophos
technical support.
You have downloaded the latest IDEs. Now install Sophos Anti-Virus on
Windows NT/2000/XP workstations (section 7) or Windows 95/98/Me
workstations (section 9).
24
Installation on Windows NT/2000/XP workstations
Sophos Anti-Virus installation guide
7 Creating the auto-update account
The auto-update account is the account workstations use to log on to the
server and collect Sophos Anti-Virus updates from the central installation
directory.
Create the auto-update account at the same workstation you used in section
4. If the workstation is running Windows 2000, follow the instructions in
the Windows NT/2000/XP auto-update account supplement instead, then
continue to section 8.
1. At the taskbar, click Start|Programs|Administrative Tools (Common)|User
Manager.
2. In the User Manager window, on the User menu, click New User.
3. In the New User dialog box, in the Username text box, type
SWEEPUPD
in capital letters. In the Description text box, type
SweepUpdateAccount
In the Password text box, type a password. In the Confirm Password text
box, confirm the password. It is case-sensitive.
Deselect User Must Change Password at Next Logon, and select User
Cannot Change Password and Password Never Expires. Click OK.
If this installation guide will be stored in a secure place, make a note of the
password in appendix 4.
26
Unix server
4. In the User Manager window, click the SWEEPUPD account. On the
Policies menu, click User Rights.
5. In the User Rights Policy dialog box, select Show Advanced User Rights.
Click the drop-down arrow on the Right box and select Log on as a service.
Then click Add.
27
Sophos Anti-Virus installation guide
6. In the Add Users and Groups dialog box, click Show Users. Scroll down the
Names list to SWEEPUPD and click it. Click Add. When SWEEPUPD is
displayed in the Add Names list, click OK.
7. In the User Rights Policy dialog box, click OK.
8. Close the User Manager window.
You have created the auto-update account. Now install Sophos Anti-Virus
from the central installation directory onto the Windows NT/2000/XP
workstations (section 8).
28
Unix server
8 Installing Sophos Anti-Virus on the
Windows NT/2000/XP workstations
This section describes how to install Sophos Anti-Virus on the
Windows NT/2000/XP workstations on the network. There are two
alternative methods:
Install Sophos Anti-Virus on each workstation one at a time, by repeating
the procedure described in section 8.1.
or
Carry out the procedure described in sections 8.1 and 8.2 on one
workstation, then copy the installation to the other
Windows NT/2000/XP workstations using a network administration tool
called SAVAdmin, as described in section 8.3.
The second method is more complicated, but saves time on larger networks.
8.1 Install Sophos Anti-Virus on one workstation
To install Sophos Anti-Virus on one workstation, do the following:
1. At the workstation that you used in section 4, if you have not already done
so, log on with Administrator rights.
2. At the taskbar, click Start|Run.
3. In the Run dialog box, click Browse. Locate and double-click Setup.exe in
\\[servername]\InterChk\NTInst\i386
where [servername] is the name of the server on which you created the
central installation directory (CID).
4. In the Run dialog box, click OK.
29
Sophos Anti-Virus installation guide
5. In the SOPHOS Setup dialog box, click Next to continue the installation.
6. In the SOPHOS Setup - Folder Selection dialog box, click Next to accept the
default folders.
30
Unix server
7. In the SOPHOS Setup - InterCheck Support and Network Access dialog
box, select InterCheck Client. Click Next.
8. In the SOPHOS Setup - Installation Options dialog box, ensure Auto-update
is selected. Click Next.
31
Sophos Anti-Virus installation guide
9. In the SOPHOS Setup - Auto-Update Account Details dialog box, in the
Domain text box, type the computer name. In the Account name text box,
using capital letters, type
SWEEPUPD
In the Password text box, type the case-sensitive password you used in
section 7 (see appendix 4). In the Confirm password text box, confirm the
password. Click Next.
10.In the SOPHOS Setup - Auto-Update Mode dialog box, click
Non-interactive. Deselect Allow users to postpone auto-update, and ensure
the Auto-update check frequency is set to 60 minutes. Click Next.
32
Unix server
11. In the SOPHOS Setup - Configuration Details dialog box, click Finish to
complete the installation. If you see a message about error number 1069,
click Back and check you have entered the correct details in the SOPHOS
Setup - Auto-Update Account Details dialog box.
12. In the SOPHOS Setup message box, if you wish to view the Sophos
Anti-Virus window, click Run Sophos Anti-Virus. Otherwise, click Exit.
Remember to update Sophos Anti-Virus every month. In addition, you
must update Sophos Anti-Virus whenever there is a significant new virus
threat. Updating is described in the Sophos Anti-Virus Unix server update
guide.
33
Sophos Anti-Virus installation guide
You have installed Sophos Anti-Virus on this workstation.
If you want to install Sophos Anti-Virus on other Windows NT/2000/XP
workstations one at a time, repeat this section (section 8.1) at each
workstation.
If you want to test Sophos Anti-Virus, go to section 8.2.
If you want to copy this installation of Sophos Anti-Virus to other
Windows NT/2000/XP workstations using SAVAdmin, test the installation
first as explained in section 8.2.
If you want to install Sophos Anti-Virus on any Windows 95/98/Me
workstations on the network, go to section 9.
8.2 Test Sophos Anti-Virus
If you would like to test Sophos Anti-Virus on a Windows XP workstation,
you should first read the SavTest32 section of the utilities readme, located
on the Sophos CD at
Tools\Utils\Readutil.txt
1. At the Windows NT/2000/XP workstation on which you installed Sophos
Anti-Virus in section 8.1, insert the Sophos CD. The CD should auto-run. If
auto-run is disabled, run D:\Launchcd (where D: is the CD drive).
2. In the Sophos CD window, click Sophos Anti-Virus. At the next screen, click
Utilities. At the next screen, click SAVTEST.
3. Click Launch SAVTEST for Win32 platforms.
4. In the SavTest32 window, on the File menu, click On-Access Test.
34
Unix server
SavTest32 creates a file that simulates a virus. Sophos Anti-Virus reports a
virus find on the workstation, and confirms that on-access
detection/prevention is working.
On-access detection/prevention is also known as InterCheck.
If SavTest32 reports that on-access detection/prevention is not functioning
correctly, contact Sophos technical support.
When you exit from SavTest32, the test file is deleted.
You have tested Sophos Anti-Virus.
If you want to install Sophos Anti-Virus on other Windows NT/2000/XP
workstations one at a time, repeat section 8.1 at each workstation.
If you want to copy this installation of Sophos Anti-Virus to other
Windows NT/2000/XP workstations using SAVAdmin, go to section 8.3.
If you want to install Sophos Anti-Virus on any Windows 95/98/Me
workstations on the network, go to section 9.
35
Sophos Anti-Virus installation guide
8.3 Install Sophos Anti-Virus on the remaining workstations
This section describes how to copy the installation you made in section 8.1
onto the other Windows NT/2000/XP workstations on the network.
This procedure involves the following three steps.
Install SAVAdmin (section 8.3.1).
If necessary, enable SAVAdmin to access any Windows XP workstations
(section 8.3.2).
Copy Sophos Anti-Virus to the remaining workstations (section 8.3.3).
8.3.1 Install SAVAdmin
If you have already downloaded the SAVAdmin files from the Sophos
website, go to step 5.
1. At the same workstation you used in section 4, insert the Sophos CD. The
CD should auto-run. If auto-run is disabled, run D:\Launchcd (where D:
is the CD drive).
2. In the Sophos CD window, click Sophos Anti-Virus.
3. At the next screen, click SAVAdmin.
4. At the next screen, start the SAVAdmin setup program.
5. In the WinZip Self-Extractor message box, click OK.
6. In the SAVAdmin for Windows NT/2000 Self-Extractor dialog box, click
Unzip.
36
Unix server
7. In the WinZip Self-Extractor message box, click OK to display the
SAVAdmin window.
8. In the SAVAdmin window, in the left-hand pane, locate your network and
click it. The computers in the network are shown in the right-hand pane.
The workstation on which you installed Sophos Anti-Virus shows Installed
in the SAV Installed column.
If you have any Windows XP workstations, SAVAdmin may not have access
to them (‘None’ is displayed in the Access column). Continue to section
8.3.2 to enable SAVAdmin to access those workstations.
If there are no Windows XP workstations, or if SAVAdmin has full access to
your Windows XP workstations (‘Full’ is displayed in the Access column), go
straight to section 8.3.3.
37
Sophos Anti-Virus installation guide
8.3.2 Enable SAVAdmin to access Windows XP workstations
Complete this procedure on each Windows XP workstation that SAVAdmin
cannot access.
1. At the Windows XP workstation, log on with Administrator rights.
2. At the taskbar, click Start|Control Panel.
3. In the Control Panel window, on the left-hand side, click Switch to Classic
View. The options in the window are now displayed as icons. Double-click
the Administrative Tools icon.
4. In the Administrative Tools window, double-click Local Security Policy.
5. In the Local Security Settings window, in the left-hand pane, double-click
Local Policies then click Security Options. In the right-hand pane,
double-click Network access: Sharing and security model for local
accounts.
38
Unix server
6. In the dialog box, change the drop-down list option to Classic – local users
authenticate as themselves. Click OK.
7. Close all windows.
Repeat this procedure on each Windows XP workstation that SAVAdmin
cannot access.
You should now be able to see that SAVAdmin has full access to the
Windows XP workstations.
Now copy the installation of Sophos Anti-Virus from the first workstation to
the remaining workstations (section 8.3.3).
39
Sophos Anti-Virus installation guide
8.3.3 Copy Sophos Anti-Virus to the remaining workstations
1. In SAVAdmin, right-click the name of the workstation on which you installed
Sophos Anti-Virus to display a menu. Select Copy SAV Config.
2. In the SAVAdmin message box, click Yes to save the configuration.
3. In the Current Copy/Paste SAV Config dialog box, in the bottom right-hand
corner, ensure the User name text box contains SWEEPUPD in capital
letters. If the workstations are connected to the server as a workgroup, the
Domain text box should contain the name of the workstation. Click OK.
4. In the SAVAdmin window, hold down the ‘Ctrl’ key and click the names of
all the Windows NT/2000/XP workstations on which you would like to
install Sophos Anti-Virus.
Ensure you click only Windows NT/2000/XP workstations.
5. Right-click one of the selected workstations to display a menu. Select Paste
SAV Config.
40
Unix server
6. In the Task Settings: Install SAV dialog box, click the Account details tab.
Click Target computer name. In the User name text box, using capital
letters, type
SWEEPUPD
In the Password text box, type the case-sensitive password you used in
section 7 (see appendix 4). In the Confirm password text box, confirm the
password. Ensure Create account if not present on target computer is
selected.
7. Click the CID list tab and ensure the correct path to the CID is shown (see
appendix 4 if you are not sure of the path). Click Apply, then click Create.
8. In the SAVAdmin message box, click Yes to start the installation.
In the SAVAdmin window you can see the workstations updating.
Users see the files being copied onto their workstations.
When installation is complete, SAVAdmin shows that the workstations have
Sophos Anti-Virus installed. They are protected by InterCheck, which means
all files are checked for viruses as they are accessed by the workstations.
If the installation is unsuccessful and you tried to install Sophos Anti-Virus
on more than one version of Windows (e.g. NT and 2000), try repeating
this procedure for only the workstations that use the same version of
Windows as the workstation you used in section 8.1. Then repeat sections
8.1–8.3 for each of the other Windows versions as necessary.
41
Sophos Anti-Virus installation guide
You can use SAVAdmin to monitor workstation installations of Sophos
Anti-Virus at any time. Savadmin.exe is located at
C:\Program Files\Sophos\SAVAdmin\Ver2.20
For more information about SAVAdmin, see the SAVAdmin user manual.
Remember to update Sophos Anti-Virus every month. In addition, you
must update Sophos Anti-Virus whenever there is a significant new virus
threat. Updating is described in the Sophos Anti-Virus Unix server update
guide.
You have installed Sophos Anti-Virus on the Windows NT/2000/XP
workstations. Now install Sophos Anti-Virus on any Windows 95/98/Me
workstations on the network.
42
Installation on Windows 95/98/Me workstations
Sophos Anti-Virus installation guide
9 Installing Sophos Anti-Virus on the
Windows 95/98/Me workstations
9.1 Install Sophos Anti-Virus on the workstations
You can use one of two different methods to install Sophos Anti-Virus on the
Windows 95/98/Me workstations:
Use the login script to install Sophos Anti-Virus on all
Windows 95/98/Me workstations simultaneously. For details, contact
Sophos technical support. Test the installations as described in section
9.2.
or
Install Sophos Anti-Virus on each workstation one at a time, by repeating
the procedure described below.
To install Sophos Anti-Virus on an individual workstation do the following:
1. At the workstation, at the taskbar, click Start|Run.
2. In the Run dialog box, click Browse. Locate and double-click Setup.exe in
\\[servername]\InterChk\W95Inst
where [servername] is the name of the Unix server on which you
created the central installation directory (CID).
3. In the Run dialog box, type
-inl -a
at the end of the path. Click OK.
44
Unix server
A message is displayed stating that the workstation will reboot. When
Windows restarts, the workstation is checked for viruses.
Once this check has finished, installation is complete.
Remember to update Sophos Anti-Virus every month. In addition, you
must update Sophos Anti-Virus whenever there is a significant new virus
threat. Updating is described in the Sophos Anti-Virus Unix server update
guide.
If you want to install Sophos Anti-Virus on other Windows 95/98/Me
workstations one at a time, repeat this section (section 9.1) at each
workstation.
If you want to test Sophos Anti-Virus, go to section 9.2.
If you have installed the SAVAdmin administration tool and want to use it
to monitor the Windows 95/98/Me workstations, go to section 9.3.
45
Sophos Anti-Virus installation guide
9.2 Test Sophos Anti-Virus
1. At one of the Windows 95/98/Me workstations on which you installed
Sophos Anti-Virus in section 9.1, insert the Sophos CD. The CD should
auto-run. If auto-run is disabled, run D:\Launchcd (where D: is the CD
drive).
2. In the Sophos CD window, click Sophos Anti-Virus. At the next screen, click
Utilities. At the next screen, click SAVTEST.
3. Click Launch SAVTEST for Win32 platforms.
4. In the SavTest32 window, on the File menu, click On-Access Test.
SavTest32 creates a file that simulates a virus. Sophos Anti-Virus reports a
virus find on the workstation, and confirms that on-access
detection/prevention is working.
On-access detection/prevention is also known as InterCheck.
If SavTest32 reports that on-access detection/prevention is not functioning
correctly, contact Sophos technical support.
When you exit from SavTest32, the test file is deleted.
You have tested Sophos Anti-Virus.
If you want to install Sophos Anti-Virus on other Windows 95/98/Me
workstations one at a time, repeat section 9.1 at each workstation.
If you have installed the SAVAdmin administration tool and want to use it
to monitor the Windows 95/98/Me workstations, go to section 9.3.
46
Unix server
9.3 To enable SAVAdmin to monitor Windows 95/98/Me workstations
If you have installed SAVAdmin on a Windows NT/2000 workstation, and
you want to monitor Windows 95/98/Me workstation installations of Sophos
Anti-Virus, you can enable SAVAdmin to do this. Copy the SAVAgent utility
to the StartUp folder of each Windows 95/98/Me workstation, where it is
run whenever Windows starts. Do as follows:
1. At the workstation on which you installed SAVAdmin, insert a floppy disk.
2. Copy
C:\Program Files\Sophos\SAVAdmin\Ver 2.20\Savagent
to the floppy disk.
3. At any of the Windows 95/98/Me workstations that you would like to
monitor using SAVAdmin, insert the floppy disk.
4. If the workstation is running Windows 95, copy Savagent to
C:\Windows\Start Menu\Programs\StartUp
If the workstation is running Windows 98/Me, copy Savagent to
C:\Windows\All Users\Start Menu\Programs\StartUp
The next time Windows starts, the SAVAgent utility is run on the
workstation, enabling SAVAdmin to monitor the workstation.
Repeat steps 3 and 4 for any other Windows 95/98/Me workstations you
would like to monitor using SAVAdmin.
For more information about SAVAdmin, see the SAVAdmin installation guide
or the SAVAdmin user manual.
47
Sophos Anti-Virus installation guide
48
Appendices
Installing on multiple Unix computers
Installing central reporting
Options for non-default installation
Notes about the installation
Sophos Anti-Virus installation guide
Appendix 1 Installing on multiple Unix computers
If you have multiple, networked Unix computers, you may want to install
and update Sophos Anti-Virus from a central directory, rather than carrying
out installation at each computer separately.
This procedure assumes that there is a trust relationship between the
computers.
1. On one Unix computer, set up a shared area that is available to all the other
computers.
2. Untar the Sophos Anti-Virus for Unix distribution archive or archives to this
shared area.
If you have computers on your network that use more than one Unix
operating system (e.g. Linux and FreeBSD), untar the distribution archive for
each system into a separate directory.
3. Use ssh to run the install.sh script on every connected Unix computer, from
the shared area. For example, enter
ssh -l [username] [hostname] / .install.sh
where [username] is your user ID and [hostname] is the computer on which
you want to install Sophos Anti-Virus.
In each case, ensure that you run install.sh from the correct set of
distribution files for that computer’s operating system.
On older Unix computers, ssh may not be available. You can use rsh
instead, though it is less secure.
Step 3 can be put into a script which is run from one of your Unix
computers.
50
Unix server
Appendix 2 Installing central reporting
InterCheck Server is a daemon that runs on the Unix server, and processes
virus alerts sent from Windows, Macintosh and OS/2 workstations. To use it
you need to set up a user and group for the daemon and set permissions on
a common directory.
To install Sophos Anti-Virus with InterCheck Server, there are six steps:
Prepare for installation (appendix 2.1).
Extract the installation files (section 1.1).
Install Sophos Anti-Virus (section 1.2).
Check the system settings (section 1.3).
Add the latest virus identity files (section 1.4).
Activate central reporting (appendix 2.2).
Appendix 2.1 Prepare for installation
Before the first installation, you must
create a user group called ‘sweep’
create a user called ‘sweep’. The primary group of this user should be
‘sweep’, and the user should not be allowed to log in at a terminal. You
may want to set the shell to /bin/false. Check your Unix
documentation for details of how to do this.
Now extract the installation files (section 1.1).
Appendix 2.2 Activate central reporting
To use InterCheck Server, do as follows:
1. Export the /var/spool/intercheck directory so that it is visible to the
non-Unix workstations.
2. Start InterCheck Server. Enter
icheckd
For information on controlling and configuring central reporting, refer to the
Sophos Anti-Virus Unix user manual.
51
Sophos Anti-Virus installation guide
Appendix 3 Options for non-default installation
You can specify the Sophos Anti-Virus files that are installed, and the
directories where they are installed.
To perform a non-default installation, run the installation script, install.sh,
with any of the following options.
-d [prefix]
Installs the programs, library, virus data and manual pages in [prefix]/bin,
[prefix]/lib, [prefix]/sav and [prefix]/man.
You do not have to install all these files in the same directory. See the -b,
-l, -m and -s options.
-b [directory]
Installs the virus scanning programs in [directory].
The other files are installed in the default directory, unless you specify
otherwise with the -l, -m or -s options.
-l [directory]
Installs the Sophos Anti-Virus library in [directory].
The other files are installed in the default directory, unless you specify
otherwise with the -b, -m or -s options.
-m [directory]
Installs the man pages in [directory].
The other files are installed in the default directory, unless you specify
otherwise with the -b, -l or -s options.
-s [directory]
Installs the virus data in [directory].
The other files are installed in the default directory, unless you specify
otherwise with the -b, -l or -m options.
-i [directory]
Installs the files for InterCheck Server in [directory]. If no directory is
specified, the value in /etc/icheckd.conf is used, or the default
/var/spool/intercheck. The icheckd binary and manual pages are
also installed.
52
Unix server
-ni
Does not install InterCheck Server at all.
-ssi
Stops and starts InterCheck Server after installation (default setting, implies
-i).
-nssi
Does not stop and start InterCheck Server after installation.
-h
Prints help.
-v
Verbose operation. Displays the location of each file as it is installed.
53
Sophos Anti-Virus installation guide
Appendix 4 Notes about the installation
This section lists the directories and accounts used in the Sophos Anti-Virus
installation. You will need this information when adding workstations to the
network and when updating Sophos Anti-Virus. Blanks are left for your own
information.
Name of the Unix server (p6):
...................................................................................................
Name of the Windows workstation used to administer Sophos Anti-Virus
for Windows NT/2000/XP on the Unix server (p14):
...................................................................................................
Location of the central installation directory (CID) for the Sophos
Anti-Virus for Windows NT/2000/XP installation files as seen from
workstations (p16):
\\[servername]\InterChk\NTInst\i386
Name of the Windows workstation used to administer Sophos Anti-Virus
for Windows 95/98/Me on the Unix server (p19):
...................................................................................................
Location of the central installation directory (CID) for the Sophos
Anti-Virus for Windows 95/98/Me installation files as seen from
workstations (p21):
\\[servername]\InterChk\W95Inst
Windows NT/2000/XP update account username (p26):
SWEEPUPD
Windows NT/2000/XP update account password (p26):
...................................................................................................
If you write your password here, store this installation guide securely.
54
200208 - h