1
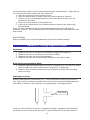
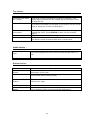
GPS Project 2009
Breeze Lessons
Sponsored by PRCVI and SET-BC
1
GPS Project
Sponsored by PRCVI and SET- BC
GPS
PRCVI
SET-BC
- Global Positioning System
- Provincial Resource Centre for the Visually Impaired
- Special Education Technology – British Columbia
Introduction
About the project
This project was initiated to examine the impact of GPS technology on the orientation and
mobility of secondary students with visual impairments in British Columbia. The goal of
the project is to explore the use of GPS technology currently available for students with
visual impairments, and assess its usefulness to support Orientation and Mobility
capabilities.
Project organizers and participants wish to thank Dave Rathwell, teacher of the visually
impaired, orientation and mobility instructor, and assistive technology consultant, for his
dedication and expertise in developing this set of Breeze lessons.
As an adjunct to the original Trekker Project, this set of lesson plans is designed for use
with the Breeze
About Breeze
Breeze is a GPS system for the Blind and visually impaired that uses GPS and digital
maps to help blind persons find their way in urban and rural areas. Breeze users can
pinpoint where they are, learn about area attractions, and find out how to get to specific
destinations.
Breeze is used in one of 5 ways. They are:
1. Explore - when you are walking in an area, but not being guided on a route.
2. Routes – after a route has been created and you want to travel it, from the point of
origin to the destination point.
3. Backtrack – when you want to reverse a route and travel back to the point of origin
4. Guidance to Landmark – Once a landmark has been created Breeze can guide you
to it while either walking or driving.
5. Motorized. The unit automatically adjusts between pedestrian and motorized based
on the speed of travel. Cross streets are announced. Routes cannot be created
when travelling by vehicle.
Unlike the PDA-based Trekker, the Breeze has the following features:
• The user must know the route at the time of travel. Breeze records the route as it
is being travelled the first time. Therefore, it is recommended that routes be
initially travelled and recorded with the assistance of a sighted guide.
2
•
•
•
•
•
•
The map in the Breeze cannot be browsed. Therefore it is not possible to create a
route offline for travel at a later time. It is also not possible to extract civic
information such as the address and phone number of a POI.
Breeze allows the user to preview a recorded route for instructions prior to travel.
The Breeze automatically switches between pedestrian and vehicle mode. It senses
the speed of travel and adjusts the mode accordingly.
Breeze does not allow for text entry. All information is entered verbally.
Breeze differentiates commercial POIs that are on the map, from those created by
the user. User created POIs are now called Landmarks.
Breeze is not compatible with the PM Viewer for use with a PC.
Important Caution
The Breeze system is designed as an ORIENTATION AID only, and must not, at any time, be used as
the only aid while traveling. A conventional mobility aid should be used in conjunction with the GPs
unit as BREEZE IS NOT A MOBILITY DEVICE. It is the user's responsibility to use this device with
caution. Furthermore, always take extra precautions when traveling on foot on roads designed for
motorized transportation.
About the Student Lessons
Much of the information contained in this lesson plan document is drawn from the Breeze
1.1 User Manual prepared by HumanWare. Permission to use it, directly or indirectly, has
been granted by the authors of the Breeze 1.1 User Manual.
This document is intended to be a companion document to the Breeze 1.1 User Manual
and is not meant to replace it. A great deal of valuable information and detail can only be
found in the Breeze 1.1 User Manual found on the companion CD.
Please refer to pertinent section numbers in the Breeze User Manual when using these
lesson plans.
3
Table of Contents
Contents
GPS Project ........................................................................................................... 2
Sponsored by PRCVI and SET- BC ............................................................................. 2
Introduction ........................................................................................................ 2
About the project ............................................................................................... 2
About Breeze .................................................................................................... 2
Important Caution ............................................................................................. 3
About the Student Lessons ................................................................................. 3
Table of Contents .................................................................................................... 4
Lesson 1 Preparing to Travel .................................................................................... 6
Activity 1: Unpacking the box ................................................................................ 6
Step 1 Locate and identify the components of the system ..................................... 6
Step 2 Locate the charging port on the Breeze ..................................................... 7
Activity 2: Exploring the PDA ................................................................................. 7
Step 1 Locate the keys found on the Breeze .......................................................... 7
Step 2 Key Describer mode ................................................................................ 9
Step 3 Perform a soft reset ................................................................................ 9
Lesson 2 Understanding Menus .............................................................................. 10
Activity 1: Understanding Menu Navigation ........................................................... 10
Step 1 Learning about Menus and Lists............................................................... 10
Step 2 Settings ............................................................................................... 11
Lesson 3 Using Explore Mode ................................................................................. 11
Activity 1: Starting Breeze .................................................................................. 12
Step 1 Getting Ready ....................................................................................... 12
Step 2 Speaker .............................................................................................. 12
Step 3 Start Breeze ........................................................................................ 12
Activity 2: General Information while Travelling in Explore Mode ............................. 12
Step 1 Travelling ............................................................................................ 13
Step 2 Getting Information while Travelling ........................................................ 13
Activity 3: The “Where Am I” Button in Explore Mode ............................................. 13
Step 1 Orientation while Travelling .................................................................... 13
Step 2 Next Intersection Information ................................................................. 13
Activity 4: Points of Interest (POI’s) and Landmarks in Explore Mode ....................... 14
Step 1 POI vs Landmark .................................................................................. 14
Step 2 Searching for POIs and Landmarks ......................................................... 14
Step 3 Create a Landmark ............................................................................... 14
Step 4 Settings .............................................................................................. 14
Step 5 Rename a Landmark .............................................................................. 15
Step 6 More About Landmarks........................................................................... 15
Step 7 Delete a Landmark ............................................................................... 15
Lesson 4 Guidance to Landmark .............................................................................. 15
Activity 1: Have Breeze Guide You to a Landmark .................................................. 16
Step 1 Pedestrian Guidance to a Landmark ........................................................ 16
Step 2 Landmarks in Open Areas ....................................................................... 16
Lesson 5 Routes ................................................................................................... 17
Activity 1: Creating a Route ................................................................................ 17
Step 1 Create a Route ..................................................................................... 17
4
Activity 2: Preview a Route Indoors ...................................................................... 18
Step 1 Preview an Activated Route Indoors ........................................................ 18
Activity 3: Working with Routes ........................................................................... 19
Step 1 Activating a Route ................................................................................ 19
Step 2 Travelling a Route................................................................................. 19
Step 3 Deviating from a Route ......................................................................... 19
Step 4 Cancelling a Route ................................................................................ 20
Activity 4: Walk a Return Route (Backtrack) .......................................................... 20
Step 1 Backtrack a Route ............................................................................... 20
Activity 5: Points of Interest on Routes ................................................................. 20
Step 1 What’s Around ..................................................................................... 21
Appendix 1 Quick Reference Chart ......................................................................... 22
Top Section:...................................................................................................... 23
Middle Section : ................................................................................................. 23
Bottom Section: ................................................................................................ 23
Appendix 2 Settings (from User Guide ver. 1.1) ........................................................... 24
Landmarks ........................................................................................................ 24
Rename Landmark: ......................................................................................... 24
Set or Unset Landmark as possible destination: ................................................... 24
Delete Landmark: ............................................................................................ 24
Routes .............................................................................................................. 25
Renaming Route: ............................................................................................. 25
Deleting Route: ............................................................................................... 25
Verbosity .......................................................................................................... 25
Point of interest Verbosity settings: ................................................................... 25
Route instructions Verbosity settings: ................................................................ 25
Where am I verbosity settings: ......................................................................... 26
Intersection verbosity settings: ......................................................................... 26
Voice ................................................................................................................ 26
Rate: ............................................................................................................. 26
Pitch: ............................................................................................................. 26
Distance Units ................................................................................................... 26
About Breeze..................................................................................................... 27
Re-setting Default Settings ................................................................................. 27
Appendix 3 Breeze Skills Checklist ................................................................................ 28
5
Lesson 1 Preparing to Travel
Objectives:
1. The student will be able to identify the various components that make up the
Breeze GPS System (Breeze device, external speaker, power adaptor, USB
connector cable, carrying case).
2. The student will be able to connect and charge the components.
3. The student will be able to identify the buttons and ports on the device.
4. The student will understand the functions associated with the buttons and ports.
Brief Review of Prerequisite Skills:
1.
2.
3.
4.
Proficiency with all mobility skills related to street travel
Ability to discriminate buttons and ports that have different shapes and sizes
Ability to categorize
Ability to understand synthesized speech
Challenges and Tips
1. The Map Manager program contained on the Breeze Companion CD, will need to be
installed on your PC if you wish to transfer maps and/or back-up your routes and
landmarks. It assumes that you will have a screen reader running and know how to
use it.
2. Prior to using Breeze it will be necessary to install Active Sync on your computer. It
is contained on the Breeze CD.
Features:
Breeze is HumanWare's revolutionary orientation aid. It uses the Global Positioning
System (GPS), and digital maps to help blind and visually impaired people find their way
in urban and rural areas. Breeze users can pinpoint exactly where they are, and be made
aware of points of interest in the area. It complements existing mobility aids (white
canes and guide dogs). It does not replace them.
Sleek and discreet, Breeze provides information in the most natural way possible and
allows users to record vocal and landmarks and notes. A wide variety of maps covering
North American and European countries are available. For a list of available coverage,
please consult the HumanWare website (www.HumanWare.com). Maps can be bought
from HumanWare's website. They will be delivered on CD or online.
Activity 1: Unpacking the box
Step 1 Locate and identify the components of the system
Contents of the Package:
Talking GPS with battery
Map on SD card (installed in unit)
Power supply
External speaker
6
USB cable
Carrying case with strap
Companion CD (User guides, Map Manager, Microsoft ActiveSync)
Step 2 Locate the charging port on the Breeze
. Insert the power adaptor into the port and connect the other end to a wall socket.
Charge the unit.
Activity 2: Exploring the PDA
Step 1 Locate the keys found on the Breeze
Left edge:
7
The Volume wheel is located on the top left side. Roll up and down to raise or
lower volume.
The SD card slot and USB connector are located on the bottom portion of the left
edge of the unit. A protective rubber flap covers both.
Right edge:
The Power On/Off switch is located on the top right side of the device. Push up
to turn the device ON.
The Reset Button is located on the right side, below the Power ON/OFF switch.
Only use the Reset button if the system locks up. This will cause the Breeze to
restart.
The Power connector is located on the bottom portion of the unit. It is covered by
a rubber protective flap.
Bottom edge:
Lanyard. There is a small opening through which you can attach a lanyard.
Upper edge:
The External speaker connector is located in the middle of the round top edge of
the unit.
Face of the Breeze:
On the left, near the top edge is the microphone. This is where your route and
landmark names will be recorded.
On the right, near the top edge, is the speaker where messages, when not using
the external speaker, will be heard.
Top section:
In the top section there are 3 buttons that the user will press to obtain information.
The Where am I button is the large circular orange button located in the middle of
the top section.
The Information button is located to the left of the Where am I button.
The Repeat button is located to the right of the Where am I button.
Middle section:
The middle section includes the Left and Right arrow and the Confirm button in
between them.
The Left and Right arrow are orange triangular buttons located to each side of
the Confirm button.
The Confirm button is the small black circular button located between the arrows.
Bottom section:
The bottom section is made of three buttons placed in circle. These buttons will be used
for action purposes.
8
The Record button is the oval button with a raised tactile dot. It is located at 12
o’clock in the circle formed by the three lower buttons. It is directly underneath the
Confirm button.
The Explore button is located in the bottom left section of the unit.
The Go To button is located in the bottom right section of the unit.
Back side (Battery compartment)
The battery compartment is located in the back of the Breeze. To remove the battery,
press on the clasps on each side and pull out.
To insert the battery: Insert the tab found on the battery's bottom edge and insert into
the corresponding opening on the bottom of the battery compartment. Push the top of the
battery into the compartment until you hear the clasps lock the battery in place.
The battery is designed to fit in only the correct orientation.
The fully charged battery will provide up to 8 hours usage time. However, usage time may
be reduced in the following cases:
- If the battery is charged for less than 5 hours.
- High volume level.
- After about 400 recharge cycles the battery capacity will start to reduce.
Important: It is normal for the battery to become warm during recharging. Therefore, it is
recommended not to charge the battery with the Breeze near a heat source or within the
carrying case.
Note: The Breeze's serial number can be found on the battery as well as inside the battery
compartment.
Note: A beep will be heard when installing a battery or when plugging the AC adapter.
Step 2 Key Describer mode
Use the Key Describer to explore the keys found on the Breeze (without activating
them).
Launch the Key Describer function by pressing and holding the Repeat button until you
hear the message “Key Describer ON”. At this point, you will be able to obtain a general
description of each button (and its secondary function) by simply pressing them.
To exit the Key Describer, press and hold the Repeat button until you get the message
"Key Describer OFF".
Step 3 Perform a soft reset
Should Breeze freeze or become unresponsive it may be necessary to perform a soft
reset. This will not erase data. To do this, locate the small reset button below the On/Off
switch. Depress the button for 2 seconds and the unit will reset. User settings, routes and
landmarks will not be erased.
9
Lesson 2 Understanding Menus
Objectives:
1. Students will learn the hierarchical menu structure of Breeze
Brief Review of Prerequisite Skills:
1. Students are familiar with synthesized speech
2. Students understand the concept of menus, submenus, navigation and item
confirmation
Challenges and Tips
1. Breeze’s spoken route, POI and connection information takes verbal precedent over
menu and dialogue box information when both occur at the same time. This may
initially confuse the user as to where the focus of the device actually is. In fact
even though Breeze GPS related info is spoken, open menu’s and dialogue boxes
are still open and active.
Features:
1. Many buttons perform a second function when held down until they beep
2. Button actions are interrupted and cancelled when a new button is pressed. That is,
pressing a new button will launch its assigned function, no matter what was the
action of the previous button pressed.
3. No matter what actions have been undertaken, you can always return to basic
exploration of your surroundings by pressing the Explore button.
4. Escaping from a button’s action is done by pressing any other button, as
mentioned above; however, this may execute another action. To simply escape and
return to route or landmark guidance, press the “Where Am I” button.
Activity 1: Understanding Menu Navigation
In order to use Breeze it is necessary to understand how to navigate menus and
submenus
Step 1 Learning about Menus and Lists
Using the information below, students will learn to open menus, navigate within them to
select an item and then confirm it.
Navigating Hierarchical Menus
Menus are lists of items. Some keys can perform more than one function. If the key has a
second function it will be chosen by holding down the key until a beep is heard. You can
10
use key describer mode to find out which buttons have a second function. When the key
is in the second function mode it will often open a list.
1. Use the arrow keys to scroll through the list.
2. When the desired item is spoken, press the Confirm button to choose it.
3. If there is a new list associated with the item, press the arrow keys until the
desired item is spoken.
4. Press the Confirm button to choose that item.
5. Lists may be closed at any time (without making a selection) by pressing the
Explore button.
When you have reached the end of the lists associated with the button Breeze will
announce “Explore”. This indicates that the final selection has been made and menu has
been closed.
Step 2 Settings
Refer to Appendix 2 for a list and explanation of the various Breeze settings
Lesson 3 Using Explore Mode
Objectives:
1.
2.
3.
4.
Students
Students
Students
Students
will
will
will
will
learn
learn
learn
learn
to interpret the information relayed while exploring
how to find points of interest (POI’s)
how to create Landmarks
the setting changes available in the Explore mode
Brief Review of Prerequisite Skills:
1. Students understand that Breeze is an aid for orientation only. It is not to be used
without traditional mobility aids such as a long cane or a guide dog.
2. Students’ have proficient mobility skills for all aspects of street travel including
street crossings
Challenges and Tips
Breeze’s descriptions of intersections (e.g. “3-way intersection crossing First Street on
your right” may be confusing to students who do not have an accurate understanding of
their travel in relation to the streets they are approaching. See diagram below:
First Street
The arrow is the direction of travel on 2 possible sidewalks. Regardless of which side of
the street you are on Breeze will announce “3-way intersection crossing First Street on
11
your right”. However whether or not the student actually crosses First Street depends on
which side of the street they are traveling on. It cannot be overstated that Breeze is only
a general aid for orientation. Specific orientation knowledge and mobility skills are
essential for safe and successful travel.
Features:
1. Verbosity settings allow the student to customize the amount of detail that Breeze
announces.
2. Specific information relating to the area is available on request (e.g. POIs,
landmarks that have been created)
3. Specific information relating to direction, speed and altitude is available on request
Activity 1: Starting Breeze
Step 1 Getting Ready
Before using Breeze, verify that the External Speaker is properly attached and the map of
your current area is properly inserted in the card slot of the Breeze.
Step 2 Speaker
Make sure that the external speaker is attached as close as possible to your ear.
Step 3 Start Breeze
To start Breeze, go outdoors and press the power button.
•
Breeze will announce that it is initializing and give the status of the battery level.
•
It will then announce that it is searching for satellites.
•
When it has made contact with satellites it will announce the strength of the signal
as low, medium or high.
Activity 2: General Information while Travelling in Explore Mode
The information Breeze provides comes directly from the map that is loaded.
Explore Mode means that you are not walking a recorded route. You are simply walking
down a street.
While walking Breeze announces:
• The name of the street you are on.
• When no name is provided for a specific street in the map database, the system
will announce "Street with no name".
• A description of the type of intersection that you will encounter next (2, 3, 4-way
intersection or more) and the current street name followed by the cross-street
name. For example: Breeze will announce the following message: "3-way
intersection. Main Street crossing First Street on your right." (See Challenges and
Tips)
• While walking, the user will be informed of a landmark or point of interest (if
activated) when approaching within 10 meters of it. It will be identified by name.
12
Step 1 Travelling
Travel in a familiar area to experience the orientation information that Breeze provides as
mentioned above.
Step 2 Getting Information while Travelling
You can obtain general GPS information from the Breeze by pressing the Information
button.
• Press Right arrow to obtain information on the Quality of the GPS signal, battery
status and speed information.
• Press Right arrow again to obtain city name and altitude information.
Activity 3: The “Where Am I” Button in Explore Mode
You can obtain specific information relating to your location by pressing the Where Am I
button. This information includes:
• Route status (on route / off route) if you are on a route that has been activated
(see section on Routes).
• Current heading: The compass direction in which you are heading (North, South,
East, West, South West etc…)
• Current location: current estimated street address number and street name or
name of area.
• Next intersection: description of next intersection located in front of you and
distance. Note that the distance to the next intersection is not given when traveling
by vehicle.
• Next instruction (if a route is activated) provides information on what to do next to
follow the route.
• Your cardinal direction.
• The current street name and estimated address.
• The nearest POI (if any).
• The nearest intersection located in front of you.
• The next intersection that you will be approaching and the distance to it.
• The next instruction if you are on a route (see section on Routes).
Step 1 Orientation while Travelling
While walking with sighted assistance, press the Where Am I button to get orientation
information about your immediate environment.
Step 2 Next Intersection Information
Continue travelling in Explore Mode.
13
Press the Right arrow to announce the next intersection you will encounter if you
continue in the same direction. Continuing to press the Right Arrow will announce
upcoming intersections if you continue on the same street.
Activity 4: Points of Interest (POI’s) and Landmarks in Explore Mode
Step 1 POI vs Landmark
What is the difference between a POI and a Landmark?
A POI is a commercial business that is located on the map on the SD card.
A Landmark is a personal marker that is set by the user for future reference.
Step 2 Searching for POIs and Landmarks
Searching What’s Around (POIs and Landmarks)
Begin walking a familiar street. Press and hold the Where am I button until it beeps. This
will activate the What’s Around function. When traveling in streets, points of interest
(pedestrian only) and landmarks on your current street segment will be announced.
Breeze will also inform you whether points of interest are located to the left or right of
your current position.
Step 3 Create a Landmark
Create a Landmark
Users can create landmarks any time along their outdoor environment. These act as
reference points or markers and will be detected when the user comes across them.
To record a landmark:
1. Press the Record button. It is located below the confirm button and has a raised
tactile dot.
2. After the beep, provide a 4 second description of the landmark. A double beep will
indicate the end of the landmark creation. The description and location of the
landmark will be saved by the system.
3. You can directly access Landmark Settings. To do so, press and hold the Go To
button, then, using the arrow keys, select a landmark. Press confirm to choose.
4. Press and hold Information. The following options are made available:
- Rename landmark
- Unset landmark as a possible destination
- Delete landmark
.
Step 4 Settings
Press and hold the Information button to enter the Settings menu
Use the arrows to select the option you wish to modify. The list of 7 options is as follows:
Landmarks
Routes
Verbosity
Voice
Distance unit
About
Reset Default Settings
Press Confirm to choose an item
14
-
Step 5 Rename a Landmark
Stop on Landmarks (see User Manual for information on other settings)
Use the arrows to select the Landmark you wish to configure.
Press Confirm to load the selected landmark
Use the arrows to select the operation you wish to perform on the Landmark. Operations
include: Rename, Set/Unset as destination and delete.
Stop on Rename. Upon selecting this option, a beep will prompt you to dictate the new
name for the landmark in question. After 4 seconds, recording ends with a beep and
message. The system exits configuration mode and announces the current state.
Step 6 More About Landmarks
Upon triggering this option, the system will ask you to set or unset the current landmark
as a possible destination. Press Confirm to set or unset the landmark as a destination.
Upon doing so, the system exits configuration mode and announces the current state.
This operation can also be achieved while you are recording your landmark.
When recording the landmark. Press Confirm within 30 seconds after its creation. Breeze
will confirm that the landmark has been unset as a possible destination.
Step 7 Delete a Landmark
Upon selecting this option, the system prompts you to delete the current landmark
selected. Press Confirm to Delete. Upon doing so, the system exits configuration mode
and announces the current state.
Lesson 4 Guidance to Landmark
Objectives:
1. Students will directions to find a Landmark.
2. The student will learn to travel to Landmarks in unmapped areas
Brief Review of Prerequisite Skills
1. The student has an understanding of angles expressed in degrees as they relate to
their body and direction
2. The student has a general sense of distance in relation to their stride and traveling
speed
3. When walking, directions are given in a clock-face orientation. In order to be
successfully guided to a Landmark, the student must understand the concept of
hour notations on an analogue clock.
Challenges and Tips
1. The accuracy of the angle and distance to a POI’s varies with the number of
satellites, environment and time of day.
15
2. The distance to a Landmark is always general. GPS accuracy is typically within 10 –
20 meters.
3. A good understanding of an analogue clock will facilitate guidance to a Landmark
4. Should clock face direction exceed 6:00 o’clock, you have walked past the
Landmark and need to turn around.
5. Navigating to Landmarks (and) POI’s assumes that you are moving, as your
distance and direction are recalculated every 10 seconds. If you stop and wait you
will notice that Breeze will provide greatly differing information in terms of distance
and direction (even though you aren’t moving). This is because GPS information is
degraded by the US government for civilian use. GPS information is most accurate
when you keep moving.
Features:
•
•
•
•
Turn instructions are adjusted to pedestrian or in-vehicle navigation.
Turn instructions for in-vehicle navigation are calculated according to the “quickest
route” criteria.
Routes calculated for in-vehicle use favor highways and other streets that may not
be suitable for pedestrian travel.
Turn instructions for Pedestrian navigations are intended to provide the shortest
route possible
Activity 1: Have Breeze Guide You to a Landmark
Step 1 Pedestrian Guidance to a Landmark
To have Breeze guide you to a landmark:
1. Press and hold the Go To button located in the bottom right region of the unit. This
will take you to the list of landmarks you can use as possible destination.
2. Use the left and right arrows to select the landmark of your choice. A vocal
description of each landmark is heard.
3. Press the Confirm button to start receiving pedestrian instructions on the direction
to take to begin your route.
4. Press and hold the Confirm button for in-vehicle navigation instructions.
Step 2 Landmarks in Open Areas
If you are in an open area and heading towards a landmark that is also in an open area,
the Breeze will guide you in a straight line towards it. It will give you an indication of its
relative distance and heading. The Breeze will inform you when you reach your landmark,
but you will need to deactivate the route manually by pressing Explore. If Breeze detects
that you are deviating from your path, instructions will be automatically provided to direct
you towards your selected landmark.
IMPORTANT: Effective guidance relies on the quality of the positioning (point of origin and
landmarks). Always make sure that street positions are not mapped in open areas, and
that open areas are not mapped on the street network.
16
You may cancel guidance instruction at any point by pressing and holding the Go To
button or pressing the Explore button. You will be asked to confirm. If the Confirm
button is not pressed, the route will remain activated.
Lesson 5 Routes
Objectives:
1.
2.
3.
4.
5.
6.
Students will understand how routes are created.
Student will learn to preview recorded routes for instructions
Students will understand how routes are travelled
Learn how to walk the reverse route (Backtrack)
Students will learn how to find points of interest (POI’s)
Students will learn the setting changes available for routes
Brief Review of Prerequisite Skills:
1. Students understand that Breeze is an aid for orientation only. It is not to be used
without traditional mobility aids such as a long cane or a guide dog.
2. Students’ have proficient Orientation and Mobility skills for all aspects of route
travel including street crossings
About Breeze Routes
Breeze requires that routes be initially travelled sighted guide. There is no ability to
browse a map offline so there is no ability to create routes offline for travel later. You
must be walking and have a GPS connection to create a route. When a route is created
and walked it will record the streets, intersections that are travelled. The route is saved by
the system and can be renamed or deleted. When a route is activated it will announce
turn by turn directions as well as announcing Landmarks and POIs. There is a Backtrack
feature for return routes.
Features:
1. Verbosity settings allow the student to customize the amount of detail that Breeze
announces.
2. Specific information relating to the area is available on request (e.g. POIs,
landmarks that have been created)
3. Specific information relating to direction, speed and altitude is available on request
Activity 1: Creating a Route
Step 1 Create a Route
1. Press and hold the Record button. The system will ask you to dictate a route
name. When prompted, press Confirm to start creating a route.
17
2. After the beep, you will have 4 seconds to describe the route. You may find helpful
to name the route by its origin and destination. For example, Home to pharmacy.
3. When the system has confirmed that you are creating a route, navigate the entire
course of the route. Breeze will emit a beep every 60 seconds to indicate the
recording of the route. If GPS coverage is lost along the way, a message will inform
you and beeping will stop. When GPS coverage is found again, beeping resumes.
4. Note that you can create landmarks along the way. To do so, press the Record
button. After the beep, you will have 4 seconds to provide a vocal description of
the landmark. A double beep will indicate the end of the landmark creation, at
which point you can continue your route.
5. When you have reached your destination, press and hold the Record button until
you hear the beep, to inform the system that the destination has been reached.
The beeping stops and a message informs you that Route recording has ended.
Note: On occasion when creating a route, the system will announce the wrong
intersection. This occurs when parallel streets are close to each other. If you know that
the current intersection announced is wrong, press the Confirm button. You will be
asked if you wish to delete this intersection from your route. Press Confirm again to
delete the intersection. The system will fill in the gap to complete the route.
Important: You cannot record routes when in a vehicle. If you enter a vehicle during the
route creation, please note that that your route may not be valid. Please preview before
using this route. If you create a route while in a vehicle, the Breeze will return to
pedestrian mode and will announce "Warning, this route will be created for pedestrian
travel."
Activity 2: Preview a Route Indoors
Breeze allows you to preview a route before navigating it. This gives you a chance to learn
the route instructions ahead of time. Indoor preview will provide you with detailed
intersection information and turn instructions.
To preview a route indoors without being interrupted by GPS information:
Step 1 Preview an Activated Route Indoors
1. Activate the route. To do so, press the Go To button located in the bottom right
region of the unit and use the left and right arrows to browse among available
routes. When the route you are looking for is announced, press Confirm to load
the route in the system.
2. Press and hold the Left or Right arrow. Breeze will announce you are in the
Indoor Preview mode followed by the first instruction.
3. You will be able to navigate through all instructions using the Left and Right
arrows without being interrupted by incoming GPS information.
18
Activity 3: Working with Routes
You can obtain information regarding various aspects of the route and the system by
pressing the Information button located in the upper left region of the unit. You will be
given the following information: ON or OFF route, route name, Distance remaining,
Distance traveled, and Route length.
Press Right arrow to obtain information on the Quality of the GPS signal, battery status
and speed information. Press Right arrow again to obtain city name and altitude
information
Step 1 Activating a Route
To select and activate a route:
1. Press the Go To button located in the bottom right region of the unit.
2. Use the left and right navigation arrows to browse among available routes.
3. When the route you are looking for is announced, press Confirm. The route is
selected and you will be given instructions on the direction to take to begin your
route.
Step 2 Travelling a Route
Along the way, you will be instructed on which direction to take when you come across
intersections. Instructions on street network are given according to hand-side
(left/right/go straight). For example, Breeze could tell you to "turn left on Fleet Street."
When you enter an open area, a message will inform you. In this case, clockwise
orientation is used to instruct the user on directions to take. For example, Breeze could
announce the following message: "Turn at 10 o'clock. Next instructions in 25 meters."
Upon reaching your destination, a message will be heard and the route will be
automatically deactivated.
At any moment while travelling a route, you can have the system announce the next or
previous instruction by pressing the Right or Left Arrow. You will be given an instruction
indicating a distance and the next action to be taken. To return to your present route
instructions press Confirm.
Step 3 Deviating from a Route
If you were supposed to take a turn but continued on the same street for a distance
greater than 50 meters, the system will ask you to turn back so that you can return to the
intersection. However, if you find yourself on a street that is not connected to a street on
your route, the system will inform you that you are Off route and will ask you if you want
to be rerouted to your destination. If you press Confirm, the system will provide
instructions to guide you to your destination.
If you deviate from your route in an open area, the system will provide instructions on
how to return to your route. Guidance instructions will be given in clockwise manner.
For example, if the system notices that you are heading away from the route, you might
get a message such as:
19
"Off-route: Turn at 3 o'clock to come back to the route".
The Breeze will provide these instructions until you return to your route, at which point it
will announce ""Back on Route".
In both situations, you will always be able to use the right arrow to get information on
upcoming instructions to return to your route. For example: "In 50 meters, go straight".
Step 4 Cancelling a Route
After activating a route, you may cancel navigation at any point by pressing the Go To
button again. Alternatively, you can select another operation such as the Explore button.
You will be asked to confirm. If the Confirm button is pressed within 30 seconds,
guidance will end and the system will return to exploring the environment. If the Confirm
button is not pressed, the route will remain activated.
Note that if you attempt to load a new route while one is already active, you will be asked
to press Confirm to cancel the current route, after which you will be able to select a new
route to follow.
Activity 4: Walk a Return Route (Backtrack)
Backtrack is a feature that allows you to retrace your steps and return to your point of
origin:
Step 1 Backtrack a Route
1. Press and hold the Explore button located in the bottom left region of the unit.
2. You will be asked if you really want to backtrack. Press Confirm to do so. The
system will provide you with instructions to guide you back to your point of origin.
A message will inform you when you have reached your destination.
To Cancel Backtrack
Press and hold the Explore button again. You will be asked to confirm that the Backtrack
feature will be deactivated. Press the Confirm button within 15 seconds to deactivate
Backtrack.
Note: On a full battery, the system will be able to Backtrack a route traveled while the
device is turned on, for several hours. This information is lost if the device is turned off
along the way. The track will not be kept after powering OFF.
Note that the Backtrack feature is not available when traveling by vehicle.
Activity 5: Points of Interest on Routes
When traveling in streets, points of interest (pedestrian only) and landmarks found on
your current street segment will be announced. Breeze will also inform you whether points
of interest are located to the left or right of your current position. When traveling in open
20
spaces, landmarks found within the default range of (500 meters) will be announced. Use
the arrows to browse the list to get an idea of the landmarks found in the vicinity.
Step 1 What’s Around
Press and hold the Where am I button to activate the What’s around function. When
traveling in streets, points of interest (pedestrian only) and landmarks found on your
current street segment will be announced. Breeze will also inform you whether points of
interest are located to the left or right of your current position. When traveling in open
spaces, landmarks found within the default range of (500 meters) will be announced. Use
the arrows to browse the list to get an idea of the landmarks found in the vicinity.
.
21
Appendix 1
Quick Reference Chart
22
Top Section:
Where Am I button
Press and hold Where
Am I Button
Information button
Press and hold
Information
Repeat button
Press and hold Repeat
It provides information on the user's current position.
Lists what is around (landmarks or points of interest) in the
street segment where you are located. Use the arrows to move
through the list.
It provides information on the state of the system. Use the arrow
keys to access the 3 levels of information.
This activates System settings. Use arrows to move through
hierarchical menu. Press Confirm to open into the selected
option.
It is used to repeat the last message.
This activates the Key Describer feature. When activated, press
any button to hear a general description of its function.
Middle Section :
Left and Right Arrow
keys
Confirm button
The Left and Right arrow are used to browse through items in a
list.
It is used to launch an action and confirm the current selection
Bottom Section:
Record button
Press and hold
Record
Explore button
Press to record a 4 second description of a landmark.
Used to launch Route creation where users can record a 4 second
description of the route.
It is used to deactivate a route, letting you explore your
environment without being guided.
Press and hold
Explore
This is used to launch the Backtrack function, allowing you to
retrace your steps.
Go To button
Press and hold Go To
Button
It is used to activate a pre-recorded route.
Used to activate guidance to a landmark. It provides access to the
list of landmarks that are set as possible destinations.
23
Appendix 2 Settings (from User Guide ver. 1.1)
To configure the system, press and hold the Information button located in the upper left
region of the unit.
Use the arrows to select the option you wish to modify. The list of 7 options is as follows:
1. Landmarks
2. Routes
3. Verbosity
4. Voice
5. Distance unit
6. About
7. Reset Default Settings
Press Confirm to select an option.
Press Explore or press and hold Information at any moment to exit the Settings menu.
Landmarks
Use the arrows to select the landmark you wish to configure.
Press Confirm to load the selected landmark
Use the arrows to select the operation you wish to perform on the landmark. Operations
include: Rename, Set/Unset as destination and delete.
Press Confirm to trigger the selected operation.
Rename Landmark:
Upon selecting this option, a beep will prompt you to dictate the new name for the
landmark in question. After 4 seconds, recording ends with a beep and message. The
system exits configuration mode and announces the current state.
Set or Unset Landmark as possible destination:
Upon triggering this option, the system will ask you to set or unset the current landmark
as a possible destination. Press Confirm to set or unset the landmark as a destination.
Upon doing so, the system exits configuration mode and announces the current state.
This operation can also be achieved while you are recording your landmark.
When recording the landmark. Press Confirm within 30 seconds after its creation. Breeze
will confirm that the landmark has been unset as a possible destination.
Delete Landmark:
Upon selecting this option, the system prompts you to delete the current landmark
selected. Press Confirm to Delete. Upon doing so, the system exits configuration mode
and announces the current state.
Note regarding Landmark configuration: You can directly access Landmark Settings. To
do so, press and hold the Go To button, then select a landmark, press and hold
Information. The following options are made available:
- Rename landmark
24
-
Unset landmark as a possible destination
Delete landmark
Routes
Use the arrows to select the route you wish to modify.
Press Confirm to load the selected route. Use the arrows to select the operation you wish
to perform on the route. Operations include: Rename and delete.
Press Confirm to trigger the selected operation.
Renaming Route:
Upon selecting this option, a beep will prompt you to dictate the new name for the route
in question. After 4 seconds, recording ends with a beep and message. The system exits
configuration mode and announces the current state.
Deleting Route:
Upon selecting this option, the system prompts you to delete the selected route. Press
Confirm to Delete. Upon doing so, the system exits configuration mode and announces
the current state.
Note regarding Route configuration: You can directly access Route Settings. To do so,
press the Go To button, select the desired route, then, press and hold Information. The
following options are made available:
- Rename Route
- Delete Route
Verbosity
Use the arrows to select which verbosity option you wish to modify. There are four
verbosity options: Point of interest verbosity, Route information Verbosity, Where am I
verbosity and Intersection verbosity. Press Confirm to select the verbosity option of your
choice.
Point of interest Verbosity settings:
Upon entering the Point of interest Verbosity settings menu, use the arrows to cycle
through the options and press Confirm to make your selection. The Point of interest
Verbosity settings are as follows:
Not announced (default value). Points of interests are not announced and no beep is
heard when encountered.
Tone. Points of interest are only announced by a beep when encountered.
Name and direction. Point of interest are announced with beep and message.
Route instructions Verbosity settings:
Upon entering the Route instructions Verbosity settings menu, use the arrows to cycle
through the options and press Confirm to make your selection. The Route Verbosity
settings are as follows:
Turns only (default value). The next instruction announces only intersection where
user has to turn.
All instructions. The next instruction announces all intersections even if user does not
need to turn.
25
Where am I verbosity settings:
Upon entering the Where am I Verbosity settings menu, use the arrows to cycle through
the options and press Confirm to make your selection. The Where am I Verbosity settings
are as follows:
Route status and location. Announces Route Status (if a route is activated) and
Current location.
Route status, heading, location, intersection or next instruction (default value) (if a
route is activated).
Route status, heading, location, intersection and next instruction (if a route is
activated).
Intersection verbosity settings:
Upon entering the Intersection Verbosity settings menu, use the arrows to cycle through
the options and press Confirm to make your selection. The Intersection Verbosity settings
are as follows:
Crossing streets only. Announces Crossing street.
Detailed. Announces intersection description.
Voice
Use the arrows to select which Voice option you wish to modify. There are two Voice
options: Rate and Pitch. Press Confirm to select the Voice option of your choice.
Rate:
Upon entering the Rate settings menu, use the arrows to cycle through the five options
and press Confirm to make your selection. The Rate settings are as follows:
Very Slow
Slow
Standard (default value)
Fast
Very Fast
Pitch:
Upon entering the Pitch settings menu, use the arrows to cycle through the 5 options and
press Confirm to make your selection. The Pitch settings are as follows:
Very Low
Low
Standard (default value)
High
Very High
Distance Units
Use the arrows to cycle through the 2 options and press Confirm to make your selection.
The Distance settings are as follows:
Kilometers and meters
Miles and feet (default value)
26
About Breeze
Use the Arrows to browse through the following information:
Device name and version
Map coverage name and version
Device serial number
Software build number
Press Confirm to exit the information. The system will announce current state.
Re-setting Default Settings
Press Confirm to reset settings to their default values. The default settings are:
Speech rate: Standard
Pitch rate: Standard
Where am I verbosity: Route status, heading, location, intersection or next instruction
Point of interest verbosity: Not announced
Intersection verbosity: Detailed
Route instructions verbosity: All instructions
27
Appendix 3 Breeze Skills Checklist
The following is a checklist of student achievement skills related to their independent
travel, using the Trekker GPS system. It is strongly recommended that students master
the skills in each lesson before moving on.
Lesson 1:
□ Student
□ Student
□ Student
□ Student
□ Student
Preparing to Travel
is proficiency with all mobility skills related to independent street travel
is able to discriminate Breeze buttons that have different shapes and sizes
can perform a soft reset
has the ability to categorize
has the ability to understand synthesized speech
Lesson 2:
Understanding Menus and Dialogue Boxes
□ Student can navigate menus using the arrow keys and select an item
□ Student understands the functions of the Confirm button
Lesson 3:
Using Explore Mode
□ Student understands that Breeze is an aid for orientation only. It is not to be used
without traditional mobility aids such as a long cane or a guide dog.
□ Student has proficient orientation and mobility skills for all aspects of street travel
including street crossings
□ Student has a correct conceptual understanding of general orientation, traffic flow and
intersection descriptions as described by the Where Am I button. These include:
compass directions, clock face directions, and cardinal directions
□ Student is proficient searching, creating, renaming and deleting a Landmark
Lesson 4:
Guidance to a Landmark
□ Student has an understanding of clock face directions
□ Student can use pedestrian guidance instructions to be guided to a Landmark
□ Student can use clock face directions in an open area to locate a Landmark
Lesson 5:
□ Student
□ Student
□ Student
□ Student
□ Student
□ Student
Routes
can create a route
can preview a route indoors
can activate and travel a route using guidance instructions
can deviate from a route and successfully re-route
can cancel a route
can backtrack a route
28
Review of the Breeze Key Commands
Student knows the location and function of the following keys on Breeze
Buttons
Where Am I
Information
Left Arrow key
Confirm
Right Arrow key
Record
Explore
Go To
Repeat
Reset
Location
___
___
___
___
___
___
___
___
___
___
Function
___
___
___
___
___
___
___
___
___
___
Other
On / Off switch
Power connector
Microphone
Speaker
Headphone connector
Volume
SD card slot
USB connector
Battery clips
Location
___
___
___
___
___
___
___
___
___
Function
___
___
___
___
___
___
___
___
___
29