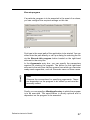
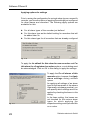
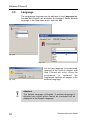
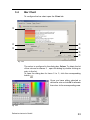
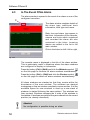
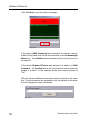
1
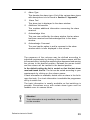
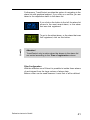
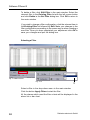
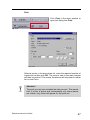
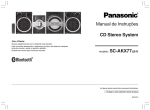
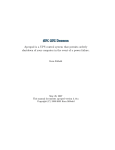
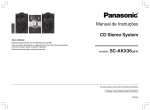
User Manual Software PGuard II Dallmeier electronic GmbH 1 DK 200.003 GB / Rev. 4.1.1 / 040809 Software PGuard II Copyright © Dallmeier electronic GmbH & Co.KG, 2004 All rights reserved. This document may not be copied, photocopied, reproduced, translated, transferred to an electronic medium or converted to a machine-readable form either whole or in part without first receiving written permission from Dallmeier electronic GmbH & Co.KG. We reserve the right to make technical modifications. The manufacturer accepts no liability for damage to property or pecuniary damages arising due to minor defects of the product or documentation, e.g. print or spelling errors, and for those not caused by intention or gross neglegence of the manufacturer. Dallmeier electronic GmbH & Co.KG Cranachweg 1 D 93051 Regensburg, Germany www.dallmeier-electronic.com [email protected] 2 Dallmeier electronic GmbH Table of contents 1 Introduction ............................................................................................ 4 1.1 1.2 1.3 1.4 1.5 Conventions .............................................................................................. 4 Liability ....................................................................................................... 4 System Requirements ............................................................................... 5 Installation .................................................................................................. 5 Starting PGuard II for the first time ............................................................ 6 2 Overview ................................................................................................. 7 2.1 2.2 2.3 2.4 2.5 What is PGuard II ....................................................................................... 7 Integration .................................................................................................. 7 The Main Window ..................................................................................... 9 Bar Chart Recorders / Alarms ................................................................ 13 Alarm window ......................................................................................... 14 3 Configuration ....................................................................................... 16 3.1 3.1.1 3.2 3.3 3.4 3.5 Recorder Configuration ........................................................................... 16 Configuring alarm settings ...................................................................... 20 User Configuration .................................................................................. 30 Language ................................................................................................ 32 Bar Chart ................................................................................................. 33 System .................................................................................................... 36 4 PGuard in Operation ........................................................................... 37 4.1 4.2 4.3 4.4 Logging On and Off ................................................................................ 37 Alarm Evaluation and Analysis ............................................................... 38 In The Event Of An Alarm ........................................................................ 50 Switching to PView ................................................................................ 53 5 Appendix ............................................................................................... 54 5.1 Alarm Types and Their Meaning ............................................................. 54 Dallmeier electronic GmbH 3 Software PGuard II 1 Introduction In the current age of progress the demand for security technology is rising. Surveillance systems in banks, industry or even in private households are used more and more. The software PGuard II offers many useful functions to simplify alarm management. PGuard II also gives you a better overview of the alarms. With PGuard II. it is possible to isolate specific alarms from the numerous alarm types and display them in an alarm window with acoustic warning. Filter criteria such as time period or the recorder to be displayed may also be selected. In addition the management of existing configurations and the setting of all functions without the recorder being connected is possible. This manual provides a step by step description of the functionality and operation of PGuard II. 1.1 Conventions To improve the clarity of this manual, important sections are designated by the “Warning“ symbol below. Read these sections and the text next to the symbol carefully. They contain information, which will assist you in working with PGuard II. Warning! These sections contain a brief summary of the preceding text. Words in bold letters and italics generally depict menu commands or buttons. 1.2 Liability Neither the author nor Dallmeier electronic GmbH will accept any responsibility whatsoever for damage of any kind which may be incurred through the use of this manual or the PGuard II software. 4 Dallmeier electronic GmbH 1.3 System Requirements To be able to fully utilise all the functions of PGuard II the operating system Win NT or Win 2000 should be installed on your PC. If either the operating system Win 98 or Win ME are installed the functions RAS / ISDN are not available. Please note that the programme will not run under the operating system Windows 95. The recommended screen resolution is 1024 x 768 with a colour depth of at least 16 bit. If lower values are used for screen resolution and colour depth, a faultless functioning cannot be guaranteed. In addition your system should meet the following requirements: - Preset TCP/IP-Address of network board; - Preset Gateway Address for ISDN transmission; - Preset network board identification; - Working memory: at least 64 MB 1.4 Installation Prior to installation ensure that there is adequate space available on the harddisk. The programme itself only requires approximately 20 MB disk space. However additional disk space will be required to save the incoming alarms. Approximate values are given in the table below. No. of Alarms Memory Space in MB No. of Alarms Memory Space in MB 1000 5000 0,4 2,0 10.000 100.000 4,0 40,0 Deactivate all running programmes (including virus protection software and screen savers), to avoid possible conflicts during the installation of PGuard II. Insert the PGuard II CD-Rom in the CD-Rom drive. Dallmeier electronic GmbH 5 Software PGuard II Click the Start button in the task bar and select Run. In the following dialog box select the corresponding drive name for your CD-ROM drive with the file “PGuard_Installer.exe“. Follow the instructions in the menu windows. 1.5 Starting PGuard II for the first time PGuard II is protected by a Hardlock-Dongle. To be able to operate PGuard II the dongle supplied must be connected to the parallel port on your computer. Attention! Ensure that the Dongle supplied is connected to the parallel port on your PC correctly. Once the dongle has been connected, start PGuard II 3.0. The dialog box Unlocking Hardlog Dongle will open in which you must enter the serial number. The serial number is supplied with the dongle. Fig. 1-1 First of all define whether you have a full or demo version and enter the serial number. Confirm with OK. The license number is only required when starting PGuard II for the first time. 6 Dallmeier electronic GmbH 2 Overview This section contains a basic overview of the following elements of the PGuard II programme. 2.1 - The Main Window - Bar Chart Recorders / Alarms - The Alarm Window What is PGuard II PGuard II is a programme designed to monitor and manage incoming alarm messages from Dallmeier Recorders. The programme offers the following features: - Alarm Recording - Alarm Reporting via Alarm Window - Switching via PView - Statistical Evaluation In addition to receiving incoming alarms it is also possible to configure your recorder. PGuard II provides the user with numerous request and configuration options. 2.2 Integration Together with PView, SmartGUI and SmartGUI Editor, PGuard is an integrated element of the “Video Management System” (VMS). PView is the central control instrument for one or more Dallmeier Recorder(s). It enables recorder configuration via network plus requests for current data and pictures. In addition to functions such as live picture transmission, backup, virtual tours and synchronisation, PView offers the user numerous request and configuration options. Dallmeier electronic GmbH 7 Software PGuard II PView PGuard SmartGUI Fig. 2-1 SmartGUIEditor Interfaces PGuard is a software for recording and reporting alarms. In addition to alarm recording, alarm reporting and statistical evaluation, pictures can be switched via PView. SmartGUI is a special Server Software, which controls the communication between a browser and PView. 8 Dallmeier electronic GmbH SmartGUI Editor is a software with which expanded graphic interfaces for controlling PView can be created. These interfaces are started in the browser. Whenever a button is clicked to activate a function, the parameters are transmitted to SmartGUI. SmartGUI interprets the parameters and forwards them to PView, where the corresponding actions are executed. N.B. SmartGUI and SmartGUI Editor are options. With interaction PView checks, when running, whether PGuard II or SmartGUI are activated. If this is the case, PView will indicate this by an icon on the left under the menu bar. These icons are the same as the programme icons. PView also offers the option to bring these programmes to the foreground by double clicking the icons. 2.3 The Main Window As soon as the PGuard programme is started the main window opens. 8 1 2 3 4 5 6 7 Fig. 2-2 Dallmeier electronic GmbH 9 Software PGuard II 1 The Alarm List Incoming alarms are displayed in a list. The sequence of the columns can be defined individually per drag & drop. With the default setting the list is sorted by the column Time – Receipt. By clicking on the different column names the list can be sorted according to individual requirements. 2 TrendControl Fig. 2-3 This is an additional overview of the alarms received. TrendControl takes the form of a black bar. Alarms are depicted by a red line. NB. TrendControl is only active when the list is sorted by Time – Receipt. 3 Editing and Apply filters 2 1 3 Fig. 2-4 Click the button Edit Filter 1, to set new filters, or to edit or delete existing filters. Select an existing filter in the drop-down menu 3. Click the button Apply Filters 2 to view the required alarms with this filter setting. 4 Configuration / Print To create new users or recorders, or to edit or delete existing users or recorders, click the Configuration button. Click the Print button to print out the current view of alarms received either in list or chart form. 10 Dallmeier electronic GmbH 5 Status Bar In this bar the number of alarms received is displayed on the left. Next to this you will find the user currently logged on and (in brackets) whether this is the Default User or Administrator. 6 Select All / Delete Click the Select All button to mark all the alarms in the list. If you wish to delete the marked alarms in the list, click Delete. Fig. 2-5 7 Log On and Log Off / Exit To log off the current user or to log on another user click the Log On / Log Off button. To quit PGuard II either click the Exit button or the Close icon in the upper right of the main window. Attention! You must have the pemission “Quit PGuard” to be able to close PGuard II. 8 Symbols Click this symbol to insert or mask TrendControl. By clicking this button the alarms received are displayed in list form. Click this button to display the alarms received in chart form. Click this button and select the menu item Info on PGuard... to open the dialog box About PGuard II ... containing information on the PGuard II programme. By clicking this button only the Alarm list is displayed. All further buttons and information are cut out. Dallmeier electronic GmbH 11 Software PGuard II Click the Minimise icon to minimise the window. The PGuard II programme symbol appears on the bottom right in the taskbar. To reopen the application left click the programme symbol in the taskbar. The main window appears as soon as you start the PGuard II program. Using the context menu of the system menu box (or the context menu of the taskbar button), you can configure how PGuard II should display when multiple programs are running. Fig. 2-6 Context menu of the system menu box The context menu can be accessed by clicking the right mouse button. Fig. 2-7 Accessing the context menu via the taskbar button If you have activated the Always in the foreground option, PGuard cannot be covered up or overlapped by other applications and always remains visible. 12 Dallmeier electronic GmbH 2.4 Bar Chart Recorders / Alarms Click this symbol on the upper right to display the alarms received in a bar chart. 1 4 2 3 Fig. 2-8 Depending on the current filtering, the bar chart Recorders / Alarms provides a graphical overview of the following information: Name (if available) and IP-address of the recorder Sum of alarm messages for each recorder Number of alarms of one type. Each alarm type may be allocated a different colour. 1 Bar Chart The alarms received are displayed in a bar chart. The individual recorders each have a different colour. Below each bar you will find the name and IP-address of the recorder. Dallmeier electronic GmbH 13 Software PGuard II 2 Recorder Click the arrow with the mouse and move it left or right. This enables you to define the number of recorders displayed on each page. The number of recorders displayed appears to the right of the arrow. All configured recorders are displayed. 3 TrendControl TrendControl is not active in the bar chart view. 4 Page Click one of the two arrows to display either the previous or the next page. The main window appears as soon as you start the PGuard II program. 2.5 Alarm window The alarm window appears when an alarm occurs with a configured recorder. The alarm window allows you to view various details about the alarm (cf. Chapter 4/4.3 An alarm occurs in the manual). As is the case with the PGuard II main window, you also can configure various settings for the alarm windows in the same context menu (see section 2.3). Fig. 2-9 14 Dallmeier electronic GmbH To do this, select the Minimize alarm windows option; the alarm windows now will be displayed grouped in the Windows taskbar. Minimized alarm windows can be returned to normal view via the Restore alarm windows option. Fig. 2-10 You also can hide the windows in place of minimizing them. To do this, select the Hide alarm windows option; the alarm windows will now be hidden. Note: The alarm window settings can only be configured when an alarm is registered over PGuard. Dallmeier electronic GmbH 15 Software PGuard II 3 Configuration Before PGuard II is able to record and manage alarms, the recorder must be configured in PGuard II. There are several configuration options available: - Assume Recorder Create and Configure Recorder Editing Recorder Configurations Delete Recorder In addition to recorder configuration this section also deals with the aspects User Configuration and Programme Configuration: - Create User Editing User Configurations Delete User Select Language Bar Chart Layout System Settings Recorder and user may be configured provided there is no alarm and you have the relevant permissions. 3.1 Recorder Configuration There are two stages to recorder configuration. First of all the recorder must be created by defining the name and IP-address. In the second step the properties and settings are defined. Assume Recorder Under certain circumstances it may not be necessary to explicitly create the new recorder in PGuard II. If a recorder is installed in PView but not in PGuard II this recorder can be assumed by PGuard II automatically provided the following conditions are met: 16 Dallmeier electronic GmbH PView and PGuard II must be installed on the same PC PView must be open The recorder must be created in PView The name of the recorder in PView does not yet exist as a recorder name in PGuard II To start the transfer of the recorder data, click Assume from PView in the Recorder tab (see screen shot below) in the dialog box Configuration. Attention! Select the language (Language tab) before assuming the recorder settings from PView. Otherwise the settings will be assumed in the default language (English). Create and Configure Recorder To add a new recorder in PGuard, click on the Configuration button in the main menu. Switch to the Recorder tab in the Configuration dialog window. Fig. 3-1 Dallmeier electronic GmbH 17 Software PGuard II Click on the New button. The Name dialog window appears, in which you can enter a name for the recorder to be defined. Click on the New button. Fig. 3-2 Enter the IP address of the recorder in the following Address dialog window. Fig. 3-3 Attention! Ensure that you correctly enter the IP address of the recorder. PGuard II does not check your entry! Click on the Next button to call up the dialog for defining the alarm settings. Here you can define which action is to be triggered for which alarm of the recorder. 18 Dallmeier electronic GmbH Fig. 3-4 Now select an alarm from the Alarm (A) list by simply clicking on one with the mouse. In order to be able to configure a setting for this alarm, you need to activate the Show alarm window and execute actions (B) option. B A Fig. 3-5 The settings for the individual alarms can be configured by using the seven tabs of the dialog (Appearance, Visibility, Connection to PView, Sound, E-mail notification, Combine alarms, Execute program). Dallmeier electronic GmbH 19 Software PGuard II If you do not want to configure any settings for a particular alarm, select the respective alarm in the Alarms off list and deactivate the Show alarm windows and execute actions (B) option for this alarm. The alarm now will be shown in the list with a gray symbol. If this alarm is selected by a mouse click, the tabs for the settings will be hidden. 3.1.1 Configuring alarm settings Active options and boxes are displayed in black in all alarm setting tabs. Light gray options and boxes are first activated when certain options are selected. Now select the alarm from the Alarm off list for which you want to configure settings. An explanation of the various alarm types can be found in Chapter 5 / Annex of the operating instructions. Then configure the respective settings for this alarm using the tabs. Appearance Fig. 3-6 Activate the Alarm text (short) and Notification text (long) options; you can enter a short alarm text and a long notification text that is to be displayed in the alarm window. With the Preview for notification text button, you can allow a preview of the text message to be shown. The long notification text is displayed in its own window in exactly the form in which it will appear later on in the alarm window. 20 Dallmeier electronic GmbH If you activate the Show scroller option, a scroller appears with additional information in the alarm window. You can select another color for the alarm window by clicking on the Other... button. The Color dialog appears. Click on one of the color boxes on the left-hand side to select the new color. Then click on the OK button to define the selected color as an alarm color. You can define your own color on the right-hand side of the dialog. Clicking on Add a color adds the color to the User-defined colors area. Fig. 3-7 Visibility On the Visibility tab, you can set how long the alarm window is to be visible. Fig. 3-8 If you select the Until confirmation option, the alarm window remains visible until it has been confirmed in this window that the alarm has been acknowledged. If you activate the With comment option, you have the possibility of adding a comment to the confirmation. Dallmeier electronic GmbH 21 Software PGuard II If you have selected the Required phrase option, you only can close the alarm window once you have entered the defined phrase here as a comment. For the Time span option, you need to specify how many seconds the alarm window is to be shown. After this time has expired, the alarm window automatically closes. If you want to view the alarms of a recorder with a simultaneously running PView and not have the alarm window displayed, select the Time span option. Enter 0 seconds as the value. Viewing in PView now will occur without an alarm window being displayed. Connection to PView Fig. 3-9 Decide if viewing is to be of a live picture or is to occur on a track. If you select the View track option, you need to configure additional settings. The Camera-specific track viewing option attempts to determine the alarm-triggering camera - whose track is to be viewed - based on the track ID. For some alarm types, this ID is sent to PGuard together with the alarm notification from the recorder. Track viewing with the On this track (name) option occurs independently of the track ID. Simply enter the name of the desired track. 22 Dallmeier electronic GmbH If the recorder is not added as a new recorder in PGuard but instead is applied from PView, there is a peculiarity with respect to the track name. If PView was connected to the recorder (in the same session) prior to this, the existing names of the recorder tracks are applied as well during the process of applying the recorder. These then can be selected from the drop-down menu. You can activate the Prealarm option independently of both types of track viewing. Here, by specifying a time span, you can configure track viewing to be activated at a point in time prior to the alarm triggering. Say, for example, that an alarm is triggered at 13:00. Five minutes are set for the Prealarm. Track viewing then will be activated at 12:55. Finally, you can decide if viewing in PView should occur Immediately on alarm or After confirmation (of the alarm window). Also observe the notes on both options under the section entitled “Visibility”! Sound Fig. 3-10 Here, you can determine which sound or acoustic signal is to be played back when an alarm occurs. Note! In order to play back a WAV file (sound file), a sound card must be installed in the computer and configured! Dallmeier electronic GmbH 23 Software PGuard II To select a sound file, click on Button ... and choose a *.wav file in the Open dialog window. Click on the Open button to insert the selected file as a sound. Fig. 3-11 To delete a sound that has been inserted, click on the Delete button. To test the selected sound, click on the Play button. Parallel to playing back a sound file, you can output an acoustic signal over the system loudspeaker of the PVS. To do this, activate the Play back sound over system loudspeaker option and select the type of sound and duration. E-mail notification Fig. 3-12 You also have the option of sending a notification via e-mail when an alarm is triggered. Activate the Send notification via e-mail option and enter the required data. 24 Dallmeier electronic GmbH Enter the e-mail address of the sender in the From box and enter the e-mail address of the recipient in the To box. In the Server box, either enter the name or the IP address of the server (e.g. [email protected] or 213.165.65.100). If the SMTP server requires authentification, activate the User authentification required check box. Then enter your user name and password in the Login and Password boxes. Acquire the server data from your configured e-mail program, or ask your administrator if you are uncertain. Edit e-mail ... The e-mail sent in the event of an alarm can be individually prepared from the recorder-specific data of the alarm. In the E-mail notification tab described above, click on the Edit e-mail ... button to open the E-mail editor dialog. Fig. 3-13 The text and subject line of the e-mail can be edited as in a text editor. You can insert the text of your choice in any area, thus configuring the default setting shown above to suit your needs. Dallmeier electronic GmbH 25 Software PGuard II The recorder-specific data are inserted as a variable in the text or the subject line of the e-mail wherever the cursor is located. To do this, click on the menu button (upper right-hand corner of the dialog) and select a variable from the menu shown. Note! Do not change the inserted variables (e.g. $(AddInfo)), as these will no longer be recognized and replaced. By clicking on the Restore defaults button, you can reconfigure the e-mail with the default settings as shown above. Combine alarms Fig. 3-14 Depending on the type of alarm, configuration and duration of the triggering situation, the recorders send many similar alarms that all belong to one event; as such, you have the option of combining the alarms in a single alarm window. Instead of 50 windows appearing in an alarm situation, only one window appears in which the 50 individual events are combined. This improves clarity and prevents the desktop from being filled up with unnecessary alarm windows. Set the time frame here in which the incoming, similar alarms are to be combined. 26 Dallmeier electronic GmbH Execute program If a particular program is to be executed in the event of an alarm, you can configure the required settings on this tab. Fig. 3-15 First type in the exact path of the application to be started. You can either enter the path directly or call up a dialog for selecting the file via the Execute this program button located on the right-hand side next to the entry box. In the Arguments entry box, you can specify the parameters required for starting the program. The button on the right-hand side next to the entry box calls up a menu from which you can enter ready-made arguments, such as Recorder name or Alarm name. Note! Observe the conventions for specifying arguments. These are dependent on the program to be called up and must be manually edited. Finally, you can specify a Working directory in which the program is to be executed. This specification is usually optional and is dependent on the program to be executed. Dallmeier electronic GmbH 27 Software PGuard II Applying options for settings Prior to saving the configuration for a single alarm type on a specific recorder, you have the option of applying the settings just configured for other alarms and recorders. The following apply options are available for this: z For all alarm types of the recorder just defined z For this alarm type as the default setting for recorders that will be added later on z For this alarm type for all recorders that are already configured Fig. 3-16 To apply the As default for this alarm for new recorders and For this alarm for all registered recorders options, a note dialog must be acknowledged. Click on OK in this dialog to apply the settings. To apply the For all alarms of this recorder option, however, the Apply alarm settings dialog window opens. As applying all settings of an alarm type for the remainder of the alarms is generally not always practical, you can specify which settings are to be applied by checking the boxes in this dialog. Fig. 3-17 28 In the base setting, the boxes are not checked for the various alarm types for which applying the respective setting would provide little or no value. Dallmeier electronic GmbH Applying settings Once you have configured the settings for the selected alarm type to suit your needs, click on the OK button in the Edit recorder main dialog to apply the settings for the selected alarm type for this recorder. Applying here occurs independently of whether you previously noticed one of the apply options or not. Throughout the entire recorder configuration process, you can click on the Back button in every dialog window to correct entries you have made. Changing recorder configurations If you want to change the settings for a specific recorder, highlight the desired recorder in the Recorder tab and click on the Edit button. The Edit recorder dialog window opens up, providing you with all of the functions described for configuring a recorder. Switch between the Name, IP address, and Alarm settings tabs to edit the recorder configurations. If you have made all of the changes, click on the OK button to close the dialog window and save your changes. Deleting a recorder Just as a recorder can be added to the list, it can be deleted. To do this, highlight the respective entry in the list and click on the Delete button in the Recorder tab. Dallmeier electronic GmbH 29 Software PGuard II 3.2 User Configuration PGuard provides the option to allow certain functions only to be performed by authorised persons. In the user configuration permissions can be defined for each user. Before awarding any permissions a user must be defined in the User tab. As soon as the user logs on with his user name and password the permissions allocated to him will become active. The detailed list of permissions is to be found under Section 5 / Appendix. Create User To configure the user click Configuration in the main window. To define a new user click New in the User tab. Fig. 3-18 The dialog box Create New User opens. Enter the user’s name and also the password and repeat your entry to confirm the password. Each user may be allocated individual or universal permissions by activating the permissions with the left mouse button. Fig. 3-19 Before clicking OK decide whether this user should be installed as the Default User. 30 Dallmeier electronic GmbH Special Status of the Default User Activate this option with the left mouse button in the dialog box Create New User. The Default User is the user who is logged in when the programme is cued. If a user logs off, the Default User is logged on automatically and the name of the Default User appears in the status bar in the main window. Special Status of the Administrator The Administrator is the default setting. Neither name nor permissions allocated to the administrator can be deleted. It is only possible to change the password and define whether the administrator should also be the Default User. Attention! The Administrator has all permissions. Once you have completed all your settings, click OK to save these settings and add the user to the list. Editing User Configurations To edit the settings for a specific user, either double click the relevant entry or mark the entry in the list and click the Edit button in the tab. The same dialog box as for creating a new user will open. Adjust the user configuration and proceed precisely as if creating a new user (see page 30). Once all changes have been made click OK to accept the new settings and close the dialog box. Delete User To delete a user, mark the relevant entry in the list with the left mouse button and click Delete in the User tab. If you attempt to delete the Administrator, the Default User or the user currently logged on an error message will be displayed since these users cannot be deleted. Attention! Each user can only use those permissions allocated to him. Dallmeier electronic GmbH 31 Software PGuard II 3.3 Language The programme language can be adjusted in the Language tab. German and English are available as standard. Select another language in the drop-down menu and click OK. Fig. 3-20 Fig. 3-21 For the new language to be assumed, respond to the security request with Yes. PGuard will close. When the programme is restarted the programme captions will appear in the selected language. Fig. 3-22 Attention! The default language is English. If another language is selected any words which cannot be translated will be displayed in the English language. 32 Dallmeier electronic GmbH 3.4 Bar Chart To configure the bar chart open the Chart tab. 1 2 4 3 5 6 7 Fig. 3-23 The colour is configured in the dialog box Colour. To obtain the list of bar colours for alarms 1 , open the dialog by double clicking an entry in the list. To open the dialog box for items 2 to 5, click the corresponding . button Once you have either selected or defined a colour click OK to allocate the colour to the corresponding area. Fig. 3-24 Dallmeier electronic GmbH 33 Software PGuard II 34 1 Bar Colour Filler (Recorder) Define the colours for the bars depicting the individual alarm types. 2 Axes Define the colour of the axes. 3 Chart Background Colour Define the background colour of the chart. 4 Bar Colour Outline (Recorder) Define the outline colour of the bars. 5 Labels Define the colour of the labels in the chart. 6 Restore Click Restore to reinstate the default setting. 7 Accept Click Accept to save the new configuration. Dallmeier electronic GmbH The figure of a bar chart below demonstrates which element of the bar chart is affected by each item on the Chart tab. The numbering in the bar chart corresponds with the numbering in the screen shot tab – Chart. 1 2 3 4 5 Fig. 3-25 Dallmeier electronic GmbH 35 Software PGuard II 3.5 System On the System tab of the Configuration dialog you can specify the maximum number of alarm windows to be shown. This is especially useful if you do not utilize the Combine alarms option (see Combine alarms). Fig. 3-26 Specify the maximum number of alarm windows to be displayed by entering a number in the Max. number of simultaneously open alarm windows box. This setting does not influence the alarm list in any way. All incoming alarms are shown in this list, regardless of whether they were displayed in an alarm window or not. Alarms that are registered for which no alarm window opens (due to this restriction) can be marked with a special comment. This makes it easy to identify these alarms in the alarm list. In addition to specifying the maximum number of alarm windows you can also Reset cache here. The database cache of the PGuard II saves database values in order to make the application start faster. Manual resetting is normally not required. In the event of a system crash (e.g. caused by a power failure), the cache data may become inconsistent. If this happens, click on the Reset cache button. You then will be asked to complete a dialog for restarting the PGuard II, which will cause the cache to be recalculated. 36 Dallmeier electronic GmbH 4 PGuard in Operation In this section the main functions of PGuard required in day-to-day operation are explained in detail. 4.1 Logging On and Off Alarm Evaluation and Analysis Filter Configuration Printing Alarms Deleting Alarms In The Event Of An Alarm Switching to PView Logging On and Off PGuard can be started without a password since the Default User including password is pre-defined as standard. Click the Log On / Log Off button in the main window to either log off the current user or log on a new user. The Administrator If a user other than the Default User is logged on, click the Log On / Log Off button to open the dialog box Log Off. After logging off the Default User is logged on automatically. The Default User If the Default User is logged on, the dialog box Log on to PGuard opens. You may then log on to PGuard II with your user name and password. The user name must be alphanumeric and is not case sensitive. Fig. 4-1 Dallmeier electronic GmbH 37 Software PGuard II The password must be alphanumeric and is not case sensitive. Case sensitive means that capital letters must be observed when entering the password. If an incorrect user name or password is entered, you will not be able to log on and an error message will appear. Click OK to close the error message and then enter the correct user name and password. 4.2 Alarm Evaluation and Analysis Alarm List The alarms received are displayed in a list. 1 2 3 4 5 6 7 8 9 Fig. 4-2 1 Acknowledge A green hook denotes whether the alarm has been confirmed. 2 Time – Receipt This is the time the alarm arrives at the PC on which PGuard II is running (system time). 3 Time – Sent This is the time the alarm was sent by the recorder (recordersystem time). 4 Recorder The alarm was received by this recorder. 5 Camera This camera detected the alarm. 38 Dallmeier electronic GmbH 6 Alarm Type This denotes the alarm type. A list of the various alarm types with descriptions is to be found in Section 5 / Appendix. 7 Alarm Text This alarm text is displayed in the alarm window. 8 Additional Information This contains additional information concerning the alarm received. 9 Acknowledge User This user was notified by the alarm window, that an alarm had been received and acknowledged this in the alarm window. Acknowledge Comment The user has the option to add a comment in the alarm window which is later displayed in this column. The sequence of the columns may be defined according to individual requirements by clicking on the column names with the left mouse button, holding the mouse button depressed and moving the column to the desired position. Release the mouse button and the column will be inserted in the desired position. In the default setting the list is sorted so that the last alarm received heads the list. The list can be sorted according to your requirements by clicking on the column names. If track information is available, double click an alarm in the list to open the track. If no track information is available the programme will try to switch live. The track information is usually available so that switching is possible. Exceptions occur with certain alarm types such as harddisk error or camera failure. Attention! Track information is only available, when a recording is made on the recorder. Dallmeier electronic GmbH 39 Software PGuard II Bar Chart The alarm types received are depicted by different colours in the bar chart. A more detailed description of the bar chart can be found in Section 2 / 2.3 Bar Chart Recorder / Alarms. TrendControl TrendControl provides an additional overview of the incoming alarms. Fig. 4-3 TrendControl displays the time span from the first to the last alarm in the form of a black bar. Here, the incoming alarms are designated by red bars, whereby the height of a bar indicates the number of alarms saved at a specific point in time. If the mouse pointer is positioned over the TrendControl background, a tool tip shows the respective date and point in time. Fig. 4-4 If, however, the mouse pointer is positioned over an alarm (red bar), additional information - such as the recorder name and camera number - are shown. Fig. 4-5 Additionally, TrendControl shows the temporal position of the alarm that is selected in the alarm list. The display is comprised of two green bars that are located at the top and bottom of TrendControl. Fig. 4-6 40 Dallmeier electronic GmbH Furthermore, TrendControl provides the option of navigating in the alarm list with graphical support. If you click on a red bar, you are taken to the respective alarm in the alarm list. If you click on the button to the left, the alarm list moves to the most recent alarm, or the alarm that was last registered. To get to the oldest alarm, or the alarm that was first registered, click on this button. Attention! TrendControl only is active when the alarms in the alarm list are sorted according to the Time of registration column. Filter Configuration With the effective use of filters it is possible to isolate those alarms of real interest from the large volume of alarm data. Before a filter can be used however it must first of all be defined. Dallmeier electronic GmbH 41 Software PGuard II Click Edit Filter in the main window, to configure new filters, or to edit or delete existing filters. Fig. 4-7 Existing filters are displayed in the list Existing Name. By double clicking one of the filter names the corresponding filter options will be displayed at the top of the dialog box. Active filter options are highlighted black. Light grey options are currently not active since certain conditions are not fulfilled. To create a new filter click New in the dialog box Edit Filter. Fig. 4-8 Enter a name for the new filter in the Filter Name list. Confirm your entry with Return. The options in the sections Activate Filter and Link Filter will become active, i.e. will be highlighted black. Select the required filter options in these sections. 42 Dallmeier electronic GmbH Time Period Select the item Time Period and click . The dialog box Set Filter Time Period will open. In this dialog box a specific time period may be defined so that only alarms occurring during this time will be displayed in the alarm list in the main window. In the first option the day and time, during which alarms are to be displayed, are defined. Fig. 4-9 To adjust the time click in the relevant field (hours, minutes, seconds) and adjust the time manually via the keyboard or use the up / down arrows. To change the date click the arrow down button next to the date to open the calendar. Select the required date with a left mouse click. Click the arrow buttons to the left and right of the month to jump to the previous or next month. Fig. 4-10 You may however decide to opt for the second option in which only the last number of days without time is defined manually via the keyboard. Select Time arrival to display only the received alarms. If you select Time departure only those alarms will be displayed that are also passed on. Click OK to close the dialog box. Dallmeier electronic GmbH 43 Software PGuard II Recorder Select the option Recorder and click the button .... The dialog box Set Recorder Filter will open. In this dialog box define which recorders are to be displayed and which not. sollen und welche nicht. Fig. 4-11 Click a recorder in either of the two lists and decide by clicking the buttons > and < whether the recorder should be displayed or not. Clicking the buttons > and < will move the selected recorder to the other list. By clicking the buttons >> or << all the recorders in the list will be moved to the other list. If you wish to undo your changes, click Undo. All the recorders will be returned to their original position in the appropriate list. 44 Dallmeier electronic GmbH Alarm Types Select the option Alarm Type and click the button .... to open the dialog box Set Filter: Alarm Types. In this dialog box define which alarms are to be displayed or printed out, by clicking the relevant alarm types with the left mouse button. The different alarm types will be described in more detail in Section 5. Fig. 4-12 Click the All On button to mark all alarm types. To undo all markings click the All Off button. Click Toggle to unmark all marked alarms and mark all unmarked alarms. Click OK to close the dialog box. To cancel your settings, click Undo. In the dialog box Set Filter select either the option AND or the option OR. With the option AND all the criteria (time period, recorder, alarm type), selected in the Activate Filter dialog, must apply. When a filter is selected in the main window, only those alarms, which meet all the filter criteria, will be displayed in the list or bar chart. With the option OR at least one of the selected criteria must apply. All the alarms, which meet one of the filter conditions, will be displayed in the main window. Dallmeier electronic GmbH 45 Software PGuard II To delete a filter, click Edit Filter in the main window. Select the relevant filter in the Existing Filter list with the left mouse button and click Delete in the Set Filter dialog box. Click OK to return to the main window. If you wish to change a filter configuration, click the relevant item in the Existing Filter list followed by Edit. Make your changes to the filter configuration proceeding in the same way as when creating a new filter. Once you have completed your adjustment click OK to save your changes and quit the dialog box. Selecting a Filter Fig. 4-13 Main window Fig. 4-14 1 Select a filter in the drop-down menu in the main window. Click the button Apply Filters to start the filter. All the alarms which meet the filter criteria will be displayed in the alarm list or bar chart. 46 Dallmeier electronic GmbH Print Click Print in the main window to open the dialog box Print. Fig. 4-15 Fig. 4-16 Select a printer in the drop-down list, enter the required number of copies and confirm with OK. The current view in the main window will then be printed. This means the alarms will be printed in either list or chart form. Attention! The print-out only ever includes the data you see. This means that, if a filter is active and consequently only some alarms are visible, only these will appear on the print-out. Dallmeier electronic GmbH 47 Software PGuard II If the list view of the alarms received is displayed in the main window, the same view will be printed out. The print-out contains the same data on the alarms received as appears in the main window. If the alarm data is required in chart form, you will need to switch to the chart view in the main window to obtain the following print-out. In addition to the bar chart the print-out contains the following information: Period during which the alarms were received Number of recorders connected Total number of alarms received by all recorders Time of the evaluation / print-out. Names and IP-addresses of the recorders Deleting Alarms If you wish to delete an alarm, mark the relevant alarm in the list (A) in the main window and click Delete (B). A B Fig. 4-17 A dialog box with a security request will then open, requesting confirmation that the highlighted alarm(s) is (are) really to be deleted. Click Yes to delete the selected alarm(s). Fig. 4-18 48 Dallmeier electronic GmbH To delete all the entries in the alarm list, click Select all to mark all the alarms. Next click Delete. Confirm the security request with Yes, if you definitely wish to delete all the entries in the alarm list. Fig. 4-19 It is also possible to mark several individual alarms in the list by holding the CTRL key depressed and then highlighting the relevant alarms with left mouse clicks. Click Delete to delete the highlighted alarms. Fig. 4-20 To mark several alarms in succession, press the CTRL and SHIFT keys simultaneously and select the first 1 and last 2 alarm. All the alarms in between will also be highlighted. Click Delete to delete all the highlighted alarms. 1 2 Fig. 4-21 Dallmeier electronic GmbH 49 Software PGuard II 4.3 1 In The Event Of An Alarm The alarm window is opened in the event of an alarm on one of the configured recorders. The alarm window contains details of the alarm type, additional track information, track type and name. Date, time and alarm type appear in the ticker. Information on the recorder, camera and track which registered and recorded the alarm are also contained in the ticker. Incoming alarms are added to the list in the main window. Click in the ticker to shift it left or right. Fig. 4-22 The recorder name is displayed in the title of the alarm window. This is particularly useful in situations where the alarm windows are configured to display no information. Press the hotkey (Ctrl)+ (Shift) and click the Minimise symbol on the title page to minimise all alarm windows simultaneously. Press the hotkey (Ctrl) + (Shift) and click the Restore symbol on the title page to restore all alarm windows simultaneously. All alarm windows are stacked so that they remain within the boundaries of the main window. The windows are stacked overlapping so that no window completely covers another. If all the available space for new windows is used up a new stack of windows is started following the same pattern. The windows are then iconised. Windows manages the z order of the windows in the taskbar. If windows are restored they are ordered into the correct position (as already described). Attention! No configuration is possible during an alarm. 50 Dallmeier electronic GmbH Alarm with Timer If a time has been specified under Alarm Configuration / Visibility the dialog box closes automatically at the end of this time period (see also page 21). Fig. 4-23 Fig. 4-24 Alarm with Acknowledge If the option With Acknowledge is selected under Alarm Configuration / Visibility the alarm must be confirmed to close the dialog box. Fig. 4-25 Dallmeier electronic GmbH 51 Software PGuard II Click Confirm to quit the alarm message. Fig. 4-26 If the option (With Comment) was selected, a comment may be added. In this case click the left mouse button in the Acknowledge Memo box. The Confirm button becomes active once the entry is completed. If the option Required Phrase was activated, in addition to With Comment, the Confirm button will only become active when this phrase is entered. In the example below the required phrase is “OK”. After the phrase additional comments may be entered in the same box. These comments are separated from the phrase in the alarm list and displayed under comments. Fig. 4-27 52 Dallmeier electronic GmbH 4.4 Switching to PView Direct Switching By double clicking an entry in the alarm list the pictures from the relevant camera are switched in PView. By selecting the alarm the track is switched automatically with the corresponding time filter. It is important to note that both recorder tracks and live pictures can be switched. This depends on the alarm configuration. See Section 3.1 / Connection to PView. Switching in the Event of an Alarm If the option With Acknowledge was selected in the tab Visibility of Alarm Window on Alarm during configuration (Section 3), the alarm is not switched to PView until it is acknowledged. Attention! Note the following with an ISDN connection. When PGuard is connected to the recorder via ISDN incoming alarms must be acknowledged within 25 seconds for the alarm to be switched to PView. This is necessary since the ISDN connection is disconnected by the recorder after 25 seconds. Switching is no longer possible after this interval. If switching is desired without alarm window in the event of an alarm, enter 0 seconds under the option Defined Time in the tab Visibility of Alarm Window on Alarm during configuration (Section 3). Pre-alarm is possible with switching. Example: A production line is monitored by two cameras: Camera 1 at the top end and Camera 2 at the bottom. If the recorder reports an alarm on Camera 2 the scene can be viewed on Camera 1 on the track 60 seconds before the alarm on Camera 2 for example since the production line takes 60 seconds between Camera 1 and Camera 2. Attention! In contrast to previous versions of PGuard it is no longer necessary to install a second LAN connection in PView for switching. Dallmeier electronic GmbH 53 Software PGuard II 5 Appendix 5.1 Alarm Types and Their Meaning Alarm Messages Alarm Messages Recorder in PGuard Meaning TrackFull Track is full A recording track is full Overflow Above (*) Disk occupancy has exceeded defined percentage level Pictures are recorded digitally on the recorder harddisks. If the disk occupancy exceeds the defined percentage level this alarm is activated. Overflow Below (*) Disk occupancy is below defined percentage level Pictures are recorded digitally on the recorder harddisks. If the disk occupancy falls below the defined percentage level this alarm is activated. Standard Track Saved (*) Standard Track saved As a result of a pre-defined situation a new standard track has been created and the old one saved. ContTrack Camera Master Number Contact Contact recording by the camera in a track ContCamG (*) Camera Contact Camera n in all tracks ContStopG All contact recordings have been stopped Stops all running contact recordings ContCamS Contact recording, camera n in Standard Track Contact recording of a camera in the Standard Track ContStopCamS Contact recording by one camera stopped on all tracks Contact recording by a camera stopped on all Tracks ContStopTrack Contact recording stopped in one track Contact recording by a camera stopped on one Track Alarm (*) Alarm Start Alarm Status was activated on the recorder (data of first alarm picture) Alarm (*) Alarm End Alarm Status on the recorder was ended. Camera Failur Camera(s) Failed A list of the affected cameras is displayed in the box Additional Information. Camera Failur Cameras back online A list of the affected cameras is displayed in the box Additional Information. (*) can be configured via user interface. 54 Dallmeier electronic GmbH Alarm Messages Alarm Messages Recorder in PGuard Meaning ContMulti („Field Contact“) (*) Contact Recording – DTP, ProCash, Network, Serial List with information for the first picture of this contact. ContForward A (keyboard) contact or serial contact was detected Looping through of contact on keyboard or serial interface to PGuard TrackDel Notification of deleted track Track was deleted HDFail Harddisk Error Pictures are recorded digitally on the recorder harddisks. The recorder harddisk is defective. ContSensor („Sensor Contakt“) Sensor Contact One of the sensor cards connected to the recorder has detected an event. Event (*) Picture Comparison Event Picture comparison detected an event. SensCamFail Camera Signal to Sensor The camera signal to the connected Card noisy sensor card is noisy. A list of the affected cameras is displayed in the box Additional Information. SensCamFail Signal noise from camera(s) to Sensor Card removed ContStopSensor Sensor sent Contact End A list of the affected cameras and tracks message in is displayed in the box Additional Asynchronous Information. Response Mode/Start ContStopMulti Recording was stopped for an array of cameras Counterpart of field contact (also tracks) SensAlarm Alarm Input on a sensor card has changed The card number (sensor card) and the Alarm-Input-Mask of the triggering sensor card are displayed in the box Additional Information (Alarm-Input-7 is the twilight switch for example). The camera signal noise to the connected sensor card is removed. A list of the affected cameras is displayed in the box Additional Information. (*) can be configured via user interface. Dallmeier electronic GmbH 55 Software PGuard II Alarm Messages Alarm Messages Recorder in PGuard UPS („UPS Messages“) (*) 56 UPS Command Meaning The Uninterruptible Power Supply (UPS) sent a message. The message is displayed in the box Additional Information: killpower, commfailure,commok, powerout, onbattery, failing, timeout, loadlimit, runlimit, doreboot, doshhtdown, mainsback, annoyme, mergency, changeme, remotedown, restartme, command unknown Dallmeier electronic GmbH