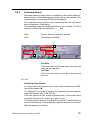
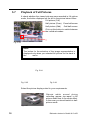
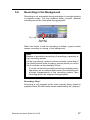
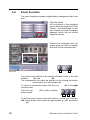
1
Operating manual
Digital HD-Recorder
DMS 180 III
DLS 6 S1
DLS 24 S1
Dallmeier electronic GmbH & Co.KG
1
DK 124.000 / Rev. 1.3.5 / 040809
Copyright © Dallmeier electronic GmbH & Co.KG, 2004
All rights reserved. This document may not be copied,
photocopied, reproduced, translated, transferred to an electronic
medium or converted to a machine-readable form either whole
or in part without first receiving written permission from Dallmeier
electronic GmbH & Co.KG.
We reserve the right to make technical modifications.
The manufacturer accepts no liability for damage to property or
pecuniary damages arising due to minor defects of the product
or documentation, e.g. print or spelling errors, and for those not
caused by intention or gross neglegence of the manufacturer.
Dallmeier electronic GmbH & Co.KG
Cranachweg 1
D 93051 Regensburg, Germany
www.dallmeier-electronic.com
[email protected]
2
Dallmeier electronic GmbH & Co.KG
Table of contents
Table of contents ............................................................................................. 3
1
About this document ...................................................................... 5
1.1
1.2
1.2.1
1.3
Validity .................................................................................................. 5
Documentation on the DMS/DLS .......................................................... 5
Storing the documents ......................................................................... 6
Warnings in this document .................................................................. 7
2
For your safety ................................................................................. 9
3
Description ...................................................................................... 13
3.1
3.2
3.3
3.4
3.5
3.6
3.7
3.8
3.8.1
3.8.2
3.8.3
3.8.4
3.8.5
3.9
Intended use ...................................................................................... 13
Performance features ....................................................................... 13
Interfaces ........................................................................................... 13
Indicators on the DMS/DLS front ....................................................... 14
Filter pad ............................................................................................. 14
Feature Overview .............................................................................. 15
Track Names ...................................................................................... 16
Security devices in the system ......................................................... 17
Power failure protection .................................................................... 17
Forced ventilation ............................................................................... 18
Temperature Control ........................................................................... 18
Tamper protection .............................................................................. 20
Quiescent-current monitoring ............................................................ 20
Certifications ...................................................................................... 21
4
Live operation ................................................................................. 23
4.1
4.2
4.3
Selection of a live split ....................................................................... 24
Sequencer operation ......................................................................... 24
Direct switching to a camera picture ................................................ 24
5
Playback mode ............................................................................... 25
5.1
5.2
5.3
5.4
5.5
5.6
5.6.1
5.6.2
5.6.3
5.6.4
5.7
5.8
Select Track for Playback .................................................................. 26
The Operating Panel for Playback ..................................................... 27
Playback Speed .................................................................................. 28
Fast Picture Search ........................................................................... 28
Camera Filter for Track 1, 2 and 3 ..................................................... 29
Picture Search using „Filter Criteria“ ................................................. 31
Simple Search .................................................................................... 32
Fast search with time intervals ......................................................... 33
Index Search ...................................................................................... 34
Extended Search ............................................................................... 35
Playback of Full Pictures .................................................................... 36
Recording in the Background ............................................................ 37
Dallmeier electronic GmbH & Co.KG
3
5.9
5.10
Zoom Function ................................................................................... 38
Print Selected Picture ......................................................................... 39
6
Exporting and importing pictures .............................................. 41
6.1
6.1.1
6.1.2
6.1.3
6.2
Exporting pictures .............................................................................. 42
Writing picture sequence to CD-ROM ................................................ 44
Exporting individual pictures to floppy disk ....................................... 48
Exporting picture sequence to video tape ........................................ 51
Importing exported pictures ............................................................... 52
7
Delete Saved Tracks (Release) ................................................... 55
8
Controlling the Camera ................................................................ 57
8.1
8.2
Saving and Retrieving Camera Positions .......................................... 58
Assigning Position Names ................................................................. 58
9
Reference Picture Memory ......................................................... 59
9.1
9.2
9.3
9.4
Creating New Reference Picture Record ......................................... 59
Comparison of Reference to Live Picture ......................................... 60
Viewing Reference Picture Records ................................................ 61
Deleting Reference Picture Records ................................................. 61
10
Archive of system messages .................................................... 63
10.1
10.1.1
10.2
10.2.1
10.2.2
10.3
Displaying all system messages ....................................................... 63
Limiting displayed lines in the list ....................................................... 64
Filtering system messages ................................................................ 64
Selecting a category .......................................................................... 64
Time localization ................................................................................. 65
Exporting an archive .......................................................................... 66
11
Extras ................................................................................................ 67
11.1
11.2
11.3
11.4
Downloading Viewer ......................................................................... 67
Ejecting Removable Medium ............................................................... 68
Downloading PRemote ....................................................................... 68
Exporting the Protocol File ................................................................. 69
12
Viewing pictures using an Internet browser ......................... 71
12.1
12.2
12.3
12.4
Making the connection ....................................................................... 71
Installing plug-in .................................................................................. 72
Viewing recorder pictures ................................................................ 73
Ending picture viewing via browser ................................................. 76
13
Info Menü ......................................................................................... 77
14
Switching off the device ............................................................... 79
14.1
Restarting system (reboot) ................................................................ 80
15
Troubleshooting ............................................................................. 81
Appendix ......................................................................................................... 83
A1
4
Certifications ...................................................................................... 84
Dallmeier electronic GmbH & Co.KG
1
1.1
About this document
Validity
This document is valid for the following systems:
DMS 180 III
DLS 6 S1
DLS 24 S1
For simplification purposes the designation „DMS/DLS“ is used in
this document for all systems.
The system consists of the DMS/DLS, the connected cameras and,
if applicable, other devices and components.
This document has been written on the basis of version 5.1.1 (system
software version).
1.2
Documentation on the DMS/DLS
Operating Instructions (this document)
The „Operating Instructions“ describe the operation of the device.
This includes, for example, controlling cameras, setting the screen
view in Live mode, searching for saved pictures and playback,
importing/exporting pictures and changing the filter pad.
The target group for this document is the user. Knowledge of using
a computer mouse is required. No special technical skills are
required for using the device.
Dallmeier electronic GmbH & Co.KG
5
Installation and Configuration
The document entitled „Installation and Configuration“ describes
installation, mounting, connection, start-up, configuration, tests and
repairs.
The target group for this document comprises specially trained and
authorized personnel („installers“).
Technical messages
In addition, the specially trained and authorized professionals
(„installers“) receive „technical messages“ when changes are made
at the device.
1.2.1
Storing the documents
All documents, including the technical messages, are part of the
product.
Keep the documents in an accessible place near the product.
Pass on all the documents to any future owner or user of the system.
6
Dallmeier electronic GmbH & Co.KG
1.3
Warnings in this document
Warnings about dangers when using the device are shown in this
document as follows:
DANGER!
The warning word DANGER denotes an immediate danger that may
cause death or serious injury if it is not prevented.
The device may involve danger from electric current, for example if
the voltage supply is damaged.
WARNING!
The warning word WARNING denotes a possible danger that may
cause death or serious injury if it is not prevented.
CAUTION!
The warning word CAUTION denotes a possible danger that may
cause minor injury if it is not prevented.
CAUTION!
The warning word CAUTION without a symbol warns you about
possible damage and unsafe procedures.
For example, the device may be damaged or destroyed if liquid
gets into it or the ventilation slots are covered.
Important! Note!
These sections contain important information directly or
indirectly relating to safety and the avoidance of damage.
Tip!
Sections headed with „Tip!“ include useful information on the
best way to proceed as well as background information and
recommendations.
Words that are in
commands or buttons.
Dallmeier electronic GmbH & Co.KG
usually designate menu
7
8
Dallmeier electronic GmbH & Co.KG
2
For your safety
The DMS/DLS is built with state-of-the-art technology according to
the recognized technical rules. However, danger to life and limb of
the user or third parties through the use of the DMS/DLS and other
objects or pecuniary damages could arise. Therefore:
Only use the DMS/DLS when in proper working order, as intended
and while keeping safety and potential dangers in mind and
observing the instructions and technical data! Malfunctions which
can compromise safety are to be eliminated immediately (by trained
professionals)! This applies especially for damage to the power
supply.
Read and understand instructions
Read the instructions carefully before taking action. Always follow
the instructions.
Note information on the DMS/DLS
Note all information on the DMS/DLS and keep in readable condition.
Do not make modifications
Do not make modifications to the DMS/DLS and/or the software
without consulting with Dallmeier electronic GmbH & Co.KG.
Dallmeier electronic GmbH & Co.KG accepts no liability for damage
resulting from unauthorized or improper modifications to the DMS/
DLS.
Observe regulations
Comply with the local laws and regulations, particularly those relating
to health and safety and environmental protection.
Use trained personnel
Installation, mounting, connection, start-up, configuration, testing
and repairs may only be performed by trained and authorized
personnel („installers“).
Dallmeier electronic GmbH & Co.KG
9
Maintain mains voltage
The mains voltage must match the rated voltage of the DMS/DLS
or the power supplies for their additional components. Otherwise,
the DMS/DLS can be permanently damaged.
Observe the ambient temperature and
ensure that ventilation slits are not blocked
Overheating can cause the DMS/DLS to be permanently damaged.
The ambient temperature must not exceed 104 °F.
Protect from foreign bodies and liquids
No objects or liquids may penetrate into the DMS/DLS. Otherwise,
extensive damage, e.g. short circuit, could occur.
Keep the ventilation slits on the DMS/DLS from being blocked. Do
not store objects closer than approx. 4 inches away from the
ventilation slits of the DMS/DLS.
Change filter pad
A soiled filter pad can lead to overheating and failure of the DMS/
DLS.
Change the filter pad on the front of the DMS/DLS regularly, e.g.
monthly, or as soon as the filter pad is gray, at the latest.
Measures for damage and burning odor
If the DMS/DLS is damaged or if a burning odor or smoke develop,
switch off the DMS/DLS immediately and disconnect it from the
supply voltage (pull power plug). Then notify the service personnel.
Do not move the DMS/DLS while in operation
Do not bump the DMS/DLS or move it in a jerky motion while in
operation. The hard disk of the system and/or other components
can be damaged by this. Instruct the cleaning personnel accordingly
if necessary.
The DMS/DLS has a motion detector which logs movement of the
DMS/DLS. If the DMS/DLS is moved during operation and a hard
disk is damaged, the warranty cannot be honored due to the log.
10
Dallmeier electronic GmbH & Co.KG
Do not open the DMS/DLS
Deadly voltages may be active in the DMS/DLS!
All tests, settings and repairs inside the DMS/DLS may only be made
by trained and authorized professionals.
Data protection
The system stores personal information subject to data protection.
For this reason, observe the data protection regulations when
operating the DMS/DLS.
If you call up data from the DMS/DLS, whether via floppy disk,
removable medium or as a printout, store it carefully. Only forward
information on your DMS/DLS to people who have been selected
and authorized by you.
Dallmeier electronic GmbH & Co.KG
11
12
Dallmeier electronic GmbH & Co.KG
3
3.1
Description
Intended use
The DMS/DLS is a high resolution digital security recording system.
The DMS/DLS is used to record and evaluate video pictures. Up to
24 cameras can be connected. The DMS/DLS can be operated on
a network.
3.2
Performance features
Motion detection enables efficient analysis of recorded data in
predefined picture areas. For example, the recording speed can be
increased automatically depending on movements in the picture
area.
The DMS/DLS works with several tracks. Functions such as the
recording speed can be set independently for the individual tracks.
Using SEDOR technology, camera tampering (focus change, turning,
covering, spray painting) is automatically detected.
3.3
Interfaces
The integrated Ethernet interface allows full connection on existing
networks. The USB interface on the front offers a simple option for
connecting external media for backup.
See the „Installation and Configuration“ document for a detailed
description of the interfaces.
Dallmeier electronic GmbH & Co.KG
13
3.4
Indicators on the DMS/DLS front
The 4 LED’s indicate the operating status of
the unit.
Error (red) Indicates a hardware problem,
e.g. hard disk fault or camera failure.
Alarm (orange) Indicates the alarm status
of the recorder.
Record (green) Indicates the recording
activity (hard disk activity) of the recorder.
Power (blue) Indicates the operating state.
Always lights up while the unit is switched
on.
Fig. 3-1
In normal operation, the display shows the
serial number of the system, the software
version, the internal and external
temperature and the model name of the
recorder (e.g. DMS-180 III).
With some malfunctions, you also receive
information on possible sources of the fault
on the display.
Fig. 3-2
3.5
Filter pad
A filter pad is located behind the front panel in front of the intake fan
(see 3.8.2). The filter pad prevents dirt particles in the ambient air
from reaching the inside of the unit. A soiled filter pad can lead to
overheating and failure of the DMS/DLS.
Change the filter pad regularly, at the latest when it is gray.
14
Dallmeier electronic GmbH & Co.KG
Filter-change procedure
The unit should be switched off (replacement is possible while
in operation, however).
Open front panel on the left side of the recorder using the recess
(above)
Remove filter pad
Remove lint/dust with a dry cloth if necessary.
Insert new filter pad
Close panel
The frequency of filter changes is dependent upon the installation
site and the degree of soiling associated with it. In normal office
rooms, checking every three months is generally sufficient, while a
monthly check would be recommended for rooms with large amounts
of dust (storage etc.).
3.6
Feature Overview
The three models differ in their standard features considerably. The
table below provides an overview of the features.
Features
D
Video Inputs (maximum)
Model
DLS 6 S1
DLS 24 S1 DMS 180 III
18
24
24
Activated Video Inputs
6
12
6
Software (Tank / Bank / Industry)
all
all
all
Half- / Full Frame Recording
/
/
/
Tracks (Track 1,2,3 - Standard - Reference)
all
all
all
2-fold
4-fold
—
4-fold
Wavelet Board
VGA Connection SCD-25 (OnBoard)
optional
Splitter Board MCD-25
optional
Multi-purpose disk drive
optional
LAN
optional
ISDN
optional
optional
optional
SCSI
optional
optional
optional
Browser
Dallmeier electronic GmbH & Co.KG
optional
optional
optional
optional
15
3.7
Track Names
The camera pictures are recorded on one or more hard disks. The
hard disks are divided into tracks for this purpose (see the Track
settings section in the Installation and Configuration manual).
The track types and their properties are identical for all systems
and system parameters. To make things easier, we use the names
under the „Industry“ parameter setting in the description.
The following table provides an overview of the track names.
Track Type
Track Names
Industry
Bank
Tank
Longplayspur 1
A
Track 1
Suspicion
Car Wash
Longplayspur 2
B
Track 2
Foyer
Shop
Longplayspur 3
C
Track 3
ATM
Cashdesk
D
16
General
Description
Camera specific single tracks
S
Standard
Attack
Pump
Reference Tracks
D
Reference
Reference
Reference
Dallmeier electronic GmbH & Co.KG
3.8
Security devices in the system
3.8.1
Power failure protection
The power supply of your DMS/DLS is designed in such a way that,
with a built-in hard disk, a brief power failure of 200 ms is bridged.
For comparison: Statistics show that 80 % of power failures are
shorter than 200 ms. The VdS (VdS Schadensverhütung GmbH, a
German loss prevention company) requirement for bridging is 100
ms. In comparison with standard PC power supplies, the bridge
time of the DMS/DLS is greater by a factor of 14.
When several hard disks are installed, this bridge time is reduced.
Standby
Should the failure last longer, the power supply is switched off and
the DMS/DLS is switched to Standby mode. When the mains voltage
is available again, the DMS/DLS automatically starts up again. The
duration of the failure does not play a role here.
A minor disadvantage of the long bridge duration is the fact that you
must wait at least 10 seconds after switching off the system before
you can switch it on again. The reason for this is the discharge time
of the bridging electrolytic capacitor. After normal switch-off of the
DMS/DLS with the power switch, the electrolytic capacitor is
discharged very slowly. As long as the electrolytic capacitor is not
discharged, the DMS/DLS remains in Standby mode and will not
start up.
For this reason, wait approx. 10 seconds after switching off before
switching on again.
Lightning protection
The power supply of your DMS/DLS can bear a peak voltage (surge
over power cable) of 3.5 kV during a lightning strike. This value is
also well above the standard PC power supply, whose limit value is
approx. 1 kV.
Dallmeier electronic GmbH & Co.KG
17
3.8.2
Forced ventilation
Your DMS/DLS is equipped with forced ventilation. The cool air is
drawn in at the front, and the heated inside air is blown out at the
back on the right side by the outlet fan.
Outlet fan
Fig. 3-3
Intake fan with
exchangeable filter
pad behind the
front panel
The service life of the DMS/DLS depends on the ambient
temperature of the installation site. Always ensure proper ventilation.
Ensure that the ventilation slits of the DMS/DLS are located at least
4 inches from other objects or to a cabinet wall.
3.8.3
Temperature Control
The DMS/DLS is equipped with three temperature sensors to control
the temperature. The sensor measuring the external temperature
is located on the rear side of the connector plate. A further sensor
measures the internal temperature of the system and a third controls
the CPU temperature.
18
Dallmeier electronic GmbH & Co.KG
Attention!
If the external temperature reaches 107 °F, a message appears
on the screen and the red Error LED lights up.
At an external temperature of 134 °F, the system is switched
off automatically. The system remains switched off even when
the temperature drops and must be switched back on by the
user.
The system is also switched off at approx. 37 °F and must be
switched back on by the user when the temperature increases.
The system is designed so that it can survive 16 hours at an
increased ambient temperature (due to sunshine) of 131 °F without
incurring damage. This corresponds to Environment Class II, VdS
2110.
Fan controller
To keep bothersome noise of the fans to a minimum, the DMS/DLS
features a fan controller, which regulates the fans depending on the
external, internal and CPU temperatures.
This is why there is less bothersome noise in well-ventilated rooms,
especially in air-conditioned office rooms.
Fan monitoring
Failure of the fans can lead to overheating and subsequent failure
of the DMS/DLS.
For this reason, the DMS/DLS features fan monitoring, which
displays a message on the screen when a fan fails and allows the
other fans to run at maximum power. Have a defective fan replaced
as soon as possible.
Dallmeier electronic GmbH & Co.KG
19
3.8.4
Tamper protection
If the cover screw is screwed out, tamper switch M triggers an alarm.
If the housing cover is removed, the cover contact N also triggers
an alarm.
Cover contact
N
Tamper switch
M
Fig. 3-4
Additional protection against cable manipulation and movement of
the DMS/DLS can be achieved with the VdS installation kit, an
optional accessory.
3.8.5
Quiescent-current monitoring
An external device can be connected to the OUT contact.
This is usually a burglar alarm. The burglar alarm has a specific
quiescent current, depending on the model. If it is interrupted or
changed, the burglar alarm emits a signal.
The recorder can be configured so that the burglar alarm responds
when:
the recorder is switched off
the cable is disconnected
the cable is manipulated (e.g. short-circuit)
the recorder is shut down properly
Detailed information on quiescent-current monitoring is found in the
manual for the installer.
20
Dallmeier electronic GmbH & Co.KG
3.9
Certifications
Our recording systems have the following certifications, which can
be downloaded via the Internet (www.dallmeier-electronic.com) as
a PDF or ZIP file:
UVV-Kassen („Accident Prevention Regulation“ banks)
VdS
(only DMS 180 III)
Power network approvals
in accordance with IZB / DVS / FIDUCIA
UL USA - NWGQ E219273
UL Canada - NWGQ7 E219273
C-TICK / FCC / CB - DK 4624
Kalagate
CE
More detailed information on certifications is found in the Appendix.
Dallmeier electronic GmbH & Co.KG
21
22
Dallmeier electronic GmbH & Co.KG
4
Live operation
The system is in Live mode after being switched on. Depending
on the configuration of the split presentation (see Installation and
Configuration manual), the presentation of the split window can
differ.
Fig. 4-1
The following functions are available to the user in Live mode
without having to enter a password:
Selection of a live split
Direct selection of a camera
Switch to sequencer operation
If you click the right mouse button once, the context dialog for Live
mode appears.
A
B
C
Fig. 4-2
Dallmeier electronic GmbH & Co.KG
23
4.1
Selection of a live split
For another split presentation in Live mode, click one of the buttons
with the available split presentation (A).
The camera picture displayed on the individual split windows is
determined by the setting in the
dialog (see "Installation
and Configuration", Splitter function).
4.2
Sequencer operation
For automatic camera switching in a split window, click the
(B).
Which cameras are to be seen with camera switching is defined
in the dialog box
.
4.3
Direct switching to a camera picture
To specifically switch the picture from a camera, click the button
with the corresponding camera name (C).
Note!
To see camera switching both with the sequencer as well as
with direct switching to a camera picture, a split window of
the selected split format must be assigned the
function in the configuration of the live split.
This function may need to be configured by the installer (see
„Installation and Configuration", Splitter function).
24
Dallmeier electronic GmbH & Co.KG
5
Playback mode
To switch from live operation to Playback Mode, click the left mouse
button.
To login enter your password.
Fig. 5-1
Note!
If no input is made or the mouse is not moved within a period
of 10 minutes in Playback mode, the system automatically
switches to Live mode for security reasons (unauthorized use).
Split type selection
Dialog selection
Information
window
Fig. 5-2
Operating panel
In both cases you will now find yourself in the
with the
corresponding live pictures, but not in Playback Mode.
To access Playback Mode, you will first of all need to select a track.
Dallmeier electronic GmbH & Co.KG
25
5.1
Select Track for Playback
Click the
button in the operating panel.
Fig. 5-3
Select tracks
All the available tracks with their standard names or the names
defined by you in the
dialog are displayed in the selection
window.
The camera specific single tracks are denoted by a „-“ in front of the
camera name. If no camera name has been assigned, only the
camera number will appear (e.g. -2 for single track of Camera 2).
If camera specific single tracks (Standard Tracks) have already been
saved, for example due to an alarm, the saved tracks are denoted
by date and time of saving in the list.
Saved single tracks
Not saved single tracks
Fig. 5-4
Click the track with the
recording you wish to
evaluate followed by
.
Fig. 5-5
Tip!
The recording track can also be opened by a double click
skipping the step with the
button.
Note!
If there was no recording on the activated track, the following
message appears: „Warning! No picture found“.
26
Dallmeier electronic GmbH & Co.KG
5.2
The Operating Panel for Playback
With the exception of the reference track (see Chapter Reference
Track) the same control elements always apply for playback.
All existing information regarding the
picture currently displayed are listed
in the information box.
Fig. 5-6
Fig. 5-7
1 2 3
4 5 6
7 8 9 10 11 12 13 14 15
16 17 18
The buttons on the operating panel have the following meaning:
1
2
3
4
5
6
7
8
9
Delete all pictures on this track
Activate / Deactivate recording
Export pictures
Print pictures
Select track
Database for playback
To the start of the track
Fast reverse playback
Reverse playback
Dallmeier electronic GmbH & Co.KG
10
11
12
13
14
15
16
17
18
Single frame reverse playback
Pause
Single frame forward playback
Forward playback
Fast forward playback
To the end of the track
Filter for search functions
Magnifying Glass
End playback mode
27
5.3
Playback Speed
During normal forward and reverse playback, the playback speed
can be adjusted for picture search. Click the required button and
leave the cursor resting on this button.
A slider is inserted. With the aid of this slider the playback speed
can be adjusted to meet your requirements. Slider up means faster
playback, slider down slower playback.
Fig. 5-8
If you change the playback direction e.g. from forward to reverse
playback, the playback speed already defined is not affected.
5.4
Fast Picture Search
At the top of the control panel you will find a slider bar for fast picture
search. After selecting the required track click the button with the
„left/right“ arrows and hold depressed.
The slider can now be moved either left or right to a specific position
on the track.
Date and time of the current position (recorded picture) are to be
found on the left in the information box.
The oldest picture is at the far left, the newest picture at the far right
of the slider.
Fig. 5-9
28
Dallmeier electronic GmbH & Co.KG
5.5
Camera Filter for Track 1, 2 and 3
Note!
The described „Camera filters“ section does not apply for
the standard track, as this track type deals with tracks for
individual cameras.
With tracks 1, 2 and 3 the pictures of all the cameras, defined for
recording on one of these tracks in the
dialog,
are to be seen in playback.
In the operating panel for the
playback the buttons of these
cameras are depressed (green) and
thus active for playback.
Fig. 5-10
To playback pictures from just one camera, all the other cameras
must be deactivated for playback. The button(s) of the deactivated
camera(s) are highlighted orange.
The individual cameras can be activated or deactivated for playback
by clicking the relevant camera name (camera number). However,
if a lot of cameras (up to 24) were recorded on the track in question,
this method is relatively time consuming.
Activating individual cameras for playback
If you wish to view the pictures of one camera only, position the
cursor on the appropriate button and click the right mouse button.
Select
.
Fig. 5-11
Dallmeier electronic GmbH & Co.KG
29
With the exception of the selected
camera, all the other cameras are
now deactivated for playback (orange button).
Fig. 5-12
Of course you can subsequently activate further cameras and include
them in playback.
Activating all cameras for playback
In contrast to the single selection of a camera, it is possible to activate
all cameras via the selection dialog.
Position the cursor on a camera button and click the right mouse
button.
Select
.
Fig. 5-13
Fig. 5-14
30
Dallmeier electronic GmbH & Co.KG
5.6
Picture Search using „Filter Criteria“
A targeted search for pictures and events can be conducted using
filter criteria.
Click the button
.
Fig. 5-15
There are four tabs for the different search functions:
Simple Search
Picture search by date and time
Fast Search
Picture search by time intervals
Index Search
Picture search by events
Extended Search
Picture search by, for example, account number or transaction
number
Click the relevant tab to select the required search function.
Tip!
With all search functions the database can also be utilised for
the search. However this only leads to a search result, provided
recording with database entry was selected in the menu
.
If this is not the case, the picture search lasts longer accordingly
(especially with very large tracks/hard disks).
Dallmeier electronic GmbH & Co.KG
31
5.6.1
Simple Search
Click the tab
.
Fig. 5-16
A click in the box
opens a calendar, in which
you can select the date. To set the time, use the
arrow keys next to hours, minutes and seconds.
Click
to start the picture search.
Fig. 5-17
If the picture in question was found and you wish to view the pictures
before and after, close the tab by clicking the button
.
The normal playback functions are now available again.
32
Dallmeier electronic GmbH & Co.KG
5.6.2
Fast search with time intervals
With fast search the search is made in time intervals. The intervals
are configurable by day, hour, minute, second in steps of 1, 5, 10 or
30.
With a setting of Hour/5 the time interval is 5 hours.
Using the arrow keys it is possible to browse forwards and backwards
according to the time intervals. The playback functions single frame
forwards and backwards are active with this search function and
can be utilised for a more exact search.
Fig. 5-18
Dallmeier electronic GmbH & Co.KG
33
5.6.3
Index Search
With the Index Search the search is made for events before and
after the starting picture.
The „Events“ listed with Index Search are a compilation of single
events. Single events which take place within 10 seconds, for
example with picture comparison result in an event. An event can
be a recording after picture comparison or a marker (index marker
after contact) with permanent recording.
Click the button
and select the tab
.
A
Fig. 5-19
Next click the button
(A).
B
Fig. 5-20
The list contains 7 events before and after the „Current Position“.
The current position is the starting picture identified with fast or
simple search before starting the search function.
Using the keys
and
(B) you can
access the listed events. To view the events belonging to the relevant event close the search function.
An event can also be selected by double clicking the relevant list
entry.
34
Dallmeier electronic GmbH & Co.KG
5.6.4
Extended Search
Extended search is used, where, in addition to the picture data incl.
date and time, further data concerning the picture were saved. This
is particularly the case with ATMs and cashdesks.
The available search items for this search function are defined in
the configuration of the dialog
.
The extended search is conducted within a time window. The time
window is defined by the entries for
and
.
Click
Current date and time are entered.
Click
The setting is deleted.
A
B
B
Fig. 5-21
Set Date
Click the date box (A) and select the required
date on the calendar.
Set Time
Click the arrow keys to set hour, minute and
second.
Fig. 5-22
Selecting Search Items
You may select four search items, which are enlisted as an ANDlink for the search (B).
For example if you wish to search for a specific account number,
select the search item „ID02 A/C No.“.
Click the symbol for the virtual keyboard next to the search item
and enter the account number, you wish to find.
Following this procedure you may define a further 3 search items to
fine tune the search. For example by a specific amount or currency.
Start the search by clicking
.
Dallmeier electronic GmbH & Co.KG
35
5.7
Playback of Full Pictures
A check whether the viewed pictures were recorded in full picture
mode, the button displayed on the left in the picture below offers:
Full picture (Full)
Half picture (Even) Even half screen
Half picture (Odd)
Odd half screen
Click on this button to switch between
the individual modes.
Fig. 5-23
Note!
The button for the selection of the image representation is
displayed only when you selected full picture for the track in
the
menu.
Fig. 5-24
Fig. 5-25
Fig. 5-26
Select the picture display suited to your requirements.
Objects which moved during
recording, appear „torn apart“ in full
picture mode due to the comb effect.
In this case you should switch to halfpicture mode.
Fig. 5-27
36
Dallmeier electronic GmbH & Co.KG
5.8
Recording in the Background
Recording is not interrupted during evaluation of recorded pictures
in playback mode. You may however define yourself, whether
recording should be interrupted during playback.
Fig. 5-28
Recording
Stop / Start
When the button is red the recording is halted, a green button
means recording is running in the background.
Note!
Beware of accidental overwriting of recordings, especially at
high recording speeds.
As the ring-memory method involves constant overwriting of
the oldest pictures while recording, pictures which you would
like to evaluate could potentially be lost.
If you do not have the possibility of storing complete picture
sequences on an external data carrier and evaluating the
pictures independently of the recording system, then
recording should be stopped during playback.
Recording „Stop“
Recording is only stopped on the track currently being viewed in
playback mode. All other tracks remain unaffected by the „stop key“.
Dallmeier electronic GmbH & Co.KG
37
5.9
Zoom Function
The zoom function provides a digital detail enlargement with fixed
size.
Click the button
.
All the buttons in the playback
menu, with the exception of „Print
Picture“, are deactivated. In the
split window a bright rectangle
appears, which can be moved
using the mouse.
Fig. 5-29
Position the rectangle over the
picture area you wish to enlarge
and click the left mouse button.
Fig. 5-30
A
B
Two buttons are inserted in the bottom left hand corner of the split
window:
(A) and
(B).
The enlargement can either be printed out by clicking the button
in the picture or in the symbol bar.
To return to normal size either click the icon
(A) or the right
mouse button.
Click the icon
(C) to select a further
picture detail.
A
C
B
To quit the zoom function, first of all return to normal size. Click the
left mouse button once within the split window or click the button
(A).
38
Dallmeier electronic GmbH & Co.KG
5.10
Print Selected Picture
By clicking the button
single pictures can be printed
out directly from the playback menu.
Fig. 5-31
Print picture
Highlight the printer on which the picture should be printed.
Click
. Your picture will be printed out on the relevant
printer.
Setup and adjustment of your printer to your recording system is
performed by the installer (see the document entitled „Installation
and Configuration“).
Dallmeier electronic GmbH & Co.KG
39
40
Dallmeier electronic GmbH & Co.KG
6
Exporting and importing pictures
Before exporting pictures or picture sequences, select the desired
cameras in the operating panel.
Activating individual camera for export
If you would only like to view the pictures of one camera, move the
cursor to the desired button and click the right mouse button.
Select:
.
Fig. 6-1
Except for the selected camera, all
cameras are now deactivated for
playback (orange button color).
Fig. 6-2
Naturally, you can also activate other cameras for playback later
on.
Activating all cameras for export
In contrast to single camera selection, you can activate all cameras
via the selection dialog.
Move the cursor to a camera button
and click the right mouse button.
Now select:
.
Fig. 6-3
Fig. 6-4
Dallmeier electronic GmbH & Co.KG
41
6.1
Exporting pictures
To export pictures or picture sequences to external data media,
click the
button.
Fig. 6-5
Export pictures
The
window with a time filter opens. The start and stop
times define the first and last picture of a sequence to be exported.
A
Fig. 6-6
B
The hour, minute and second are set by clicking the arrow buttons.
The date is selected in the calendar opened by clicking the date
field.
When the
button (A) is clicked, the date
and time of the picture currently seen in the split window in Playback mode is entered.
42
Dallmeier electronic GmbH & Co.KG
If you would like to set start and stop times using the
(S) slider knob in the playback menu, click the
button for the
button for the
.
or the
S
Fig. 6-7
After clicking the button for the
, for example, the Export dialog
disappears and you are in Playback mode.
With the
slider knob, you can now select the picture
which is to be at the beginning of the picture sequence to be
exported. If you release the mouse button, the Export dialog
appears again and the corresponding point in time for the start is
entered.
You can proceed in the same way for the stop time.
deletes the respective entry at
Clicking the
button
the start or stop.
When you click the
button (B), the DMS/DLS searches
for connected drives which are ready for operation.
In the example, a floppy disk and
CD drive (burner) are
connected.
DVD drives and hard disks
(USB connection) can also be
connected.
When one of the buttons with
the drive symbol is clicked, only
the respective drive is listed.
D
C
Fig. 6-8
Clicking
(C) brings you back to the
dialog.
If you click the
button (D), another search for drives is carried
out, and the list is updated, if applicable.
Clicking
ends and closes the
Dallmeier electronic GmbH & Co.KG
function.
43
6.1.1
Writing picture sequence to CD-ROM
Backing up individual picture sequences to CD-ROM, especially
recordings of alarm situations, provides maximum data security.
Several smaller backups can be burned to the CD-ROM via the
multi-session process. When you complete (finalize) the CD, a
viewer allowing you to view pictures on any PC is automatically
copied to the CD.
Additional backups cannot be written to a CD-ROM which has
been finalized, even if storage space is still available.
The function sequence is almost identical to the export to hard
disk described previously.
Insert a CD-ROM.
Click
playback menu.
in the
Fig. 6-9
Select the date, start time and
stop time of the picture
sequence to be exported.
Select the camera (see next
step), or click the
button (B).
B
Fig. 6-10
Fig. 6-11
Fig. 6-12
44
When exporting from tracks 1, 2
and 3, all camera pictures of this
track are exported, i.e. selection
is not prompted.
As long as the
dialog box
(enter start time and stop time)
is shown, you can change your
camera selection by clicking the
camera buttons in the operating
panel.
Dallmeier electronic GmbH & Co.KG
Double-clicking the list entry
of the CD drive or clicking the
(B) button
establishes the connection to
the drive.
B
Fig. 6-13
Check to ensure that the
available space is large
enough.
If the available storage space
is not sufficient for an export,
insert another CD (empty/with
sufficient storage space) and
click the
button (D).
D
Fig. 6-14
Multi-session or finalizing CD?
Before switching to the next dialog, decide
whether the CD is to be finalized or additional backups are to be burned to this CD
(Multisession checkbox not activated) via the
checkbox.
Fig. 6-15
Note!
Additional backups cannot be burned to a finalized CD.
Dallmeier electronic GmbH & Co.KG
45
If you select
(checkbox activated), the ProcessViewer
program is also burned to the CD after the backup is burned. With
this program and your PC, you can view and evaluate the picture
sequences burned to CD.
E
Click the
button (E)
after making your selection.
Fig. 6-16
Using the virtual keyboard,
enter a file name for the
picture sequence.
Burning starts when you click
.
Fig. 6-17
Fig. 6-18
Once burning is complete (the duration depends on the scope of
the data), the drive drawer opens and the CD-ROM can be removed.
46
Dallmeier electronic GmbH & Co.KG
Erasing rewritable CDs (CD-RWs)
Rewritable CDs can only be fully erased. Erasing individual files is
not possible.
Switch to the dialog for data
medium information.
Click the
button (F).
F
Fig. 6-19
Select
erase or
erase in the prompt box.
If you would not like to
proceed with the erase, click
.
Fig. 6-20
Only the directory of the CD is deleted. The actual data is still
present on the CD.
All data on the CD is erased.
Dallmeier electronic GmbH & Co.KG
47
Note on Process Viewer
The ProcessViewer is a small program developed especially for
viewing pictures and picture sequences. Using this program, you
can view the pictures saved to CD-ROM or CD-RW on your PC.
The "ProcessViewer" program can also be downloaded to floppy
disk or USB stick via the Extras function in the main menu "System" of your DMS/DLS.
Please observe the detailed ProcessViewer description for this.
6.1.2
Exporting individual pictures to floppy disk
Exporting to floppy disk is only recommended for saving individual
pictures, as the storage space required for picture sequences is
accordingly large.
First select the picture you would like to export (picture in split
window) in Playback mode.
Insert a formatted floppy disk into the drive of the DMS/DLS.
Click the
button in the playback menu.
Fig. 6-21
Select the start time and stop
time of the backup.
For individual pictures, click
the
button
for both start and stop.
Click the
button
(B).
B
Fig. 6-22
48
Dallmeier electronic GmbH & Co.KG
Select the drive entry in the list
and click the
button (B).
You can also access the next
dialog by double-clicking the
entry in the list.
B
Fig. 6-23
E
In the following dialog, you are
provided with information on
the required and available
storage space, among other
things.
If the available storage space
is insufficient due to existing
files, you must either delete a
file, insert another floppy disk
or write to another medium,
e.g. CD.
Fig. 6-24
If the available storage space
is sufficient, click the
button (E).
Using the virtual keyboard,
enter a file name for the
picture.
The length of the file name is
limited to 17 characters.
Your input is confirmed by
clicking
. Saving is started
automatically.
Fig. 6-25
Please wait to remove the floppy disk until
Dallmeier electronic GmbH & Co.KG
appears.
49
To select other time ranges or to name other recording media,
button (C) in the active window.
click the
Clicking
ends and closes the
function.
Erasing file on floppy disk
If you would like to delete wrongly saved pictures, select the relevant file in the list of data medium information.
Then click the
button
(F) and confirm the safety prompt
which then appears.
F
Fig. 6-26
50
Dallmeier electronic GmbH & Co.KG
6.1.3
Exporting picture sequence to video tape
An entire track (e.g. a saved single track) or part of a track can also
be "exported" to a video tape.
Tip!
This method is only recommended in exceptional cases, as
the export can only occur via forward playback in real time
and can thus be time consuming.
Before exporting, please check whether the VCR is connected
properly. The video input of the recorder should be connected to
the looping through output of the monitor (connected to M1 of the
DMS/DLS) and connected properly.
Note!
Monitor output 2 of the DMS/DLS can only be used if the field
in the
dialog (
) is selected (see
document entitled "Installation and Configuration", Chap. 7
Setting Sequencer).
Open the track with the desired recording.
Search for the starting point of playback with the playback
functions.
Insert a video tape into the VCR.
Start recording with the VCR.
Click the playback function
in the playback menu
of your DMS/DLS.
Recording is not ended automatically. The record function of the
VCR must be ended to stop recording.
Dallmeier electronic GmbH & Co.KG
51
6.2
Importing exported pictures
Two options are available for viewing exported pictures:
1. ProcessViewer (picture viewing on PC)
2. Import (imaging viewing on DMS/DLS)
Pictures exported using the export function can be read back in at
the DMS/DLS and viewed. This does not include backups on video
tape, however.
Note!
Pictures already processed can no longer be read in and
viewed on the system.
Exported pictures cannot be saved to the hard disk of the
DMS/DLS with the Import function.
Click
selection.
in the dialog
Fig. 6-27
Insert a floppy disk or CD into
the respective drive.
Select the relevant drive in the
device list and click the
button (B).
B
Fig. 6-28
52
Dallmeier electronic GmbH & Co.KG
Select the file whose pictures are
to be viewed in the list of data
medium information.
Open the file by double-clicking
this entry or clicking
(E).
If the sought file is not found on
the inserted data medium, insert
another data medium (CD in this
case) and click
(D).
D
E
Fig. 6-29
All playback functions are available for evaluation of the recording.
Erasing files
The
function is also available in the
dialog. Individual recording files can be erased from a floppy disk, as described in
the Export chapter.
With CD-RWs, only the entire CD can be erased.
Dallmeier electronic GmbH & Co.KG
53
54
Dallmeier electronic GmbH & Co.KG
7
Delete Saved Tracks (Release)
Saved single tracks (Standard Tracks), should be released for
recording after evaluation.
Tip!
Saved single tracks (Standard Tracks), should be released
for recording after evaluation.
First switch to Playback mode.
Fig. 7-1
Delete track
Attention!
Data loss due to inadvertent erasure!
When pictures are erased, they are permanently lost.
Carefully consider whether you want to erase the pictures
of a track.
After clicking the button
a security request will open.
With the response
all the pictures on this track are deleted,
with the response
this menu will be quitted and you will find
yourself back in the
dialog.
If in doubt the relevant pictures or picture sequences should be
exported onto an external medium (see Chapter
).
Dallmeier electronic GmbH & Co.KG
55
56
Dallmeier electronic GmbH & Co.KG
8
Controlling the Camera
By clicking on a camera in the lower control panel, you will be able
to determine from the function button
, whether the camera
has been defined as controllable or not.
The function button for
is deactivated.
Camera 1 is not controllable.
Fig. 8-1
The function button for
Camera 2 is controllable.
is activated.
Fig. 8-2
Clicking the active function buttons
of the control panel for camera control.
Fig. 8-3
1
2
3
will result in the insertion
4
The functions are:
1
2
3
4
5
6
Clicking the direction arrows steers the camera up,
down, left or right. By clicking the button with the cross
hairs the camera will return to its starting position.
Fig. 8-4
The buttons 5 and 6 stand for zoom (in/out).
The buttons F1 to F4 and ALT are prepared for future options but
not yet active.
Dallmeier electronic GmbH & Co.KG
57
8.1
Saving and Retrieving Camera Positions
In addition to manual control there are up to 18 fixed positions to
choose from.
First of all, using the buttons for direction, focus, zoom and iris,
define the required position and picture segment.
To save your configuration right click the
position number under which you wish to
save the configuration.
Fig. 8-5
Select
mouse button.
Fig. 8-6
8.2
and click the left
To retrieve a particular position, left click the appropriate position
number. The camera will automatically move into the position defined
under this number.
Assigning Position Names
For easier identification of the saved camera positions you may
enter a name instead of a number.
Right click the position key for which you
wish to assign a name.
Fig. 8-7
Select
and click the left
mouse button. Using the virtual keyboard
enter the name of your choice. Click
to
accept the name.
Fig. 8-8
58
Dallmeier electronic GmbH & Co.KG
9
Reference Picture Memory
The reference picture memory is used for comparing picture quality
and camera viewing angle during inspections. It can be used to
determine whether the lens was moved or if the position of the
camera was changed in mechanical terms. If necessary the original position of the camera can be recreated.
The pictures saved at a particular point in time are defined as the
reference picture record.
Attention!
When a reference picture memory is installed, all previously
recorded pictures are deleted, since the hard disk has to be
restructured due to the additional memory. Important pictures
should therefore be transferred to another storage medium
via „Export“ beforehand.
9.1
Creating New Reference Picture Record
A reference picture record can only be created, if the appropriate
access permission has been allocated.
Fig. 9-1
Select track
Click the
button. In the inserted „Track Selection
Window“, select the track
and click
.
To create a new reference picture
record, click
.
Fig. 9-2
Dallmeier electronic GmbH & Co.KG
59
Next you will be requested to enter a name for the reference picture
record using the virtual keyboard. Once your entry has been
confirmed with
, the date and time together with the record name
will appear in the box
.
Simultaneously the pictures from the currently connected cameras
appear in the box
.
Fig. 9-3
9.2
Comparison of Reference to Live Picture
Using the arrow keys select the picture from a camera from a
reference picture record.
A left mouse click on one of the
preview pictures opens this
picture in a split window. In the
upper symbol bar the buttons
,
and
are
activated.
To obtain the corresponding live
picture, click
.
Click
to end the picture
comparison and return to the
previous menu level.
Fig. 9-4
60
Dallmeier electronic GmbH & Co.KG
9.3
Viewing Reference Picture Records
If several reference picture records already exist, it is possible to
view specific records.
In the box
highlight the picture record you wish
to view and compare with current live pictures.
Next click
. The pictures from the corresponding picture record
will be inserted.
The procedure for selection and comparison is as already described.
9.4
Deleting Reference Picture Records
Since the memory capacity of the reference picture memory is
limited, you should delete the oldest reference picture records again.
To delete a picture record, highlight the record you wish to delete in
the
field and then click
.
The memory capacity of the reference picture memory is limited to
1000 pictures. This is the equivalent of approximately 41 picture
records when 24 cameras are connected.
Dallmeier electronic GmbH & Co.KG
61
62
Dallmeier electronic GmbH & Co.KG