1
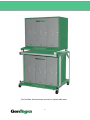
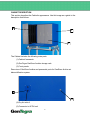
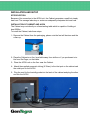
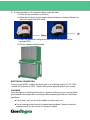
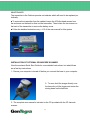
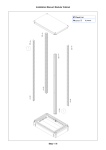
GenStore Archive Cabinet
Setup and Maintenance Manual
Version A
April 2014
Two GenStore Archives shown mounted on optional table stand.
2
Contents
Getting Started ................................................................................................. 4
Using this Manual ..............................................................................................4
Safety Precautions ............................................................................................4
Contact Us .........................................................................................................5
Cabinet Properties and Description ...................................................................6
Cabinet Properties and Function .......................................................................6
Cabinet Description .......................................................................................... 7
Installation and Setup ........................................................................................9
Site Selection .....................................................................................................9
Installation of Cabinet and ACDH .......................................................................9
Electrical Connection .........................................................................................10
Initial Cleaning ...................................................................................................10
Installation of Optional Wireless Temperature and Humidity Monitor…………...11
Maintenance…………………………………………………………………………...12
Installation of Optional 2D Barcode Scanner…………………………………….…12
Cabinet Operation ............................................................................................. 13
Appendix ........................................................................................................... 14
3
GETTING STARTED
Congratulations on your purchase of the GenTegra GenStore Archive Cabinet
and ACDH (the “Cabinet”). The Cabinet, together with the GenTegra GenPlates,
provides a safe and efficient, room temperature solution to long term biosample
storage. This manual serves as a reference for both the laboratory technicians
who use the Cabinet and the service technicians who maintain it.
USING THIS MANUAL
As a proud owner of the GenTegra GenStore Archive Cabinet and ACDH, it is
important that you read this entire manual, which covers installation, operation,
and maintenance of the Cabinet. Further, GenTegra strongly recommends that
only trained service technicians perform repairs to the Cabinet.
SAFETY PRECAUTIONS
The ACDH uses compressed air and high voltages. Throughout this manual, the
Safety icon (left) indicates when you must follow a procedure to avoid a safety hazard
such as shock or other injury. Read this section for precautions related to installation,
grounding, maintenance and repair, electrostatic damage, and product protection.
Failure to follow the guidelines here could invalidate any guarantees and warranties.
■ Installation: Follow the instructions in this manual exactly to make sure your
Cabinet functions properly.
■ Maintenance and repair:
■ Only trained and qualified repair technicians should perform repair tasks.
■ The Cabinet must be disconnected from voltage while repair or
maintenance is conducted.
■ All safety or other fixed covers must remain in place while voltage is
disconnected for maintenance or repair.
■ No equipment spare parts that a user can replace are included with the
Cabinet.
■ Product and sample protection: The Cabinet protects samples in the
GenStore Archive storage rack only when operated under normal conditions,
with all doors closed.
4
CABINET PROPERTIES AND DESCRIPTION
This chapter describes the physical properties of the Cabinet. Study the information
here before installing or working with the Cabinet.
CABINET PROPERTIES AND FUNCTION
Included with this cabinet is a separate air compressor/dehumidification (ACDH) unit
(that plugs directly into the GenStore Archive for power), which provides a source of
clean dry air to maintain humidity at or below 40% RH in most environments. This unit
generates compressed air and also removes moisture from that air. Included tubing
which attaches to the GenStore Archive cabinet pipes the conditioned air from the unit
into the cabinet. Additionally, this unit contains a condensate drain outlet. Depending
on the quality of the compressed air supply, certain amounts of liquids might be
exhausted from this port. These liquids can be disposed in several ways:
A collecting vessel can be placed underneath the port.
A PVC or Polyurethane hose can be attached to the port, leading to a floor drain or
laboratory sink. A 10 foot length of standard tubing is included with the cabinet to
connect the GenStore Archive Cabinet with the ACDH unit and for liquid draining
purposes.
An installed and pre‐configured humidistat ensures that before relative humidity
exceeds 40% the dryer will turn itself on automatically. Once relative humidity has
reached about 30% the dryer will switch off.
The inlet port for compressed air is located on the back of the cabinet. It accepts
supplied standard pneumatic tubing or an alternative with an outer diameter of 6.35
mm (¼ inch).
Cabinet Dimensions
Height:
888 mm (36 in.); Width: 1054 mm (41.5 in.);
Depth: 762 mm (30 in.)
Weight (without plates):
150 kg (330 lbs)
Performance Specifications
Relative Humidity Control: 30% ±10%
ACDH Supply voltage:
(110V‐120V single phase @ 60Hz ) or
(230V single phase @50Hz depending upon your country)
Full Load Current:
5 ampere maximum
Fuse Size:
5 x 20 mm, 10A‐250V, slow‐blow
5
CABINET DESCRIPTION
This section describes the Cabinet’s appearance. Use this image as a guide to the
description that follows.
2
1
3
The Cabinet includes the following main parts:
(1) Cabinet framework
(2) GenTegra GenStore Archive storage rack
(3) Front panels
Rear view of GenStore Archive and pneumatic ports for GenStore Archive air
dehumidification system.
5
4
(4) Dry Air inlet 4
(5) Connector to ACDH unit
6
View #1 of air compressor/dehumidifier unit
1
3
2
1) Air Inlet Fan: Warning, do not block this fan at any time. Please maintain a
distance of 6 inches between the fan and the nearest object.
2) Humidity Control Display
View #2 of air compressor/dehumidification unit
8
6
5
3
4
7
3) Exhaust Fan: Warning, do not block this fan at any time. Please maintain a
distance of 6 inches between the fan and the nearest object.
4) Plug to electrical outlet
5) I/O switch for ACDH unit
6) Condensate Drain Outlet
7) Dry Air Outlet
8) Plug for humidity probe from Cabinet
7
INSTALLATION AND SETUP
SITE SELECTION
Because of its connection to the ACDH unit, the Cabinet generates a small but steady
heat load. The average laboratory or workroom adequately dissipates this heat load.
INSTALLATION OF CABINET AND ACDH
The Cabinet may rest directly on a freestanding table which is capable of holding at
least 500lbs.
To install the Cabinet, take these steps:
1- Remove the Cabinet from the packaging, please note the feet will be down and the
rollers up.
2- Place the Cabinet on a firm, level table away from airflow or if you purchased a table from GenTegra, on that table.
3- Place the ACDH unit on the floor near the Cabinet.
4- Attach the supplied pneumatic tubing (6.35mm) to the inlet port on the cabinet and
the outlet port on the ACDH.
5- Plug the cord for the humidity probe into the back of the cabinet and plug the other
end into the ACDH.
8
6- It is also possible to roll a second cabinet under this table
a- Place the second cabinet on the floor.
b- Raise the foot by turning the castor wheel clockwise so that the Cabinet can
freely roll, repeat with all 4 rollers.
c- Attach the pneumatic tubing and sensor cord to this cabinet and the
second ACDH.
d- Roll the cabinet under the table.
ELECTRICAL CONNECTION
To plug in your ACDH, connect the power cord to an electrical supply of 110V‐120V,
1‐phase, 60 Hz power or 230V, 1‐phase 50Hz power depending upon your country.
CLEANING
Once the Cabinet is installed and turned on, clean its surfaces once to remove debris
accumulated from transportation and setup. Before cleaning the Cabinet, read these
guidelines:
■ Use a clean, soft, lint‐free cloth suitable for clean‐room use.
■ Use a cleaning product suited for painted steel surfaces. Consult a product’s
manufacturer if you are unsure of a product’s effects.
9
■ Avoid using harsh chemicals or abrasives.
■ Wipe down the Cabinet surfaces with a damp cloth and appropriate cleaning
product.
■ Carefully wipe off all debris and biological material from GenPlate surfaces
before they are placed in the Cabinet.
INSTALLATION OF OPTIONAL WIRELESS TEMPERATURE AND HUMIDITY
MONITOR
1- The transmitter comes pre‐installed by GenTegra. It rests vertically inside the back
of the cabinet.
Transmitter
Connection to Cabinet Mount
Attachment to Cabinet
2- The receiver and software must be installed on a computer at the installation site.
3- Please refer to the enclosed User Guide for this system for detailed operating instructions.
4- Insert the supplied software CD into your CD‐ROM drive on your computer and follow the on‐screen directions to install.
5- Attach the supplied antenna to the receiver. Pointing it up is recommended. Plug
the attached cord into the receiver and your computer’s
USB port.
6- When your computer indicates that it has “found new hardware” follow the wizard
instructions to install the correct USB driver from the CD.
7- For detailed instructions on capturing humidity data please see p. 3‐6 thru 3‐18
from the provided user manual for this system.
10
MAINTENANCE
The transmitter in the Cabinet operates on batteries which will need to be replaced periodically:
■ To remove the transmitter from the cabinet loosen the 4 Philips head screws from
the enclosure on the back to slide out the transmitter. Then loosen the two screws on
the back of the transmitter to remove the battery cover.
■ Follow the detailed instructions on p. 4‐12 of the user manual for this system
INSTALLATION OF OPTIONAL 2D BARCODE SCANNER
View the enclosed Quick Start Guide for more detailed instructions, but what follows
are a few key instructions.
1- Ensure your computer is turned off before you connect the base to your computer.
2- To scan, hold the imager directly over
the barcode, pull the trigger and center the
aiming beam on the barcode.
3- The complete user manual is included on the CD provided with the 2D barcode
scanner.
11
CABINET OPERATION
This section describes how to operate the GenStore Archive system, including the ACDH unit.
The on/off switch for the system is located on the back of the ACDH
■ To turn the system on, press the switch to the I position.
■ To turn the system off, press the switch to the O position.
■ Leaving the switch in the I position is required for automated humidity control.
12
APPENDIX
Electrical Safety
The ACDH is tested as a Class 1 electrical device. The correct fuse must be fitted at all
times. This, along with other parts of the electrical system, should be examined
frequently for signs of damage.
13
Should you have any questions or comments about the GenStore
Archive Cabinet, storage rack, or GenPlates, use the information
provided here to reach the GenTegra staff.
GenTegra LLC
1061 Serpentine Lane, Suite B
Pleasanton, CA 94566
Telephone 925-461-3010
8:00am to 5:00pm PST Monday‐Friday
Email [email protected]