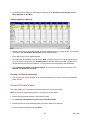
1
Up Your Cash Flow Software User Manual
Welcome!
The Up Your Cash Flow user manual assists you by retrieving specific help for all
sections of the program.
Included are step-by-step instructions on how to use a particular section or item, tips on
how and when to use certain functionality and shortcuts to maximize your interaction
with the program.
We welcome your comments and suggestions at any time. *If you do not find the help
you are looking for, please send an email to [email protected] with a detailed
explanation and we will gladly respond.
*Please note, this is a user manual on how to use the program. If you have a
current support plan, and have a support issue, you may contact us:
Phone: 1-800-873-7789
Email: [email protected]
We will respond to your requests within 24 hours (up to 48 hours on weekends).
Thank you again for being a valued customer. Now let’s get started!
Sincerely,
Up Your Cash Flow Support Team
www.upyourcashflow.com
1
Rev. 8/08
Up Your Cash Flow Help Desk
The Up Your Cash Flow Help Desk assists you by retrieving specific help for any section of the program.
Included are step-by-step instructions on how to use a particular section or item, tips on how and when to
use certain functionality and shortcuts to maximize your interaction with the program.
Main Contents
3
Getting Started
8
Importing Data
15
Managing Entities
22
Company Data
25
Sales and Collections
43
Cost of Goods Sold
52
Expenses
68
Other Financial Items
74
Other Cash Flow Items
78
Reports
83
Multi-year Forecasts
88
Consolidations
92
Integrating Actual Data
96
Roll Forward
97
Financial Analysis
102
Troubleshooting
2
Rev. 8/08
Getting Started
This section allows you to familiarize yourself with how Up Your Cash Flow is organized.
4
Welcome Screen Overview
5
Quick Start
6
Planning Center
7
One Hour Forecast
9
Sample Plan and Sample Data
9
Screen Resolution
3
Rev. 8/08
Welcome Screen Overview
The Welcome screen provides a visual guide to the main areas of Up Your Cash Flow. It allows access
to Quick Start, the Planning Center, One hour Forecast, Open Create Forecast, Key In/Import Data
feature, Tutorials and Help.
The Quick Start button takes you to an interface that allows users to create a forecast
with limited planning options for faster results. It is a step by step guide to creating simple forecasts .
The Planning Center button takes you to a user interface screen that allows access to
all planning features of the program. Here, you can build a new plan or edit an existing one. Enter or edit
data by left clicking on a feature directly. Items that are numbered represent areas for basic planning and
correspond to the Quick Start sections. Those marked with an X indicate you have entered data for that
section.
The One Hour Forecast button takes you to an interface that allows the user to
create a forecast using prior period information as well as basic expense and collection assumptions. The
format is easy to use and promises the user will have results within an hour.
The Open / Create a Forecast button provides quick access to a list of
entities that have been created. From here the user can create new entities and forecasts or switch to an
existing entity.
With the Import Data function, UYCF allows you to bring your current or
historic financials from ANY bookkeeping program via .CSV format. See instructions below for generic
importing. The Key In function allows you to input Beginning Balance Sheet and Profit and Loss
information to your forecast.
The Tutorial and Help button gives the user access to a myriad of helpful tutorials.
The tutorials are instructional videos designed to provide step by step instructions on how to properly
enter data and make use of the numerous planning options available for developing forecasts. Please
note all tutorials are online and require an internet connection to be viewed.
There is also a tool bar for quick and convenient access to other functions of the program. The function
of each icon is displayed by placing the mouse pointer over the icon.
The bottom bar on the main screen identifies the name and number of the entity currently open.
4
Rev. 8/08
Quick Start
The Quick Start section gives you the opportunity to create a forecast using limited planning options. The
interface simplifies forecast creation by numbering the steps involved, limiting the planning options to
provide the most common development methods, and allowing users to preview financials reports to see
how their changes have impacted their forecast.
Company Data - Defines company information such as company name and fiscal year.
Beginning Balances - Establishes Beginning Balance Sheet data
Sales - Determines sales data and how it will be collected. Assumes sales are calculated in a basic
manner and does not allow % of completion or sales allocation by product or employee. You may access
these options from the Planning Center.
Miscellaneous Income - Gathers all non operating income generated.
Cost of goods sold - Defines how cost of sales will be calculated and payment assumptions. Assumes
cost of sales will be calculated as a percentage of sales. Other options are available from the Planning
Center.
Expenses - Generate a basic payment assumption for your expenses and create/edit existing expenses
in up to 9 expense departments.
Amortization of Prepaid expenses - Amortize beginning and new generated prepaid expenses.
Income taxes - Establish an income tax rate and generate a payment schedule.
5
Rev. 8/08
Payment on beginning accounts payable - Generate a payment assumption for beginning accounts
payable.
Payment on beginning accrued expenses - Generate a payment assumption for beginning accrued
expenses.
Payment on other payables - Generate a payment assumption for beginning other payables.
Payroll - Define payroll expense for your expense departments.
Owner’s Draw - Develop an owner’s draw account.
Payroll taxes - Develop a payroll tax expense.
Purchase of equipment - Record a planned equipment purchases for the year as well as financing for
the purchase.
Depreciation - Define how depreciation expense will be calculated for each expense department.
Term Loans - Generate new tern loans and define an amortization schedule for existing term loans.
Credit Line Financing - Record any existing credit lines as well as payments and new borrowings. The
credit line maybe calculated as function of accounts receivable and inventory account balances.
*Preview reports allows users to view and print forecasted P&L, Balance Sheet, and Cash Flow
Statements*
Planning Center
The Planning Center gives you a bird's eye view of how Up Your Cash Flow groups together different
sections of the planning process. Think of it as a "map" that visualizes how each function relates to
another. From here you can access any part of the process, track where you have been and determine
what sections have not yet been completed. Note: all options available here can be accessed directly
from the Profit & Loss and Cash Flow reports.
The Planning Center is divided into 9 sections containing several items within.
Company Data - Gathers company data and beginning balance sheet data.
Sales - Determines sales data and how it will be collected.
Cost of Sales - Defines how cost of sales will be calculated and payment assumptions
Total Department 1 - Calculates expenses for Expense Department 1.
Total Department 2 - Calculates expenses for Expense Department 2.
Total Department 3 - Calculates expenses for Expense Department 3.
Total Department 4 - Calculates expenses for Expense Department 4. Note: this is the default
expense department. Use it for General and Administration expenses, or if you have only 1 expense
department.
6
Rev. 8/08
Other Financial Items - Details loan activity, interest and income taxes.
Other Cash Flow Items - Gathers data for equipment purchases and other items that affect cash flow.
There are 3 buttons on the lower right corner pertaining to Expense Departments.
Enter Expense Department Titles - Rename the 4 expense departments as you wish.
Enter Expense Payment Assumption - Defines the default expense payment assumption for the entire
plan. Individual expense payment assumptions may be edited directly from the expense prompt.
Display 5 Additional Departments - Adds up to 5 additional expense departments. You will edit
expense data directly from the profit and loss instead of using the Planning Center.
Other Functions
Set the Color of the Planning Center - Click this button to reduce eye strain by setting a color scheme.
Back - Takes you back to the Welcome Screen. Note: to use any functions located on the top tool bar
you must first close the Planning Center by clicking this button.
Done/View Results - After entering data, click this button to calculate and view the results of your plan.
You will be taken directly to the Profit & Loss report. You may continue entering/editing data directly from
the profit and loss.
Legend Information
An X will appear next to those sections you have visited and entered data for.
Numbered items indicate sections necessary for basic planning. Entering data for these sections will
result in a simple basic plan including beginning balances, sales, cost of sales, expenses, loans and
credit lines, income tax, and equipment purchases. All other sections are optional and usage will vary
according to the complexity and breadth of your projections.
One Hour Forecast
Up Your Cash Flow allows users to access the one hour forecast. As the name suggest, using limited
information, users can create a forecast in as little as one hour. Sections 1-5 shown in the interface
represent a mandatory field, which must be completed in order for the software to generate a forecast.
Also, each section is numbered to shown the order in which we recommend the data be entered.
7
Rev. 8/08
1. This is your company data which includes company name and fiscal year.
2. Your beginning balance sheet data is entered here. See the Beginning Balances section for more
information.
3. Enter the sales estimate for the period that you are forecasting.
4. Enter the prior year’s sales data for each month.
5. Enter the prior year’s collections from sales for each month.
6. Enter cost of goods sold as a percentage of sales
7. Enter variable expenses as a percent of sales and fixed expenses as a given monthly amount.
For section 6 and 7 if you would like a more detailed breakdown of these expense, click the “Use a
worksheet” button. This menu allows you to drill down the cost of goods sold and fixed expense data.
8. Enter the depreciation expense for your forecast. See the Depreciation section of this document
for more information.
9. Enter any credit line financing items here. See the Line of Credit section of this document for
more information.
8
Rev. 8/08
10. Enter any tern debt items here. See the Term Loan Amortization section of this document for
more information.
Once you are finished entering in your data click Save and use this data to transfer this data to your
forecast. You may continue to edit your data through the P&L or the Planning center. However, If you
open another One Hour forecast in the same entity the One Hour forecast data will override any data you
had previously entered.
Sample Plan and Sample Data
Up Your Cash Flow provides an entity containing sample data for a hypothetical business allowing new
users to familiarize themselves with the process of planning with Up Your Cash Flow. You can view and
edit all data entered in this entity. Manipulating the data yourself allows you to understand how the
program relates different areas of the planning process. Tip: Try changing a cash flow or payment
assumption and then immediately viewing the cash flow or P & L report to see the impact.
To access the sample data:
• Click Entity Control
• Select Open an Entity
• Double click on Entity No. 99 "Up Your Cash Flow Sample Data"
Screen Resolution
Because Up Your Cash Flow screens are so comprehensive, some screens may appear to run off the
screen when used with monitors set to 800 by 600 pixel resolution. We recommend setting your monitor
resolution to 1024 by 768 pixels or higher for the best viewing situation. This ensures you will see all
menus and windows in their entirety.
To set your monitor's screen resolution:
• Click the Start button on your Windows tool bar
• Select Settings, then Control Panel
• Double click on Display
• Select the Settings tab
• Slide the Tab in the Screen Area box to a setting of 1024 by 768 pixels or higher.
• Click OK
• Click OK again to accept the resolution change.
9
Rev. 8/08
10
Rev. 8/08
Importing Data
Up Your Cash Flow allows you to import data from most bookkeeping software and accounting packages,
saving you valuable time normally lost on data entry. This feature allows you to quickly create a financial
plan using historical information that then serves as a comparative analysis. Certain assumptions are
made when creating the new plan that may or may not apply to your situation. Please see page 25 to
address this concern.
The following types of data can be imported into Up Your Cash Flow:
1. A trial balance (generally used to develop a financial plan using history)
2. Monthly profit and loss data (used for comparing actual P & L to your planned P & L)
3. A Budget (used to compare actual spending with budgeted amounts)
4. Monthly balance sheet (used for comparing actual cash flow to your planned cash flow)
Process
Prepare a file for importing. Transfer your file data into UYCF. Assign and map account titles. Transfer
mapped data to a UYCF entity. Adjust plan for assumptions made.
10
Preparing a File for Importing
12
Mapping Accounts
14
Transferring Data
Preparing a File for Importing
Up Your Cash Flow is designed to import historical or current financial data from a generic spreadsheetform file that has been exported from any software. UYCF can easily import data that has been exported
from most accounting programs to an Excel spreadsheet. The spreadsheet, (trial balance for example),
must be in a specific format: 4 columns of data including account number, account titles, debits and
credits; saved to a comma delimited (.CSV) file.
Most accounting programs have an export feature. Consult your program's manual for help in exporting
your data to Excel or converting it to a common delimited ASCII file.
After importing data to Excel, arrange your data into 4 columns:
Column A
Account Numbers
Column B
Account Titles
Column C
Debits
Column D
Credits
After arranging, your spreadsheet should look like this:
11
Rev. 8/08
Please note no commas in the numeric columns.
You are now ready to save your data to a comma delimited (CSV) file.
• In Excel, click File and then click Save As.
• In the field, Save As Type, choose CSV (OS/2 or MS-DOS)(*.CSV) from the drop down list.
• Enter a file name and click Save. Note: remember the file name and where you saved it.
The saved file will look like the following when opened in MS Word.
Please note no commas in the numeric columns.
Importing a File
• From the Welcome screen click the Key In/Import Historical Data
12
button.
Rev. 8/08
• Choose to import a trial balance, P & L, budget, or actual balance sheet by clicking on the
corresponding button.
• Answer prompts (if applicable) and select the file to be imported.
Mapping accounts:
The following screen allows you to map imported data accounts so that they correspond to UYCF
accounts. The left side contains data from your imported file, the right lists all UYCF accounts (by default,
Balance Sheet accounts are listed first). By mapping your import accounts to those in Up Your Cash
Flow, the program ensures all information is included in your forecast and is placed in the correct
accounts. Ex: in your trial balance you have petty cash and 2 checking accounts, both would be mapped
to the Cash account in UYCF.
• Highlight (left mouse click) an item on the left, then left double-click the UYCF account you want to
assign it on the right.
• To map a group of imported accounts into one UYCF account, highlight the first item then hit the
spacebar, highlight the second item then hit the spacebar, and so on. Once all desired items have
been highlighted, highlight (one click) the corresponding UYCF account on the right and hit the
spacebar. All items will be mapped to that UYCF account.
To un-map an item, highlight the item on the left and right-click the item.
• Balance Sheet accounts are displayed by default. To display P & L accounts, click Display Profit and
Loss. To display General/Administrative Expense accounts click Display Default Dept. 4. To display
all departments in UYCF, click Display All Depts.
Automatically Map Accounts
This feature saves time by automatically mapping your accounts to corresponding UYCF accounts. But
because there are several different naming conventions for the same type of account (i.e. cash can be
petty cash, checking account, etc.) you should review the accounts list after mapping to ensure all
accounts were correctly mapped.
• Click Automatically Map Accounts.
• Read the statement and click Next.
This begins the auto mapping process. You may receive prompts asking for data in special
circumstances and/or data regarding term loans and line of credit.
13
Rev. 8/08
•
Transferring Data
• After mapping all accounts, you must click Transfer Trial Balance (P&L or Balance Sheet) to transfer
your data into Up Your Cash Flow.
Your data has now been imported into UYCF. You can proceed to run your reports.
• Click Quit
Assumptions
Because a trial balance provides limited detailed data, certain assumptions are automatically made when
importing and the most basic scenarios are assumed. Therefore after importing your data, you should
adjust your plan to more accurately reflect your situation. Below are the assumptions made:
•
Because a trial balance does not specify data by month, UYCF assumes sales data will be spread
evenly through the 12 months. Because this is probably not realistic, you should adjust sales data
after completing the import feature.
14
Rev. 8/08
•
UYCF assumes all expenses are a percentage of sales. Since this may not necessarily be true, you
should adjust each expense item to reflect the actual situation.
•
All sales are assumed to be collected 100% the month of the sale. You should adjust this to reflect
the actual situation.
•
All payments assumed to be paid 100% the month of the expense. You should adjust this to reflect
the actual situation.
15
Rev. 8/08
Managing Entities
Up Your Cash Flow creates financial plans for what are referred to as Entities. Think of an entity as a
separate file. Each of these files holds data for either a single business, a division of a business or a
single year of multi-year plan. You can create and store up to 99 separate entities. The current entity
you are working on is shown on the blue bar on the bottom left of the screen.
All functions dealing with entities can be found by clicking the icon
16
Create a New Entity
16
Open an Existing Entity
16
Save an Entity's Data
17
Copy Data from One Entity to Another
17
Restore an Entity from a Disk
18
Zip Up an Entity
18
Remove Data from an Entity
19
Delete an Entity
19
Change Entity's Name, Fiscal Period or Plan Year
19
Set for USA/Canada
20
Using Percentage of Completion Accounting
20
Transfer Account Titles from One Entity to Another
20
Export Data to an Excel Spreadsheet
16
located on the top tool bar.
Rev. 8/08
Create a New Entity
• Click Entity Control
• Select Open an Entity. Create a New Entity
• In the menu, click the Create New Entity button at the bottom
• Enter a number between 2 and 98. Note: the following entities are not available for creating a new
entity. 0 - Consolidation Entity, 1 - Default Entity, 99 - Sample Data Entity.
The program will then notify you are working in the selected new entity.
• Click OK to begin working in the new entity.
Note: At any time, verify what entity you are working on by looking at the blue bar on the bottom left of the
screen.
Open an Existing Entity
• Click Entity Control
• Select Open an Entity. Create a New Entity
• A List of Entities window will pop up. Double click on the entity you want to open.
• The program will then notify you that you are working in the selected entity.
• Click OK to begin working in this entity.
Note: At any time, verify what entity you are working on by looking at the blue bar on the bottom left of the
screen.
Save an Entity's Data
Up Your Cash Flow saves data automatically as you go. There is no need to tell the program to save
data once it has been entered. You can, however, save an entire entity to another location on your hard
drive or network, or you can save the entity to a disk for transfer to another PC or site.
To save to another directory or disk:
• Click Entity Control
• Select Copy Data to Directory/Disk
17
Rev. 8/08
• Select Save Data to Diskette or Hard Drive
• Enter the number of the entity you want to save
• Select the Destination Drive and/or Destination Folder
• Click OK
Copy Data from One Entity to Another
This function transfers data from an existing entity to another entity. If requested to transfer/copy data to
an entity that has not been created, the program creates the requested entity and saves data in it.
However, the program will not copy an entity with no sales data entered.
To copy data from one entity to another:
• Click Entity Control
• Select Copy... Another Entity
• Select Copy Data from One Entity to Another
• Enter the number of the entity to copy and the number of the entity to copy to
• Click OK
• Verify the action
Restore an Entity from a Disk
If you have data from another computer on a disk that you want to use here, you must transfer this data.
After transferring, you must open the entity.
To restore an entity from a disk:
• Click Entity Control
• Select Copy... Restore Data from Disk
• Select Copy Data from a Diskette or Hard Drive
• Select the Originating Drive and/or Originating Folder
18
Rev. 8/08
• Select File Type (The program saves entities as either Entity No. or Savit File types. By default, Entity
No. files are listed. If no files appear when you select the D; (CD-Rom) drive, you may need to select
Savit File in order to display the files on your disk.)
• Highlight the desired file by left clicking on it.
• Click OK
• Enter the number of the entity (1 - 98) you wish to copy the new data to and click OK
The program will notify you when your data has been transferred
To begin working on the data, you must Open the Entity
Zip Up an Entity
This function allows you to zip up an entity for file transfer. Zipping creates a smaller sized file and makes
it easier to copy to a disk. All files in an entity's database are copied and condensed into one new file
which can then be copied to another disk or folder on a hard drive.
To zip up an entity:
• Click Entity Control
• Select Zip Up This Entity
• Enter the number of the entity you wish to zip
The program will zip the files using DOS commands in a new window. You do not need to enter any
information. Once complete, the program displays the file name and location of the new zip file. Make a
note of it for future reference.
Remove Data from an Entity
This function permanently erases all data from an entity except the following 4 areas that can be saved:
employee names and numbers; product names and numbers; user-defined expenses; and/or "drill down"
expense data. Once deleted the data cannot be recovered. The entity, however, can be reused.
To remove selected data from an entity:
• Click Entity Control
• Select Remove Data from This Entity
• The next menu asks what data it should delete. Click Yes to delete the item or No to save the item for
each section. Your choices are displayed below each question.
19
Rev. 8/08
• Verify all selections are correct (remember, deleting is permanent) and type in the word CLEANUP to
confirm the deletions.
• Click OK to complete the action. (If you decide not to delete, click Done to exit the menu.)
Delete an Entity
Deleting an entity erases all information in an entity including the entity itself. Use this function for erasing
an entire entity only. If you wish to remove all or most data from an entity use the Remove Data from an
Entity function. Note: you cannot delete the active entity. To delete the active entity, open and activate
another entity and perform the delete function there. Otherwise the program will not allow you to delete.
To delete an entity:
• Click Entity Control
• Select Delete an Entity
• Enter the number of the entity you wish to delete
• Verify the action
Change an Entity's Name, Fiscal Period or Plan Year
Change the current active entity's Company name, fiscal period, incorporation status or plan year. This is
the same function found by selecting Name, Fiscal Period, and Plan Year under the Company Data
section of the Planning Center.
To change an entity's data:
• Click Entity Control
• Select Change the entity's name, fiscal period or plan year
• Enter the appropriate changes
• Click Done
Set for USA/Canada
Because Canadian businesses need to take Value Added Taxes (VAT) into account, Up Your Cash Flow
allows you to set the program to account for GST in different areas of the business plan. While the GST
usually balances to zero at the end, it can be a considerable cash flow concern. Setting this function
allows you to consider the tax in your projections.
20
Rev. 8/08
Set for USA/Canada:
• Click Entity Control
• Select Set for USA, Canada
• Click the button for either USA or Canada (GST included)
Using Percentage of Completion Accounting
This method performs sales calculations by job or contracted work. It is ideal for contractors who need to
project cash flow by job. The program must be told to use this method of accounting before entering data
for this section.
To set for percentage of completion accounting:
• Click Entity Control
• Select Set this Entity to Percentage of Completion Accounting
• Verify the action
Transfer Account Titles from One Entity to Another
This function if useful when creating entities for separate branches/departments within a company that
carry similar account titles or for multi-year forecasting. It eliminates having to re-enter al titles again in
the new entity.
To transfer account titles:
• Click Entity Control
• Select Transfer One Entity's Account Titles to Another Entity
• Enter the number of the entity you wish to copy titles from and the number of the entity you wish to
copy titles to.
• Click OK
The program will notify you the transfer is complete.
Export Data to an Excel Spreadsheet
Up Your Cash Flow allows you to export data in an entity's Profit & Loss, Cash Flow, Balance Sheet,
Profit & Loss VS Actuals, and/or Plan Assumptions report to an Excel spreadsheet.
21
Rev. 8/08
To export report data to an Excel spreadsheet:
• Click Entity Control
• Select Export this Entity's P&L, Cash Flow, Balance Sheet to Excel
• Select the reports you wish to export. The program will instantly create a transfer file for each
selection made.
• To view the reports immediately in Excel, click Retrieve File in Excel. This opens the Excel program
separately and loads the report data in spreadsheet form.
• Click Done when finished
22
Rev. 8/08
Company Data
This section gathers data to setup your plan.
23
Company Name, Fiscal Period, Plan Year
23
Beginning Balances
23
Rev. 8/08
Company Name, Fiscal Period, Plan Year
This section asks for the company name, fiscal period of the plan, incorporation status and the plan year.
To enter the above information:
• From the Planning Center select Name, Fiscal Period, Plan Year
• Enter Company Name
• Select the beginning month of your forecast by choosing from the drop down menu. If you prefer to
use a numeric (1 - 12) system, click Use Numeric 1 to 12.
• Select Yes if the business is incorporated, No if it is not
• Enter the year this plan occurs
• Click Done to return to the Planning Center
Beginning Balances
This section allows you to enter beginning balance data for your plan if appropriate. You can also
transfer the ending balance sheet of another entity into the beginning balance sheet of this entity. Note:
you are not required to have beginning balances to create a plan. Payments, collections and amortization
of items in beginning balances are accounted for later in the planning process.
To enter beginning balance data:
• Enter data for Assets
• Enter data for Liabilities and Stockholder's Equity (Accounts Payable is solely monies owed on the
cost of goods sold. All other expenses should be entered in the Accrued Expenses line.)
The program will warn you if assets and liabilities are out of balance. You will not be able to run, view or
print reports if you are out of balance. While it is possible to exit this section "out of balance", you will be
required to correct the condition before running any reports.
The "Out of Balance" amount is displayed at the lower left corner of
the screen. If out of balance, correct the data.
Or to transfer another ending balance sheet here:
• Click on Transfer Another Entity's Ending Balance Here
• Enter the number of the entity you want to transfer the ending balance sheet from
• Click OK
24
Rev. 8/08
All data from that entity will be transferred here. Adjust as needed.
After entering all data:
• Click Print to immediately print the beginning balance data you just entered. The program will
automatically send the print file to your default printer.
• Click Done to exit and return to the Planning Center.
25
Rev. 8/08
Sales and Collections
This section gathers sales data and collection assumptions. There are 3 methods for entering sales and
collection data, varying in levels of detail. The General Method forecasts total sales and collections. The
Sales by Product method supports a full manufacturing environment, offering separate cash flow
assumptions for each product, employee, service or customer. The Percentage of Completion method
forecasts sales and collections by job (contractors). All are accessible through the Planning Center. You
can also access the options by double clicking the Sales line in the Profit & Loss report.
26
General Sales and Collections Method
31
Sales by Product/Employee/Service/Customer Method
36
Percentage of Completion Method
40
Miscellaneous Income
If you decide to enter data for more than one sales method for comparative purposes, you need to
designate which method to use in your actual plan. Click the Use This Sales Option button in the sales
method menu you wish to use. Otherwise the program uses the last sales method entered. This allows
you to switch sales methods back and forth and immediately view the impact on your cash flow and profit.
26
Rev. 8/08
General Sales and Collections Method
This method is the quickest way to forecast basic sales data for your plan. Enter your estimated annual
sales or the prior year's sales and increase/decrease that amount by dollars or a percentage. Then
specify how to spread the annual sales over the 12 months. Finally, choose from 3 collection options.
The sales and collections screen allows you to enter/edit any section in any order. (If entering data for
the first time, follow the order of the list.) The right side summarizes the assumptions used for each
section.
• Select any item to work on. Note: if you decide to change data for any item in this list later, the
program will automatically update all other related sales sections. Therefore you will not have to enter
each section to manually update new data.
Note: sections with several options allow you to enter data for any/all options for comparison purposes.
The program provides comparison screens after which you will be prompted to select an option to use in
your plan.
Sales (Annual)
Sales by Month
Sales Collection Assumptions
Sales Collection by Month
After entering data into any section here, this screen summarizes data entered and assumptions used.
This is displayed to the right of the screen.
Once you have entered data for all 4 sections, click Use This Sales Option to make the program choose
this data over other sales options. Otherwise, if you have entered this data for comparison purposes
only, click Done to save data entered but not use in your plan.
Sales (Annual)
• Enter the last 12 months' total sales number or the current year's total sales estimate.
• Increase/decrease the above number by a dollar amount or a percent.
27
Rev. 8/08
The new sales forecast for this plan is calculated below.
• Click Done
Sales by Month
This section spreads the annual sales projection by month. It allows you to create a monthly sales
pattern in 1 of 3 ways: following a sales ratio determined by last year's sales data, spreading total sales
equally by month, or by entering specific monthly sales as you wish.
Enter data for any of the following options:
Option 1 Create a pattern based on the last 12 month's sales.
Option 2 Spread sales equally over the next 12 months.
Option 3 Enter monthly sales data as you wish.
• Click Next
• Select which option to use in your plan by clicking the corresponding button.
Create a pattern based on the last 12 month's sales.
For existing companies:
• Enter the last 12 month's sales data in the fields of the left column.
This data will be turned into a ratio displayed in the % Column. The program uses the total sales
estimate provided in the Sales (Annual) section and applies this ratio. The results are displayed in
Column 1 New Sales.
For start up companies or companies without prior year sales data:
You can still create an incremental sales pattern to follow.
• Click the button Click Here found above the left column.
• There are 4 options for determining sales: increase by a fixed percent: increase each month, increase
every other month, increase each quarter, increase semi-annually. Enter the fixed percent for the
desired option. The result is displayed in the fields below using the provided percentage and total
sales estimate provided in the Sales (Annual) section.
• Click Done
Spread sales equally over the next 12 months.
This option is automatically calculated for you. The program takes the total sales estimate provided in the
Sales (Annual) section and divides it by 12 months. The result is equal sales numbers per month for the
12 months of the forecast. This is displayed in Column 2 New Sales Equal Each Mth.
28
Rev. 8/08
Enter monthly sales data as you wish.
This option allows you to enter specific monthly sales data as you wish or edit data transferred from the
other columns. Click buttons in the lower left corner of the screen to transfer column data.
• Enter sales numbers directly into the fields under Column 3 Allocate New Sales as You Wish.
Sales Collection Assumptions
This section defines how and when you will collect revenue from sales during the forecast period and
affects the Accounts Receivable line on the balance sheets. Without collection data, it is not possible to
properly forecast cash flow. Be sure you enter data here. There are 3 collection options to choose from.
Enter data for all 3 if desired. The following screen will recap your data and prompt you to choose one for
use in the plan.
Option 1 Collections as a percent of sales.
Option 2 Collections by month.
Option 3 Collections by setting number of days sales in accounts receivable.
• Click Next
Collections as a percent of sales.
This option collects sales for the entire year as a dollar amount or percent of sales. This amount will be
divided equally among the 12 months.
Note: any amounts in beginning accounts receivable are assumed collected by the end of the forecast
year, but the program will not specify when they are collected.
• Enter total annual collections as a dollar amount or percent of sales.
• Click Next or enter data for other collection options.
Collections by month.
This option allows more detail than annual collections. It assumes sales will be collected consistently in
the month of and/or the months following the sale. You may forecast collections up through 4 months
after the sale.
• Enter the percent of sales you expect to collect each month. Ex: you expect to collect 80% of the sale
the 1st month after the sale and 20% the 2nd month. Enter 0 for Month of Sale, 80 for 1st Month After
Sale, and 20 for 2nd Month After Sale.
Note: total collection percent cannot equal more than 100%.
29
Rev. 8/08
Collection on Accounts Receivable
You must indicate a collection assumption on accounts receivable if you choose this option. Otherwise
the program will not know how to collect your beginning A/R. There are 2 options.
Apply Option 2's Formula
This applies the percent formula entered above towards your A/R.
• Click this button and the next screen shows you amounts that will be collected based on days aging.
These amounts will be collected in the plan year.
Make Collections on Beginning A/R as You Wish
This allows you to enter specific dollar collections in the month they occur in the plan period. This allows
a more accurate forecast.
• Click this button and enter dollar amount collections by month. The beginning A/R balance is shown
above. As you collect, the remaining A/R balance is shown below. Click Done when finished.
Collections by setting number of days' sales in accounts receivable.
This option calculates collections based on days' sales remaining in accounts receivable. Prior year's
sales data is required for this option.
The screen is split into 2 sections to offer a comparative analysis: prior year's days in A/R and forecast
year's estimate of days in A/R.
Prior year's days in A/R (left side)
Based on the beginning A/R balance entered in the Beginning Balances section and the prior year's
monthly sales data entered in the fields below, the program calculates how many days' sales in A/R
existed for the prior year.
This number will be automatically plugged into the field for days' sales in A/R on the right side. The
program will then calculate the A/R for the forecast period.
Forecast year's days in A/R (right side)
The number of days' sales in A/R entered in the field on the right drives the accounts receivables in the
plan. You can now decide whether your day’s sales in A/R for the plan year should remain the same or
be adjusted. Here you can play "what if" scenarios with the day’s sales in order to reach the account
receivable amounts you want. These amounts will then drive collections by month shown in the following
screen.
Explanation of calculations
By entering your current or estimated days' sales in A/R for the forecast period, the program will calculate
your monthly A/R by multiplying each month's average daily sales by the desired number of days' sales.
In the event that your desired days' sales is greater than 30, the program will multiply the prior month's
average daily sales by the number of days sales minus 30, and add that amount to the current month's
A/R. The calculation allows days sales greater than 30.
30
Rev. 8/08
To use this option:
• Enter the prior year's monthly sales data in the fields provided on the left. The program will
automatically calculate days' sales A/R for the prior year and display it above.
• Enter the desired number of days' sales in A/R for your forecast in the field provided on the right.
Accounts receivables calculated from this data will be displayed on the right. Adjust the number of
days' sales in A/R as desired. You will see the impact on collections in the next section "Collections by
Month".
Sales Collections by Month
This screen shows your collections grouped by collection options entered in the screen before. Only
those options you have entered data for previously will show up here. Otherwise the column will be
zeroed out. Decide which option (column of data) is most appropriate for your plan and choose it using
the buttons provided on the following screen.
Column 1
The first column of blank fields allows you to enter prior year's collections by month. This is then
translated to a percent ratio which is applied to forecasted sales. The result of this calculation is
displayed in Column 1 Collections X Percent to the Left.
Column 2
This data corresponds to Collection Option 1. You had entered a total desired annual collection amount
or collections as a percent of sales, which is then divided equally among the months of the plan. This
data includes collections on both A/R and beginning A/R.
Column 3
This data corresponds to Collection Option 2. Collections are based on the percent pattern entered
previously. To view the pattern, click the View Pattern button above. This data includes collections on
A/R and beginning A/R (using the pattern or as amounts you enter).
Column 4
This data corresponds to Collection Option 3. Collections are calculated using a desired number of days'
sales in A/R. This data includes collections on A/R and beginning A/R.
• Decide which option (column of data) to use. Click Next. Click the button corresponding to the option
you wish to use.
• The next screen allows you one more chance to edit collections as you wish. Enter data if desired.
• Click Next
• Add default notes by clicking on View/Default Notes.
• Click OK
31
Rev. 8/08
Sales by Product/Employee/Service/Customer Method
This option allows you to plan sales in more detail depending on the configuration of your company. You
may plan sales by product/product line, employee, service, or by customer.
• Access any of the following options by selecting Sales by Prod/Employee/Service/Customer under
the Sales section of the Planning Center or by double clicking the sales line in the Profit & Loss report.
32
Sales by Product
34
Sales by Employee
35
Sales by Customer
36
Sales by Salesperson or Service
• Click Use This Sales Option to make the program choose this data over other sales options.
Otherwise, if you have entered this data for comparison purposes only, click Done to save data
entered but not use in your plan.
32
Rev. 8/08
Sales by Product
Use this option if your company has multiple products with different sales prices. You can also figure in a
sales price increase/decrease starting any month of the period.
• Select Plan Sales by Product
Standard Sales Collection Assumption
• Enter a standard sales collection assumption for this option. You will have the opportunity to edit this
assumption for each product. Enter the percent you expect to collect each month. Click Next
Product Data
• Enter Product Number (required), Product Name and the Sales Price per Unit
• If there will be a price change in this product during the forecast, enter what month (1-12) the change
will occur, and the price change as either a dollar or percent (for a decrease use the - minus sign).
• Enter an estimate of units of this product to be sold each month.
Price Increase Analysis
This is a calculator for determining the impact of a price increase/decrease on current profit margins. The
calculations show the maximum decrease in units and percent of sales to maintain the current profit
margins.
• Click the Price Increase Analysis button
• Enter the product number and name and requested product data. To choose a product you have
entered data for to work on, click List/Print/Delete/Pick a Product, double click on the desired
product and click Work on This Item. The data will be transferred to the calculator.
The bottom section of the screen shows you the maximum decrease in units, maximum decrease in
percent of sales, and minimum number of units to maintain the current profit margin.
• Click Done
Collection Assumption
You may edit the sales collection assumption for each individual product, overriding the standard
collection assumption. This affects the accounts receivable amounts on the balance sheet.
• Click on Edit Collection Assumption
• Enter the percent you expect to collect for this product each month. Click Next
33
Rev. 8/08
• After entering all data for this product, click Enter/Go to Next Product to enter data for another
product.
• Click Next after you have entered data for all products.
• Click Yes to verify
Collection on Opening Receivable Balance
You must indicate collections on the beginning accounts receivable amount (if any) entered in the
beginning balance sheet.
Your beginning A/R balance is displayed on top.
• Enter cash collections in the month collected.
The remaining balance in beginning A/R is displayed at the bottom.
• Click Done
Recap of Sales by Product
• The following screen recaps total sales of all products by month. Click Next
Sales by Employee
Use this option if you wish to track sales generated per employee by billable hours. You can also figure
in a rate increase/decrease starting any month of the period.
• Select Plan Sales by Employee
Standard Sales Collection Assumption
• Enter a standard sales collection assumption for this option. You will have the opportunity to edit this
assumption for each product. Enter the percent you expect to collect each month. Click Next
Employee Data
• Enter Employee Number (required), Employee Name and the Billing Rate per Hour
• If there will be a rate change for this employee during the forecast, enter what month (1-12) the
change will occur, and the rate change as either a dollar or percent (for a decrease use the - minus
sign).
• Enter an estimate of the number of hours to be billed each month.
34
Rev. 8/08
Collection Assumption
You may edit the sales collection assumption for each individual employee, overriding the standard
collection assumption.
• Click on Edit Collection Assumption
• Enter the percent you expect to collect for this employee each month. Click Next
• After entering all data for this employee, click Enter/Go to Next Employee to enter data for another
employee.
• Click Next after you have entered data for all employee.
• Click Yes to verify
Collection on Opening Receivable Balance
You must indicate collections on the beginning accounts receivable amount (if any) entered in the
beginning balance sheet.
Your beginning A/R balance is displayed on top.
• Enter cash collections in the month collected.
The remaining balance in beginning A/R is displayed at the bottom.
• Click Done
Recap of Sales by Employee
• The following screen recaps total sales generated by all employees by month. Click Next
Sales by Customer
Use this option if you wish to track sales generated by each customer. This is ideal for companies having
loyal customers with predictable buying habits.
• Select Plan Sales by Customer
Standard Sales Collection Assumption
• Enter a standard sales collection assumption for this option. You will have the opportunity to edit this
assumption for each customer. Enter the percent you expect to collect each month. Click Next
35
Rev. 8/08
Customer Data
• Enter Customer Number (required) and Name.
•
Enter the price of 1% of the annual sales you expect from this customer as a dollar amount.
• Enter an estimate of the percent of sales each month the customer will buy. Note: the total percent of
all months cannot be greater than 100%. The program will translate the percentages to dollar sales.
Collection Assumption
You may edit the sales collection assumption for each individual customer, overriding the standard
collection assumption.
• Click on Edit Collection Assumption
• Enter the percent you expect to collect for this customer each month. Click Next
• After entering all data for this , customer click Enter/Go to Next Customer to enter data for another
customer.
• Click Next after you have entered data for all customers
• Click Yes to verify
Collection on Opening Receivable Balance
You must indicate collections on beginning accounts receivable amounts (if any) entered in the beginning
balance sheet.
Your beginning A/R balance is displayed on top.
• Enter cash collections in the month collected.
The remaining balance in beginning A/R is displayed at the bottom.
• Click Done
Recap of Sales by Customer
• The following screen recaps total sales generated by all customers by month. Click Next
36
Rev. 8/08
Sales by Salesperson/Service
Use this option if you wish to track sales generated by each salesperson or each service. This is ideal for
companies with several salespersons or several services to account for and you wish to detail the
performance of a salesperson/service instead of a general sales performance.
• Select Plan Sales by Salesperson/Service
Standard Sales Collection Assumption
• Enter a standard sales collection assumption for this option. You will have the opportunity to edit this
assumption for each salesperson/service. Enter the percent you expect to collect each month. Click
Next
Customer Data
• Enter salesperson/service Number (required), salesperson/service Name and 1% of annual sales you
expect from this salesperson/service as a dollar amount.
• Enter an estimate of the percent of sales each month the salesperson/service will sell. Note: the total
percent of all months cannot be greater than 100%. The program will translate the percentages to
dollar sales.
Collection Assumption
You may edit the sales collection assumption for each individual salesperson/service, overriding the
standard collection assumption.
• Click on Edit Collection Assumption
• Enter the percent you expect to collect for this salesperson/service each month. Click Next
• After entering all data for this customer, click Enter/Go to Next Salesperson/Service to enter data for
another salesperson/service.
• Click Next after you have entered data for all salesperson/service
• Click Yes to verify
Collection on Opening Receivable Balance
You must indicate collections on the beginning accounts receivable amount (if any) entered in the
beginning balance sheet.
Your beginning A/R balance is displayed on top.
• Enter cash collections in the month collected.
The remaining balance in beginning A/R is displayed at the bottom.
• Click Done
37
Rev. 8/08
Recap of Sales by Salesperson/Service
• The following screen recaps total sales generated by all salesperson/service by month. Click Next
Percentage of Completion Method
This method of sales calculates sales as a completed percentage of a job(s). This method is appropriate
for contractors and similar companies whose sales are dependent on the percent of job completion.
To access this method, click Contractor (% of Completion Method) under the Sales section of the
Planning Center.
Job Data
Billings & Collections
Payment of Costs
• After entering all data for the above sections, you may enter data for the next job by entering a new job
number in the Job Data screen, or by picking a previously entered job by clicking on
View/Print/Delete/Pick Jobs and choosing from the list.
• Once all job data is complete, click Use % Complete Method to use this data in your plan. Click Quit
to exit without using this data in your plan.
Collections on Beginning Accounts Receivable
You must account for beginning accounts receivable (if applicable).
• Enter dollar amounts you expect to collect on beginning accounts receivable each month.
• Click Done
Job Data
This section collects data on each "job".
• Enter the job number and name.
• Enter the contract price and the cost. The margin will be calculated for you.
Note: if you have already entered data for other jobs, you may load the job data by clicking on
View/Print/Delete/Pick Jobs, double clicking on the desired job, and clicking Work on the Item
Indicated. This transfers all data to the current Job Data screen.
• If the job was started before the forecast period, enter what percent was completed prior to the first
month of this plan.
• Enter the anticipated percentage of completion for each month. The cost and earned revenue will be
computed. Note: you may enter the cost of completion each month if it is known. This will then
calculate the percentage of completion and earned revenue.
38
Rev. 8/08
The total percent complete, total earned revenue, and total cost is displayed below. Note: the job does
not have to be 100% complete by the end of the plan year.
Billings & Collections
This section sets up billing data and cash flow assumptions for collections and retentions. Access this
section by clicking on the Billings and Retentions for the Job button on the Job Data screen.
Job Billings
This screen projects billed revenue.
• If the job was started before the forecast period, enter the beginning balance of over/under billings for
this job in the first field of the 3rd column.
• Enter the billable percent of the job each month in the 1st column. The billed revenue will be
calculated in the 2nd column and the over/under remaining balance of revenue in the 3rd column.
Totals for each column are found at the bottom.
39
Rev. 8/08
• Click on Retentions and Cash Collections to enter job collection data.
Retentions and Cash Collection
This screen determines the percent of billed revenue to be retained.
• Enter the percent of billed revenue to be retained each month in the 2nd column. The retained dollar
amount will be calculated in the 3rd column. Enter what month this amount will be collected using
numbers (1-12) for months.
Totals for each column are below.
• Click on Cash Collections
Cash Collections
This screen collects amounts on beginning accounts receivable for this job (if applicable).
40
Rev. 8/08
• Enter the beginning receivable balance for this job.
• Enter the estimated collections on this balance in dollar amounts by month.
• Click Done
Collections on Contract
This screen determines when amounts will be collected after being billed to the job.
• Enter the percent of the billed job you expect to collect each month. The collection amount and
retentions based on this percent pattern are displayed below.
• If you have actual collections for this job, you may enter the amounts by clicking on Enter Actual
Collections.
• Click OK after entering data.
• Click Back after entering all data above to return to the Job Data screen.
Payment of Costs
This section allocates the cost of a job to materials, subcontracts, labor, other and/or overhead per
month. It also defines the payment assumption for the cost of this job. Access this section by clicking on
the Payment of Costs for the Job button on the Job Data screen.
Allocation of Costs
This screen allocates the cost of a job to 5 categories: materials, subcontracts, labor, other, and
overhead. The 1st column displays the cost of the job each month.
• Enter the percent of each category allocated. Once a percent is entered it will automatically be
entered in all fields below it, but you may edit these values as desired. The total of all categories must
be 100% exactly. The 2 columns on the right will double check that you have allocated 100% of the
cost to the 5 categories. Note: a category may be allocated 0% of the cost.
41
Rev. 8/08
• Click OK
Allocations of Costs and Payments of Same
This screen defines the payment assumption for the 5 cost categories.
• Enter the percent of payment you expect to pay out each month. Note: payroll is considered paid in
the month the cost is incurred.
• Click Back
42
Rev. 8/08
Miscellaneous Income
For an accurate forecast, all sources of income must be included. This section allows you to account for
income other than sales generated (such as rental income). Each income source may be "drilled down"
for further detail. The program will roll up the elements in the drill down and only use the total income
amount in the plan.
• Enter, in dollars, other income by month. Repeat for other columns.
• Click "Drill Down" under the desired column to drill down the income into more detail.
• Click Done
43
Rev. 8/08
Cost of Goods Sold
This section gathers data on the cost of goods sold and related payment assumptions. There are 4
options for entering cost of goods sold data. Which option you choose will depend on the level of detail
you want to obtain. Use the Percentage method for basic costs and payment of costs. The Fixed and
Variable method allows fixed and variable labor/costs. The Detail method is for high levels of detail with
multiple overhead accounts. Use the Product method for manufacturing environments (sales by product
must be entered as well). All options are accessible through the Planning Center. You can also access
the options by double clicking the Cost of Goods Sold line on the Profit & Loss report.
43
Costs as a Percentage of Sales
45
Costs in Detail
50
Costs of Goods Sold by Product or Product Line
If you decide to enter data for more than one cost method for comparative purposes, you need to
designate which method to use in your actual plan. Click the Use This Sales Option button in the cost
method menu you wish to use. Otherwise the program uses the last cost method entered. This allows
you to switch costs methods back and forth and immediately view the impact on your cash flow and profit.
Cost as a Percent of Sales
This option for cost of goods sold is the quickest to calculate and is best for general cost computing. If
you want more detail and control, consider using another cost option. If entering data for the first time,
follow the order of the cost of goods sold menu. If editing, select any item and the program will
automatically update related sections for you.
• To access this menu, select Cost of Goods Sold as a % of Sales under the Cost of Goods Sold
section in the Planning Center.
The cost of goods sold screen allows you to enter/edit any section in any order. (If entering data for the
first time, follow the order of the list.)
Determine Cost of Sales
Inventory
Payment of Purchases and/or Overhead
• Once you have entered data for all 3 sections, click Use This Sales Option to make the program
choose this data over other cost options. Otherwise, if you have entered this data for comparison
purposes only, click Done to save data entered but not use in your plan.
44
Rev. 8/08
Determine Cost of Goods Sold
You have 2 options for computing cost of goods sold as a percentage.
Option 1 calculates costs as a consistent percentage of forecasted sales.
Option 2 calculates costs entering desired percents for Material, Labor and/or Overhead as a percentage
of forecasted sales. Note: the total percent of Option 2 may or may not be equal to Option 1.
• Enter desired percentages and click Next.
• The following screen allows you to compare the two options. Decide which option to use, click Next
and select Use Data Col 1 or Use Data Col 2.
Inventory
There are 4 ways to determine inventory data. Note: if your company does not have inventory (i.e.
service-based company) ignore this section and go on to Payment of Purchases.
Column 1 displays inventory at a constant rate as entered in beginning balances.
Column 2 calculates inventory at a turnover rate that you specify. Change the turnover rate by using the
arrow buttons at the top of this column. The default rate is 4 turns or once every 90 days.
Column 3 allows you to enter inventory levels as you wish. You may also transfer Column 1 or 2's data
here and edit as you like.
The 4th option is to calculate inventory as a percent of sales. The results of this option are displayed in
Column 3.
• Decide which column of data best suits your plan, click Next and select Use Data Col 1, Use Data Col
2, or Use Data Col 3.
Calculate Inventory as a Percent of Sales
• In Inventory, click Calculate Inventory as a Percent of Sales
• Enter the desired percent
• Click Done
The results will be displayed in Column 3. Adjust if needed.
Payment of Purchases and/or Overhead
This section indicates when material purchases will be paid and affects the Accounts Payable line on the
balance sheets. The program uses inventory and cost of goods sold data to automatically compute any
additional material purchases needed. Therefore a payment assumption for these purchases is needed.
• Enter the percent of material purchases to be paid in the month(s) of pay out.
45
Rev. 8/08
• Or if you want to enter specific payments on both beginning accounts payable and material purchases
in the plan, you may enter payments on purchases as you wish.
• Click Next
Payment on Accounts Payable as You Wish
For a more accurate forecast, you can enter specific payments on beginning accounts payable and
purchases made during the plan period here.
The top box displays the current accounts payable amount.
• Enter payments on beginning accounts payable in the month(s) it occurs on the left side.
• Enter payments on purchases in the month(s) it occurs on the right side.
The total payments are displayed at the bottom.
• Click Done
Costs of Goods Sold in Detail
This option provides the most comprehensive method for determining cost of goods sold. Costs that are
dependent on the fluctuation of sales (percent of sales) are variable. Costs that are independent of sales
(given amount) are fixed.
• To access this menu, select Costs in Detail under the Cost of Goods Sold section in the Planning
Center or double click the cost of sales line in the Profit & Loss report.
The cost of goods sold screen allows you to enter/edit any section in any order. (If entering data for the
first time, follow the order of the list.)
Determine Cost of Sales
Inventory
Payment of Purchases and Overhead
• Once you have entered data for all 3 sections, click Use This Sales Option to make the program
choose this data over other cost options. Otherwise, if you have entered this data for comparison
purposes only, click Done to save data entered but not use in your plan.
46
Rev. 8/08
Determine Cost of Goods Sold
This section determines cost of goods sold by 5 departments (materials, direct labor, depreciation, payroll
taxes and overhead). Material and labor can be entered as a percent of sales. Labor is detailed by
employee, as a percent of sales, or as a given monthly amount. Overhead can be expanded up to 14
separate categories.
Tip: If you need more cost accounts, choose the "drill down" option to add as many expenses as you
want. They will roll up and appear as one overhead line. You can then print the support "drill down"
schedule.
• Select a section to enter data:
Material Costs
Direct Labor Costs
Depreciation
Payroll Taxes
Other Overhead Costs
• Click Done
Material Costs
Materials are entered as a percent of sales.
• Enter material costs of each month as a percent of sales.
• Click Done
Direct Labor Costs
There are 2 options to forecast direct labor costs.
Payroll by Employee
Payroll Using Other Options
Payroll by Employee
You will enter data here one employee at a time.
• Enter Employee Number (required)
• Enter Employee Name
• Enter Hourly Rate (if applicable)
• Enter Average Number of Hours Per Week
• Enter Weekly Pay (if applicable)
47
Rev. 8/08
• Enter Monthly Pay (if applicable)
• Enter Employee Start Date and End Date. Note: if the employee is employed the entire period of
your plan, enter 1 for Start and 12 for End. Otherwise enter the applicable Start and End month as a
number 1-12.
• Enter the Month of Pay raise (if applicable)
• Enter the percent of the pay raise (if applicable)
• Click Enter/Go to the Next Employee to enter data for other employees.
• Click Done to exit this section without using this method.
• Click Next if you have completed all employee data and want to use this method.
Payroll Using Other Methods
The assumptions entered here apply to all employees in the company.
• Enter direct labor as a percent of sales.
• Or enter direct labor as a given monthly dollar amount.
Using either option displays the results in the fields below. You can then edit this data as you wish
Or you can enter data as you wish in the fields.
• Click the appropriate button to use that data.
Depreciation
• Enter an estimate of depreciation for the next 12 months.
• You can straight-line this amount equally across the 12 months. Click Yes to accept or No to enter
depreciation per month as you wish.
The results are displayed in the fields below.
• Click Done
48
Rev. 8/08
Payroll Taxes
The payroll tax percent applies to all payroll data and is a consistent percentage throughout the 12
months of the plan.
• Enter the percent of payroll tax.
The dollar amount of payroll tax is displayed by month below with a year-end total.
• Click Done
Other Overhead Costs
The overhead section expands up to 14 cost categories. Of the 14 items, 8 have default titles that can be
modified and 6 are user-defined.
• Before entering data for overhead costs, you must enter the payment assumption for this overhead
section. Enter the percent of payment you expect to pay in the month(s) it occurs.
• Click on Payment on Beginning Accounts Payable As You Wish to make specific dollar amount
payments on beginning A/P.
• Click Next
Expense Listing
• The Expense Listing displays the 14 cost categories. Double click on an item to enter data.
Each overhead cost can be determined by one of several options. These are the same options available
for general expenses. Click below for an explanation and instructions on each option.
Percent of Sales
Given Monthly Amount
Specific Monthly Amounts
Percent of Another Expense
Drill Down of an Expense
Percent of Another Entity's Sales
Percent of Any Cost of Goods Sold Item
49
Rev. 8/08
Percent of Total Cost of Goods Sold
Percent of Gross Profit
• Each option allows you to edit the payment assumption for that item. Click Edit Basic Payment
Assumption to enter a change.
Break Even Data
• Entering a break even percentage improves the accuracy of the breakeven forecast. Enter here the
percentage of the variable expense that is fixed. Note: even if an expense is variable in nature, it will
still have a fixed element. Enter the percent that is fixed.
Inventory
There are 4 ways to determine inventory data. Note: if your company does not have inventory (i.e.
service-based company) ignore this section and go on to Payment of Purchases.
Column 1 displays inventory at a constant rate as entered in beginning balances.
Column 2 calculates inventory at a turnover rate that you specify. Change the turnover rate by using the
arrow buttons at the top of this column. The default rate is 4 turns or once every 90 days.
Column 3 allows you to enter inventory levels as you wish. You may also transfer Column 1 or 2's data
here and edit as you like.
The 4th option is to calculate inventory as a percent of sales. The results of this option are displayed in
Column 3.
• Decide which column of data best suits your plan, click Next and select Use Data Col 1, Use Data Col
2, or Use Data Col 3.
Payment of Purchases and/or Overhead
This section indicates when material purchases will be paid and will affect the Accounts Payable on the
balance sheets. The program uses inventory and cost of goods sold data to automatically compute any
additional material purchases needed. Therefore a payment assumption for these purchases is needed.
• Enter the percent of material purchases to be paid in the month(s) that it occurs.
• Or if you want to enter specific data on both beginning accounts payable and material purchases in the
plan, you may enter payments on purchases as you wish.
• Click Next
• Enter the percentages of fixed and variable overhead to be paid in the month(s) it occurs.
• Or if you want to enter specific payments by month, click Payment of Fixed/Variable Overhead as You
Wish
• Click Next. The program will test if inventory levels are appropriate.
50
Rev. 8/08
Costs of Goods Sold by Product or Product Line
This option allows you to break down cost of sales by individual product. This is appropriate when
accounting for several products with different costs.
• To access this menu, select Cost by Product under the Cost of Goods Sold section in the Planning
Center or double click the cost of sales line in the Profit & Loss report.
The cost of goods sold screen allows you to enter/edit any section in any order. (If entering data for the
first time, follow the order of the list.)
Determine Cost of Sales
Inventory
Payment of Purchases
• Once you have entered data for all 3 sections, click Use This Sales Option to make the program
choose this data over other cost options. Otherwise, if you have entered this data for comparison
purposes only, click Done to save data entered but not use in your plan.
Determine Cost of Sales
Enter data one product/product line at a time.
• Enter the Product Number (required). Shortcut: to choose from the list of products entered in the
Sales section beforehand, click on List/Delete/Pick an Item to Work On and double click on the
desired product. Choose Work on Item Indicated to transfer the product's data to the previous
screen.
• Enter the Cost Per Unit as a dollar amount or as a percent of sales.
• Choose to save this product's cost as a "fixed amount" or as a "percent of sales".
• Enter the month of a price change if applicable.
• Enter the price change (if applicable) as a dollar amount or percent of the original cost. Use the minus
sign (-) for drops in price.
• Enter data for other products/product lines by clicking on List/Delete/Pick an Item to Work On and
repeating the above.
• When finished entering data, click Next and select Yes. The program will recap the total cost of goods
sold in the following screen.
• Click Next
51
Rev. 8/08
Inventory
There are 4 ways to determine inventory data. Note: if your company does not have inventory (i.e.
service-based company) ignore this section and go on to Payment of Purchases.
Column 1 displays inventory at a constant rate as entered in beginning balances.
Column 2 calculates inventory at a turnover rate that you specify. Change the turnover rate by using the
arrow buttons at the top of this column. The default rate is 4 turns or once every 90 days.
Column 3 allows you to enter inventory levels as you wish. You may also transfer Column 1 or 2's data
here and edit as you like.
The 4th option is to calculate inventory as a percent of sales. The results of this option are displayed in
Column 3.
• Decide which column of data best suits your plan, click Next and select Use Data Col 1, Use Data Col
2, or Use Data Col 3.
Payment of Purchases
This section indicates when material purchases will be paid and affects the Accounts Payable line on the
balance sheets. The program uses inventory and cost of goods sold data to automatically compute any
additional material purchases needed. Therefore a payment assumption for these purchases is needed.
• Enter the percent of material purchases to be paid in the month(s) that it occurs.
• Or if you want to enter specific data on both beginning accounts payable and material purchases in the
plan, you may enter payments on purchases as you wish.
• Click Next
52
Rev. 8/08
Expenses
Up Your Cash Flow provides up to 9 Expense Departments each with program- and user-defined
expense items that are determined by one of several calculation options. Each expense can have its own
payment assumption or use a basic payment assumption defined by the user. Note: expenses directly
related to cost of sales (material, labor, and/or overhead) are not entered here but in the Cost of Goods
Sold section.
52
Basic Payment Assumptions
53
General and Administrative Expenses
52
Methods for Calculating Expenses
64
Additional Expense Departments
Expense Departments
The expense department collects data on individual expenses (cost, payment assumption, amortization,
depreciation, etc.). There are 4 main expense departments accessible through the Planning Center.
Expense Department 4 is the default department: all general and administrative expenses (or if you have
only one expense department) should be entered here. The other 3 main expense departments may be
used as wished. If your company needs additional expense departments, 5 more may be added directly
in the Profit & Loss report. Follow the instructions on page 82.
Basic Payment Assumption
To prepare an accurate forecast you must indicate when expenses will be paid in the forecast. This
assumption governs all expenses in the plan. However, any expense can be an exception to this rule.
Each expense has an Edit the payment assumption button to change the assumption.
• Enter the percentage(s) you expect to pay expenses in the month it occurs. (Total percent may not
equal more than 100)
• Click Next to accept or if you are editing the assumption, click Changing Your Basic Payment
Assumption. Note: when changing the assumption, it will affect all expenses and cash flow except
for those items where the payment assumption was edited.
Note: the basic payment assumption does not apply to beginning accounts payable or accrued expenses.
To make payments on these items, select Beginning Payables Payments of Same under the Other
Cash Flow Items section in the Planning Center. Here you can enter dollar amount payments in the
month they occur.
53
Rev. 8/08
General and Administrative Expenses
Most plans will generally need only one expense department. Department 4 is the default department
and should be used for all general and administrative expenses. For instructions on using additional
expense departments, click here.
This department includes up to 137 individual expense items. It also allows you to enter Start Up
Expenses, Prepaid Expenses, Payroll and Payroll Taxes, Depreciation, Fringe Benefits, Amortization of
Term Loans, and Line of Credit data.
54
Expense Items
54
Calculation Options
60
Start Up Expenses
60
Prepaid Expenses and Goodwill
61
Depreciation
62
Payroll
63
Payroll Taxes
64
Fringe Benefits
64
Term Loan Amortization
65
Line of Credit
54
Rev. 8/08
Expense Items
Expense Listing
This screen displays all expenses (used and unused) for the current department. There are pre-defined
items as well as user-defined items below. All items in the list can be edited/re-titled as desired.
• To access the Expense Listing from the Planning Center, select Department Expenses in any
Expense Department section. To edit an item, double click an item or use the scroll keys to highlight
an item and hit Enter.
• To edit expense items directly from the Profit & Loss report, double click the item or use the scroll keys
to highlight the item and hit Enter.
Legend
X indicates the expense is being used in the plan with the basic payment assumption.
XX indicates the expense is being used in the plan with an edited payment assumption.
XXX indicates the expense is NOT being used in the plan but has an edited payment assumption.
Calculation Options
After selecting an expense, you have several options to calculate this expense. You may enter data for
several or all options to see which best suits your situation, but you must tell the program which option to
use by clicking on the appropriate button. Select a topic below to view specific instructions on how to
use it.
If an expense is to be an exception to the basic payment assumption, click the Edit Basic Payment
Assumption for this Expense button at the bottom of the calculation screen and enter the new
assumption.
Percent of Sales
Given Monthly Amount
Specific Monthly Amounts
55
Rev. 8/08
Percent of Another Expense
Drill Down of an Expense
Percent of Product's Sales
Cost Based on Number of Units and Cost per Unit
Percent of Any Cost of Goods Sold Item
Percent of Total Cost of Goods Sold
Percent of Gross Profit
Expense as a Percent of Sales
This option calculates an expense as a fixed percentage of monthly sales. The ratio will mirror sales
data.
• Enter the percent in the field given. The results will be displayed in Option 3's fields below.
• To edit the payment assumption for this expense only, click Edit Basic Payment Assumption at the
bottom of the screen. Enter the desired percent for payment and click Done.
• Once satisfied, click Use Data 1 or 2 Above or enter data for another option.
Expense as a Given Monthly Amount
This option calculates an expense as a fixed monthly amount equal each month.
• Enter the monthly dollar amount of this expense. The results will be displayed in Option 3's fields
below.
• To edit the payment assumption for this expense only, click Edit Basic Payment Assumption at the
bottom of the screen. Enter the desired percent for payment and click Done.
56
Rev. 8/08
• Once satisfied, click Use Data 1 or 2 Above or enter data for another option.
Expense as a Specific Monthly Amount
This option allows you to enter monthly amounts as you wish.
• Enter in dollars expense amounts by month in the fields provided. (Or use Option 1 or 2 and then edit
the results here.)
• To edit the payment assumption for this expense only, click Edit Basic Payment Assumption at the
bottom of the screen. Enter the desired percent for payment and click Done.
• Once satisfied, click Use Data 3 Above or enter data for another option.
Percent of Another Expense
57
Rev. 8/08
This option is ideal for expenses occurring as a result of another expense in the same entity. Ex:
advertising requires printed material. Therefore printing expense is a percentage of the total advertising
expense.
• Double click the desired expense to be calculated as a percent of another (percent expense) in the
Expense Listing.
• Click on Calculate This Expense as a Percent of Another Expense.
• Click Yes to verify the action.
• Select which Expense Department you want to relate this expense to.
• Double click on the expense you wish to use as the total expense item.
• Click Yes to verify the action.
• Enter the desired percentage.
• Click Done
Drill Down of an Expense
The "drill down" function allows you to develop an expense in a much more detailed fashion. It itemizes
the expense by breaking it down into elements that collectively total the expense. Ex: the expense
telephone can be drilled down to include cell phone accounts, equipment expense, long distance carriers,
or several different phone companies. The program then rolls all the elements into one expense that is
entered in the plan as a single amount.
Each individual element is determined in 1 of 4 options: as a percent of sales, fixed monthly amount,
monthly amounts as you wish, or as a percent of a product/product line's sales. You can enter as many
elements as you wish. The expense's basic payment assumption governs all elements in its drill down.
Note: after completing a drill down, this method takes precedence over other expense methods.
Access the "drill down" 2 ways:
• Right click on any expense in the Profit & Loss report and click the Drill Down Expense button.
58
Rev. 8/08
• Or double click any expense in the Expense Listing and click "Drill Down" this Expense into as
Many Elements as You Wish
Adding expense elements:
• Double click an item to enter data for that element (by default there are 12 items to edit - if you require
more items click Add Another Description for each additional item).
• Enter data for any or all 4 expense options
• Click the button of the option you wish to use. Note: for Option 4 (Percent of a product/product line),
you must enter a percent then click Get the Product to load the sales entity's data. Double click on
the desired entity and verify the selection. The calculations will be displayed in the fields below.
• Click Transfer This Data to Your Financial Plan. Or to remove this element from the plan, click
Remove This Data from Your Plan.
Printing "drill down" schedules:
• You may print the current drill down or all drill down schedules in an entity. Click the corresponding
button to print.
Percent of Product's Sales
This option allows you to calculate an expense as a percent of a product's sales.
Note: your must be using sales by product in this entity to use this option.
• Double click the desired expense in the Expense Listing.
• Click Calculate This Expense as a Percent of a Product's Sales.
• Double click the line of the desired product you want to relate to this expense.
• Enter the desired percentage and click Done.
59
Rev. 8/08
Cost Based on Number of Units and Cost per Unit
This option allows you to calculate an expense as a cost based on the number of units and the cost per
unit.
• Double click the desired expense in the Expense Listing.
• Click Calculate This Expense Using Units and Cost Per Unit.
• Enter the dollar cost per unit (expense cost of 1 unit).
• Enter the number of units per month incurring this cost. Note: this number may reference the units of
a product, number of employees, number of computers, etc.)
• Or if this expense is based on units of a product, you may select a product to drive these amounts.
Click Select a Product and double click on the desired product. This will automatically transfer the
units to the fields.
The program calculates the total expenses.
• Click Next and verify the action.
Expense as a Percent of Multiple Entities' Sales
This option calculates an expense as a percent of multiple entities' sales. In consolidations where one
entity serves as the expense entity and where the revenue is located in two or more entities, you may
calculate an expense of the expense entity as a percent of the revenue entities.
Note: to use this option the revenue entities must have sales data.
Percent of Cost of Goods Sold
Percent of Any Cost of Goods Sold Item
Percent of Total Gross Profit
This option allows you to calculate any expense as a percent of the cost of goods sold, cost of goods sold
item, or total gross profit in this entity.
• Double click the desired expense in the Expense Listing.
• Click Calculate This Expense as a Percent of Another Expense
• Click Yes to verify the action
• Select Cost of Goods Sold (Cost of Goods Sold Item or Total Gross Profit)
• Select which cost of goods sold expense to relate this expense to.
60
Rev. 8/08
• Click Yes to verify the action
• Enter the desired percent
• Click Done
Start Up Expenses
Up Your Cash Flow allows you to account for expenses accrued during the startup period. This period
can be an indefinite amount of time before the first month of your plan. The program assumes it falls
between the beginning balances and the first month of the plan. Therefore any expenses accrued during
the startup period will be considered paid before the start of the plan. To account for payments on startup
expenses incurred during the plan, carry over the expense by using regular expense methods (not the
startup option).
• From the Planning Center, select Startup Expenses under Expense Department 4.
• Double click any expense item to enter/edit data for it.
• Edit the title, if desired, and click Done to proceed (Cancel to discontinue). Note: titles in the list
include those most commonly used. User-defined items are included at the bottom of the list for your
convenience.
• Enter the dollar amount of the startup expense.
• Click Done
Prepaid Expenses and Goodwill
Up Your Cash Flow allows amortization of the following: prepaid advertising, prepaid insurance, prepaid
other, and goodwill. The amortization of these will affect the Profit & Loss statement. Cash flow will only
be affected by the month the expense occurs.
61
Rev. 8/08
Ex: the company purchases health insurance in the third month worth $12,000 amortized over 12 months.
The P & L will show a $1000 drop in profit each month starting the 3rd month while cash flow will show
$12,000 being paid in the third month only.
You may also include prepaid expenses and goodwill occurring before the forecast period. Enter this
data in the beginning balance sheet.
• From the Planning Center, select Prepaid Expense, Goodwill Amortization
• Select Prepaid Advertising, Prepaid Insurance, Prepaid Other, or Goodwill
• If you have prepaid expenses entered in the beginning balance sheet, the amount(s) will appear in the
first grayed out field of the left column. Enter how many months to amortize this amount. The monthly
payout to this expense is calculated in the right column.
• For all other prepaid expenses, enter dollar amounts for the expense(s) in the month(s) it occurs in the
left column.
• Enter how many month to amortize these amounts.
The monthly payout to these expenses is calculated in the right column.
• Click Done
Depreciation
Depreciation, as used in Up Your Cash Flow, allocates the cost of equipment over it useful lifetime.
Because the Profit & Loss is measured monthly, the program measures depreciation as a monthly loss
affecting only the P & L. It does not affect the cash flow (the purchase of equipment does). Up Your
Cash Flow allows you to enter depreciation expense for each expense department,
• From the Planning Center, select Depreciation under any expense department.
• Enter the estimated depreciation for the next 12 months on your equipment.
• The program will prompt you to straight-line this amount equally per month. Click Yes to accept or No
to enter your own data. All fields can be edited.
62
Rev. 8/08
• Click Done
Payroll
Payroll expenses can be entered using 1 of 2 methods. The Regular Method allows you to group
employees into as many as 4 sub-departments (i.e. executives, salespeople, administration, department,
etc). Payroll is calculated as either a percent of sales or given monthly amounts. The Employee method
breaks down the 4 sub-departments, allowing you to calculate each employee's payroll individually. All
employees will be rolled up and the total of each sub-department will appear on the reports.
• To access the payroll function, select Payroll under Expenses in the Planning Center.
Payroll by Regular Method
Payroll by Employee
Payroll Regular Method
This method allows you to group employees into 4 different sub-departments. It is ideal for forecasting
general payroll expense as a department when detail is not necessary. Use the Employee method if you
need to break down payroll by employee in detail.
• Select Payroll Regular Method
• Edit the title of each Sub-department as desired. (Recommended for easy reading of reports)
• Select which category (1-4) to enter/edit data for
There are 3 options to forecast payroll. Remember that the amounts you enter should include all
employees in this sub-department.
Option 1
Enter payroll as a percent of sales. Payroll by month will be displayed in Option 3's fields below. Click
Use Data 1 or 2 Above to accept this option.
Option 2
Enter payroll as a given monthly amount. The program will divide the amount equally amongst the 12
months. The amounts will straight-line and be displayed in Option 3's fields below. Click Use Data 1 or 2
Above to accept this option.
Option 3
Enter payroll amounts as you wish by month in the fields provided. Click Use Data 3 Above to accept
this option.
Note: all payroll expenses are considered paid in the month incurred.
Payroll by Employee
This method allows you to break down the 4 payroll departments by employee. This way, you can record
individual pay, raises, and start-end dates. If you do not need such detail, use the Regular method for
payroll.
63
Rev. 8/08
• Select Payroll by Employee
• Edit the title of each Sub-department as desired. (Recommended for easy reading of reports)
• Select which category (1-4) to enter/edit data for
• Enter Employee Number (required) and Name. Note: if you have already entered employee
information, click the List/Delete/Choose an Employee to Work On button, double click on the
desired employee, and click Work On Item Indicated to transfer the data.
• Enter hourly rate (if applicable), average number of hours worked per week, weekly pay (if applicable),
and monthly pay (if applicable).
• Enter employee start date (if employed before the forecast period enter 1) and last month employed (if
still employed after forecast period enter 12).
• Enter the month (1-12) of the employee's pay raise (if applicable) and the pay raise as a percent of
original pay.
• Click Enter/Go to the Next Employee to enter data for the next employee.
• Once you are done entering data for all employees, click Next
• Click Yes to verify
• Add notes by clicking View/Default Notes or edit your own. Click OK
• Click Done
Payroll Taxes
Payroll taxes are usually a percentage of payroll. If you do not know the percentage, you should consult
your accountant on what is appropriate for your situation.
• Enter the percentage of payroll tax.
64
Rev. 8/08
The program displays payroll tax amounts by month below, based on the percent you entered above.
Payroll taxes are assumed to be paid in the month occurred.
• Click Done
Fringe Benefits
Fringe benefits are usually a percentage of payroll. If you do not know the percentage, you should
consult your accountant on what is appropriate for your situation.
• Enter the percentage of fringe benefits from payroll
The program displays fringe benefit amounts by month below, based on the percent you entered above.
Fringe benefits are assumed to be paid in the month occurred.
• Click Done
Term Loan Amortization
This section allows you to amortize any term loans you have included in beginning balances or loans
taken during the forecast. Interest and payments are calculated and you can also account for a balloon
payment in any month of the forecast.
The interest accumulated from these loans is considered an expense for Expense Department 4.
Note: make sure you account for term loans listed on the Term Debt Payable line of Beginning Balances.
To check this amount, click Term Loans to Account For. This amount will default to Loan No. 1.
Note: if you enter a loan here that has not been accounted for in the plan elsewhere, the program will
notify you of the discrepancy. You may add loans by clicking Add New Loans on this screen or by
selecting New Borrowings and Investor Activities under Other Financial Items in the Planning Center.
Entering data:
• Select the loan number (1-20) from the drop down list. Note: If you have entered data for this loan
number the program will automatically transfer data to the fields. The program allows up to 20
separate loans.
• Enter payee, current loan balance, and the interest rate.
• Enter the fixed monthly payment of interest and principal. Note: a payment calculator is available by
clicking Calculate Loan Payment Amount. Enter the requested information and click Done. You
can then transfer the results directly into this line.
• Or enter the monthly payment of principal only.
• Enter the 1st month payment of loan begins in the forecast (use 1-12).
65
Rev. 8/08
• Enter the balloon payment (if applicable) and the month of the balloon payment. Note: Click Payoff
Calculation to calculate the balloon payment. Enter the month of the payoff, the payoff amount will be
calculated, and click Done. The amount will be transferred directly into this line.
• To enter data for other loans, enter the next loan number. All fields will be zeroed unless you have
already entered data for that loan number. Repeat the above.
Term loan data as you wish:
• If the above method of regular monthly payments does not apply to your situation, click Enter Term
Loans As You Wish to enter amounts as desired.
View and print all term loans:
• Click View/Print Term Loan Spreadsheet to view a list of all term loans, principal and interest
amounts, and monthly payments. Click Print at the bottom to print the spreadsheet.
• After entering all data, click Done.
Line of Credit
This section calculates credit lines borrowed on inventory, accounts receivable, and/or other collateral
amounts. Other collateral may also include other entities' inventory/receivables. The percentages you
enter apply to the incremental increase/decrease in the balance of inventory/receivables. The amounts
calculated are then netted with each column moving from left to right starting with inventory, then
accounts receivables, other collateral (other entity's inventory/accounts receivable), and finally, other
(entered as you wish). The program then calculates monthly loan balances and resulting interest
amounts. This end data appears in the Cash Flow report. The interest here is an expense in Department
4.
• Enter the average interest rate for the plan period in the upper right field.
• The 1st section Inventory displays forecasted inventory levels. Enter the percent to loan from
inventory. The amount will straight-line through all months. Edit as you wish.
• The 2nd section Accounts Receivables displays forecasted accounts receivables. Enter the percent
to loan from A/R. The amount will straight-line through all months. Edit as you wish.
• The 3rd section Other Collateral displays the total of other inventory and A/R amounts. Here you
may transfer 1 or more entities' inventory/receivables data and then borrow off of these amounts.
Click here for more instructions on this option. Enter the percent to loan from inventory and from A/R.
The amount will straight-line through all months. Edit as you wish.
The Loan Increase/Decrease column displays amounts borrowed (+) and paid (-).
• The Other Increase/Decrease column allows you one more chance to enter loan increases/decrease
from other sources. Edit as you wish.
The Loan Balance column displays the net balance of all the above activity by month.
The Monthly Interest column displays the resulting interest by month.
66
Rev. 8/08
Minimum Cash Balance
You may set a requirement for a minimum cash balance to be maintained at all times.
• Click Edit, View & Print Reports on the top toolbar. Next, select Set cash balance to be maintained
from the list and enter the desired minimum cash amount for each month. This amount will straightline through all months. Edit as you wish. Reset the minimum cash requirement column to zeros by
clicking Reset to Previous Balance. If satisfied with the amounts, click Set the cash balance. If you
no long wish to use the requirement you entered here click Disable the cash balance.
• After entering all data, click Done.
Other Collateral
Other collateral may include other entities' inventory/receivables or other amounts not listed elsewhere.
This option is ideal in consolidations where the credit line is in one entity and the A/R and or inventory is
located in another entity. You can borrow from as many entities as you wish but the program will not let
you borrow from the same source more than once.
• Click Transfer Another Entity's Inventory or Accounts Receivable to Other Collateral
• Enter the number of the entity to borrow data from. Note: click Pick an Entity to view a list of entities.
Double click any entity to transfer data to this section.
• Select to transfer Inventory or Accounts Receivable
• The selected data will be displayed by month. Click Done to complete the transfer.
Repeat this procedure if you want to include other entities' inventory and/or A/R.
Other Collateral Analysis
Click the Other Collateral Analysis button for a list of entities used in this section and whether it is using
Inventory or Accounts Receivable data. You may delete an entity's data by double clicking the desired
entity. Remember, the amounts shown for Other Collateral in the Credit Line screen are the total of all
entities listed here.
Additional Expense Departments
If you have a larger company, bigger trial balances, or an enormous amount of expense items, Up Your
Cash Flow can expand its expense departments.
In addition to Expense Department 4 (General and Administrative Expenses), there are 8 other expense
departments. 3 are accessible directly through the Planning Center and are labeled Total Department 1,
2 and 3. The 5 additional expense departments are accessible through the Profit & Loss report only.
When entering/editing data for these departments, you will double click on the actual line item to access
its options.
67
Rev. 8/08
To access the 5 additional departments:
• Enter the Profit & Loss report by clicking Done/View Results on the Planning Center or by clicking the
View/Print Reports button on the top tool bar and selecting Profit & Loss <-- Edit Here.
• Click Display All Account Titles
• Click Add Five Additional Expense Departments
The report will be expanded to include all 5 departments and will also list all account titles regardless of
being used or not. The 5 departments are located between Department 1 and 2's accounts. Use the
scroll keys to highlight the desired item and hit Enter or left double click on the desired item with your
mouse.
The same expense options found in Department 4 are available here.
• Once you have finished entering data for expenses, click Display Only Accounts Being Used to
remove all unused line items.
68
Rev. 8/08
Other Financial Items
The items found in this section of the Planning Center include loans, taxes and other financial
arrangements.
69
Loans Due To Owners or From Owners
69
Loans to Others
69
Loans from Others
69
Notes Receivable Amortization
70
New Borrowings and Investor Activities
70
Dividends to Be Paid
70
Interest on Cash Balances
71
Expense Computed on Net Income
71
Income Taxes
71
Joint Venture Activity
71
Service Contracts
73
Customer Deposits
69
Rev. 8/08
Loans Due To Owners or From Owners
This section accounts for loans borrowed from or payments to owners and/or officers.
• Enter the loan interest rate
The net amount of the Due From Owner and Loans Due to Owner lines found on beginning balances is
displayed on the first line of this screen.
• Enter borrowings from owner (loan in +) or payments to owner (loan out -) in the month they occur.
The loan balance is displayed in the 2nd column. Monthly interest is displayed in the 3rd column.
• Click Done
Loans To Others
This section accounts for funds loaned to others.
• Enter forecasted amounts to be loaned in the month loaned.
Note: any amounts entered here must be amortized using the Notes Receivable Amortization section.
• Click Done
Loans From Others
This section accounts for loans received from individuals or other sources. This item allows you to
differentiate loans that do not necessarily fall under bank term loans.
• Enter the loan interest rate. Note: interest is assumed to be paid in the month incurred.
• Enter loan amounts borrowed or loan amounts paid (-) in the month they occur.
The loan balance for this section only is displayed in the 2nd column. Monthly interest incurred is
displayed in the 3rd column.
• Click Done
Notes Receivable Amortization
This section amortizes notes with amounts owed to the company.
Note: up to 10 loans can be amortized. If you have more than 10 receivable loans, combine loans to stay
within the 10 loan limit.
70
Rev. 8/08
• Enter the loan number (1-10). If you have entered data for a loan, the program will automatically
transfer the data to the fields.
• Enter loan payer and current loan balance.
• Enter the loan interest rate and the fixed monthly payment of interest plus principal.
• Or enter payments of principal only and enter the first month (1-12) that collections on the loan will
begin.
• Click Done
New Borrowings and Investor Activities
This section forecasts term loans taken during the forecast period or investments made in the company.
Note: term loans need to be amortized in the Term Loan Amortization section under Expense Department
4.
• Enter investment funds in the 1st or 2nd fields and enter the month (1-12) funds are received.
• Enter term loans borrowed in the 3rd though 9th fields and enter the month (1-12) loans are received.
• Click Done
• The program will ask if you want to amortize any loans entered here. Click Yes to amortize and you
will be taken to the Term Loan Amortization screen. Enter an unused loan number and enter
information as applicable.
Dividends to Be Paid
Dividends to be paid to investors in the company can be calculated as a percent of income.
• Enter dividends as a percent of income.
Dividend amounts by month are displayed below.
• Click Done
Interest on Cash Balances
This section forecasts interest on cash balances maintained in the period.
• Enter the interest rate to be received on cash balances
Note: interest is calculated at the end of the month. Therefore interest is assumed to be collected that
month. Ex: interest earned for the month of January is assumed to be collected in February.
71
Rev. 8/08
• Click Done
Expense Computed on Net Income
This section allows you to calculate an expense as a percent of net income before income taxes.
Bonuses can be calculated for this way.
• Enter/edit the title for this item
• Enter this expense as a percent of net income before income taxes.
The monthly amount of this expense is displayed in the right column.
• Edit the payment assumption by clicking Payment Assumption, enter the percent of payment in the
month it occurs, and click OK.
• Click Quit
• Add a default note by clicking View/Default Notes
• Click OK
Income Taxes
Income tax must be forecasted for an accurate and complete forecast. Here you can see estimated
income tax and forecast payments.
• Enter income tax rate. This rate is applied to the net income/loss amounts in the 1st column. The 2nd
column displays the resulting income tax amounts.
• Enter estimated tax payments in the 3rd column. Note: payments occur monthly or quarterly. Enter
as appropriate.
Estimated Tax Liability
This section is a summary of tax liability versus tax payments. You can predict whether you'll expect a
refund or expect to pay taxes at the end of the plan year.
• Click View Estimated Tax Liability. The window displays beginning pre-paids and tax liability, tax
provisions, estimated tax payments, and the forecasted tax balance. Click Done.
• Click Done
• Add/edit a default note by clicking View/Default Notes. Click OK
72
Rev. 8/08
Joint Venture Activity
This section forecasts activity in joint ventures including investments, draws and income.
• Select Investments in Joint Ventures, Draws From Joint Ventures, or Income From Joint
Ventures
• Enter the amounts invested or received accordingly by month. The total of each section appears at
the bottom of the window. Click Done.
• Click Done
Service Contracts
The section is for companies that sell service contracts who need to forecast cash flow by contracts.
Here you can account for contracts receivable and adjust them throughout the forecast. Contracts
receivable are credited to deferred income (liability, not revenue). Deferred income is then amortized as
you wish. This amortization is treated as income.
• Select Service Contracts
• Enter the number of contracts forecasted to be sold each month in the 1st column.
• Enter the average price per contract each month in the 2nd column.
The 3rd column indicates dollar amounts added to deferred income.
• Enter how many months to amortize the contract each month in the 4th column. (This is usually the
entire length of the contract: a year-long contract will be amortized 12 months.)
The 5th column displays the service income recognized each month.
Collections on service contracts receivable
73
Rev. 8/08
There are 2 options for collections:
• Option 1 collects using a percentage pattern the month of and/or months following the sale. Enter the
desired percentages. Note: the total of percentages cannot equal more than 100%. The collections
as a result of this pattern are displayed in the Collections box to the right.
• Option 2 collects specific dollar amounts by month. Enter desired collections.
Beginning contracts receivable
• If you have entered amounts for contracts receivable on the beginning balance sheet you will need to
specify collections on them. Click the Enter Collection Assumption for Beginning Contracts
Receivable button and enter specific dollar amount collections by month. Click Done when finished.
• Click Done
Customer Deposits
This section is used to record deposits received or advance payments received from customers. It is
important to note that customer deposits must be entered independent of any sales collection
assumptions. Enter the assumption as if the advance did not exist. After you enter the sales collection
option and forecast collections the program will reduce accounts receivable in the month you have
selected to apply the customer deposit to. Any collections forecasted for the same month will be reduced
by the deposit to be applied for that month to prevent a double reduction in accounts receivable.
74
Rev. 8/08
Other Cash Flow Items
This section includes other items that impact cash flow.
75
Adjust Other Assets
75
Purchase of Equipment
75
Sale of Equipment
76
Deposits Made
76
Beginning Payables
76
Proprietors' Draw
76
Treasury Stock
77
Sales Tax Collection and Payment
77
Enter Actual Products Sold
75
Rev. 8/08
Adjust Other Assets
This section allows you to make payments or collections on other assets which include those entered on
the Other Assets line of the Beginning Balances.
• Enter payment or collection amounts per month
The other assets balance in beginning balances is displayed at the bottom for reference.
• Click Done
Purchase of Equipment
This section forecasts the purchase of equipment and how much of it will be financed. The cash outlay
amounts impacts the cash flow in the month of purchase.
• Enter the total cost of equipment purchased per month
• Enter the amount financed per month
The Cash Outlay column displays the amounts directly impacting cash flow per month.
• Click Done
• The program will ask your to amortize any loans (amounts financed) here. Click Yes to amortize and
you will be taken to the Term Loan Amortization screen. Enter an unused loan number and enter
information as applicable. Click Done.
Sale of Equipment
This section calculates the impact of equipment (assets) sales on the Profit & Loss and Cash Flow
reports. The program allows up to 4 sales transactions. You will need to know the sales price, sales
expense (commissions etc.), original cost, total depreciation, and anticipated method of payment (cash,
note receivable, payment of existing debt).
• Enter the month of the sale of equipment
• Enter the sales price and sales expense. The net sales price is displayed below.
• Enter the original cost of equipment and total depreciation taken. The asset basis is the original cost
minus depreciation.
The gain on the sale is the net sales price minus the asset basis.
• Enter the anticipated method of payment (cash, note receivable, payment of existing debt). You can
specify one or any combination of methods for payment. The net sales price is calculated below.
Note: the net sales price here must equal the net sales price above.
Repeat for other sales
• Click Done
76
Rev. 8/08
Deposits Made
This section allows you to forecast any payments or collections of anticipated deposits during the period.
The deposits amount found in beginning balances is displayed at the bottom for reference.
• Enter payment or collection (-) of deposits in the month it occurs.
• Click Done
Beginning Payables
Use this section to make payments on beginning accounts payable, beginning accrued expenses, and/or
other beginning payables during this plan period. These payments apply only to the amounts you have
entered on the beginning balance sheet.
• Select Beginning Accounts Payable. The beginning balance amount is displayed at the top. Enter
payments in the month it occurs. Click Done.
• Select Beginning Accrued Expenses. The beginning balance amount is displayed at the top. Enter
payments in the month it occurs. Click Done.
• Select Other Payables. The beginning balance amount is displayed at the top. Enter payments in the
month it occurs. Click Done.
Note: if you enter payments totaling greater than the beginning balance, the program will notify you.
Correct the condition by re-entering payment data.
Proprietor's Draw
This section allows you to enter the proprietor/partner's monthly draw for the forecast period. Note: this
section is only available to non-incorporated entities only. You will receive a warning message if your
entity is incorporated.
• Enter the proprietor/partner's monthly draw.
The total for the year is displayed below.
• Click Done
77
Rev. 8/08
Treasury Stock
This section allows you to enter the purchase of treasury stock. Note: this section is only available to
incorporated entities. You will receive a warning message if your entity is non-incorporated.
• Enter the amount of treasury stock purchased each month.
The total is displayed at the bottom.
• Click Done
Sales Tax Collection and Payment
This section accounts for tax on sales, its collection and payment. Not all sales are necessarily subject to
sales tax (i.e. a sale made to buyer residing in another state), therefore the total percent subject to sales
may be less than 100%.
• Enter the approximate percent of sales subject to taxes.
• Enter the tax rate.
Your tax obligation is calculated and displayed by month below. The total amount is added to your
accounts receivable (customer paying you the sales tax) and to your sales tax payable (you owing the
government the sales tax). It is assumed that sales tax is collected in the same manner sales is
collected. And it is assumed that sales tax is paid as indicated in the sales tax payment section whether it
has been collected from the customer or not.
• Click View Tax Collections to see tax collection amounts by month. Click Quit.
• Click Next
• Select how the taxes will be paid: Quarterly or Monthly.
• Click OK to verify the option chosen.
Actual Products Sold
This section allows you to enter the actual number of units sold for each product in the entity. This option
only works if you have entered product data and are using the Sales by Product sales option. This allows
you to accurately track and forecast the plan as actual data becomes available.
• Enter the product number. Data for that product will automatically be entered in the fields below for
reference.
• Enter the number of units sold each month. That number will be translated to dollar sales in the
adjacent column and the total number of units sold and total sales for this product will be displayed at
the bottom.
78
Rev. 8/08
• To enter data for the next product, enter the product number in the first field. That product's data will
automatically be entered in the fields below and the bottom fields for entering data will be zeroed.
Proceed to enter data for that product. Repeat for all other products.
• Click Next when finished entering all actual products sold data.
• The next screen recaps total sales by all products combined by month. Click Next.
Reports
Once you have finished entering data for your plan, you can edit, view and print several reports available.
Reports are available in regular data and graphic form. You can also export reports to an Excel or ASCII
file.
79
Editing in the Profit & Loss or Cash Flow Report
79
Viewing Reports
80
Printing Reports
81
Viewing and Printing Graphic Reports
81
Exporting Reports
79
Rev. 8/08
Editing in the Profit & Loss or Cash Flow Report
These reports give you the opportunity to see the results of your plan, edit any portion of the plan, have
the program calculate the new changes, and immediately see the impact on P & L or cash flow. Any item
displayed on these reports are editable.
• Access the P & L or cash flow report by clicking the Edit View & Print Reports icon on the top tool bar.
• Select Profit & Loss <-- Edit Here to edit in the P & L or Cash Flow Monthly Report to edit in the
cash flow.
• Make changes to an item by clicking directly on the line item. This brings up data entry screens
appropriate to that section. Edit as desired.
After editing, you will return directly to the P & L or cash flow.
Important: changes just made will be reflected in that line only. To view the change's impact on the
report you must click the Calculate button at the top of the report to rerun all calculations. Any time a
change is made you must recalculate or the report may be incorrect. The program will notify you anytime
a recalculation is needed.
• You can run "what-if" scenarios and globally update these changes directly from both the P & L and
cash flow reports. Click here for instructions on how to use the Sensitivity Analysis (What-if).
• Click Done
Viewing Reports
• Access the Reports menu by clicking the Edit, View & Print Reports button on the top tool bar.
The left side groups all financial related reports together, the right side all management related reports.
• Select any report to view it. The monthly P & L and monthly Cash Flow allow access to editing.
Double click on any line item to access edit options. You may print any report directly from the report
display screen by clicking Print. Tip: if you want to print several different reports at once, use the
Printing Menu. for instructions.
Financial Reports
Monthly Profit & Loss
displays P & L data by month. All items are editable here. Double click on an
item to make changes to that section.
Quarterly Profit & Loss displays P & L data each quarter with quarter YTD totals as well.
YTD Profit & Loss
displays a comparative P & L with monthly data on the left versus YTD by month
on the right.
Monthly Cash Flow
displays cash flows by month. All items are editable here. Double click on an
item to make changes to that section.
Quarterly Cash Flow
displays cash flow each quarter with quarter YTD totals as well.
80
Rev. 8/08
YTD Cash Flow
displays a comparative cash flow with monthly data on the left versus YTD by
month on the right.
Cash Flow Indirect
displays cash flow using the indirect method. (Net cash change + beginning
cash balance = Ending cash balance)
Balance Sheets
display balance sheet figures for each month.
Payroll Spreadsheet
displays payroll amounts by month per employee. (You must use the Payroll by
Employee option to use this report.)
Term Loan Sheet
displays all term loans amortized during the plan by month, including payment
amounts.
Notes Receivable
displays all notes receivable amortized during the plan by month, including
payment amounts.
Management Reports
Comparative P & L
allows you to enter actual data for comparative purposes. View actuals
integrated into P & L report.
Comparative Cash Flow allows you to enter actual data for comparative purposes. View actuals impact
on cash flow.
Annual Ratios
displays annual ratios.
Monthly Ratios
displays monthly ratios.
Breakeven Analysis
displays breakeven sales against forecasted sales and the difference between
the two.
Sales by Product
displays actual units of each product sold versus forecasted units sold. available
only if you used sales by product.
Credit Availability
displays loan/credit calculations. Enter requested data before viewing report.
5 Column Report
generates report for 5 entities side by side. Generally used for multi-year
forecasts. Enter desired entity numbers and choose type of report to view.
Notes and Assumptions displays all notes and assumptions entered in the program. You may add/edit
notes here by double clicking on the desired line.
Printing Reports
Printing Separate Reports
You may print any report directly from the report display screen by clicking Print at the bottom of each
report.
81
Rev. 8/08
Printing Multiple Reports at Once
If you wish to print several reports at the same time without having to preview each one, use the Printing
menu.
• Click the Printing Menu button on the View Reports screen.
• X off each report that you want to print.
• Click Print the List to send the reports to your default printer.
• Click Done
Because so much data is included in one report, UYCF prints landscape style and at a smaller font size.
It is recommended you set your default printer to 300 DPI for best printing resolution. Most printers
should not require adjusting. Consult your printer manual for help changing the printer resolution setting.
Viewing and Printing Graphic Reports
Up Your Cash Flow generates graphics for several reports. Graphics come in bar graph, line graph and
pie chart form. Graphs are color keyed for easier reading.
• To access the graphics menu, click the Graphics icon on the top tool bar.
• Select which report to view.
• Select which type of graphic to generate: bar graph, line graph or pie chart.
The report will be displayed full screen.
• Click the Print icon at the top of the screen to print from your default printer.
• Click the End icon at the top to exit.
Reports for Graphics:
Sales (forecasted vs. actual)
Accounts Receivable
Gross Profit (forecasted vs. actual)
Selling Expenses (forecasted vs. actual)
General and Administrative Expense (forecasted vs. actual)
Total Expenses (forecasted vs. actual)
Net Income/Loss (forecasted vs. actual)
Cash Flow
Sales vs. Total Expenses
Note: reports with (forecasted vs. actual) listed will not be complete graphs if you have not entered actual
data.
82
Rev. 8/08
Exporting Reports
You can export the P & L, Cash Flow, Balance Sheets, P & L vs. Actual, and Plan Assumption reports in
4 column form and the P & L, Cash Flow and Balance Sheet reports in 5 column form.
Click the Export icon
on the top tool bar.
• Select which report to export.
• The program will tell you the file has been created. Click OK.
Repeat for each desired report.
• To view the report in Excel, click the Retrieve File in Excel button. This loads the Excel program and
automatically displays the reports generated by export.
• Click Done
83
Rev. 8/08
Multi-Year Forecasts
Multiple year forecasts allow you to project far into the future to help see where your company is headed
in growth. Up Your Cash Flow can easily create multi-year forecasts based on one year's information.
This saves time and effort. After entering data for the 1st entity, the program can automatically develop a
2, 3, 4 or 5 year forecast where you can then adjust sales and other data individually. You can also trend
an expense up or down through subsequent years of a multi-year forecast. All changes in data will
automatically carry forward through subsequent years, eliminating the need to readjust each entity after
the change.
84
Creating a Multi-Year Forecast
84
Working on Existing Multi-Year Forecasts
85
Trending Sales and Expenses
86
Printing Trends for Any Multi-Year Forecast
87
Printing Multi-Year Forecast Reports
84
Rev. 8/08
Creating a Multi-Year Forecast
To create a 2, 3, 4 or 5 year forecast, you should already have data entered for the 1st year (entity) of the
multi-year plan.
To create the multi-year forecast:
• Click the Multi-Year Forecast icon on the top tool bar.
• Enter the entity number of the 1st year. Note: you do not have to be currently working in the 1st year
entity. You may enter any number entity as the 1st year entity to create the multi-year forecast.
• Enter the entity number you wish to use for the 2nd year. Caution: make sure you enter the number
for an empty, unused entity. The multi-year function will overwrite all existing information in an entity if
it is present. This process is irreversible. The program will warn you if you are about do so. If you are
unsure which entities are available, hit F4 to view a list of all entities.
Tip: use consecutive numbers when issuing subsequent years of a multi-year forecast. Ex: 1st year - 10;
2nd year - 11; 3rd year - 12; etc.
• Repeat the above for subsequent years in your forecast (depending on how many years you wish to
forecast). Note: this forecast function follows a cumulative process; the 3-5 year forecasts are not
directly based on the first year's forecast. Ex: the 3rd year forecast is based on the 2nd, the 4th on the
3rd, etc.
• To enter trend data (trending sales and/or expenses for subsequent years of the forecast), click
Adjust/edit the First Year for 2-5 Year Trending. This will build and test all forecasts. This may
take a moment. Once finished you will automatically be working in the last entity of your forecast.
Enter other entities by Opening an Entity.
• To run the forecast without trends, click Run Forecast. Click Yes to verify the action. The program
will build and test all forecasts. This may take a moment. Once finished you will automatically be
working in the last entity of your forecast. Enter other entities by Opening an Entity.
Assumptions used in creating the multi-year forecast:
To view a summary of the assumptions used in the forecasts, click Assumptions. This displays all
assumptions used to calculate the subsequent years. Click Done.
85
Rev. 8/08
Working on Existing Multi-Year Forecasts
After building 1 or more multi-year forecasts, you can edit data for any year of the forecast by opening the
entity of the desired year in the forecast. After entering all changes, click the Update Multi-Year
Forecast button at the bottom of the P & L to ensure all changes are automatically carried through
subsequent years of the forecast. Ex: after making changes in Year 2 of your forecast, clicking Update
Multi-Year Forecast will carry the changes through Years 3,4 and 5 and automatically recalculate all
data.
List of Existing Multi-Year Forecasts
To view a list of multi-year forecasts you have already built, click the Multiple Years icon on the top tool
bar, and click List of All Multi-Year Plans Developed. This displays the list. You may double click on
any line to automatically transfer the entity numbers to the 2 to 5 Year Forecast screen where you can
then adjust trending data by clicking Adjust the First Year for 2-5 Year Trending or open the last year of
the forecast by clicking Run Forecast.
Opening a Year (Entity) Within a Multi-Year Forecast
You must know the entity number of the year you wish to open. Consult the List of Existing Multi-Year
Forecasts to view which entity number belongs to what year. Proceed to open that entity as you would
any other entity. For instructions on how to open an entity click here.
Trending Sales and Expenses
Up Your Cash Flow allows you to trend an expense up or down through subsequent years of a multi-year
forecast. It performs all calculations for you, eliminating the need to adjust each individual year for repeat
changes. Trends are only entered in the 1st year of the forecast. In order to trend, a multi-year forecast
must already be built. For instructions on how to create a multi-year forecast, click here.
To enter trend data:
• Click the Multi-Year Forecasts icon on the top tool bar.
• Enter the entity number of the first year in the multi-year forecast. Or view a list of multi-year forecasts
by clicking List of All Multi-Year Plans Developed and double click the desired forecast to
automatically transfer the entity numbers to the fields.
• Click Adjust the First Year for 2-5 Year Trending. You will enter the 1st year of the forecast. Note:
all trend data is entered in the 1st year only.
• Add a trend by double clicking the desired expense item line under the Trend It column. (Clicking
elsewhere on that line will not bring up the Trend data screen but the expense calculation screen.)
86
Rev. 8/08
• Enter the percent you wish to trend over the next 2-5 years. The result of the trend is displayed in the
right section. For an explanation of how each year's trend data was calculated, mouse-over the
question mark next to that particular year.
• Click Done to accept the trend. Repeat for all other trends.
After entering all desired trend data:
• Click the Update Multi-Year Forecast button to automatically carry forward all trends made in this
entity to subsequent years of the forecast. If you do not click this button, no changes will be made to
subsequent years and could result in an incorrect multi-year forecast. Note: after clicking the program
will perform calculations on all years of the forecast. This may take a couple of minutes.
• Click Done to exit the P & L and return to the Multi-Year screen.
87
Rev. 8/08
Printing Trends for Any Multi-Year Forecast
You can print reports displaying trends in a multi-year forecast. Reports show P & L figures for each year
of the forecast and lists trend percentages next to each item trended.
• Click the Multi-Year Forecasts icon on the top tool bar.
• Click Print Multi-Year Trend Data.
• Double click which multi-year forecast you want to print.
• Click Yes for a print preview, No to directly print the report.
Printing Multi-Year Forecast Reports
Any multi-year forecast created can be printed to the 5-column report for a side-by-side comparison of up
to 5 years.
• Click the Edit View & Print Reports button on the top tool bar.
• Select 5 Column Report from the menu.
• Click the List of All Multi-Year Plans Developed button then double click on the plan you want to
print. This automatically enters the corresponding entity numbers. Note: any entities may be entered
manually. This is appropriate if you wish to view 2 or more entities side by side, for example different
divisions of a parent company.
• If you wish to have column headings you can choose from years or your own title. Enter appropriately.
• Click OK Transfer All to build the report.
• To view and print reports, select the desired report by clicking on the corresponding button.
There are 5 column 3 reports available:
Balance Sheets
Profit & Loss
Cash Flows
You will be able to print the report from within that section.
88
Rev. 8/08
Consolidations
Up Your Cash Flow allows you to consolidate up to 97 entities in the program. You may wish to use a
consolidation to run forecasts for separate departments, branches, divisions, etc. under one umbrella. It
is also useful for combining separate entities designated for sales, costs, expenses, etc. into one entity.
Data from separate entities are combined into one consolidated entity or forecast. You may create up to
5 consolidations.
Process
First create a Master Entity with all account titles found in all entities of the consolidation. Enter data and
complete the forecast for the master entity. Then copy the master entity to subsequent entities as part of
the consolidation. Edit data in each entity as desired. After editing, use the consolidation function to
combine the chosen entities into one single entity (forecast). You can now view the net result of the
separate entities together. If you decide to make changes to 1 or more entities, you must remove them
from the consolidation first, make the changes, then consolidate again. Otherwise making changes
directly in the consolidation entity may result in an incorrect forecast.
• Access all consolidation options by clicking the Consolidation icon
89
Creating and Copying the Master Entity
90
Transferring an Entity's Account Titles to the Consolidation
90
Consolidating Entities
91
Removing an Entity from a Consolidation
91
Transferring Consolidation Account Titles to an Entity
89
on the top tool bar.
Rev. 8/08
Creating and Copying the Master Entity
The Master Entity serves as a template for other entities in a consolidation. It must include all account
titles found in the entities regardless of whether or not it will be used in the master entity. Otherwise
accounts will not be correctly combined in the end consolidation. Ex: an entity has a Chemical Supplies
expense that does not appear in the master entity forecast. You still must include that account title in the
master entity or it will be left out in the consolidation.
Create the Master Entity
• Create or Open an entity to serve as the master entity (may be any entity 1-98).
• Set up all account titles found in the consolidation.
• Enter data as you would for any forecast. Note: you are not required to enter data for the master
entity, but it is recommended. This will reduce a lot of repeat data entry after copying the master entity
to subsequent entities.
Copy the Master Entity
• Select Copy the Master Entity to Other Entities.
• Enter the number of the master entity.
• Enter the number(s) of the entities to be included in the consolidation. Tip: use entity numbers in
sequence for easy reference, i.e. the master entity is No. 10, use 11, 12, 13 and so on. Caution:
make sure you choose unused entities. Any previous data will be permanently erased with this
function.
• Click Copy Master. The program will copy and build the new entities. This may take a moment.
• Click Done.
Proceed to enter each entity and make changes as appropriate to that entity (such as adding or deleting
expense data).
Caution: after copying the master entity, correct the beginning balance sheet of the subsequent entities
to make sure it is not a duplicate of the master entity's. This will avoid an overstatement of beginning
balances in the consolidation.
Set up all account titles found in the consolidation.
You must include all account titles found in the consolidation entities regardless if they will be used in the
master entity. Otherwise some items may be left out when consolidated. The master entity serves as a
master list of accounts.
• Open the Master Entity.
• Click the Edit View & Print Reports button on the top tool bar.
90
Rev. 8/08
• Select Profit & Loss <-- Edit Here
• Click the Display All Account Titles button on the lower left corner.
• X out the departments you want to set up for your consolidation. Remember you must include all
accounts for the entire consolidation.
• Click OK.
All the accounts for the departments chosen will be displayed.
• Edit the titles by double clicking on the desired item and entering the new title in the field provided.
Enter data for this item if desired. Remember to edit/enter titles for accounts not found in the master
entity but found in other entities.
• After entering all account titles and desired data, click Done.
• This returns you to the View Reports Menu. Click Done.
Proceed to copy the master entity to other entities.
Transferring an Entity's Account Titles to the Consolidation
Before consolidating you will need to transfer the master entity's account titles to the consolidation entity
to prepare it for consolidation.
• Select Transfer an Entity's Account Titles to the Consolidation.
• Click Yes to transfer all account titles found in the mater entity, or click No to transfer titles from a
specific department.
• Enter the number of the entity you wish to transfer from, click OK.
• If you clicked Yes above, click Yes again to verify the transfer.
• If you clicked No above enter the department number that contains the titles you wish to transfer, click
Yes to verify the transfer.
Consolidating Entities
After creating the master entity and preparing the consolidation entities you are ready to consolidate.
Tip: to ensure entities are consolidated correctly, it is recommended that you briefly check the P & L after
consolidating each entity to make sure data appears correct. These allow you to double check and
eliminate potential corrupted consolidations which are almost impossible to fix without reconsolidating all
entities again.
• Open entity No. 00 (the consolidation entity).
91
Rev. 8/08
• Select which Consolidation No (1-5) to work on. These consolidation titles can be edited as desired.
• Click the Consolidation icon
on the top tool bar.
• Select Consolidate Entities.
• Enter the number of the entity you wish to add to the consolidation entity. Click OK. Click Yes to
verify.
• Enter the number of the next entity you wish to add. Click OK. Click Yes to verify.
• Repeat for each entity to be added. Click Cancel when finished.
You can now enter the reports and view the consolidation results. If you need to make a change to the
consolidated entities, you must remove them from the consolidation first. After making the changes, you
will need to add that entity back to the consolidation using the above process.
Removing an Entity From a Consolidation
If after viewing the results of a consolidation you decide to make changes to one or more entities, you
must remove the entity(s) from the consolidation first.
• While in the consolidation entity 00, select Remove an Entity From the Consolidation.
• Enter the number of the entity you wish to remove.
• Click OK. Click Yes to verify.
• Click Cancel to return to the main screen.
Now you can open up that entity and make appropriate changes. When you are ready to consolidate that
entity again, follow the Consolidating Entities procedure.
Transferring Consolidation Account Titles to an Entity
You may transfer the consolidation account titles to any entity.
• Click the Consolidation icon
on the top tool bar.
• Select Transfer Consolidation Account Titles to an Entity.
• Enter the number of the entity you wish to transfer the titles to. Click Yes to verify. Note: the entity
you choose must already exist. If it does not, first create a new entity.
• Click Cancel to return to the previous screen.
92
Rev. 8/08
Integrating Actual Data
Up Your Cash Flow allows you to integrate actual data with your forecast for comparative purposes. With
actuals, you can see if your plan forecasts realistically with actual results as they become available.
Actuals may be entered for the Profit & Loss and Cash Flow reports by month. You can then integrate
those results into the forecasted P & L or Cash Flow and view its impact on the year. This gives you the
opportunity to readjust your forecast as needed reflecting the new data. These reports may then be
exported to an Excel spreadsheet.
Requirements
You will need actual P & L data for a comparative P & L report and either the actual balance sheet or end
of the month cash balance for a comparative cash flow report.
• Access all functions regarding actual data by clicking the Integrating Actual Data icon
on
the top tool bar. (Or access the comparative P & L and comparative cash flow reports in the View
Reports menu by clicking the Edit View & Print Reports button on the top tool bar.)
93
Integrated Actual Profit & Loss
94
Integrated Actual Cash Flow
95
Exporting to Excel
93
Rev. 8/08
Integrated Actual Profit & Loss
Actual P & L data is entered by month, allowing you to instantaneously see the effect on your planned
monthly and yearly amounts. Once entered it will be integrated in the comparative P & L (this is separate
from the forecasted P & L). As each month's actuals become available, you can enter the data and
constantly see how well your plan is faring against actual results.
Entering Actual P & L Data
Viewing/Printing the Integrated P & L
Back to Integrating Actuals Menu
Entering Actual P & L Data
Actuals are entered by month.
• Click Enter Actual Profit & Loss Data.
• Enter the number of the month (1-12) in the forecast you want to enter actuals for. Click OK.
Legend of columns:
Account
- lists all accounts in your plan
Plan (Month) - displays forecasted figures for the month chosen
%
- displays forecasted percentages
Actual (Month) - where you will enter actuals for this month
%
- calculates the actual percentages
Diff. (Month)
- calculates the difference between forecasted and actuals
Plan YTD
- displays forecasted year-to-date amounts for all accounts
%
- displays forecasted year-to-date percentages
Actual YTD
- displays actual year-to-date amounts for all accounts
%
- displays actual year-to-date percentages
Diff YTD
- calculates the difference between Actual YTD and Plan YTD
• Double click on a cell in the Actual (Month) column to enter the actual amount. Tip: hit enter after
each entry to automatically advance to the next line.
• As you enter actuals, the program will calculate the other columns. Enter data for all appropriate
accounts.
• Press the Esc key after entering all data. (This allows you to use other functions, the program will not
allow you to do anything else until you hit this key.)
• Note: If you entered incorrect data or are not satisfied with the data, click Remove Actuals to remove
all data in the Actual (Month) column.
• Click the Print button to print the report as it appears on screen.
• Click Done when finished with this month.
Repeat the above for each month you want to enter actuals for.
94
Rev. 8/08
Viewing/Printing the Integrated P & L
After you have entered actual for all desired months, the program replaces these months in the
forecasted P & L with actual data, leaving the rest of the months as forecasted in your plan.
• Click View/Print Integrated Profit & Loss
• The P & L for all 12 months are displayed as well as annual totals and annual percentages. By
default, only those accounts being used are displayed. You may display all other account titles by
clicking Display All Account Titles.
Note: changes to the forecast cannot be made in this report. To edit/enter changes you will need to
access the Planning Center or the regular P & L report.
• To run a "what if" analysis on this report and view potential results click "What If" and Global Editing.
• This integrated report is also available as a quarterly or year-to-date format. Click Print/View
Qtrly/Year to Date Reports and select the desired report.
• Click Done.
Integrated Actuals Cash Flow
To view the impact of actuals on cash flow by month you must enter either the actual balance sheet or the
actual cash balance at the end of that month. Once entered it will be integrated into the comparative
Cash Flow (this is separate from the forecasted Cash Flow report. As each month's actuals become
available, you can enter the data and constantly see how well your plan is faring against actual results.
Entering Actual Cash Flow Data
Viewing the Impact on Cash Flow
Entering Actual Cash Flow Data
There are 2 options for entering actuals for cash flow: enter the monthly actual balance sheet or the
actual cash balance at the end of the month. Both options result in the same report.
Using the Actual Balance Sheet
• Click Enter Actual Balance Sheet
• Select Enter your Actual Balance Sheets
Legend of columns:
Account
- lists all accounts in your plan
Jan - Dec
- enter actual data by month here
• Double click on a cell in the (Month) column to enter the actual amount. Tip: hit enter after each entry
to automatically advance to the next line.
95
Rev. 8/08
• Press the Esc key after entering all data. (This allows you to use other functions, the program will not
allow you to do anything else until you hit this key.)
Note: If you entered incorrect data or are not satisfied with the data, click Remove Actuals to remove all
data in the Actual (Month) column.
Repeat the above for each month you want to enter actuals for.
• Click X in the top right corner when finished entering data.
Using the Actual Cash Balance
• Select the month that you have an actual cash balance for from the drop down menu.
• Enter the cash balance in the field next to it. Note: this amount must be the cash balance at the end of
the selected month.
• Press Enter
Repeat the above for each month that you have an actual cash balance for.
Viewing the Impact on Cash Flow
After you have entered balance sheet or cash balance data, you can view its impact on future cash flow.
• Click View Impact on Future Cash Flow
The program displays a monthly cash flow screen with the original forecasted cash flow, adjusted cash
flow (with actuals), and the difference between the two.
Click Done
Exporting Comparative Reports to Excel
You may export the Comparative P & L report to an Excel spreadsheet for further editing, etc.
•
Click Transfer Report to Excel
The program will recalculate any new data and create an ASCII file.
Note down the ASCII file name ActPL(entity no.).PRN for future reference. Ex: for a comparative P&L
report in entity 10 the file created will be named ActPL10.PRN.
UYCF will request your computer to load the Excel program. The P & L report will automatically open up.
Note: you will need to realign the columns once in Excel. Procedure: Click on column A to highlight the
entire column. Select from the top tool bar, Data, then Text to Column. Click Next on all screens until
you see the Finish button. Click Finish and the columns will be properly aligned.
96
Rev. 8/08
Roll Forward
The feature automatically rolls forward your plan 1, 2 or 3 months. This way, you can keep your plan in
its most current as the year progresses so you'll always know where you're headed and when to expect
cash crunches and avoid them.
Note: this feature is not available when using the percentage of completion method for sales.
• Click the Roll Forward icon
on the top tool bar.
• Choose to roll forward your plan by 1, 2, or 3 months.
• The Beginning Balance Sheet will be displayed. Adjust the data here if desired to account for the roll
forward. Click Done when finished.
• A new sales screen will be displayed. Forecast sales in the new month(s) of the plan. These field(s)
will have $0 sales. Click Done.
• At this point you should enter new collection assumptions for beginning balances in A/R, A/P, accrued
expenses and other payables. Because of the roll forward, the original amounts will have changed.
Click Yes to enter collections for these items, enter the amounts in the month(s) you expect to collect
for each item, and click Done.
If you have expenses using options other than "expense as a percent of sales" or "expense as a given
monthly amount", you should review each of those expenses for possible changes.
Your plan is now rolled forward.
97
Rev. 8/08
Financial Analysis
This section provides tools to help determine where your company stands and calculators to take the
guess work out of equations concerning products, pricing, margins, and loans.
97
Business Valuation
98
Sensitivity Analysis (What -If Scenarios)
100
Annual and Monthly Ratios
100
Z Score Calculation
The remaining tools are calculators to determine product price/cost and product reordering as well as a
loan analysis.
• To access these calculators click the Financial Analysis 2
icon on the top tool bar. A
hidden menu will open. Then click the desired icon. Enter requested data and the program will make
the calculations.
Calculators available:
Product Price Analysis
Reorder Point Analysis
Economic Order Analysis
Determine Product Price
Determine Product Cost
Determine Product Margin
Other (loans) Analysis
Business Valuation
Use this section to determine the value of a business. While this tool can calculate the value of future
activity, it is only an estimate of value. Please consult with a professional for best results.
To determine the value of a business, the program first calculates future activity and then determines the
value of that future activity.
• Click the Financial Analysis 1 icon
on the top tool bar. A hidden menu will open.
• Click the Business Valuation icon
on the top tool bar.
There are 3 steps:
Calculate value based on discounted cash flows.
Calculate value based on capitalization of excess earnings.
Recap of all values plus additional methods.
98
Rev. 8/08
• Enter each section by clicking on the corresponding button and enter requested data. There are tool
tips provided for each section. Mouse over the Help icon,
a section.
to view an explanation or calculation of
• Each section can be printed to a report by clicking the Print button.
• Click Done when finished.
Sensitivity Analysis (What-If Scenarios)
This tool runs unlimited what-if scenarios to forecast what impact a sales increase/decrease and/or a cost
increase/decrease will have on profit and cash flow. Ex: what will happen if my sales decrease by 15%
and my costs increase by 10%? You can run what-if scenarios without necessarily applying them to the
plan, or you can apply them using the global update feature.
Note: if you are using sales by product or sales using percentage of completion, the what-if scenario will
not apply to product or job data. But it will allow you to see the impact on profit and cash flow reports.
• Click the Dashboard
icon on the top tool bar.
The first section allows you to enter 4 different what-if scenarios:
Increase/decrease sales by a percent
Increase/decrease cost of sales by a percent
Increase/decrease fixed expenses by a percent
Increase/decrease variable expenses by a percent
• Enter a percentage (use the minus (-) sign for decreases) in the desired field and hit the Tab key.
The program automatically calculates the what-if and displays the impact on sales, cost of sales, and
bottom line figures in the Adjusted box. The Original box shows plan data before the what-if and the
Difference box calculates the difference between Original and Adjusted data.
99
Rev. 8/08
• If you decide to apply all what-if changes to your plan, click Apply All to Plan, or if you only want to
transfer certain what-if scenarios click the corresponding button to that scenario.
• The program also allows you view the impact of changes to days sales in accounts receivable and
inventory turnover on cash balances.
After you have made the changes you can view the impact on cash balances below.
100
Rev. 8/08
• To view this report in graph form click Graph.
• You can print this report in data form by clicking the Print button.
• Click Done when finished.
Annual and Monthly Ratios
This section calculates projected ratios for several items in the plan. Each ratio includes a detailed
explanation on what it calculates and how it makes the calculation.
Click the Financial Analysis 1 icon
Click the Annual Ratios icon
on the top tool bar. A hidden menu will open.
or Monthly Ratios icon
.
Select any ratio to view its detailed explanation and calculation.
You can print monthly ratios directly from the monthly ratio screen. Otherwise print both annual and
monthly ratios from the Print Reports menu.
Click Done.
Z Score Calculation
This tool calculates a company's financial health using a scale of 1.0 - 8.0. Click the Explanation button
for an explanation of how the Z score is calculated and what factors it includes.
101
Rev. 8/08
• Click the Financial Analysis 1 icon
• Click the Z Score icon
on the top tool bar. A hidden menu will open.
on the top tool bar.
• Enter the value of the company's equity.
The Z score will be calculated. Compare your score to the scale given.
• Click Print to print the data in report form.
• Click Done
102
Rev. 8/08
Troubleshooting
*Throughout the program you may find small boxes with inverted exclamation points in them
. These
are Help Icons that are designed to provide you with helpful information in order to enhance you UNCF
experience. Just place your cursor over the Help Icon to view the helpful information.*
This section explains the most common problems encountered when using Up Your Cash Flow and how
to solve them. If you do not see your problem listed here, or it cannot be solved using other sections in
the Help Desk, please call Up Your Cash Flow's Technical Support Line at (310) 478-3177.
1. Can't use any of the functions on the tool bar when I am in the middle of a plan.
2. "Memory low" warning when running on Windows 2000.
3. Printed report font is too small or distorted.
4. Screens appear too large for my monitor.
5. Why doesn't my file appear when trying to restore an entity from disk?
6. An "Error Message" appears and then the program crashes.
7. Problems with accounts receivable data - check/adjust your collection assumption in the sales section.
8. Problems with accounts payable data - check/adjust your payment assumption in the cost of sales
section.
Can't use any of the functions on the tool bar when I am in the middle of a plan.
To use the tools and options on the top tool bar, all other windows must be closed and you must return to
the Welcome screen. Click Quit or Done on open screens until you reach the Welcome screen. You can
then access any functions on the tool bar.
"Memory low" warning when running on Windows 2000/XP.
If you are running UYCF on the Windows 2000 or XP edition, you may experience a "memory low"
warning message. This occurs because the program spikes memory usage for a short moment and the
Windows 2000 or XP memory manager flashes a warning. To bypass this message click Default on the
warning message window. This will solve the problem and is not cause for alarm.
Printed report font is too small or distorted.
If your reports are distorted or too hard to read, make sure your printer is set to a 300 dpi resolution. .
Screens appear too large for my monitor.
If the UYCF screens go off your monitor, you need to set your screen resolution to 1024 x 768 dpi. Go to
page 6 for instructions.
Why doesn't my file appear when trying to restore an entity from disk?
Before trying the following, make sure you have selected the correct disk drive or hard drive and have
searched any pertinent folders.
103
Rev. 8/08
If you are transferring entities between computers and you still do not see your file in the file list, try
designating a different file type.
• When prompted to select the file to open, select Savit File from the List Files of Type drop down
menu.
• This will list all zip files in that location. Select it from the list and click OK.
An "Error Message" appears and then the program crashes.
If this occurs, please locate the "error.log" file in your program's folder and attach it to an email. Send the
email to UYCF's technical support center at [email protected]. We'll analyze the problem and try to
resolve a fix (a current support plan may be required). Please call the technical support line at (800) 8737789 with any questions.
C. 2008 Granville Software. All rights reserved.
“Granville Publications”, “Granville Software”, “GPS”, “Up Your Cash Flow”, “UYCF” are all registered
trademarks of Granville. Reproduction withouth permission is strictly prohibited.
Be sure to visit our website regularly for updates at www.upyourcashflow.com or www.cashplan.com
If you need a forecast quick and easy and don’t have time, visit www.gohagit.com and we’ll do it for you!
104
Rev. 8/08