1
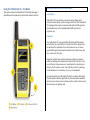
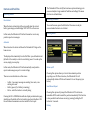
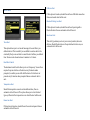
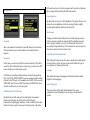
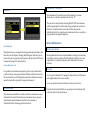
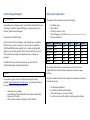
USER GUIDE FOR YELLOWBRICK v3 Version 1.9.7 Using the Yellowbrick V3 – The Basics ..................................................... 3 Device Orientation, Set-‐up and Key Features ................................................................... 3 User Interface ................................................................................................................................. 3 Orientation ...................................................................................................................................... 3 Charging and Switching On ..................................................................................................... 4 Sending a basic alert ................................................................................................................... 4 Features and Facilities ............................................................................. 5 Operating Modes ........................................................................................................................... 5 De-‐activated .................................................................................................................................... 5 Activated .......................................................................................................................................... 5 Accessing the menu ...................................................................................................................... 5 Tracking Menu ................................................................................................................................ 5 Status on/off ................................................................................................................................... 5 Send Manual Report .................................................................................................................... 5 History ............................................................................................................................................... 5 Report Frequency ......................................................................................................................... 6 Burst Mode ...................................................................................................................................... 6 GPS Hot ............................................................................................................................................. 6 Alerts Menu ...................................................................................................................................... 7 Timer Alert ...................................................................................................................................... 7 Dead Man’s Switch ....................................................................................................................... 7 Temperature Alert ....................................................................................................................... 7 Power Loss Alert ........................................................................................................................... 7 USB Loss Alert ................................................................................................................................ 7 Bluetooth Pairing Loss Alert .................................................................................................... 7 Geo-‐fence Alert ............................................................................................................................... 7 Settings Menu .................................................................................................................................. 8 Screen idle ........................................................................................................................................ 8 Screen lock ....................................................................................................................................... 8 GPS Wakeup time (Early Wakeup) ....................................................................................... 8 Screen brightness ......................................................................................................................... 8 Stealth mode ................................................................................................................................... 8 User Mode (not fully implemented) ...................................................................................... 8 Language ......................................................................................................................................... 8 Send Config Report ...................................................................................................................... 8 Bluetooth Menu .............................................................................................................................. 9 Turn on/off ...................................................................................................................................... 9 Android / iOS Software .............................................................................................................. 9 Messages Menu .............................................................................................................................. 9 New Message .................................................................................................................................. 9 Freetext ............................................................................................................................................. 9 Inbox ................................................................................................................................................ 10 Sent Items ...................................................................................................................................... 10 Outbox ............................................................................................................................................. 10 Remove All ..................................................................................................................................... 10 Custom Preset Message Lists ................................................................................................. 10 Sending a message to your Yellowbrick ........................................................................... 10 Waypoints ...................................................................................................................................... 11 Mark Waypoint ............................................................................................................................ 11 Custom Waypoint Lists ............................................................................................................ 11 Advanced Menu ........................................................................................................................... 11 Deactivation / Turning Off ..................................................................................................... 11 Device Maintenance .............................................................................. 11 Replacing the Battery ............................................................................................................... 11 Cleaning .......................................................................................................................................... 11 Fault Finding and Support ..................................................................... 12 Troubleshooting .......................................................................................................................... 12 Helpdesk ......................................................................................................................................... 12 Battery Life Expectations ....................................................................... 12 Important Note: To remain in compliance with EMC regulations, USB cables used with this device must remain less than 3m in length. Using the Yellowbrick V3 – The Basics Device Orientation, Set-‐up and Key Features This section outlines the Yellowbrick V3 Two-‐Way Messenger’s capabilities and describes how to utilize them when in the field User Interface Yellowbrick V3’s user interface consists of a mono display and 5 buttons. One alert button, and four navigation buttons. The Yellowbrick V3 is designed to be used in conjunction with either the YBlog system (for individual use) or the Yellowbrick Back-‐Office system (for corporate use). Orientation Your Yellowbrick V3 is equipped with both Iridium & GPS antennas located in the top of your device. For the best results it is important to be mindful of the orientation of your device when in use. To ensure good satellite signal, the antennas should be clear of obstructions and have a clear view of the sky. Examples of obstructions include a heavily wooded area or inside a vehicle or building. Environments such as these offer very little, if any view of the sky. In these instances, it would be best to reposition your device so that it can have a clear view of the sky, such as in a clearing, on the dashboard or rear window of a car or on a windowsill. Once switched ON, your Yellowbrick V3 will try to obtain a GPS signal. The time taken to obtain a signal will vary from few minutes when the device has never been used or not been used for a while to few seconds when the device is regularly used. Charging and Switching On The Yellowbrick V3 has an internal rechargeable battery which must be charged before use. Before the first use we recommend the device is left on charge overnight. Your Yellowbrick V3 can be charged from any USB compatible charging device, although we recommend you use the provided charger whenever possible. To charge the unit: -‐ Connect the charger to a wall outlet -‐ Attach the USB cable to the charger -‐ Unscrew the cap from the rear to reveal the USB port -‐ Plug the USB cable into the USB port on the back of the device When charging the light on the front of the keypad will be red. The red light will flash for 5 minutes when the unit has finished charging, and will then go off. The estimated charging time to fully charge the device is 7 to 8 hours from completely discharged. The device can be used whilst charging, however, the charging cycle will complete more quickly if the device is deactivated. The device can be used with a partially charged battery. Your Yellowbrick V3 is now ready for use. You can turn it on by pressing and holding the OK button for 5 seconds. Sending a basic alert The alert button is located under the flap at the top of the unit. To trigger an alert, lift the flap and hold down the alert button for a few seconds. The screen will display ‘Sending Alert’ and the Yellowbrick V3 will try to transmit an alert message. If you are in an alert situation, ensure that you give your alert the best possible chance of sending by considering the orientation of the device. Ensure it has a good view of the sky, or as good a view as is possible in your situation. The better the view of the sky, the more likely it is that your alert will be received. The alert button will work even if the unit is deactivated. Features and Facilities Operating Modes De-‐activated When the device is deactivated, the screen will show the current battery percentage, and will display ‘NOT ACTIVE’ on the screen. In this mode, the Yellowbrick V3 will not transmit or receive any position reports or messages. Activated When turned on the device will show the Yellowbrick V3 logo on the home screen. The display will automatically turn itself off after a pre-‐defined interval (default is 20 seconds) in order to save battery power. To wake up the screen, simply press any key. In this mode, the Yellowbrick V3 will automatically send position reports and messages as per its current settings. There are several indicators on this screen: -‐ In/Out – how many messages are waiting to be read, or are waiting to be sent -‐ Battery power (% of battery remaining) -‐ Status – what the tracker is currently doing Pressing the UP or DOWN button will also display an information page, which shows the details of the last position report and whether a GPS fix and Iridium transmission were successful for that report. The Yellowbrick V3 has a fully featured menu system allowing you to access and adjust a large number of facilities and settings. The menu structure is outlined below. Accessing the menu To access the menu, press the OK button. The menu can only be accessed when the device is activated. Tracking Menu Status on/off Choosing this option allows you to turn the automatic position reporting on or off. When turned on, the Yellowbrick V3 will automatically obtain a GPS fix and transmit it at a set frequency (see below). Send Manual Report Choosing this option will prompt the Yellowbrick V3 to obtain an immediate GPS fix and transmit the position immediately. This function is also possible from the home screen, by pressing/holding the UP button for 2 seconds. History The history screen allows you to see the last 10 attempted position reports and their associated data (time, lat, lon, altitude) and whether the reports were sent successfully over Iridium. Report Frequency Using this menu option the frequency of automatic position reporting can be viewed and set. Options range from ‘Continuous’ which will obtain and send reports as quickly as possible, to 12-‐hours, allowing for 2 automatic reports per day. There is also a BURST mode. Burst Mode Burst mode allows the Yellowbrick to collect many GPS reports, in order to get more accurate tracking information, but to send them as a batch in order to keep airtime costs down. For example, the Yellowbrick can collect a GPS fix every 5 seconds, and then transmit those positions once per minute. To set burst mode, in the Report Frequency you need to choose Burst. Then, in the Burst Settings menu you can choose how often you wish to take a fix (Burst fix) and how often you wish to transmit (Burst transmit). Note: This mode will use power more quickly than other tracking modes, since the GPS chip is kept on all of the time. GPS Hot In some situations you may want to immediately mark a position with a manual report whilst travelling at speed. In this sort of situation you want to be able to rely on an instant GPS fix when you fire a manual report. With GPS Hot turned ON, this means the GPS chip is continually keeping track of your position so there is no delay between the time you fire a manual report and the time the position is marked. Note: This mode will use power more quickly than other tracking modes, since the GPS chip is kept on all of the time. Alerts Menu Timer Alert This option allows you to set an alert message to be sent after a pre-‐ defined interval. This is useful if you would like to send an alert in the eventuality that you are not able to cancel the alert within a pre-‐defined time. Timers can be chosen between 5-‐minutes to 12-‐hours. Dead Man’s Switch The dead man’s switch alert allows you to set a frequency. You are then required to press a button on the device every X minutes when prompted, to confirm you are still with the device. If a button is not pressed every X minutes when prompted then an automatic alert is sent. Temperature Alert Should the temperature exceed a certain defined value, then an automatic alert will be sent. This option allows you to turn this alert type on/off and set the temperature over which the alert will be sent. Power Loss Alert If this option is turned on, should the unit lose external power then an automatic alert will be sent. USB Loss Alert If this option is turned on, should the unit lose a USB data connection then an automatic alert will be sent. Bluetooth Pairing Loss Alert If this option is turned on, should the unit lose its pairing with a Bluetooth device then an automatic alert will be sent Geo-‐fence Alert This alert type allows you to set your current position, then set a distance. Should the device leave the pre-‐defined circular area, an automatic alert will be sent. GPS more time to get a fix. Options range from 20 seconds to 3 minutes. By increasing this time, battery life will be decreased. Settings Menu Screen idle After a set number of seconds the screen will timeout to save battery. This option allows you to set the number of seconds before this happens. Screen lock In this menu you can turn on/off the screen lock and set a PIN code to access the device. When this option is turned on, you must enter a PIN code to be able to access the menu system. A PIN code is entered by working clockwise around the keypad from LEFT, so LEFT, UP, RIGHT, DOWN. You press each key the right number of times for the PIN code, so for example, with the PIN 1234 you would PRESS LEFT once, UP twice, RIGHT three times and DOWN four times. The unit would then let you into the system. GPS Wakeup time (Early Wakeup) By default the unit will wake up 20 seconds before the automatic position reporting time, in order to obtain a GPS fix before transmission. In challenging conditions, or where visibility of the sky is limited, it may be required to increase this wakeup time to allow the Screen brightness By default the screen is set to 50% brightness. This option allows you to change the screen brightness for better viewing in bright sunlight. Increasing the brightness will decrease battery life. Stealth mode Turning on stealth mode will stop the screen from turning on when a button is pressed, and will also stop the LED from flashing when the unit is trying to transmit or receive. It is still possible to access the menu when in Stealth mode, but a PIN code must be entered to get into the unit (see earlier section on Screen Lock) User Mode (not fully implemented) This setting will remove some of the more complex menus and options from the system, to allow for ease of operation for different types of user. Options are ‘Standard, Advanced’. Language This setting will change the language of the device from the default English to other languages. Send Config Report This menu option will prompt the Yellowbrick V3 to send a configuration report detailing its current setup to the back-‐office system. Bluetooth Menu Messages Menu Turn on/off By default the Bluetooth chip is turned off on the Yellowbrick V3. This is to conserve battery. From this option you can turn the Bluetooth pairing and messaging capabilities on/off. Dependent on the Bluetooth accessories and sensors you have purchased, you may have other options on this menu. Android / iOS Software The ‘Yellowbrick Messenger’ app is available to download from the Android and Apple App Stores – this software allows you to pair your smartphone or tablet with the Yellowbrick V3 and send messages to email and SMS destinations through it from anywhere in the world. It also allows you to update your social media status amongst other features. This is called Advanced Messaging, and is only available on some Yellowbrick V3 models. You will need a username and password to pair your Yellowbrick Messenger app with the device. Your individual username and password is shown on the admin home page of your YBlog, just after you log in. New Message From this menu you can choose to send a new preset message Messages sent using the device will go to your chosen destinations which are pre-‐setup using either your YBlog (individual customers) or back-‐office system (corporate customers). You can choose whether you would like an acknowledgement from the receiver, and if you wish to send the message immediately (or if not, the message will be sent on the next scheduled transmission). When you are finished choosing/writing your message, pressing OK will put the message into the outbound queue ready to send. Remember -‐ if you chose the ‘Send Immediately’ option then the Yellowbrick V3 will try to send straight away. If not, then the Yellowbrick V3 will queue the message and attempt send it at the same time as the next scheduled position report. Freetext You can also send free text messages, using a ‘pinball style’ on-‐screen keyboard. Note, we do not recommend this for long messages!! To do this, go into free text, use the left/right/up/down buttons to move around the keyboard, and press LEFT and RIGHT together to choose a letter. When you have finished, choose EXIT to confirm and send your message. As mentioned, this is NOT a good way to send long messages, and we would suggest either pairing with a smartphone/tablet or using preset messages where possible. Inbox This page allows you to cycle through messages received on the Yellowbrick V3. You can choose if you wish to delete messages, or reply to them. Message details shown are the date/time, source, and the message itself. Sent Items This page allows you to cycle through messages sent from the Yellowbrick V3. You can choose if you wish to delete messages. Message details shown are the date/time, destination, and the message itself. The Yellowbrick V3 will also indicate if the message was successfully sent, and if it was acknowledged (if an acknowledgement was requested). Outbox This page allows you to cycle through messages waiting in the queue to be sent. You can review these messages and delete them from the outbox if you change your mind and do not wish to send them any more. From the outbox you can also force an immediate retry-‐send of all messages waiting to be sent. Remove All If you want to clear all old messages from your inbox and sent items then you can do so using this option. Custom Preset Message Lists It is possible to customize the preset message list on your Yellowbrick, to better suit your own personal needs. Facilities and instructions to do this can be found in your YBlog admin panel (for individual customers) and in the back-‐office system (for Corporate customers) Sending a message to your Yellowbrick Every Yellowbrick V3 has its own e-‐mail address which you would have been provided with at registration. You can write your email address here for safe-‐keeping: _______________________________ @ my.yb.tl People can send emails to this address, and those emails will be forwarded through to your Yellowbrick and picked up at the next transmission. New messages will go into the Inbox. Any messages you send from your Yellowbrick to e-‐mail contacts will also come from this e-‐mail address, and people can reply directly to those emails as well. Similarly, people can reply to any text messages they receive from your Yellowbrick and these replies will also be routed through. Note: Only registered contacts are allowed to send you emails – to add contacts to your ‘allowed’ list, use your YBlog admin panel (individual customers) or the Yellowbrick Back-‐Office system (corporate customers). Deactivation / Turning Off Waypoints Mark Waypoint Using this feature you can mark interesting points and send them to the back-‐office for the display. Choosing ‘Mark Waypoint’ will allow you to choose the type of waypoint, and the system will then take a GPS fix and transmit the waypoint to the back-‐office. Custom Waypoint Lists It is possible to customize the waypoint type list on your Yellowbrick, to better suit your own personal needs. Facilities and instructions to do this can be found in your YBlog admin panel (for individual customers) and in the back-‐office system (for Corporate customers) Advanced Menu The advanced menu will have a number of features, dependent on your Yellowbrick V3 model. These features are for advanced use only, and should only be adjusted under instruction from a member of Yellowbrick staff or following specific instructions. The Yellowbrick V3 cannot be turned off completely, but can be deactivated – much like a standby mode for your TV. The unit can be deactivated by choosing DEACTIVATE from the menu and then pressing OK to confirm. Note, the green light may continue to flash for a few minutes after de-‐activation. This is because the Yellowbrick will try to complete any transmissions that are currently in progress before turning off completely. Device Maintenance Replacing the Battery Rechargeable batteries have a limited number of charge cycles and may eventually need to be replaced. The Yellowbrick V3 battery is not user replaceable; it can only be replaced by your Yellowbrick V3 service provider. Cleaning To clean your Yellowbrick V3, unplug all cables and turn off. Then use a soft, slightly damp cloth to clean any dirt. Do not use alcohol or abrasive substances to clean your device. Periodic lubrication of the USB rear cap (using a silicon lubricant) will reduce the risk of water penetration. Fault Finding and Support Troubleshooting If something isn’t working correctly, switch off the Yellowbrick V3, wait until the green light has stopped flashing (can sometimes be up to 5 minutes) and then switch on again. Ensure the unit is fully charged. If the tracker is totally unresponsive, and charging has not worked, a full factory reset can be carried out. To do this, press and hold the ALERT and DOWN buttons together for 10 seconds. A red light will appear on the unit. Release the buttons. The unit will then be reset to factory defaults, including all tracking frequencies, settings, and messages. If neither of the above work, then please get in touch with the Yellowbrick helpdesk, using the details below. Helpdesk For assistance, please contact the Yellowbrick support team by emailing support@yellowbrick-‐tracking.com -‐ it would greatly help us if you provided the following information: -‐ Name and contact number -‐ Serial number of the Yellowbrick V3 (see serial number label) -‐ Symptoms of the fault -‐ History of action taken to attempt to rectify the fault Battery Life Expectations These battery life predictions assume the following: • No display usage • Bluetooth off • GPS Early-‐wake set to 20s • SD-‐Card logging is set to ON(a small improvement may be seen if this is set to OFF) • Clear sky conditions Interval Transmissions Hours Days Weeks Months Continuous 2600 29.4 1.2 0.2 0.0 5 minutes 2339 194.9 8.1 1.2 0.3 15 minutes 2302 575.5 24.0 3.4 0.8 1 hour 2148 2148 89.5 12.8 3.0 4 hour 1694 6779 282.5 40.4 9.4 8 hour 1322 10580 440.8 63.0 14.7 As with all portable battery powered devices, battery life can be significantly shortened by extreme temperatures and some usage patterns. Key factors which will shorten the number of transmissions possible on a battery charge are: • Use of Bluetooth facilities • Use of GPS Hot Mode and Burst Mode • Poor positioning, so poor view of the sky • Use of the device with the display on for long periods of time