1
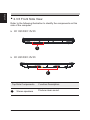
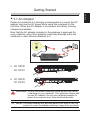
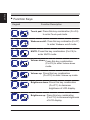
User's Manual B13IEXX/B11IEXX B13IVXX/B11IVXX Notice The information in this user’s manual is subject to change without notice. THE MANUFACTURER OR RESELLER SHALL NOT BE LIABLE FOR ERRORS OR OMISSIONS CONTAINED IN THIS MANUAL AND SHALL NOT BE LIABLE FOR ANY CONSEQUENTIAL DAMAGES, WHICH MAY RESULT FROM THE PERFORMANCE OR USE OF THIS MANUAL. The information in this user’s manual is protected by copyright laws. No part of this manual may be photocopied or reproduced in any form without prior written authorization from the copyright owners. Product names mentioned herein may be trademarks and/or registered trademarks of their respective owners/companies. The software described in this manual is delivered under a license agreement. The software may be used or copied only in accordance with the terms of the agreement. This product incorporates copyright protection technology that is protected by U.S. patents and other intellectual property rights. Reverse engineering or disassembly is prohibited. TABLE OF CONTENTS Notice Chapter 1: Preface 1.1 Regulations Information.....................................................................................5 1.2 Safety Instructions..............................................................................................6 1.3 Notes for This Manual........................................................................................7 1.4 Release History..................................................................................................8 Chapter 2: Getting to know the basics 2.1 Product Specification.........................................................................................9 2.2 Preparing your Computer.................................................................................12 2.3 Product Overview.............................................................................................14 2.3.1 Top-Open View...........................................................................................14 2.3.2 Bottom Side View.......................................................................................17 2.3.3 Right Side View..........................................................................................18 2.3.4 Left Side View.............................................................................................19 2.3.5 Front Side View..........................................................................................20 Chapter 3: Getting Started 3.1 AC Adapter.......................................................................................................21 3.2 Installing the battery pack................................................................................22 3.3 Knowing the Keyboard.....................................................................................23 3.3.1 Keyboard Usage.........................................................................................24 3.4 Using the touchpad..........................................................................................27 Chapter 4: BIOS SETUP 4.1 About BIOS Setup............................................................................................28 4.1.1 When to Use BIOS Setup ?........................................................................28 4.1.2 How to Run BIOS Setup ?..........................................................................28 4.2 BIOS Setup Menu............................................................................................29 4.2.1 Info Menu....................................................................................................30 4.2.2 Main Menu..................................................................................................31 4.2.3 Advanced Menu..........................................................................................34 4.2.4 Security Menu.............................................................................................35 4.2.5 Boot Menu..................................................................................................37 4.2.6 Exit Menu....................................................................................................38 English Preface 1.1 Regulations Information • FCC-B Radio Frequency Interference Statement This device complies with Part 15 of the FCC Rules. Operation is subject to the following two conditions: (1) this device may not cause harmful interference, and (2) this device must accept any interference received, including interference that may cause undesired operation. Any changes or modifications not expressly approved by the party responsible for compliance could void the authority to operate equipment. This equipment has been tested and found to comply with the limits for a Class B digital device, pursuant to Part 15 of the FCC Rules. These limits are designed to provide reasonable protection against harmful interference in a residential installation. This equipment generates, uses and can radiate radio frequency energy and, if not installed and used in accordance with the instructions, may cause harmful interference to radio communications. However, there is no guarantee that interference will not occur in a particular installation. If this equipment does cause harmful interference to radio or television reception, which can be determined by turning the equipment off and on, the user is encouraged to try to correct the interference by one or more of the following measures: • Reorient or relocate the receiving antenna. • Increase the separation between the equipment and receiver. •C onnect the equipment into an outlet on a circuit different from that to which the receiver is connected. • Consult the dealer or an experienced radio/TV technician for help. • CE compliance This device is classed as a technical information equipment (ITE) in class B and is intended for use in living room and office. The CE-mark approves the conformity by the EU-guidelines: - EMV-guideline 89/336/EWG electromagnetic tolerance - LVD-guideline 73/23/EWG use of electric devices within certain voltage-limits CAUTION: A ny changes or modifications not expressly approved by the guarantee of this device could void the user's authority to operate the equipment. English 1.2 Safety Instructions The following safety precautions will increase the life of the Computer. Follow all Precautions and instructions. Do not place this device underneath heavy loads or in an unstable position. Do not use or expose this device around magnetic fields as magnetic interference may affect the performance of the device. Do not expose this device to high levels of direct sunlight, high-humidity or wet conditions. Do not block the air vents to this device or impede the airflow in any way. Do NOT expose to or use near liquid, rain, or moisture Do NOT use the modem during electrical storms. •The unit can be operated at an ambient temperature of max. 35°C (95°F). Do not subject it to temperatures below 5°C (41°F) or above 35°C (95°F). English 1.3 Notes for this Manual CAUTION! Important information that must be followed for safe operation. NOTE : Information for special situations. English 1.4 Release History Version Revision Note Date 1.0 First Released 03.2010 English Getting to know the basics 2.1 Product Specification This User’s Manual provides instructions and illustrations on how to operate this notebook. It is recommended to read this manual carefully before using this notebook. ・Physical Characteristic Dimension B11IEXX/B11IVXX: 293 x 200.2 x 27.7 ~ 35.4 mm (w/ Rubber-foot) B13IEXX/B13IVXX: 334 x 230 x 25.5 ~ 32.27 mm (w/ Rubber-foot) Weight B11IEXX/B11IVXX: 1.25kgs + 3cells B13IEXX/B13IVXX: 1.58kgs + 3cells ・CPU Support Processor B11IEXX/B13IEXX: Intel® Pineview-D ATOM Intel® Pineview-M ATOM B11IVXX/B13IVXX: Intel® Pentium® Processor Intel® Celeron® Processor ・Core Chips North Bridge B11IVXX/B13IVXX: Mobile Intel® GS40 South Bridge B11IVXX/B13IVXX: ICH9M B11IEXX/B13IEXX: Mobile Intel® NM10 ・Memory DDR2/DDR3 B11IEXX/B13IEXX: DDR2 800 MHz B11IVXX/B13IVXX: DDR3 1066/1333 MHz RAM socket * 1 ・Power AC Adapter 40 Watts , 2 Pin (for B11IEXX/B13IEXX/B11IVXX/B13IVXX used) 30 Watts , 2 Pin (for B11IEXX/B13IEXX with Pineview-M CPU used) Battery Li-ion Battery English ・Storage HDD SATA HDD support Card reader 4 in 1 Card Reader Card ・I/O Port DC-in x1 USB USB 2.0 x 3 CRT x1 RJ45 x1 RJ11 (Optional) x1 Phone jacks for x 2 microphone/ headphone Card Reader x1 ・Audio Audio Codec Azalia standard support Speaker/MIC Build-in 2 speakers and internal MIC support ・Input Keyboard Standard NB KB Pointing Device PS2 Touch Pad with 2 buttons ・Display VGA Intel Integrated Graphic LCD B11IEXX/B11IVXX: 11.6" WXGA, 16:9 LED type, resolution 1366 x 768 B13IEXX/B13IVXX: 13.3" WXGA, 16:9 LED type, resolution 1366 x 768 10 English ・Communication Port LAN 10/100 Mb/Sec Wireless LAN 802.11b/g/n ・Webcam Webcam Build-in Webcam module CAUTION: MODEL B13IEXX/B11IEXX/B13IVXX/B11IVXX (x=0-9 or blank)IS DESIGNED TO USE WITH THE FOLLOWING AC ADAPTER MODEL ONLY Manufacture: Delta Model: ADP-40PHAB Manufacture: FSP Model: FSP040-RAC CAUTION: MODEL B13IEXX/B11IEXX (x=0-9 or blank) IS DESIGNED TO USE WITH THE FOLLOWING AC ADAPTER MODEL ONLY Manufacture: Delta Model: ADP-40PHAB Manufacture: FSP Model: FSP040-RAC Manufacture: FSP Model: FSP030-DQyA1xx Manufacture: DVE Model: DSA-30PFA-19 b xy 11 English 2.2 Preparing your Computer B11IEXX/B11IVXX 1 2 3 4 B13IEXX/B13IVXX 12 1 2 3 4 English 1 Turn your notebook computer upside down so the bottom is facing up. Insert the battery pack as shown into the battery compartment until it clicks into place. Then slide the lock/unlock latches into the lock position. 2 Plug the AC adapter cable into the DC power connector on the left side of your notebook computer . 3 To open your notebook computer. 4 Press the power button to turn on your notebook computer. NOTE : T he product’s color and specification will depend upon the actually shipping product. 13 English 2.3 Product Overview This section provides the description of basic aspects of the notebook. 2.3.1 Top-Open View The figure of top-open view and description shown below will lead you to browse the main operating area of your notebook. B11IEXX/B11IVXX 1 2 3 11 4 5 6 10 8 14 9 7 English B13IEXX/B13IVXX 1 2 3 4 7 5 8 6 Top Side Components 9 10 Function Description 1 Webcam The built-in Webcam allows picture taking or video recording. 2 LCD screen Displays of your notebook computer. 15 English Top Side Components Function Description 3 Power Button Turns on the power of your notebook computer. 4 Keyboard The keyboard provides keys with comfortable travel. 5 Touchpad Touch-sensitive pointing device which functions like the mouse. 6 Left and right touchpad buttons The left and right buttons function like the left and right buttons on a standard mouse. 7 Power Status LED The Power indicator shows the Power status. 8 The RF indicator shows the RF status. RF Status LED Wireless/3G module(Optional) 9 Battery Status LED The Battery indicator shows the Battery status. 10 HDD Status LED The HDD indicator shows the HDD status. 11 Microphone Built-in microphone. (For B11IEXX/B11IVXX only) CAUTION:When you are not using the computer, keep the LCD screen closed to protect it from dust. 16 NOTE: The keyboard differs for each territory. English 2.3.2 Bottom Side View Refer to the following illustration to identify the components on this side of the computer. B13IEXX/B13IVXX B11IEXX/B11IVXX 4 3 2 1 Top Side Components Function Description 1 Battery pack Insert the battery into this compartment. 2 Battery lock latch Slide to lock/unlock the battery. 3 Microphone Built-in microphone. (For B13IEXX/B13IVXX only) 4 3G SIM card door For end-user to install/un-install 3G SIM card. CAUTION:Do not put the computer on your LAP or other Parts of the body to avoid injury from the heat. 17 English 2.3.3 Right Side View Refer to the following illustration to identify the components on this side of the computer. B11IEXX/ B11IVXX 1 2 3 4 5 6 B13IEXX/ B13IVXX Top Side Components Function Description 1 4-in-1 Card Reader SD/MMC/MS/MS Pro Memory Card 2 Headphone jack Connects amplified speakers or headphones into this jack. 3 Microphone jack Connects a microphone into this jack. 4 USB Port Connects an USB device (such as USB Zip drive, keyboard or mouse) into this jack. 5 Modem Port Connect to ISP. (For B11IEXX/B11IVXX only) 6 Network Jack 18 Connects network. English 2.3.4 Left Side View Refer to the following illustration to identify the components on this side of the computer. B11IEXX/ B11IVXX 1 2 3 4 5 B13IEXX/ B13IVXX Top Side Components Function Description 1 Power Connector Connects the AC adapter into this connector. 2 External monitor connector Connects an external monitor. 3 USB Port Connects an USB device (such as USB Zip drive, keyboard or mouse) into this jack. 4 GXT (graphic performance extension) Need to bundle with Shuttle GXT docking for enable. 5 Vent Thermal Vent. NOTE: Always disconnect all telephone lines from the wall outlet before servicing or disassembling this equipment. To reduce the risk of fire use only No. 26 AWG or larger telecommunication line cord. 19 English 2.3.5 Front Side View Refer to the following illustration to identify the components on this side of the computer. B11IEXX/B11IVXX 1 B13IEXX/B13IVXX 1 Top Side Components 1 20 Stereo speakers Function Description Produce stereo sound. English Getting Started 3.1 AC Adapter Please be noted that it is strongly recommended to connect the AC adapter and use the AC power while using this notebook for the first time. When the AC adapter is connected, the battery is being charged immediately. Note that the AC adapter included in the package is approved for your notebook; using other adapter model may damage either the notebook or other devices attached to it. B11IEXX/ B11IVXX B13IEXX/ B13IVXX CAUTION:Do not use inferior extension cords as this may result in damage to your notebook. The notebook comes with its own AC adapter. Do not use a different adapter to power the computer and other electrical devices. NOTE: The power adapter may become warm to hot when in use. Be sure not to cover the adapter and keep it away from your body. 21 English 3.2 Installing the battery pack Insert the battery pack as shown into the battery compartment until it clicks into place. Then slide the lock/unlock latches into the lock position. B11IEXX/B11IVXX Battery pack 22 B13IEXX/B13IVXX Battery pack NOTE: N ever attempt to remove the battery pack while the computer is turned ON, as this may result in the loss of working data. English CAUTION! Only use batteries that are approved by an authorized dealer. All batteries are not the same and therefore should not be treated as such. Using the wrong battery could cause serious damage to your computer and yourself through toxic emissions. CAUTION! Danger of explosion if battery is incorrectly replaced. Replace only with the same or equivalent type recommended by the manufacturer. Dispose of used batteries according to the manufacturer's instructions. Never remove the battery pack while the power is on as this may result in data loss when the system loses power. 23 English 3.3 Knowing the Keyboard The following defines the colored hot keys on the B13IEXX/B11IEXX /B13IVXX/B11IVXX Keyboard. The colored commands can only be accessed by first pressing and holding the function key while pressing a key with a colored command. 24 English 3.3.1 Keyboard Usage To activate these functions, press and hold down <Fn> together with the keys described below: Function Keys Keypad Function Description BT on/off: Press this key combination (Fn+Esc) to enter BT on/off mode. (Optional) Fn + Fn + Fn + Fn + Fn + Wireless on/off: Fn + 3G on/off: P ress this key combination (Fn+F5) (Optional) to enter 3G on/off mode. Z Z Suspend: Press this key combination (Fn+F1) to enter sleep mode. I-Powerxross: Press this key combination (Fn+F2) to enter I-Powerxross mode. LCD/CRT mode: Press this key combination (Fn+F3) to enter LCD/CRT mode.Changes Display Mode: LCD-only, CRT-only, LCD/CRT simultaneously LCD ress this key combination (Fn+F4) P to enter Wireless on/off mode. 25 English Function Keys Keypad Function Description Fn + Touch pad: Press this key combination (Fn+F6) to enter Touch pad mode. Fn + Webcam on/off: Press this key combination (Fn+F7) to enter Webcam on/off mode. Fn + MUTE: Press this key combination (Fn+F8) to enter MUTE mode. + Volume down: Press this key combination (Fn+F9) to enter Volume down Fn mode. 26 Fn + Fn + Fn + Volume up: Press this key combination (Fn+F10) to enter Volume up mode. Brightness down: Press this key combination (Fn+F11) to decrease brightness of LCD display. Brightness up: Press this key combination (Fn+F12) to increase brightness of LCD display. English 3.4 Using the touchpad The touchpad is a rectangular electronic panel located just below your keyboard. You can use the static-sensitive panel of the touchpad and slide it to move the cursor. You can use the buttons below the touchpad as left and right mouse buttons. Press the left 1 and right 2 buttons located on the edge of the touchpad to make selections and run functions. These two buttons are similar to the left and right buttons on a mouse. Tapping on the touchpad produces similar results. B11IEXX/B11IVXX 1 2 B13IEXX/B13IVXX 1 2 CAUTION: Keep your fingers dry and clean while using the touchpad. Also keep the touchpad dry and clean. The touchpad is sensitive to finger movements. Therefore, the lighter the touch, the better theresponse. Tapping too hard will not increase the touchpad’s responsiveness. 27 BIOS SETUP English 4.1 About BIOS Setup 4.1.1 When to Use BIOS Setup ? You may need to run the BIOS Setup when: ・An error message appears on the screen during the system booting up and is requested to run SETUP. ・You want to change the default settings for customized features. ・You want to reload the default BIOS settings. 4.1.2 How to Run BIOS Setup ? To run the BIOS Setup Utility, turn on the notebook and press the [Del] key during the POST procedure. If the message disappears before you respond and you still wish to enter Setup, either restart the system by turning it OFF and ON, or simultaneously pressing [Ctrl]+[Alt]+[Del] keys to restart. Be noted that the screen snaps and setting options in this chapter are for your references only.The actual setting screens and options on your Notebook may be different because of BIOS update. The setup uses a menu interface to allow the user to configure their system and the features are briefly listed as follow. Press F11 key for Boot Menu. 28 English 4.2 BIOS Setup Menu Once you enter the BIOS Setup Utility, the Main Menu will appear on the screen. Select the tags to enter the other menus. Info Menu Show System Information about BIOS version,CPU features and Manufacturer Main Menu Show system overview about memory size, main HDD or ODD and setting of system time and date. Advanced Menu To select the XD feature enable or disable XD feature only work with Intel platform + Windows Security Menu Install or clear the password settings for supervisor and user. Boot Menu Configure Settings during System Boot. EXIT Menu Save or discard the changes before leaving the BIOS Setup Menu. 29 English 4.2.1 Info Menu ・System Information This item provides the information about the firmware, processor, and system memory. ・BIOS Information BIOS VERSION : BIOS version EC VERSION : EC version Build Date : BIOS Build Date ・Processor Processor Type ・Manufacturer Manufacturer Name ・Product Name:Product Name 30 English 4.2.2 Main Menu 31 English 4.2.2 Main Menu ・System Date This item allows you to set the system date. The date format is [day:month:date:year]. Use [ENTER], [TAB] or [SHIFT-TAB] to select a field. ・System Time This item allows you to set the system time. The system clock will go on no matter you shut down the PC or get into sleep mode. The time format is [hour:minute:second]. Use [+] or [-] to configure system Time. 32 Day of the week, from Sun to Sat, which is determined by BIOS (read-only). Month (Month) The month from 01 (January) to 12 (December). Date (Date) The date from 01 to 31. Year (Year) The year can be adjusted by users. English Day ・AHCI Port0 While entering setup,BIOS auto detects the presence of AHCI devices. This displays the status of auto detection of AHCI devices. 33 English 4.2.3 Advanced Menu ・Execute-Disable Bit Capability [Enabled]: When disabled, force the XD feature flag to always return 0. 34 English 4.2.4 Security Menu ・Change Supervisor Password When this item is selected, a message box shall appear on the screen as below: Enter New Password Type a maximum of 6-digit password and press [Enter]. The password typed now will replace any previously set password from CMOS memory. You may also press [ESC] to abandon new password setting. When the Supervisor Password is set, new items Change User Password and Password Check will be added in the menu. Select Change User Password to give or to abandon password setting 35 English same as Change Supervisor Password item above. Note that Supervisor Password field allows users to enter and change the settings of the BIOS SETUP UTILITY, while User Password field only allows users to enter the BIOS SETUP UTILITY without having the authorization to make any change. The Password Check item is used to specify the type of BIOS password protection that is implemented. Settings are described below: Setup Always The password is required only when users try to access to BIOS SETUP UTILITY. The password is required every time when the Notebook is powered on or when users try to access to BIOS SETUP UTILITY. To clear a set Supervisor Password/ User Password, just press [Enter] under Change Supervisor Password/ Change User Password field when you are prompted to enter the password. Please note that when Supervisor Password has been cleared, User Password will be cleared as well. A message box will pop up confirming password will be disabled. Once the password is disabled, the system will boot and user can enter setup without entering password. 36 English 4.2.5 Boot Menu ・Boot Configure Settings during System Boot. ・LAN Remote Boot [Enable]: Boot from LAN or not. ・1st Boot Device ・2nd Boot Device ・3rd Boot Device Specifies the boot sequence from the available devices. A device enclosed in parenthesis has been disabled in the corresponding type menu. 37 English 38 4.2.6 Exit Menu English ・Save & Exit Setup Exit system setup after saving the changes. F10 key can be used for this operation. ・Discard Changes and Exit Exit system setup without saving any changes. ESC key can be used for this operation. ・Discard Changes Discards changes done so far to any of the setup questions. F7 key can be used for this operation. ・Load Default Settings Load Optimal Default values for all the setup questions. F9 key can be used for this operation. 39