1
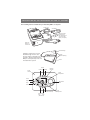
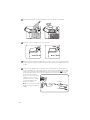
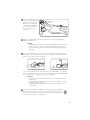
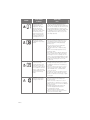
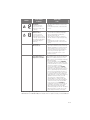
V e t e r i n a r y G R Pro™ 2.1
Control Unit
User’s Manual
Model Number
550450
This User’s Manual is also available online at
www.gamereadycanine.com and
www.gamereadyequine.com under Products.
T H E G A M E READY DI F F EREN C E
T H E G A M E READY DI F F EREN C E
Game Ready® was built upon the concept that the principles behind spacesuit
technology could be used to develop an injury treatment system. As a designer for
the National Aeronautics and Space Administration (NASA) and an inductee into the
U.S. Space Foundation’s Hall of Fame, our founder helped pioneer the technology
involved in controlling pressure and temperature within a flexible garment. In 1998,
Game Ready began working with athletes, athletic trainers, veterinarians, and
engineers to expand breakthrough discoveries into the realm of sports medicine.
RE G I S TER
YO U R
P ROD U C T
Please complete your Warranty Registration for both the Veterinary GRPro™ 2.1
Control Unit and the Wraps online at www.gamereadyvet.com. The Wrap registration
card is packaged with the Heat Exchanger of each Wrap. You must register within 30
days from the date of purchase in order to receive warranty service. Further warranty
information can be found on page 22.
Let us know what you think of our products by calling us at the numbers below
or emailing us at [email protected]. We’d love to hear from you.
Brought to you by CoolSystems, Inc.
1800 Sutter Street, Suite 500
Concord, CA 94520
In the United States call toll-free:
1.888.GameReady (1.888.426.3732)
Outside of the United States:
+1.510.868.2100
www.gamereadyvet.com
D e sc r i p t i o n o f T H E V e t e r i n a r y G R P r o 2 . 1 S Y S TE M
The following items are included in your Veterinary GRPro 2.1 System:
Power Cord
AC Adapter
High
Med
Welcome Packet
(containing the
User’s Manual and
other information
about your System)
p
Wra
Avg. p.
Tem
55/13
50/10
Low
sure
Pres
Off
45/7
40/5
ºF/ºC
p
Slee
Time
Run
Time
Bath
Ice p.
Tem
Connector
Hose
Veterinary
GRPro 2.1
Control Unit
Heat Exchanger
A Wrap (comprised of an inner
Heat Exchanger and an outer
Sleeve) must be attached to the
System to begin treatment. Each
Wrap is sold separately and is not
included in the System.
Wrap
(sold separately)
Sleeve
Volume
Power
Indicator
Pressure
Backlight
Pressure
Indicator
Actual
Temperature
Pressure
Off
Low
Med
High
Actual
Temperature
55/13
Power
50/10
Program
40/5
45/7
ºF/ºC
Play/
Pause
Sleep
Time
Run
Time
Target
Temperature
Coldest
Wrap Temp.
C/F(Celsius/Fahrenheit)
Subtract Add
Time
Time
(Manual Mode)
Temperature
Knob
Target
Temperature
TABLE O F C ONTENT S
Detailed Instructions for Use _________________________________ 2
Modes of Operation______________________________________ 2
Buttons_________________________________________________ 2
Adjusting Temperature___________________________________ 3
Display__________________________________________________ 3
Operating the System____________________________________ 5
Storage ____________________________________________________ 8
Cleaning ____________________________________________________ 9
Maintenance ________________________________________________ 10
Accessories _________________________________________________ 11
Indications for Use___________________________________________ 11
Contraindications____________________________________________ 12
General Warnings and Cautions _____________________________ 12
Specifications_______________________________________________ 13
Safety Electrical Classification ________________________________ 14
Electromagnetic Compatibility________________________________ 15
Troubleshooting ____________________________________________ 19
Warranty ___________________________________________________ 22
D e t a i l e d I n s t r uc t i o n s f o r U s e
Do not use this device without your veterinarian’s specific recommendations for the
frequency and duration of your treatments.
Be sure to read further safety warnings on pages 12-13 of this User’s Manual.
MODES OF OPERATION
Manual Mode: The System automatically starts in this mode, and allows the user to
adjust treatment time and pressure settings.
Program Mode: This mode allows the user to choose one of six treatment programs that
provide therapy for a set time then sleep (no treatment) for a set time, continuously, at a
specific pressure setting.
Drain Mode: Allows a user to connect a Hose with a special Hose Adapter (purchased
separately) to the unit, enter Drain Mode and have the unit empty the water out of the ice
box through the Hose. Drain Mode can be accessed by pressing the program key and
toggling through all six programs. To empty water in the System while in Drain Mode, press
the program key until you reach Drain Mode, attach the Hose Adapter to the Connector Hose,
place the Hose Adapter over a sink, and press the Play button. Drain Mode
will run the Control Unit’s fluid pump for up to six minutes (long enough
to fully empty the ice box). Drain Mode is indicated by the following icons:
BUTTONS
Power: Use this button to turn the Control Unit on and off.
Program: Use this button to select one of the available Programs or to return to
Manual Mode. See page 8 in this manual for more information on Programs.
Play/Pause: Use this button to start or pause a treatment.
Add Time: Use this button to add time in Manual Mode (does not work in Program
Mode). You can add up to 90 minutes. Treatment must be paused in order to add
or subtract time.
Subtract Time: Use this button to reduce time in Manual Mode (does not work in
Program Mode). You can subtract up to 90 minutes. Treatment must be paused in
order to add or subtract time.
Pressure Selection: Use this button to select one of four pressure settings: No
Pressure, Low Pressure (5-15 mmHg), Medium Pressure (5-50 mmHg), and High
Pressure (5-75 mmHg). Pressure selection is not available in Program Mode.
Treatment must be paused to change pressure settings.
Volume: Use this button to select the option of sound or no sound. Push to mute
sound. Alarms will still sound even with Volume off.
C/F Button: Use this button to select either Celsius or Fahrenheit on the
temperature display.
Backlight: Use this button to turn the backlight on or off.
EN- 2
Adjusting Temperature
To adjust the temperature being applied during treatment, simply turn the temperature
knob towards 3 snowflakes for the maximum amount of cold, or towards 1 snowflake for
the least amount of cold. Notice that as you adjust the knob, the “Target Temperature” on
the display will change. The System will automatically adjust to match the temperature you
have selected.
TIP: The maximum amount of cold is dictated by the amount of ice in the reservoir and the
setting of the temperature adjustment knob. You may need to stir or replenish the ice to
achieve coldest temperatures. Ice will melt faster in the acute phases of injury as the Game
Ready System is removing greater amounts of heat from the treatment site.
DISPLAY
Status bar:
Off (Mute)
On
Indicates selected mode.
Indicates unit is paused.
Indicates unit is running.
Other Icons:
Error
Sleep
Battery
Temperature:
Indicates an error. See troubleshooting
pages 19-21 for error codes.
Indicates sleep mode time.
Indicates remaining battery capacity.
Actual Temperature: Approximate
temperature of the water leaving the Control
Unit.
Target Temperature: Indicates the target
temperature setting. The Control Unit will
automatically match the Actual Temperature
and Target Temperature as closely as possible.
EN-3
Displays the amount of run time
remaining.
Sleep time
count-down bars.
When the System
is running in
Program Mode:
Run time count-down bars.
When the System
is running in
Manual Mode:
Displays the amount of run time
remaining.
Displays the amount of sleep time
remaining.
When selecting a
program:
Displays pressure.
Pressure
Off
Low
Med
High
Actual
Temperature
55/13
50/10
45/7
40/5
ºF/ºC
Sleep
Time
Displays amount of
time unit will sleep.
Pressure:
EN- 4
Off
Low
Med
High
Off
Low
Med
High
Off
Low
Med
High
Off
Low
Med
High
Run
Time
Target
Temperature
Displays amount of
time unit will run.
OPERATING THE SYSTEM
To operate your Veterinary GRPro 2.1 System, you need:
• Control Unit reservoir filled with ice and water. Optimal performance is achieved by first
completely filling the reservoir with ice, then adding water to 1” below the reservoir lid.
• Game Ready supplied power supply.
• Connector Hose.
• Wrap (includes a Heat Exchanger and Sleeve).
Notes:
• The Wrap is comprised of an inner Heat Exchanger and an outer Sleeve. The combination
of Sleeve and Heat Exchanger is referred to throughout this manual as a “Wrap.”
• The Veterinary GRPro 2.1 Control Unit should be placed on a stable surface (such as the
floor or a table) during use. • Note that using the System in an environment with a high ambient temperature may
affect its ability to provide adequate cooling, or may limit the ice life. • If you will be using the System with a Game Ready optional battery pack (sold separately),
please consult the instructions for use that accompany that battery pack.
Warning:
• Your Veterinary GRPro 2.1 Control Unit should be plugged into a grounded electrical
outlet prior to operation.
• Position the Control Unit to minimize the risk of tripping over the Control Unit, Connector
Hose, or power cord.
Precautions:
• Failure to properly follow the instructions of this manual and those of your medical
provider may interfere with or prevent delivery of appropriate therapy.
• To avoid risk of electrical shock unplug the Control Unit from the electrical outlet prior to
filling the Control Unit with ice and water.
1
Push the door release button to open the ice box door.
EN-5
2
Fill entire reservoir with ice. Then add water to the reservoir up to 1” below lid.
3
Close the ice box door. Make sure you hear it click.
Click
4
Place the Control Unit in the location where you plan to use it. The Control Unit should
only be used in the upright orientation as shown. The Control Unit will leak if placed on
its side.
5
Connect the AC Adapter to the receptacle on the end panel of the Control Unit, then
plug the AC Adapter into a grounded electrical outlet. The power indicator light (orange
color) on the Control Unit should illuminate. Press the power button.
The screen
should light up and the Control Unit should beep twice. The power indicator light
should turn from orange to
green. If you do not see these
indicators, refer to “Control
Unit will not turn on” on page
21 of the Troubleshooting
Guide in this manual.
AC Adapter
Note: The Control Unit should
be turned on prior to attaching
a Wrap.
to electrical outlet
EN- 6
6
Connect the larger end of the
Connector Hose (with the red
button) to the Control Unit.
Make sure you hear it click.
To disconnect, simply press
the red button and remove
the connector from the
Control Unit.
Disconnect
Button
Connector Hose
7
to Wrap
Apply the selected Wrap (consult the Use Guide accompanying each Wrap for
application instructions).
Caution:
• The Wrap is not sterile. Do not place directly against open wounds, sores,
rashes, infections, or stitches. The Wrap may be applied over dressing.
• To ensure best fit, be sure the Wrap is completely deflated prior to each
application.
8
Connect the smaller end of the Connector Hose (with a blue or gray button) to the
Wrap. Make sure you hear it click. To disconnect, simply press the blue or gray button
and remove the connector from the Wrap.
Click
Disconnect Button
If you have any problems with the set-up of your Veterinary GRPro 2.1 System, in
the U.S. call Game Ready Customer Service at 1.888.426.3732 (+1.510.868.2100);
from outside of the U.S. please contact your local distributor.
Warnings:
• Follow the treatment recommendations of your veterinarian for the use
of this device.
• Improper placement or prolonged use of the Veterinary GRPro 2.1 System
could result in tissue damage.
• For additional warnings and precautions, please refer to pages 12 & 13
of this manual.
9
Set your target temperature (displayed in the Target Temperature window) by
turning the knob. Turning the knob clockwise, towards 3 snowflakes, will
provide more cold therapy. Turning the knob counter-clockwise, towards 1
snowflake, will provide less cold therapy.
EN-7
10
You can choose to operate in either Manual Mode or Program Mode.
Manual Mode allows you to adjust time and pressure settings as you
choose. Program Mode allows you to choose one of six programs that
provide treatment for a set time then sleep (providing no treatment) for a set time,
continuously, at a specific pressure setting (refer to list of available programs below).
The unit automatically starts in Manual Mode.
Manual Mode:
Set the time in five minute increments by pushing the +/- buttons.
Set the pressure by pushing the pressure button. You can select
from 4 pressure settings: No pressure, Low Pressure (5-15mmHg),
Medium Pressure (5-50mmHg), High Pressure (5-75mmHg).
Program Mode:
Push the program button to enter Program Mode. In Program Mode,
the unit will operate continuously according to the selected program.
You will need to replenish ice and water as previously indicated in
step 2.
You can select from the following programs: (Push the Program
Button to scroll through the available programs.)
Program 1: 30 minutes on, 30 minutes sleep. No pressure.
Program 2: 30 minutes on, 30 minutes sleep. Low pressure.
Program 3: 30 minutes on, 30 minutes sleep. Medium pressure.
Program 4: 30 minutes on, 60 minutes sleep. No pressure.
Program 5: 30 minutes on, 60 minutes sleep. Low pressure.
Program 6: 30 minutes on, 60 minutes sleep. Medium pressure.
Program d: Drain Mode. Please refer to page 2 in this manual for
details.
Storage
When you are done using the System for the day:
• Unplug the AC Adapter and the Connector Hose from the Control Unit.
• Push the door release button to open the door.
• Carefully pour out the ice and water.
• Wipe off any excess water. • Store the Control Unit with the lid fully open to allow the interior to dry and preserve
the reservoir seal. Store the Control Unit in the Carry Bag or in another safe location.
Remember that your GRPro 2.1 Control Unit is a valuable piece of equipment and should
be treated with great care, like a laptop computer.
Storage Temperature Conditions: 33° - 120°F (1° - 50°C)
Relative Humidity: 10% - 95% non-condensing
Caution: Do not keep in extreme cold or hot temperatures (below 33°F or above 120°F
or below 1° or above 50°C). Do not leave in a hot or freezing car. Do not leave the Control
Unit in direct sunlight. The UV light may damage or discolor the Control Unit.
EN- 8
Cleaning
CONTROL UNIT
The exterior of the Control Unit and the visible interior surfaces of the reservoir can be
cleaned with a soft cloth and one of the following cleaning agents:
•
•
•
•
•
Mild detergent
70% Isopropyl alcohol
100% Simple Green®
Quaternary ammonium (such as Virex® – typically only found in a clinical use setting)
Cavicide®
Procedure:
Follow the manufacturer’s instructions and precautions for the cleaning agent you select.
• Apply the selected cleaner to a soft cloth and wipe down all surfaces of the Control Unit.
• Allow the Control Unit to dry thoroughly before storing it in the bag.
• The Control Unit should be cleaned as needed.
•
DO NOT USE:
• Phenolic-based disinfectants (such as Amphyl® – typically only found in a clinical use
setting).
• Any solvent-based cleaners on the Control Unit. Doing so will damage the plastics and
will void your warranty.
• Abrasive materials to clean the Control Unit. Doing so will damage the plastics and will
void your warranty.
Caution: The Control Unit is not a waterproof device. Do not apply a direct stream of any
liquid onto the Control Unit, submerge the Control Unit, or allow any liquid to pool on the
surface of the front panel of the Control Unit.
CONNECTOR HOSE
The surface of the Connector Hose can be cleaned using a soft cloth and one of the
following:
• Mild detergent
• Steri-Fab®
• 70% Isopropyl alcohol
• We do not recommend the use of quaternary ammonium (such as Virex®) or Cavicide.®
DO NOT USE:
• Phenolic-based disinfectants (such as Amphyl® – typically only found in a clinical use
setting).
• Any solvent based cleaners. Doing so will damage the plastics and will void your
warranty. • Abrasive materials. Doing so will damage the plastics and will void your warranty.
• Any petroleum based lubricants. Doing so will damage the o-rings and will void your
warranty. If lubrication is required, the use of silicon spray is recommended.
WRAPS
Gently remove Heat Exchanger from the Sleeve. Hand wash the Sleeve in cold water,
using a mild detergent or antibacterial soap. Do not use fabric softener. Hang to dry.
If needed, the external surface of the Heat Exchanger may be cleaned by wiping down with
commercial non-bleach cleaning wipes or hand washed using a very small amount of mild
detergent or antibacterial soap. DO NOT MACHINE WASH.
Refer to the Wrap Use Guide accompanying individual Wraps for more information.
EN-9
CARRY BAG
The Carry Bag should be cleaned using a soft cloth or brush and a mild detergent. Febreze®
or the equivalent can be used on the Bag if desired. If the Carry Bag has a biological
material on the surface, Steri-Fab® may be used to decontaminate those surfaces.
Be sure to test any product on a small portion of the Bag to ensure that it will not cause
damage.
Note: To operate the Veterinary GRPro 2.1 System, you do not need to remove it from
the Carry Bag. Simply unzip the Bag’s main compartment and end panel. Fill the reservoir
with ice and water. Attach the Connector Hose and the AC Adapter to the end panel of the
Control Unit and plug the AC Adapter into a grounded electrical outlet.
maintenance
The reservoir filter should be inspected, cleaned, and/or replaced as necessary.
EN- 10
1
Identify the filter within
the ice reservoir.
4
Rinse debris from the
filter and be sure there
are no obvious signs of
damage.
If you have questions
or would like to order
a new filter, in the
U.S. call Game Ready
Customer Service at
1.888.426.3732
(+1.510.868.2100);
from outside of the
U.S. please contact
your local distributor.
2
Using two fingers, grasp
and squeeze the two
protruding prongs.
3
Slide the filter out.
5
To replace the filter, or install
a new filter, first ensure that
the filter is oriented properly
with the plastic tab facing
up. If the filter is not oriented
properly, the protruding tab
will prevent the filter from
sliding back into place.
6
You will feel and
hear the filter snap
back into place.
Other than maintaining the reservoir filter, no product service should be performed by
the user. If your Veterinary GRPro 2.1 System requires service, in the U.S. call Game
Ready Customer Service at 1.888.426.3732 (+1.510.868.2100); from outside of the U.S.
please contact your local distributor.
Acc e ss o r i e s
The Veterinary GRPro 2.1 Control Unit can be used with any of the following accessories:
•
•
•
•
•
Any Game Ready Wrap (wraps made by any other manufacturer CANNOT be used with
this System)
Game Ready supplied Power Supply (GlobTek Model GTM-21097-5012) or FSP Group, Inc.
model FSP 030-RCAM and Hospital Grade Power Cord
Game Ready supplied Connector Hose
Game Ready Carry Bag
Game Ready Drain Mode Adapter
INDI C ATION S F OR U S E
•
Follow the recommendations of your veterinarian for duration and frequency of use for
this device.
The Veterinary GRPro 2.1 System combines cold and compression therapies. It is intended
to prevent injuries, treat post-surgical and acute injuries to reduce edema, swelling, and
pain where cold and compression are indicated.
EN-11
C o n t r a i n d i c at i o n s
Compression Therapy (vasopneumatic compression) using the Game Ready System or any
compression therapy device should not be used in patients:
• Who
are in the acute stages of inflammatory phlebitis in the affected region.
• Who
have any history or risk factors for deep vein thrombosis or pulmonary embolus
(including prolonged bed or stall rest) in the affected region (to be treated with this therapy).
• Who
have significant arteriosclerosis or other vascular ischemic disease in the affected region.
• Who
have a condition in which increased venous or lymphatic return is not desired in the
affected extremity (e.g., carcinoma).
• Who
have decompensated hypertonia in the affected region.
Cryotherapy using the Game Ready System or any cryotherapy device should not be used
in patients:
• Who
have significant vascular impairment in the affected region (e.g., from prior
frostbite, diabetes, arteriosclerosis or ischemia).
•Who
have acute paroxysmal cold hemoglobinuria or cryoglobulinemia.
G e n e r a l W a r n i n gs a n d C a u t i o n s
Thank you for choosing the Game Ready System. To assure you have the best experience
possible, please be sure to read the entire User’s Manual prior to use of the product.
Warnings
•
Improper placement or prolonged use of Game Ready could result in tissue damage
such as frostbite.
•
During the course of Game Ready therapy, the treatment provider should monitor the
tissue surrounding the treated region or the extremities of the treated limb for any
abnormal appearance, increased swelling, or pain. If any of these signs present, or any
changes in skin appearance occur (such as increased redness, discoloration, or other
noticeable skin changes), you are advised to discontinue use and consult a veterinarian.
•
The Game Ready Wrap is not sterile; do not place directly against open wounds, sores,
rashes, infections, or stitches. May be applied over dressing.
•
The Game Ready wraps are available in multiple configurations but are not intended for
all possible uses. Use caution when selecting a particular wrap for use on anatomic regions
other than that for which the wrap is indicated and closely supervise the animal’s status.
•
To avoid the risk of electrical shock, do not remove any panels from the Control Unit. For
all servicing and repair, please contact Game Ready Customer Service; from the U.S. call
toll-free at 1.888.426.3732, from outside the U.S. call 001.510.868.2100. Opening the
case will void the Game Ready warranty.
•
To avoid the risk of electrical shock, always turn off the System and disconnect the power cord from its electrical outlet when not in use or before adding or emptying ice
and water.
•
Do not use any adapter other than that provided by Game Ready. Use of other adapters
may result in electrical shock and will void the Game Ready warranty.
EN- 12
CAUTIONS
•
Caution: This product is for veterinary use only and is not indicated for human use.
•
Caution: Always attend the animal while the Game Ready Veterinary System is being
used, in the case that the animal needs to be quickly disconnected from the Control Unit.
•
Do not operate the System without any water in the ice box.
•
Never operate the System with damaged power cords or Connector Hoses, or other
mechanical damage, or if the unit is otherwise not fully operational.
•
Do not pour hot water into the ice box. The System was not designed to operate, and
has not been tested, with hot water.
•
Do not pick up the Control Unit by the lid. Carry using the handle only.
•
Do not use other manufacturers’ wraps with the Game Ready System.
•
Do not operate the Control Unit without a Connector Hose attached.
•
Be careful not to trip over the System’s power cords and Connector Hose, or use the
product where these are likely to trip an animal.
•
The Game Ready Control Unit is a veterinary medical device. Handle it with the same
care as you would a laptop computer. Do not drop it, kick it or otherwise abuse it
unnecessarily. Such abuse will void all Game Ready warranties. Do not place the AC
Adapter or battery pack inside the ice box for storage or transport.
In addition to the precautions listed above, additional warnings and safety precautions
are posted throughout this manual. Read and carefully follow these instructions prior to
operating the System.
sp e c i f i c a t i o n s
Size: 16.25” length x 7.75” width x 9.25” height (413 x 197 x 235) mm, not including Carry Bag
Weight: 7.3 lb. empty, approximately 18 lb. full of ice and water
Pressure level: cycles from 5mm Hg up to 75mm Hg
AC power: 100-240 V~, 50-60 Hz, 1.6A
DC input: 12V/2.5 A
EN-13
S A F ETY ELE C TRI C AL C LA S S I F I C ATION
Protection against electric shock (5.1):
The Veterinary GRPro 2.1 System is considered to be Class I (protective earth) when
connected to the FSP Group, Inc. model FSP 030-RCAM power supply. The Veterinary
GRPro 2.1 System is considered to be Class II (double insulated) when connected
to the GlobTek Model GTM-21097-5012 power supply.
Protection against harmful ingress of water (5.3):
This product provides ordinary protection against ingress of water.
Degree of safety in the presence of flammable anesthetics or oxygen (5.5):
Not suitable for use in an oxygen enriched environment or in the presence of flammable
anesthetics.
Powered by Direct Current
Type BF Applied Parts
Attention: Consult accompanying documents before use.
Manufacturer
Electromagnetic interference:
This equipment has been tested and found to comply with the limits for medical devices
in IEC 60601-1-2:2001. These limits are designed to provide reasonable protection against
harmful interference in a typical medical installation. This equipment generates, uses and
can radiate radio frequency energy and, if not installed and used in accordance with the
instructions, may cause harmful interference to other devices in the vicinity. However,
there is no guarantee that interference will not occur in a particular installation. If this
equipment does cause harmful interference to other devices, which can be determined by
turning the equipment off and on, the user is encouraged to try to correct the interference
by one or more of the following measures:
•
•
•
EN- 14
Reorient or relocate the receiving device.
Increase the separation between the equipment. Connect the equipment into an outlet
on a circuit different from that to which the other device(s) are connected.
Consult the manufacturer or field service technician for help.
E l e c t r o m a g n e t i c C o mp a t i b i l i t y
Electromagnetic Compatibility Information According to IEC/EN 60601-1-2
Table 1 for Emissions
Guidance and Manufacturer’s Declaration –
Electromagnetic Emissions
The Veterinary GRPro 2.1 is intended for use in the electromagnetic environment specified below.
The customer or the user of the Veterinary GRPro 2.1 should assure that it is used in such an
environment.
Emissions test
RF emissions CISPR 11
Compliance
Electromagnetic environment – guidance
Group 1
The Veterinary GRPro 2.1 uses RF energy
only for its internal function. Therefore, its RF
emissions are very low and are not likely to
cause any interference in nearby electronic
equipment.
The Veterinary GRPro 2.1 is suitable for
use in all establishments, including domestic
establishments and those directly connected
to the public low-voltage power supply network
that supplies buildings used for domestic
purposes.
RF emissions CISPR 11
Class B
Harmonic emissions
IEC 61000-3-2
Class A
Voltage fluctuations/
flicker emissions IEC
61000-3-3
Complies
EN-15
Table 2 for Transient Electromagnetic Immunity
Guidance and Manufacturer’s Declaration –
Electromagnetic Immunity
The Veterinary GRPro 2.1 is intended for use in the electromagnetic environment specified below.
The customer or the user of the Veterinary GRPro 2.1 should assure that it is used in such an
environment.
IEC 60601 test level
COMPLIANCE LEVEL
Electromagnetic environment – guidance
Electrostatic
discharge (ESD)
IEC 61000-4-2
IMMUNITY TEST
± 6 kV contact
± 8 kV air
± 6 kV contact
± 8 kV air
Floors should be wood, concrete or
ceramic tile. If floors are covered with
synthetic material, the relative humidity
should be at least 30%.
Electrical fast
transient/burst
IEC 61000-4-4
± 2 kV for power
supply lines
± 1 kV for input/
output lines
± 2 kV for power
supply lines
± 1 kV for input/
output lines
Mains power quality should be that
of a typical commercial or hospital
environment.
Surge
IEC 61000-4-5
± 1 kV line(s) to
line(s)
± 2 kV line(s) to
earth
± 1 kV line(s) to
line(s)
± 2 kV line(s) to
earth
Mains power quality should be that
of a typical commercial or hospital
environment.
Voltage dips, short
interruptions and
voltage variations
on power supply
input lines
IEC 61000-4-11
<5% UT
(>95% dip in UT)
for 0.5 cycle
40% UT
(60% dip in UT)
for 5 cycles
70% UT
(30% dip in UT)
for 25 cycles
<5% UT
(>95% dip in UT)
for 5 s
<5% UT
(>95% dip in UT)
for 0.5 cycle
40% UT
(60% dip in UT)
for 5 cycles
70% UT
(30% dip in UT)
for 25 cycles
<5% UT
(>95% dip in UT)
for 5 s
Mains power quality should be
that of a typical commercial or
hospital environment. If the user of
the Veterinary GRPro 2.1 requires
continued operation during power
mains interruptions, it is recommended
that the Veterinary GRPro 2.1 be
powered from an uninterruptible power
supply or a battery.
Power frequency
(50/60 Hz)
magnetic field
IEC 61000-4-8
3 A/m
3 A/m
Power frequency magnetic fields
should be at levels characteristic of a
typical location in a typical commercial
or hospital environment.
NOTE UT is the AC mains voltage prior to application of the test level.
EN- 16
Table 3 for RF Electromagnetic Immunity
Guidance and Manufacturer’s Declaration –
Electromagnetic Immunity
The Veterinary GRPro 2.1 is intended for use in the electromagnetic environment specified below.
The customer or the user of the Veterinary GRPro 2.1 should assure that it is used in such an
environment.
Immunity test
IEC 60601 test level
Compliance level
Electromagnetic environment – guidance
Portable and mobile RF communications
equipment should be used no closer to
any part of the Veterinary GRPro 2.1,
including cables, than the recommended
separation distance calculated from the
equation applicable to the frequency of the
transmitter.
Conducted RF
IEC 61000-4-6
3 Vrms
3Vrms
150 kHz to 80 MHz
Radiated RF
IEC 61000-4-3
3 V/m
3 V/m
80 MHz to 2.5 GHz
Recommended separation distance
d = 1.2 √P 80 MHz to 800 MHz
d = 1.2 √P 80 MHz to 800 MHz
d = 2.3 √P 800 MHz to 2.5 GHz
where P is the maximum output power
rating of the transmitter in watts (W)
according to the transmitter manufacturer
and d is the recommended separation
distance in meters (m).
Field strengths from fixed RF transmitters,
as determined by an electromagnetic site
survey,a should be less than the compliance
level in each frequency range.b
Interference may occur in the vicinity of
equipment marked with the following
symbol:
NOTE 1 At 80 MHz and 800 MHz, the higher frequency range applies.
NOTE 2 These guidelines may not apply in all situations. Electromagnetic propagation is affected by
absorption and reflection from structures, objects and people.
Field strengths from fixed transmitters, such as base stations for radio (cellular/cordless)
telephones and land mobile radios, amateur radio, AM and FM radio broadcast and TV broadcast
cannot be predicted theoretically with accuracy. To assess the electromagnetic environment due
to fixed RF transmitters, an electromagnetic site survey should be considered. If the measured
field strength in the location in which the Veterinary GRPro 2.1 is used exceeds the applicable RF
compliance level above, the Veterinary GRPro 2.1 should be observed to verify normal operation. If
abnormal performance is observed, additional measures may be necessary, such as re-orienting or
relocating the Veterinary GRPro 2.1.
b
Over the frequency range 150 kHz to 80 MHz, field strengths should be less than 3 V/m.
a
EN-17
Table 4 for RF Immunity
Recommended Separation Distances Between Portable and Mobile
RF Communications Equipment and the Veterinary GR Pro 2.1
The Veterinary GRPro 2.1 is intended for use in an electromagnetic environment in which radiated RF
disturbances are controlled. The customer or the user of the Veterinary GRPro 2.1 can help prevent
electromagnetic interference by maintaining a minimum distance between portable and mobile RF
communications equipment (transmitters) and the Veterinary GRPro 2.1 as recommended below,
according to the maximum output power of the communications equipment.
Separation distance according to frequency of transmitter
Rated maximum output
power OF TRANSMITTER
150 kHz to 80 MHz
80 MHz to 800 MHz
800 MHz to 2.5 GHz
W
d = 1.2 √P
d = 1.2 √P
d = 2.3 √P
0.01
0.12
0.12
0.23
0.1
0.38
0.38
0.73
1
1.2
1.2
2.3
10
3.8
3.8
7.3
100
12
12
23
For transmitters rated at a maximum output power not listed above, the recommended separation
distance d in meters (m) can be estimated using the equation applicable to the frequency of the
transmitter, where P is the maximum output power rating of the transmitter in watts (W) according to
the transmitter manufacturer.
NOTE 1 At 80 MHz and 800 MHz, the separation distance for the higher frequency range applies.
NOTE 2 These guidelines may not apply in all situations. Electromagnetic propagation is affected by
absorption and reflection from structures, objects and people.
WARNINGS:
Electrical Equipment needs special precautions regarding EMC and needs to be
installed and put into service according to the EMC information provided in the
User’s Manual.
Portable and mobile RF communications equipment can affect Electrical Equipment.
The Veterinary GRPro 2.1 System has to be powered with the AC adapter models
GlobTek #GTM-21097-5012 or FSP Group Inc. #FSP030-RCAM in order to be compliant
with IEC/EN 60601-1-2 section 6.1 and 6.2 EMC requirements.
The use of accessories, transducers and cables other than those specified and sold
by the manufacturer of the Veterinary GRPro 2.1 System as replacement parts for
internal components may result in increased emissions or decreased immunity of the
system.
The Veterinary GRPro 2.1 System should not be used adjacent to or stacked with
other equipment. If adjacent or stacked use is necessary, the Veterinary GRPro 2.1
System should be observed to verify normal operation in the configuration in which
it will be used.
The essential performance of the Veterinary GRPro 2.1 System is:
Compression Cycle:
High: cyclic 5-75mm Hg
Med: cyclic 5-50 mm Hg
Low: cyclic 5-15 mm Hg
NO Pressure: wrap shall be vented to atmosphere
The cooling temperature of the circulating ice water will be adjustable between
34°F (1°C) and 50°F (10°C) as long as the ice water in the ice box is supplied with
sufficient amount of ice.
EN- 18
T r o u b l e sh o o t i n g
Error
What Does
it Mean?
What can
I do?
Air Pressure Sensor: The
Control Unit has detected a
problem calibrating the air
pressure circuit on start-up.
• This is most likely to occur if you have
Self-Test Error – Air
Pump: The Control Unit
has detected an electronic
problem in the air circuit on
start-up.
• Disconnect the Wrap from the Control Unit.
• Turn the Control Unit off and on again
Dry Pump: The Control Unit
has detected a dry pump.
In order to prevent possible
damage to the fluid pump,
the unit will stop therapy.
• Note that if you are using new Wraps,
restarted the System with an inflated Wrap
attached.
• Detach the Wrap, pressing it flat to expel
the air accumulated inside and try again.
without a Wrap connected.
• Reconnect the Wrap and resume treatment.
• If the problem persists, contact Customer
Service.
•
•
•
•
•
•
Over Pressure: Indicates
that the Control Unit has
exceeded the target air
pressure.
the water in the reservoir may have been
depleted and causing this error. Make sure
there is adequate water in the reservoir
based on the fill line indicator label. Refer to
instructions for priming a Wrap below.
Verify that the ice box filter is not clogged
(refer to filter maintenance instructions on
page 10).
Make sure there are no kinks in the Wrap or
Connector Hose.
Turn the Control Unit off and on again.
Disconnect and reconnect the hose from the
Control Unit and the Wrap, verifying that an
audible “click” is heard at both connection
points.
Prime the Wrap using the following steps:
- Select “No Pressure.”
- Attach the hose to the unit and the wrap.
- Lay the Wrap open and flat next to or
lower than the Control Unit (not on the
body).
- Run the System for 2 minutes.
Prime the Control Unit using the following
steps:
- Disconnect the hose from the Control Unit.
- Now, look at the Wrap connection location
on the Control Unit. On the top valve,
push the white prong in so that it is flush
with the metal connector.
- Make sure you are not fully covering the
opening in the prong.
- Push start, and water should squirt out of
the valve.
- Restart the System.
• Turn the Control Unit off and back on.
• Make sure the Wrap is applied securely
around the body.
• Try using a different Wrap and Hose to
isolate which component may be producing
the error. For example, an error which
occurs with a Utility Wrap but not with any
other Wrap may indicate that the Utility
Wrap itself is causing the error, not the
Control Unit.
EN-19
Error
What Does
it Mean?
What can
I do?
Under Pressure: The
Control Unit can’t reach
its target maximum
compression. This often
indicates that there is
a leak in the pneumatic
compression circuit, either
in the Connector Hose,
Wrap or Control Unit. Or
it may occur because the
hook and loop fastener on
your Wrap has worn out.
• Make sure the Wrap is applied securely.
• Try using a different Wrap and Hose to
Deflation Error: The Control
Unit has detected that
the Wrap has not properly
deflated.
• Turn the Control Unit off.
• If there is air left in the Wrap, disconnect
isolate which component may be producing
the error. For example, an error which occurs
with a Utility Wrap but not with any other
Wrap may indicate that the Utility Wrap itself
is causing the error, not the Control Unit.
• If using a Dual Hose, make sure you have
two Wraps attached.
•
•
•
•
the Wrap from the Connector Hose and
manually deflate the Wrap by applying
pressure to it.
Reconnect the Hose to the Wrap and
reapply the Wrap to the body.
Turn the Control Unit on and press play/
pause.
Make sure the Wrap is applied securely
against the body.
If possible, try using a different Wrap and
Hose to isolate which component may be
producing the error. For example, an error
which occurs with a Utility Wrap but not with
any other Wrap may indicate that the Utility
Wrap itself is causing the error, not the
Control Unit.
Pump Performance Error:
The Control Unit has
determined that the fluid
pump may be working too
hard. This could be caused
by ice or debris in the fluid
circuit. In order to prevent
possible damage to the fluid
pump, the unit will stop
therapy.
• Turn the Control Unit off and back on again.
• Reapply the Wrap, making sure to follow
Low Flow: Control Unit
has detected something
blocking the water flow.
• Check all hose connections.
• Disconnect and reconnect Wrap from
all application instructions accompanying
the Wrap.
• Disconnect and reconnect the hose from
the Control Unit and the Wrap, verifying
that an audible “click” is heard at both
connection points.
• If that does not solve the problem turn the
Control Unit off for 20 minutes (to let the
pump cool down) before turning it on again
to try again.
Connector Hose.
• Make sure there is water in the ice box.
• Verify that the ice box filter is not clogged.
• Make sure there are no kinks in the Wrap or
Connector Hose.
• Reapply the Wrap snugly, making sure
to follow all application instructions
accompanying the Wrap.
• Turn the Control Unit off and on again.
• Disconnect and reconnect the hose from
the Control Unit and the Wrap.
EN- 20
Error
What Does
it Mean?
What can
I do?
Self-Test Error –
Fluid Circuit:
The Control Unit has
detected an electronic
problem in the fluid circuit
on start-up.
• Turn off the Control Unit.
• Turn the Control Unit back on and resume
treatment.
• If the problem persists, contact Customer
Service.
Temperature
Calibration Error:
The Control Unit has
detected a failure in the
Temperature Control circuit
or is being operated outside
of the advised temperature
range (33-120 degrees
Fahrenheit).
• Be sure you are operating and storing the
System within the advised temperature
range of 33-120 degrees Fahrenheit.
• Turn the Control Unit off.
• Fill the Control Unit with ice and water.
• Turn the unit back on again and push Play/
Pause.
• Repeat this process up to three times.
• If the problem persists, contact Customer
Service.
Control Unit
will not turn on:
• Press the power button. If no orange or
green light is illuminated, make sure the AC
Adapter is plugged into a working electrical
outlet and all connections are secure.
(Test outlet with another electrical device.)
• Press the power button again. If the
Control Unit still will not turn on, call
Customer Service.
Control Unit won’t reach
Target Temperature, or
temperature is unstable:
First completely fill the reservoir with ice, then
fill the remaining space with water to administer
therapy on the coldest setting. If you are still
unable to achieve your desired target temperature,
try the following steps:
• If you are still unable to achieve WARMER
temperatures, be sure the Temperature Knob
is turned to full warm, use less ice, and reduce
the amount of water if necessary.
• If you are still unable to achieve COLDER
temperatures, confirm that the Temperature
Knob is set to full cold and that the reservoir is
full of ice, replenishing frequently and stirring
the reservoir to break up large formations of
ice if necessary. Make sure there are no kinks
in the Wrap or Connector Hose. Reapply the
Wrap, making sure to follow all accompanying
application instructions. Finally, if you still
cannot achieve the coldest temperature
desired, adding more water may also allow
the Control Unit to reach colder temperatures.
To achieve this effect, water may be added
to the top of the ice level. CAUTION: By
overfilling the reservoir as in the last step, the
temperature control feature of the System
will not work and the Control Unit will be
administering therapy at “full cold.” Consult the
Warnings on page 12 to make sure you take
proper steps to minimize the risk of injury.
Need more help with a problem? In the U.S. call Game Ready Customer Service at
1.888.426.3732 (+1.510.868.2100); from outside of the U.S. please contact your local distributor.
EN-21
Warranty
MANUFACTURER’S WARRANTY
CoolSystems warrants that the Veterinary GRPro 2.1 Control Unit, if properly used, will be
free from defects in material and workmanship for a period of two (2) years after the date
the Veterinary GRPro 2.1 Control Unit was purchased. If the Veterinary GRPro 2.1 Control
Unit, which is the subject of this Limited Warranty, malfunctions during the warranty
period for reasons covered by this Limited Warranty, CoolSystems, at its options, will:
REPAIR the Veterinary GRPro 2.1 Control Unit OR
REPLACE the Veterinary GRPro 2.1 Control Unit with another Veterinary GRPro 2.1
Control Unit.
THIS LIMITED WARRANTY AND ANY IMPLIED WARRANTIES THAT MAY EXIST
UNDER STATE LAW APPLY ONLY TO THE ORIGINAL PURCHASER OF THE GRPRO 2.1
CONTROL UNIT AND ARE NON-TRANSFERABLE.
•
•
Extent of Limited Warranty
This limited warranty does not cover damages due to external causes, including, without
limitation, accident, usage not in accordance with product instructions, misuse, neglect,
alteration or repair.
How to Obtain Warranty Service
To obtain warranty service, in the U.S. call Game Ready Customer Service at 1.888.426.3732
(+1.510.868.2100); from outside of the U.S. please contact your local distributor. If you are
not sure who the local distributor is, call Game Ready Customer Service at +1.510.868.2100
and we will refer you to one. You must have returned the Warranty Registration card
to CoolSystems within thirty (30) days from the date of purchase to qualify for warranty
service. If you qualify for warranty service from CoolSystems, you will be issued a Returned
Material Authorization (RMA) number. When you return the Veterinary GRPro 2.1 Control
Unit to CoolSystems, you must write the RMA number on the outside of the package.
CoolSystems will not accept returned Veterinary GRPro 2.1 Control Units without
an RMA number on the package. If you return the Veterinary GRPro 2.1 Control Unit to
CoolSystems, you must assume the risk of damage or loss during shipping. You must use
the original packaging or the equivalent. CoolSystems may require you to verify in writing
that you are the original purchaser of the Veterinary GRPro 2.1 Control Unit. CoolSystems
may elect to replace or repair the Veterinary GRPro 2.1 Control Unit with either a new or
reconditioned product. The returned product shall become CoolSystems’ property upon
receipt. The replacement Veterinary GRPro 2.1 Control Unit is warranted under this written
warranty and is subject to the same limitations and exclusions for the remainder of the
original warranty period. THIS WARRANTY IS NOT TRANSFERABLE.
WARRANTY LIMITATIONS AND EXCLUSIONS
THESE WARRANTIES REPLACE ALL OTHER WARRANTIES, EXPRESS OR IMPLIED
INCLUDING, BUT NOT LIMITED TO, THE IMPLIED WARRANTIES OF MERCHANTABILITY
AND FITNESS FOR A PARTICULAR PURPOSE. COOLSYSTEMS MAKES NO EXPRESS
WARRANTIES BEYOND THOSE STATED HERE. COOLSYSTEMS DISCLAIMS ALL OTHER
WARRANTIES, EXPRESS OR IMPLIED INCLUDING, WITHOUT LIMITATION, IMPLIED
WARRANTIES OF MERCHANTABILITY AND FITNESS FOR A PARTICULAR PURPOSE.
SOME JURISDICTIONS DO NOT ALLOW THE EXCLUSION OF IMPLIED WARRANTIES
SO THIS LIMITATION MAY NOT APPLY TO YOU. ALL EXPRESS AND IMPLIED
WARRANTIES ARE LIMITED IN DURATION TO THE LIMITED WARRANTY PERIOD.
EN- 22
NO WARRANTIES APPLY AFTER THAT PERIOD. SOME JURISDICTIONS DO NOT
ALLOW LIMITATIONS ON HOW LONG AN IMPLIED WARRANTY LASTS, SO THIS
LIMITATION MAY NOT APPLY TO YOU.
LIMITATIONS OF LIABILITY
COOLSYSTEMS’ RESPONSIBILITY UNDER THIS, OR ANY OTHER WARRANTY, IMPLIED
OR EXPRESS, IS LIMITED TO REPAIR OR REPLACEMENT, AS SET FORTH ABOVE.
THESE REMEDIES ARE THE SOLE AND EXCLUSIVE REMEDIES FOR ANY BREACH
OF WARRANTY. COOLSYSTEMS IS NOT RESPONSIBLE FOR DIRECT, SPECIAL,
INCIDENTAL, OR CONSEQUENTIAL DAMAGES RESULTING FROM ANY BREACH OF
WARRANTY OR UNDER ANY OTHER LEGAL THEORY INCLUDING, BUT NOT LIMITED
TO, LOST PROFITS, DOWNTIME, GOODWILL, AND DAMAGE TO OR REPLACEMENT
OF EQUIPMENT AND PROPERTY. SOME JURISDICTIONS DO NOT ALLOW THE
EXCLUSION OR LIMITATION OF INCIDENTAL OR CONSEQUENTIAL DAMAGES, SO
THE ABOVE LIMITATIONS OR EXCLUSIONS MAY NOT APPLY TO YOU. THIS LIMITED
WARRANTY GIVES YOU SPECIFIC RIGHTS, AND YOU MAY ALSO HAVE OTHER RIGHTS
THAT VARY FROM JURISDICTION TO JURISDICTION.
Wa r r a n t y r e g i s t r at i o n
REGISTRATION
Please complete the Warranty Registration for both the Veterinary GRPro 2.1 Control Unit
and the Wraps online at www.gamereadyvet.com. You must register within 30 days from
the date of purchase in order to receive warranty service.
You will need the following information to complete your Warranty Registration: The Control
Unit’s model number (REF) and its serial number (SN). These numbers are located on
the label on the bottom of the Control Unit. Simply go to www.gamereadyvet.com, click
on the Product Registration link at the top of the page, fill out and submit your information.
Extended Warranties
Extended Warranties are available for the Veterinary GRPro 2.1 System. For details
and information, in the U.S. call Game Ready Customer Service at 1.888.426.3732
(+1.510.868.2100); from outside of the U.S. please contact your local distributor.
EN-23
Brought to you by CoolSystems, Inc.
1800 Sutter Street, Suite 500
Concord, CA 94520
1.888.GameReady (1.888.426.3732)
+1.510.868.2100
www.gamereadyvet.com
Game Ready Control Unit User’s Manual PN 703520 Rev A
©2012 CoolSystems, Inc. All rights reserved.