1
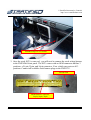
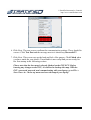
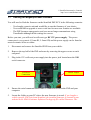
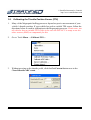
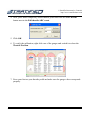
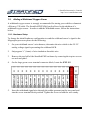
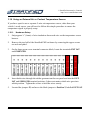
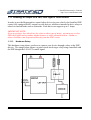
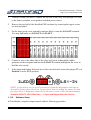
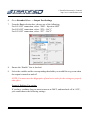
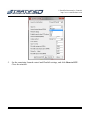
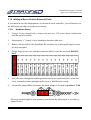
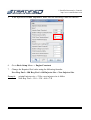
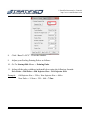
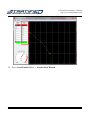
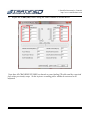
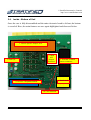
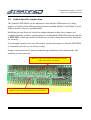
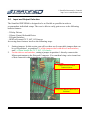
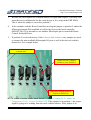
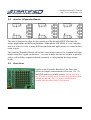
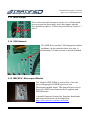
© Stratified Automotive Controls
http://www.stratifiedauto.com
Stratified PNP
Megasquirt ND64
Plug and Play Electronic Fuel Injection System
Installation Guide
Thank you and congratulations on the purchase of your new Stratified PNP ND64 Engine
Controller. This document should be followed to ensure safe and proper installation and operation
of your new ECU.
0204-0003.8
-1-
© Stratified Automotive Controls
http://www.stratifiedauto.com
WARNINGS – PLEASE READ CAREFULLY
ALL parts are sold for OFF ROAD RACE-ONLY ground vehicle use only.
Aftermarket EFI/EMS systems are not for use on pollution controller vehicles. Alteration of emission
related components constitutes tampering under most local emission regulation guidelines and can lead
to fines and penalties.
Stratified Automotive Controls is not responsible for any fines, injuries, or damages incurred as a result
of the installation or use of our products. It is the complete responsibility of the purchaser of such
products to ensure that they are used in a legal and safe manner.
DISCONNECT THE NEGATIVE BATTERY TERMINAL BEFORE PERFORMING ANY OF THIS
WORK. IF YOU DO NOT FEEL COMFORTABLE ABOUT MAKING THESE MODIFICATIONS,
HAVE THEM PERFORMED BY A PROFESSIONAL.
WARNING: If your system has a base map installed, please be aware that this is a BASE map and
should be adjusted to suit the setup of your particular vehicle. We take no responsibility for any
damage you do to your car. We strongly recommend you learn how to tune and tune your car
little by little watching all relevant gauges and data logging.
0204-0003.8
-2-
© Stratified Automotive Controls
http://www.stratifiedauto.com
Table of Contents
1.
Stratified PNP ND64 Installation Guide .................................................................... 4
1.1.
1.2.
1.3.
1.4.
1.5.
2.
How-To Procedures ................................................................................................ 14
2.1.
2.2.
2.3.
2.4.
2.5.
2.6.
2.7.
2.8.
2.9.
2.10.
3.
Vehicle Specific Setup ................................................................................................. 4
ECU In-Car Installation................................................................................................ 4
Tuning Software (Megatune) Setup.............................. Error! Bookmark not defined.
Tuning SoftwareTunerStudio (v. 1.001) Setup ............................................................ 7
First Startup ............................................................................................................... 10
Establishing Communications with the PNP ECU ..................................................... 15
Looking at and Burning a Calibration/Map to the PNP ECU ...................................... 17
Flashing the Megasquirt Base Firmware ................................................................... 18
Calibrating the Throttle Position Sensor (TPS) .......................................................... 20
Adding a Wideband Oxygen Senor ........................................................................... 22
Using an External Air or Coolant Temperature Sensor ............................................. 26
Enabling an Output for a Fan, Shift Light or Other Device ........................................ 29
Adding a Clutch Switch for Launch Control or Flat Shifting ....................................... 33
Adding a Boost Control Solenoid Valve..................................................................... 36
Changing Injector Sizes ............................................................................................ 39
Stratified PNP ND64 Hardware Guide .................................................................... 44
3.1.
3.2.
3.3.
3.4.
3.5.
3.6.
3.7.
3.8.
3.9.
3.10.
3.11.
3.12.
3.13.
3.14.
3.15.
0204-0003.8
Front Panel ................................................................................................................ 44
Rear Panel ................................................................................................................ 44
Inside - Top of Unit .................................................................................................... 45
Inside - Bottom of Unit ............................................................................................... 46
Vehicle Specific Jumper Area.................................................................................... 47
Input and Output Selection ........................................................................................ 48
External Terminal Block Connector ........................................................................... 53
Area for 3 Expander Boards ...................................................................................... 54
Proto Area ................................................................................................................. 54
Pull-ups ..................................................................................................................... 55
MAP Sensor .............................................................................................................. 55
External Power Connector ........................................................................................ 55
Boot Jumper .............................................................................................................. 56
CAN Network............................................................................................................. 56
MSII ECU - Microsquirt Module ................................................................................. 56
-3-
© Stratified Automotive Controls
http://www.stratifiedauto.com
1.
Stratified PNP ND64 Installation Guide
1.1. Vehicle Specific Setup
You have purchased a vehicle specific PNP ND64 unit, this section will cover the basic
vehicle installation steps, tuning software setup, and how to get started with your tune.
Please remember that this unit is a powerful tool to help you achieve your tuning goals.
Although the unit includes a base map, you will have to calibrate/tune the unit for your
specific setup and be watchful of how the vehicle is running. Stratified is not
responsible for any tuning or setup errors that may damage your vehicle so please
make sure you know what you are doing. The warranty strictly covers the
functionality of the electronics and wiring harness setup. The base map is there to
get you started but it is NOT MEANT TO REPLACE a good tune.
The package that you received includes the following items:
- Stratified PNP ND64 system
- 5 feet of rubber hose
If you purchased additional options such as a tuning cable, sensors, or actuators, these
will also be included.
1.2. ECU In-Car Installation
1. The first step is to disconnect your negative battery cable. You are working with
electronics and this is always a good idea.
2. Now, the stock ECU must be removed. Access the stock ECU in your vehicle - in
most vehicles it is usually under the dash behind some carpetting. An example
location for a 1990 Mazda Protege is shown.
0204-0003.8
-4-
© Stratified Automotive Controls
http://www.stratifiedauto.com
Mazda Protege ECU Location
3. Once the stock ECU is removed, you will need to connect the stock wiring harness
to the PNP ND64 front panel. The ECU comes with an OEM connector that has 3
positions: a 26 pin, 22pin, and 16pin connector. Your vehicle may not use all 3
positions. Connect all available stock harness plugs to the PNP ECU.
Vacuum Port
OEM Harness Connector:
26 pin, 16pin, 22pin
0204-0003.8
-5-
© Stratified Automotive Controls
http://www.stratifiedauto.com
4. Run a vacuum hose from the intake manifold directly to the vacuum port on the
PNP ND64 through the firewall.
Vacuum hose attached to the
intake manifold and running to
the PNP ND64
If you did not purchase any additional options/hardware with your Stratified PNP
ND64, you are now ready to proceed with the Tuning Software Setup described
in the next section. Specific option installation steps are covered on our site where
the options are purchased.
The tuning software, USB-Serial drivers, and other information can be found
alongside these instructions on the Stratified website.
0204-0003.8
-6-
© Stratified Automotive Controls
http://www.stratifiedauto.com
1.3. Tuning SoftwareTunerStudio (v. 1.001) Setup
It is extremely important to setup the Tuning Software properly and be able to
communicate with the ECU before going any further or even trying to start your car.
You will need this software for setting your base timing, monitoring how your car is
running, and making changes to the base map.
Note: Many of the screenshots in this manual are done using Megatune software which is
an earlier version of the tuning software. The functionality of TunerStudio which you are
installing is very similar to Megatune so all the How-To Procedures covered using
Megatune screenshots still apply.
1. In order to tune your vehicle you must have a portable computer that can connect
to the Stratified PNP ND64. The native connectivity type is through a serial DB9
connection located on the rear panel of the unit. Using a computer with a serial
port is the most reliable method for connecting to this ECU. However, most
modern computers do not have such a port and serial-to-USB adapter can be used.
If you have purchased a USB adapter from Stratified, the drivers that may be
needed can be downloaded from our website in the same location as the ND64
Customer Software Package.zip and these instructions.
Serial Tuning Cable Connector
2.
Once the physical connection to the computer is sorted out, TunerStudio must be
installed from our website or from (http://tunerstudio.com/index.php/tuner-studio).
On our site, TunerStudio and other tuning software tools are found in the ND64
Customer Software Package.zip file. TunerStudio is compatible with all versions of
Microsoft Windows from 95 up to Windows 7. Follow the TunerStudio software
installation instructions.
0204-0003.8
-7-
© Stratified Automotive Controls
http://www.stratifiedauto.com
3.
Once TunerStudio is installed, run the program and you will see the following screen.
4.
Make sure that the ECU is connected to the laptop and installed in the car. Turn the
ignition key to the ON position to turn on the ECU. Navigate to File Project New Project. Here, name the project as you choose and select desired location where
all the maps and data logs will be stored. Once this is done, click Detect.
TunerStudio will autodetect your ECU and give you the following confirmation
message.
5. Click Accept, and then click Next on the Create New Project window. The
following screen will look as shown below. Here, change the settings as desired.
One setting that MUST be changed is the MICROSQUIRT_MODULE. Set this
to Activated as shown below.
0204-0003.8
-8-
© Stratified Automotive Controls
http://www.stratifiedauto.com
6. Click Next. The next screen confirms the communication settings. These should be
correct. Click Test Port and the message next to it should say Successful!!!
7. Click Next. This screen sets up the look and feel of the gauges. Click Finish when
you have made the your choice. TunerStudio is now setup and you are ready for
the first startup in the following section.
Please note that the base map is already flashed on the PNP ECU. Before
burning any changes to the ECU, it is advised to backup this map. With the
ECU connected, powered, and communicating with your laptop, go to File ->
Save Tune As... in the top menu and save the map to your laptop.
0204-0003.8
-9-
© Stratified Automotive Controls
http://www.stratifiedauto.com
1.4. First Startup
1.
You are now ready to start your vehicle. Here is a quick checklist of items before
your crank over the key.
-
The Stratified PNP has the stock OEM harness plugs securely inserted.
The vacuum hose from the intake manifold to the ECU is attached.
Any extra sensor or options (such as O2 sensors, or intake air temperature sensors)
are installed and properly connected to the PNP ECU. (Please Note: Extra sensors or
options that come with the unit have their own setup instructions that you must
follow)
Your laptop is connected to the ECU and you have verified that you can
communicate with the ECU.
Your battery terminals are attached, there is gas in the tank, and mechanically the
vehicle is ready to start
-
2.
If you have checked all the above, turn the ignition key to the ON position but do not
crank the vehicle over yet.
3.
Make sure TunerStudio is started on your laptop and the correct project is selected.
Your TunerStudio screen on your laptop should look similar to the image below:
0204-0003.8
-10-
© Stratified Automotive Controls
http://www.stratifiedauto.com
4.
In TunerStudio, navigate to Tuning Real Time Display.
5.
Make sure the following values make sense and are reasonable (the car must not be
running at this point)
-
Coolant Temperature
MAT (Intake Air Temperature)
MAP should read between 98-102 KPa at sea level
Batt Voltage
6.
Remember that the base map included on the unit is setup for the stock injectors and
stock coolant, intake air temp and oxygen sensors. The base map is therefore setup
for a stock vehicle. If you have different hardware installed on the vehicle this is a
good time to make changes to this base map. Setting some of these items up is
covered in our How-To Procedures section of this manual or on the Stratified
website: http://www.stratifiedauto.com/
7.
Finally, you are ready to crank over the engine. Be patient, it may require a few tries.
Do not continuously crank for longer than 10 seconds.
0204-0003.8
-11-
© Stratified Automotive Controls
http://www.stratifiedauto.com
8.
Once the engine has started and is running a steady idle, it is time to set the base
timing. You will need a timing light and the knowledge of how to set timing in your
vehicle. Remember to keep an eye on coolant temperature as you're doing this.
9.
Look up in your vehicle's manual what the base timing should be at idle and how to
set timing. In most vehicles, you are asked to adjust the distributor or a similar
mechanical device. This is not necessary with the PNP as you can adjust the timing
electronically.
10. Instead, in TunerStudio navigate to Basic Setup More Ignition Options. In this
menu set Fixed Advance to Fixed Timing and set the Timing for Fixed Advance
field to match the base timing settings in your vehicle's manual (usually 10 degrees
BTDC). Click Burn. What this does is tell the PNP to only use this set advance so
that you can set the timing correctly using a timing light. The settings are shown
below.
11. Using the timing light, determine whether the timing you set in TunerStudio in the
step above matches the actual timing of the motor. If it does not – this is probably
because you have an adjustable distributor. You must set the timing just like it is
described in the workshop manual of the vehicle. Usually this involves loosening
and adjusting the distributor until the timing marks match when viewed with the
timing light. IT IS VERY IMPORTANT TO CHECK and to have the base timing
set correctly before you do any driving or tuning or engine damage may occur. The
Megasquirt must be in sync with your actual engine timing for the timing maps to be
correct.
12. After the base timing is set, don’t forget to set the Fixed Advance in TunerStudio
back to Use Table and to click Burn.
0204-0003.8
-12-
© Stratified Automotive Controls
http://www.stratifiedauto.com
13. If you have a variable TPS or non stock sensors (IAT, CLT, O2) these must be
calibrated. The procedures are in the How-To Procedures section of this document
below
14. Restart the car to reset the ECU and you are now ready to start tuning. Start slowly
and always keep an eye on your sensors, gauges, and an ear on the sound of the
vehicle. You will need a Wideband O2 sensor for this. If something doesn't seem
right, stop or you may cause damage. For tuning advice, check the Stratified site
(http://www.stratifiedauto.com/) for tuning guides or for purchasing additional
support and tuning if required. Additional tuning and setup information can also be
found at:
http://www.msextra.com/doc/ms2extra/MS2-Extra_Datalog.htm
http://www.tunerstudio.com/
0204-0003.8
-13-
© Stratified Automotive Controls
http://www.stratifiedauto.com
How-To Procedures
To complete the following how to procedures, you need to be familiar with the following
parts of the PNP circuit board:
1.
2.
3.
4.
Boot Jumper
Screw Terminal Block
I/O Selection Jumper Area
Sensor Input Jumper Area
2 Screw Terminal Block
1 Boot Jumper
3 I/O Selection Jumper Area
4 Sensor Input Jumper Area
0204-0003.8
-14-
© Stratified Automotive Controls
http://www.stratifiedauto.com
1.5. Establishing Communications with the PNP ECU
1.
Ensure your tuning computer or laptop is connected to the Stratified PNP with the
supplied serial tuning cable. The cable connects to the DB9 Tuning Cable
Connector, located on the rear panel of the enclosure.
2.
With the PNP installed in your vehicle, turn the vehicle’s key to the “ignition on”
position. This will turn on the power to the PNP, and it will begin to send data to
your computer.
3.
If the TunerStudio gauges do not respond, this means the communications is not
setup properly.
4.
Go to the Communications Menu → Settings…
5. Ensure the selected Port is correct. For computers with a DB9 serial COM port,
the Port setting should be set to COM1.
6. For computers with a USB serial port, where a USB-to-RS232 cable is used, the
Port number must be verified by viewing the Window’s Device Manager. In the
case shown above, COM4 is selected.
0204-0003.8
-15-
© Stratified Automotive Controls
http://www.stratifiedauto.com
7. The Serial date rate must be set to 115200.
8. Once these settings have been properly selected, click the “Click to test” button.
You should see “Success” to indicate that communications has now been
established. Close the window.
0204-0003.8
-16-
© Stratified Automotive Controls
http://www.stratifiedauto.com
1.6. Looking at and Burning a Calibration/Map to the PNP ECU
1. If you want to burn a saved calibration/map on your ECU or just look at the values
in a different map you will need to open it using TunerStudio. Please note that you
can only properly view maps that are saved from ECUs with the same firmware
installed. If you are opening a calibration saved using different firmware,
TunerStudio will show a number of warnings.
2. Go to File Menu → Open… and select the Engine Calibration msq file.
3. After opening this file, TunerStudio will ask to send the entire set calibration value
to the Megasquirt. If you would like to flash this calibration on your ECU, ensure
the ignition key is ON and hit “Yes”.
4. If you want to just look at the values in TunerStudio, hit "No." To just look at a
calibration/map you don't need to be connected to the ECU.
5. After hitting “Yes”, TunerStudio will send all the calibration values to the
Megasquirt processor. This process may take several minutes, and TunerStudio
will be completely unresponsive during this time. Do NOT interrupt the
communication or shut off TunerStudio.
6. Once completed, the Megasquirt processor and the TunerStudio software will be
synchronized.
0204-0003.8
-17-
© Stratified Automotive Controls
http://www.stratifiedauto.com
1.7. Flashing the Megasquirt Base Firmware
You will need to flash the firmware on the Stratified PNP ECU in the following scenarios:
- You bought a generic unit and would like to run the firmware of your choice
- You would like to upgrade to a new code base because new features are available
- The PNP becomes unresponsive and you can no longer communicate using
TunerStudio although all the settings are correct.
Before you start, you will need a wall wart type DC 12V power supply. The power
connectors is very generic (2.1mm ID, 5.5mm OD) and the power supply can be found at
most electronics stores or online
1.
Disconnect and remove the Stratified PNP from your vehicle.
2.
Remove the top half of the PNP enclosure by removing the upper screws on each
end panel.
3.
Plug in the 12V wall wart power supply into the power jack located near the DB9
serial connector.
12V Power
Connection
BOOT Jumper
4.
Ensure the serial communications cable is connected between the PNP and your
computer.
5.
Locate the folder on your PC where the new firmware is stored. If you bought a
vehicle specific PNP unit from Stratified, the installed firmware is located on our
website in the ND64 Customer Software Package.zip file called Firmware. The
0204-0003.8
-18-
© Stratified Automotive Controls
http://www.stratifiedauto.com
firmware version originally installed on the ECU is printed on the label on the back
of the ECU.
6.
On your computer, run the download file located in the firmware folder. This file is
often called download-MS2-firmware
7.
When asked, select Microsquirt Module.
8.
When asked if you are upgrading from standard code, select No
9.
Follow the procedure as prompted by the software.
10. If there are any problems, where the process does not complete successfully,
RESTART the process from the start. The firmware download is also documented
online at: http://www.msextra.com/doc/ms2extra/upgrade.html#download
IMPORTANT NOTE:
You must open and install your vehicles engine calibration following re-flashing the base
firmware. This procedure has been described previously in the section titled “Opening
and Installing an Engine Calibration”
0204-0003.8
-19-
© Stratified Automotive Controls
http://www.stratifiedauto.com
1.8. Calibrating the Throttle Position Sensor (TPS)
1.
Many of the Megasquirt fuelling processes depend on precise measurement of your
vehicle’s throttle position. If your vehicle has such a variable TPS sensor, follow the
directions below to send its calibration to the Megasquirt processor. Please note: not
all vehicles have a variable TPS. If this is the case the PNP ECU is setup to use the
other sensors (MAP) to compensate for this.
2.
Go to: Tools Menu → Calibrate TPS…
3.
Without pressing on the throttle pedal, click the Get Current button next to the
Closed throttle ADC count.
0204-0003.8
-20-
© Stratified Automotive Controls
http://www.stratifiedauto.com
4. Next, press down completely on the throttle pedal and click the Get Current
button next to the Full throttle ADC count.
5. Click OK.
6. To verify the calibration, right click one of the gauges and switch it to show the
Throttle Position.
7. Press your foot on your throttle pedal and make sure the gauge value corresponds
properly.
0204-0003.8
-21-
© Stratified Automotive Controls
http://www.stratifiedauto.com
1.9. Adding a Wideband Oxygen Senor
A wideband oxygen sensor is strongly recommended for tuning your vehicles volumetric
efficiency (VE) table. The Stratified PNP ND64 easily allows for the addition of a
wideband oxygen sensor. In order to add the Wideband sensor, follow the instructions
below.
1.9.1. Hardware Setup
To change the initial hardware configuration to send the wideband sensor’s signal to the
Megasquirt processor please do the following:
1.
On your wideband sensor’s wire harness, determine the wire which is the 0V-5V
analog voltage signal representing the wideband AFR.
2.
Strip approx ¼” (6mm) of wire insulation from this wire.
3.
Remove the top half of the Stratified PNP enclosure by removing the top two screws
on each end panel.
4.
On the large green screw terminal connector block, locate the EXT O2.
5.
Insert the wideband signal wire through the rubber grommet on the rear panel and
into the screw terminal block position. Tighten the screw to hold the wire steady.
0204-0003.8
-22-
© Stratified Automotive Controls
http://www.stratifiedauto.com
6. Locate the jumper J3, and move the black jumper to position 2, to select EXT O2.
Note that when the jumper is position 1, the sensor inputs are routed to the stock vehicle
harness.
The wideband sensor signal is now properly routed to the Megasquirt’s sensor input.
1.9.2. Software Setup
The newly installed wideband sensor must have its signal calibration values sent to the
Megasquirt processor in order to be interpreted properly. To setup the software, please
do the following:
1.
In TunerStudio navigate to Tools → Calibrate AFR Table…
2.
Select the Oxygen Sensor Type from the list available, and click OK. You will see
the software count up to 1023 as it writes the values to the ECU
0204-0003.8
-23-
© Stratified Automotive Controls
http://www.stratifiedauto.com
3.
In the example below, an Innovate LC-1 wideband sensor has been selected. Ensure
you select your particular brand of senor.
4.
If your particular wideband sensor does not appear on this list, you may select the
bottom option “Generic/Custom Linear WB”. In this case, you must enter the sensor
voltage and corresponding AFR values, for the bottom and the top of the sensor’s
range.
5.
If the calibration stalls, or the does not completely count up to 1023 values, repeat
the sensor selection.
6.
Once the calibration has been completely sent, close the window.
7.
Go to Basic setup Menu → EGO Control
8.
Select the EGO Sensor Type as Single Wide Band.
0204-0003.8
-24-
© Stratified Automotive Controls
http://www.stratifiedauto.com
9.
Set the other settings as desired. Also note that your Wide Band sensor in closed
loop will now target the values in your AFR table located under Basic Setup ->
AFR Table 1. Set this table as desired.
10. Click Burn To ECU. Close the window.
11. Go to Basic Settings → AFR Table 1
Adjust the target AFR values for your vehicle.
0204-0003.8
-25-
© Stratified Automotive Controls
http://www.stratifiedauto.com
1.10. Using an External Air or Coolant Temperature Sensor
If you have opted to use a separate 2-wire air temperature sensor, other than your
vehicle’s stock sensor, you will need to follow this simple procedure to ensure the
temperature signal is properly setup.
1.10.1.
Hardware Setup
1.
Strip approx ¼” (6mm) of wire insulation from each wire on the temperature sensor
harness.
2.
Remove the top half of the Stratified PNP enclosure by removing the upper screws
on each end panel.
3.
On the large green screw terminal connector block, locate the terminals EXT IAT
and SNSR GND.
4.
Insert both wires through the rubber grommet on the rear panel and into the EXT
IAT and SNSR GND terminal positions. It does not matter which wire goes into
which position. Tighten the screws to hold the wires steady.
5.
Located the jumper J2, and move the black jumper to Position 2, labelled EXT IAT.
0204-0003.8
-26-
© Stratified Automotive Controls
http://www.stratifiedauto.com
Note that when the jumper is position 1, the sensor inputs are routed to the stock vehicle
harness.
6.
If you are installing an external coolant sensor the procedure is the same except
you will insert the coolant sensor wires in the terminal block connector positions
EXT CLT and SNSR GND and you will move J1 to position 2.
The external air temperature or coolant temperature sensor signal is now properly routed
to the Megasquirt’s sensor input.
1.10.2.
Software Setup
The newly installed temperature sensor must have its signal calibration values sent to the
Megasquirt processor in order to be interpreted properly. To setup the software, please
do the following:
7.
Go to Tools Menu → Calibrate Thermistor Tables…
0204-0003.8
-27-
© Stratified Automotive Controls
http://www.stratifiedauto.com
8.
When the window opens, select Air Temperature from the list box
9.
Ensure the bias resistor value is set to 2490 ohms. This value should not be adjusted.
12. Now, using your specific air temperature sensor resistance values which you will
find from your vendor or manufacturer of the sensor, enter three points into the
Thermistor Measurements section, and hit OK when finished.
13. Setting the software for the coolant temperature sensor happens the same way, you
just need to select Coolant Temperature in step 10 and enter the correct Thermistor
Measurements in step 12.
0204-0003.8
-28-
© Stratified Automotive Controls
http://www.stratifiedauto.com
1.11. Enabling an Output for a Fan, Shift Light or Other Device
In order to use the Megasquirt to control other devices in your vehicle, the Stratified PNP
comes fully equipped with 3 output low side drivers, which are intended to drive relays or
other low current loads such as solenoids. Each driver can support up to 3 Amps.
IMPORTANT NOTE:
If you are using a low side driver for a fan or other type of motor, you must use a relay.
LED shift lights and secondary intake runners or other solenoids with a ~10ohm or
above resistance can be powered directly from the PNP circuit.
1.11.1.
Hardware Setup
This hardware setup shows you how to connect your device through a relay to the PNP
drivers. The image below shows a typical circuit involving a relay being controlled with
the PNP though the LS1-OUT control signal.
0204-0003.8
-29-
© Stratified Automotive Controls
http://www.stratifiedauto.com
1.
From the circuit seen above, connect the one side of the relay coil through a 5A fuse
to the battery terminal, or an ignition switched power source.
2.
Remove the top half of the Stratified PNP enclosure by removing the upper screws
on each end panel.
3.
On the large green screw terminal connector block, locate the LS1-OUT terminal.
You may optionally use LS2-OUT or LS3-OUT.
4.
Connect a wire to the other side of the relay coil, insert it through the rubber
grommet on the rear panel and into the LS1-OUT terminal and tighten the screw to
hold the wire steady.
5.
In the Input and Output Selection area of the circuit board, ensure the jumper J7 is in
Position 1, in the ILED position.
NOTE: If you wish to access an I/O port directly from the Megasquirt and want to
decouple it from its low side driver circuit, this is done by setting the jumper for that
port to position 2. Read more about this in the later section of this document named:
Stratified MSNPN ND64 Hardware - 2. Input and Output Selection Section
1.11.2.
Software Setup
In TunerStudio, setup the output control with the following procedure:
0204-0003.8
-30-
© Stratified Automotive Controls
http://www.stratifiedauto.com
6.
Go to Extended Menu → Output Port Settings
7.
From the Port selection box, choose one of the following:
For LS1-OUT connection, select: “PM3 – Injection LED”
For LS2-OUT connection, select: “PT6 – IAC1”
For LS3-OUT connection, select: “PT7 – IAC2”
8.
Ensure the “Enable” box is checked.
9.
Select the variable and the corresponding thresholds you would like to govern when
the output is turned on and off.
NOTE: You must turn the Megasquirt off and on in order for the settings to properly
take effect.
Example Radiator Fan setting:
If you have a radiator fan you want to turn on at 200°F, and turn back off at 195°F,
you would choose the following settings.
0204-0003.8
-31-
© Stratified Automotive Controls
http://www.stratifiedauto.com
Example Shift Light setting:
If you would like your shift light to turn on above 7000rpm, you would choose the
following settings:
0204-0003.8
-32-
© Stratified Automotive Controls
http://www.stratifiedauto.com
1.12. Adding a Clutch Switch for Launch Control or Flat Shifting
To enable more advanced features such as launch control, flat shift, or other input
control mechanisms, the Stratified PNP offers 2 separate inputs. The Stratified PNP is
compatible with digital inputs that are active when the input is connected to the
vehicle’s chassis ground.
To enable an input switch, such as a clutch switch, follow the procedure below:
1.12.1.
Hardware Setup
1. Strip approx ¼” (6mm) of wire insulation from the wire coming from the input
switch.
2. Remove the top half of the Stratified PNP enclosure by removing the upper screws
on each end panel.
3. On the large green screw terminal connector block, locate the terminals SW1-IN
or SW2-IN. You may use either one as an input.
4. Insert the wire through the rubber grommet on the rear panel and place it into the
screw terminal position and tighten the screw to hold the wire steady.
0204-0003.8
-33-
© Stratified Automotive Controls
http://www.stratifiedauto.com
5. Locate the jumper J5 (if using SW1-IN) or J6 (if using SW2-IN), and ensure the
black jumper is in position 1.
For SW1-IN, ensure the jumper is in position 1 for PE1.
For SW2-IN, ensure the jumper is in position 1 for SPRADC2.
The input switch signal is now properly routed to the Megasquirt’s input.
NOTE: If you wish to access an I/O port directly from the Megasquirt and want to
decouple it from its digital input conditioning circuitry, this is done by setting the jumper
for that port to position 2. Read more about this in the later section of this document
named: Stratified MSNPN ND64 Hardware - 2. Input and Output Selection Section
1.12.2.
Software Setup
In TunerStudio, the following procedure must be followed to enable the input for the
megasquirt processor.
1.
Ensure TunerStudio is connected to your Megasquirt, and your Megasquirt is
powered.
2.
Go to Extended Menu → Launch Control
3.
Select the Launch Control Option to either Launch or Launch/Flatshift.
4.
If you wired your clutch switch to SW1-IN, select Input On: PE1
If you wired your clutch switch to SW2-IN, select Input On: JS4
0204-0003.8
-34-
© Stratified Automotive Controls
http://www.stratifiedauto.com
5.
Set the remaining Launch control and Flatshift settings, and click Burn to ECU.
Close the window.
0204-0003.8
-35-
© Stratified Automotive Controls
http://www.stratifiedauto.com
1.13. Adding a Boost Control Solenoid Valve
If you intend to use the Megasquirt as an electronic boost controller, you will need to use
the following procedure to properly set this up:
1.13.1.
Hardware Setup
1.
Using a 2-wire solenoid valve, connect one wire to a 12V source that is switched on
with the ignition switch.
2.
Strip approx ¼” (6mm) of wire insulation from the other wire
3.
Remove the top half of the Stratified PNP enclosure by removing the upper screws
on each end panel.
4.
On the large green screw terminal connector block, locate the terminal: BOOSTOUT.
5.
Insert the wire through the rubber grommet on the rear panel and place it into the
screw terminal position and tighten the screw to hold the wire steady.
6.
Located the jumper J10, and ensure the black jumper is located in position 1, PA0.
The boost control signal is now properly routed from the Megasquirt to your boost
solenoid valve.
0204-0003.8
-36-
© Stratified Automotive Controls
http://www.stratifiedauto.com
NOTE: If you wish to access an I/O port directly from the Megasquirt and want to
decouple it from the boost control circuitry, this is done by setting the jumper for that
port to position 2. Read more about this in the later section of this document named:
Stratified MSNPN ND64 Hardware - 2. Input and Output Selection Section
1.13.2.
Software Setup
1.
Ensure TunerStudio is connected to your Megasquirt, and your Megasquirt is
powered.
2.
Go to Advanced Menu → Boost Control Settings
3.
Change Boost control Enabled to On.
4.
Select the Boost Control Pin as JS11.
5.
Adjust the solenoid frequency and other settings based on your selection of solenoid
valve.
6.
Click Burn To ECU. Close the window.
7.
Go to Advanced Menu → Boost Control Duty Table
0204-0003.8
-37-
© Stratified Automotive Controls
http://www.stratifiedauto.com
8.
Enter the desired Duty Cycle Values within this table. This will be an interative
process that will take an understanding of your solenoid valve’s characteristics.
0204-0003.8
-38-
© Stratified Automotive Controls
http://www.stratifiedauto.com
1.14. Changing Injector Sizes
The base engine calibration that comes with the Stratified PNP is setup for the vehicle’s
stock injector size. If you have changed your fuel injector size, you will need to make
adjustments in TunerStudio in order to recalibrate Megasquirt’s fuel maps. Follow the
instructions below to change your injector size.
1.14.1.
1.
Software Setup
Ensure TunerStudio is connected to your Megasquirt, and your Megasquirt is
powered.
2.
First, find out if your injectors are HIGH Impedance or LOW Impedance.
3.
Go to Basic Setup Menu → Injector Characteristics
4.
If the injectors are HIGH impedance, make sure the following values are entered
0204-0003.8
-39-
© Stratified Automotive Controls
http://www.stratifiedauto.com
5.
If the injectors are LOW impedance, make sure the following values are entered
6.
Go to Basic Setup Menu → Engine Constants
7.
Change the Required Fuel value using the following formula:
New Req. Fuel = Old Req. Fuel × Old Injector Size ÷ New Injector Size
Example:
0204-0003.8
original injector size = 230cc, new injector size is 460cc
New Req. Fuel = 15.0 × 230 ÷ 460 = 7.5
-40-
© Stratified Automotive Controls
http://www.stratifiedauto.com
8.
Click “Burn To ECU”. Close the window.
9.
Adjust your Fueling Priming Pulses as follows
10. Go To Startup/Idle Menu → Priming Pulse
11. Adjust all the pulse widths as indicated below using the following formula:
New Pulse = Old Pulse × Old Injector Size ÷ New Injector Size.
Example:
0204-0003.8
Old Injector Size = 230cc, New Injector Size = 460cc
New Pulse = 15.0ms × 230 ÷ 460 = 7.5ms
-41-
© Stratified Automotive Controls
http://www.stratifiedauto.com
12. Go to Accel Enrich Menu → Acceleration Wizard
0204-0003.8
-42-
© Stratified Automotive Controls
http://www.stratifiedauto.com
13. Adjust the Value (ms) values using the same formula as shown above.
Note that All CRANKING PULSES are based on your fueling VE table and the required
fuel value previously setup. So the injector cranking pulse widths do not need to be
adjusted.
0204-0003.8
-43-
© Stratified Automotive Controls
http://www.stratifiedauto.com
2.
Stratified PNP ND64 Hardware Guide
The Hardware Guide will go through all the user-accessible features of the Stratified PNP
ND64. We start with the outside of the unit.
2.1. Front Panel
Vacuum Port
OEM Harness Connector: 26
pin, 22pin, 16pin
2.2. Rear Panel
Wire Outlet for Additional Installed Features Not
Part of Vehicle Harness (eg. Wideband O2 Sensor)
DB9 Tuning Cable Connector
0204-0003.8
Stratified Product Label
-44-
© Stratified Automotive Controls
http://www.stratifiedauto.com
2.3. Inside - Top of Unit
Once you open the top of the case, you will see the internal electronics of the unit.
Highlighted below are the key features of the PNP ND64. They are shown and discussed
in detail below.
8. External Power Connector
9. Boot Jumper
4. Area for 3 Expander Boards
5. Proto Area
10. CAN Network
11. MSII MCU with Relay and Boost
Drivers Underneath
3. External Terminal
Block Connector
2. Input
and
Output
Selection
1. Vehicle Specific Jumper Area
7. MAP Sensor
0204-0003.8
-45-
© Stratified Automotive Controls
http://www.stratifiedauto.com
2.4. Inside - Bottom of Unit
Once the case is fully disassembled and the main electronic board is slid out, the bottom
is revealed. Here, the main features are once again highlighted and discussed below.
1. Vehicle Specific Jumper Area
2. Input
and
Output
Selection
6. Pull Ups
5. Proto Area
4. Area for 3 Expander Boards
10. CAN Network
0204-0003.8
3. External Terminal
Block Connector
-46-
© Stratified Automotive Controls
http://www.stratifiedauto.com
2.5. Vehicle Specific Jumper Area
The Stratified PNP ND64 can be adapted to work with the OEM harness of a large
number of vehicles from different manufacturers including Mazda, Ford, Honda, Toyota,
Subaru, Suzuki, Chrysler, and Mitsubishi.
Modifying the unit from one vehicle to another depends on how these jumpers are
configured and the software configuration. If you bought the PNP ND64 already built for
A SPECIFIC vehicle and model you don't have to worry about these and they should be
set correctly.
If you bought a generic unit, you will need to connect the jumpers so that the PNP ND64
is connected correctly to your factory wiring.
Jumper connections can be made on both the top and bottom of the main boards - the
markings are on both sides.
MS side. These connections are labeled as per the
B&G Microsquirt convention.
Vehicle harness side. The connector pins are
numbered 1-64. Recommended wire size is 20AWG
0204-0003.8
-47-
© Stratified Automotive Controls
http://www.stratifiedauto.com
2.6. Input and Output Selection
The Stratified PNP ND64 is designed to be as flexible as possible in order to
accommodate individual setups. The user is able to easily gain access to the following
built-in features:
- 3 Relay Drivers
- 1 Boost Control Solenoid Driver
- 2 Digital Switches
- OEM or External CLT, IAT, O2 Sensors
Accessing these features involves the following steps:
1.
2.
Setting jumpers. In this section you will see there are 9 removable jumpers that can
be set in position 1 or position 2. 6 of the jumpers deal with drivers and switches,
and 3 of them handle the CLT, IAT, O2 sensors
For the drivers and switches, setting a jumper in position 1 directly connects the
Microsquirt output to the External Connector. You can then bring a wire in and out
of this connector without touching a soldering iron.
Output to boost control
solenoid is here
Jumper for Boost Control set to
Position 1
0204-0003.8
-48-
© Stratified Automotive Controls
http://www.stratifiedauto.com
3.
Because the Microsquirt has a limited number of inputs and outputs, a user may not
want the exact configuration for the extra drivers as it is setup in the PNP ND64.
This is when the jumper is moved to position 2.
4.
In the example with the Boost Controller, moving the jumper to position 2 makes the
Microsquirt output PA0 available as well as the input to the boost controller
(BOOST-IN) if it is desirable to use another Microsquirt pin to control the Boost
Control Solenoid Driver.
5.
If position 2 is selected for any of the 6 drivers and switches, wire jumpers are used
to connect the now-available Microsquirt I/O pins as well as the drivers/switches
themselves. See example below
SPAREADC2 Microsquirt pin
available here
Jumper for SW-2 (Digital
Switch 2) set to Position 2
SW2-OUT (Digital Switch 2
Output) available here
6.
A similar selection can be made for the 3 sensors: Coolant (CLT), Intake Air
Temperature (IAT), Oxygen Feedbad (O2). If the jumper is in position 1, the sensor
signal is going to be coming from the stock vehicle harness. If the jumper is in
0204-0003.8
-49-
© Stratified Automotive Controls
http://www.stratifiedauto.com
position 2, the sensor signal is routed to the terminal block entry point labelled for
that sensor. This makes adding external sensors such as Wideband O2 sensors, IAT
sensors, or CLT sensors easy and without having to solder anything.
7.
See the example below involving the O2 sensor.
IF O2 sensor jumper set to Position 1, O2
sensor signal connected to stock vehicle harness
IF O2 sensor jumper set to Position 2, O2 sensor
signal is routed to the Terminal Block making adding
a Wideband O2 very easy
0204-0003.8
-50-
© Stratified Automotive Controls
http://www.stratifiedauto.com
8.
Below is a table of all the optional inputs and outputs available on the Stratified PNP
ND64. Remember that enabling these features also requires turning them on in the
software (TunerStudio).
Feature
Digital Switch 1 (SW1)
Digital Switch 2 (SW2)
Relay Driver 1 (LS1)
Relay Driver 2 (LS2)
Relay Driver 3 (LS3)
Boost Control Solenoid
Driver
9.
Description
Use
Digital switch, active (ON)
when SW1-IN pulled to
ground
Digital switch, active (ON)
when SW1-IN pulled to
ground
When activated, it makes
connection to ground. Can
be used for relays, solenoids,
should not exceed 3A
current continuous
When activated, it makes
connection to ground. Can
be used for relays, solenoids,
should not exceed 3A
current continuous
When activated, it makes
connection to ground. Can
be used for relays, solenoids,
should not exceed 3A
current continuous
When activated, it drives a
boost control solenoid that
controls a turbocharger
waste gate
Microsquirt I/O
Name
Table Switching, NOS Input,
PE1
Launch Control, Flat Shift
SPAREADC_2, AD7,
JS4
Secondary intake runners,
fans, water injection,
intercooler sprayer, shift
lights, etc.
TACHOUT, PM-3,
Injection LED
Secondary intake runners,
fans, water injection,
intercooler sprayer, shift
lights, etc.
PT6
Secondary intake runners,
fans, water injection,
intercooler sprayer, shift
lights, etc.
PT7
Boost control
PA0, JS11
As mentioned above in step 5, you can use these Microsquirt I/O pins for something
else simply by setting the selection jumpers to position 2. The table on the next page
is sourced from the Megasquirt documentation website and shows all the possible
uses for the I/O pins.
0204-0003.8
-51-
© Stratified Automotive Controls
http://www.stratifiedauto.com
Source: http://www.msextra.com/doc/ms2extra/MS2-Extra_Hardware.htm
0204-0003.8
-52-
© Stratified Automotive Controls
http://www.stratifiedauto.com
2.7. External Terminal Block Connector
This connector allows the easy (solder free) addition of wiring to and from the Stratified
PNP ND64 unit.
It has 16 positions divided and labelled as follows:
Remember that these outputs are affected by the position of the removable jumpers
described in Section 2. Input and Output Selection.
- BOOST-OUT - Boost controlled solenoid output connection
- LS1-OUT to LS3-OUT - Relay drivers output connections (eg. fan
control)
- SW1-IN and SW2-IN - Digital switch inputs (eg. clutch switch)
- EXT CLT - External coolant sensor connection
- EXT IAT - External intake air temperature sensor connection
- EXT O2 - External oxygen sensor connection
- SNSR GND - Ground connection for ANY of the 3 external
sensors
- EXTRA 1 to EXTRA 6 - Can be used for any other wires that need
to be brought in or out of the PNP and are not part of the stock
wiring harness (eg.
adding COP ignition, or Sequential
injection)
0204-0003.8
-53-
© Stratified Automotive Controls
http://www.stratifiedauto.com
2.8. Area for 3 Expander Boards
This area is designed to allow for the expansion of the Stratified PNP ND64 unit for
unique applications and different platforms. Although the PNP ND64 is a very complete
unit as-is, since it covers so many different platforms and applications, we wanted to have
room to grow.
The Stratified Expander Boards will include extra injector drivers for sequential injection,
knock controllers, signal conditioners ... we want to make our unit as versatile as possible
and we will sell these expansion boards separately as each platform develops unique
needs.
2.9. Proto Area
Similar to the Expander Board area, the Proto area
allows for unique customizations of the unit. 12V, 5V
and GND pads are available nearby. Please note that
the 5V source should not be loaded with any more than
200mA of current. The 12V source should not be
loaded with any more than 3A of current.
0204-0003.8
-54-
© Stratified Automotive Controls
http://www.stratifiedauto.com
2.10. Pull-ups
In some applications the ignition inputs require
pull-up resistors to either 5V or 12V or the outputs
require flyback diodes. The OPTO+, VR2, ALED,
WLED pins are located here next to 12V and 5V
pull-up locations for convenience.
2.11. MAP Sensor
The Stratified PNP ND64 base unit comes with a pre-installed 2.5
bar MAP sensor good for up to 21psi of boost. We offer upgraded
sensors if this is not enough for your application.
2.12. External Power Connector
If you would like to flash the
flash a new calibration on the
unit at home or re-flash the
firmware with the unit out of
the vehicle, you will need to
power the PNP ND64 using a
12V AC adapter similar to the
one pictured above. The
connector specifications are:
2.1mm ID, 5.5mm OD.
0204-0003.8
-55-
© Stratified Automotive Controls
http://www.stratifiedauto.com
2.13. Boot Jumper
If for some reason the firmware needs to be re-flashed and
processor put into boot mode, move this jumper into the
boot position as shown. Follow the procedure in Section 1.7
above.
2.14. CAN Network
The MSII Processor has CAN integration and the
backbone can be reached at these two pins. A
terminating 120 ohm resistor is already included.
2.15. MSII ECU - Microsquirt Module
The Stratified PNP ND64 is powered by a fast and
proven Megasquirt II (MSII) processor on a
Microsquirt module board. This powerful processor is
driven by MSII-Extra firmware and it supports and
MSII firmware.
A detailed firmware feature list, firmware downloads
and setup instructions can be found here:
http://www.msextra.com/doc/ms2extra/
0204-0003.8
-56-