1
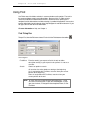
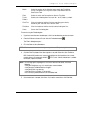
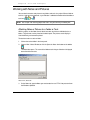
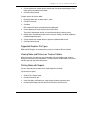
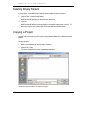
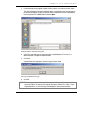
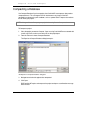
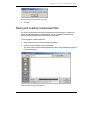
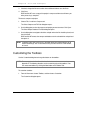
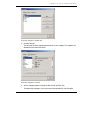
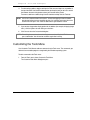
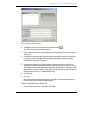
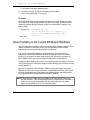
Chapter 6
Tools and Techniques
This chapter describes tools and techniques to help you work more efficiently and
productively.
•
Use Find
•
Work with notes and pictures
•
Techniques for copying and moving folders and tasks
•
Delete empty folders
•
Copy projects
•
Compact databases
•
Save and load in compressed format
•
Customize Tools menu
•
Update to the current RS Means database
BSD CostLink/AE User Manual
83
Chapter 6 : Tools and Techniques
Using Find
Use Find to search for folders and tasks in resource windows and in projects. The tasks in
the resource windows contain many abbreviations. Because of this, it is often easier to
search for the folders that would contain the tasks, rather than for the specific task. A
complete list of the abbreviations and their meanings is provided in Appendix B. You can also
type the abbreviation into the Index tab of the Help dialog box in order to find the term. Or you
can type a term in order to find its abbreviation.
For more information on Help, see Chapter 3.
Find Dialog Box
To open Find, from the Edit menu choose Find or click the Find button on the toolbar
Find dialog box
Find What
Enter the word(s) you expect to find in the task or folder
description exactly as you expect it to be spelled. It is not case
sensitive.
Search
Choose an option to search:
All: searches the entire database starting at the beginning
Up: in conjunction with Find Next, searches from your current
position to the beginning
Down: in conjunction with Find Next, searches from your
current position to the end
NOTE: To search from your current position to the end for tasks: 1. Click
on a task in the sheet panel; 2. Open the Find dialog box; 3. Enter
your search criteria; 4. Change the Search option to Down; 5. Click
Find Next.
84
BSD CostLink/AE User Manual
.
Chapter 6: Tools and Techniques
Match
Select the portion of the field that must match the Find What
string. The options are: Any Part of the Field, Whole Field, or
Start of the Field.
Field
Select to search the Description or Source Tag field.
Tasks/
Folders
Select one or both options to search for - tasks, folders, or both.
Find First
Click this button to find the first item matching your criteria,
based on your selection in the Search field.
Find Next
Click this button to find the next item after finding the first.
Close
Closes the Find dialog box.
To search using the Find dialog box:
1.
If you have more than one window open, click in the window that you want to search.
2.
From the Edit menu choose Find, or click the Find toolbar button
.
The Find In dialog box opens.
3.
Fill in the fields as described above.
NOTE: Find searches for exact words. If you misspell a word, Find probably will not find it.
4.
Click the Find First button if the Search option is set to All. Other wise click Find Next.
BSD CostLink/AE performs the search and highlights the first found item in the sheet
panel by placing an arrow to the left of it ( ) if it is a task. If the first found item is a folder
on the tree, it opens the folder.
NOTE: If a message opens reporting that “The search item was not found,” check the
following:
• Verify the Find title bar says it is searching the correct window;
• Verify that the Find What field has no typos;
• Verify that Field is set correctly;
• Verify that Tasks or Folders is set correctly.
If all is correct, try different words in the Find What field.
5.
If the correct item is located, click Close. If it is not the correct item, click Find Next.
BSD CostLink/AE User Manual
85
Chapter 6 : Tools and Techniques
Working with Notes and Pictures
You can attach text notes and pictures to any folders and tasks in a project. When a folder or
task has a note or picture attached, a cyan indicator is added to the bottom left of the folder or
task icon:
,
, or
.
NOTE: See Chapter 4 for entering project-wide notes using the Summary Info dialog box.
Attaching Notes or Pictures to a Folder or Task
Within a project, use the Notes form to attach text notes or pictures to individual tasks or
folders. The text notes can be printed on the detail report. The pictures are for display in
CostLink/AE only, and cannot be printed.
To attach text notes to a task or folder:
1.
Click on the task or folder in the sheet panel.
2.
Choose View > Notes Window, or click the Open the Notes form button on the toolbar
.
The Notes form opens. The name of the folder or task that you clicked on is displayed
above the white note area.
Notes form, Notes tab
3.
86
On the Notes tab, type the Notes you want to attach or use CTRL+V to paste text from
the Windows clipboard.
BSD CostLink/AE User Manual
Chapter 6: Tools and Techniques
4.
Click on another task or folder to enter another note. You do not need to Apply or Close
before clicking on another task or folder.
5.
Click Close when finished.
To attach pictures to a task or folder:
1.
Display the Notes form as above (steps 1 and 2).
2.
Click the Pictures tab.
3.
Click New.
BSD CostLink/AE opens the Load New Picture dialog box.
4.
Use the dialog box to select the picture file and click Open.
The picture is displayed on the tab. Use the field to the right to name the picture.
5.
Repeat step 3-4 to add more pictures to the same task or folder. Use Back and Next to
navigate through the pictures.
6.
Click on another task or folder to enter a picture on a different folder or task
7.
Click Close when finished.
Supported Graphics File Types
BMP and JPG file types can be attached as pictures to a CostLink/AE task or folder.
Viewing Notes and Pictures on Tasks or Folders
When you see the cyan note icon on a task or folder, click on the folder or task and then
display the notes form as described above. To view the note on another folder or task, leave
the form open and click on the folder or task.
Printing Notes with Reports
You can choose to print text notes on the Detail Report of an estimate.
To print notes on reports:
1.
Choose File > Reports Setup.
2.
Click the Preferences tab.
3.
In the Print Notes and Footer area, select the types of Notes you want to print.
4.
Click the Select Reports tab and click Print or Preview, or click OK to exit.
BSD CostLink/AE User Manual
87
Chapter 6 : Tools and Techniques
Techniques for Copying and Moving
Tips and techniques for copying and moving tasks and folders in BSD CostLink/AE are
described below. Much of this information involves standard mouse and keyboard operations
for the Microsoft Windows operating systems.
Using the Standard Windows Cut, Copy, and Paste Commands
To move or copy tasks or folders from one location to another, use the standard Windows
Cut, Copy, and Paste commands. These commands are available as buttons on the toolbar,
in the Edit menu, and in context menus when you right-click.
You can also cut, copy, or paste text in fields in item forms or while in edit mode on the name
of a folder or task. To enter edit mode in the Tree Panel, click once on the name of a folder
and then click again. In the Sheet Panel, click once on the name of a task or folder. When in
edit mode the background of the text is blocked and a right click results in a context menu
that contains only Cut, Copy, Paste, and Delete.
When cutting or copying tasks (not just the description text) in the Sheet Panel, first select a
task by clicking the selector box to the left of the item in the Sheet Panel so that the whole
record is selected before using the commands from the Edit menu or the toolbar. You can
select all the tasks in the Sheet Panel using Edit > Select All Tasks. Or you can select multiple
tasks using CTRL and Shift as described later.
You can move and copy tasks and folders by dragging them with your mouse. If you drag
with the right mouse button you get additional options as described later.
Be aware that when you cut an item, it may not disappear immediately from view. This is
because BSD CostLink/AE does not automatically refresh the display when you Cut. If you
close the window and reopen it, the cut item will be gone. Be sure to Paste the Cut item
before you close the window.
Shift-Click and Ctrl-Click
Select folders and tasks in the Tree Panel or Sheet Panel by clicking the left (or primary)
mouse button. In the Sheet Panel, hold down the Shift and Ctrl keys in combination with
clicking to select multiple tasks:
88
•
Click on the selector box to the left of the first task with the left mouse button, and then
hold down Shift while you left-click on the selector box for the last task to select a
continuous range of tasks.
•
Click on the selector box to the left of the first task with the left mouse button, and then
hold down Ctrl while you left-click on additional tasks to select multiple tasks not in a
continuous range, or to remove the selection from a group of selected tasks.
BSD CostLink/AE User Manual
Chapter 6: Tools and Techniques
These commands work the same as in standard Windows programs, such as Windows
Explorer.
Dragging and Dropping
Drag and drop is a powerful tool for copying folders and tasks in BSD CostLink/AE. You can
drag and drop items between the Tree or Sheet Panels of different windows.
When you drag an item to a position where you are allowed to drop it, BSD CostLink/AE
changes the mouse pointer to a hand with a page:
Effects of Dragging and Dropping
The default effect of dragging and dropping with the left mouse button depends on the
situation as follows:
When You Drag and Drop…
Then BSD CostLink/AE…
from a resource window to a project
copies the item(s)
within the same window
moves the item(s)
Example: You copy an assembly
from the Assembly Resource window
into your estimate.
Example: You move tasks from one
folder to another in the estimate.
Left-Click and Right-Click for Drag and Drop
When you drag and drop using the left mouse button, BSD CostLink/AE performs the default
operations as listed in the table above. In most cases, BSD CostLink/AE allows other options
besides the default. You can access these options by dragging with the right mouse button
instead of the left. In this case, when you release the right mouse button to drop the item(s),
BSD CostLink/AE opens a context menu with the available options. The default option (the
one that would happen if you dragged with the left) is shown in bold.
Tip:
While learning to use BSD CostLink/AE, drag and drop using the right-mouse button.
This helps you learn the effects of drag and drop in different situations.
Turning off the Confirmation Prompt
By default, BSD CostLink/AE prompts you to confirm before completing any drag and drop
operation. You may turn this off from the Tools menu by choosing Prompt before completing
Drag. When the option is turned on, there is a checkmark next to the command.
BSD CostLink/AE User Manual
89
Chapter 6 : Tools and Techniques
Deleting Empty Folders
In your project, use Delete Empty Folders to remove folders that have no tasks.
1.
Choose Tools > Delete Empty Folders.
BSD CostLink/AE prompts you to confirm the command.
2.
Click OK.
BSD CostLink/AE deletes the empty folders in the project except those at Level 1. To
delete any empty Level 1 folder, right-click on the folder and choose Delete.
Copying a Project
Use the Copy command in the File menu to copy a project database to a different name or
location.
To copy a project:
1.
Make sure the project you want to copy is not open.
2.
Choose File > Copy.
The Select Unopened File to be Copied dialog box opens.
The Select Unopened File to be Copied dialog box
90
BSD CostLink/AE User Manual
Chapter 6: Tools and Techniques
3.
Locate the project to be copied. Double-click the project, or click once and click Open.
The Enter Destination File Name dialog box opens immediately in the same location as
the previous dialog box. It looks just like the Select Unopened File to be Copied dialog
box except that it has a Save button instead of Open.
Enter Destination File Name dialog box
4.
In the File name field, type the new name for the copied database. To save it in a
different location, navigate to a different folder.
5.
Click Save.
A confirmation message opens when the copy has been made.
File Copy Completed message
6.
Click OK.
NOTE: The new copy will not be listed in the Recently Used dialog box because you have
never had it open. To open the new copy of the project, choose File > Open > Open
Project Database, or in the Recently Used dialog box click the Browse button.
BSD CostLink/AE User Manual
91
Chapter 6 : Tools and Techniques
Compacting a Database
Use Compact Database if you have projects that CostLink/AE cannot open or that produce
unexpected errors. This can happen if the file size becomes very large or if the file is
corrupted by an abnormal system shutdown, such as a power failure. Compact also reduces
the file size of your project.
NOTE: It is a good idea to Compact your project before using Save to Compressed.
To Compact a project:
1.
Close the project you want to Compact. If you are using CostLink/AE over a network with
a multi-user license, make sure no one else has the project open.
2.
From the File menu choose Compact Database.
The Repair and Compact Database dialog box opens.
The Repair and Compact Database dialog box
3.
Navigate to and select the project to be compacted.
4.
Click Open.
BSD CostLink/AE repairs and compacts the project and opens a confirmation message
when finished.
92
BSD CostLink/AE User Manual
Chapter 6: Tools and Techniques
Repair and Compact confirmation message
5.
Click OK.
Saving and Loading Compressed Files
Use Save to Compressed and Load from Compressed to archive projects in compressed
format, or to retrieve previously archived projects. You can save projects to compressed
format in order to email them to someone who has CostLink/AE.
To save a project in compressed format:
1.
Open the project you wish to save to compressed format.
2.
From the File menu choose Save to Compressed.
The Select Compressed File Path dialog box opens with a name automatically assigned
in the File Name field.
Select Compressed File Path dialog box
BSD CostLink/AE User Manual
93
Chapter 6 : Tools and Techniques
3.
If desired, change the file name and/or select a different folder to save the file to.
4.
Click Save.
BSD CostLink/AE saves a copy of the project in compressed format and informs you
when processing is complete.
To extract a compressed project:
1.
Choose File > Load from Compressed.
The Select Compressed File Path dialog box opens.
2.
Use the dialog box to select the compressed project you want to extract. Click Open.
The Select Project Database File Path dialog box opens.
3.
Use the dialog box to navigate to the drive and path where the file should be placed, and
then click Save.
BSD CostLink/AE extracts the compressed database to the selected drive and path and
then opens it.
NOTE: If a project of the same name exists in the folder, BSD CostLink/AE prompts you to
confirm overwriting it. You can overwrite the file, place the new file in a new location,
or Cancel.
Customizing the Toolbars
Use the Customize dialog box to change the buttons on the toolbars.
NOTE: For a comprehensive list of the default toolbar buttons and menu commands, see
Appendix A. The following directions are for customizing the existing toolbars. You
can create new toolbars by clicking the New button on the Toolbars tab.
To customize a toolbar:
1.
From the View menu choose Toolbars, and then choose Customize.
The Customize dialog box opens.
94
BSD CostLink/AE User Manual
Chapter 6: Tools and Techniques
Customize dialog box, Toolbars tab
2.
Click the Tools tab.
This tab shows all of the available tool commands, in each category. The categories are
derived from the CostLink/AE menus.
Customize dialog box, Tools tab
3.
Select a Category of tools to change the tools listed in the Tools area.
To find out what a tool does, click on the name of the tool and then click Description.
BSD CostLink/AE User Manual
95
Chapter 6 : Tools and Techniques
4.
To add a tool to a toolbar, drag the tool from the Tools area and drop it on any toolbar at
the top of the BSD CostLink/AE window. Before you drop the tool, you will see a vertical
line between the two existing buttons where your new tool will be placed.
To remove a tool from a toolbar, drag it from the toolbar and drop it on the Tools tab.
NOTE: You can also add these tools to the menus. Instead of dragging the tool to a toolbar,
drag the tool to the menu you would like to place it in, hold your mouse over the menu
and the menu will open. Then move the tool to where you would like it listed.
5.
If you want to change other display options for the toolbars (for example, displaying larger
icons), click the Options tab and make your selections.
6.
Click Close to close the Customize dialog box.
NOTE: Reinstalling the current version or installing a new version of CostLink/AE will remove
your customization. You will need to customize again after installing.
Customizing the Tools Menu
Use Customize Tools Menu to add new commands to the Tools menu. The commands you
add must be executable programs recognized by the Windows operating system.
To add a command to the Tools menu:
1.
From the Tools menu choose Customize Tools Menu.
The Customize Tools Menu dialog box opens.
96
BSD CostLink/AE User Manual
Chapter 6: Tools and Techniques
Customize Tools Menu dialog box
2.
To add the first item, click the Command Line browse button
.
The Select Command Line dialog box opens.
3.
Use the dialog box to select the executable file for the program you want to start from the
Tools menu.
4.
In the Menu Text field, type the name you want the command to have in the Tools menu.
For example, if you were adding a command for opening your timesheet you might
make the Menu Text Open Timesheet.
5.
If you want the program in the Command Line to open a particular file, also fill in the
Arguments and Initial Directory fields (otherwise leave them blank). For example, if you
were adding a command for opening your timesheet, you would fill in the Arguments field
with the filename of the timesheet (i.e. timesheet.xls) and the Initial Directory field with the
location of the timesheet (i.e. X:\Administrative Files).
6.
Click Add Item.
7.
Click OK.
BSD CostLink/AE adds the command to the Tools Menu. Choose the command from
the Tools Menu to launch the executable program.
To delete a command from the Tools menu:
1.
From the Tools menu choose Customize Tools Menu.
BSD CostLink/AE User Manual
97
Chapter 6 : Tools and Techniques
The Customize Tools Menu dialog box opens.
2.
In the Menu Text area, click on the command you want to delete.
3.
Click the Delete Item button. Then click OK.
Example
You might want to create a command called Calculator to launch the Windows calculator.
Since no other file needs to be opened when you open the calculator, you would leave the
Arguments and Initial directory fields blank, and fill in the Command Line and Menu Text
fields as follows:
Command Line
C:\Windows\calc.exe
(or on a Windows NT or 2000 computer, you
would choose C:\WINNT\System32\calc.exe)
Menu Text
Calculator
About Updating to the Current RS Means Database
Your subscription to CostLink/AE includes annual updates of the RS Means database. These
updates are delivered in the Spring of each year. The new database will be installed
automatically when you install the Spring version of CostLink/AE.
If you use the CostLink/AE templates to create new projects, your new projects will
automatically use the newest RS Means database. Any projects that you have created
previously, and any copies you make of those projects, will continue to use the older RS
Means database unless you choose to update the project to the current database.
To determine which database your project is using, open the project, then from the File menu
choose Summary Info. The RS Means database section will display the name of the currently
referenced database.
When you change to the newest RS Means Database for any given project, the Location
Adjustment Factor will also change to the newest Location Adjustment Factor. There can be
only one Location Adjustment Factor applied in any individual project, and it will be the one
that is appropriate for the currently referenced RS Means database.
NOTE If your project was created using a cost model, you will not be able to switch it from
one year to another. If you need to update the costs in a project that was started with a
model, you can copy the project folders from the model project into a non-model
project and then update the costs in the non-model project.
98
BSD CostLink/AE User Manual
Chapter 6: Tools and Techniques
Updating Options
There are two separate functions related to changing from one RS Means database to
another. One is switching the database for the addition of future cost items in the database.
The second is repricing the existing cost items to the new RS Means database. You can
change to the newest RS Means database for the addition of future cost items and leave the
existing cost items with the older pricing. Or you can switch to the newest RS Means
database for the addition of future cost items and reprice your existing costs to the newest RS
Means database.
NOTE: If you want to keep an archive copy of your project before it is changed, make a
backup of your project, either using Windows Explorer, or by using the Copy
command in the File menu. You can also use the Save to Compressed function in the
File menu.
Change RS Means Database
To switch an existing project to the newest RS Means database so that you can copy items
from the newest database, do the following:
1.
Open the project.
2.
From the Tools menu choose Change RS Means Database.
A message opens asking, “Do you wish to change the RS Means database from the
Year [old year] to the Year [new year].”
3.
Click Yes to change to the new database.
A message will open asking, “Changing the RS Means Database for this Project will
update the location index and may cause your Project costs to change accordingly. Do
you want to also update pricing for existing project items? Click Yes to CHANGE the RS
Means Database AND to UPDATE your existing costs. Click No to CHANGE the RS
Means Database, BUT leave the existing costs UNCHANGED. Click Cancel to leave the
existing RS Means Database AS IS.”
4.
Click Yes, No, or Cancel depending on which you want to do.
Once you have changed your project to the 2014 RS Means Database, you cannot
change it back to 2013.
Note: If you are trying to change a database from one year to a year more than one
year later, you must step through each year one by one. If you have a project created
with the 2012 Means database and want to change it to use the 2014 Means
database, you must first change it to use the 2013 database and then you can change
it to use the 2014 database.
BSD CostLink/AE User Manual
99
Chapter 6 : Tools and Techniques
Update to RS Means Database
If you have changed to a different RS Means Database, but have not updated the costs for
the existing RS Means cost items by clicking No in step 4 above, use Update to RS Means
Database to update the existing costs.
To use Update to RS Means Database:
1.
Open the project you want to update.
2.
From the Tools menu choose Update to RS Means Database.
A confirmation message will open saying, ”Do you wish to UPDATE the costs for all RS
Means items in this Project to the [current year] RS Means Database?”
3.
Click OK to proceed or click Cancel to cancel the operation.
If you click OK, the project will close and reopen after repricing the cost items.
100
BSD CostLink/AE User Manual