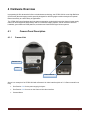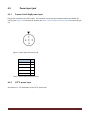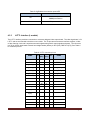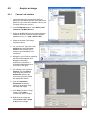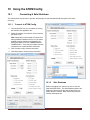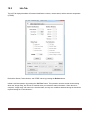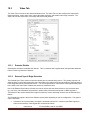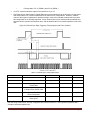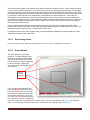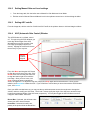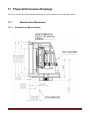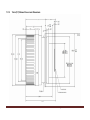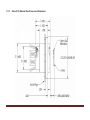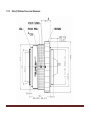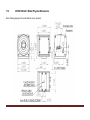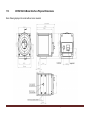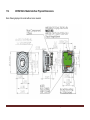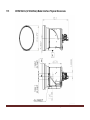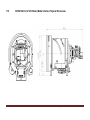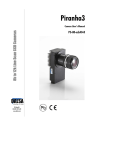
1
ATOMTM 1024 User Manual TM ATOM is a trademark of Sofradir-EC Inc. Page 1 Revision 1.0.28 March 2013 © Sofradir EC, Incorporated A Sofradir Group Company www.Sofradir-EC.com This manual and the software described in it are copyrighted with all rights reserved. This manual and the software may not be copied, in whole or in part, except as pertains to the normal use of the product, such as backup copies, without written permission from Sofradir-EC Incorporated. The same copyright and restrictive notices must be duplicated on any authorized copies. Page 2 ATOM 1024 USER MANUAL ................................................................................................................................................. 1 1 ABOUT ......................................................................................................................................................................... 6 1.1 1.2 1.3 TRADEMARKS ................................................................................................................................................................... 6 LICENSING ....................................................................................................................................................................... 6 WARNINGS ...................................................................................................................................................................... 6 2 MODEL OVERVIEW ....................................................................................................................................................... 8 3 GETTING STARTED ....................................................................................................................................................... 9 3.1 UNPACKING ..................................................................................................................................................................... 9 3.2 WHAT YOU NEED TO GET STARTED........................................................................................................................................ 9 3.2.1 ATOM 1024 SW Support Disk contents .............................................................................................................. 10 3.2.2 Additional Documents ........................................................................................................................................ 10 3.2.3 Frame Grabber support notes ............................................................................................................................ 10 3.3 FEATURES ...................................................................................................................................................................... 10 4 HARDWARE OVERVIEW ............................................................................................................................................. 11 4.1 CAMERA PANEL DESCRIPTION ........................................................................................................................................... 11 4.1.1 Camera Link ....................................................................................................................................................... 11 4.1.2 GigE .................................................................................................................................................................... 12 4.1.3 LVTTL .................................................................................................................................................................. 13 4.1.4 Continuous Zoom ............................................................................................................................................... 14 4.2 POWER INPUT JACK ......................................................................................................................................................... 15 4.2.1 Camera Link & GigE power input ....................................................................................................................... 15 4.2.2 LVTTL power input.............................................................................................................................................. 15 4.2.3 Continuous Zoom power input ........................................................................................................................... 16 4.3 DIGITAL VIDEO OUTPUT INTERFACE .................................................................................................................................... 17 4.3.1 Camera Link interface (C models) ...................................................................................................................... 18 4.3.2 GigE interface (G models) .................................................................................................................................. 18 4.3.3 LVTTL interface (L models) ................................................................................................................................. 19 4.4 CAMERA MOUNT (FOR C AND G MODELS) ........................................................................................................................... 21 4.5 LENSES.......................................................................................................................................................................... 21 4.5.1 Manual Focus (13mm & 50mm) ........................................................................................................................ 22 4.5.2 Fixed Focus (25mm & 50mm) ............................................................................................................................ 23 4.5.3 Continuous Zoom ............................................................................................................................................... 25 4.6 ACCESSORIES ................................................................................................................................................................. 26 5 INSTALLING PC SOFTWARE ........................................................................................................................................ 27 5.1 THIRD PARTY TOOLS ........................................................................................................................................................ 27 5.1.1 Pleora PureGEV .................................................................................................................................................. 27 5.2 SOFRADIR-EC TOOLS ....................................................................................................................................................... 32 5.2.1 ATOM GUI Application ....................................................................................................................................... 32 5.3 INSTALL THE PLEORA ETHERNET DEVICE DRIVER (FOR GIGE CAMERA MODELS) ............................................................................ 33 6 INSTALLING CAMERA FILES ........................................................................................................................................ 34 6.1 6.2 7 NI CAMERA FILE (*.ICD) ................................................................................................................................................... 34 CUSTOMIZE THE NI CAMERA FILE TO OPERATE WITH A DIFFERENT FRAME GRABBER ..................................................................... 35 GIGE CONNECTION CONFIGURATIONS (FOR GIGE CAMERA MODELS) ........................................................................ 36 7.1 CONFIGURE WINDOWS FIREWALL (FOR GIGE CAMERA MODELS) .............................................................................................. 36 Page 3 7.2 CONFIGURE THE GIGE FOR POINT-TO-POINT CONNECTION (FOR GIGE CAMERA MODELS) .............................................................. 36 7.2.1 Configure the PC NIC for static IP address (for GigE camera models) ................................................................ 36 7.2.2 Restore NIC setup for network connection (DHCP delivered IP address) ........................................................... 37 7.3 JUMBO FRAMES/PACKETS SETUP (FOR GIGE CAMERA MODELS) ................................................................................................ 38 7.3.1 PC NIC setup for jumbo frames/packets ............................................................................................................ 38 7.3.2 Verify setup of jumbo frames/packets ............................................................................................................... 39 7.4 ENABLING SIMULTANEOUS CAMERA CONTROL AND IMAGE ACQUISITION (FOR GIGE CAMERA MODELS) ............................................ 39 8 GETTING AN IMAGE ................................................................................................................................................... 41 8.1 CONNECTING YOUR CAMERA AND POWERING ON .................................................................................................................. 41 8.2 ACQUIRE AN IMAGE ......................................................................................................................................................... 42 8.2.1 Camera Link interface ........................................................................................................................................ 42 8.2.2 GigE Video interface ........................................................................................................................................... 43 8.2.3 LVTTL interface ................................................................................................................................................... 50 8.3 TROUBLESHOOTING YOUR IMAGE (FOR GIGE CAMERA MODELS) ............................................................................................. 51 9 CAMERA CONFIGURATION AND ADJUSTMENT .......................................................................................................... 53 9.1 9.2 9.3 10 USER CONTROL .............................................................................................................................................................. 53 ATOMGUI APPLICATION OVERVIEW .................................................................................................................................... 53 SERIAL COMMAND INTERFACE OVERVIEW ............................................................................................................................ 53 USING THE ATOM CONFIG...................................................................................................................................... 54 10.1 CONNECTING & SAFE SHUTDOWN ..................................................................................................................................... 54 10.1.1 Connect to ATOM Config .................................................................................................................................... 54 10.1.2 Safe Shutdown ................................................................................................................................................... 54 10.2 INFO TAB ...................................................................................................................................................................... 55 10.3 VIDEO TAB .................................................................................................................................................................... 56 10.3.1 Detector Disable ................................................................................................................................................. 56 10.3.2 External Sync & Edge Detection ......................................................................................................................... 56 10.3.3 Select Image Zoom ............................................................................................................................................. 58 10.3.4 Zoom Window .................................................................................................................................................... 58 10.3.5 Lens Selection (only for customers purchasing multiple lenses) ........................................................................ 59 10.3.6 Setting Output Video Dynamic Range (8-bit or 14-bit) ...................................................................................... 59 10.3.7 Setting Frame Rate ............................................................................................................................................ 59 10.3.8 Setting Output Correction (Corrected or Uncorrected) ...................................................................................... 59 10.3.9 Video Source & Test Pattern Selection ............................................................................................................... 60 10.4 IMAGE TAB .................................................................................................................................................................... 61 10.4.1 Select Palette (White-Hot, Black-Hot) ................................................................................................................ 61 10.4.2 Setting Manual Gain and Level settings ............................................................................................................. 62 10.4.3 Setting AGC cutoffs ............................................................................................................................................ 62 10.4.4 AGC (Automatic Gain Control) Window ............................................................................................................. 62 10.5 NUC TAB ...................................................................................................................................................................... 63 10.5.1 Initiating a Touchup (against the shutter) ......................................................................................................... 63 10.5.2 Initiating a Touchup (through Lens) ................................................................................................................... 64 10.6 LENS TAB (ONLY FOR CZ LENS CAMERAS) ............................................................................................................................. 64 10.7 DEFAULT VALUES ............................................................................................................................................................ 65 11 PHYSICAL DIMENSIONS DRAWINGS ....................................................................................................................... 66 11.1 STANDARD LENS DIMENSIONS ........................................................................................................................................... 66 11.1.1 Universal Lens Mount Inteface........................................................................................................................... 66 11.1.2 13mm (f1.1) Manual Focus Lens Dimensions ..................................................................................................... 67 11.1.3 25mm (f1.2) Athermal Fixed Focus Lens Dimensions ......................................................................................... 68 11.1.4 50mm (f1.2) Athermal Fixed Focus Lens Dimensions ......................................................................................... 69 11.1.5 50mm (f1.0) Manual Focus Lens Dimensions ..................................................................................................... 70 Page 4 11.2 11.3 11.4 11.5 11.6 11.7 ATOM 1024-20 C MODEL PHYSICAL DIMENSIONS.............................................................................................................. 71 ATOM 1024 G MODEL INTERFACE PHYSICAL DIMENSIONS ................................................................................................... 72 ATOM 1024 L MODEL INTERFACE PHYSICAL DIMENSIONS .................................................................................................... 73 ATOM 1024 G (CZ 25-225MM) MODEL INTERFACE PHYSICAL DIMENSIONS ........................................................................... 74 ATOM 1024 G (CZ 25-150MM) MODEL INTERFACE PHYSICAL DIMENSIONS ........................................................................... 75 ATOM 1024 G (CZ 15-100MM) MODEL INTERFACE PHYSICAL DIMENSIONS ........................................................................... 76 12 SPECIFICATIONS ..................................................................................................................................................... 77 13 MAINTENANCE ....................................................................................................................................................... 78 13.1 CLEANING ..................................................................................................................................................................... 78 13.1.1 Non-Optical Surfaces.......................................................................................................................................... 78 13.1.2 Optical Surfaces ................................................................................................................................................. 78 13.2 REPLACING COMPONENTS ................................................................................................................................................ 78 14 WARRANTY ............................................................................................................................................................ 78 15 REPAIRS ................................................................................................................................................................. 79 15.1 15.2 16 RETURNING PRODUCTS FOR WARRANTY REPAIR ................................................................................................................... 79 RETURNING PRODUCTS FOR “OUT OF WARRANTY” REPAIR..................................................................................................... 80 CONTACT INFORMATION ....................................................................................................................................... 80 Page 5 1 About 1.1 Trademarks LabVIEW, National Instruments, and NI are registered trademarks of National Instruments Corporation. Camera Link is a registered trademark of Automated Imaging Association GEVPlayer is a registered trademark of Pleora Technologies Inc. ATOM 1.2 TM is a trademark of Sofradir-EC Inc. Licensing Software “Software” is defined as machine-readable code or firmware, which is owned by or licensed to Sofradir-EC Incorporated, resides in Product memories, tapes, disks, CDs, or other media and provides operating instructions. With respect to any Software that is furnished to BUYER and/or BUYER’s customers (“Recipient”) hereunder, the Recipient is granted a non-exclusive, license to use the Software in conjunction with the Product(s) purchased, for the life of said Product. Notwithstanding the foregoing, the Recipient is not granted any title or ownership rights to the Software whatsoever. The Recipient is not authorized to reproduce, copy, modify, repair, decompile, reverse engineer, disassemble, reverse translate, or in any manner decode the Software. BUYER agrees to include and enforce terms no less stringent to its customers. Use of the software on the camera, and included in any additional distribution media, is subject to the terms of the end user license agreement. You should not use the camera or any related software until you have read the end user license agreement. The complete end user license agreement is included on the "ATOM Software" CD included with your camera. By using the software, you signify that you have read the end user license agreement and accept its terms. Remedies, Damages and Limitations IN NO EVENT SHALL SOFRADIR-EC INCORPORATED BE LIABLE FOR INDIRECT, INCIDENTAL, SPECIAL, OR CONSEQUENTIAL DAMAGES, LOSS OF PROFITS, LOSS OF USE OR DATA OR INTERRUPTION OF BUSINESS, WHETHER SUCH ALLEGED DAMAGES ARE LABELED IN TORT, CONTRACT OR INDEMNITY, EVEN IF SOFRADIR-EC INCORPORATED HAS BEEN ADVISED OF THE POSSIBILITY OF SUCH DAMAGES, FURTHERMORE, DIRECT DAMAGES ARE STRICTLY LIMITED TO THE VALUE OF THE PRODUCT. Actions, however asserted, shall be commenced within two years from the date the cause of action accrues; provided, however, an action for nonpayment may be commenced at any time within four years from the date the cause of action accrues. 1.3 Warnings The ATOM 1024 camera and related firmware and software components are not designed or intended for use or resale in hazardous environments requiring fail-safe performance, such as in the operation of nuclear facilities, aircraft navigation or communications systems, air traffic control, or other devices or systems in which a Page 6 malfunction of the camera hardware or software would result in foreseeable risk of injury or death to the operator of the device or systems, or to others. Operating Do not use a dedicated PoCL (Power over Camera Link) Frame Grabber with the camera. Handling Avoid touching the detector window. Install the dust cap when the lens is removed. Avoid touching the lens. Install the lens cap when the camera is not in use. Window cleaning Cleaning of the window should only be considered in case of absolute necessity. Only use isopropyl alcohol and special lens paper for optics. Follow classical rules for optics cleaning (only translation motion without return, from the center to the edge, never use the paper twice, etc.). Detector life Avoid viewing very intense energy sources, such as the sun, lasers, electrical arcs, whether powered or not since this may cause damage to the detector or to its factory calibration. Accessories Use only the approved accessories and options with this product. Incompatible accessories may damage the camera, compromise equipment safety measures and/or provide inaccurate readings. Restriction–of–Use Environments If the equipment is used in a manner not specified by the manufacturer, the protection provided by the equipment may be impaired. The following disclaimers apply as non-standard, non-warrantied applications: 1. 2. 3. 4. Unit is not intended for permanent, fixed-mount outdoor applications. Unit is not designed to withstand immersion or exposure to rain. Unit is not intended for exposure to salt water atmosphere. Unit is not intended for dynamic-mount applications, such as on vehicles or heavy machinery, in which the transmitted vibration is continuously sustained. 5. Unit should be placed in a carrying case when not in use. ITAR Restriction Equipment described herein may require US Government authorization for export purposes. Page 7 2 Model Overview ATOM Model Lens HFOV (nominal) 13mm, f1.1 manual focus 73º 1024-73L (LVTTL) 1024-73C (Camera Link) 1024-73G (GigE) 1024-20L (LVTTL) 1024-20C (Camera Link) 1024-20G (GigE) 50mm, f1.0 manual focus OR 20º 50mm, f1.2 fixed focus 1024-40L (LVTTL) 1024-40C (Camera Link) 25mm, f1.2 fixed focus 40º 1024-67/10G (GigE) 15-100mm, f1.4 continuous zoom motorized focus 9.15-56º 1024-40/6.6G (GigE) 25-150mm, f1.4 continuous zoom motorized focus 6.6-40º 1024-40/4.4G (GigE) 25-225mm, f1.4 continuous zoom motorized focus 4.4-40º 1024-40G (GigE) Page 8 3 Getting started 3.1 Unpacking Carefully inspect the shipping container for damage. Remove the contents from the box and check for visible damage. Check if the following items are included: 1. Camera 2. Power Supply 3. CD/DVD Release Software Disk (which includes a copy of the User Manual) 4. Quick Start Guide 5. Additional Accessories ordered (Lens, cables) 3.2 What you need to get started To setup and use the ATOM 1024 camera, the following items are needed: ATOM™ 1024 Camera For L models, customer designed hardware is required to power the camera and access the video stream. Power Supply PC running XP/Vista/Win7 with latest Service Packs installed and at least one of the following: o 1000Base-T Ethernet interface (for cameras with GigE Video interface) o Camera Link Frame Grabber (for cameras with Camera Link interface) Note: Do not use a “dedicated” PoCL Frame Grabber to avoid damaging the Frame Grabber and/or the PC. Use either a conventional Camera Link Frame Grabber or a “switchable” PoCL Frame Grabber with SafePower which can detect if the camera is/is not PoCL compliant and handle accordingly. Standard Cables o Camera Link cable (for cameras with Camera Link) - Mini-Camera Link to Standard Camera Link (SDR to MDR) cable o Ethernet cable - (for cameras with GigE Video Port) - CAT-5e or better Ethernet cable CD/DVD Release Disk (containing software and documentation) Page 9 3.2.1 ATOM 1024 SW Support Disk contents 1. ATOM 1024 Release Notes.pdf 2. ATOM 1024 User Manual.pdf (This manual) 3. Standard ATOM 1024 EULA 030612.pdf (End User License Agreement) Folders: ATOM SW – contains (GUI Application files, NI frame grabber configuration file (.icd) (Camera Link based cameras only), Readme.txt Pleora – contains installer and documentation for GigE Vision software (for GigE based cameras only) 3.2.2 Additional Documents The Quick Start Guide is a brief guide to get your Atom 1024 setup, installed and running. This document is included on the software CD as well as in the box with the camera. At additional cost, the following documents are available: Atom 1024 Advanced Interface Guide Atom 1024 Software Development Kit 3.2.3 Frame Grabber support notes Some Camera Link frame grabbers require a minimum pixel clock of 20MHz. The ATOM 1024 will need to be configured for XGA (1024x768) Video Output Resolution to produce the required pixel clock to use these frame grabbers. If VGA (640x480) Video Output Resolution is desired, use either the NI PCI-1426 or NI PCIe-1427 Camera Link frame grabbers which have been tested and work with the ATOM 1024 cameras. 3.3 Features High Performance imaging – High resolution XGA format (1024x768) with superb image detail and excellent thermal sensitivity for increased range and detection performance Short Thermal Time Constant for sharp images of objects in motion Low power consumption for long battery life Integrates easily into multiple platforms External Sync feature Motorized Continuous Zoom Lens support Page 10 4 Hardware Overview Incorporating ULIS’s advanced all silicon microbolometer technology, the ATOM 1024 is a true High Definition (XGA format) thermal imaging module specially designed for delivering high resolution analysis and optimal thermal sensitivity to a wide variety of applications. The ATOM 1024’s small package and low power consumption coupled with its superior thermal image quality makes for ideal integration within military and COTS thermal imaging systems, and an excellent choice for handheld, ground/airborne EOIR platforms, and advanced fusion based night visions systems. 4.1 4.1.1 Camera Panel Description Camera Link Camera Link Power Camera Mount Above is an example of an ATOM 1024 with a Camera Link video interface (with an f 1.0 50mm manual focus lens) See Section 4.2.1 for the power supply pin layout. See Section 4.3.1 for more on the Camera Link video interface. Camera Mount Page 11 4.1.2 GigE GigE Power Camera Mount Above is an example of an ATOM 1024 with a GigE video interface (with an f 1.2 50mm fixed focus lens) See Section 4.2.1 for the power supply pin layout. See Section 4.3.2 for more on the GigE video interface. Page 12 4.1.3 LVTTL LVTTL Connector Above is an example of an ATOM 1024 with an LVTTL video interface (with an f 1.0 50mm manual focus lens) See Section 4.3.3 for the power supply pin layout. See Section 4.3.3 for more on the LVTTL video interface. The LVTTL model does not have a Camera Mount Page 13 4.1.4 Continuous Zoom The Continuous Zoom models come with a GigE video interface. GigE Power See Section 4.2.3 for the power supply pin layout. See Section 4.3.2 for more on the GigE video interface. Page 14 4.2 4.2.1 Power input jack Camera Link & GigE power input Power input connection for 6V DC supply. The connector is a circular type receptacle (Hirose p/n HR10A-7R5S(73)). See Figure 1 for connector pin location and Table 1: Power input connector pin-out for connector pinout. Figure 1: Power input connector pin ID NAME Pin PWR (6V) 1 Do Not Use 2 GND 3 Do Not Use 4 Do Not Use 5 Table 1: Power input connector pin-out 4.2.2 LVTTL power input See Section 4.3.3 for information on the LVTTL power input. Page 15 4.2.3 Continuous Zoom power input The parts included to power the CZ camera (with part numbers from TE Connectivity): Power Supply 12V 1.5A minimum 2-pin housing (770602-2) Crimps (770601-2) & Crimp Tool (58517-1) Negative ATOM 1024 CZ 25-150mm Positive ATOM 1024 CZ 25-225mm 422 Level Converter Board, as displayed above Page 16 4.3 Digital Video Output Interface Depending on the model, the Digital Video output interface will be LVTTL, Camera Link, or GigE. The digital video interface provides 14 bits of parallel pixel data, with clock signals identifying pixels (pixel clock), lines (horizontal sync), and frames (vertical sync). It will be selectable between uncorrected raw, full amplitude resolution non-uniformity corrected, and 8-bit gain and level compensated image data. When operating in 8-bit mode, the output bits will occupy the most significant bit positions of the parallel output channel, with the unused bit positions set to zero values. Video imaging can be managed by making three selections: Input field of view This selection specifies the effective image field of view by adjusting the FPA pixel region used to generate the output image. Output resolution Specify the resolution of the output signal Digital zoom level Apply an image zoom transformation between the input and output images The following table identifies the video modes, and provides explicit input and output resolution information for each. Not all modes are supported on all models; grayed out entries and accompanying explanations are not supported for the system shipped with this document. Table 2: Video Modes Physical Display FOV Wide Output Frame XGA Frame Rate 30 XGAVGA Medium VGA 60 Dual Mode Narrow VGA 60 User Zoom # Detector Columns # Display Columns Actual Electronic Zoom 1 1024 1024 1 2 512 1024 2 3 341 1024 3.0029326 4 256 1024 4 1 640 640 1 2 320 640 2 3 213 640 3.0046948 4 160 640 4 1 320 640 2 2 160 640 4 3 107 640 5.9813084 4 80 640 8 When operating in the 1024x768 resolution, the FPA is configured to output the maximum resolution, with all pixels displayed. When a zoom command is applied in this mode, a smaller rectangular area of pixels centered in the original image will be digitally expanded to fill the 1024x768 output frame. Page 17 In addition to selecting the output signal resolution, the System Controller can also specify the pixel encoding and processing using the Video Tap serial command (Registers 0x11, 0x91). The output video modes supported by the ATOM 1024 Thermal Imaging Module are listed in the following table: Table 3: Video Output Processing Modes Video mode 4.3.1 Bits/pixel NUC Applied Gain/Level Applied Zoom Applied Polarity Selection Applied Uncorrected raw 14 No No No No Corrected raw 14 Yes No No No Palletized 8 Yes Yes Yes Yes Camera Link interface (C models) The Camera Link interface is compliant with the Base Camera Link standard which supports 5 LVDS pairs for the serialized video data and sync, 2 LVDS pairs for asynchronous serial communication, and 4 LVDS pairs for discrete control signals. The discrete control signals are not used with the ATOM 1024 Camera and are terminated. The connector is a Mini-Camera Link 26-pin 3M SDR receptacle. Power over Camera Link, PoCL, is not supported. 4.3.2 GigE interface (G models) The GigE interface provides network connectivity to transmit high-speed video and control data at gigabit speeds. The connector is a RJ45 type connector with 2 LED’s to display network activity and connection speed. 4.3.2.1 Network Activity LED Table 4: GigE Network Activity LED 4.3.2.2 LED Status Off No connection Green Connected Blinking Green Data is being transmitted or received Network connection speed LED Page 18 Table 5: GigE Network connection speed LED 4.3.3 LED Status Off No connection, 10Mbps connection, 100Mbps connection Green 1Gbps connection LVTTL interface (L models) The LVTTL interface provides a connection to customer designed video output board. The video signals are 3.3V LVTTL and are not intended to be driven over a cable. The 70-pin camera connector interface supports, 14 bits of data, framing, clock and 2 asynchronous serial signals along with 2 control signals and power. The connector is a 70-pin 0.5mm pitch board to board 2mm height header (Hirose p/n DF17(2.0)-70DP-0.5V(57)). See Table 6 for connector pin-out. Table 6: LVTTL connector pin-out NAME I/O J1 (Pin) J1 (Pin) I/O NAME GND I 1 70 I SHUTTER_PWR GND I 2 69 I SHUTTER_PWR 3.3V_PWR_IN I 3 68 3.3V_PWR_IN I 4 67 I 3.3V_PWR_IN 3.3V_PWR_IN I 5 66 I 3.3V_PWR_IN 3.3V_PWR_IN I 6 65 I 3.3V_PWR_IN GND I 7 64 I GND GND I 8 63 I GND 9 62 10 61 RS232_TX I 11 60 RS232_RX O 12 59 CC1(External Sync) I 13 58 CC2 I 14 57 15 56 16 55 17 54 Page 19 NAME I/O J1 (Pin) J1 (Pin) 18 53 19 52 I/O NAME O FRAME_SYNC PCLOCK O 20 51 LINE_SYNC O 21 50 22 49 O D12 23 48 O D13 24 47 I GND 25 46 O D11 26 45 O D10 27 44 O D9 28 43 O D8 29 42 O D7 30 41 I GND 31 40 O D6 32 39 O D5 33 38 O D4 GND GND I I D0 O 34 37 O D3 D1 O 35 36 O D2 3.3V_PWR_IN: 3.3V-3.45V Conditioned Power. SHUTTER_PWR: 3.3V-3.45V Conditioned Power. GND: Ground D [0:13]: 14 bits of data. PCLOCK: Clock used to synchronize the data. FRAME_SYNC: Frame Sync used to signal the start of a frame. LINE_SYNC: Line Sync used to signal the start of a line. RS232_TX: Serial Data received by the ATOM RS232_RX: Serial Data transmitted by the ATOM CC1: 3.3V LVTTL signal External Sync CC2: 3.3V LVTTL signal (for future use) The 14-bit parallel data bus contains full-dynamic range RAW/NUC digital output with bad pixel correction. The ATOM 1024 system changes Output Video data on the falling edge of PCLOCK. The system receiving data from the ATOM 1024 system should latch it on the rising edge of this clock. Page 20 TXDFRAME SYNC LINE SYNC DATA 13:0 [1 pack et delay ]Line 0 Line1 Line2 LineN Figure 2: Digital Interface Frame Timing Number of active LINES in each active Frame is 768 for XGA and 480 for VGA modes. 4.4 Camera Mount (for C and G models) The ATOM 1024 C and G models have a camera mount so the camera may be mounted on a tripod. The L models do not have a camera mount. 4.5 Lenses ATOM 1024 lenses come in three different types: Manual Focus Fixed Focus Continuous Zoom Page 21 4.5.1 Manual Focus (13mm & 50mm) 4.5.1.1 13mm f/1.1 Manual Focus 73° FOV 4.5.1.2 50mm f/1.0 Manual Focus 20° FOV Page 22 4.5.2 4.5.2.1 Fixed Focus (25mm & 50mm) Fixed focus (25mm f/1.2 40° FOV) Adjusting the 25mm Fixed Focus Lens The fixed focus lens allows the option to unlock and change the focus; then re-lock the lens in place with the lock ring. Inner Lens Lock Ring 1. While facing the camera, use the grooves on the lock ring to turn it counterclockwise in order to unlock the inner lens. Grooves 2. Rotate the inner lens to the appropriate new location. 3. While holding the inner lens in place, use the grooves to turn the lock ring clockwise until it locks tight. Important: Be careful to not overturn the lens; it will come off. Less than one full turn is required for the full range of focus. The minimum focus is 2 meters; a closer focus can be achieved with caution. For hyperfocal distance, focus the lens at 45 meters for focus from 25 meters to infinity. Focus the lens at 35 meters for focus from 17.5 meters to infinity. Page 23 4.5.2.2 Fixed Focus (50mm f/1.2 20° FOV) Lens Baffle Focus Grip Adjusting the 50mm Fixed Focus Lens: 1. Rotate the Focus Grip to adjust your focus. 2. When the desired focus is reached, insert the supplied lockdown screw (replacement screw: Nylon Tip 18-8 SS Socket Set Screw 4-40 Thread, 1/8" Length McMaster part number: 90291A103) into the hole circled below. 3. Hand-tighten the screw. Locking thread Note: Do not grip the Outer Lens to change focus as it will not adjust the focus; it can turn independently of the focus grip. Special to the Athermal Lens: You will notice that the Lens Baffle can expand and contract up to a few millimeters. When positioning your camera for use, be sure to leave room for the Lens Baffle to move freely in and out. Restricting the fluctuation of the Lens Baffle will negatively affect the Athermal functions of the lens. Page 24 4.5.3 Continuous Zoom 4.5.3.1 25-150mm f/1.4 Continuous Zoom motorized focus 6.6-40° FOV 4.5.3.2 25-225mm f/1.5 Continuous zoom motorized focus 4.4-40° FOV Page 25 4.5.3.3 4.6 15-100mm f/1.4 Continuous zoom motorized focus 9.15-56º FOV Accessories Camera Link Cable (Mini – Standard) o 2m (915154) o 5m (915155) o 10m (915156) Power Supply with serial cable (915288) Camera Link Frame Grabber Boards: o 16MB PCI-1426/16 (915219) o 32MB PCI-1426/32 (915220) o PCI-1428 (915221) o PXI-1428 (915222) o PCIe-1427 (915223) o PCLe-1429 (915243) Camera Link LVTTL Conversion Kit (915325) Page 26 5 Installing PC Software 5.1 Third Party Tools When installing all of the third party software packages, take care to review the End User License Agreements associated with each. Sofradir-EC provides these packages on our installation media as a convenience, and takes no responsibility for performance and reliability, and provides no direct support for these products. 5.1.1 Pleora PureGEV For information regarding Pleora release compatibility, please reference the release notes. The Pleora PureGEV package includes an application to display video captured from a standard GigE Video camera. This application is named “GEVPlayer”, and may be useful in Gigabit Ethernet environments. Run the Setup application in the Pleora folder. Click on the “eBUS-PureGEV Package” button to install the software. Page 27 Click on the “Next” button to continue to install the software. Read the end-user software license agreement and click the bullet next to the statement of accept once the license agreement has been reviewed and agreed to. Click on the “Next” button to continue. Page 28 Click on the “Next” button to continue. If the default folder location is not acceptable click on the “Change” button to edit the folder location then click on the “Next” button to continue. Click on the “Install” button to continue. Page 29 Click on the “Finish” button when completed. Page 30 Following a successful installation, these new items should appear on your Start menu under the Pleora Technologies Inc heading. Select the item for GEVPlayer to start the video acquisition application. Page 31 5.2 Sofradir-EC Tools Review the Readme.txt file for ATOM GUI application installation instructions. 5.2.1 ATOM GUI Application The ATOM GUI application is the program that allows you to send communications to your ATOM 1024 camera. Initiating the ATOM GUI setup wizard will present you with a preliminary welcome screen. Click 'Next' to proceed to the installation folder. The recommended settings will present the ATOM GUI installation path by default. A manual installation path can be selected by clicking browse, and selecting a folder through the explorer. Also, at this point you may select your preference as to how ATOM GUI may be accessed between accounts. Click ‘Next’ to proceed to the next installation screen, and then next again to commence installation. Your installation will proceed with a status bar at this point. Selecting cancel at any time prior to completion will abort the installation procedure. Once this has completed, click 'Close'. Page 32 5.3 models) Install the Pleora Ethernet device driver (for GigE camera 1. Run the Driver Installation Tool from All Programs > Pleora Technologies Inc. > eBUS SDK > Tools 2. Verify the current driver installed. 3. Select the driver from the Action pull down menu then click Install. Page 33 4. Click Install again to install the device driver. 5. Verify the Current Driver installed is an eBUS driver. 6. Click Close when done. 6 Installing Camera Files Cameras using the Camera Link interface require camera files for the NI software to communicate between the NI frame grabber and the camera. 6.1 NI camera file (*.icd) 1. Locate the NI camera file (*.icd) on the CD/DVD Release disk or electronic mail. 2. Copy the NI camera file to: Vision Acquisition Software prior to 8.2.3 Place the *.icd file in <National Instruments>\NI-IMAQ\Data Vision Acquisition Software 8.2.3 and later For Windows XP, place the *.icd in C:\Documents and Settings\All Users\Shared Documents\National Instruments\NI-IMAQ\Data For Windows 7, place the *.icd in C:\Users\Public\Public Documents\National Instruments\NIIMAQ\Data Page 34 6.2 grabber Customize the NI Camera File to operate with a different frame The distribution media, CD/DVD or electronic mail, contains a NI Camera File that is designed to work with the most popular NI Camera Link frame grabbers: the PCI-1426, and the PCIe-1427. If you have a different NI frame grabber, you can modify one of the provided camera files to work with your frame grabber using the NI Camera File Generator software. An installer for this package is provided on the distribution media in the folder “\National Instruments\Camera File Generator”. To use the NI Camera File Generator to add support for additional frame grabbers, follow these steps on the PC that has the target frame grabber installed: 1. Verify that the SEC provided camera files (.icd) have been copied to the appropriate folder on your PC, as described in the section above. 2. Run the NI Camera File Generator program. 3. On the initial screen, click on the button labeled “Open Existing Camera File.” 4. Navigate to the NI camera file folder, and select one of the provided SEC camera files (e.g. Sofradir-EC ATOM 1024.icd). 5. The program should notify you that the opened file does not support the installed frame grabber, and offer to update it to include support. Click on the “Yes” button: 6. Click on the “File” item in the program’s menu bar, and save the camera file with a new name. 7. Close the NI Camera File Generator program. 8. You should now be able to select and use this new camera file from within the NI Measurement & Automation application to display video. Note that if it is more convenient, the NI Camera File Generator program can also be used to display streaming video from the camera. Page 35 7 GigE Connection Configurations (for GigE camera models) 7.1 Configure Windows Firewall (for GigE camera models) Configure Windows Firewall to allow GEV Player through. 1. From the Start menu, select Start > Control Panel 2. From the Control Panel, select the category System & Security, then Windows Firewall 3. From Windows Firewall, select Allow a program through Windows Firewall. 4. Put a check in the box for GEVPlayer. Note: If GEVPlayer is not listed, select the Add program button and add it to the list. 5. If other firewall software is installed (e.g. Norton Internet Security), use the equivalent procedure to permit access. 7.2 Configure the GigE for point-to-point connection (for GigE camera models) 7.2.1 Configure the PC NIC for static IP address (for GigE camera models) The PC NIC will need to get an IP address, either from a DHCP server if in a typical network setup or manually programmed in a point-to-point connection. 1. From the Start menu, select Start > Control Panel 2. From the Control Panel, select Network and Sharing Center 3. Right click on local network connection and select Properties. 4. Select Internet Protocol Version 4 (TCP/IPv4) and click the Properties button. Page 36 5. Select the “Use following IP address” bullet and enter 192.168.1.1 for the IP address and 255.255.255.0 for the Subnet mask. Note: The Subnet mask may automatically be filled in with 255.255.255.0 after the IP address is entered. 6. Click Ok when done. 7.2.2 Restore NIC setup for network connection (DHCP delivered IP address) 1. Select the “Obtain an IP address automatically” and “Obtain DNS server address automatically” bullets. 2. Click Ok when done. Page 37 7.3 Jumbo frames/packets setup (for GigE camera models) Before using Jumbo frames, make sure the PC NIC and Ethernet switches support Jumbo frames, otherwise the packets will be discarded. 7.3.1 PC NIC setup for jumbo frames/packets For Windows 7, 1. Select Start 2. Right-click on Computer 3. Select Manage 4. Click on Device Manager on the left side 5. Click on Network Adapters in the center 6. Right-click on the Network Adapter being used 7. Select Properties 8. Click the Advanced Tab 9. Select Jumbo Frames from the list of properties and select the MTU size from the value pull-down 10. Click Ok when done and close the Computer Management window. Page 38 7.3.2 Verify setup of jumbo frames/packets 1. Open a Command Prompt window, Click on Start > Run, then type Cmd in the Run box and click Ok. 2. In the Command Prompt window, type the following and hit Enter ping [–f] [–l size] [target name or IP address] ping –f –l 9000 192.168.0.133 3. Verify ping works. 7.4 Enabling simultaneous camera control and image acquisition (for GigE camera models) For the user to control the camera while acquiring images, the Pleora GEV Player must be set as a data receiver and multicast mode must be used for streaming. Without multicast enabled, video can be displayed, but the camera controls are unavailable. Important Note: Multicast mode uses IGMP and requires an IGMP compliant Ethernet switch if used in a network. If connecting point-to-point, an IGMP compliant Ethernet switch is not required. 1. Make sure GEV Player is setup correctly, (i.e. network, point-to-point, image size), and can acquire video. 2. Click the Stop button and the Disconnect button. 3. Launch AtomGui from your computer by clicking the AtomGui.exe application file. 4. Select your method of connection from the Interface pull-down menu. 5. Click the Connect button. 6. Select the Multicast check box as seen below. Page 39 7. From the GEV Player main screen, Select Tools then Setup. 8. From the Setup window, select Data receiver and Multicast. 9. Make sure that the Multicast address from the GEV Player matches the Atom Gui Multicast Address (as shown above) Page 40 10. Click Ok 11. In GEV Player, Click the Select / Connect button. 12. Select your Gig-E interface and verify that the Access Status says “Control” highlighted in yellow. 13. Click OK 14. The GEV Player should now display video and the GUI can be used to control the camera. Note: The Play and Stop button are not active as well as the GEV Device control button so if a change in image size is needed the GEV Player will need to be set back to Controller and Data receiver. 8 Getting an Image 8.1 Connecting your camera and powering on 1. Connect the digital video interface to the acquisition hardware with the appropriate cable. a. For LVTTL, connect the custom designed hardware, connected to the LVTTL 70-pin connector, to the appropriate designed for ima acquisition hardware with an appropriate cable. Note: The custom designed hardware should have a video interface from which to connect to an image acquisition device. b. For Camera Link, connect the Mini-Camera Link connector to the Frame Grabber with a Camera Link cable. c. For GigE, connect the GigE Video RJ-45 connector to a network switch or directly to a PC’s gigabit Ethernet port with a Cat-5e or better Ethernet cable. Note: Review the following and perform the necessary steps. i. Update to the Pleora Ethernet Driver (See Section 5.3) ii. Configure Windows Firewall (See Section 7.1) iii. Decide on either point-to-point or network connection iv. Configure NIC IP address (if point-to-point; See Section 7.2.1) v. Configure Camera’s GigE IP address (if point-to-point) vi. Configure NIC for Jumbo packets (See Section 7.3) vii. Configure switches for Jumbo packets Additional Note: Try to acquire images without user control first. Once this is accomplished, configure the PC and cameras GigE Video interface to add simultaneous user control if needed. 2. Connect the Power Supply to the camera and plug into an AC outlet. Note: After power is first applied, the shutter can be heard closing and opening. Page 41 8.2 8.2.1 Acquire an image Camera Link interface 1. Launch Measurement & Automation Explorer (MAX) from the desktop shortcut or the start menu. (Make sure your Atom CD installation CD is in your computer before your first use.) 2. In the Configuration panel, select Devices and Interfaces > NI-IMAQ Devices. 3. Under the NI-IMAQ Devices the image acquisition hardware will show, select the image acquisition hardware to use, (i.e. img0 : NI PCIe-1427). 4. Select the channel of the image acquisition device. 5. For your first use, right-click on the Channel item and select Open Camera. This will allow you to browse to your Installation CD’s camera file. 6. Navigate to your CD-drive containing the Atom1024 installation disk. Navigate to AtomSW > AtomGui for CameraLink > SofradirEC14BitCameraLink.ic d (as seen to the right). 7. For following uses, right-click Channel, click the Camera drop-down and choose the Sofradir-EC selection (as seen to the right) and choose the appropriate camera. 8. From the Acquisition Parameters tab near the bottom of the window, setup the Width and Height. 9. Click Snap to acquire a single image or click Grab to continuously acquire images. 10. Right-Click the image and select Viewer Tools > Zoom to Fit for the full image. Page 42 8.2.2 GigE Video interface Review the following and perform the necessary steps. a. Update to the Pleora Ethernet Driver to improve performance (See Section 5.3) b. Configure Windows Firewall to allow GEV Player through (See Section 7.1) c. Configure for network or point-to-point connection d. If point-to-point connection, configure static IP addresses for PC NIC and Camera GigE port (See Section 7.2.1) e. Configure for Jumbo packets (not required) (See Section 7.3) f. Use workaround steps to simultaneous use the GUI to control and GEV Player to acquire images Acquire video by performing the steps for a network connection or point-to-point connection. Note: There is a workaround needed to be performed in order to simultaneously use the GUI to control the camera and use GEV Player to acquire images. See Section 7.4 on the steps needed to be performed. 8.2.2.1 GigE Video interface network connection 1. Launch GEVPlayer from the desktop shortcut or the start menu. 2. Click the Select / Connect button. 3. Select the Gig-E interface. 4. If your device is not listed, select the “Show unreachable GigE Vision Devices” checkbox. Click on “Set IP Address” and enter an appropriate address and net mask. Note: If more than one camera is located, verify the correct interface with the MAC address. Page 43 5. Click the Play button 6. Observe Error count is 0 and the Stream number of images is incrementing. 8.2.2.2 GigE Video interface point-to-point connection 1. Configure the PC’s NIC for a static IP address (Section 7.2.1) 2. Launch GEVPlayer from the desktop shortcut or the start menu. 3. Click the Select / Connect button. 4. Check the Show unreachable GigE Vision Devices. Page 44 5. Select the Gig-E interface. Page 45 6. Select the “Set IP Address…” button. Page 46 7. Enter a two as the last digit of the IP address and click OK. Page 47 8. Verify the IP Configuration is Valid now. Page 48 9. Select the GigE interface and click OK. 10. The following warning may be displayed. Click Ok. Note: It is recommended to go back and update the Ethernet device driver for improved performance (See Section 5.3). Page 49 11. Select the GEV Device control button 12. Setup Width, Height, PixelFormat (Mono14) and TestImageSelector (Off). 13. Click the Play button and observe Error count is 0 and the Stream number of images is incrementing. 8.2.3 LVTTL interface Note: The LVTTL interface is intended to connect to custom designed hardware. The custom designed hardware will provide an interface from which to acquire an image. Note: The Camera Link LVTTL Conversion Kit (915325) can be used to image and benchmark the core camera functions and allow for debugging customer interface hardware. Page 50 8.3 Troubleshooting your image (For GigE Camera Models) This section contains images that illustrate the effects of common configuration problems. If the Gigabit Ethernet interface hardware is configured to generate a test pattern instead of live video from the camera, the displayed images will be a saw-tooth pattern that moves from right to left at a speed that depends on the configured image size. Follow the instructions in Section 8.2.2 that describes configuring GEV Player in Unicast mode to resolve this problem. Note that the camera may default to test pattern mode each time it is powered on. If the image pixel configuration is not set to 14 bits per pixel, the resulting image will appear excessively noisy, and may show repeating patterns in areas of low contrast. Follow the instructions in Section 8.2.2 that describes configuring GEV Player in Unicast mode to resolve this problem. Page 51 If the image dimensions are not set correctly, you will see a correctly acquired and displayed image, but the image field of view will not be correct. You will likely see a smaller image area than expected. If you see vertical banding of any size in the image, this may simply be the result of a mismatch between the display window size and the screen resolution. If you see this effect, try resizing the window until the displayed image is clean. In this example, a dramatic improvement to the image quality was achieved by just changing the window size. Keep in mind that the display program is attempting to scale a 1024x768 pixel image into a variable sized window. Optimal image quality will be obtained if the display area is an integral multiple of the fundamental image size (e.g. 2x, 1x, 1/2x, 1/4x). Page 52 9 Camera configuration and adjustment 9.1 User Control Camera control is implemented over the serial transmit and receive lines for the Camera Link video interface and packetized for the GigE video interface. The AtomGui sample application provides a user friendly interface for camera control, although individual commands can be arranged to read and write registers directly for testing and debugging purposes. Note for Camera Link models: The AtomGui supports NI Frame Grabbers. If the user intends on using another manufacturer Frame Grabber and still needs camera control, the serial interface can be changed from the Camera Link serial lines to a separate serial interface requiring a Power Supply with Serial Cable accessory (915288) and a camera setting change. The Power Supply with Serial Cable serial port can be connected to a PC COM port and the AtomGui setup to use the PC COM port. Currently the serial port camera setting is not available to the user and will need to be sent back unless the camera was purchased with this configuration. Note for GigE models: The AtomGui cannot control the camera at the same time video is acquired. If the user needs to control the camera while acquiring images, the GEV Player software can be setup as a Data Receiver with Multicast streaming enabled. A description of the workaround is in Section 7.4. 9.2 AtomGui application overview The AtomGui sample application provides a user interface to control the camera. The GUI handles proper command formation and communication with point and click simplicity. Section 10 outlines each of the GUI screens while also displaying the read command byte mapping for each control. 9.3 Serial Command Interface overview The Serial Command Interface utilizes the serial TXD and RXD signals within the video interface to exchange status and configuration information. Allowing lower level functionality, the user can formulate commands and interface with ATOM 1024 control registers directly. The user is then able to control FPGA operations for help in design debugging and production testing. And, to read and write FPGA registers (e.g. current operating/configuration settings) and SDRAM memory (e.g. test patterns, diagnostic frame captures), useful for debugging and manufacturing purposes. Serial command exchanges are initiated by the external controller, with responses and acknowledgements generated by the ATOM 1024. The ATOM 1024 will not generate any asynchronous serial messages that are not a direct response to an external command or query. The serial interface settings are 57600 baud, 8 bit data, 1 stop bit, no parity, and no flow control. The ATOM 1024 receives data on the TXD signal and transmits data on the RXD signal. The TXD and RXD serial signals are 3.3V LVTTL level signals and the TXD signal needs to be set high when the serial interface is idle. Page 53 10 Using the ATOM Config 10.1 Connecting & Safe Shutdown The GUI requires only two files to operate: AtomConfig.exe and AtomSerialCmdLib.dll (both in the same directory). 10.1.1 Connect to ATOM Config 1. Launch AtomGui from your computer by clicking the AtomGui.exe application file. 2. Select the method of connection via the Interface pull-down menu. Note: Depending on the number of Camera Link frame grabbers installed in the PC or if the frame grabber supports dual Base configuration, the Serial Port selection may be CAMERALINK0 or CAMERALINK1. There may be multiple cameras connected on a network that are discovered. 3. Click Connect to open camera connection. 4. Click Disconnect to close camera connection. 10.1.2 Safe Shutdown Before unplugging your camera, be sure to click the Safe Shutdown button. The Safe Shutdown button will disable the detector and close the shutter before you power down the camera. Both actions help preserve camera and detector life. Page 54 10.2 Info Tab The Info Tab displays hardware & firmware identification numbers, camera status, and the detector temperature (VTEMP). Refresh the Status, Fault Indicators, and VTEMP values by pressing the Refresh button. Initiate a self-test operation by pressing the “Self Test” button. This operation can take several minutes during which the “Image ready” box will not be checked when you refresh the status information. When the test is complete, “Image ready” will return to the checked state, and any error conditions detected during the test will be reported among the “Fault indicators.“ Page 55 10.3 Video Tab The Video Tab is used to set the detector window format. The Video Tab can also configure the output video display resolution, output video zoom, output video data resolution, and enable video image correction. The Video Tab can also select from a live image and several test patterns. 10.3.1 Detector Disable Selecting this checkbox will disable the detector. This is a function that is applied when using the safe shutdown button in order to preserve the detector. 10.3.2 External Sync & Edge Detection The External Sync Tab is used to control the camera from an external timing source. The primary purpose is to allow the User to control and synchronize the Frame Rate to an external clock and secondarily to align the start of frame integration activity with external events. Full camera performance is achieved at rates approximately equal to the 30Hz frame rate used to calibrate the camera at manufacture time. Use of the External Sync feature is flexible and can be used to slow the camera down to very low frame rates (e.g. sub 1Hz), with associated compromises in spatial noise performance and speed of 1NUC operations. The balance of this section describes the signal connectivity, control and timing issues to use the External Sync feature. The External Sync signal is driven from different access points depending on the I/O configuration. The signal is input is as follows: In Camera Link camera models, the signal is accessed from the CC1 control line and Pair8 signals on Camera Link interface). Pair8 signals are connected as follows: o Camera end Pin 22 (PAIR8+) and Pin 9 (PAIR8-) Page 56 o Frame grabber Pin 5 (PAIR8+) and Pin 18 (PAIR8-) In LVTTL camera models the signal is accessed from J1 pin 13. The External Sync signal exists in Gigabit Ethernet camera models and can be accessed via the Pleora SDK as the same CC1 control line described in the Camera Link configurations. However, software control of this signal is impractical for precision timing in most host controlled situations and as a result this configuration is not formally supported. Some useful results may be obtained with specialized host hardware and/or operation at low frame rates, and the determination of successful operation is left to the user. Figure 2a: External Sync Edge Triggering Timing Diagram with Zoom disabled Table 7: External Sync Timing Parameters Symbol Parameter Min Max units X Time between frames 33.332 34.130 (Note 1) ms Frame Rate 1/X 29 (Note 1) 30.01 HZ A Active Sync edge to Detector Frame Start 520 600 ns B Active Reset pulse edge to start of Output Video Frame Valid 127.75 408.9 µs C Reset pulse to End of Output Video Frame Valid -163.55 385.4 µs D End of last line Integration to Reset pulse 183 238.60 µs Note 1: The camera will perform as calibrated within the specified Min to Max frame rate range. Operation higher than this range cannot occur; the rate is capped at the maximum 30.01Hz. Lower operation is possible with caveats of increased spatial noise. Page 57 The NUC that limits spatial noise depends on the thermal conditions around the pixels. These conditions include not only camera ambient temperature, but also effects such as the self heating generated by bias current applied during the integration time as well as the cooling that takes place in the interval between integration cycles. While NUC operations compensate for ambient temperature changes, this self heating and cooling is directly influenced by variations in frame rate and is not automatically compensated for in NUC adjustments. As a result, the External Sync control operated at rates below the specification will produce an image, but with increasing gain and offset errors. Offset error can be compensated by 1NUC operations when performed specifically at the Frame Rate driven by the External Sync signal. Failure to 1NUC at the current Frame Rate will result in poor imaging when operated outside the limits. During a 1NUC operation, the camera accumulates video frames for each pixel’s offset computation. When performed at reduced Frame Rate, this operation takes proportionally longer to complete and may look like a nonresponsive system at really low (e.g. < 0.5HZ) external clock rates. In applications that require minimal system delay, note that enabling the Digital Zoom function adds one Frame delay between Detector and output Video. 10.3.3 Select Image Zoom From the Video tab, click the bullet next to desired Zoom (1X, 2X, 3X, or 4X). The default value is 1X Zoom. 10.3.4 Zoom Window The Zoom Window is, by default, turned off. To begin using the Zoom Window, you must align all the edges of the Zoom Window frame to all four corners of the live image (as displayed by the four arrows). Aligning the corners will ensure the accuracy of your crop box. All four corners aligned First, click Move and drag the Zoom frame to align the top left corner of the box. Click Resize, then click and drag the frame box to align the bottom right corner with the live image. Once your box is set, click Crop to select the area you would like to zoom to. To adjust the crop area, simply click Crop again and re-select the area. Once you are satisfied, click Activate to initiate the zoom. If you would like to cancel what you have done with the Zoom Window open, click Cancel. Page 58 Once your zoom area has been set, you may use the up and down arrows next to the text boxes to change the values in order to modify your zoom area. The X and Y values signify the origin of the zoom area, and the W and H signify the width and height of the zoom area, respectively. You may also toggle the zoom window on and off using the “Enabled” check box. 10.3.5 Lens Selection (only for customers purchasing multiple lenses) This field is only present if your configuration file defines manual lens choices. If you have purchased more than one lens to connect to your ATOM 1024 camera, you would select which lens you are operating with from the dropdown menu. In the example displayed to the right, a customer has purchased three different lenses; a 13mm, 25mm, and 50mm. When switching lenses, simply select the appropriate lens from the drop-down menu and the appropriate NUC table will be applied. 10.3.6 Setting Output Video Dynamic Range (8-bit or 14-bit) From the Video tab, click the bullet next to 8 bits per pixel or 14 bits per pixel. The camera will default to be 8 bits per pixel. Note: When operating in 8-bit mode, the output bits will occupy the most significant bit positions of the parallel output channel, with the unused bit positions set to zero values. 10.3.7 Setting Frame Rate From the Video tab, click the bullet next to Normal or 1/3 Frame Rate. The Normal Frame Rate is 30hz. Note: Cameras are normally shipped as 30hz default. Special orders can modify factory defaults. The 10hz option can be used in any interface; however the setting is intended to allow multiple cameras on a single GigE network segment. 10.3.8 Setting Output Correction (Corrected or Uncorrected) From the Video tab, click the bullet next to Corrected or Uncorrected to enable or disable 1NUC and 2NUC processing. The camera’s default displays the Corrected image. Note: When operating in 14-bit mode, the output image data will be selectable between uncorrected raw full amplitude resolution, and non-uniformity corrected. In 14 bit mode, palette, gain level adjustments, and zoom are not applied to the output image. In 8-bit mode, the output image data is always gain and level compensated. Page 59 10.3.9 Video Source & Test Pattern Selection From the Video tab, click the bullet next to Test Pattern to change your video source from the Detector to the Test Pattern. There are six Test Patterns you may choose from: All White, All Black, Col Ramp (Black -> White), Col Ramp (White -> Black), Row Ramp (Black -> White), and Row Ramp (White -> Black). Note: The test patterns are labeled as they appear for a White Hot scene. If you have selected Black Hot from the Image tab, each test pattern will be reversed. Col Ramp (Black -> White) Col Ramp (White -> Black) Row Ramp (Black -> White) Row Ramp (White -> Black) Page 60 10.4 Image Tab The Image Tab can set the palette, auto or manual gain and level, and AGC cutoff thresholds. Palette – The Polarity settings configures the video as White-Hot or Black-Hot. The camera defaults to White-Hot. Gain Mode – The gain mode defaults to Automatic Gain. Manual Gain – The Gain setting allows manual gain span control of the digital outputs, similar to image contrast with visible cameras. Level Mode – The level mode defaults to Automatic Level. Manual Level – The Level setting allows manual gain level control of the digital outputs, similar to image brightness with visible cameras. AGC Cold Cutoff – The AGC Cold Cutoff specifies the percentage of the coldest pixels to be excluded from the AGC calculation. AGC Hot Cutoff – The AGC Hot Cutoff specifies the percentage of the hottest pixels to be excluded from the AGC calculation. 10.4.1 Select Palette (White-Hot, Black-Hot) From the Image tab, select White-Hot or Black-Hot from the Palette pull-down menu. Page 61 10.4.2 Setting Manual Gain and Level settings 1. From the Image tab, click the bullet next to Manual for Gain Mode and Level Mode. 2. Edit the value for Manual Gain and Manual Level in the up/down counter box or click and drag the slider. 10.4.3 Setting AGC cutoffs From the Image tab, edit the value for Cold & Hot AGC Cutoffs in the up/down boxes or click and drag the sliders. 10.4.4 AGC (Automatic Gain Control) Window The AGC Window is, by default, turned off. To begin using the AGC Window, you must align all the edges of the AGC Window frame to all four corners of the live image (as displayed by the four arrows). Aligning the corners will ensure the accuracy of your crop box. All four corners aligned First, click Move and drag the AGC frame to align the top left corner of the box. Click Resize, then click and drag the frame box to align the bottom right corner with the live image. Once your box is set, click Crop to select the area you would like AGC to be applied to. To adjust the crop area, simply click Crop again and re-select the area. Once you are satisfied, click Activate to initiate the AGC. If you would like to cancel what you have done with the AGC Window open, click Cancel. Once your AGC area has been set, you may use the up and down arrows next to the text boxes to change the values in order to modify your AGC area. The X and Y values signify the origin of the AGC area, and the W and H signify the width and height of the AGC area, respectively. You may also toggle the AGC Window on and off using the “AOI Enabled” check box. Bound Box: If selected, this will draw a box around your AGC Area of Interest Invert Box: If selected, this will invert polarity of the pixels inside the Bound Box. Page 62 10.5 NUC Tab The NUC Tab is used to initiate a Touchup (1 pt. NUC), and to enable or disable image processing including video noise reduction. The NUC tab also allows selection of the Auto 1NUC Threshold percentage which if the ambient temperature of the current plateau has changed by more than this percentage, a Touchup is automatically performed. By default, the shutter mode is set to Automatic. By default, the Median Filter and Freeze Video During Touchup will be on. 10.5.1 Initiating a Touchup (against the shutter) 1. From the NUC tab, click the “Touchup Now” button. 2. Observe an audible sound of the shutter being closed and opened. Page 63 10.5.2 Initiating a Touchup (through Lens) 1. From the NUC tab, change the Shutter Mode from Automatic to Manual by clicking the bullet next to Manual for Shutter Mode. 2. Place a uniform temperature object in front of the lens. 3. Click the “Touchup Now” button. 4. Remove the uniform object and verify the image. 10.6 Lens Tab (only for CZ lens cameras) The Lens Tab is used for zoom and focus control with Motorized Continuous Zoom Lens. The Zoom and Focus may be adjusted different ways: Clicking the Wide, Mid, or Narrow (or Far & Close) buttons Using the up/down Coarse and Fine buttons Clicking along the zoom or focus bar Clicking and dragging the cursor across the bar Manually entering in a value in the text box Note 1: The changes to the Focus and Zoom will be immediately reflected. “Set All” is not necessary to make changes. Note 2: The NUC tables that are appropriate for selected ZOOM position are automatically selected and loaded when zoom level is changed. Note 3: The camera will maintain proper Focus position for selected Zoom level until Focus position is manually changed by the user. Page 64 10.7 Default Values This table shows the power-on defaults for all user controllable settings. The Atom camera will return to these configuration settings every time it is powered on. Tab Video Image NUC Field Name Field Default Detector Disable Detector enabled (unchecked) Enable External Trigger Disabled (unchecked) Zoom 1X Output Bits 8 bits per pixel Frame Rate Normal Output NUC and BP Correction Corrected Video Source Detector Test Pattern Selection All White Edge Detection Falling Edge Palette White Hot * Gain Mode Automatic Level Mode Automatic AGC Cutoff – Cold 5 AGC Cutoff – Hot 1 Enable 1NUC Enabled Enable 2NUC Enabled Enable BP Replace Enabled Enable Auto 1NUC on Plateau Enabled Enable Auto 1NUC on Threshold Enabled Shutter mode Automatic Shutter position Open Median Filter Enabled * Freeze Video During Touchup Enabled Auto 1NUC Threshold 10% * Factory configured: some cameras may have different default setting Page 65 11 Physical Dimensions Drawings This section contains the physical dimension drawings for each permutation of the ATOM 1024 camera. 11.1 11.1.1 Standard lens Dimensions Universal Lens Mount Inteface Page 66 11.1.2 13mm (f1.1) Manual Focus Lens Dimensions Page 67 11.1.3 25mm (f1.2) Athermal Fixed Focus Lens Dimensions Page 68 11.1.4 50mm (f1.2) Athermal Fixed Focus Lens Dimensions Page 69 11.1.5 50mm (f1.0) Manual Focus Lens Dimensions Page 70 11.2 ATOM 1024-20 C Model Physical Dimensions Note: Drawing displays the model without a lens mounted. Page 71 11.3 ATOM 1024 G Model Interface Physical Dimensions Note: Drawing displays the model without a lens mounted. Page 72 11.4 ATOM 1024 L Model Interface Physical Dimensions Note: Drawing displays the model without a lens mounted. Page 73 11.5 ATOM 1024 G (CZ 25-225mm) Model Interface Physical Dimensions Page 74 11.6 ATOM 1024 G (CZ 25-150mm) Model Interface Physical Dimensions Page 75 11.7 ATOM 1024 G (CZ 15-100mm) Model Interface Physical Dimensions Page 76 12 Specifications Infrared Engine Model ATOM 1024 FPA Uncooled ASi Microbolometer Size 1024 x 768 Pixel Pitch 17 µm Frame Rate (full frame) 30 Hz Thermal Time Constant < 10 ms Digital Output LVTTL (L model), Gigabit Ethernet (G model), Camera Link (C model) Size: (W x H x D) 61 x 69 x 66mm (w/o lens, Camera Link option) (2.4” x 2.7” x 2.6”) Weight (w/o lens, LVTTL option) < 250g Weight (w/o lens, Camera Link option) <390g Weight (w/o lens, Gigabit Ethernet option) <500g Input Voltage 6 – 12 VDC Power Consumption < 1.7W LVTTL; < 2.2W Camera Link < 3.6W Gigabit Ethernet Detector Thermal Sensitivity 1 < 50 mK Time to First Image < 4 sec Video Processing Non-uniform Correction Operational Temperature -40°C to 60°C Non-operation Temperature -45°C to 70°C 1 Normalized to unity transmission and f1.0 lens Page 77 13 Maintenance 13.1 Cleaning 13.1.1 Non-Optical Surfaces The non-optical surfaces of the ATOM 1024 Camera can be cleaned with water, mild detergents, and a soft cloth. 13.1.2 Optical Surfaces The optical surfaces of the lens should only be cleaned when visibly dirty. Care should be taken to avoid touching the exposed lens faces. Skin acid left behind with fingerprints can be damaging to coatings and lens substrates. First use a jet of dry air or blow across the surface to remove any sand or abrasive particles before cleaning. If oil, water spots, or fingerprints form on the optical surfaces, clean as soon as possible using a soft cotton cloth and mild neutral soap diluted with lukewarm distilled water (1 part soap to 100 parts water), followed by reagent-grade isopropyl alcohol or acetone swab. Dust can be removed gently using an alcohol or acetone swab. Note: Avoid swabs that incorporate plastic stems, as some plastics will dissolve in alcohol or acetone. 13.2 Replacing Components There are no user serviceable parts inside the camera. For service, please contact Sofradir-EC. 14 Warranty 1) Seller warrants that at the time of delivery to the carrier, the Products are free from defects in material and workmanship. Any warranty described herein shall extend to the first ultimate user only for a period of one year from the date of shipment from Seller's factory except as otherwise stated in our written quotation. 2) Seller's obligation under this warranty shall be limited to furnishing a replacement for, or at Seller's option, repairing any part that, to the Seller's satisfaction, proves defective, provided such part is returned to the Seller's service facilities in New Jersey, all transportation charges paid (including freight, insurance, customs, duties, taxes, etc.). No part may be returned without Seller's prior return authorization approval. 3) Seller shall not be responsible for installation costs. In no event will any claim for labor in removing or replacing defective parts or for incidental or consequential damages be allowed. Page 78 4) No warranty is made as to Products which have not been installed, operated or maintained in accordance with Seller's instructions or the instructions contained in its operations or maintenance manuals when furnished by Seller, or which have been subject to misuse, abuse, accident or alteration or to improper or negligent use, maintenance, storage, transportation or handling. 5) Products not manufactured by Seller which are sold by Seller are covered exclusively by the original manufacturer's warranty and Seller may, at its option, assign to Buyer its warranty claims against the original manufacturer of defective Products in full settlement of Buyer's possible claims against Seller with regard to such Products. 6) Where Buyer is a distributor, financing company or similar entity acting for or on behalf of the initial user of the equipment, the warranty is transferable to the initial user only. In all other cases, the warranty is limited to the Buyer and is not transferable unless agreed to in writing by the Seller. 7) Caveat Emptor: The Warranty contained herein is exclusive and expressly in lieu of all other warranties, written, oral, implied or statutory, including but not limited to express or implied warranties of merchantability or of fitness. In addition, Seller shall not be liable for any loss, damage or injury of any nature, whether direct, indirect or consequential, in connection with or resulting from use of the Products. 15 Repairs 15.1 Returning Products for Warranty Repair Return the product to your Authorized Dealer. Dealer will notify the service department by telephone before returning any product. OR Contact the manufacturer directly through the phone number and address provided on the contact sheet at the end of this booklet. A Return Authorization (RA) number will be assigned by the service department. This number must be marked clearly on the outside of the package being returned. Service department will provide a shipping address. The following information must be included on the packing slip: Model and serial number of camera Your shipping address Your billing address (if different) Your fax, telephone numbers and/or email address Description of the problem Name of the point of contact Return authorization number Page 79 Repaired equipment will be returned prepaid (surface freight only). If goods are being returned from outside the United States, the shipper is responsible for all customs and brokerage charges. 15.2 Returning Products for “Out of Warranty” Repair Following expiration of the warranty period, the owner is financially obligated to pay for any repairs that are required. The owner may either return their camera to their dealer, or, they may work with the manufacturer directly. If you choose to deal directly with the manufacturer, you may contact us through the phone number and address provided in the Contact Information section at the end of this booklet. You are required to provide the following information: Model and serial number of camera Your shipping address Your billing address (if different) Your fax, telephone numbers and/or email address Description of the problem Name of the point of contact Return authorization number You will be asked for payment of an evaluation fee prior to us starting work. Following evaluation, when the extent of the repairs is known, the manufacturer will contact you and estimate the total cost of the repair. If you choose not to have the repair completed, you will still be liable for the evaluation fee. If you choose to authorize the repair, the camera will be repaired and returned following receipt of payment. 16 Contact Information Sofradir-EC Incorporated 373 Route 46 West Fairfield, NJ 07004 USA Telephone: (973) 882-0211 Fax: (973) 882-0997 E-mail: [email protected] Page 80