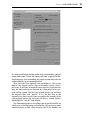
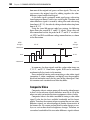
1
T H E AV I D
HANDBOOK
Advanced Techniques,
Strategies, and Survival
Information for Avid
Editing Systems
5th Edition
GREG STATEN
STEVE BAYES
AMSTERDAM • BOSTON • HEIDELBERG • LONDON • NEW YORK • OXFORD
PARIS • SAN DIEGO • SAN FRANCISCO • SINGAPORE • SYDNEY • TOKYO
Focal Press is an imprint of Elsevier
Focal Press is an imprint of Elsevier
30 Corporate Drive, Suite 400, Burlington, MA 01803, USA
Linacre House, Jordan Hill, Oxford OX2 8DP, UK
Copyright © 2009 by Elsevier Inc. All rights reserved.
No part of this publication may be reproduced, stored in a retrieval system, or
transmitted in any form or by any means, electronic, mechanical, photocopying,
recording, or otherwise, without the prior written permission of the publisher.
Permissions may be sought directly from Elsevier’s Science & Technology Rights
Department in Oxford, UK: phone: (44) 1865 843830, fax: (44) 1865 853333,
E-mail: [email protected]. You may also complete your request on-line
via the Elsevier homepage (http://elsevier.com), by selecting “Support &
Contact” then “Copyright and Permission” and then “Obtaining Permissions.”
Recognizing the importance of preserving what has been written, Elsevier prints
its books on acid-free paper whenever possible.
Library of Congress Cataloging-in-Publication Data
Staten, Greg.
The Avid handbook : advanced techniques, strategies, and survival information
for Avid editing systems / Greg Staten and Steve Bayes.—5th ed.
p. cm.
Previous ed. cataloged under author Steve Bayes.
Includes index.
ISBN 978-0-240-81081-2 (pbk. : alk. paper)
1. Video tapes—Editing—Data processing. 2. Motion pictures—Editing—Data
processing. 3. Avid Xpress. 4. Media composer. I. Bayes, Steve, 1959- II. Bayes,
Steve, 1959- Avid handbook. III. Title.
TR899.B37 2009
778.59’3—dc22
2008026273
British Library Cataloguing-in-Publication Data
A catalogue record for this book is available from the British Library.
ISBN: 978-0-240-81081-2
For information on all Focal Press publications
visit our website at www.elsevierdirect.com
09 10 11 12
5 4 3 2 1
Printed in the United States of America
For Kathleen
This page intentionally left blank
CONTENTS
v
CONTENTS
Dedication . . . . . . . . . . . . . . . . . . . . . . . . . . . . . . . . . . . . . . . . . . . . . . . . . . . . . . . . . iii
Preface . . . . . . . . . . . . . . . . . . . . . . . . . . . . . . . . . . . . . . . . . . . . . . . . . . . . . . . . . . . . xi
Chapter 1 Assembling the Timeline . . . . . . . . . . . . . . . . . . . . . . . . . . . . . . . . . . . . . . . . 1
Building the Story Framework . . . . . . . . . . . . . . . . . . . . . . . . . . . . . . . . . . . 1
Source-to-Record Editing . . . . . . . . . . . . . . . . . . . . . . . . . . . . . . . . . . . . . . . 1
Editing from the Bin . . . . . . . . . . . . . . . . . . . . . . . . . . . . . . . . . . . . . . . . . . . 16
Cutting Down Your Sequence . . . . . . . . . . . . . . . . . . . . . . . . . . . . . . . . . . . 23
Navigating the Timeline . . . . . . . . . . . . . . . . . . . . . . . . . . . . . . . . . . . . . . . . 26
Chapter 2 Zen and the Art of Trim . . . . . . . . . . . . . . . . . . . . . . . . . . . . . . . . . . . . . . . . . . . 29
Thinking Nonlinearly . . . . . . . . . . . . . . . . . . . . . . . . . . . . . . . . . . . . . . . . . . 30
Trimming Fundamentals . . . . . . . . . . . . . . . . . . . . . . . . . . . . . . . . . . . . . . . 32
Methods of Trimming . . . . . . . . . . . . . . . . . . . . . . . . . . . . . . . . . . . . . . . . . 36
Types of Trim . . . . . . . . . . . . . . . . . . . . . . . . . . . . . . . . . . . . . . . . . . . . . . . . 44
Trimming in Filler . . . . . . . . . . . . . . . . . . . . . . . . . . . . . . . . . . . . . . . . . . . . . 49
Trimming Outside of Trim . . . . . . . . . . . . . . . . . . . . . . . . . . . . . . . . . . . . . . 50
Conclusion . . . . . . . . . . . . . . . . . . . . . . . . . . . . . . . . . . . . . . . . . . . . . . . . . . 51
Chapter 3 Intermediate Techniques . . . . . . . . . . . . . . . . . . . . . . . . . . . . . . . . . . . . . . . . 53
Multiple Methods to Solve One Problem . . . . . . . . . . . . . . . . . . . . . . . . . 54
Using the Keyboard . . . . . . . . . . . . . . . . . . . . . . . . . . . . . . . . . . . . . . . . . . . 54
Navigating Nonlinearly . . . . . . . . . . . . . . . . . . . . . . . . . . . . . . . . . . . . . . . . 57
Audio Monitoring . . . . . . . . . . . . . . . . . . . . . . . . . . . . . . . . . . . . . . . . . . . . . 60
Organizing Your Material . . . . . . . . . . . . . . . . . . . . . . . . . . . . . . . . . . . . . . . 61
Customizing Your Interface Environment. . . . . . . . . . . . . . . . . . . . . . . . . . 65
Backing Up . . . . . . . . . . . . . . . . . . . . . . . . . . . . . . . . . . . . . . . . . . . . . . . . . . 68
Nontimecoded Material . . . . . . . . . . . . . . . . . . . . . . . . . . . . . . . . . . . . . . . . 70
Conclusion . . . . . . . . . . . . . . . . . . . . . . . . . . . . . . . . . . . . . . . . . . . . . . . . . . 70
Chapter 4 Avid Administration . . . . . . . . . . . . . . . . . . . . . . . . . . . . . . . . . . . . . . . . . . . . . 71
Room Design . . . . . . . . . . . . . . . . . . . . . . . . . . . . . . . . . . . . . . . . . . . . . . . . 71
vi
CONTENTS
Electrical Power . . . . . . . . . . . . . . . . . . . . . . . . . . . . . . . . . . . . . . . . . . . . . . 73
Ergonomics . . . . . . . . . . . . . . . . . . . . . . . . . . . . . . . . . . . . . . . . . . . . . . . . . . 75
Media Storage and Management . . . . . . . . . . . . . . . . . . . . . . . . . . . . . . . . 75
The Importance of Empty Space . . . . . . . . . . . . . . . . . . . . . . . . . . . . . . . . 81
Consolidate . . . . . . . . . . . . . . . . . . . . . . . . . . . . . . . . . . . . . . . . . . . . . . . . . . 82
Using the Operating System for Copying . . . . . . . . . . . . . . . . . . . . . . . . . 87
Deciding What to Delete . . . . . . . . . . . . . . . . . . . . . . . . . . . . . . . . . . . . . . . 88
Using Creation Date . . . . . . . . . . . . . . . . . . . . . . . . . . . . . . . . . . . . . . . . . . . 88
Using Custom Columns . . . . . . . . . . . . . . . . . . . . . . . . . . . . . . . . . . . . . . . 89
Basic Media Deletion Using Media Relatives . . . . . . . . . . . . . . . . . . . . . . 89
Lock Items in Bin . . . . . . . . . . . . . . . . . . . . . . . . . . . . . . . . . . . . . . . . . . . . . 91
Changing the Media’s Project Association. . . . . . . . . . . . . . . . . . . . . . . . . 92
Relinking . . . . . . . . . . . . . . . . . . . . . . . . . . . . . . . . . . . . . . . . . . . . . . . . . . . . 94
Backing Up and Archiving . . . . . . . . . . . . . . . . . . . . . . . . . . . . . . . . . . . . . . 98
Use Common Sense . . . . . . . . . . . . . . . . . . . . . . . . . . . . . . . . . . . . . . . . . 100
Chapter 5 Standard-Definition Video Fundamentals . . . . . . . . . . . . . . . . . . . . . . . .101
Signal Fundamentals . . . . . . . . . . . . . . . . . . . . . . . . . . . . . . . . . . . . . . . . . 102
Composite Video . . . . . . . . . . . . . . . . . . . . . . . . . . . . . . . . . . . . . . . . . . . . 108
Component Video. . . . . . . . . . . . . . . . . . . . . . . . . . . . . . . . . . . . . . . . . . . . 114
Video Frame Structure . . . . . . . . . . . . . . . . . . . . . . . . . . . . . . . . . . . . . . . . 117
Introduction to Digital Video . . . . . . . . . . . . . . . . . . . . . . . . . . . . . . . . . . . 121
Digital Component Video. . . . . . . . . . . . . . . . . . . . . . . . . . . . . . . . . . . . . . 121
Chapter 6 The Wild World of High Definition. . . . . . . . . . . . . . . . . . . . . . . . . . . . . . .131
A Brief History of High Definition . . . . . . . . . . . . . . . . . . . . . . . . . . . . . . . 131
1080-Line High Definition . . . . . . . . . . . . . . . . . . . . . . . . . . . . . . . . . . . . . 133
720-Line High Definition . . . . . . . . . . . . . . . . . . . . . . . . . . . . . . . . . . . . . . 140
Working with High Definition in Avid . . . . . . . . . . . . . . . . . . . . . . . . . . . . 142
Chapter 7 Importing and Exporting . . . . . . . . . . . . . . . . . . . . . . . . . . . . . . . . . . . . . . . .145
Import and Export Basics . . . . . . . . . . . . . . . . . . . . . . . . . . . . . . . . . . . . . 146
Fields and Still Graphics . . . . . . . . . . . . . . . . . . . . . . . . . . . . . . . . . . . . . . 152
Configuring the Import Setting . . . . . . . . . . . . . . . . . . . . . . . . . . . . . . . . . 157
CONTENTS
vii
Exporting. . . . . . . . . . . . . . . . . . . . . . . . . . . . . . . . . . . . . . . . . . . . . . . . . . . 161
Importing and Exporting Motion Video . . . . . . . . . . . . . . . . . . . . . . . . . . 166
Using OMFI for ProTools . . . . . . . . . . . . . . . . . . . . . . . . . . . . . . . . . . . . . . 168
Adobe After Effects . . . . . . . . . . . . . . . . . . . . . . . . . . . . . . . . . . . . . . . . . . 170
Conclusion . . . . . . . . . . . . . . . . . . . . . . . . . . . . . . . . . . . . . . . . . . . . . . . . . 171
Chapter 8 Introduction to Effects . . . . . . . . . . . . . . . . . . . . . . . . . . . . . . . . . . . . . . . . . .173
ACPL-Based Effects. . . . . . . . . . . . . . . . . . . . . . . . . . . . . . . . . . . . . . . . . . . 174
Types of Effects . . . . . . . . . . . . . . . . . . . . . . . . . . . . . . . . . . . . . . . . . . . . . 174
Effect Design . . . . . . . . . . . . . . . . . . . . . . . . . . . . . . . . . . . . . . . . . . . . . . . . 176
Rendering . . . . . . . . . . . . . . . . . . . . . . . . . . . . . . . . . . . . . . . . . . . . . . . . . . 176
Keyframes . . . . . . . . . . . . . . . . . . . . . . . . . . . . . . . . . . . . . . . . . . . . . . . . . . 179
Advanced Keyframe Model . . . . . . . . . . . . . . . . . . . . . . . . . . . . . . . . . . . . 179
Timewarps . . . . . . . . . . . . . . . . . . . . . . . . . . . . . . . . . . . . . . . . . . . . . . . . . 191
Timewarp Freeze Frames . . . . . . . . . . . . . . . . . . . . . . . . . . . . . . . . . . . . . 196
Saving Effect Templates . . . . . . . . . . . . . . . . . . . . . . . . . . . . . . . . . . . . . . 198
Add Edits . . . . . . . . . . . . . . . . . . . . . . . . . . . . . . . . . . . . . . . . . . . . . . . . . . . 198
Nesting . . . . . . . . . . . . . . . . . . . . . . . . . . . . . . . . . . . . . . . . . . . . . . . . . . . . 199
Chroma Keying . . . . . . . . . . . . . . . . . . . . . . . . . . . . . . . . . . . . . . . . . . . . . . 203
3D Effects . . . . . . . . . . . . . . . . . . . . . . . . . . . . . . . . . . . . . . . . . . . . . . . . . . 212
Paint and AniMatte® . . . . . . . . . . . . . . . . . . . . . . . . . . . . . . . . . . . . . . . . . . 213
AVX . . . . . . . . . . . . . . . . . . . . . . . . . . . . . . . . . . . . . . . . . . . . . . . . . . . . . . . 213
Titles . . . . . . . . . . . . . . . . . . . . . . . . . . . . . . . . . . . . . . . . . . . . . . . . . . . . . . 214
Conclusion . . . . . . . . . . . . . . . . . . . . . . . . . . . . . . . . . . . . . . . . . . . . . . . . . 216
Chapter 9 Conforming and Finishing . . . . . . . . . . . . . . . . . . . . . . . . . . . . . . . . . . . . . . .217
Choosing the Finishing Resolution: Standard Definition . . . . . . . . . . . . 217
Choosing the Finishing Resolution: High Definition . . . . . . . . . . . . . . . . 218
Delivery Requirements to Online . . . . . . . . . . . . . . . . . . . . . . . . . . . . . . . 219
The Online Project . . . . . . . . . . . . . . . . . . . . . . . . . . . . . . . . . . . . . . . . . . . 224
Necessary Equipment for Online Suites . . . . . . . . . . . . . . . . . . . . . . . . . 230
Onlining and Offlining on the Same Machine . . . . . . . . . . . . . . . . . . . . . 231
Preparing to Recapture . . . . . . . . . . . . . . . . . . . . . . . . . . . . . . . . . . . . . . . 236
viii
CONTENTS
Batch Capturing . . . . . . . . . . . . . . . . . . . . . . . . . . . . . . . . . . . . . . . . . . . . . 244
Integrating the Audio Mix . . . . . . . . . . . . . . . . . . . . . . . . . . . . . . . . . . . . . 248
Linking to Other Sequences . . . . . . . . . . . . . . . . . . . . . . . . . . . . . . . . . . . 249
Conforming to High Definition . . . . . . . . . . . . . . . . . . . . . . . . . . . . . . . . . 250
Conforming Mixed-Format Sequences . . . . . . . . . . . . . . . . . . . . . . . . . . 259
Chapter 10 Color Correction . . . . . . . . . . . . . . . . . . . . . . . . . . . . . . . . . . . . . . . . . . . . . . 261
Before You Correct . . . . . . . . . . . . . . . . . . . . . . . . . . . . . . . . . . . . . . . . . . . 261
The Color-Correction Interface . . . . . . . . . . . . . . . . . . . . . . . . . . . . . . . . . 264
Color-Correction Workflow . . . . . . . . . . . . . . . . . . . . . . . . . . . . . . . . . . . . 270
Color Correcting with Curves . . . . . . . . . . . . . . . . . . . . . . . . . . . . . . . . . . 276
Playing within Color Correction . . . . . . . . . . . . . . . . . . . . . . . . . . . . . . . . 280
Color Correcting with Avid Symphony. . . . . . . . . . . . . . . . . . . . . . . . . . . 281
Conclusion . . . . . . . . . . . . . . . . . . . . . . . . . . . . . . . . . . . . . . . . . . . . . . . . . 286
Chapter 11 Troubleshooting . . . . . . . . . . . . . . . . . . . . . . . . . . . . . . . . . . . . . . . . . . . . . . .287
Basic Troubleshooting Philosophy . . . . . . . . . . . . . . . . . . . . . . . . . . . . . . 287
RTFM . . . . . . . . . . . . . . . . . . . . . . . . . . . . . . . . . . . . . . . . . . . . . . . . . . . . . . 288
Techniques for Isolating Hardware from Software . . . . . . . . . . . . . . . . . 289
Software Problems . . . . . . . . . . . . . . . . . . . . . . . . . . . . . . . . . . . . . . . . . . . 290
Audio Problems . . . . . . . . . . . . . . . . . . . . . . . . . . . . . . . . . . . . . . . . . . . . . 292
The Importance of Connections . . . . . . . . . . . . . . . . . . . . . . . . . . . . . . . . 294
Standard Computer Woes . . . . . . . . . . . . . . . . . . . . . . . . . . . . . . . . . . . . . 302
Media Management . . . . . . . . . . . . . . . . . . . . . . . . . . . . . . . . . . . . . . . . . . 303
Version Numbers . . . . . . . . . . . . . . . . . . . . . . . . . . . . . . . . . . . . . . . . . . . . 306
Electrostatic Discharge . . . . . . . . . . . . . . . . . . . . . . . . . . . . . . . . . . . . . . . 308
Calling Avid Customer Support . . . . . . . . . . . . . . . . . . . . . . . . . . . . . . . . 308
Chapter 12 Nonlinear Video Assistants . . . . . . . . . . . . . . . . . . . . . . . . . . . . . 311
Capturing . . . . . . . . . . . . . . . . . . . . . . . . . . . . . . . . . . . . . . . . . . . . . . . . . . 312
Drives . . . . . . . . . . . . . . . . . . . . . . . . . . . . . . . . . . . . . . . . . . . . . . . . . . . . . 313
Media Management . . . . . . . . . . . . . . . . . . . . . . . . . . . . . . . . . . . . . . . . . . 314
Basic Maintenance . . . . . . . . . . . . . . . . . . . . . . . . . . . . . . . . . . . . . . . . . . . 315
CONTENTS
Backing Up . . . . . . . . . . . . . . . . . . . . . . . . . . . . . . 315
Output . . . . . . . . . . . . . . . . . . . . . . . . . . . . . . . . . . 315
Recapturing. . . . . . . . . . . . . . . . . . . . . . . . . . . . . . 316
Blacking Tape. . . . . . . . . . . . . . . . . . . . . . . . . . . . . 317
Appendix Preparing for Linear Online . . . . . . . . . . . . . .321
Preparing Sound . . . . . . . . . . . . . . . . . . . . . . . . . 324
Using the Offline Cut in Online . . . . . . . . . . . . . . 324
Dubbing with Timecode . . . . . . . . . . . . . . . . . . . . 325
Tape Names in EDLs . . . . . . . . . . . . . . . . . . . . . . 327
EDL Manager . . . . . . . . . . . . . . . . . . . . . . . . . . . . 327
Getting Ready . . . . . . . . . . . . . . . . . . . . . . . . . . . . 328
Formatting Floppies and RT-11 . . . . . . . . . . . . . . 329
Be Prepared . . . . . . . . . . . . . . . . . . . . . . . . . . . . . 331
EDL Templates. . . . . . . . . . . . . . . . . . . . . . . . . . . . 331
What Is an EDL? . . . . . . . . . . . . . . . . . . . . . . . . . . 332
Translating Effects . . . . . . . . . . . . . . . . . . . . . . . . 333
Multiple Layers of Graphics and Video . . . . . . . 334
Simplify the EDL. . . . . . . . . . . . . . . . . . . . . . . . . . 335
Sound Levels . . . . . . . . . . . . . . . . . . . . . . . . . . . . 336
Settings . . . . . . . . . . . . . . . . . . . . . . . . . . . . . . . . . 337
Conclusion . . . . . . . . . . . . . . . . . . . . . . . . . . . . . . 343
Index . . . . . . . . . . . . . . . . . . . . . . . . . . . . . . . . . . . . . . . . . . . . . .345
ix
This page intentionally left blank
PREFACE
PREFACE
When Steve Bayes approached me about taking over The Avid
Handbook, I don’t think I fully realized what a huge responsibility
he had handed me. Now in its fifth edition, this book has been an
essential tool and reference for thousands of editors around the
world. Taking over a book from another author is always fraught
with peril. Because I wasn’t going to completely rewrite the book,
the result is a merger of our two voices and styles. Fortunately, I
discovered that Steve and I have very similar writing voices, so
the merger went well.
The world of editing has evolved in a number of ways since the
publication of the last edition, most notably with the expectation
that editors will be comfortable working in both standard and
high definition, which wasn’t really on the radar when the last
edition came out. Fortunately, much of the existing information
in the book was still relevant and I was able to focus my attention
on new sections, such as a complete discussion of standard and
high-definition video signal, a much deeper discussion of finishing workflows, and color correction. I also took this opportunity
to reduce the amount of information covering earlier Avid hardware platforms including the Avid Broadcast Video Board and the
Meridien system. There is still some information on Meridien—
especially as those systems are still in use in some markets—but
the focus of the book is on the newer hardware, DNA- or DXbased hardware.
Media Composer has dropped dramatically in price since the
last edition of this book, with a software-only version selling for
U.S. $2495, a price that many folks probably never thought they’d
see. (I remember that the first Avid system I worked on nearly 16
years ago cost nearly $100,000.) But though the system has
dropped in price and evolved in capabilities, the core remains the
same as it was all those years ago. Media Composer continues, in
my opinion, to have the deepest trim toolset of any system on the
market. I feel so strongly about this that Chapter 2, one of the
new chapters in the book, is almost entirely focused on trim.
Chapter 1, similarly, focuses on methods of editing. These two
initial chapters are designed to introduce you to the core power
of the system, and I strongly encourage all levels of editors to read
through them, especially because they don’t just cover the basics
but also delve into the deep techniques buried in the system.
You’ll also notice that this edition includes sidebars and tips.
The sidebars are displayed in gray boxes and contain discussions
xi
xii
PREFACE
of topics that are either somewhat peripheral to the main topic
being discussed or expand on a topic mentioned in the main
body. Tips and notes are also provided and run in the margin to
the outside of the main body. These are typically also displayed
against a gray background in small boxes. Tips are called out with
a thumbtack icon while notes are called out with an exclamation
point icon. These are designed to supplement the main body providing additional information or guidance on the topic being
discussed.
You will also on occasion notice a flag icon by itself to the outside of the main body. These flags indicates a feature that was
added in version 3.0, the latest version of Avid Media Composer
as this edition goes to press. If you are running a previous version, the material being discussed in the main body may not be
applicable to you.
The Icons Used in this Book
Web Link — External websites that offer additional resources
or information.
Noteworthy — Learn important “gotchas” or pitfalls that can
put your production at risk.
Technical Tips — How-to’s or important advice on how to get
the job done.
Flag — New features added in Avid Media Composer,
version 3.0.
This book is intended for overworked editors and assistants
who find themselves needing to know more about the system
than their limited—or perhaps nonexistent—training has provided them. Though you could certainly read this book from cover
to cover, I encourage you to treat it nonlinearly. If it were fiction it
would be a collection of short stories rather than a novel. Jump to
the section you need to learn more about and dive in! Then put
the book proudly back on the shelf for later reading and reference.
If you are a professional whose career is editing on Avid, by all
means find the time to take a class or find a good teacher or mentor. Spend time with other experienced editors in your facility or
at one of Avid’s user groups. There is a whole world of knowledge
out there waiting to be explored and experienced.
PREFACE
I’d like to thank a few folks without whom this book would not
have been possible. First on this list is Steve Bayes for believing
that I could shepherd his baby onward into the future. I’d also like
to thank Curtis Poole with Avid’s training services. Some of the
content in this book—most particularly the chapters on standarddefinition and high-definition video signal—I had originally written for training courses while a member of Avid’s excellent
Training Services group. It is with Curtis’s blessing that this material is reproduced here. I’d also like to thank Ashley Kennedy for
reviewing some of the content in this book and allowing me to
use material from her short documentary, Common Art, for some
of the visual illustrations. And thanks to Fife Productions for
allowing me to use the Nashua Symphony promotional material
and shots from their Epic Australia production.
Finally, I have to thank my wife, Kathleen, for putting up with
me as I took time away from our family to write this book. I know
that there is no way I could have done this book without her support and reassurance. I love you, my wife.
xiii
This page intentionally left blank
1
ASSEMBLING THE TIMELINE
“ Throw up in the morning. Clean up in the afternoon.”
—Ray Bradbury
Though there are many approaches to an edit, many years ago
a friend showed me the quote above, which is perhaps the best
explanation of the editorial process I’ve ever seen. In other words,
get the elements you need into the timeline first. Once they’re
there you can refine and fine-tune them until you get to the final
result. These two phases of the edit are where the storytelling is
done and where we’ll begin our exploration of Avid Media
Composer®. In this chapter we’ll look at the techniques and
approaches you would use in the rough-assembly phase. In
Chapter 2 we’ll explore the fine-tuning phase.
Building the Story Framework
When it comes to adding material to a timeline, there are two
different approaches you can take. The first is the classical
source-to-record process where a clip is loaded into the source
monitor, marks are made, a location for the edit is selected in the
timeline, and then the desired material is added to the timeline.
The second is by selecting a clip or clips in a bin, then dragging
them to the desired location in the timeline. Both have their
advantages and disadvantages. You could, if you wished, build
your entire sequence using only one of these two techniques. But
if you really want to master the tools that Avid provides you with,
you should become comfortable with both.
Source-to-Record Editing
As this is the classic approach, long-time video editors will
probably be most familiar with this method. But if you’re more
1
2
Chapter 1 ASSEMBLING THE TIMELINE
familiar with the drag-and-drop approach to editing, you may
find some of these techniques to be a revelation. Even in the
rough-assembly stage, the precision available with this sourceto-record editing can be a real time-saver.
Rather than discuss the basic workflow for editing from source
to record, let’s take a look at some techniques you can use to help
with your speed and precision. One of the points to remember
about Avid is that there are always multiple approaches that can
be used to tackle any problem. For that reason I’ve presented the
techniques below, organized into categories rather than by workflow stages.
Finding the Edit Point
Once you’ve loaded the desired shot into the Source monitor,
the most common approach to finding the edit point is to push
Play and then either place a mark or stop when you reach the
desired location. You could also just grab the position indicator
and drag it right or left, scrubbing the clip until you find the point
you want. Finally, you can also use the frame step keys (mapped
by default as numeral keys 1, 2, 3, and 4 on the main keyboard) to
move forward or backward by either one or ten frames. All of
these approaches work, but there are some additional tools available to you that can really help you find the right place for your
mark or edit.
Digital Audio Scrub
One disadvantage to finding your point by dragging the position
indicator is that you can see the picture, but you can’t hear the
sound. Digital Audio Scrub is designed to address that limitation.
When enabled, you hear individual frames of audio as the position
indicator passes over them. To enable Digital Audio Scrub:
●
●
Press the Caps Lock key to turn Digital Audio Scrub on. It
remains on until you press the Caps Lock key again to turn
it off.
Hold the Shift key down while scrubbing. Using the Shift key
will only activate Digital Audio Scrub while it is depressed.
Digital Audio Scrub is most useful when finding the beginning
and ending of distinct sounds, such as the beginning and ending
of a sound bite. It is, to be honest, fairly useless when trying to
find a point in music or even dialog recorded on location in a
noisy environment. Indeed, you’ll probably find it to be more
annoying than useful in those situations!
Despite this, give it a try. You may find it to be one of the fastest
techniques available to quickly hit the beginning and end of a
Chapter 1 ASSEMBLING THE TIMELINE
sound bite. But please, for the sake of those nearby and perhaps
for your own safety, turn it back off after you’ve used it to find
your mark. There are few things more annoying to others within
earshot than a continual blip, blip, blip every time you move to a
new position in a source or in the timeline. There is a reason why
some editors refer to the Caps Lock key as the “torture key”!
I strongly recommend that you use the Shift key instead of the
Caps Lock key when using Digital Audio Scrub. That way it is only
on for the brief moment of time that you need it on. Believe me,
everyone around you will appreciate it. But there is one “gotcha”
to using the Shift key: If you want to use it along with the singleframe step keys (mapped to the 3, 4, ←, and → keys by default),
you can’t have anything else mapped to the “shifted” state of that
key. It is for this very reason that the left and right arrow keys on
the default keyboard have the single-frame step commands
mapped to each key’s normal and shifted state.
J-K-L Scrub
This is quite possibly the most versatile feature in the system.
If you aren’t already using it then it is time to start! J-K-L Scrub is
very powerful because it gives you access to all of the following
capabilities in just three keys:
●
●
●
●
Play forward or backward at sound speed (i.e., 29.97
frames per second [fps] for NTSC, and so on).
Shuttle at high-speed forward or backward.
Scrub at quarter-speed forward or backward.
Scrub forward or backward by one frame while hearing
audio.
Best of all, you can do all of these not only while looking through
your footage or your sequence, but also while trimming it. Also,
if your deck supports the full Sony command set, you can also
use it while shuttling through a tape.
We call it “J-K-L” Scrub because those are the keys the Play
Reverse, Pause, and Play Forward commands are mapped to by
default. But you can map them to any keys. For example, on my
system I have them mapped to D, F, and G on the left half of the
keyboard. Regardless of where you map them, the functionality
remains the same. Table 1.1 lists how to access the various play
modes. (Note: If you have remapped these commands, press
those keys instead.)
J-K-L shuttling is great because you can dynamically switch
on-the-fly between all of the play modes listed in Table 1.1. This
means you can roll forward at 2 speed, switch to 1 reverse
speed when you roll past the point you want, then play forward
and backward at either quarter speed or frame by frame until you
3
4
Chapter 1 ASSEMBLING THE TIMELINE
Table 1.1 J-K-L Scrub Operation
Operation
Key Usage
Play forward at sound speed
Press L key
Play reverse at sound speed
Press J key
Pause playback
Press K key
Play forward at faster than sound speed
Press L key twice for 2, three times for
3, four times for 5, five times for 8*
Play reverse at faster than sound speed
Press J key twice for 2, three times for
3, four times for 5, five times for 8*
Play forward at quarter speed
Hold K key, then press L key
Play reverse at quarter speed
Hold K key, then press J key
Scrub forward by one frame
Hold K key, then tap and release L key
Scrub backward by one frame
Hold K key, then tap and release J key
*The sound only plays at speeds up to 3; once you hit 5, the sound, thankfully, cuts out.
find the exact frame you want. This technique is actually similar,
and uses the same default keys, as a linear tape editor used on an
edit controller to shuttle through a tape. But shuttling on a computer is far faster than it could ever be on tape, as decks just can’t
respond as quickly as a digital system.
Soon you will find yourself cooking through the material at
double or triple speed while following the script. Surprisingly,
you’ll be able to understand what people are saying and can work
consistently at the higher speed, flying faster through the material and more quickly finding what you’re looking for.
One distinct difference between J-K-L Scrub and Digital Audio
Scrub is that J-K-L has a more “analog” sound, especially when
scrubbing at quarter speed. Long-time editors (those who have
been in the business long enough to edit on open-reel decks)
often refer to J-K-L as “rocking reels,” as the sound really does
match what you’d hear if you were manually scrubbing open-reel
audiotape with your hands. As a result, J-K-L Scrub is especially
useful for hearing inhales and exhales. When heard at quarter
speed, a breath has that distinct “Darth Vader” sound that makes
it so easy to hear when someone has finished exhaling or inhaling. Once you start using J-K-L you’ll wonder how you ever managed to cut without it.
Seeking a Specific Timecode
In some cases you may be working with a producer who has
screened the footage and has noted a series of “great lines” or
similar points and given them to you in an email. Media
Chapter 1 ASSEMBLING THE TIMELINE
5
Changing the Way J-K-L Scrub Changes Speed
By default, J-K-L Scrub instantly reverses direction if you switch between forward and reverse play, regardless of the
speed you were working at. Many editors prefer this method as it allows them to instantly change direction when they
roll past a section they were looking for. But some editors prefer to use J-K-L as much as they would a shuttle knob on a
deck. In this case, for example, if you are rolling forward at 3 and turn the knob slightly counterclockwise, the deck
slows down slightly, perhaps to 2, but continues forward. In order to reverse direction, you must roll the knob further
counterclockwise through pause and then into reverse.
This approach is known as speed ratcheting and you can configure J-K-L Scrub to ratchet if you wish. To use speed
ratcheting with J-K-L:
●
Hold the Alt/Option key down while pressing the J, K, and L keys.
The following illustration shows how J-K-L ratcheting works.
8
5
3 2 1
0
1 2 3
5
+8
If you prefer this scrubbing style simply map the Alt/Option modifier to the J, K, and L keys on your keyboard. Then
the modifier will be applied automatically, and you don’t need to add it yourself.
Composer allows you to easily seek, or jump to, any Society of
Motion Picture and Television Engineers (SMPTE) timecode that
exists in the loaded source clip. Of course, that means that the
timecode has to exist in that clip; if you seek a point outside the
timecode range of a loaded clip (e.g., if the clip has timecode
from 06:25:05:01 to 06:27:06:25 and you ask it to seek to 06:27:15:00)
the system will merely beep at you. To seek to a timecode:
●
Load the desired clip into the Source monitor and ensure
that the Source monitor is active. (If you aren’t sure, click
on the Source monitor to activate it.)
Using the keyboard’s numeric keypad, type the desired timecode and press Enter to seek that timecode. (If you are working
on a laptop you cannot use the number keys above the letters to
enter timecode. Instead you must use the Fn key to enter the
numbers using the alphanumeric keys. See your laptop’s manual
for more information on using the Fn numeric keyboard.)
6
Chapter 1 ASSEMBLING THE TIMELINE
Save Keystrokes While Entering Timecode
You do not have to enter the colons (or semicolons if using drop-frame timecode); the system will add them for you
automatically. In addition, you only have to enter the portion of the timecode that is unique from the timecode of the
frame you parked on. This means that if you are parked on a frame with timecode 01:02:09:08 and you wish to seek to
frame 01:02:25:00, you only have to type “2500” and press Enter. The system will use the hour and minute from the current frame. In addition, you can press the period (.) key on the numeric keypad to enter two consecutive zeros. This
means, for example, that you can seek timecode 01:00:00:00 by typing “1…” on the numeric keypad.
There is a potential “gotcha” that could prevent you from seeking any timecode, even that which exists in a clip. Media Composer
seeks based on the time format displayed above the Source or
Record monitor. Depending on how your system is configured, you
may not be displaying timecode but instead frame numbers, film
key numbers, clip durations, or even clip names. If timecode is not
displayed you must modify the display to show timecode.
Fortunately, it is relatively easy to change the display to show timecode. (Note: If two lines of information are displayed, only the top
one must be displaying timecode. The lower line can be used to
display any other information desired.)
To set the source information display to timecode:
1. Click on the information display you wish to modify to
show the menu. The top of the menu allows you to set the
type of information you wish to use. Below that are various
types of data that are valid for the type of data currently
selected.
2. Move the cursor to the Source option at the top of the
menu and a submenu will display listing all the tracks in
the loaded source clip.
Chapter 1 ASSEMBLING THE TIMELINE
3. Move the cursor again to one of the source tracks and
another submenu will display that lists the types of information available. For video projects you will see TC1 (timecode), Frm (frame count), and Clip (clip name). If you are
in a film project you will see additional types of information including key number, ink number, and so on.
4. Select “TC1” from the menu to change the information
display to timecode.
Searching for Timecode across Clips in a Bin
During capture, often a camera tape is broken down into many, perhaps dozens, of master clips that contain key
sections, or selects, from the tape. But, perhaps the producer who is providing his or her list of timecode points may
have been watching a copy of the tape and hands you a list of timecode references that don’t directly correspond to
the master clips you created. Fortunately, Media Composer allows you to search across an entire bin to find a clip that
contains a specific clip. This is accomplished using the Sift command. We’ll discuss Sift in detail in Chapter 3, but for
now let’s look at how we would use it to find the master clip containing the timecode we need to seek to.
1. Open or select the bin containing the clips from the tape the producer logged.
2. Choose a bin view that contains at least the Start or End timecode column. (The built-in Statistics view
contains both of these columns. If you are on Media Composer 3.0 or later you can also choose the
Capture view.)
3. Choose “Bin Custom Sift…” to open the Sift dialog.
7
8
Chapter 1 ASSEMBLING THE TIMELINE
4. From the top line enter the entire timecode you wish to find. It is not necessary to enter the colons or semicolons, but
you must enter the hours, minutes, seconds, and frames.
5. Click either Apply or OK to perform the sift.
The clip (or clips) that contain that timecode will be displayed in the bin. All other clips will be hidden. To show them
again, choose “Bin Show Unsifted.”
You can also seek by timecode in the sequence as long as the sequence timecode (Mas or Mas TC) is displayed in the
highest information view above the Record monitor.
Making Your Marks
To make an edit you need to set marks and a point of sync. I’m
not going to go into the hows and whys of three-point editing,
but there are some details regarding the way Media Composer
either lets you mark or responds to those marks that are worth
discussing. Perhaps some of these are new to you!
Checking Your Duration
By default, Center
Duration displays
the duration in
SMPTE timecode. If you
click on the time display
you can switch it between
timecode and frame count.
If you are in a film project,
you can also switch it to
feet and frames.
One of the handiest features in the Composer window is Center
Duration. This useful feature provides you with a single location
where the marked (or unmarked) duration of the active monitor is
always displayed. If you are migrating from Xpress Pro® this feature
will be new to you, but I’m often surprised at the number of Media
Composer editors who don’t know about it. How is that so? Well,
the feature has always, for some reason, been disabled by default.
Fortunately, that has changed with version 3.0 of both Media
Composer and Symphony®. If you create a new user in these versions you’ll discover that your new user has this option, among
others turned on by default. You’ll also find a new set of interface
colors installed when you create a new user. (Yes, that is right, the
purple highlight is now gone by default. You can still access it via
an interface setting named “Classic” if you miss it.)
If you don’t have this enabled in your user setting, you can do
so via the Window tab in the Composer setting. When enabled it
displays the marked (or unmarked) duration of the active monitor. Media Composer obeys the following rules regarding marks,
or lack of marks, and the displayed duration:
●
●
●
In and Out mark: Marked duration displayed.
In or Out mark only: Duration between mark and position
indicator.
No marks: Duration from position indicator to end of
active clip or sequence.
Chapter 1 ASSEMBLING THE TIMELINE
9
What Is It with Media Composer Version Numbers?
You might wonder why, if Media Composer is 20 years old, the latest version, as of this printing, is called 3.0.
Prior to the release of the Adrenaline® hardware in 2003, Media Composer had reached version 12.0. Whether it was a
superstition for the number 13, a fear that the version number had gotten too high, or some other reason understood
only by those who made the decision, Media Composer was reset to version 1.0 when Media Composer Adrenaline was
released. If the numbering had continued we would have seen version 15.0 of Media Composer released in 2008.
(Similarly, Avid Symphony had reached version 5.0 before it was reset to version 1.0 with the release of Avid Symphony
Nitris® in 2005.)
Note: In 2008, Media Composer and Symphony were sychronized at version 3.0, which simplifies the version numbers
somewhat.
Three-Point Editing
The most fundamental method of editing is, of course, the
three-point edit. Remember that the In and Out marks indicating
edit duration can be made in either the Source or the Record
monitor. And, in the absence of the solo In mark, the Avid system
will use the location of the position indicator.
Back-Timing an Edit
A three-point edit doesn’t have to be two In marks and one Out
mark. If you want to use the Out point as the sync reference, then
use two Outs and one In!
“Mark and Park” Editing
Lightworks®, another digital film editing system popular in the
early 1990s, was configured so that an editor never had to mark
an Out if he or she didn’t want to. The editor could instead mark
the In and then park on the frame he or she wanted to cut out on.
You could argue that all this does is save a single keystroke, but
those single keystrokes can add up over time.
Media Composer also provides this functionality under a feature called “Single Mark Editing.” You can enable this under the
Edit tab of the Composer setting. Once set, all you need to do is
mark an In (or an Out for a back-timed edit), move your position
indicator to the frame you want for the other side of your edit,
and then either Splice or Overwrite the footage into the timeline.
(Note: If this feature is not enabled, marking just an In point will
edit in from the mark to the end of the clip.) You might want to
give this feature a try; I know a lot of editors, especially feature
film editors, who swear by it.
10
Chapter 1 ASSEMBLING THE TIMELINE
Changing Your Marks
If you want to change the position of your In or Out mark, you
can simply move the position indicator to a new position and
remark. But you can also drag an existing mark to a new location.
Simply hold the Alt/Option key down, click on the mark below
either the Source or Record monitor, and drag it to the desired
position. (You must drag from the timebar beneath one of the
monitors; you cannot drag marks on the timeline.)
Previewing Your Edit
Media Composer contains a nice feature known
as Phantom Marks that allows you to see the
“fourth” mark in a three-point edit. This feature is
especially useful when doing an Overwrite or
back-timed edit as you can see the frame duration
that will be affected prior to performing the edit.
If you wish to turn these marks on, you can do so
via the Edit tab of the Composer setting.
These marks are incredibly useful, but unfortunately the color used for these marks is just slightly
bluer than the regular gray marks. On a highresolution display or any display after eight hours
of editing, I can promise you that you’ll go crosseyed trying to discern which mark is real and which
is a phantom.
Fortunately, all of the functionalities for Phantom Marks are
available when this option is disabled! This feature merely turns
on the display of these marks. If you have marked for a threepoint edit, all of the following functionalities are available for the
side with only one mark:
●
●
You can access
Play to Out by
holding the Alt/
Option key down and
pressing Play.
●
Go to In/Go to Out: If you’ve marked an In, pressing Go to
Out will jump to the last frame that will be edited in or
over, based on the marked duration in the other monitor.
And if you’ve marked an Out, pressing Go to In will jump
to the first frame that will be edited in or over. As you can
imagine, this is extremely useful for back-timed edits!
Play In to Out: This plays the duration marked on the other
side. It will either play from your marked In or to your
marked Out.
Play to Out: This plays from your marked In to the last
frame that will be edited in or over. This command is not
very useful for back-timed edits, but is the perfect command if you are parked on your In point.
Be careful, though! Remember that if you don’t have any marks,
Media Composer uses the position indicator as the In point. That
Chapter 1 ASSEMBLING THE TIMELINE
11
means if you don’t have an In or Out marked when you use either
Go to Out, Play In to Out, or Play to Out the position indicator
will move to a new location, which will then become your new In
point for the edit. It might seem odd that it behaves that way, but
it is utterly logical when you think about it. (And remember that
computers are nothing if not logical.)
Marking a Timecode Offset
If you wish to mark a specific duration you can mark either an
In or an Out then use the numeric keyboard to move the position
indicator to a specific number of frames then add the other mark.
This is easily accomplished by adding a “” either at the beginning or end of the offset number, then hitting Enter. But remember, Media Composer uses a film-based counting method that
includes every frame within the marks. This means you’ll usually
want to move one frame less than the duration desired. See the
next sidebar, “Counting Frames the Avid Way,” for more information on why Avid works this way.
Most of the time you probably want to enter a timecode duration such as three seconds (3:00), but sometimes you want to
move a specific number of frames, not seconds. If you type three
digits in Avid, it automatically assumes you are entering timecode and assigns the first digit to seconds and the third (and
fourth) to frames. If you really want 300 frames instead of three
seconds, simply type a lowercase “f ” after you’ve typed your numbers but before you hit Enter. The “f ” tells the Avid to count in
frames and you’ll notice that it immediately recalculates the
timecode using the number of frames you specified.
Counting Frames the Avid Way
Avid editing systems work from the film model that insists that every frame exists and is important to duration calculations. In contrast, the linear tape model allows you to have an Out point and an In point on the same frame of timecode. How can two shots use the same frame on the master tape? Don’t ask—in linear video editing they just do, and
video editors who grew up editing linearly are occasionally confused when the Avid editing system counts every frame
discretely. Mark an In and Out point on the same frame in Avid. What’s the duration? One frame. And if you are parked
on a frame and mark it as the In point, then tell the system to “Go 15 frames from here” by typing “ :15,” then mark
Out, you will have a duration of 16 frames. You told the system, “Take this first frame and 15 more,” which makes perfect
sense to a film editor and seems suspiciously like a bug to a video editor.
This is why if you want to mark, for example, a five-second duration, you must subtract one frame from your offset
duration. You can either do that, as most Avid editors do, by typing “4:29” (for NTSC 30 fps timings; use “24” instead
for PAL timings) instead of “5:00”; or, type the full duration then back up a frame before marking your Out point.
Personally, I find “doing the math” in my head is quicker than moving back a frame after the fact.
12
Chapter 1 ASSEMBLING THE TIMELINE
By the way, when you enter a frame offset via the numeric keypad, Media Composer automatically stores that offset. If you
need to use it again simply hit the Enter key on the numeric keypad without entering any numbers and the system will automatically move again by that amount. This is an especially useful tool
when marking out beats either for edits or for effect keyframes.
Marking a Segment in the Timeline
You should already know that, for a selected track, you can park
in the middle of a segment and press Mark In-to-Out to mark the
entire segment. But if you have multiple tracks selected, doing so
will mark the nearest points in either direction where the tracks
share a common edit point. Sometimes that means the entire
sequence is marked. If you only want to mark the duration of the
shortest segment across all tracks, simply hold the Alt/Option key
down when pressing Mark In-to-Out.
Snapping to Edit in the Timeline
Sometimes you need to mark several segments. In this case,
you can use the Ctrl/Command key to snap to either the head or
tail of an edit point. This makes it easy to quickly mark a series of
shots for quick replacement or removal.
●
●
Press Ctrl/Command and click the mouse button to snap
to the head of the nearest edit. You’re now properly positioned to mark an In.
Press CtrlAlt/CommandOption and click the mouse
button to snap to the tail of the nearest edit. You’re now
properly positioned to mark an Out.
You can also use the FF (fast forward) and REW (rewind) keys to
move from edit to edit. By default they snap to the heads of edits
and, just as is the case with Mark In-to-Out, only move to common edit points if multiple tracks are selected. If you want to jump
to every edit point regardless of track selection, just hold the Alt/
Option key down, just as you did with Mark In-to-Out. Or, you can
go even further if desired. The FF/REW tab in the Composer setting allows you to reconfigure these two commands. You can force
them to move to every edit on each track (by choosing Ignore
Track Selectors) and even instruct them to stop at tail frames of
an edit and/or locators. I rarely set them to stop at tail frames,
preferring to use the CtrlAlt/CommandOption click for that;
however, setting them to stop at locators can be extremely useful,
especially when reviewing a screening with your client or producer. Indeed, I have a special Composer setting I switch to in
these situations where the FF/REW keys are set to only jump to
locators, allowing me to quickly move from comment point
to comment point.
Chapter 1 ASSEMBLING THE TIMELINE
Editing to the Timeline
Certainly the most common edits are Splice, which always
adds your marked frames to the sequences, and Overwrite, which
generally replaces footage that already exists in the sequence. But
there are two other edits that are extremely powerful.
Sync Point Overwrites
The Sync Point Overwrites edit is a special configuration of the
Overwrite edit that changes the way the two Source and Record
sides are synchronized. Remember that normally Avid uses either
two In points or, in the case of a back-timed edit, two Out points
as the point of synchronization. A Sync Point Overwrite only uses
an In and an Out to specify the duration of an edit. The blue position indicators are used as the points of sync.
Sync Point Overwrites cannot be three-point edits for this very
reason. Indeed, you must have only one In and one Out point or the
edit will fail. The marks can be either both in the Source or Record
or, less commonly, one in the Source and the other in the Record.
This type of edit is especially useful for cutaways and inserts
because often the point of sync is somewhere in the middle
rather than the beginning or end of the edit. For example, if I
wanted to cut to an insert of a glass being dropped on the floor,
the point of sync is likely to be the sound of the glass when it hits
the floor. The In and Out points of the edit are used just to establish the timing around the drop.
As mentioned previously, accessing this type of edit requires
you to change the Overwrite edit’s configuration. You can do so
two different ways:
●
●
Select “Sync Point Editing (Overwrites)” from the Edit tab
of the Composer setting.
Select the Composer window then choose “Special Sync
Point Editing.” You can also right-click on the Composer
monitor and choose “Sync Point Editing.”
Regardless of the technique used, the Overwrite button’s icon
will change, and an orange dot will be added in the middle of the
arrow.
To use a Sync Point Overwrite:
1. Mark the desired duration for your edit in either the Source
or Record monitor.
2. Move the position indicator to the appropriate sync point
for each side of the edit.
3. Press Overwrite to perform the edit.
Because this edit replaces the normal Overwrite edit, you need
to make sure to turn it off once when you are ready to return to
13
14
Chapter 1 ASSEMBLING THE TIMELINE
You might want to
turn Phantom
Marks on when
using Sync Point Overwrites
as it will make it easy to see
the duration you’ll edit in
without forcing you to reset
your point of sync.
normal Overwrite editing. Some editors choose to leave it on, but
have to remember to properly place their position indicators and
make sure to only use two marks.
Replace Edit
Perhaps even more powerful than the Sync Point Overwrites is
the Replace edit. This edit does not require any marks in either
the Source or Record side. (Indeed, it does not allow any marks
in the Source.) Instead it uses existing edit points for a segment in
the timeline as the duration and the two position indicators
as the point of sync. In this respect it is extremely similar to the
Sync Point Overwrites with the exception that the duration is
always specified in the sequence rather than the source.
The Replace edit button looks similar to the Splice and
Overwrite edit buttons, but has a blue arrow instead of the yellow
and red arrows used for Splice and Overwrite, respectively. On
early versions of Media Composer, the Replace edit lived between
the Splice and Overwrite buttons at the bottom of the Composer
window. On modern Avids, it lives in the command Fast menu
that resides between the Splice and Overwrite edit buttons. You
can, of course, map it anywhere you wish, including putting it
back in its old location. (I personally map it to ShiftB so it lives
on the same key as the Overwrite edit.)
The most common usage is to replace an entire segment in the
timeline with another shot or take. When I’m doing an online finish of a show someone else cut, I find myself particularly using
the Replace edit if the legal review of the program requires the
replacement of some of the B-roll or interview material used in
the edit. Interview material may require some trimming and
careful adjustments to ensure that I don’t change the program
duration (see Chapter 2), but the Replace edit is certainly the safest way to replace footage in a locked-to-time program.
To perform a Replace edit:
1. Place the Timeline’s position indicator inside the segment
you wish to replace.
2. Place the Source monitor position indicator at a point of
sync to match the Timeline’s position indicator.
3. Press the Replace edit button.
What isn’t well known about the Replace edit, though, is that it
can use marks instead of a segment for its duration. The only limitation is that these marks can only reside in the timeline, not in
the source. When used with marks, the Replace edit behaves
identically to the Sync Point Overwrites. That means that if the
timing of your insert or cutaway is based on the sequence duration, you can use the Replace edit instead of switching the configuration of the Overwrite edit.
Chapter 1 ASSEMBLING THE TIMELINE
15
Even less well known is that you can actually use a segment’s
duration but set the point of sync to a location outside of the segment. This is most frequently used to replace a split edit. If you’ve
split an interview so the sound cuts before the picture, you’ll
likely want to use the start of the sound bite as your point of sync.
Since the head of the audio segment is the start of sync, replacing
the audio is easy. But the picture edit start is delayed by the split
edit. How do you replace it so it stays in sync with the sound?
Easy! Place the position indicators appropriately so they
are lined up in sync, then use one of the segment mode buttons
to select the desired segments as shown in the following
illustration.
When you perform the Overwrite edit, the entire split edit
(both video and audio) will be replaced with the new synced
material. If the old and new interview sound bites have a different duration, you’ll just need to trim the tail. In this way, the
Replace edit allows you to keep the split you already positioned,
instead of unsplitting, replacing the edit, then resplitting! This
technique has saved me lots of time in the online—and even
color-grade—stage.
Editing from a Pop-Up Monitor
This next technique is probably familiar to those who have
edited with Xpress Pro or NewsCutter® and is tailor-made for cutting back and forth between two or more clips. If you hold the
Alt/Option key down while double-clicking on a clip in the bin
(instead of loading into the Source monitor) the clip will load into
a pop-up monitor. You mark an edit from a pop-up using the
same keyboard shortcuts as you would with the Source monitor.
If you prefer to use the onscreen buttons instead, you must use
the buttons at the bottom of the pop-up monitor instead of the
buttons in the Composer window. If you’re cutting back and forth
between two clips, you will find this approach quicker—and certainly less carpal tunnel–inducing—than switching between the
two clips in the Source monitor.
You can resize
pop-up monitors
just as you can any
other window. Just grab
any corner or edge
(Windows) or the lower
right corner (Macintosh).
16
Chapter 1 ASSEMBLING THE TIMELINE
Editing from the Bin
Rather than loading material into the Source monitor, making
your marks, and editing that footage into a sequence, many editors today prefer a more interactive approach where they simply
grab clips from a bin, drag them to the timeline, then drop them
at a location of their choosing. If an editor started working with
another nonlinear editor such as Final Cut Pro® or Premiere® this
is likely the technique they first learned.
Many long-time Avid editors would argue that the classic
source-to-record approach is the best, but dragging clips from a
bin can be a very fast and efficient approach, especially if you
have either logged selects from tape or subclipped out the material you plan on using. Personally, I find this technique especially
useful when I’m quickly putting a B-roll section together, or when
I’m dropping audio sound effects, music, and stings into my
sequence.
Basic Drag Techniques
Though the basics of dragging a clip from a bin to the timeline
are certainly obvious, there are some subtleties to the way it currently works on Avid.
Choosing the Type of Edit (Splice versus Overwrite)
When you drag a clip to the bin, Media Composer assumes that
you add new material to your sequence and automatically selects
the Splice segment editing. But that isn’t always what you want.
You may, instead, want to perform an Overwrite. You can do so,
but you must tell the system that is what you want to do before
you begin your drag.
To switch to Overwrite drag-and-drop editing:
●
Map the Lift/
Overwrite segment
mode button to a
key on the keyboard so it is
quickly accessible.
Select the Lift/Overwrite (red arrow) segment mode by
clicking on the red arrow at the bottom of the timeline.
As long as the Lift/Overwrite segment mode is enabled, every
clip dragged to the timeline will be overwritten. I typically use this
approach when I’m adding audio elements to the timeline.
Splicing them in will push later material on the track down in time
and break its sync. When you want to switch back to the Splice
segment editing, simply turn the Lift/Overwrite segment mode off
or select the Extract/Splice (yellow arrow) segment mode.
Dropping the Clip Precisely
When you’re dragging a clip to the timeline, you’ll often want
to drop it in a specific location, such as between two existing
edits. If you’re dropping in a cutaway you might want to drop it
Chapter 1 ASSEMBLING THE TIMELINE
17
so that the cutaway begins after a specific frame of a shot already
in your timeline. Media Composer has tools that help you accurately perform both types of precise positioning.
Modifiers and Dragging from a Bin
Typically, when you use a modifier to affect a mouse click or drag, you hold the modifier down before you press the
mouse button. For drag-and-drop editing, though, you must first click the mouse and then add the modifier. Why?
Because these modifiers are also used to change a bin selection or bring up information windows.
For example, if you hold CtrlAlt/CommandOption down and click on an item in the bin, an Info window appears
that displays a set of metadata about the clip including its tape, tracks, video resolution, duration, and so on.
Make sure, though, that you hold the modifier down until you’ve released the mouse. Otherwise the system will think
you changed your mind and not apply the modifier to the drop.
The Avid offers a set of modifiers that can be used to tell the
system to snap to different places in the timeline. The most commonly used of these is the Ctrl/Command key, which restricts the
drag-and-drop in a number of very useful ways:
●
●
●
●
Snap to the head of an existing edit on any track in the
timeline.
Snap to the head of the position indicator.
Snap to an In point.
Specify the duration used in the source clip.
What is that last one, you say? Specify duration? Absolutely! If
you use In and Out marks to set a duration in the timeline, then
drag a clip while holding down the Ctrl/Command key, the clip is
not only snapped to the In point, but the Out point defines the
duration you will edit in from your source clip. As you are likely
dragging in clips without a defined duration (other than the complete duration of the source clip), this technique makes it easy to
drop in only the duration you need.
18
Chapter 1 ASSEMBLING THE TIMELINE
This works for both Splice and Overwrite drags, but keep in
mind that if you Splice drag, there will be a new edit at the
In point and all of the existing footage at that point will push
down to make room for the new clip.
Another modifier worth knowing is Alt/Option. When you drag
a clip into the timeline your ability to accurately drop it at a specific frame is limited by the pixel resolution of your screen and
your timeline zoom level. If you’re really zoomed out on a long
sequence, a single pixel move may actually move the clip several
seconds forward or backward. If you hold the Alt/Option key
down, though, you will always move a frame at a time forward or
backward. Indeed, as you drag back and forth while holding these
modifiers down, you may see your cursor move further than the
actual clip moves. This is because it is moving a distance less than
a single pixel, which your cursor cannot do.
A third modifier worth knowing is really useful when doing an
Overwrite drag. If you hold the CtrlAlt/CommandOption
modifiers down, an Overwrite drag will snap to the tail of an edit,
allowing you to back-time the clip into the timeline. Unfortunately, this modifier does not work for a Splice drag. Instead of backtiming, the Splice drag will always occur at the position of the
head of the shot you’re dragging in.
Similar to the Ctrl/Command modifier, the CtrlAlt/
CommandOption drag will snap to tails of edits, the tail of the
position indicator or a mark. It does not, however, snap to a duration—that capability is reserved for the Ctrl/Command modifier.
There’s a fourth modifier but it really isn’t applicable for a dragand-drop edit. We’ll discuss it when we explore Segment mode
later in this chapter.
The Drag-and-Drop Viewer
When you drag a clip from a bin into the timeline, the
Composer window switches to a four-monitor view. This view
allows you to see the frames from the sequence that will be just
before and just after the clip you are dropping.
Chapter 1 ASSEMBLING THE TIMELINE
This display can be extremely useful in conjunction with the
CtrAlt/CommandOption modifiers to precisely align the clip
you’re dropping. It can also be helpful with snap-to-head or
snap-to-tail drops as well because it lets you confirm that you are
dropping the clip between the right two shots.
On older, slower systems this display can sometimes take a
moment to display. If you’re doing a lot of drag-and-drop edits,
that momentary delay can get extremely annoying. For that reason, there is a way to disable the four-monitor view:
●
Deselect “Show Four-Frame Display” from the Display tab
of the Timeline setting.
Dragging Sync Material to the Timeline
When you drag a video-only or audio-only clip to the timeline
you can specify which track (or tracks) the clip will be dropped
onto. In previous versions of Media Composer, you could not do
that if you were dropping a clip containing both video and audio
tracks. Fortunately, that has changed in version 3.0. Now when
you drag a video/audio clip to the timeline, you can drag up or
down to specify the track the video will be dropped onto.
Unfortunately, that clip’s audio tracks will only drop onto to the
audio tracks that match in number (A1 to A1, and so on).
Ultimately, it would be great to be able to specify the track for
either video or audio, and hopefully we’ll see that in a future
release.
Dragging Multiple Clips to the Timeline
If you select multiple clips and drag them as a group to the
timeline, the drop behavior is quite different from that of a single
clip. Instead of letting you drag them to any location in the timeline, the selected clips are always edited in at the head of an In
point, or, if there are no In points in the sequence, the head of the
position indicator.
In addition, the clips are always ordered as they appear in the
bin. If you are displaying the bin in Brief, Text, or Script view, that
means the clips are edited in order from top to bottom. If you are
displaying the bin in Frame view, they are edited in “reading”
order (left to right, top to bottom). Frame view, therefore, is probably the best view to use for this type of editing, as it lets you
quickly rearrange your clips the way you want them.
Dragging to the Record Monitor
In addition to dragging to the timeline, you can also drag to the
record monitor. As with dragging multiple clips directly to the
timeline, clips dragged to the record monitor are always edited in
at either the In point or, in the absence of an In, the position
19
20
Chapter 1 ASSEMBLING THE TIMELINE
indicator. You use modifier keys to specify whether the edit will
be a Splice or an Overwrite:
●
●
Hold the Alt/Option key down to Splice the clip(s) to the
timeline.
Hold the Shift key down to Overwrite the clip(s) to the
timeline.
Marking in the Bin
By default, when you drag a clip from the bin to the timeline,
the entire clip is edited into your sequence. Though this works well
for short clips or premarked subclips, the reality is that you usually
want to edit in just a portion of the clip into your sequence. This is
easily accomplished using either the bin’s Frame or Script view.
When in either of these views, you can select a clip and then use
the keyboard to:
●
●
●
●
Rewind to the first frame (the Home key by default).
Fast forward to the last frame (the End key by default).
Use J-K-L to scrub through the clip.
Play and stop the clip (the 5 key or space bar by default).
And while the clip is playing you can:
●
●
Mark an In point (the I or E key by default).
Mark an Out point (the O or R key by default).
Note that you must be playing when you mark an In or an Out.
This is to prevent you from accidentally changing a mark when
you might, for example, be trying to rename the clip.
Editing from the Bin via the Keyboard
After marking a clip in the bin, you can certainly use any of the
previously discussed dragging techniques to edit the clip into
your sequence, but you can also use the keyboard to edit the clip
into your sequence. This option is disabled by default, but can
quickly be enabled via the bin settings. To enable Edit from
the bin:
●
You can quickly
open a window/
tool’s setting dialog
by selecting the window or
tool and pressing Ctrl/
Commandⴙⴝ.
Select “Enable Edit from Bin (Splice, Overwrite)” from the
bin settings.
Once you’ve enabled this option, simply use the keyboard
Splice or Overwrite buttons to edit the selected clip into your
sequence. You can even edit multiple clips in simultaneously. If
more than one clip is selected, they are edited into the sequence
in “reading” order, left to right from top to bottom.
Taking this one step further, you can use the arrow keys on the
keyboard to move between clips in the bin. Doing so makes it
Chapter 1 ASSEMBLING THE TIMELINE
21
easy to move between clips, play and mark a duration, edit them
into your sequence, then move to another clip and continue editing. This technique is especially useful if you wish to build a
quick montage from B-roll footage. I find it especially useful
when editing an interview or single-camera scene, as using the
arrow keys to move back and forth between clips is far faster than
switching between two or more clips in the Source monitor.
Disabling and Enabling Tracks from the Bin
Sometimes you only want to use some of the clip’s tracks when
you edit from the bin. Though you can certainly load them, one
at a time, into the Source monitor and disable or enable the
desired tracks, you can also do this from Frame view in the bin.
This technique can also be used to quickly see which tracks are
available in a clip. To disable or enable a clip’s tracks from the bin:
1. If necessary, switch to Frame view.
2. Press Alt/OptionClick on the name of the clip in the bin.
A pop-up menu will appear showing all of the tracks in the
clip with checkmarks at the head of those tracks that are
currently enabled.
3. With the mouse held down, select a track and release the
mouse button to toggle the track off or on.
4. Repeat steps two and three for each additional track you
wish to affect.
Auto-Enable Source Tracks
By default, when you load a clip into the Source monitor, all tracks are automatically enabled, even if you previously
disabled them. This is because a feature named Auto-Enable Source Tracks is enabled by default on most versions of
Media Composer. I usually disable this option as I prefer for tracks I’ve disabled to stay disabled, especially because
I often use bin editing in the early stages of an edit. This option is located in the Edit tab of the Composer setting.
Rearranging Your Edits
After you’ve assembled a good portion of your sequence, you
may want to rearrange some of the clips you’ve used. This is easily accomplished using the two segment mode buttons at the
bottom of the screen. Though you probably know some of segment mode’s basic functionality, you may not know some of the
more obscure and newer techniques.
Select Segments via Timeline Lasso
You can quickly select a segment or, more importantly, a group
of segments (or clips) by holding the mouse button down and
22
Chapter 1 ASSEMBLING THE TIMELINE
If you have a lot of
tracks it may be
difficult or
impossible to select above
or below the actual tracks
in your sequence. In this
case, simply hold the Alt/
Option key down when
you begin your selection.
This modifier instructs
Media Composer to begin
the lasso selection from
anywhere in your timeline.
Note, however, that you
must begin your selection
outside any segment you
wish to select.
dragging, from left to right, a lasso around them. Any adjacent set
of segments can be quickly selected. You must, however, begin
your lasso selection either above or below the tracks in your
sequence. That is because clicking within a track instructs the
Avid system to scrub the position bar. When you release the
mouse any segments you’ve completely enclosed will be selected.
By default, when you lasso a set of segments using the lasso,
the yellow (Extract/Splice) segment mode is selected. If you’d
rather use the red (Lift/Overwrite) mode, simply click on the red
segment mode button and you’ll switch modes without losing
your selection. Alternatively, you can click on the red segment
mode button before your selection, though doing so does prevent
you from using the Alt/Option modifier to select from within the
sequence’s tracks.
If you’d like to add additional segments to your selection, simply
hold the Shift key down and click on them. Keep in mind, though,
that you must select adjacent segments in any track or you will not
be able to move them. This means that if there is a section of filler
between two segments you must also select the filler. (I know, the
concept of selecting the “empty space” between two shots may
seem a bit odd, but that’s how it works in the Avid world. Empty
space is actually a physical thing in the Avid timeline. There are
advantages to this but, as you can see, also some disadvantages.)
Moving Segments
Moving multiple segments in the timeline changed in some
very significant ways in version 3.0. Because of that, let’s look at
how segments move in previous releases first and then how they
move in version 3.0.
Moving Segments Prior to Version 3.0
In segment mode you can select multiple segments anywhere
in the timeline, but you can only move them if the segments are
directly adjacent (contiguous) on a single video or audio track.
Groups of segments can be moved horizontally—as long as they
obey the contiguous rule on each track—but only audio segments
can be moved vertically. You can also delete selected segments en
masse regardless of their location in the timeline by simply pressing Delete on the keyboard.
Moving Segments in Version 3.0
Significant changes were made to segment moves in the latest
release. Many of the movement restrictions were eliminated in this
version and you are now able to select and move segments horizontally and/or vertically across multiple video and audio tracks.
This means you can now select a group of composited segments
and move them both horizontally (in time) and vertically (in track.)
Chapter 1 ASSEMBLING THE TIMELINE
23
Previously, moving a group of composited segments was a very
time-consuming process (or required use of the Avid clipboard).
Note, however, that if you select multiple segments on any
given track, the selection must be contiguous, and this includes
filler. Make sure that you select the filler between two or more
shots so that the empty space is moved as well. Hopefully, this
step can be eliminated in future versions, but for now you must
select it or the system will refuse to let you move the segments.
In addition, if you have selected both video and audio segments, you can move either the video or the audio segments vertically while moving everything selected horizontally. To do so,
simply begin your move by clicking and dragging on the type of
segment you want to move vertically. For example, if you want to
move the video segments vertically, simply click on one of the
video segments to begin your move.
Restricting Segment Movement
If you wish to precisely align the segments you are moving,
you can hold a keyboard modifier down. The modifiers listed in
Table 1.2 are available.
Table 1.2 Segment Mode Modifiers
Modifier
Restriction
Ctrl/Command
Snap to the head of an existing segment,
an In/Out mark, or the position indicator
CtrlAlt/CommandOption
Snap to the tail of an existing segment, an
In/Out mark, or the position indicator
CtrlShift/Ctrl
Restrict to vertical-only movement
Alt/Option
Force frame-by-frame movement;
regardless of how zoomed out your
timeline is you will always move
frame-by-frame
In addition to the modifiers, you can force the system to always
snap to the head of an existing segment, mark, or the position
indicator by enabling “Default Snap-to Edit” from the Edit tab of
the Timeline setting. This was Xpress Pro’s default configuration,
and may be the preferred method of operation if you’re migrating
from Xpress Pro.
Cutting Down Your Sequence
While you’re still in the rough-edit mode you’ll probably
need to cut out portions of the sequence. The most common
To ensure the
modifier is applied,
always release the
mouse button before the
modifier.
24
Chapter 1 ASSEMBLING THE TIMELINE
commands are Extract and Lift (which are complements, respectively, of Splice and Overwrite), but there are other ways to
quickly remove material. For example, as just mentioned earlier,
segment mode can be used to remove multiple shots at once and
makes a terrific technique to quickly blow away whole sections of
the timeline. And when used in conjunction with the Add Edit
command, you can also use it to remove portions of a segment
instead of an entire segment.
What Happened to the Weightlifter Guy?
Something that you’ll likely quickly notice in version 3.0 is that the Lift and Overwrite icons have been changed and
the weightlifter guy has been replaced with an icon using an up arrow. Scandalous, you might say! How could Avid possibly get rid of that goofy icon that we’ve all come to love? Well, considering I was one of those who was a party to his
removal, I’ll tell you.
Old
New
Lift
Extract
f0100
One of the challenges with quirky/idiosyncratic icons and features is that they are difficult to discern by new users or
those who “grew up” with a different program. Though we would never want to homogenize the system so that every
editing program behaved identically, there are certain assumptions that users make, simply based on how most programs
(both editorial and noneditorial) function today. The old lift (weightlifter) and extract (scissors) icons created problems for
new users. The lift icon’s function wasn’t obvious, and, more importantly, the scissors icon actually implied a different
function. (Scissors typically are used to indicate a Cut command—as part of the Cut/Paste paradigm—which is a very
different operation from Extract.) In addition, the key point that the Lift and Extract commands were complements to the
Overwrite and Splice commands, respectively, wasn’t clear from their icons.
We did some focus testing and came up with a new set of icons with upward arrows that better informed the user of
the function and, by using yellow and red icons, their relationship to Splice and Overwrite. Naturally, there were some
long-standing users who mourned the loss of the weightlifter—though no one mourned the loss of the scissors—and
one even wrote a very funny ode to the weightlifter guy (which you can find with a bit of Googling or even on my Avid
blog, community.avid.com/blogs/editors/). Note that a few other icons changed as well—the “loop” commands in particular, again with the intent of making the icons more obvious to inform users of their functions. I think it is safe to
assume that other icons will change in future releases.
Top
Top and Tail
Tail
These two commands first made their appearance in
NewsCutter and migrated to Media Composer several years ago.
Chapter 1 ASSEMBLING THE TIMELINE
They are designed to help you quickly cut down existing shots
in the timeline by quickly removing either the head or the tail
from the segment you are parked on. Interestingly, these two
commands are actually built-in macros. Top is the equivalent of
pressing Mark Clip, Mark Out, and Extract, while tail is the equivalent of pressing Mark Clip, Mark In, and Extract. These two sets
of commands, called TRX/TEX or TIX/TOX by old-school Avid
news editors, are such essential quick cut-down commands that
they were rolled in to single commands.
Top and Tail aren’t mapped to your keyboard by default, but
they live on the Edit tab of the Command Palette. I mapped them
to ShiftQ and ShiftW on my keyboard.
These two commands make it extremely easy to slice off the
unnecessary head and tail of clips you dragged into the timeline
or otherwise edited in long. To remove the top of the clip simply
park on the last frame you want to remove and press “Top.” It will
then remove from the first frame to the frame you are parked on.
If you wish to remove the tail of a clip simply park on the first
frame you want to remove and press “Tail.”
Be careful, though, as the first command issued by either of these
is “Mark Clip,” so you need to make sure that you have not selected
tracks that do not have common edit points with the track containing the shot you’re cutting down. Because the Mark Clip command
marks a common duration across all active tracks, you can easily
remove more material than you intended—up to and including
every frame in the sequence prior to or after your position indicator!
Take a look at the following illustration. Because of the track
selection, applying the Top command would remove everything
in the timeline preceding the position indicator. To ensure that
doesn’t happen, all tracks but V1 must be deactivated.
Extract and Lift and the Clipboard
Have you ever wondered what happens to the footage that you
either Extract or Lift out of the timeline? When you perform either
function, the removed footage is loaded onto the Avid clipboard.
You can therefore see and, if desired, subclip or re-edit the footage
by choosing “Clipboard Contents” from the Source monitor menu.
25
26
Chapter 1 ASSEMBLING THE TIMELINE
Since this capability is unquestionably handy when moving
large chunks of material from one part of the sequence to another,
you can eliminate the entire Clipboard Contents step by simply
holding the Alt/Option key down when you do either an Extract or
a Lift. That modifier instructs the Avid editing system to automatically load the removed material into the Source monitor, ready for
use elsewhere in the current sequence or any other sequence.
Navigating the Timeline
Before we leave the rough edit phase, let’s take a look at a few
different commands techniques you can use to quickly navigate
around the Timeline.
Zooming In and Out
Though the zoom bar can be a quick way to zoom in and out, a
quicker way is to do so via the keyboard. Avid has three keyboard
commands that allow you to zoom in (Ctrl/Command]), zoom
out (Ctrl/Command[), and see the entire sequence (Ctrl/
Command/). These are all designed to be accessed via the
right-hand’s ring or pinkie finger. They work well, but as we often
have our right hand on the mouse, their placement is awkward.
And if you’re a left-handed mouser, their position is actually
rather difficult to get to using only the right hand.
These commands live in the Timeline fast menu and I recommend remapping them to a more convenient place on the keyboard. For the left hand I map them to ShiftZ, ShiftX, and
ShiftC (Show Entire Sequence, Less Detail, and More Detail,
respectively), while for the right hand I map them to Shift,
Shift, and Shift/ (Less Detail, More Detail, and Show Entire
Sequence, respectively). This places them on the lowest row of the
keyboard, just next to the Shift key. (I’ve yet to find a more useful
position for them on the keyboard.) I’ve also experimented with
using multibutton mice for these commands and currently use
the two side buttons found on Logitech and Microsoft mice for
zooming in and out.
Jumping In
I refer to this set of commands as “jumping” rather than zooming, as they are typically used to quickly zoom in on a specific
section of the timeline.
●
Focus: The Focus button (the H key) is especially useful for
troubleshooting small problems like flash frames because
it is a one-step zoom to a preset amount to analyze a small
Chapter 1 ASSEMBLING THE TIMELINE
●
●
section. This command is a toggle, so pressing it again
takes you back to where you were.
Jump In: Ctrl/CommandM provides you with a uniqueshaped cursor that lets you quickly jump into a specific
duration in the timeline. Simply issue the command and
lasso across the section you want to see and the system
zooms in so that section fills the entire timeline. This technique is very useful for pinpointing a segment that needs
more refinement.
Jump Back: Ctrl/CommandJ sends you back to the exact
zoom level you were at before the jump in. These two commands allow you to quickly hop in and out, and I find
them extremely useful for popping into check for sync,
offline material, etc. Both of these commands also live in
the Timeline fast menu and can be remapped, if desired.
Unwrapping Wrap Around
If you used Xpress Pro on a laptop or a large monitor you were
probably driven partially insane by a devious option called “Wrap
Around.” Whenever you zoomed in, this option would use the
available vertical room in the timeline to display your tracks as if
they were staves of music on a sheet. Though this seemed like a
great idea to the person who invented it many years ago, in reality this option has perhaps befuddled more users than any other
feature in the system—especially because Xpress Pro users inexplicably couldn’t disable it!
Fortunately this can be disabled in Media Composer via the
Timeline fast menu. Simply uncheck the “Wrap Around” option.
This feature is now disabled by default when you create a new
user in version 3.0.
27
This page intentionally left blank
2
ZEN AND THE ART OF TRIM
“Every block of stone has a statue inside it and it is the task of the
sculptor to discover it.”
—Michelangelo
A sculptor has many tools at his or her disposal. Regardless of
the medium used there are always those tools used to rough out
the shape that remove large sections of unneeded material and
finer tools used to refine and give life to small details. I like to
think of Trim as the fine sculpting tools. Though you could certainly complete a sculpture using only the large rough removal
tools, most mediums require the fine tools to give the sculpture
the definition it needs to be truly considered a work of art. Not
only that, but using only the rough-out tools makes any fine detail
work extremely difficult and inefficient. The same holds for editing. Chapter 1 described and defined the rough to medium tools
for sculpting a story. Trim is your set—yes, set—of fine work tools.
I’ve named this chapter “Zen and the Art of Trim” because I
firmly believe that Trim is the heart and soul of the Avid editing
system and what ultimately continues to set it apart from other
systems. I’ve heard many editors over the years proclaim that
“nothing trims like an Avid.” They say so not just because of the
trimming tools available to you, the editor, but because of the way
Trim works in Avid. A good friend of mine after learning the
“deep” trim approaches in the system exclaimed that it really felt
like he was “one with his footage.”
I certainly don’t promise you’ll experience such a revelation,
but hopefully by the end of this chapter you’ll have a better
understanding of why so many editors feel the way they do about
the system. Master Trim and you have mastered the system and
changed the way you think about editing forever. Trim is creative,
not just corrective. And I will promise you one thing: If you take
the time to practice and integrate the techniques in this chapter
29
30
Chapter 2 ZEN AND THE ART OF TRIM
into your daily editorial work, you will become a faster and more
efficient editor.
Thinking Nonlinearly
Beginners bring linear thinking to the trimming process. This
is potentially the biggest mistake you can make, short of deleting
all your media. The first place I see this is when beginners misuse
the Match Frame button. Think of this really as the “fetch” button
because the Match Frame name is too close to the function
that linear tape editors have been using since the beginning of
computer-controlled timecode editing.
The traditional tape method is to get the edit controller to find
the same frame on the source material as where you are parked
on the master tape. The source tape cues up, you adjust the video
levels to match what is already on the master tape, and then you
lay in a little more of the shot, usually a dissolve or another effect.
You can do this in Avid as well. This is logical and simple, but it
completely misses the point. Every master clip that you add into
the sequence is linked to the rest of the captured material. You
don’t need to go get it because it is already there. Think of the
extra captured material as always being attached to every edit in
the timeline all the time. Each shot in a sequence is a window
onto the original source material. The window can be moved,
enlarged, contracted, or eliminated in the sequence, but the original source material is still there. It should be used for reviewing
material, not as an integral part of the trimming process.
However, if used the incorrect way, it is another dog paddle.
The best way I have discovered to think about trimming is to
imagine moving earlier in time or later in time to see a different
part of the shot. Coincidentally, as you move earlier you may be
making a shot longer or shorter. Any trim that adds or subtracts
frames—any trim that is on one side or the other of the transition—changes the length of that track and must have a corresponding change on all of the other tracks in the sequence. Not
all trims change the actual length of a sequence, but the ones that
do—the trims on one side of the transition or the other—knock
you out of sync if you don’t pay attention. This means you must
look to the tracks that are highlighted when you decide to add a
little video. Don’t make the beginner’s mistake of thinking that
just because you are adding a few more frames to lengthen an
action, it is a video-only trim. All the soundtracks must be
trimmed if you make the sequence longer or shorter in any way.
The main reason that trimming is so much better than just
extracting the shot and splicing it back in is that you have the
Chapter 2 ZEN AND THE ART OF TRIM
immediate feedback of seeing the shot in context. When you use
Trim to fix a shot while it is in place you get that instant sensory
feedback that is so important when using a nonlinear editing system. When expanding your use of the Trim mode, stay in sync as
much as possible. Now obviously, there are times when you want
to go out of sync, for cheating action or artistic purposes—I’m
not talking about that. I’m referring to the skill of understanding
the relationship between what tracks are highlighted and what
kind of a trim you are doing. Some people get so flustered the
first few times they try trimming with sync sound that they abandon it altogether and invent elaborate workarounds that are easier for them to understand. Lots of energy, not much style. This is
one of those skills that film editors (those who have actually
touched celluloid) have over video editors. It is pretty hard to
knock yourself out of sync with a tape-based project, so thinking
in terms of maintaining sync is quite foreign. But film editors
must learn that whenever they add something to the picture—a
trim or a reaction shot—they must add a corresponding number
of frames to the soundtrack.
Staying in Sync
The easiest way out of this dilemma is to turn on the sync locks.
The sync locks allow the system to resolve certain situations
where you tell it to do two different things: make video longer and
don’t affect the soundtracks. The system adds the equivalent of
blank mag (silence) to the soundtrack. This may be safer than
trimming and accidentally adding the director shouting “Cut!” but
it will also leave a hole that must be filled in later. Blank spaces in
the soundtrack are really not allowed! You will find yourself having to return and add room tone or presence so the sound does
not drop out completely.
There will be a time when you tell the system conflicting
things. You tell it to make the video shorter, don’t change the
audio tracks, and stay in sync. This is beyond the laws of physics.
In this case, the system cannot make the decision for you where
to cut sound in order to stay in sync, so it will give you an error
beep and do nothing.
Sync locks work best if the majority of your work is straight
assembly with little complex trimming. It is very effective, however,
when you are sync locking a sound-effect track to a video track.
The crash and the flying brick need to stay together. Also sync locking multiple video tracks together to keep them from being
trimmed separately may keep you from unrendering an effect.
Sometimes you will be cutting video to a premade soundtrack.
The video and audio parts of the sequence do not give you sync
31
32
Chapter 2 ZEN AND THE ART OF TRIM
breaks when you change their relationship. Here, you must be
even more conscious of maintaining sync. Don’t fall into the trap
of thinking that you can knock yourself out of sync now and later;
when you get a chance, go back and fix it. Believe me, by the time
you get the chance to go back, you will have created a situation
that takes much longer to fix than if you did it right in the first
place.
The most important aspect of trimming is to be aware of when
you are going to change the length of the sequence by trimming
on one side or the other of a transition and which tracks will be
affected. When you grasp these points and overcome the fear of
going out of sync, you will have a much more powerful tool and
feel much more comfortable with the workflow concept of refine,
refine, refine.
Sync Break Indicators
With the extra power of the nonlinear world (and film was the
first nonlinear editing system!), there is the responsibility of keeping track of sync. The Avid editing systems do a pretty good job of
telling you if the video and audio you captured together or autosynced together (matching sound and vision from separate
sources after digitizing) have lost their exact relationship. They
are the white numbers called sync breaks. I think of them as a
silent-white alarm that, when I see them ripple across my timeline, tells me I most probably have made a mistake. The only time
I want to see sync breaks is when I have cheated action or I am
dropping in room tone. Sync break indicators can be turned on
and off via the Timeline Fast menu.
Trimming Fundamentals
Let’s take a moment to look at some of the basic mechanics of
Trim. I’m sure that much of this will be review for many of you,
but you may also discover something that you didn’t know or perhaps once knew but forgot.
Chapter 2 ZEN AND THE ART OF TRIM
Entering Trim
There are two basic ways to enter Trim mode:
●
●
Park the position indicator near the edit point where you
wish to trim and press the Trim mode button.
Drag a lasso around the edit point where you wish to trim.
When you drag a lasso, be sure to only drag it around the
edit and not around any complete shots. Doing so will
ensure that you enter Trim mode and not Segment or Slip
mode (depending on whether you lasso from left to right
to select a segment or right to left to slip a segment).
There’s a third method worth mentioning, that has a very special use. When doing very complex trims you’ll often take a few
moments to select and enable the appropriate tracks and edits. If
you hold down the Alt/Option key and press the Trim mode button, you can reenter Trim mode with all of the tracks and edits
you had previously selected for trimming reselected. If you’re
doing complicated trimming—which you will at some point, I
guarantee you—this technique is a huge time-saver.
Exiting Trim
Unlike entering Trim mode, there are many ways to exit, including switching to a different mode; but there are two specific ways
that bear mentioning here:
●
●
Click on the Timecode track. This is the most typical method
used by the majority of editors I know. It has the benefit of
not just exiting Trim mode, but also allows you to place the
position indicator wherever you desire in the timeline.
Use the Edit Review button. When you’ve finished a trim,
you usually need to see the adjustments you’ve just made
in context. The Edit Review button allows you to do just
that with a single key. When pressed, the system exits Trim,
moves backwards one edit plus two seconds, then plays.
Think of this button as a predefined macro, similar to the
Top and Tail functions mentioned in Chapter 1. This button is not mapped by default, but is available for mapping
from the Play tab of the Command Palette.
Adding and Removing Trim Rollers
There are a couple of different scenarios where you may need to
add or remove trim rollers. In the first, you wish to add or change
the rollers on a track you’ve already selected, while in the second,
you wish to add rollers to additional tracks in the sequence.
33
34
Chapter 2 ZEN AND THE ART OF TRIM
Though there are some common techniques, let’s treat each one
separately.
Adding and Removing from a Selected Track
Certainly the most common method used on a single track is
to switch between A-side, B-side, and both sides trimming. This
is easily accomplished using one of three different methods:
●
●
●
The Cycle Trim
Sides button has
the added
capability of switching the
green Audio monitor bar
from one side to the other.
If you have both sides
selected for trim and want
to switch the position of the
green Audio monitor trim
bar from one side to the
other, simply press Cycle
Trim Sides twice.
Click on the A-side or B-side monitor to switch to that side
or click between the two monitors to select both sides.
Use the Trim Side buttons to switch sides. These keys are
mapped to the P (trim A-side), [ (trim both sides), and ]
(trim B-side) buttons, respectively.
Use the Cycle Trim Sides button to switch between the trim
sides. This button has the advantage of performing the
function of all three of the Trim Side buttons but takes up
only one key on your keyboard. Each key press toggles, in a
loop, between A-side only, both sides, B-side only, both
sides, and so on. This button isn’t mapped by default, but
can be mapped from the Trim tab of the Command Palette.
Another typical scenario to add trim rollers is to add similarly
positioned rollers on additional tracks. This is most easily accomplished by simply enabling the desired tracks; the system will
enable the nearest trim rollers it finds to the currently selected
edit. The trim rollers on the newly enabled tracks will have the
same side selected as the current track(s). You can also remove
rollers from tracks by simply disabling the desired track.
Finally, you may want to simply add or remove rollers at specific edits on specific tracks. In these instances, just hold down
the Shift key on the keyboard and click to add the rollers. The
Shift key adds a roller to either the A- or B-side. If you want to add
two rollers simply Shiftclick on both sides of the edit or press
the Cycle Trim button once. Similarly, Shiftclick on an active
roller to remove it.
Adding Rollers Where No Edits Exist
Let’s take a look at the following editorial scenario. The
sequence contains multiple video and audio tracks but you only
want to trim on a subset of those tracks. Perhaps the timeline
looks similar to the following illustration. You need to shorten V1,
A1, and A2, but maintain sync across all tracks.
Though you could certainly use sync locks to achieve the fix,
there is another approach that is extremely useful. If you hold
down the Alt/Option key while you press the Add Edit button, edit
points will only be added to those tracks that do not contain clips.
This gives you an edit point to trim on where none previously
existed. And, if you are in Trim mode when you issue this
Chapter 2 ZEN AND THE ART OF TRIM
command, these new edits will automatically be selected for trim,
as shown in the following illustration.
You can now trim in confidence that sync will be maintained
across all tracks. At the end of your trim you can choose to either
leave or remove these edit points. Personally, I like to remove
them as soon as I’ve finished using them, but they can certainly
be left in the timeline. Technically they won’t cause a problem in
your sequence but you can always choose “Clip Remove Match
Frame Edits” to remove them en masse in your timeline.
If you’d prefer to remove them at the end of the trim, simply
press the Backspace key on the keyboard before you exit Trim
mode. The Backspace key issued from Trim mode instructs the
system to remove all selected match frame edits, selected edits
being those that are currently being trimmed. You can think of this
as a quick shortcut for the Remove Match Frame Edits command.
This function isn’t a replacement for the sync locks but merely
another method you can take to solve a complex sync problem.
One limitation with this technique, though, is when you have a
nonempty track without an edit at the same location, as shown in
the following illustration.
35
36
Chapter 2 ZEN AND THE ART OF TRIM
In this instance, you could still use the Alt/OptionAdd Edit
command, but you would then need to manually select a trim
point on A5 and A6 before trimming, otherwise you would risk
losing sync on those two tracks. This example is a great one for
the benefits of sync locks. If you were to turn sync locks on for all
tracks and then trim the tail of V1, A1, and A2, the gap between
the two clips on A5 and A6 would automatically be tightened up
for you and the timing between the cuts on A1/A2 and A5/A6
would be maintained, as shown in the following illustration.
In summary, both Alt/OptionAdd Edit and sync locks are key
techniques to maintaining sync across multiple tracks in the
sequence. Each has its distinct advantages and, arguably, disadvantages. (Sync locks really only show their power when you have
a complex audio bed and/or lots of video effect composites. In
simple timelines they can actually prevent you from making a
reductive trim. This is probably where they have gained an undeserved negative impression with many editors. If you discarded
them as a tool long ago perhaps it is time to revisit them!)
Methods of Trimming
Now that we’ve reviewed—and expanded upon—some of the
fundamentals of Trim mode, let’s look at all the different ways we
can actually perform a trim. As with the previous section some of
this will be familiar and hopefully some of it will be new. Every
editor has their favorite method of trimming. Perhaps you’ll discover a new favorite in this section!
Drag Trim
This is the most fundamental method of trimming. After selecting the appropriate trim tracks, edits, and sides, simply grab a
roller and drag it to its new position. The video monitors in the
Composer window will update as you drag, showing you the
result of your trims. Be careful, though, to always drag from an
existing roller, including the correct side! If you try to drag from
Chapter 2 ZEN AND THE ART OF TRIM
37
an edit or side that does not contain a trim roller you’ll remove all
existing trim rollers and create a new one. Usually it only takes a
few times of doing this to remember the rule. If you do a lot of
drag trimming and don’t want to be endlessly frustrated be sure
to learn it and live by it.
Remember that the total number of frames you have trimmed
on both the A-side and the B-side is indicated via the Trim numbers in the center of the Composer window, just above the command buttons.
One disadvantage to drag trimming is that you only see the
picture change. If you want to hear the audio change you must
hold down the Shift key (or use Caps Lock) to activate Digital
Audio Scrub. Remember that this technique will play the frame of
audio you are trimming as you drag the rollers. If you are trying
to drag right up to the beginning of a sound bite you can use
Digital Audio Scrub to hear the beginning of the bite—and perhaps even the breath before it. In addition, you can enable the
audio waveforms by selecting “Timeline Fast menu Audio
Data Sample Plot.” As this is a relatively awkward menu command to get to, I strongly recommend mapping it to a key. If you
don’t already know how to do this, we’ll discuss it in Chapter 3.
Power User: Defining Which Frame’s
Audio Is “Scrubbed”
When you move the position indicator by one frame,
there are two possible frames you might want to hear
the audio from: the frame you park on or the frame that
precedes it.
To see and modify the frame heard, you must display
the Digital Audio Scrub parameters in the Composer
window.
Once enabled, you will see either a 0/1 or a 1/0 in the outside corner above the Source and Record monitors.
• 0/1: You hear the frame you are parked on.
• 1/0: You hear the frame to the left of the frame you are
parked on.
38
Chapter 2 ZEN AND THE ART OF TRIM
You will almost always use Digital Audio Scrub in the default (0/1) configuration, especially when you’re scrubbing
and marking. But when you are trimming on the tail of a shot, it may be preferable to hear the preceding frame instead.
This is especially true if you are trying to remove a blip, breath, or similar sound at the end of a shot.
Let’s take a look at the following scenario. The timeline below shows an undesired sound at the end of the clip.
When you select the A-side of the edit and trim backwards you want to hear that the undesired sound is gone when
it is really gone. If Digital Audio Scrub is set to “0/1” you will hear the sound from the frame you just trimmed away (and
is therefore no longer in your sequence), but if it is instead set to “1/0” you will hear the frame that remains at the end
of your edit. Give it a try and you’ll see what I mean. I know editors who do tight audio editing all day who swear by this
option and are switching it back and forth as they move through the editorial stages.
Note: If you want to use this in Trim there is a critical fact you must be aware of. The Digital Audio Scrub parameters
above the Source also set the scrub configuration for the A-side in Trim. Likewise, the Record monitor also sets the scrub
configuration for the B-side in trim.
Snapping to an Edit or Mark
When using drag trim you may often want to snap your trim
position to another edit in the timeline or a mark. Both of these
can be easily accomplished by holding down the Ctrl/Command
key while dragging. When the command is held down the trim
rollers will snap to all edit points on all tracks in the timeline. It
will also snap to In and Out marks, making it easy to premark a
position for trimming prior to dragging.
For example, if you were splitting an edit, you could play
through that section of the timeline and mark an In or Out at the
point where you wanted to split. Then simply enter trim on the
video track, hold down the Ctrl/Command key, and drag to the
mark you placed. Release the mouse and you will be trimmed
exactly as you desired. (Be sure to hold down the Ctrl/Command
key through the entire mouse movement, including the release,
or the system will ignore the snap to command.) As we’ll see later,
there are arguably more efficient ways of doing this type of split
edit, but this technique works very well if you are most comfortable with drag trims.
Chapter 2 ZEN AND THE ART OF TRIM
Keyboard Trim
Dragging is fine, but it tends to be a bit inaccurate, especially if
you are trying to trim in or out a beat or trim a specific duration
of time. For these instances, you might want to use the keyboard
to trim instead. Two different types of trims are available: offset
trims and directional trims.
Offset Keyboard Trims
These types of trims use the numeric keypad on your computer. Naturally, these types of trims are easy to do if you have a
full keyboard but they are a bit harder to do on a laptop or other
reduced keyboard, at least with one hand. To perform an offset
trim you type the number of frames you wish to trim, indicate the
direction you wish to trim using a or – symbol (a “” indicates
a forwards trim while a “–” indicates a backwards trim), then
press Enter. You can issue these in any order, as the commands
“15” and “15” will both accomplish the same thing: a 15frame forward trim. You can even change your mind and switch
from forward to backward or vice versa by typing the other
modifier before you press Enter.
Be sure to remember the rule from Chapter 1 regarding
numeric keyboard entry: one or two digits equal frames while
three digits equals seconds and frames. If you want to trim backwards by, for example, 120 frames, you need to type “120 f ” then
press Enter to tell the system to count by frames, not by timecode
(seconds and frames). Unlike the “” and “” modifiers, the “f ”
modifier must always follow the numbers.
Directional Keyboard Trims
These trims use the trim keys on the numeric keyboard. These
keys will trim the selected edits one or ten frames backwards or
forwards. You can also use Digital Audio Scrub in conjunction
with the trim keys, just as you can with drag trimming, or turn on
the audio waveforms. If you are using the single-frame trim keys
this method can be very useful in trimming up to the beginning
or end of a sound or breath.
Both the offset and directional techniques are great if you
know—or feel—the amount of frames you need to trim, for it is
far quicker to press the M key once to trim backwards by ten
frames (or type “10” from the numeric keypad) than it is to drag
exactly ten frames. These techniques are great for opening up or
tightening by “beats.” Of the two options I often find myself using
the numeric keyboard more than the trim keys, but that is possibly because I use the trim keys for on-the-fly trimming, as I’ll
describe in the next section.
39
40
Chapter 2 ZEN AND THE ART OF TRIM
Trimming with J-K-L Scrub
This is my second-favorite method of trimming on Avid. Just as
J-K-L is a great way to find points in your source material, using it
in Trim is a fantastic way of fine-tuning an edit. Indeed, many “oldschool” editors like to think of J-K-L Scrub as “rocking reels” for
the analog audio sound is analogous to the sound and precision
one got by manually scrubbing on an open-reel audio tape deck.
J-K-L functions in Trim identically to the way it functions in
Source/Record, with the exception that you are actively trimming
material while playing. To review, Table 2.1 lists how to access the
various play modes. (Note: If you have remapped these commands, press those keys instead.)
Table 2.1 J-K-L Trim Functionality
Operation
Key Usage
Trim forward at sound speed
Press L key
Trim backward at sound speed
Press J key
Pause playback
Press K key
Trim forward at faster than sound speed
Press L key twice for 2, three times for
3, four times for 5, five times for 8*
Trim backward at faster than sound speed
Press J key twice for 2, three times for
3, four times for 5, five times for 8*
Trim forward at quarter-speed
Hold K key, then press L key
Trim backward at quarter-speed
Hold K key, then press J key
Trim forward one frame
Hold K key, then tap and release the L key
Trim backward one frame
Hold K key, then tap and release J key
*The sound only plays at speeds up to 3. Once you hit 5, the sound, thankfully, cuts out.
Just as is the case with J-K-L play, the real power in J-K-L trim
comes from the fact you can dynamically switch between all of
the above trim. When using this technique it isn’t unusual for an
editor to “overtrim” slightly more than required then use JK or
KL to roll back and forth until he or she has nailed the desired
edit timing.
Trimming a Split: The Watch Point
If you wish to trim an already split edit, you can use J-K-L to
trim either at the video edit or at the audio edit. Your decision will
affect whether you are more interested in the picture or the
sound transition. When you’ve selected a split for trimming, the
Chapter 2 ZEN AND THE ART OF TRIM
blue position indicator will be positioned on the edit that will be
used as the center point for your J-K-L trim. By default the position indicator is aligned with the video edit. I typically find that
when I’m trimming a split I need to fix an audio problem, so I
prefer to center my J-K-L trim at the audio edit.
Doing so is quite easy. Simply click on the trim roller you wish
to center on and the position indicator will jump to that position.
Unfortunately, there is no keyboard-based method of doing
this—you must click with the mouse to move the position indicator. Moving the position indicator to the audio edit in a split
also changes the center point around which trim loop play is
performed.
Trimming On-the-Fly
In my opinion, the best way to trim on an Avid editing system
is to trim on-the-fly. Indeed, this is the very trimming technique
that the editor I mentioned previously was referring to when he
said that trimming made him feel one with the footage. When I
trim I often start with J-K-L to get close then switch to on-the-fly
to really nail the edit.
Trimming on-the-fly is a technique used during trim loop play.
During the trim loop you can use the Mark In, Mark Out, or the
keyboard Trim keys to trim the selected edit or edits. The Mark
and Trim buttons operate differently while trimming on-the-fly,
so we’ll cover them separately.
Mark In and Mark Out
While the trim loop is playing, you can press Mark In or Mark
Out to immediately update the edit to the point you marked. For
example, if you are trimming the A-side of an edit and wish to cut
out on that side immediately after a specific word in the dialog,
simply press either Mark button at the desired time. The trim will
be immediately applied and the play loop will begin again, looping through the newly trimmed edit. You can press either Mark
button again to further refine the edit then see your changes in
the next loop. And you can even open the edit up by pressing the
mark button either past the edit (in the case of an A-side trim) or
prior to the edit (in the case of a B-side trim).
41
42
Chapter 2 ZEN AND THE ART OF TRIM
As you can imagine, the interactivity is what makes this technique so fantastic and powerful. Instead of dragging, playing,
stopping, dragging again, playing, stopping, and so on, you simply play, mark, immediately review your change, and continue to
revise while playing as required. If you do the majority of your
trimming by either dragging or entering numbers on the keyboard, then give this technique a try. You may well find your new
favorite method of trimming!
If you are trimming on a single edit point the Mark In and Mark
Out buttons have the exact same function. But if you are trimming a slip or a slide, the two buttons operate differently:
●
●
Use the Mark In button to change the edit timing of the
first, or left, edit.
Use the Mark Out button to change the edit timing of the
second, or right, edit.
Keyboard Trim Keys
Only the keyboard
trim keys will work
with this technique.
If you try to use the onscreen
trim buttons, playback will
immediately stop.
As opposed to the Mark buttons, when you press the Trim keys
on the keyboard the key presses are not immediately applied, but
are instead accumulated and applied at the end of the trim loop.
This enables you to press, for example, the comma three times to
trim backwards three frames without interrupting the loop playback. When the loop completes, Avid will apply the three-frame
trim and begin the loop again.
In my opinion, this technique is the finest “tool” in the Trim
toolbox for it lets you trim away frame by frame and instantly see
the result. When you’re trying to fine-tune a dialog edit I believe
there is no better tool to use. J-K-L would be a close second, but, as
I mentioned earlier, I often begin the fine-tune process with
J-K-L then switch to keyboard trim on-the-fly to really nail the edit.
Changing the Trim Loop Duration
By default, the Avid system uses a four-second trim loop and
plays from two seconds before the edit being trimmed, known as
preroll, to two seconds after the edit, known as postroll. (In the
case of a slip or slide, the loop plays two seconds before the first
edit, through the slip or slide, then two seconds past the second
edit.) This can be modified two different ways.
The first way is to use the preroll and postroll fields in the left
side of the command region of the Composer window. These fields
are displayed if you have both rows of buttons displayed. This is
easily accomplished using the Composer setting. (We’ll discuss
configuring the Composer window in Chapter 3.) Simply enter the
duration desired for the preroll and postroll and you’re set.
Chapter 2 ZEN AND THE ART OF TRIM
Preroll
Postroll
Another method—and one that can be accessed completely
via the keyboard—is available via the Trim settings. The first tab
in this setting provides not only the preroll and postroll settings,
but also an intermission setting that can be used, if desired, to
pause the loop. One possible use for the intermission is to give
the client a chance to digest the loop before beginning it again.
Personally, I don’t use this setting, but I do know editors who do.
So how do you access and modify the Trim setting completely
from the keyboard? Simple! Just press Ctrl/Command4 to select
the Composer window, then press Ctrl/Command to open
the Composer window settings. Once the dialog is open you can
use the Tab key to move through the three fields to enter the
desired duration (in seconds and frames). Finally, just hit the
Enter key to close the settings dialog.
As this is a user setting, your preferred trim loop preroll and
postroll settings will be stored with your user setting.
Switching Trim Types On-the-Fly
While in trim loop play you can use the Trim sides or Cycle
Trim keys on the keyboard to toggle the trim between an A-side,
B-side, or both sides trim. After pressing the key, the trim will
43
44
Chapter 2 ZEN AND THE ART OF TRIM
update and the loop will immediately restart. You can also use the
keyboard track buttons to enable or disable tracks, but using
these buttons will stop trim loop play.
Types of Trim
Now let’s take a look at the various types of trim. We’ll start with
a quick review of single- and dual-roller trim then move onto the
more advanced types of trim.
Dual-Roller Trim
Dual-roller, or center, trim is usually the first type of trim an
editor discovers because it is has the lowest risk of knocking a
sequence out of sync. But it is also the least-useful type of trim as
it always does two in-kind edits. I’ve watched beginning editors
roll back and forth over an edit with dual-roller trim as if they
were trying to decide which “wrong” sound edit was the least
offensive. That is because the chance of revealing undesired
material while removing other desired material is so easy to do
when you’re trimming both sides simultaneously. If you’re stuck
in dual-roller land, it is time to step out and use single roller.
This isn’t to say that dual roller trim is useless. Far from it! If
you are trying to split or unsplit an edit, dual roller is the perfect
trimming tool to use.
Single-Roller Trim
This is the most fundamental type of trim in the Avid system. It
is also the type of trim that often scares beginning editors away
from trim. Unlike other editing systems, the Avid system is “sync
unlocked” by default. If you want to perform a single-sided trim
on just the video or just the audio of a sync sound clip, the system
will let you—even though doing so will knock you out of sync.
Remember that, at the very minimum, you can press Undo to get
out of any situation.
Slip
Beyond the basic situations, most of the difficult sync problems are fixed by using the Slip mode. First you have to ignore the
“fact” that trimming a shot must make the sequence longer. Trim
in the center of the transition, basically not affecting the sync,
then use the Slip function. Many people have a difficult time
grasping slip trim because it is so tied to the nonlinear, random
access concept.
Chapter 2 ZEN AND THE ART OF TRIM
You can enter the Slip mode by multiple methods. With Media
Composer and Symphony you can double-click on a clip once
you are already in the Trim mode (as long as the timeline view
allows you to see a black arrow cursor). In all models you can also
get to slip trim by lassoing the entire clip from right to left. You
may need to hold down the Alt/Option key to select the exact clip
in a complex timeline. I generally get there by double-clicking in
Trim mode because I use it as a second step in a difficult trim
situation.
Think of slipping as a shot on a treadmill. The shot slips forward or backward, showing an earlier or later part, but the place
in the timeline never changes. A slip will change the content of a
shot by revealing new material, but leaves the duration of the
shot and location in the timeline the same. Because you usually
have more video linked to any shot used in the sequence, you can
slip that entire shot back and forth.
So if you trim the beginning of the shot ten frames as part of a
center trim, you can slip the shot back into position so that it still
starts with the same frame. If the first ten frames of shot B are
important, then slip them back into place. Your center trim
moves the frames viewed in the A and B shots of a transition to
be ten frames later. Although shot A gets longer and shot B gets
shorter, the length of the sequence is not affected and the sync is
not disturbed. Shot B has gotten shorter, but after you slip, it still
has the same starting frames. I have worked with producers who
have edited their programs on Avid systems for years who had
never seen slip trim! Although it seems complex at first, it is truly
a powerful tool when used in the right place.
Another very powerful way to use Slip mode is to use it to
search through B-roll footage. Let’s say that a piece of B-roll you’ve
edited into your sequence just isn’t working for you. You know you
want to use B-roll at that point in the timeline, but the shot just
isn’t working. Before you go digging through your bins looking for
another shot to use, select the shot and enter Slip on that shot.
Then press the L key (or J key) multiple times and start whipping
through the B-roll clip. You may find another section of the same
B-roll clip that works better than what you cut in. And the beauty
of searching through your clip via Slip mode is that once you’ve
found the footage you’re happy with you’re basically done. A little
fine-tuning to get the right first frame is all that is required.
Slide
The corollary to Slip mode is Slide mode. You can enter Slide
mode by Ctrl/Option dragging from right to left, or Ctrl/Option
double-clicking in Trim mode.
45
46
Chapter 2 ZEN AND THE ART OF TRIM
Slide mode moves the shot neatly through the sequence by
trimming the shots on both sides of the selection. It affects the
location of the shot in the timeline, but not the content or the
duration. It is a good alternative to dragging a shot with the segment mode arrows if you are making a smaller change, but not
nearly as useful as Slip mode.
Trimming in Two Directions
Trimming in two directions, an asymmetrical trim, is a subtle
and very powerful technique. I typically use it when joining two
scenes together as it allows you to easily tighten up the transition
between the two scenes while simultaneously carrying over audio
from the first scene into the second. It also is useful when you must
trim a video clip longer, but don’t want to add extra material to a
sound effect or music that would keep you in sync but ruin an edit.
To help you grasp this technique, let’s look at an editing scenario.
You are joining two scenes, B and C, together. To marry them
so they appear to be part of a continuous story you want to overlap the audio from scene B with the video and audio from scene
C. You don’t want, however, to extend the audio from scene B as
the director yells “Cut!” almost immediately after the last frame
you used. To prepare for the audio overlap, you move scene B’s
audio to a separate track, as shown in the following illustration.
Now let’s analyze what we want to accomplish via Trim. We
want to shorten the tail of shot B/1-A’s video but not affect the
video (or audio) of shot C/3-X. This suggests a single-roller Asided trim on the tail of B/1-A. But we don’t want to remove any
frames from the audio of B/1-A. We have to perform some sort of
reductive trim, though, on A2 or we’ll break sync downstream.
An asymmetrical trim means that we can trim on the head of
one edit and the tail of another. The two trims will both either
trim out or trim in footage, but roll in separate directions to
accomplish this. Since we don’t want to affect shot B/1-A’s audio,
we can select a B-side trim on the filler just past the audio clip.
Finally, we need to consider A1. We know we don’t want to trim
away any of C/3-X’s audio but we need to perform a reductive
Chapter 2 ZEN AND THE ART OF TRIM
trim on this clip as well or we’ll lose sync. If we had sync locks on,
this trim would be handled for us automatically. But if we want to
do it manually all we need to do is select an A-side trim on the
filler preceding shot C/3-X’s audio on A1. These trim rollers are
shown in the following illustration.
Now that the trim rollers are properly configured we’re ready to
trim, right? Well, if we are going to use drag to trim, the answer is
“yes.” But if we want to use any other trimming technique the
answer is “not necessarily.” Why? Simply because we will have
trim rollers moving in two different directions. Take, for example,
the concept of a J-K-L trim. If we were to trim backward using
JK on V1 and A1 the shot would be shortened. But if we were to
trim backward using JK on A2 the filler would be lengthened. It
is critical that we tell the Avid system which roller we want to
“control” so the trim operates as we expect it to. To tell Avid which
roller you wish to control simply click on the desired edit. Clicking
on either V1 or A1 means that a JK trim will be a reductive trim.
Clicking on A2 means that a JK trim will extend the edit.
Regardless of the roller you select, when you actually perform
the trim you’ll discover that the system will move all rollers in the
correct direction so that the overlap is created and everything
stays in sync.
Trim Two Tails (or Two Heads)
Version 3.0 introduces a powerful new method of trimming:
trim two tails or two heads. To help you grasp this technique, let’s
look at an editing scenario.
You are well into the edit and need to shorten clip B/2-X in the
sequence illustrated below. Unfortunately, the duration of the
47
48
Chapter 2 ZEN AND THE ART OF TRIM
scene is already locked. What are your options? Well, you could
use a dual-roller trim at the edit point between B/2-X and B/1-A,
but that would change the head frame edit on B/1-A, which is
undesirable. Alternatively, you could slide B/1-A, but that would
change the head frame edit on BA/3-X, which is also undesirable.
Since neither single trim approach really works for you, you’ll
likely do an A-side trim on the tail of B/2-X, write the number of
frames trimmed on a piece of paper, then find the tail of another
shot in the scene that you could extend. It works, but hopefully
you won’t get distracted by a panicked producer while you’re
searching for that other clip.
In Media Composer 3.0 we’ve provided a new trimming technique that not only solves this problem, but many other similar
problems. Indeed, I may never do another slide trim again. You
can now select two A-sides (tails) or two B-sides (heads) anywhere in the timeline and perform an asynchronous trim on
those two edits! In this scenario let’s select the tail of B/2-X and
BA/3-X, as seen in the timeline below.
Note the trim rollers. To make the above selection I lassoed the
edit between B/2-X and B/1-A, switched to an A-side trim, and
Shift clicked on the other two rollers. Once selected, you can use
any trim technique you desire (drag, J-K-L, on-the-fly, etc.). After
trimming the tail of B/2-X, the timeline looks like the following.
Notice that the position of shot B/1-B (and everything afterward) has not changed. You made your adjustment in one
Chapter 2 ZEN AND THE ART OF TRIM
49
interactive trim without changing the duration of the scene. As
you can see, this is a very powerful trim technique and one that
will likely change the way you approach some complex trimming
situations, especially late in the game, editorially.
Trimming in Filler
There will be times when you’ll enounter a trimming situation
when you want to remove material from only one side of an
edit but you want to maintain the duration of the section of
the sequence. For example, you may have a synced clip with
some undesired audio—such as an audio pop or an off camera
thunk—at the head or tail of the edit. You’re happy with the duration of the cut, but need to get rid of the audio. If there’s no obvious sync in the clip, then you can often solve this problem by
slipping just the audio—but sometimes slipping is just not
possible.
In these instances you can hold the Alt key down (Windows) or
the Ctrl key down (Macintosh) while performing a single-sided
trim. Instead of simply reducing the duration of the selected clip,
frames of filler are edited into the sequence for every frame of
footage removed from the clip. You can use any trimming technique desired with this technique, but be sure to hold the modifier down until you complete the trim—especially when using
J-K-L trim.
If you use this technique with audio you may find yourself
with a location in the sequence where there’s no audio playing.
This absence of sound will be very obvious to the listener and you
should replace the filler with recorded silence from the environment of the shoot (often referred to as “room tone”) so that any
atmospheric noise present when the sound was recorded carries
over to this region of your soundtrack.
Once you’ve
begun this trim you
cannot reverse
direction while maintaining
a single-sided trim
selection. Doing so will
knock you out of sync. You
will need to switch to dualroller trim to adjust the edit.
Multicamera Take Names
In the previous examples the clips used a common naming convention for multicamera live sitcoms or dramas. The
clip names break down as: Scene/Take-Camera. Scenes are numbered alphanumerically starting with A. If there is a
camera reset and a scene continuation, the scene number is usually given a second digit (e.g., scene B and scene BA). In
a four-camera stage shoot the cameras are typically labeled A, B, C, and X (for eXtra). Depending on the director the cameras can be positioned audience left to right in A, B, C, X or X, A, B, C order.
50
Chapter 2 ZEN AND THE ART OF TRIM
Trimming Outside of Trim
Let’s conclude our discussion of trim by looking at two techniques you can use to trim outside of Trim mode. Some folks like
to refer to these two methods as “trim unplugged,” which is certainly an apt name.
Extend
As I mentioned earlier, the most typical use of dual-roller, or
center, trim is to perform a split edit. As split editing is a very common technique, Avid includes the ability to do this outside of Trim
using a function called Extend. Extend uses either a Mark In or
Mark Out to indicate the direction for the Extend. The key to
remember is that the edit you wish to extend must be contained
within the mark. Therefore, if you wish to extend an edit backwards, mark an In point prior to the edit, and if you wish to extend
it forwards, mark an Out point after the edit. Then simply turn on
the tracks you want to extend, and press the Extend button. It will
not knock you out of sync because it is a center trim and it trims
both sides of the transition simultaneously. I find it most useful
for mechanical trims that go to a direct and easy-to-mark point. It
is best used, for instance, to extend a B-roll shot to the end of a
sound bite. If any finessing is needed, I go to the Trim mode.
The Extend button is not mapped by default, but is available
via the Trim tab of the Command Palette.
Slip in Source/Record
As slipping is also a commonly used function, especially to
align disparate video and audio in sync, this function is also available outside of Trim. If you wish to slip a shot outside of Trim,
simply park on the shot you wish to slip, turn on the tracks you
wish to slip (and turn off those you don’t), and use the keyboard
Slip keys to slip the shot either backwards or forwards.
It is important to note that the trim keys in this type of slip
function opposite to the way they do in Trim mode. Table 2.2 lists
their functionality in Source/Record slip.
Table 2.2 Trim Key Slip Functionality
Key
Function
Trim left one frame
Slip forward in time one frame
Trim left ten frames
Slip forward in time ten frames
Trim right one frame
Slip backward in time one frame
Trim right ten frames
Slip backward in time ten frames
Chapter 2 ZEN AND THE ART OF TRIM
Notice that I use the term “in time” to describe the direction of
the slip. If you were to park on a locator and slip the track containing the locator you would see the locator move left when you
use the Trim Left keys and move right when you use the Trim
Right keys. But in order for that locator to move left, the shot
must slip forward in time. Think about it. For a locator to move to
the left, the shot must start later in the original source. Starting
later in the source means that you are trimming forward in time.
I’ll admit that it can sound confusing, but the best way to understand it is to try it yourself.
A typical way this is used is to park on an audio sound cue then
slip the video until it aligns with the cue. I use this technique
quite often when adjusting the timing of inserts. If the insert
must be synchronized to a sound on the main audio track, such
as, for example, the clinking of two glasses, I can drop the insert
in over the sound, park on the sound, then slip left and right until
the action in the insert is synchronized.
I’ve also used this to realign individual shots that drop out of
sync and even to force audio out of sync to remove an undesired
sound. Remember that you can always break sync if the sync break
won’t be noticeable to the viewer. If there isn’t lip flap or other
obvious examples of sync you can slip the audio and video out of
sync to remove an undesirable sound, such as an off-camera tap
or thunk.
Conclusion
As you can see, Trim is an extremely powerful set of tools that
you can use to refine and fine-tune your edit. If you aren’t using
Trim yet, by all means jump in head first! And if you’ve only just
begun to trim, use this chapter as the impetus to dive into the
deep end of the trimming pool.
51
This page intentionally left blank
3
INTERMEDIATE TECHNIQUES
“’ Tis skill, not strength, that governs a ship.”
—Thomas Fuller
It may come as a surprise that most beginners of the Avid editing system make the same basic mistakes. I don’t mean mistakes
caused by the software being too difficult, but mistakes from
working hard to grasp some fundamental ideas. They are sometimes crucial mistakes, like not knowing exactly what to back up
and then trying to restore a project with no bins. Sometimes it is
a subtler mistake, like not using the power of a new tool because
“That’s not the way I work.” You may be missing a huge opportunity to improve your speed and understanding.
I have heard people say that Avid is difficult to learn and that
the interface has a steep learning curve. This is only partially correct. You can be mousing around the screen in only a few hours
and really editing by the end of your first day. But as with any professional tool, you want it to go faster and do more and the Avid
interface rewards this, yet very few people use everything the
software has to offer. If you have a particular task to perform,
there are the tools designed to facilitate that task in a straightforward way. If you need something a little different, there is a lot of
room for variations. The variations take the most time to learn,
but are the most rewarding.
The most basic mistakes are made right at the beginning, when
editors are still trying to learn how to navigate through their
material. There is a lot of translation going on between where
they want to go, how they used to do it, and the two or three techniques they know how to use. They end up settling for the dog
paddle before they have mastered the breaststroke, the crawl, the
backstroke, and the sidestroke. They will always poke along
unless they unlearn the method that wastes energy and, let’s face
it, gets them there without much style.
53
54
Chapter 3 INTERMEDIATE TECHNIQUES
Multiple Methods to Solve One Problem
Here is another fundamental tenet of using the Avid systems:
You can use multiple methods, one after the other, to fix a problem. Editors who consider themselves novices may have acquired
one or two methods that they use under all circumstances. The
more experienced editor uses a method of trim to get close as fast
as possible, depending on the particular timeline view and level
of sequence complexity. The editor then reanalyzes the problem
and easily switches to another method to put the final polish on
the fine points. The “right” way is the way that accomplishes what
you want in any given particular situation in the fastest way
possible.
Using the Keyboard
You may have guessed by now that I am referring to the overuse and abuse of the mouse or trackball. This is where you should
start to improve your technique. When you first learn, use the
most obvious way—the mouse. This helps you get over the beginner’s problem of trying to remember what you want to do next
and where it is on the screen. After this beginner’s stage, you
instantly forget how magical it all is and want to go as fast as possible. Then you must cast down the mouse! Use your keyboard!
Force yourself to use the edit keys and keyboard equivalents as
soon as possible. If you haven’t put the colored keycaps or stickers on your keyboard yet, you are missing a whole world of speed.
Look at the Ctrl/Command key equivalent for the functions you
use the most and think up funny little ways to make them stick in
your head. Ctrl/CommandZ to undo and Ctrl/CommandS to
save should be comfortable before your first day is over. Then
start to use Ctrl/CommandW to close windows and Ctrl/
CommandA to select all. Use F4 to start capturing once you are
in the Capture mode and, as an ongoing project, memorize the
Tools menu. You should mark Ins and Outs mainly from the keyboard so you can keep your material rolling and mark on-the-fly.
Trimming can be done in several ways from the keyboard. You
don’t want to give yourself a repetitive stress injury, though, so
always try to make the environment as friendly as possible for
your wrists. Get the keyboard at the right height, get a wrist pad if
you need it, and give your wrists the rest time and exercise they
need to keep functioning. Use the extra time gained with these
keyboard techniques to watch the sequence one more time and
think about it.
Chapter 3 INTERMEDIATE TECHNIQUES
Customized Keyboard
There are many ways to personalize the keyboard. I don’t recommend any special keyboard layouts since I believe they all
should be created organically from observing the functions and
keys you use the most. You can take any button from the
Command Palette and put it on any key (button to button).
Some recommend learning the colored keycaps and modifying
only the function keys or the shifted functions of keys that make
alphabetic sense to you. For example, you can use the shifted
function of the keyboard to store a wide set of mnemonic-based
shortcuts; put Render on ShiftR, Subclip on ShiftS, Import on
ShiftI, Export on ShiftO, and so on!
Once you’ve mapped commands to your keyboard, don’t be
afraid to change them. If you find yourself not using a mapped
command anymore, change it! There is no reason to leave a key
mapped to a function you never use if you could better utilize it.
One rule to consider is that if you find yourself consistently using
a command for the menu in a session, map it! I know of some
editors who use the function keys as their “session scratch pad”
and remap them continuously to commands they are using at the
moment. If the function becomes a consistent part of their daily
use they then map it down to the main keyboard.
Over the years my keyboard has evolved with the type of editing I do. My current keyboard map is primarily customized on
the left side. That is because I both edit on a curved “ergonomic
keyboard” and I tend to leave my right hand primarily on the
mouse. I also make extensive use of shifted commands as I find it
a quick and convenient method to access the commands I need
to use. The following figures show my current keyboard in both
its normal and shifted function.
55
56
Chapter 3 INTERMEDIATE TECHNIQUES
Some functions on the pulldown menus do not have keyboard
equivalents or buttons. You will need to map them in order to use
them as a single keystroke or in conjunction with a third-party
macro creation program. A good example of this would be the
Audio Data Sample Plot (or audio waveform) command that
lives in the Timeline Fast menu. If you find yourself toggling this
on and off during your edit session it is far faster to have it
mapped to a key than to navigate through the Timeline Fast
menu every time you want to turn it on or off.
Here is how to map a pulldown menu to a key:
1. Open the Keyboard setting and the Command Palette at
the same time.
2. Click on the Menu to Button reassignment button on the
lower right of the Command Palette. Your cursor will
change to an icon of a mini-pulldown menu.
3. On the Keyboard setting window, click the key you want to
map. Hold down the Shift key if you want it to be a shifted
function.
4. Choose the menu you would like to map from the pulldown menu choices. The initials representing that function will appear on the key.
When you are mapping the keyboard, be sure to save your settings. This is quickly accomplished by highlighting the Project
window and pressing Ctrl/CommandS. You may want to locate
your user settings (which are in an Avid Users folder inside an Avid
program folder stored in either the shared files or documents
folder of your system or, for older systems, within the Program
Files folder), and save a backup copy of the settings on removable
media.
Once you feel comfortable with where everything is on the
screen, push yourself to resist the mouse and keep your hands on
Chapter 3 INTERMEDIATE TECHNIQUES
the keyboard! You may find that you need to create several keyboard settings and use them for different types of projects.
If you have a custom keyboard, be aware that it works best for
the version of the software you were using when you created it. If
you go to an earlier version of the Avid software, your keyboard,
like all user settings, may have features that do not exist in the
earlier version. Usually you can go forward to the latest software
version with Keyboard settings, but this has been known to occasionally create odd, unrepeatable problems. It is best to take a
screenshot of your Keyboard settings (use a shareware screen
capture program to save the Keyboard settings window as a
graphic file), print it out, and make the custom keyboard again.
Navigating Nonlinearly
Another beginner’s challenge is to not think linearly when
jumping large amounts of time. Editors make a compromise and
move at the speed of human comprehension in order to grasp a
particular point in the material or listen to the performance. But
what if you just want to get there as fast as possible? I see beginners actually dragging the timeline’s blue bar through their material or sequence to get to the end! It’s random access; get random.
Jump to the end with the End key and jump to the beginning with
the Home key.
Fast Forward and Rewind
The Fast Forward and Rewind buttons are useful if you just want
to jump to the next or the previous edit, but these buttons are usually left to the user setting default of being “track
sensitive.” This means that the default for the Fast
Forward and Rewind buttons jumps to the next
edit that uses all the tracks that are highlighted in
the timeline. If video track 1 is highlighted, then
you jump, in a sequential way, from cut to cut on
video track 1 only. Turn on all the tracks (Ctrl/
CommandA with the timeline highlighted). Now
you jump to every edit where all the tracks in the
sequence have a cut in the same place. No straight
cuts on all your tracks in the same place? With all
your tracks highlighted, Fast Forward jumps all the
way to the end of the sequence! That can be confusing since there is no easy way to get back to
where you were in the timeline. There is no undo
for jumping to the wrong place!
57
58
Chapter 3 INTERMEDIATE TECHNIQUES
If you find yourself jumping to the end of the sequence a lot by
accident, you can change the Composer user setting on Media
Composer and Symphony so that it jumps to every edit regardless
of which tracks are highlighted. You can change the settings to
jump to every locator, too. You can reverse this default Composer
setting instantly by holding down the Alt/Option key in combination with the Fast Forward or Rewind keys. This may be faster than
going to the setting, especially if you need this option only
occasionally.
Using the Timeline
Modifying Fast Forward and Rewind still misses the larger
point, which is that you don’t need to step through lots of edits
just to get through the timeline. If you want to get near the end,
just click there! But more important, you need to be able to see
where you are going. Learn to change the scale or view of your
timeline quickly and easily.
There is a marvelous and intuitive drag bar to resize the timeline. Drag the slider to the left and the timeline compresses; drag
it to the right and it expands. You have fantastic fine control and
can change the view by large amounts quickly with the same
function. On Media Composer and Symphony there are more
keyboard controls so don’t neglect these:
●
●
●
●
●
The Focus button (the H key) is especially useful for troubleshooting small problems like flash frames because it is
a one-step zoom to a preset amount to analyze a small section. Since it is a toggle, pressing it again takes you back to
where you were.
The keyboard equivalents to the drag bar (Ctrl/
Command[, Ctrl/Command]), which I map on my keyboard to ShiftX and ShiftC, respectively, so they are
always available under my fingers.
Ctrl/Command/ to show the entire sequence. This is
always a quick reference if you get lost while zoomed in
too far. I map this to ShiftZ on my keyboard.
Ctrl/CommandJ for “jump back.”
Ctrl/CommandM for zoom in or “more.” Ctrl/
CommandM allows you to drag a unique-shaped cursor
around a specific area in the timeline where you want to
zoom in. This technique is very useful for pinpointing a
segment that needs more refinement.
There are so many easy ways to change the scale of the view in
the timeline because it is vital to using the power of the system.
The timeline is not just a pretty picture. It is an important tool for
navigation and should always be sized to fit your needs for that
Chapter 3 INTERMEDIATE TECHNIQUES
moment. Swoop in to do some fine trimming, step back a little
and look at the whole section, then fly off somewhere else to fix
the next problem. You should be considering the scale of the
sequence view at every stage of the work.
Jumping Precisely
Even though you may see precisely where you are going, you
may not always get there the fastest by just clicking the mouse.
Don’t dog paddle through the sequence; you need to combine
the power of the random-access navigation of the timeline with
the precision of the Fast Forward and Rewind keys. How can I
jump huge distances in a single bound and still end up on the
first frame of the cut? There are a series of modifier keys without
which life as you know it could not exist. The most important is
the Ctrl/Command key. When you hold down the Ctrl/Command
key and click in the timeline, the blue position bar always snaps
to the first frame of any edit on any track. It also snaps to marked
In or Out points.
If you hold down the Ctrl/Command key while dragging your
cursor through the timeline, it snaps to the head of every video
and every audio edit. If you click anywhere in the timeline with the
Ctrl/Command key held down, you are guaranteed to land at the
head of the frame or a marked In or Out point. This can eliminate
missing a frame here or there and creating flash frames. You must
still combine this with the timeline zooming techniques, especially with a very complicated sequence. You may be surprised
that you have snapped to the audio edit on track 7, which is three
frames off from the video edit on track 1 you really wanted.
Lasso with Modifiers
This trick is one of the most important for using the timeline
precisely and as a true nonlinear graphic tool. Holding down the
Alt key on a Windows or the Control key on a Macintosh allows
you to lasso any transition on any track and go into the Trim
mode at a specific place. In combination with the Shift key, you
can make multiple selections easily and, in a graphic way, extend
the use of the timeline to get exactly what you want.
Changing the Track Name
A hidden timeline feature that is quite useful when working
with lots of layers is the ability to name the track you are working
on. You can right-click or ShiftCtrlclick on the track number
in the timeline. Choose “Rename track.” Be careful, though.
These customized names do not appear in the digital cut or audio
mix tools. Instead these tools use the original track numbers.
59
60
Chapter 3 INTERMEDIATE TECHNIQUES
Audio Monitoring
Many beginners don’t see the connection between what they
are viewing and why they can’t hear the sound anymore. Being
able to turn audio track monitors on and off selectively means
you can concentrate on just the sound effects on track 5 or make
five versions in separate languages and monitor one language at
a time. But it also means you always need to keep an eye on
which tracks are being monitored because they could be different
from the tracks you are trying to use.
Occasionally, having all 16 audio channels playing at once is
distracting when you just want to find the blip. Even though you
may have 16-channel potential for monitoring, sometimes it is
faster to solo a track for a critical trim. You can solo a track (or
multiple tracks like a sound effect and a verbal cue) by Ctrl/
Command-clicking on the desired audio monitor icons. This
turns the entire monitor icon area green. To summarize:
●
●
The audio track key will enable/disable the track for editing.
Ctrl/Command-clicking on the audio monitor solos the
track. Multiple solos are possible.
It is a significant workflow improvement to have all these tracks
monitored when you are using J-K-L keys to fly through lots of material or a sequence where you have “checkerboarded” the dialog.
Checkerboarding is a great dialog technique of putting each of two
actors on separate audio tracks. This makes it easier to slip overlapping dialog without chopping off the previous spoken line. With one
line on V1 and the next on V2, you can monitor something that
sounds like the finished audio when you are trimming and continuing to tweak the sequence. No more lip reading at 2 speed!
Creating a Temp Mono Mix
During an edit session you may need to create a temp mono mix so you or the producer can hear audio clearly and are
not distracted by an incomplete stereo mix. (It also eliminates the “Why is she talking out of only the left speaker?”
questions from the producer.)
To create a temp mono mix:
1. Open the Audio Project setting and switch to the Output tab.
2. Click the Mix mode button until “Mono” appears. Now all audio clips will play in mono.
Keep in mind that this is a temp mono mix only. If you’ve already applied some pan and gain to clips in your sequence
those adjustments will be maintained. Simply switch back to “Stereo” and your mix will be restored to its original
configuration.
Chapter 3 INTERMEDIATE TECHNIQUES
Organizing Your Material
One thing that working with a computer forces you to do is
organize. If you don’t have a plan from the beginning that is easy
for you, you just won’t do it, and you will find yourself relying on
the frame view to find shots. Although this may make it easier for
clients to put their fingers on your monitor and shout “That one!”
it is slow. The bins that come from the telecine need to be named
for scene and take, but after that, everything follows the standard
script notation. In a traditional film edit room, organizing has
more to do with tracking the physical film and keeping the right
scenes ready for cutting. In a nonlinear edit, a film project must
keep everything from a scene together. Documentaries or other
formats where the form takes shape during the edit must live or
die by good organizing of shots in a computer-based edit. I once
edited a show with 200 sound bites and no script. To use the tools
that are available for finding shots, you need to enter the information in a way that allows you to search for it easily.
There are two things to keep in mind when creating bins: tape
name and bin size. Generally, the tape name is most important
when you are starting to organize, because this is initially what
you are handed from the field. Tape names should have some criteria for allowing you to trace back shots. For instance, with day
and location coded into the number used for the tape name, you
61
62
Chapter 3 INTERMEDIATE TECHNIQUES
more easily can follow a series of shots to a common starting
point. Also, as mentioned before, you can start with a tapenamed bin for digitizing and then organize based on content.
If your bins are too large, however, you are defeating a lot of
the benefit of the organizing. It takes longer to open and close
large bins, and once they are open, it takes longer to find exactly
what you need. Most likely, you will use the Find Bin button frequently, so you want it to be opening small bins to speed up the
retrieval process. To use the Find Bin function, you must have
that bin listed in the Project window (or in a folder in the Project
window); it needs to have been opened once in the project. Also,
you can go directly from the Sequence window to the source bin
by using Alt/OptionFind Bin. Again, Match Frame is also a useful tool for calling up a shot if you are not interested in the bin. It
calls up the source clip regardless of whether the bin even still
exists! All Match Frame needs is media on the drives.
If you mistyped the
name of a custom
column, simply
hold down the Alt/Option
key and click on the name
to highlight it. Then simply
type the corrected column
name.
This menu is
populated by
default in the
order of entry. To resort it
alphabetically, simply close
and reopen the bin.
Using Custom Columns in a Bin
One feature that I’m continually surprised that experienced Avid
editors don’t know about is that you can create custom columns in
a bin. Though there are dozens of statistical and metadata columns
available by default, you can create your own custom columns by
simply clicking on an open area in the Bin headings. Then simply
type the custom name you want and start entering data!
Be sure to be consistent in not only how you name your custom columns but what you put in them. For example, if you create a custom column called “Shot Type” and enter both “Wshot”
and “WS,” you will have a harder time locating the shot you’ll
need. To facilitate accurate custom column entry, you can Alt/
Optionclick on a field in a custom column and a pop-up menu
will appear containing all of the data you’ve entered into the custom column. Simply select the desired data and they will be
inserted into the selected field.
Chapter 3 INTERMEDIATE TECHNIQUES
63
Sorting in the Bin
You can easily sort on any column by simply clicking on the
Bin heading then pressing Ctrl/CommandE. If you wish to sort
in reverse order (i.e., Z to A), simply press CtrlAlt/Command
OptionE. If you wish to sort by multiple columns, simply
arrange them in the order you wish to sort, left to right, select all
the desired columns to sort by, then press Ctrl/CommandE.
Sifting Clips
Though sorting often helps you find the clip you are looking for,
sifting displays in the bin only those items that meet a certain criteria. Everything else is temporarily hidden from view. For example, you may want to display only those clips containing “INT” in
the Location column. To access Sift choose “Bin Custom Sift.”
The Custom Sift dialog allows you to refine your search by up
to three criteria. You could, for example, look for all Location:
INT, Shot Type: CU, Scene: 47A shots. The second set of criteria
allows you to search for a second set of clips, allowing you, for
example, to also find all shots that are Location: EXT, Shot Type:
WS, Scene: 47A.
You can even use this dialog to search by timecode. If the Start
and/or End columns are displayed in your bin you can enter a
specific timecode and find the shot that contains it. To do so,
simply enter the complete timecode without the colons or semicolons into the find field then select “Start to End Range” from
the search menu. I find this technique especially useful when the
To sift by film
KeyKode number,
enter only the
numbers following the
dash.
64
Chapter 3 INTERMEDIATE TECHNIQUES
producer has screened footage using source or select reels with
timecode burn-in. If he or she found a great line reading at
07:16:44:05, I can simply enter that timecode value in the appropriate bin—or even the Media Tool—and quickly find the clip
containing the desired line reading.
There’s one “gotcha” with the Sift function, though, that has
burned many an editor. When you sift a bin you are hiding some
of its contents. Don’t make the mistake of opening a sifted bin
and panicking because some of the shots are missing. Before
throwing open the edit bay door and screaming out that when
you get your hands on the so-and-so that deleted your media,
pause briefly and look at the name of the bin. If you see the text
“(sifted)” to the right of the bin name then the bin is in a sifted
view and other clips, sequences, and so on could be stored in the
bin. Simply choose “Bin Show Unsifted” to show the entire
contents of the bin.
Using the Media Tool for Editing
The Media Tool is a good way to find shots, especially if the bin
has been deleted, by sorting or sifting in the Media Tool window
and then dragging the shots to a new bin. If the media files are
online, you can get them through the Media Tool. Most people
use it for media management, but it is an easy way to find hidden
shots quickly by searching across projects.
On a very large job, or a system with lots of media, opening
the Media Tool can be a time-consuming process causing some
people to avoid it completely. That is why you can choose exactly
what drives or what projects you will search through before you
open the Media Tool. The smaller amount of media that are
searched through, the faster the Media Tool will open. Opening
the Media Tool causes the system to read the media databases
from every active MediaFiles folder and load that information
Chapter 3 INTERMEDIATE TECHNIQUES
into RAM. That can take drive access time and potentially use up
much of the available RAM (if you have hundreds of thousands of
objects or several terabytes of storage). Of course, if you are really
desperate to find a shot, you can just press All Drives and All
Projects, and load the entire media database. Once loaded completely, all searches in the Media Tool will be instantaneous for
the rest of the session or until you shut down the computer.
Early in the process of organizing a new project, if the Media
Tool is not too large yet, I leave it open to avoid having to keep
opening a bunch of separate bins when looking for a shot. Think
of the Media Tool as the largest bin of media you can have at one
time, and when it gets really large, open it only when you must.
So far we have discussed stylistic techniques; the benefit
gained is primarily in speed, efficiency, and making you look
good. But a few common techniques, if not followed regularly,
can create real technical problems. I’ll describe some of these
problems in Chapter 12, but let’s cover a few that can be prevented easily by just following directions.
Customizing Your Interface Environment
There has been so much progress in the user’s ability to change
and optimize the user interface that now we need to discuss the
65
66
Chapter 3 INTERMEDIATE TECHNIQUES
most effective trick to cut through the options. Most interface
changes can be saved and recalled quickly through the judicious
use of workspaces, toolsets, and custom views. The trick to finding and using your perfect setup is how quickly you can keep
changing it to exactly what you need at exactly the right moment.
General Modality
A general philosophy for modal editing systems is to have only
the functions you need in front of you when you need them. The
idea of modes is very powerful and should not easily be dismissed
by marketing hype. If you have all the functions available all the
time, what is the possibility that you will need more than a very
small percentage of them? The rest are wasted and clutter valuable
screen real estate. If pressed accidentally, these unneeded functions may cause more harm than good, sending you into a function or display change that is not desired. Did you mean to trim
that shot or just navigate there to look at it? A mouse click in just
the wrong place will give the undesired result. A very careful mouse
click in just the right place eventually will cause carpal tunnel syndrome. A nonmodal interface also may obscure the more needed
functions at just the most critical time when you must have them
close at hand. If you can’t find a function, it doesn’t exist.
A modal system gives you a series of streamlined, focused interfaces for the most used functions. To go to or from a mode should
be seamless; this is where the real challenge comes. If you can’t get
to a mode easily, then you may feel that you need to have the
important parts of that mode available all the time. The Avid editing interface is based on the Source/Record mode being a type of
home page. By pressing the Escape key you can get to it instantly
from any other mode. You can get to the other modes, trims,
effects, and color-correction functions through dedicated buttons
that can be mapped to the keyboard. These mapped keys are critical to using the modal interface to its most powerful advantage.
Custom Views
There are custom views for the timeline as well as for the entire
user interface. You can change colors and track size, position, and
information displayed for the timeline to display just the information you need; for instance, for audio mixing or effects creation. Create the view in the timeline, then click on the default
name of the view and choose Save As. You can use the general
user interface to eliminate or enlarge buttons and use color as a
key to the functions you are using and sign as to what custom setting you are using. Go to Interface in the Project window, then the
Chapter 3 INTERMEDIATE TECHNIQUES
Appearance tab. If you really mess up the view (and potentially
can’t see anything to change it back) go to that view and rightclick/CtrlShiftclick and choose Restore to Default. When you
are done customizing a setting, name it something useful so that
you can tie it together with a workspace or toolset. If you have
other user settings that are meant to be used at the same time,
name the interface the same thing.
Workspaces and Toolsets
One way to conquer the complexity of modes and settings is to
create a series of snapshots of your favorite configurations. These
are workspaces and toolsets.
Workspaces can be created from scratch, whereas toolsets start
with some preset modes like Source/Record, Color Correction, and
Effects. You can modify both types to reflect your personal choices
for button layout, screen colors, text, and button size. Think of
these as user interface setup macros since they can even contain
Project and user settings. If you find yourself switching between
any two user settings on a regular basis, just program them into
the workspace. If you need to have a timeline change the size,
color, and information displayed when you start to do audio mixing, link the workspace or toolset to the particular timeline view.
To link a toolset or a workspace to a setting you must first create
the setting and then give it a name. For workspaces the name of
the linked setting must be the same as the workspace. For the toolset you can link a preset toolset to any user setting name. If you
have multiple user or project settings that you want to change at
the same time, you must give them all the same name. You can
name workspaces and other settings by clicking the empty space
to the right of the default setting name in the Project window. You
can create multiple versions of any setting by clicking once to
make it active and then using Ctrl/CommandD to duplicate it
(the duplicate command is also under the Edit menu and is a
right-click/ShiftCtrlclick choice). Then change the setting and
rename it. To see your new setting make sure that the Project window is displaying all settings, not just active settings. Otherwise
you will continue to duplicate settings and never see them!
The following method links user settings to workspaces:
1. Create a timeline view that is designed especially for audio.
Turn on important audio graphic information, make the
video tracks smaller, and move the timecode track in
between the video and audio tracks.
2. Save the timeline view and name it “Audio.”
3. Open important audio tools that you like to use, like the
Audio Mix and Automation Gain windows. Position them
67
68
Chapter 3 INTERMEDIATE TECHNIQUES
4.
5.
6.
7.
8.
9.
10.
where they are best integrated with the rest of the
interface.
Click a workspace in the user settings window and duplicate it (Ctrl/CommandD).
Double-click to open the workspace.
Choose “Activate Settings Linked by Name” and “Manually
Update This Workspace.”
Click on “Save Workspace Now.”
Click the empty space next in the user settings window
on the workspace setting to name the workspace. Name
it “Audio.” If this is your only workspace then it is
“Workspace 1.” Workspaces are numbered based on alphabetical order in the user settings window. They can change
numbers dynamically when you add new workspaces so
be careful when you name them. You may want to name
the workspaces with numbers like “1 Color-Correction
Workspace” so that when you create an audio workspace the
order won’t change.
Open the Keyboard setting and the Command Palette at
the same time.
Go to the More tab and grab the button for W1. This audio
workspace is “Workspace 1.” Map it somewhere you can
remember easily like Shift-1.
When you press this button you will call up all the audio windows and the timeline will change. Make a workspace or a toolset
in a similar manner for all your important functions. The toolset
actually is easier since you can choose “Link Current to …” from
the Toolset menu and get several options for linking to different
user settings, although you have fewer toolsets to work with.
Backing Up
If you are a beginner to the computer, you may not realize the
seriousness of backing up, but first imagine the cost of losing a
Chapter 3 INTERMEDIATE TECHNIQUES
day of work. Then imagine losing the entire project. Until you
lose your first project, you might not back up on a regular basis.
The fact that for about a dollar and five extra minutes you easily
could have saved all the project information is a very compelling
argument. There is nothing more sickening than returning to a
project after a short break and not being able to find a sequence.
Back up everything important, even twice a day, using rewritable
CD-Roms. Always have your work somewhere else when something goes wrong. Auto-save can fail if the drive is too full and
random crashes can destroy boot drives with projects and
sequences. I back up constantly, but not to the same disk! Use a
separate removable disk for every day of the week, and you will
have seven chances to find a usable version.
What should you back up? It is usually difficult to back up all of
your captured media in the middle of a project. But with terabyte
and larger FireWire® and USB external drives becoming affordable, backing up media isn’t out of the question. Backing up captured media may not be top priority in your project unless you
are working with lots of nontimecoded material. Batch digitizing
can be faster than any other form of restore—if you have the
source tapes! What you really need to recreate your job is
the project folder on the internal hard drive. Take all of it, not
just the bins or the project icon. Many short-term projects should
have a project folder that can fit onto a high-density floppy. If
you are working on “History of the World” or need to back up lots
of graphics and music tracks from CDs, however, you need to
back-up to CD-Rom or DVD. A CD-Rom holds 650 megabytes of
data and a DVD will hold 4.75 gigabytes.
Alternatively, you can send your project over a fast network to
a system that contains a drive suitable for backup. On a particularly big job several years ago, I backed up to a USB drive on an
Ethernet server every hour. Although we lost power almost every
afternoon while editing on location, we never lost any data.
Backing up to another hard drive on your system or another
computer at your facility may not be good enough. I have had
both the Boston Fire Department and Mother Nature ruin two
different suites where I was working. (To be fair, the fire department was trying to save an historic building.) A particularly successful film assistant I know in Los Angeles makes two backups of
the project as the film gets close to picture lock. He takes one, his
assistant takes one, and they take separate routes home. It is Los
Angeles after all. Avid technical support has a category in their
database to record reasons for equipment failure. Earthquake is
one of them. And having a flash drive in your pocket also means
you are more likely to get paid as a freelancer.
69
70
Chapter 3 INTERMEDIATE TECHNIQUES
Nontimecoded Material
In the rush to complete a project, people throw anything and
everything into their project just to get it done. Scratch audio is
recorded straight to the timeline, VHS material is cued up by
hand, and CDs are played directly into the Avid without any
thought about recreating the job or, worse, starting over again if
disaster were to strike. If the time is available, then seriously consider dubbing all nontimecoded material to a timecoded, highquality format source. The potential slight loss of quality involved
in dubbing will be the difference between quickly recreating what
you have done or matching things by eye and ear. If you cannot
timecode all your sources, then seriously consider copying to a
large inexpensive FireWire or USB drive for the evening after
you have finished digitizing all your media. Remember, a digital
nonlinear project is never done, you just run out of time, money,
or both.
Conclusion
Beginners don’t grasp these techniques from the entry-level
course. The techniques are usually a combination of changing
some of your work methods and taking advantage of some unfamiliar functions. There are many other keys, modifiers, and tips
and techniques in the Avid editing systems, but these are the
main areas to concentrate on. Use the keyboard more and spend
more creative time using the Trim mode. Start to think nonlinearly about navigation and the structure of the sequence. You will
find your speed incrementing in leaps and bounds.
4
AVID ADMINISTRATION
“It’s hard to be fully creative without structure and constraint. Try to
paint without a canvas.”
—David Allen
Some people are lucky enough to have their Avid system
administered by someone else—if you’re one of them, hand them
this chapter and go back to cutting. However, the day-to-day reality is that most people are responsible, at some level, for their
own system. After all, if you have created a difficult situation for
yourself, it is you who cannot go home until it is resolved. A
smooth-running session makes you look good, period.
This chapter explores the peripheral issues of owning and maintaining a professional editing system. This includes environment,
media management, and networks. For the Avid administrator or
postproduction supervisor, getting media in and out of the system
is as important as anything you do with it while editing.
Room Design
It is easier to administer a system that is set up correctly and put
into a room that is well designed for the Avid system. Fewer constraints are placed on the design of a digital, nonlinear suite than a
traditional, tape-based suite, but this doesn’t mean you can just
plunk the equipment down in a pile! There is flexibility to move all
the equipment into another room and keep the bare minimum in
the suite or move the noisiest parts, like drives. There are technical
implications to making cables longer, as you will see. Suites need
to be designed so they can be serviced and simple maintenance
can be done without disruption. If you plan to use the suite as an
online finishing facility, then you should treat it like an online
suite. Use an external waveform and vectorscope, high-quality
71
72
Chapter 4 AVID ADMINISTRATION
speakers, a high-quality third monitor, and seriously consider a
patch bay. There is nothing worse at 2 am than hauling video decks
around so that you can do two dubs. If connections are made
through a professionally installed patch bay, there is a better
chance the dubs will come out well!
Probably the biggest consideration after editor ergonomics is
the noise level. Many people make the mistake of putting all their
equipment in one room. Though it is simple, it can make for a
noisy environment. The drives and the computer processing unit
(CPU) are likely to be the noisiest elements of your system
because of their fans, so they are the most important to move to
another room.
The slickest installations I have seen have completely relocated
the CPU and the drives to another room. You’ll need to use a KVM
(keyboard, video, mouse) extender to connect your keyboard
mouse and monitors to the relocated equipment—these are easily found nowadays even for dual-DVI (digital visual interface)
monitor configurations. Of course, if you have no central
machine room and the editor must load tapes and capture, there
should be a connection for a video deck’s video, audio, and control cables. If all the hardware is in another room, there should be
telephone links between the two rooms (preferably with speakerphones for troubleshooting purposes). The best facilities have
gone back to the central machine room design after the initial
years of isolated Avid suites. It is important to have a range of
decks during the course of an edit, so multiple decks need to be
available. Tying up a deck all day when it is not really needed is
just as bad. A central machine room also makes it easier to get to
the equipment for support or upgrading. There is nothing worse
than working under a table with a flashlight in your mouth, the
telephone in one hand, and a screwdriver in the other.
Unfortunately, this happens way too often because of thoughtless
room design.
If you must have all of your equipment in the room you’re editing in, then look into buying a sound-isolating rack. They typically come in desk-side half-height configurations, but full-height
configurations are available as well. You can usually find them for
sale at sound equipment supply sites. These racks typically
include airflow controls but they’ll only keep your equipment
cool and happy if you install them correctly. Remember: Those
cable snake holes are there for a reason. Don’t just leave the back
of the rack open—not only will you dramatically increase the
equipment noise, but you’re increasing the risk of your equipment overheating and failing.
One of the nicest things about many of the Avid suites I have
worked in is the addition of windows. There is nothing better to
Chapter 4 AVID ADMINISTRATION
clear your head than to stick it out a window for a few minutes,
and having natural light is a nice change; however, I must fall
back on the admonition that if you are doing color correction or
shot matching of any kind, you need to have complete control of
the lighting. (We talk more about a proper color-correction environment in Chapter 10.) Pick the neutral color temperature of the
lighting carefully and by all means avoid fluorescent fixtures.
Color temperature of sunlight changes during the day, so a shot
captured and evaluated in the morning may not look like those
adjusted at noon unless the ambient lighting is indirect and consistent. If you have windows, make sure you can pull the roomdarkening shades and keep glare off the monitors.
If you also are planning to do final sound mixing, make sure the
room has been deadened. Apply sound-absorbing foam around
the room or make sure that the room has enough carpeting and
wall hangings. Mixing in an empty office is probably a bad idea.
Investing in good speakers and a real amplifier pays off quite
quickly. You may also want to consider cheap speakers with an A/B
switch to the reference monitors or pumping the Avid audio output through a standard home television monitor in the suite. There
is nothing worse than listening to your wonderful sound mix at
home and having it sound muddy from overpowered bass.
Personally, I feel no suite is complete without two phones, a
trash can, a box of tissues, and a dictionary. You’d be surprised
where people set up these temporary suites: attics, basements,
bedrooms, storage closets, hotel rooms, boats, bank vaults, Chinese
laundries, and ski lodges. Try to minimize any environmental
impact like heat, dust, or jarring motion (like editing in the back of
a moving truck). Even 5–10 degrees of difference in temperature
can add or subtract useful years from the life of the equipment.
Electrical Power
The final and probably most important piece of equipment
you need under any conditions is an uninterruptible power
source (UPS). If you are running a system now without a UPS,
you should nonchalantly put down this book and run to the
phone to order one now. You are living on borrowed time. A UPS
regulates your power, giving you more when your electric company browns out or less when you get a spike. If power fails completely, a UPS gives you enough battery time to shut down the
system in an orderly fashion and avoid crashing, losing work, and
potentially corrupting important media or sequences. A UPS
makes your equipment run with fewer problems, and you will be
able to charge for more productive hours of use.
73
74
Chapter 4 AVID ADMINISTRATION
The real question is not whether you have a UPS, but how
much of one do you need? They are figured in the confusing scale
of volt-amps. The math is not so hard if you can find out what
each piece of equipment needs for electrical power for either
volts or amps. The numbers are usually in the manuals or on the
equipment itself. There is information on the Avid website under
the Customer Support Knowledge Center that lists the power
requirements of each piece of equipment. But don’t neglect connecting the tape deck. What happens to your camera’s original
tape if the power goes out when you are rewinding?
Here is how to figure the size of an uninterruptible power
source that is sold in volt-amp models:
volts amps power factor volt-amps power factor
watts
The power factor for computers is between 0.6 and 0.7, so you
can look at the same equation as:
watts 1.4 volt-amps for computers
And because you don’t really trust manufacturer specs for
the UPS and you buy more than you need to accommodate
future expansion, add another 33 percent on top of what they
recommend.
Keep in mind that before you get a true blackout, you will probably suffer from sags and brownouts. These may cause the UPS to
use up some of its battery power to keep you going until the “big
one” hits. Then, when the power comes back on, you can count on
a serious power spike. A spike can cause damage to boards, RAM,
and drives, and that damage may not show up until days, weeks,
or months later as the parts start to fail prematurely. The fact that
all power is going through a series of batteries and power conditioners with a UPS before it gets to your delicate equipment should
give you a warm feeling in your stomach. Just make sure when you
get it all hooked up that the battery is actually connected, since
some UPS manufacturers ship the equipment that way.
If there is any question about what to put on the UPS, imagine
using that device full tilt when the power goes out. Ever see a
one-inch machine lose power while rewinding a finished master
tape? Not good. A cassette-based tape deck will almost certainly
crease the source tape if it is rewinding when the power goes out.
Even if all the lights and your monitors go out, you can always
save and shut down quickly using just the keyboard. In an emergency, remember:
●
Ctrl/Command9 activates the Project window. You want
to save the whole project, not just the active bin.
Chapter 4 AVID ADMINISTRATION
●
●
●
Ctrl/CommandS saves everything.
Ctrl/CommandQ quits the application in an orderly way.
Quitting will save everything first, but trying to save the
project should be your first step anyway. You may have to
hard boot the system to get control back after a power hit.
Saving should be an automatic first step in any emergency
procedure.
Enter to confirm that you really do want to quit.
This sequence of keystrokes avoids the chance of corrupting
the project from being shut down improperly and can be performed (if you really have to) with the monitors blacked out. A
UPS has saved me literally a dozen times—I even use one at
home on my computer and NAS (network attached storage).
After your first serious power hit, what is the real cost of replacing
your system?
Ergonomics
Human ergonomics has been written about at length in other
places, so just a quick word about it here. Don’t scrimp on chairs.
They make the difference between happy editors and editors in
pain. Get chairs that can adjust armrests, back, and height. Many
people swear by armrests, and with a keyboard and wrist rest at
about the same level, there is less chance of wrist strain. Keyboards
can be put on sliding shelves below the workspace. Keep the back
of the hand parallel to the forearm to reduce wrist strain. The relationship of chair, keyboard, and monitor cannot be underestimated as important to the creative process. Some editors even cut
standing up, just like they did when they cut on a Moviola!
Media Storage and Management
Let’s discuss the nuts and bolts, the bits and bytes, of what happens when you put media on your system. The Avid editing application is an object-oriented program, which means that many
things you do create an object. Capturing media and rendering,
importing, and creating sequences and bins all create different
kinds of objects. It is the relationship between those objects that
allows you to combine things in such interesting ways.
The editing system sees only the media files that are on the
media drives in the folder named OMFI MediaFiles (for OMF
media) or Avid MediaFiles (for MXF media) depending on the type
of media you are using. This folder is created automatically and
named by the software when the application is first launched and
the drive is used for capturing. Both of these folders must stay on
75
76
Chapter 4 AVID ADMINISTRATION
the root level of a drive or partition and cannot be renamed. If you
do, the media files inside the folder go offline and are no longer
accessible to you when you try to edit.
While media files are stored directly inside the OMFI MediaFiles
folder, media files in the Avid MediaFiles folder are stored inside a
series of subfolders. If you open the Avid MediaFiles folder you’ll
see a folder named “MXF,” and if you open that folder you’ll see
one or more folders, each with an associated number (at the very
least there is a single folder named “1”). The reason for this hierarchy is that the Avid MediaFiles folder structure is designed to store
more than one type of media. Currently, only MXF media is stored,
hence the “MXF” folder, but it is entirely possible that future versions of Avid editor will store other types of media in their own
associated folder.
Now, about those numbered folders in the Avid MediaFiles/
MXF folders. These folders are designed primarily to help reduce
the number of individual files in any given folder. Though modern
operating systems can now handle thousands and thousands of
files in a given folder, that wasn’t always the case. And even
though they can handle thousands and thousands of files in a
folder doesn’t necessarily mean that it is a good idea! In fact, you’ll
find that the Avid system will automatically generate a second
folder named “2” once you reach about 10,000 files in folder “1.”
You don’t have to just let the system manage your MXF media,
though. You can use a folder numbering scheme to keep one set
of media (e.g., originally captured media) from another (such as
rendered media). The Avid system will always write new material
to a folder numbered “1” until it determines that folder is full. But
it will read media from any numbered folder it finds in the MXF
directory.
Give this a try sometime: Quit Media Composer then open up
an Avid MediaFiles folder on one of your storage drives or partitions and then open the MXF folder inside that. Renumber
that folder. I recommend that you only use numbers because
alphanumeric names are not officially supported, but I’ve typically found that if you always start with a number you can usually
name the folder anything you want. This technique is especially
useful when working with P2 media as it lets you keep your P2
media organized.
OMF or MXF?
As I mentioned previously, Avid supports both OMF and MXF
media. And by both I mean that you can freely mix and match
OMF and MXF media in a project or sequence. You can even mix
them in a single master clip as it is possible for your video media
Chapter 4 AVID ADMINISTRATION
to be MXF and your audio media to be OMF or vice versa. Many
folks use OMF media because that is the older type of media and
a type they’ve been using for years. For the most part, the two
types of media are interchangeable. But MXF has some distinct
advantages over OMF when it comes to storing video media:
●
●
●
OMF files are limited to 2 GB in total duration. The Avid
system can be configured to automatically span multiple
OMF files during capture, but this 2-GB limit can be a real
pain when you’re trying to work with high-resolution
material. MXF media files can grow much larger.
OMF only supports 8-bit media while MXF supports both
8- and 10-bit video media.
OMF can only store NTSC and PAL media. MXF can also
store 720- and 1080-line HD media and beyond.
Regarding audio, both OMF and MXF are uncompressed and
both support all of the expected sample rates and bit depths.
MXF also supports compressed audio though you’ll likely only
encounter this when working with XDCAM proxies or other proxy
material.
So which one should you use? Often the facility you work at,
especially their audio postdepartment, will define the format for
the audio media. And the postfacility may have a preference for
the format of your standard-definition (SD) material. But if you’re
working with high-definition (HD) material, you have to use MXF.
Compression, Complexity, and Storage Estimates
None of this clever manipulation of objects solves the basic
problem of running out of space on the media drives. It is only a
matter of time before this problem occurs, and you should prepare for it in an organized way. There are several ways to tell
when you are going to run out of space. The Hardware Tool under
the Tools menu (also under the Info tab of the Project window)
gives you a bar graph of how full the drives are relative to each
other, the amount of storage empty and used, and percentages
full (if you have Tool Tips turned on). This is good for figuring out
where to start capturing the next job, but it does not give you the
amount of space in terms of amount of footage.
If you need precise numbers, then open the Capture Tool and
choose the tracks you think will be needed the most (this may be
called the Digitize or Record Tool on your system, but all new
Avid systems have moved to use the term Capture). If you are
working with material that has sync audio, then turn on all the
tracks. But if you are working with mostly MOS (silent) film transfer that will be cut to an existing soundtrack, get the estimate
77
78
Chapter 4 AVID ADMINISTRATION
with only the video track turned on. Make sure the compression
level or resolution you will be using is set correctly. Video takes a
massive amount of space to store, even compressed, compared
to audio files. The Capture Tool gives you an estimate of how
much time you have on each drive.
Table 4.1 provides you with some consumption rates for popular Avid resolutions. Simply multiply the number of minutes of
footage you have to capture by the consumption per minute to
estimate the storage required. Note that audio takes up such a
small amount of space as compared to video that it isn’t typically
that significant (audio consumes roughly 1250 MB per channel
per hour).
Table 4.1 Resolution Storage Requirements
Format
Resolution
Storage Consumption
NTSC or PAL
1:1
2:1
3:1
10:1
15:1s
1.22 GB/min
526 MB/min
345 MB/min
132 MB/min
31 MB/min
1080i/59.94
1:1
DNxHD 220
DNxHD 145
8.68 GB/min
1.54 GB/min
1 GB/min
1080i/50
1:1
DNxHD 185
DNxHD 120
5.79 GB/min
1.28 GB/min
0.85 MB/min
1080p/23.976
1:1
DNxHD 175
DNxHD
5.56 GB/min
1.22 GB/min
0.81 GB/min
MB megabytes; GB gigabytes.
If you select all the clips in a bin and choose Ctrl/CommandI
(Get Info), the Console opens and gives you a total length of all
your clips. This is a powerful way to see whether you have enough
space on your drives to recapture everything.
Unlike video or film, compressed images are judged by their
complexity. A complex image takes exactly the same amount of
space to record on videotape as a simple one! When you capture
an analog image to disk or “ingest” an already digital image, the
level of image complexity is important. The more information
and detail in the frame, the more space it takes to store and the
more difficult it is to play back. Playback from a disk-based system is a question of throughput or how much information can be
read from the hard drive, pushed through the connecting buses
Chapter 4 AVID ADMINISTRATION
into the host memory, and out to the monitors or tape decks. This
is why a slower system may not be able to handle high-resolution
images—it cannot get the information from the drives fast
enough to play all the information in real time with effects and
audio.
There are three categories for captured images: uncompressed,
lossless compression, and lossy compression. All compressed
images on Avid systems are lossy, where redundant information
is thrown away during capturing. As you move closer and closer
to uncompressed quality, you pay a higher cost for hardware and
disk space. You must carry over every pixel of every frame, no
matter how redundant that pixel is. Uncompressed images
demand faster computers, wider bandwidth, and much more
disk space on faster, striped drives.
Lossless compression is many times touted as better than
uncompressed (or noncompressed, as some insist) because it
takes less disk space. Lossless compression is associated more
with programs like WinZip™ for compressing documents before
posting them on the Web for downloading. The difference when
compressing something variable, like a moving video shot, is that
as the image gets more complex, the compression is less effective. Potentially, under a wide range of circumstances, a lossless
compressed image could be larger than the equivalent uncompressed image (compression information and the less compressible image are added together). If the editing system is designed
to take advantage of a low bandwidth as a benefit of smaller file
sizes, you may have some playback problems. The system may
impose a rollback, where a maximum frame size is imposed by
throwing away information (lossy) when the frame size gets too
big. If they don’t do this, they must prepare to handle even larger
frame sizes than the uncompressed system and lose much of the
benefit of lossless compression.
The reality is that compression is here to stay. Though highend postproduction is still done with uncompressed images,
even in HD, virtually all methods of transmission and distribution use compression. And virtually every digital video acquisition format today is also compressed. One primary main reason
to use uncompressed images is that the less compression artifacts in your image, the less likely those artifacts will compound
into worse artifacts in the final product. Uncompressed (or lightly
compressed) is also useful for archival purposes since there
may be a future compression method that works better if it is
starting with no compression at all. These uncompressed SD
images will most likely be upconverted to HD at some point in
the near future, and any compression may be visible in context
at that time.
79
80
Chapter 4 AVID ADMINISTRATION
Deletion of Precomputes
Predicting available space on media drives must go hand-inhand with keeping track of rendered effects, or precomputes.
Imported graphics and animation also take up space. Every time
you render an effect, it creates a media file on the drive. Even
though you may cause that effect to become unrendered or
delete it from the sequence, that file still lurks on your media
drive. This is actually for a very good reason, for both undoing
and for all the multiple versions of that sequence, but it means
you need to pay attention to how full a drive has become even
though no one has captured to it that day.
Deletion of precomputes is one of the most important things
an Avid administrator can oversee. One of the most common calls
to Avid customer support is when, during a session, a system
grinds to a halt because it is too full of thousands of tiny rendered
effects. Are all those effects necessary? Probably not, and now the
editor or the assistant must be walked through the process of
deciding what can go. One of your most important responsibilities in making sure that sessions start and end smoothly is to
keep an eye on how many precomputes are on the system and
how many are really important. The Avid editing systems do not
keep track of how many sequences are created during a project.
There could be multiple CPUs accessing the same media or
archived sequences that are modified on another system and
brought back. Since the system is so flexible, there is no way the
system could definitively know the number of sequences created.
What if the system was to make very important decisions for you,
like deleting “unneeded” rendered effects? What would happen if
you called up a sequence you had spent hours rendering to find
that the software had neatly deleted that media file automatically,
thinking you were done with it? Just because you deleted the
effects sequence from sequence version 15 doesn’t mean you
don’t want effects on sequence versions 1–14! There are too many
variables, and this decision is too important to leave up to an
automated function at this stage in the technology.
That being said, there is, in fact, some auto-deletion of precomputes going on under your very nose! But, as it should be
with all automatic functions that cause you to lose things, it is
very conservative and you may not even notice. The only autodeletion of precomputes occurs when you are making creative
decisions quickly and removing or changing effects. If you are
rendering the effects one at a time and then quickly deleting
them, there is at no time any opportunity for the system to save
the sequence with those effects in place. There is no record that
Chapter 4 AVID ADMINISTRATION
they will be needed in the future because they have not been
saved. Saving happens automatically at regular intervals and,
when you render effects in a bunch, they are saved as the last
step before allowing you to continue. Every time you close a bin,
you also force a save of the contents. That is why the software
auto-deletes precomputes only when you are rendering one at a
time and quickly removing or unrendering them by changing and
tweaking. If a save occurs while an effect is in a sequence, the
precompute is not deleted automatically.
Every little bit helps to keep the drives unclogged, but you still
must evaluate the amount of precomputes and delete them on a
regular basis. This is really not so hard even though it is a little
intimidating at first because it involves deleting material that
someone (probably the editor) may need if you get it wrong. This
chapter will deal with the isolation of precomputes when we look
at efficient deleting strategies.
It is certainly a good idea to remember to delete all of the precomputes when you finish your project. I know far too many editors who have remembered to delete their captured video and
audio media, but forgot about the precomputes! If you don’t
delete them they won’t expire on their own, and I guarantee you
that they will eventually fill up a drive! (I remember an unscrupulous rental agent who, when faced with a drive filled with precomputes, told the production that “these things happen” and
they’d need to rent more drives.)
The Importance of Empty Space
Remember the media database? Any file that keeps track of all
the media is a concern if you overfill your drives. That file must
be allowed to enlarge to deal with the many files you add during
the course of editing. If there is just not enough room for the
media database file to update and grow larger, you may have
media file corruption and eventually drive failure. A good rule of
thumb is to leave at least 5–10 percent of each partition empty.
This limit is flexible, but if you detect slow performance in the
form of more underruns or dropped frames, then consider moving media to an emptier drive. It is also a good idea to erase
media drives completely after a job has been completed. Don’t
get initializing a drive confused with low-level reformatting! That
is only a very last resort to save a dying drive. However, reformatting causes a drive to lock out any bad sectors—those same bad
sectors that may have been giving you problems will be eliminated from future problems.
81
82
Chapter 4 AVID ADMINISTRATION
Consolidate
The best tool you have for moving media while inside the software is Consolidate. Consolidate can be used for two main
purposes:
●
●
Moving media from multiple drives to one drive.
Eliminating unneeded material.
Take whatever you need to move, either the media relating to
an entire bin or a finished sequence, and consolidate it to another
drive.
There are some choices when you consolidate that may make
things less confusing. First, you need enough free space on your
drives equal to the amount of material you wish to consolidate.
You are able to specify a number of drives for consolidation.
Using the list of drives means that, even if you run out of space
on one drive, the next drive in line will take the overflow material.
The second drive will take the material until it is almost filled,
then the third drive, and so on, until the sequence is finished
consolidating.
These are the two major reasons to use the Consolidate function, although as a quick troubleshooting tip you may choose to
consolidate a clip that is not playing back correctly. If the clip
plays back better after consolidating it to another drive or partition, you may have a drive problem or you may have captured
the clip to a drive that was too slow to play back that resolution.
Consolidating a Sequence
The beauty of Consolidate is the advanced way that it looks at
everything that is needed in a sequence and copies only that.
There are, after all, other ways to copy media, but it is very difficult to tell at the operating system level what clips are really necessary to play a sequence. The Consolidate function will search
all your drives for you, gather only the bits you need, and then
copy them to the desired drive.
Consolidating will break the sequence into new individual
master clips and copy just the material required for the sequence
to play. This creates shorter versions of original master clips
because you are copying only the bit that is needed. You can then
selectively delete unused media.
Consolidate is especially important at the end of a project when
the final sequence has been completed and it is time to back up
the material. Instead of backing up all the media, you consolidate
first and back up only the amount of media that was actually used.
Chapter 4 AVID ADMINISTRATION
It is also useful before sending audio to be sweetened on a digital
audio workstation. Delete the video track from a copy of the finished sequence, then consolidate this sequence and make sure the
audio media files go to a removable drive.
After you select the sequence and consolidate it, the system
looks at the original master clips to determine exactly what is
necessary. If you have an original master clip that is five minutes
long, but you used only ten seconds of it, then only that ten seconds will be copied. The new ten-second master clip will have
the original name with “.new.01” if it is the first time in the
sequence that shot is used. If you use another five seconds of the
same original master clip, then you will have a second consolidated clip with “.new.02,” and so forth.
The Consolidate process also allows you to specify handles, or
a little extra at the beginning and end of the clip, so you can make
some little trims or add a short dissolve later. If the handles are
83
84
Chapter 4 AVID ADMINISTRATION
too long, you will throw off your space calculations, so be careful;
however, if the handles cause two clips to overlap material, then
Consolidate will combine the two clips into one new clip rather
than copy the media twice.
Consolidating Master Clips
If you want to move media from multiple drives to a single
drive, you can consolidate master clips. This will take all of the
media linked to the clips in a bin and copy them in their entirety
to another drive. Notice the difference between move and copy.
You are really just copying and then must decide whether or not
to delete the original. Copy and delete are the two steps that
make up the move.
Consolidating master clips is a fantastic method for being able
to clear off multiple drives and put everything from one project
Chapter 4 AVID ADMINISTRATION
onto a single drive or onto a series of drives so you can remove
them or back them up. Consolidating master clips does not
shorten material. It is just convenient and takes a complicated
media management task and makes it one step. Be careful not to
overfill any one partition.
If the idea is to move media from multiple drives to one target
drive, then you must ask yourself, “Have I used this target
drive before for capturing this project or a previous consolidation?” If the answer is yes, then you may already have some of the
material you need on the destination drive. You don’t need to
copy the media twice! Be sure to check the option “Skip media
files already on the target disk.” You would use this only if you
were consolidating master clips and not sequences. Using the
media already on the drives is perfectly fine. When the
Consolidate function finds the long, original media file already
on the target drive, it will leave it alone, untouched. This is the
best setting for moving media from multiple drives to a single
selected drive.
There is a secondary choice that becomes available to you only
when you check “Skip media files already on the target disk,” and
that is the somewhat confusing “Relink selected clips to target
disk before skipping.” You want to make sure that when you skip
the media files that are already on the drive that the consolidated
master clips are linked to them. When the system makes consolidated master clips that link to existing media it doesn’t add a
“.new” to the end of the master clip name. It will add “.old” to the
master clip in the original bin, however, since it needs to distinguish between the two clips.
85
86
Chapter 4 AVID ADMINISTRATION
Consolidate Summary
If you are consolidating sequences:
●
●
●
Choose the drive(s).
Determine the handle length.
Uncheck “Skip media files already on the target drive.”
If you want to delete the original media after you have created
the shorter consolidated clips, then check “Delete original media
files when done.” If you are feeling prudent, go back and delete
the original media in the Media Tool after consolidation. This is
especially important if you are consolidating multiple sequences
and they all share media. Do not delete the original files until you
have consolidated all the sequences that use the media! If you are
working with multicam, you should choose to consolidate all the
clips in the group if you want to continue to have all the camera
angles available in the consolidated sequence.
If you are consolidating master clips:
●
●
●
Choose the drive(s).
Choose “Skip media files already on the target drive.”
Choose “Relink selected clips to target drive before skipping.” Do not choose this if you are continuing to work on
the project and someone else will take the consolidated
media away and work on them elsewhere.
You probably do not want to delete original media here and
will proceed with more sophisticated media management later. If
you do not delete your media now, you will have a mix of “.old”
with original clips on the original drive and “.new” with the new
clips on the target drive.
Fixing Capture Mistakes with Consolidate
Let’s take the example where you have captured too many
tracks. Perhaps you (or someone just like you) weren’t paying
attention when you were capturing and you captured a video
track with a voiceover master clip. Delete the unneeded video and
keep the audio through Consolidate. You can take this master clip
and make a subclip of the entire length, making sure that you turn
off the tracks that you don’t want. If you have captured voiceover
and accidentally captured (black) video, turn off the video track
while it is in the Source window before you subclip the master
clip. The subclip will be audio only. Highlight that audio subclip in
the bin and choose “Clip Consolidate.” The Consolidate function will copy only the media you want to keep. You will have a
new subclip and a new master clip with only the audio tracks and
can delete the original master clip to free up disk space.
Chapter 4 AVID ADMINISTRATION
There is even a faster method to do this particular technique.
You can find the clip in the Media Tool and delete just the media
file that you don’t need. You are given a choice of whether to
delete the audio or video media, so for the video with voiceover
problems, pick the video media for deletion. Then unlink the clip
and choose “Modify.” Change the master clip to reflect that it is
now just audio. You will not be able to change the number of
tracks of the master clip unless you unlink it first, then relink the
clip back to the audio media. This method also ensures that you
don’t end up with strange media management problems down
the line when batch capturing or restoring from an archive.
Subclipping Strategy with Capture
You can also use the subclipping then consolidating method
just to shorten your master clips after you decide what part of
them you really need for the project. In fact, many people like
this method as a general strategy and capture master clips that
are quite long, maybe an entire scene or the full length of an
already edited master tape. This creates fewer files on your drives
for the computer to keep track of, creates fewer objects for an
object-oriented program, and can speed up performance. Then
subclip all the sections you will actually use, consolidate the
subclips to create new master clips, and delete the rest.
Using the Operating System for Copying
If your goal is to move an entire project to another drive, you
may be better off working at the desktop level. If you have been
using MediaMover (www.randomvideo.com), your job is a snap.
MediaMover will search all your media drives, find all the media
from a specific project, and then move that media into a folder
with the project name. Copy the entire folder with the name of
your project from each of the affected media drives. It is easy to
do a Find File (Windows/CommandF) and copy every folder
found with the project name even if you have a dozen drives. If
you are backing up or moving media around and you don’t have
MediaMover, then buy MediaMover. It is as simple as that.
The situation may be complicated if there are two different
resolutions to keep track of in this project. You may want to copy
only the low-resolution material and leave the high-resolution
material on the drives or vice versa. Planning helps here and, if
you are on a Macintosh, I recommend that you use the Labels
function provided by the Macintosh operating system (this is for
OS 9.x only). If you go to the Control Panel for labels, you can
change what the colors represent. Change the blue label to
87
88
Chapter 4 AVID ADMINISTRATION
“Project X Low Res” and the green label to “Project X High Res.”
Select all media files immediately after you have captured them
and change their label color. You can sort the media files by label
color and copy or delete only the files you want. This also allows
you to track down those stray media files that always manage to
escape even the most careful herding.
Whether you choose to use Consolidate or Copy on the Finder
level, you need to keep track of all media. It must be searched for,
backed up, copied, or deleted. The number of objects on the system should be checked periodically, and unneeded rendered
effects or precomputes must be deleted on a routine basis. If your
drives fill up, the session stops.
Deciding What to Delete
A process in which an administrator or an assistant must be
very careful and yet very efficient is with the deletion of unneeded
material. Sometimes this can be agreed upon mutually with the
editor and you can eliminate all of the material for Show 1 when
you are well under way with Show 2. Many times different projects share the same material and you must be careful not to
delete that which is needed by both. The Media Tool and
MediaMover can both be used efficiently project by project, but
this may not be good enough. You must find some other criteria
to sort or sift by, protect certain shots, or change the project name
of the material you want to keep.
Using Creation Date
Creation Date becomes a very important criterion to look for
individual shots, and it is often overlooked by many assistants. It
does not work like the modified date on the desktop, which
updates to reflect the last time someone opened and modified
the file. The creation date is stamped on the clip when it is logged,
so if the shot is logged and captured on the same day, this
becomes a useful heading to eliminate material that was captured at the beginning of a project.
I especially like to use Creation Date as a heading in my
sequence bin. I duplicate my sequence whenever I am at a major
turning point or even if I am going to step away for lunch, dinner,
or a snack. When I duplicate the sequence, Creation Date time
stamps it so I know that I am working on the latest version. Then
I can take the older sequence and put it away in an archived
sequence bin (or several archive bins as the bins get too big). I
have control over the exact times that I have stored a version,
Chapter 4 AVID ADMINISTRATION
instead of leaving it up to the auto-save, and I can keep the
amount of sequences in any open bin to a minimum.
Sequences will be the largest files you will work with. In an
effort to have the bins open and close quickly and not use up too
much RAM, I try to keep the bins small and keep only the latest
version of any sequence.
If you are trying to determine which sequence is the latest version and the editor is not present, Creation Date is the best tool.
There is always the chance that the editor duplicated the sequence
and continued to work on the old one, but you should have an
agreement with the editor about how to determine this crucial fact.
Using Custom Columns
There are many other criteria you can use for sorting and sifting. If you plan it well, you can create custom columns to give
you an extra tool to work with. Some people will create a custom
column with an X or some other marker to show whether a shot
has been used. One way to use sifting powers of the bin is to
change the sift criteria to “match exactly” and have it search for a
blank space in a custom column. This way, any shot that has not
been marked is called up. The Media Tool is the only way to
search for media files that are online across bins. You can create a
Media Management bin view, which can be used in the Media
Tool. Your custom columns will show up there, too.
Basic Media Deletion Using Media
Relatives
Another way to find out if a shot has been used within a project
or sequence is to use the Find Media Relatives menu choice that is
in every bin. This is the best way to search across bins to clear
unneeded shots, other than consolidating and deleting the old
media.
The most useful way to use Find Media Relatives is with
sequences:
1. Open the Media Tool. You have a choice whenever you
open the Media Tool to show master clips, precomputes,
or individual media files for all the projects on the drive or
just for this project.
2. Show master clips and precomputes for this step. I like to
show “All Projects” when checking for media relatives
because many times the bins I am working with came from
another project.
89
90
Chapter 4 AVID ADMINISTRATION
3. Open all your relevant sequence bins for this method to be
accurate.
4. Put all the sequences that you want to work with into one
bin.
5. Select all the sequences and then choose “Find Media
Relatives” from that sequence bin. The system searches all
open bins and the Media Tool, and highlights all the master clips, subclips, and precomputes that you will need to
keep.
6. Go back to the Media Tool and choose “Reverse Selection”
in the pulldown menu.
7. After reversing the selection to highlight all the unused
media, press Delete.
Keep in mind that Find Media Relatives does not unhighlight
something, so before you begin this operation, make sure nothing in the Media Tool is already selected. Also, give everything
selected for deletion one final look. This is the last time you will
see these files, and you don’t want to trust anything or anyone
except yourself at this stage—there is no undo. Don’t do this
when you are tired! Not all of us are “morning” people!
You can choose to show only precomputes in the Media Tool.
You will see all the rendered effects for a project with all the
effects on your drives. You can use the previous method, Find
Chapter 4 AVID ADMINISTRATION
Media Relatives, to track down the precomputes used for the
sequences you’ve selected and then, remembering to reverse the
selection, delete the unneeded precomputes. This process can
be done every day if you are working on intensive effects
sequences, like in a promotions department. It doesn’t need to be
done unless you need the space or memory requirements are
climbing into the hundreds of thousands of objects. There is
always the chance you might delete something you want to keep,
so be careful.
Occasionally you will want to find exactly where a specific file is
and for some reason, Consolidate, MediaMover, or the Media Tool
is not sufficient to perform the task you need. You can use a function called Reveal File, which will go to the desktop level and highlight the media file associated with a specific master clip.
Lock Items in Bin
If I have achieved my goal of making you slightly paranoid
about deleting material during a project, then you will approach
this task with the proper amount of stress. There is a great way to
relieve some of this stress that does not require a doctor’s prescription. Many years ago I spent a week at a major network
broadcast facility observing their operations. They needed someone who knew nothing about the individual projects being edited
to come in late in the day and clear drive space for the next
morning. On longer jobs, this person would be familiar with the
exact needs of the editor. In this case, they were working on as
many as five or more projects a day. At the end of the day, some
material needed to stay—material that had been grabbed from
their router and therefore had no timecode—but the majority of
the material needed to be deleted. This is where the idea for Lock
Items in Bin originated.
It was supposed to work like this: As the editors gather shots
and use them, they decide that they need some shots for the continuing story tomorrow and clone the master clips (not the
media). They Option-drag and clone the master clips into a bin
named Stock Footage. At intervals during the day, the editor goes
to the stock footage bin and selects all (Ctrl/CmdA). The editor
chooses “Lock Bin Selection” from the Clip pulldown menu (or
right-mouse/Shift-Ctrlclick). A lock icon appears in the Lock
heading that is displayed as part of the view for that bin. The file
is locked automatically on the desktop level so that if some
intrepid assistant decides to throw everything away, he or
she sees a warning that certain items are locked and cannot be
thrown away. Any good assistant, however, knows that on the
91
92
Chapter 4 AVID ADMINISTRATION
Macintosh if you hold down the Option key when emptying the
trash, you can throw almost anything away and cheerfully ignore
these pesky warnings. On Windows, you need to go to the file,
right-click the icon, and unlock the file under Properties. You can
select many files simultaneously for locking or unlocking, but if
you drag them to the Recycle Bin you will get a warning that the
file is read only. It may allow you to delete it at that point, but
since you are going to the Recycle Bin you will get the chance to
retrieve it. You can see whether a media file is locked on Windows
by looking at the Properties to see if the file is read only.
A happy side effect of the Lock Items in Bin command is that
it can also be applied to sequences. Subsequent copies of a
sequence are also locked automatically when the sequence is
duplicated. This helps avoid the all-too-common problem when
people have mixed clips and sequences in the same bin and they
decide to delete files. They select all the files, delete them, and
then, “Hey, where did my sequence go?” Certain types of objects
are selected automatically as choices to be deleted when you
select all files in a bin. The sequence is automatically not checked
for deletion if it is mixed in a bin with clips. If a bin has only
sequences then they will indeed all be checked for deletion.
Deleting a sequence by accident is usually someone’s first visit to
the attic, only to recall the version of the sequence he or she
worked on 15 minutes ago!
There are ways to outsmart the Lock Items in Bin command if
you are determined. You can duplicate the locked clip and then
unlock the duplicate. Because both clips link to the same media,
you can delete the media when you delete the second clip. You
can also unlock the media at the desktop level and throw them
away without even opening the editing application. But you can’t
delete the media until someone, somewhere, unlocks them. Using
these methods is really the honor system for media management.
Changing the Media’s Project Association
There is another way to organize shots for easy media management: change a master clip’s project name. There can be confusion about exactly which project is associated with which media.
It is so easy to borrow clips from another project that you may
not even know that certain shots are from another project unless
you choose to show that information in your bin headings. This is
why I create a custom bin view just for media management. It
shows the project name, lock status, creation date, tracks, video
resolution, disk, and any other customized headings that relate to
media management. If the clips have been borrowed from
another project and brought into the new project, even if you
Chapter 4 AVID ADMINISTRATION
recapture them, they retain their connection to the project in
which they were logged.
Project affiliation makes a big difference when it comes to
recapturing at a higher resolution. Because all the shots from one
tape are captured at once, if you are trying to recapture from Tape
001 in Project X, and the clip is really from Project Y, the software
considers these two different tapes. While batch capturing, the
system will ask for Tape 001 twice since it really should be two separate tapes if it was logged correctly. There are several steps to
changing project affiliation. The first thing to keep in mind, as
mentioned in Chapter 2, is that the project name is part of the tape
name. The trick to changing the project name is to change the tape
name to a tape name from the right project. All tapes have a
Project column in the Select Tapes window when assigning tape
names. This allows you to see which project each tape is from.
In Capture mode, whenever you show the list of tapes that
have been captured and you check Show other projects’ tapes,
you might see multiple “Tape 001” listed from other projects. Use
the “Scan for Tapes” button in recent versions to make sure the
system has updated all the tapes captured and used on the
system.
Here is the best way to change the project name of a master clip:
1. Open the new project.
2. Open the Media Tool and show the original project media
files.
3. Consolidate the master clips into a new bin in the new
project.
4. Do not skip files that are already on the drive.
5. Select all clips in the bin and choose “Modify” from the
Clip menu.
If the tape name you want has not been used before in this
project, then you can create a new tape name. You can choose an
existing name if you made an earlier mistake and need to rename
these clips so they all come from an existing tape in the new
project. As you finish with the modification process, you get a
series of warnings that are important if you are working with key
numbers in a film project since the new clips need them reentered after you modify the tape name. A film project will not allow
you to change a source name of a clip without unlinking first. If
you are not using key numbers, just check OK.
Now the clips are associated with the new project as far as the
Media Tool and the headings in the bin are concerned. The change
has not really affected the actual media file at this stage, just the
master clip in the project. This is not enough for MediaMover to
recognize that there has been a change because it looks only at the
media file and not the project. The project information about a
93
94
Chapter 4 AVID ADMINISTRATION
media file is actually recorded in the media object identification
(MOB ID—it has nothing to do with gangsters). The MOB ID is
attached to the media file when it is captured, and the media file
itself must now be changed to update this information. Here is
another use for Consolidate: You need the space on the drives to
copy the files you want to change.
To change the project name of the media files, select all the
clips and Consolidate with the following options checked:
●
●
●
Have the old name link to the new media files.
Do not skip over the media files if they are already on the
drive.
Delete the old media files when you are done.
If you want two sets of the media—one set of media in one
project and one set in another—do not delete the original media
files after you consolidate.
Relinking
All master clips, subclips, sequences, and graphics must link to
media in order to play. When you log a shot into a bin, you create
a text file. When you capture the shot, you create a media file on
the media drive. The relationship between the master clip and the
media file is considered to be a link. If the master clip becomes
unlinked from the media file, it is considered offline. The media
may be on the media drive, but if the master clip is unlinked, the
media are considered offline and unavailable. In order to link, you
must highlight the clip and choose “Relink” from the Clip pulldown menu. The ability to link, relink, and unlink is very important to sophisticated media management. We will revisit these
concepts over and over again in this book. Following are eight
rules that govern this complex and confusing behavior.
Rule 1—Tape Name and Timecode
All linking between a master clip and a media file is based on
an identical tape name and timecode with media in the OMFI
MediaFiles or Avid MediaFiles folders. You can also relink by key
number for picture only, which is excellent for linking media
from a new film transfer to a finished sequence. There will also be
a choice in all models to relink based on resolution. This will
allow you to force master clips and sequences to link to media
based on the highest quality resolution available so that you can
instantly go from low resolution to high resolution without deleting or hiding media.
Chapter 4 AVID ADMINISTRATION
If you have media files offline that you know are on a connected
drive you can simply Refresh Media Directories under the File
menu. If this doesn’t work then you will need to try relink. You can
relink media when you have a master clip, subclip, sequence, or
graphic that is offline. Highlight the object in the bin and choose
“Relink” from the Clip menu. Your system searches the active
MediaFiles folder for media that use the same tape name and
timecode.
Rule 2—Tape Name and Project Name
Just because the tape name looks the same doesn’t mean it is
the same tape. There can be only one tape logged per project with
a particular name. Every time you add a tape as “New” in the Tape
Name dialog, you are creating a unique tape that is associated
with that project. You can use “Tape 001” two different times in
95
96
Chapter 4 AVID ADMINISTRATION
the same project, but the files are logged in separate projects and
are always considered different tapes.
The project name is displayed as a column next to the tape name
in the Tape Name dialog window. You can choose to show other
project’s tapes if you think the tape you need is in another project.
To reduce confusion, all tapes for a project should be logged in the
same project or in another project with the exact same name.
Having said all that, there is a way to bypass the project name.
In the Relink dialog, uncheck the “Relink only to media from the
current project.” Then only the tape name is important and not
the project name. You can choose whether the media files are
from the same project and you can make sure that you will match
the case of the tape name. The main use for unchecking the case
of the tape name is when you are trying to link to an EDL (edit
decision list) that has been imported. You can link to these clips if
the tape name is the same, but most EDL formats change the
original Avid name for the tape to something with all capital letters. An EDL may also truncate a long tape name, which is a good
reason to use short or numerical tape names, as recommended
earlier. If these two choices are checked, then the first time you
try to relink, nothing may happen; however, if you are relinking to
a terabyte or two of media, you will appreciate these choices
when working with the tape names of dozens of projects online.
Uncheck the choices and try the relink again.
Rule 3—Size Does Matter
A master clip cannot link to captured media files that are more
than a few frames different from the master clip’s start and end
times, even though it has a common timecode and tape name.
For various reasons, this rule became looser in later versions of
the software, but only by a few frames.
Rule 4—Subclips Are Less Choosy
A subclip will relink to media files that are longer than the subclip. This is true even if the subclip is exactly the same length as a
master clip that will not relink. Subclips are programmed to link
to more media than the subclip start and end times.
Rule 5—Sequences Are Really Collections of
Subclips
A sequence may relink when the individual master clips that
are contained within it will not. Think of a sequence as many
subclips.
Chapter 4 AVID ADMINISTRATION
Rule 6—Multipart Files Make Things More
Complicated
A sequence or a subclip will not relink to a media file that is
shorter than the media it needs unless it is a multipart file. If you
are working with OMF media, a single capture can be constructed
of several video media files (due to the 2-GB limit for OMF files).
This can make relinking a bit more complicated, as it is possible
that only part of the master clip will relink if one or more of those
file parts are missing. If only one of several media files links to
the sequence or subclip, then the clip will be partially online
with the Media Offline slide displaying wherever a piece of media
is missing.
Rule 7—Relinking Master Clips Is Different Than
Relinking Sequences
In the Relink dialog, the system will gray inappropriate choices.
If a master clip and a sequence are both selected, then you must
choose which one you really want to relink.
Rule 8—Relinking a Sequence to Selected Master
Clips Works Only in the Same Bin
In the Relink dialog box, the “Relink all nonmaster clips to
selected online items” button can be used only when you have
highlighted specific online master clips that you want to relink to
a sequence. In older versions, this was called “Relink to Selected.”
There is no way to unlink a sequence, only forcing it to relink to
other media, taking the original media offline or using the decompose function.
This Relink to selected online items option works only within a
single bin. It is used primarily to force a sequence to relink to
media at another resolution or from another project. To relink to
clips from the Media Tool, the clips must first be dragged from
the Media Tool into the same bin with the sequence. Everything
in the bin to be relinked must be highlighted. Do not check this
function unless you are specifically linking To Selected, or nothing will happen.
Unlinking
Unlinking is one of those powerful, dangerous, useful, and
poorly understood functions that people know they should use
but don’t really know when. Sometimes a link must be deliberately broken using Unlink. In the Clip menu, highlight the desired
97
98
Chapter 4 AVID ADMINISTRATION
clips, hold down Shift-Ctrl on Macintosh or Shift-Alt on Windows,
and Relink becomes Unlink. Any media that have been captured
for this master clip now become offline. The system considers
this master clip as never been captured and is not linked to any
media or to any sequences. The sequence linking is important
because otherwise every use of this clip in any sequence will be
changed. You want to change this one master clip, but you probably don’t want every use of it to change, too. That is why Unlink is
required as a safeguard.
You then can modify the duration of the clip, but you must
recapture all the unlinked clips. Do not unlink media that have
no timecode, and do not modify the master clip because you will
be unable to batch recapture.
Unlink is extremely useful for multicam projects. After batch
capturing Reel 1 from Camera 1, you can duplicate all the master
clips, unlink them, and change the tape name (Reel 2, Reel 3,
etc.). Now you can batch capture all the other camera angles. Just
be sure to duplicate the original clips using Ctrl/CommandD
and not Alt/Option drag to another bin. You must be working
with a true duplicate and not a clone of the master clip before
you unlink.
There is no way to unlink a sequence using the Unlink command. Sequences have a loose link to media that allows them to
change resolutions easily. The best way to unlink a sequence is to
duplicate and decompose. You can throw away all the new
decomposed master clips and just use the sequence. Because a
sequence is loose about linking, you don’t really need to unlink
most of the time. You can just force the sequence to link to new
material (Relink all nonmaster clips to selected online items with
both media and sequence in the same bin), and it will automatically break the links to the old media.
Backing Up and Archiving
So, what is your most important job as an editor? Making a
great edit, right? Well, if you are a freelancer without a staff IT
archivist at your disposal your most important job is backing up!
Why? Well, no matter how good an edit is, if the sequence is accidentally deleted or the system crashes, that edit doesn’t exist and
is useless to the client, no matter how brilliant it was. A good
friend of mine commented once that he was the fastest editor in
the world the second time he edited the job. In other words, when
you lose your sequence you better be both brilliant and fast
because you’re about to do it all over again!
Let’s look at some back-up strategies.
Chapter 4 AVID ADMINISTRATION
Daily Project Backups
In many respects, the most important thing you can buy for an
edit bay is a spindle of CD-Roms. I feel strongly that you should
back up your project at the end of every single day. Both
Macintosh and Windows systems have CD-burning capabilities
built in. Use them. At the end of each shift, grab a CD off the
spindle, put it in the computer’s optical drive, and copy your
entire project to the CD. Then do it again. Label both carefully
indicating the project, job/client code if one exists, and the date.
I recommend keeping two backups—one onsite and one offsite.
One stays in the edit bay or at the facility. The other goes home
with you every night. Not only is it a good backup practice—one
recommended by virtually everyone—but you never know when
your personal backup will save your client. Though this has thankfully never happened to me, I’ve spoken with many different editors who arrived one morning at the postfacility they were cutting
at to discover that a burglary had occurred and the computer in
their edit bay was stolen. One even arrived one morning to discover padlocks on the door and a foreclosure notice taped to the
window. As the tapes are often the property of the client you can
usually get those back without spending too much time in court.
Good luck, however, convincing the judge to let you copy their
project off the seized computer!
If you wish, you could also use a flash drive to make your personal copy. Remember, you are doing your client a service by
backing up their work. You want them as a long-time customer of
yours, right?
Long-Term Archival
When the project is over you’ll want to back up the project. The
easiest and most inexpensive way to back up media files is to not
back them up. Instead, vault your tapes, any graphics or animations created, and a copy of the project. Remember that if you
captured with timecode you can always recapture that material.
But with the proliferation of inexpensive terabyte and larger
portable hard drives, you may well want to save some time and
back up everything to a hard drive you can easily put on a shelf
for long-term storage. Once again, if you want to quickly back up
everything in a project use MediaMover to move all the project
media into their own folders. Believe me, if you are in this business to make money and you want to back up your media you
need MediaMover. Just go buy it already.
If you are backing up the media, be sure you also back up the
project and any graphics or animations created. Copy these to
99
100
Chapter 4 AVID ADMINISTRATION
the hard drive with the media and to a CD-Rom (or even a flash
drive), and vault it as well.
Backing Up User Settings
You should be able to reproduce user settings in about five
minutes, but some people resist it like a trip to the dentist. There
is no way to lock your user settings to keep unauthorized folks
from making a few “improvements” or just accidentally changing
them, so it is a good idea to back them up somewhere safe and
hidden. Many freelancers carry their user settings on a USB
memory stick attached to their keychain.
When software versions change, especially substantial version
changes, you should always remake your user settings. I know
this sounds tedious, but recreating them solves many unusual
and unpredictable problems, especially if your customized keyboard is complex. You may be trying to access menus that have
been moved or deleted! Or there may be more subtle problems
that don’t immediately appear to relate to user settings. One of
the first things Avid customer support asks you to do if you are
getting unusual behavior, like a common feature suddenly not
working, is to create a new project or user settings. If the software
version has not changed recently, having a backup of your user
settings may be enough to fix the problem, rather than having to
recreate them from scratch.
Another reason to create new user settings whenever there is a
version upgrade is that there are often new capabilities that you
won’t get unless you create a new user. For example, in version 3.0
there are new interface configurations and some very useful new
default bin views. If you don’t create a new user you won’t get them.
Use Common Sense
Even though there is a lot to be in charge of when administering an Avid system, much of it is common sense and taking
advantage of existing computer peripherals and software that
make your job easier. Make sure the policy you decide on is followed uniformly. Make sure that all members of your staff are
educated on the correct procedures as well as just a little troubleshooting. Then they can deal with those questions themselves
during the night shift. You may want to consider creating a media
management policy in writing and making sure your clients know
it, even by getting them to sign it when beginning a project. If set
up right, you will significantly reduce downtime and make it easier to diagnose and solve technical problems and missing media.
5
STANDARD-DEFINITION VIDEO
FUNDAMENTALS
“ The devil is in the details.”
—German proverb
Back in the early days before nonlinear editing became the way
of working, editors learned the craft a certain way—and learned
about far more than why and where to make a cut. Before they
could work in the edit bay they had to cut their teeth in the video
dupe department, then work as an assistant, and so on. Of course,
this meant they spent years—for very little pay—doing something
other than what they wanted to do; but it was about more than
simply “paying the dues,” it was all about learning. And one thing
video editors had to learn before they were allowed in the edit bay
was signal.
Editors had to become intimately familiar with video signal,
with a deep understanding of how to read, manipulate, and, most
importantly, calibrate video voltages. Indeed, their first task as an
online editor each shift was to “time” the room, making sure that
the voltages throughout the room were calibrated. Because if they
didn’t, their show would likely look pretty terrible and be filled
with all sorts of nastiness like horizontal shifts, vertical rolls,
visual distortions at edits, luminance (brightness) and color
shifts, and so on. The analog world was hard. Virtually anything
could go wrong, and editors could be guaranteed that plenty
would go wrong unless they became masters of the video signal.
The digital domain simplified things dramatically, but unfortunately we’re now faced with an editing world where the details that
are easy to ignore will truly bite you—and your clients—at the end.
In this chapter we’re going to dive deep into the world of video signal, starting first with the foundations of video and progressing
101
102
Chapter 5 STANDARD-DEFINITION VIDEO FUNDAMENTALS
into the digital world. Along the way I’m going to get incredibly
technical. Indeed, some folks argue that video engineering documents are best suited for insomniacs. Though I don’t agree with
that statement, I certainly agree that this is the geekiest part of this
book by a mile.
My goal with this chapter, and Chapter 6 on high-definition
(HD) video, is not to turn you into an engineer, but to try to
express, using as nontechnical a language as possible, the world
of video signal. Trust me, if you want to go far in this business you
need to know this stuff.
Signal Fundamentals
Despite the growing prevalence of digital video formats for
production (including DV, Digital Betacam, XDCAM, and so on) it
is important to remember that video began as an analog, voltagebased feat of engineering. Indeed, all digital video formats have
analog video as their foundation. In addition, most of the video
signals in today’s broadcast or cable distribution facilities, with
the exception of HD, spend some or all of their time in analog
form, and must adhere to analog standards. So, even if you work
exclusively in digital, it is crucial to learn the fundamentals of an
analog signal.
To better understand video signal fundamentals, let’s begin by
breaking down the signal into its most basic components, beginning with a single-line black-and-white signal.
When an analog video camera captures an image, the image is
measured, or sampled, as a series of voltages that describe the relative brightness of the image. The higher the voltage, the brighter
that portion of the picture. Specific voltages are assigned to both
black and white (these are often referred to as video black and
video white). The entire image is measured by scanning, or sampling, the image from left to right, one line at a time from top to
bottom.
Video Line Structure
The majority of the video signal is dedicated to the display of
the picture and is referred to as the active region or active picture.
Outside of the active region, a line of video contains additional
information used to help synchronize and align the line so it is
properly displayed. This region serves two purposes: to define the
beginning and end of a line, and to turn off, or blank, the display
so the electron gun can quickly fly back from the right edge to the
left so that it can scan or display the next line. This synchronization area is referred to as the horizontal blanking region.
Chapter 5 STANDARD-DEFINITION VIDEO FUNDAMENTALS
103
Two specific voltages are used in the horizontal blanking region:
●
●
Synchronization: This is used briefly in a sync pulse to
align the timing of the video line. The sync pulse contains
a unique voltage that is significantly lower in voltage than
any other portion of the video signal.
Blanking: This is used throughout the blanking region (with
the exception of the sync pulse). The voltage is the same as
is used for video black.
To better understand what a video signal looks like, standardized test patterns are used. For the first part of our exploration
into signal we will use a grayscale ramp test pattern. (A grayscale
ramp test pattern is a horizontal gradient between black and
white.) When displayed on a video monitor, the signal looks like
the first figure shown here. The second figure shows the basic signal structure for a line of video displaying this test pattern.
Some video
systems use a
different voltage
for blanking and video
black. We’ll discuss this
difference in a moment.
Blanking
Region
Active Region
Sync
Video Line Voltages
Now let’s add some actual voltages into the mix:
●
●
●
●
In both NTSC and PAL, blanking is assigned a value of 0 volts.
The blackest portion (video black) of the image is also
assigned a value of 0 volts in PAL; NTSC video black will be
described later.
The whitest portion (video white) of the image is given a
value of 714 millivolts (mV) in NTSC and 700 mV in PAL.
The sync pulse is assigned a value of –286 mV in NTSC
and –300 mV in PAL.
104
Chapter 5 STANDARD-DEFINITION VIDEO FUNDAMENTALS
●
The entire signal, from sync to peak white, has a range of 1
volt. This is often expressed as 1 V P–P (one volt, peak to
peak).
Though voltages are used as the unit of measurement in PAL,
in NTSC the values of 714 mV and –286 mV don’t lend themselves
well to describing and measuring a signal. Therefore, the IRE unit
was established to describe an NTSC signal. An IRE unit is equivalent to 1 percent of the range from blanking to peak white, or
7.14 mV. When expressed in IRE units, blanking is assigned a
value of 0 IRE, peak white a value of 100 IRE, and sync a value of
40 IRE. The following image shows the signal structure for a line
of video, this time with voltages and IRE units assigned.
PAL
700 mV
NTSC
100 IRE / 714 mV
1.0 V (P–P)
0 mV
300 mV
0 IRE / 0 mV
40 IRE / 286 mV
Black-Level Setup (NTSC Only)
In NTSC, a further signal distinction exists, that of black-level
setup. Video black is raised slightly above the level of blanking.
100 IRE / 714 mV
Setup
Voltage
Blanking
Voltage
7.5 IRE / 53.6 mV
0 IRE / 0 mV
40 IRE / 286 mV
Chapter 5 STANDARD-DEFINITION VIDEO FUNDAMENTALS
105
This was done to give television sets a distinct blanking signal
apart from black. Black level is assigned a value of 7.5 IRE
(53.6 mV). This means that blanking is actually blacker than black.
Not all NTSC countries (e.g., Japan) use black-level setup. In those
cases, black is assigned the same value as blanking (0 IRE) just as
it is in PAL.
Black-level setup is only used in NTSC analog composite and
component formats. It is not used in any digital component
format.
Adding Color
Black-and-white images are easy to record as a video signal as
each level of brightness is simply assigned a voltage. Color
complicates matters somewhat. Video cameras capture color
information by breaking down an image into three primary
colors: red, green, and blue (RGB). (These three colors are
known as the additive primaries and are the primary components of light.) By describing the percentage of each of these colors, we can record and reproduce a large portion of nature’s
colors.
When a camera captures a color scene, the color information is
not captured linearly. This nonlinearity is due to the fact that virtually all video cameras are less sensitive to changes in darker
areas than they are to changes in lighter areas. This nonlinearity
is referred to as a camera’s gamma response curve or simply as its
gamma. When recording a video signal we correct for this nonlinearity, or gamma, and use the prime mark () to indicate that the
signal has been gamma-corrected. Therefore, in video we refer to
these signals as the R, G, and B signals.
To best understand how a color signal is created we will use a
standard set of color bars. The next figure shows color bars
with 100 percent (of peak) chroma saturation on all three
color channels. The following illustration shows the signal produced from this color bars pattern for red (R), green (G), and
blue (B).
Notice that each of these signals is full bandwidth. Unfortunately, recording a color image as RGB means that we need to
store three times the amount of information than we do with a
black-and-white image. This presented the engineers who developed the color system with a big problem: There simply wasn’t
enough bandwidth in the video signal to record that much information. Additionally, the engineers wanted to create a color
signal that black-and-white televisions could interpret and
display.
Full bandwidth
indicates that the
signal’s voltage
contains excursions
between video black and
video white.
106
Chapter 5 STANDARD-DEFINITION VIDEO FUNDAMENTALS
Blue (B´)
Green (G´ )
700 mV (PAL)
100 IRE (NTSC)
Wt Y
C
G
M
R
B Bk
Wt Y
C
G
Red (R´ )
M
R
B Bk
Wt Y
C
G
M
R
B Bk
0 mV (PAL)
0 IRE (NTSC)
Generated
Signal:
This method of
storing color
information was
based on standards
defined by the CIE
(Commision Internationale
de L’Éclairage) in 1931.
The Component Video Solution
The solution was to store the signal in some other way. The signal has to start as an RGB signal and end as an RGB signal (in
order for the monitor to display it). The challenge was to develop
a method that took less bandwidth but would be easy to encode
and decode.
The engineers decided to store a full-bandwidth luma (blackand-white) signal and two color-difference signals of lower
Chapter 5 STANDARD-DEFINITION VIDEO FUNDAMENTALS
107
bandwidth. The human eye is more sensitive to differences in
brightness than it is to differences in shades of color. By dedicating the majority of the signal to luma information, the engineers
were able to take advantage of the way our eyes work. The color
information must be stored in two additional color-difference signals, making for a total of three signals. Three signals are required
to ensure that the original RGB information can be converted
back to RⴕGⴕBⴕ for display on the monitor.
Storing a video image in this color-difference form has two significant advantages over storing it as RGB:
●
●
Substantially less bandwidth is required as only one highbandwidth signal is required for the luminance as opposed
to three high-bandwidth signals for RGB.
Gain distortions in any one of the component signals have
a less-detrimental affect on the picture. A low level on one
channel in a color-difference signal will only produce
subtle changes in brightness, hue, or saturation. A gain
distortion in RGB will produce significant color shifts
throughout the entire image and can even produce “illegal” colors that exceed what is allowed for broadcast.
The Luma Signal
Luma, often referred to as Y, is created by combining the red,
green, and blue signals. They aren’t combined in equal parts. This
is because the human eye is more sensitive to some colors than
others. We see the greatest amount of detail in greens, less detail
in reds, and very little detail in blues. Therefore, the luma signal
is primarily composed of 58.7 percent G, 29.9 percent R, and
11.4 percent B. This can be expressed as:
The symbol Y is
also augmented
with a prime (Y)
to denote that it represents
the weighted sum of
gamma-corrected
components.
Y 0.587 G 0.299 R 0.114 B
The following illustration shows the luma portion of
the signal for the 100-percent color bars pattern. Note:
The steps in the “staircase” are not equal. This is
because of the percentage of red, green, and blue used.
For example, the first bar, white, is composed of all
three values (0.587 G 0.299 R 0.114 B) and the
second bar, yellow, is only composed of green and red
(0.587 G 0.299 R).
Wt
Y
C
G
M
R
B
B´
R´
B´
B´
The Color-Difference Signals
In addition to luma, two color-difference signals are
required. The color-difference signals store the color
information that is different from the luma information. These signals are created by subtracting luma
G´
R´
B´
Bk
108
Chapter 5 STANDARD-DEFINITION VIDEO FUNDAMENTALS
from one of the original red, green, or blue signals. This way, we
can recreate the original signal by adding together the colordifference signal and the luma signal.
As the luma signal is primarily made up of green, subtracting
luma from green doesn’t yield a very useful signal. Therefore, one
color-difference signal is created by taking blue and subtracting
luma from it (B–Y); the other by taking red and subtracting luma
from it (R–Y).
Using the same 100-percent color bars pattern, the following
figure shows the created B–Y and R–Y signals. These values are
then normalized so that the peaks for B–Y and R–Y are identical. NTSC and PAL use different voltage normalizations, as shown
in the illustration.
NTSC
Voltages
B´ – Y´
466.66 mV
R´ – Y´
PAL
Voltages
350 mV
0 mV
0 mV
466.66 mV
350 mV
In summary, the three signals used for a color video image are
Y, B–Y, and R–Y. From these signals, RGB can be recreated
mathematically by circuits in the monitor.
Every method of storing and transmitting a color video signal
(composite, S-video, component, and digital) uses the previously
discussed method to create the key parts of the video signal. Now,
let’s examine each standard to see how they differ.
Composite Video
Composite video is unique among all the analog video formats
in that it is the only one actually broadcast over the air. All of the
others are only transmitted between equipment within a facility.
Composite video is the oldest method of storing a color video
signal. It also has the least available bandwidth and the lowest
quality. To reduce the amount of space required for our two colordifference signals, we take advantage of another characteristic of
the human eye: We cannot see fine detail in color changes as easily as we can see fine detail in brightness changes. Therefore, we
can reduce bandwidth of the two color-difference signals without
Chapter 5 STANDARD-DEFINITION VIDEO FUNDAMENTALS
109
noticeably degrading the image as long as we don’t reduce the
bandwidth of the luma signal. Additionally, composite color
requires that the three signals—Y, B–Y, and R–Y—be combined into a single signal. To do this, a method known as encoded
color was developed.
Encoded Color
Encoded color uses a well-established concept: amplitude modulation (which is used for AM radio). Amplitude modulation uses a
high-frequency carrier wave whose amplitude (height) is varied by
the addition of another frequency. A carrier wave is simply a highfrequency sine wave of a specific frequency. When an additional
signal is applied, the height of the sine wave varies with the voltage
of the added signal—the greater the voltage, the greater the amplitude of the sine wave at that point in time. Additionally, the carrier
wave frequency must be high enough to capture all of the color information.
One voltage stored
Amplitude modulation is a form of analog
sampling. Each period of the carrier wave
carries one voltage, or sample. A period of a
sine wave starts with no voltage at 0°, travels
to peak positive voltage at 90°, returns to no
voltage at 180°, travels to peak negative voltage at 270°, and returns to no voltage at 360°.
Due to the different frame rates and line
90°
270°
counts of the NTSC and PAL standards, the
0°
180°
360°
two formats use different carrier wave frequencies for their encoded color:
●
●
NTSC uses a carrier wave frequency of 3.58 MHz.
PAL uses a carrier wave frequency of 4.48 MHz.
Because there are two signals (B–Y and R–Y) to be encoded,
one is carried on one carrier wave and the other on a second carrier wave that is offset 90° from the first. (This is technically
known as phase quadrature and the entire process as quadrature
amplitude modulation, or QAM.) This encoded signal is commonly referred to as chroma.
In addition, the B–Y and R–Y signals are scaled and bandwidth-limited. Once scaled and limited these signals are often
referred to as U and V, respectively.
Combining Luma and Chroma
We now have only two signals, luma and chroma, which have
to be combined. The luma and chroma signals from our 100percent color bars are shown in the next figure for reference.
Frequency is the
rate of change
over time. High
frequency implies that a
voltage changes rapidly
from a high value to a low
value or vice versa.
110
Chapter 5 STANDARD-DEFINITION VIDEO FUNDAMENTALS
Luma Signal
0%
100
12.5%
80
60
40
20
7.5
75%
20
40
100%
Chroma Signal
100
12.5%
80
60
40
20
7.5
75%
20
40
100%
60
If we compare the luma and chroma signals, you will observe
that the luma signal contains primarily low-frequency (the rate of
change over time) information while the chroma contains primarily high-frequency information. The only high-frequency
information in the color bars test pattern is at the transition
between one bar and the next. Though this transition is quite
rapid, it is not immediately repeated.
Indeed, it can be stated that luminance signals are primarily
composed of low-frequency information. This is true not just for
test patterns, but for almost all video signals. (Luminance signals
can contain some high-frequency information. This is most typically seen in high-contrast patterns such as a plaid jacket. Accurate
Chapter 5 STANDARD-DEFINITION VIDEO FUNDAMENTALS
111
representation of these signals is unfortunately not always possible in composite video systems.)
Since the luma signal contains few high-frequency data and
the chroma signal is entirely composed of high-frequency data,
the two signals can be combined together (the chroma signal is
summed with the luma signal) with little risk of signal contamination. (Since the chroma is carried in a carrier wave and is the
secondary of the two signals, it is referred to as a subcarrier.)
Additionally, an unmodulated portion of the carrier wave is
placed on the back porch (see sidebar) of the blanking interval.
This portion, known as the color burst, is used when decoding the
composite video signal to isolate the encoded color from the rest
of the signal.
Bar Bets and Video Signal
When you are talking with video engineers you’ll often hear them refer to the right section of blanking after sync as
the back porch. Likewise, they’ll refer to the left section of blanking prior to sync as the front porch. Where did these
terms come from? Believe it or not, from the design of the typical house in a hot and humid climate (such as the southeast United States). These houses always have a front and back porch (for living on during the cooler evening hours) and
a single hallway flowing down the middle of the house (known as the breezeway). This house design utilized a concept
known as negative air pressure to draw air through one of the two openings, through the house, and back out the other
opening. This negative airflow would pull a significant amount of air through the house and dramatically cool what
would otherwise be an unlivable environment.
As crazy as it sounds, this is literally where these terms came from. Some engineers, especially down in the South,
still refer to the sync pulse as the breezeway. So when you’re out late with an especially geeky set of video editors, feel
free to pull this arcana out and use it to get someone else to buy the next round!
When we combine the luma and chroma signals from the 100percent color bars, the signal in the following figure is produced.
Notice that the chroma in the summed composite signal has
been raised by the luminance voltage. The composite amplitude
of the signal is the sum of the luma and chroma voltage.
Peak Composite Amplitude
The 100-percent color bars pattern produces a peak composite
voltage of:
●
131 IRE (NTSC) or 1000 mV (PAL).
The 100-percent color bars pattern produces a minimum composite voltage of:
●
23 IRE (NTSC) or 300 mV (PAL).
112
Chapter 5 STANDARD-DEFINITION VIDEO FUNDAMENTALS
120
0%
100
12.5%
80
60
40
20
7.5
75%
20
40
100%
Although this is the maximum allowable voltage according to
the composite video specification, the 100-percent color bars
pattern’s peak voltage exceeds what most broadcasters will accept
for a composite format signal.
For this reason, this 100-percent color bars pattern is usually
replaced by a 75-percent color bars pattern where the maximum
chroma is only 75 percent of the allowable peak. The 75-percent
color bars pattern creates a peak composite amplitude of:
●
100 IRE (NTSC) or 700 mV (PAL).
This composite signal has the same peak amplitude as the
luma signal. The following illustration shows the signal produced
by a 75-percent color bars test pattern. Note: We’ve configured the
scope to display both the full composite signal and the luma signal side by side. Notice that the luma voltages in the 75-percent
pattern are different than the 100-percent color bars pattern.
0%
100
12.5%
80
60
40
20
7.5
75%
20
40
100%
Chapter 5 STANDARD-DEFINITION VIDEO FUNDAMENTALS
The entire system is quite ingenious and can be encoded and
decoded entirely using analog circuitry.
Composite Video Limitations
Composite signals are not without their problems. As the
color-difference signals are kept separate by a difference in
phase, very small phase distortions can cause large color distortions in a picture. These phase distortions are so common in
NTSC signals that a subcarrier phase adjustment (known as hue)
is standard on every television set.
Many other problems exist with composite signals and are
principally a result of the encoding, overlaying, and decoding of
the chroma signal. This is often referred to as the composite footprint and manifests itself in chroma crawl, chroma edge inaccuracies, cross-color moiré patterns, and so on. For example, the
plaid jacket mentioned earlier is represented by high-frequency
luma information. When the composite signal is decoded, this
high-frequency luma data may be converted to chroma information. This results in cross-color moiré patterns. If the signal is
reencoded to composite, the jacket pattern is left as chroma and
some luma detail is lost. On the next decode, some of the remaining luma information is converted to chroma and even more
luma data are permanently lost.
Composite Video Differences in PAL
As just mentioned, one of the key limitations of the composite
video format is that the subcarrier phase cannot be readily
deduced, causing hue shifts in the decoded image. The designers
of the PAL video format solved this problem by inverting the subcarrier phase with every other line of video.
Decoding circuitry was then designed to use these phase inversions to calculate the correct subcarrier phase, eliminating the
need for a subcarrier phase (or hue) adjustment by the end user.
In addition to PAL, the SECAM format is also used in some
European countries for transmission. Studio production in these
countries, however, is often done in PAL or 625-line component
as SECAM is a transmission-only format.
Video Frame Rates
Prior to the introduction of color, American television operated at a frame rate of 30 frames per second (fps) and European
television operated at a frame rate of 25 fps. These two frame
rates were not chosen arbitrarily, but instead were chosen to correspond to the alternating current (AC) power frequency used in
the host countries (60 Hz and 50 Hz, respectively).
113
114
Chapter 5 STANDARD-DEFINITION VIDEO FUNDAMENTALS
The developers of the NTSC format discovered that when color
was added to the signal, the difference between the audio and
color subcarrier frequencies introduced a noticeable dot pattern
across the image. To reduce and hopefully eliminate this dot pattern, they slowed the frame rate slightly by a factor of 1.001,
resulting in a new frame rate of 29.97 fps. Fortunately, this adjustment was compatible with existing black-and-white televisions
and was adopted. Unfortunately, this change has led to a wide
variety of problems and compromises in video production, postproduction, and transmission that continue to this day, even into
the HD formats.
As the PAL video format did not have to be compatible with
earlier European black-and-white transmission formats, the
developers of the PAL format were able to avoid this problem and
design a system that would support the 25-fps rate.
S-Video
S-video, also referred to as Y/C, is a simple variant of composite video. The two color-difference signals are encoded using
QAM, just as with composite video. The only real difference is
that the luma and chroma are not multiplexed (combined), but
are left as two separate signals. This method eliminates the problems inherent in combining and separating luma and chroma,
but it still has a reduced chroma bandwidth.
Y/C signals are extremely advantageous in composite video situations as they allow the encoded color to be transmitted from
one piece of equipment to another without being multiplexed
and demultiplexed over and over again. This is critical because
the composite footprint becomes more and more apparent each
time the signal is demultiplexed and remultiplexed.
Though Y/C signals have been used for years, they became the
foundation of the consumer and industrial format S-VHS.
Matsushita, the developer of S-VHS, coined the phrase S-video
when they introduced the format, and the name continues to
be used.
Component Video
Earlier we said that all video starts as RGB color and is translated into luma (Y) and two color-difference signals (B–Y and
R–Y). The component video format keeps the three signals (Y,
B–Y, and R–Y) separate and does not encode and overlay the
color information over the luma. The two signals are scaled just as
they are in a composite signal, but the scaling applied is different
Chapter 5 STANDARD-DEFINITION VIDEO FUNDAMENTALS
Luma Signal
0%
100
12.5%
80
60
40
20
7.5
75%
20
40
100%
Chroma Signal
100
12.5%
80
60
40
20
7.5
75%
20
40
100%
60
than that used for composite signals. The color-difference signals
are referred to as PB and PR in analog component systems.
The following diagram is the signal resulting from a set of fullfield 100-percent (of peak chroma) color bars for the 525-line and
625-line formats. Note that the voltages for Y, PB, and PR are different for the two formats. The 625-line format uses the EBU N10
standard. Though the 525-line format can also use EBU N10
(which is also referred to as SMPTE N10), the Betacam component standard is more common. The Betacam component maintains the NTSC composite voltages for luma to make it easier to
115
116
Chapter 5 STANDARD-DEFINITION VIDEO FUNDAMENTALS
transcode component video to composite and vice versa. All Avid
systems use the Betacam component standard.
714 mV
Y´
525-line Betacam Component
PB
PR
466.66 mV
0 mV
466.66 mV
53.6 mV
700 mV
Y´
625-line EBU N10
PB
PR
350 mV
0 mV
0 mV
350 mV
NTSC and PAL in the Component World
Technically, the terms NTSC and PAL are only valid if used to describe a composite video format. Component video
formats instead are named by the number of scan lines in the format. Therefore, the proper terms are 525-line (instead of
NTSC) and 625-line (instead of PAL). We will discuss scan line counts in greater detail in the next section.
Also notice that a 525-line component signal is measured in
millivolts, not IRE. IRE measurements are only valid for composite signals.
By keeping the three signals separate we eliminate many of the
problems inherent in composite video. For example, pulling a
clean chroma key from a composite signal is extremely difficult,
particularly around the edges of an object. This is due to the inevitable footprint of composite encoding. However, a clean chroma
key is fairly easy to pull from a component signal.
Additionally, component video does not have to undergo the
amount of signal compression needed for composite video and it
can handle a much greater bandwidth of color information.
Component video does, however, have its challenges. Any time
you have three signals traveling through three distinct wires you
run the risk of variances in both gain and timing for the three signals. Therefore, it is critical that component analog equipment is
connected using three cables of identical length.
Chapter 5 STANDARD-DEFINITION VIDEO FUNDAMENTALS
Video Frame Structure
Up until now we’ve focused primarily on the picture portion of
the video line. Now let’s take a look at the rest of the video signal.
Blanking Interval
As we alluded to at the beginning of the module, a portion of
the line is reserved for synchronization information called the
blanking interval. The following illustration displays this interval
in detail.
Sync rise time
Burst Amplitude
50%
50%
Sync
Color Burst
Blanking Interval
The blanking interval contains several critical synchronization
components, each of which must have specific timings and/or
amplitudes. Table 5.1 lists the critical components and their
respective timings and/or amplitudes in both NTSC and PAL. The
information for NTSC is derived from the SMPTE 170M specification and the information for PAL is derived from the ITU System
B specification. These two specifications codify the NTSC and
PAL analog video formats.
The blanking interval derives its name from its primary purpose: to shut off, or blank, the video signal between each line of
video. This is required because the video frame is displayed one
line at a time from left to right. The blanking interval allows the
signal to rapidly fly back to the left edge of the screen at the end
of each active line period.
117
118
Chapter 5 STANDARD-DEFINITION VIDEO FUNDAMENTALS
Table 5.1 Blanking Interval Timings and Amplitudes
Blanking Component
NTSC (SMPTE 170M)
PAL (ITU System B)
Blanking interval duration
10.9 μs 0.2 μs
12.0 μs 0.3 μs
Sync rise time
140 ns
140 ns
Sync duration
4.7 μs 0.1 μs
4.7 μs 0.2 μs
Sync amplitude
40 IRE (286 mV)
300 mV
Color-burst duration
9 subcarrier cycles 1
10 subcarrier cycles 1
μs microsecond, or one-millionth of a second; ns nanosecond, or one-billionth of a second;
subcarrier cycle the time it takes the subcarrier to complete one period.
Scan Line Structure
The total number of lines in the video frame is different for
NTSC and PAL. NTSC uses 525 lines for each frame and PAL uses
625 lines. Though the majority of these lines are used for picture
(and are referred to as the active picture area), some lines are
reserved for vertical synchronization and are referred to as the
vertical blanking interval. (We’ll discuss these lines in greater
detail in a moment.)
In addition, due to limitations of technology and bandwidth
(the amount of space available to store the video signal), only half
of the frame is scanned at a time. The first pass through the image
scans every other line. The second pass scans the skipped lines.
These two scans combine to create the whole image. This scanning
sequence is known as interlaced scanning. Each scanning pass is
called a video field. The following illustration shows the scanning
pattern for the active picture area for both NTSC and PAL.
Both NTSC and
PAL begin and
end the active
picture area with a half
line. The other half of the
line is part of the vertical
blanking interval. Also note
that the top line in NTSC is
from field 2 while the top
line in PAL is from field 1.
PAL Interlacing
NTSC Interlacing
Start of Field 2 Start of Field 1
Start of Field 1 Start of Field 2
1
2
1
2
1
2
1
2
1
2
1
2
1
2
1
2
1
2
1
2
1
2
1
2
1
2
2
1
2
1
2
1
2
1
2
1
2
1
2
1
2
1
2
1
2
1
2
1
2
1
2
1
Chapter 5 STANDARD-DEFINITION VIDEO FUNDAMENTALS
119
The Boy Who Invented Television
At the beginning of the twentieth century, inventors and companies around the world were trying to figure out how to
transmit images electronically over the air. The irony was that a 14-year-old boy had already figured it out. Philo T.
Farnsworth was harvesting potatoes on his family’s farm, endlessly driving the harvester row by row back and forth
through the field, when inspiration struck. What if one were to “draw” a picture on a television screen line by line just as
one would plow a field? Just as the eye could resolve the field from the plow lines, he imagined that the eye could stitch
the transmitted lines back together and see the picture. He further imagined what he called his “image dissector,” which
used an electron gun to scan an image and then redraw it in another location. (Other inventors used large spinning
mechanical disks to scan the image.)
The year was 1922, a full year before anyone else had come to a similar conclusion. The sad reality was that it
wasn’t until July 1957 that the television industry finally publically acknowledged his contributions—and that acknowledgment came on the game show “I’ve Got a Secret.” Between his invention and that game show were decades of legal
battles between Farnsworth and the massive RCA corporation who wanted sole ownership of the invention. The tale is a
fascinating one, and if you want to read more about it, visit www.farnovision.com.
Vertical Blanking Interval
Let’s look at the vertical blanking interval (VBI) in greater
detail. The interval is composed of two sections: a reserved area
with specific vertical synchronizing and equalizing pulses, and a
section available for special vertical interval signals. These signals
can include such information as vertical interval timecode
NTSC Line Structure
PAL Line Structure
1
1
Blanking
23
21
Field 1
Field 1
310
263
Blanking
283
336
Field 2
Field 2
525
623
Blanking
(not to scale)
(not to scale)
120
Chapter 5 STANDARD-DEFINITION VIDEO FUNDAMENTALS
(VITC), closed-captioning data, and other types of information as
defined by the broadcaster. The following illustration and Table
5.2 show the line structure for both NTSC and PAL. To enhance
readability, the blanking sections have been written in italics.
Table 5.2 NTSC and PAL Line Structure
NTSC Line Structure
Line/Field
Left Half of Line
Right Half of Line
1–9/f1
Blanking: EQ and sync
Blanking: EQ and sync
10–20/f1
Blanking: vertical interval
Blanking: vertical interval
21–262/f1
Active picture
Active picture
263/f1
Active picture
263/f2
Blanking: EQ and sync
264–271/f2
Blanking: EQ and sync
Blanking: EQ and sync
272/f2
Blanking: EQ and sync
Blanking: empty
273–282/f2
Blanking: vertical interval
Blanking: vertical interval
283/f2
Blanking: vertical interval
Active picture
284–524/f2
Active picture
Active picture
525/f2
Active picture
Active picture
PAL Line Structure
Line/Field
Left Half of Line
Right Half of Line
1–5/f1
Blanking: EQ and sync
Blanking: EQ and sync
6–22/f1
Blanking: vertical interval
Blanking: vertical interval
23/f1
Blanking: empty
Active picture
24–310/f1
Active picture
Active picture
311–312/f1
Blanking: EQ and sync
Blanking: EQ and sync
313–318/f2
Blanking: EQ and sync
Blanking: EQ and sync
319–335/f2
Blanking: vertical interval
Blanking: vertical interval
336–622/f2
Active picture
Active picture
623/f2
Active picture
623/f1
624–625/f1
Blanking: EQ and sync
Blanking: EQ and sync
Blanking: EQ and sync
The longer vertical blanking time also allows the electron beam
to return to the top of the screen. (Due to the structure of the
beam, the vertical retrace is much slower than the horizontal
retrace.)
Chapter 5 STANDARD-DEFINITION VIDEO FUNDAMENTALS
Subcarrier Synchronization (Composite Video Only)
In addition to the syncronization signals in the vertical interval, the NTSC and PAL composite video formats contain a phase
synchronization structure for the color subcarrier. This structure
is four fields long in NTSC and eight fields long in PAL. This relationship is referred to as SCH or subcarrier-to-horizontal phase.
Editing in a pure-composite environment required editors to
maintain the SCH alignment of these four- or eight-field structures or color errors could occur. Fortunately, this is not necessary in component video formats as the chroma signal is not
contained in a modulated subcarrier.
Introduction to Digital Video
As we learned earlier in this chapter, sampling is the fundamental process of creating a video signal by converting what the
camera sees into a series of voltages. Though these analog voltages can accurately represent the image, there are many problems with analog recordings. Any analog signal is subject to
voltage errors or loss that can be introduced while transmitting
the signal from one location to another. In addition, the process
of merely reading and rerecording the voltages can introduce
small generational errors that over time can dramatically reduce
the quality and accuracy of the signal. And finally, mixing multiple analog signals carried over different cables in a production
environment can introduce timing errors that will further degrade
the signal.
Digital signals, on the other hand, can be much more resistant
to such errors and degradation. Digital data can be packaged and
sent over almost any distance with no appreciable loss in quality.
When the engineers began to develop digital video, they built
on what had already been established for analog video. Just as
was the case with analog, storing the signal as RGB would be
an inefficient approach and they decided to use the same Y,
B–Y, and R–Y signals as they had for analog.
Standards exist for both digital composite and digital component video. However, the digital composite video format, implemented in the tape formats D2 and D3, has fallen by the wayside
in favor of digital component video and will not be discussed.
Digital Component Video
Digital component video captures the three video components—Y, B–Y, and R–Y—as three separate signals. The digital
121
122
Chapter 5 STANDARD-DEFINITION VIDEO FUNDAMENTALS
derivation of Y from RGB uses the same weighted function as
used in analog video:
Y 601 0.587 G 0.299 R 0.114 B
The Y component is subscripted with 601 to indicate that the
luma component is derived using the values ascribed in ITU-R
BT.601, the international specification for standard-definition
(SD) digital video. High-definition video uses a different derivation of luma.
The B–Y and R–Y signals are low-pass filtered, bandwidth
reduced, and are referred to as CB and CR, respectively.
Sampling the Analog Video Signal
Since digital video was based on the analog video standards of
the day, when converting an analog video signal to digital, two
questions must be answered:
1. What portion of the signal should be captured? Though
the obvious answer would be to capture the entire signal,
that isn’t always the best approach. Most of the blanking
interval (both horizontal and vertical) contains synchronization signals that can be more efficiently represented in
the digital domain using small data timing blocks. Therefore,
the designers decided to sample the active picture and omit
most of the blanking interval. We’ll look in detail at the portions to be captured later in this section.
2. At what level of detail should the material be captured?
This question concerns sampling resolution. Sampling is
the process of capturing analog information for measurement and is similar to looking at an image through a wire
mesh. Each open hole in the mesh is a single sample. All of
the image detail within the hole is averaged to create a single color value for the sample. The finer the sampling, the
more detail that can be measured and stored.
If the sampling rate is not high enough to capture the relevant
information, errors can be introduced. These errors are known as
aliasing and can result not only in a reduction of detail, but in
worst-case situations, in wholly incorrect data being measured.
If you recall from our earlier discussion of encoded color, a
sampling frequency of 3.58 MHz (NTSC) or 4.48 MHz (PAL) was
used to sample the chroma information in the analog composite
format. As the luminance signal contains significantly more information than the chroma, a much higher sampling rate must be
used to ensure that the luminance data are accurately captured.
Chapter 5 STANDARD-DEFINITION VIDEO FUNDAMENTALS
123
Digital Sampling Frequency
A joint SMPTE/EBU (Society of Motion Picture and Television
Engineers/European Broadcasting Union) taskforce worked to
define a common sampling method that would work for both
525-line (NTSC) and 625-line (PAL) systems. They settled on a
luma sampling rate of 13.5 MHz. This sampling method was codified in ITU-R BT.601.
A sampling rate of 13.5 MHz results in a total of 858 samples for
525-line and 864 samples for 625-line across an entire line of
video (including the blanking interval). Since the analog blanking
interval is not really necessary to synchronize a digital signal, only
720 samples are actually used to capture the actual picture information. The sampled region is known as the digital active line.
The following illustration shows this sampling of the video signal.
Note: Portion of Blanking Interval Included in Sample
Digital Active Line – 720 cycles of 13.5 MHz
525-line video: 858 total cycles in 13.5 MHz
625-line video: 864 total cycles in 13.5 MHz
Notice that the digital active line is slightly longer than the
analog active region and that a small portion of the analog blanking interval is sampled. This is done deliberately as the transition
(or rise time) in and out of blanking is considered a critical timing
in broadcast environments. Whenever an analog signal is sampled, this blanking region is preserved.
Since the entire analog horizontal blanking interval is not sampled, some other mechanism must be used to synchronize the line
data. Two special digital signals, SAV (start of active video) and EAV
(end of active video) packets, are used. These are placed at the
beginning and end of the active picture region in each sampled
This blanking
region is only
required for
analog-originated signals.
Preserving this region is
optional for digital cameras
and other digital-originated
signals.
124
Chapter 5 STANDARD-DEFINITION VIDEO FUNDAMENTALS
line. The remainder of the digital line (between the EAV and SAV
packets) is used to store audio and other ancillary data. This region
is often referred to as the HANC (horizontal ancillary).
Even though the horizontal blanking interval is not sampled, a
standard analog sync reference signal is used when synchronizing digital equipment with other digital or analog equipment.
4:2:2 and Other Sampling Methods
As mentioned earlier, different sampling rates are used when
sampling the luma and color-difference signals. In digital composite systems, the sampling rate of four times the frequency of
the subcarrier, or 4fSC, was used to sample the composite signal.
Out of this early system came the convention of using the
numeral 4 to indicate that full-rate (13.5 MHz) sampling was
used. It was then further decided that the numeral 2 would indicate half-rate (6.625 MHz) sampling.
4:2:2 Sampling
Y´ sampling
CB, CR sampling
ITU-R BT.601 specifies that the luma (Y) is sampled at the fullrate of 13.5 MHz and the chroma (CB and CR) is sampled at the
half-rate of 6.75 MHz. Using the numbering convention just
noted, this format is described as having 4:2:2 sampling. 4:2:2 sampling results in 720 Y samples and 360
CB and CR samples per digital active line. The following illustration shows what 4:2:2 sampling looks like
in two dimensions.
Most component digital equipment uses 4:2:2 sampling. Two other sampling systems, 4:1:1 and 4:2:0,
are also used in digital video, primarily in MPEGbased systems. Both use full-rate sampling for the
luma. Their differences come in how the colordifference signals are sampled.
4:1:1 Sampling
In this sampling system, the color-difference signals are sampled at a quarter-rate, or 3.375 MHz,
resulting in only 180 CB and CR samples per digital
active line. 4:1:1 is primarily used in MPEG-based
systems, including consumer DV, DVCAM, and DVD.
The following illustration shows what 4:1:1 sampling
looks like in two dimensions.
Y´ sampling
CB, CR sampling
4:2:0 Sampling
In this sampling system, the color-difference signals are sampled at half-rate, but are only sampled
Chapter 5 STANDARD-DEFINITION VIDEO FUNDAMENTALS
on every other line. Though the exact placement of
the CR and CB samples varies in different 4:2:0 implementations, the MPEG-2 and 625/50 DV formats use
co-sited sampling: where Y is sampled on every
line, CB is only sampled on every odd line, and CR is
only sampled on every even line. 4:2:0 sampling is
used in Panasonic DVCPRO 25 systems and some
PAL DV systems. The following illustration shows
what 4:2:0 sampling looks like in two dimensions.
Y´ sampling
CB sampling
CR sampling
Representing Voltages Digitally
If you recall from the previous module, 525-line and 625-line
systems use different voltage ranges for storing picture information. To simplify matters, digital component video uses a singlevoltage range for both 525-line and 625-line systems. The voltage
range used is referred to as SMPTE N10 and specifies that video
black is assigned a voltage of 0 mV and video white a voltage of
700 mV. It further specifies that there is no setup in 525-line
systems.
The analog voltage is digitally sampled and stored as either an
8-bit or a 10-bit number.
Luma (Y) Sampling
The following illustration shows the digital values used to
sample the luma signal. Note: Even though component digital
only captures the video signal between the SAV and EAV packets,
the blanking interval is included to provide an example of the
sampled signal headroom and footroom.
Analog
Voltage
8-bit 10-bit
766 mV
700 mV
255
235
1024
940
16
0
64
0
Video White
Video Black
0 mV
50 mV
SAV
EAV
Notice that a reasonable amount of headroom and footroom is
provided beyond video black and video white (66 mV of headroom and 50 mV of footroom, respectively). This headroom and
125
126
Chapter 5 STANDARD-DEFINITION VIDEO FUNDAMENTALS
footroom is shown in the previous illustration in gray. Due to the
nature of digital video, filtering and compression can cause
blooming and ringing at the signal’s limits. Giving the signal
generous headroom and footroom can help eliminate or dramatically reduce these problems. In addition, the footroom allows for
the digital sampling of luma key elements, a critical requirement
in broadcast environments at the time the standard was
developed.
Don’t Confuse Your Analog and Digital Voltages!
Remember that 525-line digital uses the voltage range of 0 mV–700 mV, while 525-line analog uses a voltage range of
53.6 mV–714 mV. Because of this, care must be taken when switching between the two formats and measuring signal
information on an external scope. Assuming the analog and digital formats use the same voltages is a common mistake
made when first working with digital video systems.
Color-Difference (CB and CR) Sampling
The color-difference signals are similarly sampled, with the
values of –350 mV and 350 mV used for the nominal peak chroma
levels. As with the luma signal, a reasonable amount of signal
headroom and footroom are provided (approximately 50 mV for
both headroom and footroom). The following illustration shows
the digital values used to sample the color-difference signals.
Note: Though the CR signal is shown in the illustration, the same
voltage range and bit values are used for both CR and CB.
Analog
Voltage
8-bit 10-bit
399.2 mV
350 mV
255
240
1024
960
0 mV
128
512
350 mV
400 mV
16
0
64
0
Reserved Samples
The lowest four digital values (0–3) and the highest four digital
values (2528–2558 or 102,110–102,410) are reserved (in the Y, CR,
and CB signals) for synchronization purposes.
Chapter 5 STANDARD-DEFINITION VIDEO FUNDAMENTALS
Video Line Sampling
As mentioned earlier in this module, digital video systems do
not need to sample the majority of the analog signal’s blanking
interval. Instead, this time interval is used for ancillary digital
data. Only the active picture lines are sampled. That said, the
actual lines sampled vary depending on the digital implementation. Though ITU-R BT.601 provides the specification for digital
line sampling and encoding, it does not define which video lines
will be sampled. As a result, various digital video formats (such as
Digital Betacam, DV, etc.) have their own specification for the
video lines that will be sampled and stored.
The video line sampling most commonly used is specified in
ITU-R BT.656. This specification provides for 486 digital active
lines in 525-line video and 576 digital active lines for 625-line
video. Digital tape formats including Digital Betacam, D1, and D5
conform to this specification. Table 5.3 lists the digital line sampling specified in ITU-R BT.656 for the 525-line and 625-line
formats.
Table 5.3 ITU-R BT.656: 525-Line and 625-Line Sampling
Sampling Region
525-Line
625-Line
Field 1: start of active picture
21
23
Field 1: end of active picture
263
310
Field 2: start of active picture
283
336
Field 2: end of active picture
525
623
Notice that only the active picture is sampled; the vertical
blanking interval is not sampled from the analog. The serial digital interface standard specifies that this region can be used to
transmit ancillary data such as synchronization, audio, or other
information. This region is often referred to as the VANC (vertical
ancillary). It is not required by the standard that this area be
stored on tape or disk.
All two-field Avid media, with the exception of the DV resolutions, conform to the ITU-R BT.601 and ITU-R BT.656 specifications, providing for 4:2:2 sampling of a 720 486 (525-line) or
720 576 (625-line) frame.
Digital Frame Structure
Let’s take a look at the structure of the digital frame. The following illustration shows the line structure of the interlaced
frame for both the 525-line and 625-line formats.
Notice the field ordering of the 525-line and 625-line formats.
The field ordering follows the same structure as the analog
127
128
Chapter 5 STANDARD-DEFINITION VIDEO FUNDAMENTALS
525-Line Frame Structure
625-Line Frame Structure
1
1
Blanking
23
21
Field 1
Field 1
310
263
Blanking
283
336
Field 2
525
Field 2
623
Blanking
(not to scale)
(not to scale)
format. In the digital domain, field ordering is often referred to by
the topness of the active frame. If the first spatial line of the frame
is from field 1 the format is said to be field 1 ordered, and if the
first spatial line of the frame is from field 2, the format is said to
be field 2 ordered. Therefore, 525-line video is field 2 ordered and
625-line video is field 1 ordered.
Unfortunately, this terminology is not universal and other terms
are used by various manufacturers and software programs. Some
number the field by its temporal position in the frame data stream
instead of by the topness. When the frame is viewed temporally
from the first to the last line, field 1 is said to be in the upper position and field 2 in the lower position. The field ordering is still measured by the topness, but the upper and lower terms are used
instead of field 1 and 2. Therefore, 525-line video is said to be lowerfield ordered and 625-line video is said to be upper-field ordered.
Finally, some programs refer to the fields not as field 1 and field
2, but as odd and even fields. (Thankfully, nearly all graphics and
compositing programs today start counting fields at 1 and not 0.
This didn’t used to be the case and was the cause of a lot of
confusion!)
Table 5.4 summarizes the field ordering for 525-line and 625line video.
Table 5.4 Video Field Ordering
Format
Field Topness/Ordering
525-line
Field 2, lower field first, even
625-line
Field 1, upper field first, odd
Chapter 5 STANDARD-DEFINITION VIDEO FUNDAMENTALS
129
Video Line Sampling and DV
Unfortunately, when the DV format was developed, the format
designers did not follow the ITU-R BT.656 specification. Though
each line of video is sampled as specified in accordance with
ITU-R BT.601 (Y601, CB, and CR sampling at 13.5 MHz with 720 Y
samples per line), they did not follow the specification for the
actual lines to be sampled. Indeed, different decisions were made
for the 525-line and 625-line formats.
525-Line DV
In 525-line they decided to use a 480-line active frame instead
of a 486-line active frame. This decision was primarily due to the
fact that DV uses a DCT (discrete cosine transform) compression
that breaks the frame into 8 8 sample blocks. As 486 is not evenly
divisible by 8, they decided to use only 480, which is evenly divisible by 8.
Table 5.5 lists the line sampling used in DV 525-line formats.
The standard 525-line digital line sampling is also provided for
comparison.
Table 5.5 525-Line DV Format Sampling
Sampling Region
DV 525-Line
BT.656 525-Line
Field 1: start of active picture
23
21
Field 1: end of active picture
262
263
Field 2: start of active picture
285
283
Field 2: end of active picture
524
525
Notice that each DV field begins two lines later and ends one
field earlier (e.g., line 23 versus 21, line 262 versus 263). This
ensures that the field ordering for DV media is the same as that
for other types of digital 525-line media.
625-Line DV
Unfortunately, though 625-line DV uses a 576-line active frame
(as 576 is evenly divisible by 8), the lines sampled are not the
same as those specified in ITU-R BT.656. This was due to incorrect assumptions made by the engineers who developed the DV
format. Perhaps apocryphally, when the DV format was presented to both SMPTE and the ITU, this line sampling error was
pointed out, but the manufacturers plainly stated that cameras
and decks were already in production and the DV standard would
not be modified to correct the error.
The 480-line
active frame also
corresponds to the
clean aperture, as specified
in SMPTE RP18 7.
130
Chapter 5 STANDARD-DEFINITION VIDEO FUNDAMENTALS
Table 5.6 lists the line sampling used in DV 625-line formats.
Table 5.6 625-Line DV Format Sampling
Sampling Region
DV 625-Line
BT.656 625-Line
Field 1: start of active picture
23
23
Field 1: end of active picture
310
310
Field 2: start of active picture
335
336
Field 2: end of active picture
622
623
Though field 1 is properly sampled, field 2 is offset upward by
one line. This has the unfortunate side effect of changing the topness of the frame from field 1 to field 2 and therefore inverts the
field ordering versus regular 625-line video. Fortunately, the Avid
editing system properly handles mixing these two resolutions in
the timeline but this difference can cause definite problems when
you are exporting QuickTime® movies or other file-based video
out of the system. Most other systems do not handle, or in some
cases even understand, field order switching in the middle of a
movie or sequence.
Table 5.7 Video Field Ordering
Format
Field Topness/Ordering
525-line
Field 2, lower field first, even
625-line (BT.656)
Field 1, upper field first, odd
625-line (DV)
Field 2, lower field first, even
Table 5.7 summarizes the field ordering for all 525-line and
625-line video formats.
6
THE WILD WORLD OF HIGH
DEFINITION
“A camel is a horse designed by a committee.”
—Sir Alec Issigonis
A good friend of mine, when faced with his first high definition
(HD) online, wondered to me how a system (NTSC) that worked so
well could have been turned into the nightmare of incompatibility
that is high definition. Perhaps the best way to understand it is to
realize that the NTSC format was a series of brilliant inventions
and hacks that created a system that, despite its quirks, worked
reliably and predictably. After it was up and running, a committee
codified how it worked so others could understand it (via SMPTE
170M, and so on). Digital standard definition (SD) was therefore
an attempt to bring this simple system into the digital age.
But HD was another thing altogether and in many respects
truly is the metaphorical camel. By this I mean no disrespect to
those who worked on the development of HD, but truly it is a system that attempts to satisfy many different goals, even if those
goals are in opposition to one another. As with the camel, much
of the design is absolutely brilliant and every part has its underlying key purpose. But the sum of the parts can boggle the mind.
Let’s begin by taking at look at the genesis of the HD format.
A Brief History of High Definition
Since the earliest days of video, engineers have always looked
toward formats with higher quality and resolution. Indeed, the
current NTSC format was called “high definition” at its time of
development since it had more than double the scan lines of earlier experimental systems.
131
132
Chapter 6 THE WILD WORLD OF HIGH DEFINITION
The Grand
Alliance members
were AT&T,
General Instrument
Corporation, MIT, Phillips
Consumer Electronics, the
David Sarnoff Research
Center, Thompson
Consumer Electronics, and
Zenith Electronics.
The genesis of the modern high-definition system began in 1968
when Japanese broadcaster NHK began work on a format called
NHK Hi-vision. NHK Hi-vision was a 1125-line analog format that
used a hybrid of both analog and digital compression to reduce
the bandwidth requirements. The format was eventually named
MUSE and went online in the early 1980s. MUSE used 1035 active
interlaced scan lines and had an aspect ratio of 1.66:1. (For reference, NTSC is a 525-line analog format with 486 active scan lines
while PAL is a 625-line analog format with 576 active scan lines.)
Around the time that the MUSE system went on-air, the Federal
Communications Commission (FCC) began soliciting proposals
for a next-generation video system. A number of companies and
organizations put forward their own, often incompatible, format
proposals. After years of hearing competing proposals and political arm-twisting, the FCC asked the groups to pool their resources
and in 1993 the Grand Alliance was formed.
Prior to the formation of the Grand Alliance, there were 23 different format proposals made. These were eventually whittled
down to 4 digital and 2 analog systems. The Grand Alliance
focused not only on the high-definition digital video format, but
also on the method of over-the-air transmission. As this book is
focused on editing, we’ll leave the discussion of over-the-air
transmission to another book, such as How Video Works, Second
Edition, by Diana Weynand and Marcus Weise (Focal Press, 2007).
The Advanced Television Standards Committee
Out of the Grand Alliance was formed the Advanced Television
Standards Committee (ATSC). Though the committee eventually
decided on a single transmission format, as is often the case with
committee-based standards, they didn’t propose a single HD format, but instead released a list of supported video formats in
what has become known as ATSC Table 3. They also agreed to use
the MPEG-2 compression format for all signals.
The original ATSC Table 3 is produced here as Table 6.1 for your
reference. Don’t worry if this table generates more head scratching than useful information. That is the way virtually everyone
feels when they first see it. We’ll break the table’s information
down in a moment.
According to the ATSC format, as used in the United States, any
of the ATSC Table 3 formats can be broadcast at the whim of the
broadcaster and every high-defintion television (HDTV) set sold
must support all of the listed formats. In reality, the broadcasters
settled on two primary broadcast formats: one with 1080 active
scan lines and one with 720 active scan lines. Other formats are
used primarily for acquisition and mastering. The 480-line formats,
133
Chapter 6 THE WILD WORLD OF HIGH DEFINITION
Table 6.1 ATSC Table 3 Compression Format Constraints
Vertical Size Value
Horizontal Size
Value
Aspect Ratio
Information
Frame Code Rate
Progressive
Sequence
1080
1920
1, 3
1, 2, 3, 4, 5
4, 5, 6, 7, 8
1
0
720
1280
1, 3
1, 2, 3, 4, 5, 6, 7, 8
1
480
704
2, 3
1, 2, 4, 5, 7, 8
4, 5
1
0
640
1, 2
1, 2, 4, 5, 7, 8
4, 5
1
0
Legend
Horizontal Size Value
Aspect ratio information:
1 square samples; 2 4:3 display aspect ratio; 3 16 9 display aspect ratio
Frame code rate:
1 23.976 Hz; 2 24 Hz; 3 25 Hz; 4 29.97 Hz; 5 30 Hz; 6 50 Hz; 7 59.94 Hz;
8 60 Hz
Progressive sequence:
0 interlaced scan; 1 progressive scan
Note: ATSC Table 3 does not include any 25- or 50-Hz formats. These were added later to support European broadcasters.
one of which was used by the Fox network for their early digital
broadcasting, have fallen by the wayside.
In Europe, most digital broadcasts today are a digital PAL format with 576 active scan lines, similar to the 480-line formats
used briefly in the United States. These are expected to transition
to true HD broadcasts in the coming years.
1080-Line High Definition
This format is based on a video frame that contains a total of
1125 lines, 1080 of which are considered active. The 1080-line
format is codified in SMPTE 274M. There are a total of 1920 active
samples per line.
The 1080-line format includes 11 different subformats, or systems, each with its own specific frame rates and types (progressive or interlaced). Both RGB and Y, CB, and CR (YCBCR) signals
are supported. However, as RGB signals are not yet supported
by Media Composer, we will not discuss them in this book.
Supported Frame Rates and Types
Table 6.2 lists the 11 different systems specified in SMPTE
274M. We’ll return to this table and add additional information
throughout this section.
Though we refer to
SD formats by the
total number of
scan lines (e.g., 525-line),
HD formats are instead
referred to by the number
of active number of scan
lines.
134
Chapter 6 THE WILD WORLD OF HIGH DEFINITION
Table 6.2 SMPTE 274M 1080-Line Systems
System Number
System Name
Frame Type
Frame Rate (Hz)
1
1080p/60
Progressive
60
2
1080p/59.94
Progressive
59.94 (60 ÷ 1.001)
3
1080p/50
Progressive
50
4
1080i/60
Interlaced
30
5
1080i/59.94
Interlaced
29.97
6
1080i/50
Interlaced
25
7
1080p/30
Progressive
30
8
1080p/29.97
Progressive
29.97
9
1080p/25
Progressive
25
10
1080p/24
Progressive
24
11
1080p/23.976
Progressive
23.976 (24 ⴜ 1.001)
Note: The systems listed in bold are currently supported by Avid Media Composer 3.0, but
1080p/29.97 is not available on software-only or Adrenaline-attached systems due to a hardware
limitation.
Digital Component Sampling
As with SD component digital video, HD component digital
video stores the video components Y, CB, and CR as three separate signals. The digital derivation of Y from RGB uses a different weighted function from that used in SD component digital
and analog video:
Y 709 0.7152 G 0.2126 R 0.0722 B
The Y component is subscripted with 709 to indicate that the
luma component is derived using the values ascribed in ITU-R
BT.709, the international specification for HD digital video. The
differences between the 601 and 709 derivations for luma are primarily due to the realities of modern television tube display capabilities. Indeed, it could be argued that tubes that generate a
picture in accordance with the original NTSC or PAL standards
never reached mass production. This was primarily due to difficulties manufacturing a stable green phosphor that corresponded
to the original specification.
Digital Sampling Frequency
The 1080-line format uses 4:2:2 sampling with a luma sampling
rate of 74.25 MHz. (You might recall that SD digital video uses a
sampling rate of 13.5 MHz.) This sampling rate is used by the
majority of the supported systems including the 60/30-Hz and
Chapter 6 THE WILD WORLD OF HIGH DEFINITION
135
50/25-Hz systems. However, if you recall from Chapter 5, the
NTSC format reduced the frame rate from 30 fps to 29.97 fps
using a factor of 1.001.
To maintain compatibility, and more importantly timing, with
simultaneous NTSC broadcasts, systems had to be created with a
similar reduction. In these systems the 74.25-MHz sampling rate is
divided by 1.001, the same factor used by NTSC to reduce the
frame rate. (This rate is typically referred to as 74.25/1.001 MHz.)
In addition, the high-rate progressive formats (1080p/60,
1080p/59.94, and 1080p/50) store twice as much information as
the related interlaced formats (1080i/60, etc.) and therefore sample
at double the 74.25-MHz rate, or at 148.5 MHz (or 148.5/1.001 MHz
for 1080p/59.94).
All 1080-line formats have an identical number of active samples per line (1920). However, as was the case with ITU-R BT.601
and the 525-line and 625-line formats, the total number of
samples per line varies from one frame rate to another.
Table 6.3 expands on Table 6.2 and includes the sampling frequency and total number of samples per line for each system. As
with Table 6.2, the systems currently supported by Avid Media
Composer are listed in bold.
Table 6.3 SMPTE 274M 1080-Line Systems
System Name
Frame Type
Frame Rate (Hz)
Sampling
Frequency
Total Samples
per Line
1
1080p/60
p (1:1)
60
148.5
2200
2
1080p/59.94
p (1:1)
59.94
148.5/1.001
2200
3
1080p/50
p (1:1)
50
148.5
2640
4
1080i/60
i (2:1)
30
74.25
2200
5
1080i/59.94
i (2:1)
29.97
74.25/1.001
2200
6
1080i/50
i (2:1)
25
74.25
2640
7
1080p/30
p (1:1)
30
74.25
2200
8
1080p/29.97
p (1:1)
29.97
74.25/1.001
2200
9
1080p/25
p (1:1)
25
74.25
2640
10
1080p/24
p (1:1)
24
74.25
2750
11
1080p/23.976
p (1:1)
23.976
74.25/1.001
2750
System Number
Note: Some manufacturer’s documentation, most specific in reference to sync generators, uses the term 1:1 for progressive signals and the
term 2:1 for interlace signals.
Voltage Sampling
Just as is the case with SD video, 1080-line systems use the
voltage range specified in SMPTE N10. For Y signals, black is
136
Chapter 6 THE WILD WORLD OF HIGH DEFINITION
assigned a voltage of 0 mV and white a voltage of 700 mV. The CB
and CR signals use a voltage range between 350 mV and 300 mV.
This sampling is shown in the following illustrations.
Analog
Voltage
8-bit 10-bit
766 mV
700 mV
255
235
1024
940
16
0
64
0
Video White
Video Black
0 mV
50 mV
SAV
Analog
Voltage
EAV
8-bit 10-bit
399.2 mV
350 mV
255
240
1024
960
0 mV
128
512
350 mV
400 mV
16
0
64
0
Signal Synchronization
525-line video has
a sync duration of
10.9 μs and an
amplitude of 40 IRE.
625-line video has a sync
duration of 12.0 μs and an
amplitude of 300 mV.
If you recall from Chapter 5, SD signals use an analog sync
pulse to synchronize two or more pieces of video equipment.
This synchronization signal is displayed in the next figure for
reference.
This type of sync signal is referred to as bi-level sync as the
pulse has two voltages, a nominal voltage and a low voltage. In
these systems, sync is triggered by the leading edge rise time.
Bi-level sync’s use of a low voltage adds a DC (direct current)
component that, while not causing significant problems in lowbandwidth SD signals, introduces some synchronization complexities in high-bandwidth systems. In addition, generating a
bi-level sync pulse in transmission actually requires a significant
amount of power.
Chapter 6 THE WILD WORLD OF HIGH DEFINITION
137
sync trigger
(leading edge
rise time)
Sync
Amplitude
Sync Duration
The developers of the HD format recognized that bi-level sync
would not be sufficient for HD signals and instead used a tri-level
sync. Tri-level sync has three distinct voltages instead of two and
the rise time from negative to positive is used as the sync trigger
as opposed to bi-level sync, which uses the leading edge of sync
as the sync trigger.
The sync pulse begins at 0 mV, transitions to 300 mV for a
specified duration, then transitions to 300 mV for the same
duration, finally returning to 0 mV as shown in the following
illustration.
sync trigger
(neg to pos
rise time)
300 mV
0 mV
300 mV
Sync Duration
The primary benefit of tri-level sync is that the symmetry of
the sync signal results in a net DC value of 0 mV, eliminating the
DC component introduced with bi-level sync. This makes signal
processing and transmission far easier than with bi-level sync.
Tri-level sync was
first defined in
SMPTE 240M.
High-definition
video uses a
sample count as
the unit of measure for all
timings. 1080-line video
uses a sync duration of 88
samples, measured from
the middle of the rise times.
The negative and positive
portions are each 44
samples wide as is the front
porch (see Chapter 5). The
rise times are four samples
wide.
138
Chapter 6 THE WILD WORLD OF HIGH DEFINITION
In all HD formats tri-level sync is applied to all three signals—
Y, CB, and CR—whereas it is only applied to Y in SD formats.
Unfortunately, whereas SD required only two different sync signals, one for 525-line video and one for 625-line video, the various
frame rates and frame formats in HD mean that a separate sync
generator is required for every single 1080-line format or system.
Multiformat tri-level sync generators, such as the Tektronix
TG700, can generate most of the tri-level signals, but few tri-level
sync generators generate all of them. Fortunately, the majority
generates sync for all of the more popular systems.
In addition, a standard NTSC black-burst generator can be
used for the 1080i/59.94 format and a standard PAL black-burst
generator can be used for the 1080i/50 format. It is still preferred
to use tri-level sync for these formats, though.
As you can imagine, it is critical that the proper sync be provided to all decks and to the Avid system. Applying the wrong
sync signal can result in signal distortions or even the inability to
play, capture, or output a signal.
Line Structure
As mentioned earlier, 1080-line video has 1125 total lines.
Similar to SD digital video, these lines consist of an active picture
section surrounded by vertical blanking (or VANC) sections. The
line structure is different for interlaced and progressive signals.
1080i Line Structure
If an HD signal is
transmitted by an
analog interface
(such as the component
analog outputs) half-lines
are used and the two fields
have 562.5 lines each.
Dividing the 1080-line format’s 1125 lines by 2 results in a fractional result. This would imply that half-lines of picture and
blanking are used in HD, just as they are in SD. As HD is a purely
digital system, half lines are not required for synchronization and
only full lines are used. Therefore, field 1 is comprised of 563 lines
and field 2 is comprised of 562 lines.
Table 6.4 lists the interlaced line structure for 1080-line systems.
Table 6.4 SMPTE 274M 1080-Line Structure
Field
Region
Lines
1
Vertical blanking
1–20
1
Active picture
21–560
1
Vertical blanking
561–563
2
Vertical blanking
564–583
2
Active picture
584–1123
2
Vertical blanking
1124–1125
Chapter 6 THE WILD WORLD OF HIGH DEFINITION
139
Now let’s look at the structure of the 1080-line interlaced
frame in the following figure. Notice that the 1080-line format
is field 1 ordered. This is true for all 1080-line systems, regardless
of frame rate.
1080-line Interlaced Frame
first line of active picture
f1 / 21
f2 / 584
f1 / 22
f2 / 585
f1 / 559
f2 / 1122
f1 / 560
f2 / 1123
last line of active picture
1080p Line Structure
Progressive
approaches:
●
●
video
can
be
stored
using
two
different
Progressive Segmented Frame (PsF): This stores the progressive frame just like interlaced video by dividing the
frame into two “fields,” or segments. This storage method
provides for better compatibility on some types of
digital tape formats and is used, for example, by the
HDCAM™ format developed by Sony. The two segments
are reassembled on output to recreate the original progressive frame.
Progressive: This stores the progressive frame as a single
unit and does not subdivide it. Avid editing systems
store and transmit progressive formats using this
structure.
Table 6.5 lists the progressive line structure for 1080-line
systems.
Table 6.5 SMPTE 274M 1080p Line Structure
Region
Lines
Vertical blanking
1–41
Active picture
42–1121
Vertical blanking
1122–1125
Progressive
segmented frame
formats use the
same line structure as 1080
interlaced.
140
Chapter 6 THE WILD WORLD OF HIGH DEFINITION
720-Line High Definition
This format is based on a progressive video frame that includes
a total of 750 lines, 720 of which are considered active. The 720line format is codified in SMPTE 296M. There are a total of 1280
active samples per line.
The 720-line format includes eight different subformats, or systems, each with its own specific frame rate. Interlaced video is
not supported by this format. As with the 1080-line format, both
RGB and YCBCR signals are supported by the standard, but
only YCBCR signals are supported by Media Composer at this
time.
Supported Frame Rates and Types
Table 6.6 lists the eight different systems specified in SMPTE
296M. We’ll return to this table and add additional information
throughout this section.
Table 6.6 SMPTE 274M 1080-Line Systems
System No.
System Name
Frame Rate (Hz)
1
720p/60
60
2
720p/59.94
59.94
3
720p/50
50
4
720p/30
30
5
720p/29.97
29.97
6
720p/25
25
7
720p/24
24
8
720p/23.976
23.976
Note: The systems listed in bold are currently supported by Avid Media
Composer. Support for 720p/50, 720p/29.97, and 720p/25 were added in
version 3.0.
Component Digital Sampling
As with the 1080-line format, 720-line video stores the video
components Y, CB, and CR as three separate signals and uses the
ITU-R BT.709 digital derivation of Y:
Y 709 0.7152 G 0.2126 R 0.0722 B
Chapter 6 THE WILD WORLD OF HIGH DEFINITION
Digital Sampling Frequency
The 720-line format uses 4:2:2 sampling with a luma sampling
rate of 74.25 MHz, just as is used in the 1080-line format. And,
just as is done in the 1080-line format, the systems with frame
rates of 59.94, 29.97, or 23.976 use a sampling rate of 74.25/
1.001 MHz.
All 720-line formats have an identical number of active samples per line (1280). However, as was the case with the 1080-line
formats, the total number of samples per line varies from one
system to another.
Table 6.7 expands on Table 6.6 and includes the sampling frequency and total number of samples per line for each system. As
with Table 6.6, the systems currently supported by Media
Composer are listed in bold.
Table 6.7 SMPTE 274M 1080-Line Systems
System
Number
System
Name
Frame Rate
(Hz)
Sampling
Frequency
Total Samples
per Line
1
720p/60
60
74.25
1650
2
720p/59.94
59.94
74.25/1.001
1650
3
720p/50
50
74.25
1980
4
720p/30
30
74.25
3300
5
720p/29.97
29.97
74.25/1.001
3300
6
720p/25
25
74.25
3960
7
720p/24
24
74.25
4125
8
720p/23.976
23.976
74.25
4125
Voltage Sampling
Just as is the case with 1080-line systems, 720-line systems use
the voltage range specified in SMPTE N10. For Y signals, black is
assigned a voltage of 0 mV and white a voltage of 700 mV. The
CB and CR signals use a voltage range between 350 mV and
300 mV.
Signal Synchronization
The 720-line formats use tri-level sync, as is used for 1080-line
formats. The sync pulse uses the voltages 0 mV, 300 mV, and
300 mV with the negative to positive rise time used as the sync
trigger. The sync signal for 720-line video measures 80 samples
141
142
Chapter 6 THE WILD WORLD OF HIGH DEFINITION
wide, as measured from the middle of the rise times. The negative
and positive portions are each 40 samples wide. The width of the
front porch varies from system to system.
A specific sync generator is required for all 720-line systems. A
standard NTSC or PAL black-burst cannot be used for any
720-line format.
Line Structure
As mentioned earlier, 720-line video has 750 total lines, consisting of an active picture section surrounded by vertical blanking (or VANC) sections. Table 6.8 lists the interlaced line structure
for 720-line systems.
Table 6.8 SMPTE 296M 720p Line Structure
Region
Lines
Vertical blanking
1–25
Active picture
26–745
Vertical blanking
746–750
Working with High Definition in Avid
Since they first supported HD projects, Avid editing systems
have been able to freely mix and match SD and HD material in a
sequence as long as the frame rate of the two formats matched.
Version 3.0 adds the ability to mix not just SD and HD in a
sequence, but all HD formats that share a common timeline.
This includes both progressive and interlaced formats. For example, that means that a single sequence can include the following
formats: NTSC (29.97 fps), 1080i/59.94, 1080p/29.97, and
720p/29.97. Note, however, that you cannot mix 720p/59.94 as it
has double the frame rate (59.94) as the other formats. We certainly hope to see this capability appear in a future release, but
we won’t include it until we are able to do so in real time with a
level of quality equivalent to a high-quality outboard standards
converter.
When working with a mixed-format sequence, you may need
to switch between the different formats supported. This is accomplished via the Project Type tab located in the Format tab of the
Project window. All formats compatible with your current project
format will be listed. (We’ll talk more about compatible project
Chapter 6 THE WILD WORLD OF HIGH DEFINITION
formats in Chapter 9 when we discuss conforming and finishing strategies.)
Subsampled High-Definition Rasters
Though DNxHD media uses the full HD raster
(1920 or 1280 samples), most HD camera formats
do not. Though you’ll capture some of these via
HD-SDI (also called baseband) and the camera/
deck will resize the raster to full width, if you are
bringing in a file-based format such as XDCAM
HD or P2 or capturing via FireWire either
DVCPRO HD or HDV, you will be capturing media that actually
uses a subsampled, or thin, raster. Camera formats often use a
subsampled raster for a number of reasons including space consumption and to match the actual imaging sensor. Table 6.9 lists
the raster sizes used by popular file and FireWire formats. Note
that some formats only use a “thin” raster for 1080-line systems,
not 720-line systems. In those instances we have only included
the 1080-line system.
Table 6.9 “Thin” Raster Camera Formats
Camera Format
HD System
Raster Size
HDV
1080-line
1440 1080
DVCPRO HD
1080-line
720-line
1280 1080
960 720
XDCAM HD (18, 25, 35 Mbit only*)
1080-line
1440 1080
XDCAM EX (SP mode only*)
1080-line
1440 1080
*Both XDCAM HD and XDCAM EX support both thin and full-width rasters. To use the full-width
raster in XDCAM HD, select 50-Mbit recording (only available on some XDCAM HD cameras and
decks). To use the full-width raster in XDCAM EX, select 35-Mbit HQ recording.
Avid Media Composer 3.0 natively supports the HDV, DVCPRO
HD, and XDCAM HD/EX raster sizes, though not on every hardware configuration. The Nitris hardware (used in Avid Symphony
Nitris) does not support thin rasters of any type and therefore these
rasters are missing. The Adrenaline DNxcel HD hardware only supports the full raster and the HDV (1440 width) raster. Fortunately,
this is the same raster size used by XDCAM HD and XDCAM EX so
you can use this option for those formats. The DVCPRO HD raster,
though, is not available. The new Mojo DX and Nitris DX hardware
support all thin rasters and will resize them on-the-fly in hardware
to full width for baseband output to a monitor or deck.
143
144
Chapter 6 THE WILD WORLD OF HIGH DEFINITION
As is the case for compatible HD formats, you can freely switch
between the available raster types in a project. Keep in mind,
though, that switching raster types will definitely affect your realtime effect playback performance. Why? Well, quite simply, if the
clip you are playing does not match the raster the system will
have to resize the frame on-the-fly to the selected raster. For this
reason, your best performance will always come from using the
raster that matches your material. If you have mixed rasters in
your sequence (e.g., standard DNxHD and XDCAM HD in the
same timeline), use either the raster that matches the majority of
your footage, or the thinnest raster, as a computer can always
resize down (decimate) faster than it can resize up (extrapolate).
7
IMPORTING AND EXPORTING
“Editing is a natural extension of collage making.”
—Rachel True
Graphics come in many shapes and sizes from artists, ad agencies, the Internet, scanners, digital cameras, and a wide range of
other graphics programs, but very rarely will they be perfectly prepared for video. In general, graphics tend to be the wrong size or the
wrong resolution either through accident, ignorance, or repurposing. This chapter will help you learn how to compensate for that.
Avid has built in some system intelligence to deal with all the
different graphic formats and, if the graphic format given to you is
recognized, the system automatically imports it. As opposed to
many programs, a file extension is not required for import—a very
beneficial fact if you are editing on a Windows-based Avid system
and working with graphic artists who use Macintosh systems.
Despite this fact, it is still a good idea to append the correct file
extension to each graphic in case you need to fix a problem in
Adobe Photoshop® or some other program, as few other programs
on Windows can read a file that is missing the correct extension.
Also, the new drag-and-drop capabilities of the last few releases
of Media Composer speed up workflow and simplify basic tasks.
The user creates an export template based on the requirements
outlined in this chapter and is assured every export will be consistently correct. By dragging a sequence or a master clip to the
desktop level, even complicated exports can be done by beginners. The same HIIP (host image independence protocol) technology allows users to drag a graphic straight from the network
and drop it on the open bin. By creating preset, named, copied
and carried, and import and export templates, you can make
interoperability with other software a one-step process.
Despite the fact the system supports 26 different import file
formats, we strongly recommend that you use either the TIFF or
145
146
Chapter 7 IMPORTING AND EXPORTING
PNG format when creating graphics for import. PNG is especially
useful when creating graphics with alpha channels as Adobe
Photoshop automatically generates a straight alpha channel for
the composite of all layers. In addition, PNG files do not support
the CMYK (cyan, magenta, yellow, black) color space, eliminating
one of the “gotchas” we’ll discuss below.
Import and Export Basics
Some basic issues should be understood when working with
computers, graphics, and video. Because of the way computers
have developed, with their reliance on RGB (red, green, blue)
color for their screens and memory, and the way video developed, beginning with black-and-white analog, the two mediums
have never had a particularly easy coexistence. One of the hopes
for high-definition television (HDTV) is that some of those issues
will be resolved, but the addition of more incompatible formats
has rarely made things simpler.
Color Space Conversion
Computers and video work with different color formats and different kinds of scanning and scan rates. We commonly refer to
methods of representing colors as color space. It usually is represented graphically by a cube with white at the top and black at the
bottom. The range of colors possible within a color space makes
up the height and width of the cube. Different color spaces use different methods of distributing those colors inside the cube shape.
Computers traditionally work in RGB color space and digital
component video works in Y, CB, and CR (YCBCR). RGB is easier
for displaying images on an RGB computer screen and working
with computer memory. RGB has a greater range of colors to
choose from than video, especially in the yellow hues. Thus, a
conversion between YCBCR and RGB can force colors to change
because a true exact match does not exist or because colors are
out of the range in the new color space (“out of gamut”).
Fortunately, most of the available spectrum in RGB does properly map to the YCBCR video’s color gamut, so if your colors or
video levels are changing, it is more likely you are doing something wrong like exporting or importing into the system using the
RGB levels choice instead of the 601 levels. This chapter will discuss the details of these choices later.
CMYK Color Space
The CMYK color space is specifically used for color-offset
printing onto paper. This color space uses subtractive colors to
Chapter 7 IMPORTING AND EXPORTING
remove color from the white paper and generate a full-color
image. (In contrast, video monitors use the additive colors red,
green, and blue to create color from black.) Images saved in the
CMYK color space are not compatible with video applications
and should be converted to RGB, using a program such as Adobe
Photoshop, prior to bringing into your edit bay.
Square versus Nonsquare Pixels
When graphics and animations are created for use in Avid editing systems, they can be created using either square or nonsquare
pixels. Standard-definition (SD) digital video uses nonsquare
pixels, while high-definition (HD) video uses square pixels.
Virtually all computer display cards use square pixels. Because
the display uses square pixels, most graphic and animation programs also use square pixels. With square pixels, a 100 100 pixel
box would be a perfect square.
However, SD digital video does not use square pixels. Both the
ITU-R BT.601 and DV digital video standards use a 720-pixel
width for both NTSC and PAL. But, because NTSC and PAL have
different numbers of scan lines (486 for ITU-R BT.601 or 480 for
DV versus 576), SD digital video has pixels that are stretched vertically for NTSC and stretched horizontally for PAL.
The following graphic shows a close-up of a circle drawn with
square pixels and NTSC and PAL nonsquare pixels. Notice that
the square-pixel circle has the same number of pixels both horizontally and vertically, while the NTSC and PAL circles do not.
Computer Pixels
(Square)
NTSC ITU-R BT.601 Pixels
(Non-Square)
PAL ITU-R BT.601 Pixels
(Non-Square)
Because SD video uses nonsquare pixels, graphics are usually
created at an intermediate square pixel size (e.g., 648 486 or
768 576) and then resized to 720 486 by the Avid editing system during import.
147
148
Chapter 7 IMPORTING AND EXPORTING
High-definition video, on the other hand, uses square pixels.
Therefore, HD graphics can be created at the native size
(1920 1080 or 1280 720), not an intermediate size as with SD.
Graphics and animations can be created with either square or
nonsquare pixels. However, if the proper frame size is not used,
the graphic or animation will be distorted when imported into
the system. Table 7.1 lists the proper sizes for square and nonsquare pixel frames.
Table 7.1 Proper Square and Nonsquare Pixel Frame Sizes
Square Pixel
(4 ⴛ 3)
Square Pixel
(16 ⴛ 9)
NTSC (601)
648 486
864 486
720 486
NTSC (DV)*
640 480
853 480
720 480
PAL
768 576
1050 576
720 576
1080-line HD
N/A
1920 1080
N/A
720-line HD
N/A
1280 720
N/A
Format
Nonsquare Pixel
(4 ⴛ 3 and 16 ⴛ 9)
*As mentioned in Chapter 5, NTSC DV does not use the full-frame ITU-R BT.601. Instead, it omits
four lines from the top and two lines from the bottom of the frame. As a result, native DV graphics
have a different frame size than regular NTSC.
The following guidelines should help you determine whether
to use nonsquare or square pixels when importing and exporting
SD frames and clips. Use nonsquare pixels when:
●
●
●
Importing or exporting using the SD versions of the Avid
QuickTime codec. The Avid QuickTime codecs for SD video
require nonsquare pixels. These codecs are discussed in
detail later in this chapter.
Exporting SD video out of an Avid editing system. Because
the 601 or DV frame is the native frame size for SD Avid
editing systems, if you export using the proper nonsquare
pixel size, there is no risk of artifacting due to a resize from
nonsquare to square pixels.
Creating SD animations and composites for import into
Avid editing systems. You should always render animations
and composites to the native frame size for the system into
which you are importing those files. We will discuss this in
greater detail later in the chapter.
Use square pixels when:
●
Preparing an SD still graphic for import. Sizing to a square
pixel of 4 3 or 16 9 aspect ratio is the simplest method
and is appropriate for still graphics.
Chapter 7 IMPORTING AND EXPORTING
●
●
Exporting an SD still graphic for use in print or on the Web.
Any image you plan to export for use in print or on the
Web should be at a square pixel size so it does not appear
distorted when printed or displayed. You should also
export only one field.
Importing or exporting an HD frame or clip. As the HD
frame uses square pixels natively you should always use
square pixels for both import and export.
Voltages and Video Graphics
Avid editing systems allow you to import and export animation, video, and still images using either RGB levels or ITU-R
BT.601 (for SD) or ITU-R BT.709 (for HD) levels. As an editor, you
must understand the differences between the two choices and be
able to communicate those differences to the people who are
producing the import elements for your project.
When computer graphics are created, they are often created
with absolute values for black and white. In 24-bit RGB (8 bits for
each channel), black is assigned a value of 0 and white a value of
255. There is no allowance for values beyond either black or
white.
However, the ITU-R BT.601 and ITU-R BT.709 digital video
standards do not treat black and white as absolutes—excursions
above white and below black are allowed. To maintain full compatibility, Avid systems allow the creation of graphics using either
computer graphics mapping (often referred to as RGB mapping)
or ITU-R BT.601/ITU-R BT.709 mapping (also referred to as
601/709 mapping). All Avid editing systems use 601/709 mapping
internally. Let’s take a look at the differences between the two
mapping options.
RGB Mapping
RGB mapping assumes that video black (NTSC: 7.5 IRE, HD,
and PAL: 0 mV) is assigned a value of 0 and video white (NTSC:
100 IRE, HD, and PAL: 700 mV) a value of 255. There is no allowance for excursions above these values. If an image is exported out
of an Avid editing system using RGB mapping, any values below
video black or above video white will be clipped. This results in
the signal mapping as shown in the following illustration.
Most graphics and animation packages, including Adobe
Photoshop and Adobe After Effects, assume RGB mapping. It is
appropriate for graphics created for print and onscreen use, as
black and white need to be absolute values. The concept of “whiter
than white” or “blacker than black” does not come into play.
149
150
Chapter 7 IMPORTING AND EXPORTING
RGB
VIDEO
RGB
VIDEO
255
700 mV
255
10 0 IRE
0 mV
0
7.5IRE
0
HD and Digital SD
Analog NTSC Voltages
601/709 Mapping
Recall from
Chapter 5 that the
ITU-R BT.601 and
ITU-R BT.709 standards use
identical voltage-to-pixel
sampling. The primary
difference between the two
is that the 709 standard
more accurately reflects the
color gamut that is
produced by modern video
monitor phosphors.
The ITU-R BT.601 and ITU-R BT.709 digital video standards
allow for excursions beyond video black and video white. This
ensures that some camera overexposure is maintained and allows
for subblack values for luminance keying. The ITU-R BT.601 standard specifies that black is at 16 and white at 235. This allows for
a reasonable amount of signal footroom and headroom and
results in the signal mapping shown in the following illustration.
RGB
255
235
VIDEO
763 mV
700 mV
RGB
255
235
16
0
0 mV
51 mV
16
0
HD and Digital SD
VIDEO
108.4 IRE
100 IRE
7.5 IRE
0.74 IRE
Analog NTSC
When a video signal is hard-clipped at video black and video
white, as it is with RGB graphics mapping, undesirable “blooming” or flat regions often result. Additionally, slight “ringing” due
to compression or analog filtering is often converted to blooming
and therefore amplified. By using ITU-R BT.601 or ITU-R BT.709
mapping, you can eliminate or dramatically reduce both of these
problems. This mapping also allows graphic artists to create true
luma keys, since you can represent key black (a value blacker
Chapter 7 IMPORTING AND EXPORTING
than black). As mentioned previously, Avid editing systems use
601/709 mapping internally. If you need to maintain all of the
video signal information when you export a clip, you should use
601/709 mapping. However, not all third-party programs natively
understand this mapping. Extra care might need to be taken by
the graphic artist, animator, or compositor to make sure that the
values for video black and video white are maintained and not
allowed to extend into the headroom or footroom.
When importing graphics and animations, be sure to select the
correct mapping. If the wrong mapping is chosen, the signal values will be incorrect. Table 7.2 describes what happens when the
wrong mapping is chosen.
Table 7.2 RGB and 601/709 Mismatch Results
File Has
Imported As
Result
RGB values
601/709
Luma and chroma are stretched—image
appears to have greater contrast.
Video black lowered to 51 mV (0.74 IRE).
Video white raised to 763 mV (108.4 IRE).
Valid chroma might now be out of bounds.
601/709 values
RGB
Luma and chroma are squeezed—image
appears to have lower contrast.
Video black raised to 50 mV (14 IRE).
Video white lowered to 640 mV (94 IRE).
Avid editing systems allow you to export and import graphics
and animations using either RGB or 601/709 levels. The following
guidelines should help you determine when to use each
mapping.
Use 601/709 levels when:
●
●
Exporting a frame or frames that you plan to modify subtly
and reimport. This method is appropriate when you need to
fix a dropout or touch up negative grit. Using 601/709 levels
maintains all of the captured signal. If you use RGB levels,
the system clips all values below video black and above video
white, which might introduce undesirable artifacts and
cause the modified frame not to match back in perfectly.
Using or creating video that requires superblack, such as a
luma key element.
Use RGB levels when:
●
Exporting a frame or frames that you plan to modify radically and reimport. One example is when you need to
apply a Stylize effect in Adobe Photoshop. Using RGB
151
152
Chapter 7 IMPORTING AND EXPORTING
●
levels clips the signal at video black and video white, which
is necessary in this case. If you use 601/709 levels, the
effect you apply might cause the signal to extend beyond
video black and video white.
Exporting a frame to be used in print or on the Web.
Field Ordering
If the element (graphic or animation) to be imported has been
field rendered or if it contains interlaced video, it is critical that
the file has the proper field ordering. Field ordering defines how
the frames within the file are interlaced.
●
●
An odd, or upper-field, ordering uses the first line of each
frame for field 1.
An even, or lower-field, ordering uses the first line of each
frame for field 2.
Whenever you create an animation or video composite in a
third-party program for import into Avid, you must set the field
ordering correctly or the file will not play back correctly once
imported.
Table 7.3 lists the proper field ordering that should be used
when creating animations for import or exporting video out of
the Avid editing system.
Table 7.3 Proper Field Ordering for Import
NTSC
PAL 601
PAL DV*
HD
Even
(lower field first)
Odd
(upper field first)
Even
(lower field first)
Odd
(upper field first)
*Recall from Chapter 5 that PAL DV is different than PAL 601 due to incorrect line assignment
in the DV standard.
Fields and Still Graphics
Another characteristic of graphics that must be taken into consideration is a video field. Broadcasting an interlaced signal takes
less bandwidth because only half of the image is transmitted at
any one time, but it complicates things when you are taking an
interlaced image to a noninterlaced medium like the computer. A
computer uses a progressive scan for display on your monitor,
which means that the image is drawn on the screen as a single
frame, not two fields. If you export an interlaced frame from the
Avid editing application and there is some kind of horizontal
motion in the frame, you see a difference between the first set of
scan lines, field 1, and the second set, field 2. Although they are
Chapter 7 IMPORTING AND EXPORTING
only a fiftieth or sixtieth of a second apart, you see jagged horizontal displacement of the image every other line. If you are
working with interlaced images you will need to consider when
and how to de-interlace them when exporting to graphics or animation programs.
With the ease of basic desktop editing and the combination of
graphics that go straight from one computer graphic format to a
computer video format, you have some quality challenges. All of
these image type mismatches can be dealt with if you are careful
when converting formats. These graphics have too much fine
detail to reproduce well in the relatively low-resolution, interlaced
world of SD video. Consequently, the images buzz, flicker, and
give us unpredictable results if played back with little compression. A thin line may look fine on a progressive scan monitor, but
the moment it moves to an interlaced scan medium like SD video,
that line may be only one scan line wide. This means the line is
drawn on the screen only every other field, causing a disturbing
flicker. Images that originated with a video camera can never be
recorded with that kind of problem. And since, in the past, most
graphics were seen through video monitors as they were being
created, they could be adjusted on the spot so that the design
could take into consideration the limitations of what looked good
on video. Colors were toned down and detail was blurred until the
image was acceptable, and then it was put to tape.
Until all graphic workstations can figure out how to approximate what the final product will look like after being interlaced
and reduced in resolution for SD broadcast, you must be able to
tweak the graphics after you receive them. The most common
adjustments are to open the graphic in a graphics program on
the editing workstation and add a little blur to areas that are
buzzing with too much detail. If done with a little skill, the blur
will never be noticed. In fact, a very slightly blurred image looks
better than one that is too sharp. Though you could use the Paint
effect in Avid to blur the file, the best approach is to use a deflickering effect such as the Reduce Interlace Jitter effect available in
Adobe After Effects®. Another common adjustment is to lower the
saturation of a particular color or, in a worst-case scenario, all the
colors. Again, this can be done easily and safely using the Avid
color effect or a safe color-limiter effect.
Alpha Channels: Straight or Premultiplied?
Currently Avid editing systems do not support premultiplied
alpha channels. It is critically important that all imported graphics
and video that have an alpha channel be created with a straight
alpha, and not a premultiplied alpha. Nearly all alpha channels
153
154
Chapter 7 IMPORTING AND EXPORTING
created in Adobe Photoshop are straight alphas, but many programs, including Adobe After Effects, create premultiplied alpha
channels by default.
If you import a graphic created with a premultiplied alpha into
an Avid editing system, there will be a black halo around the
edges of the graphic. This halo cannot be removed within the
Avid and can only be removed by re-rendering with a straight
alpha or converting the alpha using Adobe After Effects.
Understanding Premultiplication
Premultiplication is a method by which the alpha channel is
applied to the file’s foreground in order to modify it. An easy way
to understand premultiplication is to think of an alpha channel
as a cookie cutter. Let’s take a simple example where the file’s
foreground is a solid color and the alpha channel contains a logo.
If the file was saved with a straight alpha, the foreground is left
alone and only the alpha channel represents the logo’s shape.
Original Graphic
Premultiplied Version
Imported into Avid
Straight Version
Imported into Avid
When a file is premultiplied, the alpha channel is applied to the
foreground. This is similar to using a cookie cutter to cut a shape
out of a sheet of dough. The surrounding “dough” is removed and
replaced with a specific color, usually black.
Notice that the alpha channel is identical in both of the above
images. Premultiplication does not affect the alpha, but instead
affects the foreground.
Premultiplication is very easy to understand when the alpha
channel is purely black and white with no intermediate grays.
Chapter 7 IMPORTING AND EXPORTING
Foreground
Alpha
Now let’s examine what happens when the alpha has gray, or partially transparent, areas. Imagine that our image is a blurred registration mark, as shown in the following illustration.
Foreground
Alpha
The blurred edge is partially transparent and, when composited against another image, will be blended with the other image.
Now let’s look at how a compositing program renders the foreground and the alpha channel.
If the image is saved with a straight alpha, the shape of the registration mark is expanded so that the color of the object exists
for every pixel of the object. This includes all of the partially
transparent pixels, even those that are barely visible. The foreground looks like it was cut out by a fat version of the alpha. The
next illustration shows what the foreground and alpha look like
after rendering.
Now let’s look at the same image when rendered as a premultiplied alpha. In this case, when the alpha channel is applied to the
foreground, the partially transparent areas are composited with a
specific color, again usually black.
Working with Straight and Premultiplied Images
Because the foreground is stored very differently for straight
and premultiplied images, it is critical that the image be interpreted properly or it won’t composite correctly. Let’s take a look
at how a compositing program interprets straight and premultiplied images.
155
156
Chapter 7 IMPORTING AND EXPORTING
Foreground
Alpha
Foreground
Alpha
Straight Alpha (Not Premultiplied)
The compositing of straight alphas is very straightforward. The
alpha channel is applied like a cookie cutter to the foreground
and the surrounding information is ignored. Because the color of
the foreground exists for both opaque and partially transparent
pixels, the color of the foreground is preserved.
Premultiplied Alpha
Remember that when an alpha channel is premultiplied, the
foreground is composited with black. If the foreground object
was red, the partially transparent areas of the foreground were
stored not as a pure red, but as a blending of red and black.
Before the image can be composited against another image or a
video clip, the black must be removed from the foreground.
Compositing programs do this by applying an identical mathematical function to both the alpha channel and the foreground,
in essence “unmultiplying” it.
Premultiplication Guidelines
Avid editing systems do not know how to correctly interpret
premultiplied alphas. Therefore, it is critical that animations be
created using straight alphas.
If a premultiplied alpha is imported into the Avid editing system, artifacts will be visible. To illustrate these artifacts, we will
take our image of the blurred registration mark and composite it
against a solid color.
Because a straight alpha is used purely as a cookie cutter to
extract the shape from the foreground, the foreground pixels are
Chapter 7 IMPORTING AND EXPORTING
157
extracted exactly as they appeared in the foreground. Because
transparent pixels in a premultiplied alpha image have been
blended with black, this results in a black halo around the object.
(If the image had been premultiplied with white, a white halo
would be visible instead.)
Foreground
Alpha
Always create animations that will be imported into Avid editing systems using straight alphas.
Sequential Files
Avid Symphony Nitris can import animation and video that is
stored in a sequential file format. Unlike a QuickTime or AVI file
where the entire animation is stored in a single file, the sequential file format stores each frame as its own file. The files are numbered to identify the frame order (e.g., open.000.tif, open.001.tif,
open.002.tif, and so on). Sequential files can be stored in any
still-frame format.
Configuring the Import Setting
When correctly importing a graphic, several important choices
must be made. The dialog boxes are designed to reflect the type of
graphic to be imported. The system will import graphics correctly,
assuming that accurate information is given about your graphics.
The next few sections will show you the differences between
settings.
Aspect Ratio, Pixel Aspect: 601
●
601/709, nonsquare: (System default.) Assumes the file is
properly sized for import and leaves the image alone. If the
image is not properly sized, this option forces the image to
fit the entire video frame and will distort images with nonSD or non-HD television aspect ratios depending on your
project format. This option should also be used when
Even though this
option includes the
term “nonsquare”
it is the correct option to
choose for importing
properly sized HD graphics
into an HD project.
158
Chapter 7 IMPORTING AND EXPORTING
●
If the graphic has
an alpha channel
and one of the
three Maintain options is
chosen, the system will key
out the area around the
graphic instead of adding
video black.
●
importing HD-formatted graphics into 16 9 SD projects
or 16 9 SD-formatted graphics into HD projects.
Maintain, nonsquare: (For use with NTSC projects only.)
Designed to be used with nonsquare NTSC DV (or DVD)
images imported into a standard NTSC resolution. NTSC
DV has a frame size of 720 480. The 720 480 image is
centered in the frame and video black is added at the top
and the bottom to pad the image out to 486 scan lines.
This option should also be chosen if importing a 720 486
frame into an NTSC DV resolution. In that case, the top
four lines and bottom two lines of the 720 486 frame are
removed from the image. This conforms to the SMPTE
specification for NTSC DV frames.
Maintain, square: Designed to be used with images that are
smaller than the video frame size and cannot be resized. It
does not attempt to resize the image, but compensates for
the square pixels, centers it within the video frame, and adds
video black around the image. This option is designed to
make it easy to bring in small graphics, such as Weboriginated art, into the Avid editing system. If you import
larger than expected graphics using this option, the graphic
will be resized and, if necessary, letterboxed. If you import SD
square pixel graphics (e.g., 648 486 or 864 486) into an
HD project using this option, the graphics will be centered in
Chapter 7 IMPORTING AND EXPORTING
●
the video frame and will not be resized. This is often the preferred method to bring in SD graphics with alpha channels
into an HD project.
Maintain and Resize, square: Assumes an incorrect image
size. It letterboxes the image with video black and resizes it
to fit either the maximum width (for wide images) or
height (for tall images). It also assumes the import file has
square pixels and compensates accordingly. If you import
larger than expected graphics using this option, the
graphic will be resized and, if necessary, letterboxed. This
option can be used when importing HD-formatted graphics into a 4 3 SD project or 4 3 SD-formatted graphics
into an HD project. In either case, the graphics will be
resized to fit the video frame and letterboxed or
pillarboxed.
For reference, Table 7.4 summarizes the correct aspect ratio,
pixel aspect options for properly formatted SD and HD graphics.
Table 7.4 Aspect Ratio, Pixel Aspect Options for SD and HD Graphics
Import into
16 ⴛ 9 SD
Import into
16 ⴛ 9 HD
Source Format
Import into 4 ⴛ 3
4 3 SD
(e.g., 648 486)
601/709, Nonsquare Not supported
Maintain and
resize, Square
16 9 SD
(e.g., 864 486)
Maintain and resize, 601/709, Nonsquare
Square
601/709,
Nonsquare*
16 9 HD
Maintain and resize, 601/709, Nonsquare
(e.g., 1920 1080) Square
601/709,
Nonsquare
*Will resize the image to the full height of the HD frame. If you want to import the graphic without
resizing, use “Maintain, Square” instead.
File Field Order
File field order allows you to set the field ordering of the
imported file. If the file is not interlaced (frame rendered), set this
option to “Noninterlaced.” Otherwise, refer to Table 7.5 to choose
the correct option.
Table 7.5 Proper Field Ordering for Import
NTSC
PAL 601
PAL DV*
HD
Even
(lower field first)
Odd
(upper field first)
Even
(lower field first)
Odd
(Upper field first)
159
160
Chapter 7 IMPORTING AND EXPORTING
If you are importing a QuickTime movie that is encoded with
an Avid QuickTime codec, this setting is ignored and the animation’s field ordering cannot be changed. Therefore, it is critical
that all animations and composites are rendered with the correct
field ordering.
Color Levels
Before using RGB,
dithered, you
might want to try
reimporting graphics that
display with banding using
a 10-bit resolution.
●
●
●
RGB: This option is designed to be used with traditionally
created computer images. The blackest black in the
graphic will be assigned the value of video black and the
whitest white will be assigned the value of video white.
This option should be chosen for graphics and animations
created in third-party programs unless the graphic or animation uses 601 levels.
RGB, dithered: Assigns values identical to RGB. Select this
option if you are importing a graphic with a fine gradient.
Due to the limitations of 8-bit 4:2:2 video encoding, banding is possible in fine gradients. This option adds a slight
amount of noise to the gradient and can mask the banding
inherent in digital video.
601/709: Use this option if the graphic was created specifically to use the extended signal range available in either
the ITU-R BT.601 (SD) or ITU-R BT.709 (HD) video standards. Do not use this option if the graphic was not created
for 601 import as illegal color values may result.
Alpha
●
●
●
Use Existing: Applies only to images that have an alpha
channel; the setting has no effect on images that don’t
have an alpha channel. Use this option when importing
movies rendered with the Avid QuickTime codec.
Invert Existing: Inverts the black areas and white areas in
an alpha channel. Use this option when importing still
graphics, sequential file animations or movies, or movie
files created with standard codecs.
Ignore: If this option is selected, the system disregards the
alpha channel and imports only the RGB portion of the
image.
Single Frame Import
Use this option to set the duration, if desired, of an imported
still graphic. This option sets the maximum duration for an
imported still. Once imported, the graphic cannot be trimmed
Chapter 7 IMPORTING AND EXPORTING
out beyond this duration. I strongly recommend setting it to a
long duration if you plan to have your graphic onscreen for a significant duration. Otherwise you will have to edit it in multiple
times. Regardless of the duration you choose, the media will only
take up one frame of space on disk.
Autodetect Sequential Files
This option, off by default in Media Composer 3.0, tells the system whether or not to look for a numbered sequence of files and
import them as a single file. This option can backfire on you if
you have graphics in a file named “Logo version 1,” “Logo version
2,” and so on. If enabled it would import both of those files as a
single file with each file having a duration of one frame. If that
isn’t what you want make sure this option is disabled!
In addition, in some versions of the Macintosh operating system, enabling this option will actually hide folders and files that
are sequentially numbered. If you can’t find the file you’re looking
for, try disabling this option.
Exporting
There is certainly a joy to working on a general-purpose computer instead of a dedicated graphics workstation. You always
have the ability to quickly export a frame from the video application, tweak it in a graphics program, and import it back. You no
longer need to call the graphics department at the last minute to
make the minor changes that are inevitable as the deadlines get
closer. It makes it easy to take any frame and use it as a background, do some simple rotoscoping (painting on the video
frame by frame), or isolate parts of a frame with an alpha channel. The trap, of course, is that you will always be counted on to
do this once you have shown how easy it is!
Export Templates
Since exporting usually is done with only a handful of the
potential formats, most people find the export formats that suit
them and ignore the rest. There is also a pattern to the type of
exports; users find the video format or the graphic format they
prefer and stick with it. It makes sense then to take the settings
that are used in exporting most often and save them as templates.
You can create and save these templates as user settings so you
can take them with you from job to job with the assurance that
you will always get the export right if you make the templates
right. It is also great for experienced editors to make them for
161
162
Chapter 7 IMPORTING AND EXPORTING
their less-experienced colleagues or assistants, who can use them
with an extra level of confidence knowing that they will be
correct.
Export Basics
Exporting has its own set of choices, but most of them are
decided by the ultimate use of the image. If you are exporting an
image to work on and then you re-import back, you want the
export and import to be exactly the same. This means choosing
601 video levels and the native frame size. In NTSC that native
frame size is 720 486 and in PAL it is 720 576.
If you change the frame size during export, two things happen.
First, it takes much longer to export since the application must
do more work resizing. Second, and more seriously, the scan lines
are disturbed from their precise, standardized relationship. If you
export a still at a small size for use in a document or for a Web
page, the scan lines are not as important because the image is not
Chapter 7 IMPORTING AND EXPORTING
going back to full-frame video. A video imported back to the Avid
system needs the interlaced scan line information to reproduce
the image exactly. This means you should not de-interlace the
image in the graphics program if you are going to re-import it to
the Avid system. If you resize the image, even to a square pixel
size like 720 540 or 768 576, when you bring the image back
to a nonsquare video playback like on the Avid system, the import
process does not know exactly how the original scan lines were
laid out. The image will be degraded.
During import, the software puts the lines in a slightly different
order from the original if the size has been changed. Forget trying
to match back seamlessly to the original video if the scan lines
are in slightly different places. You will also experience a loss of
resolution because some scan lines are doubled to make up for
missing ones. If you are exporting to re-import, always choose
the native frame size and do not resize the image at all in the
graphics program.
Exporting Metadata
An important trend in interchange between systems is the ability to export with rich metadata. Avid was critical in the development of metadata exchange by creating OMFI and implementing
it as OMF 1 and OMF 2. This allows users to retain more of the
creative decisions when they move to a third-party program. The
metadata creation is so important you can think of much of
the editing process as metadata management. The interoperability with other devices in the distribution chain is critical to new
applications for video. This is the reason Avid created the
MetaSync feature and added a metadata track to the timeline.
You will be able to program points in your sequence that line up
with actor’s individual dialog in scripts, multilanguage subtitling
overlays, and interactive television applications not yet invented.
There are several steps to making the metadata exchange work
correctly. First, the user must export from the Avid system using
the preferred format. Up until now that has been OMF 2, but is
currently AAF. The third party must be able to import the metadata format and then, most importantly, the program must know
what to do with the data! It is no good importing a rich metadata
format like AAF and then stripping out all the information except
for cuts and dissolves just because you don’t know what to do
with the information! Be wary of products that claim to import
OMFI and AAF but only reduce it to an EDL once inside the program. You might as well just make an EDL!
Some manufacturers incorrectly made the assumption that
OMF 2 was a closed Avid format. This left the door open for
163
164
Chapter 7 IMPORTING AND EXPORTING
products like Automatic Duck’s Pro Import®. This product takes
the OMF 2 sequence metadata and opens it inside Adobe After
Effects 5.0 and later versions. Common effects are transferred to
After Effects like picture-in-picture, matte keys, speed changes,
and collapsed layers. The user can link the metadata to the media
already on the drives or you can export the OMFI metadata with
the media embedded. You can quickly use the advanced compositing functions of After Effects and then render as a QuickTime
movie with alpha channel using the Avid Codec.
AAF has been codified by the AAF Organization (www.aaf.org),
which is made up of major manufacturers and broadcasters. It is
Chapter 7 IMPORTING AND EXPORTING
largely based on OMF 2, but all aspects are controlled by this independent body to make sure that proprietary information is handled correctly. A common misconception is that once everybody
starts exporting and importing AAF, there will be transparency
between applications. The AAF specification allows for the use of
hidden or “opaque” data that benefit certain manufacturers that
choose to share the ability to unencrypt this proprietary metadata.
And even if the manufacturer chooses to make certain information public to all, there will be varying degrees of success as third
parties try to incorporate the data correctly into their programs.
Avid has implemented the export of AAF already for several
releases. This will enable Avid to share data better with Avid DS
and Digidesign Pro Tools® as well as any third party that correctly
implements the standard. Currently, there is an extremely high
degree of information shared with Avid DS that can be used for
conforming high-definition masters from Avid offlines. This
interchange saves approximately ten minutes, conforming each
complex effect that was created in offline compared to recreating
the effect by eye. Multiply this time savings by the typical number
of effects in a one-hour primetime program and you can see that
using AAF between Avid applications can save hours per show
during the high-definition online.
There are several choices when choosing to export metadata,
described next.
Link to (Don’t Export) Current Media
This allows any program that opens the metadata to know
exactly where all the video and audio media are on the hard
drives. It will automatically link without having to copy the media
to a new location. This can be valuable when using a third-party
program on the same system or working on a very fast network
like Unity MediaNetwork. However, if you are working with
uncompressed images, they are too big to play back over a standard gigabit ethernet network so don’t try to link to current media.
Copy All Media
This option assumes you need to move the media to another
system. You may want to copy the media files to a slower large
drive just for transportation and then copy them again to fast
drives once you get to your destination. If you are not careful, you
may break the links between the media and the composition, so
reduce the number of times you need to copy the media before
you open the metadata in the destination application. If you
break the links by accident you can use the Relink command.
This choice is excellent if you want all of the original media of all
the master clips used in the sequence.
165
166
Chapter 7 IMPORTING AND EXPORTING
Consolidate Media
By consolidating first you reduce the amount of media that
must be copied and moved. You will reduce the length of the original master clips to a length only long enough to play the sequence
and some user-defined handles. If drive space is low, copy time is
critical; or, you are moving media over a slower network, so you
will want this choice. You will not have the freedom to recreate the
project from scratch because you will not have all the original
media, but that may not be important at a late stage in the project.
Importing and Exporting Motion Video
The next step for import and export is using moving video.
Usually, people want to import animations created by a threedimensional (3D) animation program or an effect sequence rendered from a compositing program. There is also the demand to
export for Web pages, CD-Rom, or for material to be used in a
compositing program like After Effects. All the already-mentioned
procedures apply, including resizing and safe colors, but with
slight differences. Also, you must decide between two choices for
formats: movies or sequences of stills.
Let’s look at importing video first. The choice of whether to
render as QuickTime, AVI, or PICT/TIFF sequences depends on
several factors. The first and most important is: What format does
your third-party application have as an export choice? Usually
less-complex programs on Macintosh have only one choice—
QuickTime. This does indeed make things simpler.
QuickTime
QuickTime is a format that serves many masters. Its primary
purpose is as a distribution format, but it can also be used successfully as an editing and intermediate format. If you are exporting out of the Avid editing system for distribution via QuickTime, I
recommend you export as a QuickTime reference movie and use a
program such as the bundled Sorenson Squeeze® to process your
video. Not only will it provide a high-quality compression, it can
be configured via templates so you always get predictable results.
A QuickTime reference movie is a series of pointers, a small
amount of metadata, about where the original media files are on
the drives. When you export a reference movie you send this small
amount of metadata to another computer on the network or to
another program on your system. The other computer can use it
for compression using a program like Sorenson Squeeze, or a hardware-based compression system like Anystream or Telestream. The
Chapter 7 IMPORTING AND EXPORTING
compression system loads the QuickTime reference movie like it
was a real QuickTime movie and the compression software looks
for the media in their original location. It then grabs the frames
and compresses the media without slowing down or disturbing the
main editing system. This now becomes a very fast background
task to create a movie for the Web or for a DVD.
In many cases, though, you’ll use QuickTime as a transfer
mechanism to send video or animated graphics between workstations, departments, or facilities. In this case, a regular embedded QuickTime movie is required as they won’t have access to
your media on their unconnected machine.
The Avid Codec
The key to getting a QuickTime movie rendered at high quality
that imports quickly into the Avid is to use the Avid codec. A codec
(compressor/decompressor) is a system extension that any thirdparty program can access because it is in a central location on the
host computer. On the Macintosh OS 9 and earlier it is in the
System folder along with other extensions, and in OS X the codecs
go in System:Library:QuickTime, where System is the name of
your boot drive. On Windows XP it is installed automatically in the
C:\Windows\system32 folder. The Avid Codec is a .qtx file; it
allows other programs to compress and decompress a rendered
QuickTime movie using the Avid media file format. This means
that even though you are rendering a QuickTime movie, you really
are creating an Avid media file that is inside the QuickTime format. Technically, this is called encapsulating or wrapping. To work
best, use the native frame size and do not mix resolutions in the
exported sequence. You can change the resolution of the Avid
Codec–based QuickTime movie during import if you must, but it
will slow down the import significantly. This is especially important if you have only one resolution of an animation and you must
use it for offline and online. With the Adrenaline and software
only–based Avid editing systems you can mix and match resolutions in the same sequence, so create the animation at uncompressed quality and keep it that way when you import.
Make sure that you load the Avid Codec into any Macintosh or
Windows system you are using for graphics or animation; you
will be given Avid resolutions when you choose the quality of
your rendered QuickTime movie. Send the Codec to your graphics people or to anyone who is subcontracting graphics for you.
And by all means, make sure it is the most recent version! You can
get that information by calling Avid customer support or by
downloading from the Avid website (www.avid.com); be aware
that the version of the Codec may change on a different schedule
from the software itself. The reward of using the Codec and native
167
168
Chapter 7 IMPORTING AND EXPORTING
frame size is the almost real-time import speed as you come back
to the Avid system.
Size
Size of the frame is still a consideration for importing QuickTime,
for all the same reasons. Refer back to the chart for proper frame
sizes for the different formats. With a still image, maintaining the
correct frame size is important because of the scan line relationship, but there is now another consideration—import speed. If you
render at anything other than the native frame size, you have to
double lines to make up for the difference or throw away resolution and waste rendering time. You are also wasting import time
since Avid must resize each frame on the fly, which adds a considerable, unacceptable amount of extra time to the process.
The other choices involved, when rendering to import to Avid,
have to do with field order and field rendering. To get the absolute
best-quality rendered movie, choose field rendering if your application makes it available. Field rendering takes longer to render,
but it is worth it if you are working with complicated video and
lots of detail and you want this to be a finished product. This is
because you want the movement of your animations to be as
smooth as possible, and if you render using only frames, then you
are giving up half the motion resolution. With field rendering you
get all 50 or 60 fields available to you rather than 25 or 30 frames.
The extra fields smooth out motion of moving objects by giving
you more discrete images within the same amount of time.
If you are working in a 24p or 25p project then you are working
in progressive frames so a field-rendered animation won’t help
much. In all other projects, however, you will gain significant
quality improvements by taking the extra time to field render.
Importing with an Alpha Channel
With current versions of Avid editing software, you are able to
import QuickTime movies with an alpha channel attached. Many
Avid QuickTime codecs, including the DNxHD codecs, support
alpha channels, enabling you to fast import these files into your
system.
Using OMFI for ProTools
When moving a project with media to Pro Tools or AudioVision®
there are few elements that are critical:
●
All sample rates must be the same. You cannot mix 44.1 kHz
and 48 kHz in the same sequence. If you have mixed sample rates you should create a copy of the sequence and
Chapter 7 IMPORTING AND EXPORTING
●
●
convert the sample rate. Select all the sequences and
choose Change Sample Rate under the Clip or Bin menu. If
you are consolidating the media during the export you will
have the option to convert the sample rate in the export
dialog.
Macintosh systems are not compatible with WAV files. If
you have WAV files and are moving to a Macintosh or an
older Pro Tools or AudioVision you may have to convert
the files to AIFF-C. You will have to do this while embedding the media into the composition. When you choose
OMF 2 export and embed you will be given the choice to
convert the file to AIFF-C. You must embed the media
when you export OMF or AAF in order to convert it from
WAV to AIFF-C.
Macintosh systems cannot mount drives striped together
from a Windows system. A Macintosh system may have difficulty playing from any Windows-formatted drive. You may
use a Windows-formatted drive for transport, but the media
will be copied to faster HFS or HFS-formatted drives once
the media arrive at the audio studio. You can mount HFS
drives (even stripes) on a Windows system using third-party
drive-mounting software like Mediafour’s MacDrive®, but
again there may be performance issues and the media
might have to be copied. Find out the platform, format,
and the sample rate preferred by your audio facility.
If you are moving the audio to a Digidesign ProTools session,
there are two methods to consider. The first method requires less
drive space and is faster, but the second method allows more
flexibility.
The first method is to hand over the drive with the audio media
files on it and create an OMFI file that is composition only. You
may want to consolidate your sequence before you do this if you
want to put all the audio media on another drive for transport to
the audio workstation. This allows you to keep working with the
audio files you have. You might want to lock your audio tracks in
the sequence so you don’t accidentally change something while
the mix is going on.
The second method is to make an OMFI audio-only file.
Consider this method if you are going to use software that does
not recognize the Sound Designer II format that ProTools and Avid
Macintosh editing systems use. This creates an intermediate file
and converts the audio to another, more widely used audio format, AIFF, along with all the edit information. Once this very large
file is moved over to the digital audio workstation, it can be
converted back to a Sound Designer II file for use with earlier
Macintosh versions of Pro Tools software. The intermediate OMFI
169
170
Chapter 7 IMPORTING AND EXPORTING
file is opened in the OMF Tool that comes with Pro Tools and converted to a Pro Tools session. The original OMFI file can be deleted
after the conversion.
The AvidLink for Pro Tools will allow you to choose either method.
The AvidLink for AudioVision assumes you have the correct format
audio file and saves only as an OMFI composition. You will need to
copy the audio files to another drive manually or through a standard export dialog. Since AvidLink is a simplified workflow, if you
have not created the audio files in the correct format you may have
to use the more complicated method as outlined earlier.
To send the audio mix back to the editing software, you must
“bounce” the audio tracks to a continuous audio track. This realtime process changes the audio file, which now has subframe
edits, to a frame rate that can be used by the Avid. Alternately, you
can output to a digital tape format, recapture it into Avid, and line
it up to the beginning of the sequence. Having some sort of synchronizing beep tones with a countdown or flash frame simplifies this final sync.
Adobe After Effects
When preparing a composition in Adobe After Effects, you
should always use certain settings when rendering for the highest
quality:
●
●
●
●
Always use 29.97 fps when exporting from Avid and rendering from After Effects in NTSC (not 30 fps). Of course,
PAL is 25 fps and 24P is 24 fps.
Graphics or other elements should be created at 720 540
(NTSC) or 768 576 (PAL). This is an accurate square-pixel
representation of the television screen. Graphics are then
resized in After Effects to the 720 486 (720 576) D1
pixel size.
Whether one chooses to work in After Effects at 720 540,
720 486, or 648 486, it is vital that the final render
takes place at 720 486. For PAL, the proper composition
output is 720 576. This can be done by creating a composition in the final correct size, dropping your animation
into it, and using Scale-to-Fit (Ctrl-Alt-F/Cmd-Opt-F).
If you need to work at 16 9 you can use the widescreen
selection when choosing the pixel aspect ratio under the
new composition. This will keep the project the correct
frame size for anamorphic standard definition. If you are
moving material from Avid to After Effects and then back
to Avid, using the widescreen pixel aspect will keep the
material from being scaled twice.
Chapter 7 IMPORTING AND EXPORTING
●
●
●
If field rendering in After Effects, choose upper field first
when going to an ABVB system or a PAL Meridien system.
If going to an NTSC Meridien system, it should be field
rendered lower field first. All Xpress DV systems require
lower field first.
If working in 24p, do not field render! This is a progressive
format and does not use fields.
Using the Avid Codec is currently the best conduit for
going back and forth between Avid and After Effects.
If rendering a graphic for compositing in an Avid, this is the
best way to deal with the alpha channel:
●
Always render a QuickTime movie with an embedded
alpha channel because batch import allows for more control of the files once they’re in the system.
When you render in After Effects:
●
●
Select the composition in the render queue and choose
“Add Output Module” from the Composition menu.
One output module should be set up to save the RGB,
and set your color to Straight (Unmatted). Only DS uses
premultiplied mattes in the Avid product line.
Importing and exporting video, audio, and graphics have many
variations, formats, and choices. With this flexibility comes complexity, so any production company should find the processes
that work best for it, simplify them as much as possible, and be
aware that you have many tools at your disposal.
Conclusion
Learning to import and export graphics, animations, and
metadata correctly from your Avid system means you position
yourself as the hub of the creative process. You are in more control of the final result of any project and can confidently maintain
optimal quality at every stage. You can collaborate better with
graphic artists and animators as well as properly prepare your
material for distribution on the Web or DVD. This makes you
indispensable as both a technician and an artist.
171
This page intentionally left blank
8
INTRODUCTION TO EFFECTS
“Art cannot result from frivolous or superficial effects.”
—Hans Hofmann
The effect capabilities of Avid editing systems are surprisingly
deep and complex, and professional results can be achieved very
quickly. One of the leaps forward in capabilities of the past few years
is that the speed of computer processing units (CPUs) and hard
drives along with greater PCIe bus bandwidth has made real-time
effects more common. Many of the old restrictions of numbers of
video streams and real-time effects have been shattered by the
move to software- or host-based Avid systems. However, some of
the reliability of the hardware-based systems is gone as well. Now
the capabilities of your system rely on the configuration of off-theshelf computer parts rather than custom-built Avid hardware.
Numbers of streams and real-time effects may vary from system to
system based on the host computer and not on Avid’s hardware
expertise. We will explore the capabilities and implications of this
brave new world in this chapter.
The trick to maximizing your system’s resources is to do creative work in real time and then render for superior quality. The
last time I checked, time was still money, and the best way to use
the time with a client present is to show them multiple versions
and make changes quickly. The lines between cheaper/slower
and expensive/faster are blurring, especially if the preview quality is good enough to make important decisions about the final
version. Incorporating faster CPUs and hard drives means that
effects done on Avid systems can compete with much more
expensive workstations.
There is much to be covered to deal completely with effects—too
much for this book—but some basics can get you past the beginner
stage. There is nothing like the experience of a hands-on class, and
173
174
Chapter 8 INTRODUCTION TO EFFECTS
Avid offers several. This chapter can only hint at some of the techniques you will discover with enough time to experiment.
As you become more confident with effects, you will also
become serious about nesting. Nesting is the feature that gives
you more levels of video layering than you could ever practically
use except for the densest of graphics sequences. Nesting gives
you incredible power with an extra level of complexity. This chapter will discuss nesting after discussing the basics.
ACPL-Based Effects
Over the last few years the speed of the computer’s bus has
increased and CPUs and GPUs (graphics processing units) have
increased exponentially. Computers are typically shipped with
more than one CPU core or even multiple multicore CPUs. And
GPUs now ship with dozens of processing units on a single card.
All of this power adds up to some amazing real-time effects capabilities, and one of the significant changes made to Media
Composer 3.0 was to replace the effects processing engine of the
past using a new multithreaded engine known as ACPL (Avid
Component Processing Library). ACPL effects are able to be processed on both CPU and GPU cores, fully exploiting the power in
your computer. Naturally, these effects run best on the latest,
fastest systems, but you’ll also find improved performance on
earlier-generation systems that have at least two CPU cores. (GPU
effects processing requires the use of the latest-generation graphics cards.)
In addition, version 3.0 also includes multithreaded codec
engines that allow the system to decompress video streams on
one core and apply effects to them on another for an extremely
efficient processing pipeline. When it comes time to render, this
architecture provides for a blazingly fast render architecture that
can render effects exponentially faster than previous generations
of Media Composer.
Types of Effects
There are two kinds of effects: real time and non-real time. With
modern systems, real-time effects are only constrained by the
speed of your CPU/GPU architecture and drives. Depending on
your system you may be able to get as many as ten or more realtime streams of standard-definition (SD) media and five or more
real-time streams of high-definition (HD) media. When an effect
cannot be played in real time, the Avid system will begin to skip
frames, showing you as many frames as it can while maintaining
Chapter 8 INTRODUCTION TO EFFECTS
audio sync. When this happens you’ll see red dots on the timecode track, indicating which frames were skipped. This is
extremely useful for quick previsualization of a complex effect.
Don’t worry about the skipped frames; when you render the effect
you will get them all back!
Real-time effects have an orange dot over the effect icon when
unrendered. One of the main advantages of a host-based (CPU/
GPU) system is the ability to use the faster CPUs, GPUs, and large
amounts of RAM to speed up any rendering. A faster PCI bus and
an operating system that takes full advantage of all the bus speed
available will also make a difference. In practice, all real-time
effects become conditional on a modern Media Composer system. This is because real time is always determined by the capabilities of the computer and the context of the effect in the
sequence.
A non-real-time effect is too complex to be dealt with so quickly
and sports a blue dot once it is in the sequence. With the hostbased systems, non-real-time effects tend to be some AVX plugins, and certain types of motion effects. The system will always try
hard to play something, but the results may be unpredictable.
Even fancy wipes that you shouldn’t use anyway (a.k.a. “weasel
wipes”) will play a real-time preview. Clearly, if a real-time effect
does the trick, it is preferable and your effect design should take
this into consideration. You may want to substitute a real-time
effect as a temporary replacement for the final non-real-time
effect just to get the timing correct with a real-time preview. It is
easy enough to replace one effect with another after all the multilayered video and audio timings are perfect.
When layering effects on top of each other vertically, the material on the top track always has priority. This is not a true multichannel digital effect device in the way most people think of
standard DVEs. It is more like having many single-channel
devices. Each video track can be considered a separate channel
of effects and, with nesting, much more than that. It means that
the separate video tracks do not interact with each other because
they are each like separate sequences. This modularity allows
quick exchanges of shots when it comes time to modify an effect.
It also means that if moving objects are going to change their layering priority on the screen, then the lower object must be moved
to a higher video track.
In this CPU-dependent world with so many shades of real time
even the Digital Cut dialog has a choice called Video Effect Safe
Mode. This checkbox is the last chance to make sure everything
will play out to tape. As you would expect, this setting is a little
conservative. If the system can figure out the minimum to render
before being absolutely positive there are no dropped frames or
175
176
Chapter 8 INTRODUCTION TO EFFECTS
any other problem with the many layers of real
time possible today, you should let the system
take over. Think of the system as using a “manumatic” method of looking ahead and saving you
time by doing the right thing before a digital cut.
Effect Design
Good effect design tries to achieve the most
spectacular effects with the simplest use of layers.
The fewer layers used, the fewer problems with
trimming and rendering in a track-based effects model. Simpler
design means most of the time you can modify faster because it
is easier to figure out what is affecting what. If you can do something in fewer tracks, it looks better and renders faster.
Tree-based compositing is extremely powerful for creating
graphic representations of the effect flow. This is the type of control offered by the DS Nitris system and some other third-party
programs like Eyeon’s Digital Fusion. You create branches by connecting effect nodes that could have mattes fed from one branch
to another. Intermediate results (a traditional “work part” or
submaster) can be connected to advanced controls without the
restrictions of the Media Composer effect interface. The tree
opens a whole new world for deep, complex effects that can be
understood by this graphic signal flow. But all effects happen over
time so there still needs to be a timeline and keyframe aspect that
is tightly integrated with the tree. Consider signal flow, the order
of effects, and the way they change over time when designing any
composite.
Rendering
Rendering effects can be reduced significantly by using some
basic strategies. In general, you render only tracks that are combined with non-real-time effects. With so much real-time capability
these days, you should try to see if something plays without dropping frames before you consider rendering. Whenever you render
an effect, you are rendering a composite of everything below. If you
want to play the tracks below by themselves you can move the video
track monitor down to lower tracks or stripping off the very top
tracks to make multiple versions. Otherwise, you can leave these
lower tracks unrendered. One simple method to rendering only a
top track is to put a submaster effect on an empty track above the
effect sequence. Put Add Edits in the empty track on either side of
the area to be rendered and then drag a submaster effect between
Chapter 8 INTRODUCTION TO EFFECTS
them. By rendering the submaster effect you are assured of rendering only the top track; if there are many effects sequences in a row
this can be a time-saver.
What confuses people is that many times there is not just one
track available to render as the top track. The beginning of the
show may have a complicated layering section that has ten layers. Then most of the show may not go above track 3 and the end
has five tracks. The best solution is ExpertRender™.
ExpertRender
ExpertRender is a feature designed to let the intelligence of the
system solve your rendering problems for you. If the main problem with rendering is that people render too much, then the best
solution would be to make sure everyone feels comfortable with
a minimal style of rendering. The reason people render too much
is that they don’t really know what will play in real time and what
won’t. This is because many effects are conditional and depend
on what else is going on in the sequence. Don’t take the time to
step through a long and complicated sequence effect by effect
and still, perhaps, guess wrong. It is easier to mark in at the
beginning of the sequence, out at the end, turn on all the video
and audio tracks, and use Render In to Out. The expert part of the
feature will leave as much real time as necessary and render only
what is absolutely necessary.
If you don’t use ExpertRender, then rendering in to out may be
simpler, but there are some definite drawbacks. There are times
when you may disagree with ExpertRender. Specifically, you may
have plans for a certain section and you will be adding more
effects to a higher track when you are done with the rendering. In
this case, the system cannot read your mind to know what you
will do next and can return only results based on the existing
sequence. You can then choose to Modify the ExpertRender
choices. By clicking on Modify in the ExpertRender dialog,
ExpertRender leaves all of the chosen effects still highlighted in
the sequence. You can Shift-select or Shift-deselect as you see fit
and press the regular Render button when you are done. There is
no need for a Render In to Out again because all the effects are
already selected.
Another time you may disagree with ExpertRender is when you
have dissolves between titles. This is relatively rare and really
should be treated as an exception. In this case, the system will
realize that the real-time dissolve cannot be played in real time,
but because of the order that it must allocate resources, chooses
the titles for rendering. Again, the user can override this situation
easily, pick the shorter answer, and render the dissolve only.
177
178
Chapter 8 INTRODUCTION TO EFFECTS
Or you can dissolve titles using the Fade Effect button, which creates keyframes that do not need to be rendered. This limits you to
fading up and down; if you want to dissolve between titles then
the best method is still a dissolve.
The beauty of this automated analysis is that a vast majority of
the time the choices are the shortest rendering answer. In reality,
you will save so much time by letting ExpertRender do the job for
you that even the occasional overrender is easily overlooked. How
much time is wasted stepping through effects by hand? The guarantee that the system will be able to play the entire sequence
after the ExpertRender process is, all by itself, money in the bank.
Partial Render
Partial Render is the ability for the system to render only part
of an effect at a time and then come back later and pick up where
it left off. This allows you to start a render at any time, even if you
know you don’t have enough time to finish rendering the entire
effect. By pressing Ctrl/Command. (period) you can escape
from the render and keep or discard what has been rendered so
far. This is especially useful if you have a series of slow, blue dot
effects and you can start to render a little more anytime you take
a break.
The system will create a new precompute for each partial render and tie them all together to play the final effect. You can see
how much of an effect you need to render by changing the
Render Range in the timeline view to show Partial. This is the
most useful setting and should be left on most of the time since it
will show you only what is left of an effect that has started rendering, but not quite finished. This is the default setting on current
systems. If you change the view to All, then it will show you all
effects in the sequence that are not rendered. Although this can
be useful under some conditions, it can be confusing if you are
relying on ExpertRender to figure out what needs to be rendered.
The visual feedback in the timeline of the red or partial red line
across the top of the clip with the effects can clash with the information from dupe detection. I would strongly suggest that
Render Range display and Dupe Detection not be turned on at
the same time. If these two functions are important to you, they
can be made part of a workspace and changed with a single
keystroke.
The only other drawback to Partial Render is that with longterm complicated effects projects you will be generating more
precomputes. If you have been cleaning up precomputes once a
week to keep the system operating without the high, unnecessary
overhead of too many small files, you may want to do it more
Chapter 8 INTRODUCTION TO EFFECTS
often. Most of the time, however, you won’t even be aware that
Partial Render is at work. The best features, many times, are the
ones that make you more productive without attracting attention. Long after the sizzle of the product demo is over, you will be
making your deadlines with projects you are proud of, and you
won’t really care why!
Keyframes
Almost all effects can be manipulated by keyframes. The only
exceptions are the color corrections and a few other segment
effects like flip and flop. Keyframes are the method to change an
effect over time, and you always need at least two keyframes if
you want the parameters to change. At the first keyframe, certain
values about position, shape, or color are entered, and the settings change to match the values on the next keyframe. The
change, if there is any, is smoothly interpolated between the keyframes. Keyframes can be added in Effects mode on-the-fly while
playing and pressing the Keyframe key (the ’ [apostrophe] key is
the default on Symphony and Media Composer). Keyframes can
be copied and pasted, dragged by holding down the Alt/Option
key, and can be moved with the trim keys. If you want the effect
to just hang on the screen, with no motion, then you can copy
and paste the same settings between two keyframes or highlight
both keyframes when changing parameters.
Much has improved with keyframes and some of the old advice
no longer applies. Avid significantly improved the keyframe
model for certain effects and will, over time, migrate that functionality to all the effects. Now the user can choose to work in the
“classic” keyframe mode or promote the effect to the new keyframe model. You now have a keyframe per parameter—the ability to change each parameter with its own timeline and set of
keyframes. Using the new model, you need only one keyframe if
you want the parameter to change from the default but remain
the same throughout the effect. As we will see in the next section,
you also have a wide range of choices as to how the motion
between the keyframes is interpolated and how trimming affects
the timing.
Advanced Keyframe Model
Advanced keyframes add added power and complexity while
preserving much of the old keyframe methods. You can choose to
promote several effects to the advanced keyframe model as
179
180
Chapter 8 INTRODUCTION TO EFFECTS
desired once you open the Effects editor in these later versions.
Of course, you can keep the effect just the way it came to you
from an older offline machine. But if you need to add some more
sparkle to a project you can do much more while staying in the
Avid program.
Look at the bottom of the effect in the Effects editor for this
pink multi-timeline icon. By clicking on this all of your parameters are preserved (except Acceleration, which is replaced by
something more powerful) and the keyframes are moved into a
“timeline per parameter” effects interface. You can now add keyframes only to specific parameters and can add different kinds of
motion interpolation that are much more sophisticated than
simple ease-in/ease-out.
Creating, Deleting, Copying, and Moving Keyframes
When you move away from the concept of a single keyframe
affecting all the parameters in an effect at the same time, you
open some interesting possibilities that are also more complex.
To maintain speed you need a series of choices for basic keyframe
housekeeping. The first is a series of choices for adding exactly as
many keyframes as you need.
Hold down the mouse over the Add Keyframe icon in the Effects
editor and look at the choices. Let’s look at why you would use
each one.
Chapter 8 INTRODUCTION TO EFFECTS
Add to Active Parameter
This is the legacy choice of adding a keyframe to only the parameter that has been last
activated by clicking on it. This choice is available if you have an active parameter chosen. It
will add just one keyframe to this one parameter. If you have X and Y parameters of scale
checked for Fixed Aspect, however, you will get
keyframes on both parameters even with this
choice.
Add to Active Group
This will add a keyframe to an entire group of
parameters like Position. If Position is Active (selected and highlighted pink) then a keyframe will be added to the X, Y, and Z
parameters simultaneously. This is quite handy if a specific effect
needs all axes to line up precisely at the same time.
Add to Open Groups
Like the previous choice, this will add a keyframe to all parameters that are part of a group that has been opened (the small triangle
has been spun down to display all the sliders).
Add to Enabled Groups
When you promote a two-dimensional (2D) effect to a 3D Warp
effect you get the enable buttons. These buttons allow you to
adjust a parameter and then just disable it without resetting it to
the defaults. This is a quick way to see multiple versions of the
same effect since all those disabled parameters are still embedded
in the effect, ready to be turned on to see the alternate version
later. If several parameters are enabled you can choose to add
keyframes to all of them with this choice.
Add to Open Graphs
This is a different way of thinking about convenience. You may
have many parameters enabled in a complex effect, but to save
screen real estate you have only the critical parameters showing the
full keyframe graph. Rather than spend time scrolling up and down
to make sure all unwanted parameters are disabled or closed, you
can focus only on the open graphs where you are doing all the work.
Add to All Parameters
Not so sure about this advanced keyframe nonsense? You
might want to go back to adding a single keyframe for all parameters and worry about which ones to tweak later.
Here are two sneaky shortcuts that we designed to make it
even easier to use the power of keyframes per parameter. If you
181
182
Chapter 8 INTRODUCTION TO EFFECTS
right-click on the area of each parameter where the
name of the parameter shows up in the timeline, the
name of the parameter will change to the choice Apply
to Group. This is a quick way to apply some change to
the entire group without changing a single default setting. This can be applied to the entire effect by rightclicking on the very top of the parameter timelines,
where the name of the effect is shown. This will change
to Apply to All.
Deleting Keyframes
You can activate a keyframe and press the Delete button. You can also Alt/Optionclick on the Add Keyframe
icon to delete any selected keyframes. You can also rightclick on any keyframe and get a menu choice for delete.
You can even Shift-click to activate many keyframes and
delete them all at once through any of these methods.
Which way do you remember being the fastest?
Changing Parameters over Time
With the new graphs representing parameters changing over time you need some modifier keys to control the
direct manipulation of the keyframes. You can just click on any
keyframe and drag it up and down to change the parameters, but
what if you want to move the keyframe sideways to change the
position in time? You have several choices. If you like the mouse
you can hold down the Alt/Option key and while dragging you will
have complete freedom to move anywhere on the graph. However,
you may now need to constrain such movement so the parameter
doesn’t change, just the placement on the timeline. In this case,
you would hold down the Shift and the Alt/Option keys and now
move only sideways. If the parameter graph is closed (click on the
small left triangle to close a parameter graph) then the motion of
the keyframe automatically will be constrained to time changes
only. You only need to use the Alt/Option key. Finally, you can use
the trim buttons that are mapped to the keyboard for a very accurate nudge. You can push all active keyframes one frame or ten
frames depending on the trim key you use.
What is really interesting about this new method of displaying
keyframes over time is that you can have keyframes before or after
the effect itself. In other words, you can add parameters that
will begin before the effect starts to play. This allows you to adjust
Chapter 8 INTRODUCTION TO EFFECTS
timing with trimming of the clip with the effect. It is also a great way
to have an effect match another effect by starting in the same place
or same time and then syncing up later when both effects are later
visible (landing at the same time or bumping against each other, for
instance).
Aligning and Slipping Keyframes
Clearly there can be many more keyframes in each effect than
ever before by using the advanced keyframe model. Chances are
that you will need many of those keyframes to start and end at the
same time. You need to align keyframes from different parameters
so that they have a common point. This might be the beginning,
end, or somewhere critical in the middle (like on the drum beat and
cymbal crash). This is what the functions Align and Slip are for.
Imagine that you have added a keyframe to the Position X
parameter that needs to match the Scale X parameter. You need the
motion to stop at the same time the resize begins. Unfortunately,
you have already created all the keyframes and realize that the
effect is timed slightly wrong only after playing it back once.
The position keyframe is in the right place for the timing so it
becomes the reference keyframe. Click on the reference keyframe
to move the blue position bar to that location. If you have “Set
Position to Keyframe” unchecked in the Effects editor setting
then you will have to drag the blue bar to the reference location.
Align always uses the blue bar as the point in time to match up.
Then right-click in the Effects editor in the Resize parameter area
and choose Align. The highlighted pink keyframes will move to
the new position.
If you want to align more than one parameter at a time (like
the X, Y, and Z parameters of Position) then you can use the
sneaky shortcut of right-clicking on the name of the Parameter in
the timeline above the graph or on the name of the effect at the
very top of the timeline graph and choose Apply to All. This Apply
to All is so powerful that you may end up affecting too many keyframes. Make sure that all the other parameters besides the ones
you want to change have their graphs closed and no keyframes
are highlighted pink. If you accidentally moved too many keyframes then undo the Align, go to those parameters, close the
graphs, and Ctrl/Option-click on the pink keyframes to turn them
gray. Then do the Align process again.
Slip is just like Align except that all the keyframes to the end of the
effect are affected too. When the active keyframe moves to the position of the blue bar in the timeline, all the other keyframes in the
effect stay in the correct relationship and shift the same amount. This
183
184
Chapter 8 INTRODUCTION TO EFFECTS
makes sure that you don’t change the timing of the rest of the effect
when you line up one keyframe.
Trimming Effects and Keyframes
With the previous keyframe model you had only one choice of
behavior when trimming a clip with an effect to make it longer or
shorter. The keyframes followed along to make the effect slower
or faster. This could be an amazing time-saver since it meant that
the timing of the effect automatically followed the length of the
clip, but it was also limiting. Sometimes you wanted the effect to
just stay at the end of its trajectory, landing in just the right place
on the screen at just the right time, but you need an extra beat or
breath to absorb it before the cut. In this case, you don’t want the
timing of the trajectory or the moment of the effect landing to
change when you make the shot just a little longer. This is why
Avid created both elastic and fixed keyframes.
In a standard effect you can make any keyframe either elastic
or fixed. You highlight the keyframe and then right-click to get the
menu of choices. If you make a keyframe elastic then it behaves
like it always did and changes timing with the length of the clip. If
you choose a fixed keyframe then it will stay put in the relative
timing of the effect no matter how you trim the shot. Now that
the keyframe is fixed you need to determine what happens to the
effect with the extra material in the shot. Does the effect stay
absolutely still and hold in position? Or does it extrapolate and
continue to move in the same direction of the trajectory? This all
depends on the effect itself. If the effect has come to rest on the
screen then either choice is fine, but if the effect was a slow move
off the screen and you trim the clip longer and extrapolate, it will
continue to move in the same direction a little longer.
Controlling Motion between Keyframes
By far the most powerful aspect of the advanced keyframe
model is the ability to control the way the effect moves between
the keyframes. There are now four different types of motion that
improve upon the standard acceleration of 2D effects and Spline in
the 3D effects. Let’s explore each one and how they might be used.
Shelf
In many other programs Shelf would be referred to as Hold.
When the user chooses Shelf it means that the effect stays in
place until the time of the next keyframe and then it jumps
instantly to the new position. This effect can be used to change a
parameter when the object is hidden for a fraction of a second so
that when it reappears on the screen it has changed. You don’t
Chapter 8 INTRODUCTION TO EFFECTS
have to worry about the overshoot or undershoot of other motion
types. You can also use it to bounce an object around the screen
very quickly, but mostly it will be used to keep a parameter the
same over time with a minimum of complexity.
Linear
This motion type is usually associated with very mechanical
types of motion. The object moves between keyframes at a completely steady pace. There is no speedup or slowdown of the
object, and this resembles the kind of unreal motion that only a
robot could emulate. This type of movement is used when you
have many objects moving at the same time, but they start and
stop at different times and still manage to sync up. If objects are
speeding up and slowing down at different times, it is very difficult to get them to land at the same time or combine into a
graphic effect simultaneously. This motion type is also used when
185
186
Chapter 8 INTRODUCTION TO EFFECTS
objects start and stop offscreen. If you are moving large letters
across the screen so that they spell a word, you want them all to
stay evenly spaced apart even though each letter is a different
layer and 2D PIP (picture-in-picture). You also don’t really want
objects to appear to accelerate onto the screen and then decelerate as they exit. The illusion is that they are just passing by and
not grinding to a halt somewhere just out of sight.
Spline
Those who have used the older 3D Warp effect are familiar with
the Spline control. This was defined by animators to reproduce
natural types of motion. Spline in this sense emulates the smoothest natural motion between multiple keyframes. There is enough
intelligence built into the spline effect so that it can look over three
or more keyframes to determine the smoothest path through all of
them. As you move the keyframes, Spline automatically readjusts.
At the simplest, Spline creates the ease in/ease out effect that is
basic to DVE moves. It is simple and effective to create basic
smoothness without complex handles.
Bezier
Bezier begins as a Spline, but gives the user much more
control––in some cases, perhaps a bit too much control, as it can
create unexpected results from complex handles. There are handles on each keyframe that can be adjusted to control the
amount of ease in/ease out, the speed of the velocity change,
and make the effect behave differently on the other side of the
keyframe. This is because a Bezier handle can be adjusted three
Chapter 8 INTRODUCTION TO EFFECTS
ways: Symmetric, Asymmetric, and Independent. You can cycle
between the three types by holding down the Alt/Option key
when adjusting the handle. The effect defaults to Symmetric.
Hold down the Alt/Option key, and click the handle to change
the mode to Asymmetric. You can adjust the handle freely in this
mode without a modifier key. If you hold down the Alt/Option
key again you will cycle to Independent.
Symmetric
A Symmetric effect is created by pulling on both sides of the
Bezier handle the same amount. This means that if the effect
swoops and slows down to the keyframe, it will swoop away and
speed up by the same amount.
187
188
Chapter 8 INTRODUCTION TO EFFECTS
Asymmetric
You can adjust the handle to create a different speed curve
before the keyframe and after the keyframe. By holding down the
Alt/Option key while pulling on a handle on one side you can
change the speed at two different rates.
Independent
The Independent mode is sometimes referred to as breaking
the cusp. This allows very different motion, sometimes quite
extreme, on either side of the keyframe. Experiment with this
mode for dramatic and unusual movement.
Copying and Pasting Keyframes
With versions prior to 3.0, you can copy and paste individual
keyframes within a given parameter. But in version 3.0 you can
Chapter 8 INTRODUCTION TO EFFECTS
copy and paste groups of keyframes within a given parameter
and even copy and paste keyframes across multiple parameters
simultaneously. Simply use the Shift key to select a range of keyframes then press Ctrl/CommandC to copy them, move to the
desired position, and press Ctrl/CommandV to paste them.
This technique was used to create the parameter loops seen in
the previous illustrations.
You also have a new command at the top of the keyframe context menu that allows you to take a snapshot of all parameters at
a given point in time and paste it into another. Simply park at the
desired location, right-click in the keyframe region, and choose
“Copy all Values at Position.” The current value for all parameters
in the effect will be copied and then pasted wherever you desire
as a new keyframe. I use this technique to take a snapshot of a
position in the effect that I want to return to or even land on at
the end of the effect.
You can even copy and paste keyframes between effects, though
not between different parameters. This means that you can copy
and paste Position keyframes between effects, but cannot copy
X Position keyframes and paste them into Y Position.
Removing Redundant Keyframes
Another new feature in the latest version is especially useful
when conforming or troubleshooting effects created with basic
keyframes. The Remove Redundant Effects command instructs
the system to analyze the effect’s keyframes and remove any keyframes that do not change the value of a parameter and are therefore unnecessary. Remember that adding a keyframe in basic
keyframes adds a keyframe to every parameter, regardless of
whether those parameters are being modified. These extra keyframes can get in the way when you are trying to either refine or
troubleshoot an effect. I strongly recommend using this command whenever you promote a precreated effect to advanced
keyframes. You can apply it to individual parameters, but I recommend right-clicking on the top of the keyframe region so that
it analyzes and cleans up every parameter in the effect.
Effect Editor Settings
Now that we have looked at all the capabilities of the advanced
keyframe model, we should take a close look at the settings that
control the interface. Open the Effects editor setting in the Project
window to see the new choices. These settings are a combination
of controls for display and use of screen real estate along with performance enhancers for slower machines. The first three choices—
indent rows, large text, and thumbwheels—make the text easier to
read on high-resolution monitors, and the thumbwheels save
189
190
Chapter 8 INTRODUCTION TO EFFECTS
valuable horizontal space that is used up by the
classic parameter sliders.
The next four choices are ways of turning off
displays so that they don’t try to update the user
interface during the creative process. If you have a
good idea of what you need to change in the
parameters, then having the computer slow down
to try to display those frames is not that valuable.
The Set Position to Keyframe control, however,
can be turned off if you are doing a lot of align and
slipping of keyframes. This is because you are
clicking on keyframes for the alignment and can
work faster if the screen doesn’t try to update a
complex effect every time.
The Show Add Keyframe Mode menu is also a
time-saver. You can set a default for the Add
Keyframe button (again, mapped to the ’ [apostrophe] key by
default) or for the Add Keyframe icon in the Effects editor window.
If you find that you need the flexibility of adding keyframes to
open groups and some of the other more advanced choices, you
will want the Show Add Keyframe Mode menu to be on. A single
click on the Add Keyframe icon brings up a menu of choices. Click
twice to take the checked choice or change the choice depending
on how many keyframes you want to add. The Add Keyframe
keystroke will follow the choice made in Mode menu.
The final choice in the Effects editor Window, Automatic Start
and End Keyframes, gives you a choice between preserving classic Avid behavior and moving completely into the more
advanced new methods. The old Avid keyframe model always
had two keyframes and, although this was at times comforting
and familiar to the experienced Avid editor, it didn’t follow the
model of other programs. If there is no change in the parameters
over time then why add a keyframe at all? The first and second
keyframes would need to be highlighted to make any change
that applied to the whole effect and, more likely than not, you
would forget to select one and end up with some unwanted
animation.
As soon as you promote an effect to the advanced keyframe
model you don’t need a keyframe to change the default effect
parameters. Just change the parameters without one. If you add a
single keyframe you are not held back by needing another one at
the end of the effect. This simplifies basic parameter changes and
makes simple trimming situations even simpler. I would uncheck
this choice and move completely into the advanced keyframe
world.
Chapter 8 INTRODUCTION TO EFFECTS
Timewarps
The traditional “Source Side” motion effects have
been replaced by a much more advanced timewarp control for creating motion effects in the
context of the timeline. Timewarps are now applied
through the Effect Palette like all other effects.
However, you do not have to be in Effects mode to
use it. This small fact becomes very important later
as we look at the interrelationship between timewarps and trimming. The important thing about
the new motion effects user interface and the timewarp effect is that you can use the advanced keyframe model to control speed changes. You also
have a wide range of techniques for complete control over remapping time. Additionally, you have a
wide range of new types of motion, which elevates
this particular technique to an art form needing
just the right touch.
There are two types of control over the timewarp: speed and position. Most people will use
speed since it makes the most sense for a wider
set of circumstances, but both are very useful.
Speed
This pane allows you to add keyframes mapping speed to relative time. Although this sounds like a mind-bending concept out
of Dr. Who, it is really straightforward. You add a keyframe at the
time you want to change and move it up or down to determine
the speed. Add another keyframe and now you have a ramped
speed change. You can start the speed at 100 and then ramp it
down to 0 to have a smooth transition to a freeze frame. You can
add as many keyframes as you like to change the timing and control the smoothness with the wide range of motion interpolation
choices discussed above in the “Advanced Keyframe” section.
You need an anchor frame for the speed change to really work.
Fortunately, you will always have the first frame of the effect
mapped as the default anchor frame. This is the frame that
doesn’t move when everything around it is changing. It is the
frame that stays in exactly the same place as you change the keyframes around it. This is critical to having a motion effect that
doesn’t have the first frame change when you make it slower. You
have picked the first frame, and you are making the frames in
front or behind it speed up or slow down. Keeping the first frame
191
192
Chapter 8 INTRODUCTION TO EFFECTS
exactly at the beginning of the effect gives you a reference point
you can count on.
You can move the anchor frame if you want to get more sophisticated. This would be critical if you wanted a shot to start at a specific place and go backward. You don’t want to put the first frame
of this backward effect at the beginning of the cut! Edit the clip in
to the sequence by making the outpoint of the source clip the first
frame of the reverse motion. Go to the last frame of the clip in the
sequence (the starting point for the backward motion), and click
on the Set Anchor Frame button. Then change the speed to 100.
All of the frames in the effect are visible in the timeline; they just go
in the opposite order. Experiment with the anchor frame if you
want a specific point to be matched to audio cues, and have all the
frames around it update with speed change keyframes.
Position
Position is even a bit more mind bending. With Position you
really are mapping a source timecode to a sequence timecode.
This is an excellent choice if you have multiple points that have
to hit exactly to a cue like a music sting or an explosion sound
effect. You go to the exact frame of the source material and add a
keyframe. Then move that keyframe so that it matches the chosen point in the sequence. Keep adding keyframes until all the
points are mapped to the proper places.
Timewarp and Trim
Unlike other systems that allow you to keyframe motion
effects, the Avid system is designed to keep you from destroying
the rest of your sequence! Imagine that you have a full-length
project with lots of audio and video edits. You add one motion
effect in the middle and decide to make it just a little slower. You
certainly don’t want to knock the rest of your sequence out of
sync! But other systems seem not to care that whenever you
change the speed of the clip you are changing the length in the
timeline, too.
Avid designed a different solution. Here, when you change the
speed of an effect you do not change the length of the clip in the
sequence. You need to go to Trim mode and make the adjustment
in a controlled, predictable way using the best trim model in the
business. Don’t leave the result to chance when you change
speeds, especially when you have multiple keyframes and you are
spending lots of time experimenting. The ability to adjust the
speed of a clip while you are in Trim mode works quite well as a
basic technique.
Chapter 8 INTRODUCTION TO EFFECTS
Formats
You can change formats of the image during the speed change.
This is very important when working with 24-fps film in an NTSC
29.97 project. Since all 24-fps film has a 3:2 pulldown when transferred to 29.97 videotape, these extra frames become very visible
when the speed gets slower. Generally our eyes compensate, but
as soon as you extend the amount of time the pulldown frames
are on the screen the motion looks very jerky. The best approach
is to remove the pulldown before creating the motion effect. Go
to the Formats section and choose “Film with 3:2 pulldown.” The
system will then try to detect the cadence of the pulldown since
the beginning of the edit is probably not at the A frame or beginning of the pulldown cadence. The system is very good at detecting where the duplicated frames are and removing them.
However, if it makes a mistake or is fooled by an animation that
starts on repeated frames, then you can override the cadence
detection and try it on your own. Choose the 3:2 pulldown to
reinsert the pulldown after the effect is created.
If you have shot progressive frames on video you can actually
add in 3:2 pulldown for a film look. Choose “Progressive” as the
input and “Film with 3:2 pulldown” as the output. The system will
assume the first frame of the clip is the A frame and add in the
duplicated frames. You could even choose “Interlaced.”
Motion Effect Types
With so many different types of motion effects available we
need a quick overview of what each is doing and when you would
use it. Many of these effects are real time within certain restrictions on the host-based systems.
Duplicated Fields
This type drops out the second field of each frame, which significantly softens the picture. However, this type is excellent for
experimenting with motion since rendering Duplicated Fields is
much faster than any other type. To get a really fast render you
should experiment with the 3:2 pulldown still in the image. Once
you have the motion close to the way you want, remove the 3:2
pulldown with the Format button and change to a higher-quality
motion type. Think of this as the draft mode for motion effects.
You may receive offline sequences from older systems with this
choice selected by the offline editor. Chapter 10 goes into detail
about how to accommodate this choice when rendering in online.
Both Fields
Although this method preserves both fields of every frame, it
almost always looks choppy when used on moving material. It is
193
194
Chapter 8 INTRODUCTION TO EFFECTS
excellent for preserving sharpness of a still image that you must
extend to fill a sound bite.
Interpolated Fields
Although this creates smoother motion than the previous two
choices, this method is also slow to render and somewhat soft. The
system is making mathematical calculations as to which actual
fields to combine together into a single frame for smoothest motion.
Unfortunately, you may get field 1 from frame 1 and field 1 from
frame 3 combined into the same resultant frame. Since the frame
never actually gets the information from field 2, it will always look
slightly soft. This combining of fields is rather random depending on
the speeds you have chosen, but to keep the image from bouncing
back and forth from soft to sharp, all of the frames are slightly soft.
VTR-Style
This method reproduces the type of motion effect a VTR (video
tape recorder) would create when playing back each field. This
method is sharper than interpolated and smoother than both
fields, but isn’t doing any fancy math to compensate for jitter. You
will see a little horizontal movement as you go between fields.
Since so many people are used to seeing this from VTR playback,
it may not even be noticeable under medium speeds. At very slow
speeds, however, you will see a difference, and interpolated may
be a better choice.
Blended Interpolated and Blended VTR
This modification of the previous styles tends to smooth out
the motion even more. It averages the frames and performs
somewhat of a dissolve between frames. Although it preserves
the best aspects of the original motion type, the blending occasionally can call attention to itself as a “look.” But if the image is
looking jerky, try this twist.
FluidMotion™
Someday all motion effects will be as smooth and sharp as
FluidMotion. This computationally intensive breakthrough in
motion effects actually makes new pixels from combining original
source pixels. If you want to make the smoothest possible motion
effect you need to recreate the look of a high-speed frame rate.
Because usually you have only a limited number of frames from
normal film and video production, you need to manufacture the
in-between frames that will eliminate the jerkiness of normal slow
motion. Blending and interpolating will get you only so far; then
you need to predict pixels.
FluidMotion makes new in-between frames by looking at the
real frames before and after and tries to predict where each new
Chapter 8 INTRODUCTION TO EFFECTS
pixel should be. It can combine any number of frames together
as long as it properly tracks the individual pixels and in what
direction they are moving (their motion vectors). The problem
arises when the system can’t predict what the next frame will look
like. This happens with extremely fast motion where the pixels
from the real frames jump huge distances in a single field. The
pixels change so radically from frame to frame that the system
cannot track them (a similar problem arises in the tracker controls in Symphony and DS Nitris). It also happens with occlusion,
or when part of the image is covered up by a foreground object
that is not moving, like a tree. This is because the prediction from
one frame to another is interrupted if important pixels just disappear for a few frames and then show up with no history. If a pixel
pops out from behind a tree you can predict where it is going
only by looking into the future. The basic algorithm of looking
into the past as well as the future to make a weighted decision
about predicted in-between position is disrupted. FluidMotion
doesn’t know about trees, only pixels moving through time and
ones that don’t. This also applies to objects entering and leaving
the frames.
When the pixels go astray they appear to morph objects into
each other. There are some fascinating controls to help correct
for these pixel-prediction problems. The user draws around the
problem area on a frame-by-frame basis and forces the area to
have a certain vector or direction. This is done through a basic
paint tool and an eyedropper.
Stop on the frame where the image is morphing incorrectly.
Click the paintbrush icon next to the FluidMotion choice in the
Timewarp interface. You are shown an analysis of the vectors in the
image—what direction each object, really each collection of pixels,
is supposed to be going. The direction, or vector, is represented by
a color. The colors are mapped to the points of a standard vectorscope like directions of a compass. If an area is yellow then the
FluidMotion effect is predicting that the pixels in that object are
moving to the left. If this pixel prediction is incorrect, use one of
the drawing tools to draw a selection around the yellow object. The
selection will turn gray, showing that it has “zeroed out” the vector.
While the rest of the image will have its motion predicted, this section will act more like a blended interpolated effect. This may solve
the problem. Feather the edge of the selection and render. If it doesn’t
then you need to grab the eyedropper over the color-selection
tool of Set Vector mode. With object selection still active, grab a
color from somewhere else in the image that matches the correct
vector. If the object should really be moving up in the picture, then
grab the color of something moving in that direction. Up would be
red on the vectorscope/compass. The selection will turn red and
195
196
Chapter 8 INTRODUCTION TO EFFECTS
you can feather the edges a little to make sure it blends correctly.
Render the effect and see if it does the right thing.
FluidMotion is an excellent choice to hide the fact that there is
a motion effect at all. However, it does have its own look and can
be used quite effectively to make something look unique.
Timewarp Freeze Frames
Though you can certainly create freeze frames using the standard Freeze Frame effect, one significant problem you’ll eventually encounter is that you cannot make any changes to this effect,
including changing the render method (e.g., from the default of
Duplicated Field) or changing the frame frozen, without recreating the effect. The render method limitation can cause significant
problems in an online conform. Though the Timewarp effect
does not explicitly include a “freeze frame” option, you can easily
create a Timewrap Freeze Frame effect that is much more flexible
than the standard Freeze Frame effect.
To create a Timewarp Freeze Frame effect:
1. Park on the freeze frame in the timeline, and, if necessary,
turn off all higher tracks.
2. Use Mark Clip to mark the existing freeze frame in the
timeline.
3. With the timeline active, use Match Frame to load the
motion effect in the Source monitor.
4. Use Match Frame again to load the freeze frame’s source
clip.
5. Overwrite the source clip over the freeze frame. It is possible
that sufficient duration does not exist within the original
clip to fill the freeze frame duration, especially if the offline
sequence was decomposed. In this instance, overwrite as
much as is available. Then, after creating the Timewarp
Freeze Frame effect, trim it out to the desired duration.
6. Apply a Timewarp effect to the clip edited into the sequence
and enter Effect mode to open the Motion Effect Editor.
7. If it has not already been set as the render default, set the
Timewarp render method to “Blended Interpolated.” This
rendering method is the best one for most freeze frames. If
there is no intrafield motion, you may want to use “Both
Fields” instead.
8. Open the Speed graph.
9. Set the speed of the active keyframe to 0. In addition to
dragging the keyframe, you can use the leftmost field at
the bottom of the Motion Effect Editor to quickly set a
value of 0.
Chapter 8 INTRODUCTION TO EFFECTS
10. If necessary, trim the effect to the desired duration. If you
have multiple freeze frames to remake, you should save
the created effect to a bin so you can reapply it later.
Modifying a Timewarp Freeze Frame
Though we created the freeze frame using the first frame in the
edited clip, we can actually use any frame that was edited into the
sequence. To change the frame that is frozen in a Timewarp
Freeze Frame effect:
1. Park on the Timewarp Freeze Frame clip and enter Effect
mode to open the Motion Effect Editor. If your sequence contains multiple video tracks, make sure that the track containing the freeze frame you wish to modify is active. If it isn’t, the
Effect Editor will open instead of the Motion Effect Editor.
2. Open the Speed graph and set the speed of the active keyframe to 100 so you can access the other frames in the clip.
Optionally, you could set it to a higher speed or even a
negative speed. These rates are particularly useful if the
desired frame is not within the portion of the clip that was
edited into the sequence.
3. Park the position indicator on the frame you wish to freeze
and add a keyframe.
4. Press the Anchor button to affix it to the new keyframe.
The Anchor locks the source frame to the keyframe and
ensures that it will always be displayed at that keyframe.
5. Delete the first keyframe in the effect as it is no longer
required.
6. Select the new keyframe and set its speed to 0.
197
198
Chapter 8 INTRODUCTION TO EFFECTS
Saving Effect Templates
After all of this work making the effects just right, you can save
them as effects templates so they can easily be applied over and
over again. Any effect can be stored in a bin by clicking the effect
icon in the upper left corner of the Effects editor, and dragging
and dropping the effect icon in the bin. If a bin that holds an
effect template is open, that effect will be available in the Effect
Palette. The effect template can also be dragged back from the
bin and applied to the timeline. When you apply the effect, it
looks slightly different from the original effect unless the new clip
you apply it to is exactly the same length as the original clip, or
you have chosen fixed keyframes for all the parameters.
There is a sneaky trick very few people know for applying just
part of a template. Using the Effects editor, open a specific
parameter. You can drag and drop an effect template directly onto
the single parameter. The open effect will take on only the parameter that came from the template, not the rest of the effect. This is
very useful for matching drop shadows or border color and width.
This also works with the color-correction mode if you just want
to repeat a hue adjustment but nothing else.
If the Alt/Option key is held down when dragging the effect
icon to a bin, then the effect template is saved with the video
(segment effects only). This is an “effect with source” and can be
edited into the sequence like a master clip. If you add an effect to
a title, then save the effect template for the title always “with
source,” so you don’t need to hold down a modifier key. If you
want the title effect template to be just the keyframes alone so the
effect can be applied to another title, hold down the Alt/Option
key when saving it. Here’s how to remember it:
●
●
Alt/Option drag the effect template for effects gives you an
effect and the source clip. Use this like a subclip with an
effect attached.
Alt/Option drag the title template on titles gives you the
title’s keyframes and no source. Apply this template to
another title to get a similar title move.
Add Edits
If an effect cannot be manipulated with keyframes, it can be
split into sections using the Add Edit button. By splitting one effect
into multiple effects, each one can be manipulated separately and
then recombined by a dissolve. This is most useful for a color correction that can be used to change a color over time with add edits
and dissolves. If you have a camera that moves from exterior light
Chapter 8 INTRODUCTION TO EFFECTS
to interior or from bright sun to shadow you can mix the two color
corrections seamlessly. This is much easier to do with a dissolve
than with complicated keyframes since it is essentially two complete setups rather than selective parameter changes. The system
will play both color effects and dissolves in real time.
Creating add edits adds extra keyframes to an effect sequence.
If you have an effect with two keyframes and you split it with an
add edit, then you have two effects with two keyframes each. If
the original effect had a smooth motion across the screen and
now it has double the keyframes, you could have a problem with
acceleration on a basic 2D effect. Acceleration is an effect parameter that smoothes the motion of an object’s path across the
screen with an ease-in/ease-out speed change. Adding an extra
keyframe causes the effect to slow to a stop at the new point and
pause where there used to be a continuous motion. If your effect
has an object in motion with acceleration, you should apply only
an add edit at a point where a keyframe already exists.
Nesting
Nesting is the most complex, but the most powerful, characteristic of effects with the Avid editing systems. So far we have discussed building effects vertically, which, depending on your
model system, may be limited by the number of tracks. Once you
understand nesting, you can expand the amount of tracks dramatically. Nesting involves stepping into an effect and adding
video tracks inside. More effects can be added inside the nest, and
then you can step into those. It is a way of layering multiple effects
on a single clip, but also much more. The only real limitations are
how long you want to render and how much RAM you have.
There are two methods to view a nest. You can apply an effect
and then use the two arrows at the bottom left of the timeline to
step in or out (these buttons are also mappable to the keyboard).
Once inside the nest you can no longer hear audio, but you can
focus on that level alone and work on it like it is a separate
sequence. Within that layer you can add as many new video
tracks as your model allows. Red numbers on the timecode track
in the timeline will indicate how many layers you are nested in
later versions.
The other method to view nesting is used on all models. Using
the segment arrow to double-click on a segment with an effect, the
tracks in the timeline expand to see all the layers inside at the next
level. Continuing to double-click layers inside the first effect reveals
those tracks as well. Tracks can be patched and edited in this mode,
and the audio can still be monitored. It is a little easier to understand all the effects going on because the display is more graphic.
199
200
Chapter 8 INTRODUCTION TO EFFECTS
This mode of viewing nesting can frustrate people who open it
up by accident and then are confused about what they are looking
at. You can always close the expanded view by double-clicking
on the original track again with the segment arrow or, in Media
Composer or Symphony, Alt/Optionclicking on the down-nesting
arrow. The view can be turned off in Media Composer and
Symphony by unchecking the checkbox in the Timeline Settings
called Double Click Shows Nesting. I recommend turning this feature off if you like to move very quickly and you have an older Mac.
Auto-Nesting
Nesting as just described implies a certain order of assembly.
Apply the outer effect and then step inside. You must apply the
PIP and then step in for the color effect. But real life doesn’t
always work this way. Many times the nest is a secondary thought,
used well after the first effect is in place and rendered. In this case
there is auto-nesting:
1. Select the clip with the segment arrow in the timeline.
2. Alt/Option-double-click an effect in the Effect Palette.
Chapter 8 INTRODUCTION TO EFFECTS
The second effect does not replace the first effect, but it covers
it. This adds the layers from the outside instead of stepping into
the effect and building them from the inside.
All these methods are for adding multiple effects to a single
clip, but they are just as useful for adding one effect to multiple
clips. If you want a color effect to cover an entire montage, then it
is a waste of time and energy to put a separate effect on every
clip. What happens when the effect must be changed? Now you
need to change one, turn it into a template, and apply it to all the
others. But there is a faster way that uses auto-nesting:
●
●
●
●
Shift-select multiple clips in the sequence with the segment
arrow.
Alt/Option-double-click on the effect in the Effect Palette.
The effect auto-nests as one effect that covers all the clips.
Adjust the one effect and all the clips are changed.
If you want to change one of the clips and replace it with
another shot, just step inside the effect and make the edit. You
can also step inside the multiple-clip effect and add dissolves or
other transition effects. You must render these inside effects, but
you can leave the outside effect in real time to allow for future
changes. Of course, if you render the outside effect, it will create
a composite of everything inside.
The main drawback to this method is that you will have to step
inside the nest to trim the clips. But if the trimming stage is long
over and you are tweaking and finishing this is not such an issue.
With the color-correction mode it is faster to save a correction as
one of the four “buckets,” so you may prefer to use this mode
instead of nesting. By mapping the buckets to function keys you
can move just as quickly through short sections. The Symphony’s
Program side color correction is even easier by using the “Use
marks for segment correction Color Correction” user setting
described in Chapter 12.
Viewing and Changing Nesting
Collapsing Effects
You can nest an entire effect sequence into one effect after it
has been built using vertical layers. If keeping track of all the
video layers becomes tedious, you can collapse them into a single
layer. In order to nest effects, you must have an outside effect at
201
202
Chapter 8 INTRODUCTION TO EFFECTS
the outermost level so collapsing places a submaster effect over
all the layers and nests them inside. Select the area to be collapsed by marking in and out and highlighting the desired tracks.
Then press the Collapse button and watch the animation.
There is no way to really uncollapse an effect segment. Here is
the best method to work around it:
1.
2.
3.
4.
Step inside the collapsed effect.
Mark an in point and out point around the entire segment.
Turn on all the video tracks (except for V1 if it is empty).
Use the Copy to Clipboard button while inside the
collapse.
5. Paste the clipboard contents into the Source window. In
Media Composer or Symphony you can use the Alt/Option
key when copying to the clipboard, and pasting to the
Source window happens automatically. The layered segment can be used as a subsequence.
6. Cut the subsequence back over the top of the collapsed
effect in the timeline or drag it to a bin.
This alternate method is actually even simpler:
In Avid Media
Composer 3.0 you
can select all of the
segments at once
and move them up to the
new tracks!
1. Create some new video tracks—the same number as in the
collapsed effect.
2. Expand the nest in the timeline by using the double-click
with a segment arrow method to show all the tracks.
3. Drag the segments up to the empty tracks using the red
selection arrow, and the Control (Windows) or Command
(Macintosh) key to make sure they don’t slip horizontally.
You could collapse all the tracks except the top track, like a title,
and leave it in real time so you can continue to make changes
without re-rendering. Rendering a nested effect is simple; just
render the top, outside effect, and the submaster. This leaves all
the effects inside unrendered, but it is sufficient to play as long as
you are monitoring that outside effect.
You don’t need to leave the top effect of a collapse as a submaster. You can replace the submaster with another segment effect
by just dragging and dropping from the Effect Palette. You can
replace the submaster with a mask (to simulate 16:9) or a color
effect. You can also step into a nest and render the top track
inside the nest (or ExpertRender), thus leaving the outside effect
in real time. You can keep tweaking the effect on the outside of
the nest if the dissolves inside are rendered.
Collapse versus Video Mixdown
Although the collapse feature is excellent for simplifying complex
effects sequences down to one video track, a collapse can still potentially become unrendered. If you are sure that an effect sequence
Chapter 8 INTRODUCTION TO EFFECTS
will never need to be changed, match-framed back to an original
source, or used for an EDL, then you can use video mixdown. Video
mixdown (under the Special menu) takes any section of video
between marked points, whether it has effects on it or not, and turns
it into one new media file. This new media file has no timecode
(which timecode would it use if you had 15 layers?) and breaks all
links to the original media. This is why match-frame-to-originalsource clips will no longer work and EDLs will no longer reflect the
original source timecodes.
Video mixdown should be used only for finishing and for
something that you will be using as a single unit over and over,
like the graphics bed for an opening sequence you use every
week. Once all the effects are rendered, a video mixdown is as fast
as copying the media to another place on the drive, an insignificant amount of time. If the effects are not rendered before the
mixdown, they will be rendered first as part of the video mixdown
process so don’t forget to count on the rendering time in your
calculations. This workflow encourages rendering first and video
mixdown later when everything is signed off.
A video mixdown will significantly improve the performance of
Avid during long sequences with lots of effects. Instead of forcing
the computer to “build the pipes” for complex effects with many
short media files, it just needs to find one master clip. This means
snappier reaction time when you press play. Always make a copy
of the sequence before you overwrite a mixdown over your timecoded original sources, so when the client changes his or her
mind, you will have a fallback sequence. Video mixdowns are very
powerful and time-saving for a wide range of purposes, but don’t
use them for offline if you plan to recapture or make an EDL!
Chroma Keying
In a chroma key, you set up the shot in a studio to obtain precise control of the background, which consists of a flat, uniformly
colored screen. The screen is usually blue or green. When you
apply the Chroma Key effect to the clip, you select the screen color
to key out, leaving only the foreground image. Because the effect
removes the selected color from the image, the foreground subjects must not contain that color. The following list summarizes
the requirements that give you the best results when creating a
chroma key:
●
●
The background should be flat, well lit, and of uniform
color.
The subject should be well lit and should not contain the
color to key out.
203
204
Chapter 8 INTRODUCTION TO EFFECTS
●
●
●
The video should be shot on a component tape format,
such as Digital Betacam or Betacam. DV or HDV can be
used, but only if the subject is well lit.
If you’re capturing from a dub, the dub should be a component or component digital dub of the camera master.
When capturing, you should capture a serial digital or
component signal.
There are four different chroma keys provided with the Avid
Media Composer system and of them SpectraMatte™ is the most
sophisticated—and capable—keyer. Located in the Key category,
this is the highest-quality keyer available from Avid. The
SpectraMatte keyer is designed to produce keys of material containing fine details, partial transparency (e.g., smoke and glass),
and other hard-to-key foreground elements. It also includes
sophisticated spill suppression and matte manipulation parameters. This keyer is available in Avid Media Composer Adrenaline
HD 2 and later releases.
As it provides the best-looking keys, it is strongly recommended that the SpectraMatte keyer be used for the majority of
keys. If 3D manipulation of a keyed element is required, you
should use the 3D Warp Chroma Key instead. The RGBKeyer also
has very good keys and, due to its color-correction capabilities,
may be the best keyer in some situations. The basic Chroma Key
effect is not recommended.
In addition, there are several third-party plug-in chroma keyers that can be added to the Avid system. These include Ultimatte
AdvantEdge, Digital Film Tools’s zMatte, and the Primatte Keyer.
For additional information on third-party plug-in effects, visit
www.avid.com. Plug-in keyers are typically non-real-time effects.
Using the SpectraMatte Keyer
Introduced in Avid Media Composer Adrenaline HD 2, the
SpectraMatte keyer is the highest-quality keyer packaged with
the Avid editing system. It is an advanced keyframe effect and
standard keyframing is not available. Let’s look at the parameters
available for this effect and how they are used to generate a key.
Bypass
Use this parameter to toggle the effect on and off. Enable this
parameter when you sample the key color in the foreground image.
Key Color
This parameter group is used to set the initial key color. Use
the Eyedropper to sample the key color in the foreground image.
If the color backing in the image contains a wide range of color
Chapter 8 INTRODUCTION TO EFFECTS
saturation or illumination, try sampling a color near the middle
of the range of available tones.
You can use the RGB (red, green, and blue) parameters to
tweak the sampled color. You can also use the Other Options button to display the operating system’s Color Picker and use it to
tweak the sampled color.
Matte Analysis
This parameter group is used to enable or disable the two
matte analysis displays. These parameters do not affect the final
key, but allow you to more easily tweak and troubleshoot the key.
The available parameters are:
●
Show Alpha: Displays the alpha channel generated by the
key. Fully transparent areas are displayed as black and fully
205
206
Chapter 8 INTRODUCTION TO EFFECTS
●
●
opaque areas are displayed as white. Partially transparent
areas are displayed as gray. The intensity of the gray indicates the relative opacity of the area.
SpectraGraph: Displays the SpectraGraph display for the
key. The chroma values in the foreground image are displayed using a vectorscope plot. The range of chroma values
that are being completely keyed out are overlaid in black.
Partially keyed out areas are displayed as a gradient.
SpectraGraph Brightness: Controls the brightness of the
overlaid keyed region. Adjusting this parameter may make
it easier to see the vectorscope plot.
Chroma Control
This is the primary parameter group used when creating and
tweaking the key. The available parameters are:
●
●
●
Tolerance: Controls the range of hues that are keyed. The
greater the tolerance, the greater the range of hues keyed.
The tolerance is centered around the chosen key color.
Key Sat Line: Controls the saturation at which keying
begins. This parameter is used to restore (or unkey) foreground regions that contain the key color, but at a low level
of saturation. These regions are typically the result of the
key color spilling onto the foreground. The Key Sat Line
restores the low-saturation regions linearly.
Key Saturation: Controls the saturation at which keying
begins. This parameter is also used to restore (or unkey)
foreground regions that contain the key color, but at a low
level of saturation. These regions are typically the result of
the key color spilling onto the foreground. Unlike the Key Sat
Line parameter, Key Saturation restores the low-saturation
regions by offsetting the keyed region. Though the Key Sat
Line parameter is more typically used, Key Saturation has
a specific interaction with the Spill parameters, which
Chapter 8 INTRODUCTION TO EFFECTS
●
●
●
●
sometimes makes it a better option. We will discuss this
interaction later in the module.
Inner Softness: Controls the falloff (from opaque to transparent) of the keyed region. This parameter is used to
restore or remove regions that should be partially transparent in the key. At a value of 100, there is minimal falloff
within the range defined by the Tolerance parameter. As the
Inner Softness parameter is decreased in value, the colors at
the edge of the keyed region are blended into the foreground instead of being completely keyed out. The default
value for this parameter is 10.
●
Decreasing this parameter increases the opacity of partially transparent regions in the key.
●
Increasing this parameter increases the transparency of
partially transparent regions in the key.
Outer Softness: Controls the falloff (from opaque to transparent) of the pixels just beyond the keyed region. The
parameter is used to adjust pixels that lie just beyond the
boundaries of the key. The default value of 0 provides for a
moderate amount of blending of the colors at and just
beyond the edges of the key.
●
Increasing this parameter increases the transparency of
partially transparent regions on the outside edge of the key.
●
Decreasing this parameter increases the opacity of partially transparent regions on the outside edge of the key.
Alpha Offset: Moves the keyed area inward or outward
along the axis of the key color. This parameter is not used
as frequently as other parameters in this group, but can be
useful when the color backing in the image contains a
wide range of saturation values and you sampled from a
color that had a high or low saturation value relative to the
other areas of the backing.
Opacity: Adjusts the overall opacity level of the foreground
image. Use this parameter to fade the foreground image
relative to the rest of the composite.
Luma Control
This parameter group contains postprocessing controls that
can be used to further tweak a key. These parameters are typically
only used to fine-tune particularly challenging keys. The available parameters are:
●
●
Enable Luma Curve: Turns the adjustments made by the
Luma Curve on and off.
Luma Curve: Creates a luminance-based key postprocessor
and is used when you need to manipulate the partially
207
208
Chapter 8 INTRODUCTION TO EFFECTS
●
Your computer
system may not be
able to perform
matte processing in
real time. Using these
parameters may require
the effect to be rendered
before it can be played at
the Full Quality setting. If
necessary, use the Draft
Quality setting to preview
the effect.
transparent regions of the key and change their transparencies. The keyframe graph is used to define the transparency
parameters that are to be manipulated. The Luma Curve
postprocessor is not covered in this course.
Suppress Shadow: Allows you to remove shadows cast by
the foreground objects onto the background. Shadows
typically cause the key color to have a low saturation value.
Increasing this parameter increases the saturation values
(that the keyer sees) for all pixels in the foreground. (The
displayed chroma saturation is not affected.) This can
make shadows easier to key out of the frame. However, it
can also remove other partially transparent objects from
the key and should be used sparingly.
Matte Processing
This parameter group is used to manipulate the alpha channel
(or matte) generated by the keyer. It is typically used to soften the
edges of the matte to make it composite more smoothly with the
background. The available parameters are:
●
●
●
Matte Blur: Sets the amount of blurring that is applied to
the matte. Most effects require only a minimal amount of
matte blurring.
Blur Menu: Defines the type of blur defined. Three different blur types are supported:
●
Blur: Blurs to both the inside and outside of the matte
edge.
●
Erode: Blurs only the inside edge of the matte. The original matte is mixed back in with the blur to ensure that
the shape of the matte is maintained.
●
Dilate: Blurs only the outside edge of the matte. The original matte is mixed back in with the blur to ensure that
the shape of the matte is maintained. This blur method
tends to create a halo around the foreground object.
Soften Alpha Saturation: Adjusts the blending of the two
halves of the keying wedge. This parameter should be left
on for most keys but disabling it might improve the edges
of especially troublesome keys.
Spill
These parameters are used to remove chroma key background
spill on the foreground subject. Spill is removed by extracting the
key color from the pixels within the specified range. For example,
if the background is blue, blue would be removed from any partially blue pixels in the foreground. The available parameters are:
●
Spill Saturation: Only functions if the Key Saturation
parameter in the Chroma Control group has been used. If
Chapter 8 INTRODUCTION TO EFFECTS
●
209
you used Key Saturation you may have increased the visible spill on the foreground. This parameter restores the
saturation values seen by the spill suppressor and, in conjunction with the Spill Angle Offset parameter, removes
the excess spill.
Spill Angle Offset: This is the primary spill suppression
parameter. As you increase the value of this parameter,
you increase the amount of pixels that are color corrected
to remove spill.
DVE Controls
These parameter groups (Scaling, Position, Crop) provide a set
of 2D DVE parameters that can be used to manipulate the image.
These parameters function identically to those in the PIP effect.
If you need to access the 3D Warp DVE capabilities, you can
nest one underneath the SpectraMatte. Be sure to enable the 3D
Warp’s Background parameter and set it to the backing color in
the foreground image.
Configuring the SpectraMatte Keyer
In order to get consistently high-quality keys with the SpectraMatte keyer, the following workflow is strongly recommended.
Some keys will require variations from the recommended process, but following the process will ensure high-quality results for
most keys.
Setting the Initial Key Values
1. Activate the Bypass parameter to disable the key.
2. Use the Eyedropper and the Color Preview box to sample
the background key color. If the background contains a
range of luminance and saturation values, try sampling
from the center of the range of available tones. Alternatively,
if you wish to preserve partially transparent foreground elements such as smoke, try sampling a color near the partially
transparent elements you wish to keep.
3. Deactivate the Bypass parameter and enable the SpectraGraph. Even though you may have carefully sampled the
backing color, you should still check the SpectraGraph to
help determine whether the selected key color is properly
centered in hue in relation to the range of background
tones. The SpectraGraph makes it easy to determine this.
4. Open the Key Color parameter group, and use the Red
parameter to recenter the keyed region in the range of hues.
For both blue-screen and green-screen keying the Red
It is best to view the
SpectraGraph
when you are
making these initial
changes as the adjustments
make what appears to be a
relatively subtle change to
the key result at this stage.
However, if you don’t make
these adjustments, the finetuning adjustments you
need to make later will be
much harder or even
impossible to do.
210
Chapter 8 INTRODUCTION TO EFFECTS
parameter usually provides the widest range of adjustment.
For certain blue screens, you may also need to adjust the
Green parameter, and for certain green screens, you may
also need to adjust the Blue parameter. Even if the sampled
backing was highly saturated, moving the key color to the
center of the saturation range will improve the key and
make it easier to accurately key any partially transparent
portions of the foreground.
5. Increase the Tolerance until the keyed region wedge includes
all the key colors. Don’t increase it too much or you run the
risk of keying out colors that should remain keyed in.
Adjusting the Matte
Once you’ve set the proper key color and tolerance you’re ready
to adjust the matte generated by the key. In this phase you’ll not
only ensure that areas that should be fully opaque are opaque but
you will also adjust the keying of the partially transparent regions
in the foreground.
1. Disable the SpectraGraph parameter, and activate the
Show Alpha parameter to display the alpha channel (or
matte) generated by the key.
While adjusting
you might want to
toggle the alpha
channel on and off to
compare the result of the
key to the alpha.
2. Examine the alpha channel, and compare it to the foreground image. Are regions that should be completely keyed
out displayed as black and regions that should be completely keyed in displayed as white? What about the partially
transparent regions? Are they displayed as gray or are they
displayed as values of gray? In all likelihood the alpha needs
adjustment. You will use the Key Sat Line (or Key Saturation),
Inner Softness, and Outer Softness to adjust the matte until
the image is correctly keyed. The exact adjustments of these
three parameters will vary from key to key.
3. If necessary, increase the Key Sat Line parameter until the
majority of the foreground is visible in the key. Once we’ve
Chapter 8 INTRODUCTION TO EFFECTS
restored the low-saturation regions, we will use Inner
Softness and Outer Softness to ensure that the partially transparent regions are partially keyed. Most of these regions are
currently completely keyed in instead of partially keyed.
4. Increase Outer Softness and decrease Inner Softness until
you feel that the alpha channel correctly represents the
partially transparent regions. If regions of your foreground
image that should be completely keyed in are partially
keyed instead, you should instead decrease Outer Softness
and increase Inner Softness.
5. Disable the Show Alpha parameter and play through the
key, checking all areas for keying errors. If you wish, you
can also re-enable the Show Alpha parameter and play the
matte.
6. If necessary, tweak the Key Sat Line, Inner Softness, and
Outer Softness parameters until you are satisfied with the
key at this point. Don’t worry about any spill or hard edges
on the matte. You’ll correct those next.
Suppressing the Foreground Spill
Depending on the color and shininess of the foreground
objects, their proximity to the background when they were shot,
and how they were lit, there may be a some color spill on the
edges of your objects. Partially transparent objects will also
exhibit spill (due their partially transparent nature). This spill can
be removed using the Spill parameters.
The primary Spill parameter is Spill Angle Offset. This parameter defines a region surrounding the key region where the colors
being keyed out are removed from the other colors in the image.
For example, a partially transparent red object (such as a piece of
cheesecloth) on a blue key background would contain a mix of
red and blue. Increasing the Spill Angle Offset will remove the
blue from the red/blue blend and replace it with a purer red. The
larger the value of the Spill Angle Offset parameter, the more colors are replaced. Be careful with very large values of Spill Angle
Offset with highly colored foreground images for it may affect the
color saturation and balance in areas where spill is not a factor.
1. If necessary, disable the Show Alpha and SpectraGraph
parameters.
2. Open the Spill parameters group.
3. (Optional) If you used the Key Saturation parameter,
increase the Spill Saturation to an equivalent amount to
reduce the exaggerated spill that may have been introduced
by the Key Saturation parameter. This step is only required
if you used the Key Saturation parameter; otherwise this
parameter has no function.
211
If the foreground
does not contain
partially transparent
regions, only minimal
adjustments of Inner Softness
and Outer Softness will be
necessary.
212
Chapter 8 INTRODUCTION TO EFFECTS
4. Increase the Spill Angle Offset until the spill has been
removed. Be careful not to use a heavy hand on complex
foreground images. Be sure to look at the video monitor
and external scopes to ensure that you are not overdriving
the chroma of the foreground image.
5. Play through the effect to check the quality of the key and to
ensure that the spill has been removed from the entire clip.
Adding a Blur to the Matte Edge
When you played through the key and/or alpha, you may
notice an aliased (stair-stepped) edge on some areas of the composite. Depending on the source material, it may be necessary to
add a slight blur to the edge of the matte. In most cases, the best
blur method to use is Erode. This option blurs only on the inside
edge of the matte. And, to ensure that the edge you defined is
maintained, the original matte is mixed back in at a medium
degree of transparency.
1. Open the Matte Processing parameter group and confirm
that the Blur menu is set to “Erode.” This option provides
the best results for most keys.
2. Slightly increase the Matte Blur parameter. Most alpha
channels only require a light touch on this parameter,
especially if there are fine-edge details such as hair.
3. Render the effect so you can view the results of the key.
Current computer systems cannot play SpectraMatte effects
with matte processing applied in real time. Optionally you
can switch to Draft Quality to play the key while tweaking
the Matte Blur parameter. Ultimately, you should render the
effect and view it in Full Quality mode to ensure that the key
is satisfactory.
4. Play through the effect to check the final key. If necessary,
you can return to any of the procedures to make adjustments and tweaks as required.
3D Effects
In Media Composer and Symphony, all 3D effects come from
one effect, the 3D Warp. Two-dimensional PIPs, titles, and
imported matte keys can all be “promoted” to 3D.
There is also corner pinning, which allows you to fit four corners of an object so that it matches the edges of another object. It
is not quite morphing, but it allows you to put images inside TV
monitors, picture frames, or the like.
There are so many things you can do with the 3D option that I
helped write a one-day course just for that. Truly, this area calls
Chapter 8 INTRODUCTION TO EFFECTS
for personal experimentation. Just taking some of the shapes and
using them to warp images into interesting moving backgrounds
requires parameters you must discover for yourself.
Paint and AniMatte®
If you consider editing to be an interframe process—working
between frames—then painting on a frame is intraframe. There is
a full palette of familiar choices for anyone who has used thirdparty painting programs. Brushes can be changed, and areas of
the image can be blurred, color corrected, and generally affected
like any standard paint program. Multiple layers of paint effects
on the same frame are possible, but unlike the other, singleimage paint programs, you can easily change the effects over
time with keyframes.
You can also isolate parts of the frame, say the sky, and draw a
matte shape around it to make it a deeper blue. The ability to
draw on an object and create control points to adjust curves with
Bezier handles and move the edge over time means that almost
any part of an image can be manipulated separately from the
whole. By creating points that change over time, any smooth,
even motion in a shot can easily be followed with just a few keyframes. If the motion is jerky or unpredictable, you need more
keyframes to adjust the control points. If the motion is truly difficult to follow or you are doing dozens of motion-following effects,
you may want to use the tracking feature in Symphony that
allows you to automatically track specific pixels over time. Since
this is a complex and time-consuming task, occasionally you may
want to set up a separate graphics station for tracking and rotoscoping. This way you can split the tasks among multiple people
if time gets tight. You can also set up your graphics station to render while you continue to edit on the Avid system. Adobe After
Effects®, Autodesk Combustion®, or Eyeon’s Fusion® are good
choices for this kind of work. DS Nitris is the best combination of
graphics, paint, and 3D effects into a timeline-based editing program in the Avid product line. Paint and AniMatte are fine for
shorter jobs, but if you need to do lots of this type of work you
may want to consider a DS Nitris finishing suite.
AVX
An expanded range of choices is available with the AVX® (Avid
Visual eXchange) plug-ins standard. This is an interchange format so that other third-party effects companies can modify their
existing product line easily for use as an Avid plug-in. Make sure
213
214
Chapter 8 INTRODUCTION TO EFFECTS
that the version of AVX effects you are using is also compatible
with the Avid DS system if you want to take your sequence to the
next step for high-quality, high-definition finishing. As computer
processors get faster, there will be more you can do in real time
with AVX effects.
Titles
Always try to work with titles at an uncompressed resolution in
standard definition. Aliased edges and blockiness are eliminated
when titles are uncompressed. If you are working on a Meridien
system you have the ability to run the titles through the DSK. This
is a special section of the hardware dedicated to being able to
play uncompressed titles and graphics no matter what the resolution of the clip below. You also can run an uncompressed title
on V2 and have unrendered real-time effects on V1 because you
are not running three streams of video, just two streams and a
PICT file through the DSK. With the host-based systems, your
ability to play uncompressed titles is restricted only by the speed
of your computer. You can mix compression types as much as you
like with these systems.
Since you can copy and paste from a word processing program,
instantly apply a custom style, and create title rolls on most systems, it is easy to use Title Tool for large amounts of text. You can
create a custom title template and map it to a function key. All
styles are mapped automatically to the next unused function key
and are enabled only when the Title Tool window is active. If you
are creating titles with lots of font and size changes, you can highlight the text in Title Tool and press the function key to apply the
premade style.
You can open a title and edit it straight from the bin if you want
to use it as a template for new titles. Ctrl/Command-double-click
on the title in the bin to open Title Tool. It will also give you the
choice of promoting this title to Marquee on some recent
PC-based Avid systems. After you make changes you can Save As
to create a title that needs to be edited into the sequence.
Title Tool has its own Safe Color setting. If you are picking colors from a color picker or trying to match a color in an image, it
may automatically dull or change the color to make it broadcast
safe. If you really need to match the color and take your chances
later then turn off the Safe Color choice under the Object menu.
Title Tool is trying to show you a title for position, spelling, composition, and other basic choices as quickly as possible. This is why
it defaults to a lower-quality draft mode during creation. If you want
to see the finished quality of a title for approval purposes before you
Chapter 8 INTRODUCTION TO EFFECTS
are finished, press CtrlShiftP/CommandShiftP to turn on
the Preview mode.
The final tip for any title is to always check the kerning or leading of any title before saving it. This is the proportional spacing
between letters and between lines, respectively. Basic fonts almost
never have correct kerning on all words. You will have to kern the
letters together or apart to make them even and aesthetically
pleasing. The window marked Kern in the toolbar applies what a
typographer would call “tracking” to the entire text string. You can
do this from the keyboard by using the arrow keys and the Alt/
Option key. Use the arrow keys to navigate to the font pair and
then hold down the Modifier key to make the change. This will
please both your inner and outer art director.
Marquee Title Tool
For truly complex manipulation of type, you will want to work
with a program that can use vector-based graphics. Marquee now
ships as a second choice for more sophisticated titles and animations on many models. When you choose Title Tool you will be
given the choice between the old Title Tool and Marquee. If you
want the choice to always be one or the other and you want to
eliminate this pop-up option, choose Persist, and your choice
will be remembered. If you ever want to go back to being given a
choice you can go to the Marquee Title setting in the Project window. There you can switch to the other choice or reverse the
Persist choice. If you have been given titles that were created on
the old Title Tool you can choose to promote them in Marquee
and continue to add that extra level of polish and pizzazz. You
can also continue to use a mix of old titles and Marquee titles in
the same sequence. Once you have promoted an old title to the
Marquee title you cannot go back; this may have implications if
you want to send your finished sequence back to an older system
for continuing offline work. There is a checkbox for saving a version of your original title before promoting that you should check
“on.” If you need to get to an older version of the title before you
go back to a version that does not support Marquee, you can cut
these titles back into the sequence.
Marquee, a true 3D type and graphics manipulation program,
allows you to quickly create titles with textures, light sources, and
extruded type. It will give you real-time rolls and fast render
crawls on Meridien systems. You can manipulate each letter in a
title on its own timeline and control all the movement with Bezier
curves. A static title is quick to create and plays back in real time.
An animated title will take longer to render, but it will preview in
real time using the Open GL board that ships with most systems.
215
216
Chapter 8 INTRODUCTION TO EFFECTS
This render speed will increase over time, but if you find it too
slow you can go into Marquee and turn off some of the quality
settings under Render/Options. Avoid making large, soft, drop
shadows if render speed is a problem on animations. You can set
up a Marquee animation to render and then go back to editing,
but you may find the rest of your system has slowed down too
much to do much serious work.
There is much depth to Marquee and many people only scratch
the surface. If you have the time you should explore the scripts
and perhaps write some of your own. The Marquee scripts can be
written in Python programming language, so if you have a repetitive task you could write a custom function to handle it (or pay
your favorite Python programmer to do it for you). You can also
import images that are larger than standard frame size and zoom
and pan on the image. This is great for simulating motioncontrolled camera moves. Since Marquee has keyframe and
Bezier curves, you can get quite sophisticated motion on the
images. And finally, Marquee can be used as a sophisticated multilayer 3D DVE if you are willing to spend the time to learn it.
Conclusion
The ability to layer, paint, and use plug-ins has given the Avid
editor a whole range of tools and looks to create effects that look
like they were made on much more expensive systems. Graphic
looks continue to get more sophisticated and subtle, so taking the
time to explore the Avid effects and the interoperability with
third-party plug-ins and graphics programs will definitively pay
off. Faster rendering and more real-time streams make more creative work possible in the same timeframe. Faster CPUs promise
that more work can be done without dedicated hardware.
Networks will allow users to distribute work and share media
and, like the DS Nitris systems, distribute rendering to unused or
dedicated rendering systems. Editors and designers will always
continue to experiment and push the technology to the limits,
and with the tools now becoming available for nonlinear editing
with Avid, they have more choices than ever.
9
CONFORMING AND FINISHING
“ The unfinished is nothing.”
— Henri Frédérik Amiel
If editing is a finely balanced mixture of art and craft, then it
could be argued that conforming is almost entirely craft, for conforming is all about precision. In this chapter we’re going to delve
into a very specific workflow for online conforms. There are variations and branches along the way, especially when conforming in
high definition (HD), but fortunately the main thread works for
nearly all conforms of an Avid offline.
Choosing the Finishing Resolution:
Standard Definition
Before beginning your conform, you should select an appropriate resolution for media that you will be capturing in Avid online.
Though sometimes the resolution is predetermined by the production or workflow requirements, the following guidelines will help
you determine the best resolution to use for your online conform.
Though you can certainly do an online conform at a compressed
resolution, I strongly recommend that you use uncompressed
media for all of your standard-definition (SD) finishing. Finishing
at a compression ratio of 2:1 is also acceptable under some circumstances and is sometimes preferred due to the reduction in disk
space required and the fact that most SD conforms are delivered
on either Digital Betacam, which itself uses a compression ratio of
approximately 2.3:1, or IMX 50, which uses a compression ratio of
approximately 3.3:1. I still prefer uncompressed files simply
because using uncompressed material eliminates decompression
time by the computer processing unit (CPU) and allows it to do
more real-time effects processing. Rendering is time “wasted” in
online—I prefer to do as little of it as I can get away with.
217
218
Chapter 9 CONFORMING AND FINISHING
Avid Media Composer provides three different uncompressed
media formats:
●
●
●
1:1 OMF: 8-bit 4:2:2 YCBCR uncompressed OMF media.
This type of media is stored in OMFI MediaFiles folders on
your media drives.
1:1 MXF: 8-bit 4:2:2 YCBCR uncompressed MXF media.
This type of media is stored in Avid MediaFiles folders on
your media drives.
1:1 10b MXF: 10-bit 4:2:2 YCBCR uncompressed MXF
media. This type of media is stored in Avid MediaFiles folders on your media drives. As mentioned earlier in this
handbook, only MXF can store 10-bit media on Avid.
Choosing the Finishing Resolution:
High Definition
Avid systems support both uncompressed and compressed HD
media. Depending on your finishing requirements, you may find
that compressed media files are more than sufficient. However, if
your project contains extensive keying and compositing, you may
prefer to work with uncompressed HD media. All HD media are
stored in the MXF format in the Avid MediaFiles folders on your
media drives. The following HD media types are available:
●
●
●
1:1 10b HD: 10-bit 4:2:2 YCBCR full-raster (1920 1080 or
1280 720) uncompressed media.
1:1 HD: 8-bit 4:2:2 YCBCR full-raster (1920 1080 or
1280 720) uncompressed media.
Avid DNxHD: Mastering-quality compressed HD media.
The DNxHD family of resolutions provides both 8- and 10bit, extremely high-quality, full-raster compressed media.
Multiple compression levels are provided for each HD format. All of the DNxHD resolutions are considered mastering quality and an equivalent or higher data rate than
either HDCAM, D5 HD, or DVCPRO HD. DNxHD compression and decompression are performed in real time in
hardware on the Avid Symphony Nitris.
DNxHD media are named by their data rate in megabits/second instead of the compression level. As the data rate varies based
on the HD format and frame rate, the specific numbering of
DNxHD media varies from one format to another. For reference,
the following resolutions are available in the 1080i/59.94 format:
●
DNxHD 220x: 10-bit 4:2:2 YCBCR full-raster (1920 1080
or 1280 720) 220 Mbsec compressed media. The
Chapter 9 CONFORMING AND FINISHING
●
●
compression ratio is approximately 5.7:1 for 1080i and
2.5:1 for 720p.
DNxHD 220: 8-bit 4:2:2 YCBCR full-raster (1920 1080 or
1280 720) 220 Mb/sec compressed media. The compression ratio is approximately 4.5:1 for 1080i and 2.0:1 for
720p.
DNxHD 145: 8-bit 4:2:2 YCBCR full-raster (1920 1080 or
1280 720) 145 Mb/sec compressed media. The compression ratio is approximately 6.8:1 for 1080i and 3.1:1 for 720p.
Audio Format Options
When conforming an online, 99 percent of the time you should
work with 48-kHz audio samples using 24 bits per sample. The
other 1 percent of the time you typically work at 48-kHz audio
using 16 bits per sample. Why? Simply because digital decks all
run at 48 kHz natively using either 16, 20, or 24 bits per sample.
Working at 48 kHz means you can output baseband to an HD or
SD deck via SDI (serial digital interface). Mastering at 44 kHz just
isn’t done anymore.
With that choice made, the only other audio mastering decision is whether to use OMF or MXF media to store your audio.
Both provide identical audio quality so the decision usually rests
on the preferred format for the audio engineer or department.
Many audio postproduction departments still prefer to use OMF
media, primarily because their equipment also supports it
natively. If you are finishing your own audio, you can use either
one. The primary difference for you is whether you’ll store it in an
OMFI MediaFiles folder or an Avid MediaFiles folder.
Delivery Requirements to Online
As an online editor you have very specific delivery requirements for the final program master. I feel strongly that if you have
delivery requirements for your product, then you should place
delivery requirements on those delivering the offline to you. Let’s
be honest. Online bay time is expensive. If all the elements are
not delivered, you may not be able to complete the online and
will instead have to wait, burning up the client’s budget waiting
for couriers to deliver missing elements or spend unnecessary
time fixing elements that weren’t delivered properly.
Offline Element Deliverables
Table 9.1 lists the basic delivery requirements expected from
an offline editor. Some elements may vary, depending on project
workflow.
219
220
Chapter 9 CONFORMING AND FINISHING
Table 9.1 Offline Element Deliverables
Required Element
Notes
Offline project
Though only the final offline sequence is really needed for offline, it is helpful to have
the entire project, especially if troubleshooting is required.
Digital cut of final offline
A digital cut of the offline is essential. If there are any questions about title placement,
element alignment, or effect design, they can often be answered by examining the
offline digital cut.
Note: The digital cut should be laid off using sequence timecode to a timecoded tape
format such as Beta SP or DVCPRO HD. Do not accept a VHS tape.
The final audio mix:
Audio media from offline
● ProTools mix
● Digital cut
The audio mix can be delivered in a variety of formats. The method of delivery will
vary from project to project. Ensure that both you and the offline editor agree on the
delivery method.
All required source tapes
The offline editor should double check that all tapes were packaged and sent to the
online. A list of all source tapes should be included in each box of tapes, indicating
which tapes from the production are included in each box. We’ll discuss how to pull
this list later in this chapter.
Nonstandard fonts used in offline
Any nonstandard fonts should be delivered to the online. Note that I’m not saying just
a list of the fonts; I strongly recommend that the offline editor include the actual font
files. Do not assume that the online facility owns the same fonts you do.
All online import elements
All graphics, animations, and audio used in the project should be delivered to the
online. Additionally, these elements should meet a graphic delivery requirements spec.
This spec is discussed in the next section.
List of AVX plug-ins used
If plug-ins were used in the offline, the online editor must know which ones were used
so they can be made available in the online. We’ll discuss how to pull this list later in
this chapter.
●
Delivery Requirements for Import Elements
To ensure that the online goes smoothly, all graphics and animations should meet an online delivery specification. This spec
should be given to the offline editor and all graphic artists, animators, and compositors who are providing elements for the
project. Tables 9.2 and 9.3 list typical delivery requirements for
graphics and animations.
Pulling a Source List
There are a number of techniques available in the Avid system
to pull a source list, including using EDL Manager, as discussed
in the Appendix. But the simplest method by far is using the
dumpsourcesummary Console command. This method allows you
to quickly and easily generate a list of all of your tape- and
Chapter 9 CONFORMING AND FINISHING
221
Table 9.2 Standard Definition: Still Graphics
Aspect
Requirement
Notes
Frame size:
4 3 square pixel
648 486 (NTSC)
768 576 (PAL)
Frame size:
16 9 square pixel
864 486 (NTSC)
1050 576 (PAL)
These are the preferred sizes for NTSC and PAL.
Note that the PAL size is wider than you might
expect. This is due to the wide horizontal blanking
region in 601 PAL frames.
720 486 (NTSC)
720 576 (PAL)
These are the native frame sizes for SD graphics.
Frame size:
nonsquare pixel
These are the preferred square pixel sizes for
NTSC and PAL. 720 540 can also be used in
some situations for both NTSC and PAL.
Alpha channel
White on black
This is the standard used by all graphics,
animation, and compositing packages. The alpha
channel must be inverted on import.
Color mode
RGB
Other formats, including CMYK, indexed and
grayscale, can cause import errors.
File format
TIFF (.tif), PICT (.pct), or PNG (.png)
These are the three most commonly used graphic
formats. The PNG format allows for easy export of
layered graphics out of Photoshop.
Additional Requirements for SD Animation and Video
Field ordering
Even, lower field first (NTSC)
Odd, upper field first (PAL)
Even, lower field first (PAL DV)
Proper field ordering is critical.
Video level
RGB mapping
The other option, 601 mapping, should only
be used when the source requires it (e.g., test
patterns).
File format
Avid QuickTime codec
This is the preferred method of delivery.
Frame size
(4 3 or 16 9)
720 486 (NTSC)
720 576 (PAL)
Avid QuickTime codec requires the full ITU-R
BT.601 frame size.
Resolution
Uncompressed (1:1)
It is strongly recommended that all SD graphics
are uncompressed.
RGB red, green, blue; CMYK cyan, magenta, yellow, black.
file-based sources in one pass. You can either copy and paste the
resultant data out of the console into a text file or have the console send the data directly to a text file.
To generate a source summary:
1. Load the sequence to be onlined into the Record monitor.
2. Press Ctrl/Command6 to open the Console.
222
Chapter 9 CONFORMING AND FINISHING
Table 9.3 High Definition: Still Graphics
Aspect
Requirement
Notes
Frame size:
1080line
1920 1080
HD formats natively use square pixels.
Frame size:
720line
1280 720
Alpha channel
White on black
This is the standard used by all graphics, animation, and compositing
packages. The alpha channel must be inverted on import.
Color mode
RGB
Other formats, including CMYK, indexed, and grayscale can cause
import errors.
File format
TIFF (.tif), PICT (.pct), or
PNG (.png)
These are the three most commonly used graphic formats. The PNG
format allows for easy export of layered graphics out of Photoshop.
Additional Requirements for HD Animation and Video
Field ordering:
1080 interlaced
Odd, upper field first
Interlaced HD uses field ordering that is opposite of NTSC. If using
a progressive HD resolution (1080p or 720p), field rendering should
not be used.
Video level
RGB mapping
The other option, 709 mapping, should only be used when the source
requires it (such as luma key elements, animated test patterns,
preserved highlights, and so on).
File format
Avid DNxHD QuickTime or
animation codec
Avid DNxHD is preferred for RGB animations. If an alpha channel is
required, either DNxHD or Animation is acceptable.
Resolution
To match project
requirement
Though uncompressed HD is preferred, DNxHD is suitable for most
applications and imports much more quickly.
RGB red, green, blue; CMYK cyan, magenta, yellow, black.
3. Choose “Open Log File” from the Console’s Fast menu.
4. Type a name for the source summary dump and press Enter.
5. Type dumpsourcesummary into the Console and press
Enter. The source list will be displayed to the Console.
6. Choose “Close Log File” from the Console’s Fast menu.
The source summary provides you not only with the list of
every tape-based source, but also the project it was originally
logged in on. This is a critical piece of data if you have duplicate
source names. If you see any duplicate source names, these tapes
should be flagged as you may be forced to eye-match a shot or
two from one of these tapes to differentiate the two, especially if
they share common timecode.
For the file-based sources, notice that the source summary
includes the complete path for the imported files. This can be a
real time-saver when it comes to properly gathering up these files
for the online.
Chapter 9 CONFORMING AND FINISHING
Unfortunately, a list of the fonts used in either the Title Tool or
Marquee cannot be quickly gathered via the Console at this time.
You or the offline editor will need to keep careful notes of the
fonts used.
Pulling an Effect Plug-In List
After you pull a source list you should also pull a plug-in list.
It is critical that this list be generated on the offline system with all
used effects installed. This is due to the fact that not all plug-in
223
224
Chapter 9 CONFORMING AND FINISHING
effects store their name in a human readable form. If the plug-in
is installed when this list is generated, the command will quickly
parse the installed plug-ins and extract a human readable name
from the plug-in itself. Otherwise all the command can return is
the effect’s hash code.
To generate a source summary:
It is entirely
possible that a
future version of
Media Composer and
Symphony will have a
complete user interface
(UI) for the two console
commands listed above.
Check my blog at http://
community.avid.com/
blogs/editors for more
information.
1.
2.
3.
4.
5.
Load the sequence to be onlined into the Record monitor.
Press Ctrl/Command6 to open the Console.
Choose “Open Log File” from the Console’s Fast menu.
Type a name for the source summary dump and press Enter.
Type dumpfxsummary into the Console and press Enter. The
source list will be displayed to the Console.
6. Choose “Close Log File” from the Console’s Fast menu.
The Online Project
Though a sequence could certainly be recaptured in the original
offline project, there are significant advantages to using a clean
project for the online. By creating an online project you can easily
configure the Project settings and eliminate any possible errors or
problems created by Project settings created and used in the offline.
Chapter 9 CONFORMING AND FINISHING
I recommend creating a new online project for each job being
conformed. This ensures that the project format is properly configured and any unique configurations for one specific project do
not carry over to the next.
Online Project Settings
There are a number of specific setting configurations that I recommend when building an online project. Some of these settings
will vary depending on the nature of the online, but generally using
these settings will help the online go as efficiently as possible.
Audio Project Settings (Main Tab)
●
●
Sample rate and sample bit depth: Set as required by the
project. In most cases, if you are mastering to Digital
Betacam, HDCAM, or a similar format, these should be set
to 48 kHz and 24 bits, respectively.
Audio file format: Both OMF and MXF media formats are
available and can be freely mixed in a sequence. Let’s look
at the three available options.
●
WAVE (OMF): The media are packaged using the Wave
format, which is readable by nearly all Windows applications that support sound. These media are stored in
the OMFI MediaFiles folders on your media drives.
●
AIFF-C (OMF): The media are packaged using the Audio
Interchange File Format, which is readable by most
computer sound applications. These media are stored
in the OMFI MediaFiles folders on your media drives.
●
PCM (MXF): The media are packaged using the industrystandard Pulse Code Modulation format. These media
225
226
Chapter 9 CONFORMING AND FINISHING
●
You must enable
Sample Plot to see
the mismatched
rates indication.
●
are stored in the Avid MediaFiles folders on your media
drives.
Convert sample rates when playing: Set to “Never” for all
online work. Converting sample rates on-the-fly may produce a lower-quality result.
Show mismatched sample rates as different color: Set to
“Yes.” This enables you to visually identify audio clips with
the incorrect sample rate in the timeline.
Capture Settings (General Tab)
Preroll Method: This menu controls how the Avid editing system controls the deck during preroll. Four options are available:
●
●
●
Standard Timecode: Instructs the editing system to always
seek the preroll point by direct access. This is done by subtracting the specified preroll duration from the In point
timecode. If the preroll timecode does not exist, the clip is
not captured and an error is reported.
Standard Control Track: Instructs the editing system to
always seek the preroll point by control track access. This
is done by first seeking the In point then switching the
deck to Control Track Offset mode and rolling backwards
by the specified preroll duration. If sufficient continuous
control track does not exist prior to the In point, the clip is
not captured and an error is reported.
Best-Available Control Track: Instructs the editing system
to seek first using Standard Control Track. If a control track
Chapter 9 CONFORMING AND FINISHING
●
break is encountered, the system will shorten the preroll to
the amount of continuous control track available. If there
is not enough control track prior to the In point, the clip is
not captured and an error is reported.
Best Available: This option instructs the editing system to
try the following options, in order:
●
Standard Timecode
●
Standard Control Track
●
Best-Available Control Track
The default option, Best Available, provides the greatest chance
to capture the material but can take longer, in some instances,
than other methods if chosen directly. For these reasons we recommend doing the following (in conjunction with other Capture
settings options):
●
●
Choose Standard Timecode first when capturing material
previously captured in the offline. This is the fastest capture method.
After batch capturing a reel, if clips still remain offline,
change the Preroll Method to Standard Control Track to
capture the remaining clips.
Capture Settings (Batch Tab)
●
●
●
●
Optimize for batch speed: Enable this option to potentially
speed up the capture process. If this option is active, and
the distance between the Out point of one clip and the In
point of another is five seconds or less, the deck will not
pause between the two clips and will roll forward to the
next clip. Since this is not an uncommon occurrence when
capturing from a decomposed offline sequence, enabling
this option can save a significant amount of time (and
wear on the deck’s transport) that would otherwise be
spent seeking and prerolling.
Switch to emptiest drive if current drive is full: Though this
option may be useful in some local storage–only configurations, it is generally better to manually manage your
storage and specify to the system which disks or partitions
you wish to use when capturing.
Eject tape when finished: If enabled, the tape will be ejected
after the last clip from that reel is captured. Ejecting the tape
is a useful prompt for the editor, assistant editor, or tape operator that the system is ready for the next tape. This option is
particularly helpful when working with machine rooms.
Log errors to the console and continue capturing: It is
strongly recommended that this option is enabled when
batch capturing. If an error, most likely a coincidence
error, is reported by the deck, the system will note the error
Coincidence is
what a deck
reports when it
successfully seeks to the
specified timecode.
227
228
Chapter 9 CONFORMING AND FINISHING
and proceed to the next clip. If this option is not selected,
the system will pause the capture and display a dialog box
every time an error is encountered.
Deck Settings
Chapter 9 CONFORMING AND FINISHING
229
Accessing Deck Settings
The Deck settings dialog box is accessed via the Deck Configuration setting as follows:
1. Open the Deck Configuration setting. The current deck patch will be displayed, showing the control port and deck. If
this dialog box is empty, you should first connect the deck and select “Auto-configure.”
2. Double-click the deck on the right side of the patch to open the Deck settings.
●
●
Preroll: Sets the deck’s default preroll duration. This value
defaults to five seconds for most decks. Well-maintained
modern digital decks, such as the Sony DVW-A500, Sony
HDV-F500, Sony HDW-M2000, and Panasonic AJ-HD3700,
can get to speed and lock in less than one second. Reducing this preroll duration to one or two seconds can slice
minutes or even an hour or more off the time required to
recapture a long-form program with a lot of edits.
Fast cue: Instructs the system when to switch to FF/REW
on a deck (to speed up access to the requested timecode).
This option should be on for all standard baseband decks.
We’ve found, however, that leaving this option on for baseband capture from some XDCAM decks will dramatically
slow down access to the material. Disable it for those
XDCAM decks.
Media Creation (Drive Filtering and Indexing Tab)
●
Filter Out System Drive/Filter Out Launch Drive: When disabled, these options allow the system to digitize to the
drive containing either the operating system or the Avid
application. Newer Avid systems ship with very large internal drives, which some offline editors use for audio or
lower-resolution media storage. These options should be
enabled on finishing systems.
230
Chapter 9 CONFORMING AND FINISHING
Render Settings
●
Motion Effects Render Using/Timewarps Render
Using: These two options allow you to specify a
default rendering method for motion effects and
timewarps. Offline editors often choose the most
expedient rendering method (e.g., Duplicated
Field) instead of the appropriate method for the
online. These two pop-up menus allow you to
specify the method that will be used in the final
sequence when it is rendered. These two options
are usually set to VTR-Style and Blended Interpolated, respectively.
Necessary Equipment for Online Suites
Your Avid suite is now an online suite if you plan to finish there.
By purchasing the highest resolutions and the fastest drives, you
have not completed this transformation! Online suites have some
important components that must be present. There must be a
high-quality third monitor to view reference video. This must be
an engineering-quality monitor. You need one that can be adjusted
through standard adjustment procedures like using the blue bars
setting. The monitor must hold that calibration in a stable fashion
over time. This generally means more money for the monitor, but
if you ever get into a dispute about color or brightness, this monitor is your absolute. It is the end of an argument and the last word
on “what it really looks like.” Don’t put your faith in cheap equipment—this finished image is your reputation!
Some people like to have a consumer-type monitor in the
room as a low-end reference to “see what it will look like at
home.” Be careful of this since it is very hard in NTSC to get certain colors to look exactly the same on both monitors. When your
client insists that the yellow on the low-end monitor must match
your high-end monitor, you have a frustrating no-win situation.
This is why many online tape suites have only one color monitor
and everything else is black and white.
There are very precise color-measuring devices that allow you
to adjust monitors to match more closely. After such an adjustment, a video monitor should be left on all the time to minimize
the drifting that occurs with warming up and cooling down. If
you need to adjust a color monitor, always wait until it has been
on for several minutes, longer for older monitors.
It is also nearly impossible to get the computer monitors to
match up to the video monitors. They are two very different types
of monitors and, even though you can adjust the computer
Chapter 9 CONFORMING AND FINISHING
monitors, you cannot adjust hue through hardware adjustments.
Color-matching extensions give you more control than the front
panel buttons. Many professional graphics programs include
these gamma-adjusting extensions, but you will never get the
monitors to match completely. You can also use an automated
device that can run test patterns and self-adjust. Using one of
these calibration devices (e.g., an X-Rite Hubble) can help you
match the computer monitors with your video monitors. Do not
let clients pick a final color on the computer monitor. They must
have final approval on the well-adjusted, carefully lit, high-end
video monitor. And yes, it will look different at home.
You will need external waveform and vectorscopes as independent references for all signals. Use them to monitor input, output, and dubs. If you can set up a patch bay or router, everything
should go through these scopes. You cannot consider yourself an
online room until you have waveform and vectorscopes.
More and more people are deciding that having a color corrector in the suite gives them the extra protection and ability to deal
with sources that have difficult color problems. It also gives you
an extra tool to make sure that sources shot in very different locations really match up when they are next to each other. Since
there is no hue adjustment for PAL and component NTSC, and
no adjustment at all for serial digital input, the color corrector
gives you the level of control you occasionally need. It can also
give you some illegal levels if you are not careful! If a black looks
really rich and the shadows have that deep dramatic look you
really want, check that the black level never goes too low.
You need studio-quality speakers, and they must be mounted
far enough apart so that you can listen critically for stereo separation. If you can afford it, get a good compressor/limiter. This
takes your audio levels and gently compresses the loudest parts
of the sound so that they don’t distort. This means you can have
your overall sound louder and not worry about the occasional
spike in sound level. You can use it during both the capturing and
the output or you can use an AudioSuite™ plug-in before you
output. However, if you are sending your audio to a sound
designer to finish, don’t compress it. Leave the sound alone
except to adjust levels and make sure nothing is distorted.
Onlining and Offlining on the Same
Machine
In some situations, the online may be done on the same system
as the offline. If this is the case, you will likely need to make room
231
232
Chapter 9 CONFORMING AND FINISHING
on your media drives before you can begin recapturing at the
online resolution. There are two common methods for creating
the needed storage space for your online conform. One method is
fairly easy to perform and involves a general purging of all of the
project’s extraneous media from the system. A second method is
slightly more complex, but allows you to keep an “offline-quality”
version of the sequence online throughout the conforming
process.
Method 1: Delete the Offline Video and All
Unused Media
Use this method if you want to keep all the audio media from
the offline and only delete the offline video media. This method
will also allow you to keep any final online-quality media that are
used in the sequence, such as uncompressed imported graphics.
This procedure should only be done before you begin recapturing the media at the final online resolution.
Part 1: Delete the Offline Video Media
1. Create a new bin, name it “Purge Offline Media,” and
copy the final offline sequence into it. If there is more
than one version to be onlined, copy all of the versions into this bin.
2. Activate the new bin and select “Bin Set Bin
Display.”
3. Select the following:
●
In the upper section: “Rendered Effects.”
●
In the lower section: “Show Reference Clips.”
4. Deselect the following:
●
In the upper section: “Sources, Groups.”
●
In the lower section: “Show clips created by
user.”
●
The other items can be left in their original
state.
5. Click OK. The bin’s view changes to display only
the clips and rendered effects (precomputes)
referenced by the sequence.
6. Press CtrlA to select everything in the bin and
press Delete on the keyboard. The Delete Media
dialog box appears.
7. In the upper section, select both of the “Delete
associated media file(s)” options.
Chapter 9 CONFORMING AND FINISHING
8. In the lower section, deselect “Audio” and any
“online” resolutions such as “Uncompressed.”
9. Click OK to delete the media.
Be sure you have the right options selected and
deselected as there is no delete confirmation dialog
box after you press OK.
All of the original offline video media files are
deleted, including rendered video effects. The next
step is to delete all the media not required by the
offline sequence(s).
Part 2: Delete Unrelated Video and Audio
Media Files
To finish creating your storage space you now need
to delete the project’s unused video and audio media
files. This is easily done via the Media Tool.
1. Select “Tools Media Tool” to display the
Media Tool Display dialog box.
2. Select the following options:
●
The media drive(s) to which the offline
media were digitized.
●
Current project.
233
234
Chapter 9 CONFORMING AND FINISHING
You may also need to select other projects if any clips
originated in a different project.
●
Master clips and precompute clips.
Click OK.
Select the Purge Offline Media bin and press CtrlA to
select all the remaining reference clips.
Select “Bin Select Media Relatives.” The media the
sequences require are selected in the Media Tool.
From the Media Tool Fast menu, choose “Reverse
Selection.” All of the items selected in the Media Tool are
unrelated to the offline sequence and can be deleted.
Press the Delete key.
Select checkboxes for any video, audio, or precompute
tracks available.
Click OK.
If desired, select “Bin Set Bin Display” and reset the view
to display the sequence(s) and hide the reference clips.
●
3.
4.
5.
6.
7.
8.
9.
10.
The only media files that now remain in your project are the
required audio media files and any online resolution material
that was edited into the offline sequence.
Method 2: Keeping the Offline Edit Available
Optionally, you
can refer to a
digital cut of the
offline sequence.
If the offline was done on the same system, you may prefer to
have an offline-quality version of the sequence available to refer
back to as a reference while you conform the final version of the
show. This method allows you to do just that.
The following two procedures will help you maximize the
amount of storage available. Use Part 1 to generate a significant
amount of free space. Add Part 2 to help create even more storage
space if you need it.
Part 1: Clearing Excess Media through Media Relatives
First, remove all media files unrelated to your final sequence
from your system. This procedure is similar to the one in Method 1.
1. Select “Tools Media Tool” to display the Media Tool
Display dialog box.
2. Select the following options:
●
The media drive(s) to which the offline media were
digitized
●
Current project.
●
You may also need to select other projects if any clips
originated in a different project.
●
Master clips and precompute clips.
3. Click OK. The Media Tool appears.
4. Select the final offline version(s) of the sequence in your bin.
Chapter 9 CONFORMING AND FINISHING
5. Choose “Bin Select Media Relatives.” All of the media
relatives are highlighted in the Media Tool.
6. From the Media Tool Fast menu, choose “Reverse
Selection.” All of the items selected in the Media Tool are
unrelated to your final sequence and can be deleted.
7. Press the Delete key.
8. Select checkboxes for any video, audio, or precompute
tracks available.
9. Click OK.
The only media files associated with your project now are the
video, audio, and precompute effect media files required to play
back your sequence.
If you discover, after eliminating the excess media files, that
you require even more storage space, you may want to continue
on to Part 2.
Part 2: Using Consolidate to Create Additional
Storage Space
This stage “trims the fat” off of the original media files kept for
the offline. You use the Consolidate command to create smaller
copies of the media files used to play back the sequence.
When you consolidate a sequence, the system finds the media
files (or sections of media files) required for playing the sequence.
The system copies these media files (or parts of media files) to
the target disk that you specify. The process is optimized to create
as few new media files with as little digitized video and audio
data as possible. Therefore:
●
●
The system creates new media files and master clips that
are shorter sections of the original media files and master
clips. The new media files and clips are identified by the
“.new” extension in their names.
The system breaks the links that connected the sequences
to the original media files. The new consolidated media
files are not linked to any subclips or sequences except the
sequence that you consolidated.
To create additional storage space by consolidating your
sequence:
1.
2.
3.
4.
5.
Select the final offline sequence.
Choose “Clip Consolidate/Transcode.”
Select “Delete original media files when done.”
Deselect “Skip media files already on target drive.”
Select a target disk from the Video Target Drives list. The
system will alert you if the disk does not have enough
storage space.
235
236
Chapter 9 CONFORMING AND FINISHING
6. Choose a handle length. The amount of handle added is
in addition to existing media required for transition effects.
A handle length of ten frames is usually sufficient to allow
some flexibility in the online conform while saving valuable storage space for the online-quality media.
7. Click Consolidate to begin the consolidation process.
Preparing to Recapture
Before you can begin recapturing, you need to prepare the
sequence. Recapturing a sequence on Avid Media Composer or
Avid Symphony should be as fast and as efficient as possible. But,
you also need to have significant control over the process in case
you need to make changes later.
Using the Online Project
As mentioned previously there are significant advantages to
using a clean project in the online instead of the project used in
the offline.
Chapter 9 CONFORMING AND FINISHING
1. Copy the bin containing the final offline sequence into the
online project.
2. Launch Avid Symphony Nitris and open the online
project.
3. If necessary, rename the offline bin, indicating that it contains the offline version (e.g., “CommonArt—Locked
Offline Edit”).
4. Create three additional bins and name them as follows:
●
Online MOS (e.g., “CommonArt—Online MOS”).
●
Decomposed clips (e.g., “CommonArt—Decomposed
Clips”).
●
Online final (e.g., “CommonArt—Online Final”).
These bins will be used to store versions of the sequence as it
goes through the online process.
Decomposing the Sequence
The Decompose function is the first half of the batch digitizing
process. Decompose breaks your sequence into individual offline
master clips. These master clips represent only the portion of the
clip that was used in the sequence, so recapturing is very efficient. Because individual clips are created, you can easily sift and
sort by tape prior to digitizing and identify and isolate clips that
caused digitizing errors during the batch digitize.
Though it is possible to recapture a sequence without decomposing it, doing so has several disadvantages. For example, you
do not have control over the order of tapes during the recapture
process nor are you able to flexibly abort and resume the batch
digitize process.
When you decompose a sequence:
●
●
●
The system creates new master clips that are shorter
sections of the original master clips and identifies them
with a “.new” extension in their names.
The system breaks the links that connected the sequence
to the original master clips and creates new links to the
“.new” clips.
The “.new” clips created through the decompose process
have never been digitized and have no link to any media
files. The only link they have is to the sequence from which
they were created.
The most common onlining scenario is to recapture only the
video. The audio will either be brought forward from the offline,
or provided as a separate element for integration in the online.
The most efficient approach in this scenario is to decompose and
then digitize a video-only version of the sequence.
237
238
Chapter 9 CONFORMING AND FINISHING
Part 1: Create a Video-Only Version of the Sequence
1. Open the offline and MOS bins.
2. Duplicate the offline sequence and move the duplicate to
the Online MOS bin.
3. Close the bin containing the original offline sequence.
4. Rename the duplicated sequence to indicate that it is a
video-only version; for example, you might want to append
“ONLINE MOS” to the end of the name.
5. Load the sequence into the Record monitor.
6. Select all audio tracks.
7. Deselect all the video tracks.
8. Press Delete to remove the audio tracks from the
sequence.
Part 2: Decompose the MOS Version
Decompose is also
available via the
contextual pop-up
menu.
If you have also
used XDCAM
media you should
select “Captured and
imported clips” instead.
1. Select the duplicated sequence in the bin and choose
“Clip Decompose.”
2. Deselect “Offline media only.” If none of the offline media
is available, you can leave this option selected.
3. Select “Captured clips only” to decompose only the captured video clips.
4. If available, deselect “All clips in a group edit.” This option
is only available if you are working with grouped or multigrouped source clips. Groups are typically used when
working with multicamera material. If selected, this option
will decompose not only the used camera for each edit,
but the matching footage for all additional cameras.
Needless to say, this will create substantial unnecessary
Chapter 9 CONFORMING AND FINISHING
239
material and dramatically increase the time required to
recapture the sequence.
5. Enter a suitable handle length for each decomposed clip.
Usually a handle of five to ten frames is sufficient when
onlining. Since the handle is added to the head and tail of
every edit in the sequence, a larger setting for handle can
significantly increase the amount of media to be digitized
and slow down the online conform.
6. Deselect “Extend handles beyond Master Clip edges.”
When this option is disabled, the system won’t extend
handles beyond the start and end of the master clip, preventing the system from creating a master clip that may
contain nonexistent timecode. This is especially important
for field tapes shot with the camera’s timecode generator
set to “Free Run” (for generating time-of-day timecode).
7. Click OK. A dialog box appears.
8. Click OK.
As the sequence is decomposed, new master clips will be created in the Online MOS bin for each video edit in the sequence.
All links to the original offline master clips are broken and the
decomposed sequence is taken offline.
Part 3 (Optional): Modifying the Decomposed Clips
There is one thing to consider before moving on to the next
phase. After you have recaptured at the online resolution, will
any changes be required? If so, it may be difficult since the video
and audio come from different clips.
For example, if you match-frame a video edit from your final
sequence, it will match to a video-only (MOS) clip. This can be
somewhat disconcerting to the client in the online bay. To avoid
this problem, you can add audio tracks to the decomposed MOS
clips. This will not increase digitize time and will not significantly
increase storage requirements.
1. Select all the “.new” clips that resulted from the decompose process.
2. Choose “Clip Modify.”
3. Choose “Set Tracks” from the pulldown menu.
If you edit this
audio into the
online sequence,
you will need to check and
adjust the mix to integrate
the new audio into the mix.
240
Chapter 9 CONFORMING AND FINISHING
4. Enable the appropriate audio tracks (usually A1 and A2)
and click OK.
When these clips are recaptured at their higher online-quality
resolution, they will be captured with video as well as audio media.
Be sure the audio sample rate you have set in the Audio Project
setting matches the audio sample rate used in the audio mix. If
the sample rates do not match, the audio for the “.new” clips will
play back as silence when edited into the final sequence.
(Remember previously we told the system not to play mixed sample rates in real time.)
Pulling a Source List
The offline editor should have generated a source list and confirmed that all tapes were sent to the online. Occasionally,
though, a tape is overlooked. You should also pull a source list
using the dumpsourcesummary Console command and confirm
that you have all required tapes before you start capturing.
Flagging Clips from Duplicate Tape Names (Optional)
If the offline editor borrowed master clips from older projects
it is possible that the online sequence will include duplicate tape
names. These duplicates can cause real problems in the online.
For example, if there were two different tapes named “001,” when
the Avid system asks you to load reel 001, would you know which
001 it wanted? If you loaded the wrong 001 and the clip’s timecode
existed on the tape, the deck would digitize whatever footage it
found at that timecode, even if it wasn’t the right material!
Though many onlines will not have this problem, it is a good
idea to check for duplicate identifications (IDs) and then flag the
suspect clips.
1. Load the decomposed sequence into the Record monitor.
2. If you haven’t already, use dumpsourcesummary to dump a
list of the sources. This list is sorted by tape name then by
Chapter 9 CONFORMING AND FINISHING
3.
4.
5.
6.
7.
8.
9.
10.
11.
12.
project. Any duplicate tape names should appear next to
one another in the list with their associated project’s
listed to the right.
If you see any duplicate tape IDs, print the summary then
highlight them in the printout of the summary. I strongly
recommend flagging these clips in the bin so the tape
they’re from is called out. Two great methods for this are
using a clip color or adding asterisks to the head of the
clip name. First let’s set up the bin so it matches the summary printout.
Highlight the bin containing the decomposed sequence.
Select “Bin Headings” to display the Bin Column
Selector dialog box.
Press the All/None button twice to deselect all the
columns.
Select both the Tape and Project columns then press OK.
Save this view as “Tape/Project.”
Select the Tape column heading then hold the Shift key
down and also select the Project column heading.
Press Ctrl/CommandE to sort the view by tape and then
by project.
Scan through the bin, looking for duplicate tape names.
Flag the duplicated ID clips so they can be identified during the online.
Solving Duplicate Tape Names
Unfortunately, there is no easy way to fix duplicate tape name
problems in the online. But, duplicate IDs can be avoided in the
offline by using proper tape naming conventions. Many offline
editors have gotten into the bad habit of naming the first tape
used in a project “001,” the second tape “002,” and so on. Though
this habit worked fine in the linear world where each sequence
(edit decision list) was an island, this approach does not work in
the nonlinear world where it is easy to borrow material from
other projects and sequences.
A good strategy to adopt in the offline is to assign a unique
tape name to every single tape across all projects. For example,
the offline editor can simply append the show ID to the tail of the
tape number. Using the previous illustration, this approach
would result in two tape names, “003-618” and “003-704.”
Another approach is to use a tape library system and assign a
unique number to each tape that enters a facility.
Duplicate tape names slow down the online process and introduce the risk of the wrong footage being used in the sequence. If
you are working with an offline editor that uses duplicate tape
names explain to him or her and the producer the problems,
241
242
Chapter 9 CONFORMING AND FINISHING
additional time, and additional costs this is creating in the online.
Encourage them to adopt proper tape naming conventions for
future programs.
Assigning Source Ownership Using Avid Log
Exchange
To make media management and cleanup easier, you want all
the clips in the project to belong to the online project. Currently,
all of the clips belong, at best, to the offline project. In reality,
they may belong to several projects, depending on how the logging was done or if clips were borrowed from other projects.
The Modify command can change the source ownership of a clip,
but that method is tape name based and can be quite time consuming. Here is a fast method using an Avid Log Exchange (.ALE) file.
If you are
conforming a
film project,
you will need additional
columns for the film-related
metadata. Choose the Film
bin view and add the Tape
column. Then save this view
as ALE.
1. Open the Decomposed Clips bin.
2. Select all of the decomposed clips in the Online MOS bin
and move them to the Decomposed Clips bin.
3. Display the following headings in the Decomposed
Clips bin:
●
Start
●
End
●
Tracks
●
Tape
4. Save this view as ALE.
5. Select all clips in the bin.
6. Choose “File Export.”
7. Open the Export settings, and choose “Avid Log
Exchange” from the pop-up menu.
8. Click Save As and name the Export setting “ALE Export.”
9. Save the exported file to your drive and close the
Decomposed Clips bin.
10. Select the Online MOS bin.
11. Select the ALE bin view.
12. Choose “File Import.”
13. Select the ALE file you just created and press OK to
import the file and create new clips. Notice that the Start,
End, Tracks, and Tape settings have not changed. If you
add the Project heading to the bin, you will see that all of
the clips are now assigned to the online project.
Linking the Sequence to the New Clips
The sequence is still linked to the original decomposed clips,
not the newly created clips. Before we begin to capture from tape
we need to link the sequence to these new clips.
Chapter 9 CONFORMING AND FINISHING
1. Select the Online MOS bin and press CtrlA to select
everything in the bin.
2. Select “Clip Relink.”
3. Choose “Relink all nonmaster clips to selected online
items” and “Allow relinking to offline items.”
4. Deselect “Create new sequences.”
5. Click OK.
The sequence is now linked to the new clips. You can confirm
this by using the Show Media Relatives command.
Calculating the Space Required for the Recapture
Before batch digitizing, you should check the space required
for the online media.
1. Select all the clips in the Online MOS bin.
2. Ensure that the sequence is not also selected.
3. Press CtrlI. The Console opens, and the duration of the
decomposed clips is listed.
243
244
Chapter 9 CONFORMING AND FINISHING
4. Round up the duration to the nearest minute and convert
the total duration to minutes. For example, for the illustration here, we would round 2:27:49:16 to 2:28:00:00. Then
we would convert the duration to minutes, resulting in a
total duration of 148 minutes.
5. Table 9.4 lists typical SD and HD online resolutions.
Multiply the duration by the desired value to determine
the space, in GB or MB, required to capture the media.
Table 9.4 Resolution Storage Requirements
Format
Resolution
Storage Consumption
NTSC or PAL
1:1
2:1
1.22 GB/min
0.53 GB/min
1080i/59.94
1:1
DNxHD 220
DNxHD 145
8.68 GB/min
1.54 GB/min
1.00 GB/min
1080i/50
1:1
DNxHD 185
DNxHD 120
5.79 GB/min
1.28 GB/min
0.85 GB/min
1080p/23.976
1:1
DNxHD 175
DNxHD
5.56 GB/min
1.22 GB/min
0.81 GB/min
For example, if we were recapturing this sequence in HD using
DNxHD 220, we would multiply 148 by 1.54 and determine that
we needed roughly 227 GB to recapture this sequence. As a point
of comparison, if we were to recapture the sequence using
uncompressed HD, we would need 1285 GB!
Batch Capturing
The most efficient method to acquire the newly created clips is
to batch capture them tape by tape. You can ensure this process
goes as efficiently as possible by properly configuring the system
for capture. As we mentioned previously, there are several
Capture and Deck configurations that should be changed from
Chapter 9 CONFORMING AND FINISHING
their defaults for the best performance during a batch capture. It
is also wise to confirm that you are capturing at the correct resolution and to the appropriate media type before you begin the
capture. Use the following lists as a “preflight” settings checklist.
Capture Settings:
●
●
●
●
Preroll method (General tab): Choose Standard Timecode
when capturing from most tapes. This is the fastest capture method but it will generate errors if coincidence cannot be reported by the deck.
Optimize for batch speed (Batch tab): Minimizes deck
pausing and recueing. If two clips to be captured are five
seconds or less apart on the tape, the system will continue
rolling between the two clips instead of stopping and prerolling to the next clip.
Log errors to the console and continue capturing (Batch
tab): If an error is encountered during the capture process,
the system will log the error to the console and move on to
the next clip.
Eject tape when finished: Instructs the system to eject a
tape after capturing the last clip. Though this option isn’t
as important as the others, it can still save valuable time
and serve as a prompt to insert the next tape.
Deck settings:
●
Preroll: Set the preroll to a more appropriate value. For
most modern decks a preroll of one or two seconds is all
that is required.
Media Creation Tool:
●
●
Video file format (Media-Type tab): Confirm that you are
set to the appropriate media format. If you plan to capture
with 10-bit samples, you must be set to MXF or the 10-bit
resolutions will not be available. Remember that OMF
media will be stored in an OMFI MediaFiles folder while
MXF media will be stored in an Avid MediaFiles folder.
Video resolution (Capture tab): Confirm that you are set to
the appropriate resolution. Even though this can be set in
the Capture Tool, it is a good idea to set it in advance.
Audio Project settings:
●
●
Sample rate and bit depth (Main tab): Confirm that you are
set to the required rates for the program’s delivery requirements. If you will be capturing audio via SDI you should
ensure that the sample rate is set to 48 kHz.
Audio file format (Main tab): Confirm that you are set to the
appropriate media format. Remember that both Wave and
245
246
Chapter 9 CONFORMING AND FINISHING
●
Avid Media
Composer 3.0
contains a
prebuilt Capture bin view.
Remember that you must
create a new user when
you install version 3.0 in
order to include the new
view in your user setting.
(Remember to always create
a new user when upgrading
to a new version!)
AAIF-C media will be stored in an OMFI MediaFiles folder
while PCM media will be stored in an Avid MediaFiles folder.
Input source (Input tab): If you are capturing audio from
tape, be sure to set the appropriate audio input. Even
though this can be set in the Capture Tool, it is a good
idea to set it in advance.
Bin configuration: We recommend that you display, at a minimum, the following bin headings:
●
●
●
●
●
●
●
Tape
Start
Duration
Tracks
Offline
Video
Drive
You should then sort by tape and then start timecode. This
allows you to organize and, if another deck is available, preroll
the tapes to the first section you will capture from.
You can now digitize the new master clips:
1. Choose “Tools Capture” or “Bin Go to Capture Mode”
to open the Capture Tool.
2. Select all the clips from the first tape to capture.
3. Choose “Clip Batch Capture” to begin the capture process.
The system will prompt you to enter the first tape. Once you
enter the tape the prompt will automatically disappear.
As the clips are captured, their offline status will change in the
bin, making it easy to see which clips have been captured and
which remain to be captured. If there are some clips that remain
uncaptured when the last clip on a tape has been reached, then
the system encountered an error during the clip’s capture.
Though other possibilities exist, most of the time this is due to a
coincidence error on the deck.
Since prerolling
by control track
requires two
seeks, one to the start
timecode and the other to
the preroll point, I strongly
recommended that you
only use this setting when
recapturing clips that did
not capture with a standard
timecode preroll.
1. Select the Capture Tool and press Ctrl to open the
Capture settings dialog box.
2. Select the General tab and change the Preroll Method to
“Standard Control Track,” then click OK.
3. Select the clips that were not captured and choose
“Clip Batch Capture” to begin the capture process.
If, after the last clip is reached, there are still clips that remain
uncaptured, open the Console and check the error message for
those clips. It is certainly possible that a system error prevented
their capture, but this is less likely if some of the clips from the
Chapter 9 CONFORMING AND FINISHING
tape were captured. One possibility is that there are timecode
breaks on the source tape and the timecode decrements at a
break. Few decks can correctly handle this scenario and usually
report an error. You may need to manually locate the proper
section on the tape then try capturing the clips again.
Analog Source Format Considerations
If you are capturing from an analog source, you may want to
use the analog deck’s TBC (Time Base Correction) controls—or
an outboard TBC if capturing from a consumer source such as a
VHS tape—to calibrate and adjust the video signal on each tape.
Clip-by-clip calibration via the deck’s TBC should only be done
if the video signal exceeds the limits of the ITU-R BT.601 standard
(e.g., if the luminance exceeds 108.4 IRE). Otherwise, it is usually
easier to correct for signal variations using color correction.
To use the TBC to prevent signal clipping:
1. As soon as you notice the signal is being clipped, use the
TBC to lower the signal so it is no longer clipped. If you are
digitizing a short clip, it may not be possible to adjust the
signal before the end of the clip is reached. In that case,
abort the digitize, adjust the TBC, and resume the digitize.
2. Click the Trash icon in the Digitize Tool. This aborts the
batch digitize process for the current clip. A dialog box
appears asking if you wish to retry digitizing the currently
selected clip, continue batch digitizing the next clip in the
list, or abort the batch digitize entirely.
3. Retry the current clip. As the system digitizes the clip
again, confirm that the signal is no longer being clipped.
Typically, the only corrections you’ll need to make are with
gain and saturation controls. Black levels can also slip and
require correction, but that is less common. If you suspect
the black level has slipped, you can easily correct it by
examining the area of blanking within the video signal.
The blanking area should measure 0 IRE.
4. After you have successfully recaptured the clip, read just
the TBC to its original setting and continue digitizing.
External TBC adjustments are not stored by the deck. Therefore,
it is your responsibility to recalibrate all sources manually during
the recapturing process every time. This can be a potential drawback if you have to recapture a show months later for a second
output. The second calibrations may not be identical to the first
and the two shows may look slightly different. However, some
external TBC controls have scene memory and can be used to
store and recall specific TBC settings.
247
Before capturing
from the next tape
open the Capture
settings and change the
Preroll Method back to
“Standard Timecode.”
248
Chapter 9 CONFORMING AND FINISHING
Integrating the Audio Mix
When you have finished recapturing the video, you need to
reintegrate the audio back into the sequence. The audio can
come to the online in several different formats:
●
A ProTools mix delivered as a broadcast wave or OMF file.
●
A mix delivered on videotape or DAT.
●
A mix done in the offline delivered as a collection of audio
media.
If the mix is delivered as a file or on tape:
1. Import or capture the audio mix.
2. Duplicate the online MOS sequence and move the duplicate to the Online Final bin.
3. Rename the sequence “Online Final” to indicate that it is
the complete and final version.
4. Load the final sequence into the Record monitor and the
audio mix into the Source monitor.
5. Sync up the audio and the sequence by the timecode.
6. The timecode should match exactly. If it doesn’t, hopefully
a sync pop has been provided for line-up purposes. If this
is not the case, contact the offline editor.
7. Remove any extraneous In or Out marks from the sequence.
8. Edit the audio into the final MOS sequence.
If the mix was delivered to you as a collection of audio media,
the media will usually arrive on a drive that you should have copied previously to a drive on the online system.
1. Duplicate the online MOS sequence and move the duplicate to the Online Final bin.
2. Rename the sequence “Online Final” to indicate that it is
the complete and final version.
3. Load the final sequence into the Record monitor.
4. Open the Offline Version bin and load the offline sequence
into the Source monitor.
5. Select “Clip Color Offline” from the Timeline Fast menu.
6. Press the Toggle Source/Record button in the timeline to
view the source timeline.
7. Confirm that no audio media are offline. Offline media
will display as red segments in the timeline.
8. If media are offline, select the offline edit in the bin.
9. Select “Clip Relink” to open the Relink dialog box.
10. Select “Relink offline nonmaster clips to any online items”
and deselect “Relink only to media from the current project.”
11. Select “All Available Drives” from the media pop-up menu
and click OK.
12. Check the timeline to confirm that all media are back
online. If not, contact the offline editor.
Chapter 9 CONFORMING AND FINISHING
13. Park at the head of both sequences.
14. Deselect all video tracks in the online sequence (in the
Record monitor) and select all audio tracks in the offline
sequence (in the Source monitor).
15. Overwrite the audio into the online sequence. The two
sequences should match perfectly.
Linking to Other Sequences
Sometimes you will have more than one version of the program to conform. Though it is possible that each sequence will
have some unique media, it is highly likely that the majority of
the media are shared between the two.
Once you have captured the media for one version you can use
the Relink command to associate the captured media with the
other sequence version(s).
Relinking by Resolution
One risk of relinking is that the Avid system by default will
relink to the first media it finds, regardless of resolution. As you
may have some of the offline media available, you can specify the
resolution to relink to.
Relinking by resolution also allows you to easily exchange projects back and forth between the online suite and the offline suite,
or between multiple workstations in collaborative situations
where additional editing, effects work, or audio mixing are performed. You can keep two or more sets of media available in any
supported resolution, and relink the sequences and clips to either.
The bottom of the Relink dialog box provides a set of options
that lets you control how the system relinks:
●
Relink method: Allows you to specify how to identify the
media to relink. The following options are available:
●
Most Recent: Relinks to the most recently created clip.
This option is selected by default.
249
250
Chapter 9 CONFORMING AND FINISHING
Highest Quality: Relinks to the highest-quality resolution.
Most Compressed: Relinks to the lowest-quality resolution.
●
Specific Resolution: Relinks to clips of a specific resolution and enables additional options.
Relink if quality: If Specific Resolution is selected as the
relink method, two additional pop-up menus are enabled:
●
Resolution: Allows you to specify the resolution to
relink to.
●
Relink Options: Allows you to instruct it to relink only to
the selected resolution or to relink to media of the
selected resolution and either higher or lower in quality.
This option is usually set to is equal to.
Unlink lower-quality media: If Specific Resolution is selected
as the relink method, this option is enabled. If selected, any
media that are not relinked to the specified resolution will
be unlinked. This option is normally selected when relinking to alternate versions.
●
●
●
●
To relink to an alternative version:
1.
2.
3.
4.
5.
6.
7.
8.
9.
10.
11.
Select the alternate version sequence(s) in the bin.
Select “Bin Relink.”
Select “Relink offline nonmaster clips to any online items.”
Select “Specific Resolution” from the Relink Method
pop-up menu.
Select is equal to from the Relink options pop-up menu.
Select the resolution you captured (usually 1:1 or 1:1 10b)
from the Resolution pop-up menu.
Select “Unlink lower-quality media.”
Click OK. The Avid system relinks the alternate version
sequence(s) to the recaptured media. If these versions
used other clips you will need to recapture them.
Select “Clip Decompose.”
Select “Offline media only and Digitized clips.”
Click OK to decompose the sequence.
If any other clips were used in the alternate versions, these clips
will be displayed in the bin for recapture. You can now recapture
them from the source tapes, as required.
Conforming to High Definition
If you are conforming in high-definition video, the majority of
the conform process is identical to that described above. But if
the offline was done in NTSC, PAL, or even in another HD format,
you must first convert the sequence to an HD format before
decomposing it.
Chapter 9 CONFORMING AND FINISHING
The conversion process is similar for all HD formats, but has
some slight variations. Before we discuss the additional conforming
steps required, let’s look at some fundamental parts of the process.
Compatible or Convertible Formats
In the Avid system all SD and HD project formats are either
compatible or convertible with other project formats.
●
●
Compatible formats share a common frame rate.
Convertible formats have a frame rate that is different
from that used in the offline.
Compatible formats conform very similarly to SD onlines,
while convertible formats require a few additional steps.
Compatible Formats: Switching a Project’s
Format Type
All SD projects can be switched to one or more HD formats
and back again. Depending on the original project
type those formats can be either 1080-line or
720-line. The only requirement is that all of the
formats share an HD format and back again. (The
same, however, cannot be said for 720-line HD
projects.) To switch a project’s format:
●
●
Open the Project window and select the
Format tab.
Choose the desired format from the Project
Type pop-up menu.
Table 9.5 lists the HD project formats that are
available for each SD project format.
High-Definition and Standard-Definition Clips
Notice that in Table 9.5, the compatible projects have the same
frame (or field) rate. Sequences and clips also have formats and
share the same compatibility as projects. When you create a new
sequence or clip (by import, log, capture, decompose, or some
other method) it inherits the project format.
If an SD and HD format are compatible, then sequences and
clips of the same two formats are also compatible. This means
that, for example, you can open a 30i sequence in a 1080i/59.94
project and that a 1080i/50 sequence can contain 1080i/50 clips,
1080p/25 clips, 720p/25 clips, 25i PAL clips, and 25p PAL clips!
Likewise, film-rate projects (24 or 23.976 fps) can also mix
SD and HD material even though neither NTSC or PAL were
251
252
Chapter 9 CONFORMING AND FINISHING
Table 9.5 Compatible Formats
SD Project Format
Compatible Formats
30i NTSC
1080i/59.94
1080p/29.97*
720p/29.97
23.976p NTSC
1080p/23.976
720p/23.976
24p NTSC
1080p/24
25i PAL
1080i/50
1080p/25
720p/25
25p PAL
25p PAL
1080i/50
1080p/25
720p/25
25i PAL
24p PAL
1080p/24
*At the time of publication, the 1080p/29.97 is only available if an Avid Mojo DX or Avid Nitris DX
is connected to your editing system.
originally progressive. Because the original SD material has been
converted internally to progressive clips, the clips can be mixed
with the HD progressive clips.
Convertible Formats: Changing a Sequence’s
Format
It is not possible to
directly modify the
format of a master
clip or subclip.
If the frame rate of a clip or sequence is not compatible with
the current project format, then the clip or sequence cannot be
loaded into the Source or Record monitor. You encounter this
most typically at this time with the 720p/50 and 720p/59.94
project types.
In these instances you must convert the sequence’s format so
that it is compatible, which is done via the Modify command.
Table 9.6 lists the sequence conversions that are available.
To convert a sequence, you must be in a project of the format
you wish to convert to. To change a sequence’s format:
1. Create and open a project with the final online format.
2. Copy a bin containing the sequence you wish to convert
into the project and open the bin.
3. Select the sequence in the bin and choose “Clip Modify.”
Chapter 9 CONFORMING AND FINISHING
253
Table 9.6 Convertible Formats
Project Format
Convertible Format
30i NTSC
720p/59.94
25i PAL
720p/50
4. Choose “Set Format” from the modification type pop-up
menu. The project’s format will appear in the pop-up
menu. In most instances, this is the only available option.
5. Choose the desired format from the Format pop-up menu.
6. Click OK to change the sequence’s format. In
most cases, a duplicate version of the
sequence will be created and the sequence
name will be appended with the new format.
Conforming Standard-Definition
Offlines to High Definition
Now let’s look at the possible conform workflows and list the
conforming steps required for each. The following section lists
every possible SD to HD conform available in Media Composer
3.0. You can use this list as a reference when it comes time to do
your next conform.
1080i/59.94 Online from a 30i NTSC offline
1. Create a 1080i/59.94 online project.
2. Copy the bin containing the NTSC offline sequence and
prepare for the conform as discussed in the “Preparing to
Recapture” section on page 236.
3. Confirm that the project format is set to 1080i/59.94.
4. Decompose the offline NTSC sequence.
5. Continue with the conforming workflow as discussed on
page 239.
If you are using a
version prior to
3.0 and are
conforming from an
interlaced to a progressive
format, the steps listed
below will be different from
what is required on your
system. Refer to your
system’s online help for the
steps required in your
version of Media
Composer or Symphony.
254
Chapter 9 CONFORMING AND FINISHING
1080p/29.97 Online from a 30i NTSC offline
1. Create a 1080p/29.97 online project.
2. Copy the bin containing the NTSC offline sequence and
prepare for the conform as discussed in the “Preparing to
Recapture” section on page 236.
3. Confirm that the project format is set to 1080p/29.97.
4. Decompose the offline NTSC sequence.
5. Continue with the conforming workflow as discussed on
page 239.
720p/59.94 Online from a 30i NTSC offline
1. Create a 720p/59.94 online project.
2. Copy the bin containing the NTSC offline sequence and
prepare for the conform as discussed in the “Preparing to
Recapture” section on page 236.
3. Modify the sequence and change its format to 720p/59.94.
4. Decompose the offline NTSC sequence.
5. Continue with the conforming workflow as discussed on
page 239.
720p/29.97 Online from a 30i NTSC offline
1. Create a 720p/29.97 online project.
2. Copy the bin containing the NTSC offline sequence and
prepare for the conform as discussed in the “Preparing to
Recapture” section on page 236.
3. Confirm that the project format is set to 720p/29.97.
4. Decompose the offline NTSC sequence.
5. Continue with the conforming workflow as discussed on
page 239.
1080i/50 Online from a 25i PAL offline
1. Create a 1080i/50 online project.
2. Copy the bin containing the PAL offline sequence and prepare for the conform as discussed in the “Preparing to
Recapture” section on page 236.
3. Confirm that the project format is set to 1080i/50.
4. Decompose the offline PAL sequence.
5. Continue with the conforming workflow as discussed on
page 239.
1080p/25 Online from a 25i PAL offline
1. Create a 1080p/25 online project.
2. Copy the bin containing the PAL offline sequence and prepare for the conform as discussed in the “Preparing to
Recapture” section on page 236.
3. Confirm that the project format is set to 1080p/25.
4. Decompose the offline PAL sequence.
Chapter 9 CONFORMING AND FINISHING
5. Continue with the conforming workflow as discussed on
page 239.
720p/50 Online from a 25i PAL offline
1. Create a 720p/50 online project.
2. Copy the bin containing the PAL offline sequence and prepare for the conform as discussed in the “Preparing to
Recapture” section on page 236.
3. Confirm that the project format is set to 720p/50.
4. Decompose the offline PAL sequence.
5. Continue with the conforming workflow as discussed on
page 239.
720p/25 Online from a 25i PAL offline
1. Create a 720p/25 online project.
2. Copy the bin containing the PAL offline sequence and prepare for the conform as discussed in the “Preparing to
Recapture” section on page 236.
3. Confirm that the project format is set to 720p/25.
4. Decompose the offline PAL sequence.
5. Continue with the conforming workflow as discussed on
page 239.
1080p/24 Online from a 24p NTSC or 24p PAL offline
1. Create a 1080p/24 online project.
2. Copy the bin containing the offline sequence and prepare
for the conform as discussed in the “Preparing to Recapture”
section on page 236.
3. Confirm that the project format is set to 1080p/24.
4. Modify the sequence and change its format to 1080p/24.
(Even though this is a compatible format with NTSC, you
must modify the format before decomposing.)
5. Decompose the offline sequence.
6. Continue with the conforming workflow as discussed on
page 239.
1080p/23.976 Online from a 23.976p NTSC offline
1. Create a 1080p/23.976 online project.
2. Copy the bin containing the offline sequence and prepare
for the conform as discussed in the “Preparing to Recapture”
section on page 236.
3. Confirm that the project format is set to 1080p/23.976.
4. Modify the sequence and change its format to 1080p/23.976.
(Even though this is a compatible format with NTSC, you
must modify the format before decomposing.)
5. Decompose the offline sequence.
6. Continue with the conforming workflow as discussed on
page 239.
255
256
Chapter 9 CONFORMING AND FINISHING
Additional steps
are required for
this conform as
you cannot convert a 24p
SD sequence directly to
HD. You must instead
convert it to 23.976 SD
and then to HD.
1080p/23.976 Online from a 24p NTSC offline
This procedure is required if the offline was edited at the “film”
rate of 24 frames per second (fps). Current broadcast delivery
requirements require that all film-based programs be delivered at
a video rate of 23.976 fps, which matches the slowdown applied
to NTSC (29.97 fps versus 30 fps).
1. Create and open a 1080p/23.976 online project.
2. Copy the bin containing the offline sequence and prepare
for the conform as discussed in the “Preparing to Recapture”
section on page 236.
3. Change the project format to 23.976p NTSC.
4. Modify the sequence and change its format to 23.976p
NTSC.
5. Change the project format to 1080p/23.976.
6. Modify the sequence and change its format to 1080p/23.976.
(Though not explicitly required, this step is recommended,
especially if you are working on a version prior to 3.0.)
7. Decompose the offline sequence.
8. Continue with the conforming workflow as discussed on
page 239.
720p/23.976 Online from a 23.976p NTSC offline
1. Create a 720p/23.976 online project.
2. Copy the bin containing the offline sequence and prepare
for the conform as discussed in the “Preparing to
Recapture” section on page 236.
3. Confirm that the project format is set to 720p/23.976.
4. Decompose the offline sequence.
5. Continue with the conforming workflow as discussed on
page 239.
720p/23.976 Online from a 24p NTSC offline
Additional steps
are required for
this conform as
you cannot convert a
24p SD sequence directly
to HD. You must instead
convert it to 23.976 SD
and then to HD.
This procedure is required if the offline was edited at the “film”
rate of 24 fps. Current broadcast delivery requirements require
that all film-based programs be delivered at a video rate of 23.976
fps, which matches the slowdown applied to NTSC (29.97 fps versus 30 fps).
1. Create and open a 720p/23.976 online project.
2. Copy the bin containing the offline sequence and prepare
for the conform as discussed in the “Preparing to Recapture”
section on page 236.
3. Change the project format to 23.976p NTSC.
4. Modify the sequence and change its format to 23.976p
NTSC.
Chapter 9 CONFORMING AND FINISHING
257
5. Change the project format to 720p/23.976.
6. Modify the sequence and change its format to 720p/
23.976. (Though not explicitly required, this step is recommended, especially if you are working on a version prior
to 3.0.)
7. Decompose the offline sequence.
8. Continue with the conforming workflow as discussed on
page 239.
Conforming Video-Rate Offlines to a
23.976p Online
When conforming a video-rate offline to a 23.976p online, you
have to make a series of assumptions. The first one is that the 2:3
pulldown was done so that the A frame is on either a “0” or a “5.”
This is usually the case for modern HD down-convert transfers.
If, however, this was not the case, you will need to modify the
Pull-in column and enter the appropriate timecode to the pulldown phase relationship.
Due to the nature of a “matchback” conform, the final
sequence will be accurate to 1 frame at each cut. In addition, as
the sequence must be converted to an EDL as an interim step,
most of the effects done in the offline will be lost.
1080p/23.976 Online from a 30i NTSC offline
This procedure is required if a production shot on film at 24 or
23.976 fps was offline edited within an NTSC 30i project. As the
HD conform must be done at 23.976p, you must convert the 30i
video sequence back to its original film rate before you can conform with the HD master tapes.
Part 1: Create a Matchback EDL
1. Create a new 30i NTSC project with Matchback enabled.
2. Open this new project, copy the bin containing your
offline sequence into it, and open this bin.
3. Choose “Bin Set Bin Display,” enable “Show reference
clips,” and click OK. This step is critical. If you do not display the reference clips, the system will not be able to convert the timecode format.
4. Choose “Bin Headings,” activate the Start heading, and
click OK.
5. In the bin, select the Start heading and press CtrlD.
A dialog box will appear asking you to select the column
you wish to copy the information to.
If Matchback is not
enabled in this
new project you
will be unable to continue.
It is not necessary,
however, for the original
offline project to have had
Matchback enabled.
This step assumes
that the telecined
tapes used in the
offline were transferred
with the A frames on 0’s
and 5’s.
258
Chapter 9 CONFORMING AND FINISHING
6. Select the TC 24 column and click OK. Twenty-four frame
timecode is generated for each master clip used in the
sequence.
This EDL format
may result in some
source reel name
changes. (But other options
may result in even more
changes.) You will need to
check the source list for a
cross-reference list of
sources.
7. Load the offline sequence into the Record monitor.
8. Choose “Output EDL” to launch EDL Manager.
9. Choose 24 from both the Source timecode and Record
timecode pop-up menus.
10. Set the EDL Type to “CMX_3600.”
11. Select “V1” from the video track pop-up menu. (If the
offline sequence has more than one video track you need
to generate separate EDLs for each video track.) Select the
long dash “(for no track)” from each of the audio track popups. (As only the video will be recaptured in the online, the
audio source tapes do not need to be considered.)
Chapter 9 CONFORMING AND FINISHING
259
12. Click the → button to load the sequence into EDL
Manager.
13. Choose “23.976” from the Project Type dialog box.
14. Choose “File Save As.”
15. Name the EDL and save it to an appropriate location on
your system.
16. Quit EDL Manager. This step is critical. You must quit and
relaunch EDL Manager for the conversion process to
work. You cannot simply “round trip” the EDL.
Part 2: Create a 23.976p Sequence
1. Return to the Avid system and close the 30i NTSC project.
2. Create and open a 1080p/23.976 online project.
3. Change the project format to 23.976p NTSC.
4. Create and name a new bin that will be used for
the converted offline sequence.
5. Choose “Output EDL” to launch EDL Manager.
6. From EDL Manager, choose “File Open.”
7. Locate the EDL you saved previously and open it. A dialog
box appears asking you to define the frame rate of the EDL.
8. Choose “24” and click OK.
9. Click the ← button to send the EDL to the Avid editor.
A dialog box appears asking you to select the project type.
10. Choose “23.976p NTSC.”
11. Return to the Avid editor. A dialog box appears prompting you to select a bin to receive the EDL.
12. Choose the appropriate bin, then name and save the
converted sequence.
13. Prepare for the conform as discussed in the “Preparing to
Recapture” section on page 236.
14. Change the project format to 1080p/23.976.
15. Decompose the offline sequence.
16. Continue with the conforming workflow as discussed on
page 239.
Conforming Mixed-Format Sequences
The Decompose function does not know how to differentiate
between SD-format clips and differing HD-format clips. Instead,
it will create new clips that match the current project format.
If you generated
more than one EDL
(one for each video
track), load the EDLs one
by one and generate
sequences for them. Then
merge the sequences
together.
260
Chapter 9 CONFORMING AND FINISHING
Therefore, you will need to decompose multiple times, once
for one set of clips (SD or HD) and then again for the remaining
clips. The order (SD then HD or HD then SD) is not significant.
The following section will illustrate the procedure for a mixed
30i NTSC and 1080i/59.94 conform. The other conforms that support mixed format clips follow a similar procedure.
1. Create a 1080i/59.94 online project.
2. Copy the bin containing the NTSC offline sequence and
prepare for the conform as discussed in the “Preparing to
Recapture” section on page 236.
3. Change the project format to 30i NTSC.
4. Decompose the offline NTSC sequence.
5. Sort the bin by tape name and delete all the clips that
came from an HD source tape.
6. Continue with the conforming workflow as discussed on
page 239 to recapture the SD clips. After you have finished
capturing the SD clips, return to this workflow to continue
for the HD clips.
7. Change the project format to 1080i/59.94.
8. Decompose the sequence. Be sure to select the “Offline
media only” option or you will decompose the clips you just
captured as well as those that came from an HD source
tape.
9. Continue with the conforming workflow as discussed on
page 239 to capture the HD clips and continue the
conform.
10
COLOR CORRECTION
“In visual perception a color is almost never seen as it really is—as it
physically is. This fact makes color the most relative medium in art.”
—Josef Albers
One of the most sophisticated toolsets within the Avid editor is
the color-correction toolset. Within color correction you have
access to a wide range of controls and adjustments that let you
make fine adjustments to the “look” of the images in your program. Avid Media Composer and Avid NewsCutter share a basic
version of this toolset while Avid Symphony contains a more
advanced version. In this chapter we’ll look at both sets of tools
but focus our attention primarily on the version in Media
Composer and NewsCutter.
Before You Correct
Color correction is a very precise mix of art and science. And
where you correct has as much affect on the image as how you
correct. Remember that although the camera’s eye does not lie,
the human eye (integrated with the brain) does “lie” all the time.
Our eyes correct for environmental lighting, such as incandescent
lighting, and show us what our brain perceives to be balanced
colors. This is why, for example, a sheet of white paper appears to
be white to our eyes in incandescent lighting even though it is
actually quite yellow in that light. As you can imagine, this can
make color correction quite difficult! If you can’t trust your eyes,
how can you correct? In order to properly color correct our environment must be conducive to proper color recognition. Optimally this means your environment should have:
●
●
A properly calibrated broadcast monitor.
Lighting of the correct color temperature.
261
262
Chapter 10 COLOR CORRECTION
●
●
A neutral gray wall behind the monitor.
An external waveform/vectorscope.
Let’s discuss each one of these elements.
Properly Calibrated Broadcast Monitor
SMPTE has
produced a
recommended
practices document
numbered RP 167 that
discusses proper monitor
calibration in detail.
At a bare minimum you should have a monitor that has been
properly calibrated to SMPTE bars so that its setup, gain, chroma,
and, for composite monitors, hue are properly adjusted. But for a
professional correction (or grading) suite, you should also ensure
that the monitor has a proper color temperature and that it has a
neutral grayscale.
The recommended color temperature for a critical viewing
monitor is 6500 Kelvin or what is often referred to as D65. Many
consumer monitors are much bluer in tone than a D65 monitor
and will not provide you with an accurate image. For example, if
the flesh tones appear too blue, but it is entirely due to the monitor, removing the blue cast caused by the monitor will result in
yellow flesh tones in your images. As yellow flesh tones can be
interpreted as jaundiced, you probably won’t have a happy client!
Purchasing a proper viewing monitor used to be a relatively
trivial matter as all manufacturers produced tube-based monitors that properly conformed to SMPTE spec. But now that the
industry has transitioned to LCD (liquid crystal display) and
plasma monitors, it is much more difficult to get a proper grading
monitor. Though these monitors have come very close in color
accuracy—especially LCD monitors that use LED (light emitting
diode) backlighting—they still have a problem displaying clean
accurate blacks. Significant improvements in LCD monitor quality and accuracy have been made, however, in the past two years
and hopefully these problems will eventually be resolved.
It is also important that a monitor have a neutral grayscale.
This means that the “color” of gray does not vary from black to
white. Many consumer television sets shift toward green in the
blacks and toward blue in the whites. If the monitor you are
correcting on introduces a shift that you then try to remove you
will create an undesirable result!
Proper Lighting
Remember that the color of an object is affected by the light
that illuminates it. It is critical that the light in your room is of the
same D65 color temperature as your monitor. With the advent of
compact fluorescent lights you can now inexpensively order D65based lighting. Certainly your big-box hardware store won’t carry
these, but a specialty electrical supply house should either stock
them or be able to order them for you.
Chapter 10 COLOR CORRECTION
Once you have the proper color temperature you should ensure
that the lighting does not directly reflect off your monitor. This
will affect how you view the colors displayed and will unquestionably affect the accurate display of black. Low-wattage bulbs are
recommended and will help with the reflection problem.
Proper Wall Color
Here is where you’ll have to tell the interior decorator to take a
hike. You don’t want a richly colored wall behind your monitor!
Instead you want a neutral gray wall behind your monitor. Ideally
this wall should be softly illuminated with D65 lighting. This type
of lighting is referred to as a bias light and is designed to create a
halo of properly neutral gray around your monitor. Your eyes use
this neutral background to keep themselves properly calibrated.
Believe me, if you look at an incorrectly calibrated image in isolation it will eventually look correct to your eyes. The bias lighting
helps keep that from happening.
You can take a gray card to a paint store and have them mix
you a can of gray paint, but make sure that you specify that they
must use a pure-white base. Many white bases are actually either
warm or cool in temperature as they provide a better base for the
paints consumers typically prefer.
External Waveform/Vectorscope
If you are serious about color correction, you need scopes.
Period. No argument or debate allowed. When you are color correcting you aren’t just making nice-looking images, you’re also
making images that meet a broadcast delivery specification.
This means that your blacks can be no lower than 0-mV digital
and your whites typically no brighter than 700-mV digital. There
is no way you can do this with just your eyes. You need scopes
to tell you the voltages in your image. Of course, you also need
to know how to read them! Teaching you how to use external
waveform/vectorscopes is beyond the boundaries of this book,
but you can find excellent books on scope usage. You should also
sit with a colorist and learn from him how they use scopes while
grading.
Avid includes a set of internal scopes in the color corrector
but these are rudimentary at best and no substitute for real
scopes. Certainly they are a good tool to learn and experiment
with but if you are going to make money color correcting you
need real external scopes. Internal scopes are never a proper
substitute.
263
264
Chapter 10 COLOR CORRECTION
Client Discussions
Finally, before you begin correcting it is a good idea to have a
discussion with the director and/or producer of the production
you’ll be color correcting. You need to know about the conditions
of the shoot and whether any footage was shot in a specific way, for
example, with a tobacco filter on the lens. There are few things worse
than assuming a special treatment is actually an error and correcting it out. That green fluorescent look might actually be intentional!
You should speak with them and determine the following:
●
●
●
●
●
Were there any problems in the shoot, such as white balance or lighting problems? Did anything go wrong that
would affect the color and exposure?
Was any specific filtration used or deliberate attempts
made to create a specific look in the camera?
Were any shots intentionally shot low contrast, day-fornight, or a similar specific treatment?
Do any of the scenes in the sequence require specific looks?
Is there any color in a shot that must be matched to a
physical sample or color?
As you have this discussion, go through the sequence to be
corrected with them and make careful notes as to their direction.
Ask them questions about what you see and whether they want it
corrected. (For example, on one episode of a program I corrected,
the female protagonist’s recent hair coloring reacted poorly to the
set lighting and, as a result, had a slight green tint. They appreciated my noticing and agreed that it should be corrected back to
natural blonde.) By taking the time to go through the sequence
prior to beginning your correction, you are not only showing a
level of professionalism, but are expressing a genuine concern for
the quality of your client’s work.
The Color-Correction Interface
When you enter color-correction mode you are presented with
a special configuration of the Composer window and the Color
Correction tool. Let’s take a look closer look at each one.
Composer Window
The Composer window switches to a three-monitor view, each
of which is configurable. By default they are configured, left to
right, as Previous clip, Current clip, and a Reference image. Each
monitor can be individually configured to show other items such
as the entire sequence, the next shot, or one of the built-in scope
Chapter 10 COLOR CORRECTION
265
displays. If you want to change one of the monitors, simply click
on the name of the monitor to display the monitor source menu.
The default configuration is generally recommended and gives
you two different comparison clips with the current clip you are
correcting.
At the bottom of each monitor there are a series of nonmodifiable buttons. Most of these should be familiar to you from other
parts of the application. The Play button has a special function in
color-correction mode. Instead of playing the sequence, it only
plays to the end of the current clip. The only exception to this
rule is if you play within a monitor configured to either show the
Reference image or the entire sequence. In these two instances
it plays from the position indicator to the end of the sequence.
As we’ll see, though, there are other ways to play through edits,
and I don’t recommend that you play within the Reference configuration. The entire sequence option is fine for screening
a scene or an entire sequence but there are other play options as
we’ll discover later in this chapter.
Using the Dual Split in Color Correction
The Dual Split button, located below each monitor in the Composer window, can be used just as in Effect mode to perform a split screen to show both corrected and uncorrected views of the current frame. Instead of using it as a split screen,
though, I recommend using it as a full-screen switch. If you drag the lower right corner of the split display to the lower right
corner of the monitor, you can use this button to quickly switch between the corrected and uncorrected version of a frame.
266
Chapter 10 COLOR CORRECTION
This is especially useful when viewing your correction in a video monitor and is a very helpful tool in preventing yourself from being “lost” in a correction. Sometimes when correcting you can lose track of the objective and what the shot
started as. Rather than disabling all the corrections in the Color Correction tool, simply toggle this button back and forth
and the image will quickly switch between the corrected and uncorrected versions. (I map this button to the Escape key
on my system when correcting as I use it so often in a grading session.) Unfortunately, you cannot play the uncorrected
version, as displayed by the dual split. If you need to play, you must disable the correction in the Color Correction tool.
The Color Correction Tool
Just below the Composer window is the Color Correction tool.
This is similar to the Effect Editor in that it contains all of the
parameters you will use to perform the correction. It is divided
into tabs, for major correction groups, and subtabs, for different
sets of parameters within a given correction group. In Media
Composer, subtabs are only used in the HSL group, though they
are used for additional groups in Avid Symphony, as we’ll see later.
Each tab, subtab, and parameter has an Enable button that
allows you to either toggle the correction on and off or, by holding the Alt/Option key, to reset the correction tab, subtab, or
parameter to its default value.
On the far left of the Color Correction tool are the Match Color
tool, which we’ll discuss later in this chapter, and the correction
buckets. The buckets provide you with up to eight savable corrections. (Versions of Media Composer prior to version 2.8 only had
four buckets.)
To save a correction to a bucket, simply Alt/Option click on a
bucket. Everything you have done in the active correction is saved
to the bucket for later use. To use a bucket’s correction, simply
click on it. The buckets’ corrections are stored until you quit the
program. If you want to save them for another session, simply
drag each bucket to a bin to save the correction. The corrections
will be automatically named for the bucket number to facilitate
their reloading in the next session. Reloading a bucket is as easy
as simply dragging the saved correction to the desired bucket.
Let’s take a look at the two correction groups available in the
Media Composer (or NewsCutter) Color Correction tool.
HSL Group
This group is called the “HSL” group because it operates in the
Hue, Saturation, and Luminance color space. The HSL group is
divided into two subtabs, Controls and Hue Offsets.
Chapter 10 COLOR CORRECTION
Hue Offsets
Hue Offsets is the default subtab displayed and contains the
majority of the tools you’ll use for primary HSL-based corrections. To the right are your three basic Luma controls, Setup,
Gamma and Gain, and to the left are your three color-balance
wheels. Let’s look closer at these controls.
●
●
●
●
Setup: Increases or decreases the luma voltage. Setup is an
additive control that increases all voltages by an equal
amount. It is primarily used to set the voltage position of
the blacks in your image.
Gamma: Adjusts the midpoint of the luma range. Increases
in gamma will increase the voltage of all luma values but
have the most affect on the middle voltages (those at
350 mV). Voltages near 0 and 700 mV are only minimally
affected. This control is primarily used to adjust the grayscale balance.
Gain: Multiplies the luma voltage. As gain is a multiplier,
the higher the voltage (and therefore the brighter the
value), the greater the increase. It is primarily used to set
the peak white in the image, though, as a multiplier, it will
affect all voltages.
Shadow chroma wheel: Adjusts the white balance of the
shadow region of the image. The shadow region is defined
by a shelf where voltages lower than approximately 30 mV
are completely affected by the adjustment. The curve then
slopes downward until just past 350 mV, resulting in a
gradual reduction in affect of the chroma wheel. This
wheel is primarily used to balance the blacks and shadow
detail in the image.
267
268
Chapter 10 COLOR CORRECTION
●
Midtone chroma wheel: Adjusts the white balance of the
midtone region of the image. The midtone region is
defined by a bell curve with the primary affect at 350 mV,
gradually sloping off in both directions until there is no
affect at approximately 100 mV and 600 mV. This wheel is
primarily used to balance the skin tones in the image.
●
Highlight chroma wheel: Adjusts the white balance of the
highlight region of the image. The highlight region is
defined by a shelf where voltages higher than approximately 670 mV are completely affected by the adjustment.
The curve then slopes downward until just below 350 mV,
resulting in a gradual reduction in affect of the chroma
wheel. This wheel is primarily used to balance the peak
whites in the image. Unfortunately, many images contain
highlights that are actually in the midtone range, so you
may need to use that control to manipulate them as well.
You can redefine
the shadow,
midtone, and
highlight regions in Avid
Symphony.
Controls
The Controls group contains six parameters and two switches
that can be used for additional correction within the HSL group:
●
Hue: Rotates the hues in the image around the color wheel.
A value of 120 results in red shifting toward green, while
a value of 120 results in red shifting toward blue.
Chapter 10 COLOR CORRECTION
●
●
●
●
●
●
●
Saturation: Increases or decreases the color saturation of
the image. A value of 100 is the default. This is the most
commonly used correction within the Controls subtab.
Brightness: Increases or decreases the luma voltage. Setup
is an additive control that increases all voltages by an equal
amount. It is primarily used to set the voltage position of
the blacks in your image and is functionally similar to the
Setup parameter in the Hue Offsets subtab.
Contrast: Increases or decreases the amount of contrast in
the image by applying a multiplier to values above 350 mV
and a divider to values below 350 mV. Though this can be
used to quickly establish a shadow and highlight in some
images, you are typically better off using the separate Setup
and Gain parameters in the Hue Offsets subtab.
Clip Low: Establishes a value, or voltage, below which all
voltages are hard-clipped to the desired value. In Media
Composer and NewsCutter this parameter is hardwired as
8-bit values and a value of 16 is equivalent to 0 mV.
Clip High: Establishes a value, or voltage, above which all
voltages are hard-clipped to the desired value. In Media
Composer and NewsCutter this parameter is hardwired as
8-bit values and 235 is equivalent to 700 mV.
Invert Chroma: Equivalent to rotating hue by 180 degrees.
Invert Luma: Inverts all voltages within the image around
350 mV.
The two Clip parameters are typically used at the end of a
correction to remove any stray voltages, such as specular highlights, that were not brought into the valid broadcast range by
adjustments of Setup and Gain.
Curves
The Curves group operates in the RGB (red, green, blue) color
space and allows you to control the voltages of the individual R,
G, or B channels separately (via their own curves) or as a group
(via the Master curve).
A curve is a graph that maps the relationship of the input
voltages of the image on the horizontal axis to the output values
of the correction on the vertical axis. (The input is what is being
269
270
Chapter 10 COLOR CORRECTION
fed into the correction and the output is the adjustment made
by the correction.) The default lower-left to upper-right diagonal
represents a neutral curve where no change is being applied to
the color channel or channels. Control points are provided at
the ends of the curve and you can add additional curve points to
make changes to the desired channel. Points to the left of the
curve are increases in voltage while points to the right of the curve
are decreases in voltage.
Color-Correction Workflow
Now that we’ve taken a look at the various parts of the Color
Correction tool, let’s examine how to best use them. Color correction truly is an art and a skill that can’t be learned in a single chapter
or a single session. Like editing, it takes years of practice and usage
for you to gain the eye and the aesthetic required. There are also
excellent books on color correction that I strongly recommend,
especially The Art and Technique of Digital Color Correction by
Steve Hullfish (2008), a book that examines this art from the perspective of professionals in the industry. Another great resource is
Avid’s own class on color correction, which is available directly from
Avid and at their Avid Authorized Education Centers worldwide.
There are many different approaches to correcting a shot but
all approaches have some of the same fundamentals. Therefore,
even though we can’t learn the art and the craft in a chapter, we
can discover a basic workflow that can be used as a starting point
in your exploration of color correction.
In order to correct a shot, the following must be done at some
point during the correction:
●
●
●
●
Set a proper, color-neutral black point.
Establish a well-balanced grayscale.
Create a neutral highlight.
Balance the flesh tones.
Certainly there will be exceptions to the rule—and shots where
a neutral tone is not desired—but for general correction all four
criteria listed above are generally met. Let’s take a look at how to
perform a correction that meets these criteria.
Establishing the Grayscale
The first stage to our workflow is to get the grayscale, or luma,
right. Remember that in video the foundation of our signal is the
luma. Therefore, it is critical that we have a well-balanced and
appropriately represented grayscale before we attempt to do anything with color. If you ignore this step you’ll find it very difficult
Chapter 10 COLOR CORRECTION
to get good-looking results and will often end up with muddy
results instead.
Establishing a proper grayscale typically makes use of three
parameters in the HSL group: Setup, Gain, and Gamma.
Setup: Setting the Black Point
The foundation of your image is its blacks. Virtually every image
should have a proper black somewhere in it. Certainly there are
exceptions to this rule, but as a general rule the absence of a rich
black will make the user think that the image is washed out. If this
is your intention then go for it, but if not, then get that black set.
A proper black should be close to but not drop below 0 mV.
(As we saw in Chapter 5, if you are measuring an NTSC analog
signal you should not drop below 7.5 IRE.) Use Setup to make this
adjustment, raising or lowering the voltage of the entire video
signal until you have a proper black. If the shot doesn’t have
a pure black, don’t force it to 0 mV—this is where the eye and the
aesthetic come in—but use your judgment to find the correct
voltage for the blackest blacks.
Gain: Establishing the White Point
Once you have a properly positioned black, use the Gain slider
to adjust the overall amplitude of the signal so that you have a
proper white as well. This does not automatically mean a white
that rises up to 700 mV, but it definitely means a white that does
not exceed 700 mV! Many shots will not have a pure white in them,
even when they are properly exposed. Here again, you must use
your aesthetic to find the right voltage for your white. Unless the
day is overcast, exterior shots often have at least specular highlights that should approach 700 mV even if the whitest white on
the subject doesn’t begin to approach that voltage. This is where
your scope can be a real aid to you. (You do have scopes, right?)
Leaving specular highlights far above 700 mV is recommended
only if you enjoy having your tapes rejected and doing freebie
make-do work for your clients. If you’d rather be paid to do your
work then don’t leave them up there! But don’t just use the Luma
Clip parameter to hard clip your whites. This will definitely be
necessary in some cases, especially for interior shots with blownout windows, but you should try to get the most image you can
within the 0- to 700-mV range before applying your clips.
For example, on a bright day the clouds can contain specular
highlights well above 700 mV. If you hard clip those clouds at
700 mV you’ll end up with white shapes that lack depth or definition instead of proper clouds. If you’re convinced you have a
good reason to do so, remember what many great teachers say to
their art students: Before you can break the rules, you must know
271
To help you focus
on the grayscale,
you may want to
temporarily set the chroma
saturation to zero. After
you are happy with the
look of your black-andwhite image you can set it
back to 100 and adjust as
required.
272
Chapter 10 COLOR CORRECTION
You’ve probably
noticed that I’m
talking about art
and aesthetic in this
chapter. I’m not doing it
just so I can channel my
college art professors; I’m
doing so because I firmly
believe that great colorists
paint with light just as great
cinematographers do. And,
a poor colorist can destroy
the brilliance of the best
cinematographer as easily
as the best colorist can
remove the imperfections
from an image and make it
truly brilliant.
the rules with every fiber of your being. In doing so, you create
art. Without such knowledge, though, you create randomness.
After establishing your white, you may discover that your black
has changed its position. Because gain is an amplifier, all voltages
are affected. Always check your blacks after making a gain adjustment and correct as necessary. Then make a quick check again of
your whites and tweak if required. You’ll find a lot of interactivity
between these two adjustments, so be prepared to go back and
correct any new problems that arise.
Gamma: Balancing the Grayscale
Once you are satisfied with the black and white of your image,
take a look at the overall grayscale. Does it appear to be well balanced or is it weighted too heavily toward the blacks or whites?
Certainly some shots are supposed to be dark, but don’t let the
grayscale be crushed to black. The Gamma adjustment changes
the grayscale balance and lets you properly position the majority
of the signal. If you would like your shot to be lighter in tone,
increase the gamma. If you’d like it darker in tone, decrease the
gamma. Just remember that you are making an adjustment that
can affect the entire image, black to white. Don’t forget to check
your black and white points after adjusting gamma as they may
well have been affected, especially if you had to move them by a
significant amount originally.
The following illustration, reproduced in color in the four-color
insert, shows the before and after grayscale adjustment of a typical
interior image (shot on HDV with available lighting and a blown-out
window). Two additional shots are also provided in the insert. Note
how not only does the corrected shot have a better balanced grayscale, but the voltages in the waveform monitor are also better balanced. (See Figures 1, 2, and 3 in the color insert for color examples.)
Correcting for Color Balance
Once you are satisfied with the grayscale it is ready to move
onto the chroma. Just as you adjusted your blacks and whites first
before working on the overall grayscale, the classic approach to
color balance is to make sure that your blacks and whites are
pure and color neutral. This is especially critical for the blacks
though arguably less so for the whites.
Balancing the Blacks
As mentioned previously, the blacks are the foundation of
your image and they must be properly positioned, both in luma
voltage and in color purity. You want to make sure that your
blacks are pure black and not polluted with any color cast.
Though you think you can do this with your eyes, this really is
Chapter 10 COLOR CORRECTION
Original Image Prior to Correction
Corrected Grayscale Image
best accomplished using external video scopes. If you have an
analog scope, the best pattern to use is the vectorscope with the I
line indicated. On a digital scope you can use either the vectorscope and I line, or the RGB parade.
Balancing the Blacks with a Vectorscope
A vectorscope is a display that shows you only the chroma in the
image. The available chroma is displayed in a polar graph with the
various hues arrayed around the circle like the hands on a clock. As
saturation increases, the display plots the hues further out from the
center of the graph. A lack of any chroma is plotted in the center.
As we want our blacks to be perfectly neutral, we need to identify
our pure blacks and center them on the graph. Though this is easiest
done with a real-time external scope, we can use the internal vectorscope with some practice. (The primary disadvantage of the internal
scope is that it is not “live” and interactive, but instead only updates
when you release the mouse button.) To identify the blackest
273
274
Chapter 10 COLOR CORRECTION
blacks, grab the control cross in the Shadow wheel and drag it
around (releasing it every so often if using the internal vectorscope).
As you drag you should see in the vectorscope a small black mass
or, less technically, blob that responds directly to your movement.
That blob represents your shadow tones, and if you center it in the
middle of the vectorscope you neutralize them, removing any visible color cast. (Even if you are ultimately going to shift the color balance of the image to something other than neutral—for example, to
provide a cool blue look often associated with a technical facility—
you still want properly neutral blacks in almost every instance.)
Chapter 10 COLOR CORRECTION
Balancing the Blacks with an RGB Parade Display
An RGB parade is a waveform display where the voltages of
calculated red, green, and blue components are displayed side by
side, left to right. These are typically calculated values because, as
you’ll recall from Chapter 5, a video signal is comprised of luma
and two color-difference signals, not R, G, and B. Because the
signal is ultimately decoded back to R, G, and B, though, this type
of display is extremely useful. Unfortunately, due to the nature of
its creation, it is typically only found on digital scopes, and not
analog.
As with using the vectorscope, the goal is to neutralize the
blacks. In this case, our blackest blacks are the lowest points on
our three parade graphs. To neutralize the blacks is to align the
lowest voltages so that they are equivalent. To accomplish this
you use the Shadow wheel and drag it (releasing it every so often
if using the internal RGB parade display) until the three patterns
are aligned at the bottom. As you are using two axes to control
three results, this takes a bit of practice to accomplish! You should
practice this technique, though, because experienced colorists
should be able to do this as if it were second nature.
Balancing the Whites
Now that you’ve balanced your blacks, you can move onto the
whites. If there is a distinct bright white in your image and it
should be white (such as, for example, a sheet of paper or a purewhite wall) then you can use either the vectorscope or RGB
275
276
Chapter 10 COLOR CORRECTION
parade display similarly to the approach you took with the blacks.
But if there isn’t a distinct region this is a bit trickier to accomplish. Indeed, if there isn’t a distinct black some colorists tell me
they actually approach the flesh tones before the whites.
Adjusting for Flesh Tones
The midtones are typically where we want to make the greatest
adjustment and, if there are faces in the image, the flesh tones
reside here. If you do not have any people in the shot, see if you
can identify a neutral object in the midtones and use the same
technique you used for balancing the blacks. It will probably be
easier to do this using vectorscope, but if the medium neutral
object is large and distinctive enough, you may be able to identify
it on the RGB parade display and use it instead.
If, however, there are flesh tones in the image, you are better
off balancing the midtones by these instead of a neutral object.
This is because the human eye is trained from the earliest age to
identify with faces and will notice an incorrect flesh tone long
before it identifies anything else as being incorrect.
For some, balancing the flesh tones is one of the trickiest parts
to correction. How do you know whether a flesh tone is right or
not? Fortunately, the logic behind how a video signal is stored
and captured can help you. On an analog vectorscope you’ll typically see two lines etched into the graticule. These lines, known
as “I” and “Q,” are key vectors in composite analog signals. They
are also axes that happen to correspond to flesh tones and green
foliage. The I line corresponds to flesh tones, and because all
humans share a common blood, the foundation of our skin color
is essentially the same. Though there certainly can be
exceptions, the reality is that nearly all human flesh tones
reside somewhere on or near the I line. Unfortunately,
this line is not displayed on the built-in vectorscope, but
it is readily available on analog and digital vectorscopes.
To balance flesh tones with the I line, simply drag the
midtone wheel back and forth until you identify the
region, or blob, of the signal that represents the flesh
tones. Then, move that region until it is on or near the I
line on the vectorscope. You can then “walk the I” up and
down, along the angle of the line, to either warm or cool
the flesh tones. It really is an amazing technique to know
as a colorist.
Color Correcting with Curves
This group is called the Curves group because it allows you to
redefine the output of the calculated Red, Green, and Blue channels
Chapter 10 COLOR CORRECTION
using an xy graph. The Curves group contains four graphs: one
each for red, green, and blue, and one called Master, which represents red green blue.
You also see four parameters that are duplicated from the HSL
group: Master Setup, Master Gamma, Master Gain, and Master
Saturation. These allow you to make either luminance adjustments (with Setup, Gamma, and Gain) or saturation adjustments.
It is important to understand, though, that these “Master” adjustments are processed prior to curves and the results of these
changes are fed into curves. This means that you can, for example,
change the saturation of an image that you will then adjust with
curves, but you cannot remove saturation from an adjustment
made in curves. This order of processing is critical to the colorcorrection process and cannot be changed.
The Curves group will be familiar to you if you’ve worked with
Adobe Photoshop. This is an incredibly powerful tool because it
allows you to remap each channel in a linear or nonlinear fashion. Indeed, when you first display the Curves group you won’t
see anything that resembles a curve, but instead see four diagonal lines. That is because by default the input values (on the
x-axis) and the output values (on the y-axis) are equivalent
and there is no change to the image. But if you add a point and
remap input to output, a curve appears that describes the change
from input to output.
Understanding Curves
The Curves group makes it easy to understand what the general result of an adjustment to a curve will be by the background
colors displayed for each curve. Let’s take the Red channel’s curve
as an example. If you add a point (or adjust one of the two initial
points) and drag it up and to the left you will add red to the
image. If you drag a point down and to the right you will add cyan
to the image. Why cyan? Well, what you’re really doing is removing red from the image and, according to color theory, when you
remove a color you can be seen as adding that color’s complement. The complement of red is cyan, just as the complement of
green is magenta and of blue is yellow.
277
278
Chapter 10 COLOR CORRECTION
The Master curve does not have any color cast because it applies
its adjustment equally to all three color channels. You might think
of this as a luma adjustment, but in reality it isn’t because it affects
both the luma and chroma signals. This is because, as we recall
from Chapter 5, both luma and chroma are used to calculate red,
green, and blue.
Though my personal preference is to do the majority of my correction work with the HSL group, the Curves group is extremely
powerful. I usually use this group to apply color treatments or
casts, rather than for general correction. That said, I know many
colorists who can very quickly do general correction with Curves.
It really comes down to your level of comfort and experience with
the tools.
Beyond color treatments or casts, I find that the Curves group
can be used for signal clipping, especially when you are trying to
remove chroma overvoltages that are difficult to otherwise
remove. If you hold down the Shift key while dragging the upper
control point, the point will travel diagonally down the existing
curve, adding a clipping line behind it. I use this technique all the
time when I have, for example, overly hot yellows that are overdriving my composite signal. A simple adjustment—for example,
to the Blue and Green channels—are often all it takes to correct an
otherwise problematic yellow and make it suitable for broadcast.
You will recall
these magic
numbers from both
Chapters 5 and 7. The
range 16–235 corresponds
to 8-bit values for the
voltages from 0–700 mV.
You can also use this technique to precisely clip the R, G, and B
signals at 0 and 700 mV, which will also limit your luma to 700 mV,
by utilizing specific values for the input and output axes. Below
each curve are two data entry fields that correspond, from left to
right, to the input and output axes. Setting both input and output
to 16 results in a clip at 0-mV digital, while setting them both to
235 results in a clip at 700 mV.
If you want to take this clip a bit further you can also add two
additional control points between the two and drag the higher one
up and to the right and the lower down and to the left to create
a classic S-curve shape. This shape has the effect of stretching
the voltages in the signal, resulting in a greater amount of contrast.
If you want the opposite result and a reduction in contrast simply
Chapter 10 COLOR CORRECTION
move the two points in the opposite direction. I use the contrastreducing S-curve less frequently but have found it to be extremely
useful for treating backgrounds in a graphics composite.
Correcting White Balance Problems
Another useful technique for Curves is to remove white balance problems in images. This is one of the most common problems I see with video productions because either the shooter
forgets to white balance, or especially in documentary work,
there just isn’t time to do a proper white balance when the characters are moving quickly from an exterior to an interior. Take a
look at the following illustration, also reproduced in the color
insert, Color Figure 4.
As we can see, most specifically in the color version of this
illustration, the current shot is far too red, especially when compared to our properly balanced reference shot. The RGB parade
also illustrates this lack of balance as the red channel is dramatically higher than either the green or blue. By lowering the red
channel while making a slight boost to the blue we are able to
remove the majority of the incorrect color cast. You’ll notice from
the color illustrations that we left a bit of the warmth in the shot
279
280
Chapter 10 COLOR CORRECTION
as compared to the reference as the producer preferred a slightly
warm look for the scene.
As with the grayscale adjustments, we’ve provided two additional white balance corrections in the color insert (see Figures 4,
5, and 6 in the color insert).
Creating Color Treatments
Finally, the Curves group is especially useful for creating color
treatments. For example, we have to be “trained” by watching to
feel that warmer colors equal a warmer actual temperature and
perhaps a happier scene, while cooler colors equal a cooler actual
temperature and perhaps a sadder scene. And certain locations
have a distinctive look. Los Angeles is typically portrayed as
warmer, while New York is typically portrayed as cooler. (For a
classic example of this type of treatment, compare the overall
looks of CSI: Las Vegas, CSI: New York, and CSI: Miami.)
Let’s look at how to do a couple of typical color treatments.
In each instance you should refer to the color insert for the
examples as they are difficult, if not impossible, to represent on
the black-and-white page.
For our first example, we’ll take a relatively warm scene and
cool it down. The producer wanted to represent a sadder time in
the character’s life and we’ve chosen to cool down the shot.
Cooling down a shot is generally accomplished by reducing both
red and green in varying amounts (usually more reduction in red
though some shots will require more reduction in green) and
increasing blue slightly. In this instance, we also lowered the overall luminance of the shot as well by reducing the Master curve in
the midtones (see Figure 7 in the color insert).
In our second example, the producer wanted a desaturated,
mildly sepia look for a flashback section. This was accomplished
by using the Master curve to reduce the overall contrast, lowering
the Master saturation, then slightly increasing the Red curve
in the midtones, while lowering the Blue curve in the midtones
(see Figure 8 in the color insert).
Playing within Color Correction
As we mentioned earlier, the Play button has a special function
within color-correction mode. Instead of playing through the
sequence, it will only play a single segment in the timeline. This is
designed to make it easy to analyze a shot prior to correction and
to play the correction after you’ve made it.
Chapter 10 COLOR CORRECTION
But there are times when you need to play through an edit
without leaving color-correction mode. In these instances, Avid
has provided special functionality while in color-correction mode
to two other play buttons.
●
●
Edit Review: This button works in conjunction with the
Trim Preroll and Postroll settings to play a portion of the
surrounding clips. (Remember that the Trim Preroll and
Postroll settings are located in the Play Loop tab of the Trim
settings.) For example, if the Trim Preroll and Postroll are
set to a default of two seconds, the Edit Review button will
play the last two seconds of the previous clip, then the current clip, and finally the first two seconds of the next clip.
Play Loop: This button instructs the system to play the entire
sequence in the active monitor, starting from the position
indicator’s current location. This button is extremely useful if
you want to play through a section of the sequence without
switching monitors or exiting color-correction mode.
I use Play Loop so extensively in my color correction work that
I’ve mapped it to the Tilde key.
Color Correcting with Avid Symphony
Avid Symphony contains a superset of color-correction capabilities that exceed those of both Media Composer and NewsCutter. It also has different ways of representing a correction.
Color corrections can appear in the timeline in one of three ways:
●
●
●
A green line on the bottom of the timeline, which indicates
that a color correction has been applied at the source level.
A blue line at the top of the timeline, which indicates that
a color correction has been applied at the program level.
A color-correction effect, which indicates that a color correction has been applied as an effect. These are most typically found when a color correction was originally created
on Media Composer, but they can also be created within
Symphony.
Source and program corrections are perhaps the most powerful aspect of Symphony’s color corrector as they allow a single
correction to be applied across multiple segments in the timeline. For example, a source relationship can be tape based and
automatically applied to all shots from a given tape. This is especially useful if the entire tape was improperly white balanced.
A single correction could fix all of the shots used from that tape.
They can also be applied to all segments edited from a single
master clip. Program relationships are track based and allow you
281
282
Chapter 10 COLOR CORRECTION
to apply a single correction to all shots on a given video track or
even, by using marks, to a range of clips on a video track.
You can select a relationship by choosing one from the
Relationship menu, located at the upper left hand corner of the
Symphony Color Correction tool. The source and program relationships are processed in parallel. If you select the CC Effect
relationship you can add a serial cascaded correction.
Now let’s take a look at the additional controls and groups
available within Avid Symphony.
Additional HSL Controls
The HSL group has been dramatically expanded and includes a
number of additional parameters, tabs, and subtabs. Let’s take a
look at each tab and discuss the differences therein.
Controls
There are a number of significant differences from the Media
Composer color-correction toolset.
●
●
●
Parameter location: All of the slider-based parameters are
contained in this tab, instead of being divided between the
Controls and Hue Offsets subtabs. This means that you
should look here for your Setup, Gamma, and Gain
parameters.
Highlights subtab: Provides a full set of parameters—with
the exception of the Invert and Clip parameters—that only
operate on the brightest regions of the signal. These parameters are especially useful for manipulating blown-out
regions of the frame. You can bring the blown-out portions
down to manageable levels without bringing the entire
image down in gain.
Midtones subtab: Provides a full set of parameters—again
with the exception of the Invert and Clip parameters—that
only operate on the midtone region of the signal. These
parameters are perhaps the least used of the HSL controls,
but can be quite helpful when you need to work more
closely on the flesh tones in an image. The Midtones
Gamma parameter is especially useful in these instances.
Chapter 10 COLOR CORRECTION
●
Shadows subtab: Provides a full set of parameters—with the
exception of the Invert and Clip parameters—that only operate on the darkest regions of the signal. These parameters are
especially useful for expanding—or stretching—the shadow
range. For example, if you are satisfied with the overall look of
the image but want deeper, darker shadows, you can use the
Shadows Setup parameter to stretch the shadows downward.
Arguably many of the parameters are overkill. For example,
you might wonder when one might use the Shadow Highlight or
the Midtone Setup, especially as they control very similar regions
of the signal. But the engineers decided to err on the side of completeness rather than remove a portion of the controls only to
have someone need them.
Hue Offsets
This tab is the least changed in the HSL group. The color in the
wheels has been removed to provide a basic vectorscope-like
display. You can reenable the color, though, from the Color
Correction settings. In addition, a fourth, Master parameter wheel
is provided. This wheel is used less frequently than the other
three, but can be used to make an overall change to the image. If
the shot has a severe color cast, you may be able to remove most
of the cast with a single Master wheel adjustment. Use it with discretion, though, as extreme adjustments of this parameter can
cause the signal to exceed typical broadcast delivery limits.
Luma Ranges
This tab is used to customize the luma ranges that define the
highlight, midtone, and shadow areas. Any customized ranges
283
284
Chapter 10 COLOR CORRECTION
will be used for both the subtabs within the Controls tab and the
wheels in the Hue Offsets subtab. Each range can be individually
adjusted.
If I make an adjustment to these ranges, I typically open up the
highlight range. As mentioned previously the default configuration of this curve only provides full affect between 670 and
700 mV. This is a fairly narrow range and I often see what I would
define as a highlight extending down to nearly 600 mV. By reshaping the curve I can include these voltages in my adjustments.
Channels
The Channels group is best thought of as a channel repair tool.
In it you have the ability to modify the signal by adjusting how
the RGB primaries are generated. This group is especially useful
if, due to poor white balance or a damaged encoder chip, one of
the Red, Green, or Blue primary channels in the image is either
very low in voltage or clipped. You may be able to recreate this
damaged channel by blending in information from the other
channels, from Luma or one of the color-difference signals, or
apply an offset. In some cases, especially if there was in-camera
clipping on one of the color primaries, these controls may mean
the difference between a usable and an unusable shot.
You can add or subtract up to 200 percent of any given signal
then apply a positive or negative offset to the end result. Up to
four signals can be mixed together to create the new color channel. To add a new component to the formula for a channel, simply click the More button to the right of the existing components.
Levels
Chapter 10 COLOR CORRECTION
The main function of the Levels group is to balance the contrast range, or tonal range, of an image. You do this by defining
the white point, gray point, and black point of the video material.
The group provides a great deal of control over the amount of
contrast and detail that is visible in the video image, especially
since you can make adjustments on the individual color channels. Think of the Levels group as a more refined and specialized
version of the Setup, Gamma, and Gain controls in the HSL tab.
In essence, the Levels group is very similar to the Curves group
in that you are adjusting input and output points for a correction
process. The major difference is that it can operate not just on the
RGB channels, but also on the luma and the entire composite signal. Both of these options only have black and white point controls and not gray point controls. One approach to using Levels is
to use it to set precise positions for your luma black and white,
rather than relying on the Setup and Gain parameters in the HSL
group.
Secondaries
The Secondaries group is the most powerful group within the
Symphony color correction. All other parameter groups are primary corrections that affect the overall color balance of an image.
A secondary correction, on the other hand, only affects a specific
range of color within an image. Symphony can define and correct
up to 12 simultaneous color ranges.
Secondary color correction works best when the range of colors that you want to affect does not appear elsewhere in the
image. For example, you can use a secondary color correction to
change the look of the sky as long as the blue tones of the sky are
not present elsewhere in the image.
You define a secondary vector by specifying a range of hue and
saturation. You can then modify those colors’ hue, saturation, and
luminance. For example, you might want to correct a shot of a
person wearing a bright yellow scarf. After earlier stages of color
correction, you are pleased with the image in general, but the
scarf remains too saturated. Applying a secondary color correction to the yellows allows you to bring down the saturation of the
285
286
Chapter 10 COLOR CORRECTION
yellows in the scarf without affecting any other colors in the
image.
The Symphony Secondaries provide two different types of vectors: standard and custom. Standard vectors allow you to select a
range of hue and specify a minimum saturation. They look like
pie wedges. Custom vectors allow you to select a range of both
hue and saturation and look like ellipses with the defined hue
and saturation ranges used as the two axes of the ellipse. You
define them by specifying a midpoint for both hue and saturation
then a range for each.
Conclusion
As you can see, the color corrector in both Media Composer
and Symphony is incredibly sophisticated and powerful. A full
exploration of the color corrector is worth its own book, but hopefully we’ve provided you with a primer that can get you started
with these powerful tools.
11
TROUBLESHOOTING
“ Trouble will come soon enough, and when he does come, receive
him as pleasantly as possible. Like the tax-collector, he is a
disagreeable chap to have in one’s house, but the more amiably you
greet him the sooner he will go away.”
—Artemus Ward
Troubleshooting is a detective story, an Easter egg hunt, and a
test of method, memory, and patience. It is rarely an excuse for
panic, since it is only by calmly tracing problems to their roots that
you will ever achieve the solution. The end result is to get back up
and running to finish the job and complete the vision. You cannot
separate the medium from the tools, even if you prefer to think of
Avid as a cloud of magic that exists at the far end of the cables.
Basic Troubleshooting Philosophy
You will never know how a system works until you know how it
breaks. This means you need to understand signal flow and basic
connections. When a part of your toolset is missing you need to
know where it comes from and be familiar with the points of failure. For instance, if you are trying to capture video, but receive
nothing but black, you need to work your way backward to each
stage that might be wrong. Is the Capture toolset right? Is the
video source type correct? Is the FireWire cable to the computer
connected? Is the Avid hardware turned on? Is the correct video
cable connected from the deck to the Avid hardware? Is it connected to the outputs of the deck? Is the cable bad or not fully
connected? What is the signal supposed to be on the tape? You get
the idea: Trace backward to isolate the single point of failure in
the signal flow.
As you form the hypothesis of the area that should be investigated (i.e., video flow from the deck), be sure to check only one
287
288
Chapter 11 TROUBLESHOOTING
area of suspicion at a time. This means you have two approaches
depending on the nature of the problem. In the case of a loss of
video, you could use a subtractive procedure of checking one
area before moving on to the next, such as replacing a problematic cable or trying another setting (like trying different video
monitor inputs). Eliminate a potential failure point, and move on
to the next.
Or you may want a more additive approach where you disconnect everything attached to the computer and add them back one
at a time. This additive method would apply to problems with
drives, networks, and other peripherals.
It is also useful if you can’t boot the system at all. Attach a
peripheral and reboot. If successful, then add another peripheral
and reboot again. If changing something doesn’t fix the problem,
then go back to the original state before you move on—there is
no need to complicate the search by eating the breadcrumbs
back to where you started.
Keep track of every piece of software that is added to the system and when it was added. If someone has added software that
loaded a driver (or another innocent piece of secret software) and
now the Avid software won’t launch, you should know what to
uninstall. Advanced troubleshooters should know how to get into
the Windows registry to delete recalcitrant “.dll” files, but for now
just be knowledgeable about uninstalling software and launching
to the last-known good configuration.
There are actually some very easy ways to get back to work
without much effort. First, if you encounter an error message, but
you’re allowed to continue, then quickly save and keep going. If
there is odd behavior after the error, you may be better off either
quitting and relaunching the application or rebooting the
machine. If you are on Windows then check the event viewer.
Right-click on “My Computer” and choose “Manage,” then “Event
Viewer.” You will see if there have been numerous errors in a particular area that may focus your troubleshooting.
RTFM
There are many everyday situations where just a little knowledge
of troubleshooting can keep you going forward, give you a bit more
confidence, and, maybe, help you keep your job. The first thing
that can help you instantly is to read the Release Notes. This falls
under the category of RTFM (read the fine manual), but some people skip it because they just want to be up and running with the
newest version no matter what. Stop, smell the roses, and read the
known bugs. Avid is pretty good about listing what they consider
Chapter 11 TROUBLESHOOTING
to be the bugs you need to know. Your definition of a bug and
their definition of a bug may differ, but you will definitely benefit
by seeing that, for instance, one small part of something you need
to do all the time doesn’t work under certain conditions. It also
helps to know if that procedure has been replaced by something
faster, better, and simpler. Even if you haven’t memorized the
Release Notes, they can generate a little thought bubble over your
head if something seems familiar. So don’t toss the Release Notes;
keep them handy and even scan them quickly before you call Avid
customer support. Over time the base of Avid users has migrated
to a larger percentage using Windows-based systems and now the
balance is about 50/50 with the Apple systems. Current Avid systems are shipping on OS X and Windows XP, but there are plenty
of users still on Windows NT, Windows 2000, and Macintosh OS 9.
x and earlier. For all of these versions there are still some universal
basics for troubleshooting.
Customer support has improved significantly over Avid’s early
days of explosive growth into a new industry and Avid takes support very seriously, but for you, that’s not really the point. There
is time involved in figuring out that you have a problem, realizing
you don’t know how to fix it, telling the other people in the room
that maybe they had better get some coffee, and then dialing for
help. It is better to say something like, “Hmmm, did you know
you are missing the active SCSI terminator?” and subtly imply,
“Aren’t you glad you hired me?” However friendly, competent,
knowledgeable, and good-looking Avid support may be, you want
to avoid talking to them until you have a serious problem.
Techniques for Isolating Hardware
from Software
Part of the trick of troubleshooting is to determine, before you
go very far, whether the problem originates with the hardware or
the software. If you have just installed new hardware (like RAM,
or replaced an old board with a new board) suspect that first.
Image distortion, with Meridien or ABVB systems, was typically
hardware failing instead of software (though of course there is
always the exception). No hardware can function unless it has the
correct software to interface with the operating system. So it
might not be the hardware itself that has a problem, but the driver
for the hardware. This can be a device driver, and Avid uses .sys
files for device drivers in Windows. For OS X, Avid uses kernel
extensions (even though they are not technically drivers, for the
most part they are the same as a driver). These drivers should be
installed in standard updater software as soon as the hardware is
289
290
Chapter 11 TROUBLESHOOTING
in place, but if you are replacing a board you may have to load a
new driver. Hopefully, this little bit of software came with the new
board and will install itself with a simple double-click and a
restart. Don’t pull out a “defective” new board until you have
installed any new software updates that may have been included.
Hardware Problems
There are four major areas of hardware problems with Avid systems: PCI boards, drives, monitors, and keyboards/mice. All
these areas include cables and connectors that go bad, and they
can all go bad if yanked hard enough. You can isolate drive problems by shutting down or disconnecting the drives. You can isolate monitor problems by switching the cables to another
monitor. Unless you have spilled sugary brown liquids on your
keyboard or mouse, then cables and drivers are guilty until
proven innocent.
Software Problems
There are two major areas where you could have problems in
the Avid application: the project files, bins, and user settings, or
the individual media itself. Try to separate problems with the
media playback from problems with the individual media itself.
Media can always be recaptured, but I’ll bet you don’t have a few
extra video cards hanging around. The best way to tell if a particular problem rests with a piece of media is to take a close look at
it. Step through the problem areas frame by frame. That will show
if the problem is there when the drives are not working so hard.
Any corrupt images or crazy colors that are visible when you are
looking at a still frame can be solved by recapturing that shot. If
you can’t see the problem, you must go one step deeper.
Is the problem playback related? See if the sequence plays back
without any of the media online. Go to the Macintosh Finder
level and dismount your drives. On the Macintosh you can do
this by dragging the drives to the trash (the drive icons, not the
folders inside). On all systems you can change the name of the
folder on the media drives from OMFI MediaFiles or Avid
MediaFiles to anything else. I just add an “x” to the beginning of
the name so I don’t get into trouble trying to spell the correct
name of the folder again when I am in a hurry. As discussed previously, any change to the name of the OMFI MediaFiles folder
causes all the media inside to go offline. Now does the sequence
play? If there are no errors, you know that the problem is related
to the media, the drive, or the SCSI/fiberboard. If you continue to
Chapter 11 TROUBLESHOOTING
get obscure errors (my favorite is BadMagic), then you need to
look at the media databases, sequence, or the actual media.
Media databases are small files in every OMFI MediaFiles
folder. As mentioned in Chapter 4, currently they are called
“msmFMID” and “msmMMOB” on Windows and “msmOMFI.
mdb” and “msmMac.pmr” on Macintosh. Sometimes these files
become corrupted and do not update correctly. This may result in
files not appearing in the Media Tool or media appearing offline
when you know for sure the media are there. You must force the
media databases to be updated and you can do this by forcing the
update with the pulldown function Refresh Media Directories. If
this doesn’t work you may be forced to delete or move the media
database files to another folder. This will force a recreation of the
file from scratch. Moving or deleting the media database file will
force a rescan of all of your media drives, which may take a few
minutes, depending on how much media you have. After the
rescan and recreating of the media database files, you may have
successfully herded all of your lost media back online.
If the sequence or the media are the problem then you must
practice “divide and conquer” to find the offending media file or
element in the sequence. If you suspect that it is bad media, not
just the drive, then bring all the media files back online before
using this technique. Then split the sequence in half and try to
play the first half. If it plays, then try to play the second half. If
you have problems with the second half then divide that in two
and repeat the procedure. Continue this until you isolate the area
of the sequence that is corrupt. It may be a single graphic, master
clip, or effect. Delete the effect, replace the graphic, and either
extract or overwrite the master clip. Consider deleting related
precomputes and re-rendering. Recapture the master clip to see
if it is just that media. If you do not have access to the original
tapes or files, consolidate the media file to another drive and see
if it plays. If the problem remains, you may have to relog and capture the master clip to eliminate the problem.
There may be something corrupt in your bins, your project, or
your user settings. This is so easy to test that many times it is one
of the first things an Avid support representative asks you to do.
Generally, I suspect this particular problem when something that
has been working fine all day stops working or features that
should be available are suddenly not there. Create a new bin or
project and drag the clips and the sequence you were working on
into the new bin.
The next step is to remake your user settings. This should be a
fast check to see if creating new default user settings will clear up
the problem. If it does, then spend the time to recreate your settings. Better yet, call up an archived version of your user settings
291
292
Chapter 11 TROUBLESHOOTING
that has been hidden where no one can get to it. You should
always have a backup of your user settings, and as a freelancer
you will want to carry them with you. These user settings may
also be corrupted, but chances are pretty good that they are not.
Again, make sure you have new user settings for every major
change in the software. If you call up a really old group of user
settings, it may be incompatible with new menus and functions
in subtle, but important ways.
If the user settings are causing the problem, delete the old settings from the User Settings folder. Do not throw away the
AvidDefaultPrefs in the User Settings folder since this file holds
all the standard bin headings and will not be recreated automatically. Make sure you know what files are in the Site settings before
you delete those; the files may contain vital standards settings
that are required for every project. You can cover yourself by moving these files into a temporary folder rather than deleting them.
If moving them does not solve the problem, move them back.
Audio Problems
In general, if you have an audio playback problem check the
audio meters, the sample rate, then the cabling. You may solve the
problem by powering down the computer and cycling the power
on the Avid audio hardware. Check obvious issues like mixer
power or speaker power. Trace the audio flow through the whole
system, making sure you have a signal at the beginning, and go
step by step to the end.
Quickly check audio meters by using Ctrl/Command1 to call
up the Audio Tool and playing the media. If there are no levels at
all then the audio media may be offline or at a different sample
rate than the Audio Project setting. You may want to click on the
PH button in the Audio Tool and choose “Play Calibration Tone.”
If you can see the levels, but can’t hear the tone, then you have a
cabling problem with the output. Turn down the volume before
you try this method—it will be greatly appreciated by everyone
else in the suite.
A sample rate is the amount of audio samples that are played
back per second to reproduce digital sound. There are four common sample rates in video editing today: 32 kHz, 44.1 kHz, 48 kHz,
and 96 kHz. There are higher sample rates but they are used
mostly for high-end digital audio workstations like ProTools HD.
Sample rate mixing in ABVB systems was a problem never
addressed until Meridien systems. You can’t play back multiple
sample rates in the same ABVB project, and you can’t convert
from one sample rate to the other within the Avid software. Both
Chapter 11 TROUBLESHOOTING
of these issues are solved in Meridien-based systems and later.
Use SoundAppPC with Macintosh, a freeware utility that can be
used to convert audio sample rates for ABVB systems, or recapture the audio at the correct sample rate.
To track either problem, isolate the sequence into its own bin,
and through Set Bin Display, choose “Show Reference Clips.”
Choose bin headings Offline and Audio Sample Size, then sort
(Ctrl/CommandE) to find which clips have audio offline and
which clips are at the wrong sample rate. With a Meridien system
or later you can convert the individual clips to the proper sample
rate using “Change Sample Rate” under the Bin menu.
Alternately, you can go to the Audio Project settings and choose
“Show Mismatched Sample Rates as Different Colors” and look at
the sequence. If you have different colors in the timeline then
you should consider converting the sample rates or changing the
Audio Project setting “Convert Sample Rates When Playing” to
“Always.”
You may experience clicks when editing some digital audio
because the edit cuts in the middle of an audio sample. This
might be especially prevalent on imported audio CDs. You can fix
this quickly by adding two frame dissolves between the cuts.
Error Messages
If you are not used to working on complex professional software, you may not be used to generating error messages. Write
down the ones you see and, if they do not keep you from continuing, call Avid customer support after the session and get the
official explanation. Saying, “I got an error” isn’t enough to let
Avid customer support help you figure out the problem. It may
be something systemic or it may be operator error. But if it is a
“Fatal Error,” you should be on the phone immediately if you
don’t know what caused it. After working on the system for a
while, you will learn what causes the most common errors, and if
you keep a log of when they occur and to whom, you can identify
the pattern that applies to your own system, facility, and way of
working.
The real trick to error messages is deciphering them. They may
be colorful but essentially meaningless until you figure out what
the function is that has gone wrong or what kind of pattern they
follow. A section of the programming code always generates a
specific error message when something goes wrong. Essentially,
error messages tell you what happened, not why. This is because
the same error could have been caused for ten different reasons.
The computer cannot look outside of itself and say, “You have too
many unrendered effects at 2:1, the wrong terminator on media
293
294
Chapter 11 TROUBLESHOOTING
drive 4 A, and that last sound effect on audio track 6 just put me
over the edge!” It will say “Audio Underrun,” because what happened was that it could not continue to play every frame of audio
and video through that segment of the sequence. Many times this
is the only explanation that the computer can confidently produce for why it cannot play.
The Importance of Connections
Let’s look at the basic world of connections. You may have
enjoyed playing air guitar to Molly Hatchet, but air SCSI doesn’t
work as well unless it’s correctly connected to something.
Connections are one of the first things to look at, especially if you
have just moved the system. “I just moved my monitor and now it
is broken” will lead most support representatives to check your
cables to the monitor.
Many of the connections to the computer have electricity running through them and connecting anything “hot” can cause a
component to burn out. A good rule of thumb is not to change
connections while the computer is running (not including audio
or video to an external source like a deck).
Cables that are screwed in tight don’t come loose so quickly.
This seems obvious, but many facilities decide it is easier to have
them not screwed in so anyone without a Phillips head screwdriver can move things and make changes quickly. Do yourself a
favor and buy a screwdriver with one end Phillips head and the
other end flat. Tighten everything on the back of the computer
and anywhere else you can tighten things down. Of course, if you
yank really hard, you still have problems, because now you have
loosened the computer board it was attached to or even ripped
the wiring out of the connector!
Make sure that things are fastened down away from big feet
and spilling coffee, but don’t pack them away so tightly that you
can’t get at them to take a look. Get a few bags of little plastic tie
wraps from your favorite electronics store and wrap cables
together in logical groups. You have to cut the tie wrap to pull
them apart at some point, but this is still better to discourage the
unauthorized, and you can always wrap them again when you are
done. The cost compared to downtime is negligible.
Good engineers leave a little slack in all their carefully tiewrapped suites so that any piece of equipment can slide forward
enough to see around back. Large, easy-to-read labels that are
also easy to understand make any phone call to Avid customer
support less embarrassing. “Is the video input connected?” “Uh,
you mean cable VI649?” If you need to call your own video
Chapter 11 TROUBLESHOOTING
engineers, at least you will be sure that the problem is not software related. Also contemplate moving everything in the Avid
suite a few feet away from the wall and mounting a small, clip-on
lamp back there. This gives the system some more air if the room
tends to get warm and will give you easy access.
USB and PS2 Cables
One of the silliest problems that seems to happen often is with
the keyboard cables. USB is the newest version, but some
Windows systems also use PS2 cables, especially for keyboards.
You don’t want to have too many USB devices connected at once,
and be careful about using USB extenders. This is a good place to
look if peripherals are acting strangely. First, let me caution
everyone who is thinking of pulling this harmless-looking USB
cable and reconnecting it while the system is running. You may
have done this a hundred times, but the next time you do it, you
can fry your keyboard or even your motherboard. Any cable that
has power running through it has the capability to create a power
surge or damage sensitive electronic parts by “hot-swapping” or
changing the connection while the power is running through it.
Unfortunately, all keyboard and peripheral computer cables
are always about an inch or two too short and so are under a certain amount of tension all the time. Many times just a slight pull
is all it takes and your system appears to crash. You try all the keyboard reboot commands and nothing works and finally you go to
the computer processing unit (CPU) itself to press the reset
switch. When everything comes back online—surprise! You still
don’t have control because what really happened was the keyboard cable had come just slightly loose.
SCSI Connections
A USB connection is basic and straightforward compared to
the scariest of all computer connections—SCSI (small computer
system interface). The term “SCSI voodoo” may not be completely foreign to you and for a good reason. Even though you
may follow all of the complicated rules of SCSI or simplify your
system to minimize them, you may still encounter situations that
just don’t make sense.
Basic SCSI Rules
There are some basic rules to keep in mind no matter what
your SCSI configuration is. If you want peak performance and as
many streams of real time as possible, you should consider still
using SCSI drives. In many cases, fiber drives will be sufficient,
295
296
Chapter 11 TROUBLESHOOTING
but FireWire drives will not be much good for the higher resolutions and full amount of advertised real-time streams. FireWire
drives get faster and larger all the time, so check the specifications
to make sure you can get the throughput you need. If you are cutting long-form, single-stream, or dual-stream projects like feature
films and documentaries, you may find the FireWire drives sufficient. For everything else, SCSI and fiber are recommended, and
for uncompressed high definition (HD), SCSI is still the best. Of
course, when we see 10-Gbps fiber switches, all bets are off!
On older Macintosh systems there was an internal SCSI card
with every system. It was really meant for things other than video
streams. For example, you could connect up graphics, audio and
backup drives, removable media, scanners, or the ancient external three-dimensional (3D) effects “pizza box” (the Pinnacle
Aladdin) to this internal SCSI connector. The real power was in
the SCSI accelerator card that Avid included to connect the media
drives. Most high-end PCs have an internal SCSI connector that
is quite fast and may be enough for your standard-definition (SD)
needs. If you have another card, however, you can add more
drives to the system. And if you use a dual-port SCSI card you can
get even more speed from your drives through striping (which we
will cover later). Keep in mind, the more things you have connected at once, the more complicated your SCSI troubleshooting
will be.
Keep the length of your SCSI connections as short as possible.
The cables that ship with your drives are meant to be that short
because anything longer than the maximum length of normal
SCSI chain causes serious voodoo behavior. There are many supported types of SCSI drives: Classic SCSI-1, Fast and Wide SCSI-2,
Ultra SCSI-3, and Ultra2 LVD (a variation of SCSI-3). Each type
uses different cables and different cable lengths. So rather than
try to outguess the manufacturer, stick to the length that comes
with the system. The length of the cable used for the entire SCSI
chain must take into account the length of cable inside each
drive. That can add up pretty fast at over a foot per drive. A common mistake is to take one look at the length of the cables that
came with the drives and rush out to the electronics store and get
the longest cable you can find. Avoid the temptation to use these
and keep the cables short.
Make sure all your SCSI cables are of the same brand, type, and
style—different cables may have different internal configurations
that may cause some devices to just never work right. This is why
it is so important when mixing different types of drives to get all
the cabling and termination correct, as we will cover later.
SCSI cables are very sensitive to twisting and must be handled
more carefully than any other cable on the system. Just bending
Chapter 11 TROUBLESHOOTING
an SCSI cable back and forth a few times can significantly reduce
its functionality. Don’t strain, kick, stomp, or bite them.
Finally, turning drives on and off has its own set of rules. Make
sure all SCSI devices are turned on and have clearly come up to
speed before powering on the CPU. Listen for each drive to make
a single “click” sound when it has finished spinning up. Keep all
SCSI devices on if they are connected in the chain to ensure consistent behavior. Turn off all peripherals only after the computer
has shut down.
There are lots of complicated rules about SCSI, especially when
you are combining the newer ultra drives with the older narrow
drives. These four terms—ultra, fast, wide, and narrow—refer to
the speed and capabilities of passing larger amounts of data
through the SCSI chain. The drives themselves don’t look all that
different.
Drive Striping
You can get better performance from any drive by combining it
with other drives in a striped set. Drive striping is a way to make
many drives act as one large, fast drive. There are five main types
of drive striping, but the two to remember for Avid systems are
RAID 0 and RAID 1. RAID 0 (redundant array of independent
disks) is what most people mean when they stripe drives together
for more real-time effects. You use the drive striping software that
comes with Avid, mount all the drives, and stripe them into one
large drive with multiple read/write heads and thus faster seek
time to find or write media. This process will erase all the media
on the drives, so do it only when they are new out of the box or
when you have backed up all important material. You can even
stripe drives across multiple SCSI connections if you have a dualchannel SCSI PCI board. If you have four newer drives and a
dual-channel SCSI board, you can create what is called four-way
striping with two drives on each SCSI channel. It is highly recommended to do this on the Adrenaline systems for a maximum of
real-time effects based on many streams of video. Four-way striping is a good way to continue using older, slower drives, too, but
there is a drawback. If one drive fails, you will lose all the data on
the other three drives, too.
RAID 1 is also called drive mirroring and is used in Avid Unity
MediaNetwork. This means that you have a duplicate drive for
every drive full of media and the duplicate is created during capturing. You can decide to turn this on or off on Unity depending
on your needs and the importance of the project. If you choose
to use it then you may not even notice when a drive fails. You will
continue to keep editing and can replace the failed drive when
you have some time to spare. Avid is working on systems that fail
297
298
Chapter 11 TROUBLESHOOTING
even more elegantly, without duplicating drives. These systems
will eventually heal themselves by spreading redundant data
across all drives, so that when a drive fails, it can be recreated on
a spare in the background without an effect on performance.
Termination
All SCSI chains must be terminated. Termination is the way the
computer knows where the end of the chain is and which drive is
the last device. It keeps the signal from bouncing back to confuse
the computer with false signals. Technically, the chain must be
terminated at the beginning and at the end, but on most CPUs
(all the newer ones and all the ATTO cards), the termination at
the beginning is internal. This means that you need to attach
the terminator that comes with the drives to the last drive in the
chain. Don’t worry about termination at the beginning of the
SCSI chain (although occasionally that internal termination can
fail, too). Always be sure to use an active terminator, the purple
terminator that came with the narrow drives or the blue one
that came with the termination kit for the wide drives. With
the new low-voltage differential (LVD) drives the terminator is
beige and has an LED that indicates whether it is in the LVD
mode (green) or single-ended (amber). We’ll discuss the difference when we deal with mixing drive types. Don’t use the generic
gray terminators from the electronics store—they are generally
not active.
SCSI ID
The most basic SCSI rule is that the SCSI ID, the number associated with this drive in the chain, must be unique to the chain.
This usually becomes a problem when you add a new drive to the
SCSI chain or bring a drive over from another system. Always
check to see that the new drive does not have the same SCSI ID
number as another drive already on the system. The SCSI ID is
set on the back of standard drives with a pen or other pointed
object; on MediaDocks it is set on the front panel. The fact that
this fundamentally important piece of information is a small
number on the back of the drive again points out the importance
of having access to the equipment after it is installed. How do you
know which numbers are being used unless you can stick your
head back there with a flashlight and read them upside down and
backwards? The best way may actually be another piece of software—the Avid Drive Utility (ADU) on the Mac or the Computer
Manager on Windows XP. These utilities show you the correct
SCSI ID even if the ID number on the back of the drive is broken
and displaying a wrong number! ADU has a facility to flash the
lights on the front of the drives, so if you physically label the
Chapter 11 TROUBLESHOOTING
drives, this can help when troubleshooting. You can also cause
the drive lights to flash by copying a small file to that drive or
striped set. Of course, you need to be able to boot your system
with the drives attached in order to use this software. The new
LVD drives finally have the SCSI ID on the front of the drive.
Getting the wrong SCSI ID may cause the system to not boot
correctly or even to damage data. On a Macintosh system, the
desktop may also indicate that you have many more drives connected than you really do. When there is a problem with the SCSI
chain on startup with an older Macintosh, you may get the flashing question mark icon. This is because the system cannot find the
startup drive with the System folder on the SCSI chain. You have
somehow confused the SCSI chain that has the internal Macintosh
startup drive.
With narrow drives, you can use only the numbers 0–6 for an
SCSI ID. A wide drive can use 0–6 and 8–15. Never use SCSI ID 7
on any SCSI device since this is the number used by the SCSI card
itself (which is also technically an SCSI device) or by the host
computer. On the older, internal Macintosh SCSI chain, avoid
SCSI ID 0 because that is the ID used by some internal system
drives. Internal CD-ROMs generally are set at the factory to use
ID 3, so when attaching devices to the Macintosh SCSI chain, you
should avoid SCSI ID 3 as well. Scanners and Iomega Zip drives
may use SCSI ID 5 or 6. When you are adding and subtracting
drives from any system, the ID is the most important factor in
making sure the drives work happily together.
Most new computers use the IDE (integrated drive electronics)
or SATA (serial advanced technology attachment) internal drives
and IDE or SATA connectors for CD-ROM, DVD-RW, and other
internal devices, so you don’t need to be concerned about an
internal SCSI chain. However, you will still need to take into consideration that an SCSI board (either one that ships with the basic
computer or an Avid-installed accelerator) will take up an SCSI
ID, which usually will be 7. If you have a choice about adding
peripherals other than drives, like scanners, CD-ROM burners, or
anything else you want to connect to your Avid system, choose
USB or FireWire over SCSI to help eliminate conflicts.
Connecting Wide and Narrow Drives
We have already discussed the difference between narrow and
wide drives and, when you upgrade to wide or ultra drives, you
need to figure out how to connect them to the same SCSI chain
with the narrow drives. The slower (narrow or wide) drives must
come last in the SCSI chain.
When connecting wide and narrow drives on the same chain,
you need a special termination kit from Avid. Wide drives use a
299
300
Chapter 11 TROUBLESHOOTING
68-pin connector and narrow drives use a 50-pin connector. The
difference is more than cosmetic, however, since there are more
active pins inside the 68-pin connector, and these extra pins must
be terminated before connecting to the narrow drive. You get a
new wide cable to go between the last wide drive in the chain and
the first narrow drive, a small blue terminator/adapter that allows
this cable to connect to the narrow drive, and a blue terminator
to go onto the last drive in the chain.
Use the standard wide cable (68 pin to 68 pin) to go from the
computer to the first wide drive. Then use the termination kit
cable (also 68 pin to 68 pin) with a special blue terminator adapter
(68 pin to 50 pin) added to it from the kit when you connect the
wide and narrow drives together. Finally, use the special blue terminator on the last drive in the chain.
Cables to connect the wide SCSI card to the narrow drives (68
pin to 50 pin) are very different from cables that appear similar
for connecting wide drives to the narrow drives (68 pin to 68 pin
with a 50-pin adapter/terminator). Even though this narrow cable
may connect, you will have nothing but problems connecting
wide drives to narrow drives. It is a good idea to label these cables
“for narrow use exclusively.” It is better to lock up the 68-to-50pin narrow cables somewhere after upgrading to wide drives.
Connecting LVD Drives
Ultra LVD are the fastest SCSI drives offered by Avid. They can
easily play back 1:1 resolution with a two-way stripe across two
LVD disk controllers. LVD drives require the same 68-pin cables
as the fast and wide do, but if you connect an LVD drive to an
SCSI chain with a slower drive, it drops its speed to match. In
other words, an LVD drive that is connected with an iS Pro drive
will perform only as fast as the iS Pro. With the cost of drives
plummeting these days, it is a good idea to use only your fastest
drives for media playback on the SCSI chain. Take the older drives
and connect them to a server for backup over a network or for
graphics and compression stations.
There are still many complications to the SCSI chain, but these
are the basics. Even if you follow all these rules, you may find that
a particular drive works on ID 4 but not on ID 2. You may never
find a good reason for this (although there is a reason). You may
also find that the order of the drives in the chain makes a difference even though all of the termination is correct at the end of
the chain. And above all, you may have to juggle extra devices on
the internal SCSI to find the best order. Slowly rebuilding the SCSI
chain one device at a time and rebooting is often the only way to
isolate where the problem is occurring and identify the problem
device, cable, or terminator.
Chapter 11 TROUBLESHOOTING
Audio Connections
Audio connections have multiplied in type and format over the
years. There are now digital stereo pairs (AES/EBU XLR connections), S/DPIF, Optical, and analog (multipin octopus cables on
the Adrenaline and Nitris and RCA connectors on Mojo). On Nitris
there are two microphone inputs for live-audio punch-in for
voiceovers and multiple language overdubbing. On Nitris and
Adrenaline there are also quarter-inch phono jacks for monitoring
so that you no longer need any splitter cables for audio outputs.
With this cornucopia of choices, you may want to simplify
everything with a small, inexpensive audio mixer. This will allow
you to permanently connect many audio sources like tape decks
and DVD players. Also make sure that all of your digital devices
are calibrated to the same reference level. Many older systems
are calibrated to 14 dB and this caused a problem with inputting audio from Digital Betacam decks. See Chapter 9 for a full
discussion of audio calibration.
If you have self-powered speakers, connect the speakers to a
power strip with everything else and turn them on through that
strip. This is a good idea for most of the equipment since it lessens the possibility that a piece of equipment will be left off accidentally. If the speakers are on and you still have no sound, check
the Audio Tool (Ctrl/Commmand1) to make sure you actually
have audio playing back. Change the timeline view to show
Media Offline and see if the audio segment in the sequence timeline lights up bright red. Using the Audio Project settings, make
sure that the sample rate is set to the same rate the audio was
captured at or set so that it will convert between the two sample
rates when playing. The sample rate of the audio can be confirmed with a heading in the bin or by looking in the Console,
which clearly will tell you that you have a sampling mismatch.
This means you will not have to recapture just to hear the audio
play but you will still need a roll of black gaffer’s tape for something, so keep it handy!
The Black-Burst Generator
A black-burst generator (BB Gen) is like a synchronizing clock
for video or audio. It provides a steady source of a perfect video
signal: black. If you do not use a black-burst or sync generator,
your audio and video sync may drift apart over time. This is especially obvious when capturing or outputting long takes or
sequences with analog sources and decks. I highly recommend
getting a black-burst generator if it doesn’t come with the system
you ordered.
301
302
Chapter 11 TROUBLESHOOTING
Connect the BB Gen to decks, monitors, and your Avid hardware. Looping it through several devices is fine, but don’t overdo
it. Eventually you will attenuate the signal too much through
multiple devices and it will fall below the minimum signal level to
be effective. Digital decks like Sony’s Digital Betacam will supply
sync to Avid during capture. When you have set your Audio
Project settings to accept a digital signal then the audio sync is
provided by the deck. If you shut off the digital deck you will get
an error message complaining that you have lost sync. You should
switch the Audio Project settings back to analog sync.
Many decks require a stable signal to their composite video
input when they are playing back, especially the Sony UVW-1800.
If you are using the component inputs and outputs, consider
connecting the BB Gen to the composite video input permanently. It makes it easier to “black” tapes when you are not using
the deck for anything else. Just set the deck input to composite,
set the correct timecode, and start to black and encode a tape
with no other input. Just remember to switch it back to component input before you leave the room!
Connect signal generators like black-burst, color bars, and trilevel sync as permanently as you can and design a system that
requires as little connecting and disconnecting as possible.
Consider patch bays, mixers, MediaDocks, and networks. The less
wear and tear you put on cables, the more reliable and long lasting they will be. A little more initial investment during the planning stages can positively reduce troubleshooting downtime in
the future.
Standard Computer Woes
Even if you successfully eliminate the potential for problems
with connections, there is still the potential for standard
computer-type problems. Unfortunately, these kinds of problems
are not easily solvable by the typical IT department, even if you
are lucky enough to have one. This is one of the reasons it is a
good idea to be able to take care of your own computer problems.
Standard computer support personnel are going to be at a loss
with Avid problems unless they have been through some training
for the specific requirements of high-resolution video.
Access to Original Software
One of the last solutions to difficult, intermittent, or unusual
problems is to reload the software. Avid customer support may
ask you to reload the Avid software, the Macintosh or Windows
operating system, or both. All users of the system should have
Chapter 11 TROUBLESHOOTING
access to these disks. A big mistake, commonly made, is to lock
up these disks safely away from anyone who might need them,
probably at 3 am. Make sure the disks are the most recent and
correct versions of both the operating system and the Avid software. You may cause even more problems by loading an unapproved version of the operating system!
Access to the Hardware
None of these techniques does you any good unless you actually have access to the computer itself. Some installations have
cleverly hidden the system away in another room or rackmounted it in a machine room. If you are completely forbidden
to touch the hardware because of facility or union rules, then forget about it. You can just hand the phone to the appropriate
authority. Otherwise you must, phone in hand, be able to look
around back and see that all the cables are tightly connected, that
the power to everything is on, and read the disks’ SCSI IDs.
This means that you should look into getting a good engineer
to set up your suite. Good engineers are worth much more than
their salaries when they save you the embarrassment of your first
several jobs going out the door with bad levels because you were
monitoring the audio in the wrong place! Make sure, before the
engineer leaves, that you have a thorough understanding of the
cabling and get a wiring diagram you can refer to.
Media Management
Another day-to-day concern mentioned before is the management of media on the drives. You may think that you are efficiently deleting all media as you finish each project, but you may
be surprised to find all sorts of odd bits of precomputes and
imported graphics and so forth floating around on your media
drives. The best way to keep a handle on this is to delete media
from the Media Tool and not through individual bins. That way
you see the project from a big-picture point of view and can evaluate on a project-by-project basis what must go and what must
stay. It also keeps you from accidentally deleting media from
another project just because you dragged a duplicate of someone
else’s master clip into the bin you are now deleting.
The real problem, not only with having many unnecessary
small objects on your drives slowing down performance, is that
the drives may accidentally become too full. You should always
keep a minimum of 10–15 percent free space on any partition or
drive. There are all sorts of files, like the media file database,
303
304
Chapter 11 TROUBLESHOOTING
which occasionally must get larger to accommodate the changing
nature of the media on the drives. Don’t worry about defragmenting media drives, but overfilled drives corrupt media and may
crash and take everything with them.
A more difficult problem to diagnose is when you actually have
too many files in a single folder. If you are working with 9-GB partitions and capturing offline resolutions, you may find that on
long or complicated projects you are exceeding the limit on the
number of files that can be in one folder on a Macintosh. This
occurs because Avid must restrict the disk cache to the minimum
figure in order to reduce digitizing underruns. This can be 96 k
on older systems and 128 k on recent systems. This limits the
practical number of files in the OMFI MediaFiles folder to around
1200. If there are more than 1200 files (or approaching 1200
depending on the size of the files), you may have difficulty booting the system or opening the OMFI MediaFiles folder. If your
system is exhibiting these symptoms, you may want to raise the
amount of the disk cache (in the Memory Control Panel), move
items to another folder, and change the disk cache back again
later. If you are always working with offline resolutions, you may
want to limit the drive partition size to a maximum of four
gigabytes.
Deck Control Tips
There are several other reasons why you might not have deck
control. When you open the Capture Tool, you may see the
message “No Driver.” The first thing to do is to try to reload the
deck configuration or force the system to “check decks.” Both of
these choices are at the bottom of the Capture Tool under the
Deck Model pulldown menu. If this doesn’t work, then you
need to do some digging. Obviously, check the cable connections
first. You may have a V-LAN or VLX, which is an external
deck control device from Videomedia that gives you a wider
range of deck control choices. If so, then make sure you are using
the V-LAN or VLX cables and not the Avid-supplied deck control
cable.
If none of this works, you may want to check your Release Notes
or user manual to make sure you are using a supported deck. Even
if the deck is not supported, you should be able to get some limited control using the generic deck choice in the Deck Template
window of the later versions. With some DV devices, the only way
to get your deck recognized may be to do an auto-configure.
This will usually result in a generic device, which can then be
switched for a particular template using the Deck Configuration
settings.
Chapter 11 TROUBLESHOOTING
Basic Windows Troubleshooting
The main objection I hear many editors use to avoid switching
from Mac to Windows (besides the politics of “monopoly” versus
“insanely great”) is the fear of troubleshooting a more complicated operating system. The ease of access to the Macintosh
System folder is a double-edged sword, and moving vital resources
in and out on a whim is the cause for many editing problems. It is
also something that many editors have spent time to learn and so
can do some basic troubleshooting on their own. Switching to
Windows means you must relearn the top ten things to do when a
problem arises.
A serious problem with Avid Windows editing systems is when
somebody changes something from the original shipping configuration and the system will not boot. This is handled easily by the
Windows OS during the boot process when it gives you the opportunity to invoke the last-known good configuration. Press the
space bar and then type “L” when prompted. This will bypass any
changes the last user may have tried and will load a configuration
that worked the last time the system booted successfully. You may
then try again to get the configuration to be the way you want;
however, if the present configuration did indeed boot correctly,
then it will be the last-known good configuration, and you will
need to look elsewhere to find the problem.
Windows XP Recovery
Windows XP is designed with a feature called System Restore.
This keeps track of the system configuration and saves them at
crucial times as known reference for when the system was running well. If you are having problems starting your system you
will want to take the choice of starting in Safe Mode, which disables part of the operating system that may be causing problems.
Then you can use System Restore, uninstall problematic programs, or run diagnostic programs on your disk drives.
If you are extra cautious about restoring your system you may
want to look into a third-party program like Norton’s Ghost®,
which has many options for creating mirrored copies of your system drive. You would be able to switch over to the mirrored drive
if you were under pressure to continue working without time to
troubleshoot.
Reinstalling Avid Software
If you are missing a file or a file has become corrupted, you
may want to reinstall only those problem files. By loading the
305
306
Chapter 11 TROUBLESHOOTING
Avid software installation CD-ROM, you can do custom installations to replace drivers, codecs, or anything else you may suspect
as being a problem.
You may want to reinstall the entire Avid application just to
start from a clean slate. You may want to move all your AVX
plug-ins and AudioSuite plug-ins to another location so they
don’t get erased; however, if you suspect that the plug-ins may
have something to do with your problem, you may want to reinstall them as well. Be sure you have all the registration information for plug-ins that require being registered the first time you
use them.
Version Numbers
You should always have, either in the back of your head or written down someplace accessible, the version number of almost
everything associated with your system. First and foremost is the
version number of the current Avid software. You should know it
down to the last digit because every small change in the software
has a reason. Avid puts out what they call the gold version of the
software, the most tested and most stable version they can
achieve within the time allowed before it must be released.
Version 11 is an example of a gold release. Release dates are based
on complicated interrelationships all lining up at the same time.
If, after the gold version is shipped, some features didn’t make it
into the software, even though they were planned, there may
be other releases with an extra decimal point. Release 2.1 is
an example of that since it included the color-correction interface for Symphony. There may be some procedures that were not
tested and appear to have problems, so there may be another
revision called a patch release. A patch release is meant to
fix one or two small problems. This would be version 6.5.1v2. The
important thing to remember about all these releases is that you
might not need any of them except the gold version. The other
versions have not been tested as thoroughly as the gold release
because of the importance of getting out a fix in a timely manner.
Most of the time this is not a problem, but asking for a patch
release if you don’t absolutely need it pushes the envelope
unnecessarily.
It is always best to have all the systems in your facility running
the same version of the editing software. Most versions are forward compatible, but not backward. This means that a bin created in version 5.5 opens fine in version 6.5, but not the other
way around. Once a bin has been opened in the higher version, it
has been converted forever to that version. By just opening the
Chapter 11 TROUBLESHOOTING
bin once in version 6.5, you may not be able to open it in version
5.5 again. You have to export the bin full of clips as a shot log and
import it into the earlier version. Unfortunately, this does not
work well for sequences. A bin converter program goes between
versions 6.5 and 5.5.1, but it is best not to depend on such
complications.
If you are forced to change systems in the middle of a job,
always insist on the same version of the software or later. You
should know the version of the operating system you are using.
Some versions are not approved for some models, and you
should make sure that your computer can run the latest software
before you install it.
Always make sure you know the latest version of Macintosh
operating system that Avid has tested. If at all humanly possible,
try to get all your Macintoshes to run the same Macintosh operating software. Even experienced editors can make their Avid system unstable by loading an unapproved copy of the operating
system. Do not do this casually, and make sure someone else
doesn’t do it for you just to keep you up to date on the latest
must-have features. Keeping everything interchangeable is a
valuable goal and should not be complicated by an IT person or
an especially enthusiastic editor who wants to put the newest
software on the machine as soon as it is available.
Version numbers also carry over to the hardware. Each of your
boards has a revision number, which should be considered during troubleshooting. You may have an old version of a board or a
version with a known conflict. You can check the revision of your
hardware in several places. If you have Avid software running,
look under the Hardware Tool (in the Tools menu) to see configuration and drive use information. A utility called Avid System Test
allows you to get more detailed information about each PCI
board (if you have any). This is the better answer if you can’t actually launch the Avid editing software. If Avid System Test (called
the Avid System Utility on older systems) can’t see the PCI board
at all, calling it an unknown board, or if the slot is empty, then
that tells you the problem is with the board or the way it is
mounted in the slot.
Every utility that ships with your Avid system has a specific version number. The ones that ship are the ones that are meant either
for that hardware or that software. Grabbing a version from
another system just because it is newer may get you into trouble.
Certain versions of the Avid Drive Utility, for instance, are designed
primarily for four-way drive striping. The rule of thumb is: If the
new version has a tangible improvement, completely compatible
with your system and supported in the Release Notes, only then
should you load it onto your computer.
307
308
Chapter 11 TROUBLESHOOTING
Electrostatic Discharge
The sneakiest and hardest problem of all to diagnose is one
that is very easy to create: damage related to electrostatic discharge (ESD). You may not realize it, but the human body can
store and discharge frightening amounts of static electricity.
Shuffling across the carpet with a relative humidity of 10 percent
generates 35,000 volts! Compare this to the smaller, faster devices
that are needed to achieve the kind of performance necessary to
keep the system running happily, and they have a range of susceptibility of several hundred volts.
You can zap a component with static electricity by touching the
outside of an ungrounded device or, more probably, by opening
the device to do some simple troubleshooting. You may be asked
to remove or add RAM or to reseat a troublesome board. Any time
you are going to open a case, be concerned about voiding a warranty or causing ESD damage to the sensitive components inside.
The key to touching anything inside the system is to be
grounded. Being grounded ensures that any buildup of static electricity is channeled off to a ground and dissipated. This is best done
by wearing a grounding wrist strap and connecting it to a ground
or to a metal component inside the computer. Most important,
make sure the computer itself is grounded. The best way to ensure
this is to plug the computer into a grounded outlet. An even better
solution is to plug the computer into a grounded power strip that
is plugged into the wall socket and then shut the power strip off.
That way you are not supplying power to the computer while you
are working on it.
The scariest thing about ESD is that it doesn’t always kill—
sometimes it just maims. A board or a RAM chip that receives a
substantial shock may not fail right away. It may not fail for days,
weeks, or months. It may start to show intermittent behavioral
problems that cannot be isolated. These are absolutely the worst
kinds of problems to troubleshoot because they may not occur for
long periods and may not be of a type that points to any one component. It may be the CPU itself that received the shock, and no
matter how many boards you replace, it does not solve the problem. This is why ESD should be treated so seriously; any time you
handle a component or open the computer, you should be very,
very careful.
Calling Avid Customer Support
If, after all these precautions and general maintenance, you
must still call Avid customer support, at least take heart in a very
Chapter 11 TROUBLESHOOTING
short, best-in-class wait time. To make it go even faster, have
certain answers prepared since almost all support calls start with
the same basic questions. Know your versions, operating system,
CPU model, and Avid model. Be able to describe what you were
trying to do when the problem occurred. This is especially crucial
for video engineers who have not taken the time to learn the software. The editor describes the problem and the engineer cannot
explain it to the support representative in enough detail. What is
the exact wording of the error? Some errors are pretty obscure like
“missing a quiesce.” Write it down and don’t fake it with “something was missing, I think.” When did the problem begin? Right
after you put in the new RAM? Pull the RAM out. Does the problem
happen every time you perform a particular operation or is it really
random? Can you repeat it? The simplest answer to any error that
seems random is to shut down the computer and restart.
The other very important thing you need to give to customer
support is your system ID. If you don’t have a system ID, you may
not get any support! That is the way Avid determines whether you
or your company has a valid support contract. This is not something you want to discover at 3 am. The system ID can often be
found by running a utility called either Dongle Manager or
Dongle Dumper, but if you can’t launch the computer, that won’t
help much. Write it down or use Dongle Dumper and print it out.
Consider how much more helpful your customer support representative will be if you do not immediately launch into a tirade
of abuse. They know you are frustrated or you wouldn’t have
called. They are trained to help and to help calm you down, but
you can make everyone’s job easier by being civil and professional. And if you don’t hear the hold music, you are not on hold,
so don’t say insulting comments about them to everyone else in
the suite. The representative may have his or her headset muted,
but he or she is still listening!
We can’t deal with all the techniques, potential problems, and
error messages in this short space. If you want to know more about
your system, there are courses in troubleshooting and a whole curriculum to become an Avid Certified Support Representative. You
don’t need to be a technician to keep your system running happily
most of the time, but you should have some basic knowledge of
what is going on under the hood. Good maintenance routines and
a healthy dose of caution are two necessary items when dealing
with sophisticated and complicated systems. Keep it simple and
you will be rewarded with fewer steps and less stress when you
need to troubleshoot.
309
This page intentionally left blank
12
NONLINEAR VIDEO ASSISTANTS
“ The best servant does his work unseen.”
— Oliver Wendell Holmes
With the adoption of new technology has come the blending of
postproduction responsibilities. Producers and writers become
offline editors, offline editors become online editors, and the difference between film and video begins to blur. One thing that this
shift has created is many new people who can edit well, but who
don’t have the inclination, ability, or time to get involved in the
technical requirements.
This opens up the possibilities for an important position: the
nonlinear assistant. There have always been film assistants whose
responsibilities are pretty clear. They handle all the day-to-day
requirements of film handling, organization, and preparation for
the editor. There have also been video assistants in the past,
although their roles have changed through the years and at times
have been eliminated altogether. It is inconceivable to lack a film
assistant on a major feature, but many high-end production companies operate quite well without video assistants.
Assistants are very important if the design of the postproduction facility is focused around a central machine room. The editor
initiates the communication via an intercom system and tapes
are changed, set up, and dubbed by a voice on the other end.
Occasionally, the assistant is in the same room and can speed up
the editing process by doubling as a sound engineer or a character generator operator.
The elimination or devaluing of the video assistant makes it
harder for young people to break into the business. Since the film
assistant on a nonlinear project may work a second shift while
the editor works throughout the day, there is less opportunity for
the interaction between master and apprentice. With tense clients who are paying large sums per hour for time-critical work,
311
312
Chapter 12 NONLINEAR VIDEO ASSISTANTS
the production company that puts an unknown or untested
quantity in the driver’s seat is taking a risk. They may lose their
client forever to the competition or may have to discount the session to appease them.
How, then, do you break into this business? There are no second video assistants like there are in film, so what is the entrylevel position? Many times it is whatever the facility needs at the
time: a tape dubber, a receptionist, even a courier; however, with
the advent of nonlinear editing, there is the nonlinear assistant.
In large and busy nonlinear postproduction facilities, there may
be one nonlinear assistant per shift and three shifts per day. The
entry-level position then becomes the graveyard shift and eventually the day or evening shift, where editors can discretely
observe skills that keep them in demand. The job doesn’t really
require the ambition to become an editor, but the people who
gain the most from the nonlinear assistant position are those
who need to know these subtle skills to move on to the next level.
What responsibilities should these assistants be expected to
perform? Much of the knowledge they need has been covered in
this book. In fact, many editors perceive many of the techniques
in this book as something only an assistant would perform.
Others see it as required knowledge before starting a job! It is
when a facility desires such a specialization of labor, either for
personnel or billable reasons, that the assistants have the most
value. They must perform all of the functions and have all the
knowledge required to keep the systems running. The postproduction supervisor instructs the assistant on all the requirements
to keep as many jobs running smoothly as possible. The administrator or supervisor sees the big picture, and the assistant performs the tasks.
These important daily tasks include capturing, media management, basic maintenance, backup, and output. Anything that is
required to prepare the suite for the editor and the smooth transition from one project to another is appropriate for the assistant.
Each facility has its own set of requirements, but mastery of all
these skills can make someone very valuable to any busy postproduction facility.
Capturing
Capturing also implies following logs, creating bins, setting
levels, and understanding drives. The logs are handed off with the
understanding that the marked takes or possibly everything should
be captured and the master clips named according to the description in the logs. Bad logs mean bad bins unless the assistant knows
Chapter 12 NONLINEAR VIDEO ASSISTANTS
something about the specific job and is given the freedom to create better master clip names.
●
●
●
●
●
●
Assess each take as to whether only video or only audio
should be captured, thus maximizing use of disk space.
Don’t capture video for the voiceover!
Check to see if everything, even incomplete takes, should
be captured.
Don’t assume that just because there isn’t enough drive
space that certain shots must be left out. It is the assistant’s
responsibility to find the drives, connect them, and capture everything as required.
The bins can be named based on tape name, and the editor will determine where to put the shots based on content
later.
Watch the audio and video levels! Distorted audio and
blown-out video can come back to haunt the project at the
finishing stage.
Learn how to read a vectorscope and waveform monitor or
risk being bypassed by those who can!
Drives
Understanding drives is crucial to making sure the captured
video can be played back. There is a setting called Drive Filtering
under the General Setting. If this is on, only drives capable of playing back the selected resolution are available. Unfortunately, when
people use non-Avid drives, they must disable this setting all the
time. This is because when the system does not recognize the
firmware loaded onto the media drives, it assumes the drive is
incapable of higher-resolution playback. This is not always true,
but it is safer than assuming every drive can play back every resolution. Not paying attention at this stage can mean having to copy
huge amounts of material to the proper drives. Generally, however,
if there is a mismatch between resolution and drive capabilities,
there will be an error about either the video or audio overrunning
its buffers.
●
●
●
●
If you can, split the audio and video to separate drives, not
separate partitions of the same drive.
The drives should be named so there is no confusion
between what is a new drive and what is just another partition on the same drive.
Never overfill the drives. Leave a minimum of 10–15 percent free space on any partition.
Have a thorough understanding of SCSI principles (terminators, IDs, etc.).
313
314
Chapter 12 NONLINEAR VIDEO ASSISTANTS
●
●
Be sure you can recognize the difference between drive
types and speeds so that you do not slow down the performance of all the drives on the SCSI chain by adding a slow
drive in the wrong place. Have the right SCSI terminators,
cables, and adapters.
All drives should have unique names and physical labels
so they can be moved to any system and still be identified.
Understanding drives also means knowing how to resuscitate
an ailing one and knowing when to call it quits and get another.
The number of drives returned to Avid with nothing wrong is
astounding. If you can get a drive back to full health in an hour or
two, how does that impact the production schedule compared to
waiting for the morning rush delivery?
●
●
●
●
●
Know the replacement policies of your non-Avid drives.
Learn how to use all the Avid drive utilities and make sure
you have the latest versions.
Don’t always load the newest firmware until you know all
the ramifications for your configuration. Read the Release
Notes if in doubt.
Know how to mount, repartition, and, as a last resort, perform a destructive read/write test.
Dealing with very large media files still requires different
rules for maintenance. Don’t assume you can run any drive
utility on a media drive.
Media Management
All the media on all the drives is under your jurisdiction so
knowing what to keep and what to discard is both incredibly
important and commonplace.
●
●
●
●
●
●
●
●
Know how to lock and unlock media files and delete
precomputes.
Know how long it takes to copy media from one drive to
another.
Delete media through the Media Tool, Media Manager,
or drag entire projects to the trash in their media folders
after using MediaMover. Have a regular plan to delete
precomputes.
Understand the network and how it helps you to move
media efficiently.
Learn MediaMover and the Unity Administration tools if
your facility has them.
Become the network expert if you can and research the
possibilities.
Figure out how to improve network throughput.
Reduce the number of drives that must be moved.
Chapter 12 NONLINEAR VIDEO ASSISTANTS
Basic Maintenance
If you aspire to become an editor, there are people who will hold
your technical expertise against you. They think you cannot be
technically proficient and a true artist. You may have to work a little
harder to prove them wrong. It takes only a couple of success stories where you save the system and the project before employers
see the value in an editor who reduces his or her own downtime.
●
●
●
●
●
Take a Macintosh or Windows support class or a basic
troubleshooting class.
Consider becoming an Avid Certified Support Representative (ACSR).
Always have a floppy disk or some other removable media
that you can boot from and run disk-recovery programs.
Be ready to do a clean reinstallation of the system
software.
Between projects do everything you can to make all the
systems as similar as possible.
Backing Up
Consolidating is the most important feature for backing up.
Some people have enough time and tape to back up everything
in a project, but more likely, you will be forced to decide what to
keep and what to discard.
●
●
●
●
Learn all the variations for consolidating the final
sequence.
Know how to back up only the media needed to recreate
the sequence.
Create a database that can both retrieve the project and
the individual bins.
Print out the bin for each tape and include that with the
tape. You will have a paper archive when all else fails.
Output
All forms of output are important and critical to the next step
in the project. The digital cut may be the master or the approval
copy. If it is the master, then the levels must be perfect, and if it is
just a VHS or one-off DVD for approval, then it must contain all
the video tracks of graphics and all the audio, mixed or direct.
●
●
Do you have a timecode generator that can burn in the
sequence timecode to the digital cut?
Spot-check the EDL (edit decision list) for accuracy.
315
316
Chapter 12 NONLINEAR VIDEO ASSISTANTS
●
●
●
●
●
●
●
A cut list should be scrutinized at every cut because the
stakes are so much higher and the chance for adjustment
at the next stage more remote.
Make as many EDL versions and as many disks as you have
time for.
Expect that, when the online assembly finally comes,
someone may ask for something more. If the request is for
video-only EDLs, make a few with audio, too, just in case.
Make several printouts to cover yourself, save time, and
help the online editors if there is a mistake at their session.
Everybody makes mistakes and, if you have an original
copy of the EDL on paper, you can isolate the mistake
more quickly as something done wrong after your handoff.
Talk to professional sound studios. What are the most
common mistakes you are likely to make when handing off
media and projects to a ProTools session? What is correct
for one production company may be incorrect for
another—maybe because the other facility handles your
files wrong!
Document all the steps you take to prepare the files and
label everything clearly.
It really is part of your job to prevent other people from
making mistakes!
Recapturing
●
●
●
●
Does every shot need to be recaptured? It is possible to
make an EDL and a cut list with media offline. You can
even relink to master clips that are offline just for the correct version of metadata.
If the changes requested pertain only to the open and
close of a sequence, then you might be able to get away
with capturing only those sections. You can leave the rest
of the media offline.
If the need for recapturing is because the levels were set
wrong, then the saved settings for that tape must be deleted
before recapturing.
If some of the footage needs to be captured in black and
white, make sure to set the Capture Tool (Compression Tool
on older systems) to monochrome. Even more important,
change it back when you’re finished! The third monitor
shows you a color image all the time because it is monitoring what the signal looks like before it is processed. How
many times have people walked into an Avid suite during
capturing at low resolution, looked at the client monitor,
Chapter 12 NONLINEAR VIDEO ASSISTANTS
and said, “Hey, that doesn’t look so bad!”? The monitor during capturing does not reflect whether you have left monochrome on or are capturing at the wrong resolution.
Blacking Tape
It is desirable to know absolutely everything about connecting
and operating video decks. This information is beyond the scope
of this book, but it would include knowledge about:
●
●
●
●
●
●
Reference signals.
Signal termination.
Loop through.
Deck-to-deck editing.
Deck front panel input choices.
Blacking tape (sometimes called “black and coding” in
American English or “black and bursting” in the Queen’s
English).
After spending an afternoon with a well-known, much-decorated
documentary editor, I asked about his deck connections. “What’s
a BNC?” he said. Although he had a great attitude toward the new
technology, there was quite a learning curve involved in making
him self-sufficient.
If you are not supported by staff engineers, I highly recommend
that you learn how to clean the video heads. Oxide flakes off videotape and sticks in the tiny gap that video heads use to read the
video signal. If you have a regular staff of technicians, then don’t
touch the video heads, but make sure they are serviced on a regular basis. If no one is regularly cleaning the heads on the video
deck, you should take on the responsibility as routine. Cleaning
the heads with a proper head-cleaning kit once a week during
heavy usage is not a bad idea, and if you are using a consumer
deck, of course, there are head-cleaning cassettes. Consumerquality tape loses oxide faster than professional tape.
●
●
●
●
●
There is a significant difference between digital and analog
cleaning procedures, so make sure you know the deck you
are working on.
Professional digital decks do some self-cleaning.
Do not clean with alcohol. Alcohol leaves a gummy film
when it dries.
Use a freon substitute and a wipe that is recommended by
the manufacturer.
Some rental facilities cover the edges of the VTR top cover
with a seal so they know if it was opened and tampered with.
Check with the rental company before breaking the seal.
317
318
Chapter 12 NONLINEAR VIDEO ASSISTANTS
For connecting Betacam SP decks, or any decks that have both
composite and component input, I recommend looping the blackburst signal out of the reference input to the composite input. This
serves several purposes, but the most important is that you will
never accidentally use the composite input for your digital cut. It
is always a black signal. The other benefit is that you can change
the position of the switch on the front panel of the deck that
changes the deck input from component to composite. Then you
can begin to black tape without disconnecting or reconnecting
any cables. Always monitor the output of any deck that is recording or you may end up recording black when you don’t mean to!
If you buy tapes by the case, a good practice is to black them all
whenever there is any downtime. By turning down the audio
inputs and switching over to composite video input, which has
been connected to a source of black, you can black tapes at a
moment’s notice throughout the day. Be sure to turn the audio
inputs back up (or pop them back into the preset position) and
throw the front panel switch back to YRB (component) before you
start a digital cut!
When blacking tapes, set the four switches under the front
panel of the Betacam deck to:
●
●
●
●
DF (drop frame) or NDF (non–drop frame) if in NTSC.
Internal.
Record run.
Preset.
This ensures that the timecode is generated from the internal
timecode generator. It is not looking for an external signal. The
timecode will only increment (run) when the tape is recording,
and the starting point is wherever you preset it to start, no matter
what other timecode is on the tape.
The ability to preset a starting number for timecode is achieved
by manipulating the buttons on the outside of the front panel.
Each deck is slightly different, but on Sony decks other than the
UVW and DSR series:
●
●
●
Press the Hold button.
Use either the and buttons or the search knob to
choose hours, minutes, seconds, and frames.
Press the Set button.
Although the number in the LED does not show it yet, when
you begin recording, the timecode starts incrementing from the
desired preset number. The UVW and DSR series use a simple
menu system to set timecode.
Other switches to check on a Betacam SP deck are on top of
the front panel (as opposed to on its face or hidden by it), where
Chapter 12 NONLINEAR VIDEO ASSISTANTS
the record inhibit switch is also located. The 2/4 field switch can
sometimes be the cause of field-based problems when capturing
graphics from tape. You should always capture everything with
this switch in the four-field position (NTSC).
If you are trying to lay four discreet channels of audio to the
deck, you’ll need to switch the front panel audio switch that says
“1/2 | 3/4” to 3/4. If it’s on 1/2, then the audio sent to 1 and 2 is
automatically laid to 3 and 4 if those input levels are up. Many
people use channels 3 and 4 on the Betacam SP because of the
superior signal-to-noise ratio. They may want four discreet channels from the Avid system to the deck so the stereo music can go
to channels 3 and 4 while the narration and sound bites go to
channels 1 and 2.
A final note of caution: Tracks 3 and 4 are recorded helically,
alongside the video. If you make a video insert edit on a Betacam
SP master, you will wipe out tracks 3 and 4 for the length of
the edit!
Even as Betacam SP decks are replaced by DV or other digital
decks, these principles will always stay the same. Be familiar with
how to set timecode on any deck you work with.
There may be more specific requirements for assistants at your
facility, but these should cover the basic skills to make you useful
from day one. All markets are slightly different with different terminology and different kinds of clientele. Every chance you get to
watch the editors work should be snatched up, not just to see how
they use the interface, but also to see what they are doing with it.
Observe the way creative ideas are thrown around, accepted,
rejected, modified, and experimented with. This is always more
important than the equipment being used.
You have an advantage over assistants in the past because, if
you can get permission, you can take the opportunity to cut your
own versions of the scenes, commercials, or segments when the
suite would otherwise be empty. You can’t mess up the film or
add wear to the tapes just dissecting what the editor did and trying a few variations of your own. If you are lucky, you can get the
editor to check them over and offer suggestions. A recommendation by the editor may move your career along faster than anything else.
With the more affordable Avid systems available to you to learn
with, you should always be practicing when you can. Get time on
a system, even if it is at home, to improve your skills as a storyteller or your command of effects. In the past you would have
had to come into a production company in the middle of the
night to get your hands on the “big iron.” Now you can be creative and work on your editing chops on a laptop. Take advantage
of this wonderful gift of evolving technology to improve as an
319
320
Chapter 12 NONLINEAR VIDEO ASSISTANTS
artist. Positions change and so does technology. If you stay
flexible, always willing to learn something new, you will always
stay valuable to your employer. This book outlined some of the
more important techniques to keep in mind with the Avid editing
systems, but by no means all of them. To keep up with the speed
of change takes more effort and more research than you might
have expected. Stay focused on the most important aspect of the
technology—the storytelling—and you will never be out of date.
APPENDIX
PREPARING FOR LINEAR
ONLINE
“You don’t really need modernity in order to exist totally and fully.
You need a mixture of modernity and tradition.”
—Theodore Bikel
Most of the preparation for a linear, tape-based online happens
at the end of a nonlinear project when you make the edit decision
list (EDL). But there are things that must be done properly
throughout the job in order for the online to go smoothly. The
reality is that with all the twisted financing that goes on in this
crazy industry, there are still reasons to buy a bunch of offline
models and create an EDL when finished. However, the days of
saving money by going to a linear suite are swiftly ending.
Throughout this process keep one thing in mind: You are stripping valuable metadata from your sequence whenever you make
an EDL. With the growing acceptance of AAF (Advanced
Authoring Format) for transporting all of your sequence’s valuable parameters, you may want to think hard before going this
traditional, limited route to finishing your project.
This chapter discusses the most basic requirements to get a
good EDL under the most common scenarios. Then it goes a bit
deeper into the possibilities for increasing the speed of an online
auto-assembly, the Holy Grail of all expensive online sessions,
and almost as tough to find! But the good news is that many facilities want the list in a simple, bulletproof form so that they can do
their own, more complicated variations.
How do you transfer a 24-layer effects sequence with nesting,
color effects, audio equalization, and rubberbanding to a format
that supports one layer of video, four tracks of audio, and hasn’t
changed much in almost 20 years? Answer: Not very well. Dedicated
hardware is the rule in traditional online suites with a different
piece of equipment and, many times, a different manufacturer for
321
322
Appendix PREPARING FOR LINEAR ONLINE
each function, like text, special effects, and deck control. The separate pieces of equipment were purchased years apart and there
may be components that are 10 years old that still work fine for
what they were designed to do. Compare the processor of a CMX
3600 with a high-end workstation Macintosh or PC. The workstations have consistently supported Moore’s law and doubled the
amount of processes on a single chip every 18 months. Yes, if you
design the hardware to do just one thing, then you can maximize it
so that it doesn’t need as much RAM or processor speed. But just
try to add new features! This is why there are so many third-party
EDL management software choices. If the dedicated linear online
systems cannot add new software features, then new third-party
software does it and simplifies the EDL to a format the dedicated
systems can handle.
Even with third-party EDL programs, there is still a massive
mismatch in capabilities between what can be done by clever
folks with the Avid and what can be represented by this limited
format for a linear online. The only way to convert from one format to the other, preparing for that precious linear online time, is
to dumb down everything. You need to understand the limitations of what can be conveyed in an EDL. Bring the Avid EDL to a
point where the show can be built back up again, piece by piece,
in the order necessary in the linear, tape-based world.
This is more of a challenge than it would appear at first, not
because it is that difficult, but because of the limited experience
of the Avid editor in the world of linear online. Unless you have
actually worked as an editor both at an Avid system and at that
particular linear online suite, you are not really in a good position
to take advantage of all of that tape suite’s advantages. We can
discuss capabilities in generic terms, but that doesn’t help you for
the specifics of that edit suite. You need to know that for that
suite, you needed to reserve the character generator a day in
advance and you can forget using the DVE (digital video effects
generators) unless you book a night session.
This is where you must rely on two very important low-tech
tools: clear communication and the ability to collaborate with
experts. As you devolve the Avid list to something simple for the
linear assembly, you must be very clear about exactly what must
be done to every part of your sequence. What effect do you really
want? How are you going to deal with all those channels of audio?
This chapter will describe different ways to leave a paper trail that
someone else can follow. Count on the expertise of the operations
or scheduling people at the particular postproduction house that
has been chosen. Speak to the online editors if they are available.
Depending on time available and the complexity of the program,
you may even want to (gasp) plan a pre-postproduction meeting
Appendix PREPARING FOR LINEAR ONLINE
to discuss approaches with the editor! Imagine, warning him or
her of what to prepare for! Let’s face it, there is no way to predict
everything that can happen after you leave a project. It is really
not fair for the offline editor to be blamed for changes that occur
after the cut is locked. Sometimes changes ripple backward to
affect a decision you made in good faith, with the information
available weeks or months ago. Unfortunately, this happens all
the time.
Coming from a postproduction facility background, but having
freelanced for a few years as well, I strongly advocate building a
good relationship with a handful of production companies. Bring
any work you can to these select production companies, large
projects and small, and spend some time learning the facility’s
capabilities and quirks. If you create a sense of loyalty, they will
look out for you. This happens in little ways, like working a little
harder to fit you in for emergencies. They may come to know
your work and style and be able to anticipate and fix problems
for you before you even know they are there. If they can get you
in and out on time and on budget, they can fit in more paying
sessions, need fewer “make goods” for questionable mistakes,
and lower their already unnecessarily high stress level.
If you can afford to sit in on a few online sessions, it will pay off
for your customers in the long run. If they have a relationship
with you, then it is in their best interest for you to continue to
make informed decisions about effects that can be recreated easily, or faster ways to assemble the show in the final stage. Will it
be faster to dub shots onto a selects reel? Is it better to have more
tape decks available for a shorter time or fewer decks for a longer
time? And really, what can you do at a lower rate per hour to
make things go smoother? When you learn these things, you
become more valuable to your employer and have more job security. You are more likely to stay on the A-list the next time your
favorite client, director, or producer has a big job.
So it is in everyone’s best interest that you understand the
implications of every step of your offline on the final online. If
you capture without timecode or without paying attention to
tape names, you are directly hindering the next step. Don’t blame
“those Avid EDLs” when you have no regard (and, really, no
respect) for the next link in the chain. It is your job to continue to
inform the director or producer that choices they are forcing you
to make will cost them money later. If they take just a little more
time now, at the lower rates, things will go smoother at the
crunch time.
What is the biggest mistake? Ignoring the importance of timecode and tape names. Everything must have a timecode reference—all sound effects and music, all graphics and animations,
323
324
Appendix PREPARING FOR LINEAR ONLINE
and all picture and sync sound. Let me say this again: If you are
going to a linear online, every source must have timecode. It is
tempting to import just that one cut from the CD music library or
pop in just those three shots from the VHS dub. But you must be
sure to go back and match by eye or ear with a timecoded original source before you make the EDL. This is a clear example of
GIGO—garbage in (sources without timecode) and garbage out
(a list that cannot really be assembled).
Preparing Sound
There is one exception to the timecode rule: when the audio
captured into Avid will actually be used as a source in the online
(or the final mix for a film). It is becoming more common for the
first edit to lay down a digital cut of the audio, low-resolution
video, and then cut with original video sources the rest of the day.
This assumes no changes in the online that will affect sync or
length; of course, this is something you may have to mention
repeatedly! In this case, you are working from the timecode of the
digital cut, which should match the timecode of the master
sequence. If the show starts at 1:00:00:00, then the sound source
should, too. For transferring just the audio from the offline session, a timecode-controlled DAT or another digital tape format
like the eight-channel DA-98 works quite well. You could go out
of Avid using the digital audio output format to a Digital Betacam
or another video format that supports the digital material you
will be outputting. In a pinch, audio tracks 3 and 4 of a Betacam
SP can be used since these audio tracks have a higher dynamic
range and lower signal-to-noise ratio than tracks 1 and 2. This is
good for effects and sound under, but should not be the main
method for the most important sound in the project. Just make
sure the Betacam SP decks in the online suite are models that can
play tracks 3 and 4. Generally, this means a Sony editing deck
with the letters BVW in front of the model number.
Did I mention you can’t make changes?
Using the Offline Cut in Online
If you are using digital videotape to bring the Avid digital cut to
the online suite for your audio, then you should also include the
video as part of that first edit. Many online editors use a clever
trick where they lay down both video and audio from Avid to the
master tape in the online suite. They put a big circle wipe with
color bars in the center of the video. That way they can cut over
the top of the old video all day and see if there is any discrepancy
Appendix PREPARING FOR LINEAR ONLINE
between the EDL and the digital cut. Any time they see a flash of
color bars they know something is a frame or a field off and they
can make adjustments. It sure is better than squinting all day to
tell the difference between one frame of 10:1 and the original!
The other way that the captured audio without timecode from
Avid can be used is when you make an OMFI export of the audio
and the sequence for use on a digital audio workstation. But if
the original sound was captured with a little distortion or mono
instead of stereo, then the sound mixers have to recapture it on
their workstation and match it back by ear. This is not too much
trouble if it is just a few cuts, but if the music comes from a fiveminute cut and is used at every transition, then you are costing
your client money. How do you think the sound guys will justify
their higher bill?
When you are dubbing everything to timecoded sources, it is up
to you (or your assistants, dubbers, etc., but really you) to make
sure the quality is not degraded. Dub to higher formats—digital
formats—and monitor the levels very closely. There is nothing
worse than being forced to recapture a distorted media file and
finding that the dubbed source is also distorted! Some facilities
make sure that everyone who dubs a source puts his or her initials, date, and machine used on every tape. Being able to track
a problem back to the source does a lot to ensure quality control.
Dubbing with Timecode
There are some basic requirements for good timecode when
dubbing sources to be used in an online session. The first requirement is: Never dub timecode. That seems like an outrageously
stupid assertion, but one that has confused people for many
years. You should not dub timecode—you should always regenerate it. Timecode is a square-wave signal, and straight dubbing
tends to add noise to the signal. Eventually (sooner if the timecode wasn’t great to start with), the signal becomes slightly
rounded and suddenly, where that sharp edge in the signal delineated a specific number, it is now just a little too rounded to read
accurately. You may have been dubbing timecode for years and
sending your problems downstream or, luckily and more probably, your record deck has been left in the position for Regen. This
is a switch under the front Control Panel of the deck that allows
you to regenerate—resquare—the signal as it passes through the
deck’s electronics and lays it to tape.
It may be important to keep the timecode from the original
source for accounting reasons, so the stock footage can accurately be paid for or because of the way the selects reel will be
325
326
Appendix PREPARING FOR LINEAR ONLINE
made. When making a selects reel, you can be dubbing many
shots from separate reels onto one reel for the convenience of
capturing or because you will lose access to the originals during
postproduction. The shots on the selects reel may need to be
traced back one more step to the original tapes before the online.
Now you should set the internal/external timecode switch on the
tape deck to ext for external source. Make sure that the source
deck and the record deck have timecode cables connected
between them so that you can jam-sync the timecode to the new
tape. Give yourself plenty of preroll because there is a break in
the timecode at every shot. You do not want the Avid or the edit
controller to rewind over a break in the timecode when cueing up
for a shot.
All edit controllers, whether they are part of the Avid software
or part of an online suite, always expect a higher number to come
later on the tape. The timecode is expected to increment continuously! If you put hour 10 before hour 5 on the tape, anyone who
uses this tape will be confused. Edit controllers will search and
fail to find preroll and edit points. Your name will be used in vain
and no one will ever return your phone calls again.
If the beginning shots of the tape are drop-frame, then everything that is dubbed to that tape should be drop-frame, too. The
Avid system associates a tape name with whether an entire tape
is drop or nondrop. If you mix the types of timecode, you have to
give the tape two names—this is very confusing and not
recommended!
If you can lay down new timecode instead of taking it from the
original source, you can keep the timecode nice and neat on the
selects reel. If the ext/int switch is back in the int (internal) position, the record deck always generates its own timecode. Another
benefit of leaving your deck in Regen is that any assemble edit
(an edit that changes the timecode on the tape) picks up where
the last timecode on the tape left off. During the few seconds of
preroll prior to the assemble edit, the deck reads the timecode
already on the tape. At the edit point, the deck neatly regenerates
timecode without missing a frame. Either you should be purposefully presetting the timecode on the deck, jam-synching the code
from the source tape, or regenerating it from the timecode that is
already on the new tape.
Timecode is just another tool and can be used very effectively
once you know how to preset it and actively use it. If you are making a selects reel, choose a timecode that is not used by the other
field tapes. If the last field tape is tape 15 and uses timecode hour
15, then start your selects reel at hour 16. No matter how a tape is
named in the EDL, you can trace it back to the right tape based
on the hour of the timecode.
Appendix PREPARING FOR LINEAR ONLINE
Tape Names in EDLs
The tape name is incredibly important to the Avid system and,
if you get almost nothing else right, at least this should be perfect.
Every tape needs a unique name. A tape must be named while
capturing or logging in the correct project. It is good practice to
make the tape name match the timecode hour and never repeat a
tape name. As mentioned before, but bears repeating, tape names
should be short—five to seven characters maximum to allow a
space for a “B” to be attached to the end when making dupe reels
for CMX and Grass Valley Group (GVG) systems. This chapter discusses dupe reels later—you can’t count on not needing them!
Assuming that all timecodes in Avid refer back to real sources
and all tape names are unique, let’s look at the basics for preparing a list. Be sure that you have installed EDL Manager from the
Avid installation CD-ROM. This piece of software creates EDLs
from Avid sequences and is meant to be able to open bins and
locate the sequences inside the bins to create EDLs.
EDL Manager
EDL Manager is Avid’s EDL generation and list-importing software and is separate from the Avid software for several reasons.
The first reason is so that it can be updated and improved upon
with a development schedule separate from the editing systems.
EDL Manager can then skip the long and complicated beta-testing programs in favor of quality assurance just for this small piece
of software. Being separate means that the offline editor can
carry it to the online suite or the online editor can have a version
running in the suite already. The offline editor can be spared
some of the responsibility for making a good list if he or she
brings a sequence bin to the online session with the (ideally) final
version of the sequence.
The EDL Manager launches automatically when you choose
“Output EDL.” If it does not launch then perhaps either you
have not installed it from the original installation DVD-ROM or
someone has cleverly hidden it somewhere on your system and
now it cannot be found. Instead of troubleshooting, it is quicker
to go back to the original DVD-ROM and reinstall the application
in the proper location.
If both applications are running, you can use the simple arrow
icon in EDL Manager. The sequence, which is in the Record window of the Avid editing software, will load into the EDL Manager
with a single click. You can also use the arrow to go the other way
and turn an EDL into a sequence, as we discussed in Chapter 9.
327
328
Appendix PREPARING FOR LINEAR ONLINE
Getting Ready
There are so many variables in the linear online suite that you
can never be too careful about preparing for any eventuality. There
are many different kinds of edit controllers on the market today
and, to some extent, they are not compatible. The main ones in use
are CMX, Grass Valley Group (GVG), and Sony. There are also many
other less-prevalent models like Ampex ACE and Abekas; however,
within your market there may be an exception to this, and you may
find that the most popular edit controller is something else. In
Chicago, for instance, you will find many Axial controllers.
The first rule of EDLs is this: Find out which edit controller format the linear online facility needs. Notice I said what they need,
not what they have. This is for a very important reason: They may
have a CMX Omni, not a CMX 3600, but the lists are mostly compatible, so the facility may ask for a CMX 3600 list instead. Or they
may have a bizarre ten-year-old Brand X model that went out of
business seven years ago, but the darn machine just refuses to
die. They may ask for a CMX 3600 as well because out of necessity
they may have, or may have written, their own software to
Appendix PREPARING FOR LINEAR ONLINE
translate from CMX 3600. Most people consider the CMX 3600
the Latin root of all list formats.
Formatting Floppies and RT-11
The biggest challenge you’ll run into with EDLs is that edit
controllers are primarily old systems that take dual-density floppy
disks(!) as their input. Needless to say, you may have a problem
providing your list on an EDL considering that neither modern
Windows or Macintosh systems have shipped with floppy disks
in some time. You may even have trouble finding blank disks at
your local office supply store. For this reason many postproduction houses now accept lists on CD-ROM or USB memory sticks.
They’ll then transfer your list to a floppy. But if you want to do it
yourself, you can purchase USB floppy disk drives for either platform—at least as of the publication date of this book! Floppies
are a dead technology in the general computing world.
If you do want to use a floppy to submit your EDL, you must
format the floppy disks for CMX and GVG edit controllers in an
unusual way. CMX originally used a disk format that was useful
with the DEC computers they used internally when they were
developed. Because GVG developers came from CMX, GVG also
uses a version of that original CMX format. The format is called
RT-11 and is problematic with both Macintosh and Windows
because these operating systems are not designed to recognize it.
Special commands must be written to make the computer ignore
the fact that it can’t read the RT-11 floppy disk you just popped
in. The edit list software must take over for both reading and formatting these floppies. This is why if you just pop a CMX disk
into the Macintosh, you get a scary message saying this disk is
unrecognizable and asking if you want to format it. No! Eject,
now! The Mac defaults to this evil question whenever it cannot
recognize the formatting on a disk. You can work with RT-11 disks
only when you are in Avid, EDL Manager, or another piece of specialized software designed specifically for EDLs.
RT-11 was not written to make your life a living hell, but it sure
doesn’t help. Add to this the restriction that the disk used must be
a double-density, double-sided disk. I want to say that again:
double-density, double-sided. The only exception for CMX and
GVG is the HDGVG option in EDL Manager, which will correctly
format a high-density (HD) disk. Look at all the floppies strewn
around your computer (if you still use them). I’ll bet none of them
used for standard, everyday file saving is double density, double
sided. They probably all say HD, but the disks you want should
say DD (double density) on them. They are not interchangeable!
329
330
Appendix PREPARING FOR LINEAR ONLINE
This is an example of dedicated hardware being passed by very
quickly by technological standards. Double-density disks hold
only 720 KB of material. This could be a small novel, but it is not
very many EDLs. The real world uses HD floppies because they
hold 1.4 MB, almost twice the capacity of the DD disks. Even the
HD disks are pretty pathetic in a world where gigabytes are
becoming the standard measurement for storage capacity. If you
are making the edit list, it is up to you to scrutinize every disk that
is handed to you.
I strongly recommend that the DD disk should be unformatted
or already formatted for RT-11 from the edit controller that will use
it. The formatting of the disk for the EDL has caused many people
the vast majority of their EDL woes. On older Macintosh systems
you will need to “unformat” a floppy. First, quit all the programs
you are running. Pull down the Erase Disk command under the
Macintosh Special menu, as you would normally erase all the material on the floppy. Let the process run for a few seconds, but before
it finishes you must force the computer to crash. The only way you
may be able to interrupt the erase is to press the Restart button on
the outside of the computer case, or on a Macintosh, press the
Ctrl-Command-Power keys all at the same time. This works to
totally mess up the format on the floppy, but it sure is ugly. For all
of the Windows versions of EDL Manager and later versions on
Macintosh, this method is not necessary since the system will competently erase any original formatting and replace it with RT-11.
So now you have an unformatted double-density, double-sided
floppy. If you pop it back into the Macintosh, the system tells you
the floppy is now unrecognizable—this is one of the few times
you want to see this message! Windows will give you a similar
message. Now the floppy can be reformatted while you are running the EDL Manager or other EDL software.
Is it any wonder that busy postproduction facilities would
rather FedEx you a few of their own disks? Overnight mail with a
proper set of disks is a good idea from their point of view, so give
them the chance by letting them know you are coming far enough
in advance. Sometimes there are differences that have developed
over time between the disk drives at their facility and your brandspanking new Apple floppy drive. Old drives get cranky and occasionally may not accept a floppy that has been formatted by
another drive. The busy facility also has seen more than their
share of HD disks with EDLs and offline editors who blame Avid!
If all else fails, to get your floppy to be accepted by their online
edit controller, copy it to another computer that can read RT-11.
This other computer potentially may have EDL Manager running.
Turn the EDL into a text file using a word processing program,
and copy it to a properly formatted disk.
Appendix PREPARING FOR LINEAR ONLINE
Sony and DOS
One way to avoid all of this is to work with a Sony list. Sony saves
to a DOS-formatted disk that the Macintosh can easily handle.
Early versions of the Macintosh needed one of two different extensions, either PC Exchange or DOS Mounter. These extensions need
to be enabled in the Extensions folder to read or format a floppy
for Windows. Choose “Other” during the formatting dialog on the
Macintosh and choose the proper format for the size floppy you
have. Early Sony edit controllers may read only DD disks, but the
later ones read HD. If in doubt, get the DD and format 800 K.
Real-Life Variations
For one final twist, there may be weird combinations of formats for disks and formats for edit controllers. The later CMX
controllers, like the OMNI, can accept DOS-formatted disks. The
production company may have its own list optimizing software
that runs on a DOS or Windows system, so they may want the list,
no matter what it is, on a DOS floppy. There used to be edit controllers that worked from 8-inch floppies; most people have never
even seen these before. Forget about compatibility. These
unlucky people have devised a way to send information serially,
through a cable from another computer that can handle the 3.5inch floppies to their online system that can handle only 8-inch
floppies. EDL Manager allows this, too, but it takes a 1-2-3-Go!
procedure that you probably don’t want anyone to see.
Be Prepared
There appear to be many ways to get this whole EDL process
wrong because there are so many ways to get it right. With all this
potential for a 9 am thrash at the online facility, there are ways to
cover yourself. First and foremost, you should ask the production
facility what they want. If you are using the same production
houses repeatedly, then you know their drill and can have procedures in place for each edit suite of each production company you
use. There is a very useful feature on newer EDL Manager versions
that allows you to make a template for your favorite edit suites.
EDL Templates
Regardless of whether you are an offline boutique that sends
the lists to another facility or you are the facility and must make
different EDL versions for each of your edit suites, you could
331
332
Appendix PREPARING FOR LINEAR ONLINE
use a little help. To make sure the lists are always correct and to
make sure that you can turn this chore over to even the leastexperienced assistant, you can make EDL templates. These templates can actually be made by the postproduction facility and
emailed to you as an attachment. You would then place the
template file in the EDL Manager Templates folder inside
the Supporting Files folder of the EDL Manager folder. These
templates are simple text files, so they can easily be copied to a
floppy disk and loaded onto any system with the proper version
of EDL Manager. As a facility, instead of faxing a complicated
series of instructions, you can email or overnight mail the small
file on a floppy disk, which will guarantee that the offline editor
gets it right.
You will also find that you may need to make multiple versions
of every EDL for different reasons. You may need an audio-only
EDL and an EDL for each of the video tracks used in the offline
sequence. If you create a template for each of these often-used
versions, you can make them all much faster. Just choose the
Template pulldown menu for Video Suite 1 Audio Only or GVG
Suite Video 2 and quickly save the new version. With a preformatted floppy and a template from the postproduction facility, how
can you go wrong? But don’t bet everything on one floppy—use
two, they’re cheap! You may also want to save the EDL in several
other formats. Always make exactly what the facility asks for and
then make a CMX 3600 list. Pick your market’s favorite format
and make that your backup format. It is up to you whether you
want to put it on DOS or RT-11. (If you choose both, it could make
you look pretty slick.) Then you should burn the sequence bin to
a CD-ROM and, if the project was small enough, include all the
bins. You may find yourself actually making the list again from
the sequence at the online facility’s Avid or from your own copy
of EDL Manager (which you brought with you). After this is done,
trust nothing! Make two printouts and bring a copy of the project
on VHS or some other format that can be played back in the
online suite without a charge for another deck. An MPEG file on a
CD-ROM could work, especially if you have your own laptop to
play it back. You or your producer should control the playback of
this copy in the online suite so you can follow along with the
online assembly.
What Is an EDL?
Now that you are prepared to make the EDL, let’s take a look at
what an EDL really is and why it is so hard to make one from a
nonlinear editing system. The only information the edit controller
Appendix PREPARING FOR LINEAR ONLINE
wants from Avid is the tape name and timecode (sound familiar?).
The edit controller cues up the source tape and inserts the shot
onto a specific timecode on the master tape. So a basic event—a
cut, for instance—needs four timecode numbers: an In point and
an Out point on the source tape, and corresponding In and Outs
on the master. It looks like this:
017 100 V C 02:00:24:19 02:00:25:14 01:00:22:02 01:00:22:27
When you need to make a dissolve with analog tape, most of
the time you need a second source. If you must dub a shot onto a
second tape, typically it is called a B-roll. Thus, an A/B-roll system is one that allows dissolves. A dissolve needs the In points
and Out points from the B-roll in the event, and looks like this:
012 100 V C 02:18:31:29 02:18:31:29 01:00:12:19 01:00:12:19
012 100B V B 030 02:23:26:15 02:23:28:26 01:00:12:19 01:00:15:00
*BLEND_DISSOLVE
Any kind of fade up from black or from a graphic that has no
timecode is an event that starts with black (BLK) or an auxiliary
source (AX or AUX). It looks like this:
002 AX V C 00:00:03:27 00:00:03:27 01:00:01:28 01:00:01:28
002 100 V D 030 01:43:44:28 01:43:50:29 01:00:01:28 01:00:07:29
*BLEND_DISSOLVE
All edits that come from a nontimecoded source, like CD audio
or a PICT file, come in as AUX. If you have 100 PICT files, this
could be a problem.
Translating Effects
Any time you create an effect like a wipe or a three-dimensional
(3D) warp, it must somehow be translated to this very limited,
older format that is concerned with tapes and timecodes. There
are standard SMPTE (Society of Motion Picture and Television
Engineers) wipe codes, but some of the most popular effects
switchers do not use them. EDL Manager has a list of the most
popular switchers represented, and you can use these
simple templates to represent your wipe effects. You can even
take these templates for the switchers and modify them to your
own switcher if you are feeling geeky. The wipe codes can usually
be found in a manufacturer’s technical manual, and these templates are just text files.
There is no way to create a generic 3D effect that any group of
DVEs made by different manufacturers can read. Many people
don’t have the capability to send DVE information from their edit
333
334
Appendix PREPARING FOR LINEAR ONLINE
controller to the DVE. These two machines easily could be from
different manufacturers and have no communication between
them except “Go Now.” Different DVEs use different scales for
computing 3D space, their page turns look incredibly different (if
they can even do a page turn), and really, forget it, there is no
standard for effects. There won’t be such a standard for a long
time to come. You have the timecodes for the two sources for the
effect and you have the VHS. If you are really persnickety, you
may even have written down some of the effect information as
you made the effect. Adding a comment to the list like “second
keyframe is exactly 20 frames later” doesn’t hurt.
This information is best delivered to the EDL itself using locators or the Add Comment feature in Media Composer and
Symphony. You can use the text entered into locators as comments in the EDL. This is an option in EDL Manager’s Options
window under Show. To use the Add Comment feature you highlight a single shot in the sequence with the segment arrow, pull
down the menu above the Record window, and use the Add
Comment option. The comment shows up in the EDL as a little
bit of extra text when you choose “Show: Comments” in EDL
Manager. You can search by locator in the locator window or by
comment in the sequence using CtrlF/CommandF in the Avid
timeline.
Even if you can represent exactly the way an effect was going to
happen, you cannot foresee how the online edit suite will be
wired. The effect may call for three levels of dissolves, but the
switcher has only two levels it can do simultaneously. Your effect
may require that the editor create multiple layers of video, which
the editors should know how to do quickly and efficiently with
their own configuration of equipment. If you try to be too specific
about the exact procedure for creating an effect, you are denying
the online editors the chance to do what they do best.
Multiple Layers of Graphics and Video
The final insult in translating from nonlinear to linear is the way
most EDLs represent multiple layers of video. They really don’t. This
means you need to reduce all multilayered sequences to a series of
single–video track EDLs. The nested tracks must be broken out of
track one and put into separate EDLs for each track in the nest. This
provides you with the ability to run more than two video sources
simultaneously in the online edit suite. Don’t count on it unless you
have researched the specific suite you will be using.
The online editor loads the video tracks as separate sequences
into the edit controller and combines them. You can help the
Appendix PREPARING FOR LINEAR ONLINE
online editor figure out which tracks go where by the way the
separate lists are numbered. Each edit is called an event and has
a number. If the first layer of events ends at event 110, then all of
the events for the second layer of video can start with event 200.
The third layer can start at event 300, the fourth layer at event
400, and so on. The editor knows that when two events overlap in
the EDL and if one has event number 50 and the other is event
210, then 210 is part of a multilayered effect. Any multilayered
sequence should be discussed carefully with the individual
online editor. Make sure they can even get close to what you are
doing on the Avid. You may find they say, “Sure, we can do that—
in the compositing suite!” Listen for the cash register sound when
they want to put you into a special compositing suite. There may
be no other choice but to go this route. On the other hand, a
slight redesign and some extra goofing around may save you
thousands. A freelancer using Adobe After Effects or another
desktop compositing program may be the right answer if you
have the time to render. There is a tradeoff between waiting for a
short render in the expensive compositing suite and waiting until
Monday for After Effects. With the faster computer processing
units (CPUs) the render times on the desktop are becoming more
competitive. It may make sense for you to get a cheaper online
suite and arrive with all the effects already made and output to
tape so you just slug them in. Did I mention that you can’t make
changes in the online suite?
Simplify the EDL
If you try to make an EDL from a complex sequence with layers
and nesting and you just load it all into the EDL Manager and
press the purée button (or Update), what comes out will not be
very useful. You may get some error message as the system warns
you that what you are trying to do is not very nice. This is usually
some kind of a parsing error or a message that an area of the
sequence is too complex to be represented. Make a copy of your
sequence and start to simplify.
First, get rid of the nesting. Figure out what are the most important sources for that effect. What timecodes do you need? Keep
just that source. If you absolutely must have the timecodes from
multiple sources for that effect, you should not have nested it in
the first place. Yeah, right, that assumes you knew you were going
to an EDL! If you are going to an EDL, do not nest. Enter the extra
timecode and source information by hand as a Comment or a
locator. In EDL Manager, choose which video track to use, starting
with V1.
335
336
Appendix PREPARING FOR LINEAR ONLINE
If you know you are going to an EDL, don’t use imported graphics. An online suite may be able to use PICT or TIFF files through
a sophisticated character generator, but if you know you’re going
to an online room, all graphics should be fed to you on tape. The
timecode numbers of the fill, matte, or backgrounds can go
cleanly into your EDL with few questions asked. Also, if you use
imported graphics, it means additional work for the graphics
department because they must output the electronic version for
you, then they have to make a fill and matte and lay it to tape for
the online. If you have subtle variations in logos or graphics, the
online editors can put in the wrong graphic since now you expect
them to figure out which graphic on the graphics tape corresponds to your nontimecoded source. Even if you use imported
graphics to simplify your edit or because you didn’t know you
were going to an EDL, I strongly recommend recutting those
sections with the same graphics tape that is used for the online.
Sound Levels
How did you change your sound levels when you were mixing?
If you used rubberbanding, there is no problem. Those levels are
not in the EDL, but the sound edits do not confuse the online
editor either. If you used the older method of creating Add Edits,
changing the levels and adding dissolves to smooth out the level
change, then you have some work to do. These Add Edits are real
edits and the EDL Manager is smart enough to ignore them,
unless you have added a dissolve. The EDL Manager puts an edit
in the EDL and tells the online editor to dissolve to a B-roll, a dub
of the exact same audio source, just to change the audio level.
This is confusing and annoying. You need to remove the dissolves
to any audio transition that is just for a level change. This is actually easy because you can go into the effect mode and lasso or
Shiftclick them and delete them all at once. This is a good reason to use rubberbanding. You can also use a feature in EDL
Manager called “Audio dissolves as cuts.”
For the high-end jobs, the sound usually is sent out for audio
sweetening and is laid into the online session in one big edit. For
lower-cost jobs, a digital cut is laid to tape (sometimes split tracks,
sometimes stereo split) along with the low-resolution video. Then
the online editor cuts his or her video on top of that, covering it.
For these EDLs, disable the audio tracks, creating a nice, clean,
video-only EDL. To be safe, make an extra EDL with audio and
video, just in case they need to find the video for a sound bite that
has been covered up entirely. It will also help if there is a problem
with the sound from Avid in a certain spot.
Appendix PREPARING FOR LINEAR ONLINE
Settings
There still seem to be many choices in the EDL Manager that
haven’t been described yet, so don’t get nervous. Most of these
functions are for streamlining an auto-assemble and other more
obscure situations. We will get to them at the end of the chapter,
but for now let’s go with the simple answers.
Sort Modes
A sort mode is a way of ordering the events in an EDL so that
they can be edited out of linear order. Linear order means that
you load a tape into the deck, adjust the levels from the color bars
at the beginning of the tape, fast forward to the spot on the tape
where the shot is, and perform the edit. Then you
load the tape for the next shot in the program and
do the same thing. You do this whether the source
tape is 20 minutes long or two hours long. There are
a lot of repeated actions and wasted time shuttling
the source tapes back and forth. Unfortunately, a
linear order is the easiest to follow and the safest
way to assemble a show and be able to compensate
for a mistake or make changes. You know immediately if a shot is missing or a sound bite is wrong
because it does not make sense as you put it in
place.
The time savings are significant if you can assemble
a show out of linear order. It means you need to load
a source tape only once, do all the color bars setup,
and skip through the show, dropping shots wherever
they are needed from that source reel. Then put the
tape away. You might have to bring it back for effects
later, but if your show is just cuts and dissolves, you
have made serious savings in time and money. But
imagine making a change that makes the show just a few seconds
longer. If you have been inserting shots all over the master tape out
of order, this is pretty serious. How can you ripple that change and
push down all the edits after it in the program if there are already
100 shots laid down after the change? You can’t really; if you are
working with digital tape, you can clone the master and make an
exact digital copy. If it is an hour-long program and you are halfway
done, then kiss goodbye a good 45 minutes of setup and dubbing
time. Did I mention that you can’t make changes in online?
This kind of penalty for being wrong or making changes at the
last minute tends to frighten even very brave online editors. For
this reason, they want to be the person who decides how to sort
337
338
Appendix PREPARING FOR LINEAR ONLINE
the list. When asked, they inevitably tell you to use the A mode
because that is the linear mode and they sort it themselves in
their edit controller to make it a B, C, D, E, or S mode.
Let’s do a quick recap of what the different modes are so you can
discuss them intelligently at cocktail parties. B mode is for long-format shows where the source tapes are shorter than the master tape.
The source tape fast forwards and rewinds and finds shots that go
in a linear order on the master. This is easier to follow because the
master moves forward while a specific source tape is being used. As
soon as a new tape is loaded, the master rewinds to the first place
the new tape is used. It then starts to move forward again until all
the shots from that source are inserted on the master.
A C-mode list is for when the source tapes are longer than
the master tape. You may have a 90-minute film transfer for a
30-second commercial. (I hesitate to call them “spots” anymore
since in the United Kingdom that means pimples!) Here, the
source tape always moves forward in a linear way and the master
tape flails around rewinding and fast forwarding to assemble out
of linear order. Potentially this is faster than B mode but harder to
figure out what is going on. It is very disconcerting for clients who
should just look away if they are feeling queasy.
D and E modes are like B and C modes except that all the dissolves are saved for the end. This works only if you have time base
correctors that have memory for individual tape settings. More
common these days is a serial digital interface (SDI) signal from a
digital deck. Supposedly, the SDI signal does not change from deck
to deck like an analog signal and so, theoretically, never needs
adjusting. The editor must match a frame perfectly from something
that he or she adjusted that morning or the day before so that you
don’t see where the pickup point is to start the dissolve. D and E
modes get used more in PAL countries where they don’t worry about
analog hue adjustment, unless it’s terribly wrong to start with!
S mode is useful for getting a list that will be used for a retransfer from film. If you have been cutting with a one light or a best
light, inexpensive film transfer without shot-by-shot color correction, then you want to go back and retransfer the shots that were
actually used. S mode is the order that the shots came on the
original film reels and allows the colorist to identify quickly only
the used shots for the final color correction.
Dupe Reels
After choosing the format and the sort mode, it is time to think
about dupe reels. What are you going to do when you need to
dissolve or wipe? If you haven’t experienced the difficulty of dissolving between two shots on the same tape, then you are about to. With
Appendix PREPARING FOR LINEAR ONLINE
a traditional analog tape suite, you must physically copy the second
shot onto a dupe reel so that you can roll two tapes at the same time.
It seems kind of old-fashioned and quaint now, but a dupe reel is
still the necessary evil in many suites across the world. The biggest
change to this procedure was preread. Someone figured out that
since the digital-format tape was just outputting digital information,
short amounts could easily be held in a buffer, or temporary memory, in the record tape deck. During the preroll, the master record
machine loads the digital images of the shot already on the master
tape into the memory and plays it back as a source deck. With the
last shot held in memory, the master tape switches from being a
source and records the dissolve with the new incoming shot.
Some editors also use a kind of nondestructive preread called
auto-caching. Auto-caching holds the end frames of a shot for dissolves and various layers of multilayered work in a cache that uses
a digital disk recorder (DDR) or a digital tape. The edit controller
figures out what needs to be cached for later use in a dissolve or
effect. Then it automatically lays the image on the DDR or digital
tape. When the tape with the other half of the dissolve is put into
a deck, the controller performs the dissolve between the tape and
the auto-cached piece of video. This works better than preread
because prereads are destructive, meaning you are committed to
that edit permanently because the last image is recorded over
itself when the recorder becomes a source. You get only one
chance to do a preread correctly, and then you must reedit the
previous shot. Auto-caching uses a preread EDL to create the
auto-caches that can be executed and reexecuted if needed.
Most of the choices that deal with how a tape is dissolved are
refinements on these basic requirements for either a dupe reel or
preread. Under certain conditions, you can significantly reduce
the amount of tape loading and shuttling, but most of the time
you choose the simplest technique. The online editor has a very
specific requirement and again, as with sort modes, can modify
the simplest format into something he or she can use best.
339
340
Appendix PREPARING FOR LINEAR ONLINE
The simplest, best answer for most circumstances is the
Multiple B-Rolls option. It is also the least clever, but with more
sophisticated editing systems out there, editors can modify this
list to speed up the assembly. The Multiple B-Rolls option
assumes that there is a separate B-roll or dub of every tape in the
show. This is probably not true unless you have a very small
amount of material or have made simultaneous duplicates during
a film transfer. It is more likely that the online editor looks at the
list, sees that a dub is required, and hunts down the original tape.
The timecodes on the B-roll are the same as on the original tape,
and the name of the B-roll is a variation of the original tape name.
Finding the shot is easy because it has a B after the tape name or
the tape number is incremented by 500, depending on the type of
list format. The editor can then just dub that shot when it is
needed or change it over to preread in the edit controller.
Making a Special Dupe Reel
The other B-roll choices allow the editor to prepare before the
online session by taking all the shots that need to be dubbed and
putting them onto one reel. This keeps the tape loading down to
a minimum and allows you to move faster with fewer decks configured (and charged for).
The most dangerous dupe reel choice of all is the One, New
Timecodes option, although it is extremely popular in Europe.
This requires that you make two lists: one for the master tape and
the other for the tape where all the B shots will be dubbed. This
new dupe reel has perfect new timecode because you are ignoring the original timecodes of the source tapes and starting all
over again. You take each tape and dub one after the other onto
this new reel, which starts with timecode that begins at 1:00:00:00
(although you can change this). This means that the timecode
link between the original source tape and the dupe reel will be
completely broken as soon as the dupe reel is made. The dupe
reel name, which defaults to “B.REEL,” shows up in the list every
time a shot needs to be dubbed for an effect. You cannot look at
the EDL dupe reel name and figure out where the shots came
from originally. Many people choose One, New Timecodes and
then do not make the dupe reel list—a big mistake. When the
online editor turns around and asks, “OK, where is this B.REEL?”
you really should have another list to hand over (maybe even the
premade reel). Unless you make the B.REEL yourself, that reel
needs to be assembled at the beginning of the session.
Because it is assembled before the editing really starts, changes
to the B.REEL are also very difficult. You must make a second list
for the dupe reel! If you must make a dupe reel, then One, Jam
Appendix PREPARING FOR LINEAR ONLINE
Sync is better. If you forget to make the list for the new dupe reel,
at least the original timecodes are in the list and, if the timecode
hour matches the tape name, finding the original is a snap.
Another dangerous choice for the unsure is None. This gives
you a list that most edit controllers cannot read, which at first
seems like a rather bad choice. Not so if you are going to another
nonlinear editor (NLE) or an older compositing system. These
systems do not need to dub a tape in order to dissolve because,
once captured, individual shots are divorced from the physical
restrictions of tape. Loading the list into the NLE system forces it
to see tape “001” and another tape named “001B.” Is this the
same tape? There is no way to know for sure, so the NLE system
makes the safe but incorrect assumption that 001 and 001B are
two distinct tapes. When you are capturing this material, the system asks for tape 001 and then proceeds through this tape to the
end and grabs all the shots that are needed for the sequence.
Then the NLE system asks for tape 001B, rewinds, and does the
same thing again with the same tape! This is not efficient and, at
those room rates, you need to be efficient. The None choice is the
best for this situation since it shows just one tape, 001, and the
NLE system requests that tape only once.
Printing the List
When you print out the list, you should make two versions.
Once you are ready to print the EDL, think about who will be
using the printout. The people supervising the online edit certainly need it in front of them. They may not be the most listsavvy people in the production, so there are ways to make the list
more readable. Include comments in the list when you are about
to print. Use comments like “clip name” and the source table,
which is a list of all the sources needed for the online assembly.
Then print a stripped-down version for the online editor. Again,
ask if there is any special information the editor wants, like audio
patch information or repair notes. I know some offline editors are
reluctant to have repair notes show up in their list because it
looks like they did something wrong. Repair notes are important
because it may just be a case of the effect being too complex and
not being able to represent it correctly. If you have any repair
notes, then the online editor should see them.
The Source Table
The important function of the source table is when occasionally the EDL Manager finds a tape with a name that is too long
and must shorten it. Sometimes there may be a duplicate tape
341
342
Appendix PREPARING FOR LINEAR ONLINE
name from another project. There may also be two separate versions of the same project that have been combined. The EDL
Manager has to change that tape name in the list. The source table
tells you that since you had a tape 001 from project X and a tape
001 from project Y, that with a Sony format, EDL Manager changed
the second tape name to “999.” A CMX list changes a second tape
001 to “253.” According to the system, these are two different
tapes! This is why the original logging is so important. If you don’t
have that information, then you could get very lost. Never attach a
source table to the electronic version EDL on the disk because it is
really just a very long comment added to the last event. Many systems have a limit as to how many comments they can read per
event, and this will cause an error when reading the list if you have
a lot of tape sources. Make the electronic version without the
source table, but always print it out separately to take with you.
You can truncate the names of your tapes in a very specific way.
This is important if your tapes have been given names that do not
match the restrictions imposed by the EDL format. Most formats
impose a character length limit of between six and eight characters. You may find that the way the system truncates your tape
name makes very little sense. You now have control to preserve
the end of the tape name if that is where the most important digits of the tape library code exist. This is especially useful for tracking back tapes to a stock library.
PAL Lists
If you have a PAL project, be aware that the very first time you
open EDL Manager, it may default to NTSC. You can change this
to PAL under the Standards setting and it will stay that way. PAL
lists become complicated when you are working in film and want
to go back to the negative because of the two different methods
of dealing with the difference between 24 fps (frames per second)
and 25 fps. Sometimes you slow down the audio and sometimes
Appendix PREPARING FOR LINEAR ONLINE
you include extra frames in the video (that pesky 25th frame).
The PAL Method 1 is for film projects in which video and audio
are transferred together at 25 fps. PAL Method 2 is for when video
and audio are captured separately and synced in Avid. If you have
a video project without any matching back to film, then choose
plain vanilla video PAL.
Matchback and 24-fps EDLs
Matchback is a method preferred by low-budget films or
film projects that are primarily for video distribution, but will be
projected sometime in the future. This is an option that will output a 30- or 25-fps project as a 24-fps cut list. Film transfer to
video adds extra frames. There is no way for the video-based
project to keep track of the A frame, so every outpoint in a matchback project can be accurate only to plus or minus a video frame
in NTSC. The matchback is much more accurate in PAL. For
many people, depending on the material, this is quite acceptable
compared to the cost of conforming a negative first and then
transferring to video or using a film composer. They get a video
project at a high, two-field resolution that they can shop around
or distribute, and when the funding begins to flow in, they can
get the negative cut.
There is an easy way to make a 24-fps EDL for cutting negative
or to import into a 24p finishing system like Symphony or DS.
Highlight the Start column in the bin with all the sources used in
the final sequence. Use Ctrl/CommandD to duplicate the column. You will get a pop-up dialog asking where you want to copy
this information. Choose “TC 24” and the 30- or 25-fps start times
will be converted to 24 fps. You can then use the 24-fps choice in
EDL Manager to make your list. This is one of the least-known
tricks for taking any film project to a 24-fps finish without using
the Avid film options.
Using Symphony Universal at 24p allows the creation of both a
high-quality output when working at 24 fps and a perfect negative cut list using FilmScribe™, a cut list utility. This will allow
you to broadcast the finished project today and cut the negative
when theater distribution is required. Using the Universal Editing
option on Media Composer, you can output at 14:1 progressive
(which looks pretty darn good for offline) and output the perfect
list for cutting negative.
Conclusion
It should be clear by now that creating EDLs is rather complicated. It is also clear to the folks who receive these EDLs from
343
344
Appendix PREPARING FOR LINEAR ONLINE
Avid systems that many people get it wrong. The amount of 9 am
thrash that is completely avoided by asking people to bring only
a copy of their sequence bin more than pays for the EDL Manager
software, so every postproduction facility should own a copy and
have it quickly accessible. Of course, the translation to EDLs
becomes less desirable every year as Avid solutions to finish using
AAF are used by more facilities.
Here is a checklist of steps that should be taken before the linear online assembly:
Simplify a copy of the sequence before you make the list.
Do this based on feedback from the online editor.
Format the floppy for the needs of the production house
(either DOS or RT-11 or both).
Use the EDL template sent by the postproduction facility
or their faxed instructions for formats and options.
Make any extra versions that might be important (audio
only, video only, V1 separately, etc.).
Use the same template to make a CMX 3600 version.
Print the list twice. Make one for the editor and one for the
producer. Include the source table in the printed versions
only.
Make a VHS copy of the sequence that you can control
yourself in the suite.
Don’t forget to bring the source tapes!
INDEX
345
INDEX
ACPL, see Avid Component
Processing Library
Active picture, 102
Add Edit button, 198–199
Advanced Television Standards
Committee (ATSC),
132–133
After Effects, file importing and
exporting, 170–171
Alpha channel
import settings, 160
movie importing and
exporting, 168
premultiplication, 153–157
straight images, 156
Alt/Option key
drag-and-drop modifiers,
18, 21, 22
segment mode modifiers, 23
AniMatte®, 213
Archiving, see Back up
ATSC, see Advanced Television
Standards Committee
Audio
connections, 301
edit decision list and sound
levels, 336
format options in
conforming, 219
J-K-L Scrub sound quality, 4
monitoring, 60
online project setting,
225–226
preparing for linear online,
324
ProTools and OMFI files,
168–170
recapture and integration,
248–249
room design for Avid, 73
temp mono mix creation,
60–61
troubleshooting problems,
292–293
Audiovision®, 168, 170
Auto-caching, 339
Auto-Enable Source Tracks, 21
Auto-nesting, 200–201
Avid Component Processing
Library (ACPL), effects,
174
Avid Log Exchange, source
ownership assignment,
242
Avid Symphony, see Symphony®
AVX plug-ins standard, 213–214
Back porch, 111
Back-timing, edits, 9
Back up
daily projects, 99
guidelines, 68–70
long-term archival, 99–100
nonlinear video assistant role,
315
user settings, 100
Batch capture
audio project settings, 245–246
bin configurations, 246
capture settings, 245
deck settings, 245
digitizing master clips, 246
media creation tool, 245
Bezier, motion control between
keyframes, 186–188
Bin
clip sifting, 63–64
custom column, 62
editing from bin
drag techniques
clip dragging to record
monitor, 19–20
drag-and-drop viewer,
18–19
multiple clip dragging to
timeline, 19
precise dropping of clip,
16–18
Splice versus Overwrite,
16
sync material dragging to
timeline, 19
marking in bin, 20–21
overview, 16
rearranging edits
segment movement
restriction, 23
segment moving, 22–23
timeline lasso, 21–22
locking items, 91–92
organization, 61–62
sorting columns, 63
Black-burst generator, 301–302
Black point, setting, 271
Blanking interval, 117
Blanking voltage, 103
Blur
adding to matte edge,
212
Menu, 208
Broadcast monitor, color
correction, 262
Bypass, SpectraMatte keyer, 204
Capture Tool, 77–78
Chroma control, SpectraMatte
keyer, 206–207
Chroma keying
key types, 204
requirements, 203–204
SpectraMatte keyer
configuration
blur adding to matte
edge, 212
foreground spill
suppression, 211–212
initial key values, 209–210
matte adjustment,
210–211
parameters
bypass, 204
chroma control, 206–207
DVE controls, 209
key color, 204–205
luma control, 207–208
matte analysis, 205–206
matte processing, 208
spill, 209
346
INDEX
Chroma signal, 109–111
Clip
consolidation of master clips,
84–85
dragging
dragging to record monitor,
19–20
multiple clip dragging to
timeline, 19
precise dropping of clip,
16–18
relinking master clips, 97
sifting, 63–64
CMYK, color space conversion,
146–147
Color burst, 111
Color correction
Color Correction tool, 266
Composer window, 264–265
Curves group techniques
color treatment creation,
280
principles, 276–279
white balance problem
correction, 279–280
Dual Split button, 265–266
Edit Review button, 281
HSL group controls
Controls group, 268–269
Curves group, 269–270
Hue Offsets, 267–268
Play Loop button, 281
prerequisites
calibrated broadcast
monitor, 262
client discussions, 264
lighting, 262–263
wall color, 263
waveform/vectorscope, 263
Symphony
capabilities, 281–282
Channels group, 284
HSL controls, 282–284
Levels group, 284–285
Secondaries group,
285–286
workflow
balancing the blacks
RGB parade display, 275
vectorscope, 273–274
balancing the whites,
275–276
black point setting, 271
flesh tone adjusting, 276
grayscale
establishment, 270–271
Gamma adjustment, 272
overview, 270
white point establishment,
271
Color-difference sampling, 126
Color-difference signal, 107–108
Compatible format, 251–252
Component video
color-difference signal,
107–108
digital video, 121–130
luma signal, 107
standards, 114–116
Composer window, 28, 64–265
Composite video
encoded color
carrier wave frequency,
109, 111
combining luma and
chroma signals,
109–111
peak composite amplitude,
111–113
limitations, 113
overview, 108–109
PAL, 113
Compression, 79
Conforming and finishing
audio format options, 219
equipment for online suites,
230–231
finishing resolution selection
high definition, 218–219
standard definition,
217–218
high definition conforming
compatible formats,
251–252
convertible formats, 251–253
standard definition offlines
from
23.976p ntsc, 255–256
24p ntsc, 256–257
24p pal, 255
25i pal, 254–255
30i ntsc, 253–254
30i ntsc offline to
1080p/23.976, 257–259
mixed-format sequence
conforming, 259–260
online delivery requirements
effect plug-in list pulling,
223–224
import element delivery
requirements, 220–222
offline element
deliverables, 219–220
source list pulling, 220–223
online project settings
audio project settings,
225–226
capture settings
batch tab, 227–228
general tab, 226–227
deck settings, 228–229
media creation, 229
render settings, 230
onlining and offlining on
same machine
deletion
offline video media,
232–233
unused media, 233–234
storage space maximization
Consolidate, 235–236
excess media clearing
through Media
Relatives, 234–235
recapture
analog deck time base
correction, 247
audio mix integration,
248–249
Avid Log Exchange and
source ownership
assignment, 242
batch capturing, 244–246
sequence linking to new
clips, 242–243
sequence preparation
Decompose function,
237–240
online project utility,
236–237
INDEX
source list pulling
flagging clips from
duplicate tape names,
240–241
solving duplicate tape
names, 241–242
space requirement
calculation, 243–244
Relink and linking to other
sequences, 249–250
Consolidate
capture mistake correction,
86–87
master clips, 84–85
overview, 82, 86
sequence, 82–84
storage space creation,
235–236
subclipping strategy with
capture, 87
Convertible format, 251–253
Creation Date, 88–89
CtrlAlt/CommandOption
drag-and-drop modifiers,
18–19
segment mode modifiers, 23
Ctrl/Command key
drag-and-drop modifiers, 17
precise jumping, 59
segment mode modifiers, 23
CtrlShift/Ctrl, segment mode
modifiers, 23
Curves group, color correction
techniques
color treatment creation,
280
principles, 276–279
white balance problem
correction, 279–280
Custom column
bins, 62, 89
sorting columns, 63
Customer service, 289, 308–309
Custom Sift, 63–64
Cycle Trim Sides button, 34
Decompose, sequence
preparation for
recapture, 237–240
Digital Audio Scrub, 2–3
Digital video
analog voltage representation
color-difference sampling,
126
luma (Y ’) sampling,
125–126
reserved samples, 126
component video, 121–130
sampling
analog signal sampling,
121–122
4:1:1 sampling, 124
4:2:0 sampling, 124–125
4:2:2 sampling, 124
frequency, 123–124
video line sampling
digital frame structure,
127–128
525-line digital video, 129
625-line digital video,
129–130
standards, 127
Drag-and-drop viewer, 18–19
Dragging
drag trim, 36–38
editing from bin
clip dragging to record
monitor, 19–20
drag-and-drop viewer, 18–19
multiple clip dragging to
timeline, 19
precise dropping of clip,
16–18
splice versus overwrite, 16
sync material dragging to
timeline, 19
Drive Filtering, 313
Dual-roller trim, 44
Dual Split button, 265–266
Dupe reels, 338–341
DVE controls, SpectraMatte
keyer, 209
Edit decision list (EDL)
matchback edit decision list
creation, 257–259
metadata export, 163
preparing for linear online
dubbing with timecode,
325–326
347
dupe reels, 338–341
example, 332–333
input media, 329–331
matchback, 343
multiple layers of graphics
and video, 334–335
offline cut, 324–325
overview, 321–324
PAL lists, 342–343
printing, 341
simplification, 335–336
Sony list, 331
sort modes, 337–338
sound levels, 336
source table, 341–342
tape names, 327
templates, 331–332
translating effects, 333–334
relinking considerations, 96
Edit Review button, 281
EDL, see Edit decision list
EDL Manager, 258–259, 327,
331, 337
Effect Editor, keyframe settings,
189–190
Effects
Add Edit button, 198–199
Avid Component Processing
Library, 174
AVX plug-ins standard,
213–214
chroma keying
key types, 204
requirements, 203–204
SpectraMatte keyer
configuration
blur adding to matte
edge, 212
foreground spill
suppression, 211–212
initial key values, 209–210
matte adjustment,
210–211
SpectraMatte keyer
parameters
bypass, 204
chroma control, 206–207
DVE controls, 209
key color, 204–205
luma control, 207–208
348
INDEX
Effects (Continued)
matte analysis, 205–206
matte processing, 208
spill, 209
design, 176
edit decision list translation,
333–334
Keyframes manipulation
adding to
active group, 181
active parameter, 181
all parameters, 181–182
enabled group, 181
open graph, 181
open group, 181
advanced model, 179–190
aligning, 183
copying and pasting,
188–189
deleting, 182
Effect Editor settings,
189–190
motion control
Bezier, 186–188
Linear, 186
Shelf, 184–185
Spline, 186
overview, 179
parameter changing over
time, 182–183
Remove Redundant Effects,
189
slipping, 183–184
trimming effects, 184
nesting
auto-nesting, 200–201
overview, 199–200
viewing and changing
collapse versus video
mixdown, 202–203
collapsing effects,
201–202
paint effects, 213
plug-in list pulling, 223–224
real time versus non-real
time, 174–176
rendering
ExpertRender, 177–178
overview, 176–177
Partial Render, 178–179
template saving, 198
3D effects, 212–213
Timewarp controls
format changing during
speed changes, 193
Freeze Frame effect
creation, 196–197
modification, 197
motion effect types
both fields, 193–194
duplicated fields, 193
FluidMotion, 194–196
interpolated fields, 194
video tape recorder style,
194
position, 192
speed, 191–192
Trim mode, 192
titles, 214–216
Electrical power, Avid system,
73–75
Electrostatic discharge (ESD),
308
Enable Edit from Bin, 20
Ergonomics, 75
Erode, blur adding to matte
edge, 212
Error messages, 293–294
ESD, see Electrostatic discharge
ExpertRender, 177–178
Exporting
basics, 162–163
metadata
consolidate media, 166
copy all media, 165
formats, 163–165
linking, 165
motion video
alpha channel inclusion, 168
frame size, 168
QuickTime movie, 166–168
templates, 161–162
Extend, 50
External drive, back up, 69
Extract, 25–26
Extract/Splice segment mode, 16
Fast Forward and Rewind
buttons, 57–68
FF/REW tab, 12
Field ordering, graphics import,
152, 159–160
Filler, trimming in, 49
Final Cut Pro®, 16
Find Media Relatives, 89–91
Finishing, see Conforming and
finishing
525-line digital video, 127–130
Flesh tone, adjusting, 276
FluidMotion, 194–196
Fly back, 117
Focus button, 26–27
4:1:1 sampling, 124
4:2:0 sampling, 124–125
4:2:2 sampling, 124
Frame counting, 11
Frame export, see Exporting
Frame import, see Graphics
importing
Frame rate
high definition video
720-line high definition,
140
1080-line high definition,
133–134
standard definition video,
113–114
Freeze Frame effect
creation, 196–197
modification, 197
Front porch, 111
Gamma
definition, 105
grayscale balancing, 272
Hue Offsets, 267
Go to In, 10
Go to Out, 10
Graphics importing
After Effects files,
170–171
color space conversion
CMYK, 146–147
overview, 146
field ordering, 152
file formats, 145–146
online delivery requirements,
220–221
pixel shape, 147–149
RGB mapping, 149, 151–152
INDEX
settings for import
alpha, 160
aspect ratio, pixel aspect,
157–159
autodetect sequential files,
161
color levels, 160
file field order, 159–160
single frame import,
160–161
601/709 mapping, 150–152
video field considerations
alpha channels
premultiplication,
153–157
straight images, 156
sequential files, 157
tweaking, 152–153
Grayscale
establishment, 270–271
Gamma adjustment, 272
HD, see High definition
High definition (HD)
Avid
formats, 142–143
raster subsampling,
143–144
conforming
compatible formats,
251–252
convertible formats,
251–253
standard definition offlines
from
23.976p ntsc, 255–256
24p ntsc, 256–257
24p pal, 255
25i pal, 254–255
30i ntsc, 253–254
30i ntsc offline to
1080p/23.976, 257–259
finishing resolution selection,
218–219
historical perspective,
131–133
720-line high definition
frame rates and types,
140, 142
line structure, 142
sampling
frequency, 141
voltage, 141
signal synchronization,
141–142
standards, 141
1080-line high definition
frame rates and types,
133–134
line structure
1080i, 138–139
1080p, 139
sampling
frequency, 134–135
voltage, 135–136
signal synchronization,
136–138
standards, 133
Horizontal blanking region,
102–103
HSL group controls
Controls group, 268–269
Curves group, 269–270
Hue Offsets, 267–268
Symphony, 282–284
Hue Offsets, 267–268
Importing, see Graphics
importing; Video
importing
Interface customization
general modality, 66
toolsets, 68
views, 66–67
workspaces, 67–68
Interlaced scanning, 118
IRE unit, 104
J-K-L Scrub
source-to-record editing
advantages, 3
operations and key usage, 4
sound quality, 4
speed ratcheting, 5
trimming
operations and key
functions, 40
split trimming, 40–41
Jumping
Jump Back, 27
349
Jump In, 27
precise jumping, 59
Key color, SpectraMatte keyer,
204–205
Keyboard
customization, 55–57
power outage and project
protection, 74–75
shortcuts, 54
Keyboard trim
directional keyboard trims, 39
offset keyboard trims, 39
on-the-fly trimming, 42
Keyboard, video, mouse (KVM)
extender, 72
Keyframes
adding to
active group, 181
active parameter, 181
all parameters, 181–182
enabled group, 181
open graph, 181
open group, 181
advanced model, 179–190
aligning, 183
copying and pasting, 188–189
deleting, 182
Effect Editor settings, 189–190
effect manipulation overview,
179
motion control
Bezier, 186–188
Linear, 186
Shelf, 184–185
Spline, 186
parameter changing over
time, 182–183
Remove Redundant Effects,
189
slipping, 183–184
trimming effects, 184
KVM extender, see Keyboard,
video, mouse extender
Lasso, timeline, 21–22, 59
Lift, 25–26
Lift/Overwrite segment mode,
16
Lightworks®, 9
350
INDEX
Linear, motion control between
keyframes, 186
Lock Items in Bin, 91–92
Lossless compression, 79
Lossy compression, 79
Luma control, SpectraMatte
keyer, 207–208
Luma signal, 107, 109–111
Luma (Y ’) sampling,
125–126
Mapping, pulldown menu to
key, 56
Mark and park editing, 9
Mark In button
Mark In-to-Out, 12
Mark Out button, 41–42
Marquee, title tool, 215–216
Matchback, 257–259, 343
Matte analysis, SpectraMatte
keyer, 205–206
Matte processing, SpectraMatte
keyer, 208
Media
back up
daily projects, 99
guidelines, 68–70
long-term archival,
99–100
user settings, 100
consolidation, 82
deletion decisions, 88
deletion of precomputes,
80–81
empty space importance, 81
Find Media Relatives,
89–91
nonlinear video assistant in
management, 314
OMF versus MXF media,
75–77
storage and management,
75–76
storage estimates, 77–78
troubleshooting management
deck control tips, 304
overview, 303–304
Windows operating system,
305
uncompressed media
formats, 218
Media Composer, 8–9, 12, 58,
218, 261
MediaMover, 87, 91
Media Tool, editing
applications, 64–65
Metadata
consolidate media, 166
copy all media, 165
formats, 163–165
linking, 165
Multicamera takes, naming, 49
MXF folder and media, 75–77
Nesting
auto-nesting, 200–201
overview, 199–200
viewing and changing
collapse versus video
mixdown, 202–203
collapsing effects,
201–202
NewsCutter, 261
Nonlinear video assistant
backing up, 315
basic maintenance, 315
capturing, 312–313
drive management, 313–314
functional overview, 311–312
media management, 314
output, 315–316
recapturing, 316–317
tape blacking and deck
management, 317–320
Nontimecoded material,
handling, 70
NTSC
black-level setup, 104–105
frame rate, 114
frame structure, 117–121
peak composite amplitude,
111–113
video line voltages, 103–104
OMF
media, 75–77
ProTools and OMFI files,
168–170
On-the-fly trimming, see
Trimming
Operating system
copying of projects, 87–88
Windows operating system
troubleshooting, 305
Overwrite, 16
Paint®, 213
PAL
composite video, 113
edit decision lists, 42–343
frame rate, 11
frame structure, 117–121
peak composite amplitude,
111–113
video line voltages, 103
Partial Render, 178–179
Phantom Marks, 14
Phase quadrature, 109
Pixel, shape and graphics
importing, 147–149
Play In to Out, 10
Play Loop button, 281
Play to Out, 10
Pop-up monitor, 15
Power failure, 73–75
Precomputes, deletion, 80–81
Premiere®, 16
Premultiplication, alpha
channels, 153–157
Progressive video, 139
Project name
changing for master clips,
92–94
relinking considerations,
95–96
ProTools, OMFI files, 168–170
PS2 cable, 295
QAM, see Quadrature amplitude
modulation
Quadrature amplitude
modulation (QAM), 109
QuickTime, movie importing
and exporting,
166–168
Recapture
analog deck time base
correction, 247
audio mix integration, 248–249
Avid Log Exchange and source
ownership assignment,
242
INDEX
batch capturing, 244–246
nonlinear video assistant
roles, 316–317
sequence
linking to new clips, 242–243
preparation
Decompose function,
237–240
online project utility,
236–237
source list pulling
flagging clips from
duplicate tape names,
240–241
solving duplicate tape
names, 241–242
space requirement
calculation, 243–244
R’G’B’ signal, 105–107
Reinstall, 302–303, 305–306
Relinking
linking to other sequences by
resolution, 249–250
master clips, 97
rules, 94–97
Remove Redundant Effects, 189
Rendering
effects
ExpertRender, 177–178
overview, 176–177
Partial Render, 178–179
online project settings, 230
Replace edit, 14–15
Resolution, storage
requirements, 78
RGB mapping, 149, 151–152
Rollers
adding and removing from
selected track, 34
adding where no edits exist,
34–36
Room design, optimization for
Avid, 71–73
Sampling, see Digital video;
High definition
SCSI
chain termination, 298
connecting wide and narrow
drives, 299–300
drive striping, 297
ID number, 298–299
LVD drive connecting, 300
rules, 295–297
Sequence
consolidation, 82–84
cutting down
Extract, 25–26
Lift, 25–26
overview, 23–24
Tail, 24–25
Top, 24–25
recapture
linking to new clips, 242–243
preparation
Decompose function,
237–240
online project utility,
236–237
relinking, 97
subclip collections, 96
720-line high definition, see
High definition
Shelf, motion control between
keyframes, 184
Sift, 63–64
Signal, see Video signal
Single-roller trim, 44
601/709 mapping, 150–152
625-line digital video,
127–130
Slide mode, 45–46
Slip keys, Source/Record,
50–51
Slip mode, 44–45
Snapping to edit
timeline, 12
trimming, 38
Sound, see Audio
Source-to-record editing
edit point finding
Digital Audio Scrub, 2–3
J-K-L Scrub, 3–5
timecode searching, 4–8
mark setting
back-timing of edits, 9
changing marks, 10
duration checking, 8
mark and park editing, 9
previewing edits, 10–11
segment marking in
timeline, 12
351
snapping to edit, 12
three-point editing, 9
timecode offset marking,
11–12
overview, 1–2
SpectraGraph, 206, 210–211
SpectraMatte keyer
configuration
blur adding to matte
edge, 212
foreground spill
suppression, 211–212
initial key values, 209–210
matte adjustment, 210–211
parameters
bypass, 204
chroma control, 206–207
DVE controls, 209
key color, 204–205
luma control, 207–208
matte analysis, 205–206
matte processing, 208
spill, 209
Speed ratcheting, J-K-L Scrub, 5
Spill
foreground spill suppression,
211–212
SpectraMatte keyer, 209
Splice, 16
Spline, motion control between
keyframes, 186
Square pixel, 147–149
Storage, see Media
Subclip
relinking considerations, 96
sequence as subclip
collection, 96
subclipping strategy with
capture, 87
S-video, 114
Symphony®
color correction
capabilities, 281–282
Channels group, 284
HSL controls, 282–284
Levels group, 284–285
Secondaries group,
285–286
importing files, 157
marks, 8–9
nonlinear navigation, 58
352
INDEX
Sync
break indicators, 32
locking, 31–32
Sync Point Overwrite, 13–14
Synchronization voltage, 103
Tail, 24–25
Tape, blacking and deck
management, 317–320
TBC, see Time base correction
Television, invention, 119
Template
edit decision list, 331–332
exporting, 161–162
saving for effects, 198
3D effects, 212–213
1080-line high definition, see
High definition
Three-point editing, 9
Time base correction (TBC), 247
Timecode
dubbing and preparing for
linear online,
325–326
keystroke saving in entry, 6
offset marking, 11–12
relinking considerations,
94–95
searching in edit point
finding, 4–8
Timeline assembly
editing from bin
drag techniques
clip dragging to record
monitor, 19–20
drag-and-drop viewer,
18–19
multiple clip dragging to
timeline, 19
precise dropping of clip,
16–18
Splice versus Overwrite,
16
sync material dragging to
timeline, 19
marking in bin, 20–21
overview, 16
rearranging edits
segment movement
restriction, 23
segment moving, 22–23
timeline lasso, 21–22
navigation
jumping, 26–27
manipulation, 58–59
Wrap Around, 27
zooming, 26
sequence cutting down
Extract, 25–26
Lift, 25–26
overview, 23–24
Tail, 24–25
Top, 24–25
source-to-record editing
edit point finding
Digital Audio Scrub, 2–3
J-K-L Scrub, 3–5
timecode searching, 4–8
editing to timeline
pop-up monitor, 15
Replace edit, 14–15
Sync Point Overwrite,
13–14
mark setting
back-timing of edits, 9
changing marks, 10
duration checking, 8
mark and park editing, 9
previewing edits, 10–11
segment marking in
timeline, 12
snapping to edit, 12
three-point editing, 9
timecode offset marking,
11–12
overview, 1–2
story framework building, 1
Timewarp controls
format changing during
speed changes, 193
Freeze Frame effect
creation, 196–197
modification, 197
motion effect types
both fields, 193–194
duplicated fields, 193
FluidMotion, 194–196
interpolated fields, 194
video tape recorder style,
194
position, 192
speed, 191–192
Trim mode, 192
Title Tool, 214–215
Toolset, customization, 68
Top, 24–25
Track name, changing, 59
Trimming
Avid advantages, 29
bidirectional trimming, 46–47
drag trim, 36–38
effects with keyframes, 184
filler trimming in, 49
J-K-L scrub trimming
operations and key
functions, 40
split trimming, 40–41
keyboard trim
directional keyboard
trims, 39
offset keyboard trims, 39
keyframe effects, 184
nonlinear thinking, 30–31
on-the-fly trimming
keyboard trim keys, 42
Mark In button, 41–42
Mark Out button, 41–42
overview, 41
switching trim types, 43–44
trim loop duration
changing, 42–43
outside of trim
Extend, 50
Source/Record Slip keys,
50–51
rollers
adding and removing from
selected track, 34
adding where no edits exist,
34–36
snapping to edit or mark, 38
sync
break indicators, 32
locking, 31–32
Trim mode
entering, 33
exiting, 33
trim types
dual-roller trim, 44
single-roller trim, 44
INDEX
Slide mode, 45–46
Slip mode, 44–45
two heads or tails, 46–48
Troubleshooting
audio problems, 292–293
black-burst generator
applications, 301–302
connections
audio, 301
overview, 294–295
PS2 cable, 295
SCSI
chain termination, 298
connecting wide and
narrow drives, 299–300
drive striping, 297
ID number, 298–299
LVD drive connecting,
300
rules, 295–297
USB cable, 295
customer service, 289,
308–309
electrostatic discharge, 308
error messages, 293–294
hardware problems, 289–290,
303
manual importance, 288–289
media management
deck control tips, 304
overview, 303–304
Windows operating system,
305
philosophy, 287–288
software problems, 289–292,
302–303, 305–306
version numbers, 306–307
Uncompressed image, 79
Uninterruptible power source
(UPS), 73–74
Unlinking, 97–98
UPS, see Uninterruptible power
source
USB cable, 295
VBI, see Vertical blanking
interval
Vectorscope
balancing the blacks, 273–274
color correction
requirements, 263
Vertical blanking interval (VBI),
119–120
Video assistant, see Nonlinear
video assistant
Video field, 118
Video importing
alpha channel inclusion,
168
frame size, 168
QuickTime movie, 166–168
Video mixdown, 202–203
Video signal, see also Digital
video
black-level setup, 104–105
color, 105
component video
color-difference signal,
107–108
luma signal, 107
standards, 114–116
composite video
encoded color
carrier wave frequency,
109, 111
combining luma and
chroma signals,
109–111
peak composite
amplitude, 111–113
limitations, 113
353
overview, 108–109
PAL, 113
frame rate, 113–114
frame structure
blanking interval, 117–118
scan line structure,
118–120
subcarrier synchronization,
121
vertical blanking interval,
119–120
line structures, 102–103
line voltages, 103–104
S-video, 114
Video tape recorder style effects,
194
View, customization, 66–67
Waveform display
balancing the blacks with
RGB parade display,
275
color correction
requirements, 263
Weightlifter icon, 24
White balance, problem
correction, 279–280
White point, establishment,
271
Workspace, customization,
67–68
Wrap Around, 27
XPress Pro, 27
Y/C, see S-video
Zooming, timeline, 26
This page intentionally left blank
Original Image Prior to Correction
Corrected Grayscale Image
Color Figure 1
Original Image Prior to Correction
Corrected Grayscale Image
Color Figure 2
Original Image Prior to Correction
Corrected Grayscale Image
Color Figure 3
Original Image Prior to Correction
Corrected Image
Color Figure 4
Original Image Prior to Correction
Corrected Image
Color Figure 5
Original Image Prior to Correction
Corrected Image
Color Figure 6
Original Image Prior to Treatment
Treated Image
Color Figure 7
Original Image Prior to Treatment
Treated Image
Color Figure 8