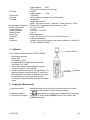
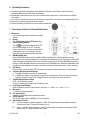
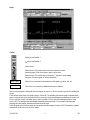
1
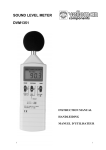
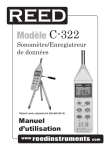
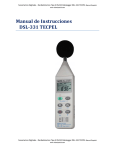
DVM322DI -- SOUND LEVEL METER
1. Introduction and Safety Information
Thank you for buying the DVM322DI ! We advise you to read this manual thoroughly. You should only use this
device for the applications described in this manual. Unauthorised applications may cause damage to the device.
Environmental Conditions :
- Max. altitude
: 2000m
- Max. relative humidity : 90%
- Operation temperature : 0 - 40°C
Maintenance
- All repairs and maintenance activities not described in this manual should be handled by qualified personnel.
- Wipe the housing clean from time to time with a dry cloth. Do not use abrasives or solvents on this device.
Safety Symbols
This device is EMC-compatible.
2. Features
This device was designed according to IEC651 type 2, ANSI S1.4 type 2 for sound level meters. The DVM322DI
meets the requirements of safety engineers and industrial safety offices for the monitoring of sound quality in various
environments.
- RS-232 interface with PC.
- data logging capacity with memory for 32000 measurements.
3. Specifications
Standards
Accuracy
Frequency Range
Measuring Level
Frequency Weighting
Microphone
Digital Display
Analogue Display
Time Weighting
MAX/MIN Hold
Level Ranges
Dynamic Range
Alarm Function
AC Output
DVM322DI
:
:
:
:
:
:
:
:
:
:
:
:
:
IEC type 2, ANSI S1.4 type 2
± 1.5dB (under conditions @ 94dB, 1KHz)
31.5Hz-8KHz
30-130dB
A-C
½" electret condenser microphone
4-digit LCD, resolution 0.1dB, display period 0.5sec.
50-segment bargraph, resolution 0.1dB, display period 50mS
FAST = 125mS or SLOW = 1sec.
To hold the highest and lowest values obtained during measurements
a total of 4 ranges at step 10dB : 30-80dB, 50-100dB, 80-130dB, 30-130dB
100dB
OVER indicator (value is higher than the upper limit of the measuring range) and
UNDER indicator (value is lower than the lower limit of the range).
: 1Vrms at full scale
1
GB
DC Output
:
Power Supply
Autonomy
DC adapter
:
:
:
Electromagnetic Compatibility
Operating Temperature
Operating Humidity
Storage Temperature
Storage Humidity
Memory Size
Dimensions
Weight
Accessories
:
:
:
:
:
:
:
:
:
Output impedance : 600Ω
FS (full scale= the upper limit of each range).
10mV/dB
Output impedance : ± 1KΩ
1 x 9V-battery
± 50hrs of continuous operation with an alkaline battery
Voltage 9VDC
Supply Current 30mA DC
Socket : pin = ground, housing = +, external Ø = 3.5mm, internal Ø = 1.35mm
RF field = 3V/m, total accuracy = specified accuracy + 0.5dB
0 to 40°C / 32 to 104°F
10 to 90%
-10 to +60°C / 14 to 140°F
10 to 75%
32000 measurements
10.8 (L) x 2.5 (W) x 1.2 (H) inch // 275 (L) x 64 (W) x 30 (H) mm
± 285g (including battery)
9V-battery, carrying case, screwdriver, user manual, windscreen, 3.5mm plug, RS232 cable, software for Windows.
4. Calibration
acoustic calibrator
Use a standard sound level calibrator (OPTION DVM1356).
1. Use the following settings :
Display : dBA
Time Weighting : FAST
Measurement Mode : MAX MIN function deactivated
Level Range : 50 to 100dB
2. Connect the microphone with the calibrator through the
microphone connection of the DVM322DI.
3. Activate the calibrator and adjust the CAL potentiometer. The
display will indicate the desired level range. This device has
been calibrated by the manufacturer. Maximum accuracy can
be expected during a one-year period after calibration.
Consequently, the device should be recalibrated every twelve
months.
screwdriver
5. Preparing for Measurements
a) Inserting the battery
: Remove the battery cover at the back of the device and insert one 9V-battery.
Observe the polarity indications inside the battery compartment !
b) Replacing the battery
: The
-symbol will flash on the display when the battery needs to be replaced.
c) Connecting an DC adapter : Connect the OPTIONAL adapter (PSU03R) with the DC 9V connector of the
DVM322DI's side panel.
DVM322DI
2
GB
6. Operating Precautions
a) Wind blowing around the microphone causes additional extraneous noise. Mount the windscreen when
performing measurements under windy circumstances.
b) Recalibrate the instrument prior to use if it has not been used for some time or if it was last used in a difficult
environment.
c) Do not store or operate the instrument under excessive temperatures or humidity for a prolonged period of time.
d) Keep the microphone dry and avoid severe vibrations.
e) Remove the battery if the device is not to be used for several days.
7. Description of the Front, Side and Back Panels
1. Windscreen
Use the windscreen when the wind-force exceeds
10m/sec.
2. Display
See “8. Description of the LCD Display” below.
3. Power & Backlight Button
4.
5.
6.
7.
8.
9.
10.
11.
12.
Use the
-key to switch the device ON or OFF
or to turn the backlight ON or OFF. Press the
button once to turn the sound level meter ON and
press it again to turn on the backlight. Hold the
button for three seconds to deactivate the device.
MAX/MIN Hold Button
Press the MAX/MIN button to activate the MAX. & MIN. recording mode. Select the proper level range
beforehand to ensure that the readings will not fall outside the measurement range. Press once to select MAX
value. Press again to select MIN value. Press a third time to select the current value (MAX/MIN annunciator is
blinking). Hold the MAX/MIN button for two seconds to exit the MAX/MIN mode. Note that the MAX/MIN mode
will clear every time a different level range is selected or the operator alternates between A and C weighting.
REC Button
Press the button to start recording. “REC” appears on the display. Press the button again to stop recording
Frequency Weighting Selection Button
A : A-weighting, for general sound level measurements.
C : C-weighting, to check the low-frequency content of the monitored noise. There is a large amount of lowfrequency noise if the value for the C-weighted level is much higher than that for the A-level.
Time Weighting Selection Button
FAST : for normal measurements
SLOW : for checking the average level of fluctuating noise.
Level Range Control Button
Press this button to select the various levels in this order : Lo → Med → Hi → Auto → Lo → …
Microphone
½” electret condenser microphone
CAL potentiometer
Calibration potentiometer used to calibrate the device.
RS-232 Interface
The RS-232 signal output is a 9600bps N 8 1 serial interface.
Signal Output Terminal
AC : 1 Vrms per range step. Output impedance = 100Ω. The output signal is transmitted via a standard
3.5mm coaxial socket. The signal is located on the pin
DC : Output : 10mV/dB. Output impedance = 1KΩ. The output signal is transmitted via a standard 3.5mm
coaxial socket. The signal is located in the middle.
DVM322DI
3
GB
13. External DC 9V Power Supply Terminal
For connection through an DC adapter (OPTION).
14. Mounting Screw
15. Battery Cover
8. Description of the LCD Display
1. 4-digit LCD
2. Underrange indication
3. Maximum indication
4. Minimum indication
5. Fast response
6. Slow response
7. Overrange indication
8. Automatic range selection is activated
9. A-weighting
10. C-weighting
11. Read-out
12. Low-battery indication
13. Auto-power OFF is activated
14. Indication that memory is full
15. Recording mode is activated
16. Range indication (88 – 180)
9. Using the Memory
Press the REC button to start recording and press it again to stop recording. To clear the memory : deactivate the
device, hold REC and the ON/OFF button for five seconds. “CLR” and “SURE” will be displayed and then disappear
to indicate that the memory has been erased.
10. Setting the Clock
Deactivate the device by holding the ON/OFF button for three seconds. Hold the A/C button and press the ON/OFF
button once while you are doing this. Press the MAX/MIN button to display the clock on the display. The digits for the
year are flashing. Enter the years with the ▲ and ▼ buttons and confirm them by pressing MAX/MIN. The digits for
the month start to flash. Enter the month, date, hours and minutes (in this order) by repeating the procedure
explained above.
Press the ON/OFF button to abort if you want to stop the process.
11. Recording the Interval Setup
Deactivate the device by holding the ON/OFF button for three seconds. Hold the A/C button and press the ON/OFF
button once while you are doing this. Press the FAST/SLOW button. Set the desired interval with ▲ and ▼ and
confirm it by pressing FAST/SLOW again.
Press the ON/OFF button to abort if you want to stop the process.
DVM322DI
4
GB
12. Auto Power OFF
The auto power off mode is always armed when the device is activated. The device will automatically deactivate after
30 minutes if no other buttons are pressed and if there is no RS-232 communication. The recording function does not
influence this feature.
Turn the device off and hold the FAST/SLOW button while pressing the ON/OFF button. The
indicator is no
longer displayed on the LCD because the auto power off function has been disabled.
13. Measurements
a. Open the battery cover and insert a 9V-battery in the battery compartment.
b. Activate the device and select the desired time weighting (FAST/SLOW) and frequency weighting (A or C). Use
FAST time weighting if the sound source consists of short bursts or if you only catch sound peaks. Use the SLOW
setting to measure average sound levels. Select A-weighting if you wish to measure the general noise level and
select C-weighting for measuring the acoustic sound level.
c. Select the desired range.
d. Hold the instrument in your hand or mount it on a stand and point the microphone at the suspected source of the
noise. The measured sound pressure level is displayed.
e. Press the MAX/MIN button to activate the MAX/MIN mode. The MAX value is now displayed. Press the button
again for the MIN value and press it a third time to display the current measurements. Press A/C to return to the
normal display mode. Hold MAX/MIN for three seconds to erase the MAX/MIN memory.
f. Deactivate the device and remove the battery when the DVM322DI is not in use.
14. Installing the Software for the RS-232 Interface
The package contains one CD and one custom-designed RS-232 TestLink cable. The software requires Windows
95, Windows 98, Windows NT 4.0 or above.
Minimum hardware requirements : PC or Notebook with Pentium 90MHz or higher, 32MB RAM, at least 5MB hard
disk space available to install TestLink. Recommended resolution 800 x 600.
Installing TestLink :
1.
2.
3.
4.
We recommend that you close all other applications before installing TestLink.
Insert the setup CD in the CD disk drive.
Choose the START button on the task bar and select RUN.
Enter “E:\SETUP” and choose OK. The file SE322.exe is copied to your hard disk (C:\program
files\TestLink/SE322).
Main Menu
File : open files or retrieve saved files
Save : save the active window.
Print : print the active window (graph or list)
Printer Setup : Select a printer
File │ Exit : terminates the TestLink program
View │ Control Panel : open this panel window to operate the meter through the screen buttons.
View │ Real-Time Graph : open the real-time graph to display the data currently being acquired by the device.
Real-Time Data │ Run : start collecting real-time data
Stop : stop collecting real-time data
DataLogger : open the Data Logger window to load data recorded with the DVM322DI
Output Tabular to Graph : Graphic display of a table with data
DVM322DI
5
GB
Graph
Toolbar
Display or hide Statistic 1.
Display or hide Statistic 2.
Normal cursor.
Select this icon. The mouse cursor turns into a cross when moved
toward the graph. Click on the graph to mark it with a cross.
Select this icon. The mouse cursor turns into an “I” sign when moved toward
the graph. Click on the graph to make an annotation.
Graph Option
Select this icon and enter the characteristics of the graph e.g. colour, font, etc..
Export Statistic
Click on this icon to export the statistical data to your clipboard
Use the mouse to select a rectangular area on the graph to zoom in on. Click on a point of your choice and drag the
mouse.
There are two vertical lines in the graph (cursor A & cursor B). The recording time and the value is indicated above
and to the right of each of the two cursors. With the mouse you can grasp and drag the vertical lines for cursors A &
B to the right or to the left. Just below cursor A and B is a slider. You can also click and drag the slider to move
cursor A or B. The statistical data is displayed immediately below the toolbar. You can read out the start time,
sampling rate, data number, maximum and minimum of the graph.
Under the graph you will find the maximum, the minimum and the average of cursors A & B. These data is updated
automatically as soon as cursor A or B is moved.
DVM322DI
6
GB
You can also doubleclick on the graph to activate the same function that is selected by clicking on “Graph Option” on
the toolbar. This function is not available when you are working with a real-time graph.
Data Logger
The recorded data is loaded when the DVM322DI is connected to your PC and you either select “Data Logger” from
the main menu or click on the
-icon on the toolbar. A moving bar indicates the state of the loading process. Click
on “Data Logger” again if an error occurs.
The exact number of loaded data sets is displayed on the left-hand side after the data has been loaded. You are also
provided with further details concerning each set (date, start time, sampling rate and number of records).
Example :
The first set of recorded data is automatically displayed on the graph. Click on another data set to visualise its
content on the graph. The data set that was recorded most recently is automatically placed at the head of the list.
The data in this new data set are also automatically visualised on the graph.
DVM322DI
7
GB
15. Learning to Use TestLink Se322
a) Recording real-time data in waveform
1. Activate the DVM322DI and connect it to a PC RS-232 serial port with the supplied cable.
2. Start the program.
3. The panel will display the same value as the DVM322DI itself if the connection is successful. The message “No
Connection” is displayed on your computer screen in TestLink Se322 if the connection has failed.
4. When the connection is successful, click to start recording real-time data. The corresponding waveform is
displayed in the real-time graph window.
5. Click to start recording.
b) Hoe bewaar ik de opgenomen real-time data in een file?
1. Klik het grafisch venster aan dat u wilt bewaren. Het venster wordt nu actief. Selecteer “File” │ “Save” in het
hoofdmenu of klik op het -icoon op de toolbar.
2. Vervolgens verschijnt er een dialoogvenster waarin u de naam van de file en de extensie kunt ingeven. U kunt
kiezen uit drie verschillende bestandsformaten : binair formaat (*.ghf), text file (*.txt) en EXCEL formaat (*.csv).
Voor een *.ghf file heft u veel minder vrije ruimte nodig op de disk dan voor de andere twee formaten, maar u kunt
dit type enkel gebruiken in TestLink Se322. Met TestLink Se322 en met om het even welke andere
tekstverwerker kunt u text files openen. Het EXCEL formaat is compatibel met TestLink Se322 en Microsoft
Excel.
b) How to save the recorded real-time data to a file.
1. Click on the graph window you want to save to make it active, then choose “File” │ “Save” from the main menu or
click on the toolbar.
2. There will be a dialogue window where you can enter the file name and the extension. Three types of file name
can be used : binary file (*.ghf), text file (*.txt) and EXCEL format file (*.csv). A *.ghf file uses much less disk
space than the other two file formats, but it can only be used in TestLink Se322. TestLink Se322 and any other
word processor program can open txt. files. e word, notepad, etc. An Excel file is compatible with TestLink Se322
and Microsoft Excel.
DVM322DI
8
GB
c) How to load the recorded data from the memory of the DVM322DI and save it to a file.
1.
2.
3.
4.
5.
Activate the DVM322DI.
Press the REC button to start recording data.
Press REC again after a while to stop recording.
Connect the sound level meter to your PC.
Start the Se322 program.
6. Choose Data Logger from the main menu or click
on the toolbar.
16. Frequently Asked Questions
1. When I connect the sound level meter to the PC’s serial port and activate the DVM322DI, the display still
reads “No Connection”.
All the serial ports may be taken by other applications. Close all other applications. If it still doesn’t work, reboot
your computer and run TestLink Se322 again.
2. How can I save the graph to a file that can be used in Excel?
The default file format for saving a graph to a file is “*.ghf”. Simply select “*.csv” for a format that can be opened in
Excel.
3. How do I uninstall TestLink Se322?
Launch the “Add/Remove Programs” applet via the control panel. Highlight he Se322 and click on “Add/Remove”.
The Se322 folder and the files contained within will be removed from your computer.
4. Why does the program fail to save the data?
This may be caused by the slow response of your PC.
5. How do I zoom in on the graph?
Leftclick and drag the cursor to select the portion of the graph you wish to enlarge and then simply release the
mouse button.
6. Some of the recorded are lost when I set up a fast sampling rate (e.g. 0.1 sec.).
This may be caused by the slow response of your PC.
DVM322DI
9
GB