1
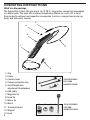
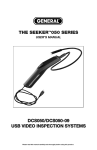
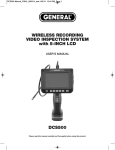
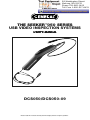
99 Washington Street
Melrose, MA 02176
Phone 781-665-1400
Toll Free 1-800-517-8431
Visit us at www.TestEquipmentDepot.com
THE SEEKER™050 SERIES
USB VIDEO INSPECTION SYSTEMS
USER’S MANUAL
DCS050/DCS050-09
Please read this manual carefully and thoroughly before using this product.
TABLE OF CONTENTS
Introduction . . . . . . . . . . . . . . . . . . . . . . . . . . . . . . . . . . . . . 3
Key Features . . . . . . . . . . . . . . . . . . . . . . . . . . . . . . . . . . . . . 3
Safety Instructions . . . . . . . . . . . . . . . . . . . . . . . . . . . . . . . . 3
Operating Instructions . . . . . . . . . . . . . . . . . . . . . . . . . . 4 – 7
Setup . . . . . . . . . . . . . . . . . . . . . . . . . . . . . . . . . . . 5 – 7
Hardware . . . . . . . . . . . . . . . . . . . . . . . . . . . . . . . . . 5
Accessories . . . . . . . . . . . . . . . . . . . . . . . . . . . . . . . 5
Software . . . . . . . . . . . . . . . . . . . . . . . . . . . . . . 5 – 7
Specifications . . . . . . . . . . . . . . . . . . . . . . . . . . . . . . . . . . . 8
Maintenance Tips . . . . . . . . . . . . . . . . . . . . . . . . . . . . . . . . . 8
Warranty Information . . . . . . . . . . . . . . . . . . . . . . . . . . . . . . 9
Return for Repair Policy . . . . . . . . . . . . . . . . . . . . . . . . . . . . 9
Test Equipment Depot - 800.517.8431 - 99 Washington Street Melrose, MA 02176
TestEquipmentDepot.com
2
INTRODUCTION
Thank you for purchasing a General Tools & Instruments’ Seeker™050 Series Video
Inspection System. We strongly suggest that you read this user’s manual carefully before
using the product.
The Seeker050 Series Systems (DCS050 and DCS050-09) are the newest members of
General’s award-winning family of Seeker Video Inspection Systems. The Seeker050 is
designed for a wide variety of inspection applications—such as inspecting buildings
for mold, leaks or pests; inspecting ducts and pipelines for corrosion or leaks; reading
parts and serial numbers of equipment in industrial and manufacturing settings; and
inspecting the interiors of motor vehicles, airplanes and marine craft. Like its siblings,
the Seeker050 offers a cost-effective way for technicians, mechanics, contractors and
repairmen—as well as the home DIY user—to visually inspect inaccessible or
hazardous areas and thus diagnose hidden system problems without the need for a
complete disassembly or teardown.
Each system has a single main component: a compact, ergonomic wand-type grip that
mates with a fixed high-strength, “flexible-obedient”, 1m (3.28 ft.) long camera-tipped
probe with adjustable LED lighting. By connecting the grip to your Windows* computer
via the attached 1m long USB cable, you can view real-time video on your computer
screen as well as record and edit. The Seeker050 has no internal battery or monitor,
making it cost-effective; it is powered through your computer’s USB 2.0 port. The only
difference between the DCS050 and DCS050-09 is the diameter of the probe. The
DCS050 has a 12mm (0.47 in.) diameter probe. The DCS050-09 has a 9mm
(0.34 in.) diameter probe.
KEY FEATURES
• Includes ScopeView interfacing/datalogging/media management software
• Connects via USB 2.0 to most modern Windows* computers running the
Windows 7*, Windows Vista* or Windows XP* operating system
• 320 x 240 pixel camera resolution and two adjustable-intensity LEDs yield crisp,
clear video
SAFETY INSTRUCTIONS
The probe is not electrically insulated, so do not bring it into contact with exposed
AC wiring.
Although the probe and camera head are water, dust and oil-proof, refrain from
immersing them in liquids. Doing so could increase the risk of electrical shock.
* Windows, Windows 7, Windows Vista and Windows XP are registered trademarks of Microsoft Corporation.
3
OPERATING INSTRUCTIONS
What’s in the package
The Seeker050 system (the grip and a 1m (3.28 ft.) long probe) comes fully assembled
in a blister pack. The pack also contains ScopeView software on a mini-CD, a set of
three probe tip retrieval and inspection accessories (a mirror, a magnet and a pick-up
hook) and this user’s manual.
3.
4.
5.
1.
2.
6.
1. Grip
2. Probe
3. Camera head
4. Camera protective cap
5. On/off/brightness
adjustment thumbwheel
6. USB cable
7. Magnetic tip
8. Hook tip
9. Mirror tip
10. Mirror
11. Thread protector
12. Magnet
13. Hook
4
7.
8.
9.
10.
11.
12. 13.
TIP ACCESSORIES
FOR 12MM
DIAMETER PROBE
TIP ACCESSORIES
FOR 9MM
DIAMETER PROBE
SETUP
HARDWARE
Before using the Seeker050 or the Seeker050-09, make sure to remove the rubber cap
that protects the camera and LEDs on the end of the probe.
ACCESSORIES
To attach any of the three 12mm accessories that come with the DCS050, slip the
semicircular end over the flats of the camera head and rotate the accessory 90° until it
snaps into place.
Attach the 9mm accessories to the Seeker050-09 probe by screwing them on to the tip
of the probe.
SOFTWARE
ScopeView Installation Instructions
1. Insert the ScopeView mini-disk in your computer’s CD/DVD drive and close the
drawer. After the CD loads, the “Welcome to the ScopeView Setup Wizard” screen will
appear. Click Next to continue.
2. Read the End-User License Agreement and accept its terms by checking the box at
lower left and clicking Next.
3. On the Custom Setup screen that appears next, note the advisory that ScopeView will
be installed in the Program Files folder of your computer’s C drive by default. This is
the recommended location. Unless you want ScopeView to be installed elsewhere on
your computer, click Next.
4. On the screen that appears next, click Install to begin the installation.
5. The next screen that appears is a Windows User Account Control dialog box. Respond
to the question, “Do you want to allow the following program from an unknown
publisher to make changes to your computer?” by clicking “Yes”.
6. When the notification, “Completed the ScopeView Setup Wizard” appears, click Finish.
7. Show your desktop. Note that the installation has placed a
icon on your desktop.
Also note that a ScopeView folder containing applications, application extensions and
drivers has been added to your Program Files folder.
8. Open ScopeView. Check that the text “USB Camera” (for Windows7 computers) or
“USB Video Device” (for Windows XP computers) appears in ScopeView’s Device
window (the third item from the left on its toolbar). If you are using a laptop computer
equipped with a video camera, the camera is likely to be the default device. Using the
pulldown in the Device window, deselect the laptop camera, select either USB Camera
or USB Video Device, and click
(the tab to the right of the Device window).
5
When you click Connect, the main screen of ScopeView should begin showing a live
video feed from your Seeker050.
You can now use the thumbwheel on the Seeker050’s grip to adjust the brightness of
the probe’s LEDs.
ScopeView Operating Instructions
Once you have installed ScopeView, you can use the software to view, capture and play
back videos and pictures “seen” by your Seeker050.
To perform these tasks, you will use five features of ScopeView:
• The main menu
• The toolbar below the main menu
• The Preview Pane at the left of the main window
• The Photos and Videos tabs of the Preview Pane
• The Photo Control bar
main window
at the bottom of the
• The status bar at the bottom of the ScopeView window
To view live video, start ScopeView, power on your Seeker050 and click the
tab.
You can change the size of the live feed that appears in ScopeView’s main window by
right-clicking on the video. The options include ten different combinations of size and
aspect ratio, plus maximum size.
Test Equipment Depot - 800.517.8431 - 99 Washington Street Melrose, MA 02176
TestEquipmentDepot.com
To start capturing video, click the
icon on the toolbar. When you do so, note that on
the right side of the status bar the word “Connected” changes to “Capturing…” and that
a stopwatch begins running at its right.
To stop capturing video, click the
icon again. Note that this stops the stopwatch on
the status bar and creates a thumbnail of the video just captured in the Preview Pane.
To play back a captured video, click its thumbnail in the Preview Pane. The video
will play from start to finish in the main window over a video control bar
that indicates both its total duration
(at the right) and the current time position (at the left). Use the play, pause and stop
icons to control playback.
To preview, save, delete, or change the name or storage location of a captured
video, or display its properties, right-click the video’s thumbnail in the Videos tab of the
Preview Pane and left-click the desired action.
By default, all videos and photos captured by the Seeker050 are stored in a folder
named ScopeView that the application creates in your My Documents folder. To change
the default storage location of videos and/or photos, left-click the Settings tab of the
main menu. On the screen that appears, you can also change the default format and
size of photos and the size and type of compression applied to videos. The Settings tab
also lets you change the default language of ScopeView from English to Mandarin
Chinese.
(All of the functions accessible through the Settings tab on the main menu are also
available from the
tab on the toolbar. Similarly, the Tool tab on the main menu
provides access to the Connect, Photo, Capture and Set Timer functions accessible
from the toolbar.
To take a picture of what your Seeker050’s probe is currently viewing, click the
icon on the toolbar. Note that doing so creates a thumbnail of the picture (often called a
screen capture or vidcap) under the Photos tab of the Preview Pane.
To view a captured photo in the main window, double-click its icon in the Preview
Pane. Note that when a picture is displayed in the main window, the Photo Control bar
also appears below it. Use the controls on the bar to zoom in or
out on the picture or rotate it 90 degrees in either direction. To view the next or
previous photo, either click the right or left arrows on the control bar or click the yellow
directional arrows that appear within the main window to the right and left of the
displayed image.
To configure ScopeView and your Seeker050 to automatically capture videos
and/or photos on a regular schedule, click the
tab on the toolbar. You can choose a
daily, weekly or monthly schedule, or specify a date, a time or a duration (for a video).
7
SPECIFICATIONS
Field of view
60º
Minimum focal distance
(Seeker050) 4 in. (100mm)
Depth of field
(Seeker050-09) 0.5 in. to 5 in. (12.7 to 127mm)
Connection/power supply
Via USB 2.0 or 3.0 computer interface
Camera resolution
320 × 240 pixels
USB cable length
1m (3.28 ft.)
Probe length
1m (3.28 ft.)
Probe diameter
Seeker050 - 12mm (0.47 in.);
Seeker050-09 - 9mm (0.34 in.)
Operating temperature
32º to 113ºF (0º to 45ºC)
Operating relative humidity (RH) 5% to 95%, non-condensing
Storage temperature
-4º to 122ºF (-20º to 50ºC), at 85% RH or less
Dimensions
10.5 x 2.9 x 3.2 in. (266 × 73 × 80mm)
Weight of grip
12.8 oz. (363g)
MAINTENANCE TIPS
The Seeker050 requires no routine maintenance other than periodic cleaning. To clean
the instrument, use a soft dry cloth. Never use a wet cloth, solvents or water.
Although the probe and camera head are water, dust and oil-proof to IP67 standards,
refrain from immersing them in liquids or allowing them to come into contact with
corrosive chemicals. Remember that the grip is not waterproof.
Never forcibly insert or bend the probe. Nor should you bend it in more than a 2 inch
radius, or use it like a stick to clear pathways or debris.
Remember to replace the camera head’s protective rubber cap after each use of the
Seeker050. If your videos have spots, gently clean the camera head with a clean,
dry cloth.
8
WARRANTY INFORMATION
The Seeker050 USB Video Inspection System from General Tools & Instruments
(General®) is warranted to the original purchaser to be free from defects in material and
workmanship for a period of 3 years. Subject to certain restrictions, General will repair
or replace this instrument, if after examination, it is determined by General to be
defective in material or workmanship.
This warranty does not apply to damages that General determines to be from an
attempted repair by non-authorized personnel or misuse, alterations, normal wear and
tear or accidental damage. The defective unit must be returned to General Tools &
Instruments or a General authorized service center, freight prepaid and insured.
Acceptance of the exclusive repair and replacement remedies described herein is a
condition of the contract for purchase of this product. In no event shall General be liable
for any incidental, special, consequential or punitive damages, or any cost, attorneys’
fees, expenses, losses alleged to be as a consequence of any damage due to failure of,
or defect in this product including, but not limited to, any claims for loss of profits.
Test Equipment Depot - 800.517.8431 - 99 Washington Street Melrose, MA 02176
TestEquipmentDepot.com
9
NOTES
________________________________________________________________
________________________________________________________________
________________________________________________________________
________________________________________________________________
________________________________________________________________
________________________________________________________________
________________________________________________________________
________________________________________________________________
________________________________________________________________
________________________________________________________________
________________________________________________________________
________________________________________________________________
________________________________________________________________
________________________________________________________________
________________________________________________________________
________________________________________________________________
________________________________________________________________
________________________________________________________________
________________________________________________________________
________________________________________________________________
________________________________________________________________
10
NOTES
________________________________________________________________
________________________________________________________________
________________________________________________________________
________________________________________________________________
________________________________________________________________
________________________________________________________________
________________________________________________________________
________________________________________________________________
________________________________________________________________
________________________________________________________________
________________________________________________________________
________________________________________________________________
________________________________________________________________
________________________________________________________________
________________________________________________________________
________________________________________________________________
________________________________________________________________
________________________________________________________________
________________________________________________________________
________________________________________________________________
________________________________________________________________
11
Test Equipment Depot - 800.517.8431 - 99 Washington Street Melrose, MA 02176
TestEquipmentDepot.com