1
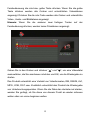
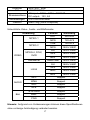
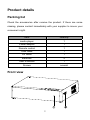
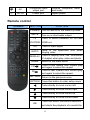
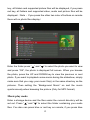
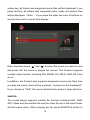
MP100 Benutzerhandbuch
Inhalt
KURZE EINFÜHRUNG.............................................................. 1
BESONDERHEITEN .................................................................... 1
GRUNDAUSFÜHRUNG ................................................................ 1
PRODUKTDETAILS .................................................................. 2
VERPACKUNGSINHALT ............................................................... 2
FRONTANSICHT......................................................................... 2
RÜCKANSICHT .......................................................................... 3
FERNBEDIENUNG ...................................................................... 4
GRUNDLEGENDE BEDIENUNG.............................................. 6
INBETRIEBNAHME ..................................................................... 6
PRODUKTGEBRAUCH ............................................................ 9
SETUP MENÜ ......................................................................... 10
BILDER MODUS ...................................................................... 12
MUSIK MODUS ....................................................................... 13
FILM MODUS .......................................................................... 14
UNTERTITEL ........................................................................... 16
HINWEISE ZUR ORDNUNGSGEMÄßEN NUTZUNG ............ 18
HÄUFIG GESTELLTE FRAGEN ............................................. 18
Kurze Einführung
Besonderheiten
Der Poppstar MP 100 aus der High Definition Media Player Serie von
Poppstar, spielt Ihre Lieblingsbilder, -lieder und -videos von der
eingebauten Festplatte, externen Speichergeräten und Speicherkarten wie
z.B. SD (Secure Digital)-Karte, MMC (Multi Media Card) auf einem
angeschlossenen Video/Ton-Wiedergabegerät ab. Hierbei kann der
Poppstar MP 100 eine Vielzahl von Audio- und Tonformaten entschlüsseln,
inklusive RM/RMVB, digitalen Fotos und MP3. Gleichzeitig kann der
Poppstar MP 100, der mit einer Vielzahl von Anschlüssen inklusive HDMI
ausgestattet ist, Bilder und Videos in High Definition anzeigen.
Grundausführung
Videoformate: MKV, AVI, MP4, MPG, VOB, DAT, RM/RMVB, DIVX
Audioformate: MP3, WMA, AAC, APE
Bildformate: JPG/BMP/PNG
USB-Anschluss: Zum Anschluss von externen Massenspeichergeräten
HDMI-Anschluss:
High Definition Multimedia Interface, hochauflösender Audio /
Videoanschluss für Ausgabe von Full HD (1920x1080)
1
Produktdetails
Verpackungsinhalt
Überprüfen Sie das Zubehör nachdem Sie das Gerät erhalten haben.
Sollte etwas fehlen, wenden Sie sich bitte umgehend an Ihren Händler.
Bezeichnung
Anzahl
Media Player
1
Netzteil
1
Fernbedienung
1
USB-Kabel
1
AV-Kabel
1
Batterien
2
Handbuch
1
Schrauben
einige
Frontansicht
2
Bezeichnung
Anmerkung
Leuchtet
①
Power/Stand-by
blau,
während
das
Gerät
angeschaltet ist Leuchtet rot, während das
Gerät ausgeschaltet ist.
②
2-in-1 Kartenleser
Unterstützt SD, MMC
So verwenden Sie Speicherkarten:
Das Produkt hat einen integrierten Multimediakartenleser, welcher
Speicherkarten wie SD-Karten und MMC unterstützt. Schieben Sie die
Speicherkarte vorsichtig mit der Pfeilseite nach oben in den Kartenleser
bis Sie ein "Klick" hören.
Rückansicht
Anschluss
Erklärung
Anmerkung
①
USB 2.0
USB-Anschluss
Anschluss an den PC
②
USB HOST
USB-Anschluss
③
HDMI
④
Coaxial
High
Definition
Anschluss
Anschluss
zu
externen
USB-Geräten
Ausgang des digitalen Signals
über HDMI
Audioanschluss
3
Ausgang
Koaxial
5.1
Audio
über
AV
⑥
DC IN
Composite-
Geimeinsamer Ausgang von
videoanschluss
Ton und Bild
Stromanschluss
Anschluss des Netzgerätes
Fernbedienung
Taste
Funktion
POWER An- und Ausschaltknopf
MUTE
TV
Ton aus
Wechsel zwischen AV- und HDMI-
SYSTEM Ausgabe
0-9
GOTO
DISPLAY
HOME
FR
FF
Zahleneingabe
Sprung zu einer bestimmten Stelle
während der Wiedergabe
Anzeige von Zeit, Titel, Informationen
über das angezeigte Video/Bild
Aufruf des Hauptmenüs
Zurückspulen, erneutes Drücken
erhöht die Spulgeschwindigkeit
Vorspulen, erneutes Drücken erhöht
die Spulgeschwindigkeit
RETURN Aufruf des vorherigen Menüs
OPTION Aufruf des Setups
Cursor nach links
Cursor nach rechts
Cursor nach oben
Cursor nach oben
4
OK
Bestätigung der Auswahl und Start der
Wiedergabe
PREV
Sprung zur vorherigen Datei
NEXT
Sprung zur nächsten Datei
VOL-
Lautstärke verringern
VOL+
Lautstärke erhöhen
SUBTITLE
PLAY
STOP
PAUSE/
STEP
Aufruf des Untertitelmenüs während
der Wiedergabe
Wiedergabe der ausgewählten Datei
Stopp der Wiedergabe der Datei
Pausieren der Wiedergabe
SETUP
Aufruf des Setups
AUDIO
Wechsel des Audioausgabe/Tonspur
ZOOM
Zoom raus/rein
Auswahl der Wiederholungsoptionen:
REPEAT Sequenz, Zufall, Einmal, Rotieren,
alles Rotieren
RED KEY Deaktivieren des Dateifilters.
BLUE
KEY
Aktivieren des Musikfilters(nur
Musikdateien werden angezeigt)
GREEN Aktivieren des Bilderfilters(nur
KEY
Bilddateien werden angezeigt)
YELLOW Aktivieren des Videofilters(nur
KEY
Videodateien werden angezeigt)
5
Grundlegende Bedienung
Inbetriebnahme
1. Stromanschluss
Entnehmen Sie das Netzteil der Verpackung und verbinden Sie es mit
dem Gerät und der Steckdose
2. Verbindung mit Ausgabegeräten
Das Gerät ist mit mehreren Anschlüssen versehen wie Composite(AV),
Koaxial und HDMI. Sie können den Anschluss je nach Bedarf
auswählen. Das Produkt macht Video-Ausgänge automatisch ausfindig,
was die Bedienung freundlich und komfortabel macht. Bitte beachten
Sie die folgenden Anweisungen um Schwierigkeiten zu vermeiden.
Verbindung mit dem Composite-Ausgang (AV)
Schließen Sie das gelbe Kabel an den AV-Ausgang des Gerätes und an
den AV-Eingang Ihres Fernsehers an und schließen Sie den roten und den
weißen Anschluss an den Audio-Eingang Ihres TV- oder HIFI-Gerätes an.
Wählen Sie bei Ihrem TV-Gerät den AV-Modus. Schalten Sie das Produkt
ein und Ihr TV zeigt den Beginn der Verbindung mit dem Produkt an.
6
Hinweis: Sie müssen den “PAL/NTSC”-Ausgang auswählen, falls kein
AV-Video-Ausgang vorhanden ist.
Verbindung mit dem Koaxial Ausgang
Verbinden Sie den Koaxial Anschluss des Media Players über das Koaxial
Kabel mit dem Koaxial Anschluss eines anderen Video- oder Audio-Gerätes.
Aktivieren Sie dann den Audio-Anschluss des Produktes und wählen Sie die
digitale Ausgangs-Option “SPDIF”. Es ist möglich, dass Sie 5.1 High Qualitiy
Sound über einen Mehrkanaldecoder/-verstärker mit Koaxial Eingang
genießen können.
Hinweis:
Wenn Sie das “normale” Ausgangsformat wählen, ist kein Audio- Ausgang
über den Koaxial-Ausgang vorhanden.
Wenn Sie das “SPDIF” Ausgangsformat wählen, haben HDMI und AV
keinen Audio-Ausgang.
HDMI Ausgang Modus
HDMI ist ein Ausgang mit besten Audio- und Videoergebnissen, der digitale
Video- und Audiosequenzen gemeinsam zur selben Zeit ausgibt. Verbinden
Sie Ihr HDMI Kabel mit dem Ausgang des Produktes und mit dem HDMI
Anschluss Ihres Bildschirms. Wählen Sie den HDMI Modus in Ihrem TV, er
die zeigt dann die Verbindung der Geräte an.
7
Hinweis: Wenn Sie den HDMI-Ausgang auswählen, ist kein Video- Ausgang
über AV vorhanden. Wenn sie den “PAL/NTSC” –Ausgang wählen, ist kein
Video-Ausgang über HDMI vorhanden.
Gebrauch des USB Anschlusses
Der USB Anschluss liest externe Festplatten, Digitalkameras, Kartenleser
und andere Datenspeichergeräte.
Sogar ohne die vorherige Installation können Sie externe Speichergeräte
über den USB Anschluss verbinden. Sie können eine Reihe von
High-Definition Formaten (Audio- und Videodateien), die auf externen
Speichergeräten abgespeichert sind, originalgetreu widergeben. Damit es
angenehmer ist, HD-Filme und digitale Fotos anzuschauen, fühlen die
digitalen Signale aus dem Ausgang die Erschütterungen der Sound- Effekte
zur selben Zeit.
USB-Verbindung zum PC
Dieser HDD Player ist ebenso ein persönliches Multimedia- Speichergerät
und kann ebenso verwendet werden, wenn Sie ihn über den USB Anschluss
mit Ihrem PC verbinden. Sie können auf einfache Weise Dateien
durchsuchen und kopieren.
1. Verbindung zum Stromanschluss
Während Sie Ihren Player mit dem PC verwenden, ist der Stromanschluss
nötig.
2. Verbindung mit dem PC über USB Kabel
Verbinden Sie den Poppstar MP 100 über ein USB Kabel mit Ihrem PC.
8
Danach können Sie Daten kopieren und transferieren.
Schalten Sie den PC an und starten Sie das System. Der PC erkennt das
Gerät
automatisch.
Danach
kann
das
Gerät
als
ein
externs
Massenspeichergerät verwendet werden.
Nachdem Sie den Datentransfer beendet haben, entfernen Sie das Gerät
sicher. Hierfür klicken Sie auf das USB-Symbol, um das Gerät zu stoppen.
Danach können Sie das USB Kabel herausziehen.
Hinweis:
1.
Schalten Sie das Gerät nicht aus, wenn es noch mit dem PC
verbunden ist und arbeitet.
2.
Falls kein USB-Gerät erkannt wird, nachdem es verbunden wurde,
kann es sein, dass der PC mit einem anderen Programm arbeitet.
Bitte ziehen Sie in diesem Fall das USB Kabel heraus, warten Sie
ungefähr 10 Sekunden und verbinden Sie die Geräte erneut.
Produktgebrauch
Wenn Sie die Stromverbindung zum ersten Mal aktivieren, drücken Sie
den “Powerknopf” auf der Fernbedienung. Das Gerät startet automatisch
und es erscheint das Hauptmenü.
Bitte lesen Sie sich die folgenden Anweisungen sorgfältig durch, damit Sie
9
die Funktion jeder Option verstehen.
Hauptmenü:
Im Hauptmenü gibt es vier verschiedene Optionen zur Auswahl.
Sie kommen ins Hauptmenü, indem Sie auf der Fernbedienung auf den
“Home” Knopf drücken. Sie können wählen zwischen LOCAL HDD,
USB DEVICE, Smart Card und Setup, indem Sie die Knöpfe “ ” und
“ ” auf der Fernbedienung betätigen. Wenn Sie nun “OK” drücken,
werden die abgespeicherten Dateien abgespielt.. Außerdem können
Sie direkt ins Setup-Menü gehen und Sprache, Bild, Ton, etc. so
einstellen, wie Sie es benötigen.
Setup Menü
Wählen Sie die “Setting” Option, um ins Setup Menü zu gelangen.
Wählen Sie dann eine Option Ihrer Wahl, indem Sie “up” und “down”
auf der Fernbedienung betätigen und bestätigen Sie dies mit OK oder
betätigen Sie die “Return” Taste um das Setup Menü zu verlassen.
10
System Setup:
Language: Auswahl der Sprache auf dem Bildschirm (OSD: On
Screen Display). Drücken Sie
und
um eine Sprache zu
wählen. Bestätigen Sie dies mit “OK”.
Subtitle: Schaltet die Untertitelfunktion an oder aus.
Screen:
Stellen
Sie
ein,
nach
wie
vielen
Minuten
der
Bildschirmschoner aktiviert werden soll. Sie können zwischen 2, 5 und
10 Minuten wählen oder den Bildschirmschoner deaktivieren.
Restore Default: Zurücksetzen auf die Werkseinstellungen
System Info: Zeigt Softwareinformationen
Audio Setup:
Wählen Sie Ihren Audio Ausgang:
Das normale Digital Signal kommt direkt aus dem Produkt
Das SPDIF Digital Audio Signal wird entschlüsselt durch einen
optischen Ausgang.
Video Setup :
Video Ausgang: Wählen Sie, um das TV System abzustimmen:
NTSC, PAL, 480P, 576P, 720P 50HZ, 720P 60HZ, 1080i 50HZ,
11
1080i 60HZ, 1080P 50HZ, 1080P 60HZ
Resume Play: An/Aus. Wird ein Film per Pausentaste unterbrochen,
erfasst das Gerät die Zeit, in der der Film unterbrochen ist und der
nächste Benutzer kann “Resume Play” betätigen, damit der Film von
der letzten Pause an wieder widergegeben wird. Dieser Vorgang
unterstützt nur die eingebaute Festplatte und die entfernbaren
Speichergeräte, jedoch nicht Ihren DVD Driver.
Auto Detect: On/Off Wählt aus, ob die automatische Suchfunktion
an- oder ausgeschaltet ist.
Foto Setup:
Slide show timing: Legt fest, wie lange ein Bild gezeigt werden
soll.3/5/10/20s
Transition Effect: Auswählen eines Übergangs von Bild zu Bild, es
kann zwischen 8 verschiedenen Effekten ausgewählt werden.
Background Music: Die Musik muss sich im gleichen Ordner
befinden. Sie können über die Navigation die Position der
Hintergrundmusik wählen.
Bilder Modus
Schließen Sie ein Speichergerät an, die Dateien werden augenblicklich
angezeigt. Drücken Sie “
” und “
” ,um den Ordner auszuwählen, in
dem Ihre Fotos abgelegt sind. Sie können auch die grüne oder rote Taste
auf Ihrer Fernbedienung drücken. Wenn Sie die grüne Taste drücken,
werden alle Ordner und unterstützten Bilder-Dateien angezeigt. Wenn Sie
die rote Taste drücken, werden alle Ordner, unterstützten Videos, Audiound Bilder-Dateien angezeigt.
Hinweis: Wenn Sie die blaue oder grüne Taste auf Ihrer Fernbedienung
drücken, werden keine Bilder-Dateien angezeigt.
12
Wenn Sie einen Ordner geöffnet haben, drücken Sie “
” und “
”, um
ein Foto zu markieren und drücken Sie “OK”, damit das Foto auf dem
gesamten Bildschirm angezeigt wird. Wenn Sie Fotos durchstöbern
möchten, drücken Sie UP und DOWN, um das letzte oder das nächste
Foto anzuzeigen. Möchten Sie während einer Diashow Musik abspielen
lassen, stellen Sie sicher, dass Sie die Musik in den gleichen Ordner, in
dem sich die Bilder befinden, hineinkopieren. Wählen Sie nun
“Background Music” und die Musik wird abgespielt, während die
Dia-Show läuft (Nur bei MP3 Format).
Musik Modus
Ihre Dateien werden angezeigt, wenn Sie das Gerät anschalten. Drücken
Sie “
” und “
”, um den Ordner zu wählen, in dem sich Ihre Musikdateien
befinden. Sie können auch die blaue oder rote Taste auf Ihrer
Fernbedienung betätigen. Wenn Sie die blaue Taste betätigen, werden alle
Ordner und unterstützte Musikdateien angezeigt. Wenn Sie die rote Taste
betätigen, werden alle Ordner und unterstützte Video-, Audio- und
Bilder-Dateien angezeigt.
13
Hinweis: Wenn Sie die gelbe oder grüne Taste auf Ihrer Fernbedienung
drücken, werden keine Musik-Dateien angezeigt.
Ein Miniaturbild erscheint auf dem Bildschirm, dort finden Sie
Informationen zu Ihren Liedern. Drücken Sie “
” und “
”, um die Datei,
die Sie abspielen möchten, auszuwählen und bestätigen Sie dies mit “OK”.
Diese Funktion unterstützt MP3, WMA, AAC und APE. Wenn Sie MP3
oder WMA-Dateien abspielen, stellen Sie sicher, dass die Liedtext-Datei
(LRC Format) und die Musik Datei denselben Namen besitzen und im
gleichen Ordner abgespeichert sind. Der Liedtext wird dann synchron zum
Lied angezeigt.
Film Modus
Greifen Sie auf ein Speichergerät zu und die Dateien werden im gewählten
Ordner angezeigt. Durch drücken von “
” und “
” können Sie den
Ordner mit den Videodateien auswählen. Sie können auch auf der
14
Fernbedieneung die rote bzw. gelbe Taste drücken. Wenn Sie die gelbe
Taste drücken werden alle Ordner und unterstützten Videodateien
angezeigt. Drücken Sie die rote Taste werden alle Ordner und unterstützte
Video-, Audio- und Bilddateien angezeigt.
Hinweis: Wenn Sie die anderen zwei farbigen Tasten auf der
Fernbedienung drücken, werden keine Filmdateien angezeigt.
Gehen Sie in den Ordner und drücken “
” und “
”, um eine Videodatei
auszuwählen, die Sie anschauen möchten und OK, um die Wiedergabe zu
starten.
Das Produkt unterstützt eine Vielzahl von Videoformaten, RM, RMVB, AVI,
MPG, VOB, DAT usw. Zusätzlich unterstützt das Produkt die Wiedergabe
von Unterbrechungspunkten. Wenn Sie die Datei das nächste mal starten,
werden Sie gefragt, ob Sie diese von diesem Punkt an wieder schauen
wollen oder von vorne beginnen wollen.
15
Untertitel
Der Mediaplayer unterstützt die Untertitelformate SSA, SUB, SRT. Stellen
Sie sicher, dass die Untertiteldatei und die Videodatei im selben Ordner
liegen und den selben Namen haben. Wenn Sie die Datei abspielen,
drücken Sie die SUBTITLE-Taste auf der Fernbedienung, um das
Untertitelmenü
ein-
bzw.
auszublenden
und
nehmen
Sie
Untertiteleinstellungen vor. Wenn Sie externe Untertitel in einem Video
nutzen möchten, drücken Sie die Pfeiltasten auf der Fernbedienung, um
diese Option zu wählen und passen diese an. Bestätigen Sie mit OK. Nun
können Sie das Entschlüsselungsformat, Schriftgröße, Schriftfarbe des
Untertitels und Auswahl des Untertitels durch die Pfeiltasten auf der
Fernbedienung verändern. Zum Beispiel, wenn Sie die Farbe des
Untertitels ändern wollen öffnen Sie das Untertitelmenü, wählen die
Farbenoption und wählen nun die gewünschte Farbe mit den Pfeiltasten
aus. Mit OK bestätigen Sie diese Einstellung.
Spezifikationen
Unterstützte
Festplatten
HDD
Dateisystem
USB host
USB port
Videoausgabe
Audioausgabe
Audio
Video
Standard SATA 3.5” Hard Drive
FAT32 und NTFS partition
Unterstützt mehrere USB-Speicher
USB 2.0 high speed port
Composite video /HDMI
Stereo/digital HDMI/coaxial
MP3, WMA, AAC, APE
MKV, AVI, MP4, MPG, VOB, DAT, DIVX,
RM/RMVB
16
Untertitel
Bild
Stromanschluss
Abmessungen
Gewicht
SSA, SRT, SUB
JPG/BMP/PNG
AC input:100V~240V,50/60HZ
DC output:12V, 2A
215×164.6×56.5mm
etwa 750g (ohne Festplatte)
Unterstützte Video-, Audio- und Bildformate:
Kodierung
Formate
MPEG-1
MPEG-2
MPEG-4, DIVX,
VIDEO
XVID
RM/RMVB
H.264
DAT
320×240
MPG
720×576
VOB
720×576
MPG
1920×1080P
AVI
1920×1080P
MP4
1920×1080P
MKV
1920×1080P
RM/RVMB
1920×1080P
AVI
1920×1080P
MP4
1920×1080P
MOV
1920×1080P
MKV
AUDIO
Bild
Auflösung
1920×1080P
MP3
Support
WMA
Support
AAC
Support
APE
Support
JPG/JPEG
Support
BMP
Support
PNG
Support
Hinweis: Aufgrund von Verbesserungen können diese Spezifikationen
ohne vorherige Ankündigung verändert werden.
17
Hinweise zur ordnungsgemäßen Nutzung
Um den ordnungsgemäßen Betrieb Ihres Poppstar MP100 zu gewährleisten
beachten Sie bitte die folgenden Hinweise:
.
z
Das Netzteil kann sich während des Betriebes bis auf 60°C erwärmen.
Dies ist durchaus normal und stellt keinen Grund zur Sorge dar.
z
Bitte vermeiden Sie es das Netzteil in einer Wärmestauprovozierenden
Umgebung einzusetzen. (z.B. im Bett) Bitte nutzen Sie das Netzteil nicht
für andere Geräte.
z
Nehmen Sie keine eigenen Reperaturversuche an dem Netzteil oder an
Ihrem Poppstar MP 100 vor, da die Gefahr für Elektroschocks besteht.
z
Bei einer Beschädigung des Netzteilkabels trennen Sie dieses von der
Stromversogung und tauschen Sie dieses bei Ihrem Händler gegen ein
neues Kabel aus.
z
Benutzen Sie Ihren Poppstar MP 100 bitte bei einer Raumtemperatur
zwischen 10~35℃.
z
Sorgen Sie dafür, dass der Poppstar MP 100 ausreichend Platz für eine
Abstrahlung seiner Eigenwärme hat. Dies bedeutet, dass rund um den
Poppstar MP 100 ein Freiraum von mindestens 15 cm sein muss.
z
Stellen Sie Ihren Poppstar MP 100 nicht in die Nähe von
wärmeerzeugenden Gegenstände (bspw. auf andere elektronische
Teile, auf eine Heizung etc.
Häufig gestellte Fragen
Dieses Kapitel gibt Ihnen Informationen wie Sie Probleme mit Ihren
18
Gerät lösen können.
Q: Ich habe das Gerät mit dem Fernseher verbunden. Wieso wird kein
Bild auf dem Fernseher angezeigt bzw. kein Ton über den Fernseher
wiedergegeben?
A: Dieses Problem hat mehrere Ursachen. Bitte überprüfen Sie
folgendes:
1) Bitte stellen Sie sicher dass die korrekte AV-Quelle auf Ihren
Fernseher ausgewählt ist.
2) Bitte überprüfen Sie ob Sie die korrekten Kabel für den Anschluss
von Ton und Video verwendet haben. Informationen hierzu finden Sie
im Kapitel Inbetriebnahme finden.
3) Das Ausgabesignal des Gerätes stimmt nicht mit der Signalquelle
am Fernseher überein. Drücken Sie auf der Fernbedienung „Video“ um
die Fernsehnorm zu ändern bis ein Bild erscheint. Wiederholen Sie dies
bis das Gerät korrekt angezeigt wird
Q: Mein Gerät gibt keinen Ton wieder.
A: Die Lautstärke ist zu gering/die Stummschaltung ist aktiv.
Bitte überprüfen Sie die Lautstärkeeinstellungen des Gerätes bzw. des
Fernsehers bzw. die Stummschaltung aktiv ist. Sollte dies nicht helfen,
überprüfen Sie bitte die Einstellungen des Audiomenüs.
Q: Wieso darf ich das Gerät nicht einfach vom Strom nehmen während
es angeschaltet ist?
A: Das Laden bzw. Speichern der Einstellungen dauert etwa 10
Sekunden. Wenn Sie das Gerät vom Strom nehmen ohne es vorher
ausgeschaltet zu haben, werden die Einstellungen nicht gespeichert.
19
Bitte schalten Sie das Gerät aus, indem Sie den An-/Ausschalter auf
der Fernbedienung bzw. am Gerät betätigen.
Q: Die Sprache des Menüs ist falsch eingestellt. Wie kann ich dies
ändern?
A: Um die Sprache zu ändern, gehen Sie in die Einstellungen. In den
Systemeinstellungen wählen Sie dann die gewünschte Sprache aus
und Bestätigen mit „OK“
Q: Ich habe Einstellungen falsch vorgenommen und würde gern die
Werkseinstellungen laden.
A: In den Systemeinstellungen wählen Sie den Menüpunkt
“Werkseinstellungen”. Bestätigen Sie dies mit „OK“. Die gespeicherten
Dateien gehen hierdurch nicht verloren.
Q:Wenn ich das Gerät anschalte, erscheint ein kurzes Aufblitzen bzw.
kein Signal auf dem Fernseher.
A:Dies ist normal. Wenn sich das System initialisiert nimmt es die
entsprechenden Einstellungen vor damit das Videosignal korrekt auf
Ihren Fernseher angezeigt wird. Während der Initialisierung erhält das
Fernsehgerät inkorrekte Signale, die dieses Aufblitzen verursachen
bzw. welche als kein Signal behandelt werden.
20
MP100 USER MANUAL
Contents
BRIEF INTRODUCTION................................................................. 1 FEATURE ........................................................................................... 1 BASIC PERFORMANCE ....................................................................... 1 PRODUCT DETAILS........................................................................ 2 PACKING LIST ................................................................................... 2 FRONT VIEW ..................................................................................... 2 BACK VIEW ...................................................................................... 3 REMOTE CONTROL ............................................................................ 4 BASIC OPERATION ........................................................................ 6 USAGE PREPARING ............................................................................ 6 OPERATION OF PRODUCT USAGE ............................................ 9 SETUP MENU .................................................................................. 10 PICTURE VIEW MODE ...................................................................... 11 MUSIC PLAY MODE.......................................................................... 12 MOVIE PLAY MODE ......................................................................... 13 SUBTITLE ........................................................................................ 14 MAINTENANCE NOTICE ............................................................ 17 FAQ ................................................................................................... 17 OTHERS........................................................................................... 19 Brief introduction
Feature
This product is a new type of family high-definition home video player,
which can play your favorite pictures, audio/videos files from the built-in
Hard Disk Drive, external storage device and memory card including
SD (Secure Digital) card, MMC (Multi Media Card) to a connected
audio/video playback device. And it can decode a number of audio and
video file formats, including the popular online movie RM/RMVB, digital
photos and MP3. Meanwhile, the product, which is facilitated with many
ports and HDMI, can show you pictures and videos with high definition.
It is really your desirable entertainment product.
Basic performance
Video Format- MKV, AVI, MP4, MPG, FLV, VOB, DAT, RM/RMVB,
DIVX
Audio Format-MP3, WMA, AAC、APE
Image Format-JPG/BMP/PNG
USB HOST- Connection USB mass storage device
HDMI-High Definition Multimedia Interface, high definition audio /video
port
1080P output -Full HD 1080P (1920x1080) decoder output
1
Product details
Packing list
Check the accessories after receive the product. If there are some
missing, please contact immediately with your supplier to insure your
consumer’s right.
Item
Quantity
media player
1
Power adaptor
1
Remote control
1
USB cable
1
AV cable
1
Batteries
2
User’s Manual
1
Screws
several
Front view
2
Element Definition
Element
Remark
①
Power/Stand-by
②
2-in-1 card reader
Turns blue while switched on and turns
red while switched off
Supports SD, MMC
How to use memory cards: The Product has an integrated multimedia
card reader supporting memory cards including SD, and MMC. Gently
insert the memory card into the reader with the arrow side upward until
there goes a “click” sound
Back View
Port definition
Port
Port definition
①
USB 2.0
USB Device port
②
USB
HOST
Outside USB port
③
HDMI
High definition port
④
Coaxial
Audio fine output
port
3
Instruction
Via this USB port for PC
communication
Reads and writes outside
USB storage via USB port
Outputs digital signal via
HDMI port
Output 5.1 audio via
coaxial port
AV
⑥
DC IN
Composite video
output port
Power port
Outputs composite video
and audio
Inputs power
Remote control
NUMBER
BUTTON
FUNCTION
POWER Turn on and off in the stand by mode
MUTE
TV
Turn on or shut audio output
Press to switch between AV out and
SYSTEM HDMI out
0-9
Press to input digital
Jump to the appointed time when
playing video
Press
to display time, title, information
DISPLAY
of chapter when play video and photo
GOTO
HOME
Switch to the main menu.
FR
Press to fast rewind from current play
and again to select the speed
Press to fast forward from current play
and again to select the speed
FF
RETURN Return to the previous menu
OPTION Press this button to enter setup menu
Press shortly to move cursor left
Press shortly to move cursor right
Press shortly to move cursor up
Press shortly to move cursor down
OK
Press this button confirms a selection
and starts the playback of a media file.
4
PREV
Press to return to previous file
NEXT
Press to go to next file
VOL-
Press to decrease the volume
VOL+
Press to increase the volume
Press to set the type, color, the text
SUBTITLE encoding format ,size of subtitle, when
playing the video
PLAY
STOP
Press to play media file and to
autoplay the picture
End the playback of a media file
PAUSE/
STEP
SETUP
Pause the playback
In any mode, press to enter to
corresponding setting menu
AUDIO
Switch the audio format output
ZOOM
Zoom in/out.
Press to set repeat option: sequence,
REPEAT random, only once, rotate one, rotate
all.
Press this button, the list of all
RED KEY documents in storage media will
display.
Press this button, the list of music
BLUE KEY documents in storage media will
display.
GREEN Press this button, the list of photo
documents in storage media will
KEY
display.
YELLOW Press this button, the list of film
documents in storage media will
KEY
display.
5
Basic operation
Usage preparing
1,Power connection
Take out power adapter from the package and connect
2,Connection of TV audio and video output
The product is designed with multi-output, including composite (AV),
Coaxial and HDMI. Individuals can select different interface according
various need. The product can detect video output automatically, making
the operation friendly and convenient. Please refer to the following
instruction for connection to avoid any problem.
Composite output connection (AV)
Plug the yellow connector into the AV output of product and AV input of TV,
and plug the red and white connector into the audio input of TV or HIFI.
Turn on the TV and select AV mode. Turn on the product and TV displays
the interface of initiation.
Note: You must select to the “PAL/NTSC” output, if not there is no video
output by AV.
Coaxial output connection
6
Coaxial output:Connect the Coaxial connector of the media player with the
coaxial connector of other video or audio device by Coaxial cable. Then
enter the product's audio output format interface, select the Digital Output
option "SPDIF”. It is available to enjoy 5.1 high quality sounds through a
multi channel decoder/amplifier with coaxial input.
Note: when select to the “normal” output format, there is no audio output by
coaxial output, and if select to the “SPDIF” output format ,the HDMI and
AV have no audio output.
HDMI output mode
HDMI is an output with best audio and video effect which outputs digital
video and audio composite at the same time. Connect HDMI cable to
output of product and display device with HDMI input. Select HDMI mode
in TV until it displays the interface of initiation.
Note: When select to the “HDMI” output, there is no video output by AV.
When select to the “PAL/NTSC” output, there is no video output by HDMI.
The usage of USB HOST interface
Player with an ability to expand large-capacity. The USB HOST port can
read external mobile hard disk, U disk, digital cameras, card readers and
other data storage devices.
Even without the installation of hard drive players, you can connect
external storage devices through the USB HOST interface. To direct play a
7
variety of high-definition formats high-fidelity audio and video files stored in
external storage devices. To watch HD movies and digital photos are more
palatable, at the same time the output digital audio signals to audio
equipment can feel the shock of high-fidelity sound effects.
How to connect USB interface to PC
This HDD Player is also a personal multimedia files storage device and can
be used by connecting to PC via USB interface.
1, Connect to the power supply
While using the HDD player with PC, power supply is also needed.
2, Connect to PC with USB cable
Connect the HDD player to PC with USB cable then you can copy and
transfer data.
Follow the instruction of the above picture and connect the device to PC.
Power on the PC and enter the system. The PC detects the device
automatically and then the device can be used as an external USB storage
device.
After data transfer finished, please remove the USB storage device safely
(click the USB device icon to stop the USB device and then pull out the
USB cable).
Notes:
1, Please don’t power off when it connect to PC for reading and writing.
8
2, If there is no USB detected after connected with USB cable, maybe the
PC is operating other program, please pull off the USB cable and wait
about 10 seconds then connect again.
This HDD Player is also a personal multimedia files storage device and can
be used by connecting to the PC. You can browse and copy files easily.
Operation of product usage
When connecting the power supply for the first time, press the “power” key
on the remote control and the device will power on automatically and
appear the main menu.
Please read the following instructions carefully to understand the function
of each option.
Main menu: There will be four function options on the main menu.
You can enter this main menu by press “HOME” key on the remote control.
9
Under the main interface, you may select the LOCAL HDD, USB Device,
Smart Card, Setup icon by press “ ” and “ ” key on the remote control,
then press “OK” key to browse or play the corresponding files stored the
HDD, the external USB, card and the card reader. In addition to, you can
go to the setup menu directly and set up the “Language”,“Video” “Audio”,
“Photo” and so on according to your needs.
Setup Menu
Select “Setting” option to enter the setup menu. Then select any option you
want by pressing “up” and “down” on the remote controller, and press OK
to confirm or press “Return” to exit.
System Setup:
Language: Select to choose the OSD (On Screen Display) language.
Press
and
to select the language. Press OK to confirm.
Subtitle:Turns the subtitle function on or off.
Screen :Turns the screen function on or off the function of screen saver.
10
Pressing the navigation keys to select. Screen saver mode will
automatically start after 2, 5 or 10 minutes of non activity.
Restore Default: To restore the factory’s default settings
System Info: View software version information
Audio Setup:
Select to choose the audio output:
Normal:Digital signal is directly outputted through product
SPDIF:Digital audio signal is decoded by the product outputs through
optical.
Video Setup :
Video Output: Select to adjust TV system:NTSC,PAL,480P,576P,720P
50HZ, 720P 60HZ, 1080i 50HZ, 1080i 60HZ, 1080P 50HZ, 1080P 60HZ
Resume Play: On/Off. When a movie paused, the device will record the
time that the movie is paused and the next user can choose "Resume
Play" to continue from the last pause point to resume playback. This
operation only supports the local hard drive and the removable storage
devices, but not support the DVD drivers.
Auto Detect: On/Off Turns the Auto Detect function on or off.
Photo Setup:
Slide Show Timing: Set time interval of slide show. 3/5/10/20s
Transition Effect: Select a picture transformation effects, there are eight
different effects to choose.
Background Music: The music must be in the same folder , and you can
choose background music’s position by the navigation
Picture view mode
Enter a storage device, and the files under the current directory will be
set out. Press “
” and “
” to select the folder containing your photo
files. You also can press green or red key on remote, if you press green
11
key, all folders and supported picture files will be displayed, if you press
red key, all folders and supported video, audio and picture files will be
displayed.(Note :If you press the other two color of buttons on remote
there will no photo files display)
Enter the folder press “
” and “
” to select the photo you want to view
and press “OK”, the photo is displayed full screen. When you browse
the photo, press the UP and DOWN key to view the previous or next
photo. If you want to playback some music during the slideshow, simply
make sure that you copy your music file(s) in the same directory as the
pictures. Then setting the “Background Music” on and the music
synchronously when browsing the picture (Only for MP3 format).
Music play mode
Enter a storage device and the files under the current directory will be
set out. Press “
” and “
” to select the folder containing your audio
files. You also can press blue or red key on remote, if you press blue
12
key, all folders and supported music files will be displayed, if you press
red key, all folders and supported video, audio and picture files will be
displayed.(Note :If you press the other two color of buttons on remote
there will no music files display)
A thumbnail strip appears at the bottom of the screen, along with song
information. Press “
” and “
” to select the file you want to play and
press OK to play. This browsing music function supports MP3, WMA,
AAC APE format Playback. When playing MP3 or WMA files, please
make sure the lyric file (LRC format) and the music file are of the same
name and stored in the same folder. The lyric will be displayed in a
synchronized way.
Movie play mode
Enter a storage device, and the files under the current directory will be
set out. Press “
” and “
” to select the folder containing your video
files. You also can press yellow or red key on remote, if you press
13
yellow key, all folders and supported movie files will be displayed, if you
press red key, all folders and supported video, audio and picture files
will be displayed.(Note :If you press the other two color of buttons on
remote there will no movie files display)
Enter the folder press “
” and “
” to select the movie you want to view
and press OK the movie is played full screen. The Product supports
multiple video formats, including RM, RMVB, AVI, MPG, VOB, DAT and
so on.
In addition, the Product also supports breakpoint movie play. Next time
you play the movie, there will be a prompt: “is play from the breakpoint”.
If you choose to “YES”, the movie will start from where it stops last time.
Subtitle
The media player supports subtitle file formats including SSA, SUB,
SRT. Make sure the subtitle file and the video file are in the same folder
and the same name .When playing the file, press SUBTITLE button to
14
show / hide the subtitle setup menu and realize subtitles settings. If
using external subtitles in a movie, press the arrow keys on the remote
control to select the option to adjust and press OK to confirm. Then we
can set the encode format , font size, font color of the subtitle and
subtitle selection by pressing UP/DOWN arrow key on remote control.
For example, to change the color of subtitle, firstly select the color
option by pressing right arrow keys, then press OK key to enter, finally
press up/down arrow key to select the option you need and press OK
key to confirm the setting.
Specification
Hard disk
support
HDD files
system
USB host
USB port
Video
output
Audio
output
Audio
Video
Subtitle
Picture
Power
adapter
Dimension
Weight
Standard SATA 3.5” Hard Drive
FAT32 and NTFS partition
Support multiple USB storage
USB 2.0 high speed port
Composite video /HDMI
Stereo/digital HDMI/coaxial
MP3, WMA, AAC、APE
MKV, AVI, MP4, MPG, FLV, VOB, DAT, DIVX,
RM/RMVB
SSA, SRT,SUB
JPG/BMP/PNG
AC input:100V~240V,50/60HZ
DC output:12V, 2A
215×164.6×56.5mm
About 750g (Without hard drive)
15
Supported video, audio and picture formats as follows
DECODE
FORMARTS
RESOLUTION
DAT
320×240
MPG
720×576
VOB
720×576
MPG
1920×1080P
AVI
1920×1080P
MP4
1920×1080P
MKV
1920×1080P
RM/RVMB
1920×1080P
AVI
1920×1080P
MP4
1920×1080P
MOV
1920×1080P
MKV
1920×1080P
MPEG-1
MPEG-2
MPEG-4,
VIDEO
DIVX, XVID
RM/RMVB
H.264
AUDIO
PICTURE
MP3
Support
WMA
Support
AAC
Support
APE
Support
JPG/JPEG
Support
BMP
Support
PNG
Support
Note: Up to the improvement, the appearance and specification will be
changed accordingly without notice.
16
Maintenance notice
To protect the normal use of all accessories, please kindly make sure to
understand and pay attention to following points.
z
Power input AC100~240V, output DC 12V/2A.
z
Under normal working status, power adapter will keep warming, but
body temperature of 60 degree or under is normal.
z
Please be sure of aeration under normal working status, do not put
the device in bed, sofa, or similar area where cooling effect is no
good.
z
Please do not teardown personally, but send it back to the pointed
service agent, or there will be danger of electronic shock.
z
Please pull out the cable and shut the device immediately when cable
broken or liquid in, and send to pointed agent for repair.
z
We advise to use the product in the environment of room temperature.
The range of environment temperature is 0~40℃.
FAQ
This chapter gives you information on how to solve some problems that may
occur with your player.
Q: I have connected the Player to my television. Why is no picture showing
on my television or no sound coming from my television?
A: This problem may have several causes. Please check the following items:
1) Please ensure that you have selected the correct AV source on your
television set.
2) Please check that you have connected the correct cable for the output of
17
the video and audio signals. Information on the correct connection of the
Player to your home entertainment system can be found in the “Connection
of TV audio and video output” chapter in the basic operation instructions.
3) The output signal of the player does not match the signal source of the TV.
Press “Video” on the remote control to switch video output until there is
image. Repeat this procedure until the picture is correctly displayed on your
television.
Q: My Player does not play any sound.
A: The volume is to low / Mute is active.
Please check if the volume for your Player and your television or your home
entertainment system is set to an adequate volume and that the sound is not
switched off via the "Mute" button. Otherwise, please select the correct digital
output mode in the Setup Menu. You can also refer to the Audio Settings.
Q: Why mustn't I disconnect the player from the mains supply without having
switched if off beforehand?
A: The loading or saving of the current system settings takes approx. 10
seconds when the Player is turned on or off. If the player is disconnected
from the mains supply without having been switched off beforehand, settings
and data may be lost. Please always switch off the Player by pressing the
power button on the device or on the remote control and wait until the power
button on the Player lights up red.
Q: The language of the user interface has been changed. How do I change
the language?
A: In order to change the selected language, enter the "Setting" menu. Select
the language you want and press the OK button on your remote control to
confirm. The selected languages are displayed.
18
Q: I have adjusted the settings of the Player under "Settings" and would like
to restore the factory defaults.
A: execute the setting menu item "Restore defaults ". The Player will be reset
to the factory defaults. The saved files are not deleted when you do this.
Q:When I try to disconnect the USB device, I keep on getting the device
Generic volume cannot be stopped right now. Try stopping the device again
later message, what should I do?
A:Close any program that might be accessing data on the player, including
Windows® Explorer. If it does not work, close all programs and wait for
another 20 seconds, then try the green arrow icon again. If it still does not
work, you should shut down the player and disconnect the USB cable.
Q:During power on, why the TV will have a short flash, blue screen or
screensaver?
A:This is normal, when the system initialize, it will setup the corresponding
parameters so it can output the correct video signal to the TV, during the
initializing time, the TV will receive incorrect signals or the signals will not be
stable and will cause the TV screen to flash, some TV will treat it as no signal,
and will display a blue screen or screensaver
Others
The accessories of products may be different, for this series products
are various according to different series and models.
Please refer to packing list or contact your agent for information.
Pleas understand no advance notice for further product improvement,
outlook design and specification update. The illustration may be a little
different from the real product.
19