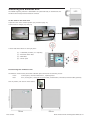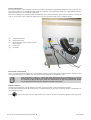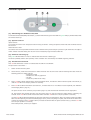
1
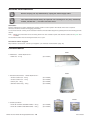
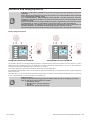
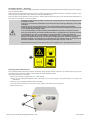
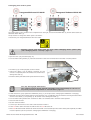
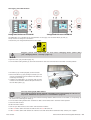
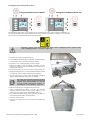
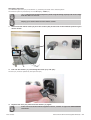
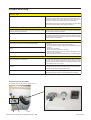
(Please read carefully before use)
User manual
Before installing and using this
machine, you must read this user
guide carefully.
Keep it in a safe place, in case you
need to refer to it later.
LE120 HP and LE140 HP
Integrated Exhausts
Accessories of
the
L-SOLUTION 100 engraving machine
First contact
G1214 701 - 12.2007 - ENG - (UPDATED EDITION NUMBER : 1)
TYPE OF MACHINE
MANUFACTURER
:
:
Exhaust Systems for the L-SOLUTION 100 LASER ENGRAVING MACHINE
PUREX INTERNATIONAL Ltd. FOR
GRAVOGRAPH INDUSTRIE INTERNATIONAL
BP 15 - Z.I. - 10600 LA CHAPELLE SAINT LUC - FRANCE
Importer's address
This publication and its contents are proprietary to Gravograph Industrie International (Gravograph), and are intended
solely for the contractual use of Gravograph customers.
While reasonable efforts have been made to assure the accuracy of this manual, Gravograph shall not be liable for errors
contained herein or for incidental or consequential damage in connection with the furnishing, performance, or use of this
material.
Gravograph reserves the right to revise this manual and make changes from time to time without any obligation by
Gravograph to notify anybody of such revision or changes.
Gravograph can not be held liable for any problems arising out of the application or use of any products, circuits, or software
described herein. Neither does it convey a license under its patent rights nor the patent rights of third parties.
Gravograph provides no warranties whatsoever on any software used in connection with a Gravograph Laser Engraving
System, express or implied. Neither does it guarantee software compatibility with any off-the-shelf software package or
any software program that has not been written by Gravograph.
Intended use of this system must be followed within the guidelines of this manual. In no event will Gravograph be liable
for any damages caused, in whole or in part, by customer, or for any economic loss, physical injury, lost revenue, lost profits,
lost savings or other indirect, incidental, special or consequential damages incurred by any person, even if Gravograph has
been advised of the possibility of such damages or claims.
Windows is a registered trademark of Microsoft Corporation.
PostScript is a registered trademark of Adobe Systems Inc.
(c) Gravograph Industrie International, 2007
All Rights Reserved.
LE120 HP and LE140 HP Integrated Exhausts . 2
First contact
Summary
Information about regulations ............................................................ 4
Warnings and safety instructions ........................................................ 5
Warnings ....................................................................................................................................... 5
Safety instructions ........................................................................................................................... 5
Introduction ....................................................................................... 6
What happens when lasing ............................................................................................................... 6
Why use fume extraction .................................................................................................................. 6
Why two Integrated Exhausts, LE120 HP and LE140 HP ........................................................................ 6
Composition of the Pack ..................................................................... 6
Installing the Exhaust unit .................................................................. 7
To do before the first use ................................................................................................................. 7
Positionning the Exhaust unit ............................................................................................................ 7
Hose connection .............................................................................................................................. 8
Electrical connection ........................................................................................................................ 8
Input/Output .................................................................................................................................. 8
Control system .................................................................................... 9
(1) Switching the Exhaust ON/OFF ..................................................................................................... 9
(2) Speed control ............................................................................................................................ 9
(3) Exhaust starting up .................................................................................................................... 9
(4) Insufficient airflow ...................................................................................................................... 9
Routine Maintenance ........................................................................ 10
Schedule ...................................................................................................................................... 10
Circuit breaker tripped ................................................................................................................... 10
Consumables .................................................................................... 10
Filtration and changing filters ........................................................... 11
Multi-stage filtration ...................................................................................................................... 11
Changing filters - Security .............................................................................................................. 12
Opening the cabinet door ............................................................................................................... 12
Changing the "Cascade" pre-filter .................................................................................................... 13
Changing the carbon pads .............................................................................................................. 14
Changing the HEPA filter ................................................................................................................ 15
Changing the activated carbon ........................................................................................................ 16
Changing the fuse ......................................................................................................................... 17
Trouble shooting ............................................................................... 18
Reclose circuit breaker ................................................................................................................... 18
Technical specifications .................................................................... 19
First contact
LE120 HP and LE140 HP Integrated Exhausts . 3
Information about regulations
This hardware was designed and build in conformity with the relevant EC marking and EEC directives :
• "Machine Security" Directive 98/37/EEC (22/06/98).
• "Electromagnetic compatibility" Directive 2004/108/EC
• "Low Voltage" Directive 2006/95/EC
The different fuses of this device comply with the IEC 127-2 norm (International Electric Committee).
Conforms to the following:
EC directives (91/263)(92/31)(98/37)
Uses the following British Standards:
(BS EN 292-1)(BS EN 292-2)(BS EN 60204-1)(BS EN 294)(BS EN 50 081-1)
Main filter assembly:
(BS EN ISO 2144)(BS EN ISO 536)(BS EN ISO 1924)(BS 5295)(UNI 7833)
(BS 4400)
Pre-filter assembly:
UNI 7832
Mechanical assembly:
(BS 8000/99)(IEC 60034/1)(BS 5000)(VDE 0530)
Enclosure ratings:
(IP 54)(IP 55)(IP 56)
Overload protection unit:
(BS EN 60947/4/1)
Control relay:
(BS 5424)(VDE 0660)
Blower:
(IEC 6000/34)(IP54)
This symbol indicates that once this equipment has reached the end of its useful life,
it must not be disposed of with non-sorted municipal waste, in accordance with the
European Directive 2002/96/EC.
The equipment must be disposed of at an appropriate collection point for processing,
sorting, and recycling of Waste Electrical and Electronic Equipment (DEEE).
The elements which compose Electrical and Electronic Equipment may contain
substances which have harmful effects on the environment or on human health.
By following these instructions, you are helping the environment, contributing to the
preservation of our natural resources, and protecting human health.
LE120 HP and LE140 HP Integrated Exhausts . 4
First Contact
Warnings and safety instructions
Warnings
• Always isolate the system from the mains power supply before opening the exhaust cover.
• Disposable gloves and a dust mask are supplied with replacement filters/prefilters. They should be used when removing
filters and disposed of with the used filter in the bag which is also provided. Safety glasses should also be worn.
• Filters are manufactured from non-toxic materials.
• Filters and prefilters are not re-usable and no attempt should be made to clean them.
• Used filters and prefilters should be disposed of in accordance with local laws and regulations. The company and its agents
disclaim all liability and responsibility for any harm, damage, contamination or injury caused by inappropriate or unlawful
disposal.
• The LE120 HP and LE140 HP exhausts use high pressure blowers, which may cause inferior filters to burst, allowing
hazardous fumes into the workplace. Do not use filters that have only been tested to BS3928, BS5295 or AS208C as these
standards are flow checks only and are designed to test filters used in general dust extraction and air conditioning.
• Consult the local regulations concerning fume extraction systems, as these may be subject to requirements including;
periodic checks by authorised agencies, re-issue of certificates of compliance or equivalents etc. Consult your supplier
if in doubt.
• Consult your supplier for information on maintenance agreements that will ensure conformance to local regulations.
Safety instructions
When using electro devices, the following fundamental safety measures must be observed in order to protect against electric
shock, injury and fire:
• Please read and observe these instructions before using the device!
• Keep these operating and maintenance instructions carefully!
• Do not use the device for suction extraction of easily ignitable or explosive gases!
• Do not use the device in explosive zones.
• Do not use the device for suction extraction of burning or glowing substances such as, for example, cigarettes, matches,
metallic dust or shavings, paper, cleaning cloths etc.!
• Do not use the device for suction extraction of burning or inflammable materials such as, for example, oils or oil mist,
grease, separating agents (e.g. silicone spray), cleaning agents etc.!
• Do not use the device for suction extraction of aggressive media!
• Do not use the device for suction extraction of any form of liquid!
• Do not use the device for suction extraction of organic substances without the written authorisation of the manufacturer!
• Protect the connection plugs against heat, moisture, oil and sharp edges!
• Pay attention to the permitted mains voltage! (Observe information on the label attached to the cabinet rear!)
• Use only Gravograph replacement parts!
• Do not operate the device without a filter insert!
• Disconnect the filter device from the mains power supply prior to opening!
• The blowing out opening must not be covered or blocked off!
• Always pay attention to ensuring that the device is standing firmly and that the brakes on the guide rolls are applied!
• When cleaning and servicing the device, when replacing parts or when converting to another function, the filter device
must be disconnected from the mains power supply!
• The filter inserts cannot be regenerated!
• Dispose of the filter in accordance with the statutory regulations in force in the country of installation in order to contribute
to the preservation of the environment!
• When using an external filter control, the control cable must be examined for damage prior to all work!
• The device must not be used if the control cable is not in perfect condition!
• The mains lead of the device must be checked at regular intervals for signs of damage!
• The device must not be used if the mains lead is not in perfect condition!
• Do not use the filter device if one or more parts of the device are defective, are missing or are damaged. In any such
case, please contact your Gravograph supplier.
First Contact
LE120 HP and LE140 HP Integrated Exhausts . 5
Introduction
What happens when lasing
When a laser beam is applied to the surface of a material,
several conditions can occur:
• The high temperatures generated cause the air near to the
contact point to expand generally back in the direction of the
lens (for stationary products)
• The laser beam causes incineration, vaporisation, melting
and softening of the material depending upon the distance
from the contact point. The rapidly expanding gases pick up
and carry the removable particles and droplets at relatively
high velocities away from the product material
• The contaminants released consist of the products of
complete and partial combustion, including possible oxides
of the base material, along with a wide variety of gases, in
some cases noxious i.e. benzene, phosgene
Why use fume extraction
Lasers are used to mark, engrave and cut a wide variety of materials. During these processes, gases, vapours and particulate
matter (dust) are released as airborne contaminants which, in most cases can be classified as harmful if inhaled. Airborne
particles also cause problems for the laser if they are allowed to be deposited on the lens, or remain in the marking area,
when loss of definition of the laser beam can occur.
Deposition of particulates within the laser enclosure can result in contamination of the product and also the need for regular
cleaning of associated operating equipment. The only practical method of overcoming the above problems is to remove
these airborne contaminants as quickly and completely as possible by the provision of a fume extraction and filtration
system.
Why two Integrated Exhausts, LE120 HP and LE140 HP
The two Integrated Exhausts LE120 HP and LE140 HP were designed especially for Gravograph applications : compatible
with the processing on noxious material, such as rubber and acrylic, without any repulsive odour.
They run at dB level of 69 !
They offer you two different capabilities :
LE140 HP
LE120 HP
Quantity of active carbon
40 liters
20 liters
Number of pleat
6
3
Use
Intensive
Standard
Engraving and cutting
Marking and engraving
Rubber stamp sheets
Wood cutting
Acrylic cutting
Plastic engraving
Wood engraving
Application
The following guidelines are intended to assist the engineer when installing laser marking extraction systems LE120 HP and
LE140 HP and to optimise their performance with the Laser engraving machine L-SOLUTION 100.
Composition of the Pack
(A)
1 Exhaust (with 4 wheels) (LE120 HP or LE140 HP)
(B)
1 Input/Output cord (500mm)
(C)
1 Black pipe hose 100mm/length 700mm with 2 clamps
(D)
1 Power cord
(E)
1 CD User manual
(F)
1 Kit "Gloves and Mask"
LE120 HP and LE140 HP Integrated Exhausts . 6
First Contact
Installing the Exhaust unit
The LASER engraving machine L-SOLUTION 100 is placed directly on the Exhaust unit.
The filters are already inserted inside the exhaust.
To do before the first use
• Open the door of the exhaust system (see procedure page 12)
• Remove the 2 wedges (C1) and (C2)
• Check that all the filters are the right place :
(2) : "CASCADE" pre-filter (3 or 6 pleats)
(3) : Activated carbon filter
(4) : HEPA filter
(8) : Carbon pads
Positioning the Exhaust unit
The Exhaust unit should be placed with sufficient space allowed for the following access:
Front:
Control panel , internal maintenance , replacing filters.
Rear:
Air in, Cooling air in, cooling air out, power cable, circuit breaker, exhaust air, interface cable (optional)
Once in position, lock the two front castors.
First Contact
LE120 HP and LE140 HP Integrated Exhausts . 7
Hose connection
Incorrect connection or layout of hose can cause poor airflow, blockages and potentially dangerous build up of fume. Use
the shortest length of hose possible and keep bends to a minimum. Your supplier can advise you of appropriate diameters
and layouts of hose for your particular application.
Ensure all connections are properly sealed and that there are no kinks in the hose. Once secured in position, connect the
hose (C) to the inlet on the machine by pushing the hose onto the inlet and by using 2 supplied clamps.
(A)
Integrated Exhaust
(B)
Input/Output cord
(C)
Black pipe hose 100mm/length 700mm
with 2 clamps
(D)
Power cord
(G)
Air Outlet
Electrical connection
Prior to connecting the power supply (D), ensure that the voltage, frequency and power requirements are correct as shown
on the label attached to the cabinet rear. Various connection methods are available to order.
This material is «class 1». The mains plug MUST always be connected to a neutral
socket and comply with the regulations in force in the country of installation. If you
do not have a plug of this type, have one installed by an approved electrician. Under
no circumstances should you depart from this instruction.
Input/Output
Connect the Input/Output cord (B) between the Laser engraving machine and the Integrated Exhaust.
The Integrated Exhaust (LE120 HP or LE140 HP) is controlled directly by the Laser engraving machine L-SOLUTION 100
using this I/O cord (B).
Press
on the control panel of the L-SOLUTION 100 in order to activate the Integrated Exhaust when engraving.
LE120 HP and LE140 HP Integrated Exhausts . 8
First Contact
Control system
(1) Switching the Exhaust ON/OFF
To switch the Exhaust ON/OFF press button (1) which will illuminate green when ON. The green LED (3) will illuminate while
the exhaust starts up.
(2) Speed Control
Speed Control
To increase the vacuum turn the speed control knob (2) clockwise. Turning the speed control knob anti-clockwise reduces
the vacuum.
What Vacuum to Set?
The lowest vacuum level possible should be used so that the fume produced by the process is just drawn into the capture
nozzle. Please note that setting the vacuum level unnecessarily high will reduce filter life.
(3) Exhaust starting up
This green LED illuminates in order to indicate that the exhaust is starting up.
The arrest (PAUSE) and the start (START) of the extraction are controlled by the LASER engraving machine.
(4) Insufficient airflow
This red LED illuminates in order to indicate that the airflow is insufficient.
The procedure is as follows: :
1.
Switch off the exhaust system
2.
Check all hose, seals and connections for leaks and check the vacuum sensor tube for blockage and also check the
following points for debris build up:
- Extraction nozzle
- Flexible hose and any pipework
- Air inlet
- Sense line (inside the air inlet)
2.
If the red LED is still lit despite all the checks described above, increase the airflow with the speed control knob (2)
until the red LED turns off (the problem is resolved).
3.
If the red LED is still lit with airflow set maximum , it means that one or more filters must be replaced (see "Filtration
and changing filters" page 11) :
3a. Open the door of the exhaust (see procedure page 12) and check that all the filters are the right place.
3b. First replace the Cascade pre-filter (see procedure page 13). Set the minimum airflow before re-starting the
exhaust. If the red LED is still lit increase the airflow until the red LED turns off (the problem is resolved).
3c. If the red LED is still lit with airflow set maximum and with a new Cascade pre-filter, the 2 carbon pads or the HEPA
filtre must be replaced (procedure described pages 14/15). Once everything is in place, Set the minimum airflow and
re-start the exhaust. If the red LED is still lit, increase the airflow with the speed control knob (2) until the red LED
turns off (the problem is resolved).
If the fault persists, contact your supplier.
First Contact
LE120 HP and LE140 HP Integrated Exhausts . 9
Routine maintenance
Before carrying out any maintenance, unplug the mains supply cable.
The mains cable should always be replaced if it is damaged in any way : flattened,
nicked, cracked etc..., or if there are bare wires.
Schedule
Primary maintenance is filter replacement and the machine control system will indicate when this is required.
All hoses should be checked for clogging periodically.
To ensure the smooth running of the extraction machine and associated equipment, please perform the following periodic
checks:
Daily - Visually check that the fumes are being drawn into the extraction point and check the status of the green and
red LEDs
The activated carbon must be changed at least once a year.
Circuit breaker tripped
May indicate a serious fault. Consult your supplier. (see "Reclose circuit breaker" page 18)
Consumables
49281
• HEPA filters - LE140 HP/LE120 HP :
- HEPA H13 - 4.2 kg
(Ref. 49281)
49282
• Activated carbon filters - LE140 HP/LE120 HP :
- 40 liters carbon box - 26 kg
(Ref. 49282)
- 20 liters carbon box - 15 kg
(Ref. 49283)
- Carbon pad - 180 g
(Ref. 49284)
- Standard carbon bag - 25 kg
(Ref. 49285)
49286
449287
• Cascade pre-filters :
- LE140 HP 6 PLEAT CASCADE Prefilter - 920 g
(Ref. 49286)
- LE120 HP 3 PLEAT CASCADE Prefilter - 600 g
(Ref. 49287)
LE120 HP and LE140 HP Integrated Exhausts . 10
First Contact
Filtration and changing filters
Operation of the filter installation must be interrupted during changing of the filter
cartridge.
Filter change and disposal must only be carried out in well-ventilated areas and with
a corresponding breathing mask!
Our recommendation: Half breathing mask DIN EN 141/143 protection level P3.
Changing of the filters should be carried out exclusively by a correspondingly trained
member of staff!
Dispose of the filter in accordance with the statutory regulations in force in the country
of installation in order to contribute to the preservation of the environment.
Manual knocking out, washing out or blowing out of the filters leads to destruction of
the filter medium. The harmful substances penetrate into the room air.
Disconnect the exhaust from the mains power supply before opening the cabinet door.
Multi-stage filtration
Integrated Exhaust LE140 HP
Integrated Exhaust LE120 HP
The machine employs a multi-stage filtration process. Contaminated air enters the machine from the process (1) and is
passed through a Cascade pre-filter (2) which removes larger particles at approximately 1 micron in size and above.
This prevents premature blockage of the next filters (3) and (4).
Two carbon pads (8) to protect the activated carbon filter and the HEPA filter.
The refillable activated carbon filter (3) removes toxic gases and the bad odors. The activated carbon must be changed at
least once a year.
The HEPA filter (4) removes 99.997% of particles larger than 0.3 microns in size and 95% of particles over 0.01 microns
in size. The purified air is now returned to the workplace (5).
Important note :
Always check the following points for debris build up before changing any filter.
This avoids false alerts related to airflow.
• Extraction nozzle
• Flexible hose and any pipework
• Air inlet
• Sense line (inside the air inlet)
First Contact
LE120 HP and LE140 HP Integrated Exhausts . 11
Changing filters - Security
The machine will warn you with visible alert if a filter (except for the activated carbon filter) is blocked (see control system).
The red LED illuminates.
Always change the Cascade pre-filter first (unless recently changed) and restart the machine. If the alert continues, check
and if necessary, change the carbon pads (8) or/and the HEPA filter (4).
Take care when removing filters as they are heavy. Always wear the protective gloves and mask provided and dispose of
them with the used filters in the bag provided.
Changing of the filters should be carried out exclusively by a correspondingly trained
member of staff!
Operation of the filter installation must be interrupted during changing of the filter
cartridge.
Goggles, gloves and mask must be worn when changing filters (label (A9)).
Filter change and disposal must only be carried out in well-ventilated areas and with
a corresponding breathing mask!
Our recommendation: Half breathing mask DIN EN 141/143 protection level P3.
Dispose of the filter in accordance with the statutory regulations in force in the country
of installation in order to contribute to the preservation of the environment.
The company and its agents disclaim all liability and responsability for any harm,
damage, contamination or injury caused by inappropriate or unlaw ful disposal.
Manual knocking out, washing out or blowing out of the filters leads to destruction of
the filter medium. The harmful substances penetrate into the room air.
Disconnect the exhaust from the mains power supply before opening the cabinet door.
Opening the cabinet door
It is important that the following procedure is followed when opening the door. Failure to do so will result in your process
operating without extraction which is an Occupational Health & Safety hazard.
The correct procedure is as follows:
• Ensure your process is stopped (the green LED is OFF)
• Switch off your Integrated Exhaust at the control panel (see control system). The green button (1) must not be
illuminated
• Disconnect your Integrated Exhaust from the mains.
• Turn the two door locks (A1) on the front of the machine 180 degrees (anti-clockwise)
• Open the door (A2)
LE120 HP and LE140 HP Integrated Exhausts . 12
First Contact
Changing the Cascade pre-filter
Integrated Exhaust LE140 HP
Integrated Exhaust LE120 HP
The Cascade pre-filter (2) is situated in the compartment on the left, next to the two others filters (activated carbon and
HEPA). The procedure to change it is as follows:
• Disconnect your Integrated Exhaust from the mains
Goggles, gloves and mask must be worn when changing filters (label (A9))
(see "Changing filters - Security" page 12).
• Open the door (see procedure page 12)
• Pull the filter (2) off the air inlet (1) and remove it
• Insert the new filter, pushing the hole in the filter over the air inlet (1)
Use only Gravograph Cascade pre-filters!
The company and its agents disclaim all liability and responsability for the use of
any other pre-filter as specified in "Consumables" page 10.
• Close and lock the door
• Set the minimum airflow
• Connect your filter device to the mains and restart the machine
• If the red LED is still lit increase the airflow until the red LED turns off
• If the red LED is still lit with airflow set maximum and with a new Cascade pre-filter, the 2 carbon pads or the HEPA filtre
must be replaced
First Contact
LE120 HP and LE140 HP Integrated Exhausts . 13
Changing the carbon pads
Integrated Exhaust LE140 HP
Integrated Exhaust LE120 HP
The carbon pads (8) are situated in the compartment on the right, one below the HEPA filter (4) and the other below the
activated carbon filter (3).
The procedure to change the carbon pads is as follows:
• Disconnect your Integrated Exhaust from the mains
Goggles, gloves and mask must be worn when changing filters (label (A9))
(see "Changing filters - Security" page 12).
• Open the door (see procedure page 12)
• Turn the filter locking handle (6) 180º anti-clockwise so that it is horizontal and in the filter unlocked position
• The filters (3,4) will drop slightly to allow release
• Remove the filters (3,4) by sliding it towards you and
remove it completely from the exhaust. Be careful not to
damage the seals (J).
• Check the carbon pads status and replace them if necessary.
Use only Gravograph main filters!
The company and its agents disclaim all liability and responsability for the use of
any other pre-filter as specified in "Consumables" page 10.
• If their status are good, replace the HEPA filter (step (•*) of the procedure "Changing the HEPA filter" next page)
• Otherwise once the carbon pads replaced, insert the filter (3,4) (completely) into the machine ensuring that the airflow
arrows on the labels (7) are pointing up. Be careful not to damage the seals (J).
• Turn the filter locking handle 180º clockwise so that it is horizontal and in the filter locked position
• Close and lock the door
• Set the minimum airflow
• Connect your filter device to the mains and restart the machine
• If the red LED is still lit increase the airflow until the red LED turns off
• If the red LED is still lit with airflow set maximumand with a new Cascade pre-filter and 2 carbon pads replaced, the HEPA
must be replaced (see the procedure "Changing the HEPA filter" next page)
LE120 HP and LE140 HP Integrated Exhausts . 14
First Contact
Changing the HEPA filter
Integrated Exhaust LE140 HP
Integrated Exhaust LE120 HP
The HEPA filter (4) is situated in the compartment on the right, over the other filters (8) and (3).
The procedure to change it is as follows:
• Disconnect your Integrated Exhaust from the mains
Goggles, gloves and mask must be worn when changing filters (label (A9))
(see "Changing filters - Security" page 12).
• Open the door (see procedure page 12)
• Turn the filter locking handle (6) 180º anti-clockwise so that it is horizontal and in the filter unlocked position
• The filters (3,4) will drop slightly to allow release
• Remove the filters (3,4) by sliding it towards you and
remove it completely from the exhaust. Be careful not
to damage the seals (J).
•* Replace the HEPA filter (4) ensuring that the part
number on the old filter matches the part number on
the new filter (label (7)).
Use only Gravograph HEPA filters!
The company and its agents disclaim all liability and responsability for the use of
any other HEPA filter as specified in "Consumables" page 10.
• Insert (completely) the filters (3,4) into the exhaust ensuring that the airflow arrows on the label (7) are pointing up.
Be careful not to damage the seals (J).
• Turn the filter locking handle 180º clockwise so that it is horizontal and in the filter locked position
• Close and lock the door
Set the minimum airflow
• Connect your filter device to the mains and restart the machine
• If the red LED is still lit increase the airflow until the red LED turns off
• If the red LED is still lit with airflow set maximum and with all the filters certified as OK, contact your supplier
First Contact
LE120 HP and LE140 HP Integrated Exhausts . 15
Changing the activated carbon
Integrated Exhaust LE140 HP
Integrated Exhaust LE120 HP
The activated carbon filter (3) is situated in the compartment on the right, below the HEPA filter (4).
The activated carbon must be changed at least once a year.The procedure to change it is as follows:
• Disconnect your Integrated Exhaust from the mains
Goggles, gloves and mask must be worn when changing filters (label (A9))
(see "Changing filters - Security" page 12).
• Open the door (see procedure page 12)
• Turn the filter locking handle (6) 180º anti-clockwise so that
it is horizontal and in the filter unlocked position
• The filters (3,4) will drop slightly to allow release
• Remove the filters (3,4) by sliding it towards you and
remove it completely from the exhaust. Be careful not to
damage the seals (J).
• Loosen the screws (S) and remove the circular plates (P)
• Empty the carbon box (3). The used activated carbon should
be disposed of in the bag provided for that purpose.
• Fill the carbon box (3) only with Gravograph activated
carbon (25kg standard carbon bag ref. 49285)
Use only Gravograph activated carbon!
The company and its agents disclaim all
liability and responsability for the use
of any other activated carbon as
specified in "Consumables" page 10.
• Replace the plates (P) and tighten the screws (S)
• Insert (completely) the filters (3,4) into the machine
ensuring that the airflow arrows on the labels (7) are
pointing up. Be careful not to damage the seals (J).
• Turn the filter locking handle 180º clockwise so that it is
horizontal and in the filter locked position
• Close and lock the door
• Connect your filter device to the mains and restart the
machine
LE120 HP and LE140 HP Integrated Exhausts . 16
First Contact
Changing the fuse
You will find a spare fuse (F2) in the drawer (T) containing the fuses of the exhaust system.
The exhaust system is protected by one fuse 8 A (T*) - 250V (F1)
(T*) = These fuses must be temporized, with a high breaking capacity and must comply
with the IEC 127-2 norm.
Unplug your mains cable from the mains socket.
1.
Disconnect the mains cable (D) from the socket (A5) at the back of the exhaust system to give
easier access.
2.
Pull out the drawer (T) containing the fuses (F1) and (F2).
The fuse (F1) must be replaced by the spare fuse (F2).
3.
Replace the fuse (F1) and close the drawer (T) again.
If the new fuse blows without apparent reason, contact an approved GRAVOGRAPH
technician.
First Contact
LE120 HP and LE140 HP Integrated Exhausts . 17
Trouble Shooting
Red LED ON
The Cascade pre-filter and/or HEPA filter may be blocked.
One or both of these filters may be blocked. Unless recently
changed you should first replace the Cascade pre-filter and restart the machine. If the red LED does not switch off you
should then replace the carbon pads or the HEPA filter.
If these filters have been recently changed then another fault
may be causing the LED to illuminate. See below.
Red LED ON and filters have been certified as OK
Connecting hose may have a leak or the vacuum sensor tubes Check all hose, seals and connections for leaks and check the
in the air inlet may be blocked.
vacuum sensor tube for blockage.
The alarm has triggered and the blower stops.
The thermal cutout on the blower may have engaged. Check
the cooling vents both inside and out. Switch off mains power
and allow the blower to cool. If this does not remedy the fault
please contact your supplier.
Electrical faults
Blower does not function or has developed a fault.
Procedure:
• Check all cables and connections inside and out.
• Ensure the power supply matches the requirements of the
machine.
Control signal to/from interfaced equipment is incorrect or
• Check circuit breaker.
absent.
• Check any fuses outside the machine.
• Switch off main power, check all vents for blockages, allow
LED is not illuminated
motor to cool and restart.
• An electrical part may need replacement, contact supplier.
Filter faults
Odour or particles in exhaust air.
The activated carbon filter may be damaged, fitted incorrectly
or missing.The activated carbon of the filter may be
exhausted and should be replaced. The activated carbon must
be changed at least once a year.
A i r f l o w i n s u f f i c i e n t t o r e m o v e f u m e w h e n t h e f i l t e r i s n o t Possible airflow leak or a blockage. Check all hose, seals and
blocked.
connections for leaks and check the vacuum sensor tube for
blockage. If OK then increase airflow level.
The HEPA filter has a shorter than expected life.
Large particles may be bypassing the particle pre-filter. Check
the particle pre-filter which may be damaged or missing.
All information in this publication is subject to change without prior notice.
Reclose circuit breaker
To engage the circuit breaker, press on (C1)
LE120 HP and LE140 HP Integrated Exhausts . 18
First Contact
Technical Specifications
Vers 1.0 - 30/10/2007
LE140 HP
40 l - 230 V
Dimensions (wxdxh)
40 l - 115 V
20 l - 230 V
20 l - 115 V
700x644x730 mm
700x644x730 mm
80 kg
69 k g
860x780x1060 mm
860x780x1060 mm
95 kg
85 k g
Net weight
Shipping dimensions
LE120 HP
Shipping weight
400 m /h
400 m3/h
10 kPa
10 kPa
Brushless
Brushless
69 dBA
69 dBA
Needle felt F6
Needle felt F6
Dimensions
540x230x600 mm
540x230x300 mm
Net weight
0.92 kg
0.6 kg
Max. air flow
Max. static pressure
Motor
Noise level
Pre-Filter
3
2
2.6 m
1.4 m2
F6
F6
6
3
Dimensions
560x365x200 mm
560x365x200 mm
Net weight
26 kg
15 k g
40 liters
20 liters
Needle felt F6
Needle felt F6
Dimensions
560x365x5 mm
560x365x5 mm
Net weight
0.09 kg
0.09 kg
Surface
0.2 m2
0.2 m2
F6
F6
Dimensions
560x365x80 mm
560x365x80 mm
Net weight
4.2 kg
4.2 kg
Surface
Filtration class
Number of pleats
Activated carbon filter
Activated carbon
Carbon pads
Filtration class
HEPA filter
HEPA filter
Air inlet and outlet
2
H13 - 6.14 m
99.997% > 0.3 µm
95% > 0.01 µm
H13 - 6.14 m2
99.997% > 0.3 µm
95% > 0.01 µm
100 mm
100 mm
Voltage
230 V ±10%
Type of protection
By a reclose circuit breaker
&
By one fuse 5x20mm - 8 A(T*) - 250V
(T*)=temporized fuse, with high breaking capacity and in conformity
with the IEC 127-2 norm
Wattage
120 V ±10%
230 V ±10%
120 V ±10%
1.1 kW
1.1 kW
50/60 Hz
50/60 Hz
Switch (On/Off)
Yes
Yes
Motor speed variation
Ye s
Yes
"Insufficient airflow"
warning system
(filter blocked warning)
Yes
Yes
Frequency
First Contact
LE120 HP and LE140 HP Integrated Exhausts . 19