1
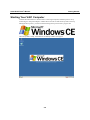
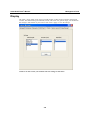
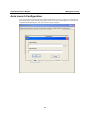
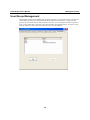
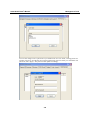
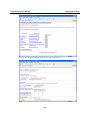
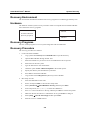
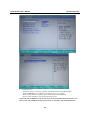
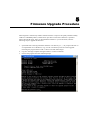
V481 WinCE User’s Manual Second Edition, April 2008 www.moxa.com/product © 2008 Moxa Inc., all rights reserved. Reproduction without permission is prohibited. V481 WinCE User’s Manual The software described in this manual is furnished under a license agreement and may be used only in accordance with the terms of that agreement. Copyright Notice Copyright © 2008 Moxa Inc. All rights reserved. Reproduction without permission is prohibited. Trademarks MOXA is a registered trademark of Moxa Inc. All other trademarks or registered marks in this manual belong to their respective manufacturers. Disclaimer Information in this document is subject to change without notice and does not represent a commitment on the part of Moxa. Moxa provides this document “as is,” without warranty of any kind, either expressed or implied, including, but not limited to, its particular purpose. Moxa reserves the right to make improvements and/or changes to this manual, or to the products and/or the programs described in this manual, at any time. Information provided in this manual is intended to be accurate and reliable. However, Moxa assumes no responsibility for its use, or for any infringements on the rights of third parties that may result from its use. This product might include unintentional technical or typographical errors. Changes are periodically made to the information herein to correct such errors, and these changes are incorporated into new editions of the publication. Technical Support Contact Information www.moxa.com/support Moxa Americas: Toll-free: 1-888-669-2872 Tel: +1-714-528-6777 Fax: +1-714-528-6778 Moxa Europe: Tel: +49-89-3 70 03 99-0 Fax: +49-89-3 70 03 99-99 Moxa Asia-Pacific: Tel: +886-2-8919-1230 Fax: +886-2-8919-1231 Moxa China (Beijing office): Tel: +86-10-6872-3959/60/61 Fax: +86-10-6872-3958 Table of Contents Chapter 1 Introduction ...............................................................................................1-1 Overview .............................................................................................................................. 1-2 Package Checklist................................................................................................................. 1-2 Product Features ................................................................................................................... 1-3 Product Hardware Specifications ......................................................................................... 1-3 Software Features ................................................................................................................. 1-5 Application Development Environment.................................................................. 1-5 Networking and Communications Capabilities....................................................... 1-6 Supported Servers and Daemons ............................................................................ 1-6 Graphics and Multimedia Tools.............................................................................. 1-6 How to Determine the Firmware Build Version................................................................... 1-7 Memory and File Systems .................................................................................................... 1-7 Hive-Based Registry............................................................................................................. 1-8 Inserting a USB Mass Storage Device into the Computer.................................................... 1-8 Inserting a CompactFlash into the Computer ....................................................................... 1-9 Eight RS-232/422/485 Serial Ports....................................................................................... 1-9 Chapter 2 Getting Started...........................................................................................2-1 Starting Your V481 Computer ............................................................................................. 2-2 Resetting Your V481 Computer ........................................................................................... 2-3 Changing the Network Settings ............................................................................................ 2-3 Using the Windows CE Network Utility to Configure Network Settings............... 2-4 Using the Command Line to Configure Network Settings ..................................... 2-4 Operating Your V481 Computer from a Telnet Client......................................................... 2-5 User/Group Management ..................................................................................................... 2-6 System Time and Time Zone................................................................................................ 2-7 Starting and Stopping Services............................................................................................. 2-7 Troubleshooting Network Connectivity ............................................................................... 2-7 Simple Network Management Protocol (SNMP) ................................................................. 2-9 Chapter 3 Management Tools ....................................................................................3-1 Before Operating the System................................................................................................ 3-2 System Information .............................................................................................................. 3-2 Process (Thread) Monitoring/Control................................................................................... 3-3 Services Monitoring/Control ................................................................................................ 3-4 Serial Port Configuration...................................................................................................... 3-5 Display.................................................................................................................................. 3-6 Auto Launch Configuration.................................................................................................. 3-7 User/Group Management ..................................................................................................... 3-8 Web Server Configuration.................................................................................................. 3-10 Chapter 4 System Recovery ......................................................................................4-1 Recovery Environment ......................................................................................................... 4-2 Hardware .............................................................................................................................. 4-2 Recovery Programs .............................................................................................................. 4-2 Recovery Procedure.............................................................................................................. 4-2 Chapter 5 Firmware Upgrade Procedure ..................................................................5-1 1 Chapter 1 Introduction The V481 is an industrial, ready-to-run embedded computer that supports VGA and audio. The computer comes with dual LAN ports, 8 serial ports, 2 CompactFlash slots, and 2 USB ports, and is based on the Intel x86 processor. With its VGA interface, the V481 is especially well suited for industrial applications, such as SCADA, factory automation, and other applications that require an onsite HMI or visual monitoring capability. The V481’s 8 built-in, software-selectable RS-232/422/485 serial ports make it an ideal solution for connecting to different devices. The dual LAN ports offer a reliable solution for network redundancy by providing continuous operation for data communication and management. In addition, the second CompactFlash socket makes it easier to add storage space, and the USB ports can connect to a wide range of devices, making the V481 a reliable embedded computer for industrial applications that require VGA and HMI features. The V481 comes pre-installed with the Windows CE 5.0 operation system, providing programmers with a friendly environment for developing application software. V481 programmers have an added advantage in that Moxa provides good software support to reduce the cost and time required for software development. In this chapter, we cover the following topics: Overview Package Checklist Product Features Product Hardware Specifications Software Features ¾ Application Development Environment ¾ Networking and Communications Capabilities ¾ Supported Servers and Daemons ¾ Graphics and Multimedia Tools How to Determine the Firmware Build Version Memory and File Systems Hive-Based Registry Inserting a USB Mass Storage Device into the Computer Inserting a CompactFlash into the Computer Eight RS-232/422/485 Serial Ports V481 WinCE User’s Manual Introduction Overview The V481 Series of x86 ready-to-run embedded computers is designed around the Intel Celeron M 1 GHz processor. In addition to the usual computer peripherals, the V481 integrates one 10/100 LAN port, one Gigabit LAN port, and 8 RS-232/422/485 serial ports, making the V481 into an ideal industrial embedded computer for handling industrial communication applications that need to connect to a monitor or HMI onsite. The on-board CompactFlash and DDR SDRAM provide ample storage capacity, and the second CompactFlash socket allows users to install additional memory. The Windows-based operating system comes pre-installed and ready-to-run, providing a Windows-like environment for easy software development. Software written for desktop PCs is easily ported to the V481 using a common complier, which means that programmers do not need to spend a lot of time modifying existing software code. In addition, the operating system, device drivers, and user-developed software can all be stored in the pre-installed CompactFlash memory Card. Package Checklist The V481 Series includes the following models: V481-CE x86 Ready-to-Run Embedded Computer with VGA, Dual LANs, 8 serial ports, CompactFlash, USB, Audio, WinCE 5.0 V481-T-CE x86 Ready-to-Run Embedded Computer with VGA, Dual LANs, 8 serial ports, CompactFlash, USB, Audio, WinCE 5.0, Wide Temperature Each model is shipped with the following items: y y y y y y y y 1 V481 Embedded Computer Quick Installation Guide Document and Software CD Din-rail Mounting Kit 100 cm RJ45-to-RJ45 cross-over Ethernet cable 20 cm Y-type cable for connecting a keyboard and mouse (CBL-MiniDIN6P/6Px2-20) Terminal block to power jack converter (includes terminal block) Product Warranty Statement Optional Accessories y Switching Power Adaptor: 60W, 24 VDC output, 100 to 240 VAC input (Order No.: 1117224250210), power cord must be ordered separately y Power Cords: Power cord with Australia Plug (Order No.: 9199000000500) Power Cord with UK Plug (Order No.: 9199000000600) Power Cord with Euro Plug (Order No.: 9199000000700) Power Cord with US Straight Plug (Order No.: 9199000000800) NOTE: Please notify your sales representative if any of the above items are missing or damaged. 1-2 V481 WinCE User’s Manual Introduction Product Features The V481 embedded computers have the following features: y y y y y y y y y y y y y y Intel Celeron M 1GHz CPU, 400 MHz FSB IDE hard disk support (for product produced after 1st June) Built-in 256 MB DDR SDRAM, 256 MB industrial CompactFlash 8 software-selectable RS-232/422/485 serial ports Serial port speed from 50 bps to 921.6 Kbps; supports ANY BAUDRATE 10/100 and 10/100/1000 Mbps LANs for network redundancy Second CompactFlash socket for storage expansion Two USB 2.0 hosts support system bootup LED indicators for system power and storage Designed to withstand 5G continuous vibration and 50G shocks Ready-to-Run WinCE 5.0 platform DIN-rail and wall-mount installation Fanless design for increased ruggedness Wide temperature model available Product Hardware Specifications System CPU: System Chipset: FSB: BIOS: System Memory: Supported OS: Display Graphics Controller: Display Memory: Display Interface: Storage Built-in: Expansion: Network Communication LAN1: LAN2: Protection: Serial Communication Serial Port: Intel ULV Celeron 1GHz processor without L2 Cache Intel 852GM GMCH + ICH4 chipset 400 MHz 4 Mbit Flash BIOS; supports Plug & Play 200-pin SO-DIMM socket x 1 with built-in 256 MB DDR; supports DDR200/266 up to 1 GB Windows CE 5.0 Integrated graphics with built-in Intel 852GM GMCH, built-in Intel extreme Graphics 2 technology Dynamic video memory, sharing up to 32 MB of system memory CRT Interface for VGA output Onboard Industrial CompactFlash to store OS, 256 MB for WinCE 5.0 model, 1 GB for WinXPe model Second CompactFlash socket for storage expansion, and IDE hard disk supported (optional) Note: HD supported with product produced after 1st June Auto-sensing 10/100 Mbps Ethernet, using integrated MAC and Intel 82562GZ Transceiver, RJ45 connector Auto-sensing 10/100/1000 Mbps Gigabit Ethernet, using Realtek RTL8110SC Controller, RJ45 connector 1.5 KV magnetic isolation protection RS-232/422/485 x 8, software-selectable, DB9 RS-232 signals: TxD, RxD, DTR, DSR, RTS, CTS, DCD, GND RS-422 signals: TxD+, TxD-, RxD+, RxD-, GND 1-3 V481 WinCE User’s Manual Protection: Data bits: Stop bit(s): Parity: Flow Control: Speed: Other Peripherals USB: Audio: KB/MS: Watchdog Timer: RTC: LEDs System: LAN1: LAN2: Buttons Power Button: Resent Button: Power Requirements Power Input: Power Consumption: Mechanical Dimensions (with casing, W x D x H): Construction Material: Mounting: Environment Operating Temperature: Storage Temperature: Anti-Vibration: Anti-Shock: Regulatory Approvals EMC: Safety: Directives: Introduction 4-wire RS-485 signals: TxD+, TxD-, RxD+, RxD-, GND 2-wire RS-485 signals: Data+, Data-, GND 15 KV ESD protection for all signals 5, 6, 7, 8 1, 1.5, 2 None, Even, Odd, Space, Mark RTS/CTS, XON/XOFF, RS-485 ADDCTM 50 bps to 921.6 Kbps; supports ANY BUAD RATE USB 2.0 compliant Host x 2, type A connector AC97 audio, supports line-in and speaker-out interface 1 PS/2 interface, support standard PS/2 keyboard and PS/2 mouse with Y-type cable Support 1 to 255 level time interval system reset, software programmable Yes, lithium battery backup Power x 1, Storage x 1 10M/100M (on connector), Tx/Link (on connector) 10M/100M/1000M (on connector), Tx/Link (on connector) Power on/off x 1 Reset button for system warm reboot x 1 9 to 36 VDC 25W, 650 mA @ 36 VDC, 2750 mA @ 9 VDC 230 x 140 x 70 mm (without wall mount ears and Din-rail Kit) Aluminum Wall-mount, DIN-rail -10 to 60°C (14 to 140°F), 5 to 95% RH (with CF installed) 0 to 40°C (35 to 104°F), 5 to 95% RH (with HD installed) -35 to 75°C (-31 to 167°F), 5 to 95% RH (for -T model) -20 to 80°C (-4 to 176°F), 5 to 95% RH -40 to 85°C (-40 to 185°F), 5 to 95% RH (for -T model) 5G @ IEC-68-2-6, sine wave, 5-500 Hz, 1 Oct./min, 1hr/axis (with CompactFlash card) 1G@ IEC-68-2-6, sine wave, 5-500 Hz, 1 Oct./min, 1hr/axis (with Hard Disk) 50G @ IEC-68-2-27, half sine wave, 30 ms (with CompactFlash card) 20G @ IEC-68-2-27, half sine wave, 30 ms (with Hard Disk) FCC: Part 15 Subpart B, CISPR22 Class A CE: EN61000-6-4, EN61000-6-2, EN61000-3-3, EN61000-3-2 LVD: EN60950-1 UL/cUL: UL60950-1, CSA C22.2 No. 60950-1-03 RoHS, CRoHS, WEEE 1-4 V481 WinCE User’s Manual Warranty Introduction 5 years Software Features The V481 Series of x86 ready-to-run embedded computers is designed around the Intel Celeron M 1 GHz processor. In addition to the usual computer peripherals, the V481 integrates one 10/100 LAN port, one gigabit LAN port, and 8 RS-232/422/485 serial ports, making the V481 into an ideal industrial embedded computer for handling industrial communication applications that need to connect to a monitor or HMI onsite. The V481’s VGA interface makes it a good choice for the industrial applications, such as SCADA and factory automation. The V481 features the Microsoft® Windows® CE 5.0 operating system (OS). Developers of embedded communication applications will find that the open programming environment makes the V481 well-suited for both new system development and migrating legacy systems. Application Development Environment The Windows CE 5.0 environment provides the following common, popular application development features that make programming just as convenient and easy as a PC environment. y y y y y y C Libraries and Run-times—The C libraries and run-times on a V481 WinCE are a subset of the WIN32 APIs. The system supports a full ANSI C run-time, standard input/output library, standard input/output ASCII library, and standard ASCII string functions. In addition, compiler C++ exception handling and Run-Time Type Information (RTTI) equivalent to desktop C++ compilers are supported. Component Services (COM and DCOM)—The Common Object Model (COM) is an operating system-independent, object-oriented system for creating binary software components that can interact with other COM-based components in the same process space, in other processes, or on remote machines. Microsoft® Foundation Classes (MFC)—MFC is a comprehensive class library and complete object-oriented application framework designed to help build applications, COM components, and controls. SOAP Toolkit—SOAP is an XML-based protocol for object exchange and calling remote procedures. Microsoft® Windows® CE 5.0 provides functionality similar to the SOAP Toolkit version 2 on the desktop. It provides a layer that allows COM objects to use SOAP as the transport protocol for remote procedure calls and to interact with Web services. Microsoft® .NET Compact Framework 2.0—Offers a choice of languages, initially Microsoft® Visual Basic® and Microsoft® Visual C#, and eliminates the common problems faced with language interoperability. XML—Provides the Document Object Model (DOM) for basic XML functionality, support for XML Query Language (XQL) and XPATH, Extensible Style Sheet Language Transformations (XSLT) that enable you to transform one class of XML document to another, SAX2 support for event-based parsing of XML documents (including MSXML Writer), and parsing based on Simple API for XML (SAX) for resource-constrained target devices. 1-5 V481 WinCE User’s Manual Introduction Networking and Communications Capabilities For network-centric embedded application usage, the V481 provides powerful communication hardware interfaces that include dual Ethernet and 8 serial ports, and also supports the networking and communications capabilities that are built into the Windows CE5.0 OS. The following features are supported: y Simple Network Management Protocol (SNMP)—Monitors remote connections to the network. y Simple Network Time Protocol (SNTP) Client—Provides support for synchronizing the device’s system time with a SNTP server, and supports Daylight Saving Time. y Simple Mail Transfer Protocol (Client)—A protocol for sending e-mail messages between servers. y Serial Communications—In addition to the 16550 UART driver bound to a debug port and the console port, a special driver for 8 or 16 additional Moxa home-made serial ports is also included. y Network Utilities (IpConfig, Ping, Route)—Utilities for troubleshooting various network problems. y TCP/IP—Includes IP, Address Resolution (ARP), Internet Control Message (ICMP), Internet Group Membership (IGMP), Transmission Control (TCP), User Datagram (UDP), name resolution and registration, DNS Client and DHCP. y Dial-up Networking—Consists of RAS client API and the Point to Point Protocol (PPP). RAS and PPP support Extensible Authentication Protocol (EAP) and RAS scripting y PPPoE—Point-to-Point Protocol over Ethernet (PPPoE) provides the ability to connect a network of hosts, over a simple bridging access device, to a Remote Access Concentrator. Supported Servers and Daemons In addition to the development and communication capability, the services and daemons listed below are also embedded in the V481. These common and easy-to-use application services help users migrate industrial communication applications to the V481 embedded computer easily and conveniently. y FTP Server—A sample server used for transferring files to and from remote computer systems over a network using TCP/IP. y Web Server (IIS)—Includes ASP, ISAPI, and Web Administration ISAPI Extensions. y SQL Express—SQL Server 2005 Express Edition is the next version of MSDE and is a free, easy-to-use, lightweight, and embeddable version of SQL Server 2005. y Watchdog Service—A CPU hardware function for resetting the CPU in a user specified time interval. You must call a Moxa library function to implemet this service. Graphics and Multimedia Tools The V481 embeds high-performance multimedia technologies found on desktop computers. These technologies provide the V481 with a friendly graphical user interface, and support waveform audio playback and capture. y Graphics Device Interface (GDI)—Provides information about the fundamental graphics architecture for Windows CE. y Diect3D Mobile Display Drivers—Provides information about creating a display driver that supports Direct3D Mobile. y DirectDraw Display Drivers—Provides information about creating a display driver that supports DirectDraw. 1-6 V481 WinCE User’s Manual Introduction y Audio Codecs and Renderers—Provides the following Codecs G.711 Audio Codec GSM 6.10 Audio Codec IMA ADPCM Audio Codec MP3 Codec MPEG-I Layer 1 and 2 Audio Codec MS ADPCM Audio Codec Wave/AIFF/au/snd File Parser Waveform Audio Renderer WMA Codec WMA Voice Codec WMAPro over s/PDIF Packetizer y Video Codecs and Renderers—Provides the following Codecs DirectShow Video Codec MPEG-I Video Codec MS RLE Video Codec Overlay Mixer Video/Image Compression Manager EMA/MEPG-4 Video Codec How to Determine the Firmware Build Version There are two ways to determine the firmware version of the V481 embedded computer. This information is important for identifying which features are supported. y Look at the welcome message after you log on to the computer. y Execute the “System Manager” application (described in a later chapter) to view the system information. Memory and File Systems The 256 MB of SDRAM is divided into the main memory, which uses about 196 MB of space and includes the operating system and user applications, and the kernel image, which occupies the rest of the space. The V481’s internal file system controls access to CF flash and also provides file storage in the object store. The file system provides persistent storage for applications and their related data even when the main power supply is lost. The file system integrates the read-only files that are stored in Flash ROM, with the read/write files of both applications and users. The system provides 1 MB of RAM-based storage under the RAMDisk directory. Although data saved in RAM will be deleted when the system shuts down, RAM storage has the advantages of faster read/write access and no life cycle. For applications that require transmitting important data immediately and directly to a host, you can store the necessary log data in RAM. After the host receives the data, the data does not need to be retained and can be deleted. Since embedded computers have resource limits, integrators must store data wisely. In general, you should only store data when you need to, and you should be sure to use the most appropriate storage medium. 1-7 V481 WinCE User’s Manual Introduction Additional file systems for USB storage devices are placed at the root of the internal file system. If you intend to use the devices to port data between your PC and the V481 computer, you should format them as the FAT file system on your PC. These devices need to be formatted as FAT .Otherwise, the V481 computer may not recognize the NTFS or any other format. Hive-Based Registry The registry for the V481 is a hive-based registry, instead of a RAM-based registry. The hive-based registry stores registry data inside files, or hives, which can be kept on file system. This removes the need for performing backup and restore on power off. The registry data is stored in the “\ Registry” directory. Inserting a USB Mass Storage Device into the Computer USB mass storage devices are useful for porting data between your PC and the V481 computer. We suggest that you format your devices with the FAT format. When the first USB storage device is plugged into the V481, a directory named “USBDisk” under the root directory is created as a link to the storage, on the internal file system. The directory created for the second USB device is “USBDisk2.” 1-8 V481 WinCE User’s Manual Introduction Inserting a CompactFlash into the Computer The V481 has a type II CompactFlash slot that supports cards of both types I and II. A mass storage card is considered to be secondary storage for the computer. When a mass storage card is inserted, the V481 creates a directory named “HardDisk” under the root directory, and the newly created directory serves a link to the storage space. Eight RS-232/422/485 Serial Ports The V481’s serial ports are numbered from left to right and bottom using the names: COM1, COM2, …, COM8. The serial ports are reliable, operate at speeds up to 921600 bps, and support the RS-232, RS-422, and RS-485 interfaces. 1-9 2 Chapter 2 Getting Started In this chapter, we explain how to operate a V481 computer from a PC. For clarity, the PC will be referred to as a “development workstation,” and the V481 embedded computer will be called a “target computer.” In addition, we give steps for facilitating operations such as system time adjustment, troubleshooting network connectivity, etc. Some of these operations can be done with system commands after gaining access to the computer, and others can be done by a “System Manager” application, which is described in a later chapter. The following topics are covered in this chapter: Starting Your V481 Computer Resetting Your V481 Computer Changing the Network Settings ¾ Using the Windows CE Network Utility to Configure Network Settings ¾ Using the Command Line to Configure Network Settings Operating Your V481 Computer from a Telnet Client User/Group Management System Time and Time Zone Starting and Stopping Services Troubleshooting Network Connectivity Simple Network Management Protocol (SNMP) V481 WinCE User’s Manual Getting Started Starting Your V481 Computer Connect the CRT monitor or LCD monitor to the target computer, and then power it on by connecting it to the power adaptor. It takes about 30 to 40 seconds for the system to boot up. During the boot process, you will see the following startup screen with a progress bar. Once the system is ready, the Windows CE desktop window will appear. 2-2 V481 WinCE User’s Manual Getting Started Resetting Your V481 Computer Reset button It may be necessary to reset the system if the computer stops responding or an application locks up. The reset button is located on the V481’s outer casing. After pressing the “Reset” button, the computer will boot up automatically. Reset to factory default The V481 embedded computer is based on Windows CE 5.0 and uses a CompactFlash card for the internal file system. The WinCE 5.0 supports the FAT file system. If you find that files, directories, or the FAT table are damaged because of an unstable power supply or application issues, then you will need to reset to factory defaults. To do this, power on the V481 computer, and then press “8” when you see the Windows CE startup screen. System prompts will guide you through the step-by-step reset procedure. Step1: Scan Disk (Automatically) The system will scan the disk automatically when you start the reset procedure. Step2: Are you sure you want to reset the system configuration to default values? (Y/N) After the disk scan is complete, the system will ask you to confirm that you want to reset to defaults. Press “Y” to reset to defaults. This will revert all settings to the factory default values. Step3: Are you sure you want to delete all files and directories? (Y/N) You will be asked whether you want to delete all files and directories. Press “Y” if you would like to delete all files in the “Program Files” directory. Step4: Proceed? (Y/N) You will be asked to confirm. Press “Y” to proceed to the reset process. NOTE: After the disk scan finishes, you may find some files named “FILE00xx.chk,” which means that some files or directories were damaged and have been fixed. Changing the Network Settings The V481 computer comes with two network interfaces. The default IP addresses and netmasks of the network interfaces are as follows: LAN 1 LAN 2 Default IP Address Netmask 192.168.3.127 192.168.4.127 255.255.255.0 255.255.255.0 2-3 V481 WinCE User’s Manual Getting Started There are two ways to change the network setting. Using the Windows CE Network Utility to Configure Network Settings Network interface settings can be configured with the Windows utility. Step1: Go to [Start] Æ [Settings] Æ [Network and Dial-Up Connections]. You will see two network interfaces. Step2: Right-Click the LAN interface (e.g., PCI\E100CE1) that you would like to configure and then click [property]. A configuration window will pop up. Step3: Input the new IP address and netmask and then click OK. Using the Command Line to Configure Network Settings Use the netconfig utility to change network settings. Note that you can type netconfig -h to display the system’s help content for this utility. \> netconfig -h Usage: netconfig -n <AdapterName | Alias> [-EnableDHCP] [-i <IP address>] [-m <netmask>] [-g <gateway>] [-d <DNS server>] [-w <WINS Server>] [-noask] e.g.: netconfig -n PCI\E100CE1 -i 192.168.10.101 -g 192.168.10.254 : netconfig -n PCI\RTCENIC1 -EnableDHCP Alias: LAN1=PCI\E100CE1 LAN2=PCI\RTCENIC1 For example, if you want to change the IP address of the development workstation’s LAN port to 192.168.1.5, and the Domain Name Server’s (DNS) IP address is 192.168.2.6, then execute the following command: \> netconfig –n LAN1 –i 192.168.1.5 –m 255.255.255.0 –g 192.168.1.254 –d 192.168.2.6 Use the command netconfig to view the new settings. 2-4 V481 WinCE User’s Manual Getting Started \> netconfig LAN1 Interface Configuration: IP Address: 192.168.1.5 SubNet Mask: 255.255.255.0 Gateway: 192.168.1.254 DNS: 192.168.2.6 LAN2 Interface Configuration: IP Address: 192.168.4.127 SubNet Mask: 255.255.255.0 Gateway: DNS: Operating Your V481 Computer from a Telnet Client Before operating your V481 computer from a Telnet client, we suggest that you change the network settings of the computer (see the previous section) so that at least one of the two network ports are on the same LAN as your development workstation. Use a cross-over Ethernet cable to connect your development workstation directly to the target computer, or use a straight-through Ethernet cable to connect the computer to a LAN hub or switch. Next, use a Telnet client on your development workstation to connect to the Telnet console utility on the target computer. After establishing a connection, type the login name and password as requested to logon to the computer. The default login name and password are both admin. Login: admin Password: admin After logging in through the console port or Telnet client, you have several commands available to operate the computer. Type HELP to display all of the commands, or type HELP [command name] to display detailed help for a particular command. Some of these commands, such as DATE and TIME, are very useful and make it easily to manage the computer’s system time. Other commands, such as DIR and MKDIR, are good utilities for file management. For example, to inspect the file structure of the root directory, type DIR \> dir /b Network BLDR SPLASH.BMX EBOOT.BIX BOOT.INI NK.BIN NK8.BIN Settings Program Files My Documents Application Data 2-5 V481 WinCE User’s Manual Getting Started User/Group Management User Group: You should assign specific services, such as ftp and telnet, to define user groups such that these services are accessible only by the users within the permissible user group. Three user groups, namely “ftpd,” “telnetd,” and “httpd,” were created by default for your convenience. Adding a Group: Use the command useradd –g <groupName> to create a user group. \> useradd –g yyyy group yyyy has been added. Deleting a Group: To remove a group, use the command userdel –g <groupName>. \> userdel –g yyyy group yyyy has been removed. Adding a User: Use the command useradd <newUserID> to add a user for accessing the system. The user’s password, by default, is the same as the user name. \> useradd xxxx user xxxx has been added. In addition, you can permit this user to access a particular service by typing -g followed by the user group name of the service, i.e., useradd –g <groupName> <newUserID>. For example, \> useradd –g telnetd xxxx user xxxx is existent group telnetd is existent user xxxx has been added to group yyyy Deleting a User: Use the command userdel <userID> to delete a user from the system. The user “admin” CANNOT be deleted. \> userdel xxxx user xxxx has been deleted You can also just remove a user from a user group by using the command userdel –g <groupName> <newUserID>. For example, \> userdel –g yyyy xxxx user xxxx has been removed from group yyyy 2-6 V481 WinCE User’s Manual Getting Started System Time and Time Zone Setting the System Time Manually: Use the date, and time commands to query the current system date/time or to set a new system date/time. The system time is save in RTC. Stopping the system won’t affect the system time. \> date The current date is: Tuesday, November 22, 2005 Enter the new date (mm-dd-[yy]yy): 12-23-05 \> date /T Wednesday, November 23, 2005 \> time The current time is: 5:27:17 PM Enter the new time (hh:mm:ss): 16:02:00 \> time /T 4:02:04 PM Setting the Time Zone: Windows CE 5.0 supports Time Zone. You can use [Control Panel] Æ [Date/Time] to adjust your current Time Zone. It also supports Daylight Date and Daylight Time. Starting and Stopping Services After booting up, the V481 computer runs several services continuously to serve requests from users or other programs. Notable services include telnet (“TEL0:”), World Wide Web HTTP (“HTP0:”), and file transfer FTP (“FTP0:”). Most users will not use these services. However, you can start or stop a service by using the “services” command. For example, Start the FTP service by typing \> services start FTP0: Stop the FTP service by typing \> services stop FTP0: The default services in the V481 are: TEL0: Telnet Service FTP0: FTP Service CON0: Console Service Troubleshooting Network Connectivity The ipconfig tool prints the TCP/IP-related configuration data of a host, including the IP addresses, gateway, and DNS servers. \> ipconfig /all Windows IP configuration Ethernet adapter Local Area Connection: IP Address: 192.168.4.127 Subnet Mask: 255.255.255.0 Adapter Name: PCI\E100CE1 Description: PCI\E100CE1 Adapter Index: 2 2-7 V481 WinCE User’s Manual Getting Started Address: 80 86 33 33 34 12 DHCP Enabled: NO Ethernet adapter Local Area Connection: IP Address: 192.168.14.202 Subnet Mask: 255.255.248.0 Default Gateway: 192.168.15.254 Adapter Name: PCI\RTCENIC1 Description: PCI\RTCENIC1 Adapter Index: 3 Address: 78 56 34 91 cc dd DHCP Enabled: NO Host name: V481 Domain Name: DNS Servers: 192.168.1.6 NODETYPE: 8 Routing Enabled: NO Proxy Enabled: NO To troubleshoot network connectivity, reach-ability, and name resolution, use the ping command. This command verifies IP-level connectivity to another TCP/IP computer by sending Internet Control Message Protocol (ICMP) Echo Request messages. The corresponding return Echo Reply messages are displayed, along with round-trip times. For more information, type ping without parameters. \> ping www.Moxa.com Pinging Host www.Moxa.com [192.168.1.16] Reply from 192.168.1.16: Echo size=32 time<1ms TTL=126 Reply from 192.168.1.16: Echo size=32 time<1ms TTL=126 Reply from 192.168.1.16: Echo size=32 time<1ms TTL=126 The route utility allows you to view or modify network routing tables. Type this command without parameters to view a list of functions. \> route To view current routing items in the tables, \> route PRINT To add a routing item on network interface 1, \> route ADD 192.168.0.0 MASK 255.255.0.0 192.168.15.254 To delete a routing item, \> route DELETE 192.168.0.0 2-8 V481 WinCE User’s Manual Getting Started Simple Network Management Protocol (SNMP) SNMP is the standard Internet protocol for network management, and is one part of the TCP/IP protocol suite. SNMP was developed to monitor and manage networks. It uses a distributed architecture that consists of agents and managers: SNMP agent The SNMP agent is an SNMP application that monitors network traffic and responds to queries from SNMP manager applications. The agent also notifies the manager, by sending a trap, when significant events occur. SNMP Manager An SNMP manager is an SNMP application that generates queries to SNMP-agent applications and receives traps from SNMP-agent applications. The V481 computer installs an SNMP agent to serve as an SNMP device. You should install the SNMP manager on the workstation computer (for example, a Linux system) that monitors the network. After installing the nodes, you need to configure the SNMP manager and agent. To check SNMP agent capabilities in a target V481 computer (e.g., if the network IP address is 192.168.3.127), log on to the workstation computer (for example, a Linux-based computer) on which the SNMP manager resides, and then type: \> snmpwalk -v 2c -c public 192.168.3.127 system SNMPv2-MIB::sysDescr.0 Microsoft Windows CE Version 5.0 (Build 1400) SNMPv2-MIB::sysObjectID.0 SNMPv2-SMI::enterprises.8691.13.7420 SNMPv2-MIB::sysUpTime.0 1282929 SNMPv2-MIB::sysContact.0 Your System Contact Here SNMPv2-MIB::sysName.0 WindowsCE You will see a series of messages from the SNMP agent on the V481 computer. From there, you can monitor and manage the computer. 2-9 3 Chapter 3 Management Tools The V481 series of ready-to-run embedded computers are network-centric platforms designed to serve as front-end computers for data acquisition and industrial control. Due to the distributed characteristics of the devices that these computers control, they are often located near the devices in harsh environments, and are usually far away from system administrators. Managing the computers requires being able to modify the network/server configuration, take care of file management, and handle process (thread) monitoring/control. A management system is provided with the V481 computer to assist administrators with these tasks. The following topics are covered in this chapter: Before Operating the System System Information Process (Thread) Monitoring/Control Services Monitoring/Control Serial Port Configuration DisplayAuto Launch Configuration User/Group Management Web Server Configuration V481 WinCE User’s Manual Management Tools Before Operating the System Before operating the system, connect your CRT or LCD monitor to the V481 box computer, and then double-click the [System Manager] icon on the desktop. System Information The first page displays the V481’s system information, including the firmware version of the computer, .Net CF version, the system time, and system resources, including main memory and file system usage. 3-2 V481 WinCE User’s Manual Management Tools Process (Thread) Monitoring/Control The V481 computer can manage up to 32 applications at the same time. You can use the management system to monitor and control the applications. To view active processes, click the Processes tab. Processes that are currently running will be listed. You can kill a process by clicking the process to highlight it, and then clicking the “kill” button. 3-3 V481 WinCE User’s Manual Management Tools Services Monitoring/Control Some services run in the background to provide services, such as FTP, Telnet, and HTTP, for user requests. You can click on a check box to toggle a start/stop operation for a service. Some listed services cannot be stopped in order to maintain normal operation of the computer. Such services do not have a check box next to them. You can also use SNTP to synchronize the system time. To do this, click the enable check box under SNTP, and then type the NTP server list in the text field and enter a refresh time. Click “Save Settings” after you finish the configuration. 3-4 V481 WinCE User’s Manual Management Tools Serial Port Configuration The V481 has 8 high-performance serial ports. Click the COM Ports tab, and then select RS-232, RS-422, or RS-485 from the drop-down lists to select the serial interface for different ports. The default is RS-232. 3-5 V481 WinCE User’s Manual Management Tools Display The V481’s VGA output can be sent to an LCD monitor or CRT monitor to display the WinCE window. The default settings are 800x600, 60 Hz, and 16 bits. For general usage, you should tune the settings to match those of your LCD or CRT. Click “Apply” to save the settings. NOTE: You must restart your V481 for the new settings to take effect. 3-6 V481 WinCE User’s Manual Management Tools Auto Launch Configuration You can specify that certain programs execute automatically at boot up. Click the “Add” button to select the program. After entering the program value, click “OK.” The programs you specify will be launched automatically the next time you boot up the computer. 3-7 V481 WinCE User’s Manual Management Tools User/Group Management The user/group utility allows adding users and removing users. You can add a user by clicking the “Add” button. Give the user name and assign the groups the user belongs to. Usually, the user group is the service that the user has permission to access. You can assign more than one group to a user. Click “Add” after you assign a user name and the corresponding groups. To remove a user, click the “Remove” button after you select the user you want to delete. 3-8 V481 WinCE User’s Manual Management Tools You can also change a user’s password. If you double click on a User Name, a change password window will pop up. Provide the current password and new password. After you confirm the new password, click “Apply.” The password will update accordingly. 3-9 V481 WinCE User’s Manual Management Tools Web Server Configuration You must use a Windows 2000 or Windows XP machine for web administration. Open an “IE” window, and then go to URL http://192.168.3.127/WebAdmin (this is provided the V481’s network IP address is 192.168.3.127). You will see the standard Web server Administration page, as shown below. Use this administration page to create a new website, or create a virtual web path for your web application. 3-10 V481 WinCE User’s Manual Management Tools You can also change the authentication for each web virtual directory. 3-11 4 Chapter 4 System Recovery The V481 series of ready-to-run embedded computers are Windows CE 5.0 OS platforms, and the internal file systems support FAT. Although it happens rarely, you may find on occasion that operating system files become damaged. In this chapter, we explain how to revert to the original OS configuration. The following topics are covered in this chapter: Recovery Environment Hardware Recovery Programs Recovery Procedure V481 WinCE User’s Manual System Recovery Recovery Environment The environment includes the hardware and recovery programs for conducting preliminary tests. Hardware The hardware used for system recovery includes a V481-CE computer and a bootable USB disk that contains the recovery programs. V481-CE Bootable USB DISK (Recovery programs) USB Port Recovery Programs We have created programs to recover system image files and executable files. Recovery Procedure The recovery procedure is as follows: 1. Create a bootable USB disk a. Copy system files kernel.sys and commond.com to a specific directory. b. Open the HP USB Disk Storage Format Tool. c. Select the USB device you want to use as a bootable disk in device options. d. Select FAT for the File system. e. Type the disk name in the volume label. f. Check the option Create a DOS startup disk in the format options. g. Specify the directory that includes the system files. h. Press start to format the USB disk. i. Copy all files in the V481_Recovery directory to the USB disk. 2. Bios setup on V481 a. Insert the USB disk into the V481. b. Power on and press DEL to enter the bios setup menu. c. Select [Advanced] Æ [hard Disk Boot Priority] and then press Enter. d. In the setup menu, use “↑” or “↓” to select the USB device. e. Press “+” to move the device to the top, and then press ESC to exit the setup menu. f. Make sure the first boot device is “Hard Disk.” If not, press Enter to change it. g. Select [Exit] Æ [Save & Exit Setup] and then press Enter. h. Select Y to save to CMOS and exit. 4-2 V481 WinCE User’s Manual System Recovery 3. System recovery > If the bios setup is correct, the computer will restart and boot from the USB disk. > In the c:\ directory type “mkdisk” to initiate the recovery procedure. > When the execution is completed, power off and remove the USB disk. > Power on the computer to activate the operating system. NOTE: The HP USB Disk Storage Format Tool can be downloaded from the Internet. Use the keyword “HP USB Disk Storage Format Tool” to search for and download this tool. 4-3 5 Chapter 5 Firmware Upgrade Procedure Moxa engineers continuously enhance software features to improve the quality and functionality of Moxa’s embedded products, and the most up-to-date version of the firmware is posted in Moxa’s download center. After you download the firmware to your work station, take the following steps to upgrade the firmware. 1. Upload this file to the target machine under the root directory (i.e., \). If you place this file on a CompactFlash or a USB device, copy it to the root directory first for a faster upgrade. Executing the program from a USB 1.1 device will take much longer. 2. Log on to the target computer through a Telnet or console connection. 3. Execute the program from the command prompt. V481 WinCE User’s Manual Firmware Upgrade Procedure 4. Press “Y” to continue the process. 5. Please allow at least one minute to complete the upgrade process. After the firmware has been upgraded successfully, press ‘Y’ to keep the current network settings. Press “N” to reset to factory default values. 5-2 V481 WinCE User’s Manual 6. Firmware Upgrade Procedure Press “Y” to reboot the target computer. 5-3