1
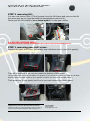
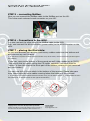
VolvoTech.EU
MANUAL
Kind
Title
Language
Version
Date
Applicable to
Contents
Installation manual
Installation manual iMIV with any HU, front mount
English
2.00
August 12th 2014
iMIV in Volvo with any HU / NO RTI installation in car
Manual describes the installation of iMIV in combination
with any HU, front mount installation.
VOLVOTECH.EU
IMIV WITH ANY
INSTALLATION MANUAL
HU, FRONTMOUNT
Pre requirements
Applicable to:
iMIV Classic, iMIV-LE, iMIV-LE+ (all MFI versions)
Starting points:
The HU radio is working ok (it at least allows you to select different sources).
Remove any CD from the unit!
There is NO need to remove battery connections if you do exactly what is stated in
this manual.
In case the installation requires you to put the ignition key in position 2, please
make sure you put your light switch in position 1 (middle position) or off (only if
your lights actually do switch off in that position) to save your battery.
Obviously; if you feel more comfortable, you can remove the ground (12V- = black) from the battery in your
Volvo while installing.
Please make sure you put the key in ignition position 2 and leave it there until the battery is connected again!
Please read the FAQ section on the bottom of this document before installation!
Required tools:
Fishbone tool (or similar)
Torx 20
Towel(s) for panel protection to avoid damages.
Decide mounting point for iPod and/or aux cable
Suggested options:
- mid arm rest (described in this manual)
- in iPhone/iPod mount next to HU, cable trough bracket next to HU
- in glove compartment
Page 1 of 10
Copyright 2014, VolvoTech.EU, Replication prohibited!
C: BE || CD 140812 || V 2.00 || RD 140812 || HC 4 || FC 3.00 ||
VolvoTech.EU-manual-EN-installation-iMIV-frontmount-v2.0
Contact details:
VolvoTech.EU
[email protected]
VOLVOTECH.EU
IMIV WITH ANY
INSTALLATION MANUAL
HU, FRONTMOUNT
STEP 0 prepare your Volvo:
Remove key from ignition and only put back once ALL connections are made or all
connectors are put back into original position.
For HUX0X and X1X (MY1999-2004):
(find instructions for removing HU-X50 further down this document!)
STEP 1 Remove pen-holder and gear-shift-cover:
Remove the pen-holder. (Pull it carefully in the direction of the gear-shifter).
Unlock and remove the panel around the gear-shifter by gently but firmly pressing
the 4 clips.
STEP 2 removing climate-control-panel:
Remove the 2 (Torx) screws from the temperature control unit (the lower part of
the whole panel) and move the bottom of that panel towards the gear-shifter.
Then remove it carefully by pulling it out.
DO NOT REMOVE ANY CABLES FROM THIS PANEL besides the cigarette lighter
connector.
Now put the unit carefully on a towel (to avoid damages) on the left side of the
tunnel and leave it there.
Page 2 of 10
Copyright 2014, VolvoTech.EU, Replication prohibited!
C: BE || CD 140812 || V 2.00 || RD 140812 || HC 4 || FC 3.00 ||
VolvoTech.EU-manual-EN-installation-iMIV-frontmount-v2.0
Contact details:
VolvoTech.EU
[email protected]
VOLVOTECH.EU
IMIV WITH ANY
INSTALLATION MANUAL
HU, FRONTMOUNT
STEP 3 removing HU:
You can now remove the 2 (Torx) screws from the HU frame and remove the HU
the same way as you just removed the temperature control unit.
Please put the HU carefully (on a towel again!) on the gear-shifter.
For HU-X50 (MY2005-2009) :
(find instructions for making connections for ALL radio’s further down this document!)
STEP 1 removing gear shift cover:
Remove the gear-shift cover (preferably use a fishbone tool to just lift it gently):
Then tilt it and turn it, so you can reach the bottom of the cover.
(It might be required to put the shifter in D position if your Volvo is an automatic shifted car! Note
that the ignition position needs to be in position 2 before you can move the shift leaver!)
Then press the 4 clips gently but firm so you can remove the whole panel.
Page 3 of 10
Copyright 2014, VolvoTech.EU, Replication prohibited!
C: BE || CD 140812 || V 2.00 || RD 140812 || HC 4 || FC 3.00 ||
VolvoTech.EU-manual-EN-installation-iMIV-frontmount-v2.0
Contact details:
VolvoTech.EU
[email protected]
VOLVOTECH.EU
IMIV WITH ANY
INSTALLATION MANUAL
HU, FRONTMOUNT
Now put the gear shifter back in to the P position (or Neutral if your Volvo is
manually shifted) and remove the (2 pieces) Torx 20 screws:
(Tip:
put a towel below the Torx screws before you try to remove them to avoid losing them!)
Once the Torx 20 screws are out, tilt (bottom part) the whole unit towards you
and pull down untill its free.
Now turn/move the radio on top or in front (towards you) of the gear shifter so
you can reach the back of the radio. Put towels (plenty!) on top of the gear shifter
and panels to avoid damages!
Page 4 of 10
Copyright 2014, VolvoTech.EU, Replication prohibited!
C: BE || CD 140812 || V 2.00 || RD 140812 || HC 4 || FC 3.00 ||
VolvoTech.EU-manual-EN-installation-iMIV-frontmount-v2.0
Contact details:
VolvoTech.EU
[email protected]
VOLVOTECH.EU
IMIV WITH ANY
INSTALLATION MANUAL
HU, FRONTMOUNT
For ALL HU’s:
STEP 4 – Connecting power:
You can now connect the quick-connects to the power source of the radio.
Find the BROWN (12V-) and the RED (12V+) of the original harness in the
GREEN connector.
(* please note that the iMIV requires battery power (power is always available to the iMIV). The iMIV will switch
on/off it selves based on MelBus information!)
(* please check if there’s no harnesses in between the original harness and the radio, some Bluetooth car kit
(Parrot or so) might be connected in between and use different colors!)
The supplied quick-connect connectors are labeled accordingly.
iMIV harness RED wire
=
iMIV harness GREEN wire =
12V+
= RED 12V+ (30+ VCC) on car harness
12V- (GND) = BROWN 12V- (GND) on car harness
The quick-connects work as follows:
Pin 12 = 12V- = BROWN Wire
Pin 1 = 12V+ = RED
Wire
Page 5 of 10
Copyright 2014, VolvoTech.EU, Replication prohibited!
C: BE || CD 140812 || V 2.00 || RD 140812 || HC 4 || FC 3.00 ||
VolvoTech.EU-manual-EN-installation-iMIV-frontmount-v2.0
Contact details:
VolvoTech.EU
[email protected]
VOLVOTECH.EU
IMIV WITH ANY
INSTALLATION MANUAL
HU, FRONTMOUNT
STEP 5 – connecting MelBus:
Now you can connect the MelBus-cable to the MelBus-port on the HU.
This is the most centered round connector on your HU.
STEP 6 – Connections to the iMIV:
You now connect the other side of the MelBus cable to the iMIV.
Also, now connect the blue connector (power cable) to the blue connector on the
iMIV.
STEP 7 – placing the iPod cable:
In your mid armrest you can now remove any rubber mats from the bottom and
also remove any coin-holders.
(* in case there is a phone handset inside the mid arm rest, do the same, remove both mats (left and right to
the handset).
If you can, remove the bottom of the armrest as well (older models up to 2003).
(You can do this by gently pulling the CD-holder upwards. You might need to
“unlock” it from the clips at the front-part of the bottom, where you just removed
any coin-holder).
You can now drill a 16mm whole in the bottom of the armrest. Please take care
here, there might be other cables running below the bottom of the armrest!
(* in case there is a phone handset inside the mid arm rest, you can either remove the whole handset or leave
the handset out, or drill the 16mm on the right of the handset.)
Page 6 of 10
Copyright 2014, VolvoTech.EU, Replication prohibited!
C: BE || CD 140812 || V 2.00 || RD 140812 || HC 4 || FC 3.00 ||
VolvoTech.EU-manual-EN-installation-iMIV-frontmount-v2.0
Contact details:
VolvoTech.EU
[email protected]
VOLVOTECH.EU
IMIV WITH ANY
INSTALLATION MANUAL
HU, FRONTMOUNT
If you are connecting an iMIV with an iPod 30pin adapter-cable (most
probably you are!), work from the armrest to the front!
(If you only connect Aux, you can work either way!)
Put the round (!) connector of the iPod cable from top to bottom through the
whole you just drilled and gently work the cable to the front of the tunnel and pick
it up there and connect it to the iMIV.
Step 8 – placing the iMIV behind the HU:
Now (once all cables are in) put the iMIV with all cables connected behind the HU,
slightly to the left in the direction of the steering Wheel. You can use the original
bubble-bag to make sure the device is stored steady if you want.
The MelBus device should be positioned just about where the red circle is:
Please note that there might be a lot of cables “stuffed” behind the HU already.
Just tighten them carefully (and fold them back to the left and right) to create the
required space. Even with all possible cables there, it is possible to fit the iMIV
there.
Step 9 testing the iMIV:
Return any removed connector to its original connection! DO NOT LEAVE ANY
CONNECTOR OUT NOW. (At least not from the air-conditioning control panel).
Check all connections for the last time and place the HU back in its original
place.
Put the car key in the ignition and switch it to II.
Wait a second and then switch on your HU. (If it is already on, leave it on.)
Depending on the HU you have, it should now give 2 additional sources, being 2 of
the following;
HU-X50
SAT1, SAT2, SAT 3 and CD-C
HU-X0X and X1X and 1205
MD-C and CD-C
Page 7 of 10
Copyright 2014, VolvoTech.EU, Replication prohibited!
C: BE || CD 140812 || V 2.00 || RD 140812 || HC 4 || FC 3.00 ||
VolvoTech.EU-manual-EN-installation-iMIV-frontmount-v2.0
Contact details:
VolvoTech.EU
[email protected]
VOLVOTECH.EU
IMIV WITH ANY
INSTALLATION MANUAL
HU, FRONTMOUNT
(Turn source knob to find these sources).
If you have connected an iPod cable, please connect it now to see if it starts
charging.
Select the SAT-1 or MD-C source (depending on radio again); this is your iPod
source.
Play music from iPod now (just press play / start music) and if you hear audio and
it sounds correctly, you’re ready.
Select CD-C (only if you also installed the Auxiliary connection) and connect any
Audio player (can be that same iPod as before, but undock from iPod cable first!).
Connect the Auxiliary jack to the headphone jacket of the player and press play.
If you hear audio now and it sounds correctly, you’re ready.
Step 10 Finalizing:
Now just put anything back to its original place. Still be careful not to scratch
things please.
Remove towels used only once totally done.
FAQ:
Q:
My Volvo displays the message ‘Battery low’ what should I do?
A:
Please start your car and leave it running for a while. (Battery was being
drained by use of radio and lights during installation.)
Q:
What position should the little switch on the iMIV be on?
A:
On position 2 generally. (only for emergency updates position 1 is used!)
Q:
After starting my car, it generally takes 15 seconds or longer before the
iMIV source is visible / selectable on the HU, how come?
A:
Please make sure the little switch on the side of the iMIV is in position 2!
Page 8 of 10
Copyright 2014, VolvoTech.EU, Replication prohibited!
C: BE || CD 140812 || V 2.00 || RD 140812 || HC 4 || FC 3.00 ||
VolvoTech.EU-manual-EN-installation-iMIV-frontmount-v2.0
Contact details:
VolvoTech.EU
[email protected]
VOLVOTECH.EU
IMIV WITH ANY
INSTALLATION MANUAL
HU, FRONTMOUNT
Q:
Can I use the iMIV in combination with the CFE (CanBus Function
Extender)?
A:
Yes you can, in any way. The CFE uses CanBus, the iMIV users MelBus.
There is no way the can or will be conflicting.
Q:
There is an “airbag” or “SRS” warning light active after installation, how
come and what should I do?
A:
Most probably you actually did put ignition to position 2 before all
connections on the air-conditioning panel had been returned to their original
position.
You’ll need to see the Volvo dealer to reset this warning light.
(No actual damages are done, the “circuit” had been broken and the car
stores that situation as an error and warns you about it.)
Q:
How do I operate the iMIV and iPod in my car?
A:
Please read the iMIV user manual, available on our website.
Q:
Can I install and use the iMIV if the internal 4 or 6 CD Exchanger is broken
and does not operate at all anymore? (It even gives “CD ERROR”)
A:
Yes. The iMIV will operate on a different “source” than the CD changer.
Actually it is a good “replacement” for the internal CD Exchanger.
Q:
If I use the Auxiliary source, there is a squelching noise audible in low
volume parts of the songs being played.
A:
Generally this is not from the Auxiliary source or the connected device but
from the device charging the player connected to the Auxiliary.
Please remove that charger from the device. If the squelch is not audible
anymore then, please replace the charger with a better one.
Q:
I bought a second hand iMIV; the device looks different / manual does not
match / iPod is not charging / iPhone is giving error messages etc.
A:
Since our current devices are MFI compliant, they have changed from the
older units. Cables cannot be exchanged with older (non-mfi) units.
Sorry, but we cannot deliver installation support on used iMIV’s.
Page 9 of 10
Copyright 2014, VolvoTech.EU, Replication prohibited!
C: BE || CD 140812 || V 2.00 || RD 140812 || HC 4 || FC 3.00 ||
VolvoTech.EU-manual-EN-installation-iMIV-frontmount-v2.0
Contact details:
VolvoTech.EU
[email protected]