1
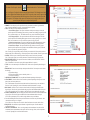
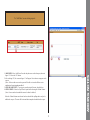
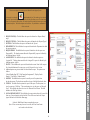
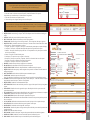
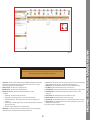
USER MANUAL
PRODUCT SUPPORT SYSTEM
Table of Contents
New Requests
.........................................................................................
1
Adding Notes................................................................................................ 2
Adding Attachments ................................................................................... 3
Signing Off ................................................................................................ 4
Report Wizard/Report Agents ...................................................................... 6
Mail Groups ................................................................................................ 7
User Settings................................................................................................ 8
Request Overview.........................................................................................
Home Screen Overview
9
............................................................................ 10
Glossary...................................................................................................... 11
TABLE OF CONTENTS
............................................................... 5
Search Requests/Search Agents
To submit a ‘New Request’, select the
button from the tool bar. The form shown in
figure 1.0 will appear. Complete the form meeting the required criteria. Field descriptions are listed below. Once completed and submitted, the request will be sent to the system owner for approval and
assignment. The requestor and any additional recipients will receive notice once the request has
been approved. All recipients on the request will continue to receive notices as the request is
processed up until the request is completed and signed off.
1. PRIORITY: Select the priority of the request from the drop down menu (low, medium, high, immediate.)
(Note: If selecting immediate as the priority, a ‘Requested Due Date’ is required.)
2. TYPE: Select the type of request from the drop down menu.
a. General Desktop Support - This request is dedicated to desktop issues and support. Select this
option for requests such as installing a printer, resolving a scanner issue, installing a program for specific
use by a particular employee, etc. This should not relate to any system, or shared folders/programs.
b. Network Support Request - This request is dedicated to network issues and support. Select this
option for requests such as installing shared programs/icons on a computer, gaining access to a “shared
folder”, server related issues, or to reset a username or password in any given system.
c. Product Development Support - This request is dedicated to developing and enhancing any system.
Select this option for requests such as adding forms, updating information or enhancing processes.
d. Technical Service Request - This request is dedicated to any problems or issues in any system.
Select this option for requests such as reporting incorrect information within any system, Cold Fusion
Errors, or any other errors generated by the system.
(Note: The task type’s are paired with systems in which they are associated with. If the required system is not
available, simply select a different task type. If the required system is still not available, contact the system owner.)
3. SYSTEM: Select the ‘System’ in which the problem or change occurs in, from the drop down menu.
(Note: If the required system is not on the drop down menu, contact the Product Support System owner.)
4. REQUESTED DUE DATE: If the request has a due date or deadline, enter it within this field. Utilize the
calendar to the right of the field.
(Note: If ‘Immediate’ is selected as the priority, this ‘Requested Due Date’ is required.)
5. TITLE: Enter a clear and descriptive title within this field. The title needs to explain the problem/change at a
glance.
6. DESCRIPTION: Enter a clear and descriptive description within this field. The description needs to include the following:
a. The problem or change.
b. The steps taken within the system to obtain the problem. -or
c. The reason for the change.
7. ADDITIONAL INFORMATION: Enter any additional information pertaining to the description.
8. ATTACHMENTS: Select the ‘Browse’ button to attach any documents pertaining to the request (ex: screen prints, forms, e-mail correspondence, etc.)
(Note: If the documents to be attached are not available at the time of submission, they can be attached at a
later time. See the ‘Uploading Files’ section of this manual to attach files/documents to a request.)
9. MAIL GROUP: Select the ‘View List’ button to choose from the list of mail groups within the Product
Support System. This will notify anyone within the mail group of notes and attachments added to the request.
(Note: If the desired mail group is not available, see the ‘Mail Group’ section to add/modify a mail group.)
10. SEND TO (ADDITIONAL): Select the ‘Employees’ button to choose from the list of users within the Product
Support System. This will notify anyone within this field of notes/attachments added to the request.
(Note: If the required employee is not on the list, simply add the necessary e-mail address.)
11. Select the ‘Submit Request’ button if the request meets the above criteria and is ready for submission. Once
selected the screen in figure 1.1 will appear.
(Note: If there are too many error to be revised, the ‘Reset Form’ button can be used to clear the form.)
12. REQUEST ID: After submitted, a request id number is assigned to the request. Note this number for
tracking/search purposes.
13. ADD FILE ATTACHMENTS: This is a second opportunity to add an attachment. Select the ‘Add File
Attachments’ button to add attachments to the request such as error messages, forms, e-mail correspondence,
etc. See the ‘Uploading Files’ section for further instruction.
Figure 1.0
NEW REQUEST
1
Figure 1.1
To ‘Add Notes’ on an existing request:
1. ADD NOTES: Select ‘Add Notes’ from the drop down on a selected request, shown in
figure 1.2. Select the ‘GO’ button.
2. After selecting ‘GO’, the screen in figure 1.3 will appear. Enter the notes to appear on the request.
(Note: All users with access to the request will be able to view and will also receive
notification of notes/attachments added.)
3. SEND ME A RECEIPT?: To receive an e-mail receipt of this note, check the box.
4. SPELL CHECK: Select the ‘Spell Check’ option before selecting the ‘Submit’ button.
(Note: Once a note has been added it can not be edited or deleted.)
Figure 1.3
Select the ‘Submit’ button once the note has been checked for spelling and is ready to be
added to the request. The note will be time and date stamped when added to the request.
ADDING NOTES
Figure 1.2
2
1. ADD/UPLOAD FILE ATTACHMENT: Select the ‘Browse’ button to attach any
documents pertaining to an existing request (ex: screen prints, forms, e-mail
correspondence, etc.)
EXCLUSIONS: Do not use the # symbol in the title of the attachment as certain systems do not recognize this symbol. Additionally, do not attach ‘MDI’ files (Microsoft Imaging Files) as certain systems do not recognize this file type.
(Note: If the documents to be attached are available at the time of submission, they
can be attached at that time. Select the ‘Add File Attachments’ button during Part II
of the New Request process. Once selected, the screen in figure 1.4 will appear.)
2. ATTACH TO TICKET: Select the ‘Request Id’ number from the drop down menu to attach documents to.
(Note: A user is only able to attach documents to requests that they are listed on.)
3. VIEW THIS TICKET: Select this button to view the request. This tool helps to
verify that the document is being attached to the correct request.
(Note: Once attached, a document can not be removed from a request.)
4. ADDITIONAL COMMENTS: Enter any additional information pertaining to the
attachment. This will appear in the note section of the request.
5. SEND AN E-MAIL TO: Select from the drop down menu, any employees to be
notified of this attachment.
(Note: This is only for employees not already listed on the request. All employees
listed on the request will be notified of all notes and attachments added.)
6. UPLOAD FILE(S): Select this button to complete the attachment process.
7. YOUR FILES HAVE BEEN UPLOADED TO THE WEB SERVER: This
symbol and note will appear if the document was successfully uploaded.
(Note: A known problem exists with the ‘Uploading Files’ feature. Occasionally,
when uploading a file, an error message appears advising of a server error. This is
a glitch within the system. Please verify whether the document was successfully
attached before attempting to re-attach. This will avoid duplicate attachments.)
Figure 1.4
ADDING ATTACHMENTS
To add an attachment to a request, select the
button from the tool bar. The form in
figure 1.4 will appear. Complete the form meeting the required criteria. The field descriptions are
listed below.
3
To ‘Sign Off’ on a request:
Figure 1.6
(Note: Adding a note in this section does not automatically sign off a request. After
adding a note to the request, the ‘Sign Off’ button must be selected to ‘Sign Off’ on the request.)
Figure 1.7
4
1. Select ‘Sign Off’ from the drop down on a selected request, shown in figure 1.5. Select
the ‘GO’ button. After selecting ‘GO’ the screen shown in figure 1.6 will appear. Select
one of the following options:
a. VIEW COMPLETE REQUEST: Select this button to ‘View Complete Request’
before signing off.
b. SIGN OFF: Select this button to ‘Sign Off’ on a completed request.
c. ADD TO REQUEST: Select this button to add a note to the request. The screen in
figure 1.7 will appear. The following options will appear in the drop down menu:
‘Closed by Unauthorized Person’, ‘Closed in Error’, ‘Program Error’,
‘Request Revision’
SIGNING OFF
Figure 1.5
The first option, is to select the button from the tool bar. The second option, is to
select the ‘Create New’ button in the Search Agents box on the left side of the Home screen. The
form shown in figure 1.8 will appear in either scenario. Complete the form, filling in the fields
necessary to search for a particular request. The field descriptions are listed below. Any individual
or combination of fields can be used. 1.
KEYWORD: This field allows the search to be limited to one or more keywords. This field is case sensitive.
1.a. USE COMPARISON: This drop down menu is associated with the ‘Keyword’ field. It allows for the
‘Keyword’ search to be filtered by the following options: And and Or.
2.
SORT BY DATE: These fields allow the search criteria to be limited to specific date ranges.
2.a. REQUEST DATE(S): This field allows the search to be limited to a ‘Request Date(s)’ range.
2.b. COMPLETED DATE(S): This field allows the search to be limited to a ‘Completed Date(s)’ range.
3.
REQUEST ID(S): This field allows the search to be limited to a ‘Request Id(s)’ range. The drop down menu filters the ‘Request Id(s)’ with the following options: =, <>, >, >=, <, or <=.
4.
VENDOR NUMBER(S): This field allows the search to be limited to a ‘Vendor Number’ or ‘Ticket Number’. The drop down menu allows the ‘Vendor Number’ search to be filtered by the following: Equals, Starts With, Ends With, Contains, or Does Not Contain.
5.
REQUEST TYPE(S): This field allows the search to be limited to the ‘Request Type’.
6.
SYSTEMS: This field allows the search to be limited to any ‘System’.
7.
TASK: This field allows the search to be limited to a ‘Task’ type. The ‘Task’, also called a ‘Menu Task Code’,
indicates which business process the request pertains to.
8.
ERROR: This field allows the search to be limited to the ‘Error Code’ in which the request pertains to.
9.
DEPARTMENTS: This field allows the search to be limited to the ‘Department’ the request pertains to.
10. REQUESTED BY: This field allows the search to be limited to who the request was ‘Requested By’. The
drop down menu allows the ‘Requested By’ search to be filtered by the following options: And, Or.
11. APPROVED BY: This field allows the search to be limited to who the request was ‘Approved By’. The
drop down menu allows the ‘Approved By’ search to be filtered by the following options: And, Or.
12. SUPERVISOR: This field allows the search to be limited to the ‘Supervisor’ of the user who initiated the
request. The drop down menu allows the ‘Supervisor’ search to be filtered by the following options: And, Or.
(Note: Not all users in the system have been assigned a supervisor due to notification purposes.)
13. ASSIGNED TO: This field allows the search to be limited to who the request was ‘Assigned To’. The
drop down menu allows the ‘Assigned To’ search to be filtered by the following options: And, Or.
(Note: Requests can and usually do have multiple ‘Assignments’ assigned to multiple ‘Developers’.)
14. STATUS: This field allows the search to be limited to the current ‘Status’ of a request. For a list and
definitions of the status types, see the ‘Request Overview’ section.
14.a. Additional options are given to include or exclude from the search. The options are as follows: ‘Include Pending Sign Off?’, ‘Hide Completed Assignments?’.
15. SORT BY: This field allows the search to be sorted by one of the options from the drop down menu. The drop down menu filters by any of the fields listed on the form.
16. SAVE AS SEARCH AGENT: This field allows the search criteria selected to be saved for future use. Enter
a descriptive title in this field. This will be saved under the ‘Search Agents’ field on the left side of the
individual user’s Home page.
Figure 1.8
Select the ‘Search’ button to complete the process.
(Note: If there are too many errors to be revised, the ‘Reset Form’ button can be used to clear the form.)
5
SEARCH REQUESTS/SEARCH AGENTS
There are two options for searching requests within the Product Support System.
There are two options for creating reports within the Product Support System.
The first option, is to select the button from the tool bar. The second way is to select the
‘Create New’ button in the Report Agents box on the left side of the Home screen. The form shown
in figure 1.9 will appear in either scenario. Fill out the form, filling in the fields necessary to search
for a particular request. The field descriptions are listed below. Any individual or combination of
Figure 1.9
Select the ‘Build Report’ button to complete the process.
(Note: If there are too many errors to be revised, the ‘Reset Form’ button
can be used to clear the form.)
6
REQUEST DATE(S): This field allows the report to be limited to a ‘Request Date(s)’ range.
2. REQUEST TYPE(S): This field allows the report to be limited to the ‘Request Type(s)’.
3. SYSTEMS: This field allows the report to be limited to the ‘System’.
4. DEPARTMENTS: This field allows the report to be limited to the ‘Department’ in which the request pertains to.
5. REQUESTED BY: This field allows the report to be limited to who the request was
‘Requested By’. The drop down menu allows the ‘Requested By’ report to be filtered by the following options: And, Or.
6. ASSIGNED TO: This field allow the report to be limited to who the request was
‘Assigned To’. The drop down menu allow the ‘Assigned To’ report to be filtered by the following options: And, Or.
7. STATUS: This field allows the report to be limited to the current ‘Status’ of the request. For a list and definitions of the status types, see the ‘Request Overview’ section.
8. Additional options are given to include or exclude from the report. The options are as
follows:
‘Include Pending Sign Off?’, ‘Hide Completed Assignments?’, ‘Display Vendor
Number?’, ‘Print Only w/Vendor Number?’
9. SORT BY: This field allows the report to be sorted by one of the options from the drop down menu. The drop down menu filters by any of the fields listed on the form.
10. VIEW AS: This field offers two options for export of the report. The first option, is to view the report as a ‘Web Page’. The second option, is to view the report as ‘Microsoft Excel’. This will allow the report to be view in a ‘Microsoft Excel’ format. This field defaults to the ‘Web Page’ format.
11. SAVE AS REPORT AGENT: This field allows the report criteria selected to be saved for future use. Enter a descriptive title in this field. This will be saved under the ‘Report Agents’ field on the left side of the Home page.
1.
REPORT WIZARD/REPORT AGENTS
fields can be used.
To View or Create a Mail Group for request notification purposes, select the button from the tool bar. A variation of the list shown if figure 2.0 will appear. The column/button
descriptions are listed below.
1. LIST NAME: This column lists the names of e-mail groups available.
2. STATUS: This column shows the groups available to each user. If the group is marked ‘Private’, only the creator has the ability to use, edit, or delete. To use ‘Public Mail groups, select the required group from the drop down when creating a request. This is the only location to view ‘Public’ mail groups. If the group is marked ‘Public’, it is available to all users.
Figure 2.0
3. EDIT: Select the
icon to ‘Edit’ the mail group.
(Note: The ‘Edit’ feature is only applicable to ‘Private’ mail groups.)
If the required ‘Mail Group’ is not on the ‘Mail Group’ list, select the ‘Add New Mail Group’ button.
The form shown if figure 2.1 will appear. Complete the form, meeting the required criteria. The field descriptions are listed below.
1. MAIL GROUP NAME: Enter a descriptive title for the ‘Mail Group’.
2. GROUP TYPE: Select the accessibility of the ‘Mail Group’. If the group is for personal use only,
select ‘Private to My Login’ from the drop down menu. If the group will benefit multiple users on the
Product Support System, select ‘Public to Everyone’ from the drop down menu.
3. AVAILABLE EMPLOYEES: Select and double-click an employee to add to the list. Once selected
the name will be removed from the ‘Available Employee’ box and placed in the ‘Members of Mail Group’ box. To remove an employee from the ‘Members of the Mail Group’ box, double-click the employee and they will be returned to the ‘Available Employees’ box.
Figure 2.1
7
Select the ‘Save Mail Group’ to complete the process.
(Note: Select ‘Clear’ to remove any employees in the ‘Members of Mail Group’ box and clear the form.)
MAIL GROUPS
4. DELETE: Select the
icon to ‘Delete’ the mail group.
(Note: The ‘Delete’ feature is only applicable to ‘Private’ mail groups.)
5. NEXT: Select the ‘Next’ button to navigate through the pages.
6. ADD NEW MAIL GROUP: If the required mail group is not on the list, please verify that it is not a
Public Mail Group, in which case it can be found on the drop down menu when creating a ‘New Request’.
If the required mail group is not available, select the ‘Add New Mail Group’ button.
1. PASSWORD: This field is used to reset/change the log in password. Enter the ‘Current
Password’, the ‘New Password’, and confirm the ‘New Password’.
2. DEFAULT SYSTEM: This field is used to specify which system the ‘New Request’ form
defaults to, in the ‘New Request’ process.
3. DEFAULT REQUEST TYPE: This field is used to specify which ‘Request Type’ the
‘New Request’ form defaults to, in the ‘New Request’ process. See the ‘New Request’
section for definitions of each type.
4. UPON LOG IN GO TO: This field is used to specify the screen to populate upon logging
in to the system. The following options are available: ‘View Requests Page’ or
‘New Requests Page’.
5. BY DEFAULT SHOW: This field is used to specify the default requests to be shown on the individual user’s Home page. The following options are available: ‘All Requests’, ‘All My Requests’, ‘My Open Requests’, and ‘My Incomplete Requests’.
6. SHOW __ RECORDS PER PAGE: This field is used to specify the number of records to
be shown per page, on the Home page.
7. SYSTEMS: This field is used to specify the systems the user has access to. (Note: If the required system is not selected, contact the Product Support System owner.)
8. OFFICE LOCATIONS: This field is used to specify the office locations the user has access
to.
(Note: If the required office location is not selected, contact the Product Support System owner.)
Select the ‘Save/Update’ button to complete the process.
(Note: If there are too many errors to be revised, the ‘Reset’ button
can be used to clear the form.)
8
Figure 2.2
USER SETTINGS
To view or change individual restrictions and permissions, select the
button from the
tool bar. The list shown if figure 2.2 will appear. The field descriptions are listed below.
To open a request enter the request id number in the ‘Quick Find’ field shown in figure 2.3. This search feature can be found on the upper left side of the Home page.
1. Select the ‘PDR #’ radio button to search the request by PDR/TSR/Request ID number.
2. Select the ‘Vendor #’ radio button to search the request by Vendor/Ticket number. If the request is being worked on by internal Developers, a Vendor number is not applicable.
3. Select the ‘GO’ radio button to complete the search.
4. The screen in figure 2.4 will appear showing an overview of the request.
Figure 2.3
For a more detailed view of the request, select the PDR/‘Request Id’ number, or select ‘View Request from the
drop down menu and select ‘GO’. The request in document form is shown in figure 2.5. The field descriptions are
listed below.
REQUEST OVERVIEW
Figure 2.4
Figure 2.5
a. REQUEST TITLE: Describes the problem/change at a glance.
b. REQUEST TYPE: Describes the type of request. See the ‘New Request’ section for the definitions of each type of request.
c. SYSTEM: Identifies the system in which the problem or change occurs in. d. MENU TASK CODE: Identifies which business process the request pertains to.
e. ERROR CODE: Identifies the type of error the request relates to. This is assigned once the request is approved.
f. REQUEST STATUS: Identifies the current status of the request. The status can also be found in the ‘Status’ column as seen in figure 2.2. The status descriptions are as follows:
1. ‘Assigned’ - The request is ‘Assigned’ to a ‘Developer’ to troubleshoot the problem and/or to complete the change.
2. ‘Completed’ - The request is ‘Completed’ indicating that the requestor has ‘Signed Off’ on the request.
3. ‘Declined’ - The request is ‘Declined’ by the system owner. For an explanation as to why the request was declined see the Note section (field y).
4. ‘Deleted’ - The request is ‘Deleted’ from the system.
5. ‘New Request’ - The request is not yet ‘Assigned’ to a ‘Developer’.
6. ‘Re-Opened’ - The request was previously ‘Completed’, ‘Declined’, or ‘Rescinded’ and is now ‘Re-Opened’.
7. ‘Rescinded’ - The request is cancelled or ‘Rescinded’ by the requestor.
8. ‘Suspended’ - The request is on hold or in a ‘Suspended’ status.
g. PRIORITY: Identifies the request ‘Priority’ ranging from low to immediate.
h. RE-OPENED: Reflects the number of times the request has been ‘Re-Opened’.
i. REQUESTED DUE DATE: Reflects the ‘Requested Due Date’ or deadline entered by the requestor.
j. REQUEST ID: Identifies the request by a number assigned to the request after it is submitted. Note this number for tracking/search purposes.
k. DATE SUBMITTED: Reflects the date in which the requestor submitted the request.
l. SUPERVISOR: Identifies the supervisor of the requestor.
(Note: If the field shows ‘None Required’, a supervisor has not been chosen for this user for notification purposes.)
m. VENDOR #: Reflects the number assigned to the request by external ‘Developers’. If this field is blank, the request is being handled by internal ‘Developers’, therefore it is not applicable.
n. REQUESTED BY: Identifies the user that submitted the request.
o. DATE APPROVED: Reflects the date in which the system owner ‘Approved’ the request for ‘Developer’ assignment purposes.
p. APPROVED BY: Identifies the user who approved the request. Most likely this will be the system owner of the system referenced in field c.
q. EST. COMP. DATE: (Estimated Completion Date) Reflects the date in which the request is estimated to be completed.
r. ASSIGNED TO: Identifies the ‘Developers’ the request has been ‘Assigned’ to.
s. DATE COMPLETED: Reflects the date the requestor ‘Signed Off’ on the request.
t. EST. HOURS: (Estimated Hours) Reflects the estimated number of hours the ‘Developers’ anticipate the request will take to be completed.
u. ACTUAL HOURS: Reflects the actual number number of hours the ‘Developers’ took to complete the request.
v. SIGN OFF DATE: Reflects the date in which the requestor ‘Signed Off’ on the request.
w. SIGNED OFF BY: Identifies the user that ‘Signed Off’ on the request.
x. DESCRIPTION: Describes the problem or change and the steps taken within the system to obtain the problem or the reason for the change.
y. NOTES: Reflects the notes added to the request.
z. DEVELOPERS: Identifies the ‘Developers’ assigned to the request and their individual, detailed assignments.
A. ADDITIONAL USERS: Identifies the users associated with the request for notification purposes.
9
B. MAIL GROUPS: Identifies the ‘Mail Groups’ associated with the request for notification purposes.
The screen shown in figure 2.6 is the ‘Home Screen’ of the Product Support System. The functions of each field are
explained throughout the manual. The field descriptions are listed below.
1. QUICK FIND: This field is used for searching requests by the PDR/Request ID number or Vendor number. Select the necessary radio button, enter the ‘Request Id’ number in the box and select ‘GO’. The figure described in #4 will appear with the required information.
2. SEARCH AGENTS: This field is used for searching for requests. 3. REPORT AGENTS: This field is used for creating custom reports.
4. REQUEST AT A GLANCE: This field shows the most important factors of a request. a. OPTIONS:
1. ‘ADD NOTES’ - Select this option and ‘GO’ to add notes.
2. ‘VIEW NOTES’ - Select this option and ‘GO’ to view the note section of the request.
3. ‘VIEW DEVELOPER LOG’ - Select this option and ‘GO’ to view the notes and progress of the
‘Developers’.
4. ‘VIEW REQUEST’ - Select this option and ‘GO’ to view the request in document form, as shown in the ‘Request Overview’ section.
5. ‘SIGN OFF’ - Select this option and ‘GO’ to sign off on the request.
5. SHOW/HIDE: Select this button from the tool bar to minimize the portion of the screen containing the ‘Quick Find’ feature, the ‘Search Agent’ feature, and the ‘Report Agents’ feature.
6.
7.
8.
9.
10.
11.
12.
13.
14.
15.
LOGOUT: Select this button from the tool bar to log out of the system. Be sure to select this button when
logging out rather than closing the window. This affects the tracking of logged in users.
USER MANUAL: Select this button from the tool bar to view the user manual for this system.
NEW REQUEST: Select this button from the tool bar to create a new request.
VIEW REQUESTS: Select this button from the tool bar to view the last request or list of requests viewed.
SEARCH REQUESTS: Select this button from the tool bar to search for a request or to create a
‘Search Agent’.
FILE UPLOADS: Select this button from the tool bar to attach files to a request.
REPORT WIZARD: Select this button from the tool bar to create a report.
MAIL GROUPS: Select this button from the tool bar to view/edit ‘Mail Groups’ private to a users log in.
USER SETTINGS: Select this button from the tool bar to reset the log in password or to view the users individual restrictions and permissions.
Select the arrow button to scroll through the tool bar.
HOME SCREEN OVERVIEW
Figure 2.6
10
Glossary
*Developers:
An individual responsible for programming and
enhancing any given system based on requests
within the Product Support System. Both
internal and external Developers included.
*Menu Task Code:
A code used to identify which business process
the request pertains to.
*Request Type:
The following are available options:
General Desktop Support
This request is dedicated to desktop issues and
support. Select this option for requests such as
installing a printer, resolving a scanner issue,
installing a program for specific use by a
particular employee, etc. This should not relate
to any system, or shared folders/programs.
Product Development Support
This request is dedicated to developing and
enhancing any system. Select this option for
requests such as adding forms, updating
information or enhancing processes.
Technical Service Request
This request is dedicated to any problems or
issues in any system. Select this option for
requests such as reporting incorrect information
within any system, Cold Fusion Errors, or any
other errors generated by the system.
*Request ID:
The number assigned to the request once
submitted. Note this number for tracking/
search purposes.
*System Owner:
The individual who both oversees and enhances
a particular system. The system owner is
responsible for assigning new requests to
Developers, tracking requests, and
troubleshooting/planning the correction of any
issues within the system.
*Ticket Number:
Also known as a ‘Vendor Number’, this number
is assigned to a request by external Developers. Not all requests will be worked on externally,
therefore, a ‘Ticket Number’ is not always
applicable.
*User:
An individual who uses the Product Support
System.
*Vendor Number:
Also known as a ‘Ticket Number’, this number
is assigned to a request by external Developers. Not all requests will be worked on externally,
therefore, a ‘Vendor Number’ is not always applicable.
GLOSSARY
*CFE or Cold Fusion Error:
An error message that appears when attempting
to complete a process within any given system.
Network Support Request
This request is dedicated to network issues and
support. Select this option for requests such as
installing shared programs/icons on a computer,
gaining access to a “shared folder”, server
related issues, or to reset a username or
password in any given system.
11
*Assignments or Assigned To:
An assignment is a task assigned to a Developer
in order to process the request. The ‘Assignments’ are ‘Assigned To’ Developers by the
system owner.