1
Desmond Quick Start Guide
Desmond 2.2
Quick Start Guide
Schrödinger Press
Desmond Quick Start Guide Copyright © 2009 Schrödinger, LLC. All rights
reserved.
While care has been taken in the preparation of this publication, Schrödinger
assumes no responsibility for errors or omissions, or for damages resulting from
the use of the information contained herein.
Canvas, CombiGlide, ConfGen, Epik, Glide, Impact, Jaguar, Liaison, LigPrep,
Maestro, Phase, Prime, PrimeX, QikProp, QikFit, QikSim, QSite, SiteMap, Strike, and
WaterMap are trademarks of Schrödinger, LLC. Schrödinger and MacroModel are
registered trademarks of Schrödinger, LLC. MCPRO is a trademark of William L.
Jorgensen. Desmond is a trademark of D. E. Shaw Research. Desmond is used with
the permission of D. E. Shaw Research. All rights reserved. This publication may
contain the trademarks of other companies.
Schrödinger software includes software and libraries provided by third parties. For
details of the copyrights, and terms and conditions associated with such included
third party software, see the Legal Notices for Third-Party Software in your product
installation at $SCHRODINGER/docs/html/third_party_legal.html (Linux OS) or
%SCHRODINGER%\docs\html\third_party_legal.html (Windows OS).
This publication may refer to other third party software not included in or with
Schrödinger software ("such other third party software"), and provide links to third
party Web sites ("linked sites"). References to such other third party software or
linked sites do not constitute an endorsement by Schrödinger, LLC. Use of such
other third party software and linked sites may be subject to third party license
agreements and fees. Schrödinger, LLC and its affiliates have no responsibility or
liability, directly or indirectly, for such other third party software and linked sites,
or for damage resulting from the use thereof. Any warranties that we make
regarding Schrödinger products and services do not apply to such other third party
software or linked sites, or to the interaction between, or interoperability of,
Schrödinger products and services and such other third party software.
October 2009
Contents
Document Conventions ...................................................................................................... v
Chapter 1: Introduction ....................................................................................................... 1
1.1 Tutorial Outline .......................................................................................................... 1
1.2 Creating a Working Directory .................................................................................. 2
1.3 Starting Maestro ........................................................................................................ 2
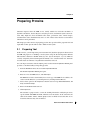
Chapter 2: Preparing Proteins ....................................................................................... 3
2.1 Preparing 1bel ............................................................................................................ 3
2.2 Preparing 2qdz ........................................................................................................... 5
Chapter 3: Building a Model System ........................................................................ 7
3.1 Building a Model System for Butane ..................................................................... 7
3.2 Building Model Systems for 1bel ........................................................................... 8
3.3 Building a Model System for 2qdz ....................................................................... 11
Chapter 4: Molecular Dynamics Simulations .................................................... 17
4.1 MD Simulations for Butane .................................................................................... 17
4.1.1 Running the Simulation..................................................................................... 17
4.1.2 Viewing the Trajectory....................................................................................... 19
4.2 MD Simulations for 1bel ......................................................................................... 21
4.2.1 Running the Simulations ................................................................................... 21
4.2.2 Setting Up the Display....................................................................................... 22
4.2.3 Viewing the Trajectory....................................................................................... 24
Getting Help ............................................................................................................................. 27
Desmond 2.2 Quick Start Guide
iii
iv
Desmond 2.2 Quick Start Guide
Document Conventions
In addition to the use of italics for names of documents, the font conventions that are used in
this document are summarized in the table below.
Font
Example
Use
Sans serif
Project Table
Names of GUI features, such as panels, menus,
menu items, buttons, and labels
Monospace
$SCHRODINGER/maestro
File names, directory names, commands, environment variables, and screen output
Italic
filename
Text that the user must replace with a value
Sans serif
uppercase
CTRL+H
Keyboard keys
Links to other locations in the current document or to other PDF documents are colored like
this: Document Conventions.
In descriptions of command syntax, the following UNIX conventions are used: braces { }
enclose a choice of required items, square brackets [ ] enclose optional items, and the bar
symbol | separates items in a list from which one item must be chosen. Lines of command
syntax that wrap should be interpreted as a single command.
File name, path, and environment variable syntax is generally given with the UNIX conventions. To obtain the Windows conventions, replace the forward slash / with the backslash \ in
path or directory names, and replace the $ at the beginning of an environment variable with a
% at each end. For example, $SCHRODINGER/maestro becomes %SCHRODINGER%\maestro.
In this document, to type text means to type the required text in the specified location, and to
enter text means to type the required text, then press the ENTER key.
References to literature sources are given in square brackets, like this: [10].
Desmond 2.2 Quick Start Guide
v
vi
Desmond 2.2 Quick Start Guide
Desmond Quick Start Guide
Chapter 1
Chapter 1:
Introduction
Desmond is an advanced application developed by D. E. Shaw Research that allows you to
conduct molecular dynamics (MD) simulations on proteins and other complex molecular
systems. Using Desmond, you can perform simulations of small molecules, proteins, nucleic
acids, and membrane systems, and visualize the trajectories in Maestro. You can also simulate
the interactions of proteins with other proteins and ligand molecules.
This tutorial provides exercises in the basic tasks of setting up a Desmond MD simulation in
Maestro and analyzing the results. Because MD simulations are very CPU intensive, the simulation exercises are on simple systems that give results in a reasonable time; the time taken is
still around 24 hours of CPU time. It is therefore advisable to run the simulations on a multiprocessor host if you can.
A basic knowledge of molecular mechanics and molecular dynamics is assumed. It is also
assumed that you have a basic familiarity with Maestro. If you are new to Maestro, try working
through the Maestro Tutorial before starting the exercises in this manual.
It is assumed that you have access to an installation of Desmond 2.2, Maestro 9.0, and Prime
2.5. If you need to install these products, see the Installation Guide for instructions.
1.1
Tutorial Outline
Chapter 2 deals with protein preparation. In this chapter you will prepare two proteins for later
use, 1bel and 2qdz.
Chapter 3 contains exercises on building a model system. The exercises cover building a
system for a small molecule (butane), for a protein without a membrane (1bel), and for a
protein with a membrane (2qdz).
The exercises in Chapter 4 demonstrate basic MD simulations. The first is for butane, which
will be minimized first, and the second is for 1bel, which will be relaxed as part of the simulation.
Desmond 2.2 Quick Start Guide
1
Chapter 1: Introduction
1.2
Creating a Working Directory
The first task to be done in preparation for the tutorial is to create a working directory to keep
all your input and output files.
1. Change to a directory in which you have write permission.
cd mydir
2. Create a directory by entering the command:
mkdir directory-name
1.3
Starting Maestro
Once you have created the working directory you can start Maestro.
1. Set the SCHRODINGER environment variable to the installation directory:
csh/tcsh:
setenv SCHRODINGER installation_path
bash/ksh:
export SCHRODINGER=installation_path
This environment variable is also required to run Jaguar jobs.
2. Change to the desired working directory.
cd directory-name
3. Enter the command:
$SCHRODINGER/maestro &
The Maestro main window is displayed, and the working directory is Maestro’s current
working directory.
2
Desmond 2.2 Quick Start Guide
Desmond Quick Start Guide
Chapter 2
Chapter 2:
Preparing Proteins
Structures imported from the PDB are not usually suitable for molecular mechanics or
dynamics calculations, because they have no hydrogen atoms, and include crystal water molecules. They might also have ill-defined bond orders, protonation states, formal charges,
tautomerization states, disulfide bonds, and so on. All of these issues must be resolved before
simulations can be performed.
This chapter provides exercises in preparing proteins. Two proteins will be prepared: 1bel and
2qdz. Both of these proteins will be used to build a model system.
2.1
Preparing 1bel
In this exercise, you will import the protein structure 1bel (hydrolase phosphoric diester) from
the PDB and prepare it for building a model system, using the Protein Preparation Wizard.
This structure contains two disulfide bonds (Cys 26 – Cys 84 and Cys 65 – Cys 72), which are
correctly assigned by the Protein Preparation Wizard; it also contains sulfate ions and methanol. The latter are remnants of crystallization and will be removed.
You can import structures with the Import panel, but the Protein Preparation Wizard panel
provides a convenient facility for importing proteins.
1. From the Workflows menu, choose Protein Preparation Wizard.
The Protein Preparation Wizard panel opens.
2. Enter 1bel into the PDB text box, and click Import.
The PDB file for 1bel is downloaded (from a local copy of the PDB if it is available, otherwise from the Web) into your working directory and imported into Maestro.
3. Select all the options in the Preprocess structure section except Selenomethionines, Fill
loops, and Find overlaps.
4. Enter 0 in the Delete waters text box.
5. Click Preprocess.
The structure is preprocessed to correct the bonding information, add hydrogen atoms,
cap the termini with NME and ACE, and delete water molecules. At the same time, the
tables in the Chains, waters, and het groups section are filled in. Note that there are no
waters listed because they were all deleted.
Desmond 2.2 Quick Start Guide
3
Chapter 2: Preparing Proteins
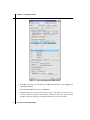
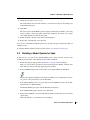
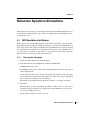
Figure 2.1. The Protein Preparation Wizard panel.
6. In the Het group table, select all sulfate ions (SO4) and methanol molecules (MOH), and
click Delete selected.
7. In the H-bond assignment section, click Optimize.
The Start dialog box opens, because this step is run as a job, which you can run on your
local host. This task optimizes the hydrogen bonding network in the protein, which
includes orientation of hydroxyl and terminal amide groups in various residues.
4
Desmond 2.2 Quick Start Guide
Chapter 2: Preparing Proteins
8. Click Start in the Start dialog box.
The dialog box closes, the job starts, and the Monitor panel opens. The job should only
take a minute or so. When the job finishes, a message is displayed at the foot of the Protein Preparation Wizard panel. The optimized structure is imported as a new entry into the
Project Table and displayed in the Workspace. It is labeled with the results of the optimization operation: Flip or No flip for hydroxyl and amide orientations, and the residue name
for histidines, whose charge state and protonation location may have been changed. Normally, you would check the labeled residues to ensure that they have been assigned
correctly, by clicking Interactive Optimizer and using the panel that opens.
9. From the Delete button menu on the toolbar, choose Labels.
The labels are deleted.
10. Close or minimize the Monitor panel.
If you do not want to proceed to the next exercise at this time, close the Protein Preparation
Wizard panel. If you want to continue with the preparation of a model system for this protein,
go to Section 3.2 on page 8.
2.2
Preparing 2qdz
In this exercise, you will import the protein structure 2qdz (FHAC: a member of the OMP85/
TPSB transporter family) from the PDB and prepare it for building a model system, using the
Protein Preparation Wizard. This structure contains two fairly large gaps, which you will cap
with NMA and ACE. If these gaps are critical to the simulation you want to perform, you could
run a Prime loop prediction. There are no waters in this structure, and no disulfide bonds.
1. If the Protein Preparation Wizard panel is open, click Reset. If it is not open, then from
the Workflows menu, choose Protein Preparation Wizard.
2. Enter 2qdz into the PDB text box, and click Import.
The PDB file for 2qdz is downloaded (from a local copy of the PDB if it is available, otherwise from the Web) into your working directory and imported into Maestro.
3. In the Preprocess structure section, select Cap termini and deselect Delete waters.
The options in the first row should all be selected by default.
Desmond 2.2 Quick Start Guide
5
Chapter 2: Preparing Proteins
4. Click Preprocess.
The structure is preprocessed to correct the bonding information, add hydrogen atoms,
and cap the termini with NME and ACE. At the same time, the tables in the Chains,
waters, and het groups section are filled in. In this case, there is only one chain, chain A,
and no waters or het groups.
5. In the H-bond assignment section, click Optimize.
The Start dialog box opens, because this step is run as a job, which you can run on your
local host. This task optimizes the hydrogen bonding network in the protein, which
includes orientation of hydroxyl and terminal amide groups in various residues.
6. Click Start in the Start dialog box.
The dialog box closes, the job starts, and the Monitor panel opens. The job should only
take a minute or so. When the job finishes, a message is displayed at the foot of the Protein Preparation Wizard panel. The optimized structure is imported as a new entry into the
Project Table and displayed in the Workspace, labeled with the results of the optimization
operation.
7. From the Delete button menu on the toolbar, choose Labels.
The labels are deleted.
8. Close the Monitor panel and the Protein Preparation Wizard panel.
If you want to continue with the preparation of a model system for this protein, go to
Section 3.3 on page 11.
6
Desmond 2.2 Quick Start Guide
Desmond Quick Start Guide
Chapter 3
Chapter 3:
Building a Model System
This chapter contains exercises for three model systems. The first two will be used in the next
chapter to perform MD simulations. The third is an exercise in preparing a model system for a
membrane protein. Simulations for this system would take much longer than the others, so it is
not included as a simulation exercise.
The System Builder generates a solvated system that includes the solute (protein, protein
complex, protein-ligand complex, protein system immersed in a membrane, etc.) and the
solvent water molecules with counter ions to neutralize the system and a salt to set the ionic
strength, if requested.
3.1
Building a Model System for Butane
In this exercise, you will build the butane molecule in the Workspace, and then use it to prepare
a model system for simulation.
1. If the Build toolbar is not displayed at the top of the Workspace, click the Show/Hide the
build toolbar button.
2. If the Workspace is not empty, click the Clear Workspace toolbar button.
3. Click the Methyl fragment on the Build toolbar, then click in the Workspace.
4. A methane molecule is placed in the Workspace.
5. Click on one of the hydrogen atoms in the methane molecule.
A methyl fragment is added to the methane molecule, to form ethane.
6. Click on the terminal hydrogen of the fragment that was just added.
Another methyl fragment is added, to form propane.
Desmond 2.2 Quick Start Guide
7
Chapter 3: Building a Model System
7. Click on the terminal hydrogen of the fragment that was just added.
Another methyl fragment is added, to form butane. If you rotate the structure, you will
see that the trans form of butane has been built.
8. Choose Applications > Desmond > System Builder in the main window.
The System Builder panel opens with the Solvation tab displayed. For this molecule, we
do not need to change any of the defaults. However, if you have used this panel previously, click Reset.
9. Click Minimize Volume, and click OK in the dialog box that is posted.
This option reorients the solute relative to the coordinate axes so that the box volume is
minimized.
10. Click Start.
The Start dialog box opens.
11. Change the job name to butane_setup.
12. Click Start.
The job is started, and the Monitor panel is displayed. When the job finishes, a new entry
group is added to the Project Table, labeled butane_setup-out1. It contains only a single
entry, which includes the entire model system. The model system consists of a cubic box
containing the butane molecule and enough water to fill the box, which has sides that are
10 Å from the butane molecule.
You can close or minimize the Monitor panel if you want.
To continue with the simulation exercise for this system, go to Section 4.1 on page 17.
3.2
Building Model Systems for 1bel
In this exercise, you will use the System Builder panel to build a model system for the protein
1bel in a 0.15 M NaCl solution, which was prepared in Section 2.1 on page 3. If you have not
completed the exercise in that section, you should do so now. You will prepare two model
systems, one for the protein before optimizing the H-bond network, and one for the protein
after the optimization.
1. If the System Builder panel is not open, then from the Applications menu, choose Desmond, then choose System Builder.
The System Builder panel opens with the Solvation tab displayed.
If the System Builder panel is already open, click Reset.
8
Desmond 2.2 Quick Start Guide
Chapter 3: Building a Model System
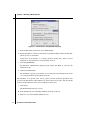
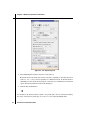
Figure 3.1. The Solvation tab of the System Builder panel.
2. Include the second of the three 1bel entries in the Workspace.
This is the structure before H-bond optimization. The first is the raw protein structure; the
third is the optimized structure.
3. Ensure that Predefined is selected under Solvent model, and that SPC is chosen in the
option menu.
This is the default, so you should not need to change it.
4. From the Box shape option menu, choose Orthorhombic.
This is the shape that best fits the 1bel protein structure.
5. Ensure that Buffer is selected for the Box size calculation method, and that all three Distances text boxes contain 10.0.
Again, these are the defaults, so no change should be needed.
Desmond 2.2 Quick Start Guide
9
Chapter 3: Building a Model System
Figure 3.2. The Ions tab of the System Builder panel.
6. Click Minimize Volume, and click OK in the dialog box that is posted.
The dialog box warns about the time taken; in fact the time taken is small. The protein is
reoriented to minimize the volume of the box.
7. In the Ions tab, ensure that Neutralize is selected.
The prepared structure is charged, so it needs to be neutralized with counter ions.
8. Select Add salt.
9. In the Salt concentration text box, enter 0.15.
Ions will be added to the simulation box that represent background salt at physiological
conditions. By default, sodium chloride is added, but you can choose a variety of positive
and negative ions for the salt.
10. Click Start.
The Start dialog box is displayed.
10
Desmond 2.2 Quick Start Guide
Chapter 3: Building a Model System
11. Change the job name to 1bel_setup.
The job should not take more than a minute, so it can be run locally. No other changes are
needed in this dialog box.
12. Click Start.
The job is started, and the Monitor panel is displayed. When the job finishes, a new entry
group is added to the Project Table, labeled 1bel_setup-out1. It contains only a single
entry, which includes the entire model system.
13. Include the third of the three 1bel entries in the Workspace.
14. Repeat Step 3 through Step 12 for this entry.
You can close or minimize the Monitor panel if you want. It will open automatically when you
submit jobs later.
To continue with the simulation exercise for this system, go to Section 4.2 on page 21.
3.3
Building a Model System for 2qdz
In this exercise, you will use the System Builder panel to build a model system for the
membrane protein 2qdz in a 0.15 M NaCl solution with a membrane.
1. Include the prepared 2qdz protein from Section 2.2 on page 5 in the Workspace.
There are several entries generated by the Protein Preparation Wizard, with the same
name. The last of these is the fully prepared protein structure.
2. From the Ribbons button menu on the toolbar, choose Show ribbons for all residues.
The protein is displayed in ribbon representation, making it easy to identify the “beta barrel” portion of the protein that goes in the membrane.
3. If the System Builder panel is not open, then from the Applications menu, choose Desmond, then choose System Builder.
The System Builder panel opens with the Solvation tab displayed.
If the System Builder panel is already open, click Reset.
4. Ensure that Predefined is selected under Solvent model, and that SPC is chosen in the
option menu.
This is the default, so you should not need to change it.
Desmond 2.2 Quick Start Guide
11
Chapter 3: Building a Model System
Figure 3.3. The Desmond - Set Up Membrane panel.
5. From the Box shape option menu, choose Orthorhombic.
6. Ensure that Buffer is selected for the Box size calculation method, and that all three Distances text boxes contain 10.0.
Again, these are the defaults, so no change should be needed. Also, when you add a
membrane, an orthorhombic box is automatically selected.
7. Click Set Up Membrane.
The Desmond - Membrane Set Up panel opens. Ensure that DPPC is selected as the
membrane model.
8. Click Place Automatically.
The membrane is placed, represented by two red slabs. The actual membrane molecules
are not inserted until the system builder job is run.
The membrane is not placed in the correct position, because the default placement takes
account of the alpha helices rather than the beta “barrel”. However, the parts of the protein that
should be in the membrane can be selected, which you will do next.
9. Click Select.
The Atom Selection dialog box opens.
10. In the Residue tab, choose Residue number from the list on the left.
11. Enter 209-554 in the Residue number text area.
12
Desmond 2.2 Quick Start Guide
Chapter 3: Building a Model System
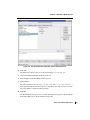
Figure 3.4. The Atom Selection dialog box, before clicking Intersect.
12. Click Add.
The ASL text box in the lower part of the panel displays res.num 209-554.
13. Choose Secondary structure from the list on the left.
14. Select Strand from the Secondary structure options.
15. Click Intersect.
The ASL expression now reads (res.num 209-554) AND (( res.sec strand ) )
This expression indicates that the atoms to be selected are those that are in the given residue range and have a strand secondary structure.
16. Click OK.
The Atom Selection dialog box closes, and the ASL expression appears in the Transmembrane atoms ASL text box in the membrane setup panel.
Desmond 2.2 Quick Start Guide
13
Chapter 3: Building a Model System
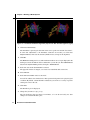
Figure 3.5. The default membrane alignment (left) and the ASL-directed alignment (right)
17. Click Place Automatically.
The membrane is placed again, this time in the correct position around the “beta barrel”.
If some finer adjustments to the membrane orientation are needed, you could select
Adjust membrane, and rotate the structure (middle mouse) to improve the alignment.
18. Click OK.
The Membrane Setup panel closes. The membrane markers are no longer displayed in the
Workspace, but the membrane will be added when you run the job. The Add Membrane
button in the System Builder panel has changed to Edit Membrane.
19. In the Ions tab, ensure that Neutralize is selected.
The prepared structure is charged, so it needs to be neutralized with counter ions.
20. Select Add salt.
21. In the Salt concentration text box, enter 0.15.
Ions will be added to the simulation box that represent background salt at physiological
conditions. By default, sodium chloride is added, but you can choose a variety of positive
and negative ions for the salt.
22. Click Start.
The Start dialog box is displayed.
23. Change the job name to 2qdz_setup.
The job should not take more than a few minutes, so it can be run locally. No other
changes are needed in this dialog box.
14
Desmond 2.2 Quick Start Guide
Chapter 3: Building a Model System
Figure 3.6. The 2qdz model system with waters undisplayed.
24. Click Start.
The job is started, and the Monitor panel is displayed. When the job finishes, a new entry
group is added to the Project Table, labeled 2qdz_setup-out1. It contains only a single
entry, which includes the entire model system.
25. Close the System Builder panel and the Monitor panel.
Desmond 2.2 Quick Start Guide
15
16
Desmond 2.2 Quick Start Guide
Desmond Quick Start Guide
Chapter 4
Chapter 4:
Molecular Dynamics Simulations
This chapter provides exercises on performing molecular dynamics (MD) simulations for two
systems that were built in Chapter 3. If you have not completed the system building exercises,
you should do so now.
4.1
MD Simulations for Butane
In this exercise, you will run a MD simulation on the butane system that you prepared earlier,
and examine the trajectory. Before running the simulation, you will perform a minimization of
the system to relax it. The model systems built by the System Builder are not optimal, and need
to be relaxed before the simulation. You can perform the relaxation as part of the MD task, or
you can perform it separately. In this exercise, you will perform the relaxation separately.
When the results are returned, you will view the trajectory.
4.1.1
Running the Simulation
1. Include the butane model system in the Workspace.
2. In the main window choose Applications > Desmond > Minimization.
The Minimization panel opens.
3. In the Model system section, ensure that Load from Workspace is chosen in the option
menu, and click Load.
A new temporary entry group is created in the Project table, with the model system split
into its components: the butane molecule and the waters. This entry group is only deleted
when you load a new model system or click Reset.
The defaults for the minimization parameters are adequate, so no changes are needed.
4. Click Start.
The Start dialog box opens. By default, the number of CPUs is set to 8, and a host is
selected that supports multiprocessor applications. For this minimization, it is not necessary to run on multiple processors.
5. Set the number of CPUs to 1 and choose a host.
Desmond 2.2 Quick Start Guide
17
Chapter 4: Molecular Dynamics Simulations
Figure 4.1. The Molecular Dynamics panel.
6. Change the job name to butane_min.
7. Click Start.
The job starts and the Monitor panel opens.
The job finishes in about a minute, and the output from the minimization is included in the
Workspace. You can close or minimize the Monitor panel.
8. Close the Minimization panel.
9. In the main window choose Applications > Desmond > Molecular Dynamics.
The Molecular Dynamics panel opens.
10. In the Model system section of the Molecular Dynamics panel, ensure that Load from
Workspace is chosen in the option menu, and click Load.
11. Deselect Relax model system before simulation.
The system has already been relaxed in the minimization calculation.
12. Click Start.
The Start dialog box opens.
13. Change the job name to butane_md.
18
Desmond 2.2 Quick Start Guide
Chapter 4: Molecular Dynamics Simulations
14. Set the number of CPUs, and choose a host.
Desmond MD simulations are CPU-intensive, and run very efficiently in parallel. This
simulation takes about 2 hours CPU time, so if you can, you should use at least 8 CPUs.
The host list is updated when you set the number of CPUs to display only the hosts that
have that many CPUs. Due to the way the algorithms are implemented, the number of
CPUs must be a power of 2.
15. Click Start.
The job starts and the Monitor panel opens.
When the job finishes, the results are imported into the Project Table and the last structure in
the simulation is displayed in the Workspace.
16. Close the Molecular Dynamics panel.
4.1.2
Viewing the Trajectory
The next part of this exercise is to view the trajectory for just the butane molecule. The display
is set up first, then the trajectory viewer is opened from the Project Table panel.
1. From the Undisplay toolbar button menu, choose Waters.
2. From the Draw atoms in Ball & Stick toolbar button menu, choose Molecule, and pick an
atom in the butane molecule in the Workspace.
3. If the Project Table panel is not open, click the Open/Close project table toolbar button.
4. Click the T button in the Aux column for the butane simulation output entry.
There should be only one such button. The Trajectory panel opens.
5. In the Frame control section, enter 1 in the Step text box.
6. Adjust the Speed slider to about the middle.
7. In the Display section, deselect Show simulation box and Show axes.
Desmond 2.2 Quick Start Guide
19
Chapter 4: Molecular Dynamics Simulations
Figure 4.2. The Trajectory panel.
8. Select Superimpose on frame, and enter 1 in the text box.
By default, the first molecule (the solute) is selected to superimpose: the ASL expression
reads mol.num 1. If you want to superimpose a different molecule, in the Pick atoms to
superimpose section, click the Clear button, select Pick, choose Molecules from the Pick
option menu, then pick the molecule in the Workspace.
9. Click the Play forward button.
You should see the butane molecule switch to the gauche and to the cis conformation during
the course of the trajectory. If the play is too fast or too slow, adjust the Speed slider.
20
Desmond 2.2 Quick Start Guide
Chapter 4: Molecular Dynamics Simulations
4.2
MD Simulations for 1bel
In this exercise, you will run MD simulations on the 1bel systems that you prepared earlier,
and examine the trajectories. The trajectories for these two model systems demonstrate the
effect of optimizing the H-bond network in the protein. In the unoptimized case, the ring in Tyr
115 flips to a new orientation. In the optimized case, this does not happen.
4.2.1
Running the Simulations
1. Include the first 1bel system built in Section 3.2 on page 8 in the Workspace
The entry group for this system is 1bel-setup-out1.
2. In the main window choose Applications > Desmond > Molecular Dynamics.
The Molecular Dynamics panel opens.
3. In the Model system section of the Molecular Dynamics panel, ensure that Load from
Workspace is chosen in the option menu, and click Load.
A new entry group is created in the Project table, with the model system split into its
components: the protein, the membrane, the waters, the various groups of ions.
4. Select Relax model system before simulation.
The model systems built by the System Builder are not optimal, and need to be relaxed
before the simulation.
Figure 4.3. The Output tab of the Advanced Options dialog box.
Desmond 2.2 Quick Start Guide
21
Chapter 4: Molecular Dynamics Simulations
5. Click Advanced Options.
The Advanced Options dialog box opens.
6. In the Output tab, deselect Monitor structural change in simulation.
This option copies the structure back to the working directory periodically and displays it
in the Workspace. It can increase the elapsed time for the simulation, so we will turn it
off.
7. Change the interval for the checkpoint file to 1200 ps.
This choice also improves the turnaround time for the simulation.
8. Click OK.
The Advanced Options dialog box closes.
9. Click Start.
The Start dialog box opens. This simulation takes about 48 hours CPU time, so if you
can, you should use at least 8 CPUs. The host list is updated when you set the number of
CPUs to display only the hosts that have that many CPUs.
10. Change the job name to 1bel_md1.
11. Set the number of CPUs and choose a host for the Master job and the Subjobs.
12. Click Start.
The job starts and the Monitor panel opens. When the job finishes, the results are incorporated as a new entry in the project table, with a T button in the Aux column to indicate the
presence of a trajectory.
13. Include the second 1bel system built in Section 3.2 on page 8 in the Workspace.
The entry group for this system is 1bel-setup-out2.
14. Repeat Step 3 through Step 12 for this model system, with the job name 1bel_md2 in
Step 10.
The Molecular Dynamics panel is already open, so there is no need to repeat Step 2. Many
of the selections that you made for the first simulation are still selected, so you might only
need to check the settings.
4.2.2
Setting Up the Display
With such a large number of atoms in the Workspace, it is difficult to see specific changes. To
best view the changes in the orientation of Tyr 115, the display needs to be set up. Tyr 73 is
22
Desmond 2.2 Quick Start Guide
Chapter 4: Molecular Dynamics Simulations
close to Tyr 115, and starts with a hydrogen bond to it which is broken and briefly reformed
during the simulation.
1. If the Project Table panel is not open, click the Open/Close project table toolbar button.
2. Include the 1bel_md2-out entry.
3. From the Display only toolbar button menu, choose Select.
The Atom Selection dialog box opens.
4. In the Residues tab, choose Residue number from the list.
Tools for selecting by residue number are displayed in the center of the panel.
5. Enter 115 in the Residue number text box and click Add.
6. Choose Residue type from the list.
7. Choose TYR from the Residue type list and click Intersect, then click OK.
The Atom Selection dialog box closes, and Tyr 115 is the only residue displayed in the
Workspace.
8. From the Draw atoms in Ball & Stick toolbar button menu, choose Residue, and pick an
atom in the Tyr 115 residue in the Workspace.
Tyr 115 should now be clearly distinguished from the other residues.
9. From the Display residues within N Å of currently displayed atoms toolbar button menu,
choose Custom.
10. In the dialog box that is displayed, enter 10.0 and click OK.
Residues around Tyr 115 are displayed, including waters. The waters will be undisplayed
in the next step.
Desmond 2.2 Quick Start Guide
23
Chapter 4: Molecular Dynamics Simulations
11. From the Undisplay toolbar button menu, choose Waters.
The water molecules are undisplayed, leaving only the protein residues near Tyr 115.
12. From the Draw atoms in Ball & Stick toolbar button menu, choose Residue, and pick an
atom in the Tyr 73 residue in the Workspace.
The residue name and number are displayed in the Status bar when you pause the cursor
over an atom, so you can check that you have the correct residue before you pick.
13. From the Tools menu, choose Measurements.
14. In the H-Bonds tab, ensure that Display H-bonds is selected.
15. In the Atom set 1 section, choose Residues from the Pick menu, and pick an atom in Tyr
115.
16. In the Atom set 2 section, choose Residues from the Pick menu, and pick an atom in Tyr
73.
The hydrogen bond is displayed as a yellow dashed line.
17. Close the Measurements panel.
18. Click the Fit to screen toolbar button.
The view zooms out so that the displayed residues occupy most of the Workspace. You
might also want to rotate the structure to get a better view of Tyr 115. Note that any
changes you make to the display are applied throughout the playing of the trajectory.
19. Repeat the above instructions for the second trajectory, 1bel_md1-out.
4.2.3
Viewing the Trajectory
Now that the display is set up, you can proceed to the viewing of the trajectory.
1. Include the 1bel_md1-out entry in the Workspace and click the T button in the Aux column.
The Trajectory panel opens.
24
Desmond 2.2 Quick Start Guide
Chapter 4: Molecular Dynamics Simulations
2. In the Frame control section, enter 1 in the Step text box.
3. In the Display section, deselect Show simulation box and Show axes.
4. In the Trajectory smoothing text box, enter 5.
5. Click the Play forward button.
The trajectory shows the H-bond breaking very soon, and reforming briefly at the end of the
simulation. By rotating the structure, you can see the ring, which is close to the edge of the
protein, moving in and out of the pocket.
1. Include the 1bel_md2-out entry in the Workspace and click the T button in the Aux column.
The Trajectory panel is updated for the new entry.
2. In the Frame control section, enter 1 in the Step text box.
3. In the Display section, ensure that Show simulation box and Show axes are deselected.
4. In the Trajectory smoothing text box, enter 5.
5. Click the Play forward button.
In this case, the H-bond breaks and reforms several times, and the rings remain in the same
orientation for a long time, but eventually the Tyr 115 ring swings out into the solvent.
Figure 4.4. The first 1bel system set up for viewing the trajectory.
Desmond 2.2 Quick Start Guide
25
26
Desmond 2.2 Quick Start Guide
Desmond Quick Start Guide
Getting Help
Schrödinger software is distributed with documentation in PDF format. If the documentation is
not installed in $SCHRODINGER/docs on a computer that you have access to, you should install
it or ask your system administrator to install it.
For help installing and setting up licenses for Schrödinger software and installing documentation, see the Installation Guide. For information on running jobs, see the Job Control Guide.
Maestro has automatic, context-sensitive help (Auto-Help and Balloon Help, or tooltips), and
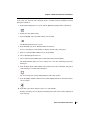
an online help system. To get help, follow the steps below.
• Check the Auto-Help text box, which is located at the foot of the main window. If help is
available for the task you are performing, it is automatically displayed there. Auto-Help
contains a single line of information. For more detailed information, use the online help.
• If you want information about a GUI element, such as a button or option, there may be
Balloon Help for the item. Pause the cursor over the element. If the Balloon Help does
not appear, check that Show Balloon Help is selected in the Maestro menu of the main
window. If there is Balloon Help for the element, it appears within a few seconds.
• For information about a panel or the tab that is displayed in a panel, click the Help button
in the panel, or press F1. The help topic is displayed in your browser.
• For other information in the online help, open the default help topic by choosing Online
Help from the Help menu on the main menu bar or by pressing CTRL+H. This topic is displayed in your browser. You can navigate to topics in the navigation bar.
The Help menu also provides access to the manuals (including a full text search), the FAQ
pages, the New Features pages, and several other topics.
If you do not find the information you need in the Maestro help system, check the following
sources:
•
•
•
•
•
•
Maestro User Manual, for detailed information on using Maestro
Maestro Command Reference Manual, for information on Maestro commands
Maestro Overview, for an overview of the main features of Maestro
Maestro Tutorial, for a tutorial introduction to basic Maestro features
Desmond User Manual, for detailed information on using Desmond
Desmond User’s Guide from D. E. Shaw Research, for details of command-line operation, file formats, and technical background.
Desmond 2.2 Quick Start Guide
27
Getting Help
• Desmond Frequently Asked Questions pages, at
https://www.schrodinger.com/Desmond_FAQ.html
• Known Issues pages, available on the Support Center.
The manuals are also available in PDF format from the Schrödinger Support Center. Local
copies of the FAQs and Known Issues pages can be viewed by opening the file
Suite_2009_Index.html, which is in the docs directory of the software installation, and
following the links to the relevant index pages.
Information on available scripts can be found on the Script Center. Information on available
software updates can be obtained by choosing Check for Updates from the Maestro menu.
If you have questions that are not answered from any of the above sources, contact Schrödinger
using the information below.
E-mail:
USPS:
Phone:
Fax:
WWW:
FTP:
[email protected]
Schrödinger, 101 SW Main Street, Suite 1300, Portland, OR 97204
(503) 299-1150
(503) 299-4532
http://www.schrodinger.com
ftp://ftp.schrodinger.com
Generally, e-mail correspondence is best because you can send machine output, if necessary.
When sending e-mail messages, please include the following information:
•
•
•
•
•
•
•
•
All relevant user input and machine output
Desmond purchaser (company, research institution, or individual)
Primary Desmond user
Computer platform type
Operating system with version number
Desmond version number
Maestro version number
mmshare version number
On UNIX you can obtain the machine and system information listed above by entering the
following command at a shell prompt:
$SCHRODINGER/utilities/postmortem
This command generates a file named username-host-schrodinger.tar.gz, which you
should send to [email protected]. If you have a job that failed, enter the following
command:
$SCHRODINGER/utilities/postmortem jobid
28
Desmond 2.2 Quick Start Guide
Getting Help
where jobid is the job ID of the failed job, which you can find in the Monitor panel. This
command archives job information as well as the machine and system information, and
includes input and output files (but not structure files). If you have sensitive data in the job
launch directory, you should move those files to another location first. The archive is named
jobid-archive.tar.gz, and should be sent to [email protected] Maestro fails, an
error report that contains the relevant information is written to the current working directory.
The report is named maestro_error.txt, and should be sent to [email protected]. A
message giving the location of this file is written to the terminal window.
More information on the postmortem command can be found in Appendix A of the Job
Control Guide.
Desmond 2.2 Quick Start Guide
29
30
Desmond 2.2 Quick Start Guide
120 West 45th Street, 17th Floor
101 SW Main Street, Suite 1300
8910 University Center Lane, Suite 270
New York, NY 10036
Portland, OR 97204
San Diego, CA 92122
Zeppelinstraße 13
Dynamostraße 13
Quatro House, Frimley Road
81669 München, Germany
68165 Mannheim, Germany
Camberley GU16 7ER, United Kingdom
SCHRÖDINGER
®