1
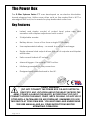
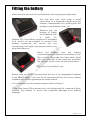
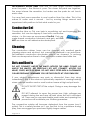
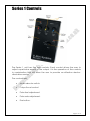
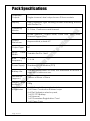
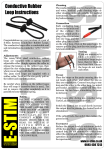
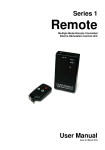
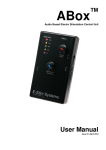
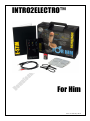
INTRO2ELECTRO™
For Him
Issue 4 January 2013
Index
INDEX
2
WELCOME
3
CONTENTS
3
WHAT IS IT?
3
THE POWER BOX
4
Key Features
4
FITTING THE BATTERY
5
TESTING IT WORKS
6
USING ELECTRODES
7
Contacts
Conductive Rubber Loops
Surface Electrodes
Connections
Positioning
Conductive Gel
Cleaning
Do’s and Don’ts
SERIES 1 CONTROLS
Output Level
Pulse Feel
Pulse Rate
Fire Button
Mode selector
7
7
7
7
7
8
8
8
9
10
10
10
10
10
OUTPUTS
11
ACCESSORIES
11
ADDITIONAL NOTES
11
Storage
Cleaning
11
11
PACK SPECIFICATIONS
12
PROBLEMS?
13
CERTIFICATE OF CONFORMITY
14
US Regulatory Wireless Notice
European Union Notice
COPYRIGHT NOTICE
Page 2 of 16
14
14
15
Welcome
Congratulations on purchasing an Intro2Electro™ Pack for Him. Given
sufficient care your pack should give you many years of erotic electrostimulated pleasure. Before starting always read these instructions and
ensure you are completely familiar with all the accessories and the safety
warnings prior to use.
Contents
The Intro2Electro™ pack is supplied inside a custom foam lined
protective case designed to help protect your valuable e-stim collection
from damage. Inside this pack you should find the following
•
•
•
•
•
•
•
An E-Stim Systems Series 1 power box.
A 2mm/TENS connection cable.
A pair of adjustable 2mm conductive rubber loops.
A set of sticky pads.
A 9v PP3 battery.
A guarantee registration card.
This manual.
If anything is missing then please contact your supplier.
What is it?
Electrostimulation or E-Stim (also called electrosex and electroplay) is the
art of using electricity to stimulate the body. With our Intro2Electro™ pack
you have chosen an excellent way to start in the world of electro
stimulation. Both men and women can enjoy the pleasures that E-Stim
can bring, just be safe and enjoy your experiences.
Page 3 of 16
The Power Box
The E-Stim Systems Series 1™ was developed as an electro stimulation
based pleasure box. Unlike some other units on the market this is NOT a
rebadged TENS unit, but a made for play dedicated e-stim box.
Key Features
•
Instant and simple control of output level, pulse rate and
sensation with stepless adjustment and control.
•
3 Adjustable modes.
•
Battery driven - hours of fun from a single PP3 battery.
•
User replaceable battery – no need to wait for a recharge.
•
Single channel dual output allows the use of unipolar and bipolar
electrodes.
•
Safe current limited AC output.
•
Manual trigger – the unique ‘FIRE’ button.
•
Lifetime guarantee on the power box.
•
Designed and manufactured in the UK.
SAFETY WARNING
(DO NOT CONNECT THE POWER BOX OR ANY ELECTRICAL
DEVICE TO ANY LOCATION ABOVE THE WAIST (ACROSS THE
ARMS COUNTS AS ABOVE THE WAIST!), BUT ESPECIALLY DO NOT
CONNECT ACROSS THE HEART, CHEST, NECK OR HEAD. DO NOT USE IF
FITTED WITH A PACEMAKER OR ARE PREGNANT. REMEMBER YOU USE
THIS DEVICE AT YOUR OWN RISK. YOU MUST READ AND UNDERSTAND
THE USER MANUAL AND ALL OTHER INSTRUCTIONS BEFORE
ATTEMPTING OPERATION.
Page 4 of 16
Fitting the battery
Make sure the power box is switched off, and unplug any electrodes.
Turn the box over and using a small
screwdriver or a fingernail inserted into the
battery compartment slot, gently prise the
battery compartment cover out.
Remove the old
battery (if fitted)
and replace with
a
fresh
9V
Alkaline PP3. The battery connector is polarized
so it should not be possible to connect the
battery incorrectly, but ensure you are
connecting it the right way around before you
plug the battery in.
Place
the
battery
into
the
battery
compartment and replace the battery cover.
The cover is fitted with two tabs which insert
into the lower half of the case first, and then
the top half of the cover will clip into position.
The unit is now ready to use.
Please note we do NOT recommend the use of re-chargeable batteries
in the EBox™ Series 1 unit, nor do we recommend the use of zinc carbon
batteries due to their general poor performance.
It is not possible to use a mains adaptor with the Series 1.
In the event your E-Stim power box is not being used for a period of time,
remove the battery to avoid any potential damage from battery
leakage.
Page 5 of 16
Testing it works
Before using the power box, you should test the unit to make sure
everything is working.
1.
Make sure the output level is set to minimum, and the Mode
Selector is switched to ‘Off’.
2.
Fit a battery.
3.
Turn the mode selection switch to the Pulse position. The Power
LED should light up continuously and the Activity LED should flash.
If the power LED does not shine then check the battery
connections and replace the battery with a known good
device. If the unit still fails to operate then email [email protected] for further instructions.
4.
Turning the Pulse Rate control should make the activity LED (and
the output) flash at a rate between 1 and 6 times a second.
5.
Switch the mode selector switch to Continuous. The activity LED
should now be on all the time.
6.
Switch the mode selector switch to Manual. The Activity LED
should light when and only when the FIRE button is pressed.
7.
Turn the unit off and connect the two
conductive
rubber
loops
to
the
2mm/TENS cable and then the power
box via one of the output jacks. Loop
both loops around your fingers. Pull them
tight and make sure they do NOT touch
each other.
8.
Turn the unit on and slowly turn the output level up. You should
start to feel a slight tingling sensation from the electrode. If you
do then everything is working. Turn the output level down, turn
the box off and unplug.
Always bear in mind the safety warnings.
If you have problems
If the output feels lower than normal, replace the battery with a new
battery.
If there is no output, and you have replaced the battery with a known
good battery, then suspect the connecting wires.
Page 6 of 16
Using Electrodes
Contacts
Electroplay needs at least two points of contact in order for it to work. This
pack is supplied with two sets of monopole electrodes (pads/loops), So
you will need a minimum of two loops, or two pads, or one loop and one
pad for everything to work.
Conductive Rubber Loops
This pack is supplied with a set of adjustable
2mm/TENS conductive rubber loop electrodes.
These electrodes are designed to wrap around
the penis giving a fantastic and erotic stimulation
direct to a man's most important member.
Surface Electrodes
Also supplied are 4 re-usable self-adhesive electro pads.
These are used in pairs and stick to the surface of the
skin. When you have finished using them they should be
returned to the plastic carrier sheet for protection.
Connections
The connection cable has two plugs on one end, and a
jack plug on the other. Each of the two coloured pin plugs
insert into each of the two loops (one plug per loop), or
one plug into each of two pads.
Do NOT plug the two pin plugs into the same loop.
The jack plug then plugs into a socket on the power box. Do not connect
or disconnect any electrode while the power box is switched on, or you
may get receive an inadvertent shock.
To remove a connection plug gently twist the body of the plug as you
pull. Do not pull the cable.
Positioning
Conductive rubber loops are designed to fit around the penis,
making sure they do not touch each other. You may if you
wish place the loops behind the scrotum, or even use a loop
and a pad at the same time. Squeeze the adjustment collar
to loose and tighten the loop.
Page 7 of 16
Self-adhesive electro pads work well on inner thighs, bottom cheeks,
even the penis – the choice is yours. The closer the pads are together,
the more intense the sensation, but make sure the pads do not touch
each other.
You may feel more sensation in one location than the other. This is the
nature of e-stim and is normal - Just try moving things around and
experiment with positions to find what works for you.
Conductive Gel
Conductive lube or Gel can help in smoothing out and improving the
sensation, but can be slippery if used with conductive
rubber – in this case we recommend TacGel. Only use
water-based conductive lubricants and gels, and DO
NOT use lube on self-adhesive electrode pads.
Cleaning
The conductive rubber loops can be cleaned with medical grade
cleaning wipes and solutions, but cannot be sterilized in an autoclave.
Self-adhesive conductive electrodes cannot be cleaned. To prolong
their use always return them to their protective carrier sheet after use.
Do’s and Don’ts
DO NOT CONNECT ABOVE THE WAIST (ACROSS THE ARMS COUNTS AS
ABOVE THE WAIST!), BUT ESPECIALLY DO NOT CONNECT ACROSS THE
HEART, CHEST, NECK OR HEAD. DO NOT USE IF FITTED WITH A PACEMAKER
OR ARE PREGNANT. REMEMBER YOU USE THIS DEVICE AT YOUR OWN RISK.
If your subject experiences any pain or discomfort then stop using
immediately. Any E-Stim device is potentially capable of causing burning
when used on sensitive and or small contact areas at high output levels.
DO NOT SHORT CIRCUIT the output. Doing so may damage the
unit.
DO NOT attempt to open the power box. High voltages are
present during use and may still exist when the unit is switched
off. There are no user serviceable parts inside and opening the
power box will invalidate your lifetime guarantee.
The connection cables will become detached from the power box if
pulled. This is a safety feature so if you find this to be a problem during
play, then we suggest you purchase slightly longer cables.
Page 8 of 16
Series 1 Controls
The Series 1 unit has five user controls. Each control allows the user to
adjust a particular aspect of the output. It is the operation of the controls
in combination that will allow the user to provide an effective electrostimulation session.
The controls are
•
Mode selector switch.
•
Output level control.
•
Pulse feel adjustment.
•
Pulse rate adjustment.
•
Fire button.
Page 9 of 16
Output Level
Adjusts the output level. Remember that the output is also dependent on
a number of factors (the resistance of the contact points, their location,
the sensitivity of the subject etc.), so may change from time to time.
Always start at zero and build up.
Pulse Feel
Controls the sensation of the output in all modes. It has been described
by some users as varying the feel from ‘soft’ to ‘spiky’.
Pulse Rate
Changes the speed of the pulses in the pulse mode. Has no effect on the
output in the other modes. The adjustment ranges from around 1 to 6
pulses per second.
Fire Button
Triggers the output when the mode selector switch is in manual mode.
Because the subject is unable to grow accustomed to the stimulation,
the effect is much more pronounced. The output is active for as long as
the fire button is pressed.
Mode selector
Used to change the program mode of the power box. The mode selector
switch has four positions.
Off
The unit is powered off. The battery may be removed.
Pulse Mode
The output is a series of pulses, the duration of each burst is controlled by
the pulse rate control, whilst the sensation of each pulse is controlled by
the Pulse Feel control.
Continuous Mode
The output is continuous, with the sensation controlled by the Pulse Feel
control.
Manual
Allows the operation of the manual fire button. The fire button is only
active in this mode.
Page 10 of 16
Outputs
Connection to electrodes is via either two 3.5mm mono jack sockets on
the top of the unit. Ensure the unit is switched off before inserting or
removing the connector to eliminate the possibility of either inadvertent
electric shocks or short circuits occurring. The two output sockets are
wired in parallel and are not isolated from each other.
Accessories
This Intro2Electro™ for Him pack is supplied with a 1.5M connection cable
fitted with a 3.5mm jack on one end and two 2mm plugs on the other, a
set of adjustable 2mm conductive rubber loops and a set of selfadhesive conductive electro pads.
Should you wish to use other electrodes, you may need additional cables
or adaptors.
Other cables and accessories are available. For more information visit
your supplier or our website at http://www.e-stim.co.uk (UK/EU) or
http://www.e-stimsystems.com (Worldwide).
Additional Notes
Storage
In the event that the E-Stim Systems EBox™ Series 1 unit is not going to be
used for a period of time always remove the battery to avoid any
possibility of damage being caused by battery leakage.
Cleaning
Do NOT use solvents to clean the EBox™ Series 1. A gentle wipe with a
soft cloth should be sufficient. It is not possible to sterilise the control unit.
Conductive rubber can be cleaned with alcohol based cleaning wipes,
but cannot be sterilized.
Self-adhesive conductive electrodes cannot be cleaned.
Page 11 of 16
Pack Specifications
Channels/
Outputs
Display
Single channel, dual output mono 3.5mm sockets.
High brightness Light Emitting Diodes indicating Activity
and Power On.
Operating
Modes
Controls
3 - Pulse, Continuous and Manual
Mode Selector, Output Level, Pulse Feel, Pulse Rate,
Manual Trigger (Fire)
Output
Waveform
Asymmetrical pulsed AC
Output Type
BF
Micro
Width
Variable 3mS to 14mS
Pulse
Burst
Pulse
frequency
1 - 6 Hz
Power Supply
Standard 9 Volt Alkaline (PP3)
Battery Life
Variable dependent on load, but estimated at around 4
days with continuous use.
Dimensions
(approx.)
145mm x 80mm x 50mm
Weight (with
battery)
250g
Supplied
Accessories
Page 12 of 16
1 off 3.5mm to 2 mm output cable,
2 off 2mm Conductive Rubber Loops
4 off Self Adhesive electro pads,
1 off 9V PP3 Battery
1 off Manual.
1 off Guarantee Registration Card
1 off Carry Case
Problems?
If the output feels lower than normal, then replace the battery.
If there is no output, and you have replaced the battery with a known
good battery, then suspect the connecting wires.
If things still don’t appear to be working then email us at
[email protected]
stating the serial number and the problem you have encountered.
There are no user serviceable parts inside and breaking
of any seals will invalidate your guarantee. All power
units are guaranteed (parts and labour) against failure
caused by manufacturing defects or failure during
normal use for the lifetime of the unit.
Do not return the unit for repair without contact us for a returns number
before you dispatch.
For more details regarding our lifetime guarantee, product registration
and our full range of e-stim products, then visit our website at
http://www.e-stim.co.uk (UK/EU customers)
or our worldwide site at http://www.e-stimsystems.com.
Our lifetime guarantee does not effect your statuary rights.
SAFETY WARNING
(DO NOT CONNECT THE POWER BOX OR ANY ELECTRICAL
DEVICE TO ANY LOCATION ABOVE THE WAIST (ACROSS
THE ARMS COUNTS AS ABOVE THE WAIST!), BUT ESPECIALLY DO NOT
CONNECT ACROSS THE HEART, CHEST, NECK OR HEAD. DO NOT USE
IF FITTED WITH A PACEMAKER OR ARE PREGNANT. REMEMBER YOU
USE THIS DEVICE AT YOUR OWN RISK. YOU MUST READ AND
UNDERSTAND THE USER MANUAL AND ALL OTHER INSTRUCTIONS
BEFORE ATTEMPTING OPERATION.
Page 13 of 16
Certificate of Conformity
US Regulatory Wireless Notice
This device compiles with Part 15 of the FCC Rules. Operation is subject to
the following two conditions: (1) this device may not cause harmful
interference, and (2) this device must accept any interference received,
including interference that may cause undesired operation.
The FCC requires the user to be notified that any changes or
modifications made to the device that are not expressly approved by
E-Stim Systems Ltd may void the users authority to operate the
equipment.
European Union Notice
Products bearing the CE marking comply with the R&TTE
Directive (1995/5/EC), EMC Directive (89/336/EEC), and the
Low voltage Directive (73/23/EEC) issued by the Commission
of the European Community.
Compliance with these directives implies conformity to the following
European norms (in parentheses are the equivalent international
standards and regulations.)
EN 55022 (CISPR 22) – Electromagnetic Interference , EN 55024 (IEC610004-2,3,4,5,6,8,11) – Electromagnetic Immunity, and EN 60950 (IEC 60950) –
Product Safety.
This device may be used in all European Union Countries.
Sold as an adult novelty device only. Not to be used by children.
EU and Norway only: Products bearing the WEEE symbol should
not be disposed of in normal household waste, but returned to
us or your nearest WEEE registered recycler for safe disposal.
Page 14 of 16
Copyright Notice
All images and text within this manual are ©E-Stim Systems Ltd 2007-2013
EBox™, EBox Series 1™, Series 1™ and Intro2Electro™ are trademarks of EStim Systems Ltd.
All rights reserved.
E & OE.
Page 15 of 16
Page intentionally blank
Page 16 of 16