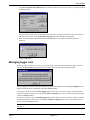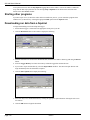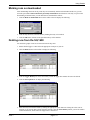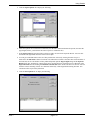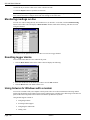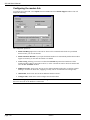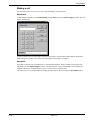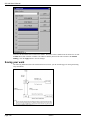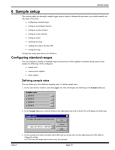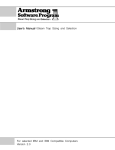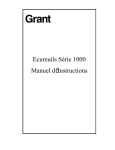
1
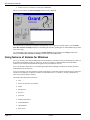
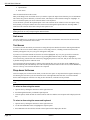
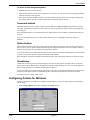
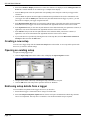
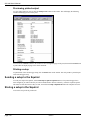
Using Setwise
3 Using Setwise
This section describes how to use Setwise for Windows. Topics covered are:
• starting Setwise for Windows
• using features of Setwise for Windows
• configuring Setwise for Windows
• creating a new setup
• opening an existing setup
• retrieving setup details from a logger
• printing setup details
• sending a setup to the Squirrel
• storing a setup in the Squirrel
• managing logger runs
• starting other programs
• downloading run data from a Squirrel
• marking runs as downloaded
• deleting runs from the SQ 1600
• exporting run data
• monitoring readings on-line
• resetting logger alarms
• using Setwise for Windows with a modem
• saving your work
• reprogramming the SQ 1600
• ending a Setwise for Windows session.
Starting Setwise for Windows
When you have installed Setwise for Windows onto the hard disk, the icon required to start a session will appear in
your Windows Program Manager screen if you are running Windows 3.11. The icon looks like this:
You can also use standard Windows procedures to place this icon on the Windows 95 desktop.
To start a session, you can:
• select the Setwise option from the Windows Start/Programs/Grantware Applications menu
• double click the Setwise for Windows icon
or
issue 1
page 3-1
SQ 1600 User’s Manual
• click the Setwise for Windows icon and press RETURN.
When you start Setwise, the Setwise Assistant window will be displayed:
The large buttons are shortcuts to frequently used functions. If you want to prevent this display, select the Don’t
show this assistant on startup checkbox. After making this selection, opening Setwise will automatically open the
most recent setup.
To restart display of the assistant, you can select Config (Options menu) to display the Config window, then
deselect the Don’t show assistant on startup checkbox and click the OK button.
Using features of Setwise for Windows
Setwise for Windows uses many standard features of the Windows environment, and you should make sure that you
are familiar with Windows before you start to use Setwise for Windows. Further information about Windows
facilities can be found in the documentation supplied with your Windows software.
Setwise for Windows functions are accessed through menus and also through icon buttons on a button bar that is
immediately below the menu bar.
To access a function, you must select the relevant menu option or icon button. When a function has been selected, a
window will be displayed. A number of features are used within Setwise for Windows, and any combination of
these may be present within a window.
The features described in this section are:
• runs
• Setwise for Windows icon buttons
• menus
• dialog boxes
• list areas
• text boxes
• drop-down list boxes
• command buttons
• option buttons
• check boxes.
page 3-2
issue 1
Using Setwise
Runs
A run is a recording made up of a number of sets of readings, each of which contains the readings of all the
channels set to log. As part of the logger setup, the user chooses the conditions that will start and end each run (eg
begin now and end when the memory is full). Runs are stored in the logger memory until they are deleted.
The download function copies some or all of the runs in the logger to a file in the computer. The user can choose
which runs to include in the .DAT file created. The runs in this file remain separate and can be analysed
individually by Squirrelwise for Windows.
Setwise icon buttons
There are 17 icon buttons in the Setwise button bar. To select an icon button, simply click it using the left mouse
button.
A brief description is given for each icon button.
Create new setup
This restores all settings to default values that you can customise for the required run.
Open setup
This selects the Open Setup file window, which you can use to load an existing Squirrel setup into Setwise.
Save setup
This saves the current settings as a .SET file; you will be prompted to enter a filename.
Print
This prints details of the current setup.
Print preview
This shows an on-screen version of the printed report.
Start Squirrel logging
This begins a logging run for the Squirrel using the current Setwise settings.
Stop Squirrel logging
issue 1
page 3-3
SQ 1600 User’s Manual
This terminates the current Squirrel run regardless of setup status.
Pause logging
This interrupts the current run but retains status information so that the run can be resumed.
Resume logging
This restarts a paused logger run.
On-line metering
This displays (in real time) readings for all the channels in the logger that are set to a range.
Download
This selects the Download window, which you can use to load data onto your computer from the Squirrel. For
more information refer to the section Downloading data.
Delete
This selects the Delete window, which you can use to delete runs from the SQ 1600 data logger.
Mark as downloaded
This marks runs in the Squirrel to show that they have been downloaded onto your computer. You will be prompted
to select the memory area containing the run(s) to be marked.
Reset alarms
This sets alarms in the Squirrel to their inactive state. You will be prompted to select the alarms to be reset.
Run Squirrelwise
This starts the Squirrelwise for Windows software (if installed on your computer). For more information, please
refer to the documentation supplied with Squirrelwise.
page 3-4
issue 1
Using Setwise
Help
This gives you access to the Setwise for Windows on-line help system.
Modem
This starts modem support, allowing you to connect to a remote logger using a modem link. Initially the icon will
be displayed as a red telephone symbol. Once the icon has been clicked and the Modem Support window is
displayed the icon will turn yellow. Finally when a call has been successfully made the icon will change to green.
Menus
A menu is a list of commands that can be implemented within Setwise for Windows. To implement a command, you
must open the menu then select the required option.
A number of menus can be accessed through the menu bar in the Setwise for Windows main screen.
Opening a menu
To open a menu, you select it either by clicking the title in the menu bar or by holding down the ALT key and
pressing the letter that is underlined in the menu title. The menu will then drop down from the menu bar.
All of the commands contained in the menu will be shown, with the first option highlighted. You may not be able to
implement all of the commands, in which case those commands that you cannot select will be shown in grey rather
than black.
Selecting an option
To select a menu option you can:
• click the option
• move the highlight to the option, using the ARROW keys, then press RETURN
or
• press the letter key underlined in the menu option.
Some menu options can be selected using a combination of keys. In this case, the key combination is shown in the
menu opposite the option. You can use the key combination to select the menu option from any window or dialog
box within Setwise for Windows.
Dialog boxes
Dialog boxes are used to enter information into Setwise for Windows. Dialog boxes are called in Setwise for
Windows either by selecting an icon button from the button bar on the main screen, or by selecting a menu option
that is followed by an ellipsis ( ... ).
Dialog boxes can be used to display messages and information, and also to allow the input of information. Entering
information can involve any combination of the following:
• list areas
• text boxes
• drop-down list boxes
• command buttons
issue 1
page 3-5
SQ 1600 User’s Manual
• option buttons
• check boxes.
These are described later in this section.
Many of the dialog boxes used within Setwise for Windows require the input of more than one piece of information.
The current entry point is marked by a selection cursor, which may be either a dotted rectangle or a highlight. To
move to a different option you can use either the mouse or the keyboard.
To use the mouse, just click the required option or area. The selection cursor will move to the new option. Using
the keyboard, you can press TAB to move the selection cursor through the options and areas. Pressing SHIFT +
TAB moves the selection cursor back to the previous option or area.
Tip If the option or area you want to select has an underlined letter in its name, you can choose that item by
holding down the ALT key and pressing the underlined letter.
List areas
List areas within Setwise for Windows are boxes that contain lists of information. You can select an item in a list
area by clicking it with the left mouse button.
Text boxes
A text box is an area into which you can enter text using the keyboard. Each text box has a name tag that indicates
the nature of the text to be entered. When you move to an empty text box, a flashing vertical bar known as the
insertion point appears. Any text you type in will appear at this point
If you move to a box that contains text, then the text will be highlighted. Any text you type in will overwrite the
existing entry in the box. You can delete the text by pressing DEL while the entry in the box is highlighted.
You can select any portion of the text in the box by dragging the pointer over the text, and you can select any word
by double clicking anywhere within the word.
You can position the insertion point by clicking in the required place, and you can also use the ARROW keys to
move the insertion point. The END key moves the insertion point to the bottom of the text box, and the HOME key
moves it to the top. You can enter and delete text as required.
Drop-down list boxes
List boxes display lists of choices from which you can select one option. A drop down list box appears initially as a
box showing one selection. If you select the down arrow at the right-hand end of the box, a list of all available
choices will be displayed. If the list is too long to show all choices, scroll bars will be provided.
Note Options are listed in the order in which they were entered, which means that they may not be in alphabetical
order.
To select an item using the mouse
1. Open the box by clicking the down arrow at the right of the box.
2. Scroll through the list until you find the required option.
3. Click the option, which will then be selected. The list will close and the selected option will be displayed in the
box.
To select an item using the mouse and keyboard
1. Open the box by clicking the down arrow at the right of the box.
2. Use the UP and DOWN arrows to highlight the required option.
3. Press RETURN. The list will close and the selected option will be displayed in the box.
page 3-6
issue 1
Using Setwise
To select an item using the keyboard
1. Highlight any current entry in the box.
2. Enter the first character (or the first few characters) of the option. The first option in the list beginning with this
character sequence will be selected.
3. If the option is not the one that you require, enter the character sequence again. The next option starting with
the sequence will be selected. Continue with this until the required option is selected.
Command buttons
Command buttons are used to initiate an action (common buttons are OK and Cancel). These buttons are shown
with a grey background, to represent keyboard style keys, and are usually located at the bottom or right-hand side
of a dialog box.
Some command buttons are not available all the time. When a button is not available, it is dimmed and cannot be
selected.
To select a command button you can either click the button or move the highlight to the button and press
RETURN.
Option buttons
Option buttons are used to represent a group of options from which only one can be selected. They are shown as a
series of circles, one per option, with the option description alongside each button. The selected option contains a
black dot. If any options are not available, the description is dimmed.
To select an option you can either click the option or press the space bar until the required option is selected. When
you select a new option, the previous option is deselected automatically.
If the description of the option contains an underlined character, then entering this character will select the option.
Checkboxes
Checkboxes are used to present a list from which you can select as many options as required. They are shown as
square boxes, each accompanied by a description of the option. When an option is selected, a cross (X) appears in
the box. If any options are not available, the description is dimmed.
To select an option you can either click the option or press the space bar until the required option is selected. If the
description of the option contains an underlined character, then entering this character will select the option.
To deselect an option, simply select it again.
Configuring Setwise for Windows
In order to use Setwise for Windows to configure your data logger, you must set up the program to communicate
with the logger:
1. Select Config (Options menu). this will display the Config window:
issue 1
page 3-7
SQ 1600 User’s Manual
2. Select the Columns to Display checkboxes to choose the columns to be displayed on the Analogue, Pulse and
Event tabs. Unused columns can be omitted to give a simpler/clearer display.
3. From the Port options select the option button corresponding to the serial port to which your logger will be
connected.
4. From the Baud rate options select the highest communications speed that will be used to communicate with
your logger. Note that the 38400 option will allow only data downloads from the logger to your PC; you will
not be able to configure your logger using this baud rate.
5. In the Download (DAT files) field you can enter the path and name of the folder that will be used to hold data
downloaded from your logger. You can click the button at the right-hand end of the field to select a folder.
6. In the Squirrelwise field you can enter the path and name of the folder that holds your Squirrelwise software (if
applicable). You can click the button at the right-hand end of the field to select a folder.
7. In the Filewise field you can enter the path and name of the folder that holds your Filewise software (if
applicable). You can click the button at the right-hand end of the field to select a folder.
8. If you want Setwise to open directly showing the most recent setup data, select the Don’t show assistant on
startup checkbox and click the OK button.
Creating a new setup
To create a new logger setup click the Create new setup button on the toolbar. A new setup will be opened with
the Setwise for Windows default settings.
Opening an existing setup
To open an existing logger setup:
1. Click the Open setup button on the toolbar. This will display the Open Setup File window:
2. Navigate to the folder or directory containing the setup, and select the setup file.
3. Click the OK button. The setup will be opened in Setwise for Windows.
Retrieving setup details from a logger
You can load the setup details from a logger into Setwise for Windows:
1. Ensure that the logger is connected to the PC using a serial link cable.
2. Select Get setup from Squirrel (Squirrel menu). Setwise will open communications with the SQ 1600 and
retrieve its setup details. This may take a few minutes. You can then amend the setup as required.
page 3-8
issue 1
Using Setwise
Printing setup details
You can print the details of the current SQ 1600 setup on any printer connected to your system. You can also set up
the printer options and preview the printed output.
Setting printer options
Setwise for Windows will use the default printer settings for your Windows installation unless you change the
options from within Setwise. To set printer options:
1. Select Printer Setup (File menu). This will display the following window:
2. Select the required printer from the drop-down list.
3. Select the paper orientation, size and source within the printer.
4. If you want to set further options, click the Options button. This will display a window containing options
specific to the selected printer. Make the required selections then click the OK button to return to the Print
Setup window.
5. Click the OK button to implement your selections.
issue 1
page 3-9
SQ 1600 User’s Manual
Previewing printed output
To view printed output on screen, click the Print preview button on the toolbar. This will display the following
window containing a preview of the print:
You can use the ARROW buttons in the window to move through the pages of the print, then click the Print button
to print either the displayed page or the whole document.
Printing a setup
To print details of the current logger setup, click the Print button on the toolbar. This will produce a printed report
of the current logger setup.
Sending a setup to the Squirrel
To send your setup to the Squirrel, select Send setup to Squirrel (Squirrel menu). If any unused triggers have
been configured, you will be asked if you want to disable them to increase efficiency; select the required response.
The status bar will show items as they are sent, and will show Setup completed OK when the setup has been sent.
Storing a setup in the Squirrel
To store the setup in the SQ 1600 itself:
page 3-10
issue 1
Using Setwise
1. Select Store Squirrel setup (Squirrel menu). As the SQ 1600 can store up to five setups, you will be presented
with the following:
Note that as the setup saved by this operation is that currently in the logger itself, this will only be the same as
that on the Setwise screen if the Send setup to Squirrel function has already been performed.
2. Select the required Store option button and click the OK button. On completion, the following will be
displayed:
3. Click the OK button.
Managing logger runs
If your SQ 1600 is connected to your PC, you can start, pause, restart and stop runs within the logger. To start a
run, click the Start Squirrel logging button on the toolbar. This will display the following window:
Click the appropriate button to start the run. When the run has been started, the message Start completed will be
displayed in the status bar at the bottom of the main Setwise window.
To pause the current run, click the Pause logging button on the toolbar. You will be asked to confirm the pause;
click the Yes button to pause the run. The message Pause completed will be shown in the status bar at the bottom
of the main Setwise window.
To resume a paused run, click the Resume logging button on the toolbar. You will be asked to confirm the restart;
click the Yes button to resume the run. The message Continue completed will be shown in the status bar at the
bottom of the main Setwise window.
Note You cannot resume a run that has been stopped. If you will need to restart a run, you must pause it rather
than stop it.
issue 1
page 3-11
SQ 1600 User’s Manual
To stop the current run, click the Stop Squirrel logging button on the toolbar. You will be asked to confirm the
stop; click the Yes stop to pause the run. The message Stop completed will be shown in the status bar at the
bottom of the main Setwise window.
Starting other programs
If you have Squirrelwise for Windows and/or Filewise installed on your PC, you can start these programs from
within Setwise for Windows by selecting the appropriate Run option from the Squirrel menu.
Downloading run data from a Squirrel
To begin downloading a run from an SQ 1600 logger:
1. Ensure that the logger is connected to the appropriate serial port of your PC.
2. Click the Download button on the toolbar to display the following:
3. Enter the file name to be used for the downloaded data, and select the folder or directory path using the Browse
button.
4. From the Logger Memory list choose the memory within the logger that contains the runs.
5. If you want to export the data directly, select the Export Runs checkbox. The Setwise Export function will
begin immediately after the download is complete.
6. Click the Select options tab to display the following:
7. Select the run(s) to be downloaded either by clicking the appropriate option button or clicking the select icon
for each run.
8. Click the OK button to begin the download.
page 3-12
issue 1
Using Setwise
Marking runs as downloaded
After downloading runs from the SQ 1600, they are automatically marked as downloaded. In this way you can
select the option button Select all runs not previously downloaded to download new runs only. To prevent the
downloading of unwanted runs you can mark them as downloaded as follows:
1. Click the Mark as downloaded button on the toolbar. This will display the following:
2. From the drop-down list, select the memory holding the run(s) to be marked.
3. Click the OK button. All runs in the specified memory will be marked.
Deleting runs from the SQ 1600
You can delete groups of runs or selected runs from the SQ 1600:
1. Ensure that the logger is connected to the appropriate serial port of your PC.
2. Click the Delete button on the toolbar to display the following:
3. From the Logger Memory list choose the memory within the logger that contains the runs to be deleted.
4. Click the Select options tab to display the following:
5. Select the run(s) to be deleted either by clicking the appropriate option button or clicking the select icon for
each run. If you want to delete all runs from the SQ 1600, click the Clear Memory button; you will be asked to
confirm the deletion, which cannot be stopped once it has started.
issue 1
page 3-13
SQ 1600 User’s Manual
6. Click the OK button to delete the runs.
Exporting run data
You can export run data in forms that can be imported into Squirrelwise for Windows, Excel, Lotus and many other
spreadsheets. You can then use those tools to analyse the data. You can export multiple runs in one operation, but
each run will produce one or more separate exported files according to the chosen settings.
To export data:
1. Select Export .DAT (File menu). This will display the following window:
2. Use the Drives and Directory areas to select the folder or directory containing the run data to be exported. The
names of data files in this folder or directory will be shown in the .Dat Files list.
3. Select the run(s) required by checking them in the Select column (this operation can be performed on any of the
tabs once the DAT file has been selected). Use the Select options tab as a short cut to selecting or deselecting
all runs.
4. Select the data file to be exported.
page 3-14
issue 1
Using Setwise
5. Click the Export options tab to display the following:
6. Select the separator to be used between data fields, the date/time column and header file options, and enter the
page length (in lines; you should set this to 0 to export as a continuous file).
7. In the Export path field enter the folder or directory path to be used for the exported data file. You can click
the button at the right-hand end of the field to select a path.
8. You can give individual names to the set of files produced for each run by entering the name of up to 8
characters in the File Name column of each run. Files within the set will have the same name with extensions of
the form #00, #01 etc. The number of files produced depends upon the Page Length setting and the Separate
Header check box. Alternatively a single name can be used for all files by entering up to five characters in the
Export file name box and clicking the Autoname selected runs button. In this case the set of files for each run
will have a name consisting of these five characters followed by a three digit number starting from 001. File
extensions will be as previously described.
9. Click the Select options tab to display the following:
issue 1
page 3-15
SQ 1600 User’s Manual
10. This tab may be used as a short cut to select or deselect all runs.
11. Click the Export button to export the selected runs.
Note When you have configured Setwise to export data, you can simply click the Export button to export future
runs. You will not need to configure future runs if the settings are to be the same.
Monitoring readings on-line
You can view sensor readings directly from within Setwise for Windows. To do this, click the On-line metering
button on the toolbar. This will display a Metered values window similar to the following, with lines for each
configured channel:
This window will be updated whenever new data is received on a logger channel.
Resetting logger alarms
You can reset alarms that are active within the SQ 1600:
1. Click the Reset alarms button on the toolbar. This will display the following:
2. Select the checkboxes for the alarms you want to set to the Off condition.
3. Click the Reset button. The alarms will be reset.
Using Setwise for Windows with a modem
You can use a modem to link your computer to the SQ 1600. There are no direct limitations when using modem
support, but the transfer speed of data between Setwise and the logger is slightly slower than using a local link. The
speed of data transfer depends on the modems used and the specification of your PC.
Using modem support consists of:
• configuring modems
• activating modem support
• configuring the modem link
• making a call.
page 3-16
issue 1
Using Setwise
Configuring modems
Before the modem support can be used, both the logger and PC modems need to be configured. To do this:
1. Select Modem Configuration (Tools menu). This will display the following:
2. In the Function Selection area, select the option button for the modem to be configured (Setwise Modem or
Logger Modem). We recommed that you should configure the Setwise modem before the logger modem.
3. In the Modem Selection area, select the option button corresponding to the type of modem to be configured. If
you are unsure of the PC modem type, check in your computer’s Control Panel. Note that the logger modem
will always be external or GSM.
4. Select the Comm Port to which the modem will be connected and the Baud Rate at which it will operate.
5. Select the checkboxes corresponding to the modem commands that will apply to the modem. When setting the
logger modem make sure that the Auto Answer option is set.
6. Click the Configure button to complete the modem setup.
Note When setting up the logger modem it must be connected to the PC on the port set in Comm Port.
Activating modem support
1. To activate modem support, click the Modem button on the toolbar. This will display the following:
This is the control panel for all Setwise modem communication. From here you can make a call, disconnect it,
configure the modem, set up the interface and view the system log. On initialisation the current modem will be
displayed in the Using Modem display and the user defined numbers displayed on buttons to the left of the
window.
issue 1
page 3-17
SQ 1600 User’s Manual
Configuring the modem link
To configure the modem link, select Options from the Tools menu in the Modem Support window. This will
display the following:
The configurable options are:
• Enable Call Hang-Up to allow a time-out for when a call is connected and left idle for a predefined
amount of time; you can enter the time
• Enable Automatic Dial Out if you require the defined number to be automatically dialled when modem
support is activated; you can enter the number to be dialled
• Connect Using, allowing you to select a modem from Modem drop-down list which shows all the
installed modems which are accessible to the PC; to select a modem for Setwise choose the modem and
select the Set As Default checkbox
• Dialling Properties, which can be used to give the modem information about how to dial (for example
dialling ‘9’ to obtain an outside line, supplying a country code or for information on calling credit)
• Add Modem, which can be used to add an additional modem to the PC
• Configure Line, which can be used to configure the selected modem.
Note The Dialling Properties, Add Modem and Configure Line functions are all standard Windows facilities
that can be accessed via the Windows Control Panel.
page 3-18
issue 1
Using Setwise
Making a call
You can make a call in one of two ways, either manual dialling or using speed dial.
Manual dial
To dial a number manually, select Manual Dialling from the Dial menu of the Modem Support window. This will
display the following:
To enter a number either click the number buttons on the keypad or click the phone number display and enter the
number using the keyboard. You can also enter a description for the number if required.
Speed dial
Speed dial is selection from a predefined list of nine predefined numbers. These are displayed on buttons at the
right-hand side of the Modem Support window. The description for a given defined number will be displayed if
supplied; otherwise the telephone number is given. To dial, click the required button.
You can set up a new speed dial number by clicking an unused button. This will display the Speed Dial window:
issue 1
page 3-19
SQ 1600 User’s Manual
First select the button that will be used for the number. Then either select a number from the archive box or click
the Edit button (this will allow a number to be added or edited by means of the same window as the Manual
Dialling). Click the Apply button to save the changes.
Saving your work
The following illustration shows the interaction between Setwise, your PC and the logger for saving and storing
setup information:
page 3-20
issue 1
Using Setwise
Tip You should save your work regularly. This will ensure that you can retrieve recent versions of your runs in
the event of a power failure or similar event.
You can save your work at any time during a Setwise for Windows session.
To save your setup details, click the Save button on the toolbar. The setup will be saved using the file name you
specified when you created the run setup.
Reprogramming the SQ 1600
To reprogram the SQ 1600 connected to your PC, select Re-program Squirrel (Squirrel menu). This will display
the Reprogram Squirrel Firmware window.
From this window you can:
• reprogram the logger firmware to the latest revision
• view the model and version number of a firmware file (.HEX).
WARNING Reprogramming the logger will delete all the runs stored in it. You should download all required runs
before you begin the reprogramming.
Use the directory and drive boxes to move to the directory that contains the .HEX file required. The fields are:
• .HEX file, which gives the name of the file that contains the new firmware
• File information, which shows the model and Version number of the firmware file
• ReProgram, which you can click to reprogram your logger.
Ending a Setwise for Windows session
When you have finished work on a window, you can close it either by selecting the Exit option from the File menu
or by clicking the Close button (marked with X) in the top right-hand corner of each window in Windows 95 or
NT. If you have any unsaved work, a message box will be displayed asking if you want to save your changes:
You can select Yes (to save changes and close Setwise), No (to abandon changes and close Setwise) or Cancel (to
keep Setwise open without saving changes) as appropriate.
issue 1
page 3-21