1
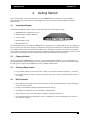
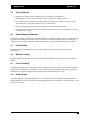
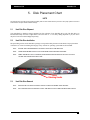
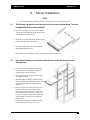
Aberdeen LLC
October 2005
AberNAS 1U
CUSTOMER
SUPPORT
INFORMATION
Mailing address: Aberdeen LLC 9130 Norwalk Boulevard Santa Fe Springs, CA 90670
Phone (562) 699-6998
Sales (800) 552-6868
Fax (562) 695-5570
Web site: www.aberdeeninc.com
E-mail: [email protected]
Aberdeen LLC
AberNAS 1U
1. Preface
Congratulations on your purchase of the ABERDEEN LLC AberNAS 1U rackmount server.
This manual is written for professional systems integrators and PC technicians. It provides information for the
installation and use of the ABERDEEN LLC AberNAS 1U rackmount server. Installation and maintenance should
be performed by experienced technicians only. Please refer to the included motherboard specifications
file(AberNAS-1U-motherboard.pdf) and the chassis specifications file(AberNAS-1U-chassis.pdf) included within
this documentation CD.
2. Overview
The ABERDEEN LLC AberNAS 1U is a high-end single processor, 1U rackmount server. It supports a single 478pin Intel Pentium 4 microPGA processor at up to 3.40 GHz with HT (hyper-threading) technology (or single a Intel
Celeron processor of up to 2.80 GHz) and up to 4 GB of ECC or non-ECC unbuffered DDR400/333/266 SDRAM
memory.
Please refer to our web site for information on operating systems that have been certified for use with the
ABERDEEN LLC AberNAS 1U (www.aberdeeninc.com) and for regular updates on supported processor speeds.
-2-
Aberdeen LLC
AberNAS 1U
FEDERAL COMMUNICATIONS COMMISSION
AND
CANADIAN DEPARTMENT OF COMMUNICATIONS
RADIO FREQUENCY INTERFERENCE STATEMENTS
This equipment generates, uses, and can radiate radio frequency energy and if not installed and used properly, that
is, in strict accordance with the manufacturer’s instructions, may cause interference to radio communication. It has
been tested and found to comply with the limits for a Class A computing device in accordance with the
specifications in Subpart B of Part 15 of FCC rules, which are designed to provide reasonable protection against
such interference when the equipment is operated in a commercial environment. Operation of this equipment in a
residential area is likely to cause interference, in which case the user at his own expense will be required to take
whatever measures may be necessary to correct the interference.
Changes or modifications not expressly approved by the party responsible for compliance could void the user’s
authority to operate the equipment.
This digital apparatus does not exceed the Class A limits for radio noise emission from digital apparatus set out in
the Radio Interference Regulation of the Canadian Department of Communications.
Le présent appareil numérique n’émet pas de bruits radioélectriques dépassant les limites applicables aux appareils
numériques de la classe A prescrites dans le Règlement sur le brouillage radioélectrique publié par le ministère des
Communications du Canada.
-3-
Aberdeen LLC
AberNAS 1U
Normas Oficiales Mexicanas (NOM)
Electrical Safety Statement
INSTRUCCIONES DE SEGURIDAD
1.
Todas las instrucciones de seguridad y operación deberán ser leídas antes de que el aparato eléctrico sea operado.
2.
Las instrucciones de seguridad y operación deberán ser guardadas para referencia futura.
3.
Todas las advertencias en el aparato eléctrico y en sus instrucciones de operación deben ser respetadas.
4.
Todas las instrucciones de operación y uso deben ser seguidas.
5.
El aparato eléctrico no deberá ser usado cerca del agua—por ejemplo, cerca de la tina de baño, lavabo, sótano mojado o
cerca de una alberca, etc.
6.
El aparato eléctrico debe ser usado únicamente con carritos o pedestales que sean recomendados por el fabricante.
7.
El aparato eléctrico debe ser montado a la pared o al techo sólo como sea recomendado por el fabricante.
8.
Servicio—El usuario no debe intentar dar servicio al equipo eléctrico más allá a lo descrito en las instrucciones de
operación. Todo otro servicio deberá ser referido a personal de servicio calificado.
9.
El aparato eléctrico debe ser situado de tal manera que su posición no interfiera su uso. La colocación del aparato eléctrico
sobre una cama, sofá, alfombra o superficie similar puede bloquea la ventilación, no se debe colocar en libreros o
gabinetes que impidan el flujo de aire por los orificios de ventilación.
10.
El equipo eléctrico deber ser situado fuera del alcance de fuentes de calor como radiadores, registros de calor, estufas u
otros aparatos (incluyendo amplificadores) que producen calor.
11.
El aparato eléctrico deberá ser connectado a una fuente de poder sólo del tipo descrito en el instructivo de operación, o
como se indique en el aparato.
12.
Precaución debe ser tomada de tal manera que la tierra fisica y la polarización del equipo no sea eliminada.
13.
Los cables de la fuente de poder deben ser guiados de tal manera que no sean pisados ni pellizcados por objetos colocados
sobre o contra ellos, poniendo particular atención a los contactos y receptáculos donde salen del aparato.
14.
El equipo eléctrico debe ser limpiado únicamente de acuerdo a las recomendaciones del fabricante.
15.
En caso de existir, una antena externa deberá ser localizada lejos de las lineas de energia.
16.
El cable de corriente deberá ser desconectado del cuando el equipo no sea usado por un largo periodo de tiempo.
17.
Cuidado debe ser tomado de tal manera que objectos liquidos no sean derramados sobre la cubierta u orificios de
ventilación.
18.
Servicio por personal calificado deberá ser provisto cuando:
A:
El cable de poder o el contacto ha sido dañado; u
B:
Objectos han caído o líquido ha sido derramado dentro del aparato; o
C:
El aparato ha sido expuesto a la lluvia; o
D:
El aparato parece no operar normalmente o muestra un cambio en su desempeño; o
E:
El aparato ha sido tirado o su cubierta ha sido dañada.
-4-
Aberdeen LLC
AberNAS 1U
3.
Table of Contents
1.
Preface.............................................................................................................................................- 2 -
2.
Overview..........................................................................................................................................- 2 -
3.
Table of Contents ...........................................................................................................................- 5 -
4.
Getting Started................................................................................................................................- 6 -
5.
Disk Placement Chart ....................................................................................................................- 8 -
6.
Server Installation ..........................................................................................................................- 9 -
7.
Getting Connected .......................................................................................................................- 10 -
8.
Powering Up..................................................................................................................................- 10 -
9.
Motherboard Specifications ........................................................................................................- 11 -
10.
Chassis Specifications ................................................................................................................- 13 -
11.
Software Management .................................................................................................................- 14 -
12.
Microsoft Windows Storage Server 2003...................................................................................- 14 -
13.
Web Based RAID Management Utility. .......................................................................................- 15 -
14.
Troubleshooting ...........................................................................................................................- 23 -
15.
Appendix A: Microsoft Windows Storage Server 2003 ...........................................................- 23 -
16.
Appendix B: RAID Management Utility .....................................................................................- 23 -
-5-
Aberdeen LLC
AberNAS 1U
4. Getting Started
This section provides a quick setup checklist to get your ABERDEEN LLC AberNAS 1U up and running.
Following these steps in the order given should enable you to have the system operational within a minimum
amount of time.
4.1.
Unpacking the System
The Aberdeen AberNAS 120 Server ships with the following items enclosed in the package:
• ABERDEEN LLC AberNAS 1U Server
• Rackmount Server Rails & Hardware
• A Power Cable
• Installation/Driver CD
• Documentation CD
You should inspect the box in which the ABERDEEN LLC AberNAS 1U was shipped and note if it was damaged in
any way. If the server itself shows damage you should file a damage claim with the carrier who delivered it. Decide
on a suitable location for the rack unit that will hold the server. It should be situated in a clean, dust-free area that is
well ventilated. Avoid areas where heat, electrical noise and electromagnetic fields are generated. You will also need
it placed near a grounded power outlet. Read the Rack and Server Precautions in the next section.
4.2.
Preparing for Setup
The box in which the ABERDEEN LLC AberNAS 1U was shipped should include two sets of rail assemblies, six
rail mounting brackets and the mounting screws you will need to install the system into the rack. Follow the steps in
the order given to complete the installation process in a minimal amount of time.
4.3.
Choosing a Setup Location
• Leave enough clearance in front of the rack to enable you to open the front door completely (~ 25 inches).
• Leave approximately 30 inches of clearance in the back of the rack to allow for sufficient airflow and ease
in servicing.
4.4.
Rack Precautions
• Ensure that the leveling jacks on the bottom of the rack are fully extended to the floor with the full weight
of the rack resting on them.
• In single rack installation, stabilizers should be attached to the rack.
• In multiple rack installations, the racks should be coupled together.
• Always make sure the rack is stable before extending a component from the rack.
• You should extend only one component at a time - extending two or more simultaneously may cause the
rack to become unstable.
-6-
Aberdeen LLC
4.5.
AberNAS 1U
Server Precautions
• Determine the placement of each component in the rack before you install the rails.
• Install the heaviest server components on the bottom of the rack first, and then work up.
• Use a regulating uninterruptible power supply (UPS) to protect the server from power surges, voltage
spikes and to keep your system operating in case of a power failure.
• Allow the hot plug SCSI drives and power supply units to cool before touching them.
• Always keep the rack's front door and all panels and components on the servers closed when not servicing
to maintain proper cooling.
4.6.
Ambient Operating Temperature
If installed in a closed or multi-unit rack assembly, the ambient operating temperature of the rack environment may
be greater than the ambient temperature of the room. Therefore, consideration should be given to installing the
equipment in an environment compatible with the manufacturer’s maximum rated ambient temperature (Tmra).
4.7.
Reduced Airflow
Equipment should be mounted into a rack so that the amount of airflow required for safe operation is not
compromised.
4.8.
Mechanical Loading
Equipment should be mounted into a rack so that a hazardous condition does not arise due to uneven mechanical
loading.
4.9.
Circuit Overloading
Consideration should be given to the connection of the equipment to the power supply circuitry and the effect that
any possible overloading of circuits might have on overcurrent protection and power supply wiring. Appropriate
consideration of equipment nameplate ratings should be used when addressing this concern.
4.10.
Reliable Ground
A reliable ground must be maintained at all times. To ensure this, the rack itself should be grounded. Particular
attention should be given to power supply connections other than the direct connections to the branch circuit (i.e. the
use of power strips, etc.).
-7-
Aberdeen LLC
AberNAS 1U
5. Disk Placement Chart
NOTE
The disk drive trays must be properly seated completely back into their sockets and they must be in their proper positions in order to
avoid software corruption and/or hardware damage.
5.1.
Hard Disk Drive Shipment
Your AberNAS by Aberdeen storage appliance has four columns of one hard disk drive each. The disk drive are
labeled numerically from left to right and in succession from 0 - 3. For safety during shipment to you, the drives
may have been removed and shipped separately.
5.2.
Hard Disk Drive Installation
The positioning stickers on the hard drive packages correspond to their placement in the chassis. Proper placement
of the drives is critical in retaining the integrity of any software or operating system that has been loaded.
5.2.1.
ENSURE THAT THE DISK DRIVE IS SECURELY MOUNTED TO THE DRIVE BAY
5.2.2.
SLIDE THE HARD DRIVE INTO PLACE WITH THE RETAINING HANDLE EXTENDED.
5.2.3.
WHEN THE DRIVE IS FULLY INSERTED, PUSH THE RETAINING HANDLE BACK UNTIL IT IS FULLY
SEATED AND SNAPPED INTO THE LATCH.
Column A
0
Row 1
Column B
1
Column C
2
Column D
3
Latch
Retaining Handle
5.3.
Hard Disk Drive Removal
5.3.1.
PUSH IN THE LATCH BUTTON SHOWN ABOVE TO RELEASE THE RETAINING HANDLE.
5.3.2.
PULL THE RETAINING HANDLE BACK UNTIL THE DRIVE IS FULLY REMOVED FROM THE CHASSIS.
-8-
Aberdeen LLC
AberNAS 1U
6. Server Installation
NOTE
For more detailed setup instructions, please refer to the user manual on the documentation CD.
6.1.
The first step is to attach the rear inner slide rails to the server as shown below. The server
is shipped with the front rails preinstalled.
• First, locate the right rear inner rail (the rail that
will be used on the right side of the chassis when
you face the front of the server).
• Align the two square holes on the rail against the
hooks on the right side of the chassis.
• Securely attach the rail to the chassis with the
supplied M4 flat head screws.
• Repeat these steps to install the left rear inner rail to the left side of the chassis.
6.2.
Next, determine where you would like to place the server in the rack then perform the
following steps:
• Position the chassis rail guides at the desired
location in the rack, keeping the sliding rail
guide facing the inside of the rack.
• Screw the assembly securely to the rack using
the supplied brackets.
• Attach the other assembly to the other side of
the rack, making sure that both are at the exact
same height and with the rail guides facing
inward
• Next, line up the rear of the chassis rails with
the front of the rack rails. Slide the chassis
rails into the rack rails until they “click” into
place and slide all the way back. At this point
it may be necessary to depress the locking tabs
while pushing to slide the server completely
into the rack.
• Conclude by tightening the thumbscrews that
hold the front of the server to the rack.
-9-
Aberdeen LLC
AberNAS 1U
7. Getting Connected
7.1.
Confirm the following connections are in place:
• Power Cord(s)
• Keyboard, Monitor, and Mouse
• Ethernet LAN Cables
• Com 1 & Parallel Ports (if applicable)
Note
It is recommended to use a regulating uninterruptible power supply (UPS) to protect the server from power surges, voltage spikes
and to keep your system operating in case of a power failure.
8. Powering Up
8.1.
Press the large red power button
Located on the front of the chassis in the middle.
8.2.
Press the button on the slim CD-Rom drive to eject the tray
• Insert preferred OS installation media.
• Proceed with OS installation by following the manufacturer’s recommended setup procedures.
Note
Important: It is recommended that you install the latest service packs and/or updates to obtain the highest performance and
reliability from your server.
- 10 -
Aberdeen LLC
AberNAS 1U
9. Motherboard Specifications
At the heart of the ABERDEEN LLC AberNAS 1U lies a single processor motherboard designed to provide
maximum performance. Below are the main features of the ABERDEEN LLC AberNAS 1U.
NOTE
For further detailed documentation regarding the motherboard installed in this server please refer to the accompanying
AberNAS-1U-MOTHERBOARD.PDF found within the Aberdeen User’s Manual CD-ROM.
9.1.
Chipset
The ABERDEEN LLC AberNAS 1U is based on Intel’s E7210 chipset. The E7210 chipset is made up of two main
components:
9.1.1.
MEMORY CONTROLLER HUB (MCH)
The MCH controls the flow of data between the host (CPU) interface, the memory interface and the I/O
Controller Hub interface. It contains advanced power management logic and supports dual-channel
(interleaved) DDR memory, providing bandwidth of up to 6.4 GB/s using DDR2-400 SDRAM.
9.1.2.
I/O CONTROLLER HUB (6300ESB)
The 6300ESB ICH provides the I/O subsystem with access to the rest of the system. It integrates a dual-channel
Ultra ATA/100 bus master IDE controller, two Serial ATA (SATA) host controllers, the SMBus 2.0 controller,
the LPC/Flash BIOS interface, the PCI-X (66MHz) 1.0 interface, the PCI 2.2 interface and the System
Management Controller.
9.2.
Processors
The ABERDEEN LLC AberNAS 1U supports a single Intel® Pentium® 4 processor of up to 3.40 GHz with hyperthreading technology in a 478-pin microPGA socket (must be 0.09 or 0.13 micron technology) or single a Intel®
Celeron® processor of up to 2.80 GHz.
• Hyper-Threading Technology provides thread-level-parallelism (TLP) on each processor resulting in
increased utilization of processor execution resources. As a result, resource utilization yields higher
processing throughput. Hyper-Threading Technology is a form of simultaneous multi-threading technology
(SMT) where multiple threads of software applications can be run simultaneously on one processor. This is
achieved by duplicating the architectural state on each processor, while sharing one set of processor
execution resources. Hyper-Threading Technology also delivers faster response times for multi-tasking
workload environments. By allowing the processor to use on-die resources that would otherwise have been
idle, Hyper-Threading Technology provides a performance boost on multi-threading and multi-tasking
operations for the Intel NetBurst® microarchitecture.
9.3.
Memory
The ABERDEEN LLC AberNAS 1U has four (4) 184-pin DIMM sockets that can support up to 4 GB of ECC or
non-ECC unbuffered DDR400/333/266 SDRAM modules. (Memory operates in a dual-channel, or interleaved
configuration for increased performance.) Low-profile memory modules are required for use in the 1U form factor
of the ABERDEEN LLC AberNAS 1U. Module sizes of 128 MB, 256 MB, 512 MB and 1 GB may be used to
populate the DIMM slots.
- 11 -
Aberdeen LLC
9.4.
AberNAS 1U
Serial ATA
A Serial ATA controller is incorporated into the E7210 chipset to provide a two port Serial ATA subsystem.
9.5.
PCI Expansion Slots
The ABERDEEN LLC AberNAS 1U has two 64-bit, 66 MHz PCI-X slots and two 32-bit 33MHz PCI slots.
9.6.
Ethernet Ports
The ABERDEEN LLC AberNAS 1U includes dual on-chip Gigabit LAN ports.
9.7.
Onboard Controllers & Ports
An onboard IDE controller supports one floppy drive and one CD-ROM/DVD device or ATAPI devices. Onboard
I/O back panel ports include one serial COM port, one parallel port, four USB ports, PS/2 mouse and keyboard ports
and two GLAN (RJ45) ports.
9.8.
ATI Graphics Controller
The ABERDEEN LLC AberNAS 1U features an integrated ATI video controller based on the Rage XL graphics
chip. Rage XL fully supports sideband addressing and AGP texturing. This onboard graphics package can provide a
bandwidth of up to 512 MB/sec over a 32-bit graphics memory bus.
9.9.
Other Features
Other onboard features that promote system health include eight voltage monitors, a chassis intrusion header, autoswitching voltage regulators, chassis and CPU overheat sensors, virus protection and BIOS rescue.
- 12 -
Aberdeen LLC
AberNAS 1U
10. Chassis Specifications
The ABERDEEN LLC AberNAS 1U is a 1U rackmount server platform configuration. The following is a general
outline of the main features of the chassis.
NOTE
For further detailed documentation regarding the chassis and power supply installed in this server please refer to the accompanying
AberNAS-1U-CHASSIS.PDF found within the Aberdeen User’s Manual CD-ROM.
10.1.
System Chassis
The ABERDEEN LLC AberNAS 1U utilizes a 1U chassis and features four hot-swap SATA hard drive bays, and a
superb cooling design that can keep today's most powerful processors running well below their temperature
thresholds.
10.2.
System Power
The ABERDEEN LLC AberNAS 1U includes a 300W power supply.
10.3.
Serial ATA Disk Subsystem
The ABERDEEN LLC AberNAS 1U chassis was designed to support up to four external Serial ATA hard drives
and one internal OS 2.5” drive. The external Serial ATA drives are hot-swappable units.
10.4.
Front Panel Control
The ABERDEEN LLC AberNAS 1U control panel provides important system monitoring and control information.
LEDs indicate power on, network activity, hard disk drive activity and overheat conditions. The control panel also
includes a main power button and a system reset button.
10.5.
Rear I/O Panel
The rear I/O panel on the ABERDEEN LLC AberNAS 1U provides one motherboard expansion slot, one COM port
(another is internal), two USB ports, PS/2 mouse and keyboard ports, a parallel (printer) port, a graphics port and
two GB Ethernet ports.
10.6.
Cooling System
The ABERDEEN LLC AberNAS 1U chassis has an innovative cooling design that features five 4-cm high
performance cooling fans. The fans plug into headers on the motherboard and operate at full rpm continuously.
- 13 -
Aberdeen LLC
AberNAS 1U
11. Software Management
The Aberdeen AberNAS 120 has been completely configured and integrated with all software installed. The server
is ready for deployment within minutes.
NOTE
For further detailed documentation regarding the installed software including the Microsoft Windows Storage Server2003 and Areca
CLI 2 RAID management utility please refer to the accompanying NAS software .PDF files found within the Aberdeen User’s Manual
CD-ROM.
12. Microsoft Windows Storage Server 2003
If you connect a monitor (1024x768x85Hz resolution), a keyboard and a mouse to your Aberdeen NAS Server for easy setup
purposes.
12.1.
Initial Set-Up
• Power up the device and Login as:
User:
Administrator
Password:
monster
The easy Graphical User Interface (GUI) NAS interface will start. Click on “Administer this Server Appliance” and
a detailed help menu embedded into interface will appear. If you see a connection error on Internet Explorer, simply
click “Try Again.”
If you don’t want to connect your Aberdeen NAS Server to a monitor, keyboard and a mouse:
Connect the server to your network, turn it on and allow it approximately two (2) minutes to boot up. Go to any
computer connected to the same network, open up your web browser and type https://abernas:8098
• Enter the default login information:
User:
Administrator
Password:
monster
The easy Graphical User Interface (GUI) NAS interface will start. Click on “Administer this Server Appliance” and
a detailed help menu embedded into interface will appear. If you see a connection error on Internet Explorer, simply
click “Try Again.”
If your network has a special IP Number or a Layer 2-3 switch and there is no DHCP Server present on your
network, second method may not function and it will be necessary to install a monitor, keyboard and mouse on the
NAS Server.
12.2.
Menu Access
To Manage Disk Volumes or Remote Desktop menus, you must be using Internet Explorer 5.5 or higher. For other
menus, any web browser application should function properly.
- 14 -
Aberdeen LLC
AberNAS 1U
13. Web Based RAID Management Utility.
How to Access Web Based RAID Management Utility.
A) If you have 12/16/24 drive bay NAS
1) Connect a separate cable from your network to “RAID Array Management Port”. That port will not
transmit file data. It will be only for the RAID array management
2) The port is set to 192.168.1.100 and 255.255.255.0 by default. You can access the RAID Management from
any remote computer on your network by typing the IP number on a web browser. Default username is
Admin and password is “0000” (4 zeros).
If you have DHCP setup and your network IP number doesn’t match, above method may not work. You need to set
it manually or get the automatically assigned IP number.
i) One way is to connect Keyboard-Monitor-Mouse and boot into NAS.
1.
Double click Archttppci
- 15 -
Aberdeen LLC
AberNAS 1U
2.
3.
4.
5.
Click and highlight the controller than click start.
Default username is Admin and password is “0000” (4 zeros).
Change the network setting under System Controls
Ethernet config.
6.
You can access the RAID Management from any remote computer on your network by typing the IP
number on a web browser.
- 16 -
Aberdeen LLC
AberNAS 1U
ii) Second way is to set it up from the boot menu
1.
Restart your computer. While system is booting, when Areca BIOS Menu appears, press TAB.
When the controller address appears press enter.
2.
3.
Default password is “0000” (4 zeros).
If you have a DHCP setup on your network, you can read it from System Information Menu and you
can access RAID Management from any remote computer on your network by typing the IP number.
- 17 -
Aberdeen LLC
4.
AberNAS 1U
If you don’t have a DHCP setup or you need to set a static IP (recommended), Open up the Ethernet
Configuration menu.
Disable DHCP and set the IP number and Subnet for the Array Management. Press F10 to save and
exit. you can access RAID Management from any remote computer on your network by typing the IP
number. Default username is Admin and password is “0000” (4 zeros).
- 18 -
Aberdeen LLC
AberNAS 1U
B) If you have 4/8 drive bay NAS
If you can connect the Keyboard-Monitor-Mouse to your server , Steps 7 and 8 will let you start remote access.
Ignore the other steps
1) Open up the NAS Main menu on your Internet browser
2) On the NAS Main menu click Maintenance.
3) On the Maintenance menu click Remote Desktop
- 19 -
Aberdeen LLC
AberNAS 1U
4) If it is the first time you are logging in to Remote Desktop, it will ask you to install an ActiveX control.
Click Yes.
5) The Remote Desktop Login menu will come up. Enter your username and password. If you did not change
this, it will be the default username and password of the NAS Main menu.
- 20 -
Aberdeen LLC
AberNAS 1U
6) A windows session will come up with the NAS Main menu and will start within that session. Just close the
Internet Explorer WITHIN THAT SESSION. (Not the one you opened up to access Remote Desktop.)
The pointer on the photo below shows where to click
7) Double click Click Archttppci
- 21 -
Aberdeen LLC
AberNAS 1U
8) Click and highlight the controller than click start. From that point on, you can access the RAID
Management from any remote computer on your network. until you restart NAS Server. To Reach from
Remote, simply enter http://xxx:81 which xxx being you NAS Server’s IP number or name
Default username is Admin and password is “0000” (4 zeros) for the controller
9) Logoff to close Remote Desktop. Remote Desktop let’s you open 2 Remote sessions at a time. So If you
don’t logoff, that session will remain open. After 2 times of not logging off ,it will not let you in. If that
happens, you may restart your AberNAS to clear those open sessions
- 22 -
Aberdeen LLC
AberNAS 1U
14. Troubleshooting
In the event a problem is encountered, the following steps should be taken to overcome the issue:
14.1.
Server does not power up:
• Check electrical connections to make sure power is being delivered to the server.
• Bypass Uninterruptible Power Supply (UPS) unit and connect directly to power outlet.
• Contact Aberdeen technical support for further assistance.
14.2.
Server powers up but there is no display:
• Check VGA connection to the server and confirm it has not come loose.
• Bypass KVM switch and connect directly to a VGA display.
• Confirm refresh rate compatibility between the server and the display. (Default 85Hz)
• Contact Aberdeen technical support for further assistance.
14.3.
Server powers up and has a display but no disk(s) can be seen by the OS installation
program:
• Remove and replace hard drive trays which may have become unseated during shipment.
• Make sure the correct SATA or SCSI drivers have been used during OS installation.
• Check internal server connections for loose cables caused during shipment.
15. Appendix A:
Microsoft Windows Storage Server 2003
For further detailed documentation regarding the installed software including the Microsoft Windows Storage
Server2003 please refer to the accompanying AberNAS 1U NAS software .PDF files found within the Aberdeen
User’s Manual CD-ROM.
16. Appendix B:
RAID Management Utility
For further detailed documentation regarding the installed software including the RAID management utility please
refer to the accompanying AberNAS 1U software .PDF files found within the Aberdeen User’s Manual CD-ROM.
- 23 -