1
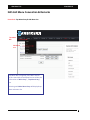
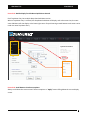
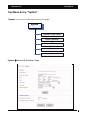
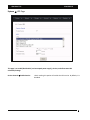
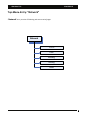
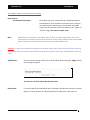
Aberdeen LLC AberNAS LX 64-Bit AberNAS LX User Guide ‐‐‐ A Linux based Network Storage OS ‐‐‐ Before reading this NAS User Guide, first please read following documents first for quick and proper reference: Default Admin ID: root ‐‐‐ case sensitive Default Password: 0000 ‐‐‐ 4 zero Quick Start Guide ‐‐‐‐ instructions for how to quickly find the NAS in an user’s network and set a static IP for the NAS, then launch the Web Administrator GUI. Setup WorkFlow ‐‐‐‐ illustrates quick steps for creating a SMB/CIFS share and access it from Windows clients. Menu Layout ‐‐‐‐ illustrates the GUI menu structure for navigating sub‐menu items/actions branching out from the top Menu‐ Entry. RAID Manager Guide ‐‐‐ AberNAS LX appliance models exclusively use either Areca’s SAS RAID Adapter or LSI’s SAS RAID adapter. Hardware RAID adapter is a very important part of the whole system, it deserves a dedicated user guide just for how to setup and manage the RAID volume. So please refer to the proper RAID Manager Guide which comes with the AberNAS LX. CUSTOMER SUPPORT INFORMATION Mailing address: Aberdeen LLC 9130 Norwalk Boulevard Santa Fe Springs, CA 90670 Phone (562) 699‐6998 Sales (800) 552‐6868 Fax (562) 695‐5570 Web site: www.aberdeeninc.com E‐mail: [email protected] Aberdeen LLC AberNAS LX NAS GUI Menu Convention & Remarks Remark‐#1: Top‐Menu Entry & Sub‐Menu List. Top‐Menu Bar. Sub‐Menu List. Top Menu Bar has eight (8) main Menu Entries. In this User Guide, these Menu Entries will also be referred to as “Main Entry”, “Top Menu Entry”, etc. Selecting each Main Menu Entry will display drop‐ down sub‐menu list. 2 Aberdeen LLC AberNAS LX Remark‐#2: Double‐Display for Sub‐Menu Quick Move‐Around. Each Top‐Menu‐Entry has multiple drop‐down Sub‐Menu entries. When a Top‐Menu‐Entry is selected, the drop‐down Sub‐Menu will display, and at the same time, the exact same Sub‐Menu will also display at the lower right corner for quick moving around between sub‐menu entries under the same Top‐Menu‐Entry. Remark‐#3: Scroll Down to check more options. Always scroll‐down the screen to see if there are options or “Apply” button falling below the current display screen. 3 Aberdeen LLC AberNAS LX Top‐Menu‐Entry: “System” “System” entry consists of following sub‐menu entries/pages System General & Shut Down Admin Password UPS Sensor Update System General & Shutdown Page 4 Aberdeen LLC AberNAS LX Server Name: the name given to the NAS, such as “MyCompanyNAS”, etc. Server Description: key in the description for the NAS that you know what this system is for. such as: “the NAS backup for my SQL server”, etc. Date / Time / Time Zone: simply input the proper date, time and time zone where this NAS is residing on. Language: this is referring to what the network client OS language will be. Network client is the computer system which will be accessing the NAS. This setting determines how file names and path to files in the NAS are to be displayed. Currently, supported languages are: English (default) Chinese Simplified Chinese Traditional UTF‐8 Japanese EUC and Korean EUC are yet to be implemented. Admin Language: this is referring to what web browser GUI language is set for. This setting determines how the NAS Admin GUI Menu will display by the Web Browser. Currently, supported Admin Languages are: English (default) Simplified_Chinese_UTF8 Traditional_Chinese_BIG5 Traditional_Chinese_UTF8 Remarks: the setting for “Language” and “Admin Language” are for two different things, however, the settings on both better to be closely matched. Other wise, folder name or share name created by NAS Admin GUI will not be the same as what the network client displays and access. 5 Aberdeen LLC AberNAS LX Apply button: make sure to click the “Apply” button after any change to the above field to make it effective. Shutdown button: click it to safely power off the NAS system. Reboot button: click it to safely reboot the NAS system. Delay before Shutdown: the seconds to wait before initiate the shutdown process. by default, ‘0’ seconds to wait before shutdown. Check File systems on Startup: check marking this option will force the NAS OS to do filesystem check on each XFS volume(network share) every time it boots. By default, it is off. 6 Aberdeen LLC AberNAS LX System Admin Password Page This page is used to change current admin password to a new password. Current Password: key in the current admin password. New Password: key in the new admin password to change to Confirm New Password: re‐key in the new admin password to confirm. click the “Apply” button to make change effective. Apply button: 7 Aberdeen LLC AberNAS LX System UPS Page This page is to enable/disable UPS ( un‐interrupted power supply ) Service, and allow some UPS selections/settings. Service Control Enable Service: check marking this option will enable the UPS service. By default, it is disabled. 8 Aberdeen LLC AberNAS LX UPS : Port : the window lists the supported UPS brands and models. Scroll down to find more brands and models. ‘port 1’ = COM1; ‘port2’ = COM2; ‘USB’ = USB port on the NAS system. Select the proper Port Type according to what connectivity you have between the NAS and your UPS. Poll Frequency: Shutdown Delay: how often to check the UPS status. by default, if the USP service is enabled, it is 5 seconds. how many seconds to wait before initiate the actual shutdown after receiving the shutdown signal from UPS service. By default, 300 seconds. Apply button: click the “Apply” button to make effective for changes to the above fields Remarks: #1: No network UPS supported, only support UPS connected via RS232 or USB. #2: for APC UPS, please use the “simple signal cable” for the RS232/COM port connection. DO NOT use the “smart signal cable” which comes with the APC UPS by default. 9 Aberdeen LLC AberNAS LX System Sensor Page Depends on the motherboard used in the NAS systems, this page may or may not display any thing. Basically, there are two types of motherboard sensor implementations: IPMI and None. for None, the Sensor page will not display any info. for IPMI, it will display readings for following sensors: CPU1_Temp, CPU2_Temp, CPUx_Temp, etc. System_Temp CPU1_Vcore, CPU2_Vcore, CPUx_Vcore, etc. CPU1_DIMM, CPU2_DIMM, CPUx_DIMM, etc +1.5V, +3.3V, +3.3VSB, +5V, +12V, VBAT, etc Fan1, Fan2, Fan3, Fan_x, etc. Just simply pick the item(s) that you want the NAS to monitor and click “Save” button. 10 Aberdeen LLC AberNAS LX System Update Page This page is used for following functions: update patch restore previous configuration save existing system configuration reboot the system after updating patch enter new license to enable and reveal special Feature/Function reset system configuration back to factory default. Update: Browse: browse the admin’s local computer for selecting the patch file. No Dependency check: from time to time, some specific patch may require check‐marking this option in order for the new patch to be installed. Update button: click “Update” button to update the selected patch file. After updating the patch, always reboot the system for the patch to take effect. Restore configuration: Browse: browse the admin’s local computer for selecting the previously saved configuration file. Restore configuration button: this button will restored the selected previous‐saved NAS configuration back to the NAS. Reboot for the restored configuration to take effect. 11 Aberdeen LLC AberNAS LX Save configuration: this button is to export the current NAS configuration into a file and save it onto a local location on the administrator’s computer. This file serves two purposes: (1) for future configuration recovery purpose (2) email to tech‐support for trouble‐shooting. Each time the administrator make some changes, such as adding users or deleting users, the configuration file need to be re‐saved again. In other words, keep the saved configuration file up today. When clicking the “Save configuration” button, the GUI will prompt you to browse and find a location in your computer to save the configuration file. Remarks: The saved configuration does not include physical volume info for volume info is stored and associated with the physical volume itself. use the Reboot button to reboot each time after updating patch, and reboot Reboot: each time after restoring the configuration file. License: Reset configuration: use the License button to key in the new license for following purposes: increase/extend supported capacity enable/reveal hidden functions/features this button is to reset system configuration back to factory default. It will remove all user accounts, either local or imported; it will remove all LVs (logical volumes) and VGs(volume groups), either network share volume or iSCSI volume, thus it will erase all data. It is useful for administrator who wants to start creating volumes and users all over without worrying any potential hidden corruption on the existing volume or unclear‐flags on configuration files. . Remarks: #1: since it will erase all data in the NAS, please take extra precaution when using this function. Please make sure either you have a full backup of the data in the NAS, or you are sure you don’t need really need the data in the NAS any more. #2: it will not reset the existing Network Configuration. 12 Aberdeen LLC AberNAS LX Top‐Menu‐Entry: “Network” “Network” entry consists of following sub‐menu entries/pages Network TCP/IP DNS Bonding Routing Hosts 13 Aberdeen LLC AberNAS LX Network TCP/IP Page In this page, you can pick any NIC port and assign a Static IP to it along with some other properties. NIC Port is identified as “ethx”, such as: eth0, eth1, eth2, ……., etc When clicking the “Edit” button of a NIC Port (ethx), the corresponding configuration of the selected NIC Port will display at the window of “Configuration”. Port: displays which NIC Port is selected here. Status: Enable or Disable the NIC Port Boot Protocol: Static IP: when selected, it allows the admin to enter the static IP address, Netmask, and Default Gateway for the NIC port. DHCP: when selected, the NIC port will get an IP assigned from the DHCP server in the network. and the fields: IP address, Netmask, and Default Gateway will display what value is assigned from the DHCP server. 14 Aberdeen LLC AberNAS LX Click “Apply” button to take effect of the settings Boot Protocol: Get Hostname from DHCP: If the Admin has a the “reverse look up” enabled and setup in the DHCP Server, then, the DHCP server will not only assign an IP to the NIC port, but also assign a Server Name to the NAS system. The Server Name is the name defined in the “System “General” page. This option is seldom used. MTU: Maximum Transmission Unit. The default value is 1500. To enable Jumbo Frame, refer to the actual Ethernet card being used for the proper MTU number. Most of the Ethernet card has 9000 MTU for Jumbo Frame, but we have seen other value besides 9000 for MTU. Remarks: in order to use Jumbo Frame properly, the network switch and the other end of the device accessing the NAS also need to be Jumbo Frame enabled and set to the same MTU. other wise, unpredictable results may occur. Apply button: Click to make the change in effect for any fields above. After clicking the “Apply” button, this message will appear: Just wait for it to finish and the GUI will come back. Blink button: it is used to identify the selected NIC port. Clicking at it will blink the LED of the selected NIC port, so that the admin can identify which physical NIC port is eth0, eth1, etc. 15 Aberdeen LLC AberNAS LX Network DNS Page DNS ‐ Domain Name System (DNS) is a database system that translates a computer's fully qualified domain name into an IP address. The computer system that runs the DNS functions is the DNS Server. In a small network environment, such as a home network or small office network, the DNS could be the internet Router. For bigger companies or corporations, normally there is at least one dedicated DNS server in place. AberNAS LX implements a “multi DNS” support scheme. If the user has more than one DNS servers, up to 3 DNS Servers’ IPs can be listed, and if the Primary DNS fails, the NAS will fallback to the Secondary DNS, and if the Second DNS fails too, then, the NAS will fallback to the Tertiary (3rd) DNS. Primary DNS / Secondary DNS / Tertiary DNS field: key in the IP address of corresponding DNS Server. If there is no Secondary or Tertiary DNS, just leave it blank. DNS Search Path ‐‐ a DNS search path is a list of Domains to try/search for when the NAS tries to translate a machine name into an IP address. It is in the Format of: mycompany.com mycompany.net mycompany.org For small network enviremnt, the administrator may not need to worry about it, just simply “localdomain” will do. Click “Apply” button to take effect of the settings 16 Aberdeen LLC AberNAS LX Network Bonding (Teaming) Page Bonding is also some times referred to as Teaming. It is to bond multiple NIC ports together under the same IP to achieve the purposes of increasing bandwidth and/or providing path redundancy. Bond Type: the AberNAS LX supports all 7 basic modes of bonding. However, these days, only 2 types are most often used, and they are: ALB and 802.3ad. Bond Type ALB: Adaptive‐Load‐Balancing. It attempts to redistribute network traffics(outgoing and incoming) on the fly based on current conditions. All NIC ports need to hook to the same network switch, and the network switch does need to have special settings for it as long as the switch is a true switch, not a hub. Because of that, the ALB mode is most often setting for the bonding, and that is why we made it as the default setting for bonding. Besides increasing network performance, ALB also provides network path failover against NIC port failure. 17 Aberdeen LLC AberNAS LX Remarks on ALB: #1: ALB does not increase Point‐to‐Point network performance. The performance advantage will show when there are multiple network clients accessing the NAS. And the performance increased is not linear, actually none of the bonding types will provide linear performance increase. #2: All NIC Ports in the same bonding must hook to the same network switch. They can not be connected to different switches. Bond Type 802.3ad: Dynamic Link Aggregation. It creates aggregation groups that share the same speed and duplex settings. Actually there are two types of 802.3ad: with or without LACP. LACP –Link Aggregation Control Protocol".The NASDirector supports ONLY the 802.3ad with LACP. This mode requires a switch that also supports IEEE 802.3ad with LACP, and the switch needs to be configured on the specific ports that the NIC ports are connected to. Setting the Bonding: Select the NIC Ports intended to be bond together, then, click “Create” button to create the bonding. Rules for Bonding: The IP of the bond is always the first NIC Port in the Bond. For example, in the above Bonding page screen, bonding the eth0 and eth1 will result in the bond0 with eth0’s IP address: bond0 IP = eth0 IP = 192.168.2.21 Multiple bonds are supported, as long as each bond is in a different network. For example: bond0 = 192.168.1.100 and bond1 = 192.168.2.100 are valid setting. But: bond0 = 192.168.1.100 and bond1 = 192.168.1.200 are not valid setting. 18 Aberdeen LLC AberNAS LX Network Routing Page This function/page is dedicated for those sophisticated users who have multiple networks and gateways in their network environments. For those who don’t have multiple networks/gateways, please skip it. What is the “Routing” page” for? Each NAS has at least two NICs, and some times more than two NICs. Some corporation users have multiple subnets and need to assign each NIC with its own subnet and with its own Gateway. However, under the “TCP/IP Setting” page, there is only one option field for “Default Gateway”. The “Routing” page is to address this need by allowing additional Gateway IP and Destination IP to be associated with designated NIC port. 19 Aberdeen LLC AberNAS LX Network Host Page The “Host” function is to allow the association of a network client’s name with its IP and stored it locally to the NAS. When it comes to finding a network client’s name/ip resolution, the NAS will first look it up locally according to this “Host” information, then, go to the DNS server. It is typically useful to enter your ADS server’s info here if you intend to join the NAS to your existing ADS server in later on session. Do Not Delete the first two existing Entries. Just Leave them alone. Address: the IP address of the network client, such as: 192.168.2.100 Names: the name of the network client, it can any of the following formats: mycompany mycompany.com mycompany mycompany.com (multiple names with space in between) Make sure to click “Add” button. 20 Aberdeen LLC AberNAS LX Top‐Menu‐Entry: “Storage” “Storage” entry consists of following sub‐menu entries/pages Storage Internal RAID (model dependent) External RAID (model dependent) Software RAID (model dependent) iSCSI Initiator USB / 1394 Volume Group Logical Volume What is “Model Dependent” ? AberNAS LX has 3 models: Appliance, Gateway, and Mini‐NAS. Appliance – the NAS has the internal PCIe based RAID controller, and the NAS self‐contains the disks for storage capacity. When NAS is purchased as “Appliance model”, the “Internal RAID” sub‐menu entry will display. Other wise, this sub‐menu entry will not display. Appliance model is the most common model. Gateway – the NAS has no internal storage at all, rather it is only a Head unit that connects to external RAID subsystems via Fibre or SAS connectivity for storage capacity. The “clustering” solution requires the Gateway model to implement. When the NAS is purchased as “Gateway” model, the “External RAID” sub‐menu entry will display, other wise, it is hidden from the sub‐menu. Mini‐NAS – the NAS has no internal hardware RAID controller, it uses the Linux OS based software RAID to do the RAID array over disks. When a NAS is purchased as Mini‐NAS model, the “Software RAID” sub‐menu entry will display, other wise, it is hidden. 21 Aberdeen LLC AberNAS LX Storage Internal RAID Page Multiple internal RAID controllers are supported. When there is only 1 internal RAID controller installed, it will display as: Launch RAID Manager for Controller #0 When there are multiple internal RAID controllers installed, it will display as: Launch RAID Manager for Controller #0 Launch RAID Manager for Controller #1 Launch RAID Manager for Controller #2 …… …… …… …… …… …… …… Click on the selected “……Controller #x” will launch the Web Admin GUI for the corresponding RAID controller. The default Login Info for the RAID Controller for the first time is: User ID: admin Password: 0000 Remarks: If you have changed the password of the NAS, the new password of the NAS will sync to the RAID controller as well. But the Controller’s user ID remains as “admin” while the ID for the NAS remains as “root”. Please refer to Areca’s RAID controller User Manual for how to setup/configure the RAID array, and make sure you initialize the RAID volume(s). Once the RAID controller has finished volume initialization, click the “Restart” button for the NAS to recognize the newly created RAID volume as the Physical Volume. 22 Aberdeen LLC AberNAS LX Storage External RAID Page The “External RAID” page will display only for the “Gateway/Head” model, other wise, it is hidden. This function is designed for those external RAID GUI management which is using Web based GUI with IP address. If your external RAID GUI management is some sort of executable application program other than Web browser, then, it is not covered by this function. Fill the URL field with IP address of the External RAID’s GUI Fill the Description field with the description that you understand what the URL is for. then, click “Add” button. Now click on the “IP” of the “RAID Manager URLs” will bring up the Web GUI Management of your External RAID system. 23 Aberdeen LLC AberNAS LX Storage Software RAID Page The “Software RAID” page will display only for the “Mini‐NAS” model, other wise, it is hidden. Under the “Physical Volumes” Window: SCSI ID: disk ID, in format of: Info: Size: Select/Stat: 0:0:0:0 = disk‐1 1:0:0:0 = disk‐2 2:0:0:0 = disk‐3 3:0:0:0 = disk‐4 disk Info, such as: Brand, Model, and Firmware disk size disk‐selection/disk‐status. The empty box means the disk is not selected. Check‐mark the box means the disk is selected. “OK” means the disk is at normal status. It could show “Failed” or “Removed” if the disk is bad or removed. 24 Aberdeen LLC AberNAS LX Blink button: Create a RAID or Spare: Stripe Size: Rebuild Speed: it will blink the selected disk LED if the chassis implements the Activity LED for the disks. It is used to identify the actual disk‐number matches what it is display in the GUI. when there is no existing RAID volume, you can only create a RAID and not allowed to create Spare. The Spare is allowed only if you have an existing RAID with RAID‐level of: 1, 5, 6, 10 Supported RAID‐level is: 0, 1, 5, 6, 10 the stripe size for the RAID can be: from 4KB ~ 1024KB, just use the pull down window. The default size is 64KB the option is: High, Mid, and Low. It is to define how much internal storage speed should be allocated to the RAID rebuilding, thus, save some resources for normal data accessing. The higher the rebuild speed is, the less resources it has for normal data access. for the first time RAID creation, always use “High”, so the RAID initialization will finish faster. Basic Steps to Create a RAID: Step‐1: select by check‐marking all the disks to be put into the same RAID array. Step‐2: select the RAID‐level Step‐3: select the Stripe‐Size, or leave it at 64KB Step‐4: click the “Create” button, and the GUI will display like below: 25 Aberdeen LLC AberNAS LX Notice that, the disks selected have disappear from the “Physical Volumes” Window, and show up in the “Software RAID Volume” Window. Now under the Software RAID Volume window, we have: SW‐RAID#0, if there is more than one SW‐RAID, it will be, SW‐RAID#1, SW‐RAID#2, so forth and so on. Volume: Info: RAID‐Level Info, such as RAID5, or RAID0, or RAID6, etc. Select/Stat: RAID volume‐selection/RAID volume‐status. When the selection box is empty, means the RAID is not selected. Status can be: Normal, Degraded, Failed, Degraded recovering %, etc. Remove button: select by check‐marking a RAID, if click “Remove” button, the selected RAID volume will be removed/deleted. Check button: select by check‐marking a RAID, if click “Check” button, the selected RAID volume will run consistency check for RAID‐level: 5 or 6. Create a HotSpare: If the existing RAID‐level is 5, 6, or 10, HotSpare disk can be added to it. 1. select by check‐marking a RAID volume from Software RAID Volume widow 2. select a disk from Physical Volume window 3. click “Create” button. 26 Aberdeen LLC AberNAS LX Storage iSCSI Initiator Page AberNAS LX has built‐in iSCSI initiator function which allows the administrator to pull in a remote iSCSI Target volume as local physical volume. Basic Steps to connect to a remote iSCSI Target / LUN: Step‐1: Check‐marking “Enable Service” Step‐2: Key in the remote iSCSI Target’s IP address in “iSCSI Target Discovery IP:” Step‐3: Key in the remote iSCSI Target port number if it is not the default 3260. Step‐4: Click “Discover” button, if the Target IP is correct, the Target name will show up in the “Target List” window. and the corresponding iSCSI LUN will show up in “iSCSI LUN Log In and Out” window. Step‐5: Select the iSCSI LUN and click “Log In” button. For CHAP, please refer to the remote iSCSI Target’s requirement. 27 Aberdeen LLC AberNAS LX Storage USB/1394 Page When an USB or 1394 disk is plugged into the system, a device and corresponding capacity will be displayed in the “Raw USB/1394 Volume Pool” window. Give it a name in the “Name” field and click “Import”, and you are prompted to format it. Once it is formatted, it will show up in the “USB/1394 Volume Pool” and ready to be used. USB/1394 disk is intended to be removable, and removing a XFS volume while online can seriously upset the entire OS and all volumes. Thus, the USB/1394 volume is defaulted to be “FAT32”, which in turn limits the volume size to 2TB maximum. USB/1394 volume by itself is a logical volume already and no need to go through the settings in the “Volume Group” page and “Logical Volume” page. Depends on the chip used in the motherboard/system and the chip used in the external Device, some times, they are not compatible, and in such case, the USB/1394 disk is not supported. 28 Aberdeen LLC AberNAS LX Storage Volume Group Page After the Internal RAID volume/External RAID volume/iSCSI Target volume has been created and the NAS restarted, such volume will show up in the “Physical Volumes” window. Check‐mark to select the Physical Volume (aka PV), and click “Create VG” button. Now, the selected PV will turn into VG and display under the “Volume Group” window. If you have multiple PVs, you can create multiple VG. If you want to increase the size of an existing VG, just simply add a new PV to the existing VG by check‐marking both the PV and VG, then click “Add PV to VG” button. Adding a PV to existing VG is also called: Linear RAID or Spanning. 29 Aberdeen LLC AberNAS LX Storage Logical Volume Page This is the last stop to create the network volume or iSCSI Target volume. Volume Types: XFS – a XFS volume is to be created for network share(s). “Assign Home Directory” is an option to create “home” folder for each user on that network share. Regardless how many XFS shares you may have, only one XFS share can be used to create “home” folder. GFS2 – a GFS2 volume is to be created for clustered network share(s), and only shows when the special license is entered, other wise, it is hidden. The special GFS2 license is only available for the Gateway/Head Model. iSCSI – an iSCSI volume is to create the iSCSI target volume, and it will act as if a local disk to the remote iSCSI initiator. iSCSI target volume has an extra field: LUN# By default, the LUN# = 0. However, if you are using multiple iSCSI target volumes from multiple NAS units with VMWare ESX, then, you might need to adjust the LUN# on them so that no two iSCSI target volumes should have the same LUN#, other wise, ESX will assign the exact same ID to all the volumes and won’t connect properly. 30 Aberdeen LLC AberNAS LX This is a typical illustration for how it looks like after a typical XFS share and an iSCSI target volume created. VG0 – it has 714,272MB in size, it has two LVs created on it, and it has 414,272MB free space for more LVs. share0 – it is a XFS share from VG0, it has size of 200,000MB, and it is all free ivolume – it is an iSCSI target volume from VG0, it has size of 100,000MB, since contents of an iSCSI volume is solely controlled by the iSCSI initiator, the NAS will not show the Free space of it. XFS volume and/or iSCSI target volume can be deleted by clicking the “Delete” button. But they can also be “Modified”, see next page for detail. 31 Aberdeen LLC AberNAS LX When clicking on an existing LV name, the “Modify Logical Volume” window will display with the corresponding LV info. In the “Modify Logical Volume” window, you can do: * Change the volume name – simply type in the new volume name over the old volume name. * Increase the volume size – if the VG still has free/available space, then, simply type in the new larger size for the Volume Size. Click “Modify” button to make the changes take effect or click “Back” button to cancel. In next page, let’s review the process and workflow of creating LV. 32 Aberdeen LLC AberNAS LX How To Create Logical Volume (LV) Workflow Storage Internal RAID External RAID Create Internal RAID volume Create Ext. RAID volume Software RAID (Create SW-RAID volume) iSCSI Initiator Connect to iSCSI Target Volume Group PV (Physical Volume) = RAID Volume Create VG from PV (Physical Volume) Logical Volume Create XFS Share from VG and / or Create iSCSI Target Volume from VG, Adjust LUN# if Necessary 33