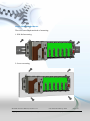
1
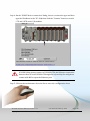
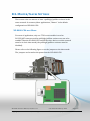
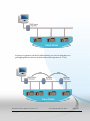
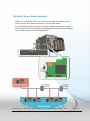
XP-8000-CE6 User Manual, version 1.0.6. Last Revised: February 2010 Copyright © 2009 ICP DAS Co., Ltd. All Rights Reserved. E-mail: [email protected] Page: 1 Warranty All products manufactured by ICP DAS are under warranty regarding defective materials for a period of one year, beginning from the date of delivery to the original purchaser. Warning ICP DAS assumes no liability for any damage resulting from the use of this product.ICP DAS reserves the right to change this manual at any time without notice. The information furnished by ICP DAS is believed to be accurate and reliable. However, no responsibility is assumed by ICP DAS for its use, not for any infringements of patents or other rights of third parties resulting from its use. Copyright Copyright @ 2009 by ICP DAS Co., Ltd. All rights are reserved. Trademark The names used for identification only may be registered trademarks of their respective companies. Support ICP DAS take your problem as ours. If you have any problem, please feel free to contact us. You can count on us for quick response. Email: [email protected] Tel: 886-3-5973366 Also, the FTP site of ICP DAS has contents about XP-8000-CE6 which you may be interested in. We believe that those contents may be helpful to your work. FTP: ftp://ftp.icpdas.com/pub/cd/xp-8000-ce6/ Contact sales of ICP DAS for OEM or ODM services. Contact sales: http://www.icpdas.com/sevices/support.htm XP-8000-CE6 User Manual, version 1.0.6. Last Revised: February 2010 Copyright © 2009 ICP DAS Co., Ltd. All Rights Reserved. E-mail: [email protected] Page: 2 1. GENERAL INFORMATION 5 1.1. INTRODUCTION 6 1.2. FEATURES 7 1.3. SPECIFICATIONS 11 1.4. DIMENSION (UNIT: MM) 14 1.5. OVERVIEW 18 1.6. COMPANION CD 21 1.7. RESCUE COMPACT FLASH CARD 22 2. QUICK START AND RESCUE 23 2.1. GETTING STARTED WITH XP-8000-CE6 HARDWARE 24 2.2. REGIONAL AND LANGUAGE OPTIONS 27 2.3. GETTING STARTED WITH XP-8000-CE6 SOFTWARE TOOLS 28 2.4. XPAC UTILITY FOR CONFIGURING XP-8000-CE6 30 2. 4.1. XPAC UTILITY MENU BAR 31 2.4.2. XPAC UTILITY PROPERTY TABS 34 2.4.3. THE FACTORY DEFAULT SETTINGS 43 2.5. DCON UTILITY FOR CONFIGURING I-7K AND I-87K SERIES I/O MODULES 44 2.6. RESCUE THE XP-8000-CE6 48 2.7. UPDATING THE XP-8000-CE6 51 2.7.1. ONLY UPDATE OS IMAGE 52 2.7.2. REINSTALL XP-8000-CE6 52 2.8. RESTORE THE RESCUE DISK XP-8000-CE6 User Manual, version 1.0.6. Last Revised: February 2010 Copyright © 2009 ICP DAS Co., Ltd. All Rights Reserved. E-mail: [email protected] 53 Page: 3 3. XPAC_CE6 TOOLS 56 3.1. DCON UTILITY (FOR PC SIDE) 58 3.2. XPAC UTILITY 59 4. YOUR FIRST PROGRAM 4.1. SETTING UP THE DEVELOPMENT ENVIRONMENT 60 61 4.1.1. INSTALLING AND SETTING PLATFORM SDK 61 4.1.2. API AND SDKS 64 4.2. CREATING YOUR FIRST PROGRAM 65 4.2.1. YOUR FIRST VISUAL C++ PROGRAM 66 4.2.2. YOUR FIRST VISUAL C# PROGRAM 75 APPENDIX A. FRAME GROUND 81 APPENDIX B. APPLICATION OF RS-485 NETWORK 83 B.1. BASIC RS-485 NETWORK 84 B.2. DAISY CHAIN RS-485 NETWORK 84 B.3. STAR TYPE RS-485 NETWORK 85 B.4. RANDOM RS-485 NETWORK 86 B.5. MASTER/SLAVES SETTINGS 87 APPENDIX C. TIPS – HOW TO 90 C.1. HOW TO USE ROTARY SWITCH 91 C.2. HOW TO USE DIP SWITCH 92 C.3. HOW TO ONLINE DEBUG XP-8000-CE6 93 C.4. HOW TO USE MULTI-IO MODULES 100 XP-8000-CE6 User Manual, version 1.0.6. Last Revised: February 2010 Copyright © 2009 ICP DAS Co., Ltd. All Rights Reserved. E-mail: [email protected] Page: 4 1. General Information This chapter covers the basic information necessary to help you maximize the effectiveness of the XP-8000-CE6. XP-8000-CE6 User Manual, version 1.0.6. Last Revised: February 2010 Copyright © 2009 ICP DAS Co., Ltd. All Rights Reserved. E-mail: [email protected] Page: 5 1.1. INTRODUCTION What is XP-8000-CE6? XP-8000-CE6 is the new generation PAC of ICP DAS. It equips a AMD LX 800 CPU (500 MHz) running a Windows Embedded CE 6.0 operating system, variant connectivity (VGA, USB, Ethernet, RS-232/RS-485) and 0/3/7 slots for high performance parallel I/O modules (high profile I-8K series) and serial-type I/O modules (high profile I-87K I/O modules). Its operating system, Windows Embedded CE 6.0 R3, has many advantages including hard real-time capability, small core size, interrupt handling at a deeper level, achievable deterministic control and low cost. Compared with CE5.0, CE6.0 updates its virtual memory architecture to increase system robustness and security. Besides, CE 6 R3 delivers rich user experiences and a unique connection to Windows PCs, servers, services, and devices. XP-8000 also supports SoftPLC such as ISaGRAF and K.W.. XP-8000-CE6 User Manual, version 1.0.6. Last Revised: February 2010 Copyright © 2009 ICP DAS Co., Ltd. All Rights Reserved. E-mail: [email protected] Page: 6 1.2. FEATURES Software Features Windows Embedded CE 6.0 Most of the popular features in Microsoft software are included, such as: ASP Web Server (Javascript and VBScript): ASP stands for Active Server Pages. ASP is an active scripting engine that runs on the server side and dynamically creates web pages for client’s requests. In XP-8000-CE6, ASP Web Server is provided. The ASP Web Server supports both VBScript and JavaScript. SQL Server Compact 3.5 SQL, Structured Query Language, is a computer language for database. SQL Server is a server of database that implements SQL query language. Microsoft SQL Server Compact 3.5 is an embedded database engine which provides faster, trusted, productive environments and better decision making support. .NET Compact Framework 3.5: Microsoft’s .NET Compact Framework provides a run-time environment, CLR, and plenty of class libraries to simplify development processes. CLR is Common Language Runtime. It provides cross-language integration, enhanced security, etc. Windows Embedded CE 6.0 supports .NET Compact Framework 3.5. Therefore, we provide .NET Compact Framework 3.5 in XP-8000-CE6. Many others: There still are others such as Jscript, VBScript, etc. XP-8000-CE6 User Manual, version 1.0.6. Last Revised: February 2010 Copyright © 2009 ICP DAS Co., Ltd. All Rights Reserved. E-mail: [email protected] Page: 7 DCON Utility DCON Utility is an application that provides an environment with easy and quick search, configure and test I/O modules in the networks. Rich Software Solutions XP-8000-CE6 equips with Windows Embedded CE 6.0 which is compatible with the popular operating system, Windows XP. Thus there are rich software solutions users can find. The followings are commonly-used development tools: Microsoft Visual Studio.NET 2005/2008: ICP DAS provides SDK as well as demo programs for Visual C#.NET, Visual Basic.NET and Visual C++. SCADA solution: InduSoft provides simple “drag and drop”, “point and click” developing environment for HMI and SCADA applications. XP-8000-CE6 User Manual, version 1.0.6. Last Revised: February 2010 Copyright © 2009 ICP DAS Co., Ltd. All Rights Reserved. E-mail: [email protected] Page: 8 Hardware Features Power CPU module The most important features of the CPU module are AMD LX 800 CPU (32-bit and 500 MHz) 512 MB RAM 4 GB Built-in Flash Disk Built-in VGA Port A built-in VGA port can be directly connected to a regular LCD display. Users can operate the HMI or SCADA software (running on the XP-8000-CE6) with display, keyboard and mouse just as how they usually did on regular PCs. 64-bit Hardware Serial Number The 64-bit hardware serial number is unique and individual. Every serial number of XP-8000-CE6 is different. Users can add a checking mechanism to their AP to prevent software from pirating. Built-in Flash Disk (4 GB) In normal situation, users can store their AP or data to the CF card or USB Flash disk. But in some vibration environment (for example, like driving ships), the two storage media would be bad connection. Then the built-in Flash disk will be the best storage media in such the vibration environment. Dual Watchdog Timer A system could be hanged up when the OS or the AP fails. There are two watchdogs (OS watchdog and AP watchdog) designed to automatically reset the CPU when the situations happen. The design will increase the reliability of the system. XP-8000-CE6 User Manual, version 1.0.6. Last Revised: February 2010 Copyright © 2009 ICP DAS Co., Ltd. All Rights Reserved. E-mail: [email protected] Page: 9 Dual Battery-Backup SRAM (512 KB) To maintain important data while power off, non-volatile memory is the ideal design. The XP-8000-CE6 equips a 512 KB SRAM with two Li-batteries to maintain data while power off. The two Li-batteries can continually supply power to the 512 KB SRAM to retain the data for 5 years; and the dual-battery design can avoid data lost while replacing a new battery. Dual Ethernet Ports XP-8000-CE6 provides two Ethernet ports. The two Ethernet ports can be used to implement redundant Ethernet communication and separate Ethernet communication (one for global Internet, one for private Ethernet). Redundant Power Input To prevent the XP-8000-CE6 from failing by the power loss, the power module is designed with two input connectors. Once a power input fails, the power module switches to the other power input. And there is a relay output for informing the power failure. Ventilated housing designed to operate between -25°C ~ +75°C Each XP-8000-CE6 is housed in a plastic-based box with a column-like ventilator that can help to cool the working environment inside the box and allow the XP-8000-CE6 operating between -25℃ and +75℃. XP-8000-CE6 User Manual, version 1.0.6. Last Revised: February 2010 Copyright © 2009 ICP DAS Co., Ltd. All Rights Reserved. E-mail: [email protected] Page: 10 1.3. SPECIFICATIONS Feature Processor Module Items Description CPU AMD LX 800 processor System Chipset AMD CS5536 System Memory 512M RAM BIOS Award 4M bits flash ROM BIOS Operating System torage Graphic Ethernet Windows CE6 R3 Flash 4 GB as IDE Master (Flash) Dual Battery Backup SRAM 512 KB (for 5 years data retain) EEPROM 16 KB, data retention: 40 years 1,000,000 erase/write cycles. CF Card - (support up to 32 GB) - (hot plug unsupported) Graphic Chip AMD LX 800 integrated graphic controller VGA resolution (640 x 480 ~ 1024 x 768 or above) Controller RJ-45*2, 10/100Mbps Base-TX Ethernet Controller (Auto-negotiating, Auto_MDIX, LED indicator) Expansion Slots One Proprietary-definition expansion for ISA and DC-in One PCI-expansion with Hirose FX8C-120P-SV6(22) Dual Watchdog Timer Yes 64-bit Hardware Serial Number Yes Rotary Switch Yes (0 ~ 9) DIP Switch Yes (8 bits) (for XP-8341/8741-CE6 only) USB2.0 x2 XP-8000-CE6 User Manual, version 1.0.6. Last Revised: February 2010 Copyright © 2009 ICP DAS Co., Ltd. All Rights Reserved. E-mail: [email protected] Page: 11 Feature Items COM1 COM2 Serial Port COM3 COM4 Description RS-232 (Internal communications with I-87K modules in slots, for XP-8341/8741-CE6 only; external COM1 only for XP-8041-CE6) Baud Rate: 115200 bps Data Bits: 8 Parity: None, Even, Odd Stop Bits: 1 Note: CPU built-in UART RS-232, Non-isolation (TxD, RxD and GND) (used to update firmware) Baud Rate: 115200, 57600, 38400, 19200, 9600, 4800, 2400, 1200 bps Data Bits: 7, 8 Parity: None, Even, Odd Stop Bits: 1 Note: CPU built-in UART RS-485 Baud Rate: 115200, 57600, 38400, 19200, 9600, 4800, 2400, 1200 bps Data Bits: 5, 6, 7, 8 Parity: None, Even, Odd, Mark (Always 1), Space (Always 0) Stop Bits: 1, 2 FIFO: 16 bytes Note: 16C550 compatible RS-232/485 Baud Rate: 115200, 57600, 38400, 19200, 9600, 4800, 2400, 1200 bps Data Bits: 5, 6, 7, 8 Parity: None, Even, Odd, Mark (Always 1), Space (Always 0) Stop Bits: 1, 2 FIFO: 16 bytes Note: 16C550 compatible XP-8000-CE6 User Manual, version 1.0.6. Last Revised: February 2010 Copyright © 2009 ICP DAS Co., Ltd. All Rights Reserved. E-mail: [email protected] Page: 12 Feature Items Description COM4 can be configured as either RS-232 or RS-485, and the COM5 FIFO: 16 bytes Environment Mechanical Operating Temp -25˚C ~ +75˚C Storage Temp -30˚C ~ +85˚C Relative Humidity 5% ~ 90% RH, non-condensing XP-8041-CE6 116 mm (W) x 132 mm (L) x 125 mm (H) XP-8341-CE6 231 mm (W) x 132 mm (L) x 125 mm (H) XP-8741-CE6 355 mm (W) x 132 mm (L) x 125 mm (H) Capacity: 1.8A, 5V supply to CPU and backplane, total 15 W Consumption:14.4 W (0.6 A @ 24 VDC) Capacity: 1.8A, 5V supply to CPU and backplane; 5.2A, 5V supply to I/O expansion slots, total 35 W Consumption:14.4 W (0.6 A @ 24 VDC) Capacity: 2.0A, 5V supply to CPU and backplane; 5.0A, 5V supply to I/O expansion slots, total 35 W Consumption:16.8 W (0.7 A @ 24 VDC) XP-8041-CE6 Power configuration depends on the pin connections as follows: RS-232 (RxD, TxD, CTS, RTS and GND) RS-485 (Data+ and Data-) There is no software configuration or hardware jumper needed. RS-232 Baud Rate: 115200, 57600, 38400, 19200, 9600, 4800, 2400, 1200 bps Data Bits: 5, 6, 7, 8 Parity: None, Even, Odd, Mark (Always 1), Space (Always 0) Stop Bits: 1, 2 Note: 16C550 compatible XP-8341-CE6 XP-8741-CE6 XP-8000-CE6 User Manual, version 1.0.6. Last Revised: February 2010 Copyright © 2009 ICP DAS Co., Ltd. All Rights Reserved. E-mail: [email protected] Page: 13 1.4. DIMENSION (UNIT: MM) XP-8041-CE6 XP-8000-CE6 User Manual, version 1.0.6. Last Revised: February 2010 Copyright © 2009 ICP DAS Co., Ltd. All Rights Reserved. E-mail: [email protected] Page: 14 XP-8341-CE6 XP-8000-CE6 User Manual, version 1.0.6. Last Revised: February 2010 Copyright © 2009 ICP DAS Co., Ltd. All Rights Reserved. E-mail: [email protected] Page: 15 XP-8741-CE6 XP-8000-CE6 User Manual, version 1.0.6. Last Revised: February 2010 Copyright © 2009 ICP DAS Co., Ltd. All Rights Reserved. E-mail: [email protected] Page: 16 XP-8000-CE6 User Manual, version 1.0.6. Last Revised: February 2010 Copyright © 2009 ICP DAS Co., Ltd. All Rights Reserved. E-mail: [email protected] Page: 17 1.5. OVERVIEW XP-8041-CE6 Overview Item Descriptions 1. Power LED Indicator 2. Rotary Switch 3. Ethernet Port 1 4. USB 2.0 Ports 5. COM Port 5 (RS-232) 6. COM Port 4 (RS-232/RS-485) 7. Power Switch 8. COM Port 2 (RS-232) 9. Power and Ground 10. COM Port 3 (RS-485) 11. Redundant Power and Ground 12. Relay Output R.COM and R.NO 13. Frame Ground 14. Ethernet Port 2 15. CF (Compact Flash) Card Slot 16. VGA Port 17. COM Port 1 (RS-232) XP-8000-CE6 User Manual, version 1.0.6. Last Revised: February 2010 Copyright © 2009 ICP DAS Co., Ltd. All Rights Reserved. E-mail: [email protected] Page: 18 XP-8341-CE6 Overview Item Descriptions 1. Power LED Indicator 2. Rotary Switch 3. Ethernet Port 1 4. USB 2.0 Ports 5. COM Port 5 (RS-232) 6. COM Port 4 (RS-232/RS-485) 7. Power Switch 8. COM Port 2 (RS-232) 9. Power and Ground 10. COM Port 3 (RS-485) 11. Redundant Power and Ground 12. Relay Output R.COM and R.NO 13. Frame Ground 14. Ethernet Port 2 15. CF (Compact Flash) Card Slot 16. VGA Port 17. Slot 1 ~ Slot 3 18. DIP Switch XP-8000-CE6 User Manual, version 1.0.6. Last Revised: February 2010 Copyright © 2009 ICP DAS Co., Ltd. All Rights Reserved. E-mail: [email protected] Page: 19 XP-8741-CE6 Overview Item Descriptions 1. Power LED Indicator 2. Rotary Switch 3. Ethernet Port 1 4. USB 2.0 Ports 5. COM Port 5 (RS-232) 6. COM Port 4 (RS-232/RS-485) 7. Power Switch 8. COM Port 2 (RS-232) 9. Power and Ground 10. COM Port 3 (RS-485) 11. Redundant Power and Ground 12. Relay Output R.COM and R.NO 13. Frame Ground 14. Ethernet Port 2 15. CF (Compact Flash) Card Slot 16. VGA Port 17. Slot 1 ~ Slot 7 18. DIP Switch XP-8000-CE6 User Manual, version 1.0.6. Last Revised: February 2010 Copyright © 2009 ICP DAS Co., Ltd. All Rights Reserved. E-mail: [email protected] Page: 20 1.6. COMPANION CD The companion CD contains full usage documents, software tools and development resources related to the XP-8000-CE6. XP-8000-CE6 User Manual, version 1.0.6. Last Revised: February 2010 Copyright © 2009 ICP DAS Co., Ltd. All Rights Reserved. E-mail: [email protected] Page: 21 1.7. RESCUE COMPACT FLASH CARD The Rescue Compact Flash Card not only support rescue mechanism but also contains full usage documents, software tools and development resources related to the XP-8000-CE6. XP-8000-CE6 User Manual, version 1.0.6. Last Revised: February 2010 Copyright © 2009 ICP DAS Co., Ltd. All Rights Reserved. E-mail: [email protected] Page: 22 2. Quick Start and Rescue This chapter covers basic steps required to help you install the XP-8000-CE6 and give you a brief of outline of its main functions. XP-8000-CE6 User Manual, version 1.0.6. Last Revised: February 2010 Copyright © 2009 ICP DAS Co., Ltd. All Rights Reserved. E-mail: [email protected] Page: 23 2.1. GETTING STARTED WITH XP-8000-CE6 HARDWARE Follow these steps below to install and start-up the XP-8000-CE6. The XP-8000-CE6 installation must provide proper ventilation, spacing, and grounding to ensure the equipment will operate as specified. A minimum clearance of 50mm between the XP-8000-CE6 and the top and bottom side of the enclosure panels must be provided. XP-8000-CE6 User Manual, version 1.0.6. Last Revised: February 2010 Copyright © 2009 ICP DAS Co., Ltd. All Rights Reserved. E-mail: [email protected] Page: 24 Step 1: Mount the hardware There are two simple methods of mounting: 1. DIN-Rail mounting 2. Screw mounting XP-8000-CE6 User Manual, version 1.0.6. Last Revised: February 2010 Copyright © 2009 ICP DAS Co., Ltd. All Rights Reserved. E-mail: [email protected] Page: 25 Step 2: Connect the power, network and monitor Step 3: Insert and wire the I/O modules XP-8000-CE6 User Manual, version 1.0.6. Last Revised: February 2010 Copyright © 2009 ICP DAS Co., Ltd. All Rights Reserved. E-mail: [email protected] Page: 26 2.2. REGIONAL AND LANGUAGE OPTIONS Follow these steps below to localize your environment. Step 1: Go to “Control Panel” Step 2: Click on “Regional Settings” Step 3: Change to your local language in “User Interface Language” Step 4: Reboot the device to make language setting take effect XP-8000-CE6 User Manual, version 1.0.6. Last Revised: February 2010 Copyright © 2009 ICP DAS Co., Ltd. All Rights Reserved. E-mail: [email protected] Page: 27 2.3. GETTING STARTED WITH XP-8000-CE6 SOFTWARE TOOLS Follow these steps below to install necessary development resources and tools using companion CD, CF card or download from our FTP Server. Step 1: Copy the PlatformSDK, XPacSDK_CE.msi, and install on the host PC. The file is used for developing on visual studio 2005/2008 and located at: CD root\ICPDAS\XP-8000-CE6\SDK\PlatformSDK (in the companion CD) CF Card root\SDK\PlatformSDK ftp://ftp.icpdas.com/pub/cd/xp-8000-ce6/sdk/platformsdk/ Step 2: Copy the “Demo” file folder to the host PC These files are located at: CD root\ICPDAS\XP-8000-CE6\SDK\Demo (in the companion CD) CF Card root\SDK\Demo ftp://ftp.icpdas.com/pub/cd/xp-8000-ce6/sdk/demo XP-8000-CE6 User Manual, version 1.0.6. Last Revised: February 2010 Copyright © 2009 ICP DAS Co., Ltd. All Rights Reserved. E-mail: [email protected] Page: 28 Step 3: Install DCON_Utility DCON Utility is used to set IO module from host PC, and you have to install it on your host PC. It’s located at CD root\ICPDAS\XP-8000-CE6\Tools\DCON_CE\PC CF Card root\Tools\DCON_CE\PC ftp://ftp.icpdas.com/pub/cd/xp-8000-ce6/tools/dcon_ce/pc Step 4: Install Remote_Display The tool is used to control XP-8000-CE6 remotely, and you have to install cerhost.exe on your host PC. It’s located at CD root\ICPDAS\XP-8000-CE6\Tools\Remote_Display\PC CF Card root\Tools\Remote_Display\PC ftp://ftp.icpdas.com/pub/cd/xp-8000-ce6/tools/remote_display/pc XP-8000-CE6 User Manual, version 1.0.6. Last Revised: February 2010 Copyright © 2009 ICP DAS Co., Ltd. All Rights Reserved. E-mail: [email protected] Page: 29 2.4. XPAC UTILITY FOR CONFIGURING XP-8000-CE6 The XPAC Utility is a tool which is designed to quickly control and management the XP-8000-CE6 controller. Starting the XPAC Utility to configure the XP-8000-CE6 To start the XPAC Utility, you can double-click the XPAC Utility shortcut on the desktop. The XPAC Utility window contains two basic components: menu bar and property tabs. XP-8000-CE6 User Manual, version 1.0.6. Last Revised: February 2010 Copyright © 2009 ICP DAS Co., Ltd. All Rights Reserved. E-mail: [email protected] Page: 30 2.4.1. XPAC Utility Menu Bar The XPAC Utility includes the following function menu; all function menus will be explained later. File Menu Help Menu XP-8000-CE6 User Manual, version 1.0.6. Last Revised: February 2010 Copyright © 2009 ICP DAS Co., Ltd. All Rights Reserved. E-mail: [email protected] Page: 31 File Menu The menu commands Restore Utility Default Used to Restore every setting of Settings XPAC Utility to its default. Reboot Restart the XP-8000-CE6. Exit Exits the XPAC Utility. XP-8000-CE6 User Manual, version 1.0.6. Last Revised: February 2010 Copyright © 2009 ICP DAS Co., Ltd. All Rights Reserved. E-mail: [email protected] Page: 32 Help Menu The menu commands About XP-8000-CE6 User Manual, version 1.0.6. Used to Displays a dialog box with information about XPAC Utility, including the current version and copyright information. Last Revised: February 2010 Copyright © 2009 ICP DAS Co., Ltd. All Rights Reserved. E-mail: [email protected] Page: 33 2.4.2. XPAC UTILITY PROPERTY TABS The XPAC Utility includes the following property tabs, all property tabs will be explained later. General tab Display tab IP Config tab Network tab Device Information tab Auto Execution tab Rotary Execution tab Multi-IO Modules tab XP-8000-CE6 User Manual, version 1.0.6. Last Revised: February 2010 Copyright © 2009 ICP DAS Co., Ltd. All Rights Reserved. E-mail: [email protected] Page: 34 General tab The General tab provides functions to configure the task bar. The tab used to How to use Lock the taskbar Select the Always On Top check box. Auto-Hide the taskbar Select the Auto Hide check box * Be sure to reboot to make the setting take effect. XP-8000-CE6 User Manual, version 1.0.6. Last Revised: February 2010 Copyright © 2009 ICP DAS Co., Ltd. All Rights Reserved. E-mail: [email protected] Page: 35 Display tab The Display tab provides functions to configure the monitor setting. The tab used to How to use Screen resolution Change the Track bar. Screen refresh rate Select the combo box * Be sure to reboot to make the setting take effect. XP-8000-CE6 User Manual, version 1.0.6. Last Revised: February 2010 Copyright © 2009 ICP DAS Co., Ltd. All Rights Reserved. E-mail: [email protected] Page: 36 IP Config tab The IP Config tab provides functions to configure either DHCP (Roaming) or manually configured (Static) network settings and to monitor the MAC address. Generally, DHCP is the default settings, but if you don’t have a DHCP server, you must configure the network settings by using manual configuration. The tab used to Configure the network settings How to use Obtaining an IP address automatically from DHCP: Select the Use DHCP to get IP address option. Manually assign an IP address: Select the Assign IP address option. Monitor the MAC address See the MAC Address 1 and MAC Address 2 fields that displays the physical address of LAN1 and LAN2. XP-8000-CE6 User Manual, version 1.0.6. Last Revised: February 2010 Copyright © 2009 ICP DAS Co., Ltd. All Rights Reserved. E-mail: [email protected] Page: 37 Network tab The Network tab provides functions to enable/disable the FTP access, enable/disable anonymous FTP access, configure the FTP directory path, and change HTTP document root directory. The tab used to Enable/disable the FTP access How to use Enable: Select Enable in the FTP field. Disable: Select Disable in the FTP field. Enable/disable anonymous FTP access Change the FTP directory path Change HTTP document root directory Enter a new path in the “Change HTTP document root directory to” field, and then press the Apply button. Enable: Select Enable in the Allow Anonymous field. Disable: Select Enable in the Allow Anonymous field. Enter a new path in the “Change FTP default download directory to” field, and then press the Apply button. XP-8000-CE6 User Manual, version 1.0.6. Last Revised: February 2010 Copyright © 2009 ICP DAS Co., Ltd. All Rights Reserved. E-mail: [email protected] Page: 38 Device Information tab The Device Information tab provides functions to monitor necessary system information of the XP-8000-CE6. The system information is most important note of version control for upgrading system. The tab used to Monitor the local I/O slots Monitor the serial number Monitor the backplane version Monitor the CPU version Monitor the OS version Monitor the .NET compact framework version Monitor the SQL CE version Monitor the XPacSDK_CE.dll version How to use See the Slot 1 ~ Slot 7 field that displays the module names plugged in XP-8000-CE6. See the Serial Number field that displays the 64-bit hardware serial number of the XP-8000-CE6. See the Backplane Version field that displays the backplane version of the XP-8000-CE6. See the CPU Version field that displays the CPU version of the XP-8000-CE6. See the OS Version field that displays the OS version of the XP-8000-CE6. See the .NET CF Version field that displays the .NET compact framework version of the XP-8000-CE6. See the SQL CE Version field that displays the SQL CE version of the XP-8000-CE6. See the XPacSDK Version field that displays the version of XPacSDK_CE.dll. XP-8000-CE6 User Manual, version 1.0.6. Last Revised: February 2010 Copyright © 2009 ICP DAS Co., Ltd. All Rights Reserved. E-mail: [email protected] Page: 39 Auto Execution tab The Auto Execution tab provides functions to configure programs running at XP-8000-CE6 startup, it allows users to configure ten execute files at most. The allowed file types are .exe and .bat, and they are executed in order of program 1, program 2, etc. The tab used to Configure programs running at startup How to use Press the Browse button to select the execute file which you want, and then press the Apply button. XP-8000-CE6 User Manual, version 1.0.6. Last Revised: February 2010 Copyright © 2009 ICP DAS Co., Ltd. All Rights Reserved. E-mail: [email protected] Page: 40 Rotary Execution tab The Rotary Execution tab decides which mode XP-8000-CE6 executes at startup. The tab used to Run at Normal Mode Run at Safe Mode Run at Normal Mode but execute DCON_CE_V600.exe Run at Normal Mode but execute cerdisp.exe Run at Normal Mode but execute user-specified program. How to use Rotary Switch to 0 and reboot XP-8000-CE6, and then it is in the Normal Mode. Rotary Switch to 1 and reboot XP-8000-CE6, and then it is in the Safe Mode. (In Safe Mode, XP-8000-CE6 clears the data saved in the registry, starts as factory default, and no applications run at startup.) Rotary Switch to 8 and reboot XP-8000-CE6, and then it is in the Normal Mode but executes DCON_CE_V600.exe. This makes users can use DCON Utility on PC side to configure I/O modules without a monitor. Rotary Switch to 9 and reboot XP-8000-CE6, and then it is in the Normal Mode but executes cerdisp.exe. This makes users can use cerhost.exe on PC side to remote display Windows CE without a monitor. Rotary Switch to 2 ~ 7 and reboot XP-8000-CE6, and then it is in the Normal Mode but executes the program user specified in the field of “Rotary Switch 2 ~ 7”. XP-8000-CE6 User Manual, version 1.0.6. Last Revised: February 2010 Copyright © 2009 ICP DAS Co., Ltd. All Rights Reserved. E-mail: [email protected] Page: 41 Multi-IO Modules tab This tab displays the port names of multi-IO modules such as 8114, 8144, 8142, and 8112. These multi-IO modules are in the slots of XP-8000-CE6. If you have to use these multi-IO ports, please use the port name shown in the tree. Take the below figure as an example, using XPacSDK_CE.dll, opening a serial port of 8144 in slot 3 is: HANDLE hPort = uart_Open(“MSB1”); 8144 in the slot 3 has four serial ports, and one of the port name is “MSB1”. For more information about expansion RS-232/RS-422/RS-485 communication module that are compatible with the XP-8000-CE6, please refer to http://www.icpdas.com/products/Remote_IO/i-8ke/selection_rs232_i8k.htm XP-8000-CE6 User Manual, version 1.0.6. Last Revised: February 2010 Copyright © 2009 ICP DAS Co., Ltd. All Rights Reserved. E-mail: [email protected] Page: 42 2.4.3. The factory default settings The following table lists the factory default settings of the XPAC Utility. General tab: Function Settings Auto Hide Uncheck Always On Top Uncheck Display tab: Function Settings Screen resolution 1024 by 768 pixels Screen refresh rate 75 Hz IP Config tab: Function Settings LAN1 DHCP LAN2 DHCP Network tab: Function Settings FTP Disable Allow Anonymous Disable FTP default download directory \Temp HTTP document root directory \System_Disk\ICPDAS\www\ Auto Execution tab: Function All field Settings Empty Rotary Execution tab: Function Settings Rotary Switch 8 \System_Disk\Tools\DCON_CE\DCON_CE_V600.exe Rotary Switch 9 \System_Disk\Tools\Remote_Display\cerdisp.exe XP-8000-CE6 User Manual, version 1.0.6. Last Revised: February 2010 Copyright © 2009 ICP DAS Co., Ltd. All Rights Reserved. E-mail: [email protected] Page: 43 2.5. DCON UTILITY FOR CONFIGURING I-7K AND I-87K SERIES I/O MODULES The DCON Utility is a tool which is designed to quickly control and management I-7K and I-87K series I/O modules via COM port and Ethernet port. The following table summarizes the information about TCP port mapping and I-7K and I-87K series expansion modules of COM port on XP-8000-CE6. COM port of XP-800-CE6 TCP Port Support modules COM 1 (Backplane) 10000 87K (High profile series) COM 2 (Console Port) 10001 7K, 87K * COM 3 (RS-485) 10002 7K, 87K COM 4 (RS-232/RS-485) 10003 7K, 87K COM 5 (RS-232) 10004 7K, 87K * * with RS-232/RS-485 converter, such as I-7520 (http://www.icpdas.com/products/Industrial/communication_module/comm unication_list.htm). XP-8000-CE6 User Manual, version 1.0.6. Last Revised: February 2010 Copyright © 2009 ICP DAS Co., Ltd. All Rights Reserved. E-mail: [email protected] Page: 44 Starting the DCON Utility to configure I-87K series I/O modules Step 1: On the XP-8000-CE6, execute the DCON firmware The DCON firmware can be obtained from: \System_Disk\Tools\DCON_CE or the link on the desktop. Step 2: Double-Click the DCON Utility shortcut on the desktop of Host PC Step 3: Click on the WIN CE command button XP-8000-CE6 User Manual, version 1.0.6. Last Revised: February 2010 Copyright © 2009 ICP DAS Co., Ltd. All Rights Reserved. E-mail: [email protected] Page: 45 Step 4: On the “WINCE device connection” dialog, choose a connection type and then type the IP address in the “IP” field, then click the “Connect” button to search i-7K and I-87K series I/O modules If DCON Utility cannot connect to XP-8000-CE6, the Ethernet connection between Host PC and XP-8000-CE6 might be rejected by fire wall, please contact with MIS to open the Ethernet port. Step 5: Click on the module name from the list to enter the configuration form. XP-8000-CE6 User Manual, version 1.0.6. Last Revised: February 2010 Copyright © 2009 ICP DAS Co., Ltd. All Rights Reserved. E-mail: [email protected] Page: 46 If there is no operation within 30 seconds, the connection will automatically close to release the COM port occupied. XP-8000-CE6 User Manual, version 1.0.6. Last Revised: February 2010 Copyright © 2009 ICP DAS Co., Ltd. All Rights Reserved. E-mail: [email protected] Page: 47 2.6. RESCUE THE XP-8000-CE6 The XP-8000-CE6 rescue mechanism can help you easily and quickly restore your XP-8000-CE6 OS in case your XP-8000-CE6 cannot start or crashed. Warning: XP-8000-CE6 has to run under normal mode, which means rotary switch = 0, to rescue XP-8000-CE6 to factory default Please follow the steps below to recovery your XP-8000-CE6 Step 1: Reboot your XP-8000-CE6. While rebooting, press “delete” key to enter BIOS setup utility Step 2: Choose “Advanced BIOS Features” and then press “Enter” key XP-8000-CE6 User Manual, version 1.0.6. Last Revised: February 2010 Copyright © 2009 ICP DAS Co., Ltd. All Rights Reserved. E-mail: [email protected] Page: 48 Step 3: Set “First Boot Device” as “HDD-1”, HDD-1 means compact flash Step 4: Save and Exit Setup XP-8000-CE6 User Manual, version 1.0.6. Last Revised: February 2010 Copyright © 2009 ICP DAS Co., Ltd. All Rights Reserved. E-mail: [email protected] Page: 49 Step 5: After restarted the devise, will enter into XP-8000-CE6 Recue Utility as following. Choose (a) or (1), create XP-8000-CE6 default partition. Step 6: Wait about several seconds for step 1 and reboot, then choose (b) or (2), format and restore XP-8000-CE6 to factory default OS. (Refer to above figure) Step 7: After finishing recovery, choose (c) or (3) to reboot. (Refer to above figure) Step 8: Repeat step 1 ~ 4 to set "First Boot Device" as "HDD-0", HDD-0 means Built-in flash, and then reboot the XP-8000-CE6. Step9: The XP-8000-CE6 will set itself default when the first reboot after recovery procedure. It needs about 1 min. After above steps, the XP-8000-CE6 recovery is completed. XP-8000-CE6 User Manual, version 1.0.6. Last Revised: February 2010 Copyright © 2009 ICP DAS Co., Ltd. All Rights Reserved. E-mail: [email protected] Page: 50 2.7. UPDATING THE XP-8000-CE6 XP-8000-CE6 update is part of the XP-8000-CE6 services to provide additional and more efficient features and functionality for XP-8000-CE6 operating system. There are two ways to update the XP-8000-CE6: i. Only update OS image Each release will contain new features, reliability, application compatibility, security, and more. Before you download any release files, we highly recommend you read the ReadMe.txt file, which contains all of this release contents. For more information about service pack, please refer to the documents which come with every release. ii. Reinstall XP-8000-CE6 If you don’t like just update OS image, you can reinstall new version XP-8000-CE6 OS in your device. The XP-8000-CE6 can be reinstalled with the XP-8000-CE6 Rescue Utility. Before reinstalling the XP-8000-CE6, make sure the necessary updating files have been are available on your CF card. The necessary files can be obtained at: ftp://ftp.icpdas.com/pub/cd/xp-8000-ce6/rescue Caution: 1. Before reinstall XP-8000-CE6, please check you have backup your data. 2. Ensure your XP-8000-CE6 running on normal mode (rotary switch = 0) during reinstall XP-8000-CE6. XP-8000-CE6 User Manual, version 1.0.6. Last Revised: February 2010 Copyright © 2009 ICP DAS Co., Ltd. All Rights Reserved. E-mail: [email protected] Page: 51 2.7.1. Only update OS image Please follow the steps below to update OS image only Step 1: download OS image, NK.bin, form ftp://ftp.icpdas.com/pub/cd/xp-8000-ce6/rescue/ce6 Step 2: Replace old OS image which is located at \System_Disk on XP-8000-CE6 devices with the NEW OS image (download from step 1). Step 3: After replaced the image and restarted the devise, XP-8000-CE6 has been updated completely. 2.7.2. Reinstall XP-8000-CE6 Warning: - XP-8000-CE6 has to run under normal mode, which means rotary switch = 0, to reinstall XP-8000-CE6 to factory default - When reinstall XP-8000-CE6, it will not only clear built-in flash (System_Disk), but also restore all files to System_Disk - Before reinstall XP-8000-CE6, please check you have backup your data. Pre-requires for reinstall XP-8000-CE6 Step 1: Download all updating files from ftp://ftp.icpdas.com/pub/cd/xp-8000-ce6/rescue Step 2: Copy files, which download from Step 1, to root of CF card Please follow the steps below to reinstall XP-8000-CE6 Step 1: Change the boot order. (It is the same as the step 1 to step 4 of above section, 2.6 Rescue the XP-8000-CE6). Step 2: After restarted the devise, will enter into XP-8000-CE6 Rescue Utility as the same as the step 5 to step 9 of above section, 2.6 Rescue the XP-8000-CE6). XP-8000-CE6 User Manual, version 1.0.6. Last Revised: February 2010 Copyright © 2009 ICP DAS Co., Ltd. All Rights Reserved. E-mail: [email protected] Page: 52 2.8. RESTORE THE RESCUE DISK This section will show you how to restore your rescue disk in case of that the rescue disk crashed or been formatted. Requirements: For restoring the Rescue Disk, you should prepare Ghost 11 or later, which you could obtain by contacting Symantec (http://www.symantec.com) There is ghost file “Rescue_Disk.gho” can recover Rescue Disk if your Rescue Disk crashed. The ghost file can be obtained at: CD root\ICPDAS\XP-8000-CE6\Rescue_Disk (in the companion CD) Note: Below example is used “Symantec Norton Ghost32 V.11” (The “Symantec Norton Ghost V.11” or above version are recommend) as a demonstration how to do recovery the Rescue Disk. Please follow below steps to recover Rescue Disk. XP-8000-CE6 User Manual, version 1.0.6. 1. Open “Symantec Norton Ghost32 V.11” software and click ‘OK’ 2. Select “Local - Disk - From Image” from function menu Last Revised: February 2010 Copyright © 2009 ICP DAS Co., Ltd. All Rights Reserved. E-mail: [email protected] Page: 53 3. Select the “Rescue_Disk.gho” file 4. Select the destination to CF card and click ‘OK’ XP-8000-CE6 User Manual, version 1.0.6. Last Revised: February 2010 Copyright © 2009 ICP DAS Co., Ltd. All Rights Reserved. E-mail: [email protected] Page: 54 5. Recovery the “Rescue_Disk.gho” file into CF card and click ‘OK’ 6. Recovering Rescue Disk 7. So far, Rescue Disk has been done. For more information of reinstall OS, please refer to ii. Reinstall XP-8000 of Rescue the XP-8000-CE6 XP-8000-CE6 User Manual, version 1.0.6. Last Revised: February 2010 Copyright © 2009 ICP DAS Co., Ltd. All Rights Reserved. E-mail: [email protected] Page: 55 3. XP-8000-CE6 Tools Following Tools has been installed on the XP-8000-CE6. XP-8000-CE6 User Manual, version 1.0.6. Last Revised: February 2010 Copyright © 2009 ICP DAS Co., Ltd. All Rights Reserved. E-mail: [email protected] Page: 56 DCON_Utility With Host PC running the DCON Utility, on the XP-8000-CE6, the DCON_CE_V600.exe allows users to view and monitor the status of I/O modules of XP-8000-CE6 through the DCON Utility. ISQLW35 The ISQLW35 implements SQL server compact 3.5 Query Analyzer. RegEdit The RegEdit edits the registry of Windows Embedded CE6 on XP-8000-CE6. Remote_Display The remote display application allows user to view the display of XP-8000-CE6 remotely on a Host PC. Users need to run cerhost.exe on the host PC and at the same time run cerdisp.exe on XP-8000-CE6. TaskMgr The TaskMgr provides details about programs and processes running on the XP-8000-CE6. XPAC Utility The XPAC Utility provides various useful functions such as configuring Ethernet settings, monitoring system settings and FTP services .etc for easy and quick management. For more information about the XPAC Utility, please refer to “3.2. XPAC Utility”. XP-8000-CE6 User Manual, version 1.0.6. Last Revised: February 2010 Copyright © 2009 ICP DAS Co., Ltd. All Rights Reserved. E-mail: [email protected] Page: 57 3.1. DCON UTILITY (FOR PC SIDE) The DCON Utility is toolkits that help user search the network, easily to configure the I/O modules and test the I/O status via the serial port (RS-232/485) or Ethernet port (using virtual com port). It supports not only the DCON Protocol I/O modules but also the M Series I/O Modules (Modbus RTU M-7K,M-87K and will support Modbus ASCII M-87K) now. For more detailed information on DCON Utility application, please refer to http://www.icpdas.com/products/dcon/introduction.htm. XP-8000-CE6 User Manual, version 1.0.6. Last Revised: February 2010 Copyright © 2009 ICP DAS Co., Ltd. All Rights Reserved. E-mail: [email protected] Page: 58 3.2. XPAC UTILITY The XPAC Utility is a tool which is designed to quickly control and manage the XP-8000-CE6. For more detailed information on XPAC Utility applications, please refer to “2.4. XPAC Utility for configuring the XP-8000-CE6” XP-8000-CE6 User Manual, version 1.0.6. Last Revised: February 2010 Copyright © 2009 ICP DAS Co., Ltd. All Rights Reserved. E-mail: [email protected] Page: 59 4. Your First Program This chapter provides basic and necessary information to start developing your own program. XP-8000-CE6 User Manual, version 1.0.6. Last Revised: February 2010 Copyright © 2009 ICP DAS Co., Ltd. All Rights Reserved. E-mail: [email protected] Page: 60 4.1. SETTING UP THE DEVELOPMENT ENVIRONMENT Before creating your first program, you must first ensure that you have the necessary development tools and the required corresponding SDKs are installed on your PC. Integrated Development Environment (IDE) Tools The XP-8000-CE6 uses Microsoft Visual Studio 2005/2008 (for Visual C#.NET and Visual Basic.NET) as its IDE tools. We have XP-8000-CE6 SDK for Visual Studio 2005/2008. 4.1.1. Installing and Setting Platform SDK The Platform SDK, XPacSDK_CE.msi, is necessary for application developers targeting Windows CE-based XP-8000-CE6. The corresponding XPacSDK_CE must be installed on the Host PC. The platform SDK is located at: CD root\ICPDAS\XP-8000-CE6\SDK\PlatformSDK (in the companion CD) CF Card root\SDK\PlatformSDK (in the companion compact flash) ftp://ftp.icpdas.com/pub/cd/xp-8000-ce6/sdk/platformsdk/ To install the XPacSDK_CE, please perform the following steps: Step 1: Run the XPacSDK_CE.msi Step 2: Follow the prompts until the XPacSDK_CE installation process is complete XP-8000-CE6 User Manual, version 1.0.6. Last Revised: February 2010 Copyright © 2009 ICP DAS Co., Ltd. All Rights Reserved. E-mail: [email protected] Page: 61 Warning: If your PC only has installed Microsoft Visual Studio 2008 without installing Microsoft Visual Studio 2005, you might encounter an error message as below when you installing XPacSDK_CE. To solve this problem, you should install XPacSDK_CE as following steps: 1. Run the XPacSDK_CE.msi 2. Choose Setup Type, select 「Custom」 XP-8000-CE6 User Manual, version 1.0.6. Last Revised: February 2010 Copyright © 2009 ICP DAS Co., Ltd. All Rights Reserved. E-mail: [email protected] Page: 62 3. Custom Setup, unavailable documentation 4. Follow the prompts until the XPacSDK_CE installation process is complete 5. Finish XP-8000-CE6 User Manual, version 1.0.6. Last Revised: February 2010 Copyright © 2009 ICP DAS Co., Ltd. All Rights Reserved. E-mail: [email protected] Page: 63 4.1.2. API and SDKs Several SDKs are provided for XP-8000-CE6, it enables you to quickly and efficiently develop your own programs. These SDKs are located at: CD root\ICPDAS\XP-8000-CE6\SDK (in the companion CD) CF Card root\SDK (in the companion compact flash) ftp://ftp.icpdas.com/pub/cd/xp-8000-ce6/sdk We will continue to add additional functions on XP-8000-CE6 SDKs, For details of XP-8000-CE6 Standard API reference, please refer to: CD root\ICPDAS\XP-8000-CE6\Document\SDK (in the companion CD) CF Card root\Document\SDK (in the companion compact flash) ftp://ftp.icpdas.com/pub/cd/xp-8000-ce6/document/sdk And demo programs of frequently-used APIs, please refer to: CD root\ICPDAS\XP-8000-CE6\SDK\Demo (in the companion CD) CF Card root\SDK\Demo (in the companion compact flash) ftp://ftp.icpdas.com/pub/cd/xp-8000-ce6/sdk/demo XP-8000-CE6 User Manual, version 1.0.6. Last Revised: February 2010 Copyright © 2009 ICP DAS Co., Ltd. All Rights Reserved. E-mail: [email protected] Page: 64 4.2. CREATING YOUR FIRST PROGRAM ICP DAS provides SDKs to help you develop your application. The following sections briefly explain how to build your first program of different development tools and different programming languages. Here we demonstrate how to build your first program with Microsoft Visual Studio 2008 in both C++ (section 4.2.1) and C#.NET (section 4.2.2). XP-8000-CE6 User Manual, version 1.0.6. Last Revised: February 2010 Copyright © 2009 ICP DAS Co., Ltd. All Rights Reserved. E-mail: [email protected] Page: 65 4.2.1. Your First Visual C++ Program This section help you start developing applications by using “MFC Smart Device Application”. Follow these steps to create a new program running on the XP-8000-CE6. Step 1: Start Microsoft Visual Studio 2008. Step 2: On the File menu, click New Projects… The New Project dialog box appears. Step 3: In the New Project dialog box, choose the project type as Smart Device in Other Languages. Then choose MFC Smart Device Application in Visual Studio installed templates. And specify project name and location. XP-8000-CE6 User Manual, version 1.0.6. Last Revised: February 2010 Copyright © 2009 ICP DAS Co., Ltd. All Rights Reserved. E-mail: [email protected] Page: 66 Step 4: Configure the settings of the project. Just follow the MFC Smart Device Wizard, as the following figures show: 1. Next 2. Make XPacSDK_CE selected and Next XP-8000-CE6 User Manual, version 1.0.6. Last Revised: February 2010 Copyright © 2009 ICP DAS Co., Ltd. All Rights Reserved. E-mail: [email protected] Page: 67 3. Choose Dialog based as Application type. 4. Next XP-8000-CE6 User Manual, version 1.0.6. Last Revised: February 2010 Copyright © 2009 ICP DAS Co., Ltd. All Rights Reserved. E-mail: [email protected] Page: 68 5. Next 6. Finish XP-8000-CE6 User Manual, version 1.0.6. Last Revised: February 2010 Copyright © 2009 ICP DAS Co., Ltd. All Rights Reserved. E-mail: [email protected] Page: 69 Step 5: Add XPacSDK_CE.lib and XPacSDK_CE.h to the project. Project -> Add Existing Item… Step 6: #include “XPACSDK_CE.h” in the testDlg.cpp file XP-8000-CE6 User Manual, version 1.0.6. Last Revised: February 2010 Copyright © 2009 ICP DAS Co., Ltd. All Rights Reserved. E-mail: [email protected] Page: 70 Step 7: Then you can use XPacSDK_CE to develop Visual C++ applications on the XP-8000-CE6. Here we take I-8051W, a Digital Input (DI) module, for example to demonstrate How powerful XPacSDK_CE is. Step 7.1: Put the I-8051W in the slot 1 of the XP-8000-CE6. And connect the GND pin and the DI3 pin to turn on the digital input value of the channel 3. You can see the detail information on the web site of ICP DAS : http://www.icpdas.com/products/Remote_IO/i-8ke/i-8051w.htm XP-8000-CE6 User Manual, version 1.0.6. Last Revised: February 2010 Copyright © 2009 ICP DAS Co., Ltd. All Rights Reserved. E-mail: [email protected] Page: 71 Step 7.2: Make a simple User Interface in the Dialog as the following figure shows. 1. Click on the Resource View 2. Double click on the Dialog item 3. Draw a Button and an Edit Control 4. Double click on the Button to write the On-Click Event XP-8000-CE6 User Manual, version 1.0.6. Last Revised: February 2010 Copyright © 2009 ICP DAS Co., Ltd. All Rights Reserved. E-mail: [email protected] Page: 72 Step 7.3: Write the content of the On-Click function. You can see that simply writing one line make us have the digital input value read back. The line for reading digital value back is: pac_ReadDI(h, slot, total_ch, &di_value); Note The arguments of the above example is described here: h: handle of UART. The I-8K series I/O modules ignore this argument. slot: the slot which I-8051W plugs in. total_ch: the number of total DI channels. In I-8051W, total_ch=16. di_value: the DI value read back. See XPAC_CE6_Standard_API_manual.pdf for more information. XPAC_CE6_Standard_API_manual.pdf can be found in the companion CD or downloaded from the FTP site of ICP DAS. XP-8000-CE6 User Manual, version 1.0.6. Last Revised: February 2010 Copyright © 2009 ICP DAS Co., Ltd. All Rights Reserved. E-mail: [email protected] Page: 73 Step 7.4: The snapshot of the demo program. Note The read back DI value is the binary representation of the total 16 DI channels. If DI3 turns on, the read back DI value is “0000,0000,0000,1000” of binary representation, that is, DI is 8 as its decimal form. Users can use pac_GetBit( DI_Value, index ) to get the DI value of a specified channel. See XPAC_CE6_Standard_API_manual.pdf for details. Note To execute the program you build, be sure to put XPacSDK_CE.dll and the program’s .exe file in the same directory. XP-8000-CE6 User Manual, version 1.0.6. Last Revised: February 2010 Copyright © 2009 ICP DAS Co., Ltd. All Rights Reserved. E-mail: [email protected] Page: 74 4.2.2. Your First Visual C# Program This section help you start developing applications by using “Smart Device Project”. Follow these steps to create a new .NET program running on the XP-8000-CE6. Step 1: Start Microsoft Visual Studio 2008. Step 2: On the File menu, click New Projects… The New Project dialog box appears. Step 3: In the New Project dialog box, choose the project type as Smart Device in Visual C#. Then choose Smart Device Project in Visual Studio installed templates. And specify project name and location. XP-8000-CE6 User Manual, version 1.0.6. Last Revised: February 2010 Copyright © 2009 ICP DAS Co., Ltd. All Rights Reserved. E-mail: [email protected] Page: 75 Step 4: Configure the settings of the project as below: Target platform= Windows CE .NET Compact Framework version= .NET Compact Framework Version 3.5 Templates= Device Application XP-8000-CE6 User Manual, version 1.0.6. Last Revised: February 2010 Copyright © 2009 ICP DAS Co., Ltd. All Rights Reserved. E-mail: [email protected] Page: 76 Step 5: Make a simple User Interface in the Dialog as the following figure shows. Then double click on the button. XP-8000-CE6 User Manual, version 1.0.6. Last Revised: February 2010 Copyright © 2009 ICP DAS Co., Ltd. All Rights Reserved. E-mail: [email protected] Page: 77 Step 6: using System.Runtime.InteropServices to DllImport pac_ReadDI, then implement the function: button1_Click(). Note In the function pac_ReadDI(h, slot, total_ch, di_value); The arguments of the above example is described here: h: handle of UART. The I-8K series I/O modules ignore this argument. slot: the slot which I-8051W plugs in. total_ch: the number of total DI channels. In I-8051W, total_ch=16. di_value: the DI value read back. See XPAC_CE6_Standard_API_manual.pdf for more information. XPAC_CE6_Standard_API_manual.pdf can be found in the companion CD or downloaded from the FTP site of ICP DAS. XP-8000-CE6 User Manual, version 1.0.6. Last Revised: February 2010 Copyright © 2009 ICP DAS Co., Ltd. All Rights Reserved. E-mail: [email protected] Page: 78 Step 7: Then you can use XPACSDK_CE to develop Visual C# applications on the XP-8000-CE6. Here we take I-8051W, a Digital Input (DI) module, for example to demonstrate How powerful XPACSDK_CE is. Step 7.1: Put the I-8051W in the slot 1 of the XP-8000-CE6. And connect the GND pin and the DI3 pin to turn on the digital input value of the channel 3. You can see the detail information on the web site of ICP DAS : http://www.icpdas.com/products/Remote_IO/i-8ke/i-8051w.htm XP-8000-CE6 User Manual, version 1.0.6. Last Revised: February 2010 Copyright © 2009 ICP DAS Co., Ltd. All Rights Reserved. E-mail: [email protected] Page: 79 Step 7.2: The snapshot of the demo program. Note The read back DI value is the binary representation of the total 16 DI channels. If DI3 turns on, the read back DI value is “0000,0000,0000,1000” of binary representation, that is, DI is 8 as its decimal form. Users can use pac_GetBit( DI_Value, index ) to get the DI value of a specified channel. See XPAC_CE6_Standard_API_manual.pdf for details. Note To execute the program you build, be sure to put XPACSDK_CE.dll and the program’s .exe file in the same directory. XP-8000-CE6 User Manual, version 1.0.6. Last Revised: February 2010 Copyright © 2009 ICP DAS Co., Ltd. All Rights Reserved. E-mail: [email protected] Page: 80 Appendix A. Frame Ground Electronic circuits are constantly vulnerable to Electro-Static Discharge (ESD), which become worse in a continental climate area. Some I-7000, M-7000 and I-8000 series modules feature a new design for the frame ground, which provides a path for bypassing ESD, allowing enhanced static protection (ESD) capability and ensures that the module is more reliable. To protect XP-8000-CE6 from ESD damage, connect the Frame Ground pins to the earth. (In section 1.5 Overview, please refer to Item 13 in “Overview Item Description” to see where the Frame Ground pins are) The XP-8000-CE6 Series provide another better protection from ESD: The XP-8000-CE6 controller has a metallic board attached to the back of the plastic basket as shown in below. XP-8000-CE6 User Manual, version 1.0.6. Last Revised: February 2010 Copyright © 2009 ICP DAS Co., Ltd. All Rights Reserved. E-mail: [email protected] Page: 81 When mounted to the DIN rail, be sure to connect the DIN rail to the earth ground. Because the DIN rail is in contact with the upper Frame Ground as shown in below. XP-8000-CE6 User Manual, version 1.0.6. Last Revised: February 2010 Copyright © 2009 ICP DAS Co., Ltd. All Rights Reserved. E-mail: [email protected] Page: 82 Appendix B. Application of RS-485 Network The RS-485 length can be up to 4000 ft or 1.2 km over a single set of twisted–pair cables, if the RS-485 network is over 4000 ft or 1.2 km, the RS-485 repeater must be added to extend the RS-485 network. XP-8000-CE6 User Manual, version 1.0.6. Last Revised: February 2010 Copyright © 2009 ICP DAS Co., Ltd. All Rights Reserved. E-mail: [email protected] Page: 83 B.1. BASIC RS-485 NETWORK The basic component of the RS-485 network consist of a Master Controller (or using a PC as a host controller), and some RS-485 devices. B.2. DAISY CHAIN RS-485 NETWORK All RS-485 devices are wired directly to the main network, If the network is up to 1.2 km, it will need a repeater (7510 series) to extend the network length. XP-8000-CE6 User Manual, version 1.0.6. Last Revised: February 2010 Copyright © 2009 ICP DAS Co., Ltd. All Rights Reserved. E-mail: [email protected] Page: 84 B.3. STAR TYPE RS-485 NETWORK There are branches along the main network. In this case, it is better to have a repeater to isolate or filter the noise that is made by devices. There is a better choice to use 7513 as a RS-485 hub on start type network. XP-8000-CE6 User Manual, version 1.0.6. Last Revised: February 2010 Copyright © 2009 ICP DAS Co., Ltd. All Rights Reserved. E-mail: [email protected] Page: 85 B.4. RANDOM RS-485 NETWORK There are branches along the main wire. In this case, it is better to have a repeater to isolate or filter the noise that is made by devices. XP-8000-CE6 User Manual, version 1.0.6. Last Revised: February 2010 Copyright © 2009 ICP DAS Co., Ltd. All Rights Reserved. E-mail: [email protected] Page: 86 B.5. MASTER/SLAVES SETTINGS There must exist one master to have a pull-high/pull-low resistor in the same network. In a master/slave applications, ”Master” is the default configuration of XP-8000-CE6. XP-8000-CE6 as a Slave: For most of application, only one 7520 series module is used as RS-232/485 converter, and its pull-high/pull-low resistors are set to be enabled. Then the XP-8000-CE6 and all the other devices on this network must be in their slave mode (the pull-high/pull-low resistors must be disabled). Please refer to the following figure to set the jumpers to the slave mode. The jumpers are located at the power board of XP-8000-CE6. XP-8000-CE6 User Manual, version 1.0.6. Last Revised: February 2010 Copyright © 2009 ICP DAS Co., Ltd. All Rights Reserved. E-mail: [email protected] Page: 87 If there are repeaters on the RS-485 network, you can see that there are pull-high/pull-low resistors on both sides of the repeaters (I-7510) XP-8000-CE6 User Manual, version 1.0.6. Last Revised: February 2010 Copyright © 2009 ICP DAS Co., Ltd. All Rights Reserved. E-mail: [email protected] Page: 88 XP-8000-CE6 as a Master (default): When one of XP-8000-CE6 is set to the master mode, then all the other devices on the same network must be set to the slave mode. Set an XP-8000-CE6 to the master mode by adjusting the jumpers on the power board of XP-8000-CE6 (the pull-high/pull-low resistors are adjusted to be enabled.) Refer to the following figure: XP-8000-CE6 User Manual, version 1.0.6. Last Revised: February 2010 Copyright © 2009 ICP DAS Co., Ltd. All Rights Reserved. E-mail: [email protected] Page: 89 Appendix C. Tips – How To XP-8000-CE6 User Manual, version 1.0.6. Last Revised: February 2010 Copyright © 2009 ICP DAS Co., Ltd. All Rights Reserved. E-mail: [email protected] Page: 90 C.1. HOW TO USE ROTARY SWITCH The rotary switch is reserved for application uses. During normal operation, the position of the rotary switch has no effects on XP-8000-CE6. We provide XPacSDK to read back the value of the rotary switch. int pac_GetRotaryID(); The returning value of pac_GetRotaryID() is what the arrow points to. XP-8000-CE6 User Manual, version 1.0.6. Last Revised: February 2010 Copyright © 2009 ICP DAS Co., Ltd. All Rights Reserved. E-mail: [email protected] Page: 91 C.2. HOW TO USE DIP SWITCH The DIP switches are reserved for application uses. During normal operation, the positions of the DIP switches have no effects on XP-8000-CE6. We provide XPacSDK to read back the value of DIP switches. int pac_GetDIPSwitch(); The returning value of pac_GetDIPSwitch() is a integer ranged from 0 to 255, which corresponds to the positions of the DIP switches. Below is the figure of DIP switches similar to that of XP-8000-CE6. The first DIP switch is the LSB and the 8th DIP switch is the MSB. If the DIP switch slides up to the “ON” side, it represents 1. If the DIP switch slides down to the number side, it represents 0. In this way, the eight-bit DIP switches can be represented by 0 ~ 255. XP-8000-CE6 User Manual, version 1.0.6. Last Revised: February 2010 Copyright © 2009 ICP DAS Co., Ltd. All Rights Reserved. E-mail: [email protected] Page: 92 C.3. HOW TO ONLINE DEBUG XP-8000-CE6 Debug XP-8000-CE6 programs in Visual Studio 2005/2008 Step 1: Make sure the following file are listed with the matching version numbers Path C:\Program Files\Common Files\Microsoft Shared\CoreCon\1.0\Bin File 1. ActiveSyncBootstrap.dll 2. ConMan2.dll 3. ConManPS.dll 4. DesktopDMA.dll 5. eDbgTL.dll 6. TcpConnectionC.dll C:\Program Files\Common Files\Microsoft Shared\CoreCon\1.0\Bin\1033 conmanui.dll C:\Program Files\Common Files\Microsoft Shared\CoreCon\1.0\Target\wce400\X86 1. Device Agent Transport.dll 2. eDbgTL.dll 3. TcpConnectionA.dll 4. clientshutdown.exe 5. CMAccept.exe 6. ConmanClient2.exe Step 2: If the version matches correctly and the entire file are there, copy the following files to XP-8000-CE6 :\ System_Disk\ICPDAS\System folder Clientshutdown.exe ConmanClient2.exe CMaccept.exe eDbgTL.dll TcpConnectionA.dll XP-8000-CE6 User Manual, version 1.0.6. Last Revised: February 2010 Copyright © 2009 ICP DAS Co., Ltd. All Rights Reserved. E-mail: [email protected] Page: 93 Step 3: On the “Tools” menu, click “Options…” command Step 4: On the “Options” dialog, select “XPacSDK_CE” from the “Show devices platform” list, and then click the “Properties…” button XP-8000-CE6 User Manual, version 1.0.6. Last Revised: February 2010 Copyright © 2009 ICP DAS Co., Ltd. All Rights Reserved. E-mail: [email protected] Page: 94 Step 5: On the “XPacSDK_CE x86 Device Properties” dialog, click the “Configure…” button Step 6: On the “Configure TCP/IP Transport” dialog, select the “Use specific IP address” option and type the IP address of XP-8X4X-CE6, and then click the “OK” button XP-8000-CE6 User Manual, version 1.0.6. Last Revised: February 2010 Copyright © 2009 ICP DAS Co., Ltd. All Rights Reserved. E-mail: [email protected] Page: 95 Step 7: On the “XPacSDK_CE x86 Device Properties” dialog, click the “OK” button Step 8: On the “Options” dialog, click the “OK” button XP-8000-CE6 User Manual, version 1.0.6. Last Revised: February 2010 Copyright © 2009 ICP DAS Co., Ltd. All Rights Reserved. E-mail: [email protected] Page: 96 Step 9: On the XP-8000-CE6 controller side, run the “ConmanClient2” and the “CMAccept.exe” applications which is located at: \System_Disk\ICPDAS\System Step 10: On the “Tools” menu, click “Connect to Device…” command XP-8000-CE6 User Manual, version 1.0.6. Last Revised: February 2010 Copyright © 2009 ICP DAS Co., Ltd. All Rights Reserved. E-mail: [email protected] Page: 97 Step 11: On the “Connect to Device” dialog, select “XPacSDK_CE” from “Platform” list and then click the “Connect” button Step 12: On the “Tools” menu, click “Connect to Device…” command Step 13: Connection established. Then you can debug on line. XP-8000-CE6 User Manual, version 1.0.6. Last Revised: February 2010 Copyright © 2009 ICP DAS Co., Ltd. All Rights Reserved. E-mail: [email protected] Page: 98 FAQ: If the connection fails shown as follow, return to step 11 to do the action below Open the command prompt, run the “ConmanClient2.exe/transport:tcpconnectiona.dll/property:port=5000/id:Con” at: \System_Disk\ICPDAS\System, and then run the “CMAccept.exe” XP-8000-CE6 User Manual, version 1.0.6. Last Revised: February 2010 Copyright © 2009 ICP DAS Co., Ltd. All Rights Reserved. E-mail: [email protected] Page: 99 C.4. HOW TO USE MULTI-IO MODULES The multi-IO modules, including I-8114W, I-8112W, I-8144W, and I-8142W, make your device have expansion COM ports. The section will describe how to use these kind modules. Step 1: Plug the IO Modules into XP-8000-CE6 Step 2: Open XPAC_Utility to check the ports’ names of modules Step 3: Open Multi-IO Modules Tab XP-8000-CE6 User Manual, version 1.0.6. Last Revised: February 2010 Copyright © 2009 ICP DAS Co., Ltd. All Rights Reserved. E-mail: [email protected] Page: 100 Step 4: Now you can use the IO ports on your program. Opening 8144 in Slot 1 Code Snippets: { BOOL ret; HANDLE hOpen; char buf[4096]; hOpen = uart_Open("MSA1"); ret = uart_SendCmd(hOpen,"$01M", buf); uart_Close(hPort); } For more information about expansion RS-232/RS-422/RS-485 communication module that are compatible with the XP-8000-CE6, please refer to http://www.icpdas.com/products/Remote_IO/i-8ke/selection_rs232_i8k.htm XP-8000-CE6 User Manual, version 1.0.6. Last Revised: February 2010 Copyright © 2009 ICP DAS Co., Ltd. All Rights Reserved. E-mail: [email protected] Page: 101