1
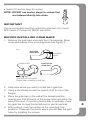
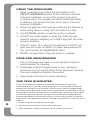
Bathroom Safety
Grab Bars
Model No. 7YUB001STS
Installation
Guide and
User Manual
ATTENTION:
DO NOT install this equipment without first reading and
understanding this instruction sheet. If you are unable to
understand these Warnings and Instructions, contact a health
care professional, dealer or technical personnel for assistance
before attempting to install this equipment - otherwise, injury
may occur.
IMPORTANT
If you have any problems with this product or there are missing
or damaged parts, please call toll free:
1-800-459-4409
Do not return the unit to the place of purchase
before calling the toll free number above.
SAFETY WARNINGS
1.After ANY adjustments, repair or service and BEFORE use,
make sure that all attached hardware is tightened securely.
2.Grab bars add security for bath and toilet areas if attached
as instructed. Location, size and angle of bars should be
determined by a qualified professional to provide optimum
safety and function.
3.Use EXTREME caution on wet tub or floor surfaces.
4.Users with limited physical capabilities should be supervised
or assisted in bath and toilet areas, even when using the
grab bars.
5. These grab bars can provide support and increased stability
for an individual weighing up to 226.8 kgs (500 lbs). Grab
bars are NOT designed to support the total weight of an
individual. Use the grab bars for assistance ONLY.
6.Be sure grab bars are correctly and securely installed.
NEVER use grab bars if they feel loose or unstable.
TOOLS REQUIRED
• Power drill
• 3.17mm (1/8-inch) drill bit (to drill pilot hole for installation of
wood screw into wood wall stud)
• Phillips screwdriver
• Stud finder
• Safety glasses
2
• Silicone sealant
PARTS SUPPLIED
• Twelve (12) #10 x 5cm (2in) wood screws
OR
FLAT HEAD
WOOD SCREW (6)
ROUND HEAD
WOOD SCREW (6)
• Twelve (12) anchor plugs for screws
NOTE:DO NOT use anchor plugs for screws that
are fastened directly into studs.
IMPORTANT
The recommended mounting method for grab bars is to mount
BOTH ends of the bar into WOOD wall studs.
BEFORE INSTALLING GRAB BARS
1.Remove the grab bars and parts from the package. Move
cover plates away from mounting holes (see Figure 1).
Fig. 1
EXPOSED
GRAB BAR
COVER PLATE
MOUNTING
HOLES
CONCEALED
GRAB BAR
COVER PLATE FITS OVER
FLANGE AND CONCEALS SCREWS
2. Determine where you want to install each grab bar.
3.Using a stud finder, locate the nearest stud to one of the
flanges.
4.Place the grab bar on the wall at the desired position,
making sure that at least 2 of the screw holes are within the
area of the stud. If mounting horizontally or vertically, check
the grab bar for level (horizontal) and/or plumb (vertical).
5. With a pencil, mark the centers of the mounting hole
positions. These are the points where you will later drill pilot
holes for installing the screws.
3
6.Repeat step 5 for the other end of the grab bar.
7.Put on safety glasses before starting.
8.Use the power drill and 3.17mm (1/8-inch) drill bit to drill
all holes into the wall and wood wall studs at the marked
positions.
9.Place grab bar on wall, aligning the mounting holes with the
holes in the wall.
10.To provide a water tight installation, apply a bead of silicone
on the holes and insert the wood screws provided into one
end of the grab bar. Screw into the wall and wall stud or plug
(HAND TIGHTEN ONLY). See Figure 2. Repeat on the
other side.
WOOD
SCREW
FIG. 2
WOOD
WALL STUD
WALLBOARD
WOOD
WALL STUD
TOP
WOOD
SCREW
WOOD
WALL
STUD
BOTTOM
WOOD SCREW
LOCATED BELOW
TOP WOOD SCREW
IN WALL STUD
GRAB
BAR
GRAB
BAR
TOP VIEW
HORIZONTAL MOUNT
WALLBOARD
SIDE VIEW
VERTICAL MOUNT
11.Securely tighten all mounting wood screws with a
screwdriver. Be sure not to overtighten or you may crack the
finished surface of the wall (tile, acrylic, etc.)
12.Move cover plates over flange and mounting holes and firmly
press against the wall.
4
WARNING: GRAB BARS MAY NOT PROVIDE DESIGNED
AMOUNT OF SUPPORT UNLESS THESE INSTALLATION
INSTRUCTIONS ARE STRICTLY FOLLOWED. NEVER USE
GRAB BARS IF THEY FEEL LOOSE OR UNSTABLE.
NOTE: For proper installation, both ends of the grab bar
MUST be positioned over a wall stud.
For solid support, at least two (2) of the three (3) screws on the
end of the grab bar MUST go through the wallboard or tile and
be tightly secured into the wall stud. Given the standard distance between wall studs (40.6cm /16in), only two (2) of the
three (3) screws may screw into the wall stud.
Grab bars may be installed vertically, horizontally or at an angle,
provided at least two (2) of the three (3) mounting screws on one
end of the grab bar are secured into a wall stud (see Figure 3).
Using a stud finder, locate the nearest stud to one of the flanges.
FIG. 3
WOOD
WALL
STUD
STANDARD
16" ON CENTRE
WOOD
WALL
STUD
WOOD
WALL
STUD
FRONT VIEW
HORIZONTAL MOUNT
STANDARD
16" ON CENTRE
FRONT VIEW
ANGLE MOUNT
FRONT VIEW
VERTICAL MOUNT
THE FOLLOWING STEPS ARE REQUIRED FOR DRILLING
INTO THE WALL
When drilling into the wall, exercise care to avoid any electrical
wiring or plumbing that may be located behind the wall. Damaged
electrical wiring can cause electrical shock and/or fire. Since older
homes do not comply with current building codes and requirements, be sure to know where internal wall wiring and plumbing is
located so they will not interfere with your installation.
PROPER INSTALLATION IS EXTREMELY IMPORTANT.
IF IN DOUBT, INSTALLATION SHOULD BE DONE BY A
QUALIFIED PROFESSIONAL.
5
USING THE GRAB BARS
1.Read, understand and follow the information in the
SAFETY WARNINGS section of this instruction booklet.
Improper installation or use of ths product may result
in serious injury. The supplier will not be held responsible
or liable for any injuries that may occur due to misuse or
incorrect installation.
2.Grasp the grab bar when exiting or entering the bathtub or
when sitting down or rising from the toilet/commode.
3.Use EXTREME caution on wet tub or floor surfaces.
4. DO NOT put entire weight on grab bar. Grab bars are
rated for persons weighing up to 226.8 kgs (500 lbs) when
properly installed.
5 DO NOT stand, sit or step on the grab bars. DO NOT use
grab bars as a step or platform to reach areas above the
tub. Use the bars for ASSISTANCE ONLY.
6. NEVER use grab bars if they feel loose or unstable.
CARE AND MAINTENANCE
1.Use of mild soap and water or a non-abrasive cleaner is
recommended for cleaning.
2.Periodically inspect the grab bar(s) for any damage or
looseness. Do not use the bar(s) if they feel loose. Remove
the cover plate(s) and tighten the screws.
3.Save these instructions for future reference.
ONE YEAR GUARANTEE
This unit is warranted to the original purchaser to be free of defects in material and
workmanship for one (1) year from the date of purchase. This warranty does not extend to
commercial or institutional use or installation. Warranty service should be arranged through
our customer service department. The purchaser is responsible for transporting the unit to and
from the point of purchase. Incidental repairs that would involve a minimum of time and effort
on behalf of the purchaser will not be considered warranty work and no compensation will
be deemed forthcoming. Any failure of the unit that is not traceable to a defect in material or
workmanship is not covered by this warranty. These non-warrantable items include, but are not
limited to:
6
• Change in colour or finish due to chemical usage.
• The use of abrasive cleansers on the stainless steel surface.
• Unit(s) not properly installed in accordance with manufacturers instructions.
• Damage caused during shipping, handling or installation (eg. cracks, chips, scratches).
• Operating, maintenance, safety guidelines not being followed.
• Any alterations to the unit.
• Damage to the unit(s) as a result of accidental impact, fire, flood, freezing, normal wear.
• Scratches, chips, cracks or holes caused due to shipping, storage or installation.
Inspection prior to installation is the responsibility of the installer, contractor or user. Quality
Craft will not be liable for failures or damage that could have been discovered or avoided by
proper inspection and testing. Quality Craft will not be held liable for damages resulting from
the improper fit or installation of products not supplied by this company. Quality Craft will not be
held liable for loss of use of unit, inconvenience, costs incurred for labour, materials, removal
and installation of replacement units or any other incidental or consequential damages.
Costs relating to obtaining access for repair or replacement are the responsibility of the user.
Under no circumstance shall Quality Craft or any of its representatives be held liable for injury to
any persons or damage to any property.
Quality Craft obligations shall be limited to the repair or replacement of a unit (at our option)
that may prove, by our sole examination, to be defective under normal use and service during
the warranty period. The Company may issue credit in the amount of the invoice value of the
defective product (or a percentage of it according to use) in lieu of repair or replacement.
Quality Craft warranty is non-transferable and shall be voided if the unit is removed from its
initial installation or if it is not installed following the manufacturer’s specifications. This warranty
shall not apply to any product that has been subject to accident, alteration, misuse, abnormal
chemical conditions. This warranty is made in lieu of all other warranties expressed or implied.
No other warranty, expressed or implied, is assumed or will be assumed.
Warranty claim procedure
If a claimable defect occurs, please fill out a claim form through our website at:
www.qualitycraft.com or contact our customer service department at 1-800-459-4409
(Monday to Friday, 8:30am to 5:00pm, EST).
Before you make your claim call, please make sure you have:
1. The description of the product
2. Proof of sale
3. Details regarding the defect
4. Name and address of the owner and installer
Claims must be filled out in writing and returned within six (6) months of appearance of defect.
Failure to comply with this stipulation will make the warranty null and void. We reserve the right
to a thirty-day (30) delay following receipt of claim in which to inspect the product. We assume no
responsibility for labor costs or removing/replacing a previously installed product or transportation
or return of a product.
Imported by:
QUALITY CRAFT
2436 Boul. Industriel
Laval, Quebec
Canada H7S 2G7
Tel: 1-800-459-4409
www.qualitycraft.com
7
8
9