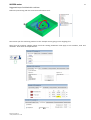
1
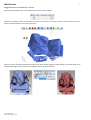
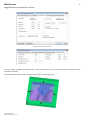
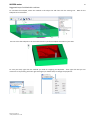
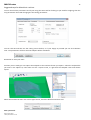
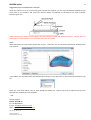
1 MAYKA notes Suggested steps for Wheelchair cushions These are suggested reminder steps to use when making a wheelchair seat cushion from scan data made with the Artec Scanner. Please refer to the Mayka User Manual for specific explanations. See inside the Mayka software > Help menu > Manual. Mayka can be used in conjunction with your machine tool suppliers advice on machine operation and safety. Launch Mayka and check the machine configuration. This is remembered each time you open the software, but it is worth checking. Some of the preferences that users change are under the Edit menu. Patrick Thorn & Co www.patrick-‐thorn.co.uk 2 MAYKA notes Suggested steps for Wheelchair cushions Open your Scanned file. (STL or OBJ exported mesh from Artec Studio) Select the Perspective View to orientate your view to see clearly. Any view is valid to make it easier to see to make a good orientation to the main XYZ origin. Note if you have already orientated the model in the Artec Studio software, shown below, you will not have to do the following Align to facet procedures in Mayka. This is the Artec m ethod. Patrick Thorn & Co www.patrick-‐thorn.co.uk 3 MAYKA notes Suggested steps for Wheelchair cushions Mayka “Align to facet”, then click on the horizontal facet you want and click the OK. In the Top view, use the Manual transformation tool to adjust the model to the orientation you want. Patrick Thorn & Co www.patrick-‐thorn.co.uk 4 MAYKA notes Suggested steps for Wheelchair cushions You can check and refine the positioning in the other orthographic views with relation to the datum XYZ. In our example, it looks like this. Patrick Thorn & Co www.patrick-‐thorn.co.uk 5 MAYKA notes Suggested steps for Wheelchair cushions Now create a “selection zone” that you can use to split the model into the parts you require for milling in foam. You can use the selection zone in many ways and positions to allow you to split the model. To adjust zone with mouse, drag the XYZ markers as required. In this example we are thinking of cutting the inside selection zone from the outside, b ut the way you work is up to you. Select the model and the s election zone in the object list then choose Split from the model menu. Patrick Thorn & Co www.patrick-‐thorn.co.uk 6 MAYKA notes Suggested steps for Wheelchair cushions As we want to extract the inside of the zone, we used Cut by Clipping. Yhe model is duplicated from the original and split into inside and outside models. We want the Inside in this example. You can hide the Exterior by clicking its blue icon in the object list. The select the Inside and use the Model menu > Separate surfaces command. To select the largest part you want to keep, you can click on it and it will b e shown on the screen and object list. You can now h ide or throw a way the other parts you d o not need. Patrick Thorn & Co www.patrick-‐thorn.co.uk 7 MAYKA notes Suggested steps for Wheelchair cushions You can use the various Split option for cut the model. Here a common problem is to split the s eat s ection from the back, however, you may create open s ections. Use the split command with the respective selected model section and the selection zone you want. So we can make a filled section for the cut of the s eat we are going to create contours where the split takes place. You can have as many s elections zones as you want if it is easier for you. Here the Inside.00 has b een split and the section contours created. Patrick Thorn & Co www.patrick-‐thorn.co.uk 8 MAYKA notes Suggested steps for Wheelchair cushions Select the contour section and the seat model and rotate both in an orthographic view to the horizontal position. The reason we do this is that we can only manual draw contours from the top view. How in the top view with the contours tools you can create the other bits of contour you want to make a closed shape. Patrick Thorn & Co www.patrick-‐thorn.co.uk 9 MAYKA notes Suggested steps for Wheelchair cushions As the contours are on different levels, align the contours in Z by selecting them in the object list. Remember the first one n earest the top of the list stays still whilst the others a lign to them. Now with the contour selection tool, s elect contours. This can be in the object list or by dragging over them with the mouse. Click Auto Append and one end will join. Reselect them and click Close. If you have multiple contours you made need to make some further edits, like changing their d irection etc before they will join. Patrick Thorn & Co www.patrick-‐thorn.co.uk 10 MAYKA notes Suggested steps for Wheelchair cushions Now we are going to convert the contours in to a slab of model. To do this, select the contours and then use the Tesselate contour function. The contour will be filled with a model object we can use for the cut of the s eat. Make the back s ection of the s eat visible in the object list. Then with the manual transform realign the S eat and the Tesselation to the back. Only use the a xis lines in side view to move the seat and contour, then you will not make in error rotations. In the object list duplicate the Tesselation model. One for the seat and one for the back, then group each pair so you have a tessellation with the s eat and the back. Patrick Thorn & Co www.patrick-‐thorn.co.uk 11 MAYKA notes Suggested steps for Wheelchair cushions With the manual transform move the back away from seat. Here we have a seat and a back each with its tessellated s ection, which when milled will allow you to easily build the final cushion. Note: Ideally m ake any transformations in an orthographic view as this will make it easier for you to align them when performing m illing. Make other splits as you require, using previous processes. Here is a s uggestion we m ade. However, it will most likely depend on the size of the raw foam you decide to use. In this case, then double click on your s election zone and adjust the s izes accordingly. Patrick Thorn & Co www.patrick-‐thorn.co.uk 12 MAYKA notes Suggested steps for Wheelchair cushions MILLING The key is to define a block for the foam with a datum point for the machine and then position each part in the block, one at a time to p erform the milling processes. Depending on the machine capacity, cutter sizes, spindle power and the resistance of the materials, you will most likely need to perform a roughing pass and than a finishing pass. Define Foam Block for milling s et up at the s ize you require. Align the model to the b lock b y s electing them in the object list. Remember the first one n earest the top of the list stays still whilst the lower item will a lign to the block. Choose the position you require. Patrick Thorn & Co www.patrick-‐thorn.co.uk 13 MAYKA notes Suggested steps for Wheelchair cushions Refine the positioning with the manual transformation tools. Now create your fist machining method. In this example we are going to use roughing first. Note from the machine supplier please check the cutting parameters that apply to the machine, tools and materials. Enter them in the parameters. Patrick Thorn & Co www.patrick-‐thorn.co.uk 14 MAYKA notes Suggested steps for Wheelchair cushions Advance parameters a re not needed You can change through the different tabs in the parameters as you like, then Click OK on the bottom of the parameters window. You probably will need to adjust methods cutting zone as required b y you. Patrick Thorn & Co www.patrick-‐thorn.co.uk 15 MAYKA notes Suggested steps for Wheelchair cushions To calculate the toolpath, select the method in the object list and then click the cutting icon. Wait for the toolpath to b e calculated. You can s elect the toolpath in the list and the b lock to perform toolpath simulation if you want. To save you work, right click the method you used for roughing and duplicate. Then right click and you can rename it to say finishing and then right click a gain (or double click) to change the properties. Patrick Thorn & Co www.patrick-‐thorn.co.uk 16 MAYKA notes Suggested steps for Wheelchair cushions You can check a ll the parameters and if your using the same tool for finishing as you used for roughing, then the only parameters that n eed changing are the cutting parameters. You can click OK and then use the cutting icon as before, or if your happy to proceed you can click calculate now. The parameters will close and the toolpath will b e calculated. Remember to save your work. So when you are ready you can export the toolpaths to the machine format you require. Select the toolpath file you want in the object list, then either use file > export menu, or right click the toolpath name and choose export. Select the machine format in the save as type s ection, check the filename and click save. Save your w ork. Patrick Thorn & Co www.patrick-‐thorn.co.uk 17 MAYKA notes Suggested steps for Wheelchair cushions When the machine is set as instructed by your machine tool supplier, you can copy the Mayka toolpath file you have made to the machine and check the machine datum corresponds to the datum you used in Mayka. Something like this. Always abide by the machine tool suppliers and your facilities health and safety procedures. Mayka does not have eyes to s ee the machine, so it will follow what you have told it. Notes With some parts you may need to profile the cushion. To do this, use the Contouring method as detailed in the user manual. If you always use the same block and methods then saving a scene with these in will retain the parameters you set. Open this scene and choose save as, then change the model file. Adjust any zones if required and you can calculate the m ethods for new toolpaths. …end. Sales & Support: Patrick Thorn & Co Tel : 01784 466474 E-‐mail : info@patrick-‐thorn.co.uk Web : http://www.patrick-‐thorn.com Version 1.2 / 28-‐Oct-‐11 Patrick Thorn & Co www.patrick-‐thorn.co.uk