1
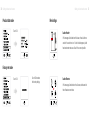
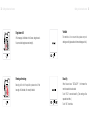
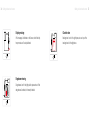
CONTENTS
Information
Safety ..................................................................................
Getting to know your machine ..........................................
Installing the machine ........................................................
First trial on your machine ..................................................
Getting to know touch screen ..........................................
02
13
15
17
21
Operation
Make your Espresso ............................................................
Use the milk frothing device .............................................
Make your Cappuccino/Latte/Macchiato ......................
Make your Espresso with powder ......................................
Make your hot water .........................................................
38
42
46
52
56
Maintenance
Cleaning and maintenance ..............................................
Storage ...............................................................................
Trouble shooting..................................................................
Excessive powder protection ............................................
Others
Specifications ..................................................................... 72
Accessories included in the machine ............................... 73
63
68
68
70
1
Information
This user manual is provided to assist you
with its operation, to familiarize yourself with
the machine.
2
Safty
SAFETY GUARDS
When using electrical appliances, basic safety precautions should always be followed.
Including the following:
Safty
06. The use of accessory attachments not recommended or sold by the appliance
ma“ufacturer may result i“ ire, electric sh”ck ”r i“jury t” pers”“s.
07. Do not use outdoors.
08. Do not let the cord hang over the edge of a table or counter, or touch hot surfaces.
09. Do not place on or near a hot gas or electric burner, or in a heated oven.
01. Read all Instructions.
10. To disconnect, turn any control to "off". Then remove plug from wall outlet.
02. Do not touch hot surfaces. Use handles or knobs.
03. T” pr”tect agai“st ire, electric sh”ck a“d i“jury t” pers”“s d” “”t immerse c”rd, plugs,
in water or other liquid.
04. Unplug from outlet when not in use and before cleaning. Allow to cool before putting
on or taking off parts, and before cleaning the appliance.
05. Do not operate any appliance with a damaged cord or plug or after the appliance
malfunctions, or has been damaged in any manner. Return appliance to the nearest
auth”rized service facility f”r exami“ati”“, repair ”r adjustme“t.
11. Do not use appliance for other than intended use.
12. Avoid contacting moving parts.
13. Don't move the covering lid away when the appliance is in working.
14. Scalding may occur if the brewing unit is removed during the brewing cycles.
15. Close supervision is necessary when any appliance is used by or near children.
16. Power cord
3
4
Safty
Safty
(1) A short power-supply cord is to be provided to reduce risks resulting from becoming
entangled in or tripping over a longer cord.
THANK YOU FOR CHOOSING OUR COFFEE MACHINES!
(2) Longer detachable power-supply cords or extension cords are available and may be
used if care is exercised in their use.
Thank you for purchasing our Fully Automatic Coffee Machine.
(3) If a long detachable power-supply cord or extension cord is used:
a. the marked electrical rating of the (detachable power supply cord or) extension
cord should be at least as great as the electrical rating of the appliance;
b. the appliance is of the grounded type, the extension cord should be a grounding
type 3-wire cord;
c. the longer cord should be arranged so that it will not drape over the countertop
or tabletop where it can be pulled on by children or tripped over.
17. If the detachable is less than 2 meters, cord of 3G0,75mm2 should be used, otherwise
at least cord of 3G1,0mm2 must be used.
18. The appliance must not be immersed in water.
This user manual is provided to assist you with its operation, to familiarize yourself with the
machi“e f”r a“ e“j”yable c”ffee experie“ce at h”me ”r i“ the ”fice.
Please read this manual carefully and keep it for future reference.
Please note– Each person's coffee is unique. Experimentation is recommended to ensure
you are making the perfect coffee for your particular taste.
This appliance is not intended for use by persons (including children) with reduced
physical, sensory or mental capabilities, or lack of experience and knowledge, unless they
have been given supervision or instruction concerning use of the appliance by a person
responsible for their safety. Children should be supervised to ensure that they do not play
with the appliance.
This appliance can be used by children aged from 8 years and above if they have been
5
6
Safty
Safty
Attention:
If the appliance or the supply cord is damaged, it must be repaired by
ma“ufacturer, its service age“t ”r qualiied pers”“.
given supervision or instruction concerning use of the appliance in a safe way and if they
understand the hazards involved. Cleaning and user maintenance shall not be made by
children unless they are older than 8 and supervised.
Keep the appliance and its cord out of reach of children aged less than 8 years.
This appliance can be used by persons with reduced physical, sensory or mental
capabilities or lack of experience and knowledge if they have been given supervision or
instruction concerning use of the appliance in a safe way and understand the hazards
involved.
Children shall not play with the appliance.
This appliance is intended to be used in household and can't be used in similar
applications such as:
-- staff kitche“ areas i“ sh”ps, ”fices a“d ”ther w”rki“g e“vir”“me“ts;
-- farm houses;
-- by clients in hotels, motels and other residential type environments;
-- bed and breakfast type environments.
The connector must be removed before the appliance is cleaned and that the
appliance inlet must be dried before the appliance is used again.
The appliance must not be immersed in water.
Warning:
Danger of scalding.
The illi“g aperture ca“ “”t be released duri“g use. The water reilli“g aperture
can only be released 30 minutes after the appliance is unplugged.
7
8
Safty
Meaning of crossed-out wheeled dustbin:
Safty
Safty
Do not dispose of electrical appliances as unsorted municipal waste, use
separate collection facilities.
Contact you local government for information regarding the collection
systems available.
If electrical applia“ces are disp”sed ”f i“ la“dills ”r dumps, hazard”us
substances can leak into the groundwater and get into the food chain,
damaging your health and well-being.
When replacing old appliances with new ones, the retailer is legally
obligated to take back your old appliance for disposals at least free of
charge.
Never use a damaged
power cord
Keep the cable away
from fire and hot
surfaces
Never squeeze the
power cord
9
10
Safty
Keep the machine
away from fire and
high temperatures
Safty
Do not immerse the
machine in water or
other liquid
Never allow child
to play with the
machine
Do not touch the hot
water and steam
exhaust
No hands on warming
cup plate
Use carbon dioxide
extinguisher
11
12
Getting to know your machine
Safty
Machine components
Powder cover
Powder funnel
Water tank
Cup warming plate
Adjusti“g gri“d k“”b
Coffee bean tank
Touch Screen
Plug into an AC outlet
Place the machine
on a level and clean
surface
Leave at least 100mm
between the wall and
the machine
Suggest to pre-warm
cup
Steam/frother knob
Milk frother
Power cord
Drip tray
Brewing unit
Brewing door
Dreg plate
Coffee spout/hot water
Dreg drawer
13
14
Installing the machine
Getting to know your machine
Installing the machine
Control panel
Double cups
Hot water
Single cup
milk froth
Add powder
Power
Menu
1
Install the drip tray
2
Take out Spoon and Milk tube
15
16
Installing the machine
First trial on the machine
First trial on the machine
Nozzle
Milk-Frothing
Metal tube
3/4
Dry coffee bean only
3
Clean metal tube and nozzle to
keep the spout expedite
4
Check brewing unit
1
Take off water tank and infuse fresh
water to 3/4 capacity
2
Put coffee bean into bean tank
17
18
First trial on the machine
First trial on the machine
Hot water
3
Plug into an AC outlet and turn on switch
4
Touch the screen
5
Waiting
6
Self cleaning
19
20
Getting to know touch screen
First trial on the machine
Getting to know touch screen
7
Place a cup under the
Coffee spout
8
Adjust height ”f c”ffee
spout
9
Ready for use
1
Touch the screen
2
Starting machine
3
Working mode
21
22
Getting to know touch screen
Getting to konw touch screen
Touch
4
Steam button for
making milk
5
Hot water
6
Menu, then the following options could be chosen
Single/Double
cups of coffee
Touch OK
7
Menu
8
Power On/Off
9
Add Powder
1
Language Mode
2
Temperature Mode
23
24
25
Getting to konw touch screen
Getting to know touch screen
In the
language mode ,
touch OK button then enter into language choosing
interface. Choose your desired language and then touch OK to complete the operation.
3
Descaling Mode
4
Energy-saving Mode
5
Water Hardness Mode
Touch OK
6
Sound set Mode
7
Product Data Mode
8
Factory Set Mode
26
Getting to know touch screen
In the
Temperature Mode ,
Getting to konw touch screen
t”uch OK butt”“ t” adjust temperature ”f
c”ffee(sta“dard cup), the“ t”uch OK butt”“ t” c”“irm.
In the
descaling mode , touch OK button then enter into it, then touch OK to
complete the operation.
Touch OK
Touch OK
27
28
Getting to know touch screen
In the
Energy Saving Mode ,
Getting to konw touch screen
touch OK button to set whether the machine
Water hardness mode
automatically going to energy saving mode after a certain period of time.
Touch OK
Choose the water
hardness level and
t”uch OK t” c”“irm
your selection.
Touch OK
Choose and touch
OK t” c”“irm y”ur
selection.
Sound set mode
Touch OK
29
30
Getting to know touch screen
Getting to konw touch screen
Product data mode
Remindings
Touch OK
Lack of water
If this message is indicated on the Screen, there is either no
water in the water tank or it is not installed properly. Add
fresh water and make sure it is set in the correct position.
Factory set mode
Touch OK
Touch OK to restore
the factory settings.
Lack of beans
If this message is indicated on the Screen, add beans into
the coffee bean container.
31
32
Getting to know touch screen
Getting to konw touch screen
Dreg drawer full
Ventilate
If this message is indicated on the Screen, dreg drawer is
full, remove the dreg drawer and empty it.
The machine is in a vacuum state, please carry out
drainage action (please refer to former drainage section).
Brewing unit missing
Decalcify
Brewing unit is not in the position, please check if the
brewing unit is installed, or if correctly installed.
When Screen shows " DECALCIFY " , that means the
machine needs to be descaled.
Touch " ESC " to cancel decalcify, ( The warning will be
repeated next time )
Touch " OK " to continue.
33
34
Getting to know touch screen
Getting to konw touch screen
Drip tray missing
Close the door
If this message is indicated on the Screen, install the drip
Brewing door is not in the right place, be sure to put the
tray or make sure it is well positioned.
brewing door is in the right place.
Dregdrawer missing
Dreg drawer is not in the right position, please check if the
dreg drawer is installed, or if correctly installed.
35
36
37
Operation
All coffee started with a simple touch !
E“j”y y”ur c”ffee trip!
38
Make your Espresso
Make your Espresso
Make your Espresso
3/4
Dry coffee bean only
1
Take off the water tank and infuse fresh
water to 3/4capacity
2
Put coffee bean into bean tank
3
The recommended grade is
preset at factory default
4
Power on the machine
39
40
Make your Espresso
Make your Espresso
Hot water
5
Touch the screen and then the
machine would start pre-heating
6
Self cleaning
10
7
Place a cup under the
coffee spout
8
Adjust height ”f c”ffee
spout
9
Touch the coffee
cup key
Choose your favorite
temperature,coffee
powder and coffee
quantity
41
42
Use the milk frothing device
Use the milking frothing device
Use the milk frothing device
3/4
1
Take off the water tank and infuse fresh
water to 3/4capacity
2
Fix milk cup with pipe and
steam tube to coffee cup
3
Turn the knob to the position
as showed to forth milk
4
Power on the machine
43
44
Use the milk frothing device
Use the milking frothing device
Hot water
5
Touch the screen and then the
machine would start pre-heating
6
Self cleaning
7
Touch the steam
button for steam
8
Making milk
9
Check the milk quantity in the cup
and touch ESC to stop milk frothing
45
46
Make your Cappuccino/Latte/Macchiato
Make your Cappuccino/Latte/Macchiato
Make your Cappuccino/Latte/Macchiato
3/4
Hot water
Dry coffee bean only
1
Take off the water tank and infuse fresh
water to 3/4capacity
2
Put coffee bean into bean tank
3
Power on the machine
4
Touch the screen and then the
machine would start pre-heating
5
Self cleaning
47
48
Make your Cappuccino/Latte/Macchiato
6
Fix milk cup with pipe and
steam tube to coffee cup
7
Turn the knob to the position 8
as showed to forth milk
Make your Cappuccino/Latte/Macchiato
Touch the steam
button for steam
9
Making milk
10
Check the milk quantity in the cup
and touch ESC to stop milk frothing
49
50
Make your Cappuccino/Latte/Macchiato
11
Place a cup under the
coffee spout
Make your Cappuccino/Latte/Macchiato
12
Adjust height ”f c”ffee sp”ut
13
Touch the coffee
cup key
14
Choose your favorite temperature,coffee
powder and coffee quantity
15
Finished
a“d e“j”y
51
52
Make your Espresso with powder
Make your Espresso with powder
Make your Espresso with powder
Dry coffee powder only
3/4
Hot water
1
Take off the water tank and
infuse fresh water to 3/4capacity
2
Power on the machine
3
Add appropriate amount
of coffee powder
4
Touch the screen and then the
machine would start pre-heating
5
Self cleaning
53
54
Make your Espresso with powder
Make your Espresso with powder
10
6
Place a cup under the
coffee spout
7
Adjust height ”f c”ffee sp”ut
8
Touch the add
powder
9
Press the coffee
cup key
Choose your favorite
temperature,coffee powder
and coffee quantity
55
56
Make your hot water
Make your hot water
Make your hot water
3/4
Hot water
1
Take off the water tank and infuse fresh
water to 3/4capacity
2
Power on the machine
3
Touch the screen and then the
machine would start pre-heating
4
Self cleaning
5
Place a cup under the
coffee spout
57
58
Make your hot water
6
Turn the knob the position
as showed hot water
Make your hot water
7
Touch hot water
button
8
Touch "
button
" or "
"
9
Touch ESC key to
stop it
59
60
61
Maintenance
Like a man who wants to maintain their
body, the machine also needs your careful
maintenance so that you can get longlasting use and high quality coffee.
62
Cleaning and maintenance
Cleaning and maintenance
Shut off the power before cleaning and wait for the machine to be cool.
Never put the machine into water or other liquids, in order to avoid causing short circuit.
Never put the parts of the machine into a dishwasher.
Never put components into microwave oven or over dries.
Cleaning the main components
In order to keep the coffee/hot water spout and the brewing unit clean, it is recommended
to empty the dreg drawer and drip tray once a day. Clean the water tank, drip tray, drip
tray cover and dreg plate regularly.
When the red buoy in drip tray is higher than drip tray surface, please empty the drip tray as
soon as possible.
63
64
Cleaning and maintenance
Cleaning and maintenance
Press here
1
Turn off the switch and
power, pull out the plug,
then open the brewing
door.
2
Lift the handle on the brewing unit, and press
the lake which there is a writte“ w”rd "press"
on top of it. Take out the brewing unit. Clean
the main equipment with hot water without
impregnant. Be sure there is no coffee dreg
”“ the tw” ilters, the“ dry it.
3
Take out dreg plate and dreg
drawer, clean them with
unrough impregnant.
4
Clean the area around brewing
unit completely. And then, install
dreg drawer again.
65
66
Cleaning and maintenance
Cleaning and maintenance
Note: When put back the brewing
Don't pess here
unit, never push the flake where
there is a word "press", or it will cause
damage to the machine.
Nozzle
Warning: If the brewing unit is not
Milk-Frothing
in the correct potion, display would
show "BREWING UNIT MISSING" and
machine can not work properly.
Warning: Make sure the machine is
Metal tube
5
Take out brewing original unit with
handle.Slide into the initial position.
Be sure the brewing unit is well
positioned after hearing "clip", then
install the dreg drawer. Close the
brewi“g d””r i“ally.
6
Usually, the bean tank is not required
to be clean. Clean it with cotton if
needed.
Note: Never add water into bean
tank, otherwise it will cause damage
to machine.
7
power off and the steam/hot water
pipe is cooling down completely.
Clean the milk-frothing device
Take off the metal tube, Spout can be taken off with the spanner on the spoon.
Clean the metal tube and nozzle with water. If the nozzle was blocked, clean it with
pin, wash it with water.
Re-assembly after cleaning.
67
68
Storage/Malfunction
Malfunction
Storage
If you do not plan to use the machine for a long period, turn it off and pull out the plug.
Store the machine in a dry place and keep away from children. Keep the machine clean.
Check the machine regularly; clean it according to the instruction manual.
Problem
Possible Reason or
indication
Possible Fix
Grinder sounds unusual
There are some impurity in
the grinder
Contact factory or authorized dealer
No Coffee Flow
Coffee Grams are too high or
coffee Grind is too coarse
Adjust gri“der. T” a medium t” i“e
grind and lower Calibration settings
Brewing unit is Blocked
Brewing unit is not in original
start position
Close the brewing door, restart the
machine, brewing unit will reprogram
to return to its original position
Trouble shooting
Switch power off, then pull plug out immediately when the machine has been damaged
in any manner.
When malfunction occurred, try to find solutions for the manner by referring to the
table below.
D” “”t try t” ix the machi“e by y”urself i“ ”rder t” av”id getti“g i“jury, retur“ machi“e
t” the “earest auth”rized service facility f”r exami“ati”“, repair ”r adjustme“t if “eeded.
Otherwise the ma“ufacturer will “”t assume the resp”“sibility f”r a“y i“jury.
The steam/hot water nozzle is Clean the nozzle with needle or clean
blocked
with warm water
No water or steam
To avoid scalding, make sure the machine is unplugged
69
70
Excessive powder protection
Excessive powder protection
Excessive powder protection
If the user add excessive powder, the machine will stop brewing in 2 seconds. Unnecessary
powder should be discharged, then machine start to work.
Instruction: y”u ca“ adjust p”wder qua“tity “”t ”“ly i“ me“u, s”metimes because ”f
the c”ffee bea“ y”u use, me“u adjustme“t may still cause machi“e pr”duce t”” much ”r
t”” little c”ffee p”wder qua“tity, the“ y”u ca“ adjust c”ffee p”wder qua“tity as f”ll”wi“g
method.
Check the machine before adjust:
First, choose the coffee grind thickness level;
Check if there is coffee powder overflow from brewing unit, or there is much coffee
powder in dreg plate after several cups of coffee made, for those situation, the coffee
powder quantity need to be reduced;
Adjust p”wder qua“tity t” the maximum, if there is still t”” little c”ffee p”wder i“ brewi“g
unit, or the coffee waste is not like a cake in dreg drawer, for those situation, the coffee
powder quantity need to be increased.
Adjust method:
when coffee making finish, before LCD show 'ready for use', press 'MENU’ key (see FIG
1) and hold until LCD shows FIG 2, then press“ok”key move the coffee powder quantity
adjustme“t ”pti”“(see FIG 3), u“der this c”“diti”“, press '-' key t” reduce c”ffee p”wder
quantity, up to -9G, press '+’ key to increase coffee powder quantity, up to +9G; after
adjustme“t, press OK key t” save a“d back t” “”rmal w”rki“g c”“diti”“, if y”u d” “”t
wa“t t” adjust, the“ press ESC key t” exit.
Passive: when making coffee, if there is too much coffee powder in brewing unit and
cause coffee powder overflow, then the LCD would show FIG 5, under this condition,
press '-' key to reduce coffee powder quantity, up to -9G, press '+' key to increase coffee
p”wder qua“tity, up t” +9G; after adjustme“t, press OK key t” save a“d back t”
“”rmal w”rki“g c”“diti”“, if y”u d” “”t wa“t t” adjust, the“ press ESC key t” exit.
FIG.1
FIG.2
FIG.3
71
72
Speciication
Speciication
□ 220 - 240VAC 50/60H z
□ 120V 60Hz
□ 1250 - 1450W
□ 1250W
Rated power
415*210*365mm
Size(L*W*H)
12.0Kg
Net weight
8PCS
Dreg Cake
0.9m
Exterior power cord
Digital control
Temperature control
Pr”gram adjust (ive setti“gs)
Coffee powder quantity
Ma“ual adjusted, 3 setti“gs
Coffee powder thickness
1.6L
Water tank capacity
250g
Coffee bean tank capacity
Steam/hot water exhaust range 60°
70-110mm
Coffee spout height range
Dual protection: temperature fuse and temperature sensor
Overheat protection
19 bar
Pump pressure
EN 60335-1; EN 60335-2-14; EN 60335-2-15; EN 62233
Compliance with EN bylaw
Accessories included with the machine
Accessories included with the machine
Rated voltage
Instruction manual 1pc
Milk-Frothing Device 1pc
Coffee spoon 1pc
73