1
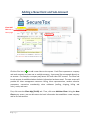
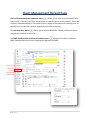
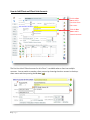
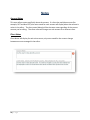
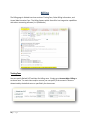
TABLE OF CONTENTS Adding a New Client and Sub-Account Page 2 - 3 Client Management Editor Page 4 – 5 Client Management: Default Page Page 6 Accounts Page 7 - 11 Notes Page 12 Billing Page 14 - 15 Client Management: More Options Page Page 16 - 17 Client Management: Randoms Page Page 17 - 18 Client Management: Misc Page Page 18 - 19 Client Management: Address Management Page A Focus on Recording a Collection Page 20 Page 21 - 22 Introduction SecureTox is a comprehensive, web-based software that lends itself to fulfilling all program management responsibilities necessary to run a successful drug and alcohol testing business. It is complete with account and client management, billing, consortia management, pool generation, reporting capabilities, and more. The SecureTox User Guide will provide a resource to help you quickly learn and maneuver this data management software. 1|Page Adding a New Client and Sub-Account Client MGT Flash tab on Home page. Click the Plus icon ( ) to add a new client to the system. Each Client represents a company and each company can have one or multiple accounts. A personnel list corresponds directly to an account. For example, a company may have a DOT and a Non-DOT account. The Client and its sub-account is established when the basic information has been saved. The next screen will provide full client management resources: billing, client representatives, random selection parameters, consortium membership, other addresses (mailing, shipping, billing and misc.), notes, and more. First, click onto the Client Mgt [FLASH] tab. Then, click onto Add New Client. Using the New Client entry screen, you are able enter the basic information that establishes a new company and its first sub-account. 2|Page This is an overview of all fields on the New Client Entry screen. New Client – Enter the Client Company Name Date Enrolled – This is the date you enrolled the client to provide service Account Reference – If a company has multiple accounts, enter a name that references this account (example; DOT or Non-DOT). If each account represents a different location, then enter the location as the reference for the account Address – This is the main mailing address for the client. If the client has multiple accounts, enter the address for the first account identified by the account reference. Each account can use the same address Company Rep – Enter the first and last name for the first company representative who will have access to information for the account. Admin – If a client has multiple accounts, an Admin will have access to all accounts for the client. DER – If a client has multiple accounts, representatives established as a DER will have access only to those accounts to which he or she has been specifically assigned. If you choose DER in the new client screen, the company representative is automatically assigned to the account. Other – This establishes the representative as simple company contact. Representatives identified as other can be given the same access privileges as a DER. Random Coordinator – This is the representative to whom you send random selection results and update you personnel list mailings. You can print, for postal delivery, all active personnel for every account in a single request. Every account personnel list is automatically addressed to the account's random coordinator. An account can have one and only one random coordinator. Save – Click the save icon to add the client and its first sub-account to the data base. You will automatically navigate to the main client management screen for the new account - see below 3|Page Client Management Editor ABC Company Cr987 789 Cherry Tree Drive Stockton, KY 48975 Editor Overview – The client account are managed through the buttons on the left. Click each button to open the page that provides data utilities for that area of the client/account profile. The button with the left arrow symbol next to it is the current page that is selected. In this example, the Account page is the current page. Account – Manage sub-account access, consortium membership, review company representative, change client and sub-account active flags and more Notes – Enter notes about the company and notes about the account. When you switch between client sub-accounts, the same Client Notes are available for review and editing while the Account Notes reflect the current sub-account for that client. Billing – Manage billing for the account. Percent Control – Manage the annual random selection targets for the year for the account. If the account is a member of a consortium, the annual targets are controlled through the Consortium Mgt resource. 4|Page Other – Specify default settings for lab, Medical Review Officer (MRO), and Designated Employee Representative (DER). More Opts – Federal Certificate No. & Certification Date, No. of Handbooks provided, Remote ID, and other Yes/No options for Agreement, Policy, Owner Ops, Vessel Name, Disable Imports, Personnel Active/Not Active date requirements, Employee vs. Contractor specification, automatic creation of drug test result records for each random selected personnel (Limited). Randoms – Review the most recent random selections generated for the account or the consortium to which the account is a member for printing, emailing to a company representative or generating compliance random when one or more donors were unable to be tested. Misc. – The default caption for two user defined fields are Location and Misc. Data. You can change the captions for each account. If populated, these two fields appear on the random selection summary report. The column headings are replaced with the captions specified for the account. Address Management – This is the representative to whom you send random selection results and update you personnel list mailings. You can print, for postal delivery, all active personnel for every account in a single request. Every account personnel list is automatically addressed to the account's random coordinator. An account can have one and only one random coordinator. Resources – Generate randoms, review random selections previously generated, generate test result reports, and more. Collections – Use the collection page to record collections for any account. 5|Page Client Management Default Page Chain of Custody Recipient drop down menu ( ) allows you to order chain of custody forms from the lab. Generally, the forms are delivered to a specific person for the account. Select the company representative here. The contact will be a preset in the resource for ordering chain of custody forms so you won't have to remember to whom they are sent. The Lab drop down menu ( ) allows you to select a default lab. Custody and Control forms are generally ordered from this lab. The MRO (Medical Review Officer) drop down menu ( ) allows you to select the default MRO. Custody and Control forms are generally reference the MRO. ABC Company Cr987 789 Cherry Tree Drive Stockton, KY 48975 Other tab will take you to Client Management Default Page Admin 6|Page Reese Rossi 555-365-1231 Accounts The account page is divided into three sections: Client, Sub-Account(s), and Company Representatives/Contacts. Client Section The client’s company name is entered here. Each client must have a unique “Login ID.” Each program users the Client Login ID to identify the company and restricts data access to only that company’s data. You can assign access to Client Reps across client boundaries if you designate a Client Rep as “For All Clients” (see contact editor) and assign the client Rep to specific accounts within another client’s area. From the editor, click to learn more about client login. The “Enable” radio button allows clients to login to their account. The “Disable” radio button disables login for all client representatives for all sub-accounts defined for the client. The Plus icon ( ) allows you to add a new client. The Magnify icon ( for another client. ) allows you to return to the client management home page and search The Floppy Disk icon ( 7|Page ) allows you to save any changes made to the client section. How to Add Client and Client Sub-Accounts Click the Plus icon to add a new client from this screen. ABC Company Cr987 Click the Plus icon to add a new sub-account. 789 Cherry Tree Drive Stockton, KY 48975 Admin Reese Rossi 555-365-1231 The first line titled “Other Accounts for this Client:” is available when a client has multiple accounts. You can switch to another client account by choosing the other account in the dropdown menu and then pressing the Go icon ( ). 8|Page Add another account for the current client by clicking on the Plus icon ( multiple accounts. (i.e. DOT and Non-DOT) The Account Reference icon ( client has multiple accounts ). A client can have ) identifies the account. It is especially important when a Account No. is assigned automatically. Every account is identified by a unique number. The Open icon ( ) is displayed if you enter another account number. Click Open to open the account identified by the new account no. The I-Bubble icon ( ) is the area where the account mailing address is located. By clicking the icon you can manage addresses for the account. Every address has a phone and fax component. The phone and fax associated with the mailing address are displayed for you convenience. Consortium Management drop down list ( ) allows you to choose the consortium from the dropdown list which this account is a member. By selecting the blank item, this removes the account as a member. Consortia are managed from the main menu, by clicking on the Consortia MGT tab. There is a DOT Regulated checkbox ( ) to be selected if the account is a DOT (Department of Transportation) account. When DOT is checked, observed substance levels (quantitative values) are not reported; only qualitative values (i.e. positive negative, etc.) If the account is a DOT account, you can further specify which type by choosing a “Mode” for the Mode drop down menu ( ), for example FMCSA, FAA, FRA, etc. If the appropriate “Mode” is not included in the list, see Other Data from the application menu after you’ve logged in. The Radom Selection checkbox ( ) allows you to identify if an account needs to have random selections generated or if random selections are generated for the consortia in which the account is a member. This option is used for some reporting features. The Date Enrolled icon ( ) is used when a client has multiple sub-accounts. It allows you to keep track of when an account is enrolled. The enrollment date is used when issuing compliance certificates. The Date Inactive icon ( ) is used when a client has multiple sub–accounts. It allows you to keep track of when the account is turned inactive. 9|Page The ACCTActive radio button allows you to set an account as active. The Not Active radio button allows you to set an account as not active. Not active accounts do not show up is search requests unless the option to show Not Active accounts is selected. The Client Representatives and Contacts Section You are able to manage a list of client representative with this section. Each client representative can login to their account and review data: personnel, test results, random selections. If a client has multiple accounts, you can limit each client representative to one or more accounts. To edit the client representative name, click on the icon to the left of their name. NOTE: The following icon descriptions are initiated for the selected contact. Click on the contact name in which you would like the icon actions to apply. The Edit icon ( ) edits the contact profile for the selected contact. Click the Add Contact icon ( ) to add a new contact. This Services icon ( ) allows you to login to services as if you were the selected contact. This will log you out of your admin session. The Email icon ( ) allows you to set the email login parameters for the selected contact. See other data to manage the email standard message. The message is always displayed for editing before it’s sent. 10 | P a g e The Email Personnel List icon ( selected contact. ) allows you to create the email personnel list for the The Print Personnel List and Add Delete Form icon ( and add/delete to form. ) allows you to print the personnel list The Email Personnel List and Add Delete Form icon ( list and add/delete the form to the selected contact. ) allows you to email the personnel The Review icon ( The icons to the right of the page have various functions described in red. ) allows you to review account assignment for the selected contact. Randomize Randoms Report Results Uncollected Randoms Personnel Email Personnel Invoice Control Add a Charge Request a CCF CCF Request History Issue a Compliance Letter EDI Accounts Clinics/Collection Site 11 | P a g e Notes Account Notes This area reflects notes specifically about the account. If a client has multiple accounts (for example, DOT and Non-DOT) the notes saved for each account will display when that account is active in the editor. The client notes (below) will be the same notes regardless of the current account you're editing. The client notes will change to a sub-account for a different client. Client Notes Client Notes will display for each sub-account; only notes saved for the account change between accounts managed in the editor. 12 | P a g e Billing The Billing page is divided into three sections: Testing Fees, Other Billing Information, and Annual Administrative Fees. The billing feature within SecureTox has integration capabilities with other accounting software (i.e. QuickBooks) Testing Fees You can specify Default DOT and Non-Dot billing rates. Simply go to Account Mgt > Billing to set these rates. For each client and/or account you can specify if the account’s rates are determined by the default rates or specifically for the account. 13 | P a g e By selecting the Default Non-DOT radio button you are associating your default Non-DOT rates (found in Account Mgt > Billing) with the account. The Non-DOT fees will display when selected. By selecting the Default DOT radio button you are associating your default DOT rates (found in Account Mgt > Billing) with the account. The DOT fees will display when selected. By selecting the Per Account radio button you are associating rates specified for this account. You are able to specify fees once this radio button is selected. Fee Components Substance fee – Each drug test will be billed at the fee specified as the “Substance Fee.” If the test result is recorded as Positive, the Positive surcharge will be added to the invoice. All associated substance fees for the test are added together as a single line item on the invoice and do not appear separately. Alcohol Screen and Confirm – Alcohol tests can be billed in two parts. If an alcohol test is recorded, the fee associated with "Screen" will appear on the invoice. If the donor submits to a confirmation test and a confirmation level is recorded, the fee associated with the "Confirm" will be added to the invoice. If an alcohol test is resulted as "Positive" then the Positive Surcharge will be added to the invoice. All associated alcohol fees for the test are added together as a single line item on the invoice and do not appear separately. Use Test Panel Fees Checkbox – You can bill according to the panel of substances tested. If you select this option, the fee specified for each panel replaces the “Client Fee” for substance testing (see above). The Positive Surcharge fee is billed if specified for tests recorded as “Positive.” If this option is checked for an account, the system will not include a test result for invoicing if a panel has not been specified for the test or if a fee was has not been specified. This option must be checked for each account for which panel fees are used instead of the Client Fee for Substance (see above). Standard Panel Pricing – You can specify a default fee for every panel in the system (see Other Data > Panels). You can also specify a different fee for every client for every panel if you need to have different pricing for selected client accounts. If you check the box to Use Test Panel Fees, the system will first retrieve the standard fee for the panel used in the test. If pricing has 14 | P a g e been specified for that panel for the client account, the fee specified for the client account is billed. For example, if an employee (donor) is tested using the “Petroleum 10 Panel” (see Standard (STD$$) Panel Pricing below), 48.50 will be billed. Note: The “Petroleum 10 Panel” does not appear in the grid on the left; Standard pricing applies. If the donor for this account is tested using the “Ten Panel Plus Alcohol”, the system will bill the account 52.00 instead of the standard 48.00. The “Ten Panel Plus Alcohol” appears in the data gird on the left. When you click the Add panel icon ( ) on the right of the panel, the panel will appear in the data grid on the left for the current account. Click into the cell under “Amt($)” and enter the price to bill for that panel for the current account. The standard fee is displayed along the side for easy reference. Click the Remove icon ( ) to remove that panel from the account. The system will user the standard fee when that panel is used in future testing. 15 | P a g e Client Management Editor: More Options Page NOTE: The following are yes and no options. (FYI: For you information) Agreement – Use this option to keep track if an Agreement with the Client for the Account has been provided. (FYI) Policy - Use this option to keep track if an Policy was provided to the Client for the Account. (FYI) Owner Operators - Instead of opening a separate client and account for every owner operator, create a single client/account and manage all owner operators under that account. When you generate randoms from a list of owner operators, you can print a different notification letter that is addressed for mailing to the owner operator as an alternative to the standard notification letter that addressed to employee DERs Vessel Names - If an account represents a list of maritime vessels, click Yes for this option. The personnel editor for the account is modified to allow a single name that reflects the name of the vessel. Disable Imports - This option allows your clients with access to the account to import data into the account's personnel table. If a client routinely gets personnel data from their HR IT department, this option allows users to update their personnel rosters easily. If a personnel list is updated by import, all tracking of personnel status (i.e., when an employee status is changed from active to not active) is lost. Dates Required (Personnel Active/Not Active) - If you are strictly managing when an employee is Active and Not-Active for DOT purposes, you'll want to set this option to yes. Date Compliance (Personnel Active/Not Active) - If you are strictly managing when an employee is Active and Not-Active for DOT purposes, you'll want to set this option to yes. Clients will not be able to set the Not-Active date for personnel prior to the last random generated for the account. Distinguish (E)mployee vs. (C)ontractor - Some Client accounts strictly differentiate between an Employee and a Contractor. Set this option to Yes for this distinction. Login as a client to see how this option affects column headings for these personnel lists. Limited - If you do not mange test results for an account and have no need to review test results for the account, set this option to “Yes.” When the option is set to yes, drug and alcohol test result records are not automatically created for each person picked in a random selection. 16 | P a g e Disable Quantitative Levels - Results Report for the Substance and Alcohol Test will not show Levels Detected. Disable DER Section - Results Report for the Substance and Alcohol Test usually includes the Primary DER for the account. Check this option so DER information is not displayed with the report. Disable Display of “Released” Test Results on DER login - Click this option to disable the display of Test Results not yet acknowledged as "Reviewed" by the DER. This option can be useful if your clients are receiving test results from an MRO (Medical Review Officer). Use this list to resolve missing donor names from EDI Data - DOT results typically do not include donor names. You can use a dummy account to enter donor names. When the EDI resource correlates Lab data with existing personnel records, it will check the list to get missing names so reports include donor names. Client Management Editor: Randoms Page Recent Random Selections - The most recent random selection for the account are available for review, printing, email and picking additional employees for a "compliance random." If the account is a member of the consortium, recent random selections for that consortium are shown. If the account is not a member of a consortium, recent random selections for the account are shown. In the unusual case that randoms have been generated for both the consortium and exclusively from the account, then both sets of recent randoms are displayed. For example, the randoms generated on 4/7/2008 was generated from the DOT-Consortium, while the random generated on 6/12/2008 was generated solely from the personnel in the account. 17 | P a g e Generate a Compliance Random Occasionally your random selections will include personnel who are no longer employed. A compliance random will pick additional people from the personnel list as it originally existed when the random was generated. The operation will exclude personnel who were previously selected. If the random selection was for a consortium, the compliance random will only choose people from the account through which the operation was requested. Click on the random selection from which you would like to pick additional personnel. Click the Open icon ( ). To print the random selections you can click on the Print icon ( ). Select the company representative to whom you would like to address for mailing, and then click on the random selection you would like to print. Choose the address position template to control the position of the address block to insure the address appears in the window of the envelope. (See Other Data > Address Position Templates to manage address positioning.) To email the random selections, you would click on the Email icon ( ). First click on the employee representative that should receive the random selection, and then click onto the random selection you would like to email. Client Management Editor: Misc. Page HR personnel data management systems can identify an employee’s location by a number of factors. Use the “Major”, “Minor” and “Other” Fields if you need to import personnel data from an HR system for multiple clients and accounts in a single request. If an employee record has the same (major, minor, other) identifier as specified for the account, the personnel record will import into that account. Not all systems allow for Global Imports. Call support for assistance. 18 | P a g e Caption 1 and Caption 2 fields - are user defined fields for personnel records that are provided. If user defined captions are not provided, the default captions are "Location" and "Miscellaneous" for Caption 1 and Caption 2, respectively. Thirty two (32) characters can be entered for these captions. You can import or manually input data into the "Location" and "Miscellaneous" fields for personnel data. Some clients require a different reference heading for these data items. The captions entered here will be used as headings for those items. The items are always included in random selection reports if the data for those items are been specified for the records. Use the Location & Misc. fields and these captions to accommodate your client's special needs. The Lab Account Caption (EDI) field - is displayed on the Test Result Report. "Lab Acct. No." is displayed if a caption is not provided. Some Clients might find the lab account number useful if the caption is modified to suite their expectations. Federal Certificate Number field - Some DOT agencies issue Federal Cert. No. This item is FYI; No reports are currently available for this data item. Federal Certificate Date field – This is a field to document the date Federal Certification Number was issued. This item is FYI; No reports are currently available for this data item No. Handbooks field - this field allows you to keep track of the number of handbooks an account has been issued. No reports are currently available for this data item. Company AKA - Occasionally a Company may change its name. After years of providing service, users can often forget the new company name. This field allows you can enter to previous name. The search resources will search by the current company name as well as the AKA. The AKA is for the Client Company name; not for each sub-account. 19 | P a g e Client Management Editor: Address Management Page You can establish any number of addresses for each client. Every address can be assigned to a sub-account for three different purposes; Mailing (U.S. Postal Service), Shipping (Non-PO Boxes for FedEx), and Billing. Every client representative (DER) can have their own address. If a DER’s address is different than the Mailing, Shipping or Billing, simply add the address under Address Management and assign it to the DER in the DER editor. In any case, choose an address for each DER to accommodate mailings. You have to declare at least one address as a Mailing address for every Client sub-account. If only a single address has been specified for a client and declared as the "Mailing" address, it will be used for Shipping and Billing too. Phone and Fax Every address can have a phone and fax. You can also specify separate phone numbers for each client representative. Billing Header 1 and 2 Clients often require invoices to be mailed to a specific department and/or to a specific individual. Use the two billing header lines to accommodate this need. If one or both header lines are specified, the system will include the lines as part of the billing address. Click the Edit icon ( ) to edit the address. Click the Add icon ( ) to add a new address for the client. 20 | P a g e Recording a Collection If you perform collections, create a Collection Site (See Other Data) for each location from which you want to record a collection. Each user must be assigned to one or more collection sites from where the user logs in and record donor collections. See Account Mgt for collection site assignments. If you're assigned to multiple collection sites, choose the collection site that reflects your location when recording a collection: see "Your Collection Site(s)" Click the Save icon ( ) to save the collection record. Collections are saved as "Not Released". Released test results are available to the Client upon log-in. You can immediately report the results of the test by email (see below). Test results can be released in bulk as a part of your general workflow. See Results-Mgt to release test results. If the donor has a Request for Testing, or a Notification Letter for random selections, you'll find a Test-ID on the form. The Test-ID uniquely identifies the record in the database. Enter the Test-ID (it's all numbers) and click the icon to retrieve the donor's name and employer. Collections must be recorded for a specific client account. Create a client as a "House Account" to record general collections for "Walk-Ins" if needed. When you finish entering the collection, you can print a report to give the donor. To do so, click the Report icon ( ) and print a collection report with payment information if the donor is paying for the drug test. The payment is recorded as "PAID” (See Billing Mgt to report paid collections for the day). Each paid collection is recorded as an Invoice that's been paid (See Account Mgt > Billing for account default fees). You can also assign fees for each client if the client fees are different than the account default fees; client fees take precedence over default account fees. The substance fee accumulates to the total only if a Substance Test Type (Urine, saliva, etc.) and a Panel are selected. You can impose separate fees for both the Alcohol Screen and the Confirmation test. The fees are applied to the total only if an Alcohol Test type is selected. The fee for the screen is applied if a value for the Screen Level is entered; including a value = 0 .The fee for a confirmation is applied if a value for the Confirmation Level is entered; including a value = 0. If any fee is waived, remove the value from the field (delete the numbers so the field is blank). The substance and alcohol tests have minimum entry requirements in order for the test fees to accumulate to an invoice total: 21 | P a g e Substance Test Requirements: Test Type: Urine, Saliva, etc. Panel: NIDA-5, 5-Panel, etc. Results: None, Negative etc Alcohol Test Requirements: Test Type: Breath, etc. Screen Level : Enter a screen level detected including "0" is no alcohol is detected Results: None, Negative etc. Click the Print icon ( ) to print a collection report without payment information. Click the Email icon ( ) to email a collection report to the employer representative. The emailed report is identical to the printed report without payment information. To Record a Collection Search for the Donor's Employer Click the "On Select Go To" Option "Collection Data Entry" Click the Open icon ( ) to go to the management screen. If you forget to choose the "On Select Go To" you can click the Collection Button from the Client Management area after clicking the Open icon ( ). Pre-Employments, Post-Accidents, Follow-Up Testing, etc. The employer can use his or her online access to easily record a "Test Request". The test request resource provides an Authorization form the employer can give to the Donor. On the form you'll find the Test-ID printed on the form. You can use the Test-ID to retrieve the existing record; the donor's name will be pre-entered, as well as other testing requirements. When the employer representative is in the system, the collection resource can send the employer an email with the results of the test for fast test result reporting when instant tests are used. Random Testing You can send the results of random selections to employers by email. The email includes the list of people selected and can include the "Notification of Testing" form. The notification of testing form includes the Test-ID. 22 | P a g e