1
Enterprise Suite
© 2004-2009 Doctor Web. All rights reserved
This document is the property of Doctor Web. No part of this document
may be reproduced, published or transmitted in any form or by any
means for any purpose other than the purchaser's personal use without
proper attribution.
TRADEMARKS
Dr.Web, the Dr.WEB logo, SpIDer Mail, SpIDer Guard, CureIt!, the
Dr.WEB INSIDE logo are trademarks and registered trademarks of
Doctor Web in Russia and/or other countries. Other trademarks,
registered trademarks and company names used in this document are
property of their respective owners.
DISCLAIMER
In no event shall Doctor Web and its resellers or distributors be liable for
errors or omissions, or any loss of profit or any other damage caused or
alleged to be caused directly or indirectly by this document, the use of or
inability to use information contained in this document.
Dr.Web Enterprise Suite
Version 5.0
Administrator Manual
01.10.2009
Doctor Web Head Office
2-12A, 3rd str. Yamskogo polya
Moscow, Russia
125124
Web site: www.drweb.com
Phone: +7 (495) 789-45-87
Refer to the official web site for regional and international office
information.
Doctor Web
Doctor Web develops and distributes Dr.Web® information
security solutions which provide efficient protection from
malicious software and spam.
Doctor Web customers can be found among home users from all
over the world and in government enterprises, small companies
and nationwide corporations.
Dr.Web antivirus solutions are well known since 1992 for
continuing excellence in malware detection and compliance
with international information security standards. State certificates
and awards received by the Dr.Web solutions, as well as the
globally widespread use of our products are the best evidence of
exceptional trust to the company products.
We thank all our customers for their support and
devotion to the Dr.Web products!
4
Table of Contents
Chapter 1: Welcome to Dr.Web® Enterprise
Suite
11
1.1. Introduction
11
1.2. Conventions and Abbreviations
12
1.3. About Dr.Web Enterprise Suite
13
1.4. Benefits
16
1.5. System Requirements
17
1.6. Distribution Kit
20
1.7. Key Files
21
1.8. Links
23
Chapter 2: Installation and Removal of
Dr.Web ES Components
25
2.1. Planning the Structure of an Anti-Virus Network
25
2.2. Installing the Anti-Virus Server and the
Anti-Virus Console
26
2.2.1. Installing the Anti-Virus Server for Windows® OS
27
2.2.2. Installing the Anti-Virus Server for UNIX®
system-based Operating Systems
38
2.3. Installing the Anti-Virus Agent
41
2.4. Remote Installation of the Anti-Virus Agent (for
Windows® OS)
43
2.4.1. Installing the Agent Software through the Console
44
2.4.2. Installing the Agent Software through Active
Directory
47
2.5. Installing NAP Validator
52
2.6. Removing the Dr.Web ES Anti-Virus
53
Administrator Manual
5
2.6.1. Uninstalling the ES Software for Windows® OS
Locally or Remote
53
2.6.2. Uninstalling the ES Agent Software through Active
Directory
55
2.6.3. Uninstalling the Server Software for UNIX®
system-based Operating Systems
55
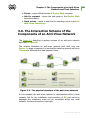
Chapter 3: The Components of an Anti-Virus
Network and Their Interface
57
3.1. The Anti-Virus Server
57
3.2. The Anti-Virus Console
58
3.3. Network Scanner
72
3.4. The Anti-Virus ES Agent
74
3.5. In-Built Web Interface
78
3.5.1. Administration
81
3.5.2. Anti-Virus Network
83
3.5.3. Help
87
3.6. The Interaction Scheme of the Components of
an Anti-Virus Network
88
Chapter 4: Getting Started. Launching the
Anti-Virus Console and Establishing a Simple
Anti-Virus Network
92
Chapter 5: Accounts and Groups
96
5.1. Anti-Virus Network Administrators
96
5.2. Managing Administrator Accounts
97
5.3. Groups. Preinstalled Groups, Creating and
Removing Groups
99
5.4. Adding a Workstation to a Group. Removing a
Workstation from a Group
103
5.5. Setting a Group. Using Groups to Configure
Workstations. Setting Users' Permissions
105
Administrator Manual
6
5.5.1. Inheriting the Configuration from Groups by
Workstations
107
5.5.2. Setting Users Permissions
109
5.5.3. Propagation of Settings to Other Groups/Stations
110
Chapter 6: Administration of Anti-Virus
Workstations
6.1. New Stations Approval Policy
112
112
6.1.1. Creating an Account for a Station
113
6.2. Viewing and Editing the Configuration of a
Workstation
114
6.3. Editing the Parameters of the Anti-Virus Agent
122
6.4. Scheduling Tasks on a Workstation
126
6.5. Launching and Terminating Anti-Virus Scanning
on Workstations
130
6.6. Viewing the Statistics
139
6.7. Configuring HTTP Traffic Checks
144
6.8. Configuring Access to Resources and Websites
146
6.9. Setting a Language of Anti-Virus Components
Interface on a Workstation
148
6.10. Sending Notifications to the Users
149
6.11. Email Protection Under UNIX®
153
Chapter 7: Configuring the Anti-Virus Server
7.1. Setting the Server Configuration
155
155
7.1.1. Traffic Encryption and Compression
161
7.1.2. Setting the Mode of Operation with Databases
164
7.1.3. Setting Alerts
165
7.1.4. Receipt of Alerts
166
7.2. Server Logging. Viewing the Log
167
Administrator Manual
7
7.3. Setting the Server Schedule
169
7.4. Administration of the Server Repository
172
7.4.1. Introduction
172
7.4.2. General Parameters of the Repository
174
7.4.3. Setting the Dr.Web Global Update System (GUS)
175
7.4.4. Setting Synchronization
176
7.4.5. Setting Propagation
177
7.4.6. Setting Notifications
178
7.4.7. A Simple Editor of the Configuration of the
Repository
178
7.5. Server Statistics
179
7.6. Peculiarities of a Network with Several
Anti-Virus Servers
180
7.6.1. Building a Network with Several ES Servers
180
7.6.2. Setting Connections between the Servers of an
Anti-Virus Network
183
7.6.3. Using an Anti-Virus Network with Several Servers
190
Chapter 8: Updating the Dr.Web ES Software
and Virus Databases
193
8.1. Upgrading Dr.Web ES for Windows® OS
193
8.2. Upgrading Dr.Web ES for UNIX® System-Based
Systems
197
8.3. Upgrading Dr.Web ES with Several Anti-virus
Servers
201
8.4. Updating Dr.Web ES through the Repository
202
8.5. Updating the Repository of a Server not
Connected to the Internet
207
8.6. Manual Updating of the Dr.Web ES Components
209
8.7. Scheduled Updates
211
Administrator Manual
8
8.8. Updating Mobile Agents
213
8.9. Replacing Old Key Files with New Ones
214
Chapter 9. Configuring the Additional
Components
218
9.1. NAP Validator
218
Chapter 10. Integration of Enterprise Suite
with UNIX® Mail Server
222
10.1. Setup and Initial Configuration of UNIX Mail
Server in Existing ES Environment
223
10.1.1. Setting Up and Configuring Dr.Web MailD
223
10.1.2. Enabling Enterprise mode for Agent and Monitor
223
10.1.3. Connecting UNIX Mail Server to Enterprise Server
224
10.1.4. Configuring Dr.Web MailD Components via
Enterprise Suite
226
10.1.5. Launching and Stopping the System
226
10.2. Integration of Functioning UNIX Mail Server
with Enterprise Suite Environment
Appendices
227
229
Appendix A. The Complete List of Supported OS
Versions
229
Appendix B. The Description of the DBMS Settings.
The Parameters of the DBMS Driver
235
Appendix B1. Setting Up the ODBC-driver
237
Appendix B2. Setting Up the Database Driver for Oracle
239
Appendix B3. Setting Up the Database Driver for SQL CE
242
Appendix B4. Using the PostgreSQL DBMS
244
Appendix C. The Description of the Notification
System Parameters
247
Administrator Manual
9
Appendix D. The Parameters of the Notification
System Templates
248
Appendix E. The Specification of Network Addresses
255
E1. The General Format of Address
255
E2. The Addresses of Dr.Web Enterprise Server
258
E3. The Addresses of Dr.Web Enterprise Agent/ Installer
259
Appendix F. Administration of the Repository
261
F1. The Syntax of the Configuration File .config
261
F2. The Meaning of .config File Instructions
264
F3. .id Files
269
F4. Examples of Administrating the Repository with a
Modification of the Status File
270
Appendix G. The Server's Configuration Files
G1. Server Configuration File
272
272
Appendix H. Command Line Parameters of the
Programs Included in ES
279
H1. Introduction
279
H2. The ES Agent Interface Module
280
H3. The ES Agent
280
H4. The Network Installer
284
H5. Dr.Web Enterprise Server
287
H6. The Administrating Utility of the Internal Database
295
H7. The Utility of Generation of Key Pairs and Digital
Signatures
296
H8. Administration of the Server Version for UNIX® OS
with the kill Instruction
297
H9. Dr.Web Scanner for Windows® OS
297
H10. ES Console
298
Administrator Manual
10
Appendix I. Environment Variables Exported by the
Server
299
Appendix J. Using the Script of ES Agent Initial
Installation
300
Appendix K. Regular Expressions Used in Dr.Web
Enterprise Suite
305
K1. Options Used in Regular Expressions
305
K2. Peculiarities of PCRE Regular Expressions
307
K3. Use of Metacharacters
309
Appendix L. Log Files Format
329
Frequently Asked Questions
332
Changing the Type of the DBMS for Dr.Web
Enterprise Suite
332
Restoring the Database of Dr.Web Enterprise Suite
336
Restoring the Server from Data Backup
339
Index
343
Administrator Manual
Chapter 1: Welcome to Dr.Web® Enterprise Suite
Chapter 1: Welcome to Dr.Web®
Enterprise Suite
1.1. Introduction
The Manual is meant for system administrators responsible for
the organization of anti-virus protection.
This Manual is intended to introduce technical features and the
functionality of the software and provide detailed information on
the organization of the complex anti-virus protection of corporate
computers using Dr.Web Enterprise Suite (Dr.Web ES).
The main part of the document explains how to organize a
complex anti-virus protection of computers of your company,
namely how to install the program, build an anti-virus network,
configure and update ES components to assure the ultimate antivirus protection.
The second part of the document (Appendices) provides technical
information, describes the parameters necessary for adjustment
of the modules, explains the syntax and values of instructions.
The Manual does not include the description of Dr.Web antivirus packages for protected computers. For relevant information,
please consult "Dr.Web® Anti-Virus for Windows. User
Manual".
Before reading this document make sure you have the latest
version of the Administrator Manual. The Manual is constantly
updated and the current version can always be found at the
official web site of Doctor Web at http://download.drweb.com/
esuite/.
Administrator Manual
11
Chapter 1: Welcome to Dr.Web® Enterprise Suite
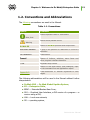
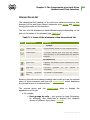
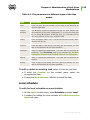
1.2. Conventions and Abbreviations
The following conventions are used in the Manual.
Table 1-1. Conventions
Symbol
Comment
Marks important notes or instructions.
Note, that
Warns about possible errors.
Warning
Dr.Web ES
Names of Dr.Web products and components.
Anti-virus network
A term in the position of a definition or a link to a
definition.
<IP-address>
Placeholders.
Cancel
Names of buttons, windows, menu items and
other program interface elements.
CTRL
C:\Windows\
Keyboard keys names.
Appendix А
Cross-references or Internal Hyperlinks to web
pages.
Names of files and folders, code examples, input
to the command line and application output.
The following abbreviations will be used in the Manual without further
interpretation:
u
Dr.Web GUS — Dr.Web Global Update System,
u
ES — Enterprise Suite,
u
EBNF — Extended Backus-Naur Form,
u
GUI — Graphical User Interface, a GUI version of a program — a
version using a GUI,
u
LAN — Local area network;
u
OS — operating system,
Administrator Manual
12
Chapter 1: Welcome to Dr.Web® Enterprise Suite
u
PC — personal computer.
1.3. About Dr.Web Enterprise Suite
Dr.Web Enterprise Suite ensures complete anti-virus protection of
your company’s computers regardless of whether they are integrated
in a local network or not.
Dr.Web Enterprise Suite provides for
u
centralized (without user intervention) installation of the antivirus packages on computers,
u
centralized setup of the anti-virus packages,
u
centralized virus databases and program files updates on
protected computers,
u
monitoring of virus events and the state of the anti-virus
packages and OS’s on all protected computers.
Dr.Web ES allows both to grant the users of the protected computers
with the permissions to set up and administer the anti-virus packages
on their computers, or flexibly limit their rights, including absolute
prohibition.
Dr.Web ES has a client-server architecture. ES components are
installed on the computers of users and administrators and the
computer(s) to function as the anti-virus Server(s), and exchange
information through network protocols TCP/IP, IPX/SPX, NetBIOS. An
aggregate of computers on which Dr.Web ES cooperating
components are installed is called an anti-virus network.
Administrator Manual
13
Chapter 1: Welcome to Dr.Web® Enterprise Suite
An anti-virus network includes the following components:
Core components:
u
Anti-virus Server stores distribution kits of anti-virus packages
for different OS’s of protected computers, updates of virus
databases, anti-virus packages and anti-virus Agents, user keys
and package settings of protected computers. The anti-virus
Server sends necessary information to the correspondent
computers on Agents’ requests and keeps a general log of
events of the whole anti-virus network.
u
Anti-virus Console is used for the remote administration of the
anti-virus network by means of editing the settings of the antivirus Server and protected computers stored on the anti-virus
Server and protected computers.
u
In-built Web Interface is automatically installed with the antivirus Server. It is a certain extension of a web page and allows
to administrate the anti-virus network as the Anti-virus Console.
u
Anti-virus ES Agent is installed on protected computers. It
installs, updates and controls the anti-virus package as
instructed by the anti-virus Server. The ES Agent reports virus
events and other necessary information about the protected
computer to the anti-virus Server.
Optional components:
u
NAP Validator. Allows to use Microsoft Network Access
Protection (NAP) technology to check health of Dr.Web antivirus software on protected workstations by enforcing
compliance with system health requirements.
The anti-virus Server can be installed on any computer of the
local network, not only on that functioning as a local network
server. It is crucial that this computer is connected to the
Internet to communicate with other anti-virus network
computers and Global Update System servers.
Administrator Manual
14
Chapter 1: Welcome to Dr.Web® Enterprise Suite
The anti-virus Console can be installed on a different
computer than the Server, there should be a TCP/IP
connection between the Console and the anti-virus Server
(IPv6 is also supported).
The anti-virus network can incorporate several anti-virus
Servers. The features of such configuration are described in
the Manual in p. Peculiarities of a Network with Several AntiVirus Servers below.
An anti-virus package installed on protected workstations
includes the following components:
Core components:
u
Dr.Web Scanner for Windows is a part of the common product
Dr.Web for Windows. Its executable file is drweb32w.exe.
The Scanner is configured through group or personal settings for
the workstation. It scans the PC upon user's demand or
according to the user's local schedule. Additionally has an antirootkit module (not included in Dr.Web Enterprise Scanner).
u
Dr.Web Enterprise Scanner for Windows is one of ES Agent
functions. It is also an anti-virus scanner and uses the same
virus databases and search engine. But this functionality is 'built
in' the ES Agent. Dr.Web Enterprise Scanner is meant to
scan for viruses on demand: either according to the schedule, or
a direct task from the ES administration Сonsole. It has no
special interface and no independent settings, it is configured
only when run through the Console interface (when scanning is
scheduled or initiated manually).
u
System Self-Protection monitor (DWProt) which protects files
and directories used by ES from unauthorized or accidental
removal and modification by user or malicious software. With
the system monitor running, access to these resources is
granted to Dr.Web processes only.
Administrator Manual
15
Chapter 1: Welcome to Dr.Web® Enterprise Suite
Optional components:
u
SpIDer Guard (a file monitor) constantly resides in the main
memory and checks all opened files on removable media and
files opened for writing on hard drives on-access. Besides, the
guard constantly monitors running processes for virus-like
activity and, if they are detected, blocks these processes and
informs the user about it.
u
SpIDer Mail (a mail monitor) also constantly resides in the
memory. The program intercepts all calls from your mail clients
to mail servers via POP3/SMTPIMAP4/NNTP protocols and scans
incoming (or out-going) mail messages before they are received
(or sent) by the mail client.
u
SpIDer Gate (an HTTP guard) constantly resides in the
computer memory and intercepts addresses to web sites. The
guard neutralizes malicious software in http-traffic (for example,
viruses in uploaded and downloaded files) and blocks access to
suspicious or incorrect resources.
u
Dr.Web Office Control resides in the computer memory and,
with the respective settings, control access to network resources
and specified local resources. In particular, allows you to limit
access to specific web sites, which helps you control access to
inappropriate web content. The component helps you ensure
integrity of important files and protect them from threats, as
well as limit access to inappropriate web sites for your
employees.
1.4. Benefits
Dr.Web ES offers the following benefits:
u
Cross-platform Server’s software enables using both Microsoft®
Windows® and UNIX® operated computers;
u
Both Windows OS and UNIX OS computers are protected;
u
Network traffic can be reduced to minimum, special compression
algorithms are applicable;
u
Data transferred between system components can be encrypted;
u
Grouping of anti-virus stations facilitates administering of the
Administrator Manual
16
Chapter 1: Welcome to Dr.Web® Enterprise Suite
anti-virus network;
u
The administrator’s workplace (anti-virus Console) can be
installed almost on any computer under any OS;
u
Remote installation and removal of the package software directly
from the Console of the system administrator (for Microsoft®
Windows NT OS, Microsoft® Windows® 2000 OS, Microsoft®
Windows® XP Professional OS, Microsoft® Windows® 2003 OS,
Windows® Vista OS);
u
Centralized installation of anti-virus Agents, the Agents’
software can be set up prior to the installation on client
machines;
u
Spam filters can be used on anti-virus stations (provided that it
is authorized by the acquired license);
u
Virus databases and program modules updates are promptly and
efficiently distributed to client computers by the Dr.Web
Enterprise Suite Server;
u
Server’s critical data (databases, configuration files, etc.) is
backed up.
In comparison to other anti-virus products, Dr.Web ES can
be installed on infected computers!
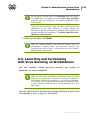
1.5. System Requirements
For Dr.Web ES to be installed and function the following is
required
u
the anti-virus Server should have access to the Internet to
receive updates from Dr.Web GUS;
u
anti-virus network computers should have access to the Internet
to connect to the Sever or be in the same local network as the
Server;
u
a TCP/IP connection between the Console and the anti-virus
Server (IPv6 is also supported).
Administrator Manual
17
Chapter 1: Welcome to Dr.Web® Enterprise Suite
u
for interaction between all anti-virus components, all ports
should be open on the computers:
Port
number
Protocols
Purpose
2193, 2371
TCP, UDP
For connection between the Server and
anti-virus components.
2193, 2371
NetBIOS,
IPX/SPX
For connection between the Server and
anti-virus components.
2193, 2372
UDP
For the Network Scanner.
139, 445
TCP, UDP
For the Network Installer.
9080
http
For the Web Interface.
9081
https
For the Web Interface.
The anti-virus Server requires
u
Intel® Pentium® III 667 MHz or faster;
u
128 MB RAM (256 MB in case a built-in database is used);
u
up to 12 GB of free (available) disk space: up to 8 GB for a builtin database (installation catalog) and up to 4GB for the system
temporary catalog (for work files);
u
Windows 2000 OS or later, Linux® OS, FreeBSD® OS or Solaris
TM
OS (see Appendix A. The Complete List of Supported OS
Versions);
u
MS Installer 2.0 (for the installation of the anti-virus Server for
Windows OS);
u
Windows Script 5.6 WindowsXP-Windows2000-Script56KB917344-x86-enu.exe (for installation on Windows XP OS and
Windows 2000 OS);
u
libiconv library v. 1.8.2 or later (for the installation of the
anti-virus Server for FreeBSD OS and Solaris OS).
MS Installer 2.0 is included into Windows 2000 (with SP3) OS
and later versions. If you use earlier versions of Windows OS,
you should previously download and install MS Installer 2.0.
For details, please visit http://msdn2.microsoft.com/en-us/
Administrator Manual
18
Chapter 1: Welcome to Dr.Web® Enterprise Suite
library/aa367449.aspx.
The Libiconv library can be downloaded from ftp://ftp.freebsd.
org.
The NAP requires
For the Server
u
Microsoft® Windows Server® 2008 OS.
For the Agents
u
Windows XP SP3 OS, Windows Vista OS, Windows Server 2008
OS.
The anti-virus Console requires
u
a computer under Windows OS or a UNIX system-based OS (see
Appendix A. The Complete List of Supported OS Versions);
u
Windows Script 5.6 WindowsXP-Windows2000-Script56KB917344-x86-enu.exe (for installation on Windows XP OS and
Windows 2000 OS);
u
the amount of RAM is determined according to the procedure
described in Appendix H10. ES console.
The administrator Web interface requires
u
Web browser Windows® Internet Explorer® 6 and later or
Mozilla® Firefox®.
If you install Server on a computer with a '_' (underline)
character in the name, configuration of Server with Web
Interface by use of Windows Internet Explorer will not be
avaliable.
In that case, use other Web browser or the Console.
Administrator Manual
19
Chapter 1: Welcome to Dr.Web® Enterprise Suite
u
Dr. Web Browser-Plugin to use Web interface in full. The
plug-in is distributed with the Server installation package. It
installs by browser request when you use elements of Web
interface which require the plug-in (for instance, for antiviruscomponents remote updater or Network Scanner).
The anti-virus ES Agent and the package require
u
Intel® Pentium® II 400 MHz or faster;
u
RAM not less than 32 MB;
u
not less than 80 MB of available disk space for executable files +
extra disk space for logs and temporary files;
u
Windows 98 SE OS, Windows Me OS , Windows NT4 (with SP6)
OS or later
· Notes: SpIDer Guard operates in 32bit systems only.
· SpIDerGate and Self-Protections operates under
Windows 2000 (SP4) OS or later.
u
UNIX system-based OS.
No other anti-virus software (including other versions of Dr.
Web anti-virus programs) should be installed on the
workstations of an anti-virus network managed by Dr.Web
ES.
1.6. Distribution Kit
The program software is distributed in two variants subj ect
to the OS of the selected anti-virus Server
1. For installation under UNIX system-base OSs, the following
components are provided as bzip2 archives or the respective
OS installation packages:
u
Server,
u
Console.
2. For installation under Microsoft Windows OS, the following
components are provided as installation wizard executable files:
Administrator Manual
20
Chapter 1: Welcome to Dr.Web® Enterprise Suite
u
Server,
u
Console,
u
Agent for Active Directory,
u
NAP Validator.
The distribution kit contains the following components
u
Anti-virus Server software for the respective OS
u
NAP Validator software
u
Anti-virus Agents software and anti-virus packages software for
supported OSs
u
Anti-virus Agents software for installation of the Active
Directory service and anti-virus packages software for supported
OSs
u
Anti-virus Console software and launch scripts for main OS
(including separate USB memory card),
u
Administrator Web Interface software
u
Virus databases
u
Manuals, templates, and examples
In addition to the distribution kit, serial numbers are also supplied.
Having registered these serial numbers one can get files with a Server
key and an Agent key.
1.7. Key Files
When purchasing a license for the Dr.Web ES anti-virus, you
receive registration keys or a registration card with a serial number.
Mind that it is impossible to install the Server unless you have key
files. These files are designed to regulate user rights to use the Dr.
Web ES anti-virus. Key file parameters are set in accordance with
the license agreement. Such files also contain user data.
Key files have a write-protected format based on the
mechanism of electronic signature. Editing the file makes it
invalid. Therefore it is not recommended to open your key file
with a text editor, which may occasionally corrupt it.
Administrator Manual
21
Chapter 1: Welcome to Dr.Web® Enterprise Suite
The Dr.Web ES license parameters and price depend on the number
of protected computers, which includes the servers protected by the
Dr.Web ES network.
Before purchasing a license for a Dr.Web ES solution you
should carefully consider this information and discuss all the
details with your local distributor. You should state the exact
number of anti-virus Servers to build the anti-virus network
with. The number of independent Anti-virus Servers (the
Servers which do not interact with each other) running the
network does not affect the license price (see also p. Installing the Anti-Virus Server and the Anti-Virus Console).
Note that Dr.Web ES is licensed per connection. When
calculating the number of licensed needed for the network,
count the number or connections between Anti-virus Servers.
Each connection requires an additional license. Furthermore,
an additional license is required for each connection between
Anti-virus Servers regardless of its type (see p. Building a
Network with Several Servers for details), that is a separate
license for each connection is required for each Anti-virus
Servers. For example, in case of one connection between
two Servers, you need two licenses.
License key files are generally sent to users by e-mail, after the
product serial number has been registered at the special web site:
http://buy.drweb.com/register/ unless otherwise specified in the
registration card attached to the product. Visit the web site above, in
the form enter your personal data and in the corresponding field type
the registration serial number (it is written on the registration card).
An archive with key files will be sent to the designated address. Or you
will be allowed to download it directly from the web site.
As a rule, key files come in a zip-archive, which contains a key file for
the Server (enterprise.key) and a key file for workstations
(agent.key).
Administrator Manual
22
Chapter 1: Welcome to Dr.Web® Enterprise Suite
Users can receive key files in one of the following ways:
u
by e-mail (usually after registration of the serial number at the
web site, see above);
u
with the anti-virus distribution kit if license files were included at
kitting;
u
as a file on a separate carrier.
Please keep key files until they expire. They are required during the
installation and re-installation of the anti-virus, as well as to restore
program components. In case a license key file is lost, you need to
complete the registration form at the web site specified above so that
you can restore it. Note that you will need to enter the same
registration serial number and the same personal data as during the
first registration, you can change the e-mail address only. In this case
the license key file will be sent to the new address.
To try the Dr.Web ES anti-virus and familiarize yourself with the
software, you can order demo keys. Such key files provide for the full
functionality of the main anti-virus components, but have a limited
term of use. Demo key files are sent upon request made through the
web form at http://download.drweb.com/demo/. Your request for
demo keys will be examined and, if approved, an archive with key files
will be sent to the designated address.
The use of obtained key files during the installation is described in p. Installing the Anti-Virus Server and the Anti-Virus Console below.
The use of key files after the program complex is installed is described
in p. Replacing Old Key Files with New Ones below.
The number of requests for a key file is limited to 25 times. If more
requests are sent, a key file will not be delivered.
1.8. Links
Some parameters of Dr.Web ES are set as regular expressions.
Regular expressions are processed by the PCRE program library,
developed by Philip Hazel.
Administrator Manual
23
Chapter 1: Welcome to Dr.Web® Enterprise Suite
The library is distributed with open source codes; the copyright
belongs to the University of Cambridge, Great Britain. All source texts
of the library can be downloaded from http://www.pcre.org/.
The Dr.Web ES software uses the Regina REXX interpreter legally
protected by the GNU license. To download the source texts of the
software or receive additional information, please visit the website of
Regina at http://regina-rexx.sourceforge.net/.
The Dr.Web ES software uses the JZlib library by JCraft, Inc. The
library is legally protected by the BSD-based license. For more
information, please visit http://www.jcraft.com/jzlib/LICENSE.txt.
The source text can be downloaded from http://www.jcraft.com/jzlib/
index.html.
The Dr.Web ES software uses the Common Codec package derivative
from Apache Jakarta Project distributed and protected by the Apache
Software License. For details go to http://www.apache.org/licenses/
LICENSE-1.1. The source text can be downloaded from http://jakarta.
apache.org/.
Dr.Web ES software uses XML API 2.0. This interface is described in
the documentation at http://<server_name>:9080/api/2.0 with
<server_name> being the IP address or computer name where the
Enterprise Server is installed.
Administrator Manual
24
Chapter 2: Installation and Removal of Dr.Web ES
Components
Chapter 2: Installation and
Removal of Dr.Web ES Components
This Chapter will guide you through the basic steps necessary to begin
using the Dr.Web ES anti-virus software.
Before installation, make sure that no other anti-virus
software is installed on your computer.
2.1. Planning the Structure of an
Anti-Virus Network
To create an anti-virus network
1. Make a plan of the anti-virus network structure taking including
all protected computers and designating which ones are to
function as the Servers.
2. Install the anti-virus Server software on the selected computer
or computers.
3. Install anti-virus Consoles on the workplaces of the
administrators of the anti-virus network. Mind that you do not
need to install the anti-virus Console on each administrator
computer. To make it accessible for use, you can share the
Console’s installation folder.
4. Through the Console, update the product software in the
Server repository.
5. Configure the Server(s) and workstations software.
6. Install the anti-virus Agent software on workstations and then
register the anti-virus workstations at the anti-virus Server.
7. Through the Console set up and run the necessary modules.
When planning the structure of the anti-virus network, you should first
of all select a computer to perform the functions of the anti-virus
Administrator Manual
25
Chapter 2: Installation and Removal of Dr.Web ES
Components
Server. Tip: the Server should be accessible on the network to all
workstations connected to it during all the time of their operation.
To install the Server, the Console, and the anti-virus Agent, onetime access (physical or remote) to the correspondent computers is
required. All further steps will be taken from the administrator’s
workplace (which can also be outside the local network) and will not
require access to anti-virus Servers and workstations.
2.2. Installing the Anti-Virus Server and
the Anti-Virus Console
The installation of the anti-virus Server is the first step in the
installation of the Dr.Web ES anti-virus. Unless and until it is
successfully installed, no other ES components can be installed.
The installation procedure of the anti-virus Server depends on the
Server version (for Windows OS or for UNIX system-based OS).
Nevertheless, the parameters set during the installation and the
structure of the installed software are the same for all versions.
All parameters set during the installation can be changed later
by an anti-virus network administrator.
Together with the anti-virus Server the Web Interface is installed,
which like the Console serves to manage the anti-virus network and
set up the Server. If you want your anti-virus network to be managed
by other administrators, it is not necessary to install a Console on
each administrator’s computer. When an anti-virus Console is being
installed, the Dr.Web Enterprise Console folder is created on the
local drive. You should share the folder, so that each administrator can
run the Console’s executable files.
Administrator Manual
26
Chapter 2: Installation and Removal of Dr.Web ES
Components
It is not recommended to install the anti-virus software on
computers on which it had previously been installed (even if
unsuccessfully). It is necessary to remove all previously
installed versions of the Dr.Web anti-virus from the
computers.
If the previously installed Server was removed before
installing the Server software, contents of the repository will
be deleted during installation and the new version will be
installed. If the repository of the previous version by some
reason was not removed, it is necessary to manually delete
the contents of the repository before installing the new
version of the Server and then renew the repository after
installation.
By default the anti-virus Server will run automatically after the
installation.
2.2.1. Installing the Anti-Virus Server for
Windows® OS
Below is described the installation of the anti-virus Server
for Windows OS. The set and the order of steps may somewhat differ
depending on the distribution file version.
Administrator Manual
27
Chapter 2: Installation and Removal of Dr.Web ES
Components
Before installing, please consider the following:
If Terminal Services are installed on Windows OS, you should
install the software through the Add or Remove Programs
Wizard only.
The distribution file and other files requested during the
program’s installation should reside on local drives of the
computer on which the Server software is installed; these
files should be made accessible for the LocalSystem user.
The anti-virus Server should be installed by a user with the
administrator’s rights to the computer.
After the anti-virus Server is installed it is necessary to
update all Dr.Web ES components (see p. Manual Updating
of the Dr.Web ES Components).
In case an external database is to be used it is necessary to
create the database first and set the ODBC driver (see
Appendix B. The Description of the DBMS Settings. The
Parameters of the DBMS Driver).
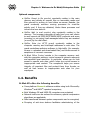
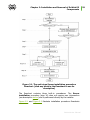
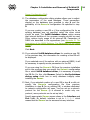
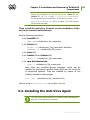
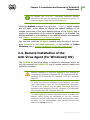
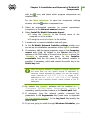
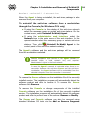
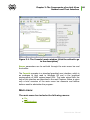
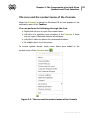
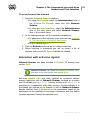
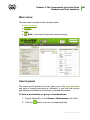
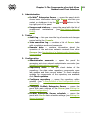
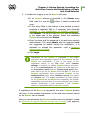
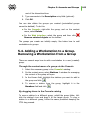
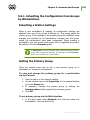
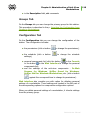
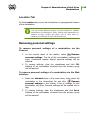
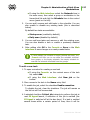
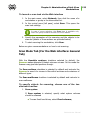
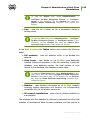
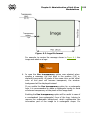
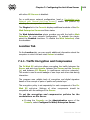
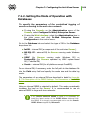
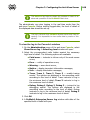
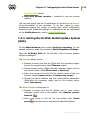
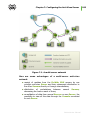
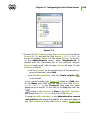
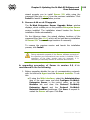
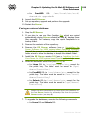
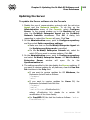
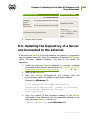
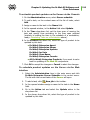
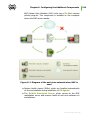
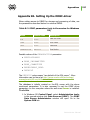
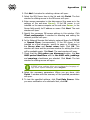
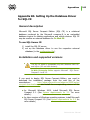
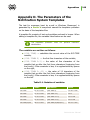
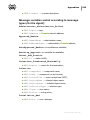
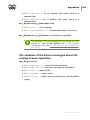
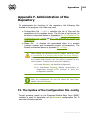
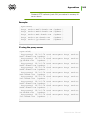
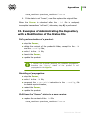
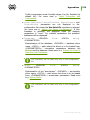
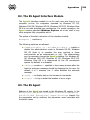
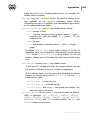
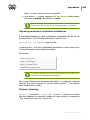
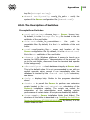
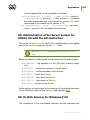
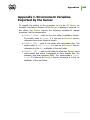
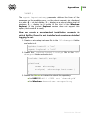
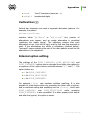
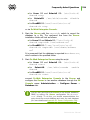
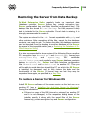
Figure 2.1 illustrates the flowchart of the anti-virus Server installation
procedure. Steps in the flowchart correspond with the detailed
description of the installation procedure shown below.
Administrator Manual
28
Chapter 2: Installation and Removal of Dr.Web ES
Components
Figure 2.1. The anti-virus Server installation procedure
flowchart (click any block in the flowchart to see its
description)
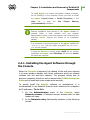
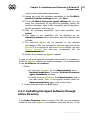
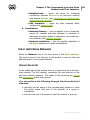
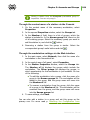
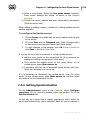
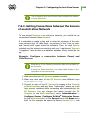
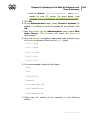
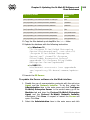
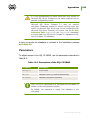
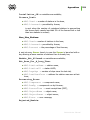
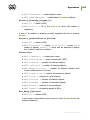
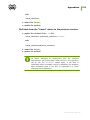
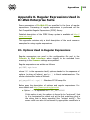
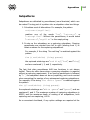
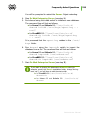
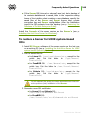
The flowchart contains three built-in procedures. The Server
installation procedure (step 16) does not require user intervention
(see description below) and is performed directly by the installer.
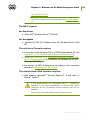
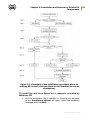
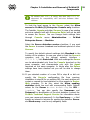
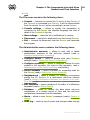
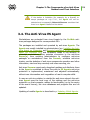
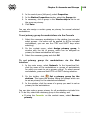
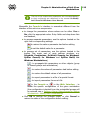
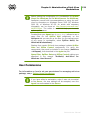
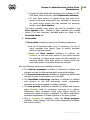
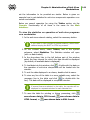
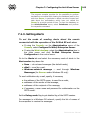
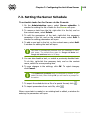
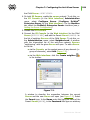
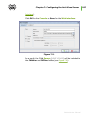
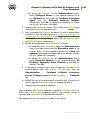
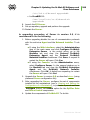
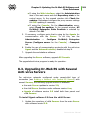
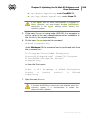
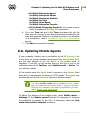
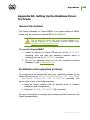
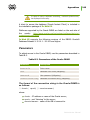
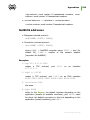
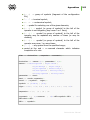
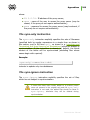
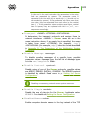
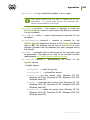
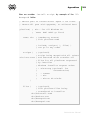
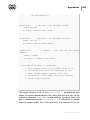
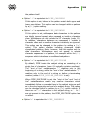
Figure 2.2. and Figure 2.3 illustrate installation procedure flowcharts
Administrator Manual
29
Chapter 2: Installation and Removal of Dr.Web ES
Components
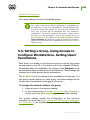
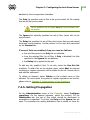
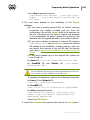
for cases when a new DB is created and when an existing DB is
used.
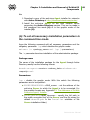
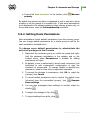
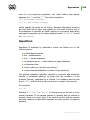
Figure 2.2. Flowchart of the installation procedure when a
new DB is created (click any block in the flowchart to see its
description)
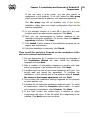
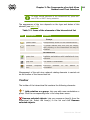
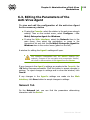
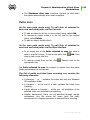
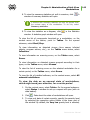
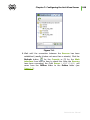
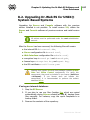
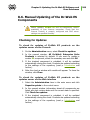
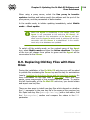
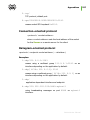
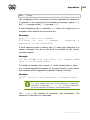
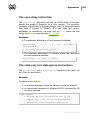
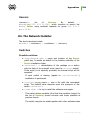
Administrator Manual
30
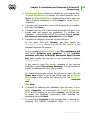
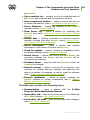
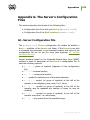
Chapter 2: Installation and Removal of Dr.Web ES
Components
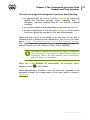
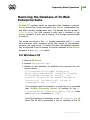
Figure 2.3. Flowchart of the installation procedure when an
existing DB is used (click any block in the flowchart to see its
description)
To install the anti-virus Server on a computer operated by
Windows OS
1. Run the distribution file. A window for choosing the language
of the Installation Wizard will open. Select the necessary
language and click Next.
Administrator Manual
31
Chapter 2: Installation and Removal of Dr.Web ES
Components
2. If Enterprise Suite software is installed on you computer and
Dr.Web SelfPROtect is enables, the wizard prompts you to
disable Dr.Web SelfPROtect. Disable self-protection and click
ОК to continue installation, or click Cancel to cancel Server
installation.
3. A window with information about the program to be installed
will open. Click Next.
4. A window with the text of the license agreement will open. You
should read and accept the agreement. To continue the
installation, in the bottom part of the window select I accept
the terms of the license agreement and click Next.
5. A window for selection of license key files will open.
In the upper field click Browse, and then specify the
enterprise.key license key file for the Server in the
standard Windows OS window.
At first installation of the Server, in the This installation will
field select Initialize new database. In the Initialize
database with this Dr.Web(R) Enterprise Agent license
key field, specify the key file for the workstation software
(agent.key).
If you want to keep the Server database of the previous
installation, select Use existing database. You will be able to
specify the database file later (see step 10).
For evaluation purposes a demo key file can be used. Click the
Demo keys button to go to the official web site of Doctor
Web company and receive the license key file (see Demo key
files).
Click Next.
6. A window for selecting the installation type will open. If you
select Complete, all components of Dr.Web Enterprise
Suite will be installed. If you select Custom, you will be able
to specify the necessary components. After selecting the
installation type click Next.
7. If you selected Complete in the previous step, a window for
changing the default installation folder (C:\Program
Administrator Manual
32
Chapter 2: Installation and Removal of Dr.Web ES
Components
Enterprise Server) will open. If
necessary, click Change and specify the installation folder.
Click Next.
Files\DrWeb
If you selected Custom in the previous step, a window for
selecting the necessary components will open. You can change
the installation parameters for each component in the context
menu: install component locally, for network access or do not
install component. If you wish to change the installation folder
for a component, click Change and specify the installation
folder. Click Next.
8. Next you can choose the language of the notification
templates, set the Agent’s shared installation folder (hidden
by default) and set up installation logging.
If you want the Server to be started automatically after the
installation, select the Start service during setup checkbox.
If you want to add an exception for your operating system
firewall (except the Windows 2000 OS) to allow Server
operations, select Add Server ports and interfaces to
firewall exceptions.
9. In the next window at first installation of the Server just click
Next. Encryption keys will be automatically generated during
setup.
If you are installing the Server for an existing anti-virus
network, select the Use existing Dr.Web® Enterprise
Server encryption keys checkbox and specify the file with the
private key. A file with the public key will be created (contents
of the public key will match the contents of the previous public
key). Otherwise after the installation it will be necessary to copy
the new encryption key to all workstations, on which ES
Agents have been previously installed.
10. Next, if you have selected the existing database at step 4, a
window where you can specify a prearranged Server
configuration file instead of that created by the installation
program will appear.
In the next series of windows the main settings stored in the
Server configuration file should be specified (see Appendix G1.
Administrator Manual
33
Chapter 2: Installation and Removal of Dr.Web ES
Components
Server Configuration File).
11. The database configuration dialog window allows you to adjust
the parameters of the used database. These parameters
depend on the database type specified in step 4 and the
availability of the Server's configuration file specified in step
9.
If you are creating a new DB or if the configuration file for an
existing database was not specified, select the driver which
should be used. The IntDB database driver option means
that internal facilities of the program complex should be used.
Other options imply usage of an external DB. Parameters of
DBMS are described in the appendices (see Appendix B. The
Description of the DBMS Settings. The Parameters of the DBMS
Driver).
Click Next.
12. If you selected IntDB database driver for creating a new DB
in the previous step, the information for creating a new DB will
be displayed.
If you selected one of the options with an external DBMS, it will
be necessary to specify access parameters for the DB.
If you are using the Server's DB from the previous installation
and in the previous step you specify the Server's configuration
file or select IntDB database driver, it is necessary to specify
the DB file. For this, click Browse. Select the Verify database
during setup check box to verify database integrity when
installing the Server.
13. Next, if you selected creation of a new DB in step 4 or did not
specify the Server's configuration file from previous
installation in step 9 (for an existing DB), a window dedicated
to network configuration will open. You can set up a network
protocol for the Server (it is allowed to create only one
protocol, more protocols can be set up later).
Specify appropriate Server access values in the Interface and
Port fields. By default, interface is set to 0.0.0.0 which
means that the Server can be accessed via any interface.
Administrator Manual
34
Chapter 2: Installation and Removal of Dr.Web ES
Components
By default port 2193 is using, but also port 2371 is
supported for compatibility with anti-virus software older
versions.
To limit the local access to the Server, select the Allow
access to Dr.Web (R) Enterprise Console only checkbox.
The Installer, Agents and other Servers (in case of an existing
anti-virus network built with Enterprise Suite) will not be able
to access the Server. You can change these settings later
through Console menu Administration → Dr.Web
Enterprise Server → Modules.
Select the Server detection service checkbox, if you want
the Server to answer broadcast and multicast queries of other
Servers.
To specify the default network settings click Standard in the
bottom of the window. In case you want to limit the Server’s
operation only to the internal network interface –
127.0.0.1, click Restricted. With such settings the Server
can be administrated only from the Console launched on the
same computer, and communicate only with the Agent
launched on the same computer. In future after the Server
settings have been checked out you will be able to change
them.
14. If you selected creation of a new DB in step 4 or did not
specify the Server's configuration file from previous
installation in step 9 (for an existing DB), the next window will
contain a request to send statistics on virus events to Doctor
Web company. To do this, select the Allow sending
statistics check box and edit corresponding fields. Default
values for the Server is stat.drweb.com, for URL –
\update. You can also specify the Username and
Password for identification of the sent statistics (contact the
Dr.Web Technical Support Service for information about
your user name and password). In the Send every <...> field
specify an interval in minutes for sending the statistics. Server
and Send every... are the only obligatory fields.
Administrator Manual
35
Chapter 2: Installation and Removal of Dr.Web ES
Components
If you are using a proxy server, you can also specify its
parameters in this window. To do this, select the Use proxy
check box and specify its address, user name and password.
The Use proxy flag will be available only if the Server
installation folder does not contain configuration files from the
previous installation.
15. If you selected creation of a new DB in step 4 in the next
window specify an administrator password. Click Next.
16. Next you are recommended to instruct updating of the
repository during the installation. To do this, select the Update
repository checkbox. Click Next.
17. Click Install. Further actions of the installation program do not
require user intervention.
18. Once the installation is complete, click Finish.
Then install the anti-virus Console on the workplace of the
anti-virus network administrator
1. Run the distribution file. A window for choosing the language of
the Installation Wizard will open. Select the necessary
language and click Next.
2. After a number of information messages a window with data
about the program to be installed will open. Click Next.
3. A window with the text of the license agreement will open. You
should read and accept the agreement. To continue the
installation, in the bottom part of the window select I accept
the terms of the license agreement and click Next.
4. Then confirm the installation catalog suggested by the program
or select another one.
5. A window for choosing the installation mode will open. To install
all components, select the Complete option button. To install
only necessary components, select Custom. Click Next.
6. If you have chosen the custom type, a window to select
components will open. In the list select the components to be
installed. Click Next, when you are done.
Administrator Manual
36
Chapter 2: Installation and Removal of Dr.Web ES
Components
7. The program will notify you when it is ready to install the
Console. Click Install. After the installation is finished, click
OK.
As a rule, the anti-virus Server is administrated by means of the antivirus Console. Elements to facilitate adjusting and managing the
Server are placed in the main Windows OS menu by the installation
wizard.
On the Programs menu, the installation wizard creates a Dr.Web®
Enterprise Server folder which contains the following items:
Console — launches the anti-virus Console,
u Documentation — gives access to the documents of the
u
anti-virus,
u
Server control folder.
The Server control folder in its turn contains the commands to
start, restart and shut down the Server, as well as the commands to
set up the logging parameters and other Server’s commands
described in detail in Appendix H5. Dr.Web Enterprise Server.
The installation folder of the anti-virus Server (for
OS Windows) has the following structure:
u
var — contains the following subfolders:
· backup –– is meant for storing the backups of DBs and
other critical data,
· extensions –– stores user scripts meant to automate
the performance of certain tasks, all scripts are disabled
by default,
· repository – it is a so-called the updates folder; here
updates of the virus databases, files of the anti-virus
packages and files of the program’s components can be
found. It contains subfolders for the program components
software which include subfolders for their versions
depending on the OS. The folder should be accessible for
writing to the LocalSystem user (under Windows OS) or
the drwcs user (under UNIX OS) under which the Server
is launched,
Administrator Manual
37
Chapter 2: Installation and Removal of Dr.Web ES
Components
u
· templates — contains a set of reports templates,
update–db –– contains scripts necessary to update the
structure of Server’s databases;
bin — here reside executable files of the anti-virus Server;
u webmin — contains administrator’s web-interface: documents,
u
icons, modules;
u
etc — contains the files where main program settings are
u
Installer — contains a program initializing the installation
stored;
of the anti-virus Agent on a computer.
The content of the updates catalog \var\repository is
automatically downloaded from the updates server through
HTTP protocol according to the Server’s schedule, or the
anti-virus network administrator can manually place the
updates to the catalog.
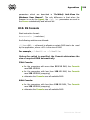
2.2.2. Installing the Anti-Virus Server for
UNIX® system-based Operating Systems
Installation should be carried out under Administrator account
(root).
Package-based installation of the anti-virus Server on a
UNIX system-based OS
1. To start installing the drweb-esuite package, use the
following command:
u
for FreeBSD OS:
pkg_add <distribution_file_name.tbz>
u
for Solaris OS:
bzip2 -d <distribution_file_name.bz2> and then:
pkgadd -d <distribution_file_name>
u
for Linux OS:
Administrator Manual
38
Chapter 2: Installation and Removal of Dr.Web ES
Components
u
for Debian OS and Ubuntu OS:
dpkg -i <distribution_file_name.deb>
u
for rpm distribution kits:
rpm -i <distribution_file_name.rpm>
If the anti-virus Server is already installed on your computer,
you can upgrade the software components. To do this, run
the distribution kit with the command:
rpm –U <distribution_file_name.rpm>.
Also, there are so-called generic packages, which can be
installed on any Linux-based system including those which are
not on the list of supported systems. They are installed by
means of the installer included in the package:
tar -xjf <distribution_file_name.tar.bz2>
Then on behalf of the superuser run the following script:
./drweb-esuite-install.sh
Installation can be cancelled at any time by sending any of
the following signals –– SIGHUP, SIGINT, SIGTERM,
SIGQUIT and SIGWINCH (under FreeBSD OS changing
the dimensions of the terminal window entails sending a
SIGWINCH signal). When installation is cancelled, the
changes to the file system roll back to the original state. When
using an rpm package, installation can be interrupted by
pressing CTRL + C.
Administrator name is admin by default.
2. Windows (the number and sequence of which can be different
subject to the OS) containing information about the copyright
and the text of the license agreement will open. To proceed with
the installation, you should accept the license agreement.
3. If necessary, select the owner group and user. The same user
will be the owner of the files of the anti-virus Server.
4. In the opened window select the key file for the Server
Administrator Manual
39
Chapter 2: Installation and Removal of Dr.Web ES
Components
(enterprise.key).
5. In the next window select the key file for the ES Agent
(agent.key).
6. In case you are installing a Solaris system-compatible version,
you will be asked to create a new database for the ES Server.
If you are upgrading an already installed Server and you want
to use the existing database, type no, press ENTER and select
the path to the database. If you are installing the ES Server on
your computer for the first time, press ENTER and specify the
administrator (admin) password to access the Server (root is
used by default).
7. Then (in case you are installing a Solaris system-compatible
version) you will be asked to create new encryption keys. If you
want to use existing keys (drwcsd.pri and drwcsd.pub),
type no, press ENTER and specify the full path to the existing
keys. To create new encryption keys, press ENTER.
8. At the next stage, in case you are installing a version for
Debian OS or FreeBSD OS, you need to create a password for
the anti-virus network administrator. Enter your password and
retype it for verification. If combinations are different and
verification fails you should start over. Follow the instructions in
appearing messages. The password should not be less than 8
characters (in the version for FreeBSD OS).
9. Then the program components will be installed on your
computer. In the course of the installation you can be asked to
confirm some actions as the administrator.
In the course of the installation of the ES Server for
FreeBSD OS an rc script /usr/local/etc/rc.d/
drwcsd.sh will be created.
u To manually stop the Server, use the command:
/usr/local/etc/rc.d/drwcsd.sh stop
u To manually start the Server, use the command:
/usr/local/etc/rc.d/drwcsd.sh start
Administrator Manual
40
Chapter 2: Installation and Removal of Dr.Web ES
Components
During the installation of the ES Server for Linux OS and
Solaris OS, an init script (/etc/init.d/drwcsd)
for the launching and termination of the Server using /opt/
drwcs/bin/drwcs.sh will be created. The latter cannot
be launched manually.
Then install the anti-virus Console on the workplace of the
anti-virus network administrator
Use the following command:
u
for FreeBSD OS:
pkg_add <distribution_file_name.tbz>
u
for Solaris OS:
bzip2 -d <distribution_file_name.bz2> and then:
pkgadd -d <distribution_file_name>
u
for Linux OS:
u
for Debian OS and Ubuntu OS:
dpkg -i <distribution_file_name.deb>
u
for rpm distribution kits:
rpm -i <distribution_file_name.rpm>
Also, there are so-called generic packages, which can be
installed on any system including those which are not on the list
of supported systems. They are installed by means of the
installer included in the package:
tar -xjf <distribution_file_name.tar.bz2>
Use the script drwconsole.sh to run the Console.
2.3. Installing the Anti-Virus Agent
The anti-virus Agent should be installed under Administrator
account of the respective computer.
Administrator Manual
41
Chapter 2: Installation and Removal of Dr.Web ES
Components
You must update the Server repository before the first
installation of the Agent (see p. Manual Updating of the Dr.
Web ES Components, p. Checking for Updates).
If there is any anti-virus software installed on the computer, the
installer will attempt to remove it before starting the installation. In
case of a failure you will have to uninstall the anti-virus software
yourself.
To install the anti-virus Agent on a computer, access from this
computer the Installer subfolder of the Server’s installation folder and
run the drwinst program. The anti-virus Agent software (but not the
anti-virus package) will be installed on the computer. The anti-virus
package will be automatically installed after the workstation has been
registered at the Server (read p. Getting Started) and restarted.
The drwinst command allows additional parameters. To view the
installation log in the real time mode, use the -interactive
parameter.
If multicasting is not used to detect the Server, it is strongly
recommended to specify a domain name for the ES Server in the DNS
service and use this name when installing the Agent:
drwinst –interactive <anti-virus_Server_DNS_name>.
It is especially useful in case you would like to reinstall the ES Server
on a different computer.
Or you can expressly specify the Server’s address as follows:
drwinst -interactive 192.168.1.3
Using the -regagent switch during the installation will allow you to
register the Agent in the Add or Remove Programs list.
The –useolddlg switch used together with the -interactive
switch allows the dialog with the Agent installation log to be
displayed.
Administrator Manual
42
Chapter 2: Installation and Removal of Dr.Web ES
Components
By default the drwinst instruction launched without
parameters will scan the network for ES Servers and try to
install the Agent from the first found Server.
When the drwinst program is run with the –config switch a dialog
box will open, which allows to change the default settings of the
installer and some of the basic default settings of the Agent and to
specify the components of the anti-virus package to be installed (the
settings available in the interface of the network installer are expanded
in p. Remote Installation of the Anti-Virus Agent).
You can also install the ES Agent remotely with the help of the antivirus Console or the Web Interface, or the facilities of Active
Directory (see p. Remote Installation of the Anti-Virus Agent).
2.4. Remote Installation of the
Anti-Virus Agent (for Windows® OS)
The Dr.Web ES anti-virus allows to detect the computers which are
not yet protected by Dr.Web ES, and in certain cases to install such
protection remotely.
Remote installation of anti-virus Agents is only possible on
workstations operated by Windows NT OS, Windows 2000 OS,
Windows XP Professional OS, Windows 2003 OS, Windows
Vista OS.
To install the anti-virus software on workstations, you must
have administrator rights on the correspondent computers.
The anti-virus Console and the Web Interface should be
launched under Windows 2000 OS, Windows XP Professional
OS, Windows 2003 OS, Windows Vista OS.
To install Agent to a remote workstation within a domain, the
domain server should be configured to use the network
connection security policy with the classic authentication mode
for users (i.e. the authentication with personal account and
without the Guest account).
Administrator Manual
43
Chapter 2: Installation and Removal of Dr.Web ES
Components
To install Agent to a remote workstation outside a domain,
do the following on the computer where you want to install
the Agent: Control Panel
→
→
View tab
clear the
(recommended) checkbox.
Folder Properties
Use
Simple
→
the
Sharing
Remote installation and removal of the Agent software is
possible within a local network only and requires
administrator’s rights in the local network, and checkout of the
anti-virus Server requires full access to its installation
catalog.
It is necessary to share the location of the Agent Installer file
drwinst.exe and the public encryption key drwcsd.
pub on the network.
In case the Server is running under UNIX OS, for remote
installation a Console under Windows OS and the Samba
file server are required.
2.4.1. Installing the Agent Software through
the Console
When the Console is launched, the catalog of the anti-virus network
in its main window displays only those computers which are already
included into the anti-virus network. The program allows also to
discover computers which are not protected with Dr.Web Enterprise
Suite and to install anti-virus components remotely.
To quickly install the Agent’s software on workstations, it is
recommended to use Network Scanner which searches for computers
by IP addresses. To do this
1. On the Administration menu of the Console, select
Network scanner. A Network scanner window with no data
loaded will open.
2. In the Networks entry field specify networks in the following
format:
Administrator Manual
44
Chapter 2: Installation and Removal of Dr.Web ES
Components
u
with a hyphen (for example, 10.4.0.1-10.4.0.10)
u
separated by a comma with a whitespace (for example,
10.4.0.1-10.4.0.10,
10.4.0.90)
u
10.4.0.35-
with a network suffix (for example, 10.4.0.0/24).
If necessary, change the port and the timeout value.
3. Click
(or Start Scanner for the Web interface). The
catalog (hierarchical list) of computers demonstrating where
the Dr.Web ES anti-virus software is installed will be loaded
into this window.
4. Unfold the catalog elements corresponding to workgroups
(domains). All elements of the catalog corresponding to
workgroups and individual stations are marked with different
icons the meaning of which is given below.
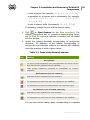
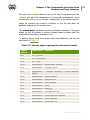
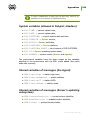
Table 2-1. Icons of the Network scanner
Icon
Meaning
Workgroups
The work groups containing inter alia computers on which the Dr.
Web ES anti-virus software can be installed.
Other groups containing protected or unavailable by network
computers.
Workstations (for the Console)
Workstations with installed anti-virus software.
The computers on which the anti-virus software is not installed.
The computers to which the administrator has no access rights.
Workstations (for the Web interface)
Workstations with installed anti-virus software.
The computers on which the anti-virus software is not installed.
You can also unfold catalog items corresponding to computers
Administrator Manual
45
Chapter 2: Installation and Removal of Dr.Web ES
Components
with the
icon, and check which program components are
installed there.
For the Web interface: to open the component settings
window, click the
station component icon.
5. Select an unprotected computer (or several unprotected
computers) in the Network scanner window.
6. Select Install Dr.Web® Enterprise Agent:
u
If using the Console: in the context menu of the
computer or in the toolbar.
u
If using the web interface: in the toolbar.
7. A window for a remote installation task will open.
8. In the Dr.Web® Network Installer settings section you
can set up the installation parameters of the Agent’s software.
9. If necessary, edit the target computer name in the Computer
names entry field. By default in the Server field the IP
address or the DNS name of the anti-virus Server to which the
Console is connected are given. In the Installer
executable field the full name of the network installer is
specified. If necessary, edit it and reselect the public key in the
Public key field.
When the Agent software is installed on several computers at
the same time you can specify several IP addresses or
computer names separated by spaces. You can also specify
entire networks as 192.168.1.0/24 or ranges of IP
addresses as 192.168.2.1-192.168.2.255. Besides,
you can enter computer domain names instead of the IP
addresses.
10. By default the Agent’s software will be installed to C:
\Program Files\DrWeb Enterprise Suite. If
necessary, specify another location in the Install path field.
11. If necessary, type the network installer command line
parameters in the Arguments field (read more in Appendix
H4. The Network Installer). In the Log level field specify the
level of detail.
12. If you are going to install through Windows Scheduler, you
Administrator Manual
46
Chapter 2: Installation and Removal of Dr.Web ES
Components
need to enter authorization parameters.
13. Having set up all the necessary parameters of the Dr.Web®
Network Installer settings section, click Next.
14. On the Dr.Web® Enterprise Agent settings tab you can
select the components of the anti-virus package, specify the
interface language, allow traffic encryption and compression,
set the parameters of the log, etc.
15. After all necessary parameters have been specified, click
Install.
16. The status of the installation will be displayed on the
Operation process tab in accordance with the selected level
of detail.
17. The anti-virus Agent will be installed on the selected
workstations. After the workstation has been approved at the
Server (if it is required by anti-virus Server settings, see also
Getting Started), the anti-virus components will be
automatically installed.
18. Restart the computer on Agent’s request.
In case an anti-virus network is basically created and it is necessary to
install the Agent’s software on certain computers, it is recommended
to use installation via network:
1. Select:
u
If using the Console: on the Administration menu →
Network installation. A window Dr.Web® Enterprise
Agent Installation will open.
u
If using the web interface: the Administration item in
the main menu. Then, in the opened window select the
Network installation item in the control menu.
2. Further steps are similar to 8-17 above.
2.4.2. Installing the Agent Software through
Active Directory
If the Active Directory service is used in the LAN, you can remotely
install the anti-virus Agent on workstations using this service. To do
Administrator Manual
47
Chapter 2: Installation and Removal of Dr.Web ES
Components
this
1. Download a copy of the anti-virus Agent installer for networks
with Active Directory at http://download.drweb.com/esuite/.
2. Install the anti-virus Agent on the local network server
supporting the Active Directory service. This can be made in
the command line mode (A) or in the graphic mode of the
installer (B).
(A) To set all necessary installation parameters in
the command line mode
Issue the following command with all necessary parameters and the
obligatory parameter /qn which disables the graphic mode:
msiexec /a <package_name>.msi /qn [<parameters>]
The /a parameter launches installation of the administrative package.
Package name
The name of the installation package for the Agent through Active
Directory usually has the following format:
drweb-es-agent-<version>-<release_date>-windows-nt<capacity>.msi.
Parameters:
/qn – disable the graphic mode. With this switch the following
parameters are to be specified:
u
ESSERVERADDRESS=<DNS_name> - set the address of the
anti-virus Server to which the Agent is to be connected. For
the possible formats see Appendix E3. The Addresses of Dr.Web
Enterprise Agent/ Installer.
u
ESSERVERPATH=<path_filename> - specify the full path to
the public encryption key of the Server and the file name (by
default drwcsd.pub in the Installer subfolder of the
Server installation folder).
Administrator Manual
48
Chapter 2: Installation and Removal of Dr.Web ES
Components
u
TARGETDIR – the network folder for the Agent image
(modified installation package), which will be select via the
Group Policy Object Editor for the selected installation. This
folder must have read and write access. The path should be
given in the network addresses format even if the folder is a
locally accessible resource; the folder should be accessible from
the target stations.
Before administrative installation the target folder for the
Agent image (see the TARGETDIR parameter) should not
contain the anti-virus Agent Installer for networks with
Active Directory (<package_name>.msi).
Examples:
msiexec /a ES_Agent.msi /qn
ESSERVERADDRESS=servername.net ESSERVERPATH=\
\win_serv\drwcs_inst\drwcsd.pub TARGETDIR=\
\comp\share
msiexec /a ES_Agent.msi /qn
ESSERVERADDRESS=192.168.14.1 ESSERVERPATH="C:
\Program Files\DrWeb Enterprise
Server\Installer\drwcsd.pub" TARGETDIR=\
\comp\share
These parameters can alternatively be set in the graphic mode of the
installer.
Next on a local network server, where Active Directory administrative
tools are installed, appoint installation of the package (see procedure
below).
Administrator Manual
49
Chapter 2: Installation and Removal of Dr.Web ES
Components
(B) To set all necessary installation parameters in
the graphic mode
Before administrative installation, make sure that the target
folder for the Agent image does not contain the anti-virus
Agent Installer for networks with Active Directory
(<package_name>.msi).
1. Issue the command
msiexec /a <path>\<package_name>.msi
2. An InstallShield Wizard window with information on the
program selected for installation will open. Click Next.
The Agent Installer uses the language specified in the
language settings of the computer
3. In the next window, specify the DNS name (preferred form) or
the IP address of the ES Server (see Appendix E3. The
Addresses of Dr.Web Enterprise Agent/ Installer). Specify the
location of the public key file of the Server (drwcsd.pub).
Click Next.
4. In the next window type the name of a network catalog, to
which the image of the Agent is planned to be written. The
path should be specified in the network addresses format even if
the catalog is a locally accessible resource; the catalog should be
accessible from the target stations. Click Install.
5. After installation is finished, the settings window displays which
helps you configure installation of the package on network
workstations.
Administrator Manual
50
Chapter 2: Installation and Removal of Dr.Web ES
Components
Installation of the package on selected
workstations
1. In Control Panel (or in the Start menu for Windows
2003/2008 Server OS's, in the Start
Programs menu for
the Windows 2000 Server OS), select Administrative Tools
→ Active Directory Users and Computers (when you
install Agent in the graphic mode, this window displays
automatically).
2. In the domain containing the computers on which the antivirus Agents are to be installed, create an organizational unit
(hereinafter OU), name it, for example, ES. To do this, in the
domain context menu, select New → Organizational unit.
In the opened window, type the new unit name and click OK.
Include the computers, on which the Agent is to be installed,
into this unit.
3. Open the group policy editor. To do this:
a) for Windows 2000/2003 Server OS: on the OU context
menu, select Properties. In the opened window go to
the Group Policy tab.
b) for Windows 2008 Server OS: select Start
Administrative
tools
Group
Policy
management.
4. For the created OU, set the group policy. To do this:
a) for Windows 2000/2003 Server OS: click Add and create
an element named ES policy. Double-click it.
b) for Windows 2008 Server OS: on the OU context menu,
select Create a GPO in this domain, and Link it
here.... In the opened window, specify the name of the
new group policy object and click OK. In the new group
policy context menu, select Edit.
5. In the Group Policy Object Editor window, specify the
settings for the group policy created on step 4. To do this:
a) for Windows 2000/2003 Server OS: in the hierarchical
tree, select Computer Configuration → Software
Settings → Software Installations.
Administrator Manual
51
Chapter 2: Installation and Removal of Dr.Web ES
Components
b) for Windows 2008 Server OS: in the hierarchical tree,
select Computer Configuration → Policies →
Software Settings → Software Installations.
6. On the context menu of Software Installations, select New
→ Package.
7. Specify the Agent installation package. To do this, specify the
address of the network shared resource which contains the
Agent image you created during the administrative installation.
The path should be specified in the network addresses format
even if the catalog is a locally accessible resource). Click OK.
8. A Deploy Software window will open. Select the Assigned
option. Click OK.
9. In the Group Policy Object Editor window, select the added
package. On the context menu of this element, select
Properties.
10. In the opened package properties window, select the
Deployment tab. Click the Advanced button.
11. An Advanced Deployment Options window will open.
Select the Ignore language when deploying this package
checkbox.
12. Click OK twice.
13. The anti-virus Agent will be installed on selected computers at
their next registration in the domain.
2.5. Installing NAP Validator
Dr.Web NAP Validator checks health of anti-virus software on
protected workstations. It is installed on the computer where a
configured NAP server resides.
To install NAP Validator
1. Run the installation file. In the dialog window, select the
language to use during install. Select English and click Next.
2. On the Welcome page of the InstallShield Wizard, click
Next.
3. On the License Agreement page, read the agreement. To
Administrator Manual
52
Chapter 2: Installation and Removal of Dr.Web ES
Components
accept the agreement and proceed with the installation, select
I accept the terms of the license agreement and click
Next. To exit the wizard, click Cancel.
4. On the next page, specify Enterprise Server IP Address and
Port and click Next.
5. Click Install. The installation begins.
6. When installation completes, click Finish.
After you install Dr.Web NAP Validator, add Enterprise Server to
the trusted NAP servers group.
To add Enterprise Server to the trusted NAP servers group
1. To open NAP server configuration component, run the nps.
msc command.
2. In the Remediation Servers Group section, click Add.
3. In the dialog window, enter the name for the new remedial
server and the Enterprise Server IP address.
4. Click OK to save changes.
2.6. Removing the Dr.Web ES Anti-Virus
2.6.1. Uninstalling the ES Software for
Windows® OS Locally or Remote
When uninstalling the program completely, do not remove the
Server in the first place. First remove the ES Agent.
To remove the ES Agent software from a workstation, run the
drwinst instruction with the –uninstall parameter (or with the
—uninstall –interactive parameters, if you want to control
the process) in the installation folder of the anti-virus Agent (by
default C:\Program Files\DrWeb Enterprise Suite).
Example:
Administrator Manual
53
Chapter 2: Installation and Removal of Dr.Web ES
Components
drwinst –uninstall –interactive
When the Agent is being uninstalled, the anti-virus package is also
removed from your computer.
To uninstall the anti-virus software from a workstation
through the Console (for Windows OS's only)
u
If using the Console: in the catalog of the anti-virus network
select the necessary group or certain anti-virus stations. On the
context menu, select Uninstall Dr.Web® Agent.
u
If using the administrator web interface: select the
Network item in the main menu of the web interface. In the
opened window select the necessary group or certain anti-virus
stations. Then click
Uninstall Dr.Web® Agent in the
control panel of the anti-virus network catalog.
The Agent’s software and the anti-virus package will be removed
from the workstations selected.
Remote installation and removal of the Agent software is
possible within a local network only and requires
administrator’s rights in the local network
In case the Agent’s removal is instructed when there is no
connection between the anti-virus Server and the anti-virus
workstation, the Agent software will be uninstalled from the
selected computer once the connection is recovered.
To remove the Server software run the installation file of the currently
installed version. The installation program will automatically detect the
software product and offer to remove it. To remove the Server
software click Remove.
To remove the Console or change components of the installed
Console software run the installation file of the currently installed
version. The installation program will automatically detect the software
product and offer to perform one of the actions: Remove or Modify.
The Server and Console software can also be removed using
standard Windows OS tools via the Add or Remove Programs
Administrator Manual
54
Chapter 2: Installation and Removal of Dr.Web ES
Components
element in Control Panel.
2.6.2. Uninstalling the ES Agent Software
through Active Directory
1. In Control Panel, select Administrative Tools
Directory users and computers.
→
Active
2. Right-click your ES organizational unit in the domain. On the
context menu, select Properties. An ES Properties window
will open.
3. Go to the Group Policy tab. Select ES policies. Double-click
the item. A Group Policy Object Editor window will open.
4. In the hierarchical list, select Computer configuration
→
→ Software installations → Package.
Then on the context menu, select All tasks → Uninstall →
Software settings
OK.
5. On the Group Policy tab, click OK.
6. The anti-virus Agent will be removed from the stations at the
next registration in the domain.
2.6.3. Uninstalling the Server Software for
UNIX® system-based Operating Systems
Deinstallation should be carried out under the administrator
account (root).
To remove the Server installed from packages
1. To uninstall the ES Server software, enter the following
command:
u
for FreeBSD OS: pkg_delete drweb-esuite
u
for Solaris OS: first stop the Server:
Administrator Manual
55
Chapter 2: Installation and Removal of Dr.Web ES
Components
· Solaris10
OS:
disable drwcsd
/usr/sbin/svcadm
· Solaris9 OS: /etc/init.d/drwcsd stop
· Then enter the command: pkgrm DWEBesuit
u
for Linux OS:
u
for Debian OS and Ubuntu OS: dpkg -r drweb-
esuite
u
to remove the Server software, installed from an rpm
distribution kit: rpm –e drweb-esuite
u
to remove the Server software, installed from a generic
package: run the drweb-esuite-uninstall.sh
script.
Deinstallation can be interrupted at any time by sending any
of the following signals to the process: SIGHUP, SIGINT,
SIGTERM, SIGQUIT and SIGWINCH (on FreeBSD OS,
changing the dimensions of the terminal window entails
sending a SIGWINCH signal). Deinstallation should not be
interrupted without necessity or it should be done as early as
possible.
2. On Solaris OS, you will be asked to confirm that you really want
to uninstall the software and agree to run the deinstallation
scripts on behalf of the administrator (root).
The ES Server software will be removed.
On FreeBSD OS and Debian OS, the Server operations will
be immediately terminated, the database, key and
configuration files will be copied to ${HOME}/drwcs/ (as a
rule, it is /root/drwcs/) under Debian OS. Under
FreeBSD OS, you will be requested to enter a path, by
default it is /var/tmp/drwcs.
On the Solaris OS operating environment, after the Server
has been removed, the database, key and configuration files
will be copied to the /var/tmp/DrWebES folder.
Administrator Manual
56
Chapter 3: The Components of an Anti-Virus
Network and Their Interface
Chapter 3: The Components of an
Anti-Virus Network and Their
Interface
3.1. The Anti-Virus Server
An anti-virus network built with Dr.Web ES must have at least one
anti-virus Server.
The anti-virus Server is a memory-resident component. You can shut
it down from the Console or through the correspondent Server
control command on Windows OS Programs menu. The anti-virus
Server software is developed for various OS’s – Windows NT OS,
Windows 2000 OS, Windows XP OS, Windows 2003 OS, Windows Vista
OS, Linux OS, FreeBSD OS and Solaris OS.
The anti-virus Server performs the following tasks:
u
installs the Agent software and anti-virus packages on a
selected computer or a group of computers;
u
requests the version number of the anti-virus package and the
creation dates and version numbers of the virus databases on all
protected computers;
u
updates the content of the centralized installation folder and the
updates folder;
u
updates virus databases and executable files of the anti-virus
packages, as well as executable files of the program on
protected computers.
Communicating with anti-virus Agents, the anti-virus Server collects
and logs information on operation of the anti-virus packages.
Information is logged in the general log file implemented as a
database. In small networks (not more than 100-200 computers) an
internal database can be used. In larger networks it is recommended
to use an external database.
Administrator Manual
57
Chapter 3: The Components of an Anti-Virus
Network and Their Interface
The following information is collected and stored in the
general log file:
u
versions of the anti-virus packages on protected computers,
u
time and date of the software installation and update on
workstations,
u
versions and dates of virus databases updates,
u
OS versions of protected computers, processor type, OS system
catalogs location, etc.,
u
configuration and settings of anti-virus packages,
u
data on virus events, including names of detected viruses,
detection dates, actions, results of curing, etc.
The anti-virus Server notifies the administrator on virus events
occurring on protected computers by e-mail or through the Windows
OS standard notification system. You can set the alerts as described in
p. Setting Alerts.
To increase the reliability and productivity of an anti-virus
network and distribute the computational load properly, the
Dr.Web ES anti-virus can also be used in the multiserver
mode. In this case the Server software is installed on several
computers.
The anti-virus Server as it is has no interface. Basic instructions
necessary to manage the Server are listed in the Server
control folder. As a rule, the anti-virus Server can be managed
through the anti-virus Console or the Web Interface which act as
an interface for the Server.
3.2. The Anti-Virus Console
The anti-virus Console is an administration tool which is used to
manage one or more anti-virus Servers. Once connection to the antivirus Server is established, the anti-virus Console allows to edit
settings and launch tasks for every anti-virus workstation connected to
this Server.
Administrator Manual
58
Chapter 3: The Components of an Anti-Virus
Network and Their Interface
The anti-virus Console is a platform-independent application and can
be installed on a computer with any OS supporting the Java virtual
machine. The connection between the Console and the Server is
provided via TCP/IP or IPv6.
For the Console to connect through the proxy-server, it is necessary
to allow the proxy the CONNECT method to the corresponding port.
The anti-virus network is administrated via the Console interface.
The Console main window includes the following elements (see
figure 3-1):
u
Main menu bar;
u
Toolbar;
u
Hierarchical list (catalog) of the anti-virus stations and groups;
u
Control panel (to enable/disable displaying this panel, use
Console settings);
u
Search panel;
u
Traffic monitor (to enable/disable displaying this bar, use
Console settings);
u
Memory usage bar (to enable/disable displaying this bar, use
Console settings);
u
Status bar.
Administrator Manual
59
Chapter 3: The Components of an Anti-Virus
Network and Their Interface
Figure 3-1. The Console’s main window (click the callout to go
to the description)
Server parameters can be set both through the main menu bar and
the toolbar.
The Console operates in a standard graphical user interface, which is
an analogue to that used in Windows OS and in the graphical
environments of UNIX system-based OS’s. The tasks solved with the
help of this interface are described in the next Chapters. Below is given
only a brief overview of the main menu bar elements and toolbar
buttons used to administer the program.
Main menu
The main menu bar includes the following menus:
u
File,
u
Administration,
Administrator Manual
60
Chapter 3: The Components of an Anti-Virus
Network and Their Interface
u
Help.
The File menu contains the following items:
u
Connect — instructs to connect the Console to the Server; if
the Console is connected to a Server, it will be disconnected
from the current Server before connecting to a new Server;
u
Console settings — allows to specify the parameters of
connection to the Server, the interface language, the level of
detail of the Console’s log, etc.;
u
Alert settings — make the list of notifications to receive;
u
Disconnect — instructs to disconnect from the current Server;
u
Exit — instructs to disconnect from the Server and terminate
the program.
The Administration menu contains the following items:
u
Administrator accounts — allows to add, edit or delete
administrator accounts of the anti-virus network (read p.
Managing Administrator Accounts);
u
Configure Server — opens a window with main Server’s
settings (read p. Setting the Server Configuration);
u
Configure repository — allows to configure settings for each
product in the repository (for more on the repository, read p.
Administration of the Server Repository and further);
u
Server schedule — opens a window for scheduling tasks for
the Server (read p. Setting the Server Schedule);
u
Neighborhood – opens a window for managing connections
among the ES Servers in a multi-server anti-virus network
(read p. Setting Connections Between the Servers of an AntiVirus Network);
u
Edit templates – opens a window of the editor of notifications
templates (read p. Setting Alerts);
u
Database — allows to remove the data about anti-virus
workstations of a certain period of time and the anti-virus
workstations themselves from the database;
u
Alerts — allows to view Server’s messages (read p. Receipt of
Alerts);
u
Audit log — view the log of events and changes made through
Administrator Manual
61
Chapter 3: The Components of an Anti-Virus
Network and Their Interface
the Console.
u
Jobs execution log — contains the list of scheduled tasks at
the Server with comments and the completion marked;
u
Show unapproved stations — opens a window with the list
of unapproved stations (read p. New Stations Approval Policy);
u
Server Statistics — viewing the statistics of the Server’s
operation (read p. Server Statistics);
u
Show Server log — opens a window for modifying the
Server’s log (read p. Keeping the Log on the Server. Viewing
the Log);
u
Remote data — displays information on anti-virus network
operation received from other Servers (read p. Using an AntiVirus Network with Several Servers);
u
Server information — opens a window with detailed
information on the version of the anti-virus Server;
u
Check for updates — opens a window to immediately check
for software updates (read p. Scheduled Updates);
u
Restart Server — reboots the current anti-virus Server (the
connection between the Server and the Console will be
interrupted and restored);
u
Shutdown Server — stops the anti-virus Server to which the
Console is connected;
u
Network scanner — allows to set the list of networks, scan
networks for installed anti-virus software and determine the
state of protection of computers, as well as install the software
(see p. Network Browser and Network Scanner);
u
Network installation — allows to simplify installing the
Agent’s software on certain workstations (see p. Network
Browser and Network Scanner).
The Help menu contains the following items:
u
Documentation – opens a window with the Dr.Web
Enterprise Suite Administrator Manual;
u
Doctor Web, Ltd. – leads to the home page of the official site
of Dr. Web company: http://www.drweb.com;
u
Doctor Web, Ltd. news – opens the web page with company’s
news: http://info.drweb.com/;
Administrator Manual
62
Chapter 3: The Components of an Anti-Virus
Network and Their Interface
u
Customer Support Center – opens the clients on-line support
section: http://support.drweb.com/;
u
Ask Customer Support – leads to the web form where you
can ask a question or upload a suspicious file for analysis:http://
support.drweb.com/request/;
u
About – opens a window with information on the versions of
the used anti-virus and system software, the license expiry date,
the number of licensed stations, etc.
Under UNIX OS, to view the web resources from the Help
menu, the user environment variable $BROWSER is applied,
and if it is not set, the value Firefox is taken by default.
Toolbar
Working with the Console is facilitated through toolbar control
buttons for data displayed by the Console. Some buttons duplicate
the commands on the main menu.
Toolbar buttons:
u
Connect to another Dr.Web® Enterprise Server – same as
File menu → Connect.
u
Refresh shown data – renew all data displayed by the
Console.
u
Configure connected Dr.Web® Enterprise Server – same
as Administration menu → Configure Server.
u
Change connected Dr.Web® Enterprise Server schedule
– same as Administration menu → Server schedule.
u
Save shown data in CSV format – write general data about
anti-virus network stations in a CSV file.
u
Save shown data in HTML format – write general data about
anti-virus network stations in an HTML file.
u
Save shown data in XML format – write general data about
anti-virus network stations in an XML file.
Administrator Manual
63
Chapter 3: The Components of an Anti-Virus
Network and Their Interface
Hierarchical list
The hierarchical list (catalog) of the anti-virus network shows the tree
structure of the anti-virus network elements, with groups and stations
forming the nodes of this structure.
The icon of a list element can have different aspects depending on the
type or the status of the element (see Table 3-1).
Table 3-1. Icons of the elements of the hierarchical list
Icon
Description
Meaning
Groups
yellow folder
Groups always shown on the hierarchical list.
white folder
If groups marked with this icon are empty,
their showing on the hierarchical list may be
disabled.
Workstations
green icon
Available workstations with installed anti-virus
software.
gray icon
Anti-virus software
uninstalled.
crossed
icon
on
the
station
is
computer The station is unavailable.
Items on the anti-virus network catalog can be set up from the context
menu of these elements and from the control panel, which duplicates
the context menu of a selected item.
The context menu and the control panel allow to change the
appearance of the list:
u
for groups:
· Sort groups by role – sort groups by type (otherwise,
by alphabet) and show/hide a dividing line between
groups of different type (see p. Groups).
Administrator Manual
64
Chapter 3: The Components of an Anti-Virus
Network and Their Interface
· Show hidden groups – show all groups included in the
anti-virus network. If you clear the checkbox, all empty
groups (not containing stations) will be hidden. It may be
convenient to remove extra data, for example, when there
are many empty groups.
· All groups membership – show a station in all groups it
is a member of (only for groups under the white folder
icon, see Table 3-1). If the checkbox is selected, the
station will be shown in all member groups. If the
checkbox is cleared, the station will be shown only in the
top white folder.
u
for stations: show stations’ unique identifiers, IP addresses or
names, if such are given.
u
for all elements: Show descriptions – enables/disables
showing of groups and stations descriptions (the descriptions
are set in the properties of an element).
Search panel
The search panel is installed to facilitate searching the necessary
element. It allows to search in the hierarchical list for both groups and
individual stations according to specified parameters.
To search for stations and groups
1. Select the search mode.
The search mode is switched by means of the button located to
the right of the Group or the Station field respectively. To
switch the mode, click the button the required number of times,
while the button will change its appearance every time. The
following search modes and the respective button statuses are
possible:
Table 3-2. Search panel buttons
Button
Mode
Find match to beginning – find all groups or stations, the
name of which begins with the given line.
Administrator Manual
65
Chapter 3: The Components of an Anti-Virus
Network and Their Interface
Button
Mode
Find match to end - find all groups or stations, the name of
which ends with the given line.
Find match at any place - find all groups or stations, the
name of which contains the given line in any place.
Find using regular expressions - find all groups or stations,
the name of which matches the regular expression given in the
search bar. A brief description of using regular expressions is
given in Appendix K.
2. Type an expression in the search bar for the search results to
match. The first found element will be automatically
highlighted in the list.
3. To search further and jump to the next element, click the
button
. To jump to the previous found element, click the
button
.
Control panel
The control panel facilitates actions over the elements of the
hierarchical list.
The panel changes its appearance depending on the object selected in
the hierarchical list.
The title of the control panel displays
u
the name of the selected station or group if an element of the
list is selected;
u
the number of selected stations or groups, if several elements of
the list are selected;
u
a "Mixed menu" line, if several heterogeneous elements of the
list are selected (both stations and groups are selected at the
same time);
u
a "Nothing selected" line, if the pointer is at the root of the
Groups list and no element of the hierarchical list is selected.
Administrator Manual
66
Chapter 3: The Components of an Anti-Virus
Network and Their Interface
The content of the control panel coincides with the context menu
items of the elements of the list. If an element of the hierarchical list is
selected, the content of the control panel duplicates its context menu.
If several, in particular, heterogeneous elements of the list are
selected, the control panel will display menu items common to the
selected elements.
The relative position of the control panel in the Console window may
be
u
determined by the user – set manually by relocating the dividing
line in the left part of the panel;
u
maximized to the size of the whole window – set by panel size
u
minimized to the right border of the window - set by panel size
control buttons ;
control buttons ;
u
hidden – set on the File menu
tab.
→ Console Settings → View
Traffic monitor
The traffic monitor is used to show the alteration of the incoming and
outgoing traffic in time, and the statistics on the level and speed of
data transfer over the network.
In the left part of the monitor the statistics of incoming, and in the
right part of the outgoing traffic is located: total data level, plus the
following upon mouse-over
u
Total – total traffic level,
u
Current – traffic speed at present,
u
Average – average speed of data transfer.
In the central part of the monitor a traffic graph is located, which
displays the level alteration of the data transferred over the network.
The graph may include markers of three types:
Administrator Manual
67
Chapter 3: The Components of an Anti-Virus
Network and Their Interface
u
red (show the comparative level of incoming traffic),
u
green (show the comparative level of outgoing traffic),
u
black (time marker).
Markers of incoming/outgoing traffic are scaled according to
the maximum value of the markers. After the maximum mark
is concealed (when it moves beyond the left border of the
graph) or a new mark larger than the maximum mark comes
from outside the right border of the graph, the graph is
rescaled and the data are displayed in accordance with the
new scale.
When the Console is launched, a black time marker is displayed on
the traffic monitor. The marker moves from the left to the right on the
graph. It serves to display traffic alteration in time and mark the
border of accumulated data: there are no data to the right of the time
marker. After the time marker has reached the right border of the
graph, the marker will be concealed and the graph will start operation
in the normal display mode of data transfer over the network (red and
green markers for incoming and outgoing traffic accordingly).
The time marker may also appear on the monitor graph, for
example, when the Console window, and accordingly the
graph length, are maximized.
The traffic monitor may be enabled or disabled in the Console
window by means of the File menu → Console settings → View tab.
Memory usage bar
The memory usage bar displays the dynamic alteration of the memory
allocated to the Console.
The bar contains the following elements:
u
status indicator for the used memory relative to the allocated
memory;
Administrator Manual
68
Chapter 3: The Components of an Anti-Virus
Network and Their Interface
u
numeric value of the total memory capacity allocated (in bytes);
u
numeric value of the memory capacity used at present (in
percentage from the total amount or in bytes);
u
button
to force memory cleaning.
The memory usage bar may be enabled/disabled in the Console
window by means of the File menu → Console settings → View tab.
Status bar
The status bar is used to display the total statistics for and the status
of the Console. The status bar is divided into several subitems
containing the following information:
u
Dr.Web® Enterprise Server access mode message –
shows the rights of the current administrator of the Console
(for more about the Console administrator rights, see p. AntiVirus Network Administrators). Possible variants:
· R/W (Read/Write) – means that the current Console
user has the full rights;
· R (Read only) - means that the current Console user
has the read-only rights.
u
Total known groups – the total number of groups. Includes
preinstalled and user groups (see also p. Groups. Preinstalled
Groups).
u
Total known stations - the total number of stations regardless
of their status.
u
Total selected objects – the number of dedicated unique
stations. If one and the same station is selected in different
groups, only one station is considered selected. If a group is
selected, all stations included in the group are considered
selected.
u
Status – displays a message about the current action or the
status of the Console or the Server it is connected to. For
example, in the waiting mode a message "Ready – The Server
is connected and ready to execute commands" is
displayed.
Administrator Manual
69
Chapter 3: The Components of an Anti-Virus
Network and Their Interface
The icon and the context menu of the Console
When the Console is started on Windows OS an icon appears in the
notification area of the Taskbar.
You can perform the following through the icon:
u
Right-click the icon to open the context menu.
u
Left-click it to minimize open windows of the Console if there
are any open. Otherwise restores all windows.
u
Left-click it twice to restore the minimized windows.
u
Or middle-click it to do the same.
To ensure quicker access, some menu items were added to the
context menu of the Console icon
.
Figure 3-2. The icon and the context menu of the Console
Administrator Manual
70
Chapter 3: The Components of an Anti-Virus
Network and Their Interface
The anti-virus Console allows to set up not only the parameters of the
Server, but also the parameters of connected workstations, which
are stored on the Server, and the configuration of the whole network.
Select an element you need to configure in the list and view the
available settings on its context menu.
The search panel facilitates searching necessary elements. The panel
allows to find all groups or stations whose names coincide with the
combination specified in the search line.
To quickly access most main menu items and subitems, use the hot
keys listed in Table 3-3.
Table 3-3. The hot keys to manage the anti-virus Console
Горячая
клавиша
Пункт меню — подменю
ALT-C
File — Connect
ALT-D
File — Disconnect
ALT-X
File — Exit
ALT-M
Administration — Administrator accounts
ALT-F
Administration — Configure server
ALT-Y
Administration — Configure repository — Entire repository
settings
ALT-S
Administration — Server schedule
ALT-N
Administration — Neighborhood
ALT-T
Administration — Edit templates
ALT-L
Administration — Alerts
ALT-A
Administration — Audit Log
ALT-J
Administration — Jobs execution log
ALT-P
Administration — Show unapproved stations
ALT-I
Administration — Server statistics
ALT-O
Administration — Show server log
Administrator Manual
71
Chapter 3: The Components of an Anti-Virus
Network and Their Interface
Горячая
клавиша
Пункт меню — подменю
ALT-R
Administration — Remote data
ALT-V
Administration — Server information
ALT-U
Administration — Check for updates
ALT-E
Administration — Network scanner
ALT-W
Administration — Network installation
ALT-SLASH
Help — Documentation
ALT-K
Help — Ask customer support
ALT-H
Help — About
F5
Refresh displayed data
3.3. Network Scanner
The anti-virus Server contains the Network Scanner component.
It is not recommended to launch the Network Scanner
under Windows 2000 operating systems due to possible
insufficiencies of network review.
The functioning of the Network Scanner is guarantied
under UNIX-like operating systems and Windows XP of later
Microsoft Windows operating systems.
Network Scanner tool's function as follows:
u
Scan (browse) the network for workstations.
u
Detect Dr.Web ES Agents on stations.
u
Install the anti-virus Agent on the detected stations as
instructed by the administrator. ES Agent installation is
described in detail in p. Installing the Agent Software through
the Console.
Administrator Manual
72
Chapter 3: The Components of an Anti-Virus
Network and Their Interface
To scan (browse) the network
1. Open the Network Scanner window:
u
If using the Console: select the Administration item in
the Dr.Web ES Console menu and click Network
Scanner.
u
If using the web interface: select the Administration
item in the main menu and select Network Scanner
item in the control menu.
2. In the settings window, set the necessary parameters:
u
IP addresses of the networks to be scanned (see Appendix
E. The Specification of Network Addresses);
u
Port to call the Agent.
3. Click the Refresh button to launch network scanning.
4. When scanning is completed you will be shown a list of
stations, with current ES Agent installations marked.
Interaction with anti-virus Agents
Network Scanner has been included in Dr.Web ES starting from
version 4.44.
Network Scanner can detect the Agents of version 4.44
and older but cannot interact with Agents 4.33.
Anti-virus Agents 4.44 and older installed on protected stations
process respective calls of Network Scanner received at a certain
port. By default port udp/2193 is using, but also port udp/2372 is
supported for compatibility with older versions. Correspondingly, it is
the default port offered by the Scanner to call at. Network Scanner
decides whether there is an Agent on the workstation based on the
assumption of the possibility to exchange information with the station
(request-response) through the specified port.
Administrator Manual
73
Chapter 3: The Components of an Anti-Virus
Network and Their Interface
If the station is forbidden (for example, by a firewall) to
accept packages at udp/2193, the Agent will not be
detected and consequently Network Scanner considers that
there is no Agent installed on the station.
3.4. The Anti-Virus ES Agent
Workstations are protected from virus threats by the Dr.Web antivirus packages designed for correspondent OS’s.
The packages are installed and operated by anti-virus Agents. The
Agents are usually installed by administrators (pp. Installing the AntiVirus Agent on Computers and Remote Installation of the Anti-Virus
Agent (for Windows OS)) and constantly reside in the memory of
protected workstations. They maintain connection to the anti-virus
Server(s), thus enabling administrators to configure anti-virus
packages on workstations from the Console, schedule anti-virus
checks, see the statistics of anti-virus components operation and other
information, start and stop remotely anti-virus scanning, etc.
Anti-virus Servers opportunely download updates and distribute them
to the Agents connected to them.Thus due to ES Agents anti-virus
protection is implemented, maintained and adjusted automatically,
without user intervention and irregardless of user’s computer skills.
In case an anti-virus station is outside the anti-virus network the antivirus Agent uses the local copy of the settings and the anti-virus
protection on that computer retains its functionality (up to the expiry
of the user’s license), but virus databases and program files are not
updated.
Updating of mobile Agents is described in p. Updating Mobile Agents.
Administrator Manual
74
Chapter 3: The Components of an Anti-Virus
Network and Their Interface
The anti-virus Agent is designed to perform the following:
u
to execute tasks set by the anti-virus Server (to install and
update the anti-virus package, launch scanning, etc.), if
necessary, anti-virus package files are run through a special
interface;
u
to send the results of performed tasks to the anti-virus Server;
u
to send notifications to the anti-virus Server on preset events
that occur during the operation of the anti-virus package.
Every anti-virus Agent is connected to an anti-virus Server and is
included in one or several groups registered on this Server (for more,
see p. Groups. Preinstalled Groups, Creating and Removing Groups).
The Agent and the anti-virus Server communicate through the
protocol used in the local network (TCP/IP, IPX or NetBIOS).
Hereinafter a computer on which the ES Agent is installed as
per its functions in the anti-virus network will be called a
workstation, while in the local network it can be functioning
both as a server or a workstation.
When run in the Windows OS environment, the anti-virus Agent
displays an icon
in the Taskbar.
Some administrative functions over the anti-virus workstation are
accessible through the context menu of this icon, which is shown in
Figure 3-3.
Administrator Manual
75
Chapter 3: The Components of an Anti-Virus
Network and Their Interface
Figure 3-3. The context menu of the anti-virus Agent
The range of settings accessible through the context menu of the
Agent icon depends on the configuration of the workstation specified
by the administrator.
Administrator Manual
76
Chapter 3: The Components of an Anti-Virus
Network and Their Interface
You can find info about the set of Agents' parameters and
description of corresponding administrative functions in the ES
Agent's help.
Mind that by selecting Exit you only remove the icon from the
notification area of the Taskbar. The Agent will remain
running.
To terminate the program itself, type
net stop drwagntd
in the command line. It is not recommended to stop the Agent
because in this case the anti-virus package software will not be
updated and the Server will not receive any information on the status
of the workstation, although the permanent protection will not be
disabled.
The Agent will be launched automatically at computer restart. To
launch the program back without restarting your computer, type
net start drwagntd
in the command line. The permanent protection will be restored.
The icon’s visual representation listed in the Table 3-4.
Table 3-4. The icon’s visual representation
Icon
Description
Action
The black picture on the The
Agent
is
operating
green background.
normally and is connected to
the Server.
A crossed Server icon on the The Server is unavailable.
basic background.
Administrator Manual
77
Chapter 3: The Components of an Anti-Virus
Network and Their Interface
Icon
Description
Action
An exclamation mark in a The Agent requests to restart
yellow triangle over the icon. the computer, or components
SelfPROtection or Spider
Guard are disabled.
→
The background of the icon An error occurred during
changes color from green to updating of the package
red.
components.
The background of the icon The Agent is stopped or not
is constantly red.
running.
The background of the icon The Agent is working in the
is yellow.
mobile mode (for more, see p. Updating Mobile Agents).
About the settings of the anti-virus Agent read p. Editing the
Parameters of the Anti-Virus Agent.
3.5. In-Built Web Interface
An additional instrument to manage the anti-virus network and set up
the Server is the in-built Web Interface. The Web Interface
functions as a Console.
From any computer with network access to the Server, Web
interface is available at the following address:
http://<IP адрес(или DNS_имя)>:<port number>
For example,
http://IP address(or domain name):9080
or
https://IP address(or domain name):9081
where you should specify the IP address or domain name for the
computer on which Dr.Web Enterprise Suite Server is installed.
The port number should be 9080 (or 9081 for https). In the
authorization dialog window specify the user name and password of
Administrator Manual
78
Chapter 3: The Components of an Anti-Virus
Network and Their Interface
the administrator (by default, administrator name is admin and the
password is root).
If you connect through https protocol (secure SSL connection), the
browser requests you to approve the Server certificate. Warnings and
indications of distrust to the certificate may display, because the
certificate is unknown to your browser. You need to approve the
certificate to connect to the Web Interface.
Some browsers (for example, FireFox 3) report errors when
connecting through https and refuse connection to the Web
Interface. To solve this problem, add the Web Interface to
the list of exceptions by clicking Add site in the warning
message. This allows connection to the Web Interface.
The administrator web interface window is divided into two parts:
header and working area.
The header consists of:
u
the Dr.Web Enterprise Suite logo which opens the main
window of the web interface if you click on it (the same as
when you select the Network item in the main window).
u
main menu,
u
search panel.
The working area is used to perform all the main functions of the Web
interface. It consists of two or three panels depending on the actions
which are being performed. Items in the panels are nested from left to
right:
1. the control menu is always located in the left part of the
working area,
2. depending on the selected item, one or two additional panels
are displayed. In the latter case, the rightmost panel contains
the settings of elements from the central panel.
The interface language must be set individually for each administrator
account (see p. Managing Administrator Accounts).
Administrator Manual
79
Chapter 3: The Components of an Anti-Virus
Network and Their Interface
Main menu
The main menu consists of the following items:
u
Administration,
u
Network,
u
Help,
u
(Exit) - close the current web interface session.
Search panel
The search panel located in the top right part of the web interface
and used to simplify searching for elements. It can find both groups
and separate workstations according to specified parameters.
To find a workstation or group of workstations:
1. Specify keyword(s) in the Group or Workstation entry field.
2. Click the
button near the corresponding field.
Administrator Manual
80
Chapter 3: The Components of an Anti-Virus
Network and Their Interface
3. The search results contain a hierarchical list of elements with
the keyword(s) in their names.
u
If you searched for a workstation, occurrence of the
workstation in groups will be displayed.
u
If no elements are found, the hierarchical list will be
empty.
You can also use the Advanced search option.
To perform an advanced search:
1. Click the Advanced search item in the search panel.
2. Specify the following parameters on the Search for Groups
and Stations panel:
u
Group - specify keyword(s) which will be searched for in
the names of groups.
u
Workstation - specify keyword(s) which will be searched
for in the names of workstations.
u
Description - specify the description in compliance to
which the element will be searched for.
You can specify parameters for one, several or all advanced
search fields. In case you specify parameters in several fields,
the program will search for elements which comply with all the
advanced search fields. E.g. if you specify parameters in the
Group and Workstation fields, the program will search for
workstations which correspond to the Workstation field and
belong to groups from the Group field.
3. After you specify all the necessary parameters, click Search.
4. All the found elements will be displayed in the hierarchical list.
3.5.1. Administration
Select the Administration item in the main menu of the web
interface. The control menu in the left part of the window is used to
view and edit information in the opened window.
The control menu consists of the following items:
Administrator Manual
81
Chapter 3: The Components of an Anti-Virus
Network and Their Interface
1. Administration
u
Dr.Web® Enterprise Server — opens the panel which
shows basic information about the Server and lets you
restart or shutdown it via the
top right part of the panel.
u
and
buttons in the
Unapproved stations — opens the panel with the list of
unapproved workstations (see New Stations Approval
Policy).
2. Tables
u
Audit log — lets you view the log of events and changes
carried out by the Console.
u
Jobs execution log — contains a list of Server tasks
with completion marks and comments.
u
Remote data — contains information about the
operation of the anti-virus network received from other
Servers (see Peculiarities of a Network with Several AntiVirus Servers).
3. Configuration
u
Administrator accounts — opens the panel for
managing anti-virus network administrator accounts (see
Managing Administrator Accounts).
u
Repository state — lets you check status of the
repository: the date when repository components were
last updates and their current status. To check whether
updates for components of the repository are available
click Check updates.
u
Configure repository — opens the repository editor
window (see A Simple Editor of the Configuration of the
Repository).
u
Configure Dr.Web Enterprise Server — opens the
panel with main settings of the Server (see Setting the
Server Configuration).
u
Dr.Web Enterprise Server schedule — opens the
panel with Server task schedule settings (see Setting the
Server Schedule).
Administrator Manual
82
Chapter 3: The Components of an Anti-Virus
Network and Their Interface
u
Neighborhood — opens the panel for managing
connections between Servers in an anti-virus network
with several Servers (see Peculiarities of a Network with
Several Anti-Virus Servers).
u
Edit templates — opens the alert template editor
window (see Setting Alerts).
4. Installations
u
Network Scanner — lets you specify a list of networks,
search for installed anti-virus software in networks to
determine protection status of computers, and install antivirus software (see Network Scanner).
u
Network installation — lets you simplify installation of
the Agent software on certain workstations.
3.5.2. Anti-Virus Network
Select the Network item in the main menu of the Web interface.
The control menu in the left part of the window is used to view and
edit information in the opened window.
Hierarchical list
In the middle part of the window there is a hierarchical list of the antivirus network. The list (catalog) represents the tree structure of the
anti-virus network elements. The nodes in this structure are groups
and workstations within these groups.
You can perform the following through the hierarchical list
elements:
u
Left-click the the name of the corresponding element to open
the control menu (left part of the window) of a group or
workstation.
u
Left-click the icon of the group to see the contents of a group.
Administrator Manual
83
Chapter 3: The Components of an Anti-Virus
Network and Their Interface
To select several elements of the hierarchical list, press and
hold CTRL or SHIFT during selection.
The appearance of the icon depends on the type and status of this
element (see table 3-5).
Table 3-5. Icons of the elements of the hierarchical list
Icon
Description
Meaning
Groups
yellow folder
Groups always shown on the hierarchical list.
white folder
If groups marked with this icon are empty,
their showing on the hierarchical list may be
disabled.
Workstations
green icon
Available workstations with installed anti-virus
software.
gray icon
The station is unavailable.
crossed
icon
computer Anti-virus software
uninstalled.
on
the
station
is
Management of the anti-virus network catalog elements is carried out
via the toolbar of the hierarchical list.
Toolbar
The toolbar of the hierarchical list contains the following elements:
Add a station or a group. Lets you add a new workstation or
group. Click the corresponding item in the drop-down menu.
Remove selected objects. Lets you remove an item(s) from the
hierarchical list. Select the item(s) in the list and click Remove
selected objects.
Administrator Manual
84
Chapter 3: The Components of an Anti-Virus
Network and Their Interface
Edit. Opens settings of the station or group in the right pane of
the Web Interface.
Data Export. Lets you save common data about workstations
in the anti-virus network to a CSV, HTML or XML file. Select the file
format in the drop-down menu.
Change group visibility settings. Lets you change the
appearance of groups in the list. Select one of the following in the
drop-down list (the icon of the group will change, see table 3-5):
u
Hide group - means that the group will not be displayed in the
hierarchical list.
u
Hide if empty - means that the group will not be displayed if
the group is empty (does not contain any workstations).
u
Show - means that the group will always be displayed in the
hierarchical list.
Become primary. Lets you determine the selected group as
primary for all workstations in it.
Set a primary group for the stations. Lets you assign a
primary group for selected workstations. If a group is selected in the
hierarchical list instead of workstations, the specified primary group
will be assigned to all workstations from this group.
Merge stations. Lets you join workstations under a single
account in the hierarchical list. It can be used if a workstation had
been registered under several accounts.
Remove personal settings. Lets you remove individual settings
of selected objects. Settings of the parent group will be used. All
workstations inside a group will also have their settings removed.
Import key. Lets you specify a key for workstation or group.
Send message. Lets you send notifications to users of
Administrator Manual
85
Chapter 3: The Components of an Anti-Virus
Network and Their Interface
workstations (see Sending Notifications to the Users).
Uninstall Dr.Web Agent. Removes the Agents and anti-virus
software from the selected workstation(s) or group(s).
Components management. Lets you manage the
components on the workstation. Select the necessary action in the
drop-down menu:
Update all components. Lets you update all installed
components of the anti-virus (e.g., when the Agent has not been
connected to the Server for a long time, etc.)
Update failed components. Lets you force synchronization
of the components that failed to update.
Interrupt running components. Lets you stop all active
scans at the station. For more details about termination of
scanning processes of a certain type, see p. Launching and
Terminating Anti-Virus Scanning on Workstations.
Tree settings let you adjust the appearance of the list:
u
for groups:
· All groups membership – show a station in all groups it
is a member of (only for groups under the white folder
icon, see Table 3-1). If the checkbox is selected, the
station will be shown in all member groups. If the
checkbox is cleared, the station will be shown only in the
top white folder.
· Show hidden groups – show all groups included in the
anti-virus network. If you clear the checkbox, all empty
groups (not containing stations) will be hidden. It may be
convenient to remove extra data, for example, when there
are many empty groups.
· Sort groups by role – sort groups by type (otherwise,
by alphabet) and show/hide a dividing line between
groups of different type (see p. Groups).
u
for stations:
Administrator Manual
86
Chapter 3: The Components of an Anti-Virus
Network and Their Interface
· Show station ID – show unique identifiers of stations in
the hierarchical list.
· Show station name – show names of stations in the
hierarchical list, if such are given.
· Show station address – show IP-addresses of stations
in the hierarchical list.
u
for all elements:
· Display personal settings – enables/disables marker on
icon of workstations and groups which shows whether
individual settings are present.
· Show descriptions – enables/disables showing of
groups and stations descriptions (the descriptions are set
in the properties of an element).
Property Pane
The property pane shows the properties and settings of workstations.
To display the property pane
1. To display the attributes, click the
Toolbar.
Edit element of the
2. A pane with properties of the station will open in the right pane
of the Web interface. This panel contains the following
settings: General, Configuration, Groups, Location. For
more details about this settings see p. Viewing and Editing the
Configuration of a Workstation.
3.5.3. Help
Select the Help item in the main menu of the web interface.
The control menu in the left part of the window contains the following
elements:
u
Documentation - opens on-line documentation in HTML
format.
Administrator Manual
87
Chapter 3: The Components of an Anti-Virus
Network and Their Interface
u
Forum - opens official forums of Doctor Web company.
u
Ask for support - opens the web page of the Doctor Web
technical support.
u
Send a virus - opens a web form for sending a virus to the Dr.
Web Virus Laboratory.
3.6. The Interaction Scheme of the
Components of an Anti-Virus Network
The Figure 3-4 describes a general scheme of an anti-virus network
built with Dr.Web ES.
The scheme illustrates an anti-virus network built with only one
Server. In large companies it is worthwhile installing several anti-virus
Servers to distribute the load between them.
Figure 3-4. The physical structure of the anti-virus network
In this example the anti-virus network is implemented within a local
network, but for the installation and operation of ES and anti-virus
packages the computers need not be connected within any local
network, Internet connection is enough.
Administrator Manual
88
Chapter 3: The Components of an Anti-Virus
Network and Their Interface
When an anti-virus Server is launched the following
sequence of commands is performed:
1. anti-virus Server files are loaded from the bin catalog,
2. the Server Scheduler is loaded,
3. the content of the centralized installation catalog and update
catalog is loaded, notification system is initialized,
4. Server database integrity is checked,
5. Server Scheduler tasks are performed,
6. the Server is waiting for information from anti-virus Agents
and commands from Consoles or Web Interfaces.
The whole stream of instructions, data and statistics in the anti-virus
network always goes through the anti-virus Server. Anti-virus
Consoles and Web Interfaces exchange information only with
Servers. Based on Console’s or Web Interface’s commands,
Servers transfer instructions to anti-virus Agents and change the
configuration of workstations.
Thus, the logical structure of the fragment of the anti-virus network
looks as in the Figure 3-5.
Administrator Manual
89
Chapter 3: The Components of an Anti-Virus
Network and Their Interface
Figure 3-5. The logical structure of the anti-virus network
Between the Server and workstations (a thin continuous line in the
Figure 3-5) transferring the following information through one of the
supported network protocols (TCP, IPX or NetBIOS):
u
Agents’ requests for the centralized schedule and the
centralized schedule of workstations,
u
settings of the Agent and the anti-virus package,
u
requests for scheduled tasks to be performed (scanning,
updating of virus databases, etc.),
u
files of anti-virus packages — when the Agent receives a task to
install them,
u
software and virus databases updates — when an updating task
Administrator Manual
90
Chapter 3: The Components of an Anti-Virus
Network and Their Interface
is performed,
u
Agent’s messages on the configuration of the workstation,
u
statistics (to be added to the centralized log) on the operation of
Agents and anti-virus packages,
u
messages on virus events and other events which should be
logged.
The volume of traffic between the workstations and the Server or
between the Server and the Console can be quite sizeable subject to
the settings and the number of the workstations. Therefore the
program complex Dr.Web ES provides for the possibility to compress
traffic. See the description of this optional mode in p. Traffic
Encryption and Compression below.
Traffic between the Server and the anti-virus Agent or between the
Server and the Console can be encrypted. This allows to avoid
disclosure of data transferred via the described channel as well as to
avoid substitution of software downloaded onto workstations. By
default traffic encryption is enabled (for more, please read p. Traffic
Encryption and Compression).
From the update web server to the anti-virus Server (a thick
continuous line in the Figure 3-5) files necessary for replication of
centralized catalogs of installation and updates as well as overhead
information on this process are sent via HTTP. The integrity of the
information (Dr.Web ES files and anti-virus packages) is provided
through the checksums: a file corrupted at sending or replaced will not
be received by the Server.
Between the Server and the anti-virus Console (a dashed line in
Figure 3-5) data about the configuration of the Server (including
information about the network layout) and workstations settings are
passed via TCP/IP or IPv6. This information is visualized on the
Console, and in case a user (an anti-virus network administrator)
changes any settings, the information about the changes is transferred
to the Server.
Connection between a Console (or a Web Interfaces) and a certain
Server is established only after an anti-virus network administrator is
authenticated by his login name and password on the given Server.
Administrator Manual
91
Chapter 4: Getting Started. Launching the
Anti-Virus Console and Establishing a Simple
Anti-Virus Network
Chapter 4: Getting Started.
Launching the Anti-Virus Console
and Establishing a Simple Anti-Virus
Network
Before using the anti-virus software it is recommended to
change the settings of the backup folder for the Server’s
critical data (see p. Setting the Server Schedule). It is
advisable to keep the backup folder on another local disk in
order to reduce the risk of losing Server’s software files and
backup copies at the same time.
The Server is started automatically once the installation of the
Server is complete. To set up the Server and configure the anti-virus
software, the anti-virus Console should be run on the computer of the
administrator and a connection to the Server should be established.
Examples below describe the launch of the anti-virus Console from
the administrator computer operated by Windows OS. For other
operating systems the actions are the same.
The program files of the Console as well as launching scripts for
certain OS’s reside in the Console’s installation folder. This folder can
be made network-accessible for other administrators.
The Console should not be placed to a folder the path to
which contains an exclamation mark (!).
To launch the anti-virus Console:
1. If you work under a UNIX system-based OS, run the script
drwconsole.sh.
2. If you work under OS Windows, run
drwconsole.exe.
Administrator Manual
92
Chapter 4: Getting Started. Launching the
Anti-Virus Console and Establishing a Simple
Anti-Virus Network
3. A window for logging in on the Server will open.
u
If no Server address is specified in the Server entry
field, type it or use the
open.
button. A search window will
u
In the entry fields in the bottom of the window a search
template is specified. Edit it, if necessary (see Appendix
Appendix E. The Specification of Network Addresses).
Click Search. The list of found Servers will be displayed
in the upper part of the window. Select the necessary
Server in this list and click Select.
u
Enter the login and the password of an anti-virus network
administrator. The name admin and the password root
are suggested by default during the installation; it is
advisable to change the password, read p. Managing
Administrator Accounts.
u
Click Login.
Registration at the Server is impossible if the traffic
encryption and compression settings of the Console and the
Server are incompatible. If this is the cause of the
registration failure, on the File menu, select Console
settings. A window for editing Console settings will open.
Go to the Communication tab. Select the same settings in
the Encryption mode and the Compression mode dropdown lists as set for the Server and click OK. (To view the
Server’s configuration from a connected Console, on the
Administration menu, select Configure server, then select
the General tab). The default parameters of these settings
for the Console and the Server are compatible; the original
compatibility may be broken if you have changed one of these
settings. Registration is also impossible if your Console
version is incompatible with the Server’s version.
If registration at the Server is successful, the main Console window
will open. In this window information on the anti-virus network stored
on the Server can be viewed.
Now you can administer the Server and the anti-virus network: create
(p. Installing the Agent Software through the Console), edit, approve,
Administrator Manual
93
Chapter 4: Getting Started. Launching the
Anti-Virus Console and Establishing a Simple
Anti-Virus Network
configure, and remove (Administration of Anti-Virus Workstations)
anti-virus workstations, view logs and other data. Main controls are the
main menu, the toolbar and the context menu of the anti-virus catalog
items as described in p. The Anti-Virus Console above.
After the Agent has been installed on a workstation it will try to
establish a connection with the Server. With default Server settings
new workstations should be approved by an administrator to be
registered at the Server (for more about the policy of connecting new
workstations, please refer to p. New Stations Approval Policy). In this
mode new workstations are not connected automatically, but placed
by the Server into the list of Unapproved stations.
To connect a new workstation to the Server, on the Administration
menu of the Console, select Show unapproved stations. A list of
detected but not approved workstations will open.
Select the station in the list, and on the context menu select Approve
and set Everyone.
If you select Approve and set group, you can appoint
another primary group for the given workstation(s). Read
more about primary groups in p. Inheriting the Configuration
from Groups by Workstations.
The workstation will be connected to the Server and the anti-virus
network layout will be changed respectively.
The workstation will be placed to predefined groups of workstations
Everyone and Online, and to other relevant groups according to the
OS family and version installed on the anti-virus station.
To finish the installation of some components for anti-virus
workstations you will need to restart the computer. In this
case there will appear a red exclamation mark over the
Agent’s icon in the Taskbar or (in earlier Windows OS
versions) the installer will display a notification.
Administrator Manual
94
Chapter 4: Getting Started. Launching the
Anti-Virus Console and Establishing a Simple
Anti-Virus Network
By default, not all groups are displayed in the hierarchical list
of the network elements (hidden groups are not displayed, if
they are empty). To view all groups, on the context menu of
any element of the catalog, select Hidden groups.
Administrator Manual
95
Chapter 5: Accounts and Groups
Chapter 5: Accounts and Groups
5.1. Anti-Virus Network Administrators
There are two types of administrator accounts:
u
Full-rights accounts
u
Read-only accounts
Full-Rights Accounts
Administrators with full rights have exclusive rights to the
administration of the anti-virus Server and of the whole network.
They can view and edit the configuration of the anti-virus network and
create new administrator accounts of both types. An administrator with
full rights can configure the anti-virus software of a workstation, limit
and disable user intervention into the administration of the anti-virus
software on the workstation (see p. Setting Users’ Permissions).
Full-rights Administrator can view and edit the list of current
administrator accounts.
Read-Only Accounts
Administrators with read-only rights can only view the settings of the
anti-virus network and its separate elements, but cannot modify them.
They can also view the list of current administrator accounts.
After system is installed, it has one full-rights account configured.
Administrator Manual
96
Chapter 5: Accounts and Groups
To manage the Dr.Web ES anti-virus, it is not necessary to
have administrator rights on computers included in the antivirus network. However, remote installation and removal of
the Agent software is possible within a local network only
and requires administrator’s rights in the local network, and
checkout of the anti-virus Server requires full access to its
installation catalog.
It is recommended to appoint a reliable, qualified employer
experienced in the administration of a local network and competent in
anti-virus protection as an administrator of the anti-virus network.
Such employer should have full access to the installation folders of the
anti-virus Server. Such employer should either be a local network
administrator or work closely with such person.
5.2. Managing Administrator Accounts
The Dr.Web ES anti-virus allows any administrator with full rights to
edit settings (including administrator name and password), create new
accounts and delete already existing ones.
By default, if not specified otherwise during the installation,
the program is installed with a full-rights administrator
account (name - admin, password - root). If the program is
installed with the default settings, it is advisable to change the
password as soon as you log in on the Server for the first
time.
To access administrator accounts via the Console
1. On the Administration menu of the Console, select
Administrator accounts. A list with administrator accounts
will open.
2. To edit an account, right-click it in the list, and on the context
menu, select the correspondent item. A window for editing the
account will open.
3. To add an account, right-click the list, and on the context
Administrator Manual
97
Chapter 5: Accounts and Groups
menu, select Add. A similar window will open.
4. To delete an account, right-click it, and on the context menu,
select Delete.
The Edit administrator window in steps 2 and 3 allows you to fill in
or edit the necessary fields (the Login, Password and Retype
password fields should be obligatorily filled in when a new account is
added).
To access administrator accounts via the Web interface
1. Select the Administration item in the main menu of the web
interface and then the Administrators item in the control
menu.
2. Select the account in the middle panel to edit its settings. The
panel with account settings will be displayed in the right part of
the window.
3. You can edit the following settings:
u
Administrator account login and password.
u
Rights.
u
First and last name of the administrator.
u
Language of the interface used by the administrator (after
changing the language it is necessary to restart the web
interface).
u
Description of the account.
4. After changing the settings click Save.
5. To add a new account, click the
Create account icon in
the middle panel. A similar window with account settings will
open.
6. To delete an account, select it in the list and click the
Remove account icon in the middle panel.
When creating an administrator account with full rights, clear the
Read only checkbox (set by default).
Administrator Manual
98
Chapter 5: Accounts and Groups
5.3. Groups. Preinstalled Groups,
Creating and Removing Groups
Grouping is designed to make the administration of anti-virus
workstations easier.
Grouping of anti-virus stations allows to set the same settings for all
stations in a group with just one instruction, as well as to initialize
certain tasks on all these stations. Groups can also be used to order
(structure) the list of workstations.
At the installation of the program so-called preinstalled (system)
groups are created.
System Groups
Dr.Web ES has an initial set of system groups. These groups are
created during the installation of Dr.Web Enterprise Server and
may not be deleted. Still the administrator may disable their display in
the administrator’s Console, if necessary.
Everyone group
Group containing all stations known to the anti-virus Server. The
Everyone group has default settings.
By workstation status
The two following groups reflect the current status of the station, that
is if it is connected to the Server or not at the moment. These groups
are completely virtual, may not have any settings or be primary
groups.
u
Online group. The group contains all workstations connected at
the moment (reacting to Server requests).
Administrator Manual
99
Chapter 5: Accounts and Groups
u
Offline group. The group contains all workstations not
connected at the moment.
By network protocol
The three following groups elicit the protocol of workstations’
connection to the Server. These groups are completely virtual, may
not have any settings or be primary groups.
u
TCP/IP group. The group contains workstations connected at
the moment through the TCP/IP protocol.
u
IPX group. The group contains workstations connected at the
moment through the IPX protocol.
u
NetBIOS group. The group contains workstations connected at
the moment through the NetBIOS protocol.
By the state of the anti-virus software on the
station
u
Expired group. For each station account at the Server, it is
possible to set a validity period. After the account has expired,
the station is transferred to the Expired group.
u
Deinstalled group. Once anti-virus Agent SW has been
deinstalled from a station, the staion is transferred to the
Deinstalled group.
By operation system
This category of groups represents the operation systems under which
the stations are working at the moment. These groups are not virtual,
may have station settings and be primary groups.
Administrator Manual
100
Chapter 5: Accounts and Groups
u
Windows family groups. This family includes a large set of
groups, which reflect the specific version of Windows operation
system. All possible group names are nevertheless sufficiently
unambiguous. For example, the Windows group includes all
stations working under all versions of Windows OS. The
Windows/2000 group includes stations working under
Windows 2000 OS, and the Windows/2000/AS group stations
under Windows 2000 Advanced Server OS, etc.
u
Linux group. Stations under Linux OS.
u
FreeBSD group. Stations under FreeBSD OS.
u
Solaris group Stations under Solaris OS.
User Groups
These groups are assigned by the anti-virus network administrator for
his/her own needs. The administrator may create own groups and
include workstations in them. The contents and names of such groups
are not restricted by Dr.Web Enterprise in any manner.
In table 5-1 all possible groups and group types are given for your
reference, along with the specific parameters supported (+) or not
supported (–) by the groups.
The following parameters are considered:
u
Automatic membership. The parameter reflects whether
stations may be automatically included in the group (automatic
membership support) and group contents automatically adjusted
during Server operation.
u
Membership administration. The parameter reflects whether
the administrator can manage group membership: add stations
to or remove from the group.
u
Primary group. The parameter reflects whether the group can
be primary for a station.
u
Possibility to have own settings. The parameter reflects
whether the group can have own settings (to be propagated to
its stations).
Administrator Manual
101
Chapter 5: Accounts and Groups
Table 5-1. Groups and supported parameters
Parameter
Group/group type
Parameter
Automatic
membership
Membership
administration
Primary
group
Possibility
to have
own
settings
Everyone
+
–
+
+
By workstation
status
+
–
–
–
By network protocol
+
–
–
–
By the state of antivirus SW
+
–
–
–
By operation system
+
–
+
+
User groups
–
+
+
+
Creating and Removing Groups
To create a new group
1. Select:
u
For the Console: Create group on the context menu
(the item is available regardless of what elements of the
anti-virus catalog are selected).
u
For the Web interface:
Add a station or a
group on the toolbar and the Add a group in the
submenu.
A window for creating a group will open.
2. The ID entry field is filled in automatically. You can edit it
during creation, if necessary. The identifier should not contain
blank spaces. In the sequel group ID can not be changed.
3. Type the group name in the Name entry field.
4. For nested groups, in the Parent group field, select a parental
group from the drop-down list. For a root group (without a
parent), leave this field blank. The group will be added to the
Administrator Manual
102
Chapter 5: Accounts and Groups
root of the hierarchical tree.
5. Type comments in the Description entry field (optional).
6. Click OK.
You can also delete the groups you created (preinstalled groups
cannot be deleted). To do this
u
For the Console: right-click the group, and on the context
menu, select Delete.
u
For the Web interface: select the group and then click
Remove selected objects on the toolbar.
The groups you create are initially empty. See below how to add
workstations to groups.
5.4. Adding a Workstation to a Group.
Removing a Workstation from a Group
There are several ways how to add a workstation to a new (created)
group.
Through the context menu of a group via the Console
1. Select the necessary group in the Console’s catalog.
2. On the context menu, select Stations. A window for managing
the content of the group will open.
3. In the Known field, highlight the stations you want to add to
the group and click
.
4. To remove a station from the group, highlight it in the
Members field and click
.
By dragging items in the Console catalog
To move a station to a different group, unfold the group folder, leftclick the station’s icon and drag it to the target group. To copy a
station to a different group, follow the same procedure keeping the
CTRL key pressed.
Administrator Manual
103
Chapter 5: Accounts and Groups
Moving a station from the Everyone preinstalled group is
impossible. You can only copy it.
Through the context menu of a station via the Console
1. On the context menu of the necessary workstation, select
Properties.
2. In the opened Properties window, select the Groups tab.
3. In the Member of field, there is a list of groups, which the
station is included to. In the Known group field, there is a list
of all existing groups. Select the necessary group you want to
add the station to, and click the
button.
4. Removing a station from the group is similar. Select the
correspondent group's radio button and click
.
Through the workstation settings via the Web interface
1. In the main menu, select Network, then click the name of a
workstation in the hierarchical list.
2. In the control menu (left pane), select Properties.
3. In the Station Properties window, select the Groups tab.
The Member of list displays the groups which include the
workstation. The Other groups list displays the groups, in
which membership for the workstation is yet available. Do one
of the following:
u
To add the workstation into a group, click the name of a
group in the Known groups list. The workstation will be
added to the group, and the group name will move into
the Member of list.
u
To remove a workstation from the group, click the name
of a group in the Member of list. The workstation will be
removed from the group, and the group name will move
into the Known groups list.
4. To save settings, click Save.
You can also add a station to a group and set this group as the
primary one. For more read p. Inheriting the Configuration from
Administrator Manual
104
Chapter 5: Accounts and Groups
Groups by Workstations.
You cannot change the set of preinstalled groups.
As a result of operations with the database or reinstallation of
the software on anti-virus workstations, several stations with
the same name may appear on the anti-virus network list
(only one of them will be correlated with the respective
workstation). To remove repeated workstation names, select
all names of such workstation, and on the context menu for
the Console or in the toolbar for the Web interface, select
Merge stations. By default the name of the anti-virus station
given to it the last time at its registration at the Server will be
offered to use.
5.5. Setting a Group. Using Groups to
Configure Workstations. Setting Users'
Permissions
Each station is included in the Everyone group as well as the groups
correspondent to the OS of the station and to the relevant OS family.
Immediately after the installation, the settings of the Everyone group
are the default uniform settings for all workstations. These settings are
inherited by all other groups and all workstations.
The Dr.Web ES anti-virus allows to join workstations into groups. You
can specify certain settings for each group, and these settings will be
inherited by all workstations belonging to the group.
To change the default settings of a group
1. Select a group in the network catalog.
2. In the context menu, or in the control pane (for Console) or
control menu (for Web Interface), select and edit a setting.
The group’s settings include the configuration of the anti-virus
programs (for more refer to p. Viewing and Editing the Configuration
of a Workstation), the schedule and permissions settings, etc. Editing
Administrator Manual
105
Chapter 5: Accounts and Groups
the configuration of anti-virus programs is completely analogous to
editing the configuration of a workstation described in Administration
of Anti-Virus Workstations. Setting the permissions is similar to setting
the permissions of separate workstations described below (p. Setting
Users Permissions).
Agent’s settings are included in the group configuration, so
they can be adjusted by means of grouping.
The administrator may specify the set of anti-virus package
components in group parameters. These settings will be inherited by
all stations for which the group is primary. For all created stations only
those anti-virus components will be installed that are specified in the
settings of the primary group. Editing of the components list for
groups is similar to editing of the components list for stations (see p.
Viewing and Editing theConfiguration of a Workstation).
You can run, view and terminate tasks for scanning for a separate
group of stations as well as several selected groups. In the same way,
you can view the statistics (on infections, viruses, start/shutdown,
scanning and installation errors, etc.) and summary statistics for
workstations of a group or several groups.
When viewing or editing workstation’s configuration inherited from the
primary group (for more read p. Inheriting the Configuration from
Groups by Workstations), a notification that the settings are derived
from the Everyone group will be displayed in correspondent windows.
If you modify the configuration of a workstation, this inscription will
disappear. You can restore the configuration inherited from the
primary group; to do this click the button Remove these settings in
the toolbar (in the Console:
, in the Web interface:
).
Administrator Manual
106
Chapter 5: Accounts and Groups
5.5.1. Inheriting the Configuration from Groups
by Workstations
Inheriting a Station Settings
When a new workstation is created, its configuration settings are
adopted from one of the groups it belongs to. That group called the
primary group. If the settings of the primary group are modified, these
changes are inherited by all workstations included into the group,
unless the workstations have been customized. When creating a
workstation, you can specify what group will be regarded as primary.
By default, this is the Everyone group.
If Everyone is not the primary group, and a different primary
group has no personal settings, the settings of the Everyone
group are inherited by a new station.
Setting the Primary Group
There are several ways how to set a new primary group for a
workstation or a group of workstations.
To view and change the primary group for a workstation
via the Console
1. Select a station in the network catalog.
2. On the context menu, click Properties. In the opened window
go to the Groups tab.
3. If necessary, reassign the primary group by clicking the
Primary option button against the necessary group.
4. Click OK.
To set primary group via the Web interface
1. In the main menu, select Network, then click the name of a
workstation in the hierarchical list.
Administrator Manual
107
Chapter 5: Accounts and Groups
2. In the control pane (left pane), select Properties.
3. In the Station Properties window, select the Groups tab.
4. In necessary, click a group in the Membership in list to set
the group as primary.
5. Click Save.
You can also assign a certain group as primary for several selected
workstations.
To set primary group for workstations via the Console
1. Select the necessary workstations in the catalog (you can also
select groups – the action will be applied to all the included
workstations, you can use the CTRL and SHIFT keys when
selecting).
2. On the context menu, select Assign primary group. A
window with the list of groups, which can be assigned as
primary for these workstations will open.
3. Select the necessary group and click OK.
To set primary group for workstations via the Web
interface
1. In the main menu, select Network. In the hierarchical list,
click the name of the workstations or groups of workstations
for which you want to set a primary group. To select several
workstations, press and hold CTRL or SHIFT during selection.
2. On the toolbar, click
Set a primary group for the
stations. This opens the window listing the groups which can
be set as primary for the selected workstations.
3. In the window, click the name of a group you want to set as
primary for the workstations.
You can also make a group primary for all workstations included into
it. To do this, select the necessary group in the catalog, and
u
If using the Console: on the context menu, select Become
primary.
Administrator Manual
108
Chapter 5: Accounts and Groups
u
If using the Web interface: on the toolbar, click
primary.
Become
By default the network structure is displayed in such a way as to show
a station in all the groups it is included into. If you want workstations
to be displayed in the network catalog in their primary groups only, on
the context menu, clear the Full membership checkbox.
5.5.2. Setting Users Permissions
New workstations inherit default permissions from the primary group.
You can change default permissions for a whole group as well as for
each workstation included into it.
To change users default permissions to administrate the
anti-virus package via the Console
1. Right-click the necessary group or unfold the group and rightclick the necessary workstation in the catalog, and on the
context menu, select Permissions. A window for editing
permissions will open.
2. By default, a user is authorized to launch each component, but
prohibited to edit components’ configuration or stop the
operation of components. To change (enable or disable) any
permission, select or clear the correspondent checkbox.
3. To accept the changes in permissions, click OK; to reject the
changes, click Cancel.
4. To cancel edited permissions and to restore the default ones
(inherited from the preinstalled groups), click
these settings.
Remove
5. You can also propagate these settings to another object by
clicking
6. To export the settings to file, click
7. To import settings from a file, click
.
.
Administrator Manual
109
Chapter 5: Accounts and Groups
To change users default permissions to administrate the
anti-virus package via the Web interface
1. In the main menu, select Network, then click the name of a
workstation in the hierarchical list.
2. In the control menu (left pane), select Permissions. This
opens the permissions configuration window.
3. By default, a user is authorized to launch each component, but
prohibited to edit components’ configuration or stop the
operation of components. To change (enable or disable) any
permission, select or clear the correspondent checkbox.
4. To accept the changes in permissions, click OK; to reject the
changes, click Cancel.
5. To cancel edited permissions and to restore the default ones
(inherited from the preinstalled groups), click
these settings.
Remove
6. To use the same settings for another object, click
Propagate these settings to another object.
7. To export settings to a file, click
8. To import settings from a file, click
Export settings.
Import settings.
9. To save changes, click Save.
5.5.3. Propagation of Settings to Other
Groups/Stations
Configuration settings of anti-virus programs, schedules and user
permissions of a group or a workstation can be propagated to other
groups and workstations. To do this
1. Right-click the necessary station or group whose configuration
settings you want to propagate and select the necessary item.
In the window for editing the configuration of the anti-virus
component, the schedule or permissions, click the Propagate
these settings in one of the following locations:
u
the editor of anti-virus component configuration,
Administrator Manual
110
Chapter 5: Accounts and Groups
u
the schedule editor,
u
the permissions editor or in the installing components
window (for the Console),
u
in the installing components window (for the Web
interface).
A window of the network catalog will open.
2. Select necessary groups and stations to which you want to
propagate the settings.
3. To enable changes in the configuration of these groups, click
OK, to reject the action and close the window – click Cancel.
Administrator Manual
111
Chapter 6: Administration of Anti-Virus
Workstations
Chapter 6: Administration of
Anti-Virus Workstations
Anti-virus networks operated by Dr.Web ES provide for centralized
configuring of anti-virus packages on workstations. The program
complex allows:
u
to set the configuration parameters of anti-virus programs,
u
to schedule tasks and launch on-demand tasks on workstations,
u
to update workstations, also after an updating error, in this case
the error state will be reset.
The administrator of the anti-virus network can grant a user with the
permissions to change the configuration of the workstation and launch
tasks, as well as restrict or prohibit such actions.
The configuration of workstations can be modified even when they are
temporarily disconnected from the Server. These changes will be
accepted by the workstations as soon as they are reconnected to the
Server.
6.1. New Stations Approval Policy
The procedure of approving new workstations manually was described
in Getting Started. Launching the Anti-Virus Console and Establishing a
Simple Anti-Virus Network.
But you can change the approval policy by choosing a different mode
of workstations’ access to the Server.
To change the access mode of workstations to the Server
1. Open the Server configuration:
u
If using the Console: on the Administration menu of
the Console select Configure Server.
Administrator Manual
112
Chapter 6: Administration of Anti-Virus
Workstations
u
If using the Web interface: select the Administration
item in the main menu, then click Configure Dr.Web
Enterprise Server in the control menu.
2. On the General tab, in the Newbie drop-down list select the
necessary option:
u
Allow access automatically,
u
Approve access manually (the mode is specified by
default unless changed at the Servers installation),
u
Always deny access.
It is recommended to set the Approve access manually mode. In
this mode new stations are placed to the Unapproved stations list
until approved by the administrator. The list is available on the
Administration menu.
To access the list of unapproved workstations via the web interface
select the Administration item in the main menu and then click the
Unapproved stations item in the control menu.
The list of unapproved workstations lets you:
u
enable access for selected workstation (or all stations) and set
the Everyone group as primary;
u
enable access for selected workstation (or all stations) and set a
primary group;
u
disable access for selected workstation (or all stations).
The Allow access automatically mode instructs to connect all new
stations automatically to the Server without requesting the
administrator.
When the Always deny access mode is set, new stations are not
connected to the Server. The administrator should manually create an
account for a new station.
6.1.1. Creating an Account for a Station
To create an account for a new workstation
1. Create a new workstation:
Administrator Manual
113
Chapter 6: Administration of Anti-Virus
Workstations
u
If using the Console: on the context menu of any
element of the network catalog, select Create station.
u
If using the Web interface: select the Network item in
the main menu, then click
Add a station or a
group in the toolbar of the opened window and select the
necessary item in the drop-down list.
A window for creating a new workstation will open.
2. The ID field is filled in automatically. You can edit the
parameter in the ID field, if necessary (it should not contain
spaces and should be unique).
3. Enter the station name and password into appropriate fields.
Retype the password.
4. If necessary, make comments in the Description field.
5. You can also specify parameters in the Groups and Location
tabs of the Console (or similar group boxes of the Web
interface).
6. Click OK in the Console or Save in the Web interface.
6.2. Viewing and Editing the
Configuration of a Workstation
Anti-Virus Components
To view what components of the anti-virus package are
installed on a workstation
1. Select the workstation in the catalog of the anti-virus
Console’s main window.
2. On the context menu, select Installed components. A
window with the list of installed components will open.
3. To close the window, click Close.
Administrator Manual
114
Chapter 6: Administration of Anti-Virus
Workstations
To check via the Web interface which components are
installed on a workstation:
1. Select the Network item in the main menu, then click the
name of a group or workstation in the hierarchical list.
2. Select the Installed components item in the control menu
(the panel on the left) to open a list of installed components.
The number of installed components depends on the OS of
the workstation.
The administrator can change the set of anti-virus components on a
workstation both before installing the Agent (see Setting a Group)
and any time after installation.
To change the set of anti-virus components
1. Open the list of components:
u
If using the Console: in the workstation's context menu
(similarly for groups) select the Installing Components
item.
u
If using the Web interface: select the Network item in
the main menu, then select the workstation or group in
the hierarchical list and click the Installed Components
item in the control menu (panel on the left).
2. Select an option for necessary components in the dropdown
list:
u
must - means that a component MUST be present on the
workstation. When a new workstation is created, the
component is installed with the anti-virus package. If the
must option is specified for an existing workstation, the
component will be added to the available anti-virus
package.
u
may - means that the component can potentially be
installed. The user decides whether the component is
required.
Administrator Manual
115
Chapter 6: Administration of Anti-Virus
Workstations
u
cannot - means that installing the component is not
allowed. When a new workstation is created, the
component will not be installed with the anti-virus
package. If the cannot option is specified for an existing
workstation, the component will be removed from the
anti-virus package.
Table 6-1 shows whether the component will be installed on the
workstation (P) according to the parameters specified by the
user and the settings defined by the Server administrator:
Table 6-1.
User parameters
Specified on the Server
Must
Install
P
Do not install
P
May
Cannot
P
3. Click ОК in the Console or Save in the Web interface to
save the settings and the set of anti-virus package components
on the workstation. Click Cancel to reject all changes and
close the settings window.
To view what virus databases are installed on a
workstation via Console
1. On the context menu of a workstation, select Virus bases.
This opens a window with the list of the installed virus
databases.
2. To close the window, click Close.
To view what virus databases are installed on a
workstation via Web Interface
1. In the main menu, select Network, then in the hierarchical list
click the workstation name.
2. In the control menu (left pane), select Virus bases in the
Tables subsection. This opens a window with information on
installed virus databases including information on the file
containing a particular database, virus database version, the
Administrator Manual
116
Chapter 6: Administration of Anti-Virus
Workstations
total number of virus records in the database, the database
creation date.
If the Virus bases item is hidden, to view the item, select
Administration in the main menu, and then select
Configure Dr.Web Enterprise Server in the control menu
of the window. On the General tab, select the Virus
database monitoring checkbox, then restart the Server.
Station settings
To view and edit the properties of a workstation via the
Console
1. On the context menu of the station, select Properties.
2. In the opened window go to the necessary tab and make
corrections you need (tab's settings described below).
3. To save changes in the settings, click OK. To reject changes
and go to the previous configuration, click Cancel.
To view and edit the properties of a workstation via the
Web Interface
1. Select the Network item in the main menu, then select the
station in the hierarchical list and click the
the Toolbar.
Edit element of
2. A panel with properties of the station will open in the right part
of the Web interface. This panel contains the following
settings: General, Configuration, Groups, Location. These
settings are similar to those in the Console.
3. To save changes in the settings, click Save.
General Tab
In the General tab you can specify
u
in the Password field, specify a password to authorize the
station at the Server;
Administrator Manual
117
Chapter 6: Administration of Anti-Virus
Workstations
u
in the Description field, add comments.
Groups Tab
On the Groups tab you can change the primary group for this station.
This procedure is described in the p. Inheriting the Configuration from
Groups by Workstations.
Configuration Tab
On the Configuration tab you can change the configuration of the
station. The configuration includes:
u
the permissions (click a button
to change the permissions),
u
the schedule (click a button
settings),
to change the schedule
u
personal components list (click the button
in the Console
or the button
in the Web Interface to change the personal
components list),
u
and the settings of the anti-virus components - Dr.Web
Scanner for Windows, SpIDer Guard for Windows,
SpIDer Mail for Windows Workstations, etc. (click a button
against the correspond item to change its permissions).
Web interface also provides you with option for deleting personal
settings of a workstation. These settings are located in the left part of
the corresponding options for components configuration options.
When you delete personal settings of a workstation, it inherits settings
from the primary group.
Administrator Manual
118
Chapter 6: Administration of Anti-Virus
Workstations
The set of the components parameters and recommendations
to their configuring are described in the manual Dr.Web®
Anti-Virus for Windows. User Manual.
Meanwhile the Console’s interface is somewhat different from the
interface of the anti-virus components:
u
to change the parameters whose values can be either Yes or
No, click the appropriate value. Entry fields and drop-down lists
are standard,
u
to manage separate parameters, use the options located on the
right from corresponding settings:
to restore the value a parameter had before editing
to set the default value for a parameter
u
to manage set of parameters, use the options located in the
toolbar (the upper part of most settings windows, e.g.
Schedule, Permissions, Dr.Web® Scanner for Windows,
SpIDer Guard® for Windows and SpIDer Mail® for
Windows Workstations),
- to propagate this parameters on other objects (group
or several groups and workstations)
- to restore the values all parameters had before editing
- to restore the default values of all parameters
- to export parameters to a file of a special format
- to import parameters from such file
in the Console or
in the Web Interface - to
delete the specific configuration of the given workstation
(the configuration inherited from the preinstalled groups will
be restored, see p. Setting a Group. Using Groups for Setting
Workstations. Setting User’s Permissions).
u
Click OK to confirm the changes made, or click Cancel to
restore the state of the configuration before editing.
Administrator Manual
119
Chapter 6: Administration of Anti-Virus
Workstations
Location Tab
On the Location tab you can set information on geographical location
of the workstation.
You can create different groups of users subject to optimal
permissions and settings for them. Setting main parameters of
stations through groups will allow you to save time on
handling the settings of each individual group.
Removing personal settings
To remove personal settings of a workstation via the
Console:
1. on the context menu of the station, select
Remove
personal settings. The list of this workstation’s settings will
open, checkboxes against altered personal settings will be
selected.
2. To remove settings, clear the checkboxes and click OK.
Settings of the workstation inherited from the primary group
will be restored.
To remove personal settings of a workstation via the Web
interface:
1. Select the Network item in the main menu, then select the
workstation in the hierarchical list and click
Remove
personal settings in the toolbar. A list of settings for this
workstation will open. Personal settings will be marked with a
flag.
2. To remove settings, clear the checkboxes and click Save.
Settings of the workstation inherited from the primary group
will be restored.
Administrator Manual
120
Chapter 6: Administration of Anti-Virus
Workstations
Before editing the configuration of a workstation for SpIDer
Guard for Windows and Dr.Web Scanner for Windows,
familiarize yourself with recommendations on using the antivirus for computers on Windows Server 2003 OS, Windows
2000 OS, or Windows XP OS. An article with necessary
information can be found at http://support.microsoft.com/
kb/822158/en. The article is meant to help you increase
system performance.
Provided that your Agent key (agent.key) allows to use a
spam filter for the SpIDer Mail component, on the
Antispam tab you can set up the filter (on the context menu
of any group or workstation, select SpIDer Mail® for
Windows Workstations).
Starting from version 5.0 anti-virus package includes SpIDer
Gate and Office Control components. For using this
components, they must be included in you license (Antivirus
+Antispam), that described in the Agent key file.
Spam filter, SpIDer Gate and Office Control settings are
described in the manual “Dr.Web® Anti-Virus for
Windows. User Manual”.
User Permissions
For information on how to set user permissions for managing anti-virus
package, see p. Setting Users Permissions.
If you have edited a workstation, when it was not connected
to the Server, the new settings will be accepted, once the
Agent has reconnected to the Server.
Administrator Manual
121
Chapter 6: Administration of Anti-Virus
Workstations
6.3. Editing the Parameters of the
Anti-Virus Agent
To view and edit the configuration of the anti-virus Agent
for the necessary station
u
If using the Console: select the station in the anti-virus network
catalog. Then on the context menu, select Configure → Dr.
Web® Enterprise Agent for Windows.
u
If using the Web interface: select the Network item in the
main menu, then select the workstation or group in the
hierarchical list and click the Dr.Web® Enterprise Agent for
Windows item in the control menu (panel on the left).
A window for editing the Agent’s settings will open.
Any changes incompatible with the Server settings (for
example, changes of the encryption and compression modes)
will result in disconnection of the Agent from the Server.
If any changes in the Agent’s settings are made via the Console, the
OK button becomes accessible. Click this button to accept changes in
settings. To reject changes in settings and to close the window, click
Cancel.
If any changes in the Agent’s settings are made via the Web
interface, click Save button to accept changes in settings.
Network Tab
On the Network tab, you can find the parameters determining
interaction with the Server:
Administrator Manual
122
Chapter 6: Administration of Anti-Virus
Workstations
u
In the Server field, you can set the address of the Dr.Web
Enterprise Server. You may leave this field blank, then the
Agent will use as the address of the anti-virus Server the value
of the parameter set on the user’s local machine (the address of
the Server from which the installation was initiated).
If the Server parameter is set incorrectly, the Agents will
disconnect from the Server and will not be able to reconnect.
In this case you will have to set the Server address on the
stations directly.
u
In the Number of retries field, set the parameter determining
the number of attempts to find a Dr.Web Enterprise Server.
u
In the Search timeout field, set the interval between attemts
to find a Dr.Web Enterprise Server in seconds.
u
The Compression mode and Encryption mode fields
determine the compression and encryption settings of network
traffic correspondingly (also see p. Traffic Encryption and
Compression).
u
In the Network scanner listen field, specify the UDP port for
the Console to use when searching for working Dr.Web ES
Agents in a network. To disable listening to ports, enter NONE.
This parameter should be specified in the network addresses
format described in Appendix E. The Specification of Network
Addresses.
By default, the udp/:2193
interfaces, port 2193".
is used, which means "all
Mobility Tab
On the Mobility tab, you can set the Mobile Mode of the Agent:
In the Update period field, specify the time interval between
anti-vrirus software updates, in seconds.
Select the Check Internet connection checkbox to enable
checking if there is a connection to the Internet before starting
updating.
Administrator Manual
123
Chapter 6: Administration of Anti-Virus
Workstations
Select the Use proxy server checkbox to use an HTTP proxy
server to receive updates from the Internet. This will make the
fields to set a proxy server available.
General Tab
On the General tab, you can set genaral parameters of the Agent,
which were not included in other tabs:
In the Server public key field, specify the path to the public
encryption key of Dr.Web ES Server on the user’s computer.
In the Local Dr.Web® key file field, specify the path to the
local key file of the Dr.Web product.
In the SpIDer Guard® statistics field, type the value of the
time interval for the Agent to send SpIDer Guard statistics in
minutes.
Select the Microsoft Network Access Protection checkbox
to enable the support of Microsoft® Network Access Protection
(NAT) (for more details see p. NAP Validator).
Select the Synchronize time checkbox to enable system time
synchronization on the Agent’s machine with the time on the
machine with Dr.Web ES Server.
Only for Web interface: specify the language for the Agent
interface in the Language drop-down list.
Log control Tab
On the Log control tab, you can set the parameters of Agent’s
logging:
In the Log file name field, specify the path to the log file on
the user’s machine.
The Log level parameter determines the level of detail of
logging (see also p. Server Logging).
The values of the Log rotation fields determine such
parameters of logging as the number and size of log files, and
old files compression.
Administrator Manual
124
Chapter 6: Administration of Anti-Virus
Workstations
The Updater log files parameter determines the maximum
number of updater log files.
Interface Tab
On the Interface tab, you can set the parameters of the Agent’s
interface.
Only for the Console: on the Language drop-down list, set the
Agent’s interface language.
In the Welcome message delay field, specify the time for which the
welcome message should be delayed, in minutes. Set the value to -1
to disable showing the welcome message.
On the Interface tab, you can select the type of events that the user
is to be notified of. For this select the respective checkbox:
u
Critical notifications - receive only critical notifications. Such
notifications include messages about the necessity to restart the
computer. The notification shows, if the user has administrator
rights.
u
Virus notifications - receive only notifications about viruses.
This type of notification includes messages about virus(es)
detection by one of the anti-virus software components.
u
Major notifications - receive only important notifications.
Such notifications include messages about the updating errors of
the anti-virus software or some of the components.
u
Minor notifications - receive only minor notifications. Such
notifications include messages about
· the starting of remote scanning;
· the stoping of remote scanning;
· the beginning of updating of virus bases;
· the end of updating of the virus bases;
· the beginning of updating of the components;
· the end of updating of the components.
If you want messages of all groups to be sent, select all the four
Administrator Manual
125
Chapter 6: Administration of Anti-Virus
Workstations
checkboxes. Ohterwise only message of the specified groups will be
displayed.
Users can configure all notifications except Critical
notifications, which are configured by administrators only.
6.4. Scheduling Tasks on a Workstation
Schedule – a list of actions performed automatically at a preset time
on workstations. Schedules are mostly used to scan stations for viruses
at a time most convenient for users, without having to launch the
Scanner manually. Besides Dr.Web Enterprise Agent allows to
perform certain other types of tasks as described below.
There are two types of schedules:
u
Centralized (Enterprise) schedule. It is set by the anti-virus
network administrator and complies with all the rules of
configuration inheritance.
u
Local schedule of a station. It is set by the user of the specific
station (if the station has the permissions) and stored locally on
this station; Dr.Web ES Server does not control this schedule.
Centralized Schedule
Using the Console or Web Interface you can schedule tasks for a
certain workstation or a group of workstations. This service facilitates
all basic operations necessary to assure anti-virus protection of your
network in the automatic mode.
To edit centralized schedule
1. Open the window for editing the schedule:
u
If using the Console: select the necessary station or a
group of stations. On the context menu, select Schedule
Administrator Manual
126
Chapter 6: Administration of Anti-Virus
Workstations
u
If using the Web interface: select the Network item in
the main menu, then select a group or workstation in the
hierarchical list and click the Schedule item in the control
menu (panel on the left).
2. You can add, remove and edit tasks in the schedule. You can
also enable or disable any existing tasks (this is described
below).
By default two tasks are available:
u
Startup scan (enabled by default),
u
Daily scan (disabled by default).
3. You can add new tasks and remove or edit the existing ones.
You can also disable a task or enable a previously disabled
task.
4. After editing click ОК in the Console or Save in the Web
interface to save changes or a newly created tasks.
If, when edited, the schedule is empty (without any task), the
Console will offer you to use either the schedule inherited
from groups, or the empty schedule. Use empty schedule to
override the schedule inherided from the groups.
To add a new task
1. To open a window for creating a new task
u
If using the Console: on the context menu of the task
list, select Add.
u
If using the Web interface: click New job on the
toolbar.
2. Give a name to the task in the Name entry field.
3. To enable the job, select the checkbox Enable execution.
To disable the job, clear the checkbox. The job will remain on
the list but will not be executed.
4. A selected checkbox Critical job instructs to perform the job at
next ES Agent launch, if execution of this job is omitted (the
ES Agent is switched off at the due time). If a task is omitted
several times within a certain period of time, then it will be
Administrator Manual
127
Chapter 6: Administration of Anti-Virus
Workstations
performed only once after the ES Agent has been launched.
5. In the Action drop-down list select the type of the task. After
the selection is made, the bottom part of the window will look
differently depending on the selected action.
u
If you want a certain program to be launched, select Run.
Then type the full name (with the path) of the executable
file to be launched in the Path entry field, and type
command line parameters for the program to be run in
the Arguments field.
u
If you want the Scanner to be run, select Dr.Web®
Scanner for Windows and type the Scanner’s command
line parameters in the Parameters field.
u
If you want the Enterprise Scanner to be run, select
Dr.Web® Enterprise Scanner for Windows.
u
If you want this event to be logged, select Log, and in the
String field type the text of the message to be added to
the log.
6. In the Time drop-down list set the time mode of the task:
u
Daily,
u
Every N minutes,
u
Hourly,
u
Monthly,
u
Shutdown,
u
Startup,
u
Weekly.
The parameters of different types of the time modes are
described below.
7. When all parameters for the task are specified, click OK to
accept changes, or click Cancel to close the window skipping
the changes in the schedule.
Administrator Manual
128
Chapter 6: Administration of Anti-Virus
Workstations
Table 6-1. The parameters of different types of the time
modes
Type
Description
Daily
Enter the hour and the minute, for the task to be launched at
the time specified.
Every N
minutes
The N value should be specified to set the time interval for
the execution of the task. At N equal 60 or more the task will
be run every N minutes. At N less than 60, the task will be
run every minute of the hour multiple of N.
Hourly
Enter a number from 0 to 59 to set the minute of every hour
the task will be run.
Monthly
Enter the day of the month, the hour and the minute, for the
task to be launched at the time specified.
Shutdown
Have no additional parameters. The task will be launched at
shutdown. The Shutdown task is not executed for Dr.Web
Enterprise Scanner and Dr.Web Scanner for Windows.
Startup
Have no additional parameters. The task will be launched at
startup.
Weekly
Enter a day of the week, the hour and the minute, for the
task to be launched at the time specified.
To edit or delete an existing task, select it in the list, and then
u
If using the Console: on the context menu, select the
correspondent item.
u
If using the Web interface: left-click to select the task.
Local schedule
To edit the local schedule on a workstation
1. On the Agent context menu, select Schedule and then Local.
2. A window for editing the local schedule of Dr.Web Enterprise
Agent will open.
Administrator Manual
129
Chapter 6: Administration of Anti-Virus
Workstations
On the Agent context menu, the Schedule item will contain
the Local option provided that the Create local schedule
checkbox has been selected in the station permissions from
the Console.
Using the local schedule a user can plan scanning and
parameters of this task. Variants of setting objects
scanning as well as command line switches which specify
program settings are described in "Dr.Web® Anti-Virus
Windows. User Manual".
set
for
the
for
3. When you are done, click Close.
With the default settings, the anti-virus Monitor runs on
workstations, updating tasks and anti-virus scanning are
launched from time to time – without the anti-virus network
administrator’s intervention.
6.5. Launching and Terminating
Anti-Virus Scanning on Workstations
You can manually initiate anti-virus scanning and specify its
parameters on every workstation.
Users can scan their workstations themselves using Dr.Web
Scanner for Windows. A Scanner’s shortcut is created on
the desktop during the installation of the anti-virus package.
The Scanner can be launched and operate successfully even
in case of Agent’s malfunction or running Windows OS in the
safe mode.
You can view the list of all scanning processes active at present (both
run manually by you, or users, or scheduled).
Administrator Manual
130
Chapter 6: Administration of Anti-Virus
Workstations
Running Components List
To view the list of running components and terminate
manually some of them via the Console
1. On the context menu, select Running components. The list
of running components will open.
2. To terminate a process, select it in the list, and then on the
context menu, select Interrupt. The task will remain in the
list, but will be marked by an X in the first column.
3. To remove interrupted processes from the list, on the context
menu of any item of the list, select Clean.
To view the list of running components and terminate
some of them manually via the Web interface
1. In the main menu, select Network, then click the name of a
workstation or group in the hierarchical list.
2. In the control menu (left pane), select
components. This lists the running components.
Launched
3. If necessary, select a checkbox next to a task to terminate and
click Interrupt on the toolbar. Execution of a task will be
terminated, and the tasks will be removed from the list.
Terminate Scans and Running Components
In this mode running scans will be terminated and all
monitores except SpIDer Guard will be disabled.
Warning! You cannot launch SpIDer Mail or SpIDer Gate
monitors via the Console or Web Interface.
You can terminate the execution of the components on workstations
u
run manually by you,
u
run by users,
u
scheduled.
Administrator Manual
131
Chapter 6: Administration of Anti-Virus
Workstations
You can also interrupt all processes matching a certain criterion. This
option is especially useful if such instruction is to be sent to numerous
stations at once.
To terminate all running components of a certain type via
the Console
1. On the context menu, select Interrupt running
components. A window for choosing scanning types will
open.
2. Select checkboxes against the necessary types.
3. Click OK.
To interrupt all running components of a certain type via
Web Interface
1. In the main menu, select Network, then in the hierarchical list
select workstations or groups.
2. In the toolbar, click
Components management and
select Interrupt running components. This opens the scan
type selection window.
3. Select checkboxes against the necessary types. To terminate all
types, select the Interrupt scannings checkbox in the
heading.
4. Click Interrupt.
Launch Scans
To launch a task for scanning via the Console
1. Select a station or a group of stations. On the context menu,
select Scan. A window for arranging a task will open.
2. Specify the parameters of the scanning and the objects to be
scanned (details of these actions are provided below).
3. Click OK to run the scanning process on the workstation.
Administrator Manual
132
Chapter 6: Administration of Anti-Virus
Workstations
To launch a scan task via the Web interface
1. In the main menu, select Network, then click the name of a
workstation or group in the hierarchical list.
2. In the control pane (left pane), select Scan. This opens the
scan task settings.
In case of group selection, the Scan item is available only
when the group contains at least one online station.
3. Specify the parameters of the scanning and the objects to be
scanned (details of these actions are provided below).
4. To start scanning the workstation, click Scan.
Below are given recommendations on how to set scanning.
Scan Mode Tab (For the Web interface: General
Tab)
With the Heuristic analyzer checkbox selected by default, the
Scanner makes attempts to detect unknown viruses. In this mode the
Scanner may give false positives though.
The Scan archives checkbox is selected by default and instructs the
Scanner to search for viruses in files within archives and containers of
different types.
The Scan mailboxes checkbox is selected by default and instructs to
scan mailboxes.
To specify obj ects for scanning, choose one of the two
alternative modes:
1. Scan system.
If Scan system is selected, specify what system volumes
should be scanned
u
To scan fixed hard drives, select Fixed volumes;
Administrator Manual
133
Chapter 6: Administration of Anti-Virus
Workstations
u
To scan all removable data storages such as floppy or CD/
DVD disks, flash drives etc, select Removable volumes;
u
To scan boot sectors of logical drives and main boot
sectors of physical drives which are selected for scanning
(or those drives where the files selected for scanning
reside), select Boot sectors.
The paths excluded from search can also be specified in the
Scan system mode. (Details of path selection are provided
below.) For Web interface, excluded paths are listed on the
Excluded Paths tab.
2. Scan paths.
If Scan paths is selected, specify the following parameters
u
the list of scanned paths, and, if necessary, the list of
paths excluded from search (how to specify excluded
paths is described below);
u
select the Boot sectors checkbox to instruct the
Scanner to scan the boot sectors of the drives selected
for scanning (or those drives where the files selected for
scanning reside). Both boot sectors of logical drives and
main boot sectors of physical drives are scanned.
Also the following options are available on the tab:
u
The Startup processes checkbox is selected by default and
instructs to scan the files automatically launched at startup.
u
The Processes in memory checkbox is selected by default and
instructs to scan the processes run in the RAM.
u
The BurstScan technology checkbox is selected by default
and instructs to use this technology, which considerably
increases the scanning speed on modern systems.
u
The Low priority checkbox is selected by default and ensures
lower Scanner load on computing recourses of a system.
Meanwhile, other processes could have higher priority as
compared to when the option is disabled. The load is reduced by
dynamical adjustment of thread priorities in the scan process.
u
Only in Console: If necessary, select the Show progress
checkbox (mind, though, that this mode considerably increases
the network traffic).
Administrator Manual
134
Chapter 6: Administration of Anti-Virus
Workstations
u
The Shutdown after scan checkbox instructs to shut down
the system automatically when scan completes.
Paths Lists
(In the scan path mode only) To edit lists of selected to
scan and excluded paths via the Console
u
To add an object to the list, on the context menu, select Add,
u
To remove an object, select it in the list, and on the context
menu, select Delete,
u
To edit an object, double-click it.
(In the scan path mode only) To edit lists of selected to
scan and excluded paths via the Web interface
u
In an empty line of the Paths selected to scan list, enter a
path to scan for viruses. To add a new path, click
enter a path in the new line.
u
To remove a path from the list, click
appropriate line.
Add, then
Remove next to the
The Paths selected to scan list contains in explicit form the paths
(disks and catalogs) to be scanned.
The list of paths excluded from scanning can contain the
following elements:
u
A character \ or / excludes the entire disc with the Windows
OS installation folder,
u
A character \ at the end of a path excludes the folder from
checking,
u
A path without a character \ at the end - all subfolders of the
selected folder are excluded from checking,
u
Regular expressions. Paths can be specified through regular
expressions. Any file whose full name (with the path)
corresponds to a regular expression is excluded from checking.
Administrator Manual
135
Chapter 6: Administration of Anti-Virus
Workstations
Before starting Dr.Web Scanner for Windows familiarize
yourself with recommendations on virus scanning for
computers operated by Windows Server 2003 OS, Windows
2000, or Windows XP OS. The information can be found at
http://support.microsoft.com/kb/822158/en. The article is
meant to help you increase system performance.
The syntax of regular expressions used for excluding paths from
scanning is as follows:
qr{expression}flags
As a flag mostly the character i is used. It instructs "to ignore letter
case difference".
Some examples of specifying excluded paths through
regular expressions are given below:
u
qr{\\pagefile\.sys$}i — skip scanning Windows NT
swap files,
u
qr{\\notepad\.exe$}i — skip scanning notepad.exe
files,
qr{^C:}i — skip scanning disk C,
u qr{^.:\\WINNT\\}i – skip scanning WINNT catalogs on
u
all disks,
qr{(^C:)|(^.:\\WINNT\\)}i – skip scanning disk C
and WINNT catalogs on all disks,
u qr{^C:\\dir1\\dir2\\file\.ext$}i –
skip
scanning the c:\dir1\dir2\file.ext file,
u qr{^C:\\dir1\\dir2\\(.+\\)?file\.ext$}i –
skip scanning file.ext, if it is located in the c:\dir1
\dir2 catalog and its subcatalogs,
u qr{^C:\\dir1\dir2\\}i – skip scanning c:\dir1
\dir2 and its subcatalogs,
u qr{dir\\^\\+}i – skip scanning the dir subcatalog
u
located in any catalog, but scan its subcatalogs,
Administrator Manual
136
Chapter 6: Administration of Anti-Virus
Workstations
u
qr{dir\\}i – skip scanning the dir subcatalog located in
any catalog and its subcatalogs.
Regular expressions briefly described in Appendix K.
See links to detailed descriptions of the regular expressions syntax in
p. Links or refer to the User Manual “Dr.Web Anti-Virus for
Windows”, the section about the Scanner's arguments.
Actions Tab
On the Actions tab, you can set the program’s reaction to events.
In the Infected files drop-down list, set the Scanner’s reaction to
the detection of a file infected with a known virus:
u
The Cure action (enabled by default) instructs the Scanner to
restore the state of the infected file as it had been before the
infection (full recovery is usually impossible; a functionally
correct state is restored). If curing is impossible, the action
specified for incurable files is applied (read below).
u
The Report action instructs to only report about the detection
of a virus (read p. Setting Alerts on how to configure alerts).
u
The Quarantine action instructs to move infected files to the
quarantine folder.
u
The Delete action instructs to delete infected files.
The Incurable files drop-down list sets the Scanner’s reaction to the
detection of a file infected with a known incurable virus (and in case
an attempt to cure a file failed). By default, the Quarantine action is
specified; other variants described above are available too (except for
Cure).
The Suspicious files drop-down list sets the Scanner’s reaction to the
detection of a file presumably infected with a virus (upon a reaction of
the heuristic analyzer). Possible actions are the same as for incurable
files (by default, it is Quarantine, as well as Delete, Report).
Administrator Manual
137
Chapter 6: Administration of Anti-Virus
Workstations
When scanning with the OS installation folder included to the
list of objects, it is advisable to select the Report action for
suspicious files instead of the default Quarantine action.
In the Infected archives drop-down list set the Scanner’s reaction to
the detection of an infected or suspicious file in a file archive or
container. The reaction is to be applied to the whole archive. Possible
actions are the same as for incurable files (by default, it is
Quarantine, as well as Delete, Report).
For Web interface: the Infected archives list is available
only when the Scan archives checkbox on the General tab
is selected.
In the Infected boot sectors drop-down list set the Scanner’s
reaction to the detection of an infected or suspicious boot sector. The
Cure (by default; disabled for suspicious and incurable files) and
Report actions are available.
The Infected boot sectors list is available only when the
Boot Sectors checkbox is selected. The checkbox is located
on the Scan Mode tab for the Console , or on the General
tab for the Web interface.
In the Adware drop-down list set the Scanner’s reaction to the
detection of this type of unsolicited software. Possible actions are
Quarantine (by default), Ignore, Delete and Report.
If you select to Ignore adware, no action is performed as
compared to when you select to inform user on virus
detection, that is, no warning is displayed and detection of an
adware program is ignored.
In the same way setting the Scanner’s reaction to the detection of
other types of unsolicited software such as
u
dialers;
Administrator Manual
138
Chapter 6: Administration of Anti-Virus
Workstations
u
jokes;
u
hacktools.
6.6. Viewing the Statistics
The charts and tables allows you to view the results of operation of the
station components such as the software updater, the anti-virus
Scanner, and the anti-virus Monitor.
Tables
To view tables
u
If using the Console: select the Tables item in the context
menu of a workstation or group.
u
If using the Web interface: select the Network item in the
main menu, then click the name of the station or group in the
hierarchical list and select a necessary item in the Tables
section of the control menu (panel on the left).
The Tables section contains the following items:
u
Infections - view information on virus events (list of infected
objects, viruses, actions, etc.).
u
Errors - view a list of scanning errors on the selected
workstation during a certain period.
u
Statistics - view statistics on the operation of anti-virus
facilities on a workstation.
u
Start/End - view a list of components which operated on the
workstation.
u
Viruses - view information on viruses detected on a workstation
(grouped by type).
u
Status - view information on unusual (and possibly actiondemanding) status of the workstation during a certain period.
Administrator Manual
139
Chapter 6: Administration of Anti-Virus
Workstations
To hide the Status item, select Administration →
Configure Dr.Web Enterprise Server (or Configure
server in the Console). On the General tab, clear the
Station status monitoring checkbox, then restart the
Server.
u
Jobs - view the list of tasks set for a workstation during a
certain period.
To hide the Jobs item, select Administration → Configure
Dr.Web Enterprise Server (or Configure server in the
Console). On the General tab, clear the Station jobs
execution log checkbox, then restart the Server.
In the Web interface the Tables section also contains the following
items:
u
Full statistics - view full statistics which is not divided into
sessions.
u
Virus bases - view details on the Dr.Web virus databases
installed including information on the file containing a particular
database, virus database version, the total number of virus
records in the database, the database creation date.
To hide the Virus bases item, select Administration in the
main menu, and then select Configure Dr.Web Enterprise
Server in the control menu of the window. On the General
tab, clear the Virus database monitoring checkbox, then
restart the Server.
u
Modules - view detailed information on all Dr.Web modules
including module description and function, the corresponding
executable file, the full module version etc.
u
All network installations - view a list of software installed on
a workstation.
The windows with the statistics for different components and the total
statistics of workstations have the same interface, and the actions to
Administrator Manual
140
Chapter 6: Administration of Anti-Virus
Workstations
set the information to be provided are similar. Below is given an
example how to get statistics for anti-virus components operation on a
certain workstation.
Below are several examples for using the Tables section via the
Console. Functionality of all items is the same for the Web
interface.
To view the statistics on operation of anti-virus programs
on a workstation
1. In the anti-virus network catalog, select the necessary station.
If you want to view records for several stations, select these
stations keeping the SHIFT or CTRL key pressed.
2. On the context menu, select Tables, and in the opened
submenu, select Statistics. The Statistics window will open
(with no data loaded).
3. In the drop-down lists in the left bottom part of the window
select the time interval for which the data should be displayed
(by default, all available data is displayed).
4. To load data into this window, click
. A table with the data on
the operation of anti-virus components will be loaded into the
window.
5. To sort the data displayed in a column, double-click its name.
6. To view any line of the table in a more suitable way, select the
necessary line in the table and click
(or double-click the
line). The data will be displayed in a separate window.
If several lines are selected in the table, the records will be
displayed in a separate window for each selected line.
7. To save the table for printing or future processing, click
save shown data in CSV format,
HTML format, or
save shown data in
save shown data in XML format.
Administrator Manual
141
Chapter 6: Administration of Anti-Virus
Workstations
8. To view the summary statistics not split in sessions, click
window of summary statistics will open.
.A
A window with summary statistics can also be opened from
the context menu of the workstation. To do this, select
Summary statistics.
9. To view the statistics as a diagram, click
window. A statistics graph window will open.
in the Statistics
To view the list of components launched on a workstation, on the
context menu of the station, point to Tables. On the opened
submenu, select Start/Stop.
To view information on detected viruses (virus names, infected
objects, program actions, etc.), on the Tables menu above, select
Infections.
To view information on scanning errors, on the Tables menu, select
Errors.
To view information on detected viruses grouped according to their
types, on the Tables menu, select Viruses.
To view the list of scanning errors on the selected workstation for a
certain period, on the Tables menu, select Errors.
To view the list of installed software, on the context menu, select All
network installations.
To view the data on an unusual state of workstations,
which might need your attention, for a certain period
1. On the context menu, select Tables. On the opened submenu,
select Status. A window to set up a request will open (with no
data loaded).
2. Click
. Data about the state of workstations will open.
3. To view only data of certain severity, specify the severity level
by selecting the respective option button in the lower part of
the window. By default, the Very low gravity level is selected,
Administrator Manual
142
Chapter 6: Administration of Anti-Virus
Workstations
all data being displayed.
4. The list will also include the stations disconnected for several
days from the Server. Type this number of days in the entry
field in the left bottom part of the window or select it in the
drop-down list.
5. You can format the way the data are presented just like in the
statistics window above.
To view operation results and statistics for several
workstations, select those workstations in the network
catalog.
Charts
Detected infections charts are available in the Web Interface only.
To view charts
1. In the main menu, select Network, then in the hierarchical list
click the workstation or group name.
2. In the control menu (left pane), select Charts. This opens a
window with the following charts:
u
Daily virus activity, which displays the total number of
viruses detected per day at all selected workstations and
groups during the selected time period.
u
Top 10 viruses, which lists top ten widespread viruses
that infected the most number of files. The chart displays
numerical data on infected objects per a virus.
u
Infection types, which displays numerical data on
objects with the specified types of infections.
u
Infection Treatment, which displays numerical data on
infected objects which were processed by anti-virus.
3. To view data of interest only, click the calendar icons to set the
time period and then click Refresh.
Administrator Manual
143
Chapter 6: Administration of Anti-Virus
Workstations
6.7. Configuring HTTP Traffic Checks
Using the Console you can configure anti-virus checks for HTTP traffic
and limit access to web resources.
To configure access to HTTP resources
1. To open the guard settings
u
If using the Console: right-click a user or user group and
select Configure and then select SpIDer Gate® for
Windows XP.
u
If using the Web interface: select the Network item in
the main menu, then click the name of the station or
group in the hierarchical list and select SpIDer Gate для
Windows XP in the control menu (panel on the left).
2. On the General tab, select the checks to perform.
3. On the Actions tab, select options to block potentially
dangerous resources:
u
Block suspicious content - to block Web pages or
elements of Web pages which are rated as possibly
harmful by heuristic analyzer.
u
Block malformed content - to block Web pages or
elements of Web pages which do not comply with the
declared format or transfer protocol.
u
Block not checked content - to block Web pages or
elements of Web pages containing objects which can not
be checked (e.g., password protected archives).
4. On the Interception tab set Check incoming content and
Check outgoing content checkboxes to check incoming and
outgoing traffic.
In the Ports field specify the ports to be checked.
In the Excluded applications field (for the Console:
Excluded field), specify the names of executable files of the
programs, whose traffic is not to be checked, for example,
opera.exe, firefox.exe, etc. To create a new entry:
u
If using the Console: right-click the list and select Add;
Administrator Manual
144
Chapter 6: Administration of Anti-Virus
Workstations
u
If using the Web interface: click the
specify the necessary value.
button and
5. On the Applications tab, specify the names of executable files
of web browsers (for example, opera.exe, firefox.exe,
etc) and other applications which HTTP-traffic you want to
check regardless of the port used by these applications. To
create a new entry, do one of the following:
u
If using the Console: right-click the list and select Add.
u
If using the Web Interface: click
the application.
Add and specify
For SpIDer Gate, a web browser is an application which
accesses resources via HTTP.
6. On the Access tab, select the WWW filter checkbox to
configure access to Internet domains. Select the Block all
sites checkbox to completely block access to the Internet. List
the domains you want to block/allow in the respective fields.
To create a new entry:
u
If using the Console: right-click the list and select Add.
u
If using the Web Interface: click
the application.
Add and specify
In the bottom of the window, select the checkboxes against the
content categories you want to block. This checkboxes activate
build-in filters which block Web sites from the predefined black
lists.
Filter lists for all categories are updated with virus database
updates.
You can report possible false alarms and detection failures in
Office control module at http://support.drweb.com/new/
urlfilter/.
7. When you finish selections, click OK.
Administrator Manual
145
Chapter 6: Administration of Anti-Virus
Workstations
6.8. Configuring Access to Resources and
Websites
You can restrict access of all stations to local and web resources.
The SpIDer Gate® for Windows component controls access to
web-resources (see Configuring HTTP Traffic Checks).
The Dr.Web Office Control component helps you to limit access to
local resources.
To configure access to local resources via the Console
1. Right-click a user or a group and select Configure, then select
Dr.Web® Office Control. This opens the guard settings.
2. On the General tab, do the following to limit access to local
resources (files and folders):
u
To turn on Dr.Web Office Control, select Enable
blocking.
u
To forbid access to removable devices, select Block
removable devices.
u
To restrict access to particular files and folders, select
Block folders and list the folders and files which you do
not want the user or group to access. To add a file or
folder, right-click the Blocked field and select Add, then
enter the path to the file or folder.
If no path to a restricted file is specified, the default path is
used (%system32%). For the user, such files are displayed
with the c:\windows\system32 prefix in the Office
Control settings.
3. When you finish selections, click OK. This applies your settings.
Administrator Manual
146
Chapter 6: Administration of Anti-Virus
Workstations
To adj ust Office control via the Web interface:
1. To open the settings window select the Network item in the
main menu, then click the name of the station or group in the
hierarchical list and select Dr.Web® Office Control in the
control menu (panel on the left).
2. Select the blocking settings in the General tab and specify
resources (files and folders) access to which you wish to
restrict:
u
Select the Enable blocking check box to activate
blocking of local resources and removable devices.
u
Select the Block removable devices check boxto
restrict access to removable devices.
u
Select the Protect files and folders check box to
restrict access to specified resources. You can specify
paths to resources which you wish to block in the Block
access to files field. To add a new path click the
button.
If no path to a restricted file is specified, the default path is
used (%system32%). For the user, such files are displayed
with the c:\windows\system32 prefix in the Office
Control settings.
3. Click Save when you finish adjusting the settings. New settings
will take effect after confirming the new configuration of a
workstation.
Dr.Web Office Control does not allow you to restrict access
to the following critical system folders (including their parental
folders):
u
u
u
%SYSTEMROOT%
%USERPROFILE%
%PROGRAMFILES%
Note, that you can resctrict access to specific subfolders of
these folders.
Administrator Manual
147
Chapter 6: Administration of Anti-Virus
Workstations
Dr.Web Office Control cannot restrict access to network
resources.
You can allow users to change Parental Control settings (see Setting
Users’ Permissions for details) and configure access to local resources.
Server settings have priority over user-defined settings. To update
access configuration at the station, connect to ES Server, edit and
reapply Office Control settings for the station.
If you limit access to a critical system folders or enter
incorrect path to the resource, Office Control settings will be
updated at the station, but incorrect access right will be
ignored. No warning is displays in case of this error.
6.9. Setting a Language of Anti-Virus
Components Interface on a Workstation
Using the Console you can set a language to be used by
the anti-virus components on a workstation or group of
workstations:
1. On the context menu of a group of station, select Configure
→ <necessary product> → go to the Miscellaneous tab.
2. In the Language field, select the required language from a
drop-down list.
To set a language for the interface of the Dr.Web anti-virus
components on a workstation or group of workstations via
the Web interface:
1. Select the Network item in the main menu, then click the
name of the station or group in the hierarchical list and click
Dr.Web® Enterprise Agent for Windows → the General
tab in the control menu (panel on the left).
2. Select the necessary language in the Language drop-down
list.
Administrator Manual
148
Chapter 6: Administration of Anti-Virus
Workstations
3. Click Save.
6.10. Sending Notifications to the Users
The system administrator may send the users informational messages
including:
message text;
hyperlinks to Internet resources;
company’s logo (or any other graphic presentation);
exact date of message receipt in the title of the window.
These messages are displayed on user’s PC as popup windows (see
figure 6-1).
Figure 6-1. Message window on user’s PC
To send a message to a user
u
If using the Console: select Send message on the context
menu of the recipient’s workstation.
u
If using the Web interface: select the Network item in the
main menu, then select the workstation or group in the
hierarchical list and click the
toolbar.
Send message button on the
Fill in the following fields in the opened window:
Message text – an obligatory field containing the message
itself.
Show the company logotype in the message – select this
Administrator Manual
149
Chapter 6: Administration of Anti-Virus
Workstations
checkbox, if you want a graphical object to be displayed in the
message window title. To load the file of the object from the
local resource, click the
button (the Browse button - if
using the Web interface) to the right of the Logotype file
field and select the necessary object in the opened file system
explorer.
You can also set the title of the message or the company name
in the Name field. This text will be displayed in the message
window title (to the right of the logo). If you leave the field
blank, a text about the Agent will be displayed in its place
instead.
In the URL field, specify the link to an Internet resource, witch
opens by clicking the logo (also by clicking the message title, if
it will be specified in the Name field).
If there is no logo set or the size of the logo exceeds the
allowable limits (see Logo File Format, p. 3), the Enterprise
Agent’s logo will be displayed in its place instead.
If the Show the company logotype in the message
checkbox is selected, the Use transparency checkbox will
become active. Select the checkbox to apply transparency to the
logo image (see Logo File Format, p. 4).
Show link in the message – select the checkbox to use
hyperlinks to web resources in messages to users. To insert a
link
1. In the URL field, insert a link to an Internet resource.
2. In the Text field, type the name of the link, a text
shown instead of the link in the message.
3. In the Message text field, put the {link} tag in all
places where you want the link to appear. In the
resulting message the link with the specified parameters
will be shown instead of the tag. You may use an
unlimited number of {link} tags in a text, all of them
having the same parameters (from the URL and Text
fields correspondingly).
For example:
Administrator Manual
150
Chapter 6: Administration of Anti-Virus
Workstations
To send the message displayed in Figure 6-1, the following
parameters were set for the link:
Message text:
Dear youngsters of military age!
In connection with the start of autumn
conscription, please make sure you visit
the military registration and enlistment
office. You may ask more details {link}.
Sincerely,
Administration.
URL: http://example.org/
Text: here
Show delivery status – select the checkbox to be notified of
message delivery to the user.
Logo File Format
A file with graphics (logo) inserted in a message should comply with
the following requirements:
1. File graphic format: bmp.
2. Bit depth: any (8 - 24 bit).
3. Maximum size of the visible part of a logo: 120x90 px (width x
height). Additional 2x2 px are allowed for a border of
transparency pixels (see p. 4), i.e. the full maximum size of an
image makes up 122x92 px (see Fig. 6-2).
Administrator Manual
151
Chapter 6: Administration of Anti-Virus
Workstations
Figure 6-2. Logo file format
For example, to receive the message shown in Figure 6-1, this
image was used as a logo:
4. In case the Use transparency option was selected when
sending a message, the first pixel in the position (0,0) is
declared transparent. All pixels of the same color as the initial
color of this pixel will become transparent, the window
background will be displayed instead.
If you enable the Use transparency option for a rectangular
logo, it is recommended to make a rectangular border to avoid
erroneous transparency of the pixels of the image itself.
Enabling the Use transparency option will be useful in case of
a nonstandard (non-rectangular) form of the logo, helping to
remove the undesirable background, which supplements the
informative part of the image to a rectangular shape. For
Administrator Manual
152
Chapter 6: Administration of Anti-Virus
Workstations
example, when using a logo like shown in Figure 6-3, the purple
background will be removed (become transparent).
Figure 6-3. Nonstandard form Logo
Before sending a message to user(s) (especially to multiple
users), it is recommended to send it first to any computer
with an installed Agent to check the adequacy of the result.
6.11. Email Protection Under UNIX®
When running Agents under UNIX-like operating systems, you can
specify 15, 30, or 50 email addresses to protect from viruses using the
Dr.Web MailD component.
To check the maximum number of protected emails
addresses, check your Agent key file (agent.key).
To specify the list of protected e-mails via the Console:
1. On the context menu of a group or station in the hierarchical
list, select Emails list.
2. In the opened window, right-click the emails list and select
Add in the context menu.
3. Enter email addresses you want to protect. Each address must
be specified in a new line.
4. To remove an address from the list, right-click it and select
Delete.
5. Click OK to save changes, or Cancel to reject changes.
Administrator Manual
153
Chapter 6: Administration of Anti-Virus
Workstations
To specify the list of protected e-mails via the Web
interface:
1. Select the workstation or group in the hierarchical list and click
Emails list in the control menu (panel on the left).
2. In the opened window, enter one email address you want ot
protect.
3. To add a new address, click
specified in a new line.
. Each address must be
4. To remove an address from the list, click
corresponding item.
next to the
5. Click Save to save changes.
Administrator Manual
154
Chapter 7: Configuring the Anti-Virus Server
Chapter 7: Configuring the
Anti-Virus Server
7.1. Setting the Server Configuration
To set the configuration parameters of the anti-virus Server
u
If using the Console: on the Administration menu of the
Console, select Configure Dr.Web® Enterprise Server.
u
If using the Web interface: select the Administration item in
the main menu and click Dr.Web Enterprise Server
Configuration in the control menu.
A window for setting the Server configuration will open.
General Tab
The Name parameter sets the name of the Server. If it is not
specified; the name of the computer where the anti-virus Server
software is installed is used.
The Threads and DB connections parameters set the interaction of
the Server with the OS and the DBMS. Change the default settings on
advice of the technical support only.
The Authorization queue parameter sets the maximum number of
workstations which can be added to the Server authorization queue.
Any natural number is allowed. In the Console, you can also select
the parameter value from the drop-down list.
In the Newbie drop-down list the connection policy for new
workstations can be set (for more, read p. New Stations Approval
Policy). The Reset unauthorized to newbie checkbox instructs to
reset the parameters of connection with Server for unauthorized
workstations which have not passed authorization check. This option
can be helpful when you change Server settings (such as public key)
Administrator Manual
155
Chapter 7: Configuring the Anti-Virus Server
or change the DB. In such cases workstations will not be able to
connect to the Server and will need to get the new parameters to
assess to the Server.
The Statistics checkbox when selected instructs to send statistics on
the operation of the anti-virus Server for analysis to the Internet
server athttp://stat.drweb.com/. If necessary, you can set up the
connection parameters in the field below. It is not recommended to set
the interval of sending less than 1 hour.
To configure statistics via the Web Interface, use the Settings tab.
In the Encryption and Compression drop-down lists the policy of
traffic encryption and compression between the anti-virus Server, the
Agents and the Console(s) is selected (for more, read p. Traffic
Encryption and Compression).
You can also use the following options:
u
Select the Show host name checkbox to log host names
instead of workstations IP addresses.
u
Select the Replace NetBios name checkbox to display host
names instead of workstation names in the catalog of the antivirus network (when host names cannot be detected, IP
addresses are displayed).
Show host name and Replace NetBios name checkboxes
are cleared by default. If the DNS service is not set up
properly, enabling these boxes may considerably slow down
the Server operation. When using any of these options, it is
recommended to enable cashing names on the DNS server.
u
Select the Audit operations checkbox to log administrator
actions in the Console and Web Interface and store the log in
the DB.
u
Select the Audit server internal operations checkbox to log
Server internal operations and store the log in the DB.
Administrator Manual
156
Chapter 7: Configuring the Anti-Virus Server
To view the log, in the main Administration menu select
Audit Log.
u
Select the Station status monitoring checkbox to log status
changes for workstations and store the log in the DB.
u
Select the Virus databases monitoring checkbox to log
changes in virus databases status and contents on workstations
and store the logs in the DB.
To view a workstation log, right-click a workstation and select
Tables
u
→ Status .
Select the Station jobs execution log checkbox to log results
of tasks execution on workstations and store the log in the DB.
Statistics Tab
On the Statistics tab you can configure sending of the statistics on
virus events to the Doctor Web company.
Set the Statistics checkbox to activate the sending process. The
following fields will become available:
u
Interval - an interval in minutes for sending the statistics;
u
Server - an IP-address or DNS name and a port of statistics
server (by default, stat.drweb.com:80);
u
URL - a path to the catalog on the statistics server (by default,
\update);
u
ID - an MD5 key of the Server (located in the enterprise.
key Server key file);
u
User - a user name for identification of the sent statistics
(contact the Dr.Web Technical Support Service for your
user name);
u
Password - a password for authentication of the sent statistics
(contact the Dr.Web Technical Support Service for your
password);
Administrator Manual
157
Chapter 7: Configuring the Anti-Virus Server
u
Proxy - (if necessary) the address of a proxy server for sending
the statistics;
u
Proxy user - (if necessary) the name of a user of the proxy
server (is not required for anonymous assess);
u
Proxy password - (if necessary) a password to assess the
proxy server (is not required for anonymous assess).
Server and Interval are the only obligatory fields.
Click Save to accept changes in settings.
Security Tab
On the Security tab, restrictions for network addresses from which
Agents, Consoles, network installers and other (“neighboring”) ES
Servers will be able to access the given Server are set. The Agents,
Installations, Consoles and Neighbors additional tabs are
designed to set the restrictions for the correspondent types of
connections.
To set access restrictions for any type of connection, go to the
correspondent tab.
By default all connections are allowed (the Use this ACL checkbox is
cleared). To make the list of allowed or denied addresses, select the
checkbox.
To allow any TCP address, include it into the TCP:Allow or TCPv6:
Allow list. To do this, right-click this list, and on the dynamic menu,
select Add. A window for editing the address will open.
Type the network address and click OK.
To add an address to the list of allowed addresses via the Web
interface specify it in the corresponding field and click Save. To add
a new field click the
a field click
button in the corresponding section; to delete
.
In the last field a prefix should be specified. It is a byte number, which
Administrator Manual
158
Chapter 7: Configuring the Anti-Virus Server
denotes the range of IP addresses in a certain IP network/subnetwork.
Examples:s
1. Prefix 24 stands for a network with a network mask:
255.255.255.0
Containing 254 addresses.
Host addresses look like: 195.136.12.*
2. Prefix 8 stands for a network with a network mask:
255.0.0.0
Containing up to 16387064 addresses (256*256*256).
Host addresses look like: 125.*.*.*
Besides, you can delete addresses from the list and edit the addresses
included into the list.
To deny any TCP address, include it into the TCP:Deny or TCPv6:
Deny list.
The addresses not included into any of the lists are allowed or denied
depending on whether the Deny priority checkbox is selected. If the
checkbox is selected, the addresses not included into any of the lists
(or included into both of them) are denied; otherwise, such addresses
are allowed.
Restrictions for IPX addresses can be set similarly.
Database Tab
On the Database tab, a DBMS for storage of the centralized log of the
Dr.Web ES anti-virus and for its setting is selected.
For more, read p. Setting the Mode of Operation with Databases.
Administrator Manual
159
Chapter 7: Configuring the Anti-Virus Server
Alerts Tab
The parameters in the Alerts tab allow to set up the mode of notifying
the anti-virus network administrators and other users on virus attacks
and other events detected by the program.
For more, read p. Setting Alerts.
Transports Tab
On the Transports tab, the parameters of the transport protocols
used by the Server are set up.
For each protocol the name of the anti-virus Server can be specified
in the Name field; if no name is specified, the name set on the
General tab is used (see above, if no name is set on the tab, the
computer name is used). If for a protocol a name other than the name
on the General tab is specified, the name from the protocol’s
description will be used by the service detecting the Server of
Agents, etc.
In the Address field, specify the address of the interface which
Server uses for interaction with the Agents on the workstations.
In the Cluster address field, specify the address of the interface
which Server uses for interaction with the Network Installers while
searching for an active anti-virus Servers.
This parameters should be specified in the network addresses format
described in Appendix E. The Specification of Network Addresses.
Modules Tab
On the Modules tab, protocols for interaction of the Server with
other ES components can be chosen.
By default, the interaction with anti-virus Agents, Console(s) and
Agent installation programs is enabled; the interaction of the Server
Administrator Manual
160
Chapter 7: Configuring the Anti-Virus Server
with other ES Servers is disabled.
For a multi-server network configuration (read p. Peculiarities of a
Network with Several Anti-Virus Servers), enable this protocol by
selecting the correspondent checkbox.
The Plugins list in the Console displays additional modules of the Dr.
Web Enterprise Server and their status.
The Web Administration plugin provides you with the built-in Web
Interface for virus network configuration. To activate the plugin,
select the Enabled checkbox. To disable the Web Interface, clear
the checkbox.
Location Tab
On the Location tab, you can specify additional information about the
computer on which the anti-virus Server is installed.
7.1.1. Traffic Encryption and Compression
The Dr.Web ES anti-virus allows encrypting the traffic between the
Server and anti-virus Agents, between the Server and the Console
(s), and between ES Servers (in multi-server anti-virus networks).
This mode is used to avoid leakage of user keys and other data during
interaction.
The program uses reliable tools of encryption and digital signature
based on the concept of pairs of public and private keys.
The encryption policy is set separately for each component of the Dr.
Web ES anti-virus. Settings of other components should be
compatible with the settings of the Server.
To set the encryption and compression policies for the
workstations on the Server
u
If using the Console: on the Administration menu of the
Console, select Configure Dr.Web® Enterprise Server.
Administrator Manual
161
Chapter 7: Configuring the Anti-Virus Server
u
If using the Web interface: select the Administration item in
the main menu and click Dr.Web Enterprise Server
Configuration in the control menu.
On the General tab, select the necessary variant in the Encryption
and Compression drop-down lists:
u
Yes — enables obligatory traffic encryption (or compression) for
all components,
u
Possible — instructs to encrypt (or compress) traffic with those
components whose settings do not prohibit it (is set by default,
if the parameter has not been modified during the Server’s
installation),
u
No — encryption (or compression) is not supported.
To set the encryption and compression policies for the
Console on the Server
1. On the File menu, select Console settings.
2. On the Communication tab, select from the drop-down list
one of the following options: Yes, Possible, No (similar to
described above).
When coordinating the settings of the encryption policy on the Server
and other components (the Agent or the Console), one should
remember, that certain combinations are incompatible and, if selected,
will result in disconnecting the corresponding component from the
Server.
Table 7-1 describes what settings provide for encryption between the
Server and the components (+), when the connection will be nonencrypted (—) and what combinations are incompatible (Error).
Table 7-1. Compatibility of the encryption policy settings
Component's settings
Server’s settings
Yes
Possible
No
Yes
+
+
Error
Possible
+
+
–
Administrator Manual
162
Chapter 7: Configuring the Anti-Virus Server
Component's settings
No
Server’s settings
Yes
Possible
No
Error
–
–
Encryption of traffic creates a considerable load on computers
whose capacities are close to the minimal system
requirements for the components installed on them (read p.
System Requirements). So, when traffic encryption is not
needed, you can disable this mode. To do this, you should
step by step switch the Server and other installed
components to the Possible mode first, avoiding formation of
incompatible Console-Server and Agent-Server pairs. If
you do not follow this recommendation it may result in loss of
connection with the component and the necessity to reinstall
it.
By default, the Console and the anti-virus Agent are
installed with the Possible encryption setting. This
combination means that by default the traffic will be
encrypted, but it can be disabled by editing the settings of the
Server without editing the settings of the components.
As traffic between components, in particular the traffic between ES
Servers, can be considerable, the Dr.Web ES anti-virus provides for
compression of this traffic. The setting of the compression policy and
the compatibility of settings on different components are the same as
those for encryption. The only difference is that the default parameter
for compression is No.
With the compression mode enabled, traffic is reduced, but
the computational load on computers is increased
considerably (more than with encryption).
Administrator Manual
163
Chapter 7: Configuring the Anti-Virus Server
7.1.2. Setting the Mode of Operation with
Databases
To specify the parameters of the centralized logging of
events occurring in the anti-virus network
u
If using the Console: on the Administration menu of the
Console, select Configure Dr.Web® Enterprise Server.
u
If using the Web interface: select the Administration item in
the main menu and click Dr.Web Enterprise Server
Configuration in the control menu.
Go to the Database tab and select the type of DB in the Database
drop-down list:
u
IntDB – internal DB (a component of the anti-virus Server),
u
MS SQL CE – external DB, for Servers running under Windows
OS,
u
ODBC (for Servers running under Windows OS) or
PostgreSQL (for Servers operated by UNIX system-based
OS) – external DB,
u
Oracle – external DB (for all platforms except FreeBSD).
For an internal DB, if necessary, enter the full path to the database file
into the Path entry field and specify the cache size and the data log
mode.
The parameters of an external DB are described in detail in Appendix
B. The Description of the DBMS Settings. The Parameters of the DBMS
Driver.
Using an internal DBMS is selected by default. This mode considerably
increases the load on the Server. It is recommended to use an
external DBMS in large anti-virus networks.
If an Oracle external DBMS is used, it is necessary to
install the latest version of the ODBC driver delivered with
this DBMS. It is strongly recommended not to use the Oracle
ODBC driver supplied by Microsoft.
Administrator Manual
164
Chapter 7: Configuring the Anti-Virus Server
The program complex provides for the possibility to perform
transactions connected with clearing the database used by the
anti-virus Server, in particular to delete records of events and
data about the workstations which have not visited the
Server for a certain period of time. To clear the database, on
the Administration menu, select Databases and perform
the respective command.
7.1.3. Setting Alerts
To set the mode of sending alerts about the events
connected with the operation of the Dr.Web ES anti-virus
u
If using the Console: on the Administration menu of the
Console, select Configure Dr.Web® Enterprise Server.
u
If using the Web interface: select the Administration item in
the main menu and click Dr.Web Enterprise Server
Configuration in the control menu.
Go to the Alerts tab and select the necessary mode of alerts in the
Alert sender drop-down list:
u
None — do not send messages (the default mode),
u
eMail — send by e-mail,
u
Windows network message — send through Windows
Messenger (for Servers under Windows OS only).
To send notifications by e-mail, specify, if necessary
u
the address of the SMTP server, to send the e-mails,
u
addresses of the sender of the message,
u
addresses of the recipient of the message,
u
if necessary, a user name and password for authorization on the
SMTP server.
Set the Debug mode flag to get detailed log of the SMTP-session.
For messages in a Windows OS network, specify the list of names of
the computers to receive the messages.
Administrator Manual
165
Chapter 7: Configuring the Anti-Virus Server
In the bottom of the tab, select checkboxes against the events on
which the notifications should be sent.
The text of messages is determined by message templates. Message
templates are stored in the var/templates subfolder of the
Server installation folder. If necessary, you can edit the template to
change the text of a message.
When a message is being generated, the program replaces the
variables in the template (written in braces) with a certain text, which
depends upon the current parameters of the anti-virus complex.
Available variables are listed in Appendix D. The Parameters of the
Notification Templates.
It is strongly recommended to use the Console’s templates editor for
editing the templates. To do this
u
u
If using the Console: on the Administration menu, select
Edit templates.
If using the Web interface: select the Administration item in
the main menu and click Edit templates in the control menu.
A window for editing templates will open. To edit any template, select
it in the list in the left part of the window. In the Subject entry field
you can edit the subject of the message. In the Headers entry field
additional headers of the e-mail message are specified. In the Body
entry field the text of the message can be edited.
If you use an external editor for editing templates remember
that the text of the templates requires UTF-8 encoding. We
do not recommend you to use Notepad or other editors
which insert a byte order mark (BOM) to indicate that the
text is encoded in UTF-8, UTF-16 or UTF-32.
7.1.4. Receipt of Alerts
By default, when a message is received from the Server an Alerts
window appears. To open it at any time, on the Administration
menu, select Alerts. A list with subjects of alerts will be displayed in
Administrator Manual
166
Chapter 7: Configuring the Anti-Virus Server
the window. To view the full text of a message, select it in the list, and
on the context menu, select Show or double-click the message.
To disable displaying messages of a certain type, select a message of
the necessary type, and on the context menu, select Filter out. You
can also cancel this filter and instruct to display all messages in future.
To do this, click
in the toolbar.
By default, only those messages are displayed, which are not disabled
for display in the settings.
To delete a message, on the context menu, select Delete.
To delete all messages, on the context menu, select Clear.
You can disable automatic opening of this window. To do this, select
the Do not disturb checkbox in the bottom left corner of the window.
To display messages in the chronological order, select the Old
messages first checkbox in the bottom left corner of the window.
7.2. Server Logging. Viewing the Log
The anti-virus Server logs the events connected with its operation. Its
name is drwcsd.log.
The log file resides by default
u
Under UNIX OS:
· for Linux: /var/opt/drwcs/log/drwcsd.log;
· for FreeBSD and Solaris: /var/drwcs/log/drwcsd.
log.
u
Under Windows OS: in the var subfolder of the Server
installation folder.
It is a plain text file (see Appendix L. Log Files Format).
Administrator Manual
167
Chapter 7: Configuring the Anti-Virus Server
The Server’s log helps to detect the problem in case of an
abnormal operation of the Dr.Web ES anti-virus.
The administrator can view logging in the real time mode from the
anti-virus Console. Before viewing logged data, the level of detail of
the displayed data should be set up.
The log in the anti-virus Console records events only from its
opening. It is impossible to view earlier data by means of this
service.
To view the log in the Console’s window
1. On the Administration menu of the anti-virus Console, select
Show Server log. A Select log level window will open.
2. Select the correspondent radio button against the necessary
log’s level of detail. The following options are available:
u
Fatal error — instructs to inform only of the most severe
errors,
u
Error — notify of operation errors,
u
Warning — warn about errors,
u
Notice — display important information messages,
u
Info — display information messages,
u
Trace, Trace 1, Trace 2, Trace 3 — enable tracing
events. The options are displayed in the ascending order
according to the level of detail. Trace instructs to log in
the minimum level of detail; Trace 3 instructs to log in
the maximum level of detail.
u
Debug, Debug 1, Debug 2, Debug 3 — instruct to log
debugging events. The options are displayed in the
ascending order according to the level of detail. Debug
instructs to log in the minimum level of detail; Debug 3
instructs to log in the maximum level of detail.
3. Click OK.
4. A Dr.Web® Enterprise Server log window with data of the
specified level of detail will open.
Administrator Manual
168
Chapter 7: Configuring the Anti-Virus Server
7.3. Setting the Server Schedule
To schedule tasks for the Server via the Console:
1. On the Administration menu, select Server schedule. A
window for setting the list of tasks for the Server will open.
2. To remove a task from the list, right-click it in the list, and on
the context menu, select Delete.
3. To edit the parameters of the task, right-click the necessary
parameter in the list, and on the context menu, select Edit. A
window for editing parameters will open.
4. To add a new task to the list, on the context menu, select Add.
A window for editing the task will open.
Old data is automatically deleted from the database to save
disk space. The default time span for Purge old data and
Purge old stations tasks is 90 days.
5. You can also disable a task, or enable a previously disabled task.
To do this, right-click the necessary task, and on the context
menu, select the corresponding item.
6. To save changes in the settings, click OK. To reject changes,
click Cancel.
The Update all products task is scheduled by default. If you
delete the task, after clicking OK you will receive a prompt for
the action.
7. To export the schedule into a file of a special format, click
8. To import parameters from such file, click
.
.
When a new task is created or an existing task is edited, a window for
entering the parameters will open.
Administrator Manual
169
Chapter 7: Configuring the Anti-Virus Server
To schedule tasks for the Server via the Web interface:
1. Select the Administration item in the main menu and click
Dr.Web Enterprise Server Schedule in the control menu.
The list with the current tasks of the Server will open.
2. To remove a task from the list select the check box against it
and click Remove these settings in the toolbar.
3. To edit a task select it in the list. This will bring up the Job
editor window which is described below.
4. To add a new task to the list click the New job item in the
toolbar. This will bring up the New job window where you
should specify necessary parameters and click Save.
5. You can also enable or disable certain tasks.
6. To export the schedule to a special file click the
the toolbar.
7. To import the schedule from a file click the
toolbar.
button in
button in the
To edit the parameters of a task
1. In the Name entry field assign a name to the task, which will
be displayed in the schedule.
2. To enable the job, select the checkbox Enable execution.
To disable the job, clear the checkbox. The job will remain on
the list but will not be executed.
3. A selected checkbox Critical job instructs to perform the job
at next ES Agent launch, if execution of this job is omitted
(the ES Agent is switched off at the due time). If a task is
omitted several times within a certain period of time, then it
will be performed only once after the ES Agent has been
launched.
4. Select the type of task in the Action drop-down list. The
bottom part of the window containing the parameters of the
selected task will change its look (the parameters of different
types of tasks are described in Table 7-2).
5. Select time intervals at which the task is to be launched and set
the time accordingly (it is similar to scheduling tasks for a
Administrator Manual
170
Chapter 7: Configuring the Anti-Virus Server
workstation, as described in p. Scheduling Tasks on a
Workstation above).
6. Click OK.
Table 7-2. Tasks types and settings
Type
Description
Run a
procedure
For tasks of this type, you need to enter the procedure
name in the Name filed.
Shutdown and
Restart
There are no additional parameters for tasks of this type.
Use these tasks to stop and restart the Server.
Run
Specify the path to the executable file of the Server in
the Path field, and the command line parameters at
launch in the Arguments field. Select Execute
synchronously option if you want the Server to wait
while task finishes.
License
expiration
reminder
Select the period till the license expiration when to
execute the task.
Update
See paragraph Updating Mobile Agents for details.
Log
Specify the message to be logged.
Backup critical
server data
Use these tasks to create backups of the Server
database, the license key file and private key.
Specify the folder where to store the backup files (empty
by default) and the maximum number of backup copies
allowed (for unlimited number of copies, use 0).
Appendix H5.5. for details.
Stations that
nave not visited
for a long time
Specify the absence period after which the station should
be considered absent for too long.
Purge unsent IS
events
Specify the period after which the event should be
purged.
After this period, a reminder displays.
Administrator Manual
171
Chapter 7: Configuring the Anti-Virus Server
Type
Description
This task affects only the event which the secondary
Servers fail to deliver to the main Server. If the
secondary Server fails to send an event, the event is
moved to the list of unsent events, which the Server tries
to resend periodically. When you execute the Purge
unsent IS events task, the events older than the
specified period are purged.
Purge old
records and
Purge stations
tasks
Specify a period after which the records or stations should
be considered outdated and purged.
The period set for a Purge records task by default equals 90
days. If you decrease the value, the statistics on the operation
of the anti-virus complex will be less representative. If you
decrease the value, the Server may need more resources.
7.4. Administration of the Server
Repository
7.4.1. Introduction
The repository of the anti-virus Server is designed to store benchmark
copies of the anti-virus software and update them from GUS servers.
The repository deals with sets of files (products). Each product resides
in a separate subfolder of the repository folder located in the var
folder, which in case of installation with the default settings is lodged
in the Server’s root folder. In the repository each product is dealt
with separately.
To administrate the updating in the repository product revisions are
used. A revision is a correct state of product files at a certain time
(including file names and checksums) and has its unique number. The
Administrator Manual
172
Chapter 7: Configuring the Anti-Virus Server
repository synchronizes revisions of products as follows:
a) to the anti-virus Server from the product update site (via
HTTP),
b) between different anti-virus Servers in a multi-server
configuration according to a specified synchronization policy,
c) from the anti-virus Server to workstations.
The repository allows to set up the following parameters:
u
the list of product update sites in a) operations,
u
restrictions to the number of products requiring synchronization
of a) type (thus, a user is enabled to track only necessary
changes of certain files or categories of files),
u
restrictions to product’s components requiring synchronization of
c) type (a user can choose what should be installed on the
workstation),
u
control of switching to new revisions (independent testing of
products before installation is possible),
u
adding one’s own components to products,
u
independent creation
synchronized too.
of
new
products
which
will
be
The Server’s repository deals with the following products:
u
the anti-virus Server,
u
the anti-virus Console,
u
the anti-virus ES Agent (the Agent’s software and the
Scheduler, the anti-virus package for workstations),
u
the Web Interface,
u
virus databases.
For more about the repository, please refer to Appendix F.
Administration of the Repository.
Via the Console, you can configure the repository either for each
product or all products, using a simple repository configuration editor
that is described in p. A Simple Editor of the Configuration of the
Repository.
Administrator Manual
173
Chapter 7: Configuring the Anti-Virus Server
Via the Web Interface, you can configure the entire repository for all
products only, similarly to A Simple Editor of the Configuration of the
Repository in the Console.
7.4.2. General Parameters of the Repository
To configure the Server’s repository, on the Administration menu
of the Console, select Configure repository. On the opened
submenu, select the product.
Further actions are described on the example of the anti-virus Agent.
Once settings of the repository have been changed, you
should update the Dr.Web ES anti-virus software to change
the state of the repository according to the settings
configured.
A window for configuring the repository for the selected product will
open. Go to the General tab.
In the Description entry field the names of products (the names
under which the product can be seen in the Console’s interface) are
displayed. You can edit this field, if necessary.
You can disable further product’s synchronization. To do this, select
the correspondent checkbox.
To reload the product (for example, to reset an error state), select the
Reload product checkbox.
If the product’s synchronization was interrupted (see p. Setting
Synchronization below), a group of radio buttons in the left part of the
tab becomes accessible. You can specify the reaction of the repository
to incomplete synchronization:
u
Leave revision as is — synchronization is prohibited,
u
Approve new revision – allows switching to a new revision
(for this purpose it is necessary to edit the settings which had
provoked the termination of the synchronization, read p. Setting
Administrator Manual
174
Chapter 7: Configuring the Anti-Virus Server
Synchronization below),
u
Stay with current revision — instructs to use the current
revision.
You can also specify the list of notifications to be sent by the Server
at synchronization of the repository. To do this, select (or keep)
checkboxes against the names of events upon which notifications
should be sent. Additional settings of notifications can be customized
on the Notifications tab, read p. Setting Notifications.
7.4.3. Setting the Dr.Web Global Update System
(GUS)
On the Administration menu, select Configure repository. On the
opened submenu, select the product or Entire Repository Settings.
Open the Dr.Web® GUS tab. On this tab, a list of known updates
servers is displayed.
The Console allows you to:
u
Remove a server from the list (Right-click the necessary object,
and on the context menu, select Remove object).
u
Change access priority (Right-click the necessary object, and on
the context menu, select Move down or Move up).
u
Add a new server to the list (On the context menu of the root
element, select Create server or Create proxy server).
u
Change the server address and user authorization parameters
(Right-click the necessary object, and on the context menu,
select Tune server).
The Web Interface allows you to:
u
Remove a server from the list (Select one or more servers
necessary object, and on the toolbar, click Remove servers
from list
u
).
Add a new server to the list (On the toolbar, click Create
server
and select server properties as described below).
Administrator Manual
175
Chapter 7: Configuring the Anti-Virus Server
u
Select a proxy server (Select the Use proxy server checkbox.
Proxy server settings are similar to those of the Update
servers).
u
Change the server address and user authorization parameters
(Click the server icon).
When editing or adding a server, a window for editing updates server’s
settings appears.
To configure the Update servers
1. Fill the Server entry fields with the server address and the port
of the server.
2. Fill in the User and the Password entry fields (if authorization
on the server is not required, leave these fields empty).
3. To save changes in the settings, click OK in the Console or
click Save in the Web Interface.
If a proxy server is used to access all or certain update servers:
u
add the proxy server to the hierarchical list (the procedure for
adding and setting a proxy server is the same).
u
Then ascribe the update server to this proxy server: on its
context menu, select Move server to.
u
A submenu with the list of accessible proxy servers will open.
Select the necessary one on the list.
If it is necessary to disconnect the update server from the proxy
server, on the context menu, select Move server to, and then select
the name of the root element of the list.
7.4.4. Setting Synchronization
On the Administration menu of the Console, select Configure
repository. On the opened submenu, select the product. Go to the
Synchronization tab.
On this tab, up to three lists of regular expressions, which define the
set of synchronized files, can be specified. Each list can be enabled or
Administrator Manual
176
Chapter 7: Configuring the Anti-Virus Server
disabled by the correspondent checkbox.
The Only list specifies a set of files to be synchronized. No file outside
this set will be synchronized.
Do not enable to use an empty Only list! Synchronization will
be blocked.
The Ignore list explicitly specifies the set of files, which will not be
synchronized.
The Delay list specifies the set of files which when being synchronized
terminate synchronization. Further actions in this case are prescribed
on the General tab.
If several lists are enabled, they are used as follows:
u
first the files given in the Only list are selected,
u
from the selected files (or all files, if Only is disabled) the files
specified in the Ignore list are deleted;
u
the Delay list is applied to the rest.
To edit any list, enable it first. To do this, select the Use this list
checkbox. To add a file, on the context menu, select Add. An element
containing a regular expression will be added to the list. Double-click it
and edit the expression.
To delete an element, select Delete on the context menu of this
element. For more about the syntax of regular expressions on this list,
please refer to Appendix F. Administration of the Repository.
7.4.5. Setting Propagation
On the Administration menu of the Console, select Configure
repository. On the opened submenu, select the product. On the
Distribution tab, the set of files which should be distributed to
workstations is specified. To do this, the Only and the Ignore lists are
used. The procedure for setting distribution lists is similar to those for
Administrator Manual
177
Chapter 7: Configuring the Anti-Virus Server
synchronization described above.
7.4.6. Setting Notifications
On the Administration menu of the Console, select Configure
repository. On the opened submenu, select the product. On the
Notifications tab, additional settings for notifications on the events
connected with synchronization are specified. The permission to send
notifications on events of different types is specified on the General
tab (see p. General Parameters of the Repository). On this tab, you
can specify the set of files which when updated trigger messages like Product has been updated successfully.
To specify the set of files the Only and the Ignore lists are used. The
procedure for setting notifications lists is similar to those described in
p. Setting Synchronization above.
7.4.7. A Simple Editor of the Configuration of
the Repository
A simple repository configuration editor allows to specify the repository
configuration parameters common to all products.
The settings specified by the simple editor cancel the settings
for separate products.
To edit the configuration of the repository for all products
at once
1. On the Administration menu, select Configure repository;
on the opened submenu, select Entire repository settings.
A window of the simple repository editor will open. Go to the
Dr.Web® GUS tab.
The setting of parameters of the Dr.Web Global Update
System is similar to that for separate products (read in p.
Setting the Dr.Web GUS above). If it is necessary to set a non-
Administrator Manual
178
Chapter 7: Configuring the Anti-Virus Server
standard URI to an updates server, select the Edit URI
checkbox and edit the entry in the Base URI field.
2. Go to the Dr.Web® Enterprise Agent tab.
In the group of radio buttons specify whether all files or only
virus databases should be updated.
3. Go to the Dr.Web® Enterprise Server tab.
In the group of radio buttons specify what files (for Windows
OS, for UNIX OS, for both of OS’s or none) should be updated.
The parameters on the Dr.Web® Enterprise Console tab are
similar to those for the Server in item 3 above.
7.5. Server Statistics
To view the Server statistics, on the Administration menu of the
Console, select Server Statistics. A statistics window will open. Go
to the Counters tab.
On this tab, the following data is displayed in numerical form:
u
use of system resources,
u
network traffic,
u
activity of clients (total number, clients active at the moment,
data on newbies and installers, neighboring Servers),
u
use of the database,
u
use of file cache,
u
external interaction (messages, web statistics, operation of the
repository).
To turn on the graph representation of a counter, click the counter
name. If a counter can be displayed as a graph on the Graphs tab, it
will become underlined. Then go to the Graphs tab.
Administrator Manual
179
Chapter 7: Configuring the Anti-Virus Server
7.6. Peculiarities of a Network with
Several Anti-Virus Servers
Dr.Web ES allows to build an anti-virus network with several antivirus Servers. In such networks each workstation is ascribed to one
Server, which allows to distribute the load between them.
The connections between the Servers can have a hierarchical
structure, which allows to optimally distribute the load between the
Servers.
When you beginning to plan structure of your antivirus
network, take into account the peculiarities of licensing multiserver environments. For details, refer to Key Files.
To exchange information between the Servers (software updates and
information about the operation of the Servers and the workstations
connected to them) a special interserver synchronization protocol is
used.
The most significant feature of this protocol is the efficient
transfer of updates:
u
the updates are distributed as soon as received,
u
the scheduling of updates on Servers becomes unnecessary
(except for those Servers which receive updates from the Dr.
Web GUS servers via HTTP).
7.6.1. Building a Network with Several ES
Servers
Several ES Servers can be installed in an anti-virus network. Each
anti-virus Agent connects to one of them; each Server with
connected anti-virus workstations functions as a separate anti-virus
network as described in previous Chapters.
Administrator Manual
180
Chapter 7: Configuring the Anti-Virus Server
Dr.Web ES allows to connect such anti-virus networks by transferring
data between the anti-virus Servers.
A Server can send to another Server
u
software and virus database updates (only one of them is to
receive updates from the Dr.Web GUS servers);
It is recommended to schedule a task for updating from the
GUS on subordinate ES Servers in case the parent ES
Server is inaccessible. This will allow the Agents connected
to a subordinate ES Server to receive updated virus
databases and program modules. For more, read p. Setting
the Dr.Web GUS.
u
information on virus events, statistics, etc.
The program provides for two types of connections
between the Servers:
u
a parent-child type of connection, where the principle Server
transfers updates to the subordinate one and receives
information about events,
u
a peer to peer connection, where data types and transfer
directions are set up individually.
An example of a multi-server structure is presented in Figure 7-1.
Administrator Manual
181
Chapter 7: Configuring the Anti-Virus Server
Figure 7-1. A multi-server network
Here are some advantages of a multi-server anti-virus
network:
u
receipt of updates from the Dr.Web GUS servers by one
principle anti-virus Server and their subsequent distribution to
the other Servers directly or through intermediates;
u
distribution of workstations between
decreasing the load on each of them;
u
consolidation of data from several Servers on one Server; the
possibility to view all the data through the Console connected
to such Server.
several
Servers,
Administrator Manual
182
Chapter 7: Configuring the Anti-Virus Server
The Dr.Web ES anti-virus monitors and prevents the creation
of cyclic data flows.
7.6.2. Setting Connections between the Servers
of an Anti-Virus Network
To use several Servers in an anti-virus network, you should set up
connections between these Servers.
It is advisable to make a plan and to draw the structure of the antivirus network first. All data flows, connections of the "peer to peer"
and "parent-child" types should be indicated. Then, for each Server
included into the network connections with any "neighboring" Servers
("neighbors" have at least one dataflow between them) should be set
up.
Example: Configure a connection between Parent and
Child Servers
Illustrations of the following procedure steps are provided for
the Console.
If using the Web interface, the similar fields display in the
right pane of the working area.
1. Make sure that both ES Servers operate normally.
2. Make sure that each of the ES Servers uses different keys
enterprise.key.
3. Connect to each of the ES Servers by means of the Console
or Web interface and give them “meaningful” names, as it will
help prevent mistakes while connecting and administering the
ES Servers. You can change the names through the ES
Console (or the Web interface) menu: Administration →
Configure Server (Configure Dr.Web® Enterprise Server
for the Web interface) on the General tab in the Name entry
field. In this example we name the Parent Server MAIN, and
Administrator Manual
183
Chapter 7: Configuring the Anti-Virus Server
the Child Server - AUXILIARY.
4. On both ES Servers, enable the server protocol. To do this, on
the ES Console (or the Web interface) Administration
menu, select Configure Server (Configure Dr.Web®
Enterprise Server for the Web interface). On the Modules
tab, select the Dr.Web® Enterprise Server checkbox (see p.
Setting the Server Configuration).
5. Restart both ES Servers.
6. Connect the ES Console (or the Web interface) to the Child
Server (AUXILIARY) and add the Parent Server (MAIN) to
the list of neighbor Servers of the Child Server. To do this, on
the Administration menu, select Neighborhood. A window
with the hierarchical list of the anti-virus network Servers
"neighboring" with the given Server will open. To add a Server
to the list:
u
via the Console: on the context menu of any element (or
group of elements), select Add (Figure 7-2).
u
via the Web interface: click the Create neighbor
in the toolbar.
Figure 7-2.
A window to describe the connection between the current
Server and the new Server will open (see Figure 7-3). Select
the Parent type. In the Name entry field type the name of the
Parent Server (MAIN), in the Password field type an arbitrary
Administrator Manual
184
Chapter 7: Configuring the Anti-Virus Server
password to access the Parent Server. To the right of the Key
field click the
button in the Console or View in the Web
interface and specify the drwcsd.pub key of the Parent
Server. In the Address field type the address of the Parent
Server.
If using the Web interface, in the Administrative console
web address field specify the address of a start web page for
the Web interface of the main Server (see p. In-Built Web
Interface).
Click OK for the Console or Save for the Web interface.
Figure 7-3.
As a result, the Parent Server (MAIN) will be included to the
Parents and Offline folders (see Figure 7-4).
Administrator Manual
185
Chapter 7: Configuring the Anti-Virus Server
Figure 7-4.
7. Connect the ES Console (or the Web interface) to the Parent
Server (MAIN) and add the Child Server (AUXILIARY) to
the list of neighbor Servers of the Parent Server. To do this,
on the Administration menu, select Neighborhood. A
window with the hierarchical list of the anti-virus network
Servers "neighboring" with the given Server will open. To add
a Server to the list:
u
via the Console: on the context menu of any element (or
group of elements), select Add.
u
via the Web interface: click the Create neighbor
in the toolbar.
In the opened window (see Figure 7-5) select the Child type.
In the Name entry field type the name of the Child Server
(AUXILIARY), in the Password field type the same
password as at step 6. To the right of the Key field click the
button in the Console or View in the Web interface
and specify the drwcsd.pub key of the Child Server.
If using the Web interface, in the Administrative console
web address field specify the address of a start web page for
the Web interface of the child Server (see p. In-Built Web
Administrator Manual
186
Chapter 7: Configuring the Anti-Virus Server
Interface).
Click OK for the Console or Save for the Web interface.
Figure 7-5.
As a result, the Child Server (AUXILIARY) will be included to
the Children and Offline folders (see Figure 7-6).
Administrator Manual
187
Chapter 7: Configuring the Anti-Virus Server
Figure 7-6.
8. Wait until the connection between the Servers has been
established (usually it takes not more than a minute). Click the
Refresh button
for the Console or F5 for the Web
interface from time to time to check this. After the Servers
have been connected, the Child Server (AUXILIARY) will
move from the Offline folder to the Online folder (see
Figure 7-7).
Administrator Manual
188
Chapter 7: Configuring the Anti-Virus Server
Figure 7-7.
9. Connect the Console (or the Web interface) to the Child
Server (AUXILIARY) to make sure that the Parent Server
(MAIN) is connected to the Child Server (AUXILIARY) (see
Figure 7-8).
Administrator Manual
189
Chapter 7: Configuring the Anti-Virus Server
Figure 7-8.
You may not connect two Servers installed with the same
license key (enterprise.key).
7.6.3. Using an Anti-Virus Network with Several
Servers
The peculiarity of a multi-server network is that updates from the Dr.
Web GUS servers can be received by a part of the anti-virus Servers
(as a rule, one or several parent Servers) and update tasks should be
scheduled on these Servers only (for information on how to set
Servers’ schedule, read p. Setting the Server Schedule). Any Server
which has received updates from the Dr.Web GUS servers or some
other Servers distributes them immediately to all connected child
Servers and those peer Servers for which this option is enabled.
Administrator Manual
190
Chapter 7: Configuring the Anti-Virus Server
The Dr.Web ES anti-virus automatically monitors the
situations when due to an imperfect structure of the network
or incorrect Server configuration an update already received
is sent again to the same Server, and cancels the updating.
The administrator can receive consolidated data about important
events on the anti-virus stations linked to any Server via intersever
connections.
To view information on virus events on all Servers linked to
the current Server
1. On the Administration menu, select Remote data. A
window with accessible Servers will open (with no data
loaded).
2. Click
, to load data into the table.
3. Each line contains data on the total number of entries on the
status (the Status column), on detected infections (the
Infections column), on scanning errors (the Errors column),
on statistics (the Statistics column), on network installations
(the All network installations column), on the launch and
termination of tasks (the Start/Stop column) available on this
Server. To view any line of the summary statistics in a more
suitable form, select it in the table and click
(or doubleclick the necessary line). A window with a detailed description
of this line will open.
If several lines are selected in the table, a detailed description
of each of them will be displayed in separate windows.
4. To save the table for printing or further processing, click
save shown data in CSV format, or
in HTML format, or
save shown data
save shown data in XML format.
5. To open the summary window with information on the status,
detected infections, scanning errors, network installations, the
launches and terminations of tasks, as well as the statistics on
stations, select the necessary Server or several Servers, and
Administrator Manual
191
Chapter 7: Configuring the Anti-Virus Server
then on the context menu, select an item with necessary
information. A window with the table similar to that described
in p. Viewing the Statistics will open. The only difference of this
table is the presence of the Server column.
Administrator Manual
192
Chapter 8: Updating the Dr.Web ES Software and
Virus Databases
Chapter 8: Updating the Dr.Web ES
Software and Virus Databases
Before updating Dr.Web ES and its components, ensure
availability of your Internet connection. Check that the
Internet Protocol is properly configured and DNS server
settings are specified correctly.
The anti-virus software and virus databases can be updated either
manually or through the schedule of a Server or an Agent.
Before updating the anti-virus software and virus databases
you should set the configuration of the repository (including
access to the Dr.Web Global Update System as described
in p. Setting the Dr.Web GUS).
8.1. Upgrading Dr.Web ES for Windows®
OS
ES Server and ES Console can be upgraded to version 5.0
automatically by using the installation wizard.
The installation wizard preserves the following files before beginning
the upgrade:
the dbinternal.dbs internal database,
the drwcsd.conf Server configuration file (the name may
vary),
encryption keys drwcsd.pri и drwcsd.pub,
Server and Agent license key files (the enterprise.key
and agent.key files, the names may vary),
SSL certificate (certificate.pem).
Administrator Manual
193
Chapter 8: Updating the Dr.Web ES Software and
Virus Databases
If necessary, copy other critical files you want to preserve to another
folder. For instance, copy the Web interface configuration file
(webmin.conf) and report templates which are stored in the
\var\templates folder. When installation completes, you can
replace the new files with the old ones.
Starting from version 5.0 anti-virus package includes SpIDer
Gate and Office Control components. For using this
components, they must be included in you license (Antivirus
+Antispam). If you license does not include this
components, it is recommended to perform the actions
described below.
If the Agent with an active self-protection is installed on
Sever computer, the wizard prompts you to disable Dr.Web
SelfPROtect during update process. Disable self-protection
in the Agent settings to continue updating the Server.
To upgrade Sever to version 5.0, launch the installation wizard and
follow the prompts. Depending on the previous Server version
installed, installation parameters which you can modify may vary as
follows:
1. Server v.4.33.0 upgrade
The Dr.Web Enterprise Server Upgrade Notes window
displays, which notifies you on the previous Enterprise Server
version installed and requests information on installation
location. The installation wizard cannot locate the Server
v.4.33.0 automatically. Click Browse and select the Server
installation folder.
On the following steps, the wizard displays locations of the
preserved files (see above) which will be used during installation
of Server 5.0. You can change locations if necessary.
To remove the previous version and launch the installation
process, click Install.
2. Server v.4.33.1 upgrade
Server v.4.33.1 installation folder is located automatically. The
Administrator Manual
194
Chapter 8: Updating the Dr.Web ES Software and
Virus Databases
wizard prompts you to install Server 5.0 while using the
preserved files (see above) from the previous installation. Click
Install to launch the installation process.
3. Server v.4.44 or v.4.70 upgrade
The Dr.Web Enterprise Server Upgrade Notes window
displays, which notifies you on the previous Enterprise Server
version installed. The installation wizard locates the Server
installation folder automatically.
On the following steps, the wizard displays locations of the
preserved files (see above) which will be used during installation
of Server 5.0. You can change locations if necessary.
To remove the previous version and launch the installation
process, click Install.
During automatic upgrade of the Server software contents of
the repository are removed and new version is installed. If the
repository of the older version was not removed, it is
necessary to manually remove its contents and renew it.
In upgrading procedure of Server to version 5.0, it is
recommend to do the following
1. Before upgrading disable the use of communication protocols
with the anti-virus Agent and the Network installer. To do
this
u
If using the Web interface: select the Administration
item in the main menu and click Configure Dr.Web®
Enterprise Server in the control menu, go to the
Modules tab and clear the Protocol Dr.Web®
Enterprise Agent and the Protocol Dr.Web®
Network Installer checkboxes. Click Save. A request to
restart the Server will open. Click Yes.
Administrator Manual
195
Chapter 8: Updating the Dr.Web ES Software and
Virus Databases
u
If using the Console: on the Administration menu,
select Configure Server. In the opened window go to
the Modules tab and clear the Dr.Web® Enterprise
Agent and the Dr.Web® Network Installer
checkboxes. Click OK. A dialog box requesting to restart
the Server will open. Click Yes.
2. Upgrade the Server to version 5.0 as described above (using
preserved Server configuration file).
3. After upgrading the Server, configure the set of components
installed at the workstations (see p. Viewing and Editing the
Configuration of a Workstation), in particular if you do not have
Antispam license, set cannot option for the SpIDer Gate
and Office Control components.
4. Update the components of Dr.Web ES. To do this
u
If using the Web interface: select the Administration
item in the main menu and click Repository state in the
control menu. In the opened window click Check for
updates. Beforehand configure the proxy servers settings
for GUS updating if necessary.
u
If using the Console: on the Administration menu,
select Check for updates. In the opened window, All
Dr.Web® Enterprise Suite Products is selected by
default. Click OK.
5. If necessary, configure ports that is using by the Agents for
communication with the Server. To do this, use the
Administration →
Configure Dr.Web® Enterprise
Server (Configure server for the Console)
tab.
→
Transport
6. Enable the use of communication protocols with the anti-virus
Agent and the Network installer, disabled at step 1.
7. Upgrade the workstations software.
After upgrading the Server software, upgrade ES Console. For this,
launch the Console 5.0 installation wizard. The previous version is
removed and Console 5.0 is installed automatically.
The upgraded anti-virus program is ready for operation.
Administrator Manual
196
Chapter 8: Updating the Dr.Web ES Software and
Virus Databases
8.2. Upgrading Dr.Web ES for UNIX®
System-Based Systems
Upgrading the Server and Console software with the previous
version installed is not possible. To install version 5.0, delete the
Server and Console software of previous versions and install version
5.0.
All actions must be performed under the root administrator
account.
After the Server has been removed, the following files will remain:
u
the internal DB dbinternal.dbs,
u
Server configuration file drwcsd.conf,
u
Web Interface configuration file webmin.conf,
u
encryption keys drwcsd.pri and drwcsd.pub,
u
license keys enterprise.key and agent.key,
u
the SSL certificate certificate.pem.
Starting from version 5.0 anti-virus package includes SpIDer
Gate and Office Control components. For using this
components, they must be included in you license (Antivirus
+Antispam). If you license does not include this
components, it is recommended to perform the actions
described below.
If using an internal database:
1. Stop the ES Server.
2. If you plan to use any files (besides files which are copied
automatically during Server uninstall at step 4), backup these
files manually. For instance, copy the report templates to a
backup folder.
3. Remove the contents of the repository.
Administrator Manual
197
Chapter 8: Updating the Dr.Web ES Software and
Virus Databases
4. Remove ES Server software (see Uninstalling the Server
Software for UNIX system-based Operating Systems). You will
be prompt to create backup copies, for this specify a folder
where to store the backup or accept the default folder.
5. Install the ES Server version 5.0 (see Installing the Anti-Virus
Server for UNIX system-based Operating Systems).
6. After new install, you can replace automatically created files
with the backup copies from the previous installation. In case
of automatic backup, replace the files in the following folders:
Files
Paths under OSes
drwcsd.pub
Linux
/opt/drwcs/Installer/
dbinternal.dbs /var/opt/drwcs/
/var/opt/drwcs/etc
drwcsd.conf
Solaris
FreeBSD
/usr/local/drwcs/
Installer/
/var/drwcs/
/var/drwcs/etc
drwcsd.pri
enterprise.key
agent.key
certificate.pem
Web interface configuration file (webmin.conf) from
version 4.xx is not compatible with the version 5.0 software.
After upgrading the Server, you cannot replace a new
configuration file with a backup copy of the 4.xx configuration
file and have to make all necessary changes manually.
In case of manual backup, replace the files in the same folders
from which you copied the files before new install.
For all backup files from the previous Server version (see
step 6) assign the same permissions as those set at the
installation of the new Server version.
7. To upgrade the databases, execute the following commands:
· for Linux OS and Solaris OS: /etc/init.d/drwcsd
upgradedb
Administrator Manual
198
Chapter 8: Updating the Dr.Web ES Software and
Virus Databases
· for FreeBSD OS:
/usr/local/etc/rc.d/
drwcsd.sh upgradedb
8. Launch the ES Server.
9. Set up repository upgrade and perform the upgrade.
10. Restart the Server.
If using an external database:
1. Stop the ES Server.
2. If you plan to use any files (besides files which are copied
automatically during Server uninstall at step 4), backup these
files manually. For instance, copy the report templates to a
backup folder.
3. Remove the contents of the repository.
4. Remove the ES Server software (see p. Uninstalling the
Server Software for UNIX system-based Operating Systems).
You will be prompt to create backup copies, for this specify a
folder where to store the backup or accept the default folder.
5. Install the ES Server version 5.0 (see p. Installing the AntiVirus Server for UNIX system-based Operating Systems).
6. Move the automatic saved files (see above) to:
· for Linux OS: to /var/opt/drwcs/etc, except for
the public key. The latter must be saved to /opt/
drwcs/Installer/
· for FreeBSD OS: to /var/drwcs/etc, except for the
public key. The latter must be saved to /usr/local/
drwcs/Installer/
· for Solaris OS: to /var/drwcs/etc, except for the
public key. The latter must be saved to /opt/drwcs/
Installer/
Assign the same permissions as those set at the installation of
the new Server version for all backup files from the previous
Server version (see step 6).
7. To upgrade the databases, execute the following commands:
· for Linux OS and Solaris OS:
Administrator Manual
199
Chapter 8: Updating the Dr.Web ES Software and
Virus Databases
/etc/init.d/drwcsd upgradedb
· for FreeBSD OS:
/usr/local/etc/rc.d/drwcsd.sh
upgradedb
8. Launch the ES Server.
9. Set up repository upgrade and perform the upgrade.
10. Restart the Server.
In upgrading procedure of Server to version 5.0, it is
recommend to do the following
1. Before upgrading disable the use of communication protocols
with the anti-virus Agent and the Network installer. To do
this
u
If using the Web interface: select the Administration
item in the main menu and click Configure Dr.Web®
Enterprise Server in the control menu, go to the
Modules tab and clear the Protocol Dr.Web®
Enterprise Agent and the Protocol Dr.Web®
Network Installer checkboxes. Click Save. A request to
restart the Server will open. Click Yes.
u
If using the Console: on the Administration menu,
select Configure Server. In the opened window go to
the Modules tab and clear the Dr.Web® Enterprise
Agent and the Dr.Web® Network Installer
checkboxes. Click OK. A dialog box requesting to restart
the Server will open. Click Yes.
2. Upgrade the Server to version 5.0 as described above (using
preserved Server configuration file).
3. After upgrading the Server, configure the set of components
installed at the workstations (see p. Viewing and Editing the
Configuration of a Workstation), in particular if you do not have
Antispam license, set cannot option for the SpIDer Gate
and Office Control components.
4. Update the components of Dr.Web ES. To do this
Administrator Manual
200
Chapter 8: Updating the Dr.Web ES Software and
Virus Databases
u
If using the Web interface: select the Administration
item in the main menu and click Repository state in the
control menu. In the opened window click Check for
updates. Beforehand configure the proxy servers settings
for GUS updating if necessary.
u
If using the Console: On the Administration menu,
select Check for updates. In the opened window, All
Dr.Web® Enterprise Suite Products is selected by
default. Click OK.
5. If necessary, configure ports that is using by the Agents for
communication with the Server. To do this, use the
Administration →
Configure Dr.Web® Enterprise
Server (Configure server for the Console)
tab.
→Transport
6. Enable the use of communication protocols with the anti-virus
Agent and the Network installer, disabled at step 1.
7. Upgrade the workstations software.
After upgrading the Server software, upgrade ES Console.
The upgraded anti-virus program is ready for operation.
8.3. Upgrading Dr.Web ES with Several
Anti-virus Servers
For anti-virus networks configured under parent-child type of
connection (see Building a Network with Several ES Servers) with
several Servers, the following upgrade method is available:
u
the main Server updates to version 5.0;
u
the child Server functions under software version 4.xx;
u
Agents of software version 5.0 install both from parent and
child Servers.
To install Agent software 5.0 from the child Server:
1. Update the repository of child Servers from the main Server
with software version 5.0.
Administrator Manual
201
Chapter 8: Updating the Dr.Web ES Software and
Virus Databases
Repository is updated according to a schedule (see Scheduled
Updates).
2. At child Servers, update Agent installation files manually.
To do this, replace the drwinst.exe Agent installation file
(located
in
the
.\DrWeb
Enterprise
Server\Installer folder) with the similar file from the .
\DrWeb
Enterprise
Server\var\repository\20-drwagntd\win
updated repository .
3. When Agents will be installed from the child Servers, they
will have the software version 5.0. Components of the Agents
installed from child Servers will have software of 5.0 version.
Without completing the procedure described above, Agent
under Microsoft Windows 2000 OS fails.
8.4. Updating Dr.Web ES through the
Repository
Server’s repository is updated according to the schedule (see
schedule settings in p. Scheduled Updates). Software and virus
database updates are transferred to the Agents automatically. To
update the Server’s software, you can use either the installer of a
newer version (if available) or the repository, from which you can
take the latest updates of the Server’s software received from Dr.
Web GUS servers.
Administrator Manual
202
Chapter 8: Updating the Dr.Web ES Software and
Virus Databases
Updating the Server
To update the Server software via the Console
1. Disable the use of communication protocols with the anti-virus
Agent and the Network installer. To do this, on the
Administration menu of the Console, select Configure
Server. In the opened window go to the Modules tab and
clear the Dr.Web® Enterprise Agent and the Dr.Web®
Network Installer checkboxes. Click OK. A dialog box
requesting to restart the Server will open. Click Yes.
2. On the Administration menu, point to Configure repository
and then select Entire repository settings.
u
Make sure that on the Dr.Web® Enterprise Agent tab
the Update everything mode is specified.
u
On the Dr.Web® Enterprise Console tab, select for
which OS’s you want to receive updates. Click OK.
3. On the Administration menu, point to Configure repository
and select Dr.Web® Enterprise Server. An Edit Dr.Web®
Enterprise Server window will open. Go to the
Synchronization tab.
4. The settings specified in this tab disable the Server updating. If
you want to receive updates for all platforms, clear the Use this
list checkbox in the Only field.
u
If you want to receive updates for OS Windows, the
Expression list will look as follows:
^common/
^win/
u
If you want to receive updates for Linux OS, the
Expression list should look like this:
^common/
^unix/
^unix-Linux-<Distribution kit>/
where <Distribution kit> stands
modification of the Linux family.
u
for a certain OS
For FreeBSD OS the last line looks as follows: ^unixFreeBSDxx.x/.
Administrator Manual
203
Chapter 8: Updating the Dr.Web ES Software and
Virus Databases
u
And for Solaris: ^unix-SunOSxx.x/, where xx.x
stands for your OS version (for more details, read
Appendix A. The Complete List of Supported OS Versions).
5. Click OK.
6. On the Administration menu, select Check for updates. By
default, it is offered to check for updates for all products. Click
OK.
7. Stop the Server (on the Administration menu, select Shut
down Server). The Console will report the Server is
disconnected.
8. Go to the Server’s installation catalog and make a backup copy
of Server configuration files from the \etc folder:
\etc\*.key
\etc\*.pem
\etc\*.conf
\etc\*.pri
\etc\*.ini
9. It is recommended to back up the folders:
\bin
\etc
\Installer
\webmin
\var\extensions
\var\templates
\var\update-db
10.Then copy the content of the repository to the following
folders:
Administrator Manual
204
Chapter 8: Updating the Dr.Web ES Software and
Virus Databases
Repository folder
Destination
folder
\var\repository\20-drwcs\windows-nt-x86\bin
\bin
\var\repository\20-drwcs\common\Installer
\Installer
\var\repository\20-drwcs\common\webmin
\webmin
\var\repository\20-drwcs\common\etc
\etc
\var\repository\20-drwcs\common\extensions
\var\extensions
\var\repository\20-drwcs\common\templates
\var\templates
\var\repository\20-drwcs\common\update-db
\var\update-db
11.Copy the files backed up at step 8 to the \etc folder.
12.Update the database with the following instruction:
u
for Windows OS:
"C:\Program Files\DrWeb Enterprise
Server\bin\drwcsd.exe" -var-root="C:
\Program Files\DrWeb Enterprise
Server\var" -home="C:\Program
Files\DrWeb Enterprise Server"
upgradedb "C:\Program Files\DrWeb
Enterprise Server\updatedb"
u
for UNIX OS:
bin/drwcsd -var-root=./var upgradedb
var/repository/20-drwcs/common/updatedb
13.Launch the ES Server.
To update the Server software via the Web interface
1. Disable the use of communication protocols with the anti-virus
Agent and the Network installer. To do this, select the
Administration item in the main menu and click Configure
Dr.Web® Enterprise Server in the control menu, go to the
Modules tab and clear the Protocol Dr.Web® Enterprise
Agent and the Protocol Dr.Web® Network Installer
checkboxes. Click Save. A request to restart the Server will
open. Click Yes.
2. Select the Administration item in the main menu and click
Administrator Manual
205
Chapter 8: Updating the Dr.Web ES Software and
Virus Databases
Configure repository in the control menu
u
Make sure that on the Dr.Web® Enterprise Agent tab
the Update everything mode is specified.
u
On the Dr.Web® Enterprise Server tab, select for
which OS’s you want to receive updates.
u
On the Dr.Web® Enterprise Console tab, select for
which OS’s you want to receive updates.
3. Click Save.
4. Select the Administration item in the main menu and click
Repository state in the control menu.
5. Click Check for updates.
6. Stop the Server (select the Administration item in the main
menu and click
Shutdown Dr.Web® Enterprise
Server). The message that the Server is disconnected will be
reported.
7. Further steps are similar to steps 7-13 of procedure above.
Once the software is successfully updated, the Console of
the old version will not be able to connect to the Server. Use
the new version of the Console to establish connection to the
Server.
Updating the Console
To update the Console software
1. Close the active Console.
2. Delete all files and folders from the installation folder.
3. Then copy the content of the repository to the following
folders:
Repository folder
Destination folder
For Unix OS
unix/bin/drwconsole.sh
Installation folder
common/jars
Create jars folder in
the installation folder
Administrator Manual
206
Chapter 8: Updating the Dr.Web ES Software and
Virus Databases
Repository folder
Destination folder
For Windows OS
Depends
on the
Windows
OS version
\20-drwconsole\windows-nt-x64
\20-drwconsole\windows-nt-x86
Installation folder
Create the
\20-drwconsole\common\jars\
\lib\DrWeb folder
in the installation
folder
4. Launch the Console.
8.5. Updating the Repository of a Server
not Connected to the Internet
If the anti-virus Server is not connected to the Internet, its repository
can be updated manually. Copy the repository of another ES Server,
which has been updated normally. This way is not meant for
upgrading.
1. Install the anti-virus Server software on another computer
connected to the Internet as described in p. Installing the AntiVirus Server and the Anti-Virus Console.
2. Stop the two Servers.
3. Start the Server connected to the Internet with the
syncrepository switch to update the anti-virus software.
Example for Windows OS:
"C:\Program Files\DrWeb Enterprise
Server\bin\drwcsd.exe" -home="C:\Program
Files\DrWeb Enterprise Server"
syncrepository
4. Copy the content of the repository catalog of the Server
connected to the Internet to the correspondent catalog on the
main (working) Server. Usually it is:
u
var\repository under Windows OS,
Administrator Manual
207
Chapter 8: Updating the Dr.Web ES Software and
Virus Databases
u
u
/var/drwcs/repository under FreeBSD OS,
/var/opt/drwcs/repository under Linux OS.
If the Agent with an active self-protection is installed on
Sever computer, you must disable Dr.Web SelfPROtect
component in the Agent settings before starting the
repository update.
5. If the main Server is runing under UNIX OS, it is necessary to
set the rights of the user created/selected at the installation of
the Server to the copied repository.
6. On the main Server execute the command
drwcsd rerepository
Under Windows OS the command can be performed both from
the command line:
"C:\Program Files\DrWeb Enterprise
Server\bin\drwcsd.exe" -home="C:\Program
Files\DrWeb Enterprise Server"
rerepository
or from the Start menu:
Start
→
All Programs
Server
→
repository
Server
→
DrWeb Enterprise
control
→
Reload
7. Start the main Server.
If Dr.Web SelfPROtect component was disabled before the
repository update, it is recommended to enable this
component after updating.
Administrator Manual
208
Chapter 8: Updating the Dr.Web ES Software and
Virus Databases
8.6. Manual Updating of the Dr.Web ES
Components
Before updating Dr.Web ES and its components, ensure
availability of your Internet connection. Check that the
Internet Protocol is properly configured and DNS server
settings are specified correctly.
Checking for Updates
To check for updates of Dr.Web ES products on the
updates server via the Console
1. On the Administration menu, select Check for updates.
2. In the opened window, All Dr.Web® Enterprise Suite
Products is selected by default. If you want to update a
certain ES component, select the necessary one and click OK.
3. If the checked component is outdated, it will be updated
automatically during the check. Products are updated according
to the settings of the repository (read p. Introduction and
further).
4. After the check a window with results will appear. To close the
window, click Close.
To check for updates of Dr.Web ES products on the
updates server via the Web interface
1. Select the Administration item in the main menu and click
Repository state in the control menu.
2. In the opened window information about all components are
listed, also last revision date and it's current state is specified.
Click Check for updates.
3. If the checked component is outdated, it will be updated
automatically during the check. Products are updated according
to the settings of the repository (read p. Introduction and
further).
Administrator Manual
209
Chapter 8: Updating the Dr.Web ES Software and
Virus Databases
4. After the check updated components will have current date in
the Last revision since column.
Updating of the Software
To update the software of an anti-virus station through the
Console
1. On the context menu of the workstation or a group, select
Force stations update.
2. On the opened submenu, select the necessary forced update
mode
u
Update failed components instructs to reset the error
state and update only those components that failed at the
previous update;
u
Speed up normal update instruct to update only those
components for which there is a new update on the
server.
u
Update all components instructs to force the update of
all components, including those updated successfully.
To update the software of an anti-virus station through the
Web interface
1. Select the Network item in the main menu, then click the
name of the station or group in the hierarchical list.
2. In the toolbar, click
Components management. In
the opened submenu select the necessary forced update mode
u
Update failed components instructs to reset the error
state and update only those components that failed at the
previous update;
u
Update all components instructs to force the update of
all components, including those updated successfully.
The same operation can be carried out with the help of the anti-virus
Agent.
Administrator Manual
210
Chapter 8: Updating the Dr.Web ES Software and
Virus Databases
To update the software of an anti-virus station through the
ES Agent
1. Permit the user of the given workstation to change the local
policy (for information on how to do it, read p. Setting Users’
Permissions).
2. On the context menu of the Agent icon, select Re-sync now.
3. On the opened submenu, select
u
Only failed components, if you want to update only
those components the updating of which was failed and to
reset the error state,
u
All components, if you want to launch updating of the
failed components as well as other components.
Critical Updating Error
In case of a critical error occurs during the operation of the
Agent
1. Initiate a forced update of the workstation (see p. Manual
Updating of the Dr.Web ES Components).
2. Through logs of the Agent and the updater stored on the
workstation investigate the cause of the error. By default both
log files (drwagntd.log and drwupgrade.log) reside
in the logs subfolder of the Agent’s installation folder.
3. Remove the cause of the error.
4. Run a forced update of the workstation again.
8.7. Scheduled Updates
You can make a schedule on a certain anti-virus Server to regularly
check for software updates and synchronize products in the repository
with new versions on another anti-virus Server or the GUS server.
For more details on the schedule, see p. Setting the Server Schedule.
Administrator Manual
211
Chapter 8: Updating the Dr.Web ES Software and
Virus Databases
To schedule product updates on the Server via the Console
1. On the Administration menu, select Server schedule.
2. To add a task, on the context menu of the list of tasks, select
Add.
3. Assign a name to the task in the Name field.
4. In the opened window, in the Action field select Update.
5. In the Time drop-down list, set the time span of running the
task and specify time according to the time span selected
(similarly to setting the time in the schedule of a workstation,
read p. Scheduling Tasks on a Workstation above).
6. In the Product drop-down list, select the type of product to be
updated by this task:
u
Dr.Web® Enterprise Agent
Dr.Web® Enterprise Server
Dr.Web® Enterprise Updater
Dr.Web® for Unix
Dr.Web® Virus Bases
Dr.Web® Enterprise Console
u
All Dr.Web® Enterprise Products, if you want to set a
task for updating all Dr.Web ES components.
7. Click OK to accept the changes or Cancel to abort the changes.
To schedule product updates on the Server via the Web
interface
1. Select the Administration item in the main menu and click
Dr.Web Enterprise Server Schedule in the control menu.
The list with the current tasks of the Server will open.
2. To add a task, click
New job in the toolbar.
3. In the opened window assign a name to the task in the Name
field.
4. Go to the Action tab and select the Update action in the
drop-down list.
5. In the shown drop-down list, select the type of product to be
updated by this task:
Administrator Manual
212
Chapter 8: Updating the Dr.Web ES Software and
Virus Databases
u
Dr.Web® Enterprise Agent
Dr.Web® Enterprise Server
Dr.Web® Enterprise Updater
Dr.Web® for Unix
Dr.Web® Virus Bases
Dr.Web® Enterprise Console
u
All Dr.Web® Enterprise Products, if you want to set a
task for updating all Dr.Web ES components.
6. Go to the Time tab and in the Time drop-down list, set the
time span of running the task and specify time according to the
time span selected (similarly to setting the time in the schedule
of a workstation, read p. Scheduling Tasks on a Workstation
above).
7. Click Save to accept the changes.
8.8. Updating Mobile Agents
If your computer (laptop) has no connection to the ES Server(s) for
a long time, to receive updates opportunely from the Dr.Web GUS,
you are well advised to set the Agent in the mobile mode of
operation. To do this, on the context menu of the Agent icon in the
notification area of the Taskbar, select Mobile mode → Active. The
icon will turn yellow.
In the mobile mode the Agent tries to connect to the Server three
times and, if unsuccessful, performs an HTTP update. The Agent tries
continuously to find the Server at interval of about a minute.
The option Mobile mode will be available on the context
menu provided that the mobile mode of using the Dr.Web
GUS has been allowed in the station’s permissions (for more,
read p. Setting Users’ Permissions).
To adjust the settings of the mobile mode, select Mobile mode →
Settings. In the Update period field set the frequency of checking
the availability of updates on the GUS. If necessary, select the Only
when connected to Internet checkbox.
Administrator Manual
213
Chapter 8: Updating the Dr.Web ES Software and
Virus Databases
When using a proxy server, select the Use proxy to transfer
updates checkbox and below specify the address and the port of the
proxy server, and the parameters of authorization.
In the mobile mode, to initiate updating immediately, select Mobile
mode → Start update.
When the Agent is functioning in the mobile mode, the
Agent is not connected to the anti-virus ES Server. All
changes made for this workstation at the Server, will take
effect once the Agent’s mobile mode is switched off and the
connection with the Server is re-established. In the mobile
mode only virus databases are updated.
To switch off the mobile mode, on the context menu of the Agent
icon, select Mobile mode and clear the Active checkbox. The color
of the icon will change from yellow to green and the Agent will be
reconnected to the Server.
8.9. Replacing Old Key Files with New
Ones
During the installation of the Dr.Web ES anti-virus you will be asked
to provide files containing the Server key and the key for workstations
(read p. Installing the Anti-Virus Server and the Anti-Virus Console; for
more information on key files read p. Key Files). Once your keys
expire, some components of the program will not operate. To restore
the full functionality of the Dr.Web ES anti-virus, you should obtain
and import new key files.
There are two ways to install new key files which depend on whether
the ID parameter in the new key file is the same as the previous key
file. Open both key files (enterprise.key) with a text editor, find
the [Enterprise] section and compare the values in the ID1
parameter.
Administrator Manual
214
Chapter 8: Updating the Dr.Web ES Software and
Virus Databases
The key file has a write-protected format using a digital
signature. Editing the key file makes it invalid. To avoid this,
do not modify the key file and/or save it when closing the text
editor.
If the Agent with an active self-protection is installed on
Sever computer, you must disable Dr.Web SelfPROtect
component in the Agent settings before replacing a key files.
To install new key files in Dr.Web ES with the same ID1
parameter
1. Replace enterprise.key in the etc subfolder of the
installation folder of the Server.
2. Restart the Server using standard Windows OS tools or the
corresponding command from the Start menu (you can also
use the Console).
3. Import the new Agent key for the Everyone group. To do
this
u
If using the Console: in the catalog of the anti-virus
network select the Everyone group, and on its context
menu, select Import key.
u
If using the Web interface: in the catalog of the antivirus network select the Everyone group, and click
Import key in the toolbar.
4. In the next window select the new key file for workstations
(agent.key) and click OK.
To install new key files in Dr.Web ES with a different ID1
parameter
1. Disable the protocols of the Agent and Network Installer.
To do this
Administrator Manual
215
Chapter 8: Updating the Dr.Web ES Software and
Virus Databases
u
If using the Web interface: select the Administration
item in the main menu and click Configure Dr.Web®
Enterprise Server in the control menu, go to the
Modules tab and clear the Protocol Dr.Web®
Enterprise Agent and the Protocol Dr.Web®
Network Installer checkboxes. Click Save. A request to
restart the Server will open. Click Yes.
u
If using the Console: on the Administration menu,
select Configure Server. In the opened window go to
the Modules tab and clear the Dr.Web® Enterprise
Agent and the Dr.Web® Network Installer
checkboxes. Click OK. A dialog box requesting to restart
the Server will open. Click Yes.
2. Export the Dr.Web Enterprise Server timetable. To do this
u
If using the Web interface: select the Administration
item in the main menu and click Dr.Web® Enterprise s
erver schedule in the control menu. Click
shown settings to file in the toolbar.
u
Export
If using the Console: on the Administration menu,
select Server schedule. In the opened window click
Export shown settings to file in the toolbar.
3. To free space in the database, remove the Dr.Web
Enterprise Server schedule. To do this
u
If using the Web interface: select the Administration
item in the main menu and click Dr.Web® Enterprise s
erver schedule in the control menu. Click
these settings in the toolbar.
u
Remove
If using the Console: on the Administration menu,
select Server schedule. In the opened window click
Remove these settings in the toolbar.
4. In case of a multi-server network, remove all the interserver
connections. This can be done via the Console's
Administration menu → Neighborhood item.
5. Replace the old key file of the Server (enterprise.key)
in the etc subfolder of the Server's installation folder with
the new one.
6. Restart the Server.
Administrator Manual
216
Chapter 8: Updating the Dr.Web ES Software and
Virus Databases
7. Select the Everyone group in the anti-virus network catalog
after that
u
If using the Web interface: click
toolbar.
Import key in the
u
If using the Console: click the Import key item in the
group's context menu.
8. In the opened window specify the key file for the workstation
(agent.key) and click OK.
9. Enable the protocols of the Agent and Network Installer
which were disabled in step 1.
10. Set up a new schedule for the Server or import the old one
which was exported in step 2.
11. In case of a multi-server network, set up all the necessary
interserver connections which were removed in step 4.
12. Restart the Server.
Administrator Manual
217
Chapter 9. Configuring the Additional Components
Chapter 9. Configuring the
Additional Components
9.1. NAP Validator
Overview
Microsoft® Network Access Protection (NAP) is a policy enforcement
platform built into Windows OS that allows you to better protect
network assets by enforcing compliance with system health
requirements.
With NAP, you can create customized health requirement policies to
validate computer health in the following cases:
u
before allowing access or communication,
u
automatically update compliant computers to ensure ongoing
compliance,
u
optionally confine noncompliant computers to a restricted
network until they become compliant.
Detailed description of NAT technology specified at http://www.
microsoft.com/windowsserver2008/en/us/nap-product-home.aspx.
NAP in Dr.Web Enterprise Suite
Dr.Web ES allows you to use the NAP technology to check health of
Dr.Web anti-virus software on protected workstations. This
functionality is provided by use of Dr.Web NAP Validator.
Means of Health Validation
A NAP health policy server which is installed and configured in
the network.
The Dr.Web NAP Validator which is an implementation of
Administrator Manual
218
Chapter 9. Configuring the Additional Components
NAP System Help Validator (SHV) with use of Dr.Web custom
policies plug-ins. This component is installed on the computer
where the NAP server resides.
Figure 8-2. Diagram of the anti-virus network when NAP is
used
System Health Agents (SHAs) which are installed automatically
on the workstations during installation of ES Agents.
The Dr.Web Enterprise Server which serves as the NAP
remediation server and ensures health of anti-virus software on
workstations.
Administrator Manual
219
Chapter 9. Configuring the Additional Components
Workstation Validation Procedure
1. Validation is activated when you configure the corresponding
settings of the Agent. For more information, see Editing the
Parameters of the Anti-Virus Agent.
2. The SHA connect to the Dr.Web NAP Validator installed on
the NAP server.
3. The Dr.Web NAP Validator determines compliance of
workstations against the health requirement policies as
described below. To determine health compliance, NAP
Validator checks workstation’s anti-virus state against the
corresponding health requirement policies, and then classifies
the workstation in one of the following ways:
Workstations which meet the health policy requirements
are classified as compliant and allowed unlimited access
and communication on the network.
Workstations which do not meet at least one requirement
of the health policy are classified as noncompliant and
have their access limited to the anti-virus Server only.
The Server allows noncompliant workstations to update
the system with the necessary anti-virus settings. After
update, the workstations are validated again.
Health Policy Requirements
1. Anti-virus Agent must be started and running (Agent health).
2. Dr.Web virus databases must be up-to-date, i.e. databases on
the workstation must be similar to those on the Server.
Setting NAP Validator
You need to configure Dr.Web NAP Validator after installing it on a
computer where a NAP server resides. For more information on
installation, see Installing NAP Validator.
To configure Dr.Web Nap Validator
1. To open NAP server configuration component, run the nps.
msc command.
Administrator Manual
220
Chapter 9. Configuring the Additional Components
2. In the Policies section, select Health Policies.
3. Configure the NAP DHCP Compliant policy:
u
To enable the policy, select Dr.Web System Health
Validator in the settings window.
u
To classify workstations as compliant only when all health
policy requirements are met, select Client passed all
SHV checks in the drop-down list.
4. Configure the NAP DHCP Noncompliant policy:
To enable the policy, select Dr.Web System Health
Validator in the settings window.
To classify workstations as noncompliant if any of the
health policy requirements are not met, select Client
failed one or more SHV checks in the drop-down list.
Administrator Manual
221
Chapter 10. Integration of Enterprise Suite with
UNIX® Mail Server
Chapter 10. Integration of
Enterprise Suite with UNIX® Mail
Server
This chapter covers administration of UNIX Mail Server with Dr.Web
MailD installed via Enterprise Server Web interface.
There are two possible situations which require Dr.Web MailD
integration with the Dr.Web Enterprise Suite:
1. Setup and initial configuration of UNIX Mail Server in existing
ES environment.
2. Incorporating successfully functioning UNIX Mail Server with
already installed and configured Dr.Web MailD in ES
environment.
Key role in Dr.Web MailD integration with the Dr.Web Enterprise
Suite belongs to the Agent component (drweb-agent module).
This module is included in standard installation package of Dr.Web
MailD. The Agent can operate in two modes:
1. Standalone mode;
2. Enterprise mode.
In general the Agent performs the following operations:
u
manages Dr.Web MailD modules settings;
u
defines Dr.Web MailD operation policy depending on current
license type;
u
collects statistics on anti-virus operation.
Actual functions performed by the Agent depend on selected
operation mode.
When the Agent works in Enterprise mode, it connects to the
Enterprise Server and downloads license key files and configuration
files with settings for Dr.Web MailD and Dr.Web Daemon
components.
Administrator Manual
222
Chapter 10. Integration of Enterprise Suite with
UNIX® Mail Server
10.1. Setup and Initial Configuration of
UNIX Mail Server in Existing ES
Environment
To set up management and control of Unix mail server via
ES web interface do the following
1. Set up and configure Dr.Web MailD.
2. Enable Enterprise mode for the Agent and Monitor.
3. Connect UNIX mail server to the Enterprise Suite Server.
4. Set up configuration for Dr.Web MailD modules via
Enterprise Suite Web interface.
5. Launch the system.
10.1.1. Setting Up and Configuring Dr.Web
MailD
Detailed description of Dr.Web MailD setup for Linux, FreeBSD and
Solaris can be found in p. 2 of Administrator Manual for «Dr.Web for
Unix mail servers».
Detailed description of Dr.Web MailD configuration for different mail
systems can be found in p. 5 of Administrator Manual for «Dr.Web
for Unix mail servers».
10.1.2. Enabling Enterprise mode for Agent and
Monitor
After Dr.Web MailD successful installation, Agent and Monitor
configuration files must be changed manually to enable Enterprise
mode for these components.
Administrator Manual
223
Chapter 10. Integration of Enterprise Suite with
UNIX® Mail Server
For Agent
In [EnterpriseMode] section of the corresponding configuration
file (%etc_dir/agent.conf) set the following parameter values:
UseEnterpriseMode = Yes;
u PublicKeyFile = %var_dir/drwcsd.pub
u
public key to access Enterprise Server. Administrator must
manually copy it from the corresponding directory of
Enterprise Server and put to the directory specified in
PublicKeyFile parameter value.
u
ServerHost = <IP-address/name>
Enterprise Server IP address or host name;
u
ServerPort = <port_number>
EnterpriseServer port number (2193 by default).
For Monitor
In [Monitor] section of the corresponding configuration file (%
etc_dir/monitor.conf) set the following parameter value:
u
UseEnterpriseMode = Yes.
10.1.3. Connecting UNIX Mail Server to
Enterprise Server
According to connection policy for new workstations (for more details
refer to p. New Stations Approval Policy), Mail Server can be
connected to Enterprise Suite in two different ways:
1. when new account is created by Enterprise Server
automatically;
2. when new account is created by Administrator manually.
Administrator Manual
224
Chapter 10. Integration of Enterprise Suite with
UNIX® Mail Server
Automatic creation of new account by ESserver
1. When Agent is first launched in Enterprise mode, it sends a
request for account details (station ID and password) to
Enterprise Server.
2. If Enterprise Server is set to Approve access manually
mode (used by default, for more details refer to p. New
Stations Approval Policy), Administrator must confirm new
workstation registration via Web interface within a limit of 1
minute after request.
3. After first launch Agent records hash of station ID and
password in special file. Path to it is set in PasswordFile
parameter value in [EnterpriseMode] section (default
value is %var_dir/agent.pwd). Encryption key is based
on host name of mail server where Agent is running.
4. Data from this file is used every time Dr.Web MailD connects
to Enterprise Server.
5. If you delete password file, repeated registration request will
be made to Enterprise Server after the next Agent launch.
Manual creation of new account by
Administrator
1. Create new account on Enterprise Server. Station ID is
generated automatically and password must be specified
manually (for more details refer to p. New Stations Approval
Policy).
2. Launch Agent using command line parameter --newpwd (or
-p) and type in station ID and password. Agent records hash
of station ID and password in special file. Path to it is set in
PasswordFile parameter value of [EnterpriseMode]
section (default value is %var_dir/agent.pwd).
Encryption key is based on host name of mail server where
Agent is running.
3. Data from this file is used every time Dr.Web MailD connects
Administrator Manual
225
Chapter 10. Integration of Enterprise Suite with
UNIX® Mail Server
toEnterprise Server.
4. If you delete password file, registration must be performed
once again.
10.1.4. Configuring Dr.Web MailD Components
via Enterprise Suite
Configuration of Dr.Web MailD and Dr.Web Daemon (anti-virus
module included in standard installation package) can be performed
via ES Web interface.
In Dr.Web Enterprise Suite standard installation package basic
configuration files of Dr.Web MailD and Dr.Web Daemon
components for Linux, FreeBSD and Solaris are included. When you
configure components via Web interface, corresponding parameters
values are changed in these configuration files on Enterprise Server.
After setting up configuration Agent requests and receives
configuration from Enterprise Server every time components start.
Detailed description of Dr.Web MailD parameters can be found in p.
3.3.1 of Administrator Manual for «Dr.Web for Unix mail servers».
Detailed description of Dr.Web Daemon parameters can be found in
p. 4.1.5 of Administrator Manual for «Dr.Web for Unix mail
servers».
10.1.5. Launching and Stopping the System
To launch the system, do the following
1. in ES Web interface open the page with Monitor settings and
select Daemon and Maild checkboxes to enable configuration
of corresponding components;
2. launch Monitor on local computer using command: # /etc/
init.d/drweb-monitor start.
To stop Monitor, run the command
# /etc/init.d/drweb-monitor stop.
Administrator Manual
226
Chapter 10. Integration of Enterprise Suite with
UNIX® Mail Server
10.2. Integration of Functioning UNIX
Mail Server with Enterprise Suite
Environment
To set up UNIX Mail Server management and control via ES
Web interface do the following
1. Enable Enterprise mode for Agent and Monitor.
2. Connect UNIX Mail server to Enterprise Suite Server.
3. Export Dr.Web MailD and Dr.Web Daemon modules local
configuration to Enterprise Server.
4. Launch the system.
Enabling Enterprise mode for Agent and Monitor
Setup procedure is similar to the one described in p. Enabling
Enterprise mode for Agent and Monitor.
Connecting Unix mail server to Enterprise Suite
Server
Setup procedure is similar to the one described in p. Connecting UNIX
Mail Server to Enterprise Server.
Export local configuration to ES Server
Configuration settings automatic export from local computer to
Enterprise Server is possible via Agent operating in Enterprise
mode. To export configuration use command line parameter -export-config (or -e). Please note that you must specify name
of the component (DAEMON, MAILD).
Example:
#
/opt/drweb/drweb-agent
config MAILD
--export-
Administrator Manual
227
Chapter 10. Integration of Enterprise Suite with
UNIX® Mail Server
Launching the system
Launch procedure is similar to the one described p. Launching the
System.
Administrator Manual
228
Appendices
Appendices
Appendix A. The Complete List of
Supported OS Versions
For the ES Server
Unix-FreeBSD-6.2
Unix-FreeBSD-6.2-amd64
Unix-FreeBSD-6.3
Unix-FreeBSD-6.3-amd64
Unix-FreeBSD-6.4
Unix-FreeBSD-6.4-amd64
Unix-FreeBSD-7.0
Unix-FreeBSD-7.0-amd64
Unix-FreeBSD-7.1
Unix-FreeBSD-7.1-amd64
Unix-FreeBSD-7.2
Unix-FreeBSD-7.2-amd64
Unix-Linux-ALT-Server-4.0
Unix-Linux-ASP-12
Unix-Linux-ASP-14
Unix-Linux-Debian-etch
Unix-Linux-Debian-etch-x86_64
Unix-Linux-Debian-lenny
Unix-Linux-Debian-lenny-x86_64
Unix-Linux-Debian-sarge
Unix-Linux-Debian-sid
Unix-Linux-generic-glibc2.3
Unix-Linux-generic-glibc2.3-x86_64
Administrator Manual
229
Appendices
Unix-Linux-generic-glibc2.4
Unix-Linux-generic-glibc2.4-x86_64
Unix-Linux-generic-glibc2.5
Unix-Linux-generic-glibc2.5-x86_64
Unix-Linux-generic-glibc2.6
Unix-Linux-generic-glibc2.6-x86_64
Unix-Linux-generic-glibc2.7
Unix-Linux-generic-glibc2.7-x86_64
Unix-Linux-generic-glibc2.8
Unix-Linux-generic-glibc2.8-x86_64
Unix-Linux-generic-glibc2.9
Unix-Linux-generic-glibc2.9-x86_64
Unix-Linux-Mandriva-2008
Unix-Linux-Mandriva 2008-x86_64
Unix-Linux-Mandriva-2009
Unix-Linux-Mandriva 2009-x86_64
Unix-Linux-Mandriva-Corporate Server-4
Unix-Linux-Mandriva-Corporate Server-4-x86_64
Unix-Linux-Open-Suse-11
Unix-Linux-Open-Suse-11-x86_64
Unix-Linux-RedHat-Enterprise Linux-5
Unix-Linux-RedHat-Enterprise Linux-5-x86_64
Unix-Linux-RedHat-Enterprise Linux-5.3
Unix-Linux-RedHat-Enterprise Linux-5.3-x86_64
Unix-Linux-RedHat-Fedora-7
Unix-Linux-RedHat-Fedora-8
Unix-Linux-RedHat-Fedora-8-x86_64
Unix-Linux-RedHat-Fedora-9
Unix-Linux-RedHat-Fedora-9-x86_64
Unix-Linux-RedHat-Fedora-10
Unix-Linux-RedHat-Fedora-10-x86_64
Unix-Linux-RedHat-FedoraCore-5
Unix-Linux-RedHat-FedoraCore-6
Administrator Manual
230
Appendices
Unix-Linux-SuSe-10
Unix-Linux-SuSe-Enterprise Server-10
Unix-Linux-SuSe-Enterprise Server-10-x86_64
Unix-Linux-SuSe-Enterprise Server-11
Unix-Linux-SuSe-Enterprise Server-11-x86_64
Unix-Linux-Ubuntu-8.04
Unix-Linux-Ubuntu-8.04-x86_64
Unix-Linux-Ubuntu-9.04
Unix-Linux-Ubuntu-9.04-x86_64
Unix-Solaris-9-x86
Unix-Solaris-10-x86
Unix-Solaris-10-sparc32 (Sparc V9 processor; UltraSparc or later)
Unix-Solaris-10-sparc64 (Sparc V9 processor; UltraSparc or later)
Windows:
- 32 bit:
Windows 2000 Professional (SP4)
Windows 2000 Server (SP4)
Windows XP Professional (SP3)
Windows XP Home (SP3)
Windows Server 2003 (SP2)
Windows Vista (SP1)
Windows Server 2008
- 64 bit:
Windows Server 2003 (SP2)
Windows Vista (SP1)
Windows Server 2008
For the ES Аgent and Anti-virus Package
Unix-Linux-generic-glibc2.3 and later
Unix-FreeBSD-4.1 and later
Unix-Solaris-9 (only for Intel platform)
Administrator Manual
231
Appendices
Unix-Solaris-10 (only for Intel platform)
Windows
- 32 bit:
Windows 98
Windows Millennium Edition
Windows NT4 (SP6a)
Windows 2000 Professional (SP4)
Windows 2000 Server (SP4)
Windows XP Professional (SP3)
Windows XP Home (SP3)
Windows Server 2003 (SP2)
Windows Vista (SP1)
Windows Server 2008
- 64 bit:
Windows Server 2003 (SP2)
Windows Vista (SP1)
Windows Server 2008
SpIDer Guard
- 32 bit:
Windows 98
Windows Millennium Edition
Windows NT4 (SP6a)
Windows 2000 Professional (SP4)
Windows 2000 Server (SP4)
Windows XP Professional (SP3)
Windows XP Home (SP3)
Windows Server 2003 (SP2)
Windows Vista (SP1)
SpiderGate and Self-Protection
Administrator Manual
232
Appendices
- 32 bit:
Windows 2000 Professional (SP4)
Windows 2000 Server (SP4)
Windows XP Professional (SP3)
Windows XP Home (SP3)
Windows Server 2003 (SP2)
Windows Vista (SP1)
Windows Server 2008
- 64 bit:
Windows Server 2003 (SP2)
Windows Vista (SP1)
Windows Server 2008
For the Console
UNIX-like (JRE not included, download from java.sun.com):
solaris x86/ sparc
linux .rpm x86/x86_64
linux .deb x86/x86_64
generic unix / MacOS X (in tar.bz2 and .zip for manual installation)
Windows (JRE included):
- 32 bit:
Windows 2000 Professional (SP4)
Windows 2000 Server (SP4)
Windows XP Professional (SP3)
Windows XP Home (SP3)
Windows Server 2003 (SP2)
Windows Vista (SP1)
Windows Server 2008
- 64 bit:
Windows Server 2003 (SP2)
Administrator Manual
233
Appendices
Windows Vista (SP1)
Windows Server 2008
Administrator Manual
234
Appendices
Appendix B. The Description of the DBMS
Settings. The Parameters of the DBMS
Driver
As a database for the anti-virus Server you can use the following
variants:
internal DBMS (IntDB);
external DBMS.
Internal DBMS
When setting access to DBMS for storage and processing of data, use
the parameters described below for internal DBMS.
Table B-1. Built-in DBMS (IntDB) parameters
Name
Default value
Description
DBFILE
dbinternal.dbs
Path to the database file
CACHESIZE
2048
Database cache size in pages
SYNCHRONOUS
FULL
Mode of synchronous logging of
changes in the database to the disk:
· FULL — fully synchronous
logging to the disk,
· NORMAL —
synchronous
logging of critical data,
· OFF —
logging.
asynchronous
External DBMS
The following database management systems may be used to arrange
the external database for the anti-virus Server:
Administrator Manual
235
Appendices
Oracle. The settings are given in Appendix B2. Setting Up the
Database Driver for Oracle.
Microsoft SQL Server Compact Edition (SQL CE). The settings
are given in Appendix B3. Setting Up the Database Driver for
SQL CE.
PostgreSQL. The settings necessary for PostgreSQL are given in
Appendix В4. Using the PostgreSQL DBMS.
Microsoft SQL Server. To access this DBMS, an ODBC driver may
be used (setting up the parameters of the ODBC driver for
Windows is given in Appendix B1. Setting Up the ODBC Driver).
With Microsoft SQL Server 2005 it is necessary to use the
ODBC driver supplied with this DBMS.
Comparison characteristics
When choosing between an internal and external database, take into
account the following peculiar parameters of DMBS’s:
In large anti-virus networks (of over 100 stations), it is
recommended to use an external DB, which is more faultresistant than internal DBs.
The internal DBMS (IntDB) is considerably faster than the
external analogs and is recommended mainly for the typical use
of databases.
You may use an external database in case it will be necessary to
work through a DBMS and access the DB directly. To facilitate
access, standard APIs may be used, such as OLE DB, ADO.NET
or ODBC. Though it is to be noted that there is no ODBC driver
for Microsoft SQL CE at present. Still, working in applications
with this DBMS may be facilitated by implementing ADO.NET
technologies and the LINQ language, which allows using all the
possibilities of the .NET Framework platform including the report
generation system CrystalReports.
Administrator Manual
236
Appendices
Appendix B1. Setting Up the ODBC-driver
When setting access to DBMS for storage and processing of data, use
the parameters described below for external DBMS.
Table B-2. ODBC parameters (only in the version for Windows
OS)
Name
Default value
Description
DSN
Drwcs
Data set name
USER
Drwcs
User name
PASS
Drwcs
Password
TRANSACTION
DEFAULT
Read below
Possible values of the TRANSACTION parameter:
· SERIALIZABLE
· READ_UNCOMMITTED
· READ_COMMITTED
· REPEATABLE_READ
· DEFAULT
The DEFAULT value means "use default of the SQL server". More
information can be found at http://www.oracle.com/technology/
oramag/oracle/05-nov/o65asktom.html.
The database is initially created on the SQL server with the above
mentioned parameters. It is also necessary to set the ODBC driver
parameters on the computer where the anti-virus Server is installed.
To do this
1. In Windows OS Control Panel, select Administrative tools;
in the opened window click Data Sources (ODBC). The ODBC
Data Source Administrator window will open. Go to the
System DSN tab.
Administrator Manual
237
Appendices
2. Click Add. A window for selecting a driver will open.
3. Select the SQL Server item in the list and click Finish. The first
window for setting access to the DB server will open.
4. Enter access parameters to the data source (the same as in the
settings of the anti-virus Server). If the DB server is not
installed on the same computer as the anti-virus Server, in the
Server field specify its IP address or name. Click Next. The next
window will open.
5. Specify the necessary DB access settings in this window. Click
Client configuration. A window for selecting and setting the
network protocol will open.
6. In the Network libraries field select a network library for TCP/IP
or Named Pipes (recommended). If the DB server is not
installed on a local computer, specify its name or IP address in
the Server alias and Server name fields. Click OK. This
window will close and the previous window for setting the driver
will be available again. Click Next. The next window will open.
7. Check that the Only when you disconnect option, the Use
ANSI quoted identifiers and the Use ANSI nulls, paddings
and warnings checkboxes are selected. Click Next. The last
window for setting access will open.
If ODBC driver settings allow you to change the language of
SQL server system messages, select English.
8. Select the necessary parameters. When you are done, click
Finish. A window with the summary of the specified parameters
will open.
9. To test the specified settings, click Test Data Source. After
you see a notification of a successful test, click OK.
Administrator Manual
238
Appendices
Appendix B2. Setting Up the Database Driver
for Oracle
General description
The Oracle Database (or Oracle DBMS) is an object-relational DBMS.
Oracle may be used as an external DB for Dr.Web ES.
The Dr.Web ES Server may use the Oracle DBMS as an
external database on all platforms except FreeBSD (see
Installation and supported versions).
To use the Oracle DBMS
1. Install an instance of Oracle DB and set up the AL32UTF8
encoding. Also you may use existence instance which is
configured to use the AL32UTF8 encoding.
2. Set up the database driver to use the respective external
database (in the configuration file).
Installation and supported versions
To use Oracle as en external DB, you must install the instance of the
Oracle DB and set up AL32UTF8 (CHARACTER SET AL32UTF8
/ NATIONAL CHARACTER SET AL16UTF16) encoding. This
can be done in one of the following ways:
u
Using an Oracle installer (use an external mode of instance
installation and configuration);
u
Using the CREATE DATABASE SQL command.
For more information on creating and configuring Oracle instances, see
Oracle documentation.
Administrator Manual
239
Appendices
In case of using a different encoding, national symbols may
be displayed incorrectly.
A client to access the database (Oracle Instant Client) is included in
the installation package of Dr.Web ES.
Platforms supported by the Oracle DBMS are listed on the web site of
the vendor http://www.oracle.com/technology/software/tech/oci/
instantclient/index.html.
Dr.Web ES supports the following versions of the DBMS: Oracle9i
Database Release 2: 9.2.0.1 - 9.2.0.8 and higher.
Parameters
To adjust access to the Oracle DBMS, use the parameters described in
Table В-3.
Table В-3. Parameters of the Oracle DBMS
Parameter
Description
drworacle
Driver name
User
Database user name (obligatory)
Password
User password (obligatory)
ConnectionString Database connection string (obligatory)
The format of the connection string to the Oracle DBMS is
as follows:
//<host>:[<port>][/<service name>]
where:
<host> - IP address or name of the Oracle server;
<port> - port ‘listening’ to the server;
<service name> - name of the DB to connect to.
Administrator Manual
240
Appendices
For Example:
//myserver111:5521/bjava21
where:
myserver111 - name of the Oracle server.
u 5521 - port ‘listening’ to the server.
u bjava21 - name of the DB to connect to.
u
An example of the configuration file drwcsd.conf
If you deploy Oracle, it is necessary to change the definition and the
settings of the database driver in the configuration file of the Server.
See a fragment of the configuration file with corresponding parameters
below:
...
;Database definition. Mandatory.
;Only one definition is allowed.
database
;DB driver (DLL or shared obj ect name)
drworacle ; Oracle DB, unix & windows
;load library from this path; empty - use default
from ""
using "User=SYSTEM Password=root
ConnectionString=//192.168.0.1:1521/ORADB"
Administrator Manual
241
Appendices
Appendix B3. Setting Up the Database Driver
for SQL CE
General description
Microsoft SQL Server Compact Edition (SQL CE) is a relational
database produced by the Microsoft company.It is an embedded
database engine for desktop applications and mobile devices. SQL CE
may be used as an external database for Dr.Web ES.
To use SQL Server CE
1) install the SQL CE server;
2) set up the database driver to use the respective external
database (in the configuration file).
Installation and supported versions
The SQL CE DBMS is compatible only with Windows 2000 OS
and higher (x32 and x64 versions).
Dr.Web Enterprise Suite supports Microsoft
Compact 3.1 and 3.5.
SQL Server
If you want to deploy SQL Server Compact Edition, you need to
download the installation package from the web site of the
manufacturer
http://www.microsoft.com/sqlserver/2005/en/us/
compact-downloads.aspx and install the corresponding version of the
server:
u
for Microsoft Windows 2000, install Microsoft SQL Server
Compact 3.1. (See System requirements for 3.1. for more
details.).
u
for later versions of Windows operating systems, install Microsoft
SQL Server Compact 3.5. (See System requirements for 3.5. for
more details.)
Administrator Manual
242
Appendices
It is not recommended to install more than one version of
Microsoft SQL Server Compact on the same computer due to
possible compatability issues.
Microsoft SQL Server Compact 3.1 does not support
encryption. Databases created on servers running under this
version of Microsoft SQL Server may not be compartible with
Microsoft SQL Server Compact 3.5 servers. Use the Dr.Web
Enterprise Suite exportdb and importdb commands
to import data from SQL Server Compact 3.1 databaes to SQL
Server Compact 3.5 databases.
A client to access the database is included in the installation package
of Dr.Web ES.
Parameters
To adjust access to the SQL CE DBMS, use the parameters described in
Table В-4.
Table В-4. Parameters of the SQL CE DBMS
Parameter
Description
drwsqlce
Driver name
DBFILE
Database name (by default mssqlce.sdf)
PASSWORD
Database encryption password
The PASSWORD parameter is an encryption key and bears no
relation to the user/password system.
By default, the password is empty (the database is not
encrypted).
Administrator Manual
243
Appendices
An example of the configuration file drwcsd.conf
If you deploy SQL CE, it is necessary to change the definition and the
settings of the database driver in the configuration file of the Server.
See a fragment of the configuration file with corresponding parameters
below:
...
;Database definition. Mandatory.
;Only one definition is allowed.
database
;DB driver (DLL or shared obj ect name)
drwsqlce ; sql server compact, windows only
;load library from this path; empty - use default
from ""
;parameters describing database connection
;defaults (DBFILE: varroot/mssqlce.sdf)
;using "DBFILE=mssqlce.sdf PASSWORD=drwcs"
using "DBFILE=mssqlce.sdf PASSWORD=drwcs"
Appendix B4. Using the PostgreSQL DBMS
General description
PostgreSQL is an object-relational DBMS distributed as a freeware
unlike such commercial DBMS’s as Oracle Database, Microsoft SQL
Server, etc. The PostgreSQL DBMS may be used to arrange an external
DB for the Dr.Web ES Server in large anti-virus networks.
Administrator Manual
244
Appendices
To do this
1) install the PostgreSQL server;
2) set up the ODBC driver;
3) set up the Dr.Web ES Server to use the respective external
database.
Installation and supported versions
Please download the latest available version of this free product,
otherwise do not use the PostgreSQL client earlier than 7.4.
PostgreSQL DMBS is compatible with the following platforms:
Linux, Solaris/OpenSolaris, Win32, MacOS X, FreeBSD.
For more information about conversion to the external database see p.
Changing the Type of the DBMS for Dr.Web Enterprise Suite.
For more information about installation of the anti-virus Server using
external database see step 10 in p. Installing the Anti-Virus Server for
Windows® OS.
Please mind that the ANSI version of the ODBC driver can be
used starting from PostgreSQL 8.2.4 version only. The
Unicode ODBC driver will work fine in all versions.
Paremeters
When setting access to PostgreSQL, use the parameters described
below.
Administrator Manual
245
Appendices
Table B-5. PostgreSQL parameters (only in the version for
UNIX OS)
Name
Default
value
Description
host
<UNIX
domain
socket>
PostgreSQL server host
PostgreSQL server port
extension of the socket file
port
dbname
drwcs
Database name
user
drwcs
User name
password
drwcs
Password
or
name
options
Debug /trace options for sending to the
Server
tty
File or tty to output at debug
requiressl
1
instructs to request a SSL
connection; 0 does not instruct to
make the request
max_expr_depth
Set a 2 or 2.5 times greater value than
the number of workstations expected in
the anti-virus network.
More information can be found at http://www.postgresql.org/
docs/7.4/static/libpq.html.
Administrator Manual
246
Appendices
Appendix C. The Description of the
Notification System Parameters
When setting the system of alerts for events connected with the
program’s operation, the parameters described below are used for
different types of annunciator drivers.
Table C-1. E-mail notifications (the drwemail driver):
Parameter
Default value
Description
HOST
127.0.0.1
SMTP host
PORT
25
SMTP port
USER
SMPT user
PASS
SMTP password
DEBUG
NO
Debug mode
FROM
drwcsd@localhost
Sender address
TO
root@localhost
Recipient address
Table C-2. Notifications through Windows Messenger (the
drwwnetm driver), for Windows OS version only:
Parameter
Default value
Description
TO
Admin
Computer network name
Administrator Manual
247
Appendices
Appendix D. The Parameters of the
Notification System Templates
The text for messages (sent by e-mail or Windows Messenger) is
generated by a Server’s component named the templates processor
on the basis of the templates files.
A template file consists of text and variables enclosed in braces. When
editing a template file, the variables listed below can be used.
The templates
substitutions.
processor
does
not
perform
recursive
The variables are written as follows:
u
{SYS.TIME} — substitute the current value of the SYS.TIME
variable,
u
u
{SYS.TIME:5} –– the first five characters of the variable,
{SYS.TIME:3:5} — the value of five characters of the
variable that go after the first three characters (beginning from
the fourth), if the remainder is less, it is supplemented by spaces
on the right,
u
{SYS.TIME:3:-12} — the value of 12 characters of the
variable that go after the first three characters (beginning from
the fourth), if the remainder is less, it is supplemented by spaces
on the left.
Table D-1. Notation of variables
Variable
Value
Expression
Value
SYS.TIME
10:35:17:456
{SYS.TIME:5}
10:35:17:456
SYS.TIME
10:35:17:456
{SYS.TIME:3:5}
35:17
SYS.TIME
10:35:17:456
{SYS.TIME:3:-12}
35:17:456
SYS.TIME
10:35:17:456
{SYS.TIME:3:12}
35:17:456
SYS.TIME/10/99
99:35:17.456
{SYS.TIME/10/99/35/77}
99:77:17.456
Administrator Manual
248
Appendices
In case a substitution is used (see the last row), there is no
limitation for the number of substitution pairs.
System variables (allowed in Subj ect, Headers):
SYS.TIME — current system time,
SYS.DATE — current system date,
u SYS.DATETIME — current system date and time,
u SYS.VERSION — Server version,
u SYS.BUILD — Server build date,
u SYS.PLATFORM — Server platform,
u SYS.PLATFORM.SHORT — short variant of SYS.PLATFORM,
u SYS.OS — Server operating system name,
u SYS.BRANCH — system version (Server and Agents).
u
u
The environment variables have the same names as the variables
specified in the environment with the ENV. prefix added (the prefix
ends with a period).
Shared variables of messages (the Agent):
GEN.LoginTime — station login time,
GEN.StationAddress — station address,
u GEN.StationID — station UUID,
u GEN.StationName — station name.
u
u
Shared variables of messages (Server’s updating
subsystem):
GEN.CurrentRevision –– current version identifier,
GEN.NextRevision –– updated version identifier,
u GEN.Folder –– product location folder,
u
u
Administrator Manual
249
Appendices
u
GEN.Product –– product description.
Message variables united according to message
types (for the Agent):
Administrator_Authorization_Failed:
MSG.Login — login,
u MSG.Address — Console network address;
u
Approved_Newbie:
u
u
MSG.AdminName — administrator name,
MSG.AdminAddress — administrator Console address;
AutoApproved_Newbie: no variables are available;
Awaiting_Approval: no variables are available;
Cannot_Add_Station:
u
MSG.ID — station UUID;
Connection_Terminated_Abnormally:
u
MSG.Reason — reason for the termination;
Infection:
MSG.Component — component name,
MSG.RunBy — component run by this user,
u MSG.ServerTime — event receipt time (GMT),
u MSG.ObjectName — infected object name,
u MSG.ObjectOwner — infected object owner,
u MSG.InfectionType — infection type,
u MSG.Virus — virus name,
u MSG.Action — curing action;
u
u
Installation_Bad:
u
MSG.Error — error message;
Administrator Manual
250
Appendices
Installation_OK: no variables are available;
License_Limit:
MSG.Used — number of stations in the base,
u MSG.Licensed — permitted by license,
u
is sent when the number of registered stations is approaching
the license limit, namely less than 5% of the license limit or less
than two stations is unused;
Near_Max_Stations:
MSG.Used — number of stations in the base,
u MSG.Licensed — permitted by license,
u MSG.Percent — the percentage of free licenses,
u
is sent at every Server launch in case the Server is launched with a
key allowing a lesser number of stations than it already has;
Newbie_Not_Allowed: no variables are available;
Not_Seen_For_A_Long_Time:
MSG.StationName — station name,
u MSG.StationID — station UUID,
u MSG.DaysAgo — number of days since the last visit,
u MSG.LastSeenFrom — address the station was seen at last
u
time;
Processing_Error:
MSG.Component — component name,
MSG.RunBy — component run by this user,
u MSG.ServerTime — event receipt time (GMT),
u MSG.ObjectName — object name,
u MSG.ObjectOwner — object owner,
u MSG.Error — error message;
u
u
Rejected_Newbie:
Administrator Manual
251
Appendices
MSG.AdminName — administrator name,
u MSG.AdminAddress — administrator Console address;
u
Station_Already_Logged_In:
MSG.ID — station UUID,
u MSG.Server — ID of the Server at which the station is
u
registered,
is sent, if the station is already currently registered at this or another
Server;
Station_Authorization_Failed:
MSG.ID — station UUID,
u MSG.Rejected — values: rejected — access to a
station is denied, newbie — there was an attempt to assign
u
the "newbie" status to a station;
Statistics:
MSG.Component — component name,
MSG.ServerTime — event receipt time (GMT),
u MSG.Scanned — number of scanned objects,
u MSG.Infected — number of infected objects,
u MSG.Modifications — number of objects infected with
u
u
known modifications of viruses,
MSG.Suspicious — number of suspicious objects,
u MSG.Cured — number of cured objects,
u MSG.Deleted — number of deleted objects,
u MSG.Renamed — number of renamed objects,
u MSG.Moved — number of moved objects,
u MSG.Speed — processing speed in KB/s;
u
Too_Many_Stations:
u
MSG.ID — station UUID,
is sent when a new station cannot log in on the Server due to the
license limitations;
Administrator Manual
252
Appendices
Unknown_Administrator:
u
u
MSG.Login — login,
MSG.Address — network Console address;
Unknown_Station:
u
u
MSG.ID — UUID of unknown station,
MSG.Rejected — values: rejected — access for a
station is denied; newbie — there was an attempt to assign
the "newbie" status to a station;
Update_Failed:
MSG.Product — updated product,
u MSG.ServerTime — (local) time of receipt of a message by
u
the Server;
Update_Wants_Reboot:
MSG.Product — updated product,
u MSG.ServerTime — (local) time of receipt of a message by
u
the Server.
Message variables, according to messages (for
Server’s updating subsystem):
Srv_Repository_Cannot_flush: no variables are available;
Srv_Repository_Frozen: no variables are available;
Srv_Repository_Load_failure:
u
MSG.Reason — message on the cause of the error;
Srv_Repository_Update:
MSG.AdddedCount — number of added files,
MSG.ReplacedCount — number of replaced files,
u MSG.DeletedCount — number of deleted files,
u MSG.Added — list of added files (each name in a separate
u
u
line),
Administrator Manual
253
Appendices
u
MSG.Replaced — list of replaced files (each name in a
separate line),
u
MSG.Deleted — list of deleted files (each name in a
separate line);
Srv_Repository_UpdateFailed:
MSG.Error — error message,
u MSG.ExtendedError — detailed description of the error;
u
Srv_Repository_UpToDate: no variables are available.
The variables of the last template do not include the files
marked as "not to be notified of" in the product
configuration file, read F1. The Syntax of the Configuration
File .config.
The variables of the Server messages about the
coming license expiration.
Key_Expiration:
MSG.Expiration — date of license expiration,
u MSG.Expired — 1, if the term has expired, otherwise 0,
u MSG.ObjId — object GUID,
u MSG.ObjName — object name,
u MSG.ObjType – object using an expiring key (server/station/
u
group).
Administrator Manual
254
Appendices
Appendix E. The Specification of
Network Addresses
In the specification the following conventions are taken:
u
variables (the fields to be substituted by concrete values) are
enclosed in angle brackets and written in italic,
u
permanent text (remains after substitutions) is written in bold,
u
optional elements are enclosed in brackets,
u
the defined notion is placed on the left of the ::= character
string, and the definition is placed on the right (as in the BackusNaur form).
E1. The General Format of Address
The network address looks as follows:
[<protocol>/][<protocol-specific-part>]
By default, <protocol> has the TCP value, IPX and NetBIOS are also
possible. The default values of <protocol-specific-part> are determined
by the application.
IP addresses
u
<interface>::=<ip-address>
<ip-address> can be either a DNS name or an IP address
separated by periods (for example, 127.0.0.1).
u
<socket-address>::=<interface>:<port-number>
<port-number> must be specified by a decimal number.
IPX addresses
u
<interface>::=<ipx-network>.<mac-address>
Administrator Manual
255
Appendices
<ipx-network> must contain 8 hexadecimal numbers, <macaddress> must contain 12 hexadecimal numbers.
u
<socket-address>::=<interface>:<socket-number>
<socket-number> must contain 4 hexadecimal numbers.
NetBIOS addresses
u
Datagram-oriented protocol:
nbd/NAME[:PORT[:LANA]]
u
Connection-oriented protocol:
nbs/NAME[:PORT[:LANA]]
where NAME — NetBIOS computer name, PORT — port (by
default 23), LANA — number of the network adapter
(important for NetBEUI).
Examples:
1.tcp/127.0.0.1:2193
means
a
TCP
protocol,
port
2193
on
an
interface
127.0.0.1.
2.tcp/[::]:2193
means a TCP protocol, port 2193 on an IPv6 interface
0000.0000.0000.0000.0000.0000.0000.0000
3.localhost:2193
the same.
4.tcp/:9999
value for the Server: the default interface depending on the
application (usually all available interfaces), port 9999; value
for client: the default connection to the host depending on the
application (usually localhost), port 9999.
Administrator Manual
256
Appendices
5.tcp/
TCP protocol, default port.
6.spx/00000000.000000000001:2193
means socket SPX loopback 0x2193.
Connection-oriented protocol
<protocol>/<socket-address>
where <socket-address> sets the local address of the socket
for the Server or a remote server for the client.
Datagram-oriented protocol
<protocol>/<endpoint-socket-address>[-<interface>]
Examples:
1.udp/231.0.0.1:2193
means using a multicast group 231.0.0.1:2193 on an
interface depending on the application by default.
2.udp/[ff18::231.0.0.1]:2193
means using a multicast group [ff18::231.0.0.1] on an
interface depending on the application by default.
3.udp/
application-dependent interface and endpoint.
4.udp/255.255.255.255:9999-myhost1
using broadcasting messages on port 9999 on myhost1
interface.
Administrator Manual
257
Appendices
E2. The Addresses of Dr.Web Enterprise Server
Receipt of connections:
<connection-protocol>/[<socket-address>]
By default, depending on <connection-protocol>:
u
tcp/0.0.0.0:2193
which means "all interfaces (excluding those with IPv6
addresses), port 2193";
u
tcp/[::]:2193
which means "all IPv6 addresses, port 2193";
u
spx/00000000.000000000001:2193
which means "all interfaces, port 0x2193";
u
nbs/drwcs:23:0
which means using NetBIOS stream protocol, port 23,
computer drwcs.
Server location service:
<datagram-protocol>/[<endpoint-socket-address>[-<interface>]]
By default, depending on <datagram-protocol>:
u
udp/231.0.0.1:2193-0.0.0.0
which means using a multicast group 231.0.0.1:2193 for
all interfaces;
u
udp/[ff18::231.0.0.1]:2193-[::]:0
which
means
using
a
multicast
group
[ff18::231.0.0.1:2193] on all interfaces;
u
ipx/00000000.FFFFFFFFFFFF:2193-
Administrator Manual
258
Appendices
00000000.000000000000
which means receipt of broadcasting messages on socket
0x2193 for all interfaces.
u
nbd/drwcs:23:0
which means using NetBIOS datagram protocol, port 23,
computer drwcs.
E3. The Addresses of Dr.Web Enterprise Agent/
Installer
direct connection to the Server:
[<connection-protocol>]/[<remote-socket-address>]
By default, depending on <connection-protocol>:
u
tcp/127.0.0.1:2193
means loopback port 2193,
u
tcp/[::]:2193
means loopback port 2193 for IPv6;
u
spx/00000000.000000000001:2193
means loopback socket 0x2193.
<drwcs-name> Server location using the given
family of protocols and endpoint:
[<drwcs-name>]@<datagram-protocol>/[<endpoint-socketaddress>[-<interface>]]
By default, depending on <datagram-protocol>:
u
drwcs@udp/231.0.0.1:2193-0.0.0.0
Administrator Manual
259
Appendices
location of a Server with the drwcs name for a TCP
connection using a multicast group 231.0.0.1:2193 for all
interfaces,
u
drwcs@ipx/00000000.FFFFFFFFFFFF:219300000000.000000000000
location of a Server with the drwcs name for an SPX
connection using broadcasting messages on socket 0x2193 for
all interfaces.
Administrator Manual
260
Appendices
Appendix F. Administration of the
Repository
To administrate the functions of the repository, the following files
located in the program root folder are used:
u
Configuration file .config specifies the set of files and the
parameters of the updates server. The file has a text format, its
structure is described below in Appendices F1. The Syntax of the
Configuration File .config and F2. The Meaning of .config File
Instructions.
u
Status file .id displays the generalized state of a product
(revision number and incremental number of transaction). The
format is described below in Appendix F3. .id Files.
When setting up interserver links for product mirroring (read
p. Peculiarities of a Network with Several Anti-Virus Servers),
please remember that configuration files are not the part of
the product and therefore are not properly handled by the
mirror system. To avoid errors during the updating
u for peer Servers, use identical configuration,
u for subordinate Servers, disable synchronizing of
components through HTTP protocol or keep the
configuration identical.
After the configuration file and the status file have been
edited, reboot the Server.
F1. The Syntax of the Configuration File .config
Formal grammar based on the Extended Backus-Naur Form (EBNF)
notation is used for description of the Server's configuration file. It
uses the following symbols:
Administrator Manual
261
Appendices
u
(...) — group of symbols (fragment of the configuration
file),
'...' — terminal symbol;
<...> — nonterminal symbol;
u | - symbol for selecting one of the given elements;
u (...)? - symbol (or group of symbols) to the left of the
u
u
operator is not obligatory (may occur 0 or 1 time);
u
(...)* - symbol (or group of symbols) to the left of the
operator may be repeated any number of times (or may be
omitted);
u
(...)+ - symbol (or group of symbols) to the left of the
operator may occur 1 or more times;
u
[...] - any symbol from the specified range;
u
period at the end — a reserved character which indicates
completion of a rule.
<line> := <instruction>? (<separator>+ <comment>?)*.
<instruction> := <name> "{"? <parameter>* "}"?.
<name> := "description" | "sync-with" |
"sync-delay" | "sync-only" |
"sync-ignore" | "state-only" |
"state-ignore" | "notify-only" |
"notify-ignore" | "notify-off".
<parameter> := <text>.
<text> := <word> <separator>*.
<word> := (<symbol> | <sign>)+.
<symbol> := [a-zA-Z] | [0-9].
<sign> := """ | "/"| "\" | "*" | "^" | "." | "-"| "$".
<separator> := \r | \t | \n | \s.
<comment> := ";"<текст>
<M2><text>+<M2>.
|
"#"<M1><symbol>+<M1>
|
"'"
<M1> := <symbol>+.
Administrator Manual
262
Appendices
<M2> := <sign>+.
The configuration file is a sequence of words separated by separators.
A separator is any sequence of the following characters: space (\s),
tab (\t), carriage return (\r), line feed (\n).
A word beginning with a semicolon (;) means the beginning of a
comment which lasts till the end of the line.
Examples:
ghgh 123 ;this is a comment
123;this; is not; a comment
separator at the beginning.
–
requires
a
A word beginning with a number sign (#) means the beginning of a
stream comment; the rest of the word is specified by the end-ofcomment marker.
Example:
123 456 #COMM from here there is a comment COMM
here it is already ended
To include a character into a word, a ' prefix (apostrophe) is used —
it is a special separating character for the given word (in other words,
this character will be regarded as separator ending this word).
Example:
xy123 '*this is one word*this is another word
If a word begins with one of the characters: apostrophe,
semicolon, number sign (', ;, #), it must be separated
by special separator characters, as described above.
The .config file consists of comments and instructions. The
sequence of instructions is inessential.
Administrator Manual
263
Appendices
The format of instructions of configuration files is casesensitive.
The repository is case-sensitive regardless of the file system
and the OS of the Server.
The meaning of instructions is explained in Appendix F2. The Meaning
of .config File Instructions.
F2. The Meaning of .config File Instructions
The description instruction
The description instruction sets a product name which is
displayed in the Console. If this instruction is unavailable, the name
of the respective folder of the product is used as the product name.
Example:
description '"Dr.Web® Enterprise Agent"
The sync-with instruction
The sync-with instruction sets the list of HTTP servers and HTTPproxy servers for updating. The name parameter sets the domain
name or the IP address. The :port construction may be absent, in
this case, by default, 80 will be regarded the port number for the HTTP
server and 3128 for the proxy server.
The servers in the list are polled consequently, once the updating is
successful, the polling procedure terminates.
The current version supports only base HTTP and proxy-HTTP
authentication.
Administrator Manual
264
Appendices
Constant HTTP redirects (code 301) are cached in memory till
server reboot.
Example:
sync-with{
http{ esuite.msk3.drweb.com
http{ esuite.msk4.drweb.com
http{ esuite.msk.drweb.com
http{ esuite.us.drweb.com
http{ esuite.jp.drweb.com
/update
/update
/update
/update
/update
}
}
}
}
}
}
If using the proxy server
sync-with{
http-proxy{ 10.3.0.74
msk7.drweb.com /update
http-proxy{ 10.3.0.74
jp.drweb.com
/update
http-proxy{ 10.3.0.74
msk5.drweb.com /update
http-proxy{ 10.3.0.74
msk6.drweb.com /update
http-proxy{ 10.3.0.74
msk.drweb.com /update
http-proxy{ 10.3.0.74
us1.drweb.com /update
http-proxy{ 10.3.0.74
msk3.drweb.com /update
http-proxy{ 10.3.0.74
msk4.drweb.com /update
http-proxy{ 10.3.0.74
us.drweb.com
/update
http-proxy{ 10.3.0.74
fr1.drweb.com /update
}
auth
} }
auth
} }
auth
} }
auth
} }
auth
} }
auth
} }
auth
} }
auth
} }
auth
} }
auth
} }
user:pass http{ esuite.
user:pass http{ esuite.
user:pass http{ esuite.
user:pass http{ esuite.
user:pass http{ esuite.
user:pass http{ esuite.
user:pass http{ esuite.
user:pass http{ esuite.
user:pass http{ esuite.
user:pass http{ esuite.
Administrator Manual
265
Appendices
where:
10.3.0.74 - IP-address of the proxy server;
u user - name of the user to access the proxy server (may be
u
absent, if the proxy do not require authentication);
u
pass - password to access the proxy server (may be absent, if
the proxy do not require authentication).
The sync-only instruction
The sync-only instruction explicitly specifies the sets of filenames
(specified both by regular expressions in a simple form as shown in
this section, and in full form qr{}, as shown in p. Launching and
Terminating Anti-Virus Scanning on Workstations) which are subject to
synchronization. If the instruction is absent, by default, the whole
content of the folder will be synchronized (excluding files whose
names begin with a period).
Example:
sync-only{^common/drw.*vdb$}
instructs to update only virus databases.
The sync-ignore instruction
The sync-ignore instruction explicitly specifies the set of files,
which are not subject to synchronization.
If some files have been locally added to a product (which
were not present in the original set) and the sync-only
instruction is not used, the added files should be listed in
sync-ignore, otherwise they will be deleted during
synchronization.
Administrator Manual
266
Appendices
The sync-delay instruction
The sync-delay instruction sets the list of files which, if changed,
disable the product’s transition to a new revision. The repository
continues to distribute the previous revision, and it is not synchronized
(the state of product is "frozen"). If a user finds this revision
acceptable for distribution, he must edit the .id status file and
restart the Server (read Appendix F3. .id Files).
Examples:
u
The automatic distribution of new revisions is disabled:
sync-delay{
distribution,
.*
}
;
no
automatic
I will test everything myself
u
The automatic distribution of revisions where the executable
files are updated is disabled:
sync-delay{ .*\.exe$ .*\.dll$ }
The state-only and state-ignore instructions
The state-only and state-ignore instructions set (limit) the
list of files for distribution.
Example:
For the anti-virus Agent:
u
no interface language, except for Russian, should be received,
u
no components designed for Windows 98 OS, Windows Me OS
should be received.
sync-ignore{
; As soon as the listed files are in the
; repository, they are to be propagated.
; Therefore, they should be deleted or
Administrator Manual
267
Appendices
; listed in state-ignore{ } or full
; synchronization in this
; configuration should be made
;^common/ru-.*\.dwl$
^common/de-.*\.dwl$
^common/pl-.*\.dwl$
^common/es-.*\.dwl$
^win/de-.*\.*
^win/pl-.*\.*
^win-9x\.*
}
we need it
The instructions of the notify group
The instructions of the notify group allow to set up the notification
system for separate products (the setting of the notification system is
described in p. Setting Alerts).
The repository generates the following types of notifications:
update — when a product is successfully updated,
u delay — when a transaction is frozen,
u flushfail — when a flush error occurs,
u loadfail — when a load error occurs.
u
By default, all the types are allowed.
The notify-off instruction allows to disable certain types of
notifications for the given product.
The notify-ignore and notify-only instructions allow to
limit or specify explicitly the list of files, for which, if changed, the
notification of the update type is sent.
Administrator Manual
268
Appendices
If at least two of the sync-only, sync-ignore or
sync-delay instructions are present in a file, the following
rule is used:
u
sync-only is applied first. Files not specified in this
u
sync-ignore is applied to the rest of files,
u
sync-delay is applied only to the remaining files
instruction (if any), are not processed,
(after the two previous items have been applied).
The same rule is applied to the application order of state-only and
state-ignore.
F3. .id Files
The product’s status file is a text file in which the Server logs the
revisions numbers of the product. Usually, the file contains a single
number (the current revision number). The product will be
synchronized if only the revision number on the GUS server is more
than the current number. The synchronization is performed in four
stages:
1. Two numbers are written to the .id file:
<new_revision> <previous_revision>.
Thus it is marked, that the product is in an incomplete
transaction from
<previous_revision> to <new_revision>.
2. All changed files are received via HTTP and placed to the
respective subcatalogs with files of the following type:
<original file name>.<new_revision>.
3. The result of the transaction is written to the .id file.
This can be a normal state but with a new number, or a
"frozen" state (frozen), if the sync-delay rule has worked:
Administrator Manual
269
Appendices
<new_revision> <previous_revision> frozen
4. If the state is not "frozen", new files replace the original files.
When the Server is rebooted after the .id file is analyzed,
incomplete transactions "roll back", otherwise, step 4) is performed.
F4. Examples of Administrating the Repository
with a Modification of the Status File
Full synchronization of a product:
u
stop the Server,
u
delete the content of the product’s folder, except for the .id
and the .config files,
u
write 0 to the .id file,
u
launch the Server,
u
update the product.
0 revision has a special meaning, as it disables propagation,
therefore the "empty" status of the product is not
propagated to the Agents.
Disabling of propagation:
u
stop the Server,
u
write 0 to the .id file,
u
comment the sync-with instruction in the .config, file
to disable synchronization,
u
restart the Server,
u
update the product.
Shift from the "frozen" status to a new version:
u
replace the content of the .id file
<new_revision> <previous_revision> frozen
Administrator Manual
270
Appendices
with
<new_revision>,
u
restart the Server,
u
update the product.
Roll back from the "frozen" status to the previous version:
u
replace the content of the .id file
<new_revision> <previous_revision> frozen
with
<new_revision previous_revision>,
u
restart the Server,
u
update the product.
At future attempts to synchronize with the previous
configuration and to the same <new revision>, the repository
will go into the "frozen" status again. A roll back is
reasonable when a suitable revision is available (for example,
after successful tests in the lab) to download it or when
changing the configuration.
Administrator Manual
271
Appendices
Appendix G. The Server's Configuration
Files
This section describes the format of the following files:
u
Configuration file of the anti-virus Server (drwcsd.conf);
u
Configuration file of the Web Inteface (webmin.conf).
G1. Server Configuration File
The drwcsd.conf Server configuration file resides by default in
the etc subfolder of the Server root folder. If the Server is run with
a command line parameter, a non-standard location and name of the
configuration file can be set (for more read Appendix H5. Dr.Web
Enterprise Server).
Formal grammar based on the Extended Backus-Naur Form (EBNF)
notation is used for description of the Server's configuration file. It
uses the following symbols:
u
(...) — group of symbols (fragment of the configuration
file),
'...' — terminal symbol;
u <...> — nonterminal symbol;
u | - symbol for selecting one of the given elements;
u (...)? - symbol (or group of symbols) to the left of the
u
operator is not obligatory (may occur 0 or 1 time);
u
(...)* - symbol (or group of symbols) to the left of the
operator may be repeated any number of times (or may be
omitted);
u
(...)+ - symbol (or group of symbols) to the left of the
operator may occur 1 or more times;
u
[...] - any symbol from the specified range;
Administrator Manual
272
Appendices
u
period at the end — a reserved character which indicates
completion of a rule.
Format of the Server's configuration file
<instruction> := (<parameter> '"'<value>'"')? (';'<comment>)?.
<parameter> := <word>.
<value> := (<word> <separator>*)*.
<word> := ([a-zA-Z] | [0-9] | <reserved_character>)+.
<reserved_character> := '&&' | '&r' | '&t' | '&n' | '&v' | '
&f' | '&b' | '&e' | '&l' | '&s'.
<separator> := \s | \t | \r | \n | \f.
The configuration file has a text format. The main structural elements
of this file are words, separated by separators — spaces, tabs, carriage
returns, line feeds, and format characters. In addition, a sequence of
characters included in straight quotation marks "..." is considered a
word.
Special sequences of two characters beginning with an ampersand (&)
can be included in a word, not breaking it. They are interpreted as
follows:
&& — as an ampersand itself,
&r — carriage return,
u &t — tab,
u &n — line feed,
u &v — vertical tab,
u &f — format character,
u &b — backspace character,
u &e — equal sign (=),
u &l — vertical bar (|),
u &s — space.
u
u
An ampersand (&) at the end of a line is equal to &n.
Administrator Manual
273
Appendices
Thus, a usual ampersand (which is not used to set a special
sequence) should be doubled.
Comments begin with a semicolon and continue till the end of the line.
The Server settings are specified in the configuration file as
instructions, each of them is one word. Instructions can be followed by
instructions parameters (one or several words).
Possible instructions and their parameters are described below. The
sequence of instructions in a file is inessential. The parameters
(fragments of parameters) set by a user are in angle brackets.
u
Name <name>
Defines the name of the Server it will respond to when the
Server is being searched for by the Agent or the administrator
Console. The default value — an empty line ("") — means
using the computer name.
u
Threads <number>
Number of Server threads which are serving clients. By default
it is set to 5. It is not advisable to change this parameter unless
recommended by the customer support.
u
DBPool <number>
Number of database connections with the Server. For Windows
OS and UNIX OS servers the parameter is set to 2 by default. It
is not advisable to change this parameter unless recommended
by the customer support.
u
Newbie <mode>
Access mode of new stations, can have the Open, Close or
Approval values (by default, it is Approval. Read more in p.
New Stations Approval Policy).
u
UnAuthorizedToNewbie <mode>
The mode can have either the Yes value, which means that the
newbie status will be automatically assigned to unapproved
Administrator Manual
274
Appendices
stations (for example, if the database has been destroyed), or
the No value (default), which stands for a standard operation.
u
WEBStatistics "Interval=<number>
Server=<server_address>
URL=<catalog>
ID=<client_identifier>
User=<user>
Password=<password>
Proxy=<proxy_server>
ProxyUser=<proxy_user>
ProxyPassword=<proxy_password>"
Above is described a web server where ES will publish its
statistics on detected viruses. The upload span is set in minutes,
the default value is 30. It is not recommended to set the upload
span to more than one hour.
The default server address is stat.drweb.com:80
The default URL is /update.
ID — client’s identifier (by default, it is derived from the
Server key file (enterprise.key).
The User and the Password fields describe the authorization
on the web server, other fields determine the proxy server and
the authorization on it. By default, the fields are empty (no
authorization required).
To get access to data collected on the statistics server, contact
the customer support at [email protected].
u
Encryption <mode>
Traffic encryption mode. Possible values: Yes, No, Possible (by
default Possible). For more read p. Traffic Encryption and
Compression.
u
Compression <mode>
Administrator Manual
275
Appendices
Traffic compression mode. Possible values: Yes, No, Possible (by
default No). For more read p. Traffic Encryption and
Compression.
u
u
ConsoleAccess, InstallAccess, AgentAccess and
LinksAccess parameters are not displayed in the
configuration file unless the Use this ACL checkbox is selected
(for more see p. Setting the Server Configuration). If this
checkbox is selected, the displayed value for disabled
parameters is “none”. For enabled parameters the specified
addresses will be displayed.
Database
<DRIVER>
from
<PATH>
using
<PARAMETERS>
Determination of the database. <DRIVER> — database driver
name, <PATH> — path where the driver is to be loaded from,
<PARAMETERS>— connection parameters between the
Server and the database. Read more in p. Setting the Mode of
Operation with Databases.
This instruction can be used only once in the configuration
file.
u
<DRIVER>
<PARAMETERS>
Alert
from
<PATH>
using
Determination of the "annunciator". <DRIVER> — annunciator
driver name, <PATH> — path where the driver is to be loaded
from, <PARAMETERS>— annunciator parameters. Read more
in p. Setting Alerts.
This instruction can be used only once in the configuration
file.
Administrator Manual
276
Appendices
In this and in the next instruction the parameters in the using
field are separated by spaces. The parameter name is
separated from the value by an equal sign (=) (should not be
surrounded by spaces). If the parameter can have more than
one value, they are separated from each other by the vertical
bars (|). If the parameter value contains equal signs, vertical
bars or spaces, they are replaced with the &&e, &&l, &&s
sequences accordingly.
u
Transport <NAME> <STREAM> <DATAGRAM>
It determines the transport protocols and assigns them to
network interfaces. <NAME> — Server name set as in the
name instruction above, if an empty line is specified, the name
is taken from name. <STREAM> (for example, tcp/),
<DATAGRAM> (for example, udp/) have the format described
in Appendix D. The Parameters of the Notification System
Templates.
u
Disable Message <message>
To disable sending messages of a specific type; possible
parameter values: message type; the full list of message types
is in the var/templates folder.
u
Disable Protocol <protocol>
Disable using of one of the Server protocols; possible values
are AGENT, SERVER, INSTALL, CONSOLE. The SERVER protocol
is disabled by default. Read more in p. Setting the Server
Configuration.
Disabling unnecessary protocols saves system resources.
u
Disable Plugin <module>
Disable the use of plug-ins for the Server. Legitimate value:
WEBMIN. For details see Setting the Server Configuration.
u
ShowHostNames=<value>
Enable computer domain names in the log instead of the TCP
Administrator Manual
277
Appendices
address. Possible values: Yes or No.
u
ReplaceNetBIOSNames=<value>
Enable replacing computer NetBIOS names with the DNS name.
Possible values: Yes or No.
u
Organization,
Department,
Country,
Province, City, Street, Floor, Room, Latitude
and Longitude parameters define additional information
The
about the location of the workstation.
u
MaximumAuthorizationQueue <value>
Specify the maximum number of workstation in the Server
authorization queue.
u
TrackAgentJobs <value>
Enable writing the results of task completion for workstations to
the DB. Possible values: Yes or No.
u
TrackAgentStatus <value>
Enable accounting of the workstation's status changes and
writing information to the DB. Possible values: Yes or No.
u
TrackVirusBases <value>
Enable accounting of the workstation's virus database status
(composition, changes) and writing information to the DB.
Possible values: Yes or No.
u
Audit <value>
Enable audit logging of the operations performed by the
administrator on the Console and writing the log to the DB.
Possible values: Yes or No.
u
AuditInternals <value>
Enable audit logging of the Server's internal operations and
writing the log to the DB. Possible values: Yes or No.
Administrator Manual
278
Appendices
Appendix H. Command Line Parameters
of the Programs Included in ES
H1. Introduction
Command line parameters have a higher priority than the default
settings, or other constant settings (set in the Server configuration
file, Windows OS registry, etc.). In some cases, the parameters
specified at launch also predetermine the constant parameters. Such
cases are described below.
Some command line parameters have a form of a switch — they begin
with a hyphen. Such parameters are also called switches, or options.
Many switches can be expressed in various equivalent forms. Thus, the
switches which imply a logical value (yes/no, disable/enable)
have a negative variant, for example, the -admin-rights switch
has a pair -no-admin-rights with the opposite meaning. They
can also be specified with an explicit value, for example, -adminrights=yes and -admin-rights=no.
The synonyms of yes are on, true, OK. The synonyms of
no are off, false.
If a switch value contains spaces or tabs, the whole parameter should
be put in quotation marks, for example:
"-home=c:\Program Files\DrWeb Enterprise Suite"
When describing the syntax of parameters of separate programs
optional parts are enclosed in brackets [...].
The names of switches can be abbreviated (by omitting the
last letters), unless the abbreviated name is to coincide with
the beginning of any other switch.
Administrator Manual
279
Appendices
H2. The ES Agent Interface Module
The Agent’s interface module is run for each user who logs in to a
computer on-line. On computers operated by Windows NT OS,
Windows 2000 OS, Windows XP OS, Windows 2003 OS, Windows Vista
OS it is run with specified user permissions. For proper operation, the
Agent requires standard Windows Explorer as a user shell or any
other program fully compatible with it.
The syntax of the start instruction of the interface module:
drwagnui [<switches>]
The following switches are allowed:
u
-admin-rights or -no-admin-rights — enable or
disable the administration mode in Windows 98 OS, Windows
ME OS (that is, to consider the user working in these
environments as an administrator or not). The administrator
can, for example, change the Agent’s settings. For Windows NT
OS, Windows 2000 OS, Windows XP OS, Windows 2003 OS,
Windows Vista OS it is determined by the OS permissions
system. By default, it is disabled.
u
-delay=<number> — specifies in how many minutes after the
load the welcome message should be displayed to the user. By
default, it is 2 minutes; the -1 value disables the welcome
message.
-help — to display help on the format of commands.
u -trace — to log in detail the location of error origin.
u
H3. The ES Agent
Settings of the Agent are stored in the Windows OS registry in the
HKEY_LOCAL_MACHINE\SOFTWARE\IDAVLab\Enterprise
Suite\Dr.Web Enterprise Agent\Settings branch. For
the parameters set by switches, the parameter name coincides with
the switch name.
Administrator Manual
280
Appendices
The list of GUS servers the Agent can connect to is stored in .
config files in repository subfolders (for Windows OS - DrWeb
Enterprise Server\var\repository\).
When the Agent is started with explicitly specified parameters, the
specified settings are used not only in the current session, but are also
written to the registry and become constant. Thus, if the Agent is run
for the first time with all necessary settings, at subsequent starts it is
unnecessary to specify any parameters.
Under Windows NT OS, Windows 2000 OS, Windows XP OS, Windows
2003 OS, Windows Vista OS the Agent is run by the system as a
service and is administrated through Control Panel. Under Windows
OS 98/Windows OS Me the Agent is run as a Windows 98 OS,
Windows Me OS service and cannot be administrated.
The start instruction syntax:
drwagntd [<switches>] [<servers>]
Switches
The following switches are possible:
u
-home=<folder> — the folder to which the Agent is installed.
If the switch is not set, the folder where the executable file of
the Agent resides is meant.
-key=<public_server_key> — a file of the Server public key,
by default, it is drwcsd.pub in the folder set by -home.
u -drweb-key=<license_key> — user license key file. This key
u
will be used by the client software, if it does not visit the Server
for a long time and in case the key received from the Server
has expired. When the Agent is connected to the Server, this
key is not required. By default, it is an arbitrary valid key in the
folder set by the –home parameter.
u
-crypt=<mode> — the encryption mode of the traffic with the
Server. Possible values are yes, no, possible, the default value
is yes.
u
-compression=<mode> — the compression mode of the
Administrator Manual
281
Appendices
traffic with the Server. Possible values are yes, no, possible, the
default value is possible.
u
-log=<log_file> — Agent’s log file. By default it resides in the
logs subfolder of the Agent’s installation folder. When
uninstalling the Agent’s software, the deinstallation log is saved
to the system temporary folder.
u
-rotate=Nf,Mu - Agent's log rotation mode, where:
· N - number of files;
· f - log-files storage format, possible values: z (gzip) compress file, uses by default, or p (plain) - do not
compress files.
· M - file size;
· u - unit measure, possible values: k (kilo), m (mega), g
(giga).
By default, it is 10,10m, which means storing of 10 files 10
megabytes each, use compression. Alternatively you can use the
none format (-rotate=none), which means "do not use
rotation, always write to the same file which may extend to any
size".
u
-rotate=<quantity,size> — log rotation mode.
If you specify k instead of m after the second number, the size
will be set in kilobytes, if there is no letter in megabytes.
In the rotation mode, log file names are generated as follows.
Assume the log file name is set to file.log (see the –log
switch above), then
· file.log — current log file,
· file.log-1 — previous log file,
· file.log-2 and so on — the greater the number, the
older the version of the log.
u
-verbosity=<details_level> — log level of detail. By default,
INFO is specified; ALL, DEBUG3, DEBUG2, DEBUG1,
DEBUG, TRACE3, TRACE2, TRACE1, TRACE, NOTICE,
WARNING, ERROR, and CRIT are also possible. The ALL and
DEBUG3 values are synonyms.
Administrator Manual
282
Appendices
u
-trace — to log in detail the location of error origin.
This switch defines the log level of detail set by the
subsequent -log switch (read above). One instruction can
contain several switches of this type.
u
-retry=<quantity> — the number of attempts to locate the
Server (if Server search is used) before the failure is reported.
3 is set by default.
u
-timeout=<time> — search retry timeout in seconds. 5 is set
u
-spiderstat=<interval> — interval in minutes for the
by default.
SpIDer Guard‘s statistics to be sent to the Server; the default
value is 30. The statistics will be sent to the Server at such
intervals provided that the statistics has been changed during
the interval.
u
-help — generate help on the format of the instruction and
its parameters. The same is for -help of the interface module,
read Appendix H2. The ES Agent Interface Module.
u
-control=<action> — administrating the state of the
Agent’s service.
Possible actions:
· install — install the service,
· uninstall — uninstall the service,
· start — run the service (only Windows NT OS,
Windows 2000 OS, Windows XP OS, Windows 2003 OS,
Windows Vista OS),
· stop — terminate the service (only Windows NT OS,
Windows 2000 OS, Windows XP OS, Windows 2003 OS,
Windows Vista OS),
· restart — restart the service (only Windows NT OS,
Windows 2000 OS, Windows XP OS, Windows 2003 OS,
Windows Vista OS).
Administrator Manual
283
Appendices
Servers
<servers> —
list
of
Servers.
By
default
-
drwcs@udp/231.0.0.1:2193, which instructs to search the
drwcs Server using multicast requests for group 231.0.0.1
port 2193.
H4. The Network Installer
The start instruction format:
drwinst [<switches>] [<variables>] [<servers>]
Switches
Possible switches:
u
-key=drwcsd.pub — name and location of the Server
public key. It resides by default in the Installer subfolder of the
Server installation folder.
u
-uninstall — deinstallation of the package on a station
with the help of the uninstall script (see the -script switch).
If the script is not explicitly provided, the internal script will be
executed.
If such switch is missing (equals to -no-uninstall),
installation is performed.
u
-script=<script_name> — sets a file with the executable
script. The default value depends upon the presence of the
switch -uninstall.
u
-override — to try to install the software once again.
This switch allows variables. Mind that the variables (except for
the list of Servers) should coincide with those specified at
previous launch.
The switch may also be used together with other switches when
Administrator Manual
284
Appendices
starting the Installer via the command line.
The attempt will fail, if any components are run. It is advisable
to use the sequence "uninstall — repeated normal installation.
The absence of this switch equals to -no-override.
If the network installer is run in the normal installation mode
(i.e. without -uninstall and –override switches) on
stations where the installation has already been performed,
this will not incur any actions. The installer program
terminates with a flag indicating that a successful installation
has been completed.
u
-interactive — in the interactive mode after the
installation or removal is completed, the user may be requested
to restart the computer, if necessary. If the parameter is not set,
after the installation or removal is completed, the program
closes automatically. The absence of the switch is equivalent to
the -no-interactive switch.
When installing the Agent’s software remotely through the
Console, this key will not work.
-retry=<quantity> — similar to the Agent.
u -timeout=<time> — similar to the Agent.
u -compression=<mode> — the compression mode of the
traffic with the Server. Possible values are yes, no,
possible, the no value is set by default.
u -home=<folder> — installation folder. By default, it is "
Program Files\DrWeb Enterprise Suite" on the
u
system drive.
u
-log=<logs_folder> — the folder for the installation and
deinstallation logs. By default, installation logs are saved to the
logs subfolder set by -home for installation. Deinstallation
logs are saved to the folder selected by the user for storage of
temporary files.
Administrator Manual
285
Appendices
Due to the use of the log folder the administrator can create a
folder in the shared resource. All stations’ logs will be located
in this folder, which is convenient for analysis. Log file names
are generated automatically using the GUID and the computer
name.
u
-verbosity=<details_level> — level of detail of the log
(similar to the Agent). The default value is ALL.
This key defines the log level of detail set by the subsequent
-log key (read above). One instruction can contain several
switches of this type.
u
-regagent — register the Agent in the list Add or Remove
u
-configure — show configuration dialog, where the user can
u
-useolddlg — use the old dialog with the installation log. If
Programs.
set various options of the installer and the Agent.
the parameter is not set, the new dialog is displayed with the
installation progress indicator and information bar, where the
current operation is described.
u
-platforms=p1,p2,p3... – platforms load order (it is
standard by default, read Appendix J. Using the Script of ES
Agent Initial Installation).
-help — offer help. Similar to the Agent’s interface module.
u -trace — to log in detail the location of error origin.
u
Variables
The variables are listed after switches. The format of the elements is
as follows:
<variable>=<value>
Some most important variables:
u agent.language="C:\Program Files\DrWeb
Administrator Manual
286
Appendices
Enterprise Suite\RU-ESAUI.DWL" - this parameter
switches the language of the Agent context menu to Russian.
You should specify the full path to the language resources. By
default, English is used.
u
spider.install=no — do not install SpIDer Guard.
u
spiderml.install=no — similarly; do not install SpIDer
u
scanner.install=no — similarly; do not install Dr.Web
Install if no variable is specified.
Mail.
Scanner for Windows.
u
spidergate.install=no — similarly; do not install
SpIDer Gate.
agent.id=<identifier>,
u agent.password=<password> — the identifier and the
u
password of a workstation; if these parameters are set, the
workstation is connected not as the a “newbie”, but with the
specified parameters.
Servers
The list of Servers is absolutely similar to the one described for the
Agent.
H5. Dr.Web Enterprise Server
There are several variants as how to launch the Server. These
variants will be described separately.
Commands described in p. H5.1 – H5.5 are crossplatform and enable
using in both Windows OS and UNIX system-based OS's, unless it is
specified otherwise.
H5.1. Managing the Server
drwcsd
[<switches>] — set the parameters for the Server
Administrator Manual
287
Appendices
operation (the switches are described in more detail below).
H5.2. Basic Commands
drwcsd start — run the Server.
drwcsd restart — restart the Server (it is executed as
the stop and then start pair).
u drwcsd stop — stop the Server.
u drwcsd
reconfigure — reread and reboot the
u
u
configuration file (it is performed quicker and without starting a
new process).
u
drwcsd retemplate – reread notification templates from
the drive.
Commands stop and restart will not work under Solaris
10 OS. Use commands:
u
/usr/sbin/svcadm enable drwcsd - to run
the Server,
u
/usr/sbin/svcadm disable
drwcsd - to
stop the Server.
H5.3. Database Commands
Database Initialization
[<keys>] initdb agent.key [<DB_script>
<ini_file> [<password>]]] — database initialization.
drwcsd
[
u
agent.key — Dr.Web license key file (must be specified).
u
<DB_script> — DB initialization script. A special value - (minus)
means not to use such script.
u
<ini_file> — previously formed file in the drweb32.ini
format, which will set the initial configuration of Dr.Web
software components (i.e. for the Everyone group). A special
Administrator Manual
288
Appendices
value - (minus) means not to use such file.
u
<password> — original password of the Server administrator
(his name is admin). By default, it is root.
A minus can be omitted, if the next parameters are missing.
Adj usting parameters of database initialization
If embedded database is used, initialization parameters can be set via
an external file. The following command is used for this:
drwcsd.exe initdbex <response-file>
<response-file> - file with initialization parameters written line-by-line
in the same order as the initdb parameters.
File format:
<path_to_key_file>
<path_to_initdb.sql>
<path_to_drweb32.ini>
<administrator_password>
If using a response file under Windows OS, any symbols are
allowed in the administrator password.
Any strings following the necessary parameter in a particular case are
optional. If a string consists of only the minus symbol "-", the default
value is used (as in initdb).
Database Updating
drwcsd [<switches>] updatedb <script> — perform any action
with the database (for example, update to a new version) by executing
SQL instructors from the <script> file.
Administrator Manual
289
Appendices
Database Upgrading
drwcsd upgradedb <folder> – run the Server to update the
structure of the database at a version upgrade (see the var/
update-db folder).
Database Export
drwcsd exportdb <file> – export the database to the specified
file.
Example for Windows:
C:\Program Files\DrWeb Enterprise
Server\bin\drwcsd.exe -home="C:\Program
Files\DrWeb Enterprise Server" -var-root="C:
\Program Files\DrWeb Enterprise Server\var" verbosity=all exportdb "C:\Program Files\DrWeb
Enterprise Server\esbase.es"
Under UNIX OS the action is performed on behalf of the drwcs:drwcs
user to the directory $DRWCS_VAR (except for FreeBSD OS, which
by default saves the file to the directory from which the script was run;
if the path is specified explicitly, then the directory should have the
recording right for the <user>:<group> that had been created at
installation, by default it is drwcs:drwcs).
Database Import
drwcsd importdb <file> – import the database from the specified
file (the previous content of the database is deleted).
Database Verification
drwcsd verifydb – run the Server to check the database. Upon
completion the Server saves the verification results in the log file
(drwcsd.log by default).
Administrator Manual
290
Appendices
H5.4. Repository Commands
u
drwcsd syncrepository – synchronize the repository
u
drwcsd rerepository – reread the repository from the
with the GUS. Stop the Server before initiating this instruction!
drive.
H5.5. Critical Server Data Backup
The following command creates backup copies of critical Server data
(database contents, Server license key, private encryption key,
Server configuration key, and Web Interface configuration key):
drwcsd -home=<path> backup [<directory> [<quantity>]] – copy critical Server data to the specified folder. -home sets the
Server installation catalog. <quantity> is the number of copies of each
file.
Example for Windows:
C:\Program Files\DrWeb Enterprise
Server\bin>drwcsd -home="C:\Program Files\DrWeb
Enterprise Server" backup C:\a
The copies are stored in the .dz format unpackable with gzip and
other archivers. After unpacking all the files, except for the database
contents, are ready to use. To restore the data, the database contents
can be imported from the backup to another database of the Server
by means of the importdb switch (see p. Restoring the Database of Dr.
Web Enterprise Suite).
Starting from the 4.33 version, ES regularly stores backups of critical
information to \var\Backup of the Server installation catalog. For
that purpose a daily task is included to the Server schedule, which
performs this function. If such task is missing, it is strongly
recommended to create it. Particularly there will be no backup critical
data task, if the initially installed (and then consequently upgraded)
Server version is 4.32.
Administrator Manual
291
Appendices
H5.6. Commands for Windows® OS Only
[<switches>]
service in the system.
install — install the Server
u
drwcsd
u
drwcsd uninstall — uninstall the Server service from a
system.
kill — perform emergency shutdown of the
Server service (if normal termination failed). This instruction
should not be used without extreme necessity.
u
drwcsd
u
drwcsd silent — disable messages from the Server.
Used in command files to disable Server interactivity.
H5.7. Commands for UNIX® system-based OS Only
drwcsd config – similar to reconfigure or kill
SIGHUP commands – restart the Server.
u drwcsd dumpimportdb – log imported data to a database.
u drwcsd interactive – run the Server, but do not direct
u
the control to the process.
drwcsd newkey – generate a new encryption keys
(drwcsd.pri and drwcsd.pub).
u drwcsd
selfcert – generate a new SSL certificate
(certificate.pem).
u drwcsd shell <file_name> – run the binary file.
u drwcsd showpath – show all program's paths, registered in
u
the system.
u
drwcsd stat – similar to send_signal WINCH or kill
SIGWINCH commands – log statistics to a file (CPU time,
memory usage, etc.).
u
drwcsd status – show the current status of the Server
(running, stopped).
drwcsd verifyakey <key_file_path> – verify the Agent
key file (agent.key).
u drwcsd verifyekey <key_file_path> – verify the Server
u
Administrator Manual
292
Appendices
u
key file (enterprise.key).
drwcsd verifyconfig <config_file_path> – verify the
syntax of the Server configuration file (drwcsd.conf).
H5.8. The Description of Switches
Crossplatform Switches
u
-activation-key=<license_key> — Server license key.
By default, it is the enterprise.key file located in the etc
subfolder of the root folder.
u
-bin-root=<folder_for_executables> —
the
path
to
executable files. By default, it is the bin subfolder of the root
folder.
-conf=<configuration_file> — name and location of the
Server configuration file. By default, it is the drwcsd.conf
file in the etc subfolder of the root folder.
u -daemon — for Windows platforms it means to launch as a
u
service; for UNIX platforms - "daemonization of the process" (to
go to the root folder, disconnect from the terminal and operate
in the background).
u
-db-verify=on — check database integrity at Server start.
This is the default value. It is not recommended to run with an
explicit opposite value, except if run immediately after the
database is checked by the drwcsd verifydb instruction,
see above.
u
-help — displays help. Similar to the programs described
above.
u
-hooks — to permit the Server to perform user extension
scripts located in the var\extensions subcatalog of the
Server’s installation catalog. The scripts are meant for
automation of the administrator work enabling quicker
performance of certain tasks. All scripts are disabled by default.
u
-home=<root> — Server installation folder (root folder). The
structure of this folder is described in p. Installing the Anti-Virus
Server for Windows NT/2000/XP/2003/Vista. By default, it is the
current folder at start.
Administrator Manual
293
Appendices
u
-log=<log> — Server log filename. A minus can be used
instead of the filename (for Servers under UNIX OS only),
which instructs standard output of the log. By default: for
Windows platforms it is drwcsd.log in the folder specified by
the -var-root switch, for UNIX platforms it is set by the syslog=user switch (read below).
u
-private-key=<private_key> — private Server key. By
default, it is drwcsd.pri in the etc subfolder of the root
u
-rotate=Nf,Mu - Agent's log rotation mode, where:
· N - number of files;
· f - log-files storage format, possible values: z (gzip) compress file, uses by default, or p (plain) - do not
folder.
compress files.
· M - file size;
· u - unit measure, possible values: k (kilo), m (mega), g
(giga).
By default, it is 10,10m, which means storing of 10 files 10
megabytes each, use compression. Alternatively you can use the
none format (-rotate=none), which means "do not use
rotation, always write to the same file which may extend to any
size".
In the rotation mode, log file names are generated as follows.
Assume the log file name is set to file.log (see the –log
switch above), then
· file.log — current log file,
· file.log-1 — previous log file,
· file.log-2 and so on — the greater the number, the
older the version.
u
-var-root=<folder_for_modified> — path to a folder to
which the Server has a write access and which is designed to
store modified files (for example, logs and the repository files).
By default, it is the var subfolder of the root folder.
Administrator Manual
294
Appendices
u
-verbosity=<details_level> — log level of detail. By default,
WARNING is specified; ALL, DEBUG3, DEBUG2, DEBUG1,
DEBUG, TRACE3, TRACE2, TRACE1, TRACE, NOTICE,
WARNING, ERROR are also possible. The ALL and DEBUG3
values are synonyms.
Switches for Windows OS Only
u
-minimized — (for Windows only, if run not as a service,
but in the interactive mode) — minimize a window.
u
-screen-size=<size> — (for Windows only, if run not as a
service, but in the interactive mode) — log size in lines displayed
in the Server screen, the default value is 1000.
u
-trace — to log in detail the location of error origin.
Switches for UNIX system-based OS Only
u
u
-etc=<path> – путь к директории etc (<var>/etc).
-pid=<file> – a file to which the Server writes the identifier of
its process.
-syslog=<mode> – instructs logging to the system log.
Possible modes: auth, cron, daemon, kern, lpr, mail,
news, syslog, user, uucp, local0 – local7 and for
some platforms — ftp, authpriv and console.
u -user=<user>, -group=<group> – available for UNIX OS
u
only, if run by the root user; it means to change the user or the
group of process and to be executed with the permissions of the
specified user (or group).
H6. The Administrating Utility of the Internal
Database
The administrating utility of the internal DB resides in the following
folders:
u
for Linux OS and Solaris OS: /opt/drwcs/bin
u
for FreeBSD OS: /usr/local/drwcs/bin
Administrator Manual
295
Appendices
u
for Windows OS's: <Server_installation_folder>\bin (by
default, the Server's installation folder is: C:\Program
Files\DrWeb Enterprise Server).
The start format:
drwidbsh
The program operates in the text dialog mode; it waits for instructions
from a user (the instructions begin with a period). To receive help on
other instructions, type .help.
For more information, use reference manuals on the SQL language.
H7. The Utility of Generation of Key Pairs and
Digital Signatures
The names and location of encryption files in the Server installation
directory:
\etc\drwcsd.pri - private key,
u \Installer\drwcsd.pub - public key.
u
Variants of the instruction format:
u
\bin\drwsign check [-public-key=<public>] <file>
u
— check the file signature using <public> as a public key of a
person who signed this file.
\bin\drwsign extract [-private-key=<private>]
<public> — extracts the public key from the private key file of
a complex format (version 4.33 and higher).
u
\bin\drwsign
genkey [<private> [<public>]] —
generation of the public-private pair of keys and their record to
correspondent files.
The utility version for Windows platforms (in contrast to UNIX
versions) does not protect private keys from copying.
u
\bin\drwsign help [<instruction>] — brief help
Administrator Manual
296
Appendices
on the program and on the command line format.
u
u
\bin\drwsign join432
[-private-key=<private>]
[-public-key=<public>]
<new_private> — combines
the public and private keys of the format for version 4.32 into a
new format of the private key for version 4.33.
\bin\drwsign
sign
[-private-key=<private>]
<file> — sign the <file> file using this private key.
H8. Administration of the Server Version for
UNIX® OS with the kill Instruction
The version of the Server for UNIX OS is administrated by the signals
sent to the Server’s processor by the kill utility.
Use the man kill instruction to receive help on the kill
utility.
Below are listed the utility signals and the actions performed by them:
u
SIGWINCH – log statistics to a file (CPU time, memory usage,
etc.),
SIGUSR1 – reread the repository from the drive,
u SIGUSR2 – reread templates from the drive,
u SIGHUP – restart the Server,
u SIGTERM – shut down the Server,
u SIGQUIT – shut down the Server,
u SIGINT – shut down the Server.
u
Similar actions are performed by the switches of the drwcsd instruction
for the Windows version of the Server, read Appendix H5.4.
H9. Dr.Web Scanner for Windows® OS
This component of the workstation software has the command line
Administrator Manual
297
Appendices
parameters which are described in "Dr.Web® Anti-Virus for
Windows. User Manual". The only difference is that when the
Scanner is run by the Agent, the /go /st parameters are sent to
the Server automatically and without fail.
H10. ES Console
Start instruction format:
drwconsole [<switches>]
the following switches are allowed:
-J-Xmx<XX> — at launch to allocate a certain RAM size to be used
by the application, where <XX> is the size of RAM.
For example, -J-Xmx1G or -J-Xmx512m.
Unless the switch is specified, the Console determines the
size of required RAM automatically:
32bit Console:
u
for the computers with more than 512 MB RAM, the Console
uses 512 MB RAM
u
for the computers with less than 128 MB RAM, the Console
uses 128 MB RAM (swapping)
u
otherwise the Console uses all available RAM.
64bit Console:
u
for the computers with less than 128 MB RAM, The Сonsole
uses 128 MB RAM (swapping)
u
otherwise the Сonsole uses all available RAM.
Administrator Manual
298
Appendices
Appendix I. Environment Variables
Exported by the Server
To simplify the setting of the processes run by the ES Server on
schedule, the data on location of the Server’s catalogs is required. To
this effect, the Server exports the following variables of started
processes into the environment:
u
DRWCSD_HOME – path to the root folder (installation folder).
The switch value is -home, if it was set at Server’s launch;
otherwise the current folder at launch.
DRWCSD_EXE – path to the folder with executable files. The
switch value is -bin-root, if it was set at Server’s launch;
otherwise it is the bin subfolder of the root folder.
u DRWCSD_VAR — path to the folder to which the Server has a
u
write access and which is designed to store volatile files (for
example, logs and repository files). The switchvalue is -varroot, if it was set at Server’s launch; otherwise it is the var
subfolder of the root folder.
Administrator Manual
299
Appendices
Appendix J. Using the Script of ES Agent
Initial Installation
The installation routine of the Agents onto workstations by using the
network installer (drwinst.exe) is set by install.script. These files
reside in the products root folder in the repository. In standard
distributions they are located in the 10-drwupgrade and 20drwagntd catalogs and describe the default installation.
If the .custom.install.script file is present in the folder, it is
used instead of the standard installation routine.
Files with other names beginning with a period are not
updated during the product update and do not influence the
operation of the repository.
The sequence of operations during the installation:
1. The network installer requests the Server for the installation of
the following platforms: win-setup, common, win, winnt and win-9x – this is the list of standard platforms in the
default order. The order of use of the platforms can be changed
by the -platforms=p1,p2,p3... switch when calling
drwinst. The win-setup platform is not included into a
standard distribution and is designed for creation of its own
installation routines, if necessary.
2. The Server forms a list of files according to the list of platforms,
viewing all products step by step in alphabetical order and lists
of files set by the files{ } constructions for the given
platform in the install.script installation routine (read
below). At the same time, the summary script is created on the
basis of the scripts{ } constructions.
3. The Server receives the general list of files and the summary
script.
4. The Server sends the files and the script which will be executed
by the network installer.
Administrator Manual
300
Appendices
Now we consider install.script by example of the
drwagntd folder.
20-
; master part of installation: Agent & its stuff.
; drwscr.dll goes with upgrader, so unlisted here.
platform{
; win - for all Windows OS
; `name: XXX' MUST go first!
name: win
; (mandatory stanza)
; this platform name
; include, scripts{ }, files{ }
; can go in any order
scripts {
;
;
win.inst.rexx ;
;
;
;
;
;
;
;
;
}
(optional)
script being merged with all others
and executed after transfer all
files for all platforms requested
by installer
Windows installer request order:
- win-setup (optional! for
customization)
- common
- win
- win-nt OR win-9x
files {
; (optional)
; this platform files being
; transfered to installer
win/uninstall.rexx
win/drwinst.exe
win/drwagntd.exe
win/drwagnui.exe
Administrator Manual
301
Appendices
win/drwhard.dll
}
}
platform {
; win-9x - for Windows 95-ME
name: win-9x
scripts{ win-9x.inst.rexx }
}
platform {
; win-nt - for Windows NT-2003
name: win-nt
scripts{ win-nt.inst.rexx }
}
platform {
; common - for any OS including
UNICES
name: common
scripts { common.inst.rexx }
}
; include file.name ; (optional)
; this stanza tells to include other file.
; including file will be searched in the
; same folder where current file are
; located if `file.name' does not include
; folder specificator
The script contains a list of the platform{ } constructions and
allows to include determinations from other files with the help of the
include construction (include is admissible on the upper level only
and is inadmissible inside platform{ }). If file.name in include
does not contain paths, but a file name only, it is searched for in the
Administrator Manual
302
Appendices
same folder as the current one. The use of include constructions in
the included files is allowed.
The description of a platform begins with the name: XXX
construction. Then, the pair of files{ } and scripts{ } lists
follows; the order of these lists is inessential. The lists may contain any
number of elements. The order of elements in the list is essential as it
defines the order of files transferred to the station and the
construction of the formed script.
The order of the platform{ } constructions is also inessential.
The variables of the installation scripts (the values for these variables
can be specified from the command line of the network installer) with
their default values are listed below.
Components to be installed:
spider.install
= 'yes'
spiderml.install = 'yes'
u scanner.install
= 'yes'
u install.home – installation folder
u agent.logfile = install.
home'\logs\drwagntd.log'
u agent.loglevel = 'trace'
u agent.logrotate = '10,10m'
u agent.servers = install.servers
u agent.serverkey
=
install.home'\drwcsd.
pub'
u agent.compression = 'possible'
u agent.encryption = 'yes'
u agent.findretry = '3'
u agent.findtimeout = '5'
u agent.spiderstatistics = '30'
u agent.importantmsg = '2'
u agent.discovery = 'udp/:2372'
u
u
u
agent.startmsg = '2' (or agent.startmsg =
Administrator Manual
303
Appendices
'NONE')
The agent.importantmsg parameter defines the form of the
messages on the updating error, on the reboot request, etc. displayed
to a user. 0 — do not display, 1 — display as a pop-up dialog over all
windows, 2 — display as a tooltip of the icon in the Windows
Explorer (if the current Explorer version does not support this
option, then mode 1 is used).
Now we create a nonstandard installation scenario in
which SpIDer Guard is not installed and maximum detailed
logging is set:
1. Create a .win-setup.inst.rexx file in the 20-drwagntd folder
and write to it
spider.install = 'no'
agent.loglevel = 'all'
2. Create the .custom.install.script file in the 20drwagntd folder and write to it
include install.script
platform{
name: win-setup
scripts{ .win-setup.inst.rexx }
}
3. Reboot the Server or instruct to reboot the repository:
u
for UNIX OS: kill -USR1 cat `drwcsd.pid`
u
for Windows: drwcsd.exe rerepository
Administrator Manual
304
Appendices
Appendix K. Regular Expressions Used in
Dr.Web Enterprise Suite
Some parameters of Dr.Web ES are specified in the form of regular
expressions. Processing of regular expressions is performed via the
Perl Compatible Regular Expressions (PCRE) library.
Detailed description of the PCRE library syntax is available at http://
www.pcre.org/.
This appendix contains only a brief description of the most common
examples for using regular expressions.
K1. Options Used in Regular Expressions
Regular expressions are used in the configuration file and in the
Console or Web interface when objects to be excluded from
scanning in the Scanner settings are specified.
Regular expressions are written as follows:
qr{EXP}options
where EXP is the expression itself; options stands for the sequence of
options (a string of letters), and qr{} is literal metacharacters. The
whole construction looks as follows:
qr{pagefile\.sys}i - Windows NT OS swap file
Below goes the description of options and regular expressions. For
more details visit http://www.pcre.org/pcre.txt.
u
Option 'a' is equivalent to PCRE_ANCHORED
If this option is set, the pattern is forced to be "anchored", that
is, it is constrained to match only at the first matching point in
the string that is being searched (the "subject string"). The
same result can also be achieved by appropriate constructs in
Administrator Manual
305
Appendices
the pattern itself.
u
Option 'i' is equivalent to PCRE_CASELESS
If this option is set, letters in the pattern match both upper and
lower case letters. This option can be changed within a pattern
by a (?i) option setting.
u
Option 'x' is equivalent to PCRE_EXTENDED
If this option is set, whitespace data characters in the pattern
are totally ignored except when escaped or inside a character
class. Whitespaces do not include the VT character (code 11).
In addition, characters between an unescaped # outside a
character class and a newline character inclusively are ignored.
This option can be changed in the pattern by setting a (?x)
option. This option enables including comments inside
complicated patterns. Note, however, that this applies only to
data characters. Whitespaces may not appear in special
character sequences in a pattern, for example within the (?(
sequence which introduces a conditional subpattern.
u
Option 'm' is equivalent to PCRE_MULTILINE
By default, PCRE treats the subject string as consisting of a
single line of characters (even if it actually contains newlines).
The "start of line" metacharacter "^" matches only in the
beginning of a string, while the "end of line" metacharacter "$"
matches only in the end of a string or before a terminating
newline (unless PCRE_DOLLAR_ENDONLY is set).
When PCRE_MULTILINE is set, the "start of line" and "end of
line" metacharacters match any newline characters which
immediately follow or precede them in the subject string as well
as in the very beginning and end of a subject string. This option
can be changed within a pattern by a (?m) option setting. If
there are no "\n" characters in the subject string, or ^ or $
are not present in the pattern, the PCRE_MULTILINE option has
no effect.
u
Option 'u' is equivalent to PCRE_UNGREEDY
Administrator Manual
306
Appendices
This option inverts the "greediness" of the quantifiers so that
they are not greedy by default, but become greedy if followed
by "?". The same result can also be achieved by the (?U)
option in the pattern.
u
Option 'd' is equivalent to PCRE_DOTALL
If this option is set, a dot metacharacter in the pattern matches
all characters, including newlines. Without it, newlines are
excluded. This option can be changed within a pattern by a (?s
) option setting. A negative class such as [^a] always matches
newline characters, regardless of the settings of this option.
u
Option 'e' is equivalent to PCRE_DOLLAR_ENDONLY
If this option is set, a dollar metacharacter in the pattern
matches only at the end of the subject string. Without this
option, a dollar also matches immediately before a newline at
the end of the string (but not before any other newline
characters). The PCRE_DOLLAR_ENDONLY option is ignored
if PCRE_MULTILINE is set.
K2. Peculiarities of PCRE Regular Expressions
A regular expression is a pattern that is matched against a subject
string from left to right. Most characters stand for themselves in a
pattern, and match the corresponding characters in the subject.
The power of regular expressions comes from the ability to include
alternatives and repetitions in the pattern. These are encoded in the
pattern by the use of metacharacters, which do not stand for
themselves but instead are interpreted in a special way.
There are two different sets of metacharacters: those recognized
anywhere in a pattern except within square brackets, and those
recognized in square brackets. Outside square brackets, the
metacharacters are as follows:
\
general escape character with several uses,
Administrator Manual
307
Appendices
^
assert start of string (or line, in multiline mode),
$
assert end of string (or line, in multiline mode),
.
match any character except newline (by default),
[
start character class definition,
]
end character class definition,
|
start alternative branch,
(
start subpattern,
)
end subpattern,
?
extends the meaning of (,
also 0 or 1 quantifier,
also quantifier minimizer.
*
0 or more quantifier,
+
1 or more quantifier,
also "possessive quantifier",
{
start min/max quantifier.
Part of a pattern that is in square brackets is called a "character class".
In a character class the only metacharacters are:
\
^
[
]
general escape character,
negate the class, but only if the first character,
indicates character range,
POSIX character class (only if followed by POSIX syntax),
terminates the character class.
Administrator Manual
308
Appendices
K3. Use of Metacharacters
Backslash (\)
The backslash character has several uses. When it is followed by a
non-alphanumeric character, it takes away any special meaning that
character may have. This use of backslash as an escape character
applies both inside and outside character classes.
For example, if you want to match a * character, you should write \*
in the pattern. This escaping action applies whether or not the
following character would otherwise be interpreted as a
metacharacter, so it is always safe to precede a non-alphanumeric with
backslash to specify that it stands for itself. In particular, if you want
to match a backslash, you write \\.
If a pattern includes the PCRE_EXTENDED option, whitespaces
(other than in a character class) in the pattern, characters between #
outside a character class and the next newline character will be
ignored. An escaping backslash can be used to include a whitespace or
# character as part of the pattern.
If you want to remove the special meaning from a sequence of
characters, you can do so by putting them between \Q and \E. The
\Q...\E sequence works both inside and outside character classes.
Non-printing characters
Backslash provides a way of encoding non-printing characters in
patterns to make them visible. There is no restriction on the
appearance of non-printing characters, apart from the binary zero at
the end of a pattern. But when a pattern is being created in a text
editor, it is usually easier to use one of the following escape sequences
than the binary character it represents:
u
\a
alarm, i.e., the BEL character (hex 07)
Administrator Manual
309
Appendices
u
\cx
"control-x", where x is any character
u
\e
escape (hex 1B)
u
\f
formfeed (hex 0C)
u
\n
newline (hex 0A)
u
\r
carriage return (hex 0D)
u
\t
tab (hex 09)
u
\ddd
character with octal code ddd, or back reference
u
\xhh
character with hex code hh
The precise effect of \cx is as follows: if x is a lower case letter, it is
converted to upper case. Then bit 6 of the character (hex 40) is
inverted. Thus \cz becomes hex 1A, but \c{ becomes hex 3B, while
\c; becomes hex 7B.
After \x from zero to two hexadecimal digits are read (letters can be
in upper or lower case).
After \0 up to two further octal digits are read. In both cases, if there
are fewer than two digits, just those that are present are used. Thus
the sequence \0\x\07 specifies two binary zeros followed by a BEL
character (code value 7). Make sure you supply two digits after the
initial zero if the pattern character that follows is itself an octal digit.
The handling of a backslash followed by a digit other than 0 is
complicated. Outside a character class, PCRE reads it and any
following digits as a decimal number. If the number is less than 10, or
if there have been at least that many previous capturing left
parentheses in the expression, the entire sequence is taken as a back
reference.
Inside a character class, or if the decimal number is greater than 9 and
there have not been that many capturing subpatterns, PCRE re-reads
up to three octal digits following the backslash, and generates a single
byte from the least significant 8 bits of the value. Any subsequent
digits stand for themselves. For example:
Administrator Manual
310
Appendices
u
\040 is another way of writing a space
u
\40
is the same, provided there are fewer than 40
previous capturing subpatterns
u
\7
is always a back reference
u
\11
might be a back reference, or another way of
writing a tab
u
\011 is always a tab
\011 is a tab followed by the character "3"
3
u \113 might be a back reference, otherwise the character
u
with octal code 113
u
\377 might be a back reference, otherwise the byte
u
\81
consisting entirely of 1 bits
is either a back reference, or a binary zero followed
by the two characters "8" and "1"
Note that octal values of 100 or greater must not be introduced by a
leading zero, because no more than three octal digits are ever read.
All the sequences that define a single character value can be used both
inside and outside character classes. In addition, inside a character
class, the sequence \b is interpreted as the backspace character
(hex 08), and the sequence \X is interpreted as the character "X".
Outside a character class, these sequences have different meanings.
Generic character types
The third use of backslash is for specifying generic character types.
The following are always recognized:
\d
u \D
u \s
u \S
u \w
u
any decimal digit
any character that is not a decimal digit
any whitespace character
any character that is not a whitespace character
any "word" character
Administrator Manual
311
Appendices
u
\W any "non-word" character
Each pair of escape sequences partitions the complete set of
characters into two disjoint sets. Any given character matches one,
and only one, of each pair.
These character type sequences can appear both inside and outside
character classes. They each match one character of the appropriate
type. If the current matching point is at the end of the subject string,
all of them fail, since there is no character to match.
\s does not match the VT character (code 11). This makes it different
from the POSIX "space" class. The \s characters are HT (9), LF
(10), FF (12), CR (13), and space (32).
Simple assertions
The fourth use of backslash is for certain simple assertions. An
assertion specifies a condition that has to be met at a particular point
in a match, without consuming any characters from the subject string.
The use of subpatterns for more complicated assertions is described
below. The backslashed assertions are:
\b
u \B
u \A
u \Z
u \z
u \G
u
matches at a word boundary
matches when not at a word boundary
matches at start of subject
matches at end of subject or before newline at end
matches at end of subject
matches at first matching position in subject
These assertions may not appear in character classes (but note that
\b has a different meaning, namely the backspace character, inside a
character class).
Circumflex (^) and dollar ($)
Outside a character class, in the default matching mode, the
Administrator Manual
312
Appendices
circumflex character is an assertion that is true only if the current
matching point is at the start of the subject string. Inside a character
class, circumflex has an entirely different meaning (see below).
Circumflex need not be the first character of the pattern if a number of
alternatives are involved, but it should be the first thing in each
alternative in which it appears if the pattern is ever to match that
branch. If all possible alternatives start with a circumflex, that is, if the
pattern is constrained to match only at the start of the subject, it is
said to be an "anchored" pattern. (There are also other constructs that
can cause a pattern to be anchored.)
A dollar character is an assertion that is true only if the current
matching point is at the end of the subject string, or immediately
before a newline character that is the last character in the string (by
default). Dollar need not be the last character of the pattern if a
number of alternatives are involved, but it should be the last item in
any branch in which it appears. Dollar has no special meaning in a
character class.
The meanings of the circumflex and dollar characters are changed if
the PCRE_MULTILINE option is set. When this is the case, they
match immediately after and immediately before an internal newline
character, respectively, in addition to matching at the start and end of
the subject string. For example, the pattern /^abc$/ matches the
subject string "def\nabc" (where \n represents a newline
character) in multiline mode, but not otherwise. Consequently,
patterns that are anchored in single line mode because all branches
start with ^ are not anchored in multiline mode, and a match for
circumflex is possible when the startoffset argument of pcre_exec
() is non-zero.
Full stop (period, dot)
Outside a character class, a period in the pattern matches any one
character in the subject, including a non-printing character, but not
(by default) newline. The handling of period is entirely independent of
the handling of circumflex and dollar, the only relationship being that
they both involve newline characters. Period has no special meaning in
Administrator Manual
313
Appendices
a character class.
Square brackets and character classes
An opening square bracket introduces a character class, terminated by
a closing square bracket. A closing square bracket on its own is not
special. If a closing square bracket is required as a member of the
class, it should be the first data character in the class (after an initial
circumflex, if present) or escaped with a backslash.
A character class matches a single character in the subject. A matched
character must be in the set of characters defined by the class, unless
the first character in the class definition is a circumflex, in which case
the subject character must not be in the set defined by the class. If a
circumflex is actually required as a member of the class, ensure it is
not the first character, or escape it with a backslash.
For example, the character class [aeiou] matches any lower case
vowel, while [^aeiou] matches any character that is not a lower
case vowel. Note that a circumflex is just a convenient notation for
specifying the characters that are in the class by enumerating those
that are not. A class that starts with a circumflex is not an assertion: it
still consumes a character from the subject string, and therefore it fails
if the current pointer is at the end of the string.
When caseless matching is set, any letters in a class represent both
their upper case and lower case versions.
The minus (hyphen) character can be used to specify a range of
characters in a character class. For example, [d-m] matches any
letter between d and m, inclusive. If a minus character is required in a
class, it must be escaped with a backslash or appear in a position
where it cannot be interpreted as indicating a range, typically as the
first or last character in the class.
It is not possible to have the literal character "]" as the end character
of a range. A pattern such as [W-]46] is interpreted as a class of
two characters ("W" and "-") followed by a literal string "46]", so it
would match "W46]" or "-46]". However, if the "]" is escaped with
Administrator Manual
314
Appendices
a backslash it is interpreted as the end of range, so [W-\]46] is
interpreted as a class containing a range followed by two other
characters. The octal or hexadecimal representation of "]" can also be
used to end a range.
The character types \d, \D, \p, \P, \s, \S, \w, and \W may
also appear in a character class, and add the characters that they
match to the class.
The only metacharacters that are recognized in character classes are
backslash, hyphen (only where it can be interpreted as specifying a
range), circumflex (only at the start), opening square bracket (only
when it can be interpreted as introducing a POSIX class name - see the
next section), and the terminating closing square bracket. However,
escaping other non-alphanumeric characters does no harm.
POSIX character classes
PCRE supports the POSIX notation for character classes. For example,
[01[:alpha:]%]
matches "0", "1", any alphabetic character, or "%". The supported
class names are
alnum
u alpha
u ascii
u blank
u cntrl
u digit
u graph
u lower
u print
u punct
u space
u upper
u
letters and digits
letters
character codes 0 - 127
space or tab only
control characters
decimal digits (same as \d)
printing characters, excluding space
lower case letters
printing characters, including space
printing characters, excluding letters and digits
white space (not quite the same as \s)
upper case letters
Administrator Manual
315
Appendices
u
u
word
xdigit
"word" characters (same as \w)
hexadecimal digits
Vertical bar (|)
Vertical bar characters are used to separate alternative patterns. For
example, the pattern
gilbert|sullivan
matches either "gilbert" or "sullivan". Any number of
alternatives may appear, and an empty alternative is permitted
(matching the empty string). The matching process tries each
alternative in turn, from left to right, and the first one that succeeds is
used. If the alternatives are within a subpattern (defined below),
"succeeds" means matching the rest of the main pattern as well as the
alternative in the subpattern.
Internal option setting
The settings of the PCRE_CASELESS, PCRE_MULTILINE, and
PCRE_EXTENDED options can be changed from within the pattern by
a sequence of Perl option letters enclosed between "(?" and ")". The
option letters are
i for PCRE_CASELESS
m for PCRE_MULTILINE
u x for PCRE_EXTENDED
u
u
For example, (?im) sets caseless multiline matching. It is also
possible to unset these options by preceding the letter with a hyphen,
and a combined setting and unsetting such as (?im-x), which sets
PCRE_CASELESS and PCRE_MULTILINE while unsetting
PCRE_EXTENDED, is also permitted. If a letter appears both before
and after the hyphen, the option is unset.
Administrator Manual
316
Appendices
Subpatterns
Subpatterns are delimited by parentheses (round brackets) which can
be nested. Turning part of a pattern into a subpattern does two things:
1. It localizes a set of alternatives. For example, the pattern
cat(aract|erpillar|)
matches
one of the words "cat", "cataract", or
"caterpillar". Without the parentheses, it would match
"cataract", "erpillar" or the empty string.
2. It sets up the subpattern as a capturing subpattern. Opening
parentheses are counted from left to right (starting from 1) to
obtain numbers for the capturing subpatterns.
For example, if the string "the red king" is matched against the
pattern
the ((red|white) (king|queen))
the captured substrings are "red king", "red", and "king",
and are numbered 1, 2, and 3, respectively.
The fact that plain parentheses fulfil two functions is not always
helpful. There are often times when a grouping subpattern is required
without a capturing requirement. If an opening parenthesis is followed
by "?:", the subpattern does not do any capturing, and is not counted
when computing the number of any subsequent capturing subpatterns.
For example, if the string "the white queen" is matched against
the pattern
the ((?:red|white) (king|queen))
the captured substrings are "white queen" and "queen", and are
numbered 1 and 2. The maximum number of capturing subpatterns is
65535, and the maximum depth of nesting of all subpatterns, both
capturing and non-capturing, is 200.
As a convenient shorthand, if any option settings are required at the
Administrator Manual
317
Appendices
start of a non-capturing subpattern, the option letters may appear
between the "?" and the ":". Thus the two patterns
(?i:saturday|sunday)
(?:(?i)saturday|sunday)
match exactly the same set of strings. Because alternative branches
are tried from left to right, and options are not reset until the end of
the subpattern is reached, an option setting in one branch does affect
subsequent branches, so the above patterns match "SUNDAY" as well
as "Saturday".
Repetition
Repetition is specified by quantifiers, which can follow any of the
following items:
u
a literal data character
u
the . metacharacter
u
the \C escape sequence
u
an escape such as \d that matches a single character
u
a character class
u
a back reference (see the next section)
u
a parenthesized subpattern (unless it is an assertion)
The general repetition quantifier specifies a minimum and maximum
number of permitted matches, by giving the two numbers in curly
brackets (braces), separated by a comma. The numbers must be less
than 65536, and the first must be less than or equal to the second.
For example:
z{2,4}
matches "zz", "zzz", or "zzzz". A closing brace on its own is not a
special character. If the second number is omitted, but the comma is
present, there is no upper limit; if the second number and the comma
are both omitted, the quantifier specifies an exact number of required
matches.
Administrator Manual
318
Appendices
Thus
[aeiou]{3,}
matches at least 3 successive vowels, but may match many more,
while
\d{8}
matches exactly 8 digits. An opening curly bracket that appears in a
position where a quantifier is not allowed, or one that does not match
the syntax of a quantifier, is taken as a literal character. For example,
{,6} is not a quantifier, but a literal string of four characters.
The quantifier {0} is permitted, causing the expression to behave as
if the previous item and the quantifier were not present.
For convenience (and historical compatibility) the three most common
quantifiers have single-character abbreviations:
* is equivalent to {0,}
u + is equivalent to {1,}
u ? is equivalent to {0,1}
u
It is possible to construct infinite loops by following a subpattern that
can match no characters with a quantifier that has no upper limit, for
example:
(a?)*
By default, the quantifiers are "greedy", that is, they match as much as
possible (up to the maximum number of permitted times), without
causing the rest of the pattern to fail. The classic example of where
this gives problems is in trying to match comments in C programs.
These appear between /* and */ and within the comment, individual *
and / characters may appear. An attempt to match C comments by
applying the pattern
/\*.*\*/
to the string
/* first comment
comment */
*/
not
comment
/*
second
Administrator Manual
319
Appendices
fails, because it matches the entire string owing to the greediness of
the * item.
However, if a quantifier is followed by a question mark, it ceases to be
greedy, and instead matches the minimum number of times possible,
so the pattern
/\*.*?\*/
does the right thing with the C comments. The meaning of the various
quantifiers is not otherwise changed, just the preferred number of
matches. Do not confuse this use of question mark with its use as a
quantifier in its own right. Because it has two uses, it can sometimes
appear doubled, as in
\d??\d
which matches one digit by preference, but can match two if that is
the only way the rest of the pattern matches.
If the PCRE_UNGREEDY option is set, the quantifiers are not greedy
by default, but individual ones can be made greedy by following them
with a question mark. In other words, it inverts the default behaviour.
When a parenthesized subpattern is quantified with a minimum repeat
count that is greater than 1 or with a limited maximum, more memory
is required for the compiled pattern, in proportion to the size of the
minimum or maximum.
Atomic grouping and possessive quantifiers
With both maximizing and minimizing repetition, failure of what follows
normally causes the repeated item to be re-evaluated to see if a
different number of repeats allows the rest of the pattern to match.
Sometimes it is useful to prevent this, either to change the nature of
the match, or to cause it fail earlier than it otherwise might, when the
author of the pattern knows there is no point in carrying on.
Consider, for example, the pattern \d+foo when applied to the
subject line
123456bar
Administrator Manual
320
Appendices
After matching all 6 digits and then failing to match "foo", the normal
action of the matcher is to try again with only 5 digits matching the
\d+ item, and then with 4, and so on, before ultimately failing.
"Atomic grouping" (a term taken from Jeffrey Friedl's book) provides
the means for specifying that once a subpattern has matched, it is not
to be re-evaluated in this way.
If we use atomic grouping for the previous example, the matcher
would give up immediately on failing to match "foo" the first time. The
notation is a kind of special parenthesis, starting with (?> as in this
example:
(?>\d+)foo
This kind of parenthesis "locks up" the part of the pattern it contains
once it has matched, and a failure further into the pattern is prevented
from backtracking into it. Backtracking past it to previous items,
however, works as normal.
An alternative description is that a subpattern of this type matches the
string of characters that an identical standalone pattern would match,
if anchored at the current point in the subject string.
Atomic grouping subpatterns are not capturing subpatterns. Simple
cases such as the above example can be thought of as a maximizing
repeat that must swallow everything it can. So, while both \d+ and
\d+? are prepared to adjust the number of digits they match in order
to make the rest of the pattern match, (?>\d+) can only match an
entire sequence of digits.
Atomic groups in general can of course contain arbitrarily complicated
subpatterns, and can be nested. However, when the subpattern for an
atomic group is just a single repeated item, as in the example above, a
simpler notation, called a "possessive quantifier" can be used. This
consists of an additional + character following a quantifier. Using this
notation, the previous example can be rewritten as
\d++foo
Possessive quantifiers are always greedy; the setting of the
PCRE_UNGREEDY option is ignored. They are a convenient notation
for the simpler forms of atomic group. However, there is no difference
Administrator Manual
321
Appendices
in the meaning or processing of a possessive quantifier and the
equivalent atomic group.
When a pattern contains an unlimited repeat inside a subpattern that
can itself be repeated an unlimited number of times, the use of an
atomic group is the only way to avoid some failing matches taking a
very long time indeed. The pattern
(\D+|<\d+>)*[!?]
matches an unlimited number of substrings that either consist of nondigits, or digits enclosed in <>, followed by either ! or ?. When it
matches, it runs quickly. However, if it is applied to
aaaaaaaaaaaaaaaaaaaaaaaaaaaaaaaaaaaaaaaaaaaaaaa
it takes a long time before reporting failure. This is because the string
can be divided between the internal \D+ repeat and the external *
repeat in a large number of ways, and all have to be tried. (The
example uses [!?] rather than a single character at the end, because
PCRE has an optimization that allows for fast failure when a single
character is set. They remember the last single character that is
required for a match, and fail early if it is not present in the string.) If
the pattern is changed so that it uses an atomic group, like this:
((?>\D+)|<\d+>)*[!?]
sequences of non-digits cannot be broken, and failure happens quickly.
Back references
Outside a character class, a backslash followed by a digit greater than
0 (and possibly further digits) is a back reference to a capturing
subpattern earlier (that is, to its left) in the pattern, provided there
have been that many previous capturing left parentheses.
However, if the decimal number following the backslash is less than
10, it is always taken as a back reference, and causes an error only if
there are not that many capturing left parentheses in the entire pattern. In other words, the parentheses that are referenced need not be
to the left of the reference for numbers less than 10. See the
subsection entitled "Non-printing characters" above for further details
Administrator Manual
322
Appendices
of the handling of digits following a backslash.
A back reference matches whatever actually matched the capturing
subpattern in the current subject string, rather than anything matching
the subpattern itself. So the pattern
(sens|respons)e and \1ibility
matches "sense and sensibility" and "response and responsibility", but
not "sense and responsibility". If caseful matching is in force at the
time of the back reference, the case of letters is relevant. For example,
((?i)rah)\s+\1
matches "rah rah" and "RAH RAH", but not "RAH rah", even
though the original capturing subpattern is matched caselessly.
Back references to named subpatterns use the Python syntax (?
P=name). We could rewrite the above example as follows:
(?(?i)rah)\s+(?P=p1)
There may be more than one back reference to the same subpattern.
If a subpattern has not actually been used in a particular match, any
back references to it always fail. For example, the pattern
(a|(bc))\2
always fails if it starts to match "a" rather than "bc". Because there
may be many capturing parentheses in a pattern, all digits following
the backslash are taken as part of a potential back reference number.
If the pattern continues with a digit character, some delimiter must be
used to terminate the back reference. If the PCRE_EXTENDED option
is set, this can be whitespace. Otherwise an empty comment can be
used.
A back reference that occurs inside the parentheses to which it refers
fails when the subpattern is first used, so, for example, (a\1) never
matches. However, such references can be useful inside repeated subpatterns. For example, the pattern
(a|b\1)+
matches any number of "a"s and also "aba", "ababbaa", etc. At
Administrator Manual
323
Appendices
each iteration of the subpattern, the back reference matches the
character string corresponding to the previous iteration. In order for
this to work, the pattern must be such that the first iteration does not
need to match the back reference. This can be done using alternation,
as in the example above, or by a quantifier with a minimum of zero.
Assertions
An assertion is a test on the characters following or preceding the
current matching point that does not actually consume any characters.
The simple assertions coded as \b, \B, \A, \G, \Z, \z, ^
and $ are described above.
More complicated assertions are coded as subpatterns. There are two
kinds: those that look ahead of the current position in the subject
string, and those that look behind it. An assertion subpattern is
matched in the normal way, except that it does not cause the current
matching position to be changed.
Assertion subpatterns are not capturing subpatterns, and may not be
repeated, because it makes no sense to assert the same thing several
times. If any kind of assertion contains capturing subpatterns within it,
these are counted for the purposes of numbering the capturing
subpatterns in the whole pattern. However, substring capturing is
carried out only for positive assertions, because it does not make
sense for negative assertions.
Lookahead assertions
Lookahead assertions start with (?= for positive assertions and (?!
for negative assertions. For example,
\w+(?=;)
matches a word followed by a semicolon, but does not include the
semicolon in the match, and
foo(?!bar)
matches any occurrence of "foo" that is not followed by "bar". Note
Administrator Manual
324
Appendices
that the apparently similar pattern
(?!foo)bar
does not find an occurrence of "bar" that is preceded by something
other than "foo"; it finds any occurrence of "bar" whatsoever,
because the assertion (?!foo) is always true when the next three
characters are "bar". A lookbehind assertion is needed to achieve the
other effect.
If you want to force a matching failure at some point in a pattern, the
most convenient way to do it is with (?!) because an empty string
always matches, so an assertion that requires there not to be an
empty string must always fail.
Lookbehind assertions
Lookbehind assertions start with (?<= for positive assertions and (?
<! for negative assertions. For example,
(?<!foo)bar
does find an occurrence of "bar" that is not preceded by "foo". The
contents of a lookbehind assertion are restricted such that all the
strings it matches must have a fixed length. However, if there are
several alternatives, they do not all have to have the same fixed
length. Thus
(?<=bullock|donkey)
is permitted, but
(?<!dogs?|cats?)
causes an error. Branches that match different length strings are
permitted only at the top level of a lookbehind assertion. An assertion
such as
(?<=ab(c|de))
is not permitted, because its single top-level branch can match two
different lengths, but it is acceptable if rewritten to use two top-level
branches:
Administrator Manual
325
Appendices
(?<=abc|abde)
The implementation of lookbehind assertions is, for each alternative, to
temporarily move the current position back by the fixed width and then
try to match. If there are insufficient characters before the current
position, the match is deemed to fail.
PCRE does not allow the \C escape to appear in lookbehind
assertions, because it makes it impossible to calculate the length of the
lookbehind. The \X escape, which can match different numbers of
bytes, is also not permitted.
Atomic groups can be used in conjunction with lookbehind assertions
to specify efficient matching at the end of the subject string. Consider
a simple pattern such as
abcd$
when applied to a long string that does not match. Because matching
proceeds from left to right, PCRE will look for each "a" in the subject
and then see if what follows matches the rest of the pattern. If the
pattern is specified as
^.*abcd$
the initial .* matches the entire string at first, but when this fails
(because there is no following "a"), it backtracks to match all but the
last character, then all but the last two characters, and so on. Once
again the search for "a" covers the entire string, from right to left, so
we are no better off. However, if the pattern is written as
^(?>.*)(?<=abcd)
or, equivalently, using the possessive quantifier syntax,
^.*+(?<=abcd)
there can be no backtracking for the .* item; it can match only the
entire string. The subsequent lookbehind assertion does a single test
on the last four characters. If it fails, the match fails immediately. For
long strings, this approach makes a significant difference to the
processing time.
Administrator Manual
326
Appendices
Using multiple assertions
Several assertions (of any sort) may occur in succession. For example,
(?<=\d{3})(?<!999)foo
matches "foo" preceded by three digits that are not "999". Notice
that each of the assertions is applied independently at the same point
in the subject string. First there is a check that the previous three
characters are all digits, and then there is a check that the same three
characters are not "999". This pattern does not match "foo"
preceded by six characters, the first of which are digits and the last
three of which are not "999". For example, it doesn't match
"123abc-foo". A pattern to do that is
(?<=\d{3}...)(?<!999)foo
This time the first assertion looks at the preceding six characters,
checking that the first three are digits, and then the second assertion
checks that the preceding three characters are not "999".
Assertions can be nested in any combination. For example,
(?<=(?<!foo)bar)baz
matches an occurrence of "baz" that is preceded by "bar" which in
turn is not preceded by "foo", while
(?<=\d{3}(?!999)...)foo
is another pattern that matches "foo" preceded by three digits and
any three characters that are not "999".
Conditional subpatterns
It is possible to cause the matching process to obey a subpattern
conditionally or to choose between two alternative subpatterns,
depending on the result of an assertion, or whether a previous
capturing subpattern matched or not. The two possible forms of
conditional subpattern are
(?(condition)yes-pattern)
Administrator Manual
327
Appendices
(?(condition)yes-pattern|no-pattern)
If the condition is satisfied, the yes-pattern is set; otherwise the nopattern (if present) is set. If there are more than two alternatives in
the subpattern, a compile-time error occurs.
There are three kinds of condition. If the text between the parentheses
consists of a sequence of digits, the condition is satisfied if the
capturing subpattern of that number has previously matched. The
number must be greater than zero. Consider the following pattern,
which contains non-significant white space to make it more readable
(assume the PCRE_EXTENDED option) and to divide it into three
parts for ease of discussion:
( \( )?
[^()]+
(?(1) \) )
The first part matches an optional opening parenthesis, and if that
character is present, sets it as the first captured substring. The second
part matches one or more characters that are not parentheses. The
third part is a conditional subpattern that tests whether the first set of
parentheses matched or not. If they did, that is, if subject started with
an opening parenthesis, the condition is true, and so the yes-pattern is
executed and a closing parenthesis is required. Otherwise, since nopattern is not present, the subpattern matches nothing. In other
words, this pattern matches a sequence of non-parentheses, optionally
enclosed in parentheses.
If the condition is the string (R), it is satisfied if a recursive call to the
pattern or subpattern has been made. At "top level", the condition is
false.
If the condition is not a sequence of digits or (R), it must be an
assertion. This may be a positive or negative lookahead or lookbehind
assertion. Consider this pattern, again containing non-significant white
space, and with the two alternatives on the second line:
(?(?=[^a-z]*[a-z])
\d{2}-[a-z]{3}-\d{2}
|
\d{2}-\d{2}-\d{2} )
The condition is a positive lookahead assertion that matches an
optional sequence of non-letters followed by a letter. In other words, it
tests for the presence of at least one letter in the subject. If a letter is
found, the subject is matched against the first alternative; otherwise it
Administrator Manual
328
Appendices
is matched against the second. This pattern matches strings in one of
the two forms dd-aaa-dd or dd-dd-dd, where aaa are letters and
dd are digits.
Appendix L. Log Files Format
Events on the Server (see p. Server Logging. Viewing the Log) and
the Agent are logged into a text file, where every line is a separate
message.
The format of a message line is as follows:
<year><month><day>.<hour><minute><second>.<centisecond>
<message_type>
[<process_id>]
<thread_name>
[
<message_source>] <message>
where:
u
<year><month><date>.<hour><minute><second>.
<hundredth_of_second> – exact date of message entry to the
log file.
u
<message_type> – log level:
· ftl (Fatal error) — instructs to inform only of the most
severe errors;
· err (Error) — notify of operation errors;
· wrn (Warning) — warn about errors;
· ntc (Notice) — display important information messages;
· inf (Info) — display information messages;
· tr0..3 (Trace, Trace 1, Trace 2, Trace 3) — enable
tracing events. The options are displayed in the ascending
order according to the level of detail. Trace instructs to log
in the minimum level of detail; Trace 3 instructs to log in
the maximum level of detail;
Administrator Manual
329
Appendices
· db0..3 (Debug, Debug 1, Debug 2, Debug 3) —
instruct to log debugging events. The options are
displayed in the ascending order according to the level of
detail. Debug instructs to log in the minimum level of
detail; Debug 3 instructs to log in the maximum level of
detail.
The tr0..3 (trace) and db0..3 (debug) levels of detail are
applicable for messsages for Dr. Web ES developers only.
u
[<process_id>] – unique numerical identifier of the process
within which the thread that wrote the message to the log file
was executed. Under certain OS’s [<process_id>] may be
represented as [<process_id> <thread_id>].
u
<thread_name> – character representation of the thread within
which the message was logged.
u
[<message_source>] – name of the system that initiated
u
<message> – text description according to the log level. It may
include both a formal description of the event and the values of
certain event-relevant variables.
logging the message. The source is not always present.
For example,
1) 20081023.171700.74 inf [001316] mth:12 [Sch]
Job "Purge unsent IS events" said OK
where:
20081023 – <year><month><date>,
171700 – <hour><minute><second>,
u 74 – <hundredth_of_second>,
u inf – <message_type>,
u [001316] – [<process_id>],
u mth:12 – <thread_name>,
u [Sch] – [<message_source>],
u
u
Administrator Manual
330
Appendices
u
"Purge unsent IS events" said OK –
<message> about the correct performance of the Purge
unsent IS events job.
Job
2)
20081028.135755.61
inf
[001556]
srv:0
tcp/10.3.0.55:3575/025D4F80:2: new connection
at tcp/10.3.0.75:2193
where:
20081028 – <year><month><date>,
u 135755 – <hour><minute><second>,
u 61 – <hundredth_of_second>,
u inf – <message_type>,
u [001556] – [<process_id>],
u srv:0 – <thread_name>,
u tcp/10.3.0.55:3575/025D4F80:2:
new
connection at tcp/10.3.0.75:2193 – <message>
u
about having established a new connection through the specified
socket.
Administrator Manual
331
Frequently Asked Questions
Frequently Asked Questions
Changing the Type of the DBMS for
Dr.Web Enterprise Suite
For Windows OS
1. Stop Dr.Web Enterprise Server through Windows services
or Dr.Web Enterprise Console.
2. Run drwcsd.exe using the exportdb switch to export the
content of the database to a file. The full command line (for
Windows) looks as follows:
"C:\Program Files\DrWeb Enterprise
Server\bin\drwcsd.exe" -home="C:\Program
Files\DrWeb Enterprise Server" -varroot="C:\Program Files\DrWeb Enterprise
Server\var" -verbosity=all exportdb D:
\esbase.es
It is presumed that Dr.Web Enterprise Server is installed to
the C:\Program Files\DrWeb Enterprise Server
folder and the database is exported to a file esbase.es,
which is in the root of disc D. Copy the line above to the
clipboard and paste to the cmd file and run the file.
If the path to a file (or a file name) contains spaces or national
characters, the path should be put in quotation marks:
"D:\long name\esbase.es"
3. Start the ES Server, connect the Console to the Server and
configure the Server to use a different DBMS. Cancel
restarting the Server.
4. Stop the ES Server through Windows services or Dr.Web
Enterprise Console.
Administrator Manual
332
Frequently Asked Questions
5. Run drwcsd.exe using the initdb switch to initialize a
new database. The command line will look as follows:
"C:\Program Files\DrWeb Enterprise
Server\bin\drwcsd.exe" -home="C:\Program
Files\DrWeb Enterprise Server" -varroot="C:\Program Files\DrWeb Enterprise
Server\var" -verbosity=all initdb D:
\Keys\agent.key - - root
It is presumed that the Server is installed to the C:
\Program Files\DrWeb Enterprise Server folder
and agent.key resides in D:\Keys. Copy this line to the
clipboard and paste to the cmd file. Run the file then.
If the path to a file (or a file name) contains spaces or national
characters, the path to the key should be put in quotation
marks:
"D:\long name\agent.key"
6. Run drwcsd.exe using the importdb switch to import the
database from the file. The command line will look as follows:
"C:\Program Files\DrWeb Enterprise
Server\bin\drwcsd.exe" -home="C:\Program
Files\DrWeb Enterprise Server" -varroot="C:\Program Files\DrWeb Enterprise
Server\var" -verbosity=all importdb D:
\esbase.es
Copy this line to the clipboard and paste to the cmd file. Run
the file.
7. Start Dr.Web Enterprise Server through Windows services
or Dr.Web Enterprise Console and make sure everything
works normally.
For UNIX OS
1. Stop Dr.Web Enterprise Server using the script
Administrator Manual
333
Frequently Asked Questions
u
for Linux OS and Solaris9 OS:
/etc/init.d/
drwcsd stop
u
for
Solaris10:
/usr/sbin/svcadm
disable
drwcsd
u
for FreeBSD OS: /usr/local/etc/rc.d/
drwcsd.sh stop
or via Dr.Web Enterprise Console.
2. Start the Server with the exportdb switch to export the
database to a file. The command line from the Server
installation folder will look as follows:
u
for Linux OS and Solaris OS: "/etc/init.d/
drwcsd exportdb /var/esbase.es"
u for FreeBSD OS: "/usr/local/etc/rc.d/
drwcsd.sh exportdb /var/drwcs/esbase.
es"
It is presumed that the database is exported to esbase.es,
which resides in the specified folder.
3. Start Dr.Web Enterprise Server using the script
u
for Linux OS and Solaris9 OS:
/etc/init.d/
drwcsd start
u
for
Solaris10:
/usr/sbin/svcadm
enable
drwcsd
u
for FreeBSD OS: /usr/local/etc/rc.d/
drwcsd.sh start
connect Dr.Web Enterprise Console to the Server and
configure the Server to use another database through the ES
Console menu: Administration → Configure Server →
Database tab.
You can also reconfigure the Server to use another database/
DBMS by editing the Server configuration file drwcsd.
conf directly. To do this, you should comment/delete the
entry about the current database and enter the new database
(for more details see Appendix G1. Server Configuration File).
Administrator Manual
334
Frequently Asked Questions
You will be prompted to restart the Server. Reject restarting.
4. Stop Dr.Web Enterprise Server (see step 1).
5. Run drwcsd using the initdb switch to initialize a new database.
The command line will look as follows:
u
for Linux OS and Solaris OS: "/etc/init.d/
drwcsd initdb /root/keys/agent.key - root"
u for FreeBSD OS: "/usr/local/etc/rc.d/
drwcsd.sh initdb /root/keys/agent.key
- - root"
It is presumed that the agent.key resides in the /root/
keys folder.
6. Run drwcsd using the importdb switch to import the
database from a file. The command line will look as follows:
u
for Linux OS and Solaris OS: "/etc/init.d/
drwcsd importdb /var/esbase.es"
u for FreeBSD OS: "/usr/local/etc/rc.d/
drwcsd.sh importdb /var/esbase.es"
7. Start Dr.Web Enterprise Server (see step 3).
If you want to change the parameters at Server start (for
example, specify the Server installation folder, change the log
level, etc.), you will have to edit the start script:
u for FreeBSD OS: /usr/local/etc/rc.d/
drwcsd.sh
u for Linux OS and Solaris OS:
/etc/init.d/
drwcsd
Administrator Manual
335
Frequently Asked Questions
Restoring the Database of Dr.Web
Enterprise Suite
Dr.Web ES regularly backs up important data (database contents,
Server license key, private encryption key, Server configuration key,
and Web Interface configuration key). The backup files are stored in
\var\Backup. For that purpose a daily task is included to the
Server schedule. If such task is missing, it is strongly recommended
to create it.
The copies are stored in the .dz format unpackable with gzip and
other archivers. After unpacking all the files, except for the database
contents, are ready to use. To restore the data, the database contents
can be imported from the backup to another database of the Server
by means of the importdb switch.
For Windows OS
1. Stop the ES Server.
2. Remove dbinternal.dbs.
3. Initialize a new database. In Windows the command line will
look as follows:
"C:\Program Files\DrWeb Enterprise
Server\bin\drwcsd.exe" -home="C:\Program
Files\DrWeb Enterprise Server" -varroot="C:\Program Files\DrWeb Enterprise
Server\var" -verbosity=all initdb D:
\Keys\agent.key - - root
The command must be entered in a single line. It is presumed
that Dr.Web Enterprise Server is installed to the C:
\Program Files\DrWeb Enterprise Server folder
and agent.key is located in D:\Keys.
Once this command is executed, a new dbinternal.dbs of
about 200 Kb will be generated in the var subfolder of the ES
Administrator Manual
336
Frequently Asked Questions
Server installation folder.
4. Import the content of the database from the correspondent
backup file. The command line will look as follows:
"C:\Program Files\DrWeb Enterprise
Server\bin\drwcsd.exe" -home="C:\Program
Files\DrWeb Enterprise Server" -varroot="C:\Program Files\DrWeb Enterprise
Server\var" -verbosity=all importdb "disc:
\path_to_the_backup_file\database.dz"
The command must be entered in a single line. It is presumed
that Dr.Web Enterprise Server is installed to the C:
\Program
Files\DrWeb
Enterprise
Server
folder.
5. Start the ES Server.
For UNIX OS
1. Stop the ES Server.
u
for Linux OS and Solaris9 OS: /etc/init.d/
drwcsd stop
u
for
Solaris10:
/usr/sbin/svcadm
disable
drwcsd
u
for
FreeBSD
OS:
/usr/local/etc/rc.d/
drwcsd.sh stop
u
for other supported versions: /bin/drwcs.sh stop
2. Remove dbinternal.dbs from the var subfolder of the
Server installation folder.
3. Make sure that the agent.key file is in the etc subfolder of
the Server installation folder. Then initialize the Server
database. The command will look as follows:
su drwcs -c "bin/drwcsd -var-root=./var verbosity=all -log=./var/server.log initdb
etc/agent.key - - password"
It is presumed that Dr.Web Enterprise Server is installed to
Administrator Manual
337
Frequently Asked Questions
the C:\Program Files\DrWeb Enterprise Server
folder and agent.key resides in D:\Keys.
Once this command is executed, a new dbinternal.dbs database
of about 200 Kb will be generated in the var subfolder of the ES
Server installation folder.
4. Import the content of the database from the correspondent
backup. The command line will look as follows:
bin/drwcsd -var-root=./var -verbosity=all
-log=logfile.log importdb /
path_to_the_backup_file/database.dz
5. Start the ES Server.
u
for Linux OS and Solaris9 OS: /etc/init.d/
drwcsd start
u
for
Solaris10:
/usr/sbin/svcadm
enable
drwcsd
u
for
FreeBSD
OS:
/usr/local/etc/rc.d/
drwcsd.sh start
u
for
other
supported
versions:
/bin/drwcs.sh
start
If some Agents were installed after the last backup had been
made they will not be connected to the Server after the
database has been restored from the backup. You should
remotely reset them to the newbie mode. To do this, on
Console’s Administration menu, select Configure Server.
A Dr.Web® Enterprise Server configuration window will
open on the General tab. Select the Reset unauthorized
to newbie checkbox.
As soon as the database is restored from the backup it is
recommended to connect the Console to the Server. On the
Administration menu, select Server schedule and check
that the Back up critical server data task is on the list. If
this task is absent, add it to the list.
Administrator Manual
338
Frequently Asked Questions
Restoring the Server from Data Backup
Dr.Web Enterprise Suite regularly backs up important data
(database contents, Server license key, private encryption key,
Server configuration key, and Web Interface configuration key). The
backup files are stored in \var\Backup. For that purpose a daily
task is included to the Server schedule. If such task is missing, it is
strongly recommended to create it.
The copies are stored in the .dz format unpackable with gzip and
other archivers. After unpacking all the files, except for the database
contents, are ready to use. To restore the data, the database contents
can be imported from the backup to another database of the Server
by means of the importdb switch (see p. Restoring the Database of Dr.
Web Enterprise Suite).
It is also recommended to store copies of the following files on another
PC: encryption keys drwcsd.pri and drwcsd.pub, license keys
enterprise.key
and
agent.key,
SSL
certiifcate
certificate.pem, and regularly copy Server database contents
backup database.dz, Server and Web Interface configuration
files drwcsd.conf and webmin.conf to another PC. Thus you
will be able to avoid data loss should the PC, on which the ES Server
is installed, be damaged, and to fully restore the data and the
functionality of the Server. If license keys are lost they may be
requested once again, as specified in p. Key Files.
To restore a Server for Windows OS
Install ES Server software of the same version as the lost one on a
working PC (see p. Installing the Anti-Virus Server for Windows).
During the installation:
u
If there is a copy of the DB (internal or external) on another PC
and it is not damaged, in the respective dialog boxes of the
installer specify it along with the saved files of the Server
license key, private encryption key and Server configuration.
Administrator Manual
339
Frequently Asked Questions
u
If the Server DB (internal or external) was lost, but a backup of
its contents database.dz is saved, then in the respective dialog
boxes of the installer select creating a new database, specify the
saved files of the Server and Agent license keys, private
encryption key and Server configuration. After the installation
import the DB contents from the backup (see p. Restoring the
Database of Dr.Web Enterprise Suite).
Install the Console of the same version as the Server’s (see p.
Installing the Anti-Virus Server for Windows).
To restore a Server for UNIX system-based
OS’s
1. Install ES Server software of the same version as the lost one
on a working PC (see p. Installing the Anti-Virus Server for UNIX
system-based Operating Systems).
2. Put the saved files to:
u
for Linux OS: /var/opt/drwcs/etc, except for the
public key. Put the latter to /opt/drwcs/
Installer/
u
for FreeBSD OS: /var/drwcs/etc, except for the
public key. Put the latter to /usr/local/drwcs/
Installer/
u
for Solaris OS: /var/drwcs/etc, except for the
public key. Put the latter to /opt/drwcs/
Installer/
For all replaced files assign the same permissions as those set
at the previous (lost) installation of the Server.
3. Generate a new SSL certificate:
u
for Linux OS and Solaris OS:
/etc/init.d/drwcsd selfcert
u
for FreeBSD OS:
/usr/local/etc/rc.d/drwcsd.sh selfcert
Administrator Manual
340
Frequently Asked Questions
u
for other supported versions:
/opt/drwcs/bin/drwcsd
-var-root=/var/
drwcs
-log=/var/drwcs/log/drwcsd.log
selfcert
4. The next steps depend on the availability of the Server
database:
a) If you have a working external DB, no further restoring
procedures are needed, provided that you have the
configuration file and the Server build is the same as the
old one. Otherwise you will have to register the database
in the configuration file and/or update the structure of the
database with the upgradedb switch (see variant c below).
b) If you have a backup of internal or external DB contents
(database.dz), start the Server, remove the internal
DB created at the installation, initiate creating a new one
and import the contents of the old DB from the backup
copy (see p. Restoring the Database of Dr.Web Enterprise
Suite).
c) If you have a saved copy of the internal DB, replace the
new file with it:
for Linux OS: /var/opt/drwcs/dbinternal.dbs
for FreeBSD OS and Solaris OS: /var/drwcs/
dbinternal.dbs
For all replaced files assign the same permissions as those set
at the previous (lost) installation of the Server.
To upgrade the databases, execute the following commands:
for Linux OS and Solaris OS:
/etc/init.d/drwcsd upgradedb
for FreeBSD OS:
/usr/local/etc/rc.d/drwcsd.sh upgradedb
for other supported versions:
/opt/drwcs/bin/drwcsd -var-root=/var/
drwcs -log=/var/drwcs/log/drwcsd.log
upgradedb update-db
Launch the ES Server.
5. Install the Console of the same version as the Server’s (see p.
Administrator Manual
341
Frequently Asked Questions
Installing the Anti-Virus
Operating Systems).
Server for UNIX
system-based
If some Agents were installed after the last backup had been
made they will not be connected to the Server after the
database has been restored from the backup. You should
remotely reset them to the newbie mode. For that purpose,
on Console’s Administration menu, select Configure
Server. A Dr.Web® Enterprise Server configuration
window will open. On the General tab select the Reset
unauthorized to newbie checkbox.
Administrator Manual
342
343
Index
components
A
access restriction
Internet resources
local resources
accounts
144
Active Directory
47
Agent, uninstalling
88, 180
updating
190
190
components, composition
97
permissions
installing
96
functions
74
installing
41
44, 47
installing, for Unix
interface
logging
222
122
start instruction switches
53, 55
213
272
38
installing, for Windows
213
modes, for UNIX OS
281
27
58
58, 167
restoring
339
schedule
169
setting connections
settings
183
155
start instruction switches
alerts
statistics
166
tasks
165
anti-virus network
130
configuration file
47
74
uninstalling
130, 297
anti-virus Server
installing, remote
mobile mode
53, 114
anti-virus scanning
installing, Active Directory
interface
15
anti-virus Scaner
222
114
41, 47, 92, 114
uninstalling
Agent
for UNIX OS
183
structure
composition
accounts
settings
25
anti-virus package
55
Administrators
reception
planning
virus events
Agent, installing
updating
22
setting connections
146
96, 97
settings
88
licensing
180
287
179
57
types of connections
180
uninstalling, for Unix
55
Administrator Manual
344
Index
anti-virus Server
uninstalling, for Windows
updating, repository
53
202
upgrading, for UNIX OS
approving stations
36, 41
interface
58
launching
197
upgrading, for Windows OS
installing
92, 298
start instruction switches
193
uninstalling
updating, repository
112
298
53
206
creating
B
groups
backup
102
station accounts
anti-virus Server
DB (data base)
D
336
blocking
DB (data base)
HTTP-traffic
144
local resources
backup files
146
DBMS
C
336
settings
centralized schedule
126
internal
88
anti-virus, composition
composition
Oracle
114
uninstalling
SQL CE
209
53
configuration file
anti-virus server
repository
272
261
connections, between the Servers
types
183
180
235
239
PostgreSQL
14
synchronization
Console
164
DB (database)
components
anti-virus network
336
332
restoring
setting
113
339
244
242
demo key files
23
distribution kit
20
DMBS settings
235
E
encryption
key files, generating
traffic
296
161
environment variables
299
Administrator Manual
345
Index
installing
F
Agent
force update
209
Agent, Active Directory
functions
Agent, remote
Agent
74
Dr. Web ES
57
Console
13
27, 38
36, 41
NAP Validator
G
47
44, 47
anti-virus Server
anti-virus Server
52
interface
getting started
groups
41
Agent
92
74
anti-virus Server
99
adding a station
Console
103
configuration, inheriting
primary
107
107
removing a station
settings
K
key files
103
58
58
21
demo
105
23
encryption, generating
settings, propagation
110
receiving
GUS
see also registration
see also manual updating
settings
209
updating
296
21
21
214
175
L
H
language
hot keys
71
anti-virus components
HTTP-traffic, blocking
144
web interface
I
licensing
icons
local schedule
Agent
Console
77
network scanner
98
21
129
M
70
hierarchical list
148
64, 84
45
mail server UNIX
222
mail server, UNIX
Administrator Manual
346
Index
mail server, UNIX
connecting to ES
integration
setup
MailD
P
224
permissions
227
Administrators
223
users
222
manual updating
109
preinstalled groups
209
metacharacters
96
primary groups
309
mobile mode of the Agent
99
107
R
213
registration
N
NAP Validator
installing
setting
Console, at the Server
218
Dr.Web product
52
21
stations, at the Server
220
regular expressions
Network
Installer
284
Scanner
44
groups
Enterprise Server
258
simple editor
templates parameters
178
149
248
updating
Office Control
174
202
176
207
restoring
anti-virus Server
DB (data base)
O
206
178
synchronization
247
103
172
Server, updating
112, 122
sending, to the users
repository
general parameters
72
repository, updating
259
Console, updating
notifications
parameters
103
stations, from a group
255
Enterprise Agent/ Installer
Network Scanner
112
305, 307
removing
network addresses
newbie
92
339
336
rights
144, 146
Administrators
users
96
109
Administrator Manual
347
Index
scanning
S
126, 130
settings
Scanner
settings, propagation
anti-virus
130, 297
Network
statistics
44, 72
automatic
anti-virus Server
130
station
schedule
centralized
status file
126
Agent
169
updates
122
anti-virus package
anti-virus Server
propagation
station
114
298
280
Network Installer
284
settings
110
209
176
system requirements
114
17, 229
T
113
adding to a group
administration
traffic
103
112
92, 112
configuration, inheriting
properties
287
Interface Module
components
155
account creating
newbie
281
synchronization
station
approving
269, 270
Console
167
settings
Agent
139
anti-virus Server
211
Server logging
179
switches, start instruction
129
Server
112
statistics
126
manually
110
139
unapproved
scanning
local
114
90
compression
161
encryption
107
112, 122
103
161
HTTP, blocking
traffic monitor
114
removing from a group
composition
144
67
U
unapproved stations
112
Administrator Manual
348
Index
uninstalling
Agent
53
Agent, Active Directory
anti-virus package
anti-virus Server
55
53
53, 55
ant-virus components
Console
114
53
updating
Agent
213
anti-virus network
190
Console through the repository
206
Dr.Web ES
force
193
209
key files
manual
214
209
mobile mode
notifications
213
178
repository
207
scheduled
211
Server through the repository
202
upgrading
Server, for UNIX OS
197
Server, for Windows OS
193
W
web interface
description
78
Administrator Manual
© 2004-2009 Doctor Web