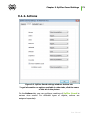
1
© Doctor Web, 2004-2011. All rights reserved
This document is the property of Doctor Web. No part of this document
may be reproduced, published or transmitted in any form or by any
means for any purpose other than the purchaser's personal use without
proper attribution.
TRADEMARKS
Dr.Web, SpIDer Mail, SpIDer Guard, CureIt!, CureNet!, AV-Desk and the
Dr.WEB logo are trademarks and registered trademarks of Doctor Web in
Russia and/or other countries. Other trademarks, registered trademarks
and company names used in this document are property of their
respective owners.
DISCLAIMER
In no event shall Doctor Web and its resellers or distributors be liable for
errors or omissions, or any loss of profit or any other damage caused or
alleged to be caused directly or indirectly by this document, the use of or
inability to use information contained in this document.
Dr.Web Agent
Version 6.0.3
User Manual
01.11.2011
Doctor Web Head Office
2-12A, 3rd str. Yamskogo polya
Moscow, Russia
125124
Web site: www.drweb.com
Phone: +7 (495) 789-45-87
Refer to the official web site for regional and international office
information.
Doctor Web
Doctor Web develops and distributes Dr.Web® information
security solutions which provide efficient protection from
malicious software and spam.
Doctor Web customers can be found among home users from all
over the world and in government enterprises, small companies
and nationwide corporations.
Dr.Web antivirus solutions are well known since 1992 for
continuing excellence in malware detection and compliance
with international information security standards. State certificates
and awards received by the Dr.Web solutions, as well as the
globally widespread use of our products are the best evidence of
exceptional trust to the company products.
We thank all our customers for their support and
devotion to the Dr.Web products!
4
Table of Contents
Chapter 1. Welcome to Dr.Web® Enterprise
Security Suite
7
1.1. Conventions and Abbreviations
7
1.2. Dr.Web® Enterprise Security Suite Antivirus
8
Chapter 2. Dr.Web Agent Component
10
2.1. Main Functions and Parameters of the Dr.Web
Agent
10
2.2. System Requirements
11
2.3. Installation and Removal of Antivirus Software
13
2.3.1. Installation of Dr.Web Agent
13
2.3.2. Removal of Dr.Web Agent
22
2.4. Dr.Web Agent Interface Start and Shutdown
23
2.5. Dr.Web Agent Administration
24
Chapter 3. Dr.Web Agent Functionality
31
3.1. Setting the Interface Language
31
3.2. Updating the Antivirus Software
31
3.3. Dr.Web Agent Settings
32
3.3.1. Server Connection Settings
33
3.3.2. Log Level of Detail
35
3.4. Agent and Server Interaction Mode
36
3.5. Schedule Setting
37
3.5.1. Local Schedule. The List of Local Jobs
37
3.5.2. Centralized Schedule
47
3.6. Mobile Mode Settings
47
User Manual
5
3.7. Viewing the Statistics
49
3.8. Viewing the Antivirus Software Status
50
3.9. Informational Messages
51
Chapter 4. Starting the Antivirus Scanner
55
Chapter 5. Quarantine
56
5.1. Interface Setup
57
5.2. Quarantine Properties
58
5.3. Quarantine Contents Management
59
5.4. Quarantine Cleanup
60
Chapter 6. Dr.Web Firewall
62
6.1. Dr.Web Firewall Settings
62
6.2. Dr.Web Firewall Log
63
Chapter 7. Office Control Settings
64
Chapter 8. SpIDer Gate Settings
66
Chapter 9. SpIDer Guard Settings
68
9.1. SpIDer Guard G3 Settings
69
9.1.1. General
70
9.1.2. Actions
73
9.1.3. Excluded
77
9.1.4. Log
80
9.2. SpIDer Guard NT4 Settings
82
9.2.1. Scan Options
83
9.2.2. Controlling
99
9.2.3. Additional dialogs
108
Chapter 10. SpIDer Mail
113
10.1. SpIDer Mail Settings
116
User Manual
6
10.2. SpIDer Mail NT4 Settings
118
10.2.1. Scan Tab
119
10.2.2. Actions Tab
126
10.2.3. Engine Tab
129
10.2.4. Log Tab
131
10.2.5. Interception Tab
132
10.2.6. Exluded Applications Tab
137
Chapter 11. Dr.Web for Outlook
11.1. Virus Check
138
140
11.1.1. Malicious Objects
140
11.1.2. Actions
140
11.2. Check for Spam
143
11.2.1. Spam Filter Settings
145
11.2.2. Black and White Lists
146
11.3. Logging
150
11.3.1. Event Log
150
11.3.2. Debug Text Log
151
11.4. Statistics
153
Appendix A. Scanner Command-Line
Switches
155
Appendix B. The Complete List of Supported
OS Versions
161
Appendix C. Detection Methods
Index
164
166
User Manual
Chapter 1. Welcome to Dr.Web® Enterprise
Security Suite
Chapter 1. Welcome to Dr.Web®
Enterprise Security Suite
1.1. Conventions and Abbreviations
The following conventions are used in the Manual.
Table 1. Conventions
Symbol
Comment
Marks important notes or instructions.
Note, that
Warns about possible errors.
Warning
Dr.Web Agent
Names of Dr.Web products and components.
Antivirus network
A term in the position of a definition or a link to a
definition.
<IP-address>
Placeholders.
Cancel
Names of buttons, windows, menu items and
other user interface elements.
CTRL
Keyboard keys names.
C:\Windows\
Names of files and folders, code examples, input
to the command line and application output.
Appendix А
Cross-references or Internal Hyperlinks to web
pages.
The following abbreviations will be used in the Manual without further
interpretation:
Dr.Web GUS — Dr.Web Global Update System,
FDD — Floppy Disk Drive - portable magnetic data carrier,
User Manual
7
Chapter 1. Welcome to Dr.Web® Enterprise
Security Suite
GUI — Graphical User Interface, a GUI version of a program — a
version using a GUI,
LAN — Local area network,
OS — operating system,
PC — personal computer,
UAC – User Account Control – is a technology and security
infrastructure introduced with Microsoft. It aims to improve the
security of Microsoft Windows by limiting application software to
standard user privileges until an administrator authorizes an
increase or elevation,
URL — Uniform Resource Locator - compact string of characters
used to identify or name a resource on the Internet.
1.2. Dr.Web® Enterprise Security Suite
Antivirus
Dr.Web Enterprise Security Suite is designed to organize and
control integrated, complex and reliable antivirus protection of
computers of a company.
Protected computers are united in an antivirus network, which is
managed by the administrator through the Enterprise Server. The
antivirus protection of company's employees computers is automated
and administered centrally, which provides for a reliable safety level,
while user interference is minimal.
Dr.Web Enterprise Security Suite provides for
centralized (without user intervention) installation of the
antivirus packages on computers,
centralized setup of antivirus packages on protected computers,
centralized virus databases and program files updates on
protected computers,
monitoring of virus events and the state of antivirus packages
and OS on all protected computers.
User Manual
8
Chapter 1. Welcome to Dr.Web® Enterprise
Security Suite
Dr.Web Agents are installed on protected computers. These
programs provide for computer protection and connection with the
Enterprise Server, through which antivirus programs and their
components are updated and set up in general.
Do not install other antivirus programs, including other Dr.
Web programs, on computers with an installed Dr.Web
Agent.
The settings users can change are described in Section Dr.Web Agent
Administration.
User Manual
9
Chapter 2. Dr.Web Agent Component
Chapter 2. Dr.Web Agent
Component
2.1. Main Functions and Parameters of
the Dr.Web Agent
Computers are protected from virus threats and spam by means of
programs included in the antivirus package of Dr.Web Enterprise
Security Suite.
The Dr.Web Agent facilitates administration of computer protection
and connection to the Enterprise Server.
The Dr.Web Agent serves the following functions:
installs, updates and sets up the antivirus package, starts
scannings, and performs other tasks given by the Enterprise
Server;
allows to call for execution the Dr.Web antivirus package files
through a special interface;
sends the results of tasks execution to the Enterprise Server;
sends notifications of predefined events in the operation of the
antivirus package to the Enterprise Server.
Users can implement the following actions through the Dr.
Web Agent:
schedule checkups (scanning) of the computer for viruses;
start scanning the computer if necessary;
change the settings of certain components of the Dr.Web
Antivirus including some settings of the Agent;
view the statistics of virus events on the computer and other
information about the Dr.Web program.
User Manual
10
Chapter 2. Dr.Web Agent Component
A user may change the settings of the Agent and the
components provided he has corresponding permissions to
such actions. A more detailed information is given in the
descriptions of the settings of concrete components.
2.2. System Requirements
No other antivirus software (including other versions of Dr.
Web antivirus programs) should be installed on the
workstations of an antivirus network managed by Dr.Web
ESS.
The Dr.Web Agent and the full antivirus package require
1. Minimal requirements:
Intel® Pentium® IV 1.6 GHz;
RAM 512 MB.
2. Recommended requirements:
Intel® Pentium® IV 2.4 GHz or faster;
RAM not less than 1 GB.
3. Not less than 180 MB of available disk space for executable
files + extra disk space for logs and temporary files;
4. Operating systems (see
Supported OS Versions):
Appendix B. The Complete List of
a) Microsoft® Windows® 98 OS, Windows Me OS, Windows
NT4 OS (SP6) and later. Depending on OS, the following
components can be installed:
Component
OS
SpIDer Gate,
SelfPROtect and Office
Control
Windows 2000 with SP4 and later.
FireWall
Windows 2000 with SP4 + Update
Rollup 1 and later.
User Manual
11
Chapter 2. Dr.Web Agent Component
Component
OS
SpIDer Guard NT4
Windows 98,
Windows ME,
Windows NT4 (SP6a),
Windows 2000 with SP4 without
Update Rollup1,
Windows XP without SP and with
SP1,
Windows 2003 without SP.
SpIDer Guard G3
Windows 2000 with SP4 and Update
Rollup1,
Windows XP с SP2 and later,
Windows 2003 с SP1 and later,
Windows Vista and later.
SpIDer Mail NT4
Windows 98,
Windows NT4 with SP6a.
SpIDer Mail
All supported OS later than systems for
SpIDer Mail NT4 version which are
above-listed.
Dr.Web Browser-Plugin Windows 2000 with SP4 and later.
for Outlook
b) Microsoft® Windows Mobile® OS;
c) Novell® NetWare® OS;
d) Mac OS® X;
e) UNIX® system-based OS: Linux® OS, FreeBSD® OS or
SolarisTM OS.
5. For Dr.Web for Outlook plug-in the the Microsoft Outlook
client from the Microsoft Office package is required:
Outlook 2000 (Outlook 9),
Outlook 2002 (Outlook 10 or Outlook XP),
Office Outlook 2003 (Outlook 11),
Office Outlook 2007,
User Manual
12
Chapter 2. Dr.Web Agent Component
Office Outlook 2010.
6. The Dr.Web Agent context help requires Windows® Internet
Explorer® 6.0 or later.
2.3. Installation and Removal of
Antivirus Software
2.3.1. Installation of Dr.Web Agent
Before the software installation, please note the System Requirements
section.
Dr.Web Agent should be installed under Administrator
account of the respective computer.
Enterprise Agent and the antivirus package can be
installed in two ways:
1. Remotely – on the Server through the network. Performed by
the antivirus network administrator. No user interference
required (see a detailed description of the creation procedure
of an antivirus station and remote installation of the antivirus
software in Administrator Manual Dr.Web Enterprise
Security Suite Antivirus).
Remote installation of Dr.Web Agents is possible only on
workstations under Windows NT4 operating systems and
later.
2. Locally – directly on the user’s machine. May be performed
both by the administrator or the user. For installation, you can
use the following files:
esinst.exe Installation Package.
drwinst.exe Agent Network Installer.
User Manual
13
Chapter 2. Dr.Web Agent Component
See the description of local installation and removal of the
antivirus software below.
2.3.1.1. Installation of Dr.Web Dr.Web Agent
via the Installation Package
If there is any antivirus software installed on the computer, the
installer will attempt to remove it before starting the installation. In
case of a failure, you will have to uninstall the antivirus software by
yourself.
To install the Dr.Web Enterprise Agent and antivirus
package:
1. Download Agent installation file. To do this, follow the link
received from the antivirus network administrator.
2. Run the downloaded esinst.exe file. A window of the
Installation Wizard of the Dr.Web Antivirus will be
opened.
3. Before installation, Wizard asks you to confirm that there is no
antivirus programs on you computer. Make sure, that there is
no antivirus software (including other versions of Dr.Web
programs) installed on your computer and set the I do not
have other anti-viruses installed on my computer flag.
Click Next.
4. In the next window, choose the type of installation:
Quick (Recommended) - the most simple type of
installation.
Custom - the type of installation that allows you to
choose antivirus components to install on your computer.
Administrative - the most detailed type of installation.
Allows you to set/change all parameters of installation and
antivirus software.
5. If you choose Custom or Administrative types of
installation, in the next window you will be offered to overview
the components of Dr.Web antivirus package. Set the flags for
components you want to install on your computer.
User Manual
14
Chapter 2. Dr.Web Agent Component
In the Installation folder field specify the path to install the
antivirus software. To set/change the default path, click the
Browse and specify the necessary path.
Click Next.
For the Custom type of the installation, go to the step 9.
6. If you choose Administrative type of installation, in the next
window specify the settings of Network installer:
In the Dr.Web Enterprise Server field, set the network
address of the Server from which the Agent and the
antivirus package will be installed. If you specified Server
address while launching the installer, it will be
automatically set in this field.
If you use the installer, created in the Dr.Web Control
Center, the Dr.Web Enterprise Server field will be set
automatically.
If you do not know the Server address, click the Find
button. The window for network searching of active Servers
will be opened. Specify the necessary fields (in format:
<Server_name>@<IP-address>/<network_prefix>:<port>)
and click Find. In the list of founded Servers choose one
for installation of the antivirus software and click OK.
In the Dr.Web Enterprise Server public key field,
specify the path to the public key (drwcsd.pub) on
your computer (if launching the installer from the Server
via network, the key will be copied to the temporary files
and after the installation it will be moved to the
installation folder).
In the Installation directory field, specify the path to
your computer for the antivirus software installation. By
default, it is the Dr.Web Enterprise Suite folder
located at the Program files at the system disk.
In the Use compression during download section,
select the traffic compression option: Yes - use
compression, No - do not use compression, Maybe Server choice.
User Manual
15
Chapter 2. Dr.Web Agent Component
The Add Dr.Web Agent to windows firewall
exclusion list flag prescribes to add ports and interfaces
of Agent for an exception for your operating system
firewall (except Windows 2000 OS). It is recommended to
set the flag. It will help to avoid errors, e.g. during the
automatic updates of the antivirus software and virus
bases.
Set the Register Agent in system list of installed
software flag, if necessary.
7.
For the Administrative type of the installation: in the next
window specify the settings of Agent:
In the Authorization section the parameters for Agent
authorization at Server are set. For the Automatic
(Default) option, the mode of the station access defines
at Server. For the Manual option, you must specify the
authorization parameters: the station Identifier and its
Password for the access to Server. The station will have
access permission without manually confirmation by the
administrator at Server.
If you use the installer, created in the Control Center,
Identifier and Password fields will be set automatically.
In Compression and Encryption sections set modes of
traffic between Agent and Server (for more details, see
the Traffic Encryption and Compression at the
Administrator manual).
Click Next.
8. The installation of Agent and antivirus components will start
(does not require user intervention).
9. After the installation is complete, the Installation Wizard will
request to restart you computer. Click Finish for the
Installation Wizard closedown.
10. Restart the computer.
User Manual
16
Chapter 2. Dr.Web Agent Component
2.3.1.2. Installation of Dr.Web Dr.Web Agent
via the Network Installer
If the network installer is run in the normal installation mode (i.e.
without -uninstall switch) on stations where the installation has
already been performed, this will not incur any actions. The installer
program terminates with a help window, contains available switches.
You must uninstall the Agent before the installation.
There are two modes of installation via the Network
installer:
1. Background mode.
2. Graphical mode.
Installation of Dr.Web Agent in the Background
Mode of the Installer
To install Dr.Web Enterprise Agent and antivirus package
in the background mode of the installer:
1. From the workstation, on which you want to install the
antivirus software, run the drwinst.exe programm, located
at:
Network catalog of Agent installation. After Server
installation, it is Installer folder (the shared hidden
resource) of the Enterprise Server installation folder.
You can change this resource further.
Installation page of the Dr.Web Control Center, which
is available at the following address:
http://<Server_address>:<port_number>/install/
where <Server_address> is the IP address or DNS name
of the computer on which Enterprise Server is installed.
And the <port_number> should be 9080 (or 9081 for
https).
By default, the drwinst
instruction launched without
User Manual
17
Chapter 2. Dr.Web Agent Component
parameters will use the Multicast mode to scan the network
for Enterprise Servers.
When you use the Multicast mode to find active Servers,
the Agent installation is performed from the first founded
Server. If the pub key is not fitted to the Server key,
installation will be failed. In this case, expressly specify the
Server address (as described below).
The drwinst command may be used with switches:
If the Multicast mode is not used to detect the Server,
it is recommended to specify a domain name for the
Enterprise Server in the DNS service and use this name
when installing the Agent:
drwinst <Server_DNS_name>
It is especially useful in case you would like to reinstall the
Enterprise Server on a different computer.
You can expressly specify the Server address as follows:
drwinst 192.168.1.3
Using the -regagent switch during the installation will
allow you to register the Agent in the Add or Remove
Programs list.
To launch the installation in the graphical mode, use the interactive parameter.
The complete list of Network Installer parameters is
describe in the Appendix H4. Network Installer at the
Administrator manual.
2. After the installation, the software of Enterprise Agent is
installed on your computer (antivirus package is not installed
yet).
3. After the station has been approved at the Server (if it is
required by Enterprise Server settings), the antivirus
package will be automatically installed.
User Manual
18
Chapter 2. Dr.Web Agent Component
4. Restart the computer on Agent request.
Installation of Dr.Web Agent in the Graphical Mode
of the Installer
To install Dr.Web Enterprise Agent and antivirus package
in the graphical mode of the installer:
1. From the workstation, on which you want to install the
antivirus software, run the drwinst.exe with the interactive parameter. The drwinst.exe programm
is located at:
Network catalog of Agent installation. After Server
installation, it is Installer folder (the shared hidden
resource) of the Enterprise Server installation folder.
You can change this resource further.
Installation page of the Dr.Web Control Center, which
is available at the following address:
http://<Server_address>:<port_number>/install/
where <Server_address> is the IP address or DNS name
of the computer on which Enterprise Server is installed.
And the <port_number> should be 9080 (or 9081 for
https).
A window of the Installation Wizard of the Dr.Web
Antivirus will be opened.
2. Before the installation, the Wizard asks you to confirm that
there is no antivirus programs on you computer. Make sure,
that there is no antivirus software (including other versions of
Dr.Web programs) installed on your computer and set the I
do not have other anti-viruses installed on my
computer flag. Click Next.
3. In the next window choose type of installation:
Quick (Recommended) - the most simple type of
installation. All parameters are set automatically. Next, go
to step 7.
Custom - the type of the installation that allows you to
choose the antivirus components to install on your
computer.
User Manual
19
Chapter 2. Dr.Web Agent Component
Administrative - the most detailed type of installation.
Allows you to set/change all parameters of the installation
and the antivirus software.
4. If you choose Custom or Administrative types of
installation, in the next window you will be offered to overview
the components of Dr.Web antivirus package. Set flags for the
components you want to install on your computer.
In the Installation path field specify the path to install the
antivirus software. To set/change the default path, click the
Browse and specify the necessary path.
Click Next.
If you chose Custom type of installation, go to the step 7.
5. For the Administrative type of the installation: in the next
window specify the settings of the Network installer:
In the Dr.Web Enterprise Server field, set the network
address of the Server from which the Agent and the
antivirus package will be installed. If you specified the
Server address while launching the installer, it will be
automatically set in this field. If you do not know the
Server address, click the Find button. The window for
network searching of active Servers will be opened.
Specify the necessary fields in format: <Server_name>@
<IP-address>/<network_prefix>:<port> and click Find.
In the list of founded Servers choose the one for the
installation of the antivirus software and click OK.
In the Dr.Web Enterprise Server public key field,
specify the path to the public key (drwcsd.pub) on
your computer (if launching the installer from the Server
via network, the key will be copied to the temporary files
and after the installation it will be moved to the
installation folder).
In the Installation directory field, specify the path to
the antivirus software installation. By default, it is the Dr.
Web Enterprise Suite folder located at the
Program files at the system disk.
User Manual
20
Chapter 2. Dr.Web Agent Component
At the Use compression during download section,
select the traffic compression option: Yes - use
compression, No (Default) - do not use compression,
Possible - Server choice.
The Add Dr.Web Agent to windows firewall
exclusion list flag prescribes to add the ports and
interfaces of the Agent for an exception for your
operating system firewall (except the Windows 2000 OS).
It is recommended to set the flag. It will help to avoid
errors, e.g. during the automatic updates of the antivirus
software and virus bases.
Set the Register Agent in system list of installed
software flag, if necessary.
6. For the Administrative type of the installation: in the next
window specify the settings of the Agent:
In the Authorization section set parameters for Agent
authorization at Server. For the Automatic (Default)
option, authorization parameters (ID and password) are
generated at the Server automatically, and the mode of
the station access is defined at Server. For the Manual
option, you must specify following authorization
parameters: the station Identifier and its Password for
access to the Server. The station will have access
permission
without
manually
confirmation
by
administrator at Server.
In Compression and Encryption sections set modes of
traffic between Agent and Server (for more details, see
the Traffic Encryption and Compression at the
Administrator manual).
Click Next.
7. Installation of Agent will start. When installation is complete,
click Finish for Installation Wizard closedown.
8. After the station has been approved at the Server (if it is
required by Enterprise Server settings or if the Manual
option has not been set at step 6 during Administrative
installation), the antivirus
package will be automatically
installed.
9. Restart the computer on Agent request.
User Manual
21
Chapter 2. Dr.Web Agent Component
2.3.2. Removal of Dr.Web Agent
To remove the Agent and the antivirus package locally, this
option must be allowed at the Server.
After removing the antivirus software, your computer will
not be protected from viruses and other malware.
You can remove the station antivirus software (Dr.Web Agent and
antivirus package):
1. By means of standard Windows OS services.
2. By using the Agent installer.
Removal by Means of Standard Windows OS
Services
This removing method will be available only if you installed
the Agent by using the graphical installer and set the
Register Agent in system list of installed software
flag.
If the Agent installed in the background mode of the
installer, the removing of the antivirus software with the
standard Windows OS services will be available only if the regagent switch was used for installation.
To remove the antivirus software, select:
for Windows 98, Windows NT, Windows ME, Windows 2000 OS:
Start
Settings
Control Panel
Add or Remove
Programs.
for Windows XP, Windows 2003 OS (depending on Start menu
view):
Start Menu: Start
Programs.
Control Panel
Add or Remove
User Manual
22
Chapter 2. Dr.Web Agent Component
Classic Start Menu: Start
Settings
Add or Remove Programs.
Control Panel
for Windows Vista OS or later (depending on Start menu view):
Home View: Start
Features.
Control Panel
Programs and
Classic View: Programs and Features.
Home View: Programs
Programs and Features.
Classic View: Start
Settings
Programs and Features.
Control Panel
In the opened list, select Dr.Web Agent and click the Remove
button (or Remove/Change depending on the version of Windows
OS). The station antivirus software will be removed.
Removal by Using the Agent Installer
To remove the Dr.Web Agent software and the antivirus package
from a workstation by using the Agent installer, run the drwinst
instruction with the –uninstall parameter (or with —uninstall
–interactive parameters, if you want to control the process) in
the installation folder of the Agent (by default C:\Program
Files\DrWeb Enterprise Suite).
2.4. Dr.Web Agent Interface Start and
Shutdown
The Dr.Web Agent is started automatically after the installation and
at every Windows OS load.
The Dr.Web Agent launched under Windows OS displays an icon
in the Taskbar notification area.
User Manual
23
Chapter 2. Dr.Web Agent Component
The Exit command of the context menu of the Agent just
removes the icon from the notification area of the Taskbar.
The Agent continues its operation.
The Agent icon is automatically shown in the notification area of the
Taskbar when the Agent is launched after Windows OS start. To
display the icon (if it was removed by the Exit command) without
restarting the computer, you can start the Agent interface by means
of the Start AgentUI command on the Windows Start menu →
Programs → Dr.Web Enterprise Suite.
To run the Agent interface under other user account (e.g.,
under account with administrative rights):
1. Open the Windows OS Start menu
Enterprise Suite.
→ Programs → Dr.Web
2. Right-click the Start AgentUI item and select Run as option
in the context menu.
3. In the opened window, enter the necessary account login and
password and click OK.
The Agent interface will be run under specified user account.
2.5. Dr.Web Agent Administration
The Dr.Web Agent launched under Windows OS displays an icon
in the notification area of the Taskbar.
When you point the mouse cursor to the Agent icon, an informational
popup window appears with data about statistics of virus events,
status of the antivirus software components and date of last update
(see also Informational Messages).
The functions of the Dr.Web Agent available for editing and viewing
are called from the context menu of the Dr.Web Agent icon. Rightclick the icon and select the necessary command.
User Manual
24
Chapter 2. Dr.Web Agent Component
Figure 2-1. Dr.Web Agent context menu
The context menu includes
Exit - remove the Dr.Web Agent icon from the notification
User Manual
25
Chapter 2. Dr.Web Agent Component
area of the Taskbar (see p. Dr.Web Agent Interface Start and
Shutdown).
Support - go to the web page of Dr.Web Technical Support
service to receive subscriber’s technical support.
Prepare logs - archive (zip) log files and files with system data
to send to the technical support.
Doctor Web, Ltd - go to the site of Dr.Web Company.
Help - open Dr.Web Agent help.
About - view information about the program and its version.
From the information window you can go to the web site of Dr.
Web Company or to the web page of Dr.Web Technical
Support service.
SpIDer Mail - enable/disable the File Monitor SpIDer Mail.
SpIDer Mail is an e-mail monitor. With default settings, SpIDer
Mail automatically intercepts all calls of any mail programs on
your computer to mail servers.
SpIDer Guard - enable/disable the SpIDer Guard File
Monitor.
SpIDer Guard constantly resides in the main memory checking
all opened files on-access and monitors running processes for
virus-like activity.
SpIDer Gate - enable/disable the SpIDer Gate HTTP Monitor.
By configuring SpIDer Gate you can turn on or turn off
monitoring of incoming and outgoing traffic and list applications
which traffic you want or do not want to monitor.
Self-protection - enable/disable the SelfPROtect system
monitor.
This component protects Dr.Web files and catalogs from
unpermitted or unintentional interference, for example deletion or
modification by viruses. When the System Monitor is enabled,
only Dr.Web programs may access the indicated resources.
In the Prevent suspicious actions drop-down list the
following options are available:
User Manual
26
Chapter 2. Dr.Web Agent Component
Protect HOSTS system file - forbid modifications of the
HOSTS file. The operating system uses this file when
connecting to the Internet. Changes to this file may
indicate virus infection.
Protect critical system objects - protect critical
objects of the operating system such as register etc.
Network access - when the item is selected, it is allowed to
access the LAN and the Internet, otherwise the access is
blocked.
Outlook plug-in - enable/disable the Dr.Web for Outlook
plug-in.
Dr.Web for Outlook checks e-mail sent/received via the
Microsoft Outlook mail application.
Firewall - enable/disable the Dr.Web Firewall.
Dr.Web Firewall protects your computer from unauthorized
access and prevents leak of vital data through networks.
To learn more about this component functions and dialog boxes, open
the application and press F1.
Detailed information about other menu items is given in Chapter 3 of
this Manual. To open the necessary section, click the respective item of
the context menu on figure 2-1.
The number of settings available on the context menu of the
Dr.Web Agent icon can vary subject to the configuration
of the workstation set by the means of the antivirus
network. The antivirus network administrator can limit user's
rights to administer and set up the antivirus tools installed
on his computer.
If some items of the context menu are not available, it may
be for the following two reasons:
1. Permissions to change these settings are disabled at
the Server by the antivirus network administrator.
2. The user has no administrator rights on this
computer.
User Manual
27
Chapter 2. Dr.Web Agent Component
The context menu of an Agent started without administrator rights
under Windows Vista and later OS includes an additional item
Administrator (see figure 2-2). This menu item enables the user to
start the Agent under administrator rights and fully access to the
functionality of the Agent, namely all menu items approved at the
Enterprise Server will become available.
Figure 2-2. Context menu of the Dr.Web Agent under a Windows 7
OS user
User Manual
28
Chapter 2. Dr.Web Agent Component
The context menu of an Agent started with administrator rights under
Windows Vista and later OS in case then the UAC (User Account
Control - technology and security infrastructure introduced with
Microsoft. It aims to improve the security of Microsoft Windows by
limiting application software to standard user privileges until an
administrator authorizes an increase or elevation. Administrator can
disable UAC in the Control panel) is enabled, includes an additional
item User. This menu item enables the user to start the Agent
without administrator rights.
In all dialog boxes of the Dr.Web Agent, to receive help,
press F1. To learn about the function of any element of the
windows, right-click it.
The Dr.Web Agent icon can have different aspects depending on
whether the workstation is connected to the Server and other
parameters.
Possible variants and the components statuses corresponding to them
are given in Table 2.
Table 2. Possible aspects of the icon and components statuses
corresponding to them
Icon
Description
Status
The black picture on the The
Agent
is
operating
green background.
normally and is connected to
the Server.
A crossed Server icon on the The Server is unavailable.
basic background.
An exclamation mark in a The Agent requests to restart
yellow triangle over the icon. the computer, or components
SelfPROtect or Spider Guard
are disabled.
→
The background of the icon An error occurred during
changes color from green to updating of the package
red.
components.
User Manual
29
Chapter 2. Dr.Web Agent Component
Icon
Description
Status
The background of the icon The Agent is stopped or not
is constantly red.
running.
The background of the icon The Agent is working in the
is yellow.
mobile mode.
User Manual
30
Chapter 3. Dr.Web Agent Functionality
Chapter 3. Dr.Web Agent
Functionality
3.1. Setting the Interface Language
Changing the language of all antivirus components could be
done only through the Dr.Web Agent.
To change the language of the Dr.Web Agent and Dr.Web antivirus
components, select Language on the context menu of its icon. In the
drop-down-list, specify the necessary language of the interface.
3.2. Updating the Antivirus Software
Dr.Web software updates are loaded and installed automatically as
they become available. Still in critical situations you can manually
update the software components (upon prior consultation with the
administrator).
To update the antivirus software installed on your computer, click
Resync now on the context menu.
When the icon background turns from green to red, you must
force synchronization of the components that failed to update.
For this, select Resync now → Only failed components in
the Agent context menu.
When it is necessary to update all installed components of the
antivirus (e.g., when the Agent has not been connected to the
Server for a long time, etc.), on the context menu select
Resync now → All components.
User Manual
31
Chapter 3. Dr.Web Agent Functionality
3.3. Dr.Web Agent Settings
To access Dr.Web Agent settings, on the context menu of the Agent
click Settings.
In the drop-down list of the Settings menu you can mark the type of
notifications about virus events on your PC that you want to receive:
Major messages - receive only important messages. Such
notifications include messages about:
the launching errors of the antivirus software or some of
the components;
the updating errors of the antivirus software or some of
the components, is displayed right after error of update
procedure;
the necessity to restart a computer after updating, is
displayed right after update procedure;
necessity of message with reboot requirement to finish
components installation.
Minor messages - receive only minor messages. Such
notifications include messages about
the starting of remote scanning;
the stoping of remote scanning;
the beginning of updating of the antivirus software or
some of the components;
the end of successful updating of the antivirus software or
some of the components.
Virus messages - receive only messages about viruses. This
type of notification includes messages about virus(es) detection
by one of the antivirus software components.
To do this, set the flag near the respective menu item (click the item).
If you want to receive all groups of messages, set all three flags.
Otherwise only messages of selected groups will be shown (see also p.
Informational Messages).
User Manual
32
Chapter 3. Dr.Web Agent Functionality
To enable system time synchronization with the Server, set the
Sinchronyze time flag. In this mode, the Agent adjusts the system
time on your computer in correspondence with the time on the
Server.
To view or change Server connection settings, select Connection
(see p. Server Connection Settings).
To view or change parameters of logging of virus events on your
computer, select Log level (see p. Log Level of Detail).
Connection and Log level options are available on the
Settings menu only if user has:
1. Permissions to change these settings. The
permissions are set at the Server by the antivirus
network administrator.
2. Administrator rights on the computer.
3.3.1. Server Connection Settings
To view and edit the settings of connection with the Enterprise
Server, on the context menu click Settings → Connection.
The Connection option is available on the Settings menu
only if the user is granted with the permissions to change
the settings. The permissions are set at the Server by the
antivirus network administrator.
In the dialog box for setting a connection with the Enterprise Server
you can change the parameters of connection to the current Server
or set up a connection with a new Enterprise Server.
User Manual
33
Chapter 3. Dr.Web Agent Functionality
Figure 3-1. Server Connection Settings.
In all dialog boxes of the Dr.Web Agent, to receive help
about the active window, press F1. To learn about the
function of any element of the window, right-click it.
Enterprise Server connection settings should be altered
only upon coordination with the antivirus network
administrator, or your computer will be disconnected from
the network.
If necessary, change the parameters:
Server - Enterprise Server name or IP address,
ID - identifier assigned to your computer for registration at the
Server,
Password - Agent password to connect to the Server.
To close the window and save the changes, click OK.
To close the window and skip the changes, click Cancel.
To reset all Server connection settings, click Newbie. The Agent will
be disconnected from the Server and the antivirus package on your
computer will not be able to provide ultimate safety. To set up a
User Manual
34
Chapter 3. Dr.Web Agent Functionality
connection to the Server again, you will have to enter new Server
registration data in this dialog box. After the registration has been
confirmed by the antivirus network administrator, your computer will
be reconnected to the Enterprise Server.
3.3.2. Log Level of Detail
To change the level of detail of events logging on your computer, on
the context menu click Settings → Log level.
The Log level option is available on the Settings menu
only if user has:
1. Permissions to change these settings. The
permissions are set at the Server by the antivirus
network administrator.
2. Administrator rights on the computer.
Select the necessary value (Debug3 - logging in maximum detail,
Critical error - logging in minimum detail, only critical errors are
registered):
Debug, Debug 1, Debug 2, Debug 3 — instruct to log
debugging events. The options are displayed in the ascending
order according to the level of detail. Debug instructs to log in
the minimum level of detail; Debug 3 instructs to log in the
maximum level of detail.
Trace, Trace 1, Trace 2, Trace 3 — enable tracing events.
The options are displayed in the ascending order according to
the level of detail. Trace instructs to log in the minimum level of
detail; Trace 3 instructs to log in the maximum level of detail.
Info — display information messages,
Notice — display important information messages,
Warning — warn about errors,
Error — notify of operation errors,
Critical error — instructs to inform only about most severe
errors.
User Manual
35
Chapter 3. Dr.Web Agent Functionality
3.4. Agent and Server Interaction Mode
To view and edit the parameters of Agent interaction with the
Server, select Run mode on the Agent context menu.
The Run mode option is available on context menu only if
user has:
1. Permissions to change these settings. The
permissions are set at the Server by the antivirus
network administrator.
2. Administrator rights on the computer.
The following items are available on the Mode drop-down list:
Connect to Dr.Web Enterprise Server - use this option to
send statistics to the Administrator and receive Server
instructions and Dr.Web updates.
Accept Jobs - use this option to accept virus check jobs from
the Administrator of your Antivirus network.
Accept Updates - use this option to receive regular updates of
antivirus components and virus databases.
Accumulate Events - use this option to collect and disable
sending an information about virus events on your computer.
If this option is enabled, the Agent interacting with the Server,
but the following information will not be sent to the Server:
periodically statistic,
information about viruses,
Agent and antivirus package configuration changes,
information about lunching and stopping of antivirus
components.
This information is not critical and do not affect to the Agent
operability. Information is stored and will be sent at the next
connection to the Server after disabling Accumulate Events
option.
User Manual
36
Chapter 3. Dr.Web Agent Functionality
This option can be useful in case of low-capacity of the
network channel.
3.5. Schedule Setting
Against the permissions at the Server, you may edit and view the
schedule of the antivirus Scanner:
set and edit the local checks schedule;
view the centralized checks schedule.
To do this, select the respective item on the drop-down menu of the
Schedule command of the Agent context menu.
3.5.1. Local Schedule. The List of Local Jobs
Against the permissions at the Server, you may create your own
schedule, to which you may add certain types of jobs to check the
computer.
The Local item is available on the Schedule menu only if
user has:
1. Permissions to change these settings. The
permissions are set at the Server by the antivirus
network administrator.
2. Administrator rights on the computer.
By clicking Schedule
your own schedule.
→
Local on the context menu you can view
If you want to schedule a task to scan your computer, click Add and
select the type of job in the opened window:
Hourly
User Manual
37
Chapter 3. Dr.Web Agent Functionality
Daily
Weekly
Monthly
Every N minutes
Startup
If you need to edit an assigned job, select it in the list and click Edit.
To remove a job, select it in the list and click Remove.
You can start scanning immediately by selecting the Scanner
command on the context menu of the Dr.Web Agent icon or on the
Windows Start menu → Programs.
In all dialog boxes of the Dr.Web Agent, to receive help
about the active window, press F1. To learn about the
function of any element of the window, right-click it.
3.5.1.1. Hourly Job
This job type is performed every hour on the specified minute of the
hour.
User Manual
38
Chapter 3. Dr.Web Agent Functionality
Figure 3-2. Hourly job dialog box
In all dialog boxes of the Dr.Web Agent, to receive help
about the active window, press F1. To learn about the
function of any element of the window, right-click it.
In the dialog box of an hourly job (see Figure 3-2) you can set the
following parameters:
Job's name - type a name of the task.
To enable the job, set the flag Enable this job.
To disable the job, clear the flag. The job will remain on the list
but will not be executed.
Set the Critical job flag to perform the job at the next Dr.Web
Agent launch, if execution of this job is omitted (the Dr.Web
Agent is switched off at the due time). If a task is omitted
several times within a certain period of time, then it will be
performed only once after the Dr.Web Agent has been
launched.
Arguments - specify, when necessary, additional job launch
parameters. Use the command-line parameters specified in
Appendix A. Scanner Command-Line Switches.
User Manual
39
Chapter 3. Dr.Web Agent Functionality
Hourly at - specify the minute when the job should be
performed.
To close the window and save the parameters of the task, click OK.
To close the window without saving the changes/new task, click
Cancel.
3.5.1.2. Daily Job
This job type is performed every day at the specified time.
Figure 3-3. Daily job dialog box
In all dialog boxes of the Dr.Web Agent, to receive help
about the active window, press F1. To learn about the
function of any element of the window, right-click it.
In the dialog box of a daily job (see Figure 3-3) you can set the
following parameters:
Job's name - type a name of the task.
To enable the job, set the flag Enable this job.
User Manual
40
Chapter 3. Dr.Web Agent Functionality
To disable the job, clear the flag. The job will remain on the list
but will not be executed.
Set the Critical job flag to perform the job at next Dr.Web
Agent launch, if execution of this job is omitted (the Dr.Web
Agent is switched off at the due time). If a task is omitted
several times within a certain period of time, then it will be
performed only once after the Dr.Web Agent has been
launched.
Arguments - specify, when necessary, additional job launch
parameters. Use the command-line parameters specified in
Appendix A. Scanner Command-Line Switches.
Daily at - specify the hour and the minute when the job should
be performed.
To close the window and save the parameters of the task, click OK.
To close the window without saving the changes/new task, click
Cancel.
3.5.1.3. Weekly Job
This job type is performed every week on the specified weekday at the
fixed time.
User Manual
41
Chapter 3. Dr.Web Agent Functionality
Figure 3-4. Weekly job dialog box
In all dialog boxes of the Dr.Web Agent, to receive help
about the active window, press F1. To learn about the
function of any element of the window, right-click it.
In the dialog box of a weekly job (see Figure 3-4) you can set the
following parameters:
Job's name - type a name of the task.
To enable the job, set the flag Enable this job.
To disable the job, clear the flag. The job will remain on the list
but will not be executed.
Set the Critical job flag to perform the job at next Dr.Web
Agent launch, if execution of this job is omitted (the Dr.Web
Agent is switched off at the due time). If a task is omitted
several times within a certain period of time, then it will be
performed only once after the Dr.Web Agent has been
launched.
Arguments - specify, when necessary, additional job launch
parameters. Use the command-line parameters specified in
Appendix A. Scanner Command-Line Switches.
User Manual
42
Chapter 3. Dr.Web Agent Functionality
Weekly on - specify the day of week, the hour and the minute
when the job should be performed.
To close the window and save the parameters of the task, click OK.
To close the window without saving the changes/new task, click
Cancel.
3.5.1.4. Monthly Job
This job type is performed every month on the specified day of month
at the fixed time.
Figure 3-5. Monthly job dialog box
In all dialog boxes of the Dr.Web Agent, to receive help
about the active window, press F1. To learn about the
function of any element of the window, right-click it.
In the dialog box of a monthly job (see Figure 3-5) you can set the
following parameters:
Job's name - type a name of the task.
To enable the job, set the flag Enable this job.
User Manual
43
Chapter 3. Dr.Web Agent Functionality
To disable the job, clear the flag. The job will remain on the list
but will not be executed.
Set the Critical job flag to perform the job at next Dr.Web
Agent launch, if execution of this job is omitted (the Dr.Web
Agent is switched off at the due time). If a task is omitted
several times within a certain period of time, then it will be
performed only once after the Dr.Web Agent has been
launched.
Arguments - specify, when necessary, additional job launch
parameters. Use the command-line parameters specified in
Appendix A. Scanner Command-Line Switches.
Monthly at - specify the day of month, the hour and the
minute when the job should be performed.
To close the window and save the parameters of the task, click OK.
To close the window without saving the changes/new task, click
Cancel.
3.5.1.5. Every N Minutes Job
This job type is performed in a certain time span set in minutes.
Figure 3-6. Job dialog box
User Manual
44
Chapter 3. Dr.Web Agent Functionality
In all dialog boxes of the Dr.Web Agent, to receive help
about the active window, press F1. To learn about the
function of any element of the window, right-click it.
In the dialog box of a job (see Figure 3-6) you can set the following
parameters:
Job's name - type a name of the task.
To enable the job, set the flag Enable this job.
To disable the job, clear the flag. The job will remain on the list
but will not be executed.
Set the Critical job flag to perform the job at next Dr.Web
Agent launch, if execution of this job is omitted (the Dr.Web
Agent is switched off at the due time). If a task is omitted
several times within a certain period of time, then it will be
performed only once after the Dr.Web Agent has been
launched.
Arguments - specify, when necessary, additional job launch
parameters. Use the command-line parameters specified in
Appendix A. Scanner Command-Line Switches.
Every <...> minutes - specify a time span in minutes.
To close the window and save the parameters of the task, click OK.
To close the window without saving the changes/new task, click
Cancel.
3.5.1.6. Startup Job
This job type is performed at computer startup.
User Manual
45
Chapter 3. Dr.Web Agent Functionality
Figure 3-7. Job dialog box
In all dialog boxes of the Dr.Web Agent, to receive help
about the active window, press F1. To learn about the
function of any element of the window, right-click it.
In the dialog box of a job (see Figure 3-7) you can set the following
parameters:
Job's name - type a name of the task.
To enable the job, set the flag Enable this job.
To disable the job, clear the flag. The job will remain on the list
but will not be executed.
Arguments - specify, when necessary, additional job launch
parameters. Use the command-line parameters specified in
Appendix A. Scanner Command-Line Switches.
To close the window and save the parameters of the task, click OK.
To close the window without saving the changes/new task, click
Cancel.
User Manual
46
Chapter 3. Dr.Web Agent Functionality
3.5.2. Centralized Schedule
In the window of the centralized checkups schedule you can view
scanning tasks assigned by the Enterprise Server to be performed in
the antivirus network.
In all dialog boxes of the Dr.Web Agent, to receive help
about the active window, press F1. To learn about the
function of any element of the window, right-click it.
3.6. Mobile Mode Settings
If your computer (laptop) has no connection to Enterprise Server(s)
for a long time, to receive updates opportunely from the Dr.Web
GUS, you are well advised to set the Agent to the mobile mode of
operation. To do this, on the context menu of the Agent icon in the
notification area of the Taskbar, select Mobile mode → Enabled.
The icon will turn yellow.
In the mobile mode the Agent tries to connect to the Server three
times and, if unsuccessful, performs an HTTP update. The Agent tries
continuously to find the Server at an interval of about a minute.
The Mobile mode option will be available on the context
menu provided that the mobile mode of using the Dr.Web
GUS has been allowed in the station permissions.
To adjust the settings of the mobile mode, select Mobile mode
Settings.
→
User Manual
47
Chapter 3. Dr.Web Agent Functionality
Figure 3-8. Mobile mode settings dialog box
In all dialog boxes of the Dr.Web Agent, to receive help
about the active window, press F1. To learn about the
function of any element of the window, right-click it.
In the Update period section, set the frequency of checking the
availability of updates on the GUS:
20 minutes - check for updates every 20 minutes.
40 minutes - check for updates every 40 minutes.
1 hour - check for updates every hour.
2 hours - check for updates every 2 hours.
4 hours - check for updates every 4 hours.
8 hours - check for updates every 8 hours.
12 hours - check for updates every 12 hours.
1 day - check for updates once a day.
If necessary, set the Only when connected to Internet flag.
When using a proxy server, set the Use proxy to transfer updates
flag and specify the address and the port of the proxy server, and
parameters of authorization. In this case, the following fields will
become active:
Address - type the address and the port of the proxy server.
Login - type the login and the password for authorization at the
proxy server.
User Manual
48
Chapter 3. Dr.Web Agent Functionality
In the mobile mode, to initiate updating immediately, select Mobile
mode → Start update.
When the Agent is functioning in the mobile mode, the
Agent is not connected to the Enterprise Server. All
changes made for this workstation at the Server, will take
effect once the Agent mobile mode is switched off and the
connection with the Server is re-established. In the mobile
mode, only virus databases are updated.
To switch off the mobile mode, on the context menu of the Agent
icon select Mobile mode and clear the Enabled option. The color of
the icon will change from yellow to green, and the Agent will be
reconnected to the Server.
3.7. Viewing the Statistics
To view the statistics of your workstation, select Statistics on the
Agent context menu or double-click the Agent icon. A window with a
table containing all the statistics on the antivirus software operation
will open.
The first column contains those Dr.Web components that were
launched at least once during the current session on your computer.
But if the component did not scan (there are not scanned objects), it is
not displayed in the statistics list.
In the other columns the number of objects checked in the current
session is specified.
These scanned objects are classified as follows:
infected objects,
modifications,
suspicious,
activities.
User Manual
49
Chapter 3. Dr.Web Agent Functionality
Then the number of the following categories of treated objects is
specified:
cured,
deleted,
renamed,
moved,
blocked.
Then the number of errors and the scanning speed are given.
For more about these statistics categories, please refer to the
Statistics Tab section of the Dr.Web for Windows help built in Dr.
Web Antivirus programs.
In all dialog boxes of the Dr.Web Agent, to receive help
about the active window, press F1. To learn about the
function of any element of the window, right-click it.
3.8. Viewing the Antivirus Software
Status
To view the status of the antivirus software installed on your
workstation, select Status on the Agent context menu.
In the top of the opened window you can view general information:
total number of records in the virus databases,
last update time,
version of the Agent installed on the computer,
scanning activity (whether the Scanner is working or not).
The status window includes the following tabs:
Databases. Contains detailed information about all virus
databases installed:
virus database file name,
User Manual
50
Chapter 3. Dr.Web Agent Functionality
virus database version,
number of records in a virus database,
virus database creation date.
Components. Contains detailed information about all Dr.Web
Antivirus components installed on the workstation:
component name,
component status: running or not running.
Modules. Contains detailed information about all Dr.Web
Antivirus modules:
product module file name,
full module version,
module description - its functional name.
In the bottom of the status window, you can find
status bar displaying the status of the antivirus software. It
shows important notifications (see p. Agent Settings). When the
Agent is running without errors, a message “No action
required” is displayed;
Agent ID (unique identification number).
In all dialog boxes of the Dr.Web Agent, to receive help
about the active window, press F1. To learn about the
function of any element of the window, right-click it.
3.9. Informational Messages
The user is notified about system events by means of popup windows
emerging near the Agent icon.
The messages in popups can contain miscellaneous information:
Notifications – detailed information about actions performed or
to be performed over the antivirus software or your PC.
Agent summary – combined data about the operation and
status of the antivirus software.
User Manual
51
Chapter 3. Dr.Web Agent Functionality
Messages from the administrator.
Notifications
Informational messages may notify about virus events and actions of
the antivirus software on your PC (for more, see p. Agent Settings).
Besides the function of informing, popup messages may also perform
control functions. For example, the dialog box prompting to restart the
PC after antivirus components have been updated (see Figure 3-9) has
the buttons to restart the PC or delay the restart message for specified
time slot. To do this, choose the necessary time slot in the drop-down
list.
Figure 3-9. Notification from the Dr.Web Agent
Agent Summary
When you point the mouse cursor to the Agent icon, an informational
popup window appears with data about:
the statistics of virus events (see also p. Viewing the Statistics),
the status of the antivirus software components,
the date of last update.
User Manual
52
Chapter 3. Dr.Web Agent Functionality
Figure 3-10. Message window of the Dr.Web Agent
Messages from the Administrator
The user may receive informational messages from the antivirus
network administrator including:
message text;
User Manual
53
Chapter 3. Dr.Web Agent Functionality
hyperlinks to Internet resources;
company logo (or any other graphic presentation);
exact date of message receipt in the title of the window.
These messages appear as popup windows (see Figure 3-11).
Figure 3-11. Message window from the administrator (provider)
Windows with messages from the administrator are be
displayed until the user closes them, unlike popup windows
with notifications and Agent summary, which are hidden
after having been inactive for a certain period of time.
User Manual
54
Chapter 4. Starting the Antivirus Scanner
Chapter 4. Starting the Antivirus
Scanner
The Scanner command of the Agent context menu starts the
antivirus Scanner of Dr.Web to check your computer for viruses and
malware. When you start the Scanner, its main window will opens
(for more, see the Dr.Web for Windows help, section Scanner's
main window). At start the Scanner performs a preliminary check
of your files, then you may instruct a more comprehensive scanning in
one of the modes.
Against the permissions at the Server, you may optimize the antivirus
check parameters: select the objects to check, types of actions over
detected objects, etc. in Scanner settings (for more, see the Dr.Web
for Windows help, section Dr.Web Scanner for Windows).
To open the Dr.Web for Windows help, press F1 in any
window of the Scanner. To receive help about any element
of the windows, right-click it.
User Manual
55
Chapter 5. Quarantine
Chapter 5. Quarantine
To view and edit the Quarantine, select Quarantine on the Agent
context menu. A new window with table that contains Quarantine
current state opens.
Quarantine of Dr.Web Antivirus serves for isolation of files that are
suspicious as malware.
On each logical drive, where suspicious files are detected, the
Quarantine folders are created. Hidden Quarantine folder named
DrWeb Quarantine is being created in the root of the disk. User
do not have access rights to files of the Quarantine folder.
When infected objects are detected at the removable storage
accessible for writing, the DrWeb Quarantine folder will be
created on the storage and infected objects will be replaced to this
folder.
Quarantine files located on a hard disk are encrypted.
Quarantine files located on a removable storage are not
encrypted.
Stations with Quarantine module must be operated by OS,
on which the installation of SpIDer Guard G3 is available
(see p. System Requirements).
Otherwise, Quarantine will not be able to manage files
from the Infected.!!! folder (stored in the installation
folder) and information on Quarantine contents will not be
sent to the Server.
User Manual
56
Chapter 5. Quarantine
5.1. Interface Setup
Figure 5-1. Quarantine window.
In the center of the window the table with the Quarantine state is
displayed. The following columns are included by default:
Name - name list of the objects in the Quarantine,
Threat - malware classification, which is assigned by the
Antivirus during automatic replace to the Quarantine,
Path - full path of the object before replacing to the
Quarantine.
You can display the columns with detailed information similar to the
data in the bottom of the Quarantine window.
To configure the columns displaying:
1. Open the context menu of the table header. To do this, rightclick the header of the table.
2. Select the Customize columns item.
3. In the opened window, set the flags for the items you want to
display in the table. Clear the flags for the items you want to
hide.
User Manual
57
Chapter 5. Quarantine
a) Click Check all to set flags for all items.
b) Click Uncheck all to clear all flags.
4. To change the columns sequence in the table, select the
corresponding column in the list and click one of the following
buttons:
a) Move up – to move the column to the table beginning
(to the head of the settings list and to the left in the
objects table).
b) Move down – to move the column to the table end (to
the foot of the settings list and to the right in the objects
table).
5. To save changes in the settings, click OK. To close window
without saving, click Cancel.
In the bottom of the Quarantine window the detailed information
about selected items is displayed.
5.2. Quarantine Properties
To configure Quarantine parameters:
1. Click the
button in the Quarantine window.
2. The Quarantine properties window will be opened. In this
window you can change the following parameters:
The Set quarantine size section allows you to configure
the amount of disk space for Quarantine folder. Move
the slider to change upper allowance of Quarantine size,
which is counting as percentage of total disk space (for
several logical drives, this size counts for every drive
which include the Quarantine folder). The 100% value
means unlimited Quarantine folder size.
In the View section, set the Show backup files flag to
display backup copies of Quarantine files in the object
table.
3. To save changes in the properties, click OK. To close window
without saving, click Cancel.
User Manual
58
Chapter 5. Quarantine
Backup copies are created automatically during moving files to the
Quarantine. Even if Quarantine files are kept permanently, their
backup copies are kept temporarily (see also p. Quarantine Cleanup).
Click the
button to display the help file.
5.3. Quarantine Contents Management
The left pane serves to filter the Quarantine objects to display. Click
the corresponding option to display all Quarantine objects or just
specified groups: files, mail objects, web pages or all other objects, not
classified.
In the Quarantine window users can see only those files
that are available by access rights.
To view hidden objects, run the dwqrui.exe
Quarantine file from the installation folder or the Dr.Web
Agent interface under an administrative account.
Use the following buttons to manage the Quarantine:
Add - add the file to the Quarantine. Select the necessary file
in the opened file system browser.
Restore - remove the file from the Quarantine and restore the
original location of the file, i.e. restore the file to the folder
where it had resided before it was moved to the Quarantine.
Use this option only when you are sure that the objects are
not harmful.
In the drop-down menu the following item is available: Restore
to - restore the file to the folder specified by the user.
Rescan - scan the file one more time. If after rescanning a file,
it will be detected as uninfected, Quarantine will offer to
restore the file.
User Manual
59
Chapter 5. Quarantine
Remove - delete the file from the Quarantine and from the
system.
To manage several objects simultaneously, select necessary objects in
the Quarantine window, press and hold CTRL or SHIFT and select
necessary action in the drop-down menu.
5.4. Quarantine Cleanup
Automatic Quarantine Cleanup
In case of disk overflow, the Quarantine cleanup is executed:
1. Backup copies of Quarantine files will be deleted in the first
place.
2. In a shortage of disk space, Quarantine files with expired
storage time will be deleted.
If the Quarantine is overflowed and automatically cleanup
failed, moving files to the Quarantine will proceed with an
error. In this case, you can enlarge the Quarantine size in
the Quarantine properties
Set quarantine size
section or delete Quarantine files manually.
Complete Quarantine Cleanup
To delete all Quarantine contents, do one of the following:
1. Open Quarantine manager via the Agent context menu,
Quarantine option. Select all files in Quarantine window and
click Delete.
2. Use Disk Cleanup system function to clean disk drive.
To launch this function, do one of the following:
User Manual
60
Chapter 5. Quarantine
Use the Windows OS Start menu
→
Programs
→
Accessories → System tools → Disk cleanup. If you
have several logical disk drives, select the disk, which
Quarantine you want to cleanup.
Use the system file browser: in the context menu of the
disk, which Quarantine you want to cleanup, select
Properties → Disk cleanup.
In the Disk cleanup window, in the Files to delete list, set
the Dr.Web Quarantine flag and click OK. Quarantine
contents will be deleted.
User Manual
61
Chapter 6. Dr.Web Firewall
Chapter 6. Dr.Web Firewall
Dr.Web Firewall protects your computer from unauthorized access
and prevents leak of vital data through networks. It monitors
connection attempts and data transfer and helps you block unwanted
or suspicious connections both on network and application levels.
By default, once installation completes Dr.Web Firewall starts
learning usual behaviour of your operating system by intercepting all
new (unknown to the firewall) connection attempts and prompting you
to select the necessary action.
The training process of Dr.Web Firewall are described in detail in the
Dr.Web for Windows Manual, the Training Dr.Web Firewall
section.
To open the Dr.Web for Windows help, press F1 in any window of
the Dr.Web Firewall.
Via the Agent context menu, you can:
1. Open the FireWall Settings.
2. List the Event Log.
6.1. Dr.Web Firewall Settings
Against the permissions at the Server, you may set up the Dr.Web
Firewall. To do this, select Firewall settings on the Agent
context menu.
User Manual
62
Chapter 6. Dr.Web Firewall
The Firewall settings option is available on the Agent
context menu only if user has:
1. Permissions to change these settings. The
permissions are set at the Server by the antivirus
network administrator.
2. Administrator rights on the computer.
A window with Dr.Web Firewall settings will open. The
administration options of Dr.Web Firewall are described in detail in
the Dr.Web for Windows Manual, the Dr.Web Firewall Setting
section.
To open the Dr.Web for Windows help, press F1 in any window of
the Dr.Web Firewall.
6.2. Dr.Web Firewall Log
Against the permissions at the Server, you may list the Dr.Web
Firewall event log. To do this, select Firewall log on the Agent
context menu.
The Firewall log option is available on the Agent context
menu only if user has:
1. Permissions to change these settings. The
permissions are set at the Server by the antivirus
network administrator.
2. Administrator rights on the computer.
A window with Dr.Web Firewall log will open. The Dr.Web
Firewall Event log is described in detail in the Dr.Web for Windows
Manual, the Event Logging section.
To open the Dr.Web for Windows help, press F1 in any window of
the Dr.Web Firewall.
User Manual
63
Chapter 7. Office Control Settings
Chapter 7. Office Control Settings
Dr.Web Office Control helps limit user access to certain local
resources and web sites.
This allows you to maintain integrity of important files and protect
them from virus infection, as well as prevent unauthorized access to
confidential data on your computer.
With Office Control you can protect files and folders stored on local
disks or removable devices (as long as they are connected to the
computer), as well as deny access to removable storages completely.
By controlling Internet access you can protect users from visiting
websites which promote violence, gambling or other undesirable
topics, or limit available websites to those which you list in Office
Control settings.
By default, the monitor blocks access to all folders of the Dr.Web
Antivirus.
Against the permissions at the Server, you may set up the Office
Control module.
Administrators of your Antivirus network have the right to
change settings of Office Control. Administrator settings
automatically override user settings.
To configure the Office Control:
1. On the Agent context menu, select Office Control settings.
User Manual
64
Chapter 7. Office Control Settings
The Office Control settings option is available only if user
has:
1. Permissions to configure Office Control. The
permissions are set at the Server by the antivirus
network administrator.
2. Administrator rights on the computer.
2. Enter the password to access the Office Control.
The list of resources is password-protected from editing.
The password is set at the first usage of the module. You
can change the password in the Office Control settings
window or ask the Enterprise Security Suite
administrator to do it.
You can change the password by clicking the Change
password button in the Settings window.
3. A window opens that contains the following tabs:
URL Filter (described in detail in the Dr.Web for
Windows Help, the URL Filter Tab section).
Local Access (described in detail in the Dr.Web for
Windows Help, the Local Access Tab section).
To open the Dr.Web for Windows help, press F1 in any
window of the Office Control.
4. Click
(Help) to get help on a window.
5. To save changes without closing the window, click Apply.
6. To save changes and close the window, click OK. To close the
windows without saving changes, click Cancel.
User Manual
65
Chapter 8. SpIDer Gate Settings
Chapter 8. SpIDer Gate Settings
SpIDer Gate is an antivirus HTTP monitor. By default, SpIDer Gate
automatically checks incoming HTTP-traffic and blocks all malicious
objects. HTTP is used by Web browsers, download managers and
other applications which exchange data with Web servers, i.e. which
work with the Internet.
The SpIDer Gate module is installed by default. It constantly resides
in main memory and starts automatically with the operating system.
By configuring SpIDer Gate settings you can completely disable or
enable monitoring of incoming and outgoing traffic, compose a list of
applications whose HTTP traffic (data transferred through the HTTP
protocol) should always be checked or exclude certain applications
from monitoring.
Modification of check parameters of the HTTP monitor SpIDer Gate
may be allowed or blocked by the Enterprise Security Suite
administrator.To view or configure SpIDer Gate settings, select
SpIDer Gate settings in the Agent context menu.
The SpIDer Gate settings option is available on the
Agent context menu only if user has:
1. Permissions to change these settings. The
permissions are set at the Server by the antivirus
network administrator.
2. Administrator rights on the computer.
By default, the monitor checks all HTTP traffic (data transferred
through the HTTP protocol). Use SpIDer Gate settings to configure
HTTP monitoring.
The administration options of SpIDer Gate are described in detail in
the Dr.Web for Windows Manual, the SpIDer Gate Settings
section.
User Manual
66
Chapter 8. SpIDer Gate Settings
To open the Dr.Web for Windows help, press F1 in any window of
the SpIDer Gate.
User Manual
67
Chapter 9. SpIDer Guard Settings
Chapter 9. SpIDer Guard Settings
SpIDer Guard for Windows is an antivirus guard (also called a
monitor). The program constantly resides in the main memory
checking all opened files on-access and monitors running processes for
virus-like activity.
SpIDer Guard loads automatically at every Windows startup and
cannot be unloaded during the current Windows session. If necessary,
for example, to perform a task which consumes a lot of processor
resources, you can temporarily disable SpIDer Guard.
With the default settings, SpIDer Guard performs on-access scanning
of files that are being created or changed on the hard drives and all
files that are opened on removable media and network drives. It scans
the files in the same way as Dr.Web Scanner but with “milder”
settings. Also, SpIDer Guard constantly monitors running processes
for virus-like activity and, if such is detected, blocks malicious
processes and reports to you.
By default, SpIDer Guard operates in background mode, that is, it
attempts to avert detected virus threats automatically without asking
for your instructions. You can change settings to configure automatic
reaction to different virus events.
Setup the Guard
SpIDer Guard settings are differ depending on installed guard
version. There are two versions of SpIDer Guard:
SpIDer Guard G3,
SpIDer Guard NT4.
The OS version is defined automatically before the guard installation,
and corresponding SpIDer Guard version get installed (see System
Requirements).
User Manual
68
Chapter 9. SpIDer Guard Settings
9.1. SpIDer Guard G3 Settings
The default settings are optimal for most uses. Do not
change them unnecessarily.
To configure SpIDer Guard settings:
1. On the Agent context menu select SpIDer Guard Settings.
The SpIDer Guard settings option is available on the
Agent context menu only if user has:
1. Permissions to change these settings. The
permissions are set at the Server by the antivirus
network administrator.
2. Administrator rights on the computer.
2. A window opens that contains the following pages:
The Scanning page, where you select a scan mode for
files and processes.
The Actions page, where you can configure reactions of
SpIDer Guard to various virus events.
The Exclusions page, where you can configure folders and
files to be excluded from SpIDer Guard checks.
The Log page, where you can set the mode of SpIDer
Guard logging.
3. Configure options as necessary.
4. After editing, click OK to save changes or Cancel to discard
them.
To receive help about the active window with SpIDer
Guard settings, press F1. To learn about the function of
any element of the window, right-click it.
User Manual
69
Chapter 9. SpIDer Guard Settings
9.1.1. General
Figure 9-1. SpIDer Guard settings window. General tab.
To get information on options available in other tabs, click the name
of this tab in the picture
On the Genetal tab, you can select a scan mode for files and
processes:
Set the Heuristic analysis flag to use heuristic analyzer when
scanning object on-the-fly.
User Manual
70
Chapter 9. SpIDer Guard Settings
To use signature analysis only, clear this flag.
The Check running applications and modules flag instructs
to scan program files running at present. To set the scanning
mode for files of running processes, select one of the following
from the drop-down list:
In background - instructs to scan modules in the
background mode, i.e. run-time scanning after modules
launching.
At application launch - instructs to scan modules
before their launching.
Set the Rescan files after update of virus bases flag to
rescan all active modules running at present and infected files
after virus bases update. If this flag is cleared, only infected files
will be rescanned after virus bases update.
The Optimal mode flag sets up the checking mode, that
defines what actions with objects require scanning "on-the-fly"
by SpIDer Guard:
If the Optimal mode flag is set, SpIDer Guard scans
files on hard drives only in several cases of access to these
files: launch for execution, creation, writing (attempt of
writing) to existing files or boot sectors.
If the Optimal mode flag is cleared, SpIDer Guard
scans files on hard drives in any cases of access to these
files: launch for execution, creation, writing (attempt of
writing) to existing files or boot sectors and in any cases
of opening files, including read-only.
Disabling the Optimal mode ensures maximum protection,
but considerably decrease computer performance.
To set modes for scanning objects on removable media and
network drives, use Scan removable devices and Scan files
on the network flags.
User Manual
71
Chapter 9. SpIDer Guard Settings
Details and recommendations
The Optimal mode is recommended for use after a thorough scan of
all hard drives by Dr.Web Scanner. With this mode activated,
SpIDer Guard prevents penetration of new viruses and other
malicious objects via removable devices into your computer while
preserving performance by omitting knowingly "clean" objects from
repeated scans.
On the Actions tab, you can configure reaction of SpIDer Guard on
detections of malicious objects.
Operating system may register some removable
devices as hard drives (e.g. portable USB hard
drives). Scan such devices with Dr.Web Scanner
on connection.
The Block autorun from removable media flag disables
autoplay option for portable data storages such as CD/DVD,
flash memory, etc. This option helps to protect you computer
from viruses transmitted via removable media.
Set the Scan removable devices flag to scan files on
removable storages (CD and DVD disks, floppy disks (FDD),
flash drives and other data carriers connectable through USB
and etc.) in any cases of access to these files including opening
read-only files.
If the Scan removable devices flag is cleared, SpIDer Guard
scans only those files that are launched from removable storages.
Set the Scan files on the network flag to scan those files on
network drives that are launched for execution and in cases of
all opening files including read-only files.
If the Scan files on the network flag is cleared, SpIDer
Guard scans only those files that are launched from network
drives.
User Manual
72
Chapter 9. SpIDer Guard Settings
9.1.2. Actions
Figure 9-2. SpIDer Guard settings window. Actions tab.
To get information on options available in other tabs, click the name
of this tab in the picture
On the Actions tab, you can configure reactions of SpIDer Guard to
various virus events. For different types of objects, actions are
assigned separately.
User Manual
73
Chapter 9. SpIDer Guard Settings
The following actions for detected virus threats are
provided:
Cure - instructs SpIDer Guard to try to restore the original
state of an object before infection. If the object is incurable, or
the attempt of curing fails, the action set for incurable viruses is
applied.
Available for known viruses except Trojan programs that are
deleted on detection, and infected files within complex objects
such as archives, mail boxes or file containers.
Delete - delete the object.
Move to quarantine - move the object to the special
Quarantine folder.
Report - display informational message about virus detection
(notification modes are described below).
Ignore - skip the object without performing any action or
displaying a notification.
If you select to Ignore, no action is performed as
compared to when you select to Report user on virus
detection, that is, no warning is displayed and detection of
an adware program is ignored.
Table 3. Reactions of SpIDer Guard to various virus events
Action
Oblect
Cure
Delete
Move to
quarantine
Report
Ignore
Adware
+
+/*
+
+
Dialers
+
+
+/*
+
Jokes
+/*
+
+
+
Riskware
+
+
+/*
+
Hacktools
+
+
+/*
+
+
+
+
+/*
+
+
Infected
Suspicious
+/*
User Manual
74
Chapter 9. SpIDer Guard Settings
Action
Oblect
Cure
Delete
Move to
quarantine
Incurable
+
+/*
Installation
packs
+
+/*
Report
Ignore
+
+
Conventions
+
action is enabled for this type of objects
+/*
action is set as default for this type of object
To set actions on virus threats detection, use the following
options:
In the Adware drop-down list set the Guard reaction to the
detection of this type of unsolicited software.
In the same way setting the Guard reaction to the detection of
other types of unsolicited software such as:
Dialers;
Jokes;
Riskware;
Hakctools.
The Infected files drop-down list sets the Guard reaction to
the detection of a file infected with a known virus.
The Suspicious files drop-down list sets the Guard reaction to
the detection of a file presumably infected with a virus (upon a
reaction of the heuristic analyzer).
The Incurable files drop-down list sets the Guard reaction to
the detection of a file infected with a known incurable virus (and
in case an attempt to cure a file failed).
Check installation packs option instructs to scan installation
files "on-the-fly".
To configure this option, select the action from the drop-down list
to execute in case of detection the virus in the installation
packages.
User Manual
75
Chapter 9. SpIDer Guard Settings
Configuring Notifications
After performing reaction you configured, SpIDer Guard displays a
notification above the Dr.Web Agent icon in the taskbar notification
area. If necessary, you can disable notifications.
To configure notifications for SpIDer Guard, set or clear the Virus
messages flag in the Settings drop-down list of the Agent
context menu.
User Manual
76
Chapter 9. SpIDer Guard Settings
9.1.3. Excluded
Figure 9-3. SpIDer Guard settings window. Excluded tab.
To get information on options available in other tabs, click the name
of this tab in the picture
On the Excluded tab, you can specify folders and files to be excluded
from SpIDer Guard checks.
The Exclude system files flag instructs to exclude from scanning
system files, which are included in the internal list of SpIDer Guard
User Manual
77
Chapter 9. SpIDer Guard Settings
component. This list is composed for each Windows OS version
according to recommendations from the Microsoft® company on using
the antivirus software.
If the Exclude system files flag is set, the following options are
available:
Exclude Prefetcher database files flag instructs to exclude
from scanning database files of the Prefetcher (Microsoft
Windows operating system component, which accelerates OS's
bootstrap loading and decrease programs loading time at the
expense of storing information, which is used for loading)
system component.
Exclude Windows search database files flag instructs to
exclude from scanning database files of Windows OS search
service.
In the List of excluded directories and files section, you can list
folders and files which you want to exclude from scanning (for
example, Quarantine folders, Program files folder, temporary
files (swap files), etc.).
By default, the list is empty. You can add either definite files and
folders, or use masks to exclude from scanning a group of files.
To configure list of exclusions
1. To add a file or folder to the list of exclusions, do one of the
following:
To add an existing file or folder, click the <...> button and
select it in the standard dialog window. You can also enter
the full path to the file or folder.
To exclude from scanning all files or folder with particular
name, enter the name without path.
To exclude a group of files of folders, enter the mask that
determines their names.
More about masks
The mask defines template for an object definition. It may
contain regular characters from the file names and special
characters like the following:
User Manual
78
Chapter 9. SpIDer Guard Settings
* replaces any (including the empty one) sequence of
any symbols;
? replaces any one symbol in the specified position.
Examples:
Report*.doc defines all Microsoft Word documents which
names
start
with
the
word
Report, e.g.
ReportFebruary.doc, Report121209.doc etc.
*.exe defines all executable files, i.e. that have the EXE
extension, e.g. setup.exe, iTunes.exe etc.
photo????09.jpg defines all JPG images which names
start with the word photo, end with 09 and contain
exact number of 4 other characters in the middle, e.g.
photo121209.jpg,
photoJune09.jpg,
photo----09.jpg etc.
2. Click Add.
3. To add other files and folders to the list, repeat steps 1 to 2.
4. To remove a file or folder from the list, select the
corresponding item and click Remove.
User Manual
79
Chapter 9. SpIDer Guard Settings
9.1.4. Log
Figure 9-4. SpIDer Guard settings window. Log tab.
To get information on options available in other tabs, click the name
of this tab in the picture
On the Log tab, you can specify the logging mode and specific logging
information.
The SpIDer Guard log is stored in the spiderg3.log file that is
located in the Enterprise Security Suite installation folder. It is
User Manual
80
Chapter 9. SpIDer Guard Settings
recommended to keep a log file and analyze it regularly.
To detail the log file, set the mode flags and types of information for
logging.
To configure logging mode, use the following options:
Detailed log – in this mode, SpIDer Guard logs the most
important actions and an additional data. It is recommended to
use this mode when determining objects that SpIDer Guard
checks most often. If necessary, you can exclude those objects
from scans, which may increase computer performance.
Debug log – in this mode, SpIDer Guard logs all details on
its activity. This may result in considerable log growth. It is
recommended to use this mode only when errors occur or by
request of Dr.Web Technical Support.
To configure the types of information for logging, use the
following options:
The Show packer application of executable files flag
instructs to log messages about detected executable files packed
with special packers, and the names of these packers.
The Show not infected files flag instructs to log information
about all scanned objects, including uninfected objects, that will
be marked with Ok mark (this mode may considerably increase
the log file size). This flag is not set by default.
The Show archiver flag instructs to log information about the
archives scanned and their contents, as well as error reports (for
example, if it failed to unpack as it was password protected).
This flag is not set by default.
The Maximum log file size (KB) field allow to limit log file size by
setting maximum permissible size in KB.
User Manual
81
Chapter 9. SpIDer Guard Settings
9.2. SpIDer Guard NT4 Settings
The default settings are optimal for most uses. Do not
change them unnecessarily.
To configure the SpIDer Guard NT4 monitor:
The SpIDer Guard Settings option is available on the
Agent context menu only if user has:
1. Permissions to change these settings. The
permissions are set at the Server by the antivirus
network administrator.
2. Administrator rights on the computer.
1. To view or modify the Guard launch parameters, operation
and alert settings, on the Agent context menu select SpIDer
Guard Settings → Scan settings. The settings are described
in detail in the SpIDer Guard Settings section.
2. To view or modify the Guard launch parameters, operation
and alert settings, on the Agent context menu select SpIDer
Guard Settings → Control. The administration options are
described in detail in the Controlling SpIDer Guard section.
3. After editing, click OK to save changes or Cancel to discard
them.
In all sections, to receive help about the active window,
press F1. To learn about the function of any element of the
window, right-click it.
User Manual
82
Chapter 9. SpIDer Guard Settings
9.2.1. Scan Options
The default settings are optimal for most uses. Do not
change them unnecessarily.
To configure SpIDer Guard settings:
1. On the Agent context menu select SpIDer Guard Settings
→ Scan settings.
The SpIDer Guard settings option is available on the
Agent context menu only if user has:
1. Permissions to change these settings. The
permissions are set at the Server by the antivirus
network administrator.
2. Administrator rights on the computer.
2. A window, containing the following pages, will open:
The Scan options page, where you select a scan mode for
files and processes.
The File types page, where you can configure files to be
scanned by SpIDer Guard, according to conditions from
the Scan options page.
The Actions page, where you can configure reactions of
SpIDer Guard to various virus events.
The Log file page, where you can set the mode of SpIDer
Guard logging.
The Exclusions page, where you can configure folders and
files to be excluded from SpIDer Guard checks.
3. Configure options as necessary.
4. After editing, click OK to save the changes or Cancel to cancel
them.
User Manual
83
Chapter 9. SpIDer Guard Settings
9.2.1.1. Scan Options
Figure 9-5. SpIDer Guard settings window. Scan options tab.
To get information on options available in other tabs, click the name
of this tab in the picture
On the Scan options tab, you can select a scan mode for files and
processes.
On-access Scan Mode
In On-access scan mode section, you can set up the checking
mode, that defines what actions with objects require scanning "on-thefly" by SpIDer Guard:
User Manual
84
Chapter 9. SpIDer Guard Settings
If the Optimal mode option button is selected, SpIDer Guard
scans files on hard drives only in several cases of access to
these files: launch for execution, creation, writing (attempt of
writing) to existing files or boot sectors.
But on removable devices and network drives, SpIDer Guard
scans files in any cases of access to these files: launch for
execution, creation, writing (attempt of writing) to existing files
or boot sectors and in any cases of opening files, including readonly.
If the Other option button is selected, the following options are
available:
Run and open files - instructs to scan files during
launch for execution and in any cases of opening files,
including read-only.
Create and write files - instructs to scan files during
creation and writing (attempt of writing) to existing files
or boot sectors.
Via these flags, you can individually set the level of your
computer protection.
When both Run and open files and Create and write
files flags are set, it ensures maximum protection but
considerably decrease computer performance.
Details
The Optimal mode is recommended for use after a thorough scan of
all hard drives by Dr.Web Scanner. With this mode activated,
SpIDer Guard prevents entry of new viruses and other malicious
objects via removable devices into your computer while preserving
performance by omitting "clean" objects from repeated scans.
On the Actions tab, you can configure reaction of SpIDer Guard on
detections of malicious objects.
User Manual
85
Chapter 9. SpIDer Guard Settings
Operating system may register some removable
devices such as hard drives (e.g. portable USB
hard drives). Scan such devices with Dr.Web
Scanner on connection.
The Disable enhanced protection mode flag instructs to
disable enhanced protection mode. By default, the enhanced
protection mode is enabled. In this mode SpIDer Guard
immediately checks all files, the scanning of which is specified in
the program settings, and all other opened files are queued for
check (files opened for reading in the Smart and Create and
write files modes). With computer resources available, the
Guard also checks these files.
Additional Tasks
Set the Scan boot floppy flag to check whether a floppy is left
in the disk drive, and, if positive, scan it for viruses (if the floppy
is infected, the PC may become infected at the next start).
Set the Scan running program and module flag to scan
program files running at present.
Set the Scan startup files flag to scan all autorun files
(Autorun folder, system *.ini files, Windows OS registry
files).
Options
Set the Heuristic analysis flag to use heuristic analyzer during
scanning object on-the-fly.
To use signature analysis only, clear this flag (see also
Detection Methods).
Set Play sounds flag to enable sound notifications. By default,
sounds are disabled.
User Manual
86
Chapter 9. SpIDer Guard Settings
9.2.1.2. File Types
Figure 9-6. SpIDer Guard settings window. FileTypes tab.
To get information on options available in other tabs, click the name
of this tab in the picture
On the File types tab, you can specify the additional restrictions to
the files which must be scanned according to conditions specified in
Scan options tab.
In the Include these files in scan section, you can select the types
of files to be scanned by guard:
The All files mode is selected by default and instructs to check
all files according to conditions specified in Scan options tab.
The mode provides the maximum protection.
User Manual
87
Chapter 9. SpIDer Guard Settings
Selected file types and By file name mask modes instruct
to check only those files, which extensions and names are
included in the list, specified on the right pane of the tab. The
list is enabled if at least one of these flags is enabled.
By default, this list includes extensions of main file types which
can contain viruses and main types of archives. You can edit this
list.
To configure list of included files
1. To add a file to the list of scanned files, do one of the
following:
To set the list of extensions of scanned files, set the
Selected file types option and specify file extensions in
the field under the list.
To set a group of particular files, set the By file name
mask option and specify the mask that determines their
names in the field under the list.
More about masks
The mask defines template for an object definition. It may
contain regular characters from the file names and following
special characters:
* replaces any (including the empty one) sequence of
any symbols;
? replaces any one symbol in the specified position.
Examples:
Report*.doc defines all Microsoft Word documents which
names
start
with
the
word
Report, e.g.
ReportFebruary.doc, Report121209.doc etc.
*.exe defines all executable files, i.e. that have the EXE
extension, e.g. setup.exe, iTunes.exe etc.
photo????09.jpg defines all JPG images which names
start with the word photo, end with 09 and contain
exact number of 4 other characters in the middle, e.g.
photo121209.jpg,
photoJune09.jpg,
photo----09.jpg etc.
2. Click Add.
User Manual
88
Chapter 9. SpIDer Guard Settings
3. To add other files to the list, repeat steps 1 to 2.
4. To remove a file from the list of scanned files, select the
corresponding item and click Remove.
5. To restore the default list, click Default.
In the File formats section, you can set the scan mode for Archives
and E-mail files:
Set the Archive flag to scan files within archives. By default, the
files within archives are not scanned, even when the type or the
mask of the archived file is specified in the list of file types or file
masks (if there is an infected file in the archive, virus is detected
by guard during the archive extraction before it can infect the
computer).
Enabling this option will exceptionally decrease computer
performance.
Set the E-mail files flag to scan email attachments. Mailboxes
are not scanned by default (if a file inside a mail attachment is
infected, the Guard will detect the virus during the attachment
extraction before it can infect the computer).
Enabling mailboxes checking will exceptionally decrease
computer performance.
To avoid the intrusion of viruses through e-mail messages,
use the SpIDer Mail.
User Manual
89
Chapter 9. SpIDer Guard Settings
9.2.1.3. Actions
Figure 9-7. SpIDer Guard settings window. Actions tab.
To get information on options available in other tabs, click the name
of this tab in the picture
On the Actions tab, you can specify the reaction of Spider Guard on
detection of infected or suspicious files and malicious software. The
reactions are set according to the type of the virus event.
Actions Setup
All types of malicious objects are represented in the hierarchical list in
the left part of pane. When an object is selected, the default program
reaction to its detection is displayed in the right part of the pane. The
action specified in the current settings and the action to be taken if the
User Manual
90
Chapter 9. SpIDer Guard Settings
first action fails are shown.
You can edit program reactions to the detection of each type of
objects separately.
To set actions for detected malicious obj ects:
1. To modify the settings for the first action, specify the primary
reaction of the program in the Primary action drop-down list.
2. In the What to do if action failed section, you can specify
another action to be applied if following primary actions fail:
cure, move to Quarantine, rename, delete.
Possible Actions
The following actions for detected virus threats are available:
Cure - instructs SpIDer Guard to try to restore the original
state of an object before infection. If the object is incurable, or
the attempt to cure fails, the action for incurable viruses is
applied.
Available for known viruses except Trojan programs that are
deleted on detection, and infected files within complex objects
such as archives, mail boxes or file containers.
Delete - delete the infected or suspicious objects (for boot
sectors no actions are applied).
By default, the program does not check and does not allow
to delete file archives. If the file archives check is enabled
(this type of check will substantially degrade computer
performance), you can enable the Delete action for
archives. To do this, open the program configuration file
(drweb32.ini in the program installation folder) in a
text editor, add a string:
EnableDeleteArchiveAction=Yes
in the [SpIDerGuardNT] section (if such line already
exists, replace No with Yes) and save the file.
User Manual
91
Chapter 9. SpIDer Guard Settings
Files inside archives cannot be treated separately. If the
Delete action is selected for an archive, the whole archive
will be deleted.
Move to quarantine - instructs to move infected or suspicious
objects to the quarantine folder specified in the Quarantine
path field (by default, it is the infected.!!! subfolder in
the program installation folder).
Report - display informational message about virus detection
(in the Virus Alert Window).
Block - instructs to block access to files checking of which called
the Guard reaction. Access to these files is unblocked after the
computer restarts or if SpIDer Guard is temporarily
suspended.
Ignore - skip the object without performing any action or
displaying a notification.
If you select Ignore, no action is performed as compared
to when you select to Report user on virus detection, that
is, no warning is displayed and detection of an adware
program is ignored.
Rename - instructs to rename the extension of infected or
suspicious object according to the mask specified in the
Rename extension field (by default it is #??, i.e. replace the
first character of the extension with #).
Table 4. SpIDer Guard actions on infected and malicious objects
Object
Action
Infected
Cure
Suspicious
+/*
Delete
+
+
Move to quarantine
+
+/*
Report
+
+
Block
+
+
Ignore
+
User Manual
92
Chapter 9. SpIDer Guard Settings
Object
Action
Infected
Suspicious
+
+
Rename
Table 5. SpIDer Guard Action on compound objects
Compound objects
Action
Archives
E-mails
Containers
+/*
+
+/*
Report
+
+/*
+
Block
+
+
+
Ignore
+
+
+
Rename
+
+
+
Move to quarantine
Table 6. SpIDer Guard actions on malicious software
Malicious software
Action
Adware
Dialers
Jockes
Riskware
Hacktools
Delete
+
+
+
+
+
Move to
quarantine
+
+
+
+
+
Report
+/*
+/*
+/*
+
+/*
Block
+
+
+
+
+
Ignore
+
+
+
+/*
+
Rename
+
+
+
+
+
Conventions
+
action is enabled for this type of objects
+/*
action is set as default for this type of object
User Manual
93
Chapter 9. SpIDer Guard Settings
On detection of objects containing Adware and Dialers,
the Guard in Dr.web for Servers applies the Move to
quarantine action, the Guard in Dr.Web for
Workstations applies the Inform action.
Reaction on Detection
On detection of infected or suspicious object the following reactions
depending on the Guard version are available:
Spider Guard in Dr.Web for workstations by default
requests for user reaction. The Guard generates a Virus Alert
Window, in which the necessary program action can be
manually specified.
SpIDer Guard in Dr.Web for Windows servers will
automatically make attempts to avert the virus threat by default.
User Manual
94
Chapter 9. SpIDer Guard Settings
9.2.1.4. Log File
Figure 9-8. SpIDer Guard settings window. Log file tab.
To get information on options available in other tabs, click the name
of this tab in the picture
On the Log tab, you can specify the logging mode and specific logging
information.
It is recommended to keep a log file and analyze it
regularly.
User Manual
95
Chapter 9. SpIDer Guard Settings
Log File
In the Log file section you can specify the general settings for the log
file.
Set the Write log file flag to write a log file on Spider Guard
operation.
You can also specify the name and location of the file in the
corresponding field. By default, the SpIDer Guard log is stored in the
logs/SpiDer.log that is located in the Enterprise Security
Suite installation folder.
Details
In the Details section you can specify the additional information, that
will be logged.
To configure the types of information for logging, use the
following options:
The Scanned objects flag instructs to log information about all
scanned objects, including uninfected objects, that will be
marked with Ok mark (this mode may considerably increase the
log file size). This flag is not set by default.
The Packed executables flag instructs to log messages about
detected executable files packed with special packers, and the
names of these packers.
The Contents of archives being scanned flag instructs to log
information about the archives scanned and their contents, as
well as error reports (for example, if it failed to unpack as it was
password protected). This flag is not set by default.
Options
In the Options section the additional information for report is
specified:
User Manual
96
Chapter 9. SpIDer Guard Settings
Set the Overwrite log file flag to to overwrite the file at the
beginning of each session (delete the old log file and write the
new one). Clear this flag to add new entries to the end of the
existing log file.
Set the Use OEM character set flag to write the log file in
DOS-encoding.
To limit log file size, set the Limit log file size flag and specify
the maximum permissible size of the file in kilobytes in the
Maximum log file size (Kb) field. When the size exceeds the
maximum value, the log file is cleared and information is written
from the beginning.
9.2.1.5. Exclusions
Figure 9-9. SpIDer Guard settings window. Exclusions tab.
To get information on options available in other tabs, click the name
of this tab in the picture
User Manual
97
Chapter 9. SpIDer Guard Settings
On the Exclusions tab, you can specify folders and files to be
excluded from SpIDer Guard checks.
In the Folders and files to exclude section, you can list the folders
and files which you want to exclude from scanning (for example,
Quarantine folders, Program files folder, temporary files (swap files),
etc.).
By default, the list is empty. You can add either definite files and
folders, or use masks to exclude from scanning a group of files.
To configure list of exclusions
1. To add a file or folder to the list of exclusions, do one of the
following:
To add an existing file or folder, click the <...> button and
select it in the standard File Manager window. You can
also enter the full path to the file or folder.
To exclude from the check all files and folders with the
specified name without the certain path, select Allow
relative file names flag and type the name in the field.
To exclude from scanning all files or folders with particular
name, enter the name without a path.
To exclude a group of files and folders, set the Allow
wildcards flag and specify the mask that determines
their names in the field.
More about masks
The mask defines template for an object definition. It may
contain regular characters from the file names and special
characters like the following:
* replaces any (including the empty one) sequence of
any symbols;
? replaces any one symbol in the specified position.
Examples:
Report*.doc defines all Microsoft Word documents which
names
start
with
the
word
Report, e.g.
ReportFebruary.doc, Report121209.doc etc.
User Manual
98
Chapter 9. SpIDer Guard Settings
*.exe defines all executable files, i.e. that have the EXE
extension, e.g. setup.exe, iTunes.exe etc.
photo????09.jpg defines all JPG images which names
start with the word photo, end with 09 and contain
exact number of 4 other characters in the middle, e.g.
photo121209.jpg,
photoJune09.jpg,
photo----09.jpg etc.
2. Click Add.
3. To add other files and folders to the list, repeat steps 1 to 2.
4. To remove a file or folder from the list, select the
corresponding item and click Remove.
9.2.2. Controlling
The default settings are optimal for most uses. Do not
change them unnecessarily.
To configure SpIDer Guard controls:
1. On the Agent context menu select SpIDer Guard Settings
→ Control.
→
The SpIDer Guard settings
Control option is available
on the Agent context menu only if user has:
1. Permissions to change these settings. The
permissions are set at the Server by the antivirus
network administrator.
2. Administrator rights on the computer.
2. A window opens that contains the following pages:
Control;
Options;
Notifications;
Reminders.
User Manual
99
Chapter 9. SpIDer Guard Settings
3. Configure options as necessary.
4. After editing, click OK to save the changes or Cancel to cancel
them.
9.2.2.1. Control
Figure 9-10. SpIDer Guard Control panel. Control tab.
To get information on options available in other tabs, click the name
of this tab in the picture
On the Control tab, you can set the load mode of Spider Guard and
perform (or cancel) the registration of the component in the OS.
User Manual
100
Chapter 9. SpIDer Guard Settings
In the Load mode section, you can specify the load mode:
If Manual load mode is selected, to lunch the Guard, click the
Load button. To terminate the Guard in this mode, click
Unload.
If Automatic load mode is selected, the Guard is loaded
automatically at every Windows OS launch.
To register the Guard in the operation system, click Install, to cancel
the registration – click Uninstall.
After installation, the Antivirus is launched automatically at each
operation system start according to its standard settings. However,
you can change the load mode of SpIDer Guard by disabling
automatic mode.
After Antivirus installation, by default settings, the loading of the
guard starts automatically every time Windows starts. To change the
SpIDer Guard load mode, disable the automatic load mode.
To disable SpIDer Guard automatic loading:
1. Select the Control tab in Control panel of SpIDer Guard.
→
The SpIDer Guard settings
Control option is available
on the Agent context menu only if user has:
1. Permissions to change these settings. The
permissions are set at the Server by the antivirus
network administrator.
2. Administrator rights on the computer.
2. In the Load mode section, select Manual load mode.
3. Click OK.
At the next Windows OS start, the program will not be loaded
automatically. If necessary, it can be loaded manually, by clicking
Load in the pane described above. The Guard started in the Manual
load mode can be terminated by clicking Unload.
User Manual
101
Chapter 9. SpIDer Guard Settings
9.2.2.2. Options
Figure 9-11. SpIDer Guard Control panel. Options tab.
To get information on options available in other tabs, click the name
of this tab in the picture
On the Options tab, you can specify the options for Spider Guard.
Performance
In the Performance section, you can specify the size of the scanned
files list, saved in memory cache.
User Manual
102
Chapter 9. SpIDer Guard Settings
Move the slider to select the size of the list.
Unless changed, files in this list will not be scanned again. By default,
the parameter value is set to 100, which corresponds to approximately
9 KB of required memory per each logical drive. If the system has
enough available memory, it is worthwhile increasing the parameter
value to 500-1000. The parameter is applicable to the Run and open
files check mode and to the Smart mode, when files on network
drives and removable media are scanned.
Miscellaneous
In the Miscellaneous section, the following settings are available:
Set the Show SpIDer Guard icon in the notification area
flag to display the SpIDer Guard icon in Windows OS Taskbar
notification area (An element of the Microsoft Windows Desktop
that displays the icons of active applications and is located in the
right part of the taskbar, which by default is positioned in the
bottom of the desktop).
Set the Save 'Paused' state between sessions flag to save
paused state after a system restart if the monitoring was paused
in the current session.
Troubleshooting
In the Troubleshooting section, the following settings are available:
Set the Do not scan objects on local network flag to scan
files on network drives only when these files are launched from
network drives.
If the Do not scan objects on local network flag is cleared,
SpIDer Guard scans files from network drives when these files
are launched for execution and in any cases of opening files
including read-only files.
User Manual
103
Chapter 9. SpIDer Guard Settings
Set the Do not scan objects on removable drives (Floppy,
CDROM, etc.) flag to scan files on removable storages only
when these files are launched.
If the Do not scan objects on removable drives (Floppy,
CDROM, etc.) flag is cleared, SpIDer Guard scans files on
removable storages (CD and DVD disks, floppy disks (FDD), flash
drives and other data carriers connectible through USB and etc.)
in any cases of access to these files including opening read-only
files.
Operating system may register some removable devices as
hard drives (e.g. portable USB hard drives). Scan such
devices with Dr.Web Scanner on connection.
User Manual
104
Chapter 9. SpIDer Guard Settings
9.2.2.3. Notifications
Figure 9-12. SpIDer Guard Control panel. Notifications tab.
To get information on options available in other tabs, click the name
of this tab in the picture
On Notifications tab, you can edit settings of various virus events
notifications: the list of events to cause notifications, the way of their
dispatch and the list of recipients.
In the When to send a notification section, set flags for virus
events types to notify.
User Manual
105
Chapter 9. SpIDer Guard Settings
In the Recipients section, set the mode of the notifications sending:
Set the Send E-mail notification flag to send notifications
about the selected events via e-mail.
Set the Send message notification flag to send notifications
about the selected events via the local network.
Send E-mail notifications and Send message
notifications flags are independent and could be set
simultaneously.
After this, create or edit the list of recipients for selected
notification modes:
1. To add a new address to the list of e-mail recipients, click Add
next to the e-mail list. A window to edit e-mail addresses will
open.
2. To add a new address to message recipients in the local
network, click Add next to the network addresses list. A
window to edit network addresses will open.
3. To delete an element from any list, select it in the list and click
Remove.
4. To edit any element in the list, select it in the list and click
Edit. The window to edit e-mail addresses or to edit network
addresses will open.
User Manual
106
Chapter 9. SpIDer Guard Settings
9.2.2.4. Reminders
Figure 9-13. SpIDer Guard Control panel. Reminders tab.
To get information on options available in other tabs, click the name
of this tab in the picture
On the Reminders tab, you can specify the settings for reminders.
Reminders are pop-up messages which appear above the SpIDer
Guard icon in Windows OS Taskbar notification area (An element of
the Microsoft Windows Desktop that displays the icons of active
applications and is located in the right part of the taskbar, which by
default is positioned in the bottom of the desktop), if the mode of the
icon displaying is specified.
User Manual
107
Chapter 9. SpIDer Guard Settings
In the Show notification message when section, select the list of
events to bring up reminders:
Engine and virus bases updated - notify when the antivirus
engine and virus databases are updated.
Malicious file disinfected - notify when an infected file is
detected and neutralized.
Status changed - notify when Spider Guard functioning is
changed (disabled, enabled).
In the Expiration of virus bases section, set the Start to
reminder me about outdated virus bases after flag to show
reminders, if the virus databases were not updated during the time
period specified in the drop-down list.
In the Reminders section, you can specify the mode of notifications
appearance:
Show a balloon tip when you log on - to show reminder
every time the OS starts.
Repeat tooltip notification every - to enable notifications
repeating every time slot selected in the drop-down list.
Click Restore defaults to restore recommended default settings.
9.2.3. Additional dialogs
9.2.3.1. Virus Alert Window
Virus Alert Window is opened, if the Guard detects an infected or
suspicious object, if in the program settings the reaction is set to
Report.
User Manual
108
Chapter 9. SpIDer Guard Settings
Figure 9-14. Virus alert window of Guard reaction request
The set of accessible buttons depends on the type of a virus event and
the type of an infected object (for archives, mail files and file
containers some reactions are inaccessible).
The Ignore button instructs to take no action, if a suspicious
object is found.
The Lock button instructs to block access to a file, if it's
checking caused reaction of the Guard. Access to the file is
unblocked after the computer restarts or if the SpIDer Guard
is temporarily suspended.
The Cure button (accessible only if a supposedly curable virus is
found, and is inaccessible for archives of any type) instructs the
Guard to cure the object infected by a known virus. If the virus
is incurable, or the curing fails, the window will open again with
options for incurable viruses.
The Rename button instructs to rename the extension of the
infected or suspicious file according to the default settings.
The Move button instructs to move the infected or suspicious
file to the default Quarantine folder.
The Delete button instructs to delete the infected or suspicious
file (for boot sectors no actions will be taken). With the default
settings, it is inaccessible for all types of archives.
User Manual
109
Chapter 9. SpIDer Guard Settings
9.2.3.2. Edit E-mail Addresses
Figure 9-15. Setting the E-mail address window
In the Add e-mail window you can specify the address and settings
of an e-mail to send the virus event notifications.
Mail Server
In the Mail server section you can specify the SMTP-server settings
for outgoing e-mail.
The following parameters are obligatory:
SMTP Host - IP address or domain name of the SMTP server to
send the e-mails.
User Manual
110
Chapter 9. SpIDer Guard Settings
Port - port number used by the SMTP-server.
If the authorization on SMTP-server is required, set the SMTP-server
requires authorization flag and specify the Username and
Password fields for access to the outgoing mail server.
If secure connection in terms of the TLS and SSL protocols is required,
set the Use secure connection (TLS/SSL) flag.
Message Header
In the Message Header section, you can specify e-mail attributes.
Specify the following e-mail addresses:
In the Target address field, specify the e-mail address on
which the virus event notifications will be sent.
In the From address field, specify the e-mail address to set as
a sender in the messages about virus situation.
You can specify the message subject in the Subject field. If this field
is left empty, the subject of the e-mail will be set by default settings.
Specify the subject of e-mail message, if necessary. Leave the field
empty to use the default subject.
User Manual
111
Chapter 9. SpIDer Guard Settings
9.2.3.3. Edit Network Addresses
Figure 9-16. Setting the computer LAN address window
In this window you can specify a computer address in a Microsoft
network to add it into the list of notification recipients.
Type a computer network address in the Enter Network Name field
or click Browse to find a computer via the Network Explorer.
User Manual
112
Chapter 10. SpIDer Mail
Chapter 10. SpIDer Mail
SpIDer Mail is an antivirus mail scanner that installs by default, runs
automatically at Windows OS startup and constantly resides in
memory.
If you have an "Antivirus + Anti-spam" license, SpIDer Mail also
scans mail for spam messages using Dr.Web Anti-spam.
The default SpIDer Mail settings are optimal for beginners, provide
maximum protection and require minimum user interference. However,
by default SpIDer Mail may block some options of mail programs (for
example, sending a message to multiple addresses might be
considered as mass distribution, incoming mail is not scanned for
spam), useful information from safe text part of infected messages
becomes unavailable in case of automatically deletion. Advanced users
can configure mail scanning settings and reaction of SpIDer Mail to
various virus events.
Mail Processing
SpIDer Mail supports automatic interception of e-mail messages
when mail clients connect to mail servers via the following standard
protocols and ports:
The POP3 protocol, port 110;
The SMTP protocol, port 25;
The IMAP4 protocol, port 143;
The NNTP protocol, port 119.
In some cases when automatic interception of POP3, SMTP, IMAP4 or
NNTP traffic is impossible, you can configure SpIDer Mail manually.
Any incoming messages are intercepted by SpIDer Mail before they
are received by mail clients. Messages are scanned for viruses with the
maximum possible level of detail. If no viruses or suspicious objects
are found, then messages are passed on to the mail program in a
User Manual
113
Chapter 10. SpIDer Mail
"transparent" mode, as if they were received immediately from the
server. Similar procedure is applied for outgoing messages before they
are sent to servers.
Dr.Web Anti-spam
This option is available when the use of Dr.Web Antispam is licensed with your key file.
Dr.Web Anti-spam technologies consist of several thousand rules
that can be divided into several groups:
Heuristic analysis – A highly intelligent technology that
empirically analyzes all parts of a message: header, message
body, and attachments, if any.
Detection of evasion techniques – This advanced anti-spam
technology allows detecting evasion techniques adopted by
spammers to bypass anti-spam filters.
HTML-signature analysis – Messages containing HTML code
are compared with a list of known patterns from the anti-spam
library. Such comparison, in combination with the data on sizes
of images typically used by spammers, helps protect users
against spam messages with HTML-code linked to online
content.
Semantic analysis – The words and phrases of a message –
both visible to the human eye and hidden – are compared with
words and phrases typical of spam using a special dictionary.
Anti-scamming – Scam (as well as pharming messages) is the
most dangerous type of spam including so-called “Nigerian”
scams, loan scams, lottery and casino scams and false messages
from banks and credit organizations. A special module of Dr.
Web anti-spam is used to filter scams.
Technical spam – Bounces are delivery-failure messages sent
by a mail server. Such messages are also sent by a mail worm.
Therefore bounces are as unwanted as spam.
User Manual
114
Chapter 10. SpIDer Mail
SpIDer Mail Reactions
By default, SpIDer Mail reacts on detection of infected incoming
messages as well as messages that were not scanned (for example,
due to complicated structure) as follows:
Malicious code is removed from infected messages, then
messages are delivered as usual. This action is called curing the
message.
Messages with suspicious objects are moved to Quarantine as
separate files; the mail client receives a notification about this.
This action is called moving the message.
Messages that were not scanned and safe messages are passed
on to the mail client.
All deleted or moved messages are also deleted from the POP3
or IMAP4 mail server.
Infected or suspicious outgoing messages are not sent to the server, a
user is notified that a message will not be sent (usually the mail
program will save such message).
If an unknown virus distributing through e-mail is detected on the
computer, SpIDer Mail can detect signs of typical viruses "behavior"
(for example, attempts at mass distribution). By default, this option is
enabled.
SpIDer Mail uses Dr.Web Anti-spam spam filter which allows to scan
mail for spam messages. By default, this option is enabled.
Mail Checks by Other Components
Dr.Web Scanner can also detect viruses in mail boxes of several
formats, but SpIDer Mail has several advantages:
Not all formats of popular mailboxes are supported by SpIDer
Guard and Dr.Web Scanner. When using SpIDer Mail, the
infected messages are not even delivered to mailboxes.
User Manual
115
Chapter 10. SpIDer Mail
Dr.Web Scanner does not check mailboxes at the moment of
the mail receipt, but either on user demand or according to
schedule. Furthermore, this action is resource-consuming and
takes a lot of time.
Thus, with all the components in their default settings, SpIDer Mail
detects viruses and suspicious objects distributed via e-mail first and
prevents them from infiltrating into your computer. SpIDer Mail
operation is rather resource-sparing; scanning of e-mail files can be
performed without other components.
Setup the SpIDer Mail
SpIDer Mail settings are differ depending on installed guard version.
There are two versions of SpIDer Mail:
SpIDer Mail,
SpIDer Mail NT4.
The OS version is defined automatically before the guard installation,
and corresponding SpIDer Guard version get installed (see System
Requirements).
If necessary, for example, to perform a task which consumes a lot of
processor resources, you can temporarily disable SpIDer Mail.
10.1. SpIDer Mail Settings
The default settings are optimal for most uses. Do not
change them unnecessarily.
To configure SpIDer Mail settings:
1. On the Agent context menu select SpIDer Mail Settings.
User Manual
116
Chapter 10. SpIDer Mail
The SpIDer Mail Settings option is available on the
Agent context menu only if user has:
1. Permissions to change these settings. The
permissions are set at the Server by the antivirus
network administrator.
2. Administrator rights on the computer.
2. A window opens that contains the following pages:
The AV Check page, where you can configure reactions
of SpIDer Mail to various virus events (described in
detail in the Dr.Web for Windows Help, the AV Check
Page section).
The Antispam page, where you can configure Dr.Web
Anti-spam (described in detail in the Dr.Web for
Windows Help, the Antispam Page section).
The Exclusions page, where you can list applications
whose mail traffic you want to exclude from monitoring
with SpIDer Mail (described in detail in the Dr.Web for
Windows Help, the Exclusions Page section).
The Interception page, where you can configure
interception of connections between mail clients and
servers (described in detail in the Dr.Web for Windows
Help, the Interception Page section).
The Log page, where you can select the mode of keeping
records in the log file (described in detail in the Dr.Web
for Windows Help, the Log Page section).
In all dialog boxes, to receive help about the active window,
press F1.
3. Configure options as necessary.
4. After editing, click OK to save the changes or Cancel to cancel
them.
User Manual
117
Chapter 10. SpIDer Mail
10.2. SpIDer Mail NT4 Settings
The default settings are optimal for most uses. Do not
change them unnecessarily.
To configure SpIDer Mail NT4 settings:
1. On the Agent context menu select SpIDer Mail Settings.
The SpIDer Mail Settings option is available on the
Agent context menu only if user has:
1. Permissions to change these settings. The
permissions are set at the Server by the antivirus
network administrator.
2. Administrator rights on the computer.
2. A window opens that contains the following pages:
The Scan, where you can configure e-mail scan mode.
The Actions, where you can configure reactions of
SpIDer Mail to various virus events.
The Engine, where you can set the antivirus engine
parameters.
The Log, where you can select the mode of keeping
records in the log file.
The Interception, where you can configure interception of
connections between mail clients and servers.
The Excluded applications, where you can list applications
whose mail traffic you want to exclude from monitoring
with SpIDer Mail.
3. Configure options as necessary.
4. After editing, click OK to save the changes or Cancel to cancel
them.
User Manual
118
Chapter 10. SpIDer Mail
10.2.1. Scan Tab
Figure 10-1. SpIDer Mail settings window. Scan tab.
To get information on options available in other tabs, click the name
of this tab in the picture
In this tab the e-mail scan mode is set.
In this group, you can select the following options for e-mail scans. It
is recommended to keep these settings:
The Heuristic analysis flag instructs SpIDer Mail to use
heuristic analysis when scanning e-mail which allows detecting
suspicious objects, i.e. infected with viruses that are yet
unknown, with high probability. This options enabled by default.
To detect known threats only, disable this option.
The Check archives flag instructs SpIDer Mail to check
contents of archives in mail. This option is enabled by default.
To accelerate SpIDer Mail, clear the Check archives flag to
disable this option.
User Manual
119
Chapter 10. SpIDer Mail
When SpIDer Guard is enabled constantly, this default
setting does not compromise security of your computer. If a
file within an archive is infected, the malicious object will be
detected and neutralized by SpIDer Guard immediately
when you try to extract archived files. Including archives
into constant scans may considerably reduce computer
performance.
The Virus activity control flag instructs SpIDer Mail to
detect peculiar signs of mass distribution of viruses via e-mail.
When operating in this mode, SpIDer Mail may block your
attempts at sending messages to several addresses. In such
case, disable this option. This option is enabled by default.
You can specify spam-check of your e-mail on this tab:
The Check for spam flag enables spam-filtering of incoming
messages.
It is possible to configure the spam filter only if the Dr.Web
application is licensed to work in the "Antivirus + Anti-spam"
mode (authorized by the key file).
The Spam filter settings can be set in the SpIDer Mail Spam
Settings window. Click Advanced to open this window.
The mail guard detects, apart from messages with infected objects,
messages containing other types of unsolicited programs:
Adware,
Dialers,
Riskware,
Hacktools,
Jokes.
To change the set of the unsolicited programs to be detected, set flags
against the types of unsolicited programs you want to be detected,
and clear flags against the types of programs you do not want to be
detected.
User Manual
120
Chapter 10. SpIDer Mail
By default, the SpIDer Mail is prescribed to detect Adware and Dialers
only.
The mail guard reaction to detection of unsolicited programs
is similar to the reaction to detection of infected messages,
specified in the Actions tab.
The Load at startup flag is set by default. The program automatically
starts at every Windows OS startup. You can clear this flag, in this
case the program can be started manually.
To set e-mail check additional parameters, click Advanced in the lower
right corner of the window.
10.2.1.1. Spam Settings
Figure 10-2. SpIDer Mail settings window.
To get information on options available in other tabs, click the name
of this tab in the picture
User Manual
121
Chapter 10. SpIDer Mail
If you use IMAP/NNTP protocols, configure your e-mail
client to download complete messages from the e-mail
server at once – without previewing their headers. This is
important for correct operation of the spam filter.
The Add prefix to the subjects of the spam messages flag
instructs SpIDer Mail to add a special prefix to the subjects of spam
messages. This prefix can be specified in the field below. Using a prefix
will allow you to create filter rules for spam in those mail clients (for
example, MS Outlook Express), where it is not possible to enable
filtering by headers.
The Allow Cyrillic text flag instructs the spam filter to analyze
messages with Cyrillic encoding. If the flag is not set, it is highly
possible that messages with Cyrillic encoding will be regarded as spam.
The Allow Chinese/Japanese/Korean text flag functions the
same as described above.
In the White list and Black list fields, white and black lists of
senders’ addresses are specified.
If the sender’s address is on the white list, the message is not
scanned for spam.
List filling methods
To add a definite sender, enter the full email address (for
example, [email protected]). This ensures delivery of
all messages from this sender.
Addresses must be divided by the ";" symbol.
To add a group of sender addresses, enter the mask that
determines their names. The mask defines template for an
object definition. It may contain regular characters from the
e-mail addresses and special * character, replaces any
(including the empty one) sequence of any symbols.
For Example, the following addresses are available:
[email protected]
*[email protected]
User Manual
122
Chapter 10. SpIDer Mail
mailbox@dom*
*box@dom*
The * symbol can be set at the start or at the
end of an address only.
The @ symbol is obligatory.
To ensure delivery of messages sent from any email address
within a domain, use the * character instead of the
username in the address. For example, if you enter
*@example.net, SpIDer Mail will deliver without
scanning the messages from all senders within the
example.net domain.
To ensure delivery of messages sent from email address with
a certain user name from any domain, use the * character
instead of the domain name in the address. For example, if
you enter ivanov@*, SpIDer Mail will deliver without
scanning the messages from all senders with the ivanov
mailbox name.
If the sender’s address is on the black list, the message will be
automatically regarded as spam.
List filling methods
To add a definite sender, enter the full email address (for
example, [email protected]). All messages from this address
will be automatically regarded as spam.
Addresses must be divided by the ";" symbol.
To add a group of sender addresses, enter the mask that
determines their names. The mask defines template for an
object definition. It may contain regular characters from the
e-mail addresses and special * character, replaces any
(including the empty one) sequence of any symbols.
For Example, the following addresses are available:
[email protected]
*[email protected]
User Manual
123
Chapter 10. SpIDer Mail
mailbox@dom*
*box@dom*
The * symbol can be set at the start or at the
end of an address only.
The @ symbol is obligatory.
To regard as spam messages sent from any email address
within a domain, use the * character instead of the
username in the address. For example, if you enter
*@spam.ru, SpIDer Mail will regard as spam messages
from all senders within the spam.ru domain.
To regard as spam messages sent from email address with a
certain user name from any domain, use the * character
instead of the domain name in the address. For example, if
you enter ivanov@*, SpIDer Mail will regard as spam
messages from all senders with the ivanov mailbox name.
Addresses from the recipient domain are not processed. For
example, if the recipient mailbox (your mailbox) is in the
mail.ru domain, then senders addresses from mail.ru
domain will not be processed with anti-spam filter.
The following headers will be added to all scanned messages:
X-DrWeb-SpamState: Yes/No. Yes shows that the message
is spam. No says that SpIDer Mail does not regard the
message as spam.
X-DrWeb-SpamVersion: version. Version – version of the
Vade Retro spam filter library.
User Manual
124
Chapter 10. SpIDer Mail
If the spam filter wrongly regards certain messages as
spam, you are advised to forward such messages to special
e-mail addresses for analysis. It is designed to improve the
spam filter performance. Messages which are wrongly
regarded
as
spam
should
be
forwarded
to
[email protected], and unblocked spam messages
should be forwarded to [email protected]. Forward the
messages as attachments. Do not include them to the
message body.
10.2.1.2. Advanced scan settings
Figure 10-3. SpIDer Mail settings window.
To get information on options available in other tabs, click the name
of this tab in the picture
In this window advanced e-mail scan settings are set.
In this group, you can set conditions under which SpIDer Mail should
acknowledge too complicated messages whose scanning is time
consuming as unchecked:
Message scan timeout - the maximum message scanning
time. If exceeded, SpIDer Mail stops the scan and
acknowledges message as unchecked.
Max file size to extract - the maximum file size at unpacking.
User Manual
125
Chapter 10. SpIDer Mail
If the size of extracted files will exceed the limit, SpIDer Mail
neither unpacks, not scans the archive.
Max compression ratio - the maximum archives compression
rate. If the compression rate of the archive exceed the limit,
SpIDer Mail neither unpacks, not scans the archive.
Max archive nesting level - the maximum nesting level for
archived files. During scan, SpIDer Mail proceeds unpacking
and scanning the archive until this limit is exceeded.
The Show virus alerts for outgoing mail flag is selected by
default. The program generates a message window notifying of the
denial to deliver an infected message to an SMTP server. As a rule, the
same message is generated by the mail program; in such case the flag
can be cleared.
10.2.2. Actions Tab
Figure 10-4. SpIDer Mail settings window. Actions tab.
To get information on options available in other tabs, click the name
of this tab in the picture
User Manual
126
Chapter 10. SpIDer Mail
In this tab, reactions of SpIDer Mail to detection of infected or
suspicious files in e-mail are specified.
Actions Setup
To set actions on virus threats detection, use the following
options:
The Infected messages drop-down list, set the SpIDer Mail
reaction to the detection of a letter containing an infected
object.
The Suspicious messages drop-down list, set the SpIDer
Mail reaction to the detection of a letter containing an object
presumably infected with a virus (upon a reaction of the
heuristic analyzer).
The Not checked messages drop-down list, set the SpIDer
Mail reaction to the detection of unchecked letters.
The Delete modified messages on server flag is set by default. It
instructs to delete messages incoming from a POP3/IMAP4 server for
which the Delete or Quarantine action is specified, regardless of the
mail program settings.
Set the Insert 'X-AntiVirus' header into messages flag to add to
all scanned messages the following headers:
X-DrWeb-SpamState: Yes/No. Yes shows that the message
is spam. No says that SpIDer Mail does not regard the
message as spam.
X-DrWeb-SpamVersion: version. Version – version of the
Vade Retro spam filter library.
Possible Reactions
The following actions for detected virus threats are available:
Delete – in this case the mail guard does not pass a message to
the mail client; instead of a deleted message, the mail program
receives a notification of the action performed.
User Manual
127
Chapter 10. SpIDer Mail
Quarantine – in this case a message is placed to the
Quarantine; it is also not transferred to the mail program, the
mail program receives a notification of the action made.
Skip – to transfer messages to the mail program as usually.
For outgoing messages any setting other than Skip results
in the denial to pass the message to a SMTP server.
Table 7. SpIDer Mail actions
Action
Object
Delete
Quarantine
Skip
Infected messages
+
+/*
Suspicious messages
+
+/*
+
Not
messages
+
+
+/*
checked
Conventions
+
action is enabled for this type of objects
+/*
action is set as default for this type of object
User Manual
128
Chapter 10. SpIDer Mail
10.2.3. Engine Tab
Figure 10-5. SpIDer Mail settings window. Engine tab.
To get information on options available in other tabs, click the name
of this tab in the picture
In this tab the antivirus engine parameters are set.
You can specify a non-standard location of the antivirus engine (the
search module) and the virus databases.
If during the mail guard session there was an update by the automatic
updating utility, SpIDer Mail immediately loads the databases
updated. If databases were updated in another way (for example, they
were copied to the installation folder), the mail guard can also load the
updated databases without reloading the program. This is periodically
checked by the flag file (by default, a "hot add-on" of the database). A
change of the flag file means it is high time to update the databases.
You can specify the name and the location of the flag file, as well as
the interval between the checks (300 seconds, by default).
Click Advanced to configure additions settings of the antivirus engine.
User Manual
129
Chapter 10. SpIDer Mail
10.2.3.1. Additional Settings of Search Modules
Figure 10-6. SpIDer Mail settings window
In this window additional settings for search modules are specified.
In the Total scan engines field, maximum number of
simultaneously loaded search engines is specified.
In the Numbers of scan engines at start field, number of
search engines loaded at the SpIDer Mail launch is specified.
In the Unused engines unload timeout field, time interval
after which unused search engines are unloaded is specified.
User Manual
130
Chapter 10. SpIDer Mail
10.2.4. Log Tab
Figure 10-7. SpIDer Mail settings window. Log tab.
To get information on options available in other tabs, click the name
of this tab in the picture
In this tab the SpIDer Mail log file parameters are set.
The Enable logging flag instructs SpIDer Mail to write a log file.
The flag is set by default.
You can specify the following logging parameters:
Set the Log scanning info flag instructs to log information
about all scanned objects, including uninfected objects.
In the Log to file field you can specify the name and the path
to the log file. Click
to select the file in the file browser.
To limit log file size, set the Maximum log file size flag and
specify the maximum permissible size of the file in kilobytes.
User Manual
131
Chapter 10. SpIDer Mail
You can specify additional parameters:
Set the Enable icon in the notification area flag to show the
SpIDer Mail icon in the Taskbar notification area.
Set the Enable icon animation flag to enable the SpIDer
Mail icon blinking in the Taskbar notification area.
Set the Show notifications flag to enable a bubble help above
the SpIDer Mail icon notifying about the program version, the
number of virus signatures, etc. The bubble help appears
immediately after the program start.
10.2.5. Interception Tab
Figure 10-8. SpIDer Mail settings window. Interception tab.
To get information on options available in other tabs, click the name
of this tab in the picture
In this tab the interception parameters of connections with POP3/
SMTP/IMAP4/NNTP servers are set.
User Manual
132
Chapter 10. SpIDer Mail
Select the interception mode:
the automatic mode is the most convenient;
the manual mode should be used in cases when automatic
interception is impossible for all or several intercepted server
addresses (the same mode should be applied for all addresses).
Having selected the mode, click the Parameters button. A window
with interception settings of the mode selected will open.
10.2.5.1. Automatic Interception Mode
Figure 10-9. SpIDer Mail Auto Interception settings window.
In this window the automatic interception mode settings are specified.
The list of intercepted addresses of mail servers by default contains
four lines:
any addresses on port 143 - standard IMAP4 servers,
any addresses on port 119 - standard NNTP servers,
any addresses on port 110 - standard POP3 servers,
any addresses on port 25 - standard SMTP servers.
User Manual
133
Chapter 10. SpIDer Mail
The list can be edited:
1. To add an element in the list, enter corresponding data in
Address and Port fields and click Add.
2. To remove the element from the list, select this element in the
list and click Delete.
The Test interception functionality at every starting flag is set
by default, in this case the program is instructed to test the automatic
interception functionality. If automatic interception of at least one
connection fails, select the manual interception mode.
10.2.5.2. Manual Interception Mode
Figure 10-10. SpIDer Mail Manual Interception settings window.
In this window, you can configure manual interception of mail traffic.
In this mode, SpIDer Mail serves as a proxy between mail programs
and servers and intercepts those connections only that are explicitly
defined in the settings. To use this mode, you need also to configure
mail programs.
The list in this window establishes a correspondence between settings
of mail servers and SpIDer Mail. By default, the list is empty. You
can add necessary connection parameters.
User Manual
134
Chapter 10. SpIDer Mail
To configure manual mail interception
1. List all mail servers whose connections you want to intercept,
and then number the servers successively in the ascending
order. It is recommended to start numbering from 7000. The
assigned numbers are call SpIDer Mail ports.
SpIDer Mail supports POP3, SMTP, IMAP4, and NNTP mail
servers.
2. In the SpIDer Mail settings window, click Interception.
3. Select the manual interception mode, then click Connection
Settings.
4. In the settings window, enter the following information:
SpIDer Mail port - the SpIDer Mail port that you
assigned for the mail server.
Server address - the domain name or IP address of the
server.
Server port - Еhe port number that the mail server uses.
5. Click Add.
6. To add other servers, repeat steps 4 to 5. To stop intercepting
connections to a mail server, select the corresponding item and
click Remove.
7. After editing, click OK to save the changes or Cancel to cancel
them.
8. Configure all mail clients to support the manual interception
mode.
To configure mail clients
In the settings of your mail client, set the following:
addresses of the incoming and outgoing mail servers to
localhost;
User Manual
135
Chapter 10. SpIDer Mail
mail server port to the SpIDer Mail port number that you
assigned to the corresponding mail server.
Usually, to assign those settings, you need to specify the following
string:
localhost:<SpIDer_Mail_port>
where <SpIDer_Mail_port> is the number selected by you for the mail
server.
Example
If you assigned a 7000 SpIDer Mail port to a mail server that uses the 110
port and the pop.mail.ru address, then set mail client to connect to
localhost via the 7000 port.
User Manual
136
Chapter 10. SpIDer Mail
10.2.6. Exluded Applications Tab
Figure 10-11. SpIDer Mail settings window. Excluded Applications
tab.
To get information on options available in other tabs, click the name
of this tab in the picture
In this pane you can specify the list of applications, whose mail traffic
will not be intercepted and checked by SpIDer Mail.
To configure an application list:
1. Enter the path to the executable file of the application.
Alternatively you can click the
the standard window of the OS.
button and select the file in
2. Click the Add button on the right. The application will be added
to the list below.
3. To remove an application from the list, select its executable file
in the list and click Delete.
User Manual
137
Chapter 11. Dr.Web for Outlook
Chapter 11. Dr.Web for Outlook
General Functions
Dr.Web for Outlook plug-in performs the following functions:
Antivirus check of e-mail attachments transferred via SMTP,
POP3 and HTTP protocols.
Check of e-mail attachments transferred via SSL encrypted
connections.
Spam check.
Detection and neutralizing of malicious objects.
Malware detection.
Heuristic analysis for additional protection against unknown
viruses.
Enabling/Disabling
To enable or disable Dr.Web for Outlook plug-in, use the Agent
context menu.
Dr.Web for Outlook Plug-In Configuring
You can set up the parameters of the plug-in operation and review the
statistics at the Microsoft Outlook mail application, in the Service
Parameters Dr.Web Anti-virus tab.
The Dr.Web Anti-virus tab of Microsoft Outlook
parameters are active only if user has permissions to change
these settings. The permissions are set at the Server by the
antivirus network administrator.
User Manual
138
Chapter 11. Dr.Web for Outlook
Figure 11-1. Microsoft Outlook settings window. Dr.Web Anti-Virus
tab.
On Dr.Web Anti-Virus tab, the current protection status is displayed
(enabled/disabled) and it provided the access to the following program
functions:
Log - allows to configure the program logging.
Check attachments - allows to configure the e-mails check and
to specify the program actions for the detected malicious
objects.
User Manual
139
Chapter 11. Dr.Web for Outlook
Spam filter - allows to specify the program actions for spam and
to create black and white lists of e-mail addresses.
Statistics - allows to review the number of checked and
processed objects.
11.1. Virus Check
Dr.Web for Outlook uses different detection methods. The infected
objects are processed according to the actions defined by user: the
program can cure the infected objects, remove them or move them to
Quarantine to isolate them from the rest of the system.
11.1.1. Malicious Objects
Dr.Web for Outlook detects the following malicious objects:
Infected archives,
Bomb viruses in files or archives,
Adware,
Hacktools,
Dialer programs,
Joke programs,
Riskware.
11.1.2. Actions
Dr.Web for Outlook allows to specify the program reaction to
detection of infected or suspicious files and malicious objects during email attachments check.
To configure the virus check of e-mail attachments and to specify the
program actions for the detected malicious objects, in the Microsoft
Outlook mail application, in the Service
Parameters
Dr.Web
Anti-virus tab, click Check attachments.
User Manual
140
Chapter 11. Dr.Web for Outlook
Figure 11-2. Check attachments window.
The Check attachment window will be available only for
users with administrative rights.
For Windows Vista and later OS, after clicking Check
attachments:
if UAC is enabled: administrator is requested to
confirm program actions, user without administrative
rights is requested to enter accounting data of
system administrator.
User Manual
141
Chapter 11. Dr.Web for Outlook
if UAC is disabled: administrator can change program
settings, user does not have the access to change
program settings.
In the Check attachments window, specify the actions for different
types of checked objects and also for the check failure. You can also
enable/disable checking the archives.
To set actions on virus threats detection, use the following
options:
The Infected drop-down list sets the reaction to the detection
of a file infected with a known virus:
The Not cured drop-down list sets the reaction to the detection
of a file infected with a known incurable virus (and in case an
attempt to cure a file failed).
The Suspicious drop-down list sets the reaction to the
detection of a file presumably infected with a virus (upon a
reaction of the heuristic analyzer).
In the Malware section, set the reaction to the detection of
types of unsolicited software such as:
Dialers;
Jokes;
Riskware;
Hakctools.
The If checked failed drop-down list allows to configure
actions, if attachment can not be checked, e.g. if attached file is
corrupted of password protected.
The Check archives (recommended) flag allows to enable or
disable checking of attached archived files. Set this flag, to
enable checking, clear - to disable.
For different types of objects, actions are assigned separately.
The following actions for detected virus threats are
provided:
Cure (only for infected objects) - instructs to try to restore the
original state of an object before infection.
User Manual
142
Chapter 11. Dr.Web for Outlook
As incurable (only for infected objects) - means, that the
action specified for incurable objects will be performed.
Delete - delete the object.
Move to quarantine - move the object to the special
Quarantine folder.
Skip - skip the object without performing any action or
displaying a notification.
Table 8. Reactions to various virus events
Action
Object
Cure
As
incurable
Infected
+/*
+
Delete
Move to
quarantine
Skip
Not Cured
+
+/*
Suspicious
+
+/*
+
Adware
+
+/*
+
Dialers
+
+/*
+
Jokes
+
+/*
+
Hacktools
+
+/*
+
Riskware
+
+/*
+
If check failed
+
+/*
+
Conventions
+
action is enabled for this type of objects
+/*
action is set as default for this type of object
11.2. Check for Spam
Dr.Web for Outlook checks e-mails for spam by means of spam filter
Vade Retro and filters the messages according to the user defined
settings.
User Manual
143
Chapter 11. Dr.Web for Outlook
To configure the check for spam, in the Microsoft Outlook mail
application, in the Service
Parameters
Dr.Web Anti-virus
tab, click Spam filter. The window with spam filter settings will be
opened.
The Spam Filter section is available when the use of Dr.
Web Anti-spam is licensed with your key file.
If your license does not support the Spam filter, its
settings are not available and the e-mails check for spam is
not performed.
The Spam Filter window will be available only for users
with administrative rights.
For Windows Vista and later OS, after clicking Spam Filter:
if UAC is enabled: administrator is requested to
confirm program actions, user without administrative
rights is requested to enter accounting data of
system administrator.
if UAC is disabled: administrator can change program
settings, user does not have the access to change
program settings.
User Manual
144
Chapter 11. Dr.Web for Outlook
11.2.1. Spam Filter Settings
Figure 11-3. Spam filter settings window.
To configure parameters of the spam filter operation:
Set the Check for spam flag to enable Spam filter.
You can add special text to the spam message header by set the
Add prefix to message header flag. The added prefix text is
specified to the right of the flag. The default prefix is
***SPAM***.
The checked messages can be marked as read in the message
options. To mark messages as read on spam check, set the
Mark message as read flag. By default this flag is set.
You can also configure white and black lists.
User Manual
145
Chapter 11. Dr.Web for Outlook
If spam filter defines certain messages incorrectly, you are
advised to forward such messages to special e-mail
addresses for analysis.
Details
Messages which are wrongly regarded as spam
should be forwarded to [email protected]
Unblocked spam messages should be forwarded
to [email protected]
Forward messages as attachments; do not include them
to the message body.
11.2.2. Black and White Lists
Black and white lists are used for messages filtration.
To review and to edit the black and white lists, click Black list or
White list respectively on the Spam filter window.
User Manual
146
Chapter 11. Dr.Web for Outlook
Figure 11-4. Black and white lists settings window.
To add an address to white or black list:
1. Click Add.
2. In the Edit list window, enter the address (see white and
black lists filling methods).
3. Click OK.
To change and address in the list:
1. Select the address you want to change and click Edit.
2. Change the address.
3. Click ОК.
User Manual
147
Chapter 11. Dr.Web for Outlook
To delete an address:
1. Select the address in the list.
2. Сlick Delete.
In the Black and White lists window, click OK to save changes.
White List
If the sender’s address is on the white list, the message is not scanned
for spam. But, if domain name of receiver and sender addresses are
matched, and this domain name is specified in the white list using the
* sign, this letter will be checked for spam.
List filling methods
To add a definite sender, enter the full email address (for example,
[email protected]). This ensures delivery of all messages from
this sender.
Each element of the list can contain only one e-mail address or one
mask that determines e-mail addresses.
To add a group of sender addresses, enter the mask that determines
their names. The mask defines template for an object definition. It
may contain regular characters from the e-mail addresses and special
* character, replaces any (including the empty one) sequence of any
symbols.
For Example, the following addresses are available:
[email protected]
*[email protected]
mailbox@dom*
*box@dom*
The * symbol can be set at the start or at the end of an
address only.
The @ symbol is obligatory.
User Manual
148
Chapter 11. Dr.Web for Outlook
To ensure delivery of messages sent from any email address within a
domain, use the * character instead of the username in the address.
For example, if you enter *@example.net, SpIDer Mail will
deliver without scanning the messages from all senders within the
example.net domain.
To ensure delivery of messages sent from email address with a
certain user name from any domain, use the * character instead of
the domain name in the address. For example, if you enter
ivanov@*, SpIDer Mail will deliver without scanning the
messages from all senders with the ivanov mailbox name.
Black List
If the sender’s address is on the black list, the message will be
automatically regarded as spam.
List filling methods
To add a definite sender, enter the full email address (for example,
[email protected]). All messages from this address will be
automatically regarded as spam.
Each element of the list can contain only one e-mail address or one
mask that determines e-mail addresses.
To add a group of sender addresses, enter the mask that determines
their names. The mask defines template for an object definition. It
may contain regular characters from the e-mail addresses and special
* character, replaces any (including the empty one) sequence of any
symbols.
For Example, the following addresses are available:
[email protected]
*[email protected]
mailbox@dom*
*box@dom*
User Manual
149
Chapter 11. Dr.Web for Outlook
The * symbol can be set at the start or at the end of an
address only.
The @ symbol is obligatory.
To regard as spam messages sent from any email address within a
domain, use the * character instead of the username in the address.
For example, if you enter *@spam.ru, SpIDer Mail will regard as
spam messages from all senders within the spam.ru domain.
To regard as spam messages sent from email address with a certain
user name from any domain, use the * character instead of the
domain name in the address. For example, if you enter ivanov@*,
SpIDer Mail will regard as spam messages from all senders with the
ivanov mailbox name.
Addresses from the recipient domain are not processed. For example,
if the recipient mailbox (your mailbox) is in the mail.ru domain,
then senders addresses from mail.ru domain will not be processed
with anti-spam filter.
11.3. Logging
Dr.Web for Outlook registers errors and application events in the
following logs:
Windows Event Log;
Text Dr.Web debug log.
11.3.1. Event Log
Dr.Web for Outlook registers the following information in the
Windows Event Log:
Plug-in starts and stops.
License key file parameters: license validation, license expiration
date (information is written during program launch, during
program operating and when key file is changed).
User Manual
150
Chapter 11. Dr.Web for Outlook
License errors: the key file is absent, permissions for usage of
program modules is absent in the key file, licence is blocked, the
key file is corrupted (information is written during program
launch and during program operating).
Parameters of program modules: Scanner, engine, virus bases
(information is written during program launch and modules
update).
Information on threats detection.
License expiration notifications (a message is registered in 30,
15, 7, 3, 2 and 1 days before expiration).
To view Event Log
1. On the Control Panel, select Administrative Tools
Event Viewer.
2. In the tree view, select Application. The list of events,
registered in the log by user applications, will be opened. The
source of Dr.Web for Outlook messages is the Dr.Web for
Outlook application.
11.3.2. Debug Text Log
The following information can be registered in the Dr.Web for
Outlook text log:
License validity status.
Malware detection reports per each detected malicious object.
Read-write errors or errors while scanning for archives or
password-protected files.
Parameters of program modules: Scanner, engine, virus bases.
Core failures.
License expiration notifications (A message is registered in 30,
15, 7, 3, 2 and 1 days before expiration).
User Manual
151
Chapter 11. Dr.Web for Outlook
Enabling the program logging in the Log file decreases
server performance, therefore it is recommended to enable
logging only in case of errors occurrence in operation of Dr.
Web for Outlook.
Configure logging
1. On Dr.Web Anti-virus tab, click Log. The window of log
settings will open.
2. Specify the detailing level (0 - 5) for logging:
level 0 corresponds to disable logging,
level 5 means the maximum level of details for the
program logging.
By default, logging is disabled.
3. Specify the maximum log file size (in kilobytes).
4. Click OK to save changes.
The Log window will be available only for users with
administrative rights.
For Windows Vista and later OS, after clicking Log:
if UAC is enabled: administrator is requested to
confirm program actions, user without administrative
rights is requested to enter accounting data of
system administrator.
if UAC is disabled: administrator can change program
settings, user does not have the access to change
program settings.
View program log
To open the text log, click Show in folder. By default, the log is
created in DrWebOutlook.log file located at the DoctorWeb
folder of the user profile folder.
User Manual
152
Chapter 11. Dr.Web for Outlook
DrWebOutlook.log file is individual for each system
user.
11.4. Statistics
In the Microsoft Outlook mail application, in the Service
Parameters
Dr.Web Anti-virus tab, statistic information about
total number of objects, which have been checked and treated by the
program is listed.
These scanned objects are classified as follows:
Checked - total number of checked messages.
Infected - number of messages with viruses.
Suspicious - number of messages presumably infected with a
virus (upon a reaction of the heuristic analyzer).
Cured - number of objects successfully cured by the program.
Not checked - number of objects, which can not be checked or
error has occurred during scan.
Clear - number of messages, which are not infected.
Then the number of the following categories of treated objects is
specified:
Moved to quarantine - number of objects, which have been
moved to Quarantine.
Deleted - number of objects, deleted from the system.
Skipped - number of objects, skipped without changes.
Spam messages - number of objects, detected as spam.
Statistics File
By default, statistics file is drwebforoutlook.stat file located at
the DoctorWeb folder of the user profile folder. To clear statistics,
delete this file.
User Manual
153
Chapter 11. Dr.Web for Outlook
drwebforoutlook.stat statistics file is individual for
each system user.
Statistic of the Dr.Web for Outlook application is transferred to the
Agent to be sent to the Server jointly with statistics from other
antivirus components of Dr.Web Enterprise Security Suite.
User Manual
154
Appendix A. Scanner Command-Line Switches
Appendix A. Scanner
Command-Line Switches
When scanning task is launched, it is performed by Dr.Web Scanner.
If necessary, you can specify additional parameters of the checkup.
You can enter the following switches (separated by spaces) in the
Arguments entry field:
/@<file_name> or /@+<file_name> instructs to scan objects
listed in the specified file. Each object is specified in a separate
line of the list-file. It can be either a full path with the file name
or the ?boot string which means that scanning of boot sectors
should be performed. For the GUI version of the scanner the file
names with mask and directory names should be specified there.
The list-file can be prepared manually in any text editor; this can
also be done automatically via applications using the scanner to
check certain files. After the scanning is completed, the scanner
deletes the list-file, if used without the + character.
/AL – to scan all files in the given device, or in the given folder,
regardless the extensions or the internal format.
/AR – to scan files inside the archives. At present, the scanning
of archives (without curing) created by the ARJ, PKZIP, ALZIP,
AL RAR, LHA, GZIP, TAR, BZIP2, 7-ZIP, ACE, etc. archivers, as
well as of MS CAB-archives – Windows Cabinet Files (QUANTUM
packing is not supported yet) and ISO-images of optical disks
(CD and DVD) is available. As it is specified (/AR) the switch
instructs to inform a user when an archive with infected or
suspicious files is detected. If the switch is supplemented with
the D, M or R modifier, other actions are taken:
/ARD – delete;
/ARM – move (by default, to the Quarantine folder);
/ARR – rename (by default, the first symbol of the
extension is replaced by the # character).
The switch may end with the N modifier, and in this case
the name of the archiver after the name of the archived
file will not be printed.
User Manual
155
Appendix A. Scanner Command-Line Switches
/CU – actions with infected files and boot sectors of drives. The
curable objects are cured and the incurable files are deleted
without additional D, M or R modifiers (if different action is not
specified by the /IC switch). Other actions taken towards
infected files:
/CUD – delete;
/CUM – move (by default, to the Quarantine folder);
/CUR – rename (by default, the first symbol of extension
is replaced by the # character).
/SPR, /SPD or /SPM – actions with suspicious files:
/SPR – rename;
/SPD – delete;
/SPM – move.
/ICR, /ICD or /ICM – actions with infected files which
cannot be cured:
/ICR – rename;
/ICD – delete;
/ICM – move.
/MW – actions with all types of unsolicited programs. As it is
specified (/MW) the switch instructs to inform a user. If the
switch is supplemented with the D, M, R or I modifier, other
actions are taken:
/MWD – delete;
/MWM – move (by default, to the Quarantine folder);
/MWR – rename (by default, the first symbol of extension
is replaced by the # character);
/MWI – ignore. Actions with certain types of unsolicited
programs are specified by the /ADW, /DLS, /JOK, /
RSK, /HCK switches.
/DA – to scan the computer once a day. The next check date is
logged into the configuration file and that is why it should be
accessible for writing and subsequent rewriting.
/EX – to scan files with extensions listed in the configuration file
by default, or, if unavailable, these are EXE, COM, DLL,
User Manual
156
Appendix A. Scanner Command-Line Switches
SYS,
SCR,
CL*,
PIF,
CAB,
MBP,
PRC,
SWF,
VXD, OV?,
CMD, 386,
HT*, VB*,
AR?, ZIP,
HLP, MD?,
SH, SHB,
ASP, LSP,
MPP, TBB.
BAT, BIN, DRV,
FON, DO?, XL?,
JS*, INF, PP?,
R??, GZ, Z, TGZ,
INI, MBR, IMG,
SHS, SHT*, MSG,
MSO, OBD, THE*,
PRG,
WIZ,
OBJ,
TAR,
CSC,
CHM,
EML,
BOO,
RTF,
LIB,
TAZ,
CPL,
XML,
NWS,
If an element of the list of scanned objects contains the
explicit file extension, and it is used with special characters
* and ?, all files specified in this element of the list will be
scanned and not only those matching this list of extensions.
/FN – to load Russian letters to the video display decoder (for
Dr.Web for DOS only).
/GO – batch mode of the program. All questions implying
answers from a user are skipped; solutions implying a choice are
taken automatically. This mode is useful for automatic scanning
of files, for example, during a daily or weekly check of the hard
disk.
/SCP:<n> – sets the priority of the scanning process, where
<n> is a number ranging from 1 to 50.
/SHELL – for the GUI version of the scanner. The switch
disables the splash screen display, scanning of the memory and
autorun files. The earlier saved lists of paths to files and folders
scanned by default are not loaded for scanning. This mode
allows to use the GUI version of the scanner instead of the
console version to scan only those objects which are listed in the
command line switches.
/ST – sets stealth mode of the GUI version of the scanner. The
program operates without any windows opened and selfterminates. But, if during scanning virus objects were detected,
the scanner window will be opened after the scanning is
completed. Such scanner mode presupposes, that the list of the
scanned objects is specified in the command line.
/HA – to perform heuristic scanning of files and search for
unknown viruses in them.
/INI:<path> – use alternative configuration file with specified
User Manual
157
Appendix A. Scanner Command-Line Switches
name or path.
/NI – do not use parameters specified in drweb32.ini
configuration file.
/LNG:<file_name> or /LNG – use alternative language
resources file (DWL-file) with specified name or path, and if the
path is not specified – the inbuilt (English) language.
/ML – scan files of e-mail format (UUENCODE, XXENCODE,
BINHEX and MIME). As it is specified (/ML) the switch instructs
to inform a user if an infected or suspicious object is detected in
a mail archive. If the switch is supplemented with the D, M or R
modifier, other actions are taken:
/MLD – delete;
/MLM – move (by default, to the Quarantine folder);
/MLR – rename (by default, the first symbol of extension
is replaced by the # character);
In addition the switch may be supplemented by an extra
modifier N (at the same basic modifiers may also be set).
In this case information output about mail archive
messages is disabled.
/NS – disable interrupting of computer scanning. With this
switch specified, a user will not be able to interrupt scanning by
pressing ESC.
/OK – display full list of scanned objects and mark the
uninfected ones with Ok.
/PF – prompt on, if multiple floppies are scanned.
/PR – prompt for confirmation before action.
/QU – the scanner checks the objects specified in the command
line (files, disks, folders) and then automatically terminates (for
the GUI version of the scanner only).
/RP<file_name> or /RP+<file_name> – log to the file specified
in the switch. If no name is specified, log to a default file. If the
+ character is present, the file is appended. If there is no
character, a new one is created.
/NR – do not create a log file.
/SD – scan subfolders.
User Manual
158
Appendix A. Scanner Command-Line Switches
/SO – enable sounds.
/SS – save the mode, specified during the current program
launch in the configuration file when the program terminates.
/TB – scan boot sectors and master boot records (MBR) of the
hard drive.
/TM – search for viruses in main memory (including Windows
OS system area). Available for scanners for Windows OS only.
/TS – search for viruses in autorun files (in Autorun directory,
system INI-files, Windows OS registry). Used only in scanners
for Windows OS.
/UPN – disable the output of the names of the programs used
for packing, conversion or vaccination of the scanned executable
files to the log file by the scanners.
/WA – do not terminate the program until any key is pressed, if
viruses or suspicious objects are found (for console scanners
only).
/? – display short help on the program.
Certain switches allow the "–" character to be used at the end. In such
"negative" form the switch means cancellation of the mode. Such
option can be useful if a certain mode is enabled by default, or with
the settings specified earlier in the configuration file. Here is the list of
the command line switches allowing the "negative" form:
/ADW /AR /CU /DLS /FN /HCK /JOK /HA /IC /ML /MW
/OK /PF /PR /RSK /SD /SO /SP/SS /TB /TM /TS /UP
/WA
For /CU, /IC and /SP switches the "negative" form cancels any
actions specified in the description of these switches. This means that
infected and suspicious objects will be reported but no actions will be
applied.
For /INI and /RP switches the "negative" form is written as /NI
and /NR accordingly.
For /AL and /EX switches the "negative" form is not allowed.
However, specifying one of them cancels the other.
User Manual
159
Appendix A. Scanner Command-Line Switches
If several alternative parameters are found in the command line, the
last of them takes effect.
User Manual
160
Appendix B. The Complete List of Supported OS
Versions
Appendix B. The Complete List of
Supported OS Versions
UNIX system-based OS
Linux glibc 2.7 and later
FreeBSD 7.3 and later
Sun Solaris 10 (only for Intel platform)
Windows OS:
- 32 bit:
Windows 98
Windows Millennium Edition
Windows NT4 (SP6a)
Windows 2000 Professional (SP4 also with Update Rollup 1)
Windows 2000 Server (SP4 also with Update Rollup 1)
Windows XP Professional (also with SP1 and later)
Windows XP Home (also with SP1 and later)
Windows Server 2003 (also with SP1 and later)
Windows Vista (also with SP1 and later)
Windows Server 2008 (also with SP1 and later)
Windows 7
- 64 bit:
Windows Server 2003 (also with SP1 and later)
Windows Vista (also with SP1 and later)
Windows Server 2008 (also with SP1 and later)
Windows Server 2008 R2
Windows 7
User Manual
161
Appendix B. The Complete List of Supported OS
Versions
SelfPROtect, Spider Gate, Office Control, FireWall
- 32 bit:
Windows 2000 Professional (SP4 also with Update Rollup 1)
Windows 2000 Server (SP4 also with Update Rollup 1)
Windows XP Professional (also with SP1 and later)
Windows XP Home (also with SP1 and later)
Windows Server 2003 (also with SP1 and later)
Windows Vista (also with SP1 and later)
Windows Server 2008 (also with SP1 and later)
Windows 7
- 64 bit:
Windows Server 2003 (also with SP1 and later)
Windows Vista (also with SP1 and later)
Windows Server 2008 (also with SP1 and later)
Windows Server 2008 R2
Windows 7
Windows Mobile OS
Windows Mobile 2003
Windows Mobile 2003 Second Edition
Windows Mobile 5.0
Windows Mobile 6.0
Windows Mobile 6.1
Novell NetWare OS
Novell NetWare 3.12
Novell NetWare 3.2
Novell NetWare 4.11
Novell NetWare 4.2
User Manual
162
Appendix B. The Complete List of Supported OS
Versions
Novell NetWare 5.1
Novell NetWare 6.0
Novell NetWare 6.5
Mac OS X
Mac OS 10.4 (Tiger)
Mac OS 10.4 Server (Tiger Server)
Mac OS 10.5 (Leopard)
Mac OS 10.5 Server (Leopard Server)
Mac OS 10.6 (Snow Leopard)
Mac OS 10.6 Server (Snow Leopard Server)
Functionality of Agent for Windows Mobile and Novell
NetWare OS described in Dr.Web Agent for Windows
Mobile and Dr.Web Agent for Novell NetWare user
manuals.
User Manual
163
Appendix C. Detection Methods
Appendix C. Detection Methods
The Dr.Web antivirus solutions use several malicious software
detection methods simultaneously, and that allows them to perform
thorough checks on suspicious files and control software behaviour:
1. The scans begin with signature analysis, which is performed
by comparison of file code segments to the known virus
signatures. A signature is a finite continuous sequence of bytes
which is necessary and sufficient to identify a specific virus. To
reduce the size of the signature dictionary, the Dr.Web
antivirus solutions use signature checksums instead of using
complete signature sequences. Checksums uniquely identify
signatures which preserves correctness of virus detection and
neutralization. The Dr.Web virus databases are composed
so that some entries can be used to detect not just specific
viruses, but whole classes of threats.
2. On completion of signature analysis, the Dr.Web antivirus
solutions use the unique Origins Tracing™ method to
detect new and modified viruses which use the known infection
mechanisms. Thus the Dr.Web users are protected against
such viruses as notorious blackmailer Trojan.Encoder.18 (also
known as gpcode). In addition to detection of new and
modified viruses, the Origins Tracing mechanism allowed to
considerably reduce the number of false triggering of the Dr.
Web heuristics analyser.
3. The detection method used by the heuristics analyser is based
on certain knowledge about attributes that characterize
malicious code. Each attribute or characteristic has weight
coefficient which determines the level of its severity and
reliability. Depending on the sum weight of a file, the heuristics
analyzer calculates the probability of unknown virus infection.
As any system of hypothesis testing under uncertainty, the
heuristics analyser may commit type I or type II errors (omit
viruses or raise false alarms).
While performing any of the abovementioned checks, the Dr.Web
antivirus solutions use the most recent information about known
malicious software. As soon as experts of Dr.Web Virus Laboratory
User Manual
164
Appendix C. Detection Methods
discover new threats, the update for virus signatures, behaviour
characteristics and attributes is issued. In some cases updates can be
issued several times per hour. Therefore even if a brand new virus
passes through the Dr.Web resident guards and penetrates the
system, then after update the virus is detected in the list of processes
and neutralized.
User Manual
165
166
Index
HTTP-traffic
A
66
local resources
64
access restriction
Internet
C
66
local resources
64
actions for objects
Dr.Web for Outlook
SpIDer Guard G3
SpIDer Guard NT
SpIDer Mail
140
73
47
context menu, Agent
25
D
daily job
90
51
Dr.Web for Outlook
anti-spam
Agent
administration
10
interface
23
language
menu
report
F
SpIDer Mail
143
Firewall
description
121
log
anti-virus chek
methods
62
functions
Agent
50
10
Dr. Web Enterprise Security Suite
8
31
arguments, command line
62
63
settings
164
anti-virus software
B
150
23
Dr.Web for Outlook
updating
8
event log, Dr.Web for Outlook
anti-spam
status
140
E
25
start, stop
138
151
Dr.Web®, anti-virus
31
164
143
reactions
24
functions
40
detection methods
126
administrator's messages
centralized schedule
155
H
hourly job
38
blocking
User Manual
167
Index
HTTP-monitor
66
mobile mode
HTTP-traffic, blocking
66
47
mode
mobile
I
47
Server interaction
informational messages
51
file
J
68
HTTP
job
daily
mail
40
every N minutes
hourly
local
44
45
weekly
41
26
43
O
43
startup
113
monthly job
37
monthly
66
system
38
Office Control
64
P
popup windows
L
language, setting
31
Q
level of detail, log
35
quarantine
local resources, blocking
local schedule
functions
64
51
56
interface setup
37
57
management
log
Dr.Web for Outlook
150, 151
SpIDer Guard G3
80
SpIDer Guard NT
95
SpIDer Mail
logging
131
M
messages
113
32
properties
59
58
R
report
Dr.Web for Outlook
35
mail monitor
36
monitor
151
SpIDer Guard G3
80
SpIDer Guard NT
95
SpIDer Mail
run mode
131
36
User Manual
168
Index
Scanner
S
55
startup job
scanner
55
statistics
schedule
centralized
local
47
37
status, anti-virus components
connection
33
run mode
anti-virus software
time
23
66
155
synchronization
36
shutdown, Agent
50
switches
command line
Server
SpIDer Gate
45
49
31
32
system monitoring
system requirements
26
11
SpIDer Guard
G3
T
69
notifications
NT
76
82
settings
updating
SpIDer Guard G3
77
reactions
report
73
80
70
SpIDer Guard NT
report
SpIDer Mail
90
V
virus
massages
50
32
virus chek
methods
164
95
113
reactions
report
31
databases, status
scan mode
reactions
23
U
68
exclusions
taskbar
126
W
weekly job
41
131
start
Agent
23
User Manual
© Doctor Web, 2004-2011