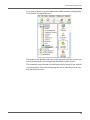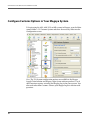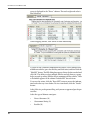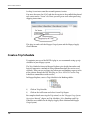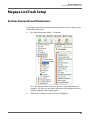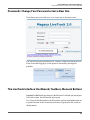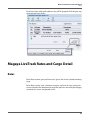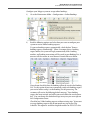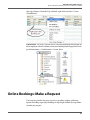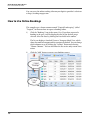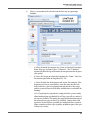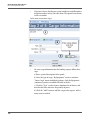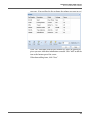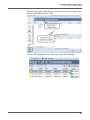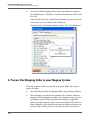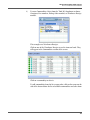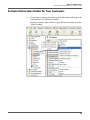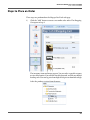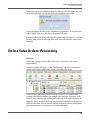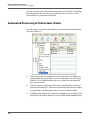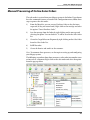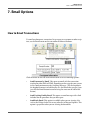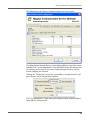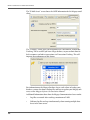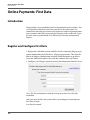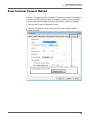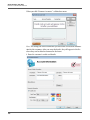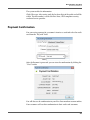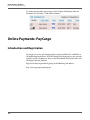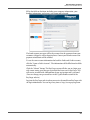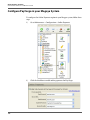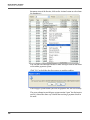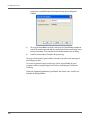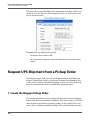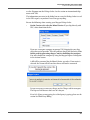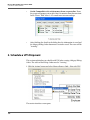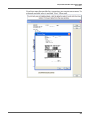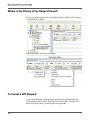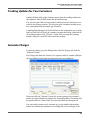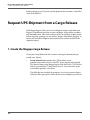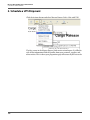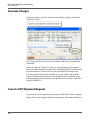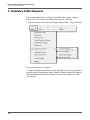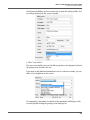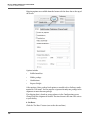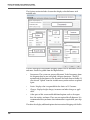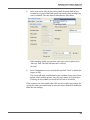
1
MagayaSof
t
war
e
Communi
cat
i
onsManual
Gui
det
o
TheMagayaNet
wor
k
TheMagayaCommuni
cat
i
onSer
ver
USCust
omsAppl
i
cat
i
ons
MagayaLi
veTr
ackOnl
i
neTr
acki
ng
MagayaOnTheGoRemot
eAccess
MagayaI
NTTRAOceanCar
r
i
er
sMessages
Onl
i
nePayment
s:
Fi
r
stDat
a&PayCar
go
andmor
e
Magaya Software Communications Manual
Table of Contents
1. How to Use This Manual . . . . . . . . . . . . . . . . . . . . . . . . . . . . . . . . . . . . . . . . . . . . . . . . 9
How This Manual is Organized . . . . . . . . . . . . . . . . . . . . . . . . . . . . . . . . . . . . . . . . 9
Where to Find Help . . . . . . . . . . . . . . . . . . . . . . . . . . . . . . . . . . . . . . . . . . . . . . . . . 10
2. The Magaya Network . . . . . . . . . . . . . . . . . . . . . . . . . . . . . . . . . . . . . . . . . . . . . . . . . . 11
Introduction . . . . . . . . . . . . . . . . . . . . . . . . . . . . . . . . . . . . . . . . . . . . . . . . . . . . . . . 11
The Magaya Community Overview . . . . . . . . . . . . . . . . . . . . . . . . . . . . . . . . . . . . 13
The Communication Center . . . . . . . . . . . . . . . . . . . . . . . . . . . . . . . . . . . . . . . . . . . 15
Overview: System-to-System Transactions . . . . . . . . . . . . . . . . . . . . . . . . . . . . . . . 16
Invitations . . . . . . . . . . . . . . . . . . . . . . . . . . . . . . . . . . . . . . . . . . . . . . . . . . . . . . . . 16
Send a Transaction from the Send Button . . . . . . . . . . . . . . . . . . . . . . . . . . . . . . . . 19
Where is the File Saved? . . . . . . . . . . . . . . . . . . . . . . . . . . . . . . . . . . . . . . . . . . . . . 21
Notifications . . . . . . . . . . . . . . . . . . . . . . . . . . . . . . . . . . . . . . . . . . . . . . . . . . . . . . . 21
Send a Transaction from the Chat Screen . . . . . . . . . . . . . . . . . . . . . . . . . . . . . . . . 23
Working with Files . . . . . . . . . . . . . . . . . . . . . . . . . . . . . . . . . . . . . . . . . . . . . . . . . 26
Configure Outgoing Messages . . . . . . . . . . . . . . . . . . . . . . . . . . . . . . . . . . . . . . . . . 31
Configure Messages from Chat Screen . . . . . . . . . . . . . . . . . . . . . . . . . . . . . . . . . . 33
Configure Incoming Messages . . . . . . . . . . . . . . . . . . . . . . . . . . . . . . . . . . . . . . . . 34
3. U.S. Customs Applications . . . . . . . . . . . . . . . . . . . . . . . . . . . . . . . . . . . . . . . . . . . . . . 41
Configure Customs Options in Your Magaya System . . . . . . . . . . . . . . . . . . . . . . 42
Customs Regulations for Exports: Magaya AES . . . . . . . . . . . . . . . . . . . . . . . . 46
Getting Started . . . . . . . . . . . . . . . . . . . . . . . . . . . . . . . . . . . . . . . . . . . . . . . . . . 46
Filing Exports with Magaya AES . . . . . . . . . . . . . . . . . . . . . . . . . . . . . . . . . . . . 47
AES Results . . . . . . . . . . . . . . . . . . . . . . . . . . . . . . . . . . . . . . . . . . . . . . . . . . . . 62
Customs Import Regulations: Magaya AMS . . . . . . . . . . . . . . . . . . . . . . . . . . . 64
Introduction to Magaya AMS for Ocean Imports . . . . . . . . . . . . . . . . . . . . . . . . 64
Getting Started . . . . . . . . . . . . . . . . . . . . . . . . . . . . . . . . . . . . . . . . . . . . . . . . . . 64
Magaya Ocean AMS Procedures Overview . . . . . . . . . . . . . . . . . . . . . . . . . . . . 65
Send a Manifest . . . . . . . . . . . . . . . . . . . . . . . . . . . . . . . . . . . . . . . . . . . . . . . . . . 66
File Vessel Departure Message . . . . . . . . . . . . . . . . . . . . . . . . . . . . . . . . . . . . . . 69
File Vessel Arrival Message . . . . . . . . . . . . . . . . . . . . . . . . . . . . . . . . . . . . . . . . 71
Amendments: To Change a Manifest . . . . . . . . . . . . . . . . . . . . . . . . . . . . . . . . . 71
Move In-Bond Cargo . . . . . . . . . . . . . . . . . . . . . . . . . . . . . . . . . . . . . . . . . . . . . 74
Supplementary In-Bond Movement . . . . . . . . . . . . . . . . . . . . . . . . . . . . . . . . . . 82
Permit to Transfer Goods . . . . . . . . . . . . . . . . . . . . . . . . . . . . . . . . . . . . . . . . . . 84
View Results/Messages . . . . . . . . . . . . . . . . . . . . . . . . . . . . . . . . . . . . . . . . . . . . 86
Other Ocean AMS Procedures . . . . . . . . . . . . . . . . . . . . . . . . . . . . . . . . . . . . . . 87
Magaya Air AMS Overview . . . . . . . . . . . . . . . . . . . . . . . . . . . . . . . . . . . . . . . . . 90
File an Air Waybill . . . . . . . . . . . . . . . . . . . . . . . . . . . . . . . . . . . . . . . . . . . . . . . 91
File a Departure Notice . . . . . . . . . . . . . . . . . . . . . . . . . . . . . . . . . . . . . . . . . . . . 93
1
Query Shipment Status . . . . . . . . . . . . . . . . . . . . . . . . . . . . . . . . . . . . . . . . . . . . 95
Notify Customs of the Status of Goods . . . . . . . . . . . . . . . . . . . . . . . . . . . . . . . 96
View Air AMS Messages . . . . . . . . . . . . . . . . . . . . . . . . . . . . . . . . . . . . . . . . . . 97
Air AMS Extra Information . . . . . . . . . . . . . . . . . . . . . . . . . . . . . . . . . . . . . . . . 99
ISF: Vessel Imports . . . . . . . . . . . . . . . . . . . . . . . . . . . . . . . . . . . . . . . . . . . . . . . . 100
Magaya ISF Introduction . . . . . . . . . . . . . . . . . . . . . . . . . . . . . . . . . . . . . . . . . . 100
Getting Started . . . . . . . . . . . . . . . . . . . . . . . . . . . . . . . . . . . . . . . . . . . . . . . . . . 100
File ISF . . . . . . . . . . . . . . . . . . . . . . . . . . . . . . . . . . . . . . . . . . . . . . . . . . . . . . . . 102
View Results . . . . . . . . . . . . . . . . . . . . . . . . . . . . . . . . . . . . . . . . . . . . . . . . . . . . 108
4. Magaya Ocean Carriers Interface with INTTRA . . . . . . . . . . . . . . . . . . . . . . . . . . . . 111
Introduction: Magaya Ocean Carriers Interface with INTTRA . . . . . . . . . . . . . . . . 111
Activate Magaya Ocean Carriers Interface Plug-in . . . . . . . . . . . . . . . . . . . . . . . . . 111
Create a Trip Schedule . . . . . . . . . . . . . . . . . . . . . . . . . . . . . . . . . . . . . . . . . . . . . . . 112
Send a Booking Request to the Carrier from the Trip Schedule . . . . . . . . . . . . . . . 113
Send Shipping Instructions to the Carrier . . . . . . . . . . . . . . . . . . . . . . . . . . . . . . . . 116
View Ocean Carrier Messages . . . . . . . . . . . . . . . . . . . . . . . . . . . . . . . . . . . . . . . . . 121
Track Shipment Events . . . . . . . . . . . . . . . . . . . . . . . . . . . . . . . . . . . . . . . . . . . . . . 123
Configuration: Link Containers . . . . . . . . . . . . . . . . . . . . . . . . . . . . . . . . . . . . . . . . 124
5. Magaya LiveTrack . . . . . . . . . . . . . . . . . . . . . . . . . . . . . . . . . . . . . . . . . . . . . . . . . . . . 127
Introduction to LiveTrack: Getting Started . . . . . . . . . . . . . . . . . . . . . . . . . . . . . . . 127
How to Access Tracking . . . . . . . . . . . . . . . . . . . . . . . . . . . . . . . . . . . . . . . . . . . . . 129
Add LiveTrack to your Website . . . . . . . . . . . . . . . . . . . . . . . . . . . . . . . . . . . . . . . 129
Resources . . . . . . . . . . . . . . . . . . . . . . . . . . . . . . . . . . . . . . . . . . . . . . . . . . . . . . . . . 129
Add Tracking to Your Website . . . . . . . . . . . . . . . . . . . . . . . . . . . . . . . . . . . . . . 130
Magaya LiveTrack Setup . . . . . . . . . . . . . . . . . . . . . . . . . . . . . . . . . . . . . . . . . . . 131
Set User Passwords and Permissions . . . . . . . . . . . . . . . . . . . . . . . . . . . . . . . . . 131
Enable Customers to Manage their own LiveTrack Accounts . . . . . . . . . . . . . . 135
Invite a Customer to Use LiveTrack . . . . . . . . . . . . . . . . . . . . . . . . . . . . . . . . . . 138
Receive Notifications . . . . . . . . . . . . . . . . . . . . . . . . . . . . . . . . . . . . . . . . . . . . . 139
Change a User’s Access . . . . . . . . . . . . . . . . . . . . . . . . . . . . . . . . . . . . . . . . . . . 141
Disable a User’s Access . . . . . . . . . . . . . . . . . . . . . . . . . . . . . . . . . . . . . . . . . . . 141
Login and Navigate the LiveTrack Interface . . . . . . . . . . . . . . . . . . . . . . . . . . . 142
Where to Find LiveTrack and Log In . . . . . . . . . . . . . . . . . . . . . . . . . . . . . . . . . 142
Passwords: Change Your Password or Get a New One . . . . . . . . . . . . . . . . . . . 145
The LiveTrack Interface: Dashboard, Toolbars, Menus & Buttons . . . . . . . . . . 145
Working with Transactions in Magaya LiveTrack . . . . . . . . . . . . . . . . . . . . . . . 151
Magaya LiveTrack Rates and Cargo Detail . . . . . . . . . . . . . . . . . . . . . . . . . . . . 153
Rates . . . . . . . . . . . . . . . . . . . . . . . . . . . . . . . . . . . . . . . . . . . . . . . . . . . . . . . . . . 153
Cargo Detail . . . . . . . . . . . . . . . . . . . . . . . . . . . . . . . . . . . . . . . . . . . . . . . . . . . . 154
Online Bookings: Getting Started . . . . . . . . . . . . . . . . . . . . . . . . . . . . . . . . . . . . 155
Online Bookings: Setup and Processing . . . . . . . . . . . . . . . . . . . . . . . . . . . . . . . 156
Set Up Online Bookings in Your Magaya System . . . . . . . . . . . . . . . . . . . . . . . 156
Process Online Booking Requests in Your Magaya Software . . . . . . . . . . . . . . 160
Online Bookings: Make a Request . . . . . . . . . . . . . . . . . . . . . . . . . . . . . . . . . . . 161
2
How to Use Online Bookings . . . . . . . . . . . . . . . . . . . . . . . . . . . . . . . . . . . . . . . 162
Online Pickup Orders: Getting Started . . . . . . . . . . . . . . . . . . . . . . . . . . . . . . . . 167
Introduction to Online Pickup Orders . . . . . . . . . . . . . . . . . . . . . . . . . . . . . . . . . 167
Getting Started . . . . . . . . . . . . . . . . . . . . . . . . . . . . . . . . . . . . . . . . . . . . . . . . . . 167
Online Pickup Orders: Setup and Process . . . . . . . . . . . . . . . . . . . . . . . . . . . . . . 169
1. Set Up Online Pickup Orders in your Magaya System . . . . . . . . . . . . . . . . . . 169
2. Process Online Pickup Orders in your Magaya System . . . . . . . . . . . . . . . . . 170
Online Pickup Orders: Make a Request . . . . . . . . . . . . . . . . . . . . . . . . . . . . . . . 172
How to Use Online Pickup Orders . . . . . . . . . . . . . . . . . . . . . . . . . . . . . . . . . . . 172
Online Cargo Releases: Make a Request . . . . . . . . . . . . . . . . . . . . . . . . . . . . . . . 176
Online Shipping Orders: Getting Started . . . . . . . . . . . . . . . . . . . . . . . . . . . . . . 179
Introduction . . . . . . . . . . . . . . . . . . . . . . . . . . . . . . . . . . . . . . . . . . . . . . . . . . . . . 179
Online Cargo Releases . . . . . . . . . . . . . . . . . . . . . . . . . . . . . . . . . . . . . . . . . . . . 179
Getting Started . . . . . . . . . . . . . . . . . . . . . . . . . . . . . . . . . . . . . . . . . . . . . . . . . . 179
Online Shipping Orders: Setup and Process . . . . . . . . . . . . . . . . . . . . . . . . . . . . 180
1. Setup Online Shipping Orders . . . . . . . . . . . . . . . . . . . . . . . . . . . . . . . . . . . . 180
2. Process the Shipping Order in your Magaya System . . . . . . . . . . . . . . . . . . . 182
Online Shipping Orders: Make a Request . . . . . . . . . . . . . . . . . . . . . . . . . . . . . 183
How to Use Online Shipping Orders . . . . . . . . . . . . . . . . . . . . . . . . . . . . . . . . . 183
Online Sales Orders: Getting Started . . . . . . . . . . . . . . . . . . . . . . . . . . . . . . . . . 190
Online Sales Orders: Setup . . . . . . . . . . . . . . . . . . . . . . . . . . . . . . . . . . . . . . . . . 191
Configure Your Magaya System . . . . . . . . . . . . . . . . . . . . . . . . . . . . . . . . . . . . . 191
Activate Online Sales Orders for Your Customers . . . . . . . . . . . . . . . . . . . . . . . 195
Notifications . . . . . . . . . . . . . . . . . . . . . . . . . . . . . . . . . . . . . . . . . . . . . . . . . . . . 196
Managing the WebTrack User Data . . . . . . . . . . . . . . . . . . . . . . . . . . . . . . . . . . 197
Inventory Organizer . . . . . . . . . . . . . . . . . . . . . . . . . . . . . . . . . . . . . . . . . . . . . . . 201
Introduction . . . . . . . . . . . . . . . . . . . . . . . . . . . . . . . . . . . . . . . . . . . . . . . . . . . . . 201
Create Categories . . . . . . . . . . . . . . . . . . . . . . . . . . . . . . . . . . . . . . . . . . . . . . . . 201
Add Inventory Items . . . . . . . . . . . . . . . . . . . . . . . . . . . . . . . . . . . . . . . . . . . . . 204
Add Photographs to Items . . . . . . . . . . . . . . . . . . . . . . . . . . . . . . . . . . . . . . . . . . 205
Assign Items to Clients . . . . . . . . . . . . . . . . . . . . . . . . . . . . . . . . . . . . . . . . . . . . 207
Add Resale Items . . . . . . . . . . . . . . . . . . . . . . . . . . . . . . . . . . . . . . . . . . . . . . . . 208
Steps . . . . . . . . . . . . . . . . . . . . . . . . . . . . . . . . . . . . . . . . . . . . . . . . . . . . . . . . . . 208
Handling of Expiration Dates for Items . . . . . . . . . . . . . . . . . . . . . . . . . . . . . . . 210
View Resale Items in Lists . . . . . . . . . . . . . . . . . . . . . . . . . . . . . . . . . . . . . . . . . 213
Convert an Existing Inventory Item into a Resale Item . . . . . . . . . . . . . . . . . . . 215
Online Sales Orders: How to Place an Order . . . . . . . . . . . . . . . . . . . . . . . . . . . . 216
Steps to Place an Order . . . . . . . . . . . . . . . . . . . . . . . . . . . . . . . . . . . . . . . . . . . . 217
Online Sales Orders: Processing . . . . . . . . . . . . . . . . . . . . . . . . . . . . . . . . . . . . . 221
Automated Processing of Online Sales Orders . . . . . . . . . . . . . . . . . . . . . . . . . . 222
Manual Processing of Online Sales Orders . . . . . . . . . . . . . . . . . . . . . . . . . . . . . 223
System Alert . . . . . . . . . . . . . . . . . . . . . . . . . . . . . . . . . . . . . . . . . . . . . . . . . . . . 224
6. Transaction Tracking . . . . . . . . . . . . . . . . . . . . . . . . . . . . . . . . . . . . . . . . . . . . . . . . . . 227
Transaction Tracking: Introduction . . . . . . . . . . . . . . . . . . . . . . . . . . . . . . . . . . . . . 227
Getting Started . . . . . . . . . . . . . . . . . . . . . . . . . . . . . . . . . . . . . . . . . . . . . . . . . . . . . 228
3
Transaction Tracking: Set Up . . . . . . . . . . . . . . . . . . . . . . . . . . . . . . . . . . . . . . . . . 229
How to Send Transaction Tracking Messages to Your Customers . . . . . . . . . . . . . 234
Set Transaction Tracking Per Customer . . . . . . . . . . . . . . . . . . . . . . . . . . . . . . . . . 236
7. Email Options . . . . . . . . . . . . . . . . . . . . . . . . . . . . . . . . . . . . . . . . . . . . . . . . . . . . . . . . 239
How to Email Transactions . . . . . . . . . . . . . . . . . . . . . . . . . . . . . . . . . . . . . . . . . . . 239
Configure Outgoing Email Messages . . . . . . . . . . . . . . . . . . . . . . . . . . . . . . . . . . . 240
Email Templates . . . . . . . . . . . . . . . . . . . . . . . . . . . . . . . . . . . . . . . . . . . . . . . . . . 244
Introduction . . . . . . . . . . . . . . . . . . . . . . . . . . . . . . . . . . . . . . . . . . . . . . . . . . . . . . . 244
Add Dynamic Fields . . . . . . . . . . . . . . . . . . . . . . . . . . . . . . . . . . . . . . . . . . . . . . . . 250
Send Email to Contacts . . . . . . . . . . . . . . . . . . . . . . . . . . . . . . . . . . . . . . . . . . . . . . 254
Email Signatures . . . . . . . . . . . . . . . . . . . . . . . . . . . . . . . . . . . . . . . . . . . . . . . . . . . 254
8. Magaya Communication Server . . . . . . . . . . . . . . . . . . . . . . . . . . . . . . . . . . . . . . . . . . 257
Introduction . . . . . . . . . . . . . . . . . . . . . . . . . . . . . . . . . . . . . . . . . . . . . . . . . . . . . . . 257
Network Configuration . . . . . . . . . . . . . . . . . . . . . . . . . . . . . . . . . . . . . . . . . . . . . . 257
Magaya Communication Server User Interface . . . . . . . . . . . . . . . . . . . . . . . . . . . . 258
9. Online Payments . . . . . . . . . . . . . . . . . . . . . . . . . . . . . . . . . . . . . . . . . . . . . . . . . . . . . . 265
Online Payments: Introduction . . . . . . . . . . . . . . . . . . . . . . . . . . . . . . . . . . . . . . . . 265
Getting Started . . . . . . . . . . . . . . . . . . . . . . . . . . . . . . . . . . . . . . . . . . . . . . . . . . . . . 265
Online Payments: First Data . . . . . . . . . . . . . . . . . . . . . . . . . . . . . . . . . . . . . . . . 266
Introduction . . . . . . . . . . . . . . . . . . . . . . . . . . . . . . . . . . . . . . . . . . . . . . . . . . . . . . . 266
Register and Configure First Data . . . . . . . . . . . . . . . . . . . . . . . . . . . . . . . . . . . . . . 266
Enter Customer Payment Method . . . . . . . . . . . . . . . . . . . . . . . . . . . . . . . . . . . . . . 267
Payment Confirmation . . . . . . . . . . . . . . . . . . . . . . . . . . . . . . . . . . . . . . . . . . . . . . . 269
Online Payments: PayCargo . . . . . . . . . . . . . . . . . . . . . . . . . . . . . . . . . . . . . . . . . 270
Introduction and Registration . . . . . . . . . . . . . . . . . . . . . . . . . . . . . . . . . . . . . . . . . 270
Configure PayCargo in your Magaya System . . . . . . . . . . . . . . . . . . . . . . . . . . . . . 272
Send Invoices to PayCargo . . . . . . . . . . . . . . . . . . . . . . . . . . . . . . . . . . . . . . . . . . . 273
Notifying Customers . . . . . . . . . . . . . . . . . . . . . . . . . . . . . . . . . . . . . . . . . . . . . . . . 275
Create a System Alert . . . . . . . . . . . . . . . . . . . . . . . . . . . . . . . . . . . . . . . . . . . . . . . 275
How You Use PayCargo.com . . . . . . . . . . . . . . . . . . . . . . . . . . . . . . . . . . . . . . . . . 275
How Your Customers Use PayCargo.com . . . . . . . . . . . . . . . . . . . . . . . . . . . . . . . 278
10. Magaya POD Mobile . . . . . . . . . . . . . . . . . . . . . . . . . . . . . . . . . . . . . . . . . . . . . . . . . . 285
POD Mobile: Introduction . . . . . . . . . . . . . . . . . . . . . . . . . . . . . . . . . . . . . . . . . . . . 285
POD Mobile: Getting Started . . . . . . . . . . . . . . . . . . . . . . . . . . . . . . . . . . . . . . . . . 285
Add POD Mobile Users . . . . . . . . . . . . . . . . . . . . . . . . . . . . . . . . . . . . . . . . . . . . . . 286
Create Tasks . . . . . . . . . . . . . . . . . . . . . . . . . . . . . . . . . . . . . . . . . . . . . . . . . . . . . . . 289
Perform POD Tasks on Handheld Units . . . . . . . . . . . . . . . . . . . . . . . . . . . . . . . . . 290
After the Deliveries are Completed . . . . . . . . . . . . . . . . . . . . . . . . . . . . . . . . . . . . . 294
Perform POD Tasks on a Smart Phone . . . . . . . . . . . . . . . . . . . . . . . . . . . . . . . . . . 297
Get the App . . . . . . . . . . . . . . . . . . . . . . . . . . . . . . . . . . . . . . . . . . . . . . . . . . . . . . . 297
Log into the App . . . . . . . . . . . . . . . . . . . . . . . . . . . . . . . . . . . . . . . . . . . . . . . . . . . 298
Select Tasks and Dispatch Items . . . . . . . . . . . . . . . . . . . . . . . . . . . . . . . . . . . . . . . 299
4
Collect the Signature . . . . . . . . . . . . . . . . . . . . . . . . . . . . . . . . . . . . . . . . . . . . . . . . 304
11. Magaya SmartBorder ABI . . . . . . . . . . . . . . . . . . . . . . . . . . . . . . . . . . . . . . . . . . . . . 307
Getting Started: Register with SmartBorder.com . . . . . . . . . . . . . . . . . . . . . . . . . . 307
Create Items & Services . . . . . . . . . . . . . . . . . . . . . . . . . . . . . . . . . . . . . . . . . . . . . 307
Configure ABI . . . . . . . . . . . . . . . . . . . . . . . . . . . . . . . . . . . . . . . . . . . . . . . . . . . . . 308
File ABI Transactions . . . . . . . . . . . . . . . . . . . . . . . . . . . . . . . . . . . . . . . . . . . . . . . 312
12. VIN Decoder Plug-In . . . . . . . . . . . . . . . . . . . . . . . . . . . . . . . . . . . . . . . . . . . . . . . . . . 315
VIN Decoder: Introduction . . . . . . . . . . . . . . . . . . . . . . . . . . . . . . . . . . . . . . . . . . . 315
VIN Decoder: Getting Started . . . . . . . . . . . . . . . . . . . . . . . . . . . . . . . . . . . . . . . . . 316
Configure: Enter Default VIN Data . . . . . . . . . . . . . . . . . . . . . . . . . . . . . . . . . . . . . 316
Scan and Decode a VIN with WMS Mobile . . . . . . . . . . . . . . . . . . . . . . . . . . . . . . 318
Enter and Decode a VIN on the PC . . . . . . . . . . . . . . . . . . . . . . . . . . . . . . . . . . . . . 320
Include a Vehicle in a Shipment . . . . . . . . . . . . . . . . . . . . . . . . . . . . . . . . . . . . . . . 322
13. Track2Go Mobile App . . . . . . . . . . . . . . . . . . . . . . . . . . . . . . . . . . . . . . . . . . . . . . . . . 325
Track2Go Mobile App: Introduction . . . . . . . . . . . . . . . . . . . . . . . . . . . . . . . . . . . . 325
Getting Started . . . . . . . . . . . . . . . . . . . . . . . . . . . . . . . . . . . . . . . . . . . . . . . . . . . . . 325
The Interface . . . . . . . . . . . . . . . . . . . . . . . . . . . . . . . . . . . . . . . . . . . . . . . . . . . . . . 326
Find Transactions . . . . . . . . . . . . . . . . . . . . . . . . . . . . . . . . . . . . . . . . . . . . . . . . . . . 327
Details . . . . . . . . . . . . . . . . . . . . . . . . . . . . . . . . . . . . . . . . . . . . . . . . . . . . . . . . . . . 328
Common Error Messages . . . . . . . . . . . . . . . . . . . . . . . . . . . . . . . . . . . . . . . . . . . . . 331
14. Magaya OnTheGo . . . . . . . . . . . . . . . . . . . . . . . . . . . . . . . . . . . . . . . . . . . . . . . . . . . . 333
Magaya OnTheGo: Introduction . . . . . . . . . . . . . . . . . . . . . . . . . . . . . . . . . . . . . . . 333
Getting Started . . . . . . . . . . . . . . . . . . . . . . . . . . . . . . . . . . . . . . . . . . . . . . . . . . . . . 333
Configure Your System for Magaya OnTheGo Access . . . . . . . . . . . . . . . . . . . . . 333
Configure Magaya OnTheGo . . . . . . . . . . . . . . . . . . . . . . . . . . . . . . . . . . . . . . . . . 334
Using Magaya OnTheGo . . . . . . . . . . . . . . . . . . . . . . . . . . . . . . . . . . . . . . . . . . . . . 336
15: Magaya Express Link . . . . . . . . . . . . . . . . . . . . . . . . . . . . . . . . . . . . . . . . . . . . . . . . . 337
Express Link: Getting Started . . . . . . . . . . . . . . . . . . . . . . . . . . . . . . . . . . . . . . . 337
Configure Express Link . . . . . . . . . . . . . . . . . . . . . . . . . . . . . . . . . . . . . . . . . . . 337
UPS and Express Link Articles . . . . . . . . . . . . . . . . . . . . . . . . . . . . . . . . . . . . . . 338
FedEx and Express Link Articles . . . . . . . . . . . . . . . . . . . . . . . . . . . . . . . . . . . . 338
Additional Details . . . . . . . . . . . . . . . . . . . . . . . . . . . . . . . . . . . . . . . . . . . . . . . . 338
Configure Magaya Express Link . . . . . . . . . . . . . . . . . . . . . . . . . . . . . . . . . . . . . 339
Enable the Plug-In . . . . . . . . . . . . . . . . . . . . . . . . . . . . . . . . . . . . . . . . . . . . . . . . 339
Complete the Registration Wizard for UPS . . . . . . . . . . . . . . . . . . . . . . . . . . . . 340
Complete the Registration Wizard for FedEx . . . . . . . . . . . . . . . . . . . . . . . . . . . 343
Register without an Account . . . . . . . . . . . . . . . . . . . . . . . . . . . . . . . . . . . . . . . . 344
Configure Express Link Accounting . . . . . . . . . . . . . . . . . . . . . . . . . . . . . . . . . . 345
Configure Labels . . . . . . . . . . . . . . . . . . . . . . . . . . . . . . . . . . . . . . . . . . . . . . . . . 345
Configure Shipment . . . . . . . . . . . . . . . . . . . . . . . . . . . . . . . . . . . . . . . . . . . . . . 346
Configure Tracking . . . . . . . . . . . . . . . . . . . . . . . . . . . . . . . . . . . . . . . . . . . . . . . 346
5
Manage Multiple Accounts . . . . . . . . . . . . . . . . . . . . . . . . . . . . . . . . . . . . . . . . . 349
Prepare Data Before Shipping . . . . . . . . . . . . . . . . . . . . . . . . . . . . . . . . . . . . . . . 349
Request UPS Shipment from a Pickup Order . . . . . . . . . . . . . . . . . . . . . . . . . . . 350
1. Create the Magaya Pickup Order . . . . . . . . . . . . . . . . . . . . . . . . . . . . . . . . . . 350
2. Schedule a UPS Shipment . . . . . . . . . . . . . . . . . . . . . . . . . . . . . . . . . . . . . . . . 352
Get Rates . . . . . . . . . . . . . . . . . . . . . . . . . . . . . . . . . . . . . . . . . . . . . . . . . . . . . . . 357
Print Labels . . . . . . . . . . . . . . . . . . . . . . . . . . . . . . . . . . . . . . . . . . . . . . . . . . . . . 358
Where is the History of my Request Saved? . . . . . . . . . . . . . . . . . . . . . . . . . . . . 360
To Cancel a UPS Request . . . . . . . . . . . . . . . . . . . . . . . . . . . . . . . . . . . . . . . . . . 360
Tracking Updates for Your Customers . . . . . . . . . . . . . . . . . . . . . . . . . . . . . . . . 361
Generate Charges . . . . . . . . . . . . . . . . . . . . . . . . . . . . . . . . . . . . . . . . . . . . . . . . 361
Request UPS Shipment from a Cargo Release . . . . . . . . . . . . . . . . . . . . . . . . . . 362
1. Create the Magaya Cargo Release . . . . . . . . . . . . . . . . . . . . . . . . . . . . . . . . . 362
2. Schedule a UPS Shipment . . . . . . . . . . . . . . . . . . . . . . . . . . . . . . . . . . . . . . . . 364
Get Rates . . . . . . . . . . . . . . . . . . . . . . . . . . . . . . . . . . . . . . . . . . . . . . . . . . . . . . . 368
Print Labels . . . . . . . . . . . . . . . . . . . . . . . . . . . . . . . . . . . . . . . . . . . . . . . . . . . . . 370
Tracking . . . . . . . . . . . . . . . . . . . . . . . . . . . . . . . . . . . . . . . . . . . . . . . . . . . . . . . 371
Generate Charges . . . . . . . . . . . . . . . . . . . . . . . . . . . . . . . . . . . . . . . . . . . . . . . . 372
Cancel a UPS Shipment Request . . . . . . . . . . . . . . . . . . . . . . . . . . . . . . . . . . . . 372
Request a FedEx Shipment from a Pickup Order . . . . . . . . . . . . . . . . . . . . . . . 373
1. Create the Magaya Pickup Order . . . . . . . . . . . . . . . . . . . . . . . . . . . . . . . . . . 374
2. Schedule a FedEx Shipment . . . . . . . . . . . . . . . . . . . . . . . . . . . . . . . . . . . . . . 376
Print Labels . . . . . . . . . . . . . . . . . . . . . . . . . . . . . . . . . . . . . . . . . . . . . . . . . . . . . 379
Cancel a FedEx Request . . . . . . . . . . . . . . . . . . . . . . . . . . . . . . . . . . . . . . . . . . . 379
Generate Charges . . . . . . . . . . . . . . . . . . . . . . . . . . . . . . . . . . . . . . . . . . . . . . . . 379
Express Link International Shipment with FedEx . . . . . . . . . . . . . . . . . . . . . . . 380
1. Create the Shipment . . . . . . . . . . . . . . . . . . . . . . . . . . . . . . . . . . . . . . . . . . . . 380
2. Schedule the FedEx Shipment with Express Link . . . . . . . . . . . . . . . . . . . . . 381
Messages . . . . . . . . . . . . . . . . . . . . . . . . . . . . . . . . . . . . . . . . . . . . . . . . . . . . . . . 386
FedEx Close of Day Procedure . . . . . . . . . . . . . . . . . . . . . . . . . . . . . . . . . . . . . . . 387
Introduction . . . . . . . . . . . . . . . . . . . . . . . . . . . . . . . . . . . . . . . . . . . . . . . . . . . . . 387
Using the Close of Day Wizard . . . . . . . . . . . . . . . . . . . . . . . . . . . . . . . . . . . . . 388
Express Link International Shipments with UPS . . . . . . . . . . . . . . . . . . . . . . . . 390
1. Create the Shipment . . . . . . . . . . . . . . . . . . . . . . . . . . . . . . . . . . . . . . . . . . . . 390
2. Schedule the UPS Shipment with Express Link . . . . . . . . . . . . . . . . . . . . . . . 391
Express Link Appendix Topics . . . . . . . . . . . . . . . . . . . . . . . . . . . . . . . . . . . . . . . 393
Add Related Columns . . . . . . . . . . . . . . . . . . . . . . . . . . . . . . . . . . . . . . . . . . . . . 393
Matching Package Types in Express Link . . . . . . . . . . . . . . . . . . . . . . . . . . . . . 394
Third-Party Billing in Magaya Express Link . . . . . . . . . . . . . . . . . . . . . . . . . . . 396
Add the Account to the Customer Profile . . . . . . . . . . . . . . . . . . . . . . . . . . . . . . 396
Handle Returns with Magaya Express Link . . . . . . . . . . . . . . . . . . . . . . . . . . . . 397
16. Denied Party Screening . . . . . . . . . . . . . . . . . . . . . . . . . . . . . . . . . . . . . . . . . . . . . . . . 401
Denied Party Screening: Introduction . . . . . . . . . . . . . . . . . . . . . . . . . . . . . . . . . . . 401
Getting Started . . . . . . . . . . . . . . . . . . . . . . . . . . . . . . . . . . . . . . . . . . . . . . . . . . . . . 402
Configure . . . . . . . . . . . . . . . . . . . . . . . . . . . . . . . . . . . . . . . . . . . . . . . . . . . . . . . . . 402
6
Assign Roles to Users . . . . . . . . . . . . . . . . . . . . . . . . . . . . . . . . . . . . . . . . . . . . . . . 405
Screen Entities and Vessels in Lists . . . . . . . . . . . . . . . . . . . . . . . . . . . . . . . . . . . . 405
Screen Entities in a Shipment . . . . . . . . . . . . . . . . . . . . . . . . . . . . . . . . . . . . . . . . . 407
Transaction Log of Screenings . . . . . . . . . . . . . . . . . . . . . . . . . . . . . . . . . . . . . . . . 409
Index
7
8
1. HOW TO USE THIS MANUAL
HOW THIS MANUAL IS ORGANIZED
1. How to Use This Manual
Welcome to the Magaya Software Communications Manual.
This manual is designed to teach you how to use the communications features
in the software such as the Magaya Network, the Magaya Communication
Server, remote access with Magaya OnTheGo, the interactive online tracking
called Magaya LiveTrack, and more, including other features for communicating with US Customs.
Magaya software is designed for logistics providers, freight forwarders,
NVOCC’s, consolidators, forwarding agents, couriers, warehouse providers
and others in the logistics industry.
How This Manual is Organized
This manual is designed to be task oriented. You can skip to any topic you need
and get step-by-step procedures for the communications features available in
Magaya software. In the PDF, you can also click on any word in the Index to go
directly to that page. This manual is organized into the following sections:
•
The Magaya Network: Send and receive Magaya transactions and documents to your Magaya system to other Magaya users, search the Magaya
Community for members, chat online with agents and others
•
US Customs Applications: How to file Customs documents, including
AES for exports, ocean and air imports AMS documents, and ISF (10+2)
requirements
•
Communication with Ocean Carriers via INTTRA: Create booking
requests and shipping instructions and send them to the ocean carrier
from within your Magaya software
•
Magaya LiveTrack: How to use the online tracking features such as view
rates, invoices, and inventory, create online pickup orders, shipping
orders, cargo releases, shipments, sales orders, purchase orders and more
•
Transaction Tracking: Send a link to your customers so they can view
real-time information about their shipments, inventory, and more
•
Magaya OnTheGo: For remote access to your Magaya database
•
Email Options: Setting up preferences, emailing individual email
messages and a batch of email messages of documents or transactions
9
1. HOW TO USE THIS MANUAL
WHERE TO FIND HELP
•
Magaya Communication Server: How to reload the communication
server, enable ports, and other topics
•
Online Payments: This chapter explains how to register for PayCargo and
First Data, and you and your customers use the features so your customers
can pay invoices online.
•
Magaya POD Mobile: This plug-in provides delivery options, including
maps, order details, task lists and more.
•
Magaya VIN Decoder: Use this plug-in to extract all the relevant vehicle
information from a Vehicle Identification Number (VIN) number.
•
Track2Go Mobile App: Track2Go is a mobile application that gives your
customers real-time updates of their Magaya transactions on their smart
phones, tablets, and other devices. Track freight, see shipment status, view
inventory, invoices, and more.
•
Magaya Express Link: Request UPS and FedEx shipments and print labels
using the details already entered in your Magaya system. Package status is
updated online automatically. Manage returns and rates for domestic
shipping. Additional carriers to be added.
Where to Find Help
If you have questions or need help, please contact Magaya Corporation:
Phone: (786) 845-9150
Email: [email protected]
How-to articles, video tutorials, and user manuals are available on the Magaya
website: www.magaya.com and on YouTube.com. Magaya Corporation also
offers training, integrations, customizations and other services. Please contact
us with any questions.
Tips are available in Magaya software in dialog boxes and other screens in the
Magaya Explorer. Hover your mouse over the “Magaya Tip” icon and click on
the message to read the tip or see a video tutorial.
Use of the Magaya software and its documentation are governed by the terms
set forth in your license.
Copyright © 2015 by Magaya Corporation. All rights reserved.
10
2. THE MAGAYA NETWORK
INTRODUCTION
2. The Magaya Network
Introduction
The Magaya Network provides the infrastructure for Magaya software users to
connect with their customers, destination agents, other Magaya users, and US
Customs. The Magaya Network enables you to send and receive documentation, transactions, and other data about shipments, etc. The Magaya Network is
included with all Magaya software products.
As documents and other information are sent over the Magaya Network, the
status of those transactions is updated in real time. For example, updates made
by a destination agent are visible immediately in the Magaya system at origin
because the Magaya Network transmits the information about transactions
automatically, providing real-time, up-to-date information about shipments
and more.
To Access the Magaya Network:
You can access the Magaya Network folder in your Magaya Explorer any of the
following ways:
1)
Expand the Magaya Network folder on the left, or
2)
Click on the “Magaya Network” menu option, or
3)
Click on the “Network” button in the top toolbar to open the Communication Center (to see just the chat screen). This can be used in any screen
in your Magaya Explorer such as Warehouse Receipts, etc.
Inside the Magaya Network folder you will find the Magaya Community screen
and the Messages folder.
11
INTRODUCTION
The Magaya Community screen includes your company profile and a directory
of companies using Magaya software. You can also search for other companies
that are using Magaya software and view any invitations you have sent or
received.
For more details, see the section “The Magaya Community Overview”.
The Messages folder can be expanded to see the subfolders inside it.
•
Outbox: Shows messages pending to go out
•
Inbox: To view messages received
•
Sent: To view sent messages
•
US Customs Messages: To view all messages related to the Automated
Manifest System (Ocean AMS/ISF, and Air AMS)
•
Ocean Carriers Messages: This displays all messages sent or received
directly from ocean carriers using the Magaya Ocean Carriers Interface
plug-in with INTTRA.
•
Express Link: Messages from couriers such as UPS and FedEx
For details on the US Customs Messages folder, see the topic “US Customs
Messages.”
12
THE MAGAYA COMMUNITY OVERVIEW
The Magaya Community Overview
The Magaya Community provides a directory of all the companies that are part
of the Magaya Network, including your company. You can access your
company profile, search for other Magaya users, and chat with them. With the
chat tool - the Communication Center - you can communicate with other
Magaya users and with your customers who have a Magaya product or who are
using Magaya LiveTrack. You can also send and receive Magaya transactions
from within the chat screen. (See the section “The Communication Center” for
more details).
When you click on the Community subfolder, the following screen opens:
Company Profile:
In the Company Profile section of the Magaya Community screen, you can
choose to publish your company profile on the Magaya Network by clicking in
the Publish checkbox. This will enable other companies in the Magaya Community to search for you and contact you. You can edit or add information about
your company. You can add a description of your company that others in the
Magaya Community can read to learn about the services you offer. You can
enter keywords that will help people find you when they are searching.
Keywords can include terms such as freight forwarder, NVOCC, warehouse,
etc.
13
THE MAGAYA COMMUNITY OVERVIEW
The buttons on the Company Profile section enable you to:
1)
Save your company profile when you enter it or make changes.
2)
Reset your changes to the previous version.
3)
Autofill will populate the fields of this company profile with information
from the “My Company Info” profile (which is available from the File
menu). You can add or edit information here about your company that is
not in the My Company Info section. The system will ask if you are sure
you want to override your network profile with your company profile to
be published on the Magaya Network directory. Click Yes or No.
4)
Upload your company profile to the Magaya Network.
Search:
To search for other companies in the Magaya Community, click on the Search
button. A new screen opens.
•
14
Search by company name, location, or keywords. Select options from the
dropdown menus such as country or city. Keywords can include any
THE COMMUNICATION CENTER
special service you need such as a company that handles oversized cargo,
hazardous materials, or transports vehicles. Tip: When looking for
companies in a state, search once by spelling out the state name and again
by the abbreviation.
•
To view a company’s information, double-click on their name in the list.
•
To send a company an invitation, click on the Invite button in their profile
window or on the list heading. You must be a member of the Magaya
Network to send invitations (if you are using the free trial before
becoming a customer, you cannot send invitations to other member until
you are a Magaya customer). When you send an invitation, a copy of it is
saved in the “Invitations” screen. When you receive a reply, the system will
notify you.
Invitations:
The Invitations screen will show invitations you have sent and received.
See the section Invitations for details about how to send and accept invitations.
The Communication Center
The Communication Center window (chat screen) shows your company name
and Magaya LiveTrack customers when they are online. The first company
listed is your company. It is designated by an icon that looks like a house.
The chat screen can be opened from any transaction or list in Magaya Explorer.
You can move the screen around or change its size. When you are working on
15
OVERVIEW: SYSTEM-TO-SYSTEM TRANSACTIONS
a Warehouse Receipt, Pickup Order, etc. or the Invoices list, you can send that
document or list to a contact in your Communication Center screen.
This feature makes the Communication Center more than just a chat program;
it is a tool to share business data from one Magaya system to another.
See the section “Overview: System-to-System Transactions” for details.
Overview: System-to-System Transactions
The Magaya Network enables you to connect with other companies that are
using Magaya software such as a destination agent or other logistics provider.
You can chat with them, send files or photos, and exchange Magaya transactions.
Invitations
Before you begin chatting with someone and exchanging documents, you must
send them an Invitation. There are two ways to do this: from the Search screen
or from the chat screen.
16
INVITATIONS
From the Search screen:
1)
Search for companies by country, city, or keyword
2)
Select the logistics company you want to connect wtih
3)
Invite them
17
INVITATIONS
From the Chat screen in the Communication Center:
1)
Click the Invite button and select an option from the pop-up menu:
2)
Select the option you want to use from the pop-up menu and follow the
instructions on the screen:
•
18
Invite the agent by Magaya Network ID:
SEND A TRANSACTION FROM THE SEND BUTTON
•
Or, invite an agent by selecting them from your list of Forwarding
Agents:
Send a Transaction from the Send Button
You can send Warehouse Receipts and Shipments to an agent or business
partner in the Magaya Network when they are not online by using the “Send’”
button.
For example, you can send a consolidation to a destination agent who is in a
different time zone, and the transaction will be in their inbox when they log in
to their Magaya system. (If they set up an email System Alert, they will receive
an email message to notify them.)
19
SEND A TRANSACTION FROM THE SEND BUTTON
To send a transaction, go to the shipment (or document view) and click on the
“Send” button in the top toolbar.
Transactions can also be sent by right-clicking the transaction from the list
view:
20
WHERE IS THE FILE SAVED?
In the “Send To” dialog box that opens, select the company from the list and
click the Send button.
Files sent using the Send button will appear in the recipient’s Inbox, not the chat
screen. Click the Configure button in your chat screen to set the notification you
want such as a pop-up window to notify you when someone sends you a file. See
the section “Notifications” for details.
Where is the File Saved?
Configure your Incoming Messages option in Go to Maintenance > Configuration > Incoming Messages. See the section: Configure Incoming Messages.
Notifications
Notifications that a message was sent to you can be set up in different ways,
depending on your business needs. Best Practices Tip: Set both notification
options described here.
21
NOTIFICATIONS
•
To get a notification in your Magaya Inbox: Go to Maintenance > Configuration > System Alerts.
Click “Add” to create an alert and select your notification options.
If you select the Email option, make sure the employee has an email
address in their profile!
22
SEND A TRANSACTION FROM THE CHAT SCREEN
•
Pop-up Notification from the chat tool: Select an option:
To make the chat window pop up whenever a chat message arrives, click
the option “Show the message window”.
To get a pop-up message when a message arrives, click “Display an alert
message”.
Configure the other settings based on your preferences.
Send a Transaction from the Chat Screen
To send a tranaction from the Chat screen, first start a chat session. Chat
sessions can only be started with another company that is online.
(If the company is offline, use the “Send” button to send transactions from the
Warehouse Receipt list or document or from the Shipment screen.)
The chat screen has a section (panel) on top where you can see who is online.
The bottom part of the screen shows a log of your chat conversation and transactions (or files) transferred.
23
SEND A TRANSACTION FROM THE CHAT SCREEN
When you begin a chat session, the bottom panel changes to show the name (or
ID) of the person you are chatting with and a Traffic tab appears. They must be
online to chat and they must have accepted your invitation first.
The Traffic tab shows the direction of the traffic, the name of the file, progress
of the download, etc.
To Begin a Chat Session:
24
1)
Click on the name of the person you want to chat with (after your invitation has been accepted).
2)
Click the first button on the left (they must be online to chat). When the
mouse is hovered over the button, the button identification appears “Start
communication session”.
SEND A TRANSACTION FROM THE CHAT SCREEN
When you begin a chat session, type in your part of the conversation in the
bottom of the screen.
Click the Send button when you are ready to send your message or transaction.
(The Send button will only appear when you are chatting with someone.) A
history of the conversation is displayed.
25
WORKING WITH FILES
With the Send button, you can send transactions (a “record”), documents, or
text. When you click on the arrow on the side of the Send button, the following
menu pops up if you are viewing a transaction:
When you are viewing a document such as a Warehouse Receipt, you can send
the document or the file (record) by using these options. The transaction or
record is called “Active” when you are viewing it.
NOTES: Cargo Releases must be sent as PDF or HTML because the recipient
cannot save it as a Magaya transaction due to dependencies regarding the items
inside the CR. A Warehouse Receipt must have items inside it or the file will be
invalid. Only a WR with items On Hand or Pending is a valid transaction to
send.
Working with Files
In the Communication chat screen, you can send and accept files, save them or
delete them.
26
WORKING WITH FILES
•
Open a File: This button opens the file so you can view it.
If the file is a Shipment, a Warehouse Receipt, or other Magaya transaction, the Magaya dialog box for the transaction will open. If the file is a
document such as a Microsoft Word document, the document will open.
27
WORKING WITH FILES
•
Accept a File: Click the Accept button to accept (to download) a file, a
transaction, or a document. When someone sends you a file, the system
will notify you. A message similar to the one in this screenshot will appear:
Click on the Traffic tab (<Traffic> page) to see the file name.
The Traffic tab has columns that will tell you if the file is incoming or
outgoing, the name of the file, the progress of the download, the file status
such as if it is pending or accepted, who sent it, the file size and more.
28
WORKING WITH FILES
Click the “Accept” button to begin downloading the file.
To automatically accept and download files, go to the Configuration
button on the chat screen toolbar. (See the section on “Configuring
Incoming Messages” for more details.)
29
WORKING WITH FILES
•
Save a File: This opens a window so you can save the file after it downloads. Files are not saved automatically.
If the file is a Magaya transaction such as a Shipment, then the Shipment
transaction will be saved in the Shipment folder in your Magaya Explorer.
Other documents can be saved on your hard drive of your computer.
Your system can be configured to overwrite files or not overwrite them
when saving files. See the section “Configuring Incoming Messages”.
•
30
Delete a File: To cancel the transfer of a file. You can also delete a file from
this list to clean up the list after the file is saved to your system.
CONFIGURE OUTGOING MESSAGES
Other Functions:
•
Delete Agent button: Use this button to delete a contact from the chat
screen. Their network ID will be deleted from your system. If you want to
chat with them in the future, you will need the ID number again.
•
Configure button: For details on using the Configure button, see the
section “Configure Messages from the Chat Screen”.
Configure Outgoing Messages
Magaya software enables you to configure how you want to send and receive
messages between Magaya systems and where they will be saved.
31
CONFIGURE OUTGOING MESSAGES
Go to the Maintenance folder > Configuration > “Outgoing Messages”.
The Outgoing Messages screen provides setup options that let you configure
how you want to send email messages, options for sending shipment and
charges information, and an email template option.
This topic will focus on configuring shipment and charges information. For
details on setting the format of outgoing email messages, see the topic on “Email
Options”.
32
CONFIGURE MESSAGES FROM CHAT SCREEN
Sending Shipment and Charges Information:
•
“Send only the Master shipment to the Carrier”: This setting applies only
if the carrier uses Magaya also. It will send only the Master shipment to a
carrier, not the House shipping documents. This option is on (checked) by
default.
•
“Send transactions income charges to destination agents”: Select this if
you want your destination agents to receive the income charges that are
related to a shipment.
•
“Send transactions expense charges to destination agents”: Select this if
you want your destination agents to receive the expense charges that are
related to a shipment. This is unchecked by default because many companies do not want to disclose their costs to their agents.
Click the Save or Reset button.
Configure Messages from Chat Screen
In the Chat screen, the toolbar on the bottom has a Configuration button to set
your preferences such as how to be notified when a message is sent to you and
how to automatically download files that are sent to you.
33
CONFIGURE INCOMING MESSAGES
The following configuration dialog box opens:
Set your preferences such as if you want to see the whole message window when
you receive a message or if you just want to see a pop-up notice (alert).
To automatically accept and download files that are sent to you, check the box
to “Automatically accept transferred files”. Note: If a transaction arrives with the
same number, you must choose an action to either save it or not. See the section
“Configure Incoming Messages” for details.
If you check the box to ignore chat invitations, you will not receive a pop-up
notice when someone tries to contact you via the Communication Center.
Otherwise the system will notify you that a new chat message is waiting.
Click the OK button when done.
See the section “Notifications” for more options such as setting up System
Alerts in the Maintenance > Configuration menu.
Configure Incoming Messages
You can set a preferred format to determine how you want to receive messages
in the Magaya Communication Center from another Magaya system.
34
CONFIGURE INCOMING MESSAGES
To set your preferences, go to the Maintenance folder and select Configuration.
Then click on “Incoming Messages”.
The options in the Incoming Messages screen are used to tell the system if you
want to automatically save messages and what folder to place them in.
The automated saving function is checked and active by default. If you uncheck
a Save button here, the system will prompt the user to ask if they want to save
each document received.
35
CONFIGURE INCOMING MESSAGES
The Incoming Messages screen has the following options:
The following will explain the configuration of each of the options and how
your Magaya system will handle these incoming messages.
•
Shipments:
The system can automatically save Shipments received such as those sent
to you from your agent’s Magaya system through the Magaya Network.
Overwrite Options: You can determine if your Magaya system will overwrite existing shipments and/or items or not overwrite them. To allow
36
CONFIGURE INCOMING MESSAGES
overwriting, check the appropriate box. To overwrite shipments that were
made by your company, check the box.
To change the location where the shipments will be saved, click the
Browse button. The default is “Incoming Shipments”.
•
Warehouse Receipts:
The system can be configured to automatically save Warehouse Receipts
(WR) when they arrive in your Magaya system.
When a WR is automatically downloaded and saved, it will be displayed
in your Inbox with the symbol of a floppy disk next to it. The “Comments”
column of the Inbox will state if the file is successfully received and if it
exists in your database and cannot be overwritten. This is the same for
Shipments.
Overwrite Options: You can determine if your system will automatically
overwrite received WRs or not overwrite them. The default is set so new
WRs will not overwrite ones you created in your company. With this
setting, WRs arrive in your Inbox; if you revise them, the system will ask
you if you want to overwrite the existing WR. The other setting here is to
overwrite WRs created by another company (another system which sent
the WR via Magaya Network).
•
Acknowledgments: The system automatically sends acknowledgments
(notices) to the Magaya Inbox that a shipment was received or released. If
you are a destination agent, this can automatically update the origin
system to show the cargo has arrived when you do the Reception process
at destination.
37
CONFIGURE INCOMING MESSAGES
•
Documents and Folders:
The system can automatically save documents and folders that are not
related to shipments that you receive in your Magaya system. You can
specify the folder here.
If you do not set your system to automatically save documents and folders,
they will remain in your Inbox in the Magaya Network Messages folder
until you go to the Inbox and save them.
The default folder is “Miscellaneous”. To change the default location, click
on the “Browse” button and select a folder. A dialog box will open with
options:
Select the location where you want to save the documents and/or folders.
Click OK when done.
Additional configuration options for Incoming Messages:
To save received transaction charges from the agent at origin, check the box. If
you do not check the box, only the other data in the transaction will be saved,
not the charges. If you check the box, the charges will be sent to your Magaya
accounting system. You must be certain your Items and Services match, and
38
CONFIGURE INCOMING MESSAGES
that the information is the same in your accounting system and in theirs. This
is unchecked by default.
To save received transaction entities (such as customers, carriers, etc.) from
agents at origin, check the box. This will add the entity information such as the
address into your Magaya system in your Maintenance folder under Customers,
Freight Forwarders, etc.
Click the Save or Reset button when you finish your configuration.
39
CONFIGURE INCOMING MESSAGES
40
3. U.S. CUSTOMS APPLICATIONS
3. U.S. Customs Applications
This topic explains how Magaya software helps you file Customs documentation electronically and keep track of it in your Magaya system. The sections in
this topic explain how to process Customs requirements for:
•
Export shipments using Magaya AES
•
Import air shipments using Magaya Air AMS
•
Import ocean shipments using Magaya Ocean AMS
•
Import ocean shipments using Magaya ISF
41
CONFIGURE CUSTOMS OPTIONS IN YOUR MAGAYA SYSTEM
Configure Customs Options in Your Magaya System
To begin using the AES, AMS, ISF, or ABI systems in Magaya, go to the Maintenance folder > US Customs Systems and enter the necessary codes into the
Configuration screen.
Note: The US Customs configuration options are available in the Magaya
Supply Chain Solution and Magaya Cargo System software products. Use of
these functions requires activating the Magaya plug-in for your account. You
also need codes from Customs. Contact your Magaya Logistics Advisor with
questions.
42
CONFIGURE CUSTOMS OPTIONS IN YOUR MAGAYA SYSTEM
Enter your SCAC code to set up Ocean AMS and ISF:
•
The AMS User Code (SCAC code) is the code for your company. SCAC
codes are assigned by the National Motor Freight Traffic Association
(www.nmfta.org). If you do not have an SCAC code for imports, US
Customs will give you one that will be valid for ISF filing only. Contact
your Customs Representative.
•
The Manifest Sequence Number is automatically generated by your
Magaya system. You can start the numbering at any number you want,
similar to setting document numbering for any other transaction in your
Magaya system.
•
The Test Environment checkbox is used when you are testing your AMS
feature before you start using it or when you are training employees.
•
If you are a VOCC (a vessel owner), check the box.
•
The Air AMS User Code is assigned by US Customs.
•
To set your paperless in-bond number, click the “Set” button.
•
If you want transactions to be encrypted as they are sent from your system
to the Magaya servers, uncheck the box.
43
CONFIGURE CUSTOMS OPTIONS IN YOUR MAGAYA SYSTEM
To set up the AES, enter your user name and password from the AESDirect
website:
If you do not enter the AES user name and password here, you will be asked for
it when you send an AES. Entering it at that time will update this field in the
configuration screen.
Enter Default Vehicle Data for Magaya VIN Decoder Scanners:
If you use the Magaya VIN Decoder, you can save data entry time by entering
default EEI information that all vehicles you ship have in common by going to
Maintenance > Configuration > US Customs. In the AES section of the screen,
click the “Default EEI” button. This is a one-time entry task.
Click the “Default EEI” button. In the dialog box that opens, enter the Schedule
B code for the vehicles and other data. For example, there are different codes for
44
CONFIGURE CUSTOMS OPTIONS IN YOUR MAGAYA SYSTEM
passenger vehicles, commercial vehicles of varying weights, diesel engine vehicles, and other types of vehicles.
Only the necessary fields are active; the others are disabled in this screen. As a
result, any vehicle entered will now have the field “Include in EEI” checkmarked
automatically so that it will automatically be included in the EEI filing of an
export shipment. (The vehicle must have a valid Schedule B code.)
Save the information. Extra Info: If you want to perform some test shipments
before sending real data to Customs, click the checkbox “Use Testing Environment.” When you’re done testing, be sure to uncheck this box.
For more on the Magaya VIN Decoder, see chapter 12 in the Magaya Software
Communications Manual.
Extra Info: To configure the ABI/SmartBorder integration, please see Chapter
11 of the Magaya Software Communications Manual.
45
CUSTOMS REGULATIONS FOR EXPORTS: MAGAYA AES
For details on the fields in the EEI tab, please the Commodities topic in the
Warehouse Receipt chpater of the Magaya Cargo System Operations Manual.
Customs Regulations for Exports: Magaya AES
Overview: The Magaya Automated Export System (AES) plug-in enables you to
send the Electronic Export Information (EEI), formerly called the Shipper’s
Export Declaration (SED), to US Customs. The EEI can be sent from within
Magaya software to the AES, complying with US Customs filing requirements
that state your export shipment documentation must be sent electronically to
US Customs if the value of the cargo is greater than $2,500.00.
Note: The Magaya AES plug-in is available for the Magaya Supply Chain Solution and Magaya Cargo System.
All the information about the items in each House shipment will be automatically filled into the AES form, including Schedule B export codes, Schedule K
and D codes, IATA, SCAC and license type codes. The Magaya AES program
verifies the data before it is sent. The AES is used for air, ocean and ground.
Getting Started
How to Get Started with AES: To use the AES feature in Magaya software, you
must first have an account on the AESDirect website:
Go to http://aesdirect.census.gov and fill in the form.
There is no cost to create an AES account, but there is a test. Follow the instructions on the AES website for their requirements. It will take one to two days to
get an authorized account with AES. They will send you an account user name
and password.
46
FILING EXPORTS WITH MAGAYA AES
Filing Exports with Magaya AES
When you create export shipment transactions in Magaya software, there is a
wizard that helps speed up entering EEI data about commodities.
Tip: All the details from the Commodities are used in the EEI transaction. Verify
that the commodities have the EEI required data before filing to save time and
errors.
For details on the fields in the EEI tab, please the Commodities topic in the
Warehouse Receipt chpater of the Magaya Cargo System Operations Manual.
Step-by-Step Procedure:
1)
Go to the Shipment in Magaya Explorer that needs the EEI filed. Notes: If
the Shipment has more than one House, file one EEI per House. If the
House has more than one Shipper, file one EEI per Shipper.
There are three ways to access the AES menu. Choose the one you prefer:
2)
•
Click on the Customs button on the Shipment Toolbar, or
•
Right-click on the shipment in the Shipment folder and select Send
> Send EEI to AES, or
•
Click on the menu option “Shipment” from the Magaya Explorer
top menu and select US Customs > Send EEI to AES
The EEI wizard opens. All the items in your shipment transaction are
listed and grouped by VIN, part number, Schedule B, or description so
EEI information can be entered in batches. The total number of pieces per
47
FILING EXPORTS WITH MAGAYA AES
group is displayed in the “Pieces” column. The total weight and value is
also calculated.
When shipping vehicles, each vehicle is listed individually.
To enter or edit Schedule B information of vehicles, select multiple lines
of different vehicles (press the Shift key and click items) and then click the
“Edit EEI” button. The EEI dialog box appears. Enter the data needed and
click OK. The ability to select multiple vehicles and edit them as a group
helps to speed up setting EEI data that is common to all the vehicles. Then
a checkmark appears in the column “Include EEI” for each item.
To reverse the action, click the “Reset EEI” button to return the information back to the way it was before. To view item details, click the “Details”
button.
Select if this is a pre-departure filing, or if you are an approved post-departure filer.
Select the type of ultimate consignee:
48
•
Direct Consumer (D)
•
Government Entity (G)
•
Reseller (R)
FILING EXPORTS WITH MAGAYA AES
•
3)
Other/Unknown (O)
Click “Save & Next.” The AES summary screen opens. Verify the data. If
data is missing in a required field, a notice will be marked in red and state
that the required field cannot be empty. Any item without a VIN, Schedule
B, part number of description is displayed as “Unknown.”
Make any corrections needed by closing the screen and returning to the
shipment.
4)
Click the Send button when all the required information is completed.
AES Data:
The following information is gathered into the AES form based on the details in
the shipment and commodities:
General Information: This section contains general shipment and carrier
information that is required for all EEI filings.
49
FILING EXPORTS WITH MAGAYA AES
50
•
Shipment Number - This is the shipment number assigned by the
Magaya system. Also called the Shipment Reference Number (SRN), the
number is 17 digits and must be unique (it cannot be used in another shipment). To change this number, close the AES form to return to the Shipment and make the change on the General tab in the Air Waybill Number
field for air shipments or the Bill of Lading field for ocean shipments.
•
Booking Number - This is the booking number found in the Shipment on
the General tab. If you do not enter a booking number for an air shipment,
the AES will fill in the air waybill number; it is not required for air shipments. A booking number is required for an ocean shipment; it is the
number assigned by the ocean carrier to reserve space on the vessel for the
cargo.
•
State of Origin - The state is gathered from the Executed Place field on the
Shipment’s General tab. It can be changed by clicking on the dropdown
menu and selecting the Edit button in the dropdown toolbar. Make
changes in the Port dialog box, in the Subdivision field.
•
Foreign Trade Zone - Point of Origin or FTZ number. To edit, go to the
Shipment’s Routing tab. This field is not required.
•
Port of Export - This is the “Port of Loading”, found on the Routing tab.
It requires the Schedule D code (for US ports). To add the code, click on
the dropdown menu for the port field on the Routing tab and select Edit.
In the Port dialog box, click on the US Customs Codes tab. Click on the
button to get the Schedule D code. Select the code and click OK.
•
Country of Destination - This is gathered from the “Port of Unlading”
field (unloading), found on the Routing tab. To change it, use the dropdown menu.
•
Departure Date - Found on the General tab.
FILING EXPORTS WITH MAGAYA AES
•
Port of Unlading - Also called the “Port of Unloading.” It is found on the
Routing tab. This is the Schedule K code.
You can enter a port here or in the Port profile in the Maintenance folder.
Open the Port dialog box and click on the US Customs Codes tab.
Schedule D codes are US ports, and Schedule K codes are foreign ports.
When you select the port of loading and the Origin US Custom code,
those codes will be associated together in your Magaya database and be
available in the dropdown of the Origin code field, making it easier to fill
in the routing tab.
•
Mode of Transport - This is found on the Routing tab. The mode of transportation is filled in from the wizard (if you used the wizard to create the
shipment).
51
FILING EXPORTS WITH MAGAYA AES
•
Carrier - This is the Exporting Carrier field on the Routing tab for ocean
shipments, and it is the Carrier field on the General tab for air shipments.
•
Conveyance Name - This is the Flight Number field for an air shipment,
found on the Routing tab. For an ocean shipment, this is found on the
Routing tab in a field called Vessel Name.
•
Vessel Flag - This is the country of register for this ship. This field is only
applicable to ocean shipments. Use the dropdown on the Routing tab to
fill in this information.
•
Related Companies - This is a Yes/No field. The data is gathered from the
Entities tab in the shipment. If you checkmark the box for “Related
Companies (AES)” on the shipment’s Routing tab, the field will fill in
“Yes” on the AES form. Related companies means your company and the
Destination Agent are part of the same company.
•
Waiver of Prior Notice: This informs Customs if your company has been
approved to waive the filing of intent notification which tells Customs that
this cargo willbe re-exported. This applies if you are claiming drawback of
duties for re-exported items.
If you are a Customs broker, you can use the Magaya ABI integration from
SmartBorder. It will synchronize your inventory items and their
accounting definitons such as ADD and CVD. Please see Chapter 11 of the
Magaya Software Communications Manual for the ABI. The “Waiver of
Prior Notice” field in the Magaya AES confirmation screen will automatically default to “no” if you do not use the Magaya SmartBorder ABI.
52
FILING EXPORTS WITH MAGAYA AES
•
Hazardous Cargo - This is a Yes/No field. This data is gathered from the
shipment commodities if at least one commodity is classified as
Dangerous Goods.
This data is found on the Commodity dialog box, on the Hazardous tab
and on the EEI tab. Include the Schedule B code and check the box for
“Include in EEI”.
If the item requires a license, also enter the license value of the item. The
value must be entered in U.S. dollars using whole numbers only (omit
cents). The value does not include overhead such as insurance or domestic
freight. This value is the corresponding export license value represented
on the license, not the value of the item itself. For example, an item value
maybe $30,000. The license value may be $100,000. Verify the value in the
Commerce Control List (CCL).
•
Routed Transaction - This Yes/No field is on the Routing tab and it is
called “Routed Transaction (AES)”; check the box if the transaction is
53
FILING EXPORTS WITH MAGAYA AES
routed. A "routed transaction" is a transaction in which the Foreign Principal Party in Interest authorizes a US agent or freight forwarder to facilitate export of items from the US on its behalf and to prepare and file the
EEI on its behalf.
US Principal Party in Interest: The USPPI is the usually the shipper of your
shipment; it can also be the person or entity in the United States that receives
the primary benefit, monetary or otherwise, from the export transaction. This is
required for all EEI filings.
54
•
Name - This is the Shipper name. It is pulled from the Shipper field on the
Entities tab in the Shipment. The shipper needs an ID number in their
profile. If you receive the error “ITN number not found”, verify if the
shipper has an ID number in their profile. The system uses the ID number
and the Air Waybill or Bill of Lading of the shipment to retrieve the ITN.
•
ID Number - Identification number of the Shipper. It can be found on the
Customer’s profile in the Maintenance folder, on the General tab.
•
ID Type - This is found in the Customer’s profile in the Maintenance
folder, on the General tab next to the Identification Number field. Select
the type of ID number from the dropdown: DUNS, EIN, SSN, Foreign,
Other.
•
Address (street, city, state, zip code) - These fields are filled in from the
Entities tab in the Shipment. The address can be changed in the Shipment
or in the Customer profile.
FILING EXPORTS WITH MAGAYA AES
•
Contact name and phone number - These fields are filled in from the
Customer’s profile in the Maintenance folder, on the General tab (not on
the Contacts tab).
Ultimate Consignee: The person, party or designee that is located abroad and
actually receives the export shipment. This may be the end-user or Foreign
Principal Party in Interest (FPPI). The type of consignee must be specified. This
is required for all EEI filings.
•
Name - This is the company name (or name) of the ultimate consignee. If
you need to change it, go to the Entities tab in the Shipment. Use the dropdown menu for the Ultimate Consignee and click on the Edit button to
open the profile. (You can also click on the Lookup button, the button
with the three dots to open the address).
•
Contact Name - This is the name of the contact person for the ultimate
consignee. To edit this field, go to the Entities tab in the Shipment and use
the dropdown menu to access the profile. This data is gathered from the
General tab of the profile, not the Contacts tab.
•
Address fields - These fields are filled in with data gathered from the
profile of the Ultimate Consignee. To edit an address field, go to the Entities on the Shipment tab to open the profile.
Intermediate Consignee: The person or entity in the foreign country that acts
as an agent for the principal party in interest with the purpose of effecting
delivery of items to the ultimate consignee. This section is conditional
(optional) based on how the transaction is delivered to the Ultimate Consignee.
Freight Forwarder: This section is only included in the EEI if you are a freight
forwarder and enter a company other than your own in the Freight Forwarder
field on the Entities tab for the shipment. The Freight Forwarder is the person
in the United States who is authorized by the principal party in interest to facil-
55
FILING EXPORTS WITH MAGAYA AES
itate the movement of the cargo from the United States to the foreign destination and/or prepare and file the required documentation. This section is
conditional (optional) based on the party filing the EEI.
All the fields for the Freight Forwarder are found on the Entities tab in the Shipment. To make changes, click on the dropdown menu to open the Freight
Forwarder’s profile, or click on the Lookup button for the entity and make the
change there. (The Lookup button is available for all the entities on the Entities
tab, and it works the same way for each.) Any change made in the Lookup dialog
box will be copied into the profile for that entity.
The following is a list of the fields in the Freight Forwarder section of the EEI:
56
•
Name - This is the company name of the freight forwarder or logistics
provider. Required field. This is found on the Entities tab of the shipment.
•
ID Number - This is the Identification Number field on the General tab
in the freight forwarder’s profile: It is the “Identification number” not the
“Entity ID”. This is a required field.
•
ID Type - This is found in the freight forwarder’s profile on the General
tab next to the Identification Number field. Select the type of ID number
FILING EXPORTS WITH MAGAYA AES
from the dropdown: DUNS, EIN, SSN, or Foreign. The ID Type “Other”
is not valid for exports. This field is required.
•
Contact Name and Phone - These fields are filled with data gathered from
the General tab freight forwarder’s profile (not the Contacts tab).
•
Address fields - These fields are filled with data gathered from the General
tab freight forwarder’s profile.
Items: Information of the items being exported that have the field “Include in
EEI” checkmarked in the Commodity dialog box. The item information used in
the EEI is from the Warehouse Receipt or the packing list. To edit item information, go to the Commodity dialog box and make changes on the EEI tab.
The information about each line item is displayed in a table in three rows on the
EEI form. This illustration shows a portion of the table and how the headings
correspond with the information. If any required information is missing, it will
be marked in red:
•
Number - This is the line item number. For example, if the shipment
contains ten items, there will be ten line items.
•
Gross Weight - The weight is displayed for each item. The weight is in
kilograms for Customs purposes.
•
Vehicle - If the item is a vehicle, this field will be “Yes”. All vehicle information is found on the EEI tab of the Commodity dialog box for the item
•
Export Code - Code that provides information about the item. This field
is required. The Export Code is found on the EEI tab of the Commodity
dialog box for the item.
•
License Type - This code provides export information about the item.
This field is required. The License Type is found on the EEI tab of the
Commodity dialog box for the item.
•
Vehicle ID Type- If exporting a vehicle, the vehicle type such as
“Passenger Car” will display here.
57
FILING EXPORTS WITH MAGAYA AES
58
•
US Dollars - The value of the item in whole US dollars as required by
Customs.
•
License Number - This field will only be required if the License Type
requires it. The License Number is found on the EEI tab of the
Commodity dialog box for the item.
•
License Value: The value must be entered in U.S. dollars using whole
numbers only (omit cents). The value does not include overhead such as
insurance or domestic freight. This value is the corresponding export
license value represented on the license, not the value of the item itself. For
example, an item value maybe $30,000. The license value may be $100,000.
Verify the value in the Commerce Control List (CCL).
•
Vehicle ID - If exporting a vehicle, the VIN will display here.
•
First Unit - If a unit is required by the commodity, it will display on the
EEI tab of the Commodity dialog box. A unit such as KG will appear in the
dialog box next to the field “Quantity 1” and/or “Quantity 2”. If the
FILING EXPORTS WITH MAGAYA AES
Schedule B does not specify a unit, then an “X” must appear in the field as
the unit:
•
First Quantity - This is the number from the Quantity 1 field on the EEI
tab of the Commodity dialog box. The Quantity 1 and 2 can also be seen
on the Schedule B code list:
•
Description - This is a description of the item based on the Schedule B
description found on the EEI tab of the Commodity dialog box.
•
Vehicle Title - If exporting a vehicle, the title number will display here.
59
FILING EXPORTS WITH MAGAYA AES
•
Vehicle Title State - If exporting a vehicle, the state that issued the title
will be displayed here.
•
Second Unit - If the item has a second unit, it will be displayed here.
•
Second Quantity - If the item has a second quantity, it will be displayed
here.
•
Commodity Code - This is the Schedule B code. This field is required
depending on the export code used.
•
ECCN - The Export Control Classification Number is 5 characters,
alpha-numeric, and is used to identify items for export control purposes.
(ECCN’s are on the Commerce Control List, which is found in Supplement 1 to Part 774 of the Export Administration Regulations (EAR).)
•
Marks and Numbers - This is an optional number that identifies the
boxes or packages of the cargo. It can be the number of the Pickup Order
or Warehouse Receipt. The number is in the Cargo List next to the item
description, depending on the columns you have selected in your Cargo
List. To change columns, use the Commodities button.
•
Origin - Indicates if the goods are domestic, foreign, or military. This is
found on the EEI tab of the Commodity dialog box.
When all the required information is filled in, click the “Send EEI” button.
This will take you to out of the Magaya screen to the AESDirect website. The
first page you will see is a warning screen.
After you log in, the system will verify your EEI. If any errors are found, a screen
will display them. For example, the errors on this EEI are a missing phone
60
FILING EXPORTS WITH MAGAYA AES
number for the USPPI, the company name for the intermediate consignee, and
the ECCN:
Enter the corrections in the screen and click the “Check and Send” button.
Other buttons enable you to exit or add a line item. You can also view the shipment by clicking on the tab “View Shipment”.
When the EEI is submitted successfully, the screen will display a Success
message.
61
AES RESULTS
When you return to the Shipment view in your Magaya system, the Shipment
will be updated to show that the EEI (SED) has been filed:
AES Results
After you send the EEI, you will receive an XTN number. Click on the arrow on
the side of the Customs button to access the AES Results screen:
62
AES RESULTS
In the dialog box that opens, the results with the XTN number (it is your EIN
and the House number) and other information will be filled in:
An Internal Transaction Number (ITN) will be sent to you from US Customs
by email as a receipt and is required before the cargo can be exported. When you
receive it, the cargo can be exported.
Note: The XTN serves as a shipper’s reference number. It is not proof of filing
the EEI. The ITN is proof of filing the EEI.
AMS and ISF results are also available in Warehousing > Shipment List. Click
the “Detail” button and select “AMS and ISF Results” from the dropdown menu
at the top of the list.
63
CUSTOMS IMPORT REGULATIONS: MAGAYA AMS
INTRODUCTION TO MAGAYA AMS FOR OCEAN IMPORTS
Customs Import Regulations: Magaya AMS
Introduction to Magaya AMS for Ocean Imports
The US Customs Automated Manifest System (AMS) is designed for electronically filing shipping documents in advance of the cargo arriving in the United
States to speed the flow of cargo.
Magaya offers an AMS plug-in for ocean and air shipments that is available for
the Magaya Cargo System and the Magaya Supply Chain Solution.
Getting Started
Three steps to get started with Magaya AMS Ocean:
64
1)
Become an AMS participant: Contact the US Customs and Border Protection (CBP) agency at www.cbp.gov to request a Respondent’s Checklist.
Information requested in the checklist includes which direct arrival U.S.
ports you use for your operations, onward destination points where
aircraft or vessels move on Permits to Proceed, number of arrivals per
month and other details.
2)
Send a letter of intent to Customs, telling them you will use Magaya
Corporation as your AMS service provider. Examples of letters are available from the Magaya AMS web page.
3)
Activate the Magaya AMS plug-in by contacting Magaya Corporation.
CUSTOMS IMPORT REGULATIONS: MAGAYA AMS
MAGAYA OCEAN AMS PROCEDURES OVERVIEW
4)
Enter your SCAC code in Maintenance > Configuration > US Customs.
If you have a paperless in-bond number, you can set it here. You can also
set your Magaya system to test and practice sending Customs transactions.
Magaya Ocean AMS Procedures Overview
Magaya Ocean AMS enables logistics providers to comply with Customs’
24-hour manifest regulation by sending your shipment data to Customs from
your Magaya system.
The regulation states that a description of the goods must be sent to Customs at
least 24 hours prior to the loading of the vessel at the foreign port.
The ocean AMS requirements are:
•
Send a Manifest: done by using the “Manifest Create” menu option
•
Notify Customs when the vessel departs the foreign port: done by using
the “Vessel Departure” menu option
•
Notify Customs when the vessel arrives in the US: done by using the
“Vessel Arrival” menu option
The Magaya AMS plug-in performs a validation procedure, marking the fields
that did not pass the validation, and enabling you to fix any errors before
sending the information to the US Customs AMS system.
Changes (amendments) can be made to a Bill of Lading, cargo can be moved
while still in bond, and other options are available in the software.
NOTE: These AMS steps are explained from the perspective of an NVOCC, not
a carrier. The Magaya AMS steps are part of a larger import process that
65
CUSTOMS IMPORT REGULATIONS: MAGAYA AMS
SEND A MANIFEST
includes duties and fees. ISF (10+2) may also need to be filed. Review all the
requirements that are needed for your shipments.
Send a Manifest
Checklist before sending the Manifest:
In addition to all the shipment details, ensure you have the following:
66
•
fill in details in the In-Bond Information screen (if you move cargo
in-bond)
•
fill in the AMS Partner Notification Information screen
•
fill in the HTS code in the Commodity dialog box > AMS tab for each item
(per commodity)
•
marks & numbers can be entered on the Commodity dialog box General
tab, Notes field; for example, enter the WHR number if you have it or get
the marks & numbers from the shipper.
CUSTOMS IMPORT REGULATIONS: MAGAYA AMS
SEND A MANIFEST
Reminder: In addition to filling in the information highlighted above, also
select the container service type you are offering: Go to the AMS tab of the
container and select from the dropdown “Type of Service”.
How to File a Manifest:
If you are an NVOCC inside the US and are filing the AMS information for the
arriving ocean shipment, the first step is to send a manifest to Customs:
1)
Create (or go to) the Shipment that needs an AMS filed. Make sure you are
in the Master. Note: The Master button is grayed out when you are in the
67
CUSTOMS IMPORT REGULATIONS: MAGAYA AMS
SEND A MANIFEST
Master view of the shipment. This screenshot shows the Master and
House levels in the Magaya folders:
2)
68
Select from the menu as shown in the screenshot: Click on the arrow on
the side of the Customs button (1)on the Shipment Toolbar and select (2)
AMS and (3) Manifest Create:
CUSTOMS IMPORT REGULATIONS: MAGAYA AMS
FILE VESSEL DEPARTURE MESSAGE
3)
The AMS Transaction Summary screen appears, showing all the Bills of
Lading in the shipment. Any fields that need corrections are marked in
red.
Make changes by closing the screen and returning to the shipment. When
you are ready, select Manifest Create again from the Customs button.
Error codes are available on www.magaya.com “Downloads” page. You
may also contact CBP for this and for the Record Identifier Codes.
4)
Click “Send” when it is ready.
View messages from Customs via the menu. For more details see the
section “View Results”.
File Vessel Departure Message
Notify US Customs when the vessel has departed the last port of the foreign
country by filing a Vessel Departure Message from the Master view of the shipment transaction. Make sure you file this during the required timeframe. The
Customs system will verify the dates to ensure it is filed within the time requirements.
1)
Click the Customs arrow and select AMS > Vessel Departure.
The information from your shipment transaction is filled into the Vessel
Departure Notification screen.
69
CUSTOMS IMPORT REGULATIONS: MAGAYA AMS
FILE VESSEL DEPARTURE MESSAGE
2)
Verify the information in the Vessel Departure Notification screen:
To make changes, close the screen, edit the shipment and refresh your
Magaya system to apply the changes. Then return to Vessel Departure
menu.
If you want to cancel a notification you previously sent to Customs, click
the checkbox.
70
3)
If the information in this screen is correct, click Save & Next to go to the
next screen.
4)
Verify the information in the summary screen. Make any corrections
needed and return to this screen to submit the Vessel Departure notification.
CUSTOMS IMPORT REGULATIONS: MAGAYA AMS
FILE VESSEL ARRIVAL MESSAGE
File Vessel Arrival Message
When a vessel arrives in the US port, notify Customs:
1)
Click the Customs arrow and select AMS > Vessel Arrival.
2)
Follow the instructions to complete the screen.
Amendments: To Change a Manifest
There are three types of amendments: to change the Quantity in a Bill of Lading
(BL), to add or to delete a BL.
71
CUSTOMS IMPORT REGULATIONS: MAGAYA AMS
AMENDMENTS: TO CHANGE A MANIFEST
Follow these steps from the House view of the shipment transaction to change
the quantity:
72
1)
Click the arrow on the Customs button in the Shipment Toolbar > select
AMS > Update Bill of Lading Quantity.
2)
In the wizard screen that opens, enter the reason code for the amendment
by using the look up button with the three dots.
3)
Click “Save & Next” and verify the information before sending it.
CUSTOMS IMPORT REGULATIONS: MAGAYA AMS
AMENDMENTS: TO CHANGE A MANIFEST
To change any other information (besides the quantity) on an existing Bill of
Lading, first delete the Bill of Lading, make the changes in your shipment transaction in Magaya, and then add a new Bill of Lading.
To add (or delete) a Bill of Lading to a House, click Customs > AMS > and select
the option needed:
•
Add a Bill of Lading to the AMS database:
Select the reason code, and enter the original BL number in the field: "This
BL is an addition from original BL number".
Note: If you sent a previous manifest with multiple BLs and one was
rejected, don’t resend the entire manifest. Just add the one BL corrected.
73
CUSTOMS IMPORT REGULATIONS: MAGAYA AMS
MOVE IN-BOND CARGO
•
Delete Bill of Lading from the AMS database:
Select the reason code.
Move In-Bond Cargo
An In-Bond Movement is the movement of items without clearing Customs. If
cargo is intended to have a different port of entry than its arrival port, the cargo
can be moved while still in bond to another location where the normal entry
process will occur.
There are different types of in-bond movements, as defined by U.S. Customs
Immigration and Customs Enforcement (ice.gov):
•
Transportation & Exportation (T&E): the movement of freight to another
U.S. port, or transiting the US, for the purpose of exporting the goods
•
Immediate Exportation (IE): the movement of freight that is to be
exported from the same port where it arrived
•
Immediate Transportation (IT): the movement of freight to an inland
port of the importer’s choosing for final Customs clearance and payment
of duties and/or taxes
The following sections explain what to file:
•
74
If the cargo will move from one bonded location to another without
clearing Customs: Request an “In-Bond Movement”.
CUSTOMS IMPORT REGULATIONS: MAGAYA AMS
MOVE IN-BOND CARGO
•
If the cargo will move within the same port: Request a "Permit to Transfer"
•
To make an additional move or correction: File a Supplementary/Subsequent in-bond movement
We also cover how to fill in the In-Bond information screen and how to update
an already submitted supplementary in-bond.
In-Bond Movements:
Overview: When cargo will be moved from one bonded location to another
without clearing Customs, there are two steps:
Step 1) request an “In-Bond Movement”. The request can be for a T&E, IE, or a
IT type of movement (as defined above).
Step 2) Arrive the shipment.
See procedures for the steps for each below.
Step 1: Request the In-Bond Movement
First, click the arrow on the side of the Customs button, select AMS > In-Bond
Information
Next, at the House level, enter the information on the in-bond information
screen for each House: Click Customs > In-Bond Information (see below).
(After that, you will create and send the manifest. Customs will send an
approval (disposition code 1J) a reason for denial.)
In-Bond Information:
75
CUSTOMS IMPORT REGULATIONS: MAGAYA AMS
MOVE IN-BOND CARGO
The “In-bond Information” dialog box is used to include information in your
request to move cargo while it is in bond.
76
1)
Click the arrow on the Customs button in the Shipment Toolbar and
select “In-bond information”.
2)
In the dialog box that opens, fill in the information that is needed for this
House shipment. The information that you enter here for this shipment
will be carried over into the In-bond Movement notification you file with
Customs:
CUSTOMS IMPORT REGULATIONS: MAGAYA AMS
MOVE IN-BOND CARGO
•
Select the Bill of Lading type from the dropdown menu.
•
Only check the Paperless Master In-bond (MIB) Participant if you
are a participant. If you are not a participant, you can file a paper
form. See the Customs website at cbp.gov for information. If you
check this box, enter your own Paperless In-Bond Number. (Set the
number in Maintenance > Configuration > US Customs.)
•
Check the box for Master In-bond (MIB) to activate the fields in the
dialog box so you can fill in the ones that apply to this shipment. If
you will file this movement in paper form, you must check this box
and enter the code for the Conventional In-Bond Number.
•
Select the In-bond entry type from the dropdown for this shipment
(this field is mandatory). The different types of in-bond movements
77
CUSTOMS IMPORT REGULATIONS: MAGAYA AMS
MOVE IN-BOND CARGO
as defined by U.S. Customs Immigration and Customs Enforcement
(ice.gov) are:
- Immediate Transportation (IT): the movement of freight to an
inland port of the importer’s choosing for final Customs clearance
and payment of duties and/or taxes
- Transportation & Exportation (T&E): the movement of freight to
another U.S. port, or transiting the US, for the purpose of exporting
the goods
- Immediate Exportation (IE): the movement of freight that is to be
exported from the same port where it arrived
- Note: 69 Transit and 70 Multi-Transit (these codes exist for backwards compatibility in the software but are no longer used for
creating new transactions)
For the other fields, you can lookup data by clicking on the button with the
three dots. The fields marked with a (C) are conditional. You may not
need to enter all of the following information, depending on your shipment:
78
•
Conventional in-bond number: enter this if you do not click the
Paperless option.
•
SCAC code for the in-bond carrier who will move the cargo (from
the Carrier’s profile)
CUSTOMS IMPORT REGULATIONS: MAGAYA AMS
MOVE IN-BOND CARGO
•
US port of destination or FIRMS code - where the cargo is going
while it is still in bond (i.e., not cleared Customs yet). Use this if you
are sending the cargo to another port in the US.
•
Foreign destination port (for I&E)
•
Foreign place of delivery (this is the city of the destination)
•
Value of the cargo
•
Bonded carrier ID number (such as the EIN number for the carrier;
this field is mandatory; the number is on the carrier’s profile on the
General tab)
•
Enter the Paperless in-bond number from Customs for this shipment (if you checkmarked the “Paperless” box. The system will validate the number. Leave the Conventional number field blank.
•
Check the box if the cargo is subject to the Bioterrorism Act of 2002
reporting requirements
Click OK when you are done.
79
CUSTOMS IMPORT REGULATIONS: MAGAYA AMS
MOVE IN-BOND CARGO
•
Step 2: Arrive the In-Bond Movement
The second step when requesting an In-Bond Movement is to Arrive the
In-Bond Movement (and/or export it, as the situation requires). Follow
these procedures:
File this from the House level: Customs > AMS > In-Bond Movement.
Use the in-bond movement application to Arrive (or Export) the in-bond
movement.
The manifest number is filled in automatically based on the set up in the
Configuration option.
- Verify the date of the movement. The movement date and time will be
the current time. Use the dropdown menu to change them.
- Select the type. This example shows an Arrival.
- For the “In-bond Entity” field, you have the choice to enter the in-bond
number, the bill of lading, or the container number (depending on the
type).
- Enter the US Customs District/Port
- Issuer: The Standard Carrier Alpha Code (SCAC) of the issuer of the bill
of lading being arrived. (If it is entered on the carrier’s profile in the Main-
80
CUSTOMS IMPORT REGULATIONS: MAGAYA AMS
MOVE IN-BOND CARGO
tenance folder, it will appear here. If not, you can enter it now. If you are
a carrier, enter your code.)
- Enter the In-bond carrier code if required. This is a code representing the
in-bond carrier assuming liability for the in bond movement.
- Bonded carrier ID: A code representing the identification (ID) number
of the bonded carrier assuming liability for the in-bond movement (also
referred to as the importer number or IRS number). If you entered this in
the In-bond Information dialog box, it will appear here. If not, you can
enter it now.
- Enter the city and state of the location where the goods will be moved to
- Check the box if this movement will occur at the intermediate port level
If the cargo will move again for T&E, file this again but select the Export type.
81
CUSTOMS IMPORT REGULATIONS: MAGAYA AMS
SUPPLEMENTARY IN-BOND MOVEMENT
Supplementary In-Bond Movement
This is used for Bill of Ladings that an in-bond movement was filed for and you
need to perform an additional movement or make a correction. This procedure
has two steps: 1) Request, 2) Arrive.
1)
Request the subsequent in-bond movement: Click Customs > AMS >
Supplementary In-Bond Request (at the House level).
The system will refer the previous in-bond number but will use a new
in-bond number for this move.
82
CUSTOMS IMPORT REGULATIONS: MAGAYA AMS
SUPPLEMENTARY IN-BOND MOVEMENT
Select the action for a new application, delete one, or update one.
Note: To send a supplementary in-bond movement, the first one needs to
be arrived (completed). Regulations allow only one in-bond movement at
a time. If the last one contains a mistake, cancel it.
Enter the rest of the information into the screen. The Quantity field shows
the total, but you can change it if you’re only moving a portion of the total.
Customs sends you a 1J disposition code if the movement is approved.
2)
Arrive (or Export) the supplementary in-bond movement:
Use the in-bond movement application to arrive (or export) the in-bond
movement: Customs > AMS > In-Bond Movement. Note: Supplementary
in-bond movements must be done with an in-bond number not at BL level
or container level.
To update an already submitted supplementary in-bond:
1)
Use the Delete function (from the House level) to delete the previous
supplementary in-bond.
2)
Use the Update function to send the updated information.
83
CUSTOMS IMPORT REGULATIONS: MAGAYA AMS
PERMIT TO TRANSFER GOODS
Permit to Transfer Goods
A Permit to Transfer (PTT) goods can be requested after filing a Bill of Lading
via AMS. For example, a Container Freight Station (CFS) will request a permit
so they can move cargo from its entry point to their location so Customs procedures can be done at that location. A CFS is a location that stores containers of
cargo before Customs inspection.
To request a PTT for a shipment in your Magaya system, follow these steps:
84
1)
Select the shipment that needs the PTT request.
2)
Click the arrow on the side of the Customs button, > “AMS” > “Permit to
Transfer”.
3)
In the screen that opens, fill in the fields:
•
The AMS Manifest Number will be filled in automatically based on
the filing of the Manifest.
•
Enter the FIRMS code. The Cargo Location FIRMS code is the code
of the location of the goods. The FIRMS location must be bonded.
FIRMS is "Facilities Information and Resources Management
System" assigned by US Customs (CBP).
•
Enter the Bonded Carrier ID number.
•
Enter other notes as needed.
CUSTOMS IMPORT REGULATIONS: MAGAYA AMS
PERMIT TO TRANSFER GOODS
4)
Click the Save & Next button.
5)
Review the summary screen and fix any errors before sending the PTT
request.
6)
Arrive the transfer.
85
CUSTOMS IMPORT REGULATIONS: MAGAYA AMS
VIEW RESULTS/MESSAGES
View Results/Messages
To view the Customs messages (notifications) for the shipment:
86
1)
From the shipment click on the arrow on the Customs button in the Shipment Toolbar and select “AMS and ISF Results”.
2)
In the screen that opens, any messages will be displayed. The list can be
filtered if needed. You can also click the “Get Messages” button to retrieve
messages.
CUSTOMS IMPORT REGULATIONS: MAGAYA AMS
OTHER OCEAN AMS PROCEDURES
AMS messages are also available in the Shipment List by clicking the Detail
button, or see messages in the Messages folder under the Magaya Network
folder:
Error Messages:
If you receive an error message from Customs, see the details about the error
codes by going to the “Downloads” page of Magaya.com.
Other Ocean AMS Procedures
Report Empty Containers: When empty containers are imported into the US,
Customs requires notification. Declare empty containers on the manifest via BL
type (previously a separate application needed to be filed):
1)
Click AMS > In-Bond Information and select BL Type “2 Empty equipment instruments of international trade”.
2)
Review the summary screen and fix any errors before sending the notice.
87
CUSTOMS IMPORT REGULATIONS: MAGAYA AMS
OTHER OCEAN AMS PROCEDURES
Requirements to file “Empty Containers” transaction:
•
The container must not have pieces inside
•
The transaction must include the container number
•
Include the service type (on the AMS tab of the Container)
•
In the description, enter the words “Empty Container”
Notify Partners of AMS Information:
If you want to send copies of the AMS information to another party (in addition
to the primary party), select this option from the Customs menu and fill in the
dialog box.
To view all AMS messages, not just for one shipment, go to the Magaya Network
folder and open the Messages folder.
For Carriers:
88
OTHER OCEAN AMS PROCEDURES
If you are a carrier, you need to report the Houses of NVOCC’s that are working
with you. Each House must refer to the Master that it belongs to. Create the
structure in your Magaya system like this example:
Also, under the Master BL:
1)
Click Customs > In-Bond Information
2)
Select the BL Type as N, P, R, or S (as appropriate for your transaction).
Send the manifest. The system will also make the calculations so the quantities of the Master include the quantities of each House.
For Non-Containerized Cargo:
Place the cargo outside the container and add the item description. The system
will characterize this as “NC”, which is non-containerized.
89
MAGAYA AIR AMS OVERVIEW
Magaya Air AMS Overview
With Magaya Air AMS solution you can submit the required Customs information such as the Air Waybill for air import shipments before the shipment
arrives in the United States.
You can also notify Customs when the plane is departing from its origin, file
in-bond, permit to proceed, and local transfers electronically from within your
Magaya software.
Make sure you have configured your Magaya system to enable AMS features.
See the section “Configure Customs Options in Your Magaya System” for
details. Magaya AMS is available for the Magaya Supply Chain Solution and
Magaya Cargo System.
When you file Air AMS, the system will:
90
•
Report the Air Waybill to US Customs - by sending the Freight Report
Inbound (for regular shipments and express)
•
Notify US Customs when the flight departs the port of origin - by sending
the Flight Departure Message
FILE AN AIR WAYBILL
File an Air Waybill
Step-by-Step Procedure to File an Air Waybill:
1)
Click the shipment that needs the AWB filed.
2)
Click the arrow on the side of the Customs button, select AMS and Freight
Report Inbound (FRI) for regular shipments or Freight Express Inbound
(FXI) for express shipments:
The menu contains options for express shipments and regular shipments
for each command.
This FRI or FXI includes the Air Waybill, which Customs requires before
an air shipment arrives in the US.
3)
In the summary screen, review the information and correct any errors by
closing the screen and making corrections in the shipment in your system.
Then perform the same process again, beginning at step 1 above.
To File Changes:
If any changes need to be made, you can send a change report by clicking the
arrow on the side of the Customs button > AMS > Freight Report Change (FRC)
for regular shipments or select Freight Express Change (FXC) for express shipments.
91
FILE AN AIR WAYBILL
In the screen that opens, enter the following information:
92
•
Enter a Change Code (Reason for Amendment) by clicking on the lookup
button with the three dots.
•
Add an amendment explanation if needed.
•
Click the checkbox to “Change Arrival Information” to activate the fields
if you need to change the carrier, the flight number, or the scheduled
arrival date.
•
Click the Save & Next button.
FILE A DEPARTURE NOTICE
•
Review the information in the summary screen and make any corrections
if needed before sending.
File a Departure Notice
US Customs requires a notice stating when the air import shipment will leave
the point of origin and when it is expected to land in the US. (This is sometimes
93
FILE A DEPARTURE NOTICE
called a “wheels up” notice.) To file this report from within your Magaya system,
follow these steps:
94
1)
Click on the shipment you need to file a report for.
2)
Click on the arrow on the side of the Customs button, select AMS and
Flight Departure Message (FDM):
3)
In the Flight Departure Message screen, verify the information:
4)
Click Save & Next. If any information is missing, the system will notify
you. Make any needed corrections and return to this screen.
5)
Review the information in the summary screen before sending it.
QUERY SHIPMENT STATUS
Query Shipment Status
If you want to ask the status of an air shipment, you can send a query from
within your Magaya system:
1)
Select the shipment.
2)
Click on the arrow on the side of the Customs button, select AMS and
Freight Status Query (FSQ). In the screen that opens, fill in the request
code by clicking on the button with the three dots.
Select from the Request Codes:
3)
•
Routing information
•
Current record status
•
Nominated agent (Originator only)
•
Retransmission of FSN messages
•
House Air Waybill information for supplied Master Air Waybill
Click Save & Next. Review the information in the summary screen and
make any corrections before sending.
95
NOTIFY CUSTOMS OF THE STATUS OF GOODS
Notify Customs of the Status of Goods
Use this option to notify Customs when the goods have arrived at their destination so Customs can inspect them.
1)
Select the shipment.
2)
Click on the arrow on the side of the Customs button, select AMS and
Freight Status Notification (FSN). In the screen that opens, select the
status code by clicking on the button with the three dots. Codes are:
3)
96
•
In-bond arrived at destination
•
Local transfer of consolidated cargo to a Deconsolidator has been
accomplished
•
Carrier cannot locate shipment
Click Save & Next. In the next screen, review the information in the
summary screen and make any corrections if needed before sending.
VIEW AIR AMS MESSAGES
View Air AMS Messages
View AMS Messages for this Shipment:
1)
From the shipment, click on the arrow on the Customs button in the Shipment Toolbar and select “AMS Results”.
2)
In the screen that opens, any messages will be displayed. The list can be
filtered if needed. You can also click the “Get Messages” button to retrieve
messages.
View All AMS Messages:
To view all AMS messages, not just for one shipment, go to the Magaya Network
folder and open the Messages folder.
97
VIEW AIR AMS MESSAGES
The messages are also available from the Shipment List (under the Warehousing
folder). Click the “Detail” button, and select the option “AMS and ISF Results”
from the dropdown menu.
98
AIR AMS EXTRA INFORMATION
Air AMS Extra Information
Use this option if you have additional information to submit regarding the air
shipment such as permit to proceed information, transfer details, Customs
information, or to indicate a split or multi-part shipment:
This information will be included in your FRI or FXI. This dialog box is available from the Customs button on the Shipment Toolbar. There are fields in this
dialog box that do not appear in the Shipment screens.
99
MAGAYA ISF INTRODUCTION
Magaya ISF Introduction
The Importer Security Filing (ISF) initiative by the US Customs and Border
Protection (CBP) requires that importers and carriers submit additional cargo
information to CBP before the cargo is brought into the United States by vessel.
The importer is the party ultimately responsible for bringing the cargo into the
US and is responsible for filing the ISF. The importer is often the consignee but
could also be the owner, purchaser or agent. You may be filing on behalf of the
importer. Be sure to understand the requirements for your shipments.
The ISF requirement is also called “10+2” because US bound cargo requires the
ISF filer to provide 10 elements in the ISF (plus two that the carrier needs to
supply regarding the vessel stow plan and container status messages). Transit
cargo (FROB, IE, and TE) requires five elements. The initiative went into effect
January 26, 2010.
With Magaya ISF, you can easily transfer shipment data electronically to CBP
from within your Magaya software. This speeds up the filing process and eliminates data entry errors.
Getting Started
The ISF may only be filed through AMS or ABI. To become a Security Filing
filer using either AMS or ABI, call (703) 650-3500 to be assigned a Client Representative by Customs.
100
GETTING STARTED
To start the process, you will need to write a Letter of Intent stating that you will
use Magaya Corporation as your ISF service provider. A sample letter is available on Magaya.com on the Magaya ISF plug-in page.
Also contact Magaya Corporation to activate the plug-in feature in your software. The plug-in is available for the Magaya Supply Chain Solution and
Magaya Cargo System.
101
FILE ISF
File ISF
1)
Create the import shipment (or receive one), adding all the data about the
shipper, carrier, the routing, commodities, etc. The Importer of Record
must have an EIN or other number.
You need the SCAC code or the code from Customs. This is the same code
is used for AMS. If you do not have a SCAC code, Customs will provide
you one. (An IATA code is not required.)
Enter it in Maintenance > Configuration > US Customs, (or in the My
Company Info dialog box on the General tab by going to File > My
Company Info).
Be sure to include a Bill of Lading number in the Shipment data:
For the Commodities in your shipment, be sure to include these three ISF
elements: the country of origin, the manufacturer, and Harmonized Tariff
102
FILE ISF
Schedule code (HTS) code number on the AMS tab:
103
FILE ISF
2)
Click on the Customs button on the Shipment Toolbar and select
Importer Security Filing (ISF):
The ISF screen opens:
3)
In the ISF screen, enter the following information:
•
104
Select the ISF Filing Type: Choose ISF 10 for US bound cargo or ISF
5 for FROB cargo (Freight Remaining On Board).
FILE ISF
•
Select the Shipment Type: Most shipments are Standard code 01.
•
Select the Action: Add, Delete, or Replace. When you file a new ISF
for the first time for a shipment, use Add. When you file a replacement, use Replace. The data previously entered will remain until you
change it. See Step 4 below for more.
•
Select the Action Type: Use the Flexible Range option if you do not
have all the data for the entities and you will send it later. Use the
Flexible Timing option if the Consolidator and/or Stuffing Location
are not available and you will provide them later in an updated
transaction. You can file these up to 24 hours before the vessel
arrives.
•
Select the Bond holder code (the company responsible). Many
fields can be the same. In some cases the importer may have the
bond. You must have an Identification Number (EIN, DUNS, or
other Customs assigned number) in your Magaya system for the
bond holder. This can be found on the General tab for the entity. The
system saves the code to the bond holder entity. When creating
another ISF filing for this entity, the system will populate this
number in the field automatically.
•
Select the Bond Activity Code: Choose from the dropdown list
(Importer or Broker, International carrier, FTZ, etc.)
105
FILE ISF
•
Select the Bond Type: Continuous or Single Transaction
•
Enter the Surety Code: The code identifies the insurance (surety)
company providing the customs bond for the importer. The system
saves the code to the bond holder entity. When creating another ISF
filing for this entity, the system will populate this number in the field
automatically.
•
Enter the Bond Reference Number: This is a unique serial number
that appears on CBP Form 301 and is used for surety company
tracking purposes. (This is not the same as bond number.)
•
Add Elements: The table in the bottom half of the screen is used to
select the entities in the “Entity” column for each Role. (Three of the
elements are in the Commodity dialog box discussed in Step 1.)
If you are filing an ISF 5, three of the elements are already included
(the HTS number, from the Commodity dialog box, the port of
unloading and the place of delivery which are on the In-Bond Information dialog box).
The 10 elements for US bound cargo are:
106
FILE ISF
For US Bound Cargo
ISF 10 Elements
1
Importer of Record Number (responsible
party)
2
Consignee Number
3
Seller (Owner) Name and Address
4
Buyer (Owner) Name and Address
5
Ship To Party (after goods released from
Customs)
6
Manufacturer (Supplier) Name and Address
(this comes from the Commodity info)
7
Country of Origin (this comes from the
Commodity info)
8
Commodity HTS-6 (this comes from the
Commodity info)
9
Container Stuffing Location
10
Consolidator Name and Address
The five elements required for Transit FROB Cargo:
For Transit FROB Cargo
ISF 5 Elements
1
Booking party name/address
2
Ship To Party
3
Commodity HTS-6 (this comes from the
Commodity info)
4
Foreign Port of Unlading (this comes from
the In-Bond Information dialog box)
5
Place of Delivery (this comes from the
In-Bond Information dialog box)
•
Click the “Save & Next” button. If any information is missing, the
system will notify you. For example, the Consignee and Importer of
Record must have an Identification number, and all Entities are
required to have addresses. To edit any Entity profile, go to the
107
VIEW RESULTS
Maintenance folder, add the information and click the Refresh
button. The ISF dat you entered will be saved so you can return to
the ISF screen and continue.
A summary screen appears. Verify the information by looking for
any error messages. Make any corrections necessary by clicking the
Back button in the screen. All the information you entered will
remain in the fields so you can edit it.
•
Click Send.
View Results
After you send the ISF to CBP, you will receive a notification in your Magaya
system Customs Messages inbox.
If there are any error messages, return to the ISF and make any corrections.
If the transaction was rejected and you did not receive a Transaction number
from Customs. This means you must file a new ISF, but you can use the same
form and edit the existing information. When the ISF is accepted, a Transaction
code will be placed in the field called “Transaction Number”.
Another option to view results is to click the arrow on the side of the Customs
button in the Shipment Toolbar and select “AMS and ISF Results”
108
VIEW RESULTS
Another option to view ISF results: Click the Customs button on the Shipment
Toolbar and select “AMS and ISF Results”.
ISF results are also available to view from the Shipment List by clicking the
“Detail” button and selecting the option “AMS and ISF Results” from the dropdown menu.
Your Magaya software retains the results of all ISF filings, demonstrating
compliance has been met.
109
VIEW RESULTS
110
4. MAGAYA OCEAN CARRIERS INTERFACE WITH INTTRA
INTRODUCTION: MAGAYA OCEAN CARRIERS INTERFACE WITH INTTRA
4. Magaya Ocean Carriers Interface with INTTRA
Introduction: Magaya Ocean Carriers Interface with INTTRA
The Magaya Ocean Carriers Interface is a plug-in that allows Magaya customers
using the Magaya Cargo System or the Magaya Supply Chain Solution to
communicate with worldwide ocean carriers electronically from within Magaya
software. The Magaya Ocean Carriers Interface is connected with INTTRA, the
provider of e-commerce solutions to the ocean freight industry.
With this plug-in, you can create booking requests from within your Magaya
software and send them to the ocean carrier. When they review the request, they
return it to your Magaya system electronically. You can also send shipping
instructions to the ocean carrier from your Magaya system. Every step of the
request process can be automatically posted online in Magaya LiveTrack for
your customers to view as the events happen, keeping them updated on the
status of their shipment.
With the WMS Mobile wireless handheld units, you can create Pick and Load
tasks and send the shipping instructions to INTTRA before the items are actually picked. This is available in Magaya software version 9.1 and higher.
This topic will explain:
•
How to activate the Magaya Ocean Carriers Interface
•
How to create and send booking requests and shipping instructions to the
ocean carrier
•
How to use Magaya LiveTrack to view all the events related to the shipment
Activate Magaya Ocean Carriers Interface Plug-in
To activate the Magaya Ocean Carriers Interface plug-in, contact your Magaya
representative and provide the names of the carriers you use. Ensure the carriers
are in the INTTRA network:
111
CREATE A TRIP SCHEDULE
See http://www.inttra.com/the-network/partners/carriers
You must also enter the SCAC code for the carriers in the profile dialog box of
each carrier on the “Ocean” tab. If not, you will get an error when processing
shipping instructions.
This plug-in works with the Magaya Cargo System and the Magaya Supply
Chain Solution.
Create a Trip Schedule
To optimize your use of the INTTRA plug-in, we recommend setting up trip
schedules in your Magaya system.
The Trip Schedules feature in Magaya Explorer gives freight forwarders and
logistics companies a method of saving information about the carriers used
regularly. Then you can use those trips when you send booking requests to the
ocean carriers through the INTTRA plug-in. (Note: NVOCC’s use the Trip
Schedule to communicate with carriers.)
In Magaya Explorer, create a Trip Schedule in the Bookings folder:
1)
Click on Trip Schedule.
2)
Click on the Add button and select Ocean Trip Export.
For complete details on using the Trip wizard, see the “Magaya Cargo System
Operations Manual” chapter on Trip Schedules. (Note: Bookings and Trip
Schedules are available for the Magaya Supply Chain Solution and Magaya
Cargo System.)
112
SEND A BOOKING REQUEST TO THE CARRIER FROM THE TRIP SCHEDULE
Send a Booking Request to the Carrier from the Trip Schedule
To verify if a carrier can accept a booking, send a request:
1)
Right-click on the ocean trip in the Trip Schedule in your Magaya
Explorer.
2)
Select Ocean Carrier Messages > Booking Request from the pop-up menu.
113
SEND A BOOKING REQUEST TO THE CARRIER FROM THE TRIP SCHEDULE
3)
In the Booking Request screen that opens, fill in the fields with the information you want to send to the ocean carrier.
- Select the Service Type from the dropdown:
•
Door to Door
•
Door to Port
•
Port to Port
•
Port to Door
- Enter the Contract Number from the carrier (optional).
- Enter the Description of Goods.
- Click the checkbox to send booking notes (optional).
- Enter Temperature Control Instructions if needed.
- Click the Save & Next button.
114
SEND A BOOKING REQUEST TO THE CARRIER FROM THE TRIP SCHEDULE
4)
The next screen is a summary of the booking request. The screen is organized into sections. If any field is marked in red, correct the error before
sending.
To make a correction, click the Close button to return to the Trip Schedule
to edit on the appropriate tabs. (All data will be saved.) For example, the
carrier can be found on the General tab of the Trip. Their SCAC code is
mandatory; if it’s missing, go to the Routing tab, and open the Carrier
profile in the dropdown menu for their name. The information in each
section is pulled from the Trip:
•
The "General" section is from the General tab of the Trip.
•
The Entities section is from the Entities tab of the Trip.
•
The Routing Information is from the Routing tab of the Trip.
•
The Shipment Instructions section is from the previous screen. Click
the Back button at the bottom of the Summary screen to go back and
edit the information if needed.
•
The Equipments section is from the Equipments tab of the Trip.
•
The Goods Details are from the Commodities tab of the Trip.
•
The email notification list is pulling an email address from each
entity.
When edits are completed, right-click on the ocean trip again from the
Trips list.
5)
When the Status of each field is OK, click the Send button. This will post
the message to the Magaya Network servers and send it to INTTRA.
Click OK in the dialog notice box.
The Booking request is sent to ocean carrier via INTTRA. The carrier verifies if
the space is available and will accept or reject the booking request. A “Conditional Acceptance” includes changes made by the carrier.
Check for Messages:
115
SEND SHIPPING INSTRUCTIONS TO THE CARRIER
You can check for messages by right-clicking on the Trip, selecting Ocean
Carrier Messages and click on “Results” from the pop-up menu. (Alternative:
You can also access it by using the Actions button or by opening the Magaya
Network folder and clicking on “Ocean Carrier Messages”.)
Send Shipping Instructions to the Carrier
This section will explain how to add Shipping Instructions to an outgoing shipment and send them to the ocean carrier. This step will be performed after the
ocean carrier has accepted your booking request.
1)
116
Go to the Outgoing Shipments folder and select the shipment you need to
send. Make sure you are in the Master level of the shipment and all the
SEND SHIPPING INSTRUCTIONS TO THE CARRIER
cargo is placed in containers. ALL cargo must be containerized in the
Master.
2)
Click the arrow on the side of the Actions button and select Ocean Carrier
Messages > Shipping Instructions.
A new screen opens for the shipping instructions. Note: If you do not have
a container in the shipment, or if there are items at the Master level that
are not inside a container, the system will notify you. If the carrier is not
in the INTTRA list, the system will notify you.
If needed, move the items inside a container at the Master level.
117
SEND SHIPPING INSTRUCTIONS TO THE CARRIER
3)
In the form, enter the following information to send to the ocean carrier.
Details entered here will appear in the Bill of Lading.
Select the service type:
118
•
Door to Door
•
Door to Port
•
Port to Port
•
Port to Door
4)
Select the Shipment Type: Full Load or Less Than Full Load (LCL)
5)
Add any routing instructions as needed.
6)
Select the clauses needed. Examples are “Freight as agreed” or “Laden on
Board”.
SEND SHIPPING INSTRUCTIONS TO THE CARRIER
7)
The Description of Goods is filled in automatically, pulling the information from your shipment. Uncheck this box to remove the description if
you don’t want it sent to INTTRA.
8)
The field “Send shipment notes” is also gathering information from the
shipment and displaying it here. Uncheck this box to remove it.
9)
The Charges section is optional. For example, if you do not have charges
entered in the shipment transaction yet, but you know they will be prepaid
(or collect, etc.), then you can select the type of charge here to send the
data to the carrier.
10) Enter the number of Freighted and Unfreighted Bills of Lading you want
printed for the carrier. The options are Original or Seaway/Express.
11) Click the “Save & Next” button.
12) The next screen displays a summary of the message that will be sent to the
ocean carrier. If the Status of any field is marked in red, it must be
corrected before sending. Click the Close button to return to the shipment
to make corrections. See the list of fields below to find the tabs to edit. The
Shipping Instructions will be saved if you need to leave the screen and
return to it to continue.
•
Make the corrections, and return to the shipping instructions again.
•
When the Status is OK, click the Send button. This will post the
message to the Magaya Network servers. Click OK in the dialog
notice box. This will send the message from Magaya’s servers to
INTTRA for approval.
List of Fields:
When making corrections, find the following fields on these tabs:
119
SEND SHIPPING INSTRUCTIONS TO THE CARRIER
•
Service Type: is found on the Routing tab
•
LCL Yes or No: Is taken from the Mode of Transportation field. If you
selected “Vessel” (which is LCL), this field will display "Yes." If you
selected “Vessel, Containerized” (which is FCL), this field will display
"No."
The ITNs for each House come from Customs and are found in the EEI
Results under the Customs button on the Shipment toolbar.
•
The Freight Payment section pulls information from the Routing tab, port
of loading or unloading and the Country Code and Port Code. If the
Ocean Freight Service is Prepaid, this will be Port of Loading. If the Ocean
Freight Service is Collect, this will be Port of Unloading.
•
Carrier: is found on the General Tab. Also on the General tab is the Bill of
Lading release information: The Code is from the Executed Place and
must be a valid port.
•
The entities such as the Freight Forwarder, the Shipper, Consignee, etc.
gather information from that entity's profile.
The Requestor gathers information from the My Company Info dialog
box (accessible via the "File" menu option in the software's top toolbar).
The documents listed are the documents selected for this shipment.
120
•
Max Pieces/Weight/Volume: General Tab
•
Shipper and Consignee: Entities Tab
•
Place of receipt/delivery by Pre-Carrier: Routing Tab. The Routing tab
contains the vessel information.
•
Equipment (Must be a container type): Equipment Tab. The “Summary”
section pulls information from the Packing List such as the equipment, the
VIEW OCEAN CARRIER MESSAGES
number of packages, and the gross weight and volume. The gross weight
depends on if you check ed the box in the Container dialog box to apply
the weight of contained pieces. The Supplier of the container is automatically filled in as the carrier.
The “Applicable Charges” information and “Shipping Instructions” such as
clauses are found on the first screen of the shipping instructions. Click the
“Back” button to return to that screen. If any comments display here, they were
pulled from the Description of Goods field on the General tab and Shipment
Notes from the Notes tabs.
The “Goods” section pulls data from the Commodity dialog box for the items.
Additional details about the commodities and containers:
•
The line number of an item indicates the contained item inside the below
container.
•
The Package level (such as "outer, Inner, or Inner Inner") is automatically
filled in based on the level the item is created.
•
The number of packages is automatically filled in from the Contained
Pieces.
•
The Commodity Package Type code is converted to 2 characters as
required by INTTRA.
•
INTTRA does not have a field for the description of goods of the house
shipment. Long package descriptions will need to be written to the Master
Description of Goods.
View Ocean Carrier Messages
To view the message to the ocean carrier, go to the Shipment, click on the
Actions button, and select Ocean Carrier Messages. Click on “Results” from the
pop-up menu.
A new screen will open, displaying messages for that shipment. The Shipping
Instructions you sent will be categorized as an outgoing message. When the
carrier sends you an application acknowledgement, you will receive this here as
an incoming message. The accepted shipping instructions will be displayed in
the bottom half of the screen. You can filter the list of messages if needed by
clicking on the Filter button. Message types:
•
Accepted - if the carrier confirmed all the criteria you requested
•
Rejected - if the booking request was not confirmed along with due explanations for the rejection
121
VIEW OCEAN CARRIER MESSAGES
•
Conditional Accept - when the carrier changed some of the criteria you
requested originally in order to accommodate your booking request. Such
conditional changes may include, but are not limited to, rolling the sailing
date you requested over to a different date due to space availability
If you need to make changes to shipping instructions, edit them and resend
them.
To view all the carrier messages, not just the ones for that specific shipment, go
to the Magaya Network folder and click on the Messages folder. Click on Ocean
Carrier Messages.
To Sort the List: You can filter the list of messages if needed by clicking on the
Filter button. You can go to a shipment from this list by selecting the shipment
message and right-clicking on it.
Bill of Lading Attached:
The ocean carrier will send you a draft of their Bill of Lading, if the carrier is
integrated with the WebBL service from INTTRA. The BL will be attached to
your shipment on the Attachments tab. If more than one draft is sent over time,
they will appear in the Attachments tab.
Changes: If you need to make changes to a Bill of Lading, you can resend the
shipping instructions. The final Bill of Lading will also appear in the Attachments tab. (You can also view the Bill of Lading from the Ocean Carriers
Message folder under the Magaya Network folder.)
122
TRACK SHIPMENT EVENTS
Option: View messages in the Shipment List > click the Detail button, and select
the option Ocean Carriers Messages.
Track Shipment Events
All the Events associated with the shipment are displayed on the Events tab in
the shipment in your Magaya Explorer.
The Events can also be viewed online via Magaya LiveTrack, or via the email
link sent via Transaction Tracking that can be viewed on a PC, smart phone or
tablet. The Events are updated automatically by the carrier and show the date
and time of the Event.
Your customers can double-click the transaction to view the tracking details
from INTTRA, which are the same as shown in your Magaya Explorer Events
tab.
Events include:
123
CONFIGURATION: LINK CONTAINERS
•
In-Gate: This Event indicates the container has arrived in the yard. From
here the container will be loaded onto a vessel for transit to final destination.
•
Loaded On Vessel: The container is being loaded onto the designated
vessel.
•
Vessel Departure: This Event provides an update on the vessel’s departure.
•
Vessel Arrival: This notifies you about the vessel’s arrival at destination.
•
Unloaded From Vessel: This Event shows the container status once it is
unloaded from the vessel.
•
Out-Gate: This Event indicates the container is leaving out of the gate at
its final destination. Normally this will signify the last part of the trip when
the container is taken to the warehouse to be processed.
•
Return Container: This reflects when your equipment (container) is
returned to its ocean carrier.
You can also keep you customers informed of shipment updates by using
Magaya Transaction Tracking; just click the arrow on the side of the “Email”
button in the top toolbar. See the topic "Transaction Tracking".
Configuration: Link Containers
To begin using the Magaya Ocean Carriers Interface plug-in, you will need to
link your containers in your Magaya database to their code descriptions.
This step is only required for existing customers who add the Magaya Ocean
Carriers Interface plug-in to their existing software. (If you are getting started
with a new license of Magaya software, the codes for containers are already
linked.) This step is only performed once.
124
CONFIGURATION: LINK CONTAINERS
To link all containers used for ocean shipments, follow these steps:
1)
Go to Warehousing > Package Types.
Select the container type that are used for ocean shipments.
Double-click on it to open it.
2)
In the dialog box that opens, click on the button with the three dots (the
Lookup button) next to the field “Container Equip. Type”.
When you click the Lookup button, a list opens displaying all the
containers and their codes.
125
CONFIGURATION: LINK CONTAINERS
3)
Find the description of the container in the list, select it and click OK.
The code for the container equipment type fills into the field.
Click the OK button in that screen to save and close the dialog box.
Repeat these steps for each container type until you have matched all the
container types with their codes.
126
5. MAGAYA LIVETRACK
INTRODUCTION TO LIVETRACK: GETTING STARTED
5. Magaya LiveTrack
Introduction to LiveTrack: Getting Started
Magaya LiveTrack is an interactive online tracking tool that provides 24/7
access to Pickup Orders, Warehouse Receipts, Cargo Releases, Shipments, Sales
Orders, Purchase Orders, Jobs, Invoices, and more. Your customers and agents
can log in to their account from any Internet-connected computer worldwide at
any time.
The link to the tracking can be added to your company website, or your
customers can go to Magaya.com and click the tracking link.
You can make cargo and inventory information and any related transactions
viewable online by setting permissions access and giving your customers and
agents a secure password. For example, you can set up one account for a
company or provide individual access to different people (contacts) at the same
company. You can also customize which transactions you want each person to
access. They can view and print from Magaya LiveTrack, including printing
attached documents such as Air Waybills, Bills of Lading, photographs, etc. and
more.
To activate LiveTrack, contact your Magaya Logistics Advisor to learn more and
see the pricing.
127
INTRODUCTION TO LIVETRACK: GETTING STARTED
The following is a brief overview of what’s available via Magaya LiveTrack. The
options visible depend on which Magaya software product you are using and
what you have given your customers permission to access:
•
Rates: Your customers can view the rates for services and sort through
them based on measurement of the cargo, mode of transportation, origin
and destination.
•
Bookings: Your customers can view existing bookings and place their
own bookings.
•
Pickup Orders: View Pickup Orders to check their status and details such
as the shipper, carrier, number of pieces, etc. Customers and agents can
create Pickup Orders online to request pick up and delivery of items and
to print labels.
•
Warehouse Receipts (WR): See shipper information, consignee, carrier,
item descriptions, date and time received, cargo on hand, in transit or
delivered, and more.
•
Cargo Detail: Shows all the cargo in the warehouse for the customer, i.e.,
every box in every WR (but not grouped by WR)
•
Inventory: Shows what inventory is available for customers who keep
inventory in your warehouse. View part number, description, serial
number, manufacturer, etc. by right-clicking on the commodity.
•
Cargo Releases: View Cargo Releases and their release date and time,
carrier, number of pieces, dimensions, etc. Customers and agents can
create Cargo Releases for items they want shipped. The screens are the
same as creating an online shipping order. See the section “Online Shipping Orders” for details.
•
Shipments: Shows information for a shipment and any documents
attached to it such as the air waybill, cargo manifest, etc.
•
Shipping Orders: Create a shipping order based on items on hand and
include delivery instructions.
•
Invoices: Shows invoices, date and amount due and more. You can also
exclude new invoices from viewing online via: Maintenance > Configuration > Accounting. Also configure a customer’s profile to give them the
option to pay, approve or dispute invoices online. See Chapter 9 on Online
Payments in the Magaya Software Communications Manual, available on
the Magaya.com website.
•
Instant Messenger: Chat live with agents and customers using the Instant
Message screen.
If you have the Magaya Supply Chain Solution or Magaya Commerce System,
you can create an online store and provide your customer with access to Sales
128
HOW TO ACCESS TRACKING
Orders, to view Purchase Orders, Job, and more. The LiveTrack also has options
to view Shipments, Quotes and Rates.
How to Access Tracking
There are a few ways to access the tracking:
•
Go to Magaya.com and click the Tracking link
•
Enter https://tracking.magaya.com into a web browser.
•
Add the Magaya Network ID to the end of this link:
https://tracking.magaya.com/?orgname=13939
Replace the numbers 13939 with your Magaya Network ID
•
Add a link to the tracking or a widget on your webpage: See the section
“Add Tracking to your Website”
Add LiveTrack to your Website
Add a direct link to the tracking so your customers stay on your website. The
link includes HTML code and your Magaya Network ID as shown in this
example:
https://tracking.magaya.com/?orgname=NetworkID
See the section “Add Tracking to your Website” or contact Magaya to get the
HTML code for this link.
Resources
Also see the topic “Magaya LiveTrack Setup” to learn how to give your
customers access and more.
Also see the “Getting Started” articles for each of the Magaya plug-ins available
on LiveTrack such as online bookings, online payments, and more. See Chapter
5 of the Magaya Software Communications Manual, available on the
Magaya.com Learning Center web page.
129
ADD TRACKING TO YOUR WEBSITE
RESOURCES
Add Tracking to Your Website
To add tracking to your website, add this code to your website. This will enable
you to offer Magaya LiveTrack directly from your website. Your customers will
not need to go to Magaya.com to track their cargo or for any other tracking.
Use this code for the iframe. It contains a demo company ID number of 13939.
It is one line that contains a space between “iframe” and “src” and a space after
the demo number 13939:
<iframe src="https://tracking.magaya.com/?orgname=13939
"width="100%"height="800px"></iframe>
Replace 13939 with your Magaya Network ID number.
Here is the code for an example of a web page:
<html>
<head>
<title>Magaya LiveTrack 2.0</title>
</head>
<body>
<iframe src="https://tracking.magaya.com/?orgname=13939"
width="100%"height="800px"></iframe>
</body>
</html>
130
MAGAYA LIVETRACK SETUP
SET USER PASSWORDS AND PERMISSIONS
Magaya LiveTrack Setup
Set User Passwords and Permissions
To give your customers passwords and set permissions to access Magaya LiveTrack, follow these steps:
1)
Go to the Maintenance folder > Customers.
Note: This example shows how to set up access and permissions for a
customer. The steps are the same to allow access for individual contacts
within a company or forwarding agents.
2)
Click on the customer’s name in the list to highlight it.
131
MAGAYA LIVETRACK SETUP
SET USER PASSWORDS AND PERMISSIONS
3)
Access a pop-up menu by right-clicking the customer name (or via the
Actions button) and select “Allow Tracking”:
A dialog box opens, showing the General tab first.
132
MAGAYA LIVETRACK SETUP
SET USER PASSWORDS AND PERMISSIONS
4)
The General tab includes fields for the user name, login, and password.
The system generates a login name. You can override the system-generated login name and create your own by typing into the field.
Create a password for your customer. You can also click the “Generate”
button to get a password generated by the system. This password will be
included in the email invitation that you will send the customer after you
complete these steps.
Note: You can give customers the option to create their own passwords.
See the section “Enable Customers to Manage their own LiveTrack
Accounts.”
5)
Set Permissions: On the Tracking tab, click in the boxes to specify the
tracking permissions for this user.
Uncheck any functions that are checked by default as needed.
Note: The features listed will be the ones available in your Magaya software
product. For example, this screenshot shows Sales Orders, which are available in the Magaya Supply Chain Solution and Magaya Commerce
System.
133
MAGAYA LIVETRACK SETUP
SET USER PASSWORDS AND PERMISSIONS
6)
Click on the Restrictions tab (optional). This tab allows you to narrow the
transactions the user can see.
The restrictions can be set by Origin, Destination, and Mode of Transportation. If you do not add any restrictions, the system will give the user
access to all modes by default.
Origin: Origin is the first choice available on this tab. Click on the Add
button. The Port list opens. Select origin ports you want to give this user
access to. The list in this screen will populate with the ports you select.
Destination: Click on “Destinations”, and click the Add button. The Port
list opens. Select the destination ports you want to give this user access to.
The list in this screen will populate with the ports you select.
Modes of Transportation: Click on “Modes of Transportation” and click
the Add button. A list of transportation modes opens. Select the modes
that you want to give this user access to, and they will be saved in the list.
7)
134
Click the OK button to save.
MAGAYA LIVETRACK SETUP
ENABLE CUSTOMERS TO MANAGE THEIR OWN LIVETRACK ACCOUNTS
Enable Customers to Manage their own LiveTrack Accounts
There are options available to give your customers the choice to register themselves online and to change their passwords themselves, without you having to
do it for them (available in Magaya LiveTrack version 2.0 and higher). This is
especially useful for couriers and others with many customers who want to track
packages online.
Steps to allow customers to register themselves:
1)
Go to Maintenance > Configuration > Customer Setup: Click the
checkbox “Allow clients to register directly on Magaya LiveTrack”.
If you want customers to be able to use LiveTrack as soon as they register,
check this box. If not, you will need to manually enable their access from
the Customer list by right-clicking on their name and selecting “Web
Track User List” and unchecking the “Disable” checkbox in the dialog
box.
2)
Specify the permissions by checking the boxes for the functions you want
the users to have access to. Some functions are checked by default. This
sets system-wide preferences; to change it per customer, go to the
Customer list, right-click on their name and select “Allow Tracking.”
3)
Allow your customers to be able to update their passwords online themselves by checking the box to “Allow clients to update their password for
Magaya LiveTrack.”
135
MAGAYA LIVETRACK SETUP
ENABLE CUSTOMERS TO MANAGE THEIR OWN LIVETRACK ACCOUNTS
Account Number Options:
Additional options in the Configuration > Customer Setup screen include
setting your system to automatically generate account numbers for new and
existing customers.
•
If you want the system to automatically generate account numbers for new
customers, click the “Set” button. In this dialog box, set the options for a
prefix, suffix, and a starting number. Click OK to save. Note: This takes
effect for all new customers, whether they sign up online or if you add
them directly into your Magaya system.
Note: If you check this option to create account numbers, then an Account
Number will be automatically filled in on the General tab in the
Customer’s profile. Then you will need to Allow Tracking for that
customer by right-clicking on their name and creating a password for
them. Then notify them of their access to the system via one of the email
templates.
•
If you want the system to automatically generate account numbers for
existing customers who do not have account numbers, check the box.
This process will occur in the background, and you can continue working
while it is being done. How long it will take depends on the quantity of
customers in your Customer List.
Result: The customer can log into LiveTrack with their user name or
account number.Just email them from Magaya to give them the link. See
the section “Invite a Customer to use LiveTrack..”
136
MAGAYA LIVETRACK SETUP
ENABLE CUSTOMERS TO MANAGE THEIR OWN LIVETRACK ACCOUNTS
•
If you import customer names via API or other import method, you can
tell the system to generate new account numbers in case there is a conflict.
•
If you want your staff to be able to search for customers in your Magaya
system by using the customer’s account number instead of their name,
check this box to “Allow searching for clients by their account numbers.”
For example, this is useful when creating a shipment or other transaction;
when selecting the customer name from the dropdown list, you can type
in the account number also, and the system will find the customer and fill
in the field.
Save the configuration.
Get Alerts:
Set up a System Alert to notify you when a customer has registered online: Go
to Maintenance > Configuration > System Alerts. Click the Add button and
select “Client Registration” in the dialog box. Fill in your preferences for notification.
To enable the system to send a notice to customers who register online, check
the box “Send Email to Sender” for External Notification.
Select an email template from the “Message/Select Email Template” dropdown
menu. To create a template, go to Configuration > Email Templates.
When a customer signs up online, the information is sent to your Magaya
system Inbox and their customer profile is created in your system automatically.
137
MAGAYA LIVETRACK SETUP
INVITE A CUSTOMER TO USE LIVETRACK
Invite a Customer to Use LiveTrack
To invite a customer to use Magaya LiveTrack, follow these steps to send them
an invitation email:
In the Customer list, right-click on the Customer’s name, and select “Send invitation email.” (The same option is available from the Actions button.)
Tip: Ensure the customer has an email address entered in their profile.
The system opens an email message template that includes the login link, their
user name and password, and a list of the transactions that they can access. The
template for the email message can be changed by selecting a different template
from the dropdown menu.
Add any attachments or make any changes and then send the message. For
more details on the email templates, see the topic “Email Options”.
Customers log in to Magaya LiveTrack with the password that you give them in
the invitation email. When a customer (or agent) clicks on the link in the invitation email, a web page opens. Their login will enable them to see the transactions that they have permission to access.
Set the Email Template:
To set an email template as a default for your Magaya system:
138
MAGAYA LIVETRACK SETUP
RECEIVE NOTIFICATIONS
Go to Maintenance > Configuration > “Outgoing Messages”.
The Outgoing Messages screen provides many setup options, but we will focus
on the Customer Tracking Invitation Email option.
Extra Info: The other configuration options for sending outgoing transaction
messages is covered in Chapter 2, “Magaya Network,” of the Magaya Software
Communications Manual.
Select the email template you want.
Save your settings.
Receive Notifications
When a customer makes a request in Magaya LiveTrack, a notification alert can
be sent to your Magaya Inbox.
139
MAGAYA LIVETRACK SETUP
RECEIVE NOTIFICATIONS
Set up the alerts in Maintenance > Configuration > System Alerts.
There are many options for different alerts. Click the dropdown menu for the
“When” field to see options. Edit other fields as needed.
Go to your Magaya Network Messages Inbox to receive the messages (or the
Task folder, per your setup). Process the request.
Tip: To see who created the online request, go to the list for that type of transaction (such as a Pickup Order) and add the column “Online Creator” to the list
by using the “Choose Columns” options from the Actions button.
140
MAGAYA LIVETRACK SETUP
CHANGE A USER’S ACCESS
Change a User’s Access
To change a customer’s (user’s) access to LiveTrack:
1)
Go to the Customer list under the Maintenance folder (or Contacts or
Forwarding Agent).
2)
Select the Customer name (or contact or agent’s name). You can also
right-click on the name. Select “Allow Tracking”. The tracking dialog box
opens.
3)
Go to the Tracking Tab. Uncheck the boxes for the transactions that you
do not want the user to access. Click the OK button to save changes.
Disable a User’s Access
1)
Go to the Customer list under the Maintenance folder. (This can also be
done for Contacts or Forwarding Agents).
2)
Select the Customer name. (Or right-click on the name.)
3)
Click on the Actions button and select “Remove Tracking”.
141
LOGIN AND NAVIGATE THE LIVETRACK INTERFACE
WHERE TO FIND LIVETRACK AND LOG IN
Login and Navigate the LiveTrack Interface
Magaya LiveTrack is a Web-based system, and login is available from any
computer or device that is connected to the Internet. You can see your cargo,
inventory quantities, invoices, etc. 24 hours a day.
Note: The online tracking is provided by Magaya Corporation, but the logistics
services are not. If you have questions about a shipment, etc., contact your logistics provider.
NOTE to Logistics Provider: The following instructions are for your
customers. “You” refers to the customer of the logistics provider (not to the
Magaya customer). These instructions show customers how to use LiveTrack
after you have configured it in your Magaya Explorer.
When you offer Magaya LiveTrack access to your customers, tell them what
transactions they will be able to see and send them the invitation email by
right-clicking on their name in the Customer list..
You can give these instructions to your customers.
Where to Find LiveTrack and Log In
A link to LiveTrack can be added to your website to open the LiveTrack page
inside your website or as a separate window/tab. This embeds your Magaya
Network ID number so that your customers do not need to enter it.
LiveTrack can also be found on Magaya.com (as of February 2015). Your
customers will need your Magaya Network ID number to log in.
Log in using one of these two ways:
- Log in from your logistics provider’s website, or
- Log into https://tracking.magaya.com/
142
LOGIN AND NAVIGATE THE LIVETRACK INTERFACE
WHERE TO FIND LIVETRACK AND LOG IN
If you access LiveTrack from your logistics provider’s website, they may have an
option that enables you to register the first time you visit the site. If not, just log
in with the user name and password they gave you:
143
LOGIN AND NAVIGATE THE LIVETRACK INTERFACE
WHERE TO FIND LIVETRACK AND LOG IN
If you use the Internet Explorer (IE) browser, Magaya LiveTrack 2.0 will open:
Note: LiveTrack 1.0 was the former version of the tracking website. Many
improvements have been made to the tracking, and the improved version is 2.0,
which we recommend. LiveTrack 2.0 works in any browser such as IE, Firefox,
Chrome, or Safari.
144
LOGIN AND NAVIGATE THE LIVETRACK INTERFACE
PASSWORDS: CHANGE YOUR PASSWORD OR GET A NEW ONE
Passwords: Change Your Password or Get a New One
If you forget your password, reset it (get a new one) in the login screen:
You can also reset your password in the “Settings” button at the top of the LiveTrack screen after logging in (if this option is activated by your logistics
provider).
The LiveTrack Interface: Dashboard, Toolbars, Menus & Buttons
Caution! Do NOT click your browser’s Back button. It will take you out of your
LiveTrack session. You will need to log in again.
Note: If you’re already familiar with the interface and just need information on
a specific function such as Inventory or Invoices, skip ahead to the section in
this document.
145
LOGIN AND NAVIGATE THE LIVETRACK INTERFACE
THE LIVETRACK INTERFACE: DASHBOARD, TOOLBARS, MENUS & BUTTONS
The Dashboard:
When the interface opens, a Dashboard displays current transactions.
The menu on the left shows the transactions you have access to such as Rates,
Bookings, Warehouse Receipts, Cargo Detail, Inventory, etc. What you see
depends on your permissions, which are set by your logistics provider.
The Date filter across the top can be used to view specific transactions based on
a date range:
146
LOGIN AND NAVIGATE THE LIVETRACK INTERFACE
THE LIVETRACK INTERFACE: DASHBOARD, TOOLBARS, MENUS & BUTTONS
•
Click on the Dates dropdown menu and select a timeframe such as “This
Week”, “This Month”, “Last Three Months”, etc.
•
To select a specific date range, select “Custom” in the Dates dropdown.
Use the dropdowns for “From” and “To” to select the dates from the
pop-up calendars.
To widen a column, drag the column header to the desired width. To rearrange
the order of the columns, click and drag the column headers to the desired place,
147
LOGIN AND NAVIGATE THE LIVETRACK INTERFACE
THE LIVETRACK INTERFACE: DASHBOARD, TOOLBARS, MENUS & BUTTONS
or click on the Actions button and select “Choose Columns”. Make changes in
the dialog box.
Other buttons on the toolbar: Refresh, Stop, and Search.
You can also select a view of the list, and save it (optional). Note: The “Transport
View” is available in the Booking list.
Other functions in Magaya LiveTrack include buttons for the following:
148
•
View: Select a transaction and click the View button to see the details of
the transaction. Custom stylesheets are available; contact Magaya.
•
Print: Print a document when viewing it.
LOGIN AND NAVIGATE THE LIVETRACK INTERFACE
THE LIVETRACK INTERFACE: DASHBOARD, TOOLBARS, MENUS & BUTTONS
•
Find: The “Find” button opens a search field in the top toolbar:
•
Quick Tracking: This opens a dialog box with search options per transaction type. (Note: This is available with the Transaction Tracking plug-in.)
149
LOGIN AND NAVIGATE THE LIVETRACK INTERFACE
THE LIVETRACK INTERFACE: DASHBOARD, TOOLBARS, MENUS & BUTTONS
•
Filter: Standard and Advanced filters are useful when lists are too long to
scroll through. The Filter dialog box options change, depending on the
transactions list you view. This is the Standard Bookings filter:
This is the standard filter for Invoices:
The Advanced Filter provides more options and a search:
Note: When you Filter a list, it will display only the filtered items. To view
the whole list again, click on the Unfilter button.
150
LOGIN AND NAVIGATE THE LIVETRACK INTERFACE
WORKING WITH TRANSACTIONS IN MAGAYA LIVETRACK
•
Actions: Choose columns, find, or export data as a PDF, CSV, XML, or
HTML. Statistics shows totals of weight, volume, etc. for a list.
Working with Transactions in Magaya LiveTrack
Click the icon for the transaction you want to view such as Warehouse Receipts,
Cargo Releases, Shipments, etc. The icons visible will depend on your permissions.
In any list, to open a transaction and view it, double-click on it.
To group items in a list, click the arrow on the side of the “Status” column
header and select “Group by this field.”
151
LOGIN AND NAVIGATE THE LIVETRACK INTERFACE
WORKING WITH TRANSACTIONS IN MAGAYA LIVETRACK
This will display totals per group.
In the Shipment list, you can select columns that display information from the
P.O. and the Commodity description.
To add an attachment, click the “Upload” button. Find the document and add
it. This will make the document available for your logistics provider. The
maximum file size is 5 MB.
You can also save an attachment: Click the attachment icon to select it and click
the “Save” button. This will save a copy of the document on your computer or
network in the folder you specify.
152
MAGAYA LIVETRACK RATES AND CARGO DETAIL
RATES
If you have items with serial numbers, they will be grouped. Click the plus sign
to expand and view the list.
Magaya LiveTrack Rates and Cargo Detail
Rates
In the Rates section, query and view rates (prices) for services related to moving
cargo.
In the Rates section, your customers can query and view the rates (prices) for
services related to the movement of cargo that you have created in your Magaya
system for air, ocean, and ground service.
153
MAGAYA LIVETRACK RATES AND CARGO DETAIL
CARGO DETAIL
•
Select the type of rate wanted by selecting the method (air, ocean, ground)
and click the Refresh button. View the rates by origin and destination by
using the “From” and “To” dropdowns.
Any available rates will appear in the list. To view details of a rate,
double-click on it in the list. A window opens showing the information:
The Rates a Livetrack user sees are the rates in your Magaya Explorer. To learn
more about entering rates in your Magaya system, see the Magaya Software
Customization Manual.
Cargo Detail
The Cargo Detail section of the online tracking shows all the cargo or items
related to your transactions. The columns available include the defaults of
status, description and dimensions. Others include Expiration Date, External
154
ONLINE BOOKINGS: GETTING STARTED
Tracking Number, transaction type and number, and warehouse location.
Choose the columns via the Actions button.
Open an item to view the details such as the Part Number (if applicable), model
name or number, status (on hand, arriving, etc.), description, dimensions and
more.
Online Bookings: Getting Started
With the Online Bookings feature in Magaya LiveTrack, you can give your
customers the option to request a booking (reservation) to schedule their cargo
on an air, ocean, or ground trip.
Online Bookings is a plug-in for the Magaya Cargo System and for the Magaya
Supply Chain Solution. To offer your customers the option to make reservations
online, you must first activate it in your Magaya account. Contact your Magaya
representative to turn on the function.
How to Get Started
To get started with the online bookings feature after it is activated for your
Magaya account, you will need to configure it and let your customers know how
to use it.
155
ONLINE BOOKINGS: SETUP AND PROCESSING
SET UP ONLINE BOOKINGS IN YOUR MAGAYA SYSTEM
Start with the topic “Set Up and Process Online Bookings.” This explains how
to configure the feature and how to process booking requests that your
customers send you from LiveTrack. Here is the link to topic in the Magaya
Knowledgebase:
http://knowledge.magaya.com/?search=setup_process_online_bookings
Refer your customers to the LiveTrack4Users Guide, located on the tracking
page, which explains all the features in the tracking, including how to use the
dashboard, menus and lists. If you only want to give them information about
online bookings, give them this link to the Magaya Knowledgebase article
“Request a Booking Online”:
http://knowledge.magaya.com/?search=online_booking_request
Online Bookings: Setup and Processing
This topic explains how to set up and process booking requests from your
customers.
Set Up Online Bookings in Your Magaya System
You can configure your Magaya system to handle online bookings either of two
ways:
•
1) to accept any bookings your customers enter, or
•
2) to use trip information in your Trip Schedule to create bookings.
Note: The steps for adding Trips is explained in the Magaya Cargo System
Operations Manual in Chapter 13.
156
ONLINE BOOKINGS: SETUP AND PROCESSING
SET UP ONLINE BOOKINGS IN YOUR MAGAYA SYSTEM
Configure your Magaya system to accept online bookings:
1)
Go to the Maintenance folder > Configuration > Online Bookings:
2)
Read the following options and select how you want to configure your
system to receive online booking requests:
To process booking requests automatically, check the box “Process
booking requests automatically.” When a customer places a booking
request online, the system will reply automatically with a booking
number, and booking transactions will be saved in your Booking List. A
message will also appear in your Magaya Network Messages Inbox.
If you do not check this box, the booking will not be saved in the Booking
List. Use this option if you want to manually verify each booking request
you receive before saving it to the Booking List for processing. The
customer will receive the following default message: “Your booking
request has been received and will be processed within the next business
day.” You can change this default message to any text you want right on
this Configuration screen.
Check the box “Allow booking requests without existing trips” if you want
to accept booking requests that do not match any trip in your Trip
Schedule. This option is useful for freight forwarders or NVOCC’s who
157
ONLINE BOOKINGS: SETUP AND PROCESSING
SET UP ONLINE BOOKINGS IN YOUR MAGAYA SYSTEM
book with the shipping line after they receive the request from the
customer. This is a more flexible option and will allow customers to enter
any origins and destinations and any modes of transport.
The ports your customers will see online are the ports you select in your
Maintenance > Ports List.
3)
Go to the Maintenance folder and click on Customers to give your
customer(s) access to Online Bookings by making these changes in their
customer profile:
•
a) Click on the customer’s name in the list to highlight it.
•
b) Click on the Actions button and select “Allow Tracking” (or
right-click on the customer name).
A dialog box opens. Click the Tracking tab, and check the checkbox
“Send Online Bookings Requests.” Other options here that might be
helpful for your customers include sending attachments and
querying rates.
Set up the customer’s login and password on the General tab of this
dialog box if you have not done so before. For details on this process,
see the section "Add Magaya LiveTrack Users & Set Up Permissions".
158
ONLINE BOOKINGS: SETUP AND PROCESSING
SET UP ONLINE BOOKINGS IN YOUR MAGAYA SYSTEM
4)
Set up a System Alert (in the Maintenance folder > Configuration) to
notify you when a customer places an online booking. Options for the
alert include sending an alert via Magaya Task or via email to any
employee you select.
To help your customers use the online bookings feature, let them know where
to log in and what to expect. If you set up your Magaya system to use Trips, tell
the customer they can only request a booking for those trips. If you configured
your system to allow all types of bookings, let them know they can enter any
origin, destination and date range.
159
ONLINE BOOKINGS: SETUP AND PROCESSING
PROCESS ONLINE BOOKING REQUESTS IN YOUR MAGAYA SOFTWARE
Process Online Booking Requests in Your Magaya Software
When a customer sends a booking request to your system, it will appear in your
Magaya Network Messages Inbox. (Extra Info: You can set up a System Alert in
the Configuration menu to notify you when a booking request arrives.)
If you have selected the option “Process Booking Requests Automatically” in the
configuration, the booking will also be saved automatically in your Booking
List.
If your system is not automated, you can review the incoming bookings from
the Inbox (or Booking List) and decide to save them. To open a booking and see
the details, double-click on it.
To save, right-click on the booking and select “Save to Database.”
From the Booking List, you can convert the booking into another transaction
such as a Pickup Order or a Warehouse Receipt via the Actions button.
If you decided to use your booking in combination with your Trip Schedule, you
can create consolidations using the trip as a Master and use the bookings inside
160
ONLINE BOOKINGS: MAKE A REQUEST
PROCESS ONLINE BOOKING REQUESTS IN YOUR MAGAYA SOFTWARE
that trip as Houses. From the Trip Schedule, right-click and select “Create
Consolidation:”
Notifications: To set up a System Alert as an extra notification for yourself (or
other employee) when a customer sends you a booking from Magaya LiveTrack,
go to Maintenance > Configuration > System Alerts.
Online Bookings: Make a Request
Your logistics provider has given you access to online tracking with many
options including requesting a booking to ship freight. Follow the steps below
to make your request.
161
ONLINE BOOKINGS: MAKE A REQUEST
HOW TO USE ONLINE BOOKINGS
You can access the online tracking either on your logistics provider’s website or
at https://tracking.magaya.com
How to Use Online Bookings
This example uses a demo customer named “Tropical Landscaping” (called
“Tropical”) to illustrate how to request a booking online.
1)
Click the “Bookings” icon in the menu. Note: If you have requested a
booking in the past, it will be displayed in the list for the date range
selected. Select the dates by clicking the Date fields in the toolbar.
The list can display a Standard View or a Transport Mode View, which
shows the mode of transport and the consignee by default. You can change
which columns to see by clicking the “Actions” button and selecting
“Choose Columns.” You can also Filter the list to view only certain transaction.
2)
162
Click the “Add” button to create a new booking request.
ONLINE BOOKINGS: MAKE A REQUEST
HOW TO USE ONLINE BOOKINGS
3)
Here is a screenshot of LiveTrack 2.0 of the first step to requesting a
booking:
•
a) Select the mode of transport: Air, Ocean, or Ground. If you don’t
know what type to choose, select “Unknown”. (The “Unknown”
option will show all trips of all modes of transportation for the ports
you specify.)
•
b) Select the Origin port from the dropdown list “From.” Select the
Destination port from the dropdown list “To.”
•
c) Select the dates for the departure and arrival. For example, if the
departure must be on a certain day, enter the same date for each
field. Otherwise, select a beginning and end date for a date range,
and the system will search in all those available dates to schedule the
booking.
Note: If your logistics provider has configured their system to only
allow booking from a predefined list of Trips, you will see a notice if
no trips are available. This means the origin and destination entered
do not match any trips in their Trip Schedule. Contact them with
questions. If your logistics provider has configured their system to
allow customers to enter trips regardless of mode or ports, then you
will not see a notice.
163
ONLINE BOOKINGS: MAKE A REQUEST
HOW TO USE ONLINE BOOKINGS
•
If you are a Carrier, the Magaya system can offer air waybill numbers
freight forwarders so they can select them. This option is not shown
in this screenshot.
In the next screen enter cargo:
•
To enter cargo information for this booking request, follow these
steps:
a) Enter a general description of the goods.
b) Select the type of cargo: “By Equipment” means a container.
“Loose Cargo” means individual packages. Only the Equipment
(containers) you have available will show in the list.
c) Click the “Type” to select from a dropdown list of choices, and
describe this item, and enter the quantity of pieces.
d) Click the “Add” button to add this cargo to the request. Add as
many items as needed.
164
ONLINE BOOKINGS: MAKE A REQUEST
HOW TO USE ONLINE BOOKINGS
4)
Click the “Next” button to add enter the information about the entities
(Shipper and Consignee):
Select the Shipper (Tropical) and Consignee names. Note: The Shipper can
be the customer, (you), freight forwarder or logistics provider who will
ship the cargo. The Consignee is the recipient at destination. In this
example, “Tropical” is the Shipper.
Select the address from the Address dropdown menu.
5)
Click the “Next” button to go to the next screen. Enter any notes as
needed.
165
ONLINE BOOKINGS: MAKE A REQUEST
HOW TO USE ONLINE BOOKINGS
6)
Click the “Next” button. A summary screen appears. Verify all the information. To make a change, click the “Back” button.
7)
Click the “Submit” button. Confirm by clicking “Yes.”
A confirmation screen appears telling you the booking has been submitted
successfully. This example shows a booking number:
8)
Click the “Finish” button. The booking request is now submitted.
If the system asks you if you want to clear the booking, click “No.”
The booking will appear in the Dashboard of LiveTrack:
166
ONLINE PICKUP ORDERS: GETTING STARTED
INTRODUCTION TO ONLINE PICKUP ORDERS
The status of this booking is “Open.” It is sent to your freight forwarder or logistics provider to process. They will contact you.
Online Pickup Orders: Getting Started
Introduction to Online Pickup Orders
Your customers can place Pickup Orders online to arrange pickup and delivery
of items with the Online Pickup Orders feature from Magaya.
They can also print labels at their location and place them on the boxes to clearly
identify them for pickup. The orders are then sent to your Magaya system to
process.
Online Pickup Orders is a plug-in for the Magaya Cargo System and for the
Magaya Supply Chain Solution. To offer your customers the option to make
reservations online, you must first activate it in your Magaya account. Contact
your Magaya representative to turn on the function.
Getting Started
To get started with the online pickup orders feature after it is activated for your
Magaya account, you will need to configure it and let your customers know how
to use it.
167
ONLINE PICKUP ORDERS: GETTING STARTED
GETTING STARTED
Start with the topic “Online Pickup Orders: Set Up and Process.” This explains
how to configure the feature and how to process requests that your customers
send you from LiveTrack. Here is the link to topic in the Magaya Knowledgebase:
http://knowledge.magaya.com/?search=online_pickup_orders_setup_process
Video: See the Magaya Software YouTube channel for a video on creating
Pickup Orders:
http://youtu.be/MfqKqeNXykQ
Note: The video shows an interface prior to the current release.
Refer your customers to the LiveTrack4Users Guide, located on the tracking
page, which explains all the features in the tracking, including how to use the
dashboard, menus and lists. If you only want to give them information about
online pickup orders, give them this link to the Magaya Knowledgebase article
“Online Pickup Orders: Make a Request”:
http://knowledge.magaya.com/?search=online_pickup_orders_request
168
ONLINE PICKUP ORDERS: SETUP AND PROCESS
1. SET UP ONLINE PICKUP ORDERS IN YOUR MAGAYA SYSTEM
Online Pickup Orders: Setup and Process
1. Set Up Online Pickup Orders in your Magaya System
To set up Online Pickup Orders in your Magaya system, follow these steps:
1)
In Magaya Explorer, go to Maintenance > Configuration > Online Shipping Orders.
2)
The Online Shipping Orders screen contains configuration options for
both online pickup orders and online shipping orders; this discussion will
focus on the online pickup orders.
3)
Check the box to allow online pickup orders.
4)
To allow automatic processing of online pickup orders, check the box.
This option will send an email message to the customer to tell them their
order is in process.
To customize the message, uncheck the box to activate the text area. Enter
text in the box “Response to the client.” Then check the box again. This
will gray out the text.
5)
Enable access for Customers: Go to the Customer profile, right-click on
the customer name and select “Allow Tracking.” In the dialog box, go to
169
ONLINE PICKUP ORDERS: SETUP AND PROCESS
2. PROCESS ONLINE PICKUP ORDERS IN YOUR MAGAYA SYSTEM
the Tracking tab and check the box “Send Online Shipping Orders” and to
“View Pickup Orders.”
6)
Notifications: To set up a System Alert to notify you when a customer
sends you a Pickup Order from Magaya LiveTrack, go to Maintenance >
Configuration > System Alerts.
2. Process Online Pickup Orders in your Magaya System
When the customer’s order is received in your system, follow these steps to
process the order:
1)
Go to the Pickup Order List of your Magaya Explorer. The Pickup Order
that your customer created online will be in the list. (Tip: See who created
it online by choosing the column “Online Creator” via the Actions
button).
To process the pick up:
Right-click on the Pickup Order and select the action you want from the
pop-up menu. Options include setting the Pickup Order as “In Transit”,
170
ONLINE PICKUP ORDERS: SETUP AND PROCESS
2. PROCESS ONLINE PICKUP ORDERS IN YOUR MAGAYA SYSTEM
creating a Warehouse Receipt (if the items are being sent to your warehouse), and more.
Note: The same options are available in the document view by clicking on
the arrow on the side of the Actions button to select from the menu.
As the status of the Pickup Order changes, the status column is updated in
real time in your Magaya system and in Magaya LiveTrack. Tip: If you
have configured your Magaya system to send out automatic Transaction
Tracking email messages, the system will send an email message to the
customer with a link so they can see the most recent updated status of their
order.
171
ONLINE PICKUP ORDERS: MAKE A REQUEST
HOW TO USE ONLINE PICKUP ORDERS
Online Pickup Orders: Make a Request
How to Use Online Pickup Orders
To send a Pickup Order request online to your logistics provider, log into the
tracking (on tracking.magaya.com or your logistics provider’s website), and
follow these steps.
1)
Click the Pickup Orders icon in the side menu, and then click the “Add”
button.
2)
Enter Commodities in the first screen:
Enter the commodity description. This can be a general description.
If you know a Part Number, click the button with the three dots next to the
Part Number field. In the dialog box that opens, select the part numbers
172
ONLINE PICKUP ORDERS: MAKE A REQUEST
HOW TO USE ONLINE PICKUP ORDERS
you want. (You can filter the list or choose the columns you want to see.)
Click “OK” when done with the parts number list. Enter the quantity of
pieces you want. Add other information as needed. Click “Add” to add the
item to the bottom part of the screen.
When done adding items, click “Next.”
173
ONLINE PICKUP ORDERS: MAKE A REQUEST
HOW TO USE ONLINE PICKUP ORDERS
3)
On the next screen is the Contact Info for two things: The Pickup and
Delivery, and the Shipper and Consignee information. Select each by
clicking the tab on the top of the screen.
To select an address, click the arrow button and choose from the addresses
show. The screen will fill in the details. You can change any information
by typing over it.
Click “Next.”
174
ONLINE PICKUP ORDERS: MAKE A REQUEST
HOW TO USE ONLINE PICKUP ORDERS
4)
In the General Info screen, fill in the fields you need such as the invoice
number, the supplier, and the preferred method of transport (optional).
Click “Next.”
5)
Review the Summary screen. The order number is “Pending” until you
submit the order. Click the “Submit” button. Click OK/Yes in the confirmation dialog box. All the information in the order is saved and sent to
your logistics provider.
Print Labels: If you want to print labels for all the items in the Pickup Order,
follow these steps:
175
ONLINE CARGO RELEASES: MAKE A REQUEST
HOW TO USE ONLINE PICKUP ORDERS
•
Click the Print button and select your option.
•
Select what you want to print. Choose the settings in your print dialog box
such as number of copies, etc. and place the labels on the boxes to identify
them for easy pickup.
The printed labels will have a barcode. When the boxes are picked up and
then arrive at the warehouse, the warehouse staff can scan the labels to
automatically convert all the data from the Pickup Order to a Warehouse
Receipt. This option requires scanners running the Magaya WMS Mobile
application connected to the Magaya Supply Chain Solution or to the
Magaya WMS.
•
Click “Finish” to close the screen. All the information in the order is saved
and sent to your logistics provider.
Online Cargo Releases: Make a Request
This document explains how to create a Cargo Release online in LiveTrack. Use
this procedure to request a release and local delivery of items from a warehouse
or distribution center.
1. Log into LiveTrack.
2. Click the “Cargo Releases” icon.
3. Click the “Add” button.
176
ONLINE CARGO RELEASES: MAKE A REQUEST
HOW TO USE ONLINE PICKUP ORDERS
When the screen opens, select how you want to view items: by consignee, part
numbers or Warehouse Receipt (WR).
4. Click a WR to highlight the line. The cargo in that WR will display.
177
ONLINE CARGO RELEASES: MAKE A REQUEST
HOW TO USE ONLINE PICKUP ORDERS
5. Add as many pieces as you want:
If you click “Add Partial,” a dialog box opens to select the quantity.
Click “Next.”
6. Enter the details for the delivery destination.
7. In the next screen, add any notes as needed.
8. Click “Next” to go to the Summary screen. If you need to make changes, the
click the “Back” button. If the order is ready, click the “Submit” button. The
178
ONLINE SHIPPING ORDERS: GETTING STARTED
INTRODUCTION
system will ask you to confirm. The Cargo Release is saved, assigned a number
and sent to your logistics provider. Print the order as needed.
Extra Info: If you click the “Close” button, the system asks if you want to clear
the order. Clicking “Yes” will enable you to create another order. Your previous
order is already saved. The Dashboard will refresh the next time you log in.
If you have any questions, please contact your logistics provider.
Online Shipping Orders: Getting Started
Introduction
Online shipping orders includes Cargo Releases and other shipments by air and
ocean. This is also called sending shipping instructions.
Online Cargo Releases
Your customers can place Cargo Release orders online via by using the Cargo
Releases section of the tracking website.
The screens are the same as if you create a Ground Shipment from the Shipment
option. Both options let you add items to a shipment by selecting them from
Warehouse Receipts, Part Numbers, or other methods. For details, see the topic
“Online Cargo Releases: Make a Request.”
Online Cargo Releases is available for users of all Magaya software products.
Getting Started
To get started with the online shipping orders feature after it is activated for
your Magaya account, you will need to configure it and let your customers know
how to use it.
Start with the topic “Online Shipping Orders: Set Up and Process.” This
explains how to configure the feature and how to process requests that your
179
ONLINE SHIPPING ORDERS: SETUP AND PROCESS
1. SETUP ONLINE SHIPPING ORDERS
customers send you from LiveTrack. Here is the link to topic in the Magaya
Knowledgebase:
knowledge.magaya.com/?search=online_shipping_orders_setup_process
Video: See the Magaya Software YouTube channel for a video on creating
Online Shipping Orders. This video shows your customers how to enter an air
shipment and an ocean shipment request online. The interface may be slightly
different, but the functions are the same or similar:
http://youtu.be/1IF9ig543gc
Note: The video shows an interface prior to the current release.
Refer your customers to the LiveTrack4Users Guide, located on the tracking
page, which explains all the features in the tracking, including how to use the
dashboard, menus and lists. If you only want to give them information about
Online Shipping orders, give them this link to the Magaya Knowledgebase
article “Online Shipping Orders: Make a Request”:
http://knowledge.magaya.com/?search=online_shipping_orders_request
Online Shipping Orders: Setup and Process
1. Setup Online Shipping Orders
With the Online Shipping Orders feature, your customers use Magaya LiveTrack to place shipping orders and instructions 24 hours a day, 7 days a week.
Customers can use the cargo information that was entered in your system such
as from a Warehouse Receipt or a Pickup Order. When you receive the order in
your Magaya system, the information can be grouped by Houses to create
consolidations.
If you have automated charges set up for Pickup Orders, Shipments, or Cargo
Releases, the charges will be automatically generated when transactions are
created online.
180
ONLINE SHIPPING ORDERS: SETUP AND PROCESS
1. SETUP ONLINE SHIPPING ORDERS
To configure your Magaya system to process Online Shipping Orders (and
Online Cargo Releases), follow these steps:
1)
In Magaya Explorer, go to Maintenance > Configuration.
2)
Click on Online Shipping Orders.
•
Check the box to allow online shipping orders (shipments and cargo
releases).
•
Select the modes of transportation you want to enable in the online
shipping section of Magaya LiveTrack.
•
If you want to save the shipments in a different folder in your
Magaya system other than the existing one, click on the “Select”
button to navigate to the folder you want. Click OK.
Or, create a new folder called “Online Shipments”. Then you can
easily load Houses into a shipment. See section 3 “Process the Shipping Order in your Magaya System”.
3)
Click the Save button when you are done with the configuration.
181
ONLINE SHIPPING ORDERS: SETUP AND PROCESS
2. PROCESS THE SHIPPING ORDER IN YOUR MAGAYA SYSTEM
4)
Activate the Online Shipping Orders feature for individual customers:
Go to Maintenance > Customers > Actions button and select Web Track
User List.
Open the Web Track user’s profile for the customer (or contact) that you
want to have access, and click on the Tracking tab.
Check the boxes “Send Online Shipping Orders” and “View Shipments”.
2. Process the Shipping Order in your Magaya System
When the customer’s order is received in your system, follow these steps to
process the order:
1)
Go to the Messages Inbox (or Shipment folder) of your Magaya Explorer.
2)
In the shipment, verify all the data entered by the customer. Make any
changes or add information as needed. Any automated charges set up in
your Magaya system will be generated in the shipment as applicable.
If this is a straight shipment, copy it to the correct folder. If this order is a
House shipment, create the Master and move this House into the consolidation by right-clicking on it to cut and paste it in the correct Master
182
ONLINE SHIPPING ORDERS: MAKE A REQUEST
HOW TO USE ONLINE SHIPPING ORDERS
consolidation folder. Option: To load Houses more quickly, click on the
arrow on the side of the Houses button in the Shipment Toolbar and select
“Load Houses from the Online Shipment Folder”. In the dialog box that
opens, click on the Houses in the list and click OK.
3)
Click on the Actions button and select the action you want from the
pop-up menu. Options include setting the shipment as “In Transit”.
As the status of the shipment changes, the status column is updated in real time
in your Magaya system and in Magaya LiveTrack. If you have configured your
Magaya system to send out automatic Transaction Tracking email messages, the
system will send an email message to the customer with a link so they can see
the most recent update in status.
Online Shipping Orders: Make a Request
How to Use Online Shipping Orders
To place a Shipping Order online (or send shipping instructions to your logistics provider), first log into the tracking website (on your logistics providers’
website or tracking.magaya.com) and then follow the steps below.
Video:
See the Magaya Software YouTube channel for a video on creating Online Shipping Orders. This video shows your customers how to enter an air shipment and
183
ONLINE SHIPPING ORDERS: MAKE A REQUEST
HOW TO USE ONLINE SHIPPING ORDERS
an ocean shipment request online. The interface may be slightly different, but
the functions are the same or similar:
184
ONLINE SHIPPING ORDERS: MAKE A REQUEST
HOW TO USE ONLINE SHIPPING ORDERS
http://youtu.be/1IF9ig543gc
1)
Click the Shipment icon in the side menu. (If you are creating a Cargo
Release, click on the Cargo Release icon. The functions are the same.) Tip:
To change the columns, click the Actions button.
2)
Click the “Add” button and select the type of shipment: Air, Ocean, or
Ground. The screens for air, ocean, and ground shipments are similar.
This example will show an air shipment.
The screen that opens first is the Commodities screen:
Note: In LiveTrack 2.0, the screen has a different appearance but the same
functions.
To widen the panel and select commodities, click on the line separating
185
ONLINE SHIPPING ORDERS: MAKE A REQUEST
HOW TO USE ONLINE SHIPPING ORDERS
the panels and drag it.
186
ONLINE SHIPPING ORDERS: MAKE A REQUEST
HOW TO USE ONLINE SHIPPING ORDERS
3)
To enter Commodities: Select from the “Find By” dropdown to choose
Consignee, Part numbers, Pickup Order number, or Warehouse Receipt
number.
This example uses Warehouse Receipts.
Click on one of the Warehouse Receipts to see the items on hand. They
will appear in the Commodities section of the screen.
Click on a commodity to select it.
To add commodities from the list to your order, click on the arrow on the
side of the button below the list of available commodities and select from
187
ONLINE SHIPPING ORDERS: MAKE A REQUEST
HOW TO USE ONLINE SHIPPING ORDERS
the pop-up menu:
The options in the pop-up menu are:
188
•
To add all the items in the selected package, use “Add”.
•
To add a partial number of items from the selected package, use
“Add Partial” and enter the number of pieces in the dialog box:
ONLINE SHIPPING ORDERS: MAKE A REQUEST
HOW TO USE ONLINE SHIPPING ORDERS
•
To add all the packages in the Warehouse Receipt, do not select a
package. Just select “All”.
To remove a package from your order, select it and click on the arrow on
the side of the button above your list. From the pop-up menu, choose the
option to delete the selected item or all items in your order:
Click on the Next button when you are done entering commodities.
4)
On the “Contact Info” screen, there are two tabs: one for the
“Pcikup/Delivery” information and one for the “Shipper/”Consignee”.
On the Shipper/Consignee tab, the shipper information is filled in. Select
the consignee.
189
ONLINE SALES ORDERS: GETTING STARTED
HOW TO USE ONLINE SHIPPING ORDERS
5)
Enter a description of the goods in the General Info screen. You can enter
preferred ports for loading and unloading, and select a mode of transport.
6)
Review the Summary screen. The order number is “Pending” until you
submit the order. Click the Submit button. Click OK in the confirmation
dialog box. All the information in the order is saved and sent to your logistics provider for processing. Contact them with any questions.
Online Sales Orders: Getting Started
With the Online Sales Order feature, your customers can place Sales Orders
online by using the interactive online tracking tool, Magaya LiveTrack. The
online sales order feature is available for the Magaya Supply Chain Solution and
the Magaya Commerce System.
When a customer places a Sales Order online, the information is sent to your
Magaya system where the system checks to see if the inventory is available. If no
inventory is available, you can configure your Magaya system to create a
Purchase Order automatically so the Sales Order can be fulfilled.
You can also configure your Magaya system to create a Cargo Release or a Shipment automatically.
The steps to use the online sales orders feature are:
1)
Set up the online sales orders feature in your Magaya system to configure
how you want it to work. See the Knowledegebase article:
http://knowledge.magaya.com/?search=setup_online_sales_orders
190
ONLINE SALES ORDERS: SETUP
CONFIGURE YOUR MAGAYA SYSTEM
2)
Create online categories and place items in them using the Inventory
Organizer:
http://knowledge.magaya.com/?search=inventory_organizer2
3)
You process the sales orders in your system after your customers place the
orders online:
http://knowledge.magaya.com/?search=process_online_sales_orders
The following article explains the process of how your customers place a sales
order online. It’s also part of the “LiveTrack4Users” Guide:
http://knowledge.magaya.com/?search=customers_place_sales_orders
Online Sales Orders: Setup
To use the online sales order feature, set up your system to receive and process
sales orders.
Configure Your Magaya System
1)
In Magaya Explorer, go to Maintenance > Configuration.
2)
Click “Online Sales Orders.”
191
ONLINE SALES ORDERS: SETUP
CONFIGURE YOUR MAGAYA SYSTEM
3)
Check the box to allow online sales orders.
Click in the checkboxes to enable the following:
192
•
Allow back orders of items. This gives you the option to let your
customers place orders for items that are not currently in your
inventory. You can also set up your Magaya system to create a
Purchase Order automatically to buy the items from a preferred
vendor automatically. (For details on creating Sales Orders and
managing backordered items, please see the Magaya Supply Chain
Solution Operations Manual.)
•
Enable automatic invoice generation. This will transfer the details of
the sales order into an invoice and send the invoice in your Magaya
Accounting folder.
•
Define the currency for orders as the home currency of your Magaya
system.
ONLINE SALES ORDERS: SETUP
CONFIGURE YOUR MAGAYA SYSTEM
•
Generate charges automatically for online sales orders: Check this
box to enable the system to include charges on sales orders that
customers place online (which the customer will see). To define
which charges to automate, go to the Intems & Services list, and
configure the charges there.
•
Allow your customers to cancel sales orders online: Check this box
to activate this. (Available in Magaya software version 9.2+ and LiveTrack 1.0, as of the date of this documentation, September 2013).
The customer can right-click on a sales order to cancel it. Note, if a
Magaya user creates a S.O. in the Magaya Explorer (not online), the
customer cannot cancel that S.O. (A Magaya user can cancel a S.O.
via the Actions button or by right-clicking.) Any canceled S.O. will
have a status of “Canceled” and display in the S.O. List. The items
will be returned to inventory.
Sales Orders that have already been canceled or contain items that
have been canceled from a Purchase Order may not be canceled
again. Sales Orders that have already been invoiced or loaded onto a
shipment or cargo release cannot be canceled.
•
Automate your system to create a Job automatically for each sales
order posted (optional). This will link the sales order and the items
inside it to the Job.
193
ONLINE SALES ORDERS: SETUP
CONFIGURE YOUR MAGAYA SYSTEM
•
Allow automatic release of the commodities in the sales order, and
define the type of release: select cargo release for ground shipments,
or use the shipment option for all modes of transport.
Save the shipments in a folder you specify when you select the option
“Create a Shipment”. Then click the “Select” button to open a list of
folders so you can navigate to the folder of your choice.
Select the modes of transportation for the orders. These options will be
available to your customers to choose:
Feature a Category: After you create categories for inventory in the
Inventory Organizer (found in the Warehousing folder), you can select a
category here to feature it in the Online Sales Order screen in Magaya
LiveTrack. This will display only this “root” category and its subcategories. This is useful if you create internal categories such as commissions
that you do not want to be visible to customers online. This is optional and
can be changed at any time.
If you do not select a Featured category, then the first category listed in
your Inventory Organizer will be displayed. Customers can use the dropdown menu to view other items. For more details on using the Inventory
Organizer, see the section on the Inventory Organizer ("Inventory Organizer"). For more details on using the Online Sales Order feature in
Magaya LiveTrack, see the section How Your Customers Place Sales
Orders Online ("How Your Customers Place Sales Orders Online").
194
ONLINE SALES ORDERS: SETUP
ACTIVATE ONLINE SALES ORDERS FOR YOUR CUSTOMERS
Activate Online Sales Orders for Your Customers
1)
To give your customer permissions to create sales orders online, go to the
Customer list in the Maintenance folder:
Find the customer’s name in the list, right-click on their name, and select
“Allow Tracking”.
195
ONLINE SALES ORDERS: SETUP
NOTIFICATIONS
2)
In the dialog box that opens, select the Tracking tab.
Check the box “Online Sales Orders”.
Note: The other option “Sales Orders” can be checked to allow the
customer to view sales orders that you create. Uncheck it if you do not
want the customer to view the sales orders.
You can also give your customers permission to send attachments,
approve or cancel a Sales Order. Be sure to have this option enabled in
your Configuration menu.
Notifications
To receive a notification in your system to alert you when a customer places a
sales order in LiveTrack, go to Maintenance > Configuration > System Alerts.
196
ONLINE SALES ORDERS: SETUP
MANAGING THE WEBTRACK USER DATA
Add an alert and set the alert options you want:
The “Internal Notification” options send an email message to the employee
selected or creates a Task that pops up on the Magaya Explorer screen.
The option “External Notification” sends an email to the customer to let them
know their order has been received.
Managing the WebTrack User Data
To view all users who have access to tracking, open the WebTrack User list via
the Actions button. You can select what information you want to see in this list
by Choosing the Columns option from the Actions button. The WebTrack User
list is available from the list of Customers, Forwarding Agents, and the Contacts
list.
197
ONLINE SALES ORDERS: SETUP
MANAGING THE WEBTRACK USER DATA
Another option to view the logins quickly is to add a column to the Customer
list (Forwarding Agent or Contacts list):
198
1)
Click the Actions button and select Choose Columns.
2)
In the dialog box that opens, click on the arrow next to the “Add
Columns” and select “Add Related Columns”.
ONLINE SALES ORDERS: SETUP
MANAGING THE WEBTRACK USER DATA
3)
In the dialog box that opens:
a. Click the Related Elements dropdown list and select “Tracking User”.
b. Select the element in the list (this will be the column heading).
Click the “Add” button to move the element to the Select Columns list.
Click OK to return to the Column Settings dialog box.
199
ONLINE SALES ORDERS: SETUP
MANAGING THE WEBTRACK USER DATA
The new column heading is now in your list:
The order of the columns can be changed by clicking and dragging each
one to a new place in the list or by using the Up or Down buttons. Adjust
other settings such as the column width as needed.
When you click OK on the Column Settings dialog box to close it, the changes
are saved and can be viewed in the Customer List.
Reports can be made using this login ID information (or other details) by going
to the Reports option available from the Actions button. This column element
is also available to use in the Advanced Filter.
This view of customers can be saved by clicking on the star button on the top of
the list. For more details on saving views, see the Magaya Cargo System Operations Manual, Chapter 5 “Magaya Explorer Interface”.
NEXT: Set up the inventory items you want in your online store. See the article
“Inventory Organizer.”
200
INVENTORY ORGANIZER
INTRODUCTION
Inventory Organizer
Introduction
The Inventory Organizer is used to create categories and to place items in your
online store (the Sales Order section of Magaya LiveTrack) so customers can
view the items and select from the categories when they place sales orders
online.
The Inventory Organizer is located under the Warehousing Folder:
Create Categories
Creating categories helps to organize the items so your customers can see
groups of related items and select from them to place their orders.
201
INVENTORY ORGANIZER
CREATE CATEGORIES
The Inventory Organizer enables you to create Parent Categories and subcategories. Decide how you want to organize your items before beginning these
steps.
1)
In the Inventory Organizer screen, click on the Categories tab to view the
Categories screen.
2)
Click the Add button. A dialog box opens.
This screenshot shows a Parent Category of “Sporting Goods” in the
dialog box. Subcategories are “Athletic Shoes” and “Sports Equipment”.
3)
202
Enter the category names: If you will have a parent category and subcategories, enter the parent name and the category name. If you will not have
a parent category, leave the Parent field blank. The Description field is
optional. When you make categories for the first time, the parent field will
be blank.
INVENTORY ORGANIZER
CREATE CATEGORIES
4)
To add a commission for this category, click the Commissions button and
enter the details in the dialog box. When items in this category are
included in sales orders and the charges generated (via the Actions
button), the system creates a bill payable to the salesperson.
5)
Click OK when you are done. The category is added to the list.
Add a Subcategory:
To add a subcategory under the parent you just created, first select the parent
category name from the Category list.
Then click the Add button. In the dialog box, the parent category name will be
filled in. Add the subcategory name in the Category field.
This is how the categories and subcategories will look online to your customers:
To see how your customers will place sales orders online, see the section “How
Your Customers Place Sales Orders Online”.
203
INVENTORY ORGANIZER
ADD INVENTORY ITEMS
Add Inventory Items
1)
Click the Inventory Item Definitions tab on the top of the Inventory Organizer screen.
2)
Click the Add button. A dialog box opens.
3)
Select items from the list in the dialog box:
This lists pulls from the Inventory Item Definitions list in the Warehousing folder. If you do not have any resalable inventory items defined,
this list will be blank. For more on adding resale items, see the topic “Add
Resale Items”.
204
INVENTORY ORGANIZER
ADD PHOTOGRAPHS TO ITEMS
4)
Click OK. The dialog box for the Item Definition List will close, and the
item will be displayed in the list.
5)
Add as many categories, subcategories, and item definitions as needed in
the Inventory Organizer.
To change the name of a category or subcategory, double-click it and make
changes in the dialog box.
Now your inventory is set up and ready for your customers to view online and
place into online sales orders. To remove an item from online view, open the
Inventory Item Definition dialog box and check the Inactive box.
Add Photographs to Items
After you enter an item into a category in the Inventory Organizer, you can view
the item to make changes or add photos.
The image file size is not limited because images are saved outside your Magaya
database (for software versions 8.5 and above).
Photographs must be in JPEG format to be viewable online.
1)
Open the Inventory Item Definition dialog box. (The Inventory Item
Definition dialog box can be opened from the Inventory Organizer screen
by double-clicking on the item in the list.)
2)
Go to the Images tab.
3)
Click the “Add” button to navigate to the folder on your computer or
network and select the photograph.
205
INVENTORY ORGANIZER
ADD PHOTOGRAPHS TO ITEMS
If you add more than one image to an item, you can select one of the images to
be featured as the Main Image by clicking on the checkbox for “Main Image”:
To view the alternate images for the item when you are in the Online Sales
Orders in LiveTrack page, click on the item to open it.
206
INVENTORY ORGANIZER
ASSIGN ITEMS TO CLIENTS
Assign Items to Clients
To assign an item to a client (or customer), only that client will be able to see
that inventory item online.
1)
Open the Inventory Item Definition dialog box. (The Inventory Item
Definition dialog box can be opened from the Inventory Organizer screen
by double-clicking on the item in the list. (Tip: You can also assign an item
when you first create a Resale Item.)
2)
Select the client’s name from the dropdown menu for the field “Client”.
3)
Click OK to save.
If an item has not been assigned, it will be viewable by all clients online.
207
ADD RESALE ITEMS
STEPS
Add Resale Items
Resale items are inventory items in your Magaya system that are available for
sale. These are items you purchased, entered in your Magaya system, and now
are available to resell.
To make items available for the Online Sales Order feature in Magaya LiveTrack, the items must be resale items. Regular inventory items will not appear
online in the online store you can create with the Inventory Organizer in the
Magaya Supply Chain Solution.
For more details on the online sales orders feature, see the Magaya Software
Communications Manual.
Steps
1)
Go to the Warehousing folder >select Inventory Item Definitions.
2)
Click the “Add” button and select “Add Resalable Inventory Item” from
the pop-up menu:
A wizard opens with fields to enter the details of the item.
208
ADD RESALE ITEMS
STEPS
3)
Enter the following information in the fields of the Resalable Inventory
Item Wizard:
•
In the “Inventory Item Definition” section, enter the part number,
model name (or number), an item description, the package type, and
dimensions.
If you keep inventory by serial number and/or want to save the serial
numbers when items are released, check the boxes.
•
In the “Associated Items and Services” section, enter the Purchase
Price and select the currency. The purchase price is the price you
paid for the item. The system automatically creates an Expense Item
(Cost) in the Accounting folder’s “Items & Services” list. It is also
209
ADD RESALE ITEMS
HANDLING OF EXPIRATION DATES FOR ITEMS
automatically assigned to the inventory assets. (The currency dropdown is available if your system is set up to use multiple currencies.)
Enter the Sales Price and select the currency. The sales price is the
price that your customers will pay for the item. The system creates
an Income Item in the “Items & Services” list.
Select the Manufacturer (optional).
Select the Client (optional) if you want this item to be assigned to
only one client (customer).
•
In the “Generated Items and Services” section, most of the fields are
filled in. Changes can be made to the Costing Method, Inventory
Account and Inventory Type. FIFO is First In, First Out. LIFO is
Last In, First Out
Note: For details on costing methods, see Chapter 10 in the Magaya
Software Accounting Manual.
4)
Click the Finish button. The resale item is saved in your list.
Note: This resale wizard does not have a field to attach photographs of inventory
items. Go to the Inventory Item Definition dialog box if you want to include
photos of the items.
Handling of Expiration Dates for Items
In Magaya software version 9.1 and higher, the Inventory Item Definition can
help you manage the expiration dates of perishable items.
Set the expiration type when you define a new item (see the section Add Resale
Items). The system will then load items based on this setting. If you want to add
this information to an existing item, open the Inventory Item Definition, go to
the Accounting tab, and set the Inventory Type. NOTE: If an item is “On Hand,”
then set the expiration date for that item before changing the Inventory Type.
210
ADD RESALE ITEMS
HANDLING OF EXPIRATION DATES FOR ITEMS
Receive a Perishable Item:
When you receive an item, set the expiration date in the Commodity dialog box
on the Identification tab.
NOTE: If an item is defined to have FEFO or LEFO, it must have a date entered
on the Commodity dialog box for all On Hand inventory.
211
ADD RESALE ITEMS
HANDLING OF EXPIRATION DATES FOR ITEMS
When receiving items using the Magaya WMS Mobile scanners, scan the item
and enter the expiration date on the Identification tab. (Complete steps for
receiving items using Magaya WMS Mobile are in Chapter 13.)
Multiple items can be scanned, and each can have a separate expiration date.
each will be on a separate line. (Lines can be merged if the dates are changed to
match.)
Moving Items that have Expiration Dates: If an item has an expiration date
and you try to move it into the same location as another item with the same
expiration date, the system will prompt you to select a date.
212
ADD RESALE ITEMS
VIEW RESALE ITEMS IN LISTS
View Resale Items in Lists
To view the resale items in your Inventory Item Definitions list separate from
non-inventory items, try these two options to see which you like best: First, add
a column to the list to display which items are resale:
1)
Click the Actions button and select “Choose Columns”.
2)
Select “Sellable” and save it. Then click on the column header to group all
resale items together.
Another way to view the Inventory Item Definitions list is to filter it and save it:
1)
Click “Filter” > Advanced Filter.
2)
Click “Sellable” in the list of available fields. Next to the condition
“Equals” select “Yes” and click “Add.”
3)
Click OK to save the filter. The list now displays only resale items.
4)
Save this view by clicking the star in the top toolbar.
213
ADD RESALE ITEMS
VIEW RESALE ITEMS IN LISTS
Tip: Another helpful column to view is “Arriving Pieces.” It shows the quantity
of items that are on order and expected to arrive.
Actions Button in the Inventory Item Definitions List: Includes functions for
updating quantity of pieces, resetting leads times, and more. See the section
“Other Actions in the Inventory Item Definitions List.”
There is another way to view inventory items in the Accounting folder: Go to
the “Items & Services” List:
Click the “Actions” button and select “Inventory Item Definitions” from the
menu:
This is useful for companies that have many inventory items.
Additional Information: For more details on creating an online store with the
Inventory Organizer, see the Magaya Software Communications Manual. For
details on Items & Services, see the Magaya Software Accounting Manual.
214
ADD RESALE ITEMS
CONVERT AN EXISTING INVENTORY ITEM INTO A RESALE ITEM
Convert an Existing Inventory Item into a Resale Item
An existing inventory item can be changed to a resale item:
1)
Open the Inventory Item Definition dialog box and go to the Accounting
tab:
2)
Fill in the value for a unit (unitary value = your purchase price); this is
optional in this screen. The price from the Purchase Item field will be used
in POs, and the price from the Sales Item field will appear in Sales Orders.
Click on the Purchase Item field and the Sales Item field to create these. If
the Purchase Item and/or Sales Item are not available in the dropdown
menu, click the plus sign in the dropdown menu combo box to create the
items. For more details on creating Items and Services, see the Magaya
Software Accounting Manual.
Fill in the other fields as needed.
215
ONLINE SALES ORDERS: HOW TO PLACE AN ORDER
CONVERT AN EXISTING INVENTORY ITEM INTO A RESALE ITEM
3)
Click OK to save.
Online Sales Orders: How to Place an Order
Overview:
You can place sales orders online by using LiveTrack. Access the tracking from
your logistics provider’s website or go to Magaya.com.
When you view the Sales Orders list, existing sales orders in the selected date
range will appear in the list, if you have placed orders previously. Other date
ranges can be viewed by sorting the list by date as needed. You can also filter the
list and choose what columns you want to see (via the Actions button).
216
ONLINE SALES ORDERS: HOW TO PLACE AN ORDER
STEPS TO PLACE AN ORDER
Steps to Place an Order
These steps are performed on the Magaya LiveTrack web page.
1)
Click the “Add” button to create a new online sales order. The Shopping
Cart opens to Step 1.
The inventory items and images appear. You can select a specific category
or view all categories. You can also search by keyword, or click any column
heading such as to sort by price from high to low price or from low to high.
Select the products to view from the menu:
217
ONLINE SALES ORDERS: HOW TO PLACE AN ORDER
STEPS TO PLACE AN ORDER
Click an item to see multiple views of it.
To sort the list of products, click the arrow as shown:
218
ONLINE SALES ORDERS: HOW TO PLACE AN ORDER
STEPS TO PLACE AN ORDER
2)
Select items: Click in the “Add to cart” field, and enter the number of
items you want. Click the “Update” button.
Click the cart add button. The part number/description, quantity of pieces
and total prices appear in the totals column. Shipping costs are not
included yet.
To delete an item from the cart, select the item and click on the shopping
cart icon button that has a red arrow on it.
Click the “Next” button to go to the next screen.
3)
Verify your contact information. This information is filled in from your
logistics provider’s database. You can change it if needed. Then click Next.
219
ONLINE SALES ORDERS: HOW TO PLACE AN ORDER
STEPS TO PLACE AN ORDER
4)
Enter the Shipping Information: Select the preferred mode of transportation. Notes are optional. Click Next.
5)
Review the order in the Summary screen.
If any changes are needed, use the Back button on the bottom of the sales
order screen.
6)
Click the Submit button to submit your order. Note that the Order
Number is “Pending” until you click the “Submit” button. Then the order
is sent to your logistics provider to be processed.
There is an option to print the order.
220
ONLINE SALES ORDERS: PROCESSING
STEPS TO PLACE AN ORDER
Verify that you want to submit the order by clicking OK in the dialog box, and
the system will notify you that the order was submitted successfully:
When you submit the Sales Order, a number is assigned to it. To view the Sales
Order, double-click on it; this shows the number assigned.
The order will now be processed. If you have permission to cancel a SO, you can
do so by going to the list and right-click on it. This will return the items to the
inventory.
Online Sales Orders: Processing
Overview:
When your customers place online sales orders, a message is sent to your
Magaya Inbox.
The order number will appear in the “Identification” column. A checkmark
appears in the Status column after viewing the online sales order.
There are many functions available when you receive a sales order from a
customer who placed it online. For example, you can create a Purchase Order
from the Sales Order by right-clicking on it (or using the Actions button) in the
Inbox list. This is useful if you do not have inventory and need to order more to
fulfill the sales order. This section will explain the options, starting with options
you can automate or a way to process the orders manually.
221
ONLINE SALES ORDERS: PROCESSING
AUTOMATED PROCESSING OF ONLINE SALES ORDERS
If you set a System Alert in the Configuration menu as a Task, then a Task dialog
box will appear for the user who was assigned the task in the Alert. See the
section below on System Alerts for details.
Automated Processing of Online Sales Orders
The sales order is received in your Magaya system and automatically added to
your Sales Order List:
222
1)
When your system is configured to create Cargo Releases or Shipments
automatically, the system will create these transactions. Go to the Cargo
Releases List or Shipment folder you set up to find the transaction that
your system created.
2)
With the invoicing automated, the Invoice is automatically created and
placed in the Invoices List. Then you can email the invoice to the customer
or email them a a tracking link so they can view the invoice online.
3)
Fulfill the order from the Cargo Release or Shipment by creating Pick and
Load Tasks and sending them to user of the WMS Mobile handheld units.
ONLINE SALES ORDERS: PROCESSING
MANUAL PROCESSING OF ONLINE SALES ORDERS
Manual Processing of Online Sales Orders
The sales order is received into your Magaya system in the Inbox. If you do not
have the automated features activated in the Configuration menu, follow these
steps to process the sales order:
1)
From the Inbox list, you can create a Purchase Order to buy the items
requested (if they are not on hand). Right-click on the message and select
the option “Create Purchase Order”.
2)
Save the message from the Inbox by right-clicking on the message and
selecting the option “Save to database”. It will be saved in the Sales Order
list.
3)
Create the Cargo Release or Shipment by right-clicking on the Sales Order
from the Sales Order List.
4)
Fulfill the order.
5)
Create the Invoice and send it to the customer.
Note: To automate these processes, see the topic on setting up and configuring
your Magaya system.
The following screenshot shows how to convert a sales order into another transaction such as a shipment: Right-click on the sales order and select the option
from the pop-up menu:
223
ONLINE SALES ORDERS: PROCESSING
SYSTEM ALERT
Note: If you get an error message when trying to convert the sales order, verify
the status of the items:
You can set the Shipment or Cargo Release “In Transit” by going to the Cargo
Release List and right-clicking on it. Complete the shipment as usual.
To move an online sales order shipment into a consolidation, click the Houses
button on the Shipment Toolbar and select “Load Houses from Online Shipment Folder.”
The status of the order is also available in the Jobs screen if you configured your
system to create a Job automatically. The customer can also view the status
online in the Jobs screen and in the online Sales Order screen.
System Alert
You can set up your Magaya system to alert you when an online sales order is
received.
224
1)
Go to Maintenance > Configuration > System Alerts
2)
Click the “Add” button to open a new dialog box so you can set up the alert
that you want.
ONLINE SALES ORDERS: PROCESSING
SYSTEM ALERT
3)
In the System Alert dialog box, select the options you want:
•
When: For this field, select “Online Sales Order is received” from the
dropdown menu.
•
Employee: Select the employee to notify. Alerts can be sent to the
employee via email or as a Magaya Task.
•
Send email notice to the sender.
•
Edit the Subject line and body of the message as you need.
•
Check the “Enabled” box.
•
Click OK to save.
225
ONLINE SALES ORDERS: PROCESSING
SYSTEM ALERT
Here is an example of a Task alert:
226
6. TRANSACTION TRACKING
TRANSACTION TRACKING: INTRODUCTION
6. Transaction Tracking
Transaction Tracking: Introduction
The Transaction Tracking feature in Magaya software gives your customers
current information about their transactions via an email message with a link.
The customer clicks on the link and views the current status of the transaction
in real time.
You can configure your Magaya software to send an email to a customer automatically whenever a transaction is generated in your Magaya system, or you
can set up your software to send an email message only when you want it sent.
You can also customize which transactions each customer receives or turn off
receipt per customer.
For example, when a Warehouse Receipt, Cargo Release, Pickup Order or shipment is created for a customer’s cargo, you can notify that customer with
Magaya Transaction Tracking. You can also customize the message in the email.
Transaction Tracking works with any Magaya software. You don’t need to
install any additional software. Contact Magaya Corporation to activate this
feature.
227
GETTING STARTED
Website Option: There is an additional way to offer Transaction Tracking to
your customers: Add it to your website.
See Magaya.com for the script:
http://www.magaya.com/en-us/Solutions/Plug-Ins/TransTracking
See the configuration set up in this topic. Contact Magaya with any questions.
Getting Started
To get started with Transaction Tracking after it is activated for your Magaya
account, see the following topics to learn how to:
•
Set up Transaction Tracking in your Magaya system
•
Send your customers a Transaction Tracking message
•
Set Transaction Tracking per customer
Video: See the following video tutorial on Transaction Tracking:
http://youtu.be/Sr4Cmy5sVwU
228
TRANSACTION TRACKING: SET UP
Transaction Tracking: Set Up
1)
Go to Options and select Configuration. (Alternatively, you can click on
the Maintenance folder and select the Configuration subfolder.)
2)
Scroll down the icons list and click on Transaction Tracking.
3)
Click in the box next to the “Allow by Transaction Tracking” at the top of
the screen to add a check to the box and enable the other checkboxes. (The
software has the feature turned off by default.)
4)
Check the boxes to choose which transactions to activate (Quotations,
Bookings, Pickup Orders, Warehouse Receipts, Cargo Releases, Invoices,
Jos, PO, SO, and/or Shipments). The transactions listed will depend on the
229
TRANSACTION TRACKING: SET UP
Magaya software product you are using. You may or may not have all the
ones shown in this screenshot:
These are activated for your system. This master list of transactions can be
tailored in the Customer’s profile to customize what you want to send to
individual customers; see the section “Set Transaction Tracking per
customer.”
230
5)
To send a Transaction Tracking email message to the entities who are
involved in an import transaction, check the box to generate the email
message for the Warehouse Receipts.
6)
In the following checkboxes, click on the options you want:
•
Check the box “Allow the client to navigate thru related transactions” if you want your customer to see any activity that is related to
that transaction. (For example if a Warehouse Receipt was created
from a Pickup Order, you can show that history of these related
transactions.) If you do not want the client (customer) to navigate
through related transactions, leave the box blank.
•
Check the box “Allow the client to view the charges when tracking
transactions” if you want your customer to view charges. If you do
TRANSACTION TRACKING: SET UP
not want your customer to view charges related to their transaction,
leave the box blank.
If you have a software programmer who is creating your own tracking
solution, click on the next checkboxes to activate these functions:
If you will use the Magaya Transaction Tracking feature for tracking via
email, leave the checkboxes blank.
•
“Allow Tracking by Transaction Numbers” such as Air Waybill
numbers or a Bill of Lading
•
To require users log in to track transactions by number
•
“Return only XML when tracking transaction” (instead of HTML)
•
Select the language
These options are useful when you are customizing your own tracking. Go
to the Magaya website’s “Transaction Tracking” page and get a free script
231
TRANSACTION TRACKING: SET UP
that will display a tracking field on your website. Follow the instructions
on the web page.
The following is just an example of what the display can look like:
With this method, your customers can select a transaction from the dropdown and enter a transaction number such as a Pickup Order number, an
Air Waybill number , or other, and get the status.
Additional Tracking Option: If your customers want to check the status of
a transaction using their mobile phone or tablet, get the Magaya Track2Go
mobile app. See the magaya.com and the topic “Track2Go” for details.
7)
232
Select the language (English, Spanish or Portuguese).
TRANSACTION TRACKING: SET UP
8)
9)
In the box titled “Transaction Tracking Email”, select from the following
options to set up how you want to send emails:
•
“Don’t send tracking email to clients” – this option will not automatically send email messages. You must go to the Email button on the
top toolbar in your Magaya Explorer and click on the arrow on the
side of the button and select the option “Send tracking link by
email.” An email is generated. Click Send.
•
“Ask before sending tracking email to clients” – this option will
create the email and display it on the screen. You must manually
click the button to send the email message.
•
“Automatically send email to clients when a transaction is finished”
– this option will send the email automatically. You do not need to
create the email or click the Send button. To customize which types
of transactions you want to send to specific customers, see the
section “Set Transaction Tracking per Customer”.
•
“Use Magaya Email Client to send tracking messages” – this option
will use the Magaya email to send email messages instead of your
Outlook Express or other email program. If you select this option,
click the Configure button. It is recommended that an IT person or
administrator configure this option. (In the dialog box enter the
SMTP server information, the authentication method, and character
set. Click OK.) This option will process the email messages in the
background without showing a notification as Outlook does.
•
Select Email Template: Choose from the list. The template “Transaction Tracking Email Template” includes links for your customers
to view their transaction on a PC or a mobile device. To customize a
template, go to Configuration > Email Templates.
Save your Changes: When you are finished setting your options, click on
the Save button to save your changes.
If you want to reset all the options in the Transaction Tracking back to the
defaults, click the Reset button.
233
HOW TO SEND TRANSACTION TRACKING MESSAGES TO YOUR CUSTOMERS
You can also limit how far back you want to allow customers to view transactions. See Chapter 8 in this manual.
Result: Now you have configured your Magaya software to send email messages
to your customers.
Note: If the customer’s email address is not in your Magaya system, you can add
their email address: Go to the Maintenance folder and select Customers. Click
on the customer’s name and add their email address.
If you want to limit the date range that users can access past transactions, see the
Tracking feature in the Magaya Communication Server dialog box. To open the
dialog box, right-click on the icon for the Magaya Communication Server Agent
in your computer’s taskbar. Select “Configure” from the pop-up menu.
How to Send Transaction Tracking Messages to Your Customers
When you are working in a transaction such as a Warehouse Receipt, Pickup
Order, Cargo Release, or a Shipment, you can send a customer or other person
a link to that transaction via email (if you did not automate this process).
1)
Go to the transaction.
2)
Click on the arrow on the side of the email button. A menu pops up.
3)
Select the option you want. Options are: Send Tracking Link by Email, or
Send Houses Tracking Links by Email. (Note: If you select “Send Document by Email”, the system will include the shipment data in the body of
the email. It will not use the Transaction Tracking text or include a link.
Result: An email message will open. The text you established in the Configuration menu settings will appear in the body of the email. Send the email message.
234
HOW TO SEND TRANSACTION TRACKING MESSAGES TO YOUR CUSTOMERS
What the Customer Sees: When your customer clicks on the link in the email,
they see the details of the transaction such as the cargo description and events.
You can set the events or add notes to the Events field in a transaction.
They can check the status by using this same email message many times. It will
always retrieve the latest information.
To send a batch of email messages, select all the transactions in the list (or filter
the list), and click the Email button option to send Batch Email. (For more
options, right-click on the selection.)
235
SET TRANSACTION TRACKING PER CUSTOMER
Set Transaction Tracking Per Customer
To customize how you send transaction tracking email messages to your individual customers, vendors, or freight forwarders, set the tracking options by
following these steps in this example:
1)
Right-click on the customer name in the Maintenance > Customers list (or
go to “Contacts” for individuals).
Option: To configure a group, filter the list to show the customers you
want to set Transaction Tracking for, and then select all their names and
follow these steps to set them all at once instead of one by one.
Select “Configure Tracking by Transaction” from the pop-up menu:
This menu can also be accessed by selecting the customer name and
clicking the Actions button.
236
SET TRANSACTION TRACKING PER CUSTOMER
2)
The dialog box that opens displays the default configuration. This
example shows all the transactions are set as defaults for the customer:
This default list is the same as the list of transactions that you set up in the
Maintenance > Configuration menu discussed at the beginning of this
chapter.
When you are viewing the default list, you cannot click on any of the
checkboxes to make changes.
To change the default, select one of the following options in the dialog box
by clicking the dropdown menu:
•
Never send tracking emails: This will turn off all the transactions
for this customer, and the system will not send any transaction
tracking emails to this customer. When you select this option, all the
checkboxes will uncheck; you do not have to uncheck them one by
one.
•
Customize default configuration: This enables you to select the
specific transactions that you want to send to this customer.
Uncheck any transactions you do not want sent. This will override
237
SET TRANSACTION TRACKING PER CUSTOMER
the selections made in the Maintenance > Configuration settings for
Transaction Tracking for this customer.
To return to the default list for this customer at a later date, select the
default option again from this dialog box. Then this customer will
have the defaults that are set in the Maintenance > Configuration
menu.
3)
238
Click OK to save the configuration.
7. EMAIL OPTIONS
HOW TO EMAIL TRANSACTIONS
7. Email Options
How to Email Transactions
To email any document, transaction, list, or report to a customer or other recipient, use the Email button on the top toolbar of Magaya Explorer.
Click the arrow on the side of the Email button to access following options:
•
Send Document by Email: This opens an email with the transaction
attached in either PDF or HTML, depending on the setup for your system
in the Configuration menu for Outgoing Messages. (This first option in
the dropdown menu is in bold because it is the default that you get if you
just click the Email button instead of using the arrow on the side of the
button.)
•
Send Tracking Link by Email: This opens an email message with a link
included for the procedure that you have open.
•
Send Batch Email: This option is available when you are viewing a list
such as the Pickup Orders List or any other list in Magaya Explorer. This
option is grayed out when you are viewing the document.
239
CONFIGURE OUTGOING EMAIL MESSAGES
•
Send Houses Tracking Links by Email: This option sends all the links at
once when you are in the Master of a Consolidation. This works similar to
a batch email function, so you do not have to send them one by one.
Configure Outgoing Email Messages
You can select a preferred email message format for all your email messages by
going to the Maintenance folder and clicking on Configuration. Then select
“Outgoing Messages”.
There are two options for sending email messages:
•
Send email using Windows
•
Send email using Magaya
To send email messages from your default Windows email client such as
Outlook Express, click on the first button.
240
CONFIGURE OUTGOING EMAIL MESSAGES
To send email messages to your customers and others from your Magaya system
using the Magaya email templates, configure your system to “Send email using
Magaya email client”.
This option configures your system to send email messages using the email
system in Magaya Communication Server. Follow the steps to fill in the fields.
241
CONFIGURE OUTGOING EMAIL MESSAGES
•
Enter the SMTP Server name and the SMTP Port. (SMTP is Simple Mail
Transfer Protocol, the Internet standard for transmitting email messages.)
To use the logged in employee’s email address, check the box. (This will
send the email from the employee’s email address instead of the company
address. For example, if this is activated, email messages will show the
signature of the employee who sends it. See the section “Email Signatures”
for more details.)
If the SMTP that you are connecting to requires authentication, select an
authentication method:
–
Plain authentication
–
SSL
–
TLS
The email client can connect to any email server that requires SSL/TLS
communication such as Gmail, Yahoo!, GoDaddy, Microsoft Office 365,
and others.
The login and password fields become active after selecting an authentication method.
Select a Character Set encoding for the email. The system is set to Western
European (ISO) by default. This displays the most common Western
European languages such as Spanish, Portuguese, Italian, French,
242
CONFIGURE OUTGOING EMAIL MESSAGES
German, and English. Other choices include Japanese, Unicode, and
more.
HTML is used in the email message body by default. If you uncheck the
box, the email text will display as ASCII text only.
Click the OK button to save settings and return to the Configuration
screen.
•
To set the format for sending documents and reports, select from the
options (PDF, HTML, or Magaya Document Designer).
Other configuration options for outgoing messages:
•
Send only the master shipment to the carrier: This box is activated by
default. This is the recommended configuration.
•
Send transactions income charges to destination agents. This checkbox is
off by default. Check it to activate it.
•
Send transactions expense charges to destination agents. This checkbox is
off by default. Check it to activate it.
For more details on configuring the outgoing messages for shipments and
charges, see Chapter 2.
For details on the Customer Tracking Invitation Email, see the topic “Magaya
LiveTrack”. For details on email templates, see the section “Email Templates.”
243
EMAIL TEMPLATES
INTRODUCTION
Email Templates
Introduction
Create email templates and use them in your Magaya system when emailing
transactions such as Warehouse Receipts, Pickup Orders, and others to your
customers, vendors, agents, employees in your company and others.
For example, you can create a template so you and your employees can email a
customer to tell them their cargo arrived in the warehouse and you can include
a photograph. If you have cameras in your warehouse and want your customer
to log into the web page to view their cargo, send them the link and log in.
244
EMAIL TEMPLATES
INTRODUCTION
You can also create email templates to send marketing messages to your
customers. To set up an email template, follow the steps below.
1)
Go to Maintenance > Configuration > Email Templates:
245
EMAIL TEMPLATES
INTRODUCTION
This list displays the system default templates you can edit and use:
246
EMAIL TEMPLATES
INTRODUCTION
2)
To create a new template, click the “Add” button. A dialog box opens.
Select the type of template you want and name it.
In this example, the type of template will create an email message to send
to your customers.
Other options: The “General” Type of email templates will be available for
all lists in your Magaya Explorer.
Other types of templates will be available when you are in certain folders
such as Invoices, Pickup Orders, etc. When you click the email button, you
will see the template choices available in a dropdown list when you send a
tracking link by email or when sending batch emails.
247
EMAIL TEMPLATES
INTRODUCTION
3)
Type in a subject line, or click the “Subject Field” button to select from a
list of dynamic fields. Using the Dynamic Fields in your templates makes
them easier to use and send email messages.
A Dynamic Field retrieves data from your Magaya system and displays it
in the email. Here is a list of current fields available to choose from:
For example, to begin each email message with the recipient’s name, select
this dynamic field by clicking the “Body Field” button:
The system will replace this field with the person’s name automatically
when you send an email to them. You do not need to type their name into
every email you write to them.
For more on Dynamic Fields and how to add your own, see the section
“Add Dynamic Fields”.
4)
Set other options in the email template as needed such as checking the box
if you want a delivery receipt for the email message. Set the importance
and sensitivity as needed. Change the font, add images or links, etc.
5)
Click OK to save the template. It is now available to use.
Example:
248
EMAIL TEMPLATES
INTRODUCTION
Let’s look at an example. We’ll create a template so we can send an email
message to your customers to let them know they can see their transactions on
their smart phones or other devices using the Magaya mobile app, Track2Go.
1)
Click “Add” to open a new template dialog box.
2)
Select the template type as “Customers” and enter the information as
shown in the example.
Click the “Body field” button to add the dynamic field for the recipients.
Type your message, and add bold text and images. To add a link to the
image, select the image and click the “Link” button.
3)
To send the email message using this template, go to the Customer list,
highlight the customer name, and click the Email button and select “Batch
Email”.
Customize the Template Appearance:
249
EMAIL TEMPLATES
ADD DYNAMIC FIELDS
•
Buttons on the toolbar for customizing the appearance of the template:
Font, Color, Link, Image insertion, and more.
•
Insert a link: Highlight the text that you want to add a link to. Click the
“Link” button and enter the URL in the dialog box.
Add Dynamic Fields
The system also provides the option to create dynamic fields that use JavaScript
to pull information from transactions so you can create email templates that are
specific to your needs.
250
EMAIL TEMPLATES
ADD DYNAMIC FIELDS
The dialog box for building a custom dynamic field is interactive; certain fields
depend on others. Creating Dynamic Fields for email templates requires knowledge of JavaScript.
From the Email Templates list in the Configuration menu:
1)
Click the “Actions” button, select “Dynamic Fields”.
The dialog box shows a list of default dynamic fields.
251
EMAIL TEMPLATES
ADD DYNAMIC FIELDS
2)
252
In the dialog box that opens, click “Add” to add a new dynamic field.
•
Select the Type: The Type selected activates the “Source Type”
option. Not all Types have options for a Source Type.
•
Enter a Display Name: This will be the name the user selects in the
template you are creating.
•
Internal Name: This field is generated by the system based on the
Display Name entered.
EMAIL TEMPLATES
ADD DYNAMIC FIELDS
•
Source Type: This field is activated depending on the Type selected.
For example, the Type “Bill” activates the Source Type menu:
•
Default: This is a rule that will place information in the space if a
field is blank in a transaction.
•
XPath: By selecting the Source Type of “XPath”, this field is activated. You are selecting a field that will be in your email message. For
example, “currency” will fill in the currency. Click the button “Select
XPath”. In the dialog box, select the appropriate field that you to
display in the email template.
•
JavaScript: Click the button “Edit JScript”. Enter the code in the
dialog box, and click OK to save. The script function accesses data.
A variable is passed call “Xml Document”. Enter this in your code.
See the “Appendix” in the Magaya Software Customization Manual
for JavaScript basics.
253
EMAIL TEMPLATES
SEND EMAIL TO CONTACTS
•
Click the “Save” button in the “Dynamic Email Field” dialog box.
Send Email to Contacts
To send an email to individual contacts, select them from the “To:” button in an
email message. For example, when you send a customer their statement, you can
choose to send it to the main company contact email address or send it to the
individual contacts in the Customer profile.
Let’s use the example of sending a customer statement, which is sent from the
Customer List by right-clicking their name and selecting “Statements.” The
email dialog box opens. (This is the same email dialog as when sending any
other transaction from your Magaya system such as a WR.)
In the email dialog box, click the “To:” button. In the list that opens, click the
customer name and click the “Add” button. This adds the main customer
contact. To include the contacts in the customer’s profile, click the arrow on the
side of the “Add” button and select “Add with contacts.”
This will include all the contacts from that profile. To delete one, select it and
click the “Remove” button.
Email Signatures
Email messages can display the signature of an individual employee or from the
company. The signature will be added automatically, saving you time typing it
for each message. Follow these steps depending on your preference:
254
EMAIL TEMPLATES
EMAIL SIGNATURES
From Employee:
1)
Set the option in Maintenance > Configuration > Outgoing Messages:
Click “Send email using Magaya email client” and click the “Configure”
button. Checkmark the box “Use logged in employee email address”.
2)
In Maintenance > Configuration > Employees, open each employee’s
profile to ensure they have an email address entered.
Click the icon next to the email field.
255
EMAIL TEMPLATES
EMAIL SIGNATURES
3)
Enter the signature details and format them.
Click OK to save.
Create an email signature for each employee.
From the Company:
1)
The company signature is set in the “My Company Info” dialog box. Click
File > My Company Info.
2)
In the company profile dialog box, click the icon button next to the email
field. Enter the signature details and format it as needed, including adding
an image such as a logo and a link to the company website.
With this option, this signature displays on all outgoing email messages,
regardless of which employee sends the email message.
256
8. MAGAYA COMMUNICATION SERVER
INTRODUCTION
8. Magaya Communication Server
Introduction
The Magaya Communication Server handles all communication with your
business partners, and your customers. It manages the communication for
Magaya LiveTrack and Transaction Tracking, and it handles the calls to the
Magaya XML API. The Magaya Communication Server is the core of the
Magaya Network and links everyone in the Magaya Network together, enabling
the exchange of information.
The Magaya Communication Server consists of two applications:
•
The Magaya Communication Server Service: Is a module that runs as a
Windows Operating System Service that runs in the background even if
you are not logged in to your Magaya software program
•
The Magaya Communication Server Agent: This manages the user interface, enabling it to interact with the Service that is running in the background. It runs when you are logged in to your Magaya software.
Network Configuration
The Magaya Communication Server is a Web server that processes incoming
HTTP connections from other peer Magaya Communication servers in the
Magaya Network or from users who are using the Magaya LiveTrack or Magaya
Transaction Tracking.
The Magaya Communication Server uses either port 80 (HTTP port) or port
3691 to receive connections from other peers or clients. (Port 3691 is the port
assigned by IANA to Magaya network. The IANA is the Internet Assigned
Numbers Authority; it allocates globally-unique names and numbers that are
used in Internet protocols.) When possible your router/firewall should be
configured to forward incoming connections on this port (80) to the computer
running the Magaya Communication Server so it can process requests efficiently.
257
MAGAYA COMMUNICATION SERVER USER INTERFACE
Based on your network configuration, your Magaya Communication Server will
be running in one of the following modes:
•
Online: The port is correctly configured in your router and the Magaya
Communication Server can receive incoming connections directly. This is
the recommended, most efficient setting. The icon in the taskbar will
display green boxes between the arrows.
•
Online Thru Gateway: The port is not configured in the firewall, but the
Magaya Communication Server was able to connect to one of the Magaya
Gateways which can accept incoming connections. Your Magaya
Communication Server will work properly, but this mode is less efficient
than the Online mode. The icon will have one green box and one yellow.
•
Online Firewalled. The port is not configured in the router and the
Magaya Communication Server cannot connect to any Magaya Gateway.
As a result, your Magaya Communication Server will not be able to
process any incoming connection, and the tracking features and the
communication with other peers are not possible. The solution to this is
to properly configure your router/firewall and make sure that at least
outgoing connections on port 80 TCP to Magaya Gateways are possible.
The icon will be red and blue.
•
Off line. The Magaya Communication Server cannot connect to the main
Magaya Servers to start the service. Make sure port 80 TCP is open in your
firewalls for outgoing connections to magaya.net. The icon will have a red
X on it. If it is not connected, right-click on the icon in the taskbar for the
Magaya Communication Server and select “Start Communication Server”
from the pop-up menu.
Magaya Communication Server User Interface
The Magaya Communication Server Agent contains all the functions to help
you manage your connections and database.
258
MAGAYA COMMUNICATION SERVER USER INTERFACE
To open the Magaya Communication Server Agent, double-click on the icon in
the taskbar:
You can also right-click on it and select a command from the pop-up menu. The
following options are available from the pop-up menu:
•
Reload: To reload the Magaya Communication Server, click on this. Use
this to stop or start the service.
•
Login and Logout: Use these to log into or out of the Magaya Network as
needed. The “Login” option will be grayed out while you are logged in.
•
Start and Stop Communication Server: Use these options to start or stop
the Magaya Communication Server as needed such as when you perform
an update. When it is running, the Start option will be grayed out.
259
MAGAYA COMMUNICATION SERVER USER INTERFACE
•
Monitor: This shows all connections to the Magaya Communication
Server.
•
Change Password: Use this option to change the password to the Magaya
Network.
For more details on server authentication, see Chapter 8 in the Magaya
Software Customization Manual.
260
•
About: This option opens a dialog box with information about your
system such as the version of the communication server and the name.
•
Configure: Select this to open the dialog box for the Magaya Communication Server.
MAGAYA COMMUNICATION SERVER USER INTERFACE
The dialog box for the Magaya Communication Server Agent opens:
The dialog box has buttons that are used to display different views. This screenshot shows the “System Information” view with details such as the software you
are running, your system ID, the status (Online through Gateway), and the
licenses and plug-ins activated.
Click on the “Connection” to view the server address, network interface, and
port. The port can be changed here if needed.
The “User Information” screen shows your company name, business address,
email address, and system ID.
261
MAGAYA COMMUNICATION SERVER USER INTERFACE
The “E-Mail Server” screen shows the SMTP information for the Magaya email
client:
The “Tracking” screen gives you the option to set a date limit in Transaction
Tracking. This is useful if you have a large database, so you can limit how far
back customers can look at transactions via Transaction Tracking. This will
improve the performance of this feature:
For information on the Magaya Database Server such as how to backup your
database, restore data from a backup file, and how to update your Magaya software, see the Magaya Software Customization Manual.
Additional Information about how the Magaya Communication Server works:
262
•
Log files are rotated after reaching a maximum of 2 MB.
•
Different log files are kept simultaneously when running multiple databases in the same server.
MAGAYA COMMUNICATION SERVER USER INTERFACE
•
Windows Events Viewer is update with the most important events (this
also applies to the Magaya Database Server).
Communication Server Credentials: If you select the “Database-level Authentication” method for employee login, you will need to add the Magaya Communication Server to your Employee list and give it a user name and password. For
more on server authentication, see Chapter 8 of the Magaya Software Customization Manual.
263
MAGAYA COMMUNICATION SERVER USER INTERFACE
264
9. ONLINE PAYMENTS
ONLINE PAYMENTS: INTRODUCTION
9. Online Payments
Online Payments: Introduction
Magaya Corporation partnered with First Data and PayCargo to provide online
payment options for users of Magaya software.
Your customers can pay their invoices with a credit card when you set up a
merchant account with First Data and enter the customer information in your
Magaya system.
With PayCargo, you send a link to your customers so they can pay their invoices
on the PayCargo website by entering their bank information to pay by e-check
(ACH).
Learn how to register for the services, configure your Magaya system to use
them, how to give your customers online permissions, how your customers pay
you (either in your Magaya system or online), and how you process receipt of
the payment.
Getting Started
To get started with the online payments options, first contact Magaya to activate
the option for your Magaya account. Then refer to the following topics to learn
about the options and choose the one that’s right for your business. You can sign
up for either service or both services.
First Data: To use First Data, see the topic “Online Payments: First Data” to
learn how to register for the service and then configure your Magaya system:
http://knowledge.magaya.com/?search=firstdata_online_payments
PayCargo: To use PayCargo, see the topic “Online Payments: PayCargo”
http://knowledge.magaya.com/?search=paycargo_online_payments
265
ONLINE PAYMENTS: FIRST DATA
INTRODUCTION
Online Payments: First Data
Introduction
Magaya offers a secure method of credit card payment for your customers. You
set it up online at FirstData.com where you can see the transactions. It is
connected to your Magaya system so you can process credit card payments from
your customers when they want to pay their invoices with a credit card. Types
of credit cards accepted include Visa, MasterCard, Discover and American
Express.
Register and Configure First Data
1. Register for a Merchant account with First Data by contacting Magaya to get
contact information for the FirstData - Magaya representative. Then click the
link in the Magaya Configuration screen for Online Payments or go to FirstData.com. Follow their process first, and then continue with step 2 below.
2. Configure your Magaya system by entering the information from First Data:
Note: The Test environment is only for testing the system. Leave this box
unchecked.
After you enter the data, the system will test your Magaya account and your
First Data account.
Save the data entered.
266
ONLINE PAYMENTS: FIRST DATA
ENTER CUSTOMER PAYMENT METHOD
Enter Customer Payment Method
To enter a customer’s credit card number, Go to the Customer List and open a
Customer’s profile. After you enter the number, it will be saved it in the First
Data system and only display the last four digits of the credit card number.
1. Click the Pmt Terms tab (Payment Terms):
2. Click the “Payment Accounts” button in the section “Manage Online
Payment Accounts.”
267
ONLINE PAYMENTS: FIRST DATA
ENTER CUSTOMER PAYMENT METHOD
When you click “Payment Accounts”, a dialog box opens.
Note: This dialog box will be blank until you add credit card account information for this customer. After you enter the details, they will appear in this list
where they can be edited or removed in the future.
3. Enter the customer’s credit card details:
268
ONLINE PAYMENTS: FIRST DATA
PAYMENT CONFIRMATION
The system verifies the information.
Click OK to save. After saving, only the last four digits of the credit card will be
visible. The full number is saved with First Data, a PCI-compliant security
credential service provider.
Payment Confirmation
You can receive payment for a customer’s invoice as usual and select the credit
card from the “Pay with” field:
After the Payment is processed, you can view the confirmation by clicking the
“View” button.
You will also see the confirmation in your First Data merchant account online.
Your customers will see their confirmation in their credit card statement.
269
ONLINE PAYMENTS: PAYCARGO
INTRODUCTION AND REGISTRATION
To void a payment after processing it, right-click on the Payment from the
Payments List and select “Void online payment.”
Online Payments: PayCargo
Introduction and Registration
PayCargo is a secure, web-based payment system available 24/7 worldwide to
the global shipping industry. With the Magaya PayCargo plug-in, you can send
invoices to your customers so they can pay them online. PayCargo works with
all Magaya software products.
Register for PayCargo online by going to the following web address:
http://www.paycargo.com/magaya
270
ONLINE PAYMENTS: PAYCARGO
INTRODUCTION AND REGISTRATION
Fill in the fields on the form, including your company information, your
banking information, and create a user name and password.
The bank account you enter will be the account that the payments from your
customers (shippers) will be deposited into. Contact your bank to ensure the
payment transactions will be enabled.
To use the same account information for both the Debit and Credit accounts,
click the “Same as Debit Account”. The information will be filled into the fields
automatically.
Click the “Submit” button. The PayCargo system will take you to a login page
with a note stating your Magaya registration has been sent to PayCargo. You
will receive an email with confirmation of your registration and a password.
(You can change your password later in the Update Profile section of the
PayCargo website.)
Log into the PayCargo website when you receive the email from PayCargo with
the login information. You can log in any time at: http://www.paycargo.com
271
ONLINE PAYMENTS: PAYCARGO
CONFIGURE PAYCARGO IN YOUR MAGAYA SYSTEM
Configure PayCargo in your Magaya System
To configure the Online Payments option in your Magaya system, follow these
steps:
272
1)
Go to Maintenance > Configuration > Online Payments
2)
Click the checkbox to enable online payments for PayCargo:
ONLINE PAYMENTS: PAYCARGO
SEND INVOICES TO PAYCARGO
3)
Select the bank account that will be used to receive payments. This is the
same account you entered in the PayCargo registration page. If you do not
have your bank account set up in your Magaya system, enter it in the Chart
of Accounts in the Accounting folder.
4)
Select the bank account that will be used for the service fee from PayCargo.
The Expense account has been set up for you. It is “Payments Processing
Fees”. The Service Provider is set to “PayCargo LLC”.
5)
Click the Save button.
Send Invoices to PayCargo
The following steps explain how to send invoices from your Magaya system to
the PayCargo online payment system.
1)
Go to the Invoices List (or the document view of an invoice).
Note: The customer for that invoice must have an email address in their
customer profile. To verify if this customer has an email address entered
in their profile, click on the dropdown arrow for their name in the “Apply
to” field, and click on the Edit button in the toolbar that appears in the
dropdown. Enter the email address.
2)
In the Invoices List, select an invoice and right-click on it. From the
pop-up menu, select “Send to Online Payment System”. (If you are in the
273
ONLINE PAYMENTS: PAYCARGO
SEND INVOICES TO PAYCARGO
document view of the Invoice, click on the Actions button to select from
the dropdown.)
You can also select multiple invoices at once and right-click to send them
to the online payment system.
Click “Yes” in the dialog box that appears to confirm sending:
Your Magaya system notifies you that the payment was sent successfully.
The status column in your Magaya system remains “open” for that invoice
until it is closed the same way it would for receiving a payment check in
the mail.
274
ONLINE PAYMENTS: PAYCARGO
NOTIFYING CUSTOMERS
Notifying Customers
An email message is sent to each customer you selected in the Invoices List. The
email message includes a link to the PayCargo website so the customer can click
on it and go to the page to make their payment. When a customer makes a
payment, you receive it that night (on business days, not weekends or bank holidays). A message will be sent to you, notifying you of a payment.
When you receive the customer’s payment via the PayCargo system, the
payment is posted automatically in your system and deposited in your account.
It has a reference number from PayCargo that will match the reference number
in your bank account for reconciliation purposes.
Create a System Alert
You can configure your Magaya system to notify you or any employee that a
payment was received from the online payment system. Go to Maintenance >
Configuration > System Alerts. Add a new alert and select “Online Payment is
received” from the “When” field. Fill in the other fields as you need to set up the
alert.
How You Use PayCargo.com
In addition to viewing and managing the payments in your Magaya system, you
can also see details of transactions in PayCargo.com.
When you log into your PayCargo account, you will see the dashboard Home
page. An overview of your transactions is displayed in charts. The menu is
275
ONLINE PAYMENTS: PAYCARGO
HOW YOU USE PAYCARGO.COM
across the top. Your account is called a “Carrier” account. Your customer’s
account is called “Shipper”.
By clicking on any menu item, you can see that section, including Transactions,
Reports, the Shipper List, Users, update your profile, a link to contact PayCargo,
and the Logout option. Please note that the screenshots in this manual are
currenty as of the date of publication. PayCargo is independent of Magaya
Corporation and may change their website at any time.
Here are the most frequently used features:
Transactions: To see transactions, click on the Transaction tab. The list will
show you any transactions based on the filter you choose. For example you can
view only Pending transactions, Approved, All, etc. You can click on any individual transaction to see details such as the history, view any attachments, etc.
276
ONLINE PAYMENTS: PAYCARGO
HOW YOU USE PAYCARGO.COM
Reports: See what has been deposited into your account and other reports. You
can view a report at any time, or schedule a report so it will be emailed to you.
Virtual Invoices/BOLs: When you are looking at the Transaction list, the
option “Virtual Invoices/BOLs” will be available to set up the option that allows
virtual invoices and/or Bills of Lading.
When an invoice is attached to a shipment in your Magaya system, then the
shipper can view the Bill of Lading. You as the logistics provider need to have
277
ONLINE PAYMENTS: PAYCARGO
HOW YOUR CUSTOMERS USE PAYCARGO.COM
Magaya Transaction Tracking enabled in your Magaya account in order to activate this feature.
For security purposes, your PayCargo session will time out if it has been inactive.
How Your Customers Use PayCargo.com
Your customers (called the “shipper”) will receive an email from you with a link
to log into the PayCargo website. The first time they go to the site, they have the
option to register at that time or at a later time.
278
ONLINE PAYMENTS: PAYCARGO
HOW YOUR CUSTOMERS USE PAYCARGO.COM
The following instructions are for your customers:
1)
Click on the link in the email to log in.
2)
Register or proceed to the transaction by clicking on the link “No, thanks.
Continue.” The home page of the PayCargo website shows a summary of
the transactions.
279
ONLINE PAYMENTS: PAYCARGO
HOW YOUR CUSTOMERS USE PAYCARGO.COM
3)
In the Transactions screen, click on a transaction to view it.
The following actions can be performed from the list or while viewing the
transaction:
•
Proof: This is a review of the transaction. It is often used by booking
departments who review the transaction amount, due date, and any
other information before the accounting department approves
them. When a transaction is Proofed, the status changes from
Pending to Proofed.
•
Proof and Approve: Approve means acceptance of the charges.
Enter payment information. The system sends a message to you to
notify you that the charges are accepted. Set the payment due date
terms according to your needs.
•
Approve: Use this to enter payment after the transaction has been
proofed. The sends a message to you to notify you that the charges
were paid (or will be paid on the due date). Set the payment due date
terms according to your needs.
•
Dispute: Dispute means the charges are not accepted. Enter amount
disputed. Click on Dispute button. In the screen that opens, select
the dispute category, subcategory and enter a reason for the dispute.
A history of the dispute is displayed. A Dispute notice is sent to you.
The following options are available when viewing a Transaction:
•
280
Alerts: Set up alerts according to your preferences in the Alerts &
Reminders section.
ONLINE PAYMENTS: PAYCARGO
HOW YOUR CUSTOMERS USE PAYCARGO.COM
•
Show BOL: This button appears when the invoice is attached to a shipment. View the Bill of Lading for that shipment by clicking on the button.
Other options in the PayCargo website:
Add your own reference number (optional) in any transaction for in-house
tracking.
Attach a document or image to any transaction.
Filter and search in the list by using the Filters or the search functions.
To rearrange the order of the columns or to change the width of a column, click
and drag column headers.
The information in the list can be exported to an Excel document or other
format.
Reports: See cash outflow, a report of disputed transactions, paid transactions,
ACH (bank) reconciliation report with all transaction details and fees, and
payment status report.
All the reports open a screen with a date range option. Select the dates for the
report.
Schedule a Report: To tell the system to create reports on a schedule, click on
the “Schedule Report” link. Any existing scheduled reports will appear in the
281
ONLINE PAYMENTS: PAYCARGO
HOW YOUR CUSTOMERS USE PAYCARGO.COM
list. To add a new scheduled report, click on the “Schedule a New Report”
button on the bottom of the screen. Reports can be scheduled per user.
•
282
Select a report name from the dropdown:
–
Cash Outflow Forecast Report
–
Paid Transaction Report
–
Disputed Transaction Report
–
Shipper Payment Status Report
–
Shipper ACH Reconciliation Report
•
Select the Carrier name.
•
Select the report format: PDF, Excel, comma-delimited, or tab-delimited.
•
Select the date to start the report
•
Select the frequency of the report: Daily (2 options), weekly or monthly.
ONLINE PAYMENTS: PAYCARGO
HOW YOUR CUSTOMERS USE PAYCARGO.COM
Credit Availability: To apply for a line of credit on the PayCargo site, click on
the yellow bar “Apply for PayCargo Credit”. Fill in the application.
Request Carrier Association: To establish a new relationship with a carrier, use
this menu option. Select a carrier from the dropdown, and click the “Request
Association” button.
Users: To see the list of users for this account, click on the Users link. The list
opens. New users can be added here, existing user profiles edited, global alerts
set up, or individual alerts per user.
User Profile: Click here to change the password or set security questions.
Contact Us: This opens an email screen for contacting PayCargo.
For security purposes, your PayCargo session will time out if it has been inactive.
283
ONLINE PAYMENTS: PAYCARGO
HOW YOUR CUSTOMERS USE PAYCARGO.COM
284
10. MAGAYA POD MOBILE
POD MOBILE: INTRODUCTION
10. Magaya POD Mobile
POD Mobile: Introduction
The Magaya POD Mobile application runs on smart phones and on wireless
handheld devices that delivery drivers use to collect delivery information and a
customer signature when delivering merchandise to the final consignee. The
driver can see the list of deliveries for the day, cargo descriptions, addresses, and
maps.
The Magaya POD Mobile application connects to the local Magaya system to
retrieve the orders pending for specific drivers so they can load their trucks. The
Magaya POD Mobile application works with all Magaya software. You can
enable your customers to view delivery order information in the online tracking
tool, Magaya LiveTrack.
Offline mode is available if you work in an area that does not have a strong or
reliable Internet connection. Select “Offiline” from the Settings menu (via the
“More. . .” button) before getting the Tasks. This will save the Tasks and all data
on the mobile device and upload it later when reconnected.
The following steps will explain the procedures to perform tasks on the PC and
how to use the handheld mobile units and on smart phones.
POD Mobile: Getting Started
Activate Magaya POD Mobile by contacting Magaya Corporation. The handheld units or smart phones must be purchased separately.
Video: See the video tutorial on POD Mobile:
http://youtu.be/Yy5BSn07vx0
Follow the steps in this topic (also available online in the Magaya Knowledgebase):
http://knowledge.magaya.com/?search=POD_mobile
285
ADD POD MOBILE USERS
Add POD Mobile Users
To add users and give them access to use the Magaya POD Mobile application,
follow these steps:
1)
In Magaya Explorer, go to the Maintenance folder > Employees.
2)
Open (or create) the employee profile and go to the User tab.
3)
Click on checkbox to “Allow Magaya POD Mobile access”.
4)
Click OK to save. This user’s name will now appear in the list of POD
Mobile Users in the Maintenance > Configuration folder.
Configuration Options per User:
286
ADD POD MOBILE USERS
The following options are available in the POD Mobile configuration menu:
Select the language per user and select measurement units for the users. To set
these options:
1)
Go to the Maintenance > Configuration folder and click on POD:
2)
Click on the “POD Mobile Users” button to open the list of employees
with access to the POD Mobile application.
287
ADD POD MOBILE USERS
•
3)
288
Select an employee name to open another dialog box. Select English
or Spanish for the language, and click OK when done.
POD Mobile Units: Click on this button to open the measurement units
dialog box. This is the same dialog box as explained in the topic “Measurement Units”.
CREATE TASKS
4)
Click the Save or Reset button when done.
Create Tasks
Delivery tasks for the Magaya POD Mobile are created in your Magaya Explorer
using transactions that involve delivery such as Cargo Releases, Pickup Orders,
or Shipments. The delivery tasks are stored in your Magaya database and are
retrieved by the handheld units.
If your Internet connection isnot reliable, select the “Offline” mode from the
“More” button in the Settings menu. This will saves the Tasks to the mobile
device.
Follow these steps to create the tasks:
1)
In Magaya Explorer, click on the Task button from the document view of
the Cargo Release, Pickup Order, or from the Shipment view.
•
In the dialog box that opens, assign the task to an employee. (If not
assigned, the tasks will be available for any employee to do.)
•
Assign the Task Type as “Delivery (POD)”.
289
PERFORM POD TASKS ON HANDHELD UNITS
•
Enter the subject and due date. Notes and the reminder are optional.
If a “Generic” Task Type is sent to the handheld unit, the task will appear
in the Task list and look similar to a text message. This is useful to send a
general message that is not specific to a delivery.
To create a Task for the Houses in a Shipment, select it from the dropdown. This
will create a batch of delivlery tasks for the POD Mobile handheld user.
To view the tasks at any time, go to the Tasks folder and select Pending Tasks.
This list shows the status of the tasks. “In Process” means a driver has selected
the task. When tasks are completed, they will appear in the History Tasks list.
Perform POD Tasks on Handheld Units
Your Magaya POD Mobile handheld units automatically connect to your
Magaya system and load all the pending tasks (orders) onto the handheld units
for drivers so the packages are placed on their trucks for delivery.
1. Driver Retrieves Tasks:
290
PERFORM POD TASKS ON HANDHELD UNITS
The driver reviews the tasks and locations for the day’s deliveries.
1)
The driver enters his or her user name and password to log in to the handheld unit.
2)
Click on Tasks on the main menu.
The Orders list screen opens.
3)
In the Orders list, select the orders you will deliver.
4)
Click the Accept button.
2. Checking Addresses and Destinations:
291
PERFORM POD TASKS ON HANDHELD UNITS
To see the address and commodities description, select the order and click the
Details button. To see the details of one item, select an item and click the Item
Details button for more details.
To see a map of the locations, click on the View Map link.
If you do not have Internet wireless access while you are delivering, then save
the map before you leave the warehouse so you have it even when you are
offline.
3. Dispatching:
292
PERFORM POD TASKS ON HANDHELD UNITS
When you arrive at the customer’s location, follow these steps to deliver
(dispatch) the items:
1)
Click on Dispatch on the main menu.
2)
Select the order for the customer and click the Dispatch button in the
Orders screen.
Select the item, scan it (or click “Quantity”).
3)
Scan the bar codes of the items in the Quantities screen. (You can also
enter the quantity manually.)
If a delivery is incomplete, you must enter a comment. Comments can be
selected from a pre-set list or you can enter them manually.
4)
Click the Next button in the completed orders screen. This will take you
to the signature screen.
Note: If you click the Save button, the information will be saved and you
can return to it later.
293
AFTER THE DELIVERIES ARE COMPLETED
5)
Ask the person receiving the package to sign the screen.
The “View Report” option on this screen will show a summary of the
delivery information.
Extra Info: If you’re working in Offline mode, the signature is saved along
with all the delivery data.
6)
Click the Finish button.
After the Deliveries are Completed
When you return to the office or warehouse, follow these steps to upload the
delivery information into the Magaya database:
294
1)
Click on “Update” on the main menu. The list of orders opens.
2)
Click the Update button in the Orders list screen. This will update the
Magaya system at your office with the delivery information on the hand-
AFTER THE DELIVERIES ARE COMPLETED
held unit. The main menu of the handheld unit will be cleared of the
orders completed (and any uncompleted deliveries).
The updated information will be visible in the History Tasks list and in the
POD tab of the related transactions (Cargo Release, Pickup Order, or
Shipment) in Magaya Explorer. The signature can be printed.
If any changes need to be made to any delivery data, click on the View
option to access the list of orders.
The information and the signature will also be available for the customer
to view in two ways: In an email with a Magaya Transaction Tracking link;
295
AFTER THE DELIVERIES ARE COMPLETED
or online via Magaya LiveTrack. Double-click on the transaction in
Magaya LiveTrack to see the details, including the signature:
296
PERFORM POD TASKS ON A SMART PHONE
Perform POD Tasks on a Smart Phone
The Magaya POD Mobile app runs on the iPhone™ and the iPad™ and any tablet
with the Google Chrome or Apple Safari Web browser. Scanning barcodes,
updating data, and collecting signatures are done with the phone.
Get the App
There are two ways to get the Magaya POD Mobile app:
•
Go to the iTunes app store and download the app
•
Open it in a web browser: http://pod.magaya.net
Configuration is the same in your Magaya system as explained in the section
"Add Users."
Creating the delivery tasks from a Cargo Release or Shipment in your Magaya
system as explained in the section "Create Tasks."
297
LOG INTO THE APP
Log into the App
To log into the Magaya POD Mobile app on a smart phone:
1)
Enter your Magaya Network ID and tap the “Connect” button to connect
to your Magaya database. (The program saves your ID.)
2)
In the next screen, select your name from the list of POD users.
(Note: These are the users given access in your Magaya system on the
employee’s profile.)
3)
298
Enter your Magaya password, and tap “Login”.
SELECT TASKS AND DISPATCH ITEMS
Select Tasks and Dispatch Items
Select the task (or tasks) you will accept to dispatch (deliver) from the Pending
Tasks list.
The Pending Tasks list displays the tasks assigned to you and the generic tasks
that are not assigned to a specific user or any notes.
Tips:
•
To open a specific task, tap the task.
•
To search for a task, you can search by entering a consignee name or task
number in the search field at the top.
•
To see a map of all the tasks, tap the “Map” button. The map screen shows
all the tasks and the best route between all the task locations. The system
automatically calculates the distance and estimated arrival time to the
delivery address from the phone location. To see the details of a task, tap
the map marker. To accept the task from the map screen, tap the “Accept
Task” button.
299
SELECT TASKS AND DISPATCH ITEMS
300
•
The bottom toolbar show the total tasks, pending and what you selected to
dispatch.
•
To refresh the Pending Task list, swipe down.
•
To view the item details before accepting a Pending Task, tap the arrow
button for that task.
•
Offline mode is available if you work in an area that does not have a strong
or reliable Internet connection. Select “Offiline” from the Settings
menu(via the “More. . .” button) before getting the Tasks. This will save
the Tasks and all data on the mobile device and upload it later when reconnected.
•
When you accept a task, it is removed from the Pending Task list and
moved to the list of “Dispatch Orders” which you can see by tapping the
“Dispatch” button on the bottom toolbar.
SELECT TASKS AND DISPATCH ITEMS
Check the map to see the route to the address. To see the package details, tap on
the marker in the map.
When delivering the items, open the task and tap “Dispatch Task”.
301
SELECT TASKS AND DISPATCH ITEMS
In the next screen, tap the “Scanner” button to scan the barcode on the packages. (You can also tap on the item instead of scanning.)
Note: The task number is displayed on the top of the screen.
302
SELECT TASKS AND DISPATCH ITEMS
For partial delivery: If you do not have all the items to deliver, swipe from right
to left and tap the plus or minus button to enter the quantity.
To enter a comment/reason for the partial delivery, tap the “Proof of Delivery”.
303
COLLECT THE SIGNATURE
The screen displays the partial delivery information.
After you scan, the app automatically changes to the signature screen.
Collect the Signature
Type in the consignee’s name, and they can sign the screen with their finger.
304
COLLECT THE SIGNATURE
Tap the “Complete Delivery” button to save the signature.
The status of the delivery is updated automatically to the Magaya database. The
task status is “Completed” and appears in the Tasks folder in your Magaya
Explorer. Customers can see the delivery details and signature online in Magaya
LiveTrack.
305
COLLECT THE SIGNATURE
306
11. MAGAYA SMARTBORDER ABI
GETTING STARTED: REGISTER WITH SMARTBORDER.COM
11. Magaya SmartBorder ABI
Magaya SmartBorder ABI: Introduction:
Electronically file US Customs documents such as the Entry/Immediate
Delivery Form 3461 and the Entry Summary Form 7501 using the Magaya
SmartBorder ABI Integration plug-in.
This plug-in is available for the Magaya Cargo System and the Magaya Supply
Chain Solution.
Getting Started: Register with SmartBorder.com
To get started using the SmartBorder ABI connection with your Magaya system,
contact your Magaya representative to activate the feature in your Magaya
account.
Next, go to www.smartborder.com to create an ABI account. Tell them you will
use Magaya software to connect to SmartBorder.
After you create the account, log in and install the software. Any future updates
to SmartBorder’s software will be installed when you log in.
Follow the steps below to set up your Magaya system with the correct Items &
Services to ensure your system manages the expenses from the ABI service.
Then configure your system so you can file ABI transactions.
Create Items & Services
In your Magaya system, create the expense items in Items & Services for the ABI
service such as Duty, Tax, ADD (antidumping fee) and Countervailing (CVD)
and other items. You can assign these expenses to any Item or Service you
choose or create specific items in your Magaya system.
For information on creating Items & Services, see the Magaya Software
Accounting Manual.
307
CONFIGURE ABI
Configure ABI
To use the Magaya SmartBorder ABI integration, configure it in your Magaya
software by following these steps.
308
1)
In your Magaya system, go to the Maintenance > Configuration menu and
select US Customs Systems.
2)
Enter your ABI filer code, user name, and password from SmartBorder:
3)
Test Connection: When the ABI plug-in is activated, click the “Test
Connection” button to verify it is working.
CONFIGURE ABI
4)
Synchronize Clients: Use this button to match your clients (customers) in
the SmartBorder system with the list of customers in your Magaya system.
This step only needs to be performed during system setup.
Link the two systems by clicking the “Auto Link” button.
The “Short Name” column displays a code name that is equivalent to the
Entity ID field that is included on the Magaya Customer profile dialog
309
CONFIGURE ABI
box:
The icon next to the Smart Border client name indicates if the client is
linked or not. A red X indicates that the SmartBorder system did not
match the SmartBorder name with a Magaya customer name.
To add a client to your Magaya list, select the name in the SmartBorder list
and click the Add button. Verify the addition by double-clicking the name
in the Magaya list to open the Customer profile. The system will automatically fill the customer name field and the Entity ID field. Enter the address
and other information as needed.
If you are new to SmartBorder but have customers in your Magaya system,
go to your SmartBorder account and enter the customer names. Then link
them in the Magaya system.
310
CONFIGURE ABI
5)
Synchronize Products: Link the Inventory Item Definitions from your
Magaya system to the products in the SmartBorder system. Ensure there
is a Part Number in the Inventory Item Definition.
Click “Auto Link” to synchronize the products. If you have products
defined in your SmartBorder account, they will appear in the synchronized list.
If you do not have products in the SmartBorder system, add them in your
SmartBorder account.
To add a product from the SmartBorder list to the Magaya list, select the
product and click the “Add” button. Double-click on the product in your
list of Magaya products. Add additional product details as needed.
When a product is linked, the symbol of a chain is displayed next to the
product name:
6)
In the Magaya Configuration screen, enter a number in the option: “Automatically update entries that were created in the last __ days”. The default
number of days is 30. This means that for 30 days after the date the shipment is sent to SmartBorder, the Magaya system will check for updated
ABI messages from Customs for that shipment. The Magaya system also
provides the option to retrieve ABI messages at any time by selecting the
option “Retrieve latest updates” from the Customs button on the Shipment Toolbar.
7)
Check the box to enable your system to retrieve accounting information
for the following items:
•
Duty Item
311
FILE ABI TRANSACTIONS
•
Tax item
•
ADD (the Antidumping fee): Antidumping fees are applied to items
that are sold at an unfairly low price to bring the price of the import
closer to the “normal value” or to remove the injury to domestic
industry in the importing country (source WTO.org).
•
CVD (Countervailing fee): Countervailing Duty is an extra duty
added to subsidized imports that are found to be injuring domestic
producers. The amount of the duty is determined by the US International Trade Administration and the US Department of Commerce
and levied by US Customs and Border Protection (CBP).
•
Other fees: Includes MPF (Merchandise Process Fee) and HMF
(Harbor Maintenance Fee). This category is updated as one charge.
These charges can be set up from the dropdown menus in this screen or in the
Items & Services subfolder in the Magaya Accounting folder.
This configuration in your Magaya system enables Customs duties, taxes, and
charges to be transferred from the SmartBorder system to the Magaya system
and be posted with the Shipment charges. The charges will be available for liquidation and will appear on invoices. If you are not using Magaya for accounting,
this option can be inactive.
File ABI Transactions
ABI documents such as Customs Entry/Immediate Delivery Form 3461, the
Entry Summary Form 7501, and others can be filed from the import shipment
screen in Magaya Explorer.
1)
Create your regular import shipment (or receive an import shipment).
Required shipment fields in Magaya are:
312
•
All commodities must be inside a container or other package type,
and the container must have a number. Add the weight of the
contained pieces to the shipment by checking the box in the
container screen. The value of the commodities must be entered.
The Harmonized Tariff code and country of origin are recommended, otherwise you will need to enter it in the SmartBorder
screen. If the code is defined in the product’s inventory item definition, the system will fill in the information for you.
•
The Bill of Lading number is required.
•
On the Entities tab, the Client to Bill must be a client that is set up in
the SmartBorder system.
FILE ABI TRANSACTIONS
•
2)
The carrier must have an SCAC code. For ocean, enter a vessel
name, flag country, and voyage identification. Schedule K and D
codes are recommended.
On the Shipment Toolbar, click the arrow on the side of the Customs
button and select ABI > Export to SmartBorder:
A dialog box opens, asking you to verify if the shipment is ready to be sent
to ABI. Click OK to continue or No to return to the shipment screen.
After the shipment is successfully sent to SmartBorder, the Magaya system
displays a confirmation screen:
The SmartBorder number is a unique number that identifies this shipment in the SmartBorder system. The Customs Entry Number will identify the shipment to Customs. These numbers will be saved in your
Magaya system and you can access them in the General Information
313
FILE ABI TRANSACTIONS
screen that is available from the Customs button on the Shipment
Toolbar:
3)
Go to your SmartBorder account, and enter the SmartBorder number to
review the transaction and add any needed data before sending the transaction to Customs. You can also review the documents you are filing.
4)
Send the transaction to Customs for processing.
After your transaction is processed by Customs, you will receive messages in
your Magaya system.
As events are posted to your system, they can be viewed online by your
customers who are using Magaya LiveTrack or with Magaya Transaction
Tracking.
When the shipment liquidation is performed, the duties, taxes, and fees are
included in the liquidation.
314
12. VIN DECODER PLUG-IN
VIN DECODER: INTRODUCTION
12. VIN Decoder Plug-In
VIN Decoder: Introduction
The Magaya VIN Decoder plug-in streamlines exporting vehicles by enabling
you to enter the Vehicle Identification Number (VIN) into your Magaya system
and automatically gather vehicle data.
When you scan the VIN, the system automatically populates much of the
vehicel data such as the make, model, and year and saves it in your Magaya database.
VINs can be scanned/entered into the Magaya system for Warehouse Receipts,
Pickup Orders, Quotations, and shipments. The scan function is available on
the Commodities tab of these transactions.
315
VIN DECODER: GETTING STARTED
VIN Decoder: Getting Started
To get started with the Magaya VIN Decoder, contact your Magaya logistics
advisor to activate the plug-in for your Magaya account. This plug-in is available for all Magaya software products.
Video: View the video tutorial on the VIN Decoder on the Magaya Software
YouTube Channel:
http://youtu.be/xSGCBoNt_Qo
Follow the steps below to configure your system and use the VIN Decoder on a
handheld scanner.
Configure: Enter Default VIN Data
To save data entry time, enter default EEI information that all vehicles have in
common by going to Maintenance > Configuration > US Customs. In the AES
316
CONFIGURE: ENTER DEFAULT VIN DATA
section of the screen, click the “Default EEI” button. This is a one-time entry
task.
Click the “Default EEI” button. In the dialog box that opens, enter the Schedule
B code for the vehicles and other data. For example, there are different codes for
passenger vehicles, commercial vehicles of varying weights, diesel engine vehicles, and other types of vehicles.
317
SCAN AND DECODE A VIN WITH WMS MOBILE
Only the necessary fields are active; the others are disabled in this screen. As a
result, any vehicle entered will now have the field “Include in EEI” checkmarked
automatically so that it will automatically be included in the EEI filing. The
vehicle must have a valid Schedule B code.
Save the information. Extra Info: If you want to perform some test shipments
before sending real data to Customs, click the checkbox “Use Testing Environment.” When you’re done testing, be sure to uncheck this box.
Scan and Decode a VIN with WMS Mobile
VINs can be scanned with the Magaya WMS Mobile plug-in application
running on wireless handheld units.
318
SCAN AND DECODE A VIN WITH WMS MOBILE
On the WMS Mobile handheld unit:
1)
Click the "Manual Receive" icon on the main screen.
2)
Scan or Type in the warehouse location where the vehicle will be stored.
3)
Enter the name of the shipper and consignee and other information as
applicable.
319
ENTER AND DECODE A VIN ON THE PC
4)
Scan the barcode on the vehicle. The system searches for the VIN details.
The system displays it in the next screen.
The details are visible by selecting the item and clicking “Edit”.
5)
Click “Finish” when you are done.
This will generate a new Warehouse Receipt with the information entered.
Enter and Decode a VIN on the PC
This example explains how to manually enter a VIN on the desktop PC (for
example, if a VIN barcode is too damaged to scan or you receive a list in
advance, etc.).
320
1)
In the Warehouse Receipt dialog box (or other applicable transaction),
click on the Commodities tab.
2)
Click the Add button and select “Add Vehicle” from the pop-up menu.
ENTER AND DECODE A VIN ON THE PC
3)
Click the mouse cursor in the VIN Number field in the dialog box, and
enter the VIN by scanning it or typing the number.
Click OK to save the VIN. The system will decode the number and fill in
the vehicle information into your system.
Continue with the Warehouse Receipt.
The system retrieves the vehicle data.
To view the data, open the EEI tab of the Commodity dialog box.
Check the box "Is Vehicle."
321
INCLUDE A VEHICLE IN A SHIPMENT
Click the “Vehicle” button. The Vehicle Data dialog box opens, displaying the
data automatically gathered from the VIN:
You can enter information in the other fields as needed.
Include a Vehicle in a Shipment
Vehicles can be loaded in export shipments with all the vehicle information
necessary to file the EEI for each vehicle.
Create the shipment as usual. For help creating shipments, please see the Shipments chapter of the Magaya Cargo System Operations User Manual.
If a vehicle was received in a Warehouse Receipt (WR), select the WR to add the
vehicle to the shipment. If the vehicle was not received in a WR, scan the VIN
barcode with Magaya VIN Decoder or manually enter the VIN. (If you configured default EEI data, it will populate in the Commodity dialog box.)
322
INCLUDE A VEHICLE IN A SHIPMENT
To send the information to US Customs, click the Customs button on the Shipment Toolbar (option “Send EEI to AES”). The wizard displays the vehicles and
any other cargo in the shipment. Items are grouped. To enter or edit Schedule
B information, select multiple lines of different vehicles (press the Shift key and
click items) and then click the “Edit EEI” button. The EEI dialog box appears.
Enter the data needed and click OK. The ability to select multiple vehicles and
edit them as a group helps to speed up setting EEI data that is common to all the
vehicles. Now a checkmark appears in the column “Include EEI” for each item.
Complete the shipment as usual.
323
INCLUDE A VEHICLE IN A SHIPMENT
324
13. TRACK2GO MOBILE APP
TRACK2GO MOBILE APP: INTRODUCTION
13. Track2Go Mobile App
Track2Go Mobile App: Introduction
Track2Go is a mobile application from Magaya Corporation designed for smart
phones that provides real-time information about Magaya transactions such as
shipments, warehouse receipts, invoices, and more.
Similar to Magaya LiveTrack and Transaction Tracking, the Track2Go app is
connected to your Magaya database so the latest information is displayed.
Getting Started
The app is available to download for free from the app market on your smart
phon It works on iPhones, iPads, Blackberry, and Android devices. It’s available
to download for free from the app market on your smart phone.
Track2Go is free for your customers to use. For Magaya customers who
currently have the Magaya Transaction Tracking plug-in, your customers can
start using Track2Go immediately.
If the Magaya Transaction Tracking plug-in is not activated in your account,
contact your Magaya Logistics Advisor to offer this service to your customers.
325
THE INTERFACE
The Interface
The first screen in the app is the search screen.
The taskbar on the bottom has icons you can tap to access different functions.
On the top of the screen the icon that looks like gear wheels opens the settings
for saving the Magaya ID, turning the toolbars on or off, and setting the units
for weight and dimensions.
326
FIND TRANSACTIONS
Find Transactions
To find a transaction, you only need three pieces of information:
1)
Enter the Magaya ID number, which you can get from your logistics
provider, or search for the company name in the Directory.
2)
Scroll to select the type of transaction you wish to track such as Shipment,
327
DETAILS
Warehouse Receipt, Quotation, Invoice, Purchase Order, a vehicle, etc.
3)
Enter the transaction number.
Notes: The number field is not case sensitive.
4)
Tap “Search” to continue.
•
If the transaction is found, then information about the transaction is
displayed such as status, the shipper, consignee, etc. To see further
details about the transaction, tap on this information button or the
“Details” icon on the bottom taskbar.
•
If the transaction is not found, a red button appears explaining why
the transaction was not found. (See the section “Common Error
Messages” below.)
Details
Transaction details are organized by categories in different tabs such as General,
Items and Events across the top of the screen. Explore these tabs by tapping on
each one to see pertinent information about the transaction:
•
328
General
DETAILS
•
Items
•
Charges (for Invoices)
329
DETAILS
•
Events
•
History
Use the History button to quickly find recently viewed transactions. You
can use this to find the transaction number so you can check it again
without having to call your logistics provider.
330
COMMON ERROR MESSAGES
Common Error Messages
Error Message
Remedy
How to Use
Verify that you have entered all the required
information in the required fields
Transaction not found
Verify the transaction number was entered
correctly, If the problem persists, contact
you logistics provider to confirm the
transaction number.
Could not connect to server
Verify that the Magaya ID number is entered
correctly. Otherwise contact your logistics
provider.
Error message screen for “Transaction Not Found”:
331
COMMON ERROR MESSAGES
If you need help using the app, open the user guide by tapping on the “More”
icon.
332
14. MAGAYA ONTHEGO
MAGAYA ONTHEGO: INTRODUCTION
14. Magaya OnTheGo
Magaya OnTheGo: Introduction
The Magaya OnTheGo plug-in gives you remote access to your company database from any Internet connection (at home or on the road). You can work
remotely as if you were in your office. You can authorize your employees or
agents to connect remotely and set permission levels for each person.
Magaya OnTheGo securely connects to the Magaya Cargo System, Magaya
WMS, Magaya Commerce System, or Magaya Supply Chain Solution and gives
the user all the functionality of those programs. All the features you use in the
office are available remotely, including air, ocean, and ground shipments;
accounting transactions, printing documents and labels; warehousing and other
operations features.
Getting Started
Setting up Magaya OnTheGo requires the following:
1)
First configure your system to allow Magaya OnTheGo access,
2)
Second install Magaya OnTheGo in the remote laptop or computer that
will connect to your system.
Follow the steps below to set up and use the program.
Configure Your System for Magaya OnTheGo Access
A) Activate Remote Access:
333
CONFIGURE MAGAYA ONTHEGO
The following steps illustrate how to give an employee remote access to your
Magaya database. Activate the remote access from your server computer:
1)
Go to the Maintenance folder and click on “Employees”.
2)
Double-click on an employee’s name (or select the name and click the Edit
button). The employee’s profile dialog box opens.
3)
Click on the User tab.
Click in the checkbox to allow Magaya OnTheGo access.
Click the OK button to save.
B) Set up the Network:
Enable the Magaya OnTheGo program to access your Magaya database by
opening port 6110 TCP. In your firewall or router, make sure you have a port
forwarding set for port 6110 TCP point to the computer that run the Magaya
database.
Configure Magaya OnTheGo
1. Contact Magaya:
334
CONFIGURE MAGAYA ONTHEGO
Contact your Magaya representative to activate Magaya OnTheGo for your
company. They will tell you how to download the plug-in program
When the File Download dialog box appears, click on “Save” to save the file (the
file name is InstMCSRem.exe).
2. Install Magaya OnTheGo:
After the download is complete, install the program.
Follow the prompts in the installation wizard.
3. Set the Port: Open port 6110 TCP for outgoing connection in case you have
a firewall.
335
USING MAGAYA ONTHEGO
Using Magaya OnTheGo
On the remote laptop or computer, log into Magaya Network using your
Network ID and password:
Next log in to your Magaya database:
Now you can use the remote version of your Magaya database just as if you were
in the office.
336
15: MAGAYA EXPRESS LINK
CONFIGURE EXPRESS LINK
15: Magaya Express Link
Magaya Express Link provides complete, end-to-end shipping order management from shipping to returns all in one place.
With it you can ship items with UPS or FedEx directly from your Magaya
system using the rates you have contracted with them.
Save time by requesting shipments and printing labels using the details already
entered in your Magaya system. You and your customers can track packages by
viewing updates. Additional carriers will be added in the future.
This procedure explains how to configure Express Link, how to make a shipment request from a Magaya Pickup Order or a Cargo Release. Requests can
also be made from the Shipment toolbar.
Express Link: Getting Started
Getting Started with Magaya Express Link:
Magaya Express Link provides complete, end-to-end shipping order management from shipping to returns all in one place. With it, you can ship items with
UPS or FedEx directly from your Magaya system using the rates you have
contracted with them. Save time by requesting shipments and printing labels
using the details already entered in your Magaya system. You and your
customers can track packages by viewing updates. Additional carriers will be
added in the future.
See the following Magaya Knowledgebase articles below to get started. (Copy
and paste the links if needed. Tip: Print this document and use it as a checklist.)
Configure Express Link
First, Configure Magaya Express Link:
http://knowledge.magaya.com/?search=ExpressLink_configure
337
EXPRESS LINK: GETTING STARTED
UPS AND EXPRESS LINK ARTICLES
Next, Prepare Data Before Shipping:
http://knowledge.magaya.com/?search=ExpressLink_prep_data
UPS and Express Link Articles
Request UPS Shipment from a Pickup Order:
http://knowledge.magaya.com/?search=ExpressLink_Ship_PU
Request UPS Shipment from a Cargo Release:
http://knowledge.magaya.com/?search=ExpressLink_Ship_CR
Express Link International Shipments with UPS:
http://knowledge.magaya.com/?search=UPS_ship_international
FedEx and Express Link Articles
Express Link International Shipment with FedEx:
http://knowledge.magaya.com/?search=FedEx_ship_international
Request a Domestic FedEx Shipment from a Pickup Order:
http://knowledge.magaya.com/?search=FedEx_Ship_PU
FedEx Close of Day Procedure: (for FedEx Ground shipments only, domestic or
international. Express services are excluded (as of May 2014).)
http://knowledge.magaya.com/?search=FedEx_close-of-day
Additional Details
Handle Returns with Magaya Express Link:
http://knowledge.magaya.com/?search=ExpressLink_Returns
Third-Party Billing in Magaya Express Link:
http://knowledge.magaya.com/?search=ExpressLink_3rd-party-billing
Add Related Columns to your Lists to view Express Link Data Easily:
338
CONFIGURE MAGAYA EXPRESS LINK
ENABLE THE PLUG-IN
http://knowledge.magaya.com/?search=ExpressLink_appendix
Matching Package Types in Express Link:
http://knowledge.magaya.com/?search=Expresslink_Match_Packages
Configure Magaya Express Link
This procedure explains how to set up the Magaya Express Link plug-in before
using it to request package shipments from carriers such as UPS and FedEx.
Enable the Plug-In
Follow the steps below to enable Magaya Express Link in your software and set
your preferences.
1)
Go to Maintenance > Configuration > Magaya Express Link
2)
Click “Enable Magaya Express Link.”
339
CONFIGURE MAGAYA EXPRESS LINK
COMPLETE THE REGISTRATION WIZARD FOR UPS
This activates all the functions on this configuration screen. The first step is to
register your account by following the steps in the section “Complete the Registration Wizard for UPS” or “Complete the Registration Wizard for FedEx.”
Complete the Registration Wizard for UPS
Follow the prompts in the wizard to connect your Magaya system with your
UPS account. (You can register multiple accounts; the first account you enter
becomes the default account. If you don’t have a UPS account, create one with
the wizard or go to www. ups.com.)
NOTE:
340
•
The fields in bold are required.
•
Verify the information before saving; it cannot be edited later.
CONFIGURE MAGAYA EXPRESS LINK
COMPLETE THE REGISTRATION WIZARD FOR UPS
The Registration Wizard connects your Magaya system to your UPS account
and brings the rates from your UPS account to be used in your Magaya system.
1)
Click the “Register” button in the Configuration screen.
Note: There is a test option in the Registration button menu. Use it for
testing, not for real transactions.
The wizard opens. Click the “Next” button in the wizard to start. Verify
and enter any needed company information.
2)
Enter your UPS account number and the UPS invoice information. If you
don’t have the information, create an account now or add it later. See the
section “Register without an Account”. You can complete with wizard
without filling in this screen. Note: The invoice section of the screen is
341
CONFIGURE MAGAYA EXPRESS LINK
COMPLETE THE REGISTRATION WIZARD FOR UPS
optional. It validates high-volume shipping accounts who have special
rates.
342
3)
In the next screen, scroll to the bottom of the license terms to activate the
acceptance button. Click the checkbox.
4)
Click “Finish.”
CONFIGURE MAGAYA EXPRESS LINK
COMPLETE THE REGISTRATION WIZARD FOR FEDEX
Complete the Registration Wizard for FedEx
The registration steps to use FedEx in your Magaya system are similar to registering UPS.
1)
Enter your company information in the wizard in the first screen.
In the next screen, enter the account. If you don’t have an account with
FedEx, click the link to create one now.
Tip: The account information cannot be changed later, so double-check it
to verify it is entered correctly.
The system will verify the account information.
2)
Click “Finish” to complete the wizard.
The account is now registered and available to use.
343
CONFIGURE MAGAYA EXPRESS LINK
REGISTER WITHOUT AN ACCOUNT
Register without an Account
If you don’t have a UPS or FedEx account, you can finish the wizard without
adding the account or invoicing information. You can add it later:
1)
344
In the Magaya Express Link Configuration screen, click the button with
the three dots that is next to the dropdown menu for Default accounts.
•
To add the account number after using the wizard, right-click on the
account, select “Add Account” and follow the prompts to connect
your Magaya system to UPS or FedEx.
•
To add the invoicing information after using the wizard, right-click
on the account, select “Validate Account” and follow the prompts to
connect your Magaya system to UPS or FedEx. This is for
high-volume shipping accounts who have special rates.
CONFIGURE MAGAYA EXPRESS LINK
CONFIGURE EXPRESS LINK ACCOUNTING
Configure Express Link Accounting
1)
Check the box to activate the fields in the Accounting section of the
screen. Set your preferences in these fields to enable the system to automatically generate charges for Express Link transactions.
2)
The cost and your income fee are set by default. If you had a UPS or FedEx
account before using Magaya Express Link, and you previously created
income and expense items by another name for this service in the list of
Items & Services, you can select them from the dropdown list instead of
using the defaults here.
This will enable the system to add the cost and fee charges to the transaction. For example, for a Magaya Cargo Release (CR), these charges will
appear in the Charges tab of the CR dialog box. Then invoices and bills can
be created.
3)
Select how you want to mark up the service (by a percent or a flat value)
and if you want a minimum charge. This markup amount will be included
in the rates that are calculated when using Express Link.
Configure Labels
Select label size and format. Check the box if you want the system to automatically print labels after shipment (optional).
If you do not check the box to automate label printing, then you or another user
can choose when to print labels later per shipment. The labels will print on the
printer you designated in the Configuration > Labels screen.
345
CONFIGURE MAGAYA EXPRESS LINK
CONFIGURE SHIPMENT
Configure Shipment
The “Shipment” portion of the Configuration screen provides options to set
measurement units, set the amount of time to process a shipment at your
company before UPS or FedEx arrives, and enter the time of day they arrive at
your facility.
The processing time affects the shipping date suggested in the courier wizard
when you request package pickup. For example, if you select one (1) day
processing time in this screen, the system will offer the shipping date as
tomorrow, which is one day after creating the request. This gives you and your
staff time to prepare the package. The Handoff/pickup time is also carried over
automatically to the courier wizard screen so you do not have to enter it each
time. This configuration can be changed here any time or changed per shipment
in the courier wizard screen. For domestic shipments, use inches and pounds.
Note: The checkbox to enable test shipments is only using during testing.
Configure Tracking
These Tracking options tell your Magaya system how often to check with UPS
or FedEx to get updates.
- Allow manual update of operation status: Check this box to allow users to
click on the Actions button in a transaction such as a Cargo Release to change
the status from In Transit to Delivered, etc. If you do NOT check this box, users
will NOT be able to change the status. The only status information will be the
Express Link updates in the Events tab of the transaction.
346
CONFIGURE MAGAYA EXPRESS LINK
CONFIGURE TRACKING
- Accept the UPS or FedEx tracking terms and conditions for couriers:
Required. Tracking information will not be sent unless you accept the terms.
- Enable automatic package tracking. The system automatically gets events as
they are updated. This step is recommended. The events show in the Events tab
of a Magaya transaction.
Tell the system when to stop getting the updates for a package. If a package has
not been delivered within 30 days, contact the carrier.
Tracking schedule: Multiple schedules can be set to tell the Magaya Communication Server when to get the latest information.
347
CONFIGURE MAGAYA EXPRESS LINK
CONFIGURE TRACKING
Click the “Tracking Schedule” button to set your options. A new dialog box
opens:
•
Name this schedule to identify it and distinguish it from any other
schedule you create. This enables you to have separate tracking schedules
for different purposes. This example is specifically to tell your Magaya
system when to get UPS or FedEx updates.
•
Set the type of schedule to “Repeating” or “Once”.
•
Set the frequency and start time. Click “No End” to make the tracking
continually checked. Save the settings.
•
Click “Save”.
Save the settings for the Configuration screen.
348
PREPARE DATA BEFORE SHIPPING
MANAGE MULTIPLE ACCOUNTS
Manage Multiple Accounts
If you have more than one account in Magaya Express Link, manage them from
the Configuration screen. You can also use a customer’s account if you ship for
them and use their account number. Then you won’t have to do third-party
billing.
Click the button next to the dropdown menu in the “Default Accounts” section
of the Maintenance > Configuration > Express Link screen.
A new dialog box opens. In it, manage accounts by adding or deleting account
numbers and add invoicing information.
Prepare Data Before Shipping
Make sure all the entities have these details in their profiles:
•
Contact name (first and last)
•
Address
•
Phone number
•
Email address
349
REQUEST UPS SHIPMENT FROM A PICKUP ORDER
1. CREATE THE MAGAYA PICKUP ORDER
This prep will save you from filling in this information every time, which is not
the best way or fun! Express Link is designed to be fast, so do this prep so you
can get the most from it.
Recommended Tips before getting started:
•
Determine what account to bill
•
For international shipments, know what documents are needed at destination
Request UPS Shipment from a Pickup Order
With Magaya Express Link, you can send shipment requests right from your
Magaya system Pickup Orders, using existing customer and commodity data.
See the section “Prepare Data Before Shipping” to ensure you have all the shipment data needed for the entities involved in the shipment request.
1. Create the Magaya Pickup Order
This section explains how to create a Magaya Pickup Order and use the Magaya
Express Link feature to schedule the shipment. This sends a request to UPS for
them to come to your facility to pickup a package. In this example UPS is the
carrier. This is a domestic ground transaction. For an international transaction,
350
REQUEST UPS SHIPMENT FROM A PICKUP ORDER
1. CREATE THE MAGAYA PICKUP ORDER
use the Shipment not the Pickup Order. See the section on international shipments with UPS.
The information you enter in the dialog box to create the Pickup Order is used
in the UPS request, so you don’t have to retype anything.
Ensure the following when creating your Magaya Pickup Order:
•
On the Carriers tab, select the Inland Carrier. If you ship directly with
UPS, select them from the list.
If you use a transport company to manage UPS shipping for you, then
select that carrier/provider. This will generate charges for that entity. This
field is used for generating charges, not for scheduling the transport.
You will schedule the transport by using the Magaya Express Link option
in the Actions button.
A bill will be generated for the Inland Carrier you select. If no carrier is
selected, the system will tell you that charges will not be generated.
It is not necessary to enter any charges on the Charges tab for transport.
The Express Link feature takes care of it for you.
Extra Info: If you are not paying, but a third-party is paying, please see the
section on Third Party Billing.
351
REQUEST UPS SHIPMENT FROM A PICKUP ORDER
2. SCHEDULE A UPS SHIPMENT
•
On the Commodities tab, each item must be on a separate line. If not,
the system will prompt you to split a line if it contains more than one item.
In the “Pieces” field, enter 1. Or, repack items into one package.
•
After finishing the details in the dialog box, the information is saved and
the Magaya Pickup Order document is created as usual. The status will be
“Arriving.”
2. Schedule a UPS Shipment
This section explains how to schedule with UPS after creating a Magaya Pickup
Order. The status of the Pickup Order must be “Arriving.”
1. Click the Actions button and select Magaya Express Link > Ship with UPS.
The courier interface screen opens.
352
REQUEST UPS SHIPMENT FROM A PICKUP ORDER
2. SCHEDULE A UPS SHIPMENT
2. Verify the information in the first screen. The fields in this screen are filled in
from the details in your Pickup Order. Preparing this information in advance
pays off here because all you need to do is click “Save & Next.”
Important information to know about this screen:
•
All fields in bold are required.
•
The system will prompt you for missing information.
•
The Billing Account is the company that will pay UPS for the transportation charges. For third-party billing, see the section “Third-Party Billing”.)
•
NOTE:
If you add information in this courier screen, it will not update in the
entity profile in your Magaya system. It is recommended that you ensure
353
REQUEST UPS SHIPMENT FROM A PICKUP ORDER
2. SCHEDULE A UPS SHIPMENT
the profiles are complete to speed up using this courier screen for each
shipment.
The “Sender” section in this screen pulls information from the Shipper field in
the Pickup Order. The “Origin” is the Pickup Location field on the Shipper tab.
The “Billing Account” is from the “Issued By” field of the Pickup Order’s
General tab.
3. Click “Save & Next”.
354
REQUEST UPS SHIPMENT FROM A PICKUP ORDER
2. SCHEDULE A UPS SHIPMENT
The next screen enables you to set the delivery options at the shipment level and
the package level and select the rate:
This screen shows the packages in the Pickup Order (if there are more than one
for this customer). The dimensions of the packages appear based on details
entered on the Commodities tab of the Pickup Order. (The only situation when
dimensions do not appear is when you elect to use UPS defined package types.)
355
REQUEST UPS SHIPMENT FROM A PICKUP ORDER
2. SCHEDULE A UPS SHIPMENT
•
A: Select shipment-level options as needed such as Saturday delivery or
add Reference numbers such as invoice, PO, part number, model or serial
number.
To notify the customer, click the button with the 3 dots (in the Options
section). Check the box to “enable this notification.” The system pulls the
email address from the customer’s information. Add more as needed.
356
REQUEST UPS SHIPMENT FROM A PICKUP ORDER
GET RATES
•
B: Select package-level options as needed such as Delivery confirmation or
COD terms. You can require a signature for only one package in the shipment or more than one package.
COD is "Collect on Delivery" to receive payment upon delivery of a
package.
Extra Info: To view or change package type details, double-click on the package
line to open a dialog box with options. Remember: UPS Express boxes will
generate express air shipment options, not ground shipments. (To learn about
defining packages with UPS dimensions, see the section “Match Package Types”
for more.)
Option: Changes to packages can also be made on the Magaya Pickup Order in
the Commodities tab. Select the item and click the “Details” button. Changes
will be updated in the Express Link transaction.
The shipping date is based on your preference in the Configuration screen.
Change it for this shipment if needed. The time shown is the time UPS arrives
at your facility.
Get Rates
Click the “Get Rates” button (next to the date and time).
Extra Info: If you click the arrow on the side of the button, options appear for
the account rates, daily rates, retail rates and standard rates.)
357
REQUEST UPS SHIPMENT FROM A PICKUP ORDER
PRINT LABELS
The resulting rates for each type of service are shown:
Select a service and rate. (Extra Info: The rate will be updated in the Pickup
Order dialog box on the Charges tab.) Estimated time does not appear for destinations within the same city. Remember: If you selected an Express type of box,
then select an Express service rate here.
Click “Save & Next”. A confirmation screen opens.
Click “Send.” For information on printing labels, see the section “Print Labels.”
For information on tracking options, see the section on Tracking.
After sending a package, new options appear in your menu under Actions >
Magaya Express Link in the Pickup Order document or list view.
Print Labels
The system asks if you want to print the labels now. Click Yes or No. Affix the
labels on the packages so they are ready when UPS arrives. To print them later,
go to the Pickup Order, click “Actions” and select Magaya Express Link. The
pop-up menu has the options for printing labels and more. You or another
Magaya user can print the labels when needed (based on your Configuration
setting). The labels will print on the printer you designated in the Configuration
> Labels screen.
358
REQUEST UPS SHIPMENT FROM A PICKUP ORDER
PRINT LABELS
If you have more than one label in a transaction, you can print one or more. To
print only one label, select it and click “View”. Then print.
359
REQUEST UPS SHIPMENT FROM A PICKUP ORDER
WHERE IS THE HISTORY OF MY REQUEST SAVED?
Where is the History of my Request Saved?
To see a list of all requests made with Magaya Express Link, go to the Magaya
Network Messages folder.
Right-click on the transaction for options:
To Cancel a UPS Request
If you cancel an Express Link operation, it must also be deleted: From the
Actions button, cancel it first, then select the Delete option. This does NOT
delete the Pickup Order, just the Express Link operation.
360
REQUEST UPS SHIPMENT FROM A PICKUP ORDER
TRACKING UPDATES FOR YOUR CUSTOMERS
Tracking Updates for Your Customers
Send the Pickup Order to the customer to give them the tracking number for
this shipment. Select HTML format for the email message.
You can also send a link via Transaction Tracking if you have that feature activated in your Magaya account. This also gives your customers tracking access
on a smart phone with the mobile app Track2Go.
A tracking link also appears in LiveTrack. Ensure the customer has access to log
into LiveTrack. In LiveTrack, the customer can open the Pickup Order and see
the tracking number in the “Charges” section. They can copy that tracking
number and paste it into UPS.com to track the package.
Generate Charges
To generate charges, go to the Pickup Order, click the Charges tab, click the
“Generate” button.
The Charges tab shows the Courier Cost (expense) and Fee (income) added to
the Cargo Release transaction and who each charge was applied to.
When you click the “Generate” button, the system generates the customer’s
invoice and your bill and saves them in the Accounting folder. The invoice will
be generated for the “client to bill” that you selected on the Consignee tab.
You can send the invoice to the customer just as you would send any other
invoice: by emailing the document or a tracking link, or by sending it to the
361
REQUEST UPS SHIPMENT FROM A CARGO RELEASE
1. CREATE THE MAGAYA CARGO RELEASE
online payment system (if you set up this option for this customer). Your bill is
saved in the Bills List.
Request UPS Shipment from a Cargo Release
With Magaya Express Link, you can send shipment requests right from your
Magaya Cargo Releases for items in your warehouse, using existing customer
and commodity data. This sends a request to UPS to ask them to come to your
facility to pickup a package. See the section “Prepare Data Before Shipping” to
ensure you have all the shipment data needed for the entities involved in the
shipment request.
1. Create the Magaya Cargo Release
Create your Cargo Release for the customer, entering the information you
usually enter. Ensure:
•
On the Inland Carrier screen, select UPS or other service
provider/carrier who contracts with UPS. If you shipped with and paid
UPS directly before using Magaya Express Link, then select “UPS” for this
field. If you spelled out “United Parcel Service”, then select that. If you
used another provider, select them.
This field does not schedule the transport; it is used to generate charges.
When the bill is generated, it will be for the carrier company you select in
362
REQUEST UPS SHIPMENT FROM A CARGO RELEASE
1. CREATE THE MAGAYA CARGO RELEASE
this tab. You will not need to enter any UPS charges on the CR Charges
tab. The Magaya Express Link feature will take care of that.
If no carrier is specified, no charges will be generated.
Extra Info: If you are not paying, but a third-party is paying, please see the
section on Third Party Billing.
•
Enter the commodities, one per line, for this customer. If all the items
will go to the same address, add each and then repack them all into one
package. Each commodity line item must have one piece in it.
Complete the Cargo Release as usual. When done with the dialog box, save it.
The status of the CR is “Loaded”.
363
REQUEST UPS SHIPMENT FROM A CARGO RELEASE
2. SCHEDULE A UPS SHIPMENT
2. Schedule a UPS Shipment
Click the Actions button and select Magaya Express Link > Ship with UPS.
The first screen in the Magaya Express Link courier wizard opens. It is filled in
with all the information from the profiles from your customer, supplier, and
other entities. This is where your preparation pays off because all you have to do
364
REQUEST UPS SHIPMENT FROM A CARGO RELEASE
2. SCHEDULE A UPS SHIPMENT
is click “Save & Next.” If anything is missing, the system will tell you. All fields
in bold are required.
Note: The Billing Account is the company that will pay UPS for the transportation charges. For third-party billing, see the section “Third-Party Billing”.
Click “Save & Next” to go the next screen.
365
REQUEST UPS SHIPMENT FROM A CARGO RELEASE
2. SCHEDULE A UPS SHIPMENT
The second screen of the courier wizard contains delivery options and rates.
366
REQUEST UPS SHIPMENT FROM A CARGO RELEASE
2. SCHEDULE A UPS SHIPMENT
•
A: Select shipment-level options as needed such as Saturday delivery or
add Reference numbers such as invoice, PO, part number, model or serial
number.
To notify the customer via email, click the button with the three dots in
the Options section. Check the box to “enable this notification.” The
system pulls the customer email address. Add more as needed.
In addition to this notification (or instead of), the other option is to use
Magaya Transaction Tracking from the Cargo Release, Magaya LiveTrack,
or Track2Go. See the section “Tracking” for details.
367
REQUEST UPS SHIPMENT FROM A CARGO RELEASE
GET RATES
•
B: Select package-level options as needed such as Delivery confirmation or
COD terms. You can require a signature for only one package in the shipment or more than one package.
COD is "Collect on Delivery" to receive payment upon delivery of a
package. A COD notice is printed on the label.
•
C: Click the “Get Rates” button.
Change the date or time for the shipment if needed (the date and time shown
here are set in your Configuration screen).
Get Rates
When you click “Get Rates,” the system will get your rates for the shipment.
This rate is the total price for all the packages in the list (if more than one
package for this customer). These are the rates you have based on your account
368
REQUEST UPS SHIPMENT FROM A CARGO RELEASE
GET RATES
with UPS. The rate includes the markup you set in the Configuration screen.
Select the rate you want.
If you have UPS boxes, you can use them to save entering dimensions every time
you ship. (See the section “Matching Package Types.”) If you select a UPS
Express box, the system will give you air rates such as Next Day Air. For ground
rates, use another package type such as a box. Double-click on a package to see
options as needed.
•
The “Large Package” option is useful for awkward sized packages. This is
an expensive option!
•
The “Additional Handling” checkbox will add to the cost also.
•
Dry ice is used for shipping foods, pharmaceuticals, and other items that
need to be temperature controlled. You can specify how much of the total
package weight is dry ice versus the item itself.
Decide on a rate. Rates are affected by the options selected. Try different options
to see if you get a better rate.
369
REQUEST UPS SHIPMENT FROM A CARGO RELEASE
PRINT LABELS
Click “Save & Next” to go the next screen.
Verify the information in this screen. This screen shows the sender, recipient,
origin and destination information, the payor, package details and cost for the
service you requested.
Send the request. The system gives you a confirmation and saves it in the
Messages folder.
Print Labels
The system asks if you want to print the labels now. Click Yes or No. Affix the
labels on the packages so they are ready when UPS arrives.
370
REQUEST UPS SHIPMENT FROM A CARGO RELEASE
TRACKING
To print them later, go to the Cargo Release, click “Actions” and select Magaya
Express Link. The pop-up menu has the options for printing labels and more:
The labels will print on the printer you designated in the Configuration > Labels
screen.
Tracking
Send the Cargo Release to the customer to give them the tracking number for
this shipment. Select HTML format for the email message.
A tracking link also appears in LiveTrack. Ensure the customer has access to log
into LiveTrack. They can open the Cargo Release and see the tracking number
in the “Charges” section. They can copy that tracking number and paste it into
UPS.com to track the package.
The other tracking option is in the second screen of the courier wizard. Click the
button with the three dots to open a notification dialog box.
Events are updated in the transactions dialog box on the Events tab and shown
in LiveTrack. The frequency of the updates is set in your Configuration screen.
Also choose columns in the Cargo Release list. See the Appendix for more.
371
REQUEST UPS SHIPMENT FROM A CARGO RELEASE
GENERATE CHARGES
Generate Charges
To generate charges, go to the Cargo Release, click the Charges tab, click the
“Generate” button.
The Charges tab shows the Courier Cost and Fee added to the Cargo Release
transaction.
When you click the “Generate” button, the system generates the customer’s
invoice and your bill and saves them in the Accounting folder. The invoice will
be generated for the “client to bill” that you selected on the Consignee tab.
You can send the invoice to the customer just as you would send any other
invoice: by emailing the document or a tracking link, or by sending it to the
online payment system (if you set up this option for this customer). Your bill is
saved in the Bills List.
Cancel a UPS Shipment Request
If you need to cancel a shipment request, go to the CR, click Actions > Magaya
Express Link > cancel Magaya Express Link operation. Then delete the Express
372
REQUEST A FEDEX SHIPMENT FROM A PICKUP ORDER
CANCEL A UPS SHIPMENT REQUEST
Link operation (not the CR). If you already generated charges, you have to
delete the generation from the CR’s Charges tab, and delete the invoice and bill.
Request a FedEx Shipment from a Pickup Order
See the section “Prepare Data Before Shipping” to ensure you have all the shipment data needed for the entities involved in the shipment request.
373
REQUEST A FEDEX SHIPMENT FROM A PICKUP ORDER
1. CREATE THE MAGAYA PICKUP ORDER
1. Create the Magaya Pickup Order
The information you enter in the dialog box to create the Pickup Order is used
in the FedEx request, so you don’t have to retype anything.
This example shows a domestic FedEx request. For international shipments, use
the Magaya Shipment not a Pickup Order. See the section on international shipments with FedEx.
•
On the Carriers tab, select the Inland Carrier. If you ship directly with
FedEx, select them from the list.
If you use a transport company to manage FedEx shipping for you, then
select that carrier/provider. This will generate charges for that entity. This
field is used for generating charges, not for scheduling the transport.
374
REQUEST A FEDEX SHIPMENT FROM A PICKUP ORDER
1. CREATE THE MAGAYA PICKUP ORDER
You will schedule the transport by using the Magaya Express Link option
in the Actions button.
A bill will be generated for the Inland Carrier you select. If no carrier is
selected, the system will tell you that charges will not be generated.
It is not necessary to enter any charges on the Charges tab for transport.
The Express Link feature takes care of it for you.
Extra Info: If you are not paying, but a third-party is paying, please see the
section on Third Party Billing.
If you are using your customer’s FedEx account, you do not have to select
an inland carrier on the Carrier tab because that field is used to generate
accounting charges only. If you are not using your account, you will not
have any accounting charges for this transaction.
•
On the Commodities tab, each item must be on a separate line. If not,
the system will prompt you to split a line if it contains more than one item.
In the “Pieces” field, enter 1. Or, repack items into one package.
•
After finishing the details in the dialog box, the information is saved and
the Magaya Pickup Order document is created as usual. The status will be
“Arriving.”
375
REQUEST A FEDEX SHIPMENT FROM A PICKUP ORDER
2. SCHEDULE A FEDEX SHIPMENT
2. Schedule a FedEx Shipment
This section explains how to schedule with FedEx after creating a Magaya
Pickup Order. The status of the Pickup Order must be “Arriving.”
1. Click the Actions button and select Magaya Express Link > Ship with FedEx.
The courier interface screen opens.
2. Verify the information in the first screen. The fields in this screen are filled in
from the details in your Pickup Order. All fields in bold are required. Preparing
this information in advance pays off here because all you need to do is click
“Save & Next.”
376
REQUEST A FEDEX SHIPMENT FROM A PICKUP ORDER
2. SCHEDULE A FEDEX SHIPMENT
The Payor in the Billing Account section is the account that will pay FedEx. You
can change the Payor in this screen if needed.
3. Click “Save & Next”.
The next screen enables you to set the delivery options at the shipment level and
the package level and select the rate.
If you need to add additional information such as a reference number, you can
add it via the dropdown on this screen.
If a commodity is hazardous, the details of the commodity will display in this
screen by double clicking the package in the Packages list.
377
REQUEST A FEDEX SHIPMENT FROM A PICKUP ORDER
2. SCHEDULE A FEDEX SHIPMENT
Shipping options are available from the button with the three dots at the top of
the screen:
Options include:
•
FedEx SmartPost
•
Hold a package
•
Notifications
•
Express Freight
Other options: Select package-level options as needed such as Delivery confirmation or COD terms. You can require a signature for only one package in the
shipment or more than one package.
The shipping date is based on your preference in the Configuration screen.
Change it for this shipment if needed. The time shown is the time UPS arrives
at your facility.
4. Get Rates:
Click the “Get Rates” button (next to the date and time).
378
REQUEST A FEDEX SHIPMENT FROM A PICKUP ORDER
PRINT LABELS
Select a service and rate. (Extra Info: The rate will be updated in the Pickup
Order dialog box on the Charges tab.) Estimated time does not appear for destinations within the same city. Remember: If you selected an Express type of box,
then select an Express service rate here.
Click “Save & Next”. A confirmation screen opens.
Click “Send.” The system asks if you want to print the labels now. For more
information on printing labels, see the section “Print Labels.”
After sending a package, new options appear in your menu under Actions >
Magaya Express Link in the Pickup Order document or list view.
Print Labels
You can print the labels right after sending the transaction to FedEx or later. To
print them later, go to the Pickup Order, click “Actions” and select Magaya
Express Link. The pop-up menu has the options for printing labels and more.
You or another Magaya user can print the labels when needed (based on your
Configuration setting). The labels will print on the printer you designated in the
Configuration > Labels screen.
Affix the labels on the packages so they are ready when FedEx arrives.
If you have more than one label in a transaction, you can print one or more. To
print only one label, select it and click “View”. Then print.
Cancel a FedEx Request
If you cancel an Express Link operation, it must also be deleted: From the
Actions button, cancel it first, then select the Delete option. This does NOT
delete the Pickup Order, just the Express Link operation.
Generate Charges
To generate charges, go to the Pickup Order, click the Charges tab, click the
“Generate” button.
If you did not select a carrier, no charges will appear. If you are billing a
third-party, the charges will not appear here.
379
EXPRESS LINK INTERNATIONAL SHIPMENT WITH FEDEX
1. CREATE THE SHIPMENT
Express Link International Shipment with FedEx
This examples shows how to ship a package via air using FedEx and Magaya
Express Link. The package is going from the U.S. to Canada.
International shipments that use Express Link for FedEx can only be processed
from Magaya shipments or to return an item from a Pickup Order (via Actions
button). Each shipment must contain only one piece. If multiple pieces, repack
them into one.
Before beginning, it is recommended that you determine if you will use your
FedEx account or use your customer’s FedEx account. Also determine what
international shipping documents are required for the destination country.
1. Create the Shipment
Create your export shipment as usual. This example shows a straight shipment
of one item to one customer, leaving the U.S. and going to Canada by air.
380
EXPRESS LINK INTERNATIONAL SHIPMENT WITH FEDEX
2. SCHEDULE THE FEDEX SHIPMENT WITH EXPRESS LINK
2. Schedule the FedEx Shipment with Express Link
Click the arrow on the side of the Actions button and select Magaya Express
Link:
The pop-up menu has the following options: Ship or upload documents.
The menu option that enables you to upload documents will upload the document from your Magaya system to FedEx. A dialog box will open. Click the
“Add” button inside that box to add documents. Also select the document type.
Click OK to save.
If you want the system to generate documents, select the “Ship with FedEx”
option. A wizard screen will enable you to add documents in another screen.
381
EXPRESS LINK INTERNATIONAL SHIPMENT WITH FEDEX
2. SCHEDULE THE FEDEX SHIPMENT WITH EXPRESS LINK
When you click “Ship with FedEx”, an Express Link wizard screen opens.
The shipping account displays at the top of the screen. This is the entity who is
shipping the item. Other options include units and currency.
The billing account is the entity who will be billed. Select to bill the shipping
account, a third-party account, the recipient, or collect.
The information in this screen is pulled from your shipment.
Verify the details and click the “Save & Next” button.
382
EXPRESS LINK INTERNATIONAL SHIPMENT WITH FEDEX
2. SCHEDULE THE FEDEX SHIPMENT WITH EXPRESS LINK
The next screen displays package options, services, rates and more.
The “Description” field is required. The field is located in the Options section.
383
EXPRESS LINK INTERNATIONAL SHIPMENT WITH FEDEX
2. SCHEDULE THE FEDEX SHIPMENT WITH EXPRESS LINK
The Options section includes a button that displays a detailed menu with
multiple tabs:
The first tab displays international shipping options such as documents, duties
and more. Details are pulled from the shipment data.
•
Documents: The system can generate Electronic Trade Documents from
the shipment data or you can upload a Magaya document. (The EDT
option binds the documents to the shipment and sends them to FedEx.) If
you selected “Upload” from the Actions menu, you do not have to upload
again.
•
Duties: Displays who is responsible for the duties to US Customs.
•
Charges: Displays freight charges, insurance and other charges as applicable.
•
Other parts of this screen enable additional options such as the export
data, the entities, and more. These are not required for all shipment. It is
recommended that you know what information is required for your shipment.
The other tabs display additional options for international shipping with FedEx:
384
EXPRESS LINK INTERNATIONAL SHIPMENT WITH FEDEX
2. SCHEDULE THE FEDEX SHIPMENT WITH EXPRESS LINK
•
Options tab shows FedEx SmartPost details if you use it, if a shipment is
for a future date, inside delivery or pickup, or premium home delivery.
(SmartPost is a FedEx service that uses the US Postal Service for
low-weight residential customers. See the FedEx website for details.)
•
Hold at Location: Specify the name and place to hold a package
•
Notifications: Add more email addresses
•
Express Freight: If you use FedEx Express Freight, enter the details
References: Click to add a reference such as a customer number:
To view package options, double-click the package to open a dialog box:
385
EXPRESS LINK INTERNATIONAL SHIPMENT WITH FEDEX
MESSAGES
•
Package options include different sizes and types packages. Check the
boxes if it includes dry ice or alcohol.
•
Dangerous Goods: Add any needed details. The system pulls in details
from the Commodity dialog box.
•
The Commodity tab includes details of the item. Double-click the item to
view or edit it.
Delivery options include signature request and COD.
The shipping date and time are pulled from your Configuration settings.
Get Rates: Click when ready to get the rates for this shipment. Choose from your
rates associated with your account or list rates. The select the rate and click
“Save & Next.”
Note: If you receive an error such as the commodity missing a Customs value,
close the Express Link screen and return to the Commodity dialog box to enter
the value on the first tab and the EEI tab. Save and perform the Express Link
function again.
The final screen is a confirmation screen. Verify the details and click “Send.”
The system asks if you want to print labels now. Click Yes or No.
Messages
View messages from FedEx in the Magaya Network folder > Messages > Magaya
Express Link. From this list, perform the Close of Day procedure, which is
required for FedEx Ground shipments. (For details on the Close of Day procedure, please see the topic “FedEx Close of Day Procedure.”
386
FEDEX CLOSE OF DAY PROCEDURE
INTRODUCTION
Other options include printing labels, viewing documents, and more. Access
this list via the Actions button or right-click on a transaction.
FedEx Close of Day Procedure
Introduction
The Close of Day procedure is performed for FedEx Ground shipments only,
domestic or international (as of May 2014). Express services are excluded. It
sends the transaction data to FedEx and enables you to print reports and the
Ground Manifest.
The Close of Day procedure must be done to finalize pending shipments. This
procedure is require before you can tender a shipment to the courier.
387
FEDEX CLOSE OF DAY PROCEDURE
USING THE CLOSE OF DAY WIZARD
Using the Close of Day Wizard
To perform the Close of Day process, go to the Magaya Express Link messages
list in the Magaya Network folder.
A separate tab opens, displaying the list of transactions that need to be closed.
The columns in this list show the courier, date and time, the account used for
closing, how many shipments were closed, and a transaction number that is
used for troubleshooting.
Click the “Add” button to begin the Close of Day wizard.
388
FEDEX CLOSE OF DAY PROCEDURE
USING THE CLOSE OF DAY WIZARD
The account that was used to create the shipments must be the same account
used to close the shipments. (If all the pending shipments use the same account,
this screen in the wizard will not display; it will move to the screen displaying all
the shipments that need to be closed.)
In the screen displaying all the shipments that need to be closed, click the
"Close" button. After a shipment has been closed, it cannot be cancelled. All the
transaction data is sent to FedEx.
After completing the wizard, print the Ground Manifest document by
right-clicking on the transaction. Give the manifest to the driver. Reports are
also available here.
389
EXPRESS LINK INTERNATIONAL SHIPMENTS WITH UPS
1. CREATE THE SHIPMENT
Express Link International Shipments with UPS
This example shows how to create an international ground shipment for UPS
and how to use Express Link to process it with UPS. This will send a request to
UPS to come to your facility to pick up a package. The Magaya system sends the
information to UPS immediately, so no close of day or end of day procedure is
needed for UPS. It is only needed for FedEx Ground.
1. Create the Shipment
Create your export shipment as usual. This example shows a straight shipment
of one item to one customer, leaving the U.S. and going to Mexico by truck (i.e.
ground shipment).
When you create the shipment, you have the option to add documents when
using the shipment wizard or adding them later when making the Express Link
request. If you have custom documents, add them from the wizard.
390
EXPRESS LINK INTERNATIONAL SHIPMENTS WITH UPS
2. SCHEDULE THE UPS SHIPMENT WITH EXPRESS LINK
2. Schedule the UPS Shipment with Express Link
From the Shipment Toolbar, click the arrow on the side of the Actions button
and select Ship with UPS.
The pop-up menu has the following options: Ship or upload documents.
The menu option that enables you to upload documents will upoad the document from your Magaya system to UPS. A dialog box will open. Click the “Add”
button inside that box to add documents. Also select the document type. Click
OK to save.
If you want the system to generate documents, select the “Ship with UPS”
option. A wizard screen will enable you to add documents in another screen.
When you click “Ship with UPS”, an Express Link wizard screen opens. The
information in this screen is pulled from your shipment. Verify that the
Description field is filled in. If not, add it now. The Description field is
required. The product must also have a value for Customs, measurement units,
country of manufacturer, and other details on the Commodity dialog box.
391
EXPRESS LINK INTERNATIONAL SHIPMENTS WITH UPS
2. SCHEDULE THE UPS SHIPMENT WITH EXPRESS LINK
Next, click the Options button.
The Options dialog box opens. To add international documents, select them
here. When you select them here, this enables UPS to generate the documents
from the shipment data in your Magaya system. This means these documents
will be electronically bound to your shipment. You do not need to send them
separately. After you complete this wizard, UPS will return the filled in documents to you in your Magaya system so you can view or print them.
If you select “Use Upload”, then the system will use the Magaya document
instead of creating a UPS one. This is useful if you have a custom document that
you want to use. Open this Options dialog box to verify that the documents are
uploaded. If not, select the option here.
Use of the other fields in the Options dialog box will depend on your shipping
needs. For example, if you need to add insurance information. The system will
pull in as much data from your shipment that is possible and display it here.
You can add details to the invoice such as if it is a gift or sample. Other entities
can be added as needed.
Click OK when you are done with the options to save them.
Get the rates by clicking the “Get Rates” button. Select the rate and go to the next
screen.
Send the transaction. Print labels now or later.
392
EXPRESS LINK APPENDIX TOPICS
ADD RELATED COLUMNS
View messages from UPS in the Magaya Network folder > Messages > Magaya
Express Link.
Express Link Appendix Topics
This section contains additional information related to the Magaya Express
Link plug-in.
Add Related Columns
Add Related Columns to your Pickup Orders or Cargo Release List:
1)
Click “Actions” and select “Choose Columns”.
2)
In the Column Settings dialog box, click the “Add Columns” button.
3)
Select “Magaya Express Link” from the Related Elements dropdown
menu. Add columns such as those shown.
393
MATCHING PACKAGE TYPES IN EXPRESS LINK
ADD RELATED COLUMNS
The status is updated based on your Configuration. Updates display in the lists
where you set the columns and in the Events tab of the transaction.
Matching Package Types in Express Link
To make it easier to ship with a courier such as UPS and use their boxes and
packages, match your package types with theirs. Then the dimensions for the
packages will be in your Magaya system so you do not need to enter them every
time you ship a UPS Express box, for example.
394
1)
Go to Warehousing > Package Types
2)
Click “Add” or “Edit” to add a new package type or select and edit an
existing one.
3)
For a new package type, select the package type on the "Description" tab
(for example "Box").
4)
For new or existing package types, go to the "Express Link" tab, check the
box to "Enable mapping."
5)
Select the package type from the dropdown list.
6)
Click OK to save the changes.
MATCHING PACKAGE TYPES IN EXPRESS LINK
ADD RELATED COLUMNS
This saves time because you do not have to enter dimensions when entering the
item in the Commodity tab of a Pickup Order, Cargo Release, or Shipment. Just
select the package type when entering the description.
Two Ways to Use the Package Types:
Option 1) Use the package type on the Commodities tab when you create a
Magaya Pickup Order, Cargo release or Shipment.
Option 2) In the courier wizard, double-click on a package to see options.
The dialog box contains options:
•
Packaging: Select the package type here. UPS Express boxes generate
express air shipment rates, not ground shipment rates. For ground rates,
use another package type such as a box.
•
The “Large Package” option is useful for awkward sized packages. This is
an expensive option!
•
The “Additional Handling” checkbox will add to the cost also.
395
THIRD-PARTY BILLING IN MAGAYA EXPRESS LINK
ADD THE ACCOUNT TO THE CUSTOMER PROFILE
•
Dry ice is used for shipping foods, pharmaceuticals, and other items that
need to be temperature controlled. You can specify how much of the total
package weight is dry ice versus the item itself.
Third-Party Billing in Magaya Express Link
If you work with a customer who has their own UPS account and they will pay
their own UPS charges, you can bill them as a third-party right from your
Magaya system with Express Link. No charges are generated for you.
Add the Account to the Customer Profile
To add the third-party billing account number to a customer’s profile:
•
396
Go to the Customer list, right-click on their name, select Magaya Express
Link and Accounts.
HANDLE RETURNS WITH MAGAYA EXPRESS LINK
ADD THE ACCOUNT TO THE CUSTOMER PROFILE
•
In the dialog box that opens, click the “Add” button and add the account
for third-party billing.
Required: Their account number, their country name and postal code
The system will generate charges for this third-party customer when you select
them as the Client to bill in the transaction dialog box.
Verify this data in the courier wizard before you send the request to UPS. You
can change the payor to the recipient as needed.
Handle Returns with Magaya Express Link
This section explains how to schedule a pickup of an item your customer wants
to return. This can only be done from a Magaya Pickup Order. It can only be
done one item at a time.
1)
Create the Magaya Pickup Order for the customer and the item.
Clear the “Client to Bill” field on the Consignee tab. Select “Other”.
397
HANDLE RETURNS WITH MAGAYA EXPRESS LINK
ADD THE ACCOUNT TO THE CUSTOMER PROFILE
2)
From the Pickup Order, click Actions > Magaya Express Link > Return
with UPS
3)
Verify information in the courier screen about the entities involved.
Click the button for notifications.
398
HANDLE RETURNS WITH MAGAYA EXPRESS LINK
ADD THE ACCOUNT TO THE CUSTOMER PROFILE
4)
In the next screen, select if you want to email the return label to your
customer or to print a label, and specify how many pickup attempts you
want to schedule. The cost changes depending on your choice.
When emailing a label, you can enter a message to the recipient in the
“Message” field. The label will state this is a return.
Get rates.
5)
In the Confirmation screen, verify details and click “Send” to submit the
request to UPS.
The system will send a notification to your customer if you selected that
option. Other tracking options: You can send a notice via Transaction
Tracking, or the customer can check in LiveTrack or Track2Go.
If the customer was not available when UPS arrived to collect the package, the
system also sends you a notification so you can contact them to let them know
about the next attempt.
399
HANDLE RETURNS WITH MAGAYA EXPRESS LINK
ADD THE ACCOUNT TO THE CUSTOMER PROFILE
400
16. DENIED PARTY SCREENING
DENIED PARTY SCREENING: INTRODUCTION
16. Denied Party Screening
Denied Party Screening: Introduction
The Magaya Denied Party Screening plug-in helps your company comply with
U.S. government export regulations that require verification of entities to determine if they are included on the list of denied individuals or companies.
A “Denied Party” is any individual or company that has been denied exporting
privileges and cannot import into or export from the U.S. because they have
been sanctioned by the government for illegal acts. Failure to comply with these
regulations is a violation of U.S. law and can result in fines, penalties, criminal
or civil prosecution, and denial of export privileges.
The Magaya Denied Party Screening plug-in uses the Consolidated Screening
List, which includes the following export screening lists of the Departments of
Commerce, State and the Treasury:
- Department of Commerce – Bureau of Industry and Security:
•
Denied Persons List
•
Unverified List
•
Entity List
- Department of State – Bureau of International Security and Non-proliferation,
list of Non-proliferation Sanctions
- Department of State – Directorate of Defense Trade Controls, the AECA
Debarred List
- Department of the Treasury – Office of Foreign Assets Control lists:
•
Specially Designated Nationals List
•
Foreign Sanctions Evaders List
•
Sectoral Sanctions Identifications (SSI) List
•
Palestinian Legislative Council (PLC) List
Source: http://export.gov/ecr/eg_main_023148.asp
401
GETTING STARTED
Magaya software includes a denied parties list which is updated regularly from
the U.S. Bureau of Industry and Security (BIS), part of the U.S. Department of
Commerce. The plug-in verifies entities in your Magaya system by comparing
them to the U.S. Denied Party Screening list.
Getting Started
First, activate the plug-in for your Magaya account, and then configure it to
screen entities, vessels and shipments. Refer to the sections below for steps.
Configure
This plug-in needs to be configured to tell the system when you want to screen
because there is a monthly service fee which includes a minimum quantity of
screenings per month. If you go over the minimum, you will be charged per
entity that you screen.
402
CONFIGURE
To configure the Magaya Denied Party Screening plug-in, go to Maintenance >
Configuration > Denied Party Screening.
1)
Check the box “Enable Denied Party Screening” to activate the options
below. These options include screening entities against the U.S. government list and screening for banned countries that you configure here.
2)
Configure when the system performs the screening by setting these
options:
•
Screen new entities/contacts when creating them: This option tells
the system to screen any new entity or contact as their profile is
created.
•
Screen entities/contacts when editing an existing entity.
•
Screen contacts of entities being checked: Check this box if you want
to check all the contacts of an entity when the entity is screened.
Leave it unchecked if you do not want to screen the contacts.
403
CONFIGURE
Preventing this screening reduces the number of transactions per
month.
•
Screen shipments before filing to AES: This option tells the system
to screen the entities in shipments before sending the EEI to AES.
You can also screen manually at any time by right-clicking an entity.
If you want the system to display the results after screening, check the box
“Always confirm screening results.”
Set the “Minimum Threshold Acceptance” to configure how accurate the
system will perform the screenings. If set to “Exact Match” then the system
will only find those entities with exact spelling match. This will not find an
entity spelled one way in your Magaya system but a different spelling in
the government list. For example, if a company spells its name “Cargo de
Miami”, but you enter “Cargo of Miami”, the system will not match this
name. To enable it to search for similar names and avoid missing an entity
due to misspelling or spelling variation, set the threshold to “Fair Match.”
This will result in a larger results list that you can check.
Set “Days to validate since last check” by selecting a number from the
dropdown. This is the number of days the screening will be considered
good, i.e., valid. This setting depends on how often your company exports.
Since the screening service is charged per entity, determine how often you
need the screening performed. If you select 30 days, and you add a new
entity to your system, that entity will be screened but others will not. You
will only be charged for new entities during this time period.
404
3)
Select banned countries: This setting varies, depending on the country in
which your company is based. In the United States, the U.S. Department
of the Treasury’s Office of Foreign Assets Control (OFAC) determines
which countries are banned. When you add countries to this setting, your
system scans shipments to verify if any entities are in these banned countries. Your Magaya system will scan this list first when you tell the system
to screen entities or screen a shipment. It will notify you if it finds one of
these countries and display that notification in a dialog box.
4)
Save the configuration.
ASSIGN ROLES TO USERS
Assign Roles to Users
Assign roles to the users who will configure the plug-in (besides the Administrator), to enable a user to change the status of a party, and for a user to screen
entities, vessels, and shipments.
1)
Go to the Employees List and right-click an employee’s name to access
Roles.
The Roles assigned to the employee are displayed. The roles that pertain
to Denied Party Screening include Compliance Officer and Run Screening
Process.
2)
Click the “Add” button. In the dialog box, select the type of role to assign
to this employee. Click “OK” to save the role.
Note: In the future, you can disable a role by clicking “Deny” in this box or
delete the role from the list.
Screen Entities and Vessels in Lists
If you run the screening process and it was already done during the time period
configured, the system will notify you that the entities do not require validation
at this time, and no fee will be charged.
405
SCREEN ENTITIES AND VESSELS IN LISTS
Entities can be screened from any list such as Carriers, Forwarding Agents,
Warehouse Providers, Customers, Vendors, etc. Right-click on an individual
entity name, and select the option you want from the pop-up menu. To screen
multiple entities, select them and right-click to access the pop-up menu.
If you configured your system to screen entities when they are created or edited
and you add a new entity, then the system will screen them against your banned
countries list and the Denied Parties List. This screening is counted toward your
total number of screenings per month.
If an entity is blocked, the system will notify you with the results screen. Review
the list and either remove the entity or clear it. All activity is logged in your
Magaya system and available to view from the Options menu at the top of your
Magaya Explorer.
To screen vessels, go to the Carriers list > Actions > Vessel List.
Right-click a vessel to access the pop-up menu and select the option you want.
(Selecting “Process” or Manual Check” will screen the vessel.)
To screen more than one vessel, select multiple vessels and then right-click. This
will enable the option to process the screening only, not the other options on the
menu. This screening is counted toward your total number of screenings per
month.
To see when it was last screened, select the screening history option. This
displays the history for the selected vessel only.
If a vessel is blocked, the system will notify you with the results screen. Review
the list and either remove the vessel or clear it. All activity is logged in your
Magaya system and available to view from the Options menu at the top of your
Magaya Explorer.
406
SCREEN ENTITIES IN A SHIPMENT
Screen Entities in a Shipment
In a Shipment, select Actions > Denied Party Screening.
The options enable screening the entities in the shipment (“Process”) or viewing
the screening history.
During the verification, the system checks the shipment for the banned countries selected in your Configuration and for possible matches in the US government denied parties list.
Note: If you run the screening process and it was already done during the time
period configured, the system will notify you that the entities do not require
validation at this time, and no fee will be charged.
407
SCREEN ENTITIES IN A SHIPMENT
The results screen displays if suspicious entities have been found. (It also
displays if your system is configured to always display the results screen regardless of what is found.)
The results screen has an option to display only suspicious entities. If this is
unchecked, then all screened entities will appear. Use the arrow/Next buttons to
scroll through the entities listed.
If an entity has more than one match, it will be marked with a status of
“Blocked.”
The list on the right displays any matches found for that entity. If more than one
match displays, select the correct one and click the OK button next to the status
field to clear it. (Only users with rights of Compliance Offer role can clear a
blocked entity by changing the status of the entity.) A reason for the status
change is required.
If no match is correct, set the status as Undetermined or Clear by selecting from
the “Status” dropdown menu. When done, click the OK button on the bottom
of the dialog box. If you click “Cancel” the screening is incomplete and will need
to be done again to proceed.
Blocked Shipments:
If a shipment is marked as “Blocked” as a result of the screening process, the EEI
cannot be sent to the AES. The system will notify you of this. Only a user with
permission can go to the screening history list and clear the shipment status.
To send the EEI, the shipment must be modified by removing the blocked entities and performing the screening process again. The other option requires a
408
TRANSACTION LOG OF SCREENINGS
user with Compliance Officer role permission to change the status of the shipment and specify the reason in the Screening Results dialog box.
Transaction Log of Screenings
The system displays all the transactions from the Options menu on the top
menu of your Magaya Explorer.
Every time entities are screened, the results are logged in this list.
409
TRANSACTION LOG OF SCREENINGS
410
Index
Numerics
10+2 initiative 100
A
Add a Bill of Lading 73
AES 46
how to file 47
AESDirect
user name and password 44
Air AMS
change 92
departure notice 93
how to file 91
Amendment to Bill of Lading 71
AMS 64
for Carriers 89
non-containerized cargo 89
notify partners 88
AMS results 97
Antidumping fee 312
app, POD Mobile 297
Assign customer account numbers 136
AWB, track online 232
B
Bill of Lading
change quantity 71
Bill of Lading sent from INTTRA 122
Bond holder 105
Bonded carrier ID 79
Booking number 50
Booking Request 113
C
Carrier list for INTTRA 111
Cart in online store 219
Chat
Accept a file 28
Begin chat session 24
Invalid files 26
Notification 21
Traffic tab 28
Close of Day procedure for FedEx 387
Close of Day, shipment cannot be cancelled 389
COD 368
Commission
For a category of items 203
Communication Center 15
Community 12
Company Profile, upload 13
Consignee type 48
Container service type 67
Conveyance name 52
Countervailing fee 312
Credit Card, enter customer’s 267
Credit card, set up for customer payments 266
Custom stylesheets online 148
Customer account numbers, how to create 136
Customer registration via Custom LiveTrack 135
Customs Broker plug-in SmartBorder ABI 307
Customs fees 311
Customs procedures 41
D
Dashboard on LiveTrack 146
Delete a Bill of Lading 74
Delivery application 285
Denied Party Screening 401
blocked shipment 408
configure 403
roles 405
screen vessels 406
screening history 406
Download POD Mobile app 297
Drawback 52
Dry ice in UPS packages 396
Dynamic field
add new 250
select in a template 248
E
ECCN 60
EEI and SED 46
EEI for vehicle 316, 322
EEI wizard 47
EEI, set up default information 44
Email
create a template 244
customize template 250
document format 243
1
example template 249
how to email a document or link 239
JavaScript and XPath 250
send to contacts 254
Transaction Tracking 235
using Magaya 241
using Windows 240
Email a batch from a list 235
Email Houses from a consolidated shipment 240
Email signature, company 256
Email signature, employee 254
Email SMTP setting 242
Email Templates
how to send an email message using a template
249
Employee email 242
Empty container report 87
Error message, Customs 87
Expiration dates of items 210
Export code 57
Export vehicles 322
Exporting
screen for denied parties 401
Express Link
3rd party billing 396
Accounting configuration 345
add columns 393
add documents 380, 390
Cancel a request 372
Charges 372
Close of Day procedure 387
Configuration 339
Delivery options 367
Email return label 399
Enable 339
Match package types 394
Multiple accounts 349
Prepare data before using 349
Print labels 370
Register with UPS 340
required field for UPS international 391
Returned packages 397
send custom documents for UPS international
392
Tracking 371
Tracking configuration 346
2
UPS request from a Cargo Release 362
Express Link UPS international shipment description 391
F
FDM 94
FIFO 210
File manifest, checklist 66
FIRMS code 79, 84
First Data
configure 266
First Data, credit cards 266
Form 3461 307
Form 7501 307
FRC 91
Free Trade Zone (FTZ) 50
FRI 91
FSN 96
FSQ 95
FXC 91
FXI 91
G
Get Rates from UPS 368
Gmail 242
H
HTS 102
HTS code 66
I
I&E 74
Image file size for online store 205
Importer Security Filing 100
Imports, ocean AMS filing 64
In-Bond movement 74
Incoming Messages
Configure 34
In-Gate event 124
Intermediate Consignee 55
INTTRA 111
INTTRA, corrections 119
INTTRA, messages 121
INTTRA, SCAC carrier code 112
Inventory Organizer 201
add inventory items to online store 204
add photographs to inventory items in online
store 205
reserve items per customer 207
Invitations 15, 16
Invite agent 18
ISF 100
ISF Elements Transit FROB cargo 107
ISF Elements US bound cargo 106
ISF error message 108
ISF filing types 104
ISF required data 102
ISF results 108
ISF, configure 43
IT 74
ITN 54
ITN number 63
L
LCL 120
License number 58
License type 57
License value 53, 58
LIFO 210
Link containers 124
Load Houses from Online Shipment 224
Loaded on Vessel event 124
M
Magaya AES plug-in 46
Magaya Air AMS 90
Magaya Communication Server 257
credentials 263
ports 257
reload 259
Magaya Community 13
Search 14
Magaya Corporation
contact help 10
Magaya Email Client 241
Magaya Inbox 22, 37
Magaya LiveTrack 127
access and permissions 131
disable users 141
invite customers to use 138
log in 142
online pickup orders 167
online shipping orders 180
print labels 175
rates 153
using the interface 142
Magaya Network 11
Magaya Ocean AMS 65
Magaya Ocean Carriers Interface 111
Magaya OnTheGo 333
Magaya POD Mobile 285
create delivery tasks 289
delivery 293
driver retrieves tasks 290
map 292
orders list 291
set measurement units 288
signature 294
update task status 294
user set up and access 286
view status online 296
Magaya VIN Decoder
introduction 315
scan VIN 319
Manifest
send to Customs 67
Manifest Create 68
Manifest sequence number 43
Marks & numbers 66
Marks and Numbers 60
Merchant account 266
MIB 77
Mobile app 325
Multiple databases 262
N
Notification of an online transaction 170
Notification of online sales order 196
Notifications in Chat screen 33
Notify receipient of transaction sent through Magaya Network 19
O
Ocean carrier messages 116, 121
Ocean carriers, connect to 111
Offline mode, POD Mobile 285, 300
Online bookings, configure without Trips 157
Online creator notice 140
3
Online Customer registration alert 137
Online payments, see also PayCargo 270
Online pickup orders 167
Online Sales Order
convert into a Shipment 223
Online Sales Orders
allow backorders 192
automate cargo release 194
automate charges 193
automate invoicing 192
cancel 193
feature an item 194
Inventory Organizer 201
set customer access 195
setup 191
view customer access 197
Online shipping orders 180
Online store 208
how to process orders received 221
how your customers place orders 216
Online store, see Inventory Organizer 201
Online tracking tool 127
Out-Gate event 124
Outgoing Messages
Configure 31
P
Paperless in-bond numbering 43
Password for LiveTrack customer 133
PayCargo 270
Bill of Lading 277
Register 270
Reports for carrier 277
Reports for shipper 281
Send invoices 273
Set Up 272
Shipper transactions 280
Payment, void 270
Payor, FedEx Express Link 377
Permissions for online tracking 131
Permissions per LiveTrack customer 133
Permit to proceed 99
Permit to Transfer goods 84
POD Mobile 285
POD Mobile app on smart phone 297
POD Mobile app, partial delivery 303
4
Port
Connect to Magaya Communication Server
257
Port of Unloading (Unlading) 51
Print labels from online tracking 175
PTT 84
Q
Quantity 59
Query 95
R
Related companies 52
Remote access 333
Resale items 208
Results AMS and ISF 86
Role column (ISF) 106
Routed transaction 53
S
Sales Orders, see also Online Sales Orders 191
Save Magaya Network messages 34
SCAC code 43, 65
SCAC code for ISF 102
Schedule D code 51
Schedule K code 51
Search by customer name or account number 137
SED 46
Send button 19
Send transactions 23
Serial numbers, grouped 153
Server and system information 261
Shipment number 50
Shipments received through Magaya Network,
how to save 36
Shipping instructions 116
Shipping Orders online 180
SmartBorder ABI 307
Add your clients 310
Configure 308
Create expense items 307
Entry number 313
File transactions 312
Register to create an account 307
Synchronize clients 309
Synchronize your products 311
Transaction confirmed 313
SMTP email setting 242
split shipments (multi-part) 99
SSL email authentication 242
Supplementary in-bond movement 82
System Alert
online payment received 275
System Alert for online transactions 159
System alert of online request 139
T
T&E 74
Test environment 43, 65
Track shipments 327
Track transactions online 231
Track2Go 325
download app for smartphones 325
error messages 331
find transactions 327
Tracking online 127
Transaction Tracking 227
custom on your website 231
for imports WR 230
how to send a link to a customer 234
limit search 234
limit view of 262
set a group of customers 236
set per customer 236
set up system defaults 229
turn off for a customer 237
Trip Schedules and INTTRA 112
Vessel departure message (AMS) 69
Vessel flag 52
VIN 44
VIN, enter in PC 320
VIN, see Magaya VIN Decoder 318
Void a payment 270
W
Waiver of Prior Notice 52
WebBL service 122
Wheels up notice 94
WR received through Magaya Network, how to
save 37
X
XTN number 62
U
Ultimate Consignee 55
Unit 58
UPS Express boxes 395
UPS request from a Cargo Release 362
US Principal Party in Interest 54
USPPI 54
V
Vehicle data screen 322
Vehicle data, send to US Customs 323
Vehicle numbers, see Magaya VIN Decoder 315
Vehicle shipping, file EEI 48
Vessel arrival message (AMS) 71
5