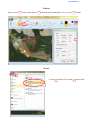
1
Advantage Alabama User Manual This page intentionally left blank. To view this document as it would be seen as a printed document, click View > Two Pages When printing, select custom range and print pages 1,3-33 and select Print Both Sides Advantage Alabama User Manual Printed in the United States of America Microsoft and Windows are either registered trademarks or trademarks of Microsoft Corporation in the United States and/or other countries. Macintosh is either a registered trademark or trademark of Apple, Inc. in the United States and/or other countries. All other brand and product names mentioned herein are the trademarks and/or registered trademarks of their respective owners. Information in this document is subject to change without notice. TABLE OF CONTENTS Introduction ................................................................................................................................... 5 About EDPA ............................................................................................................................... 5 1.0 Getting Started ........................................................................................................................ 4 1.1 System Requirements ............................................................................................................ 4 1.2 Accessing Advantage Alabama ............................................................................................. 4 1.3 Installing Silverlight .............................................................................................................. 4 1.4 Layout and Tools ................................................................................................................... 5 1.4.1 Zooming and Panning..................................................................................................... 6 1.4.2 Searching by Address ..................................................................................................... 6 1.4.3 Layers ............................................................................................................................. 6 1.4.4 Icons................................................................................................................................ 7 1.4.5 Maps and Satellite Imagery ............................................................................................ 8 1.5 Searching ............................................................................................................................... 8 1.5.1 County Specify Searches ................................................................................................ 8 1.5.2 Location-Based Searches ................................................................................................ 9 1.5.3 Search Summary ........................................................................................................... 10 1.6 Saving and printing PDFs ................................................................................................... 11 1.7 Favorites .............................................................................................................................. 12 1.8 Virtual Tours ....................................................................................................................... 13 1.9 Creating an Account ............................................................................................................ 13 1.10 Logging In ......................................................................................................................... 13 1.10.1 Recovering username/password ................................................................................. 13 2.0 Section Overviews ................................................................................................................. 14 2.1 Buildings ............................................................................................................................. 14 2.1.1 Searching for a Building ............................................................................................... 14 2.2 Sites ..................................................................................................................................... 15 2.2.1 Searching for a Site....................................................................................................... 15 2.3 Partners ................................................................................................................................ 16 2.3.1 Searching for a Partner ................................................................................................. 16 2.4 Incubators ............................................................................................................................ 16 2.4.1 Searching for an Incubator ........................................................................................... 16 3.0 Creating New Buildings and Sites ....................................................................................... 17 3.1 Adding a New Building....................................................................................................... 17 3.1.1 Criteria .......................................................................................................................... 17 3.1.2 Process .......................................................................................................................... 17 3.2 Adding a New Site .............................................................................................................. 22 3.2.1 Criteria .......................................................................................................................... 22 3.2.2 Process .......................................................................................................................... 22 4.0 Editing Buildings and Sites .................................................................................................. 24 4.1 Property Edit List ................................................................................................................ 24 4.2 Partial Saves ........................................................................................................................ 24 5.0 Uploading Images and Attachments ................................................................................... 25 5.1 Upload Guidelines ............................................................................................................... 25 5.2 Photo Guidelines ................................................................................................................. 25 6.0 Adding Additional Content .................................................................................................. 26 6.1 Adding a Partner.................................................................................................................. 26 6.1.1 Photo Requirements ...................................................................................................... 26 6.2 Adding an Incubator ............................................................................................................ 26 6.2.1 Photo Requirements ...................................................................................................... 27 6.2.3 Adding an Incubator Tenant ......................................................................................... 27 7.0 Mobile site .............................................................................................................................. 28 7.1.0 Navigation ........................................................................................................................ 28 7.1.1 Search ........................................................................................................................... 28 7.1.2 Login/Logout ................................................................................................................ 28 7.1.3 Add (Logged-in Users Only) ........................................................................................ 28 7.1.4 View.............................................................................................................................. 29 7.2.0 Viewing Properties ........................................................................................................... 29 7.3.0 Adding Properties ............................................................................................................. 29 7.3.1 Types of Data................................................................................................................ 29 7.3.2 Saving and Previewing ................................................................................................. 29 8.0 Troubleshooting .................................................................................................................... 30 9.0 Styling and Formatting Guide ............................................................................................. 31 9.1 General Text ........................................................................................................................ 31 9.2 Addresses ............................................................................................................................ 31 9.3 Images ................................................................................................................................. 31 9.4 Transportation ..................................................................................................................... 31 10.0 Index ..................................................................................................................................... 32 11.0 Technical Support/Contacts............................................................................................... 33 Request/Recover an account ..................................................................................................... 33 Appendix A: Enabling Cookies ................................................................................................. 34 Appendix B: Photographing tips ............................................................................................... 35 INTRODUCTION About EDPA EDPA was formed in 1991 by business leaders who shared a vision of an Alabama that could compete on a global stage for major economic development projects. For 23 years, EDPA has been a catalyst for economic development in Alabama and is just as committed today. The private, non-profit Partnership contributed to some of Alabama’s greatest economic development successes such as landing Mercedes-Benz, Honda, Hyundai, Boeing and Airbus. EDPA works diligently to help the state gain the competitive edge in companies seeking new operations or grow the ones already here by coordinating private industry/business resources to complement Alabama’s public efforts. EDPA brings those resources to fill a vital role by marketing and promoting Alabama as a business location, by providing research and analysis to companies and consultants that are actively searching for an industrial site and encouraging innovation within existing industry and through the commercialization of new technologies. 1.0 GETTING STARTED 1.1 System Requirements The bare minimum system requirements to use Advantage Alabama are as follows: Windows Vista, 7 or 8 o 1.6-gigahertz (GHz) or higher processor o At least 512 MB of RAM o Internet Browser Internet Explorer version 8 or later, Google Chrome version 2 or later (recommended), or Mozilla Firefox version 3 or later o Screen resolution of at least 1024x768 Macintosh o Intel Core Duo 1.83-gigahertz (GHz) or higher processor o At least 512 MB of RAM o Internet Browser Firefox version 12 or higher, or Safari version 4 or higher Advantage Alabama has not been tested with Windows XP or earlier versions of Windows. It is not recommended to use any version of Windows earlier than Windows Vista. 1.2 Accessing Advantage Alabama To access Advantage Alabama, go to advantagealabama.com. 1.3 Installing Silverlight Microsoft Silverlight is a free application framework developed by Microsoft Corporation for creating Internet applications. Numerous sites across the web use Microsoft Silverlight. Advantage Alabama requires Microsoft Silverlight to be installed on the end-user’s machine to use the features of the site. Note: If Microsoft Silverlight is not installed, you will see this message upon accessing the site. Upon accessing the site for the first time, depending on your current system configuration, you may need to install Microsoft Silverlight. This process to install Microsoft Silverlight is easy: Click the blue box that appears in the browser window. Click install for Windows or Macintosh depending on your operating system to launch an installer. You can either save the installer to your computer or just run it without saving. If a security warning appears, select “run the file.” Installing the plugin should take about a minute; it may take longer depending on your system. Once installed, close and relaunch your browser. You may need to restart your system to complete the installation. Visit microsoft.com/silverlight to manually install, view system requirements, and access additional help on installing the plugin. 4 1.0 Getting Started | Advantage Alabama User Manual 1.4 Layout and Tools Upon accessing Advantage Alabama for the first time, you will see the default interface and Default view upon accessing Advantage Alabama. map. At the top of the site is the (A) header. The header is home to the site’s logo and various features including: 1. 2. 3. 4. Search by Address Layer Controls Login User Action Panel To the left of the window is the (B) search panel, which is used to perform search queries to locate buildings, sites, partners, and incubators. The search panel is the hub of the site. In the main window are the (C) map, (D) map controls, and (E) map options. 1.0 Getting Started | Advantage Alabama User Manual 5 1.4.1 Zooming and Panning Double click on the map to zoom in to that point. You can also use your mouse’s scroll wheel or press the “+” key on your number pad. Scroll out or press the “-” key on your number pad to zoom out. Click and drag with your left mouse button or use the arrow keys to pan. Zoom In: Double-click map (or) Scroll up with your mouse’s scroll wheel. Zoom Out: Scroll down with your mouse’s scroll wheel. Pan: Click with your left mouse button and move around. If you zoomed in too far, click the Zoom Extends icon which is located on the left side of the map in the map controls to zoom back out to display Alabama in full. 1.4.2 Searching by Address To auto zoom to a specific address on the map, use the “search by address” feature located in the header to the right of the logo. Types in a street address followed by the city to quickly find the location on the map. You can also search for a city to zoom to that city. Zoom Extends Icon If the address is accurate, the map will zoom down to street level with the center point being the location of the address you entered. You can then zoom out and pan to see the area around the address. Once you are done, you can use the “zoom extends” button to zoom out. 1.4.3 Layers The Layer icon, located to the right of the “search by address” feature in the header, gives you access to multiple layers of information to enable and disable. Click the icon to open the panel, which will appear on the right side of the site. Using the arrows to the right of the sections, you can collapse and expand to show and hide additional information regarding that layer. Using the checkboxes, you can turn on and off layers on the map. Layers include: Transportation o Airports, interstates, highways, railroads, and navigable waterways Education o Post-secondary education providers Automotive Suppliers Automotive OEMs City boundaries Urban areas Metropolitan Statistical Areas Counties To hide the layers panel, click the layer control button. 6 1.0 Getting Started | Advantage Alabama User Manual Layer Icon Active layer Inactive layer Expanded layer City, urban and MSA Boundaries are identified by colors on the map once they are enabled. The colors for each are as follows: City Boundaries Anniston-Oxford Birmingham Daphne-Fairhope-Foley Florence-Muscle Shoals Huntsville Montgomery Urban Areas Auburn-Opelika Columbus Decatur Gadsden Mobile Tuscaloosa 1.4.4 Icons As you go around the site, you will notice a variety of icons that appear on the map. At any time, you can see the meaning of the icons by clicking the “layer” icon to enable the layer panel where all the icons are listed and explained. Buildings Sites Incubators and Partners Commercial Airport Rail Lines International Airport Navigable Waterways Interstate Engineering Colleges Four Lane Divided Highway Research Facilities Four Land Highway There are a variety of automotive suppliers that you can turn on in the map. Enable the layers panel and click the arrow next to automotive suppliers to view the icons for each. 1.0 Getting Started | Advantage Alabama User Manual 7 1.4.5 Maps and Satellite Imagery There are four options to view the map. You may want to change options. Streets: Basic street map based on data by Open Street Maps (default view) Topo: Detailed topography map USGS Quad: Detailed map provided by the U.S. Geological Survey Imagery: High-resolution satellite imagery Streets Topo USGS Quad Imagery 1.5 Searching To the left of the site is the search panel, where you can perform a search in several different areas for different kinds of properties. You can search for: Buildings Sites Partners Incubators To perform a search, select which area you want to search in and click “search” at the bottom of the window. Reset clears the map, extends it and resets all inputted data so you can begin a new search. To find all the content within a section, leave all fields empty and click ‘search.’ All records from the database for the kind of property you have active will appear on the map and in the summary. 1.5.1 County Specify Searches Under the Zoom Extends button on the map is the County Select tool that can be used to select a county or counties to narrow down search results to items within that county. County Select Tool To use this tool, select it and then select one or more counties. Then click the tool again to deactivate it. From here, click “search” to search for all of the properties in the selected counties, or you can narrow down your results more. To clear your selected counties, hit “reset” or select the tool again and re-click the counties. 8 1.0 Getting Started | Advantage Alabama User Manual Click to activate Move over county Click county Click search 1.5.2 Location-Based Searches Using the polygon and radius search tools, you can easy find properties in a specify area. Each tool works similarly but they are different. Polygon Search: Use the Polygon Search tool to find all properties in a rectangular area. Click the icon to enable it and then draw a rectangle on the map. All properties that match your search criteria that are located inside the area will be displayed. Click to activate Click spot on the map Drag across the map Properties will appear Radius Search: The Radius Search tool performs a search based on a radius of the center point you select. To the right of the icon is an input field for the number of miles you want the radius to be, enter a number then click the icon and select a point on the map. This tool will search for the criteria that falls within the radius. Specify the radius Click to activate Click spot on map Properties will appear 1.0 Getting Started | Advantage Alabama User Manual 9 1.5.3 Search Summary Once you perform a search, all properties that match your search criteria are displayed on the map and in the search summary. This summary appears at the bottom of the window. From the search summary, important information about the items is displayed in a sortable table. Double click any item listed in the table to open up that item’s profile to view all the information available. Also from the search summary, depending on the type of search you performed, you can create a printable PDF and add results to your favorites. Depending on the type of search, the summary varies, but certain features remain constant: 1. 2. 3. 4. 5. 6. 7. 8. Sortable columns Double click name to open profile Clickable links to county profiles Quick searching – type to narrow down results even more Export Results to a spreadsheet Create a PDF report (sites and buildings only) Add properties to favorites (sites and buildings only) Drag and down to filter results. Drag the County column to this area to have all results filtered by county. This appears for all headings. 10 1.0 Getting Started | Advantage Alabama User Manual 1.6 Saving and printing PDFs As you find the properties you like, you can save an Adobe PDF to your desktop with all the information to view and print at a later time. There are two ways you can do this via: Search Summary: save multiple properties at once Profile Page: save one property at a time Search Summary: In the search summary, select the property or properties you wish to save and click the “create PDF” button at the bottom right. Right click on the PDF and do a save as. Once you locate the location and give it a filename, click the “save” button and a confirmation will appear letting you know that it was successfully saved. Profile Page: When you find a property you like, click it on the map or double click it in the search summary to open its profile page that will give you details about it. From there, at the bottom of the window, there is a button with the label “download PDF” – click it. Right click on the PDF and do a save as and you can specify where on your computer you wish to save it and what the filename you want to name it. Once you locate the location and give it a filename, click the “save” button and a confirmation will appear letting you know that it was successfully saved. Once you save your PDF, you can open it by finding the location on your computer you saved it and double clicking it. The PDF will open in Adobe Reader, which will allow you to print the generated document. NOTE: It is unlikely but if a dialog appears “Windows can’t open this file” when you attempt to open your saved PDF, you may need to install Adobe Reader on your computer. To do so, go to get.adobe.com/reader and click install now. 1.0 Getting Started | Advantage Alabama User Manual 11 1.7 Favorites Quickly storing and viewing favorites is a great way to save the buildings and sites you like to view at a later time. Add to your favorites: In the summary, select the properties you want to add to favorites (singles or control click to select multiples). Once you have a property selected, click the “add to fav” button in the lower-right hand corner of the summary. A confirmation will appear to confirm that the selected properties where added to your favorites. Search for a property Select property Add to favorites Confirm View your favorites: For both public and logged in users, go to the user action panel, select “view favorites.” A list of saved sites and buildings will appear where you can then double click to view said property. Also from this window, you can save a PDF. Click the User Action Panel Public Users: View Favorites Logged in Users: View Favorites Select property Mapping your favorites: You can quickly add favorites back to the map. To do this, go to the User Action Panel and select view favorites. Click the favorites you wish to add to the map and click ‘Add to Map.’ The properties will then be added to the map. 12 1.0 Getting Started | Advantage Alabama User Manual E-Mailing your favorites: You can e-mail a list of your favorites to yourself or others. To do this, click View Favorites from the User Action Panel and select the favorites you wish to e-mail. Once they are selected, click e-mail favorites. This will open Microsoft Outlook (or your default e-mail program) where you can then e-mail the list to anyone. Your favorites may vary depending on whether or not you are logged in, as they are stored differently. If you added an item to your favorites when you are logged in, remember to log in again to view that item. If you are not logged in when you added an item to your favorites, make sure you are not logged in when you go to view your favorites. This is to ensure that public users are able to have the ability to use the favorites system. Note: Saving favorites while not logged in requires cookies to be enabled in your browser. By default, on most browsers, cookies are enabled; however if you clear your cookies, you will lose your favorites. To learn how to enable cookies, see Appendix A. 1.8 Virtual Tours EDPA has partnered with NextStep 360 to offer virtual tours of buildings featured on the EDPA Buildings and Sites database. Properties on the database with virtual tours can be identified by the video camera icon to the left of the property listing. These HD virtual tours serve as a valuable marketing tool to prospects when partnered with the building data featured in the searchable database. For information on adding a virtual tour to your property, please contact Greg Blalock at [email protected] or call 205.943.4750. 1.9 Creating an Account In order to access parts of the site to add and edit content, you need an account. To request an account, you should contact the EDPA project director, Greg Blalock. His contact information is listed in the contacts section of this documentation located on page 33. 1.10 Logging In Once you have an account, you can log in. At any time, click the login button (Admin Log In) located between the layers control panel and the user action panel at the top right corner and enter the login credentials provided to you. Note: Both your username and password are case sensitive. 1.10.1 Recovering username/password If, for some reason, you forgot your username and/or password, you can recover them by contacting the EDPA project director Greg Blalock. 1.0 Getting Started | Advantage Alabama User Manual 13 2.0 SECTION OVERVIEWS 2.1 Buildings There are three types of buildings to choose from while searching. Industrial Commercial Incubator 2.1.1 Searching for a Building To perform a search for a building, go to the Buildings tab located in the search panel. By default, this tab is already active. Type Name ID Keyword County Acreage Square Footage Eave Height Ceiling Height Truck Ducks Spec. Building Only Building Expandable Only Contains Cranes Only Rail Status Waterway Miles from Interstate Miles from Four Lane Miles from Airport Buildings Tab Search for a specific type of building. Search for words that make up any aspect of the name of the building. Both characters and numerical values. Search for the database identifier. Numerical value. Search for a keyword identified by the building. Search by county the building resides in. You can also select a county using the county selection tool. Search for the minimum and/or maximum number of aces the building sites on. Numerical value. Search for the minimum and/or maximum square footage the building has to offer. Numerical value. Search for the minimum and/or maximum height of the building’s eave struts. Numerical value. Search for the minimum and/or maximum height of the building’s ceiling. Numerical value. Search for the minimum and/or maximum number of truck docks the building has to offer. Numerical value. Limit results to only speculative buildings. Limit results to only buildings that are expandable. Limit results to only buildings that have cranes. Limit results to only buildings with the specified rail access and content above. If you choose to view buildings with rail access 500 ft. and closer, this will limit results to that plus any buildings with adjacent tracks, rail spurs and with tracks near the building. Limiting to 1 mile will return buildings within a mile and everything else closer as well. Limit results to only buildings with the specified waterway access. Limits results to buildings this many miles from an interstate. Limits results to building this many miles from a four-lane highway. Limits results to buildings this many miles from an airport. 14 2.0 Section Overviews | Advantage Alabama User Manual 2.2 Sites There are four types of sites you can search. Industrial Office Research Non-Designated Within each type, you can limit searches to AdvantageSites. The Alabama AdvantageSite program confirms that documentation critical to the site selection process is ready for prospective industry. This is a voluntary program that allows communities to demonstrate that due diligence has been done on the designated site. However, this does not imply that other properties in the state do not meet the same criteria – designated sites have simply undergone a vetting process to show that important information is readily available. Alabama recognizes that site location decisions require detailed information and shorter deadlines. The EDPA economic development team knows that companies seeking to locate a new facility are allowing less time for site selection, site development and project construction. To meet the needs of industry, Alabama’s economic development community is working to designate an inventory of industrial sites with sufficient site documentation for accurate, timely project evaluation. 2.2.1 Searching for a Site To perform a site search, activate the Sites tab. Type Name ID Keyword County Total Acreage Available Acreage Contiguous Acreage Zoning Industrial Parks Only AdvantageSite Only Rail Status Waterway Miles from Interstate Miles from Four Lane Sites Tab Search for a specific type of site. Search for words that make up any aspect of the name of the site. Both characters and numerical values. Search for the database identifier. Numerical value. Search for a keyword identified by the site. Search by county the building resides. You can also select a county using the county selection tool. Search for the minimum and/or maximum number of acres the site has. Numerical value. Search for the minimum and/or maximum number of acres that the site has available. Numerical value. Search for the minimum and/or maximum contiguous acres the site has. Numerical value. Limit results to sites with the specified zoning. Limit results to only Industrial Parks. Limit results to only AdvantageSites. Limit results to only sites with the specified rail access and content above. If you choose to view sites with rail access 500 ft. and closer, this will limit results to that plus any sites with adjacent tracks, rail spurs and tracks on the site. Limiting to 1 mile will return sites within a mile and everything else closer as well. Limit results to only sites with the specified waterway access. Limits results to buildings this many miles from an interstate. Limits results to building this many miles from a four-lane highway. 2.0 Section Overviews | Advantage Alabama User Manual 15 2.3 Partners The existence of EDPA and Advantage Alabama is due to the support of EDPA’s Corporate Partners. These Partners are leading Alabama companies dedicated to supporting economic development in the state. 2.3.1 Searching for a Partner To perform a partner search, activate the Partners tab. Name Keyword Expertise Industry Sectors Industry Served Alabama-Based Corporation Partners Tab Search for a specific partner by name or part of the name. Search for keywords identified by a partner. Search for an expertise associated with a partner. Limit results to a specific industry sector. Limit results to a specific industry served. Limit results to display only partners based in Alabama. 2.4 Incubators Incubators help small start-up businesses that need additional resources. There are numerous business incubators scattered across the state. 2.4.1 Searching for an Incubator To perform an incubator search, activate the Incubators tab. To search for a building owned or occupied by an incubator, access the Buildings tab and select Name Keyword Expertise Industry Served Incubators Tab Search for a specific incubator by name or part of the name. Search for keywords identified by an incubator Search for an expertise associated with an incubator. Limit results to a specific industry served. To find tenants, search for an incubator and view its profile. The Incubator tenants will be listed under the in the Incubator profile and will provide a link to the tenant profile. 16 2.0 Section Overviews | Advantage Alabama User Manual 3.0 CREATING NEW BUILDINGS AND SITES Once logged in to Advantage Alabama, approved editors can start adding content. Adding buildings and sites is easy, and this section will walk you through this process. Note: Before adding content, please review the Styling & Formatting Guide, located on page 31. 3.1 Adding a New Building Before adding a new building to the database, ensure it fits the criteria. 3.1.1 Criteria Qualifying Industrial Buildings: In general, buildings listed on the database are required to be: a minimum of 5,000 sq. ft. in good or better condition suitable for industrial use currently available for lease or sale photographed where images are available Qualifying Commercial Buildings: In general, buildings listed on the database are required to be a minimum of 20,000 sq. ft. suitable for HQ or back office space equipped with utilities currently available for lease or sale photographed where images are available Qualifying Call/Data Center Buildings: In general, buildings listed on the database are required to be a minimum of 5,000 square feet suitable for HQ or back office space currently available for lease or sale equipped with utilities (with an exception of gas) photographed where images are available 3.1.2 Process From the user action panel, click either “Add Industrial Building,” “Add Commercial Building,” or “Add Incubator Building.” Once you click one, a pop up will appear, walking allowing you to enter an enormous amount of information for this new building. Fill out as much information as possible for the new building. Some fields are not necessary depending on the type of building you want to create. Reference the columns on the left for what is available data. “I” means the field is available for Industrial Buildings, “C” means the field is available for Commercial Buildings and “B” means the field is available for Incubator Buildings. Required fields are indicated are shaded with bold text. 3.0 Creating New Buildings and Sites | Advantage Alabama User Manual 17 Field ID I C B Building Name I C B Street Address I I I I I C C C C C B B B B B Additional Address Nearest Incorporated City Within City Limits? Zip County I C B Latitude/Longitude I C Located in Industrial Park? I C Park Name C B Located in a Metro Area? B Nearest Metro Area Name B University/College Partnership? B University/College name Partner with Economic Development Office B C Stand Alone Building? C Within Office Building? I Is this a spec. building? I Within Enterprise Zone? I Within Favored Geographic Area? I Within Renewal Community? I C B General Building Data Total Size I C B Total Available I Building Dimensions I C B # of Buildings I C B # of Floors C Square Feet per Floor Description The identification number that database uses to store data. This may not be visible as it is auto-computed by the system and is not editable by any user. This is the official name of the building and what will be used to search for the building. Use the full name of the building. The physical address of the building, usually sticking to the address and street name. Try not to use abbreviations. Any additional information for the address, such as ‘Suite 101.’ This is the closest city the company is located near (or in). If the company is located within the city limits, check yes. The five-digit zip code locating in the mailing address of the building. The county the building is located in. Use the ‘get’ button located to the right of these two fields to get the GPS coordinates of the building. Note: You must enter a valid address and city for this to accurately select the coordinates. If this building is located in an industrial, business, office, or research park, select yes. If the building is located inside of an industrial, business, office, or research park, list the name of the park. If this building located in a metro area, select yes. If the company is located in a metro area, please enter the name of the metro area. If this building has some sort of partnership with a college or university, select yes. If so, indicate that college or university. If this building is in a partnership with the economic development office, select yes. If this building is a stand-alone building and there is only one building, select yes. If it makes up more than one building then select no. Select yes if this commercial space is located within an office building. This usually means that the entire office building is not available, just a section. Indicate whether or not this is a speculative building – a building that was built with no buyers in mind. Indicate whether or not this building is located in an area that has policies in place, which encourage economic growth. Indicate whether or not this building is located in an area where companies can take advantage of the Capital Investment Tax Credit for locating in a less-developed area. Indicate whether or not this building is located in an area where federal tax incentives are available for businesses located within. In square feet, calculate the overall size of the building. In square feet, calculate how much of the building is actually available to future tenants. In feet, list the overall dimensions of the building – width by length by height. List how many buildings are available on the property. List how many floors are inside the building; if there is more than one building, use the largest building for the floor count. Approximate how much floor space is available. Calculate the average square feet if the floors are different shapes and sizes. 18 3.0 Creating New Buildings and Sites | Advantage Alabama User Manual C B C Additional Available? I I I I I I I Largest Contiguous Space Largest Production Area C C C C B I Office Area Building Expandable? Expandable to Floor thickness Total Acreage Additional Available Parking? Paved Parking? C Covered Parking I C # of Cars/Parking Ratio I I C C Ceiling Height Eave Ceiling Height Maximum I Bay Spacing Length I Bay Spacing Width I Manufacturing Area A/C? C A/C? I Manufacturing Area Heated? C I C C C B Heated? # Total Clients # Staff # of Cranes Cranes Cap Largest Cranes Feet Under Hook Loading Dock? Truck Dock Levels Truck Dock Drive In # of Elevators Office Classification Year Built I C B Last Expansion/Remodel I C B B I I I C I I B B I Multi-Tenant? Refrigerated Area? I I C C C C USDA Approved? Plug and Play? # Seats Raised Floor Sprinklers? I C Security Features? In square feet, indicate how large the contiguous area is. What is the largest area that isn’t broken up? Indicate whether or not additional space is available. In square feet, indicate how large the largest area the building has for production. In square feet, indicate how large of an office area the building has. If the building can be added on to or expandable, then select yes. If the building is expandable, indicate how far it can be expanded. In inches, indicate how thick the floors are. Indicate the acreages that the building sets. Indicate whether or not there are additional acres available nearby. Indicate if there is parking available. Indicate if the parking is or not on pavement. Indicate if the parking is or not covered. If part of the parking is covered, select yes. Parking garages would be considered covered. Indicate how many parking spaces are available for cars to park. Do not count spaces that are taken up by dumpsters or unmovable objects. Indicate the height from the foundation of the building to the eave strut. Indicate the height of the ceiling at the highest point. In feet, indicate the length between the columns from one side of the building to the other. In feet, indicate the width between the columns that make up the support structure of the building. Indicate whether or not there’s air conditioning available in the manufacturing area. Indicate whether or not there’s air conditioning available in the building. Indicate whether or not there is a heating unit or units available in the manufacturing area. Indicate whether or not there’s heating available in the building. Indicate how many clients this business has. Indicate about how many people work within this building. Indicate how many cranes are available for loading and unloading. Indicate the largest cap required for the cranes. Indicate the number of feet available under the hook of the cranes. Indicate whether or not there are loading docks available at this building. Indicate the total number of truck dock levels available to the building. Indicate the total number of drive-in truck docks that the building has. Indicate the number of elevators that are in use within the building. Indicate the classification of the office building. Specify the year in which the building was built. Indicate the last year in which the building was either remodeled or expanded. Indicate whether or not multiple tenants can or do use the building. Indicate whether or not there is a refrigerated area located in or outside of the building. A refrigerated area is considered to be an area with a cooling unit that is maintained at 41 degrees Fahrenheit or below. Indicate whether or not the building is approved by the USDA. Indicate whether or not the space is equipped with telephone and data. Indicate the number of seats available in the building. Indicate whether or not the building has raised floors. Indicate whether or not the building has a sprinkler system installed. Indicate whether or not the building has any security features. If it does, list them in the key building features located under Additional Information. 3.0 Creating New Buildings and Sites | Advantage Alabama User Manual 19 I C Primary Construction Material I I I I Secondary Construction Material C C C B B B B I C Zoning Previous Use Use Description Type of Space Type of Service Focus What industries does this serve? Utilities Natural Gas Provider I Status I I I Size of Main (inches) Size of Main (PSI) Water Provider C I I I Status Size of Main (inches) Sewer Provider C I I I Status Size of Main (inches) Electricity 1 Provider C I Status I Electricity 2 Provider I Status I I I C C Amperage of Main Phase Service Voltage Service Redundancy? C Backup Generator I C C C Backup Generator Amperage Backup Generator Duration Telecommunication I C Fiber Optics? I I C C Telecom. Redundancy? XDSL? Internet Access? Redundancy? Types of Telecommunication Services Transportation B B B I C B Interstate Highway Using the options available, indicate which material was primary used in the construction of the building. Using the options available, select the secondary material used in the construction of the building. Indicate what the building is currently zoned. Indicate what the building was used for previously. Describe what the building was used for previously. Indicate the types of space available within. Indicate the types of services provided within. Indicate the focus of the incubator. List the industries the incubator serves. Indicate the provider of natural gas. Indicate the location of the closest natural gas line or whether there is already an existing hooked-up to the building. In inches, indicate the size of the main pipe. Indicate the PSI that is provided through the connected pipe. Indicate the provider of water. Indicate the location of the closest water line or whether there is already an existing hooked-up to the building. In inches, indicate the size of the main pipe. Indicate the provider of sewer services. Indicate the location of the closest sewer line or whether there is already an existing hooked-up to the building. In inches, indicate the size of the main pipe. Indicate the primary provider of electricity. Indicate the location of the closest electrical line or whether there is already an existing hooked-up to the building. Indicate the alternate provider of electricity. Indicate the location of the closest alternate electrical line or whether there is already an existing hooked-up to the building. Indicate the strength of the electric current. Indicate the distribution of the electric current. Indicate the voltage. Indicate whether or not an emergency power system is available. Indicate whether or not a backup generator is installed or available to the building. If a generator is available, indicate the amperage it provides. If a generator is available, indicate how long the generator can run for. Identify the provider of telecommunications. Indicate whether or not fiber optic cables are ran to the building and is available for use. Indicate whether or not there is a backup telecommunication system. Indicate whether or not the building is DSL ready. Indicate whether or not the building has internet access. Indicate whether or not this is a backup form of telecommunications. Indicate whether the building has a DSL, T1, or Fiber internet connection. Indicate the closest interstate highways. You can select up to three interstates. We recommend you pick the closest primary interstate, no matter the distance. 20 3.0 Creating New Buildings and Sites | Advantage Alabama User Manual I C B Distance to “on” ramp I C B Federal Highway I C B Distance I C B Four-Lane? I C B Alabama Highway I C B Distance I C B Four Lane? I Rail Service I Track Status I I Nearest Navigable Waterway Dock Facility I C B Nearest Commercial Air Service I C B Nearest Municipal Airport I C Price Is the building available for lease? I C Base Rent I I C C Is the building available for sale? Sales Price I C Is the price negotiable? I I C C B B B I C B Price per Square Feet Date quoted Price Comments Additional Information Contacts C B Area Amenities I C B Key Building Features I C B General Comments Indicate in miles how far away the interstate highways are. Note: an interstate may appear closer than it actually is. Indicate the distance it will take to travel to the on-ramp. Select the closest federal highways, you can and should choose three. Indicate, in miles, how far away are the federal highways? You should indicate what the travel distance is, not the geographic distance. Indicate whether or not the highway at least four lanes (two lanes in each direction). Select the closest state highways. Indicate in miles how far away are the state highways? You should indicate what the travel distance is, not the geographic distance. Indicate whether or not the highway at least four lanes (two lanes in each direction). If a railroad is available at the site of the building, indicate the rail provider. There are two options in case there are two providers. Indicate the status of the rail road, whether it runs into the building, whether there is a spur available or an adjacent track or how close it is to the building itself: within 500, 1500 or 3000 feet or within a mile. Indicate the closet navigable waterway. Indicate the building’s distance to a dock that is located on said waterway. Indicate the closest commercial airport and how far away it is from the building. Indicate the closest municipal airport and how far away it is from the building. Indicate whether or not the building is available for renting/leasing. If the building is available for renting/leasing, indicate the base rent by either total price or price per square feet. Indicate whether or not the building is available for sale. If the building is for sale, indicate the price. Indicate whether or not the price is negotiable. If the price is fixed, then select no. Indicate the price per square feet. Indicate the most recent date those prices were quoted. Add any additional information about the price. Indicate who should be contacted for inquiries regarding this building. Indicate what the area surrounding the building has to offer, such as shopping malls, parks and greenways, sports fields, etc. Indicate features that the building has to offer, include security features, information regarding whether or not the building has a fence with gate access, energy efficient lighting, etc. If you have any additional comments, use this section. If you don’t, use this section to sum up the building. Once all the information you can provide is entered, click “save.” To verify the building is saved, your username should appear in the “last updated” section. Click “exit” to close the window when you are finished making edits. You can later go back in and make changes, see Editing Sites and Buildings, located on page 24. Note: Your building will require approval before it appears on the map. 3.0 Creating New Buildings and Sites | Advantage Alabama User Manual 21 3.2 Adding a New Site 3.2.1 Criteria In general, sites listed on the database are required to be: at least have 20 available acres (established industrial/office/research parks with fewer 20 available acres may be listed) suitable for industrial or commercial use currently available for lease or sale photographed with images of the site boundaries 3.2.2 Process To add a new site, click “add site” located in the user action panel. Once you click this, a pop up will appear allowing you to enter an enormous amount of information for this new site. Fill out as much information as possible for the new site. Required items are shaded darker. Field ID Site Name Street Address Additional Address Nearest Incorporated City Within City Limits? Zip Code County Latitude/Longitude Type of Site? Park Name Within Enterprise Zone? Within Favored Geographic Area? General Site Data Total Acreage Available Acreage Additional Available? Largest Contiguous Smallest Tract Protective Covenants Environmental Data? Preliminary Geotechnical Report? Preliminary Wetlands Assessment? Ecological Review? Cultural/Historical Review? Zoning Description The identification number that that database uses to store data. This may not be visible as it is auto-computed by the system and is not editable by any user. This is the official name of the site and what will be used to search for the site. Use the full name of the site. The physical address of the site. Try not to use abbreviations. Any additional information for the address, such as ‘Suite.’ This is the closest city the site is located near (or in). If the site is located within the city limits, check yes. The five digit zip code that the site is located. The county the site is located. Use the ‘get’ button located to the right of these two fields to get the GPS coordinates of the company. Note: You must enter a valid address and city for this to accurately select the coordinates. Indicate what the site is, whether it is used of offices, research, or industrial use. Or whether or not it is non-designated. If the site is located within a park, identify the park. Indicate whether or not this site is located in an area that has policies in place, which encourage economic growth. Indicate whether or not this site is located in an area where companies can take advantage of the lower employment and investment thresholds for the Capital Investment Tax Credit by being in a Favored Geographic Area. Indicate how many acres total the site is. Indicate how many acres are available within the site. Indicate whether or not additional acres are available. Indicate the acres of the largest section of the site. Indicate the small piece of land available in the site. Indicate whether or not the site is located in an area that has a protective covenant. Indicate whether or not the site has environmental data. (Phase I) Indicate whether or not the site has had a preliminary geotechnical report done. Indicate whether or not the site has had a preliminary wetlands assessment done. Indicate whether or not the site has undergone an ecological review. Indicate whether or not the site has undergone a cultural or historical resource review. Indicate the zoning classified for the site. 22 3.0 Creating New Buildings and Sites | Advantage Alabama User Manual Topography Previous Use Use Description Utilities Natural Gas Provider Status Size of Main (inches) Size of Main (PSI) Water Provider Status Size of Main (inches) Sewer Provider Status Size of Main (inches) Electricity 1 Provider Status Electricity 2 Provider Status Distribution Transmission Telecommunication Fiber Optics? Telecom. Redundancy? XDSL? Transportation Interstate Highway Distance to “on” ramp Federal Highway Distance Four-Lane? Alabama Highway Distance Four Lane? Rail Service Track Status Track Status Nearest Navigable Waterway Dock Facility Nearest Commercial Air Service Nearest Municipal Airport Price Indicate what the land is on the site, whether it is flat, hilly, rolling or slight rolling. Indicate what the area was previously zoned or used for. Describe what that area previous was. Indicate the provider of natural gas. Indicate the location of the closest natural gas line or whether or not there is already an existing hook-up to the site. In inches, indicate the size of the main pipe the site has access to. Indicate the number of PSI that is provided through the connected pipe. Indicate the provider of water. Indicate the location of the closest water line or whether or not there is already an existing hook-up to the site. In inches, indicate the size of the main pipe the site has access to. Indicate the provider of sewer services. Indicate the location of the closest sewer line or whether or not there is already an existing hook-up to the building. In inches, indicate the size of the main pipe the site has access to. Indicate the primary provider of electricity. Indicate the location of the closest electricity line or whether or not there is already an existing hook-up to the site. Indicate the alternate provider of electricity. Indicate the location of the closest alternate electricity line or whether or not there is already an existing hook-up to the site. Indicate whether or not distribution is available. Indicate whether or not transmission is available. Identify the provider of telecommunications. Indicate whether or not fiber optic cables are ran to the site and is available for use. Indicate whether or not this is a backup. Indicate whether or not the site is DSL ready. Indicate the closest interstate highways. You can select up to three interstates. We recommend you pick the closest primary interstate, no matter the distance. Indicate, in miles, how far away the interstate highways are. Note: an interstate may appear closer than it actually is; indicate the distance it will take to travel to the exit. Select the closest federal highways, you can and should choose three. Indicate, in miles, how far away are the federal highways? You should indicate what the travel distance is, not the geographic distance. Indicate whether or not the highway at least four lanes (two lanes in each direction). Select the closest state highways. Indicate, in miles, how far away are the state highways? You should indicate what the travel distance is, not the geographic distance. Indicate whether or not the highway at least four lanes (two lanes in each direction). If a railroad is available at the site of the building, indicate the rail provider. There are two options in case there are two providers. Indicate the status of the rail road, whether is runs into the building, whether there is a spur available or an adjacent track or how close it is to the building itself: within 500, 1500 or 3000 feet or within a mile. Indicate the closet navigable waterway. Indicate the site’s distance to a dock that is located on said waterway. Indicate the closest commercial airport and how far away it is from the site. Indicate the closest municipal airport and how far away it is from the site. 3.0 Creating New Buildings and Sites | Advantage Alabama User Manual 23 Sale Price Land Lease Is the price negotiable? Date quoted Price Comments Additional Information Area Amenities Current Park Tenants Contacts General Comments If the site is for sale, indicate the price either per square feet or the total price. If the site is available for renting, indicate the base rent either total price or price per square feet. Indicate whether or not that price is negotiable. If it is a fixed price, select no. Indicate when those prices were quoted. Add any additional information about the price. Indicate what the area surrounding the building has to offer, such as shopping malls, parks and greenways, sports fields, etc. Other tenants in the park. Indicate who should be contacted for inquiries regarding this site. If you have any additional comments, use this section. Once all the information you can provide is entered, click “save.” To verify the site is saved, your username should appear in the “last updated” section. Click “exit” to close the window when you are finished making edits. Note: Your site will require approval before it appears on the map. 4.0 EDITING BUILDINGS AND SITES There are several ways to edit an existing building and site or to make edits to your new buildings and sites. Via Profile: Directly edits a property you have searched Property Edit List: Lists all properties that are on the map (approved properties) Partial Saves: Lists all properties not yet on the map (unapproved properties) To edit a building or site on the map, select it and open its profile. From there, scroll to the bottom and click “edit.” The edit window will appear and load the data for you to modify. 4.1 Property Edit List To view all the buildings in a quick, easy to manage way, use the “property edit list” located in the user action panel. The “property edit list” lists all approved buildings and sites in the database. Once loaded, it will list all buildings and sites (active and inactive) to edit. Locate a building from the list and double click to open the profile. Once the profile is open, scroll down to the bottom and click “edit.” The edit building window will appear and load the data for you to modify. After you are finish editing the building, click “save” and a confirmation dialog will appear to verify changes. 4.2 Partial Saves The “partial saves list” lists all the property buildings or sites you have created in the database. This is a convenient way to check your properties or to add new information that wasn’t available to you when you first created the property. Note: Not all users may have the privilege level to edit all buildings. Some users may only be able to edit buildings in an assigned county(-ies). Contact the administrator for more details on this. 24 4.0 Editing Buildings and Sites | Advantage Alabama User Manual 5.0 UPLOADING IMAGES AND ATTACHMENTS You can also upload up to five attachments (i.e., photos). At the bottom of the add/edit form, click the button “upload attachments.” For the main photo, click choose file. Browse to the location of the photo and click “open,” continue this for up to five and once you are done, click “ok.” 5.1 Upload Guidelines Ensure you are uploading only image files (JPG or PNG). Crop or resize the images to a width of 640 pixels by a height of 480 pixels or smaller before uploading. 5.2 Photo Guidelines All building and site profiles on the database are required to include at least one good quality image (total of 4 images plus the placement map). For database consistency, EDPA provides placement maps for all properties and topographical site boundary maps. The location maps will be the last image loaded for the property. Buildings: All building profiles on the database are required to include at least one image and may have as many as three included on the profile. Pictures on the database should reflect the way the facility looks at present. Exterior shots (aerial and/or ground) are most important. Interior shots and floor plan sketches are also encouraged. See Appendix B for photographing tips. Sites: All site profiles on the database are required to include at least one image and may have two. It is important to have an aerial image with site boundaries drawn. For industrial parks, a master plan drawing or image of the park entrance may be used as a secondary image. Be sure that images reflect the acreage indicated on the profile and are kept current. It is not necessary to indicate site names on images however, if names are used, be sure to use a consistent name on the site profile and accompanying images. APPENDIX C: How To Crop and Size Images 5.0 Uploading Images and Attachments | Advantage Alabama User Manual 25 6.0 ADDING ADDITIONAL CONTENT 6.1 Adding a Partner To add a new partner, select “add partner” located under the user action panel. Field Company Name Street Address Additional Address Nearest Incorporated City Within City Limits Zip County Latitude/Longitude Located in Metro Area? Metro Area Name Number of Employees Primary Company Industry Sectors Contacts Industries the company serves Marketing Text Description This is the official name of the company. This would be the physical address of the company, usually sticking to the address and street name. Try not using abbreviations. Use this field for any additional address information, such as ‘Suite.’ This is the closest city the company is located near (or in). If the company is located within the city limits, check yes. The five-digital zip code that appears on the mailing address. The county the company is located. Use the “get” button located to the right of these two fields to get the GPS coordinates of the company. Note: You must enter a valid address and city for this to accurately select the coordinates. If this company located in a metro area, select yes. If the company is located in a metro area, enter the name of the metro area. Indicate approximately how many people work for this company. Identify the primary industry sectors that this company is engaged in List the contact details for the company, including its website and social media links. Identify all the sectors that the company serves (customer base). List any marketing information for the company. This is the primary text that will appear in the company’s profile. Note: Not all users may have the privilege level to add or edit a partner. Contact an administrator for more details on this. 6.1.1 Photo Requirements There will be three images that will be used on the Partner profile. One image must be the logo and the other two are free for images pertaining to the partner. 6.2 Adding an Incubator This section describes adding an incubator profile. To add an incubator tenant, see “Adding a New Building” located on page 17. To add a new incubator, select “add incubator” located under the user action panel. Field Company Name Street Address Additional Address Nearest Incorporated City Within City Limits Zip County Latitude/Longitude Description This is the official name of the company. This would be the physical address of the company, usually sticking to the address and street name. Try not using abbreviations. Use this field for any additional address information, such as ‘Suite.’ This is the closest city the company is located near (or in). If the company is located within the city limits, check yes. The five-digital zip code that appears on the mailing address. The county the company is located. Use the “get” button located to the right of these two fields to get the GPS coordinates of the company. Note: You must enter a valid address and city for this to accurately select the coordinates. 26 6.0 Adding Additional Content | Advantage Alabama User Manual Field Located in Metro Area? Metro Area Name Number of Employees Industries the Incubator Servers Contacts Current Tenants Marketing Text Description If this company located in a metro area, select yes. If the company is located in a metro area, enter the name of the metro area. Indicate approximately how many people work for this company. Identify all the sectors that the incubator serves (customer base). List the contact details for the company, including its website and social media links. List all the current tenants in the building. To add, use the ‘+’ button and to remove, select it in the list and select the ‘-‘ button. List any marketing information for the company. This is the primary text that will appear in the company’s profile. Note: Not all users may have the privilege level to add or edit an incubator. Some users may only be able to add or edit incubators in an assigned county. Contact an administrator for more details on this. 6.2.1 Photo Requirements There will be three images that will be used on the Incubator profile. One image must be the logo and the other two are free for images pertaining to the Incubator. 6.2.3 Adding an Incubator Tenant Field Company Name Street Address Additional Address Nearest Incorporated City Within City Limits Zip County Latitude/Longitude Number of Employees Primary Company Industry Sectors Contacts Industries the company serves Marketing Text Description This is the official name of the company. This would be the physical address of the company, usually sticking to the address and street name. Try not using abbreviations. Use this field for any additional address information, such as ‘Suite.’ This is the closest city the company is located near (or in). If the company is located within the city limits, check yes. The five-digital zip code that appears on the mailing address. The county the company is located. Use the “get” button located to the right of these two fields to get the GPS coordinates of the company. Note: You must enter a valid address and city for this to accurately select the coordinates. Indicate approximately how many people work for this company. Indicate which industry sectors these company primary handles. List the contact details for the company, including its website and social media links. Identify all the sectors that the company serves (customer base). List any marketing information for the company. This is the primary text that will appear in the company’s profile. The incubator will fill out the tenant profiles. 6.0 Adding Additional Content | Advantage Alabama User Manual 27 7.0 MOBILE SITE A mobile version of the site is available for smart phone and iPad users. Upon accessing the site with one of these devices, the mobile version should automatically appear. If, for some reason it doesn’t, add mobile.htm to the URL. Much of the functionally is the same with the mobile version of the style as the biggest difference is the appearance of the site. 7.1.0 Navigation On the top of the site is the navigation bar where the main controls of the site rest. 7.1.1 Search Searching parameters are the same in the mobile version and the desktop version. Click the search icon to access the search panel, which will appear on the left side of the screen where you can search for properties. For details on performing searches, refer to pages 14-16. Default view of mobile site Because with mobile device, smaller screens are normal, some aspects of the search parameters are hidden by default, but can be modified. If you want more specific searches, click the ‘More Search Options’ link. Click the search button on the bottom left of the screen to perform your search. All the properties will fill in the map and a search summary will appear on the bottom of the search. From that summary, you can narrow down your search (‘Search Again’), view all the properties that match your results (‘View Results’) or cancel and restart your search (‘Reset’). View of mobile site with search panel open To view the results of your search click the ‘View Results’ button in the summary. A sortable table appears with all the results. Click the property’s name to view its profile or click the county name to view details about the county the property is located in. 7.1.2 Login/Logout Click login to access user-specify functionally of the site. 7.1.3 Add (Logged-in Users Only) This button is only visible for users who are logged in to the system. From this menu can you add a new building, profile, partner or site. Adding these properties is the same as the desktop 28 7.0 Mobile site | Advantage Alabama User Manual version and for information on requirements and what each item means, see page17-22 for buildings and sites and pages 26-27 for incubators and partners. 7.1.4 View On the far right side of the navigation bar is the view button. Clicking this button will open a panel to the right side of the screen where you can modify the display of the map by switching between different maps and satellite imagery. For more information on the different maps available, see page 8. From within this menu, you can turn on and off a variety of layers provided by EDPA. For information on the layers and what information they present, see page 6. 7.2.0 Viewing Properties To find a property, search for one and click ‘View Results’ and then click the property. From there the property’s profile is visible to you. The property profile will be detailed information regarding said property. On the profile page, click the ‘back’ button on the left side of the navigation bar to return to the map. To the right side of the navigation bar is the ‘Options’ menu, click this to access the available photos of the selected properties. 7.3.0 Adding Properties Adding a property via the mobile interface is similar to that of the desktop version of the site except that some content is unavailable to make the process easier. To add a property, login and then click ‘Add’ and select the property for which you want to add. Refer to pages 17 thru 24 for explanation on the information that can be entered. 7.3.1 Types of Data There are several different types of data that can be entered. Mixture of text and numbers – displayed as a screen length wide input box. Yes/No options – displayed as two buttons where the highlighted button is the current choice. Dropdown menu – displayed as a screen length wide box with a drop down arrow. Click the arrow to view all the available choices and then select a choice to choose it. Numbers – displayed as a slider. You can manually enter a number using the input box or you can use the slider to pick a number. 7.3.2 Saving and Previewing Click the submit button at the bottom of the page to save the property to the database, keeping in mind that it will have to be approved before it will appear in search results and on the map. Upon saving it, you will have the option to preview the profile of the property where you can verify the data. If changes need to be made, you can click Options> Edit. 7.0 Mobile site | Advantage Alabama User Manual 29 8.0 TROUBLESHOOTING ERROR: The system was not able to log in. Please try again. You entered an invalid username and/or password. o Check your login credentials provided to you as they may have been incorrectly typed and remember that both your username and password is case sensitive. Your login credentials are not active. o Your account may have been deactivated or not yet created; contact your administrator. QUESTION: Why can I not load Advantage Alabama? You may not be connected to the internet. o Try to access another site such as www.aegistg.com to see if that site loads. If it doesn’t, you may not be connected to the Internet, contact your IT department. Silverlight may not be installed on your system. o See Installing Silverlight on page 4. Your system may not meet the minimum system requirements. o See System Requirements on page 4. The site may be down for maintenance. o From time to time, the site may need to go through a period of maintenance. Try again in about ten minutes. QUESTION: Why do my images not upload? Wrong file format. o Some file formats are not allowed when uploading images, see Uploading Images and Attachments on page 25 for more information. File too large. o There is a maximum upload size. See Uploading Images and Attachments on page 25 for more information. 30 8.0 Troubleshooting | Advantage Alabama User Manual 9.0 STYLING AND FORMATTING GUIDE To ensure a consistent look in Advantage Alabama, please stick to these guidelines when adding or editing content on the site. 9.1 General Text Never use all caps. Use correct capitalization for all text entered into the database. For names of companies and buildings, capitalize each word (as you see fit) but do not capitalize prepositions or articles unless it is the first word. Proofread all your content before saving. In sections where you are to describe a property or are required to enter large amounts of data, it is recommended to type it first in a word processing program such as Google Docs or Microsoft Word to ensure there are no grammar and spelling errors. 9.2 Addresses When entering an address, do not abbreviate street names. Spell out the full words. For example, instead of “101 Main St” use “101 Main Street” In some cities, roads carry a suffix you can abbreviate those. For example, instead of “101 Main St SW” use “101 Main Street SW” 9.3 Images See Uploading Images and Attachment on page 25. 9.4 Transportation When specifying how close buildings and sites are to highways and interstates, specify the distance to the highway or interstate by miles driven to the nearest access or on ramp. In some cases, the actual length to an interstate is longer than if it was counted geographically such as in cases where a building isn’t directly assessable because an exit is not close by. Always include at least one interstate no matter the distance. This will affect search results when users search for “miles from interstate.” We recommend that when specifying a property’s distance to an interstate to always indicate the closest primary interstate. If auxiliary interstates are available, within 50 miles of the property, include those as well. Always include both the closest commercial airport and the closest municipal airport, no matter the distance. This will affect search results when users search for “miles from airport.” 9.0 Styling and Formatting Guide | Advantage Alabama User Manual 31 10.0 INDEX About EDPA ............................................... 5 Account Management creating an account ............................... 13 loggin in ................................................ 13 Adding Content buildings................................................ 17 incubators .............................................. 26 partners .................................................. 26 sites ....................................................... 22 Attachments .............................................. 25 Buildings creating new .......................................... 17 searching for.......................................... 14 Editing Content ......................................... 24 Favorites adding to................................................ 12 viewing .................................................. 12 Incubators creating new .......................................... 26 searching for.......................................... 16 Installing Silverlight.................................... 4 Layout and Tools layers ....................................................... 6 map options ............................................. 8 partial saves ........................................... 24 property edit list .................................... 24 search summary .................................... 10 searching by address ............................... 6 user action panel ..................................... 5 zooming and panning .............................. 6 Mobile site ................................................ 28 Partners creating new .......................................... 26 searching for.......................................... 16 PDFs saving and printing ................................ 11 Satellite Imagery ......................................... 8 Searching by address................................................ 6 by county ................................................. 8 by location ............................................... 9 for buildings .......................................... 14 for incubators ........................................ 16 for partners ............................................ 16 for sites .................................................. 15 Sites creating new .......................................... 22 searching for.......................................... 15 Styling and Formmating ........................... 31 System Requirements.................................. 4 Technical Support ..................................... 33 Troubleshooting ........................................ 30 32 10.0 Index | Advantage Alabama User Manual 11.0 TECHNICAL SUPPORT/CONTACTS Economic Development Partnership of Alabama 500 Beacon Parkway West Birmingham, Alabama 35209 USA 205.943.4700 205.943.4799 (fax) Request/Recover an account Greg Blalock Project Director, Business Information 205.943.4750 [email protected] 11.0 Technical Support/Contacts | Advantage Alabama User Manual 33 APPENDIX A: ENABLING COOKIES In order to save properties to your favorites as a non-logged in user, you will need to have cookies enabled in your browser. To do so, perform the following instructions based on your browser. In Internet Explorer: Go to tools > Internet Options Go to the privacy tab and click “Sites” In the “Address of website,” enter the Advantage Alabama website address and click “Allow” Click “Ok” to close the Sites popup and then click “Apply” to save changes Click “Ok” to close Internet Options In Mozilla Firefox: Click the Firefox menu > Options Go to the privacy section and select “Remember History” Click “Apply’ to save changes and “Ok” to close the options. In Google Chrome: Click the Chrome menu icon > Settings Near the bottom of the page, click “Show advanced settings…” In the privacy section, click “Content Settings” Make sure “Allow local data to be set” and click “Done” You are now ready to save and view your favorite properties. You may need to reset your browser. 34 Appendix A: Enabling Cookies | Advantage Alabama User Manual APPENDIX B: PHOTOGRAPHING TIPS For better results when photographing industrial buildings, follow these tips. Shot at an angle. Instead of taking a straight on photo, take the picture at an angle to give the building more dimension and character. Lighting is importance. When taking a photograph outside the building, ensure there is good nature light from the sun. Don’t take a picture on a cloudy or overcast day. Turning off the flash while outdoors might be best. Understand composition. Use the rule of thirds for more interesting photographs. Basically, divide your photo into nine squares (3x3). The building should lie along one of the lines that make up the squares. Check your exposure. You don’t want to over or under exposure your photos. A photo that looks too dark or light is bad. Adjust your settings and, worst case, just set your camera to auto. Focus. Using the focus settings on your camera, ensure that the building itself is in focus. Appendix B: Photographing tips | Advantage Alabama User Manual 35 APPENDIX C Paint: the quick and free program to crop and size images There are many image editing programs out in the computer world, but if you are at a loss for a quick cropping/sizing image program, there is the old standby Paint found in all Microsoft systems. Open Paint located in the Accessories folder. To Crop Steps to crop: c Click the “Select” button in the top menu bar; Lasso the area you want to keep; Click the 3. 2. 1. now activated “Crop” button and the unwanted area is deleted. 1. 3. 2. APPENDIX C To Shrink Steps to shrink: Click the resize button; Chose 640 pixels by 480 pixels ( or close as possible); Click OK. 3. 1. 2. 1. 2. 3. To Save 1. To save: Click the “File” button; save as JPEG. 2. 1. 2.