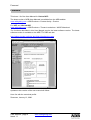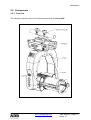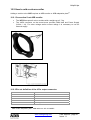
1
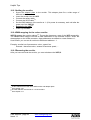
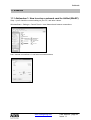
Motorised WARP
User Manual
Issue 1.1
Lighting Technologies
M 5083
1106.05.083
Disclaimer
Disclaimer
Advice before Use
Read these instructions carefully.
As soon as the equipment is delivered, open packing and inspect the equipment carefully. If
you notice any damage, contact the transport company immediately and register your
complaint in due form listing the defects. Check if the received equipment is consistent with
the delivery note and if this delivery note is consistent with your order. If it is not, contact your
supplier immediately.
Warning
The luminaire may under no circumstances be modified. ADB will not assume any
responsibility in case of damage resulting from modifications made to the luminaire. Always
refer to authorized personnel for any repair.
Warranty
See our general conditions of sales; available on our Web Site.
Warranty sheet1
1
Enclose with each Motorised WARP
www.adblighting.com
User Manual - page 1
Issue 1.1
Safety notice
Declaration of conformity
This luminaire is a piece of lighting equipment designed for professional indoor use in
theatres and television or film studios. Designed and built in accordance with EN 60598-1
and EN 60598-2-17 regulations, it must imperatively be connected to earth by means of its
earth wire. To prevent any electrical shock, this equipment should not be opened when it is
powered up. Access to internal parts is not required for normal operation.
Any parts or lenses need to be replaced if they are visibly damaged and their efficiency might
be reduced, e. g. in case of deep cracks or scratches. The lamp must be changed if
damaged or distorted by heat. If internal access is needed for control, service or repair
purposes, always refer to qualified personnel.
Standards and approvals
Safety standards:
EMC standards:
Susceptibility:
EN 60598-1 and EN 60598-2-17
EN 55022, Class A limits for emission and EN 50081-1, EN 50082-1
IEC 801-2, IEC 801-3 and IEC 801-4
User Manual - page 2
Issue 1.1
www.adblighting.com
Safety Notice
Safety Notice
Always be sure to unplug the power supply cable before opening the fixture. It is the user's
responsibility to use the luminaire for its intended purpose and to check the equipment that
might be connected to it.
Power supply cables and other connections are essential for your equipment and contribute
greatly to a safe and trouble free operation. Always pull the plug when disconnecting a cable,
never pull the cable. Never use cables or connectors in bad condition. Check them before
installation and periodically thereafter. Never tie power supply and data cables together.
This luminaire is designed for operating at a nominal voltage of 230 V (90 – 230 V in case of
automatic power supply option). For your own safety, make sure the earth wire (yellowgreen) is ALWAYS connected to earth.
WARNING: LETHAL VOLTAGE PRESENT INSIDE!
www.adblighting.com
User Manual - page 3
Issue 1.1
Foreword
Foreword
This issue 1.0 of the User Manual for Motorised WARP.
The latest version of ADB User Manuals is available from the ADB website.
www.adblighting.com > ADB Products > Product family > Product
For WARP and Motorised WARP
www.adblighting.com > ADB Products > Theatre Luminaires > WARP Motorised
The functions described in this User Manual require the latest software version. The latest
software version is available on the ADB TTV R&D web site.
http://adbttv.dyndns.org/index.php?title=Warp&article=warp
Updates to this version of the user manual will follow.
Have fun with the motorised profile.
Zaventem, January 13, 2006.
User Manual - page 4
Issue 1.1
www.adblighting.com
Index
Index
DISCLAIMER....................................................................................................................................................... 1
Advice before Use........................................................................................................................... 1
Warning........................................................................................................................................... 1
Warranty ......................................................................................................................................... 1
Warranty sheet................................................................................................................................ 1
DECLARATION OF CONFORMITY ............................................................................................................... 2
Standards and approvals................................................................................................................ 2
SAFETY NOTICE ................................................................................................................................................ 3
FOREWORD......................................................................................................................................................... 4
INDEX.................................................................................................................................................................... 5
1
SHIPPING CONTENTS............................................................................................................................ 8
1.1
1.2
1.2.1
1.2.2
1.2.3
1.2.4
2
WARP/M INCLUDES: ............................................................................................................... 8
OPTIONAL ............................................................................................................................ 9
Lamp .................................................................................................................................. 9
Hook clamp for WARP/M ...................................................................................................... 9
Accessories........................................................................................................................ 9
Color Changer.................................................................................................................... 9
DESCRIPTION ........................................................................................................................................ 10
2.1
2.1.1
2.1.2
2.1.3
2.2
2.2.1
2.2.2
2.2.3
2.2.4
FEATURES ......................................................................................................................... 10
Standard features ............................................................................................................ 10
Control and feedback....................................................................................................... 10
Optional features ............................................................................................................. 10
COMPONENTS .................................................................................................................... 11
Overview .......................................................................................................................... 11
TOPBOX .......................................................................................................................... 12
XLR4 connector on the motor-house.............................................................................. 13
Accessories...................................................................................................................... 14
2.2.4.1
2.2.4.2
2.2.4.3
3
Hook clamps........................................................................................................................................ 14
Double gobo holder ............................................................................................................................. 15
Combined iris diaphragm & gobo holder ............................................................................................ 15
INSTALLATION ..................................................................................................................................... 16
3.1
3.2
3.2.1
3.2.2
3.2.3
3.2.4
3.2.5
3.3
3.3.1
3.3.2
3.3.3
3.4
3.4.1
3.4.2
3.5
3.5.1
3.5.2
MOUNTING ......................................................................................................................... 16
POWER AND DATA CABLING REQUIREMENTS ....................................................................... 16
Mains power for the control electronics ........................................................................... 16
Lamp power ..................................................................................................................... 16
DMX data and termination when WARP receives DMX..................................................... 16
DMX data and termination when WARP is transmitting DMX ............................................ 16
Ethernet ........................................................................................................................... 17
INSTALLATION PROCEDURES............................................................................................... 17
Inserting (replacing) the lamp .......................................................................................... 17
Alignment of the lamp ...................................................................................................... 18
Suggested procedure to align the lamp........................................................................... 19
PAN & TILT – ‘RESET’ VERSUS ‘ABSOLUTE VALUES’ ............................................................ 21
Internal jumpers ............................................................................................................... 22
Jumper setting ................................................................................................................. 23
BALANCING ........................................................................................................................ 24
Factory-balancing of the WARP ......................................................................................... 24
On-site balancing of a WARP ............................................................................................. 24
3.5.2.1
Advice for balancing ........................................................................................................................... 24
www.adblighting.com
User Manual - page 5
Issue 1.1
Index
3.6
3.7
3.8
4
MENU STRUCTURE .............................................................................................................................. 27
4.1
4.1.1
4.1.2
4.2
4.3
4.3.1
4.3.2
5
LOCAL WARP MESSAGES ..................................................................................................... 52
LOCAL CALIBRATION AND RESET MESSAGES......................................................................... 52
LOCAL ERROR MESSAGES .................................................................................................. 53
TROUBLESHOOTING AND MAINTENANCE.................................................................................. 54
8.1
8.2
8.3
8.3.1
8.3.2
9
WARP’S IP ADDRESS ............................................................................................................ 37
HOME PAGE ....................................................................................................................... 38
WARP SCANNER .................................................................................................................. 39
DMX CHANNELS ................................................................................................................ 40
ARTNET CONFIGURATION ................................................................................................... 41
INFORMATION..................................................................................................................... 42
AXES AND WHEELS CONFIGURATION ................................................................................... 43
LAMP RELAY ...................................................................................................................... 45
FIRMWARE UPDATE ............................................................................................................ 46
MISCELLANEOUS ................................................................................................................ 47
RESET WARP ...................................................................................................................... 49
CALIBRATION ..................................................................................................................... 50
MESSAGES ON LOCAL DISPLAY...................................................................................................... 52
7.1
7.2
7.3
8
DMX OPERATION............................................................................................................... 33
Channel Mapping............................................................................................................. 33
Rotate 720° ...................................................................................................................... 34
How to identify a shutter shutter on your console............................................................ 34
DMX MAPPING – THE CONTROL CHANNEL ........................................................................... 35
Control Channel ............................................................................................................... 35
WEB PAGE .............................................................................................................................................. 37
6.1
6.2
6.3
6.4
6.5
6.6
6.7
6.8
6.9
6.10
6.11
6.12
7
PUSH-BUTTONS AND LEDS ................................................................................................. 27
LEDs ................................................................................................................................ 27
Push-buttons.................................................................................................................... 27
MENU FUNCTIONS – LOCAL DISPLAY .................................................................................... 28
DMX ADDRESSING ............................................................................................................. 32
DMX address ................................................................................................................... 32
Priority rule between DMX and ArtDMX .......................................................................... 32
OPERATION............................................................................................................................................ 33
5.1
5.1.1
5.1.2
5.1.3
5.2
5.2.1
6
LEARN BOUNDARIES FOR PAN & TILT .................................................................................. 25
CONFIGURATION – PRESENCE OF IRIS/GOBO HOLDER ........................................................... 25
POWERING UP .................................................................................................................... 26
SOFTWARE UPLOAD ........................................................................................................... 54
AUTO-TEST ROUTINE AT POWER UP ..................................................................................... 55
CLEANING WARP ................................................................................................................. 55
Cleaning Lenses .............................................................................................................. 55
Cleaning optical sensors and shutters............................................................................. 56
TECHNICAL SPECIFICATIONS......................................................................................................... 57
9.1
RANGES AND SPEED (TIME)................................................................................................. 57
THE INDICATION FOR SPEED IS THE TIME TO COVER THE FULL RANGE, EXPRESSED IN SECONDS.......... 57
9.1.1 Weight and size ............................................................................................................... 57
9.1.2 Construction materials ..................................................................................................... 58
9.1.3 Electrical .......................................................................................................................... 58
10
HELPFUL TIPS ....................................................................................................................................... 59
10.1
10.1.1
10.1.2
10.1.3
10.2
10.2.1
HOW TO INSERT OR REMOVE AN ACCESSORY ....................................................................... 59
Convention....................................................................................................................... 59
How to insert the iris / gobo holder .................................................................................. 59
How to remove iris / gobo holder ..................................................................................... 60
HOW TO ADD A COLOUR SCROLLER ..................................................................................... 61
Convention if not ADB scroller......................................................................................... 61
User Manual - page 6
Issue 1.1
www.adblighting.com
Index
10.2.2
10.2.3
10.2.4
10.2.5
11
Pin out definition of the 4 Pin output connector ............................................................... 61
Adding the scroller ........................................................................................................... 62
DMX mapping for the colour scroller ............................................................................... 62
Removing the scroller ...................................................................................................... 62
ADDENDA................................................................................................................................................ 63
11.1
11.2
ADDENDUM 1: HOW TO SET-UP A NETWORK CARD FOR ARTNET (WINXP) ............................. 63
ADDENDUM 2: DOWNLOADING OF PERSONALITIES FOR CONSOLES ........................................ 64
12
SPARE PARTS......................................................................................................................................... 65
13
NOTES ...................................................................................................................................................... 66
www.adblighting.com
User Manual - page 7
Issue 1.1
Content
1 Shipping contents
1.1 WARP/M includes:
WARP/M includes:
•
•
•
•
•
•
Warranty sheet
WARP/M with open-ended cable (0,8 m) for lamp supply
1,6 m power supply cable with Neutrik PowerCon cable connector and open ends on
the other side
Hook clamps plate with 4 flame head fasteners (1/4 turn fasteners)
User manual (CD Rom and/or paper version)
Metal filter frame (185 x 185 mm)
•
Balance tool
The lamp, hook clamps and accessories are optional. The next chapter describes the options
and their ADB references.
Supply voltage
Operating range for standard WARP/M: 198 V to 264 V, 50/60 Hz.
Optional: operating voltage range 90 V to 264 VAC – 50/60 Hz.
Zoom range
WARP/M is available in 2 zoom ranges: 12° to 30° and 22° to 50°
WARP
ADB Reference
Code Number
Motorised zoom profile 12° 30°
Motorised zoom profile 22° 50°
Option:
universal
PSU,
operational voltage range 90 –
264 VAC/ 50/60 Hz
WARP/M/12-30
1017.10.020
WARP/M/22-50
1017.10.030
User Manual - page 8
Issue 1.1
PSU/UNIV/WARP/M
www.adblighting.com
Contents
1.2 Optional
1.2.1 Lamp
Lamp
ADB Reference
Code Number
G9.5 axial, biplane filament,
halogen lamp 230V-800W3200K-300h
G9.5 axial, biplane filament,
halogen lamp 230V-600W3200K-300h
800W/G9.5/3200K
2990.40.500
600W/G9.5/3200K
2990.40.405
1.2.2 Hook clamp for WARP/M
Hook clamp
ADB Reference
Hook clamp for WARP/M
A40
1092.10.600
2 hook clamps required for each WARP/M
1.2.3 Accessories
Accessory
ADB Reference
Double gobo holder
Combined iris diaphragm & gobo
holder
SP/2GO/WARP
SP/OR-GO/WARP
1000.40.100
1000.40.110
1.2.4 Color Changer
ADB Reference
Color changer with adapter plate
and XLR 4 cable
Adapter plate with XLR 4 cable
CC/WARP
1050.40.405
APL-CC/WARP
1050.40.400
www.adblighting.com
User Manual - page 9
Issue 1.1
Description
2 Description
2.1 Features
2.1.1 Standard features
The Motorised WARP is an automated zoom profile spotlight providing remote control of pan, tilt,
zoom, focus and 4 framing shutters, each with 360° endless rotation.
2.1.2 Control and feedback
The Motorised WARP is controlled with USITT DMX512/1990, USITT DMX512-A2 and ArtNet; it
is RDM-ready and ACN-ready. A status report can be viewed on a web browser (see chapter
6).
2.1.3 Optional features
Iris and Gobo with 360° endless rotation; or two rotating gobos without iris.
2
Available on release 2
User Manual - page 10
Issue 1.1
www.adblighting.com
Description
2.2 Components
2.2.1 Overview
The following illustration shows the external components of Motorised WARP.
www.adblighting.com
User Manual - page 11
Issue 1.1
Description
2.2.2 TOPBOX
The following illustration shows the external components on the Topbox
Connectors:
Ethernet
DMX-OUT & THRU
DMX-IN
WARP power
Fuse for WARP power
RJ45 Connector
XLR5 Male
XLR5 Female
Neutri
PowerCon locking connector: 198 - 264 V AC 50/60 Hz (Optional:
universal power supply 90 – 264 V 50/60 Hz)
6,3A 250V SPT 5x20 mm
Lamp power
From external dimmer
More detailed information is available in the programming and installation chapter.
User Manual - page 12
Issue 1.1
www.adblighting.com
Description
2.2.3 XLR4 connector on the motor-house
The XLR4-F connector on the motor-house provides DMX data and Power Supply
(24Vdc/1A) for an additional device on the WARP. Typical example: a colour changer.
For more detailed information please refer to chapter 10 “Helpful tips – How to add a colour
scroller”.
www.adblighting.com
User Manual - page 13
Issue 1.1
Description
2.2.4 Accessories
2.2.4.1 Hook clamps
The hook clamps plate is fixed on the top box with 4 flame head fasteners (1/4 turn
fasteners).
The hook clamp plate can be fixed as shown above drawing, or turned 90°.
When hanging3, each WARP/M requires two hook clamps type A40.
3
Hook clamp for WARP/M : ADB reference : A40
User Manual - page 14
Issue 1.1
www.adblighting.com
Description
2.2.4.2 Double gobo holder4
Double gobo holder for gobo size B (85 mm)
2.2.4.3 Combined iris diaphragm & gobo holder5
Gobo holder for gobo size B (85 mm) and iris diaphragm.
4
5
Optional accessory – ADB reference SP/2GO/WARP
Optional accessory – ADB reference SP/OR-GO/WARP
www.adblighting.com
User Manual - page 15
Issue 1.1
Menu structure
3 Installation
This chapter contains instructions for the installation of the Motorised WARP. It covers
connecting power and data, powering up the Motorised WARP for the first time and addressing it
within your system.
3.1 Mounting
The Motorised WARP MUST be mounted in a vertical position, either hanging vertically on a tube
or standing on the base of its Topbox.
3.2 Power and Data Cabling Requirements
3.2.1 Mains power for the control electronics
The Motorised WARP is available in 2 different power versions: a standard 230 V version and a
universal version (option).
The standard version requires standard 230 V power for all internal electronics and motors;
the working voltage range is 198-264 V, 50/60 Hz.
The universal version requires standard AC power to power all internal electronics and
motors; the working voltage range is 90-264 V, 50/60 Hz.
Both versions are equipped with a 3-pole Neutrik PowerCon locking connector, and the mating
Neutrik PowerCon cable receptacle is included. However, you will need to purchase or
construct a supply cable appropriate for your application.
3.2.2 Lamp power
The power for the lamp of the Motorised WARP is supplied by the output of an external dimmer
(not included).
3.2.3 DMX data and termination when WARP receives DMX
The Motorised WARP is equipped with a pair of XLR5 connectors for DATA IN and DATA
OUT/THRU. DMX data from an external DMX source should be connected to the DATA IN.
Connectors are XLR5, as prescribed in the DMX512 standard.
A male XLR5 termination plug is required on the OUT/THRU of the last Motorised WARP (or the
"far end of the DMX line").
• XLR5-M plug with two 1/4W 5% 120 ohm resistors (one per data pair)
3.2.4 DMX data and termination when WARP is transmitting DMX
If WARP is used as the source of DMX i.e. as an ArtDMX-to-DMX converter, then DMX devices
can be connected to the DMX OUT/THRU connector as well as the DMX IN connector. In other
Words: WARP does not have to be at the start of the DMX line; it can also be ‘somewhere in the
middle’.
But in that case BOTH “far ends of the DMX line” MUST be terminated. Each termination
MUST be on both data pairs.
Note: as per the rules of DMX512 and EIA/RS-485: max. 32 DMX receivers per WARP.
User Manual - page 16
Issue 1.1
www.adblighting.com
Installation
3.2.5 Ethernet
The Motorised WARP is equipped with one RJ45 connector for Ethernet.
3.3 Installation Procedures
3.3.1 Inserting (replacing) the lamp
It is necessary to insert the lamp 6 before use. Ensure that power is removed from the
Motorised WARP when installing or replacing the lamp. The lamp housing, lamp assembly and
the lamp may be very hot when the lamp has been turned on. Allow the parts to cool off
before replacing the lamp.
CAUTION
The lamp housing, the lamp assembly and the lamp may be very hot!
Disconnect the power supply cable before opening the housing. Use an 8 mm screwdriver to
remove the two mounting screws (17) of the lampholder assembly. Pull out the lamp holder
(6) out of the housing. Follow the manufacturer’s instructions when handling the halogen
lamp. Insert the lamp into the socket (6a) in the heatsink.
Make sure that the grounding wire (20) has not been damaged. Re-insert the assembly (6)
into the fixture and tighten the two mounting screws (17).
6
Lamp type: G9.5, 800W, 230V, 3200°K axial biplane filament halogen lamp.
www.adblighting.com
User Manual - page 17
Issue 1.1
Menu structure
3.3.2 Alignment of the lamp
After replacing the lamp it may be necessary to make adjustments.
To adjust the beam, turn the Spot-Even ring (15) towards 'SPOT'. Adjust the position of the
bulb with the X-Y knob (16). Unlock the knob by turning it to the left (16a) and correct the
position by moving the knob in the desired direction (16b). Lock the knob again by turning it
to the right (16c). Even the beam by turning the Spot-Even ring (15) back to the EVEN
position.
User Manual - page 18
Issue 1.1
www.adblighting.com
Installation
3.3.3 Suggested procedure to align the lamp
It is not always simple to align the lamp if you do not dispose of a white screen. This
procedure to align the lamp is accurate and simple.
What you need:
1. WARP Metal filter frame (PFM/185 (185 x 185 mm)
2. White diffusion filter (Example Lee 216 / Rosco 116)
3. DMX console or DMX generator/tester
Preparation
1. Make a cross in the middle of the white diffusion filter with a marker. See drawing.
2.
3.
4.
5.
Insert the filter in the filter frame and insert into the WARP
Set level of external dimmer to 33%. (In WARP personality: lamp @ 33%)
Set DMX values for Focus and Zoom to 0 (zero)
Set Spot-Even ring in the middle
www.adblighting.com
User Manual - page 19
Issue 1.1
Menu structure
Alignment
The lamp shape is visible on the filter. Align the lamp to the middle of the cross. See drawing.
User Manual - page 20
Issue 1.1
www.adblighting.com
Installation
3.4 Pan & Tilt – ‘Reset’ versus ‘Absolute Values’ 7
When powered up, motorised fixtures go through a ‘self-discovery routine’ which can be quite
noisy at times – especially during the reset of Pan & Tilt.
Motorised WARP uses a different approach, thanks to the absolute encoders for Pan & Tilt. At
Power Up, WARP can work either with Absolute Values or with Reset function.
‘Absolute Value’ mode: after a Power Up the unit will not reset Pan & Tilt
‘Reset’ mode: after a Power Up the unit do a reset of Pan & Tilt.
Absolute Value mode is the default mode. Changing to Reset mode is done by changing the
settings of internal jumpers, or by using the webpage (see chapter Webpage).
The necessary calibration procedure for Absolute Values was done in the factory. In case of
major changes to the Motorised WARP it may be necessary to re-calibrate the WARP on site. This
comprehensive calibration takes about 20 min.
Note: How to stop a calibration
To interrupt a calibration (e.g. because it was started unnecessarily):
unplug the WARP. The old calibration data are valid kept until the new
calibration is finalised.
7
This is purely an informative chapter. Only service technicians level 2 are allowed to open the
covers. Detailed information is available in the service manual.
www.adblighting.com
User Manual - page 21
Issue 1.1
Menu structure
3.4.1 Internal jumpers
The jumpers are on the motor driver boards under the left and right yoke cover. Under the
covers you will find 3 PCB’s (Printed Circuit Boards), one board on one side and two stacked
boards on the other side.
There are 2 identical Ring driver boards (each with 6 motor driver chips) and one Pan&Tilt
board (with 2 motor driver chips). All boards include configuration jumpers.
User Manual - page 22
Issue 1.1
www.adblighting.com
Installation
3.4.2 Jumper setting
Jumpers on the Pan&Tilt board (board with two motor driver chips)
JP1 => Not used.
JP2 => Only for internal ADB use. Locks the software in the memory of the board. (Warning:
if the jumper is placed, it is not possible to upload new software.)
JP3 => Jumper absent = ‘Absolute values’ mode (factory default); jumper present = ‘Reset’
mode.
Jumpers on the Ring boards (board with six motor driver chips)
JP1 => Not used.
JP2 => Only for internal ADB use. Locks the software in the memory of the board. (Warning:
if the jumper is placed, it is not possible to upload new software.)
JP3 => Zoom range: Jumper absent = 12°-30° ; Jumper present = 22°-50°
www.adblighting.com
User Manual - page 23
Issue 1.1
Menu structure
3.5 Balancing
Motorised WARP offers superb positioning – provided it has been correctly balanced. An
unbalanced WARP will not operate properly.
3.5.1 Factory-balancing of the WARP
Prior to shipping, WARP has been balanced in the factory for ‘Standing’.
If you wish to add a colour changer then you’ll have to re-balance to compensate for the
extra weight. Changing from ‘hanging use’ to ‘standing use’ (or vice-versa) also requires a
slight adjustment (see 3.5.2.1).
3.5.2 On-site balancing of a WARP
Each WARP is shipped with the special tool required to reposition the luminaire in the yoke.
The yoke can be positioned over the entire length of the WARP, making it possible to balance
the spotlight in any position.
Loose the nuts on both sides, using the special tool.
Slide the WARP in the yoke guide (3) until the balancing point is found.
Retighten the nuts in the desired position.
3.5.2.1 Advice for balancing
Balancing the fixture for ‘hanging’
Use the control rings for focus and zoom to shift the lenses towards the accessory slots.
Then move the luminaire in the yoke to find the equilibrium point.
Balancing the fixture for ‘standing’
Use the control rings for focus and zoom to shift the lenses towards the front, away from the
accessory slots. Then move the luminaire in the yoke to find the equilibrium point.
User Manual - page 24
Issue 1.1
www.adblighting.com
Installation
3.6 Learn Boundaries for Pan & Tilt8
When WARP is positioned in a niche, or between pieces of scenery, you may wish to restrict
its range of pan & tilt movements.
Learn Boundaries is an automatic tool for detection of the physical boundaries.
WARP will remember the ‘allowed window of movement’ and will then shift (offset) the DMX
values so that
‘Pan DMX value = zero’ matches one of the two Pan boundaries.
‘Tilt DMX value = zero’ matches one of the two Tilt boundaries.
DMX value 0 (zero) for Pan equals the Pan position of “first obstacle encountered during
Learn Boundaries”.
DMX value 0 (zero) for Tilt equals the Tilt position of “first obstacle encountered during Learn
Boundaries”.
If you increase a DMX value then the luminaire will move exactly as when no boundaries are
set.
Increasing the DMX values will move WARP towards the other boundary, which will be
reached for some unknown DMX value. Any DMX value above this upper limit will be limited,
so that WARP will not touch the obstacle.
Note: The limits detected during Learn Boundaries are applied until you
perform a new Learn Boundaries.
3.7 Configuration – presence of iris/gobo holder
Configuration covers the presence (or not) of an iris+gobo or gobo+gobo accessory.
The configuration settings MUST be correct or the Motorised WARP will not operate properly.
(Menu structure) The configuration is saved in the Motorised WARP.
Inserting a gobo or an Iris is done by configuring the slot. The slot can be configured by using
the ‘menu functions’ (see chapter Menu structure) or by using the ‘webpage’ (see chapter
webpage). It is important to configure the slot before inserting the accessory into the WARP.
8
Under Development.
www.adblighting.com
User Manual - page 25
Issue 1.1
Menu structure
3.8 Powering up
When powering up a Motorised WARP the Motorised WARP must be balanced
See 3.5 Balancing.
WARNING
The ring for an iris can only rotate 90 degrees. So WARP must be made
aware of the presence of an iris. This is done in the Configuration Menu.
FACTORY SETTING: NO IRIS
See chapter Menus.
WARP leaves the factory configured for ‘no iris present’. To insert an iris holder: refer to
chapter 10.1, ‘How to insert or remove an accessory’.
WARNING
Improper insertion and/or Configuration may damage the WARP and/or
the iris.
User Manual - page 26
Issue 1.1
www.adblighting.com
Menu structure
4 Menu structure
4.1 Push-buttons and LEDs
4.1.1 LEDs
LED name →
LED status ↓
On
Power
Error
DMX
Ethernet
Powered up9
Communication
error10
Receiving DMX
and/or ArtDMX
Receiving
Ethernet and/or
ArtDMX
Using ArtDMX
Fast flash (4 per s)
Using DMX
transmitting
DMX11
or
4.1.2 Push-buttons
Up:
Down:
Enter:
Back:
page up
page down
Selection; one level up
One level back
9
Led on after booting of the WARP’s EPU. (+- 20s)
Occasional flashes will occur during booting
11
Using WARP as Ethernet to DMX node
10
www.adblighting.com
User Manual - page 27
Issue 1.1
Menu structure
4.2 Menu functions – local display
Menu
Lev 1
Default value
Possible values
1
1 – 512
Set DMX (or ArtDMX) address
ENAB
OFF
SUBN
UNIV
IP M
0
0
2.xxx.xxx.xxx
ON
OFF
0 – 16
0 – 16
ON = enable ArtNet ;
OFF = disable ArtNet
Set ArtNet Subnet
Set ArtNet Universe
Select IP address
2: static, starting with a 2
10: static, starting with a10
DHCP: dynamic
In case Static is selected DHCP is
disabled
Show unit name
Lev 2
Lev 3
ADDR
ANET
2.xxx.xxx.xxx
10.xxx.xxx.xxx
DHCP
NAME
ADB WARP
IPAD
Show IP address (No value in case of
DHCP selection)
PATI
SWAP
PINV
TINV
OFF
OFF
OFF
ON - OFF
ON - OFF
ON - OFF
Swap Pan & Tilt (Swapped yes/no)
Invert Pan (Inverted yes/no)
Invert Tilt (Inverted yes/no)
FAST
QIET
STEL
Speed of the rings (No influence on
Pan&Tilt)
FAST = Maximum speed
QUIET = Half normal speed
STEALTH = Only one motor at a time
SPED
FAST
SLOT
FRNT
NONE
NONE
IRIS
GOBO
REAR
NONE
NONE
IRIS
GOBO
User Manual - page 28
Issue 1.1
www.adblighting.com
Front accessory slot (Side of the Lens)
No accessory fitted
Iris fitted in front slot
Gobo fitted in front slot
As long as no DMX is present (or
DMX Value = 0): selecting an
accessory will automatically rotate
gobo/iris rings to the insert position.
See also CHNG
Calibration of accessory: only while
no accessory is inserted!
Rear accessory slot (Side of the lamp)
No accessory fitted
Iris fitted in rear slot
Gobo fitted in rear slot
Menu structure
As long as no DMX is present (or
DMX Value = 0): selecting an
accessory will automatically rotate
gobo/iris rings to the insert position.
See also CHNG
Calibration of accessory: only while
no accessory is inserted!
GB M
IDX
IDX
ENDL
CHNG
OFF
ON - OFF
KPON
OFF
TIMO
INV
OFF
ON
OFF
xx SEC
ON – OFF
Gobo Mode
Indexed rotating
Indexed rotating and endless rotating
See DMX operation for details
ON: sets the WARP to the gobo/iris
insert position and sets the WARP in
PARK position
OFF or “back” will bring the WARP
online
DISP
BRT
0 – 15
ON: local display turns Off after xx s
OFF: local display is On all the time
Time out for local display, in seconds
Invert display
ON for hanging
OFF for standing
Brightness level value
MAN
REST
Calibration of axes and wheels
To access Reset functions: press
ENTER for 3 seconds
Pan / Tilt: WARP is using absolute
positioning technology; a calibration
will measure all possible positions Pan
and Tilt. The Calibration takes up to
20 minutes.
A calibration of a ring will detect the
physical limits of the wheel.
ALL
ACC1
Enter
Enter
ACC2
Enter
SHUT
LENS
PATI
Enter
Enter
Enter
MOVE
www.adblighting.com
Calibration of all
Calibration of accessory 1 (rear front)
Calibration of accessory: only while
no accessory is inserted!
Calibration of accessory 2 (rear rear)
Calibration of accessory: only while
no accessory is inserted!
Calibration of All shutters
Calibration of zoom and focus
Calibration of pan and tilt
Local control to move axes and rings
(only works while DMX is absent)
User Manual - page 29
Issue 1.1
Menu structure
ACC1
0 – 255
ACC2
0 – 255
SR 1
0 – 255
SR 2
0 – 255
SR 3
0 – 255
SR 4
0 – 255
SI 1
0 – 255
SI 2
0 – 255
SI 3
0 – 255
SI 4
0 – 255
ZOOM
0 – 255
FOC
0 – 255
PAN
0 – 255
TLT
0 – 255
LAMP
Enter to Select ;
+ and – to Move
Enter to Select ;
+ and – to Move
Enter to Select ;
+ and – to Move
Enter to Select ;
+ and – to Move
Enter to Select ;
+ and – to Move
Enter to Select ;
+ and – to Move
Enter to Select ;
+ and – to Move
Enter to Select ;
+ and – to Move
Enter to Select ;
+ and – to Move
Enter to Select ;
+ and – to Move
Enter to Select ;
+ and – to Move
Enter to Select ;
+ and – to Move
Enter to Select ;
+ and – to Move
Enter to Select ;
+ and – to Move
AUTO
AUTO
OFF
ON
AUTO
ON
ON
OFF
User Manual - page 30
Issue 1.1
www.adblighting.com
Syntax:
select axis to move;
press enter to confirm;
move with + and -;
the value is displayed;
X (back) = back to the previous value
Enter = stay on the new value
The new value will remain until a new
DMX value is received.
Local move of Accessory 1
Local move of Accessory 2
Local rotation of shutter 1
Local rotation of shutter 2
Local rotation of shutter 3
Local rotation of shutter 4
Local in/out move of shutter 1
Local in/out move of shutter 2
Local in/out move of shutter 3
Local in/out move of shutter 4
Local move of zoom
Local move of focus
Local move of pan
Local move of tilt
Internal lamp relay
Note: automatically goes to AUTO
after a Power Up.
AUTO: Lamp relay On when not in
reset or calibration mode.
(Also depends on lamp configuration –
see webpage) and control signal
(DMX or ArtDMX)–
OFF: Lamp relay always off until next
Power Up
ON: Lamp relay always on until next
Power Up
What happens when power is restored
ON: WARP automatically comes online,
does RESET and Lamp on
Menu structure
OFF: After shutdown or power failure
WARP will be in Park position. To bring
WARP online use Online function in the
control channel.
TEST
Test sequence
STOP
RUN
INFO
VERS
IPAD
STAL
20
Show software version (use up/down
arrows to scroll)
Show DHCP assigned IP address
(use up/down arrows to scroll)
Stall function
If the WARP is consistently being
hindered by an immovable object, the
WARP will eventually go in Stall: WARP
freezes and lamp relay goes Off.
Stall time is the observation time
before WARP goes in Stall.
When in Stall: “STAL” message on the
local display.
The Stall time is a value between 0
and 60 s. 0 s disables the Stall
function.
To Recover from Stall: online function
or Press Enter on the top box
www.adblighting.com
User Manual - page 31
Issue 1.1
Menu structure
4.3 DMX addressing
4.3.1 DMX address
The DMX starting address is entered using the local Menu and Display, or on the webpage.
4.3.2 Priority rule between DMX and ArtDMX
WARP can be controlled via an external DMX signal (received via the XLR5 connector) and
also via ArtDMX (received via Ethernet).
Priority and automatic switch-over
Default priority: DMX from an external source has priority over ArtDMX.
So if the external DMX signal fails, ArtDMX will take over automatically (if available).
Note: this Priority can be inverted via the webpage (see tab ArtNet).
User Manual - page 32
Issue 1.1
www.adblighting.com
Operation
5 Operation
5.1 DMX Operation
5.1.1 Channel Mapping12
The first column of these charts are laid out according to a fixture definition (personality) for
in ISIS® ADB’s lighting control software.
The ISIS® column is the offset with regard to base address.
The Start=1 column shows the addresses for Starting Address = 1.
ISIS®
Offset 0
0
1
2
3
4
5
6
7
8
9
10
11
12
13
14
15
16
17
18
19
20
21
22
23
24
12
Start=1
Offset 1
1
2
3
4
5
6
7
8
9
10
11
12
13
14
15
16
17
18
19
20
21
22
23
24
25
Default Open
Value
0
32767
Control
Pan
Pan fine
Tilt
Tilt fine
Zoom
Focus
Shutter A Rot/Index Coarse
Shutter A Rot/Index Fine
Shutter A In/Out
Shutter B Rot/Index Coarse
Shutter B Rot/Index Fine
Shutter B In/Out
Shutter C Rot/Index Coarse
Shutter C Rot/Index Fine
Shutter C In/Out
Shutter D Rot/Index Coarse
Shutter D Rot/Index Fine
Shutter D In/Out
Shutters all rotation offset Coarse
Shutters all rotation offset Fine
Gobo 1 rotation – coarse
Gobo 1 rotation – fine
Iris – coarse, or coarse rotation of Gobo 2
Iris – fine, or fine rotation of Gobo 2
32767
0
0
32767
0
32767
0
32767
0
32767
0
32767
32767
0
0
Personalities for several controls are available on the ADB TTV website.
www.adblighting.com
User Manual - page 33
Issue 1.1
Operation
25
26
27
28
29
30
31
32
33
26
27
28
29
30
31
32
33
34
External dimmer (optional)
External DMX output e.g. for scroller (ch1)
External DMX output e.g. for scroller (ch2)
External DMX output e.g. for scroller (ch3)
External DMX output e.g. for scroller (ch4)
External DMX output e.g. for scroller (ch5)
External DMX output e.g. for scroller (ch6)
External DMX output e.g. for scroller (ch7)
External DMX output e.g. for scroller (ch8)
Dummy
5.1.2 Rotate 720°
Each Shutter Rot/Index and the Shutter offset channel can freely rotate 720°. Starting for the
open value; one turn right and one turn left.
The framing shutters of a Motorised WARP can freely rotate 720 °.
The Motorised WARP defines a “zero value position of the framing shutters”. This sets the four
framing shutters at right angles to each other.
When the shutter rotation position is set to “Zero value position” and you move all shutters in,
you will get a raectangular/square shape.
5.1.3 How to identify a shutter shutter on your console
An operator can easily identify a shutter by moving one shutter and then using an ‘undo’
function to move it back to its original position. The ISIS® function for this is ‘return’. This
function is available on most lighting consoles.
User Manual - page 34
Issue 1.1
www.adblighting.com
Operation
5.2 DMX Mapping – the control channel
5.2.1 Control Channel
The Control channel allows special actions such as reset, lamp on/off and partial
recalibration. To start such a special action the sequence is Fire – Choose – Arm – Fire
DMX values for the Control Channel
- Fire (DMX value 00 – 20)
- Choose (Set the value of the Control channel to the value for the required action,
duration 1 s minimum and 10 s maximum)
- Arm (DMX value 241 – 255), duration 1 s minimum and 10 s maximum
- Fire (DMX value 00 – 20) (= start the action)
Value range
00 to 20
21 to 25
26 to 30
Command
Fire
Park
Online
Explanation
Fires the previously selected command
Freezes the luminarie in the present state
Recover from park, home and Accessories insertion
mode.
Recover from accessories insertion mode will always
force a reset on gobo / iris wheels
31 to 35
36 to 40
Not used
Stealth Mode
41 to 45
Quiet Mode
46 to 50
51 to 55
56 to 60
61 to 65
66 to 70
71 to 75
76 to 80
81 to 85
86 to 90
91 to 95
96 to 100
101 to 105
106 to 110
111 to 115
116 to 120
121 to 125
126 to 130
131 to 135
136 to 140
141 to 145
146 to 150
151 to 155
156 to 160
161 to 165
166 to 170
Fast mode
Reset all
Reset all Shutters
Reset Gobo 1
Gobo 2/iris
Reset Zoom
Reset Focus
Reset Pan
Reset Tilt
Not Used
Calibration lens
Calibration of Shutters
Calibration of Pan/Tilt
Calibration of Iris/Gobo
Not Used
Pan invert On
Pan invert Off
Tilt invert On
Tilt invert Off
Pan/Tilt swap On
Pan/Tilt swap Off
Display On
Display Off
Factory default setting
User setting 1
Mode to ensure silent operation at all times (only one
wheel moves at a time)
Mode to ensure a more silent operation (reduced
speed)
Max speed on all functions, “ no limits “
Reset of all wheels
Calibration of Zoom, Focus
For future releases
For future releases
www.adblighting.com
User Manual - page 35
Issue 1.1
Operation
171 to 175
176 to 180
181 to 185
186 to 190
191 to 195
User setting 2
User setting 3
Not used
DMX address setting
Accessory change
196 to 200
201 to 205
Gobo Mode indexed
Gobo Mode indexed
and Endless rotation
206 to 210
211 to 215
216 to 220
221 to 225
226 to 230
231 to 235
236 to 240
241 to 255
Not Used
Not Used
Not Used
Not Used
Not Used
Not Used
Not Used
Arm
For future releases
For future releases
For future releases
Going to initial position and freeze wheels
Needs Online function to restart
00000 to 39167: Index 0 to 430 degree
39168 to 51455: Clockwise fast to slow rotation
51456 to 53247: Stopped
53248 to 65535: Counter Clockwise slow to fast
rotation
“Arms" Standby for fire, the command previous
selected
Note: Difference between Reset and Calibration
Calibration
Pan & Tilt
WARP is using absolute positioning technology;
a calibration will measure all possible positions Pan and Tilt
can have. The Calibration takes up to 20 minutes.
Rings
A calibration will detect the physical limits of the wheel.(Only for
lenses)
Only necessary for maintenance purposes.
IRIS/GOBO
Calibration is forbidden if the accessory is inserted
Reset
Reset will verify the optical sensors for the rings. A reset of the
wheels is included in each start up.
User Manual - page 36
Issue 1.1
www.adblighting.com
Web page
6 Web page
WARP/M provides two user-interfaces:
•
•
The local display with buttons
A webpage on any PC browser
Before going on, it is necessary to set the PC’s network card on specific IP address and
subnet setting. Some knowledge of IT is necessary.
Addendum 1 describes how to set up a network card with Windows XP.
Whenever you want to configure your Motorised WARP, or have feedback about its current
status, you can access the WARP by opening the web-browser and typing in the IP Address of
the WARP.
A tool to ‘Discover all the WARP on my Ethernet network’ is described in the paragraph WARP
Scanner.
6.1 WARP’s IP address
The WARP can either work with
- or a fixed IP address format 2.x.x.x
- or a fixed IP address format 10.x.x.x
- or a DHCP assigned dynamic IP address.
The fixed IP address is an ArtNet IP address, i.e. 2.x.x.x or 10.x.x.x. The three bytes x.x.x
are created on the basis of the serial number of the WARP.
(If necessary it is possible to change the fixed IP address.)
Working with DHCP-assigned IP addresses requires a DHCP server and knowledge of
DHCP.
Note: each Motorised WARP also responds to IP address 192.168.0.1. This
address can be used to configure the unit and upload software –
provided the PC is connected to a single WARP.
www.adblighting.com
User Manual - page 37
Issue 1.1
Web page
6.2 Home page
Web pages are familiar for internet users. The contents of a webpage reflect the information
which was received during the latest Refresh. This is nice when you wish to view pages offline – but it also means that you must refresh in order to see the most recent update.
Typing the IP address of the WARP in the browser will open its Home page.
Hyperlinks appear on the Home page. Please click on the appropriate link!
After connecting, click Refresh to download the current parameters from the WARP you’re now
working with. (This erases the webpage content of the earlier session).
You can edit the parameters on the browser; Update will send these parameters to the WARP.
User Manual - page 38
Issue 1.1
www.adblighting.com
Web page
6.3 WARP Scanner
WARP/M Scanner V2.2 is a PC program which helps to find all the WARPs on the lighting
network and gives an overview of all statuses of online WARPs. This scanner program is
available on the ADB web site. WARP Scanner runs on Windows NT and XP.
This program auto-detects all WARPs on the Network. Double click on one of the available
WARPs, to open its Home webpage.
The WARP/M Scanner program will only detect WARPs if the PC’s network card is set on a
specific IP address and Subnet, or with DHCP13.
The WARP Scanner program displays a list of devices, with the IP address, the Name, the
Software Version, DMX address and status. Status is similar as the WARP messages on the
local display.14
Software update: use the Browse function to select the file to be uploaded. Update All will
upload the software to all available WARP on the network.15
13
See Addendum 1
See Chapter 7 “ Messages on local display”
15
See also chapter 8 “Software upload”
14
www.adblighting.com
User Manual - page 39
Issue 1.1
Web page
6.4 DMX channels
Click DMX and then click the browser’s refresh icon to view the WARP’s current setting:
Function
Description
DMX starting Address
Swap Pan & Tilt
Invert Pan
Invert Tilt
Endless gobo rotation
DMX starting Address
Inverts Pan and Tilt
Inverts Pan
Inverts Tilt
Selection between Gobo Mode Indexed or Gobo Mode indexed and
endless gobo rotation
You can edit the parameters on the browser; Send will send these parameters to the WARP.
User Manual - page 40
Issue 1.1
www.adblighting.com
Web page
6.5 ArtNet configuration
Click ArtNet and then click the browser’s refresh icon to view the WARP’s current setting:
Function
Description
ArtNet Enable
ArtNet SubNet
ArtNet universe
Enable transmission of
ArtDMX on XLR5
Enables or disables the Network
ArtNet SubNet (Value between 0 – 15)
ArtNet Universe (Value between 0 – 15)
WARP includes a ArtDMX (Ethernet) to DMX converter, allowing daisychaining of WARPs by means of DMX cables
Unit Name
User-defined name for the unit; default name = ADB-WARP
ArtNet IP address
The fixed IP address is an ArtNet IP address, i.e. starting with 2 or 10.
Each Motorised WARP has a unique factory-set fixed IP address that is
created on the basis of its serial number. It is also possible to work with
DHCP-assigned IP addresses.
Note: Fixed IP address will disable the DHCP functionality.
The default priority is ‘DMX has priority over ArtDMX’. Ticking this box will
invert this priority.
ArtDMX has priority
over incoming XLR5
DMX
You can edit the parameters on the browser; Set or Save will send these parameters to the
WARP
www.adblighting.com
User Manual - page 41
Issue 1.1
Web page
6.6 Information
Click Info and then click the browser’s refresh icon to view the WARP’s current setting:
Function
Description
WARP Software version
Displayed as :“Year-MMDD”
DMX Source
Name of the WARP
Hardware address
Physical address of the WARP
DHCP IP address
Static IP address
IP address assigned by DHCP (192.168.0.1 if no DHCP server)
2.xxx.xxx.xxx or 10.xxx.xxx.xxx related to the physical address of the WARP
Online
Recover from park, home and Accessories insertion mode.
Recover from accessories insertion mode will always force a reset on
gobo / iris wheels
Freezes the luminarie in the present state
Park
User Manual - page 42
Issue 1.1
www.adblighting.com
Web page
6.7 Axes and Wheels configuration
Click Axes and then click the browser’s refresh icon to view the WARP’s current setting:
This page allows configuring, calibrating and resetting the PAN and TILT; it also allows
configuring and resetting the accessory slots. (iris + gobo, iris or gobo)
Clicking on one of the functions will immediately send the change to the WARP.
Present status will indicate selected parameter and/or the status of the function.
Refresh the information before reading the status.
www.adblighting.com
User Manual - page 43
Issue 1.1
Web page
Status can be:
ok:
Function is ok
Resetting:
Function is resetting
Calibrating:
Function is calibrating
Communication error: Hard- or software problem – Refresh the information screen. If the
error remains: contact your local ADB dealer.
Function
Global
Mode
Description
Ring
Speed
Pan & Tilt
Pan
Tilt
Front accessory slot
Rear accessory slot
WARP provides 3 speed settings:
1. NORMAL SPEED is best for most applications.
2. QUIET SPEED provides less noise in applications where speed is less
important.(Half normal speed; not applicable for Pan and Tilt)
3. STEALTH SPEED provides almost no noise in applications where
speed is not important. (All parameters.)
Note: QUIET and STEALTH are only useful during performances. They
are not useful during plotting since the WARP would seem sluggish. The
best way to use those settings is during programming by using the control
channel.
Mode
1. Normal
2. Swapped: Invert Pan and Tilt
Reset: Reset Pan
Mode:
1. Normal (use ‘Absolute values’)
2. Do a Pan Reset at every power up (Reset Mode)
Reset: Reset Tilt
Mode:
1. Normal (use ‘Absolute values’)
2. Do a Tilt Reset at every power up (Reset Mode)
Reset: Reset the Front accessory
Mode:
1. None
2. Iris
3. Gobo
Selecting an accessory will place the rings for the WARP SLOT in the insert
position, provided DMX Value = 0 or no DMX is present.
Standard WARP personalities will set the rear slot to Gobo.
Reset: Reset rear accessory
Mode:
1. None
2. Iris
3. Gobo
Selecting an accessory will place the rings for the WARP SLOT in the insert
position, provided DMX Value = 0 or no DMX is present.
Standard WARP personalities will set the front slot to Iris.
Focus
Zoom
Shutter
User Manual - page 44
Issue 1.1
Reset: Reset of Focus
Reset: Reset of Zoom
Reset all shutters
Reset S1 : Reset and rotation of shutter 1
Reset S2 : Reset and rotation of shutter 2
Reset S3 : Reset and rotation of shutter 3
Reset S4 : Reset and rotation of shutter 4
www.adblighting.com
Web page
6.8 Lamp relay
Click Lamp and then click the browser’s refresh icon to view the WARP’s current setting.
Function
Description
Lamp relay current
status
Force lamp relay Off
until next Power Up
Turn lamp relay Off if
Relay is On or Off
Force lamp relay to be Off
Turns lamp relay off, depending on selected conditions
www.adblighting.com
User Manual - page 45
Issue 1.1
Web page
6.9 Firmware update
Click Update and then click the browser’s refresh icon to view the WARP’s current setting.
See chapter 8 Troubleshooting and maintenance for full details.
Use the Browse function to select the file to be uploaded. Click Send Update16.
.
16
Also see uploading a new software chapter
User Manual - page 46
Issue 1.1
www.adblighting.com
Web page
6.10 Miscellaneous
Click Misc. and then click the browser’s refresh icon to view the WARP’s current setting:
www.adblighting.com
User Manual - page 47
Issue 1.1
Web page
Function
Description
Display always On
Time out
Invert display
Display auto off
Tick box when WARP is standing; don’t tick when it’s hanging.
Brightness level
value between 0 and 15
Power Up Setting
Enable: at power up, WARP will Reset all necessary rings.
Disable: at power up, WARP will wait for the online 17 command before
Resetting the necessary rings.
Stall detection settings
for Pan and Tilt
Stall function
If the WARP is consistently being hindered by an immovable object, the
WARP will go in Stall.
Stall: WARP freezes and lamp relay goes Off.
A Stall time is given to the Stall function before the WARP will go in Stall.
If in Stall: “Stal” is displayed on the top box display.
The Stall time is a value between 0 and 60 seconds. 0 seconds disables
the Stall function.
Recover from Stall: online function or Press Enter on the top box
You can edit the parameters on the browser; Send will send these parameters to the WARP.
17
See Control channel and Web page information
User Manual - page 48
Issue 1.1
www.adblighting.com
Web page
6.11 Reset WARP
Click Reset or Reset WARP and restore all default value and then click the browser’s refresh
icon to view the WARP’s current setting:
Be aware: the WARP will go offline during reset, it is necessary to refresh the webpage after a
reset!
www.adblighting.com
User Manual - page 49
Issue 1.1
Web page
6.12 Calibration
Click Calibration and then click the browser’s refresh icon to view the WARP’s current setting:
Only necessary for maintenance.
Pan / Tilt: WARP is using absolute positioning technology; a calibration will measure all
possible positions Pan and Tilt. The Calibration takes up to 20 minutes.
A calibration of a ring will detect the physical limits of the wheel. (0nly for lenses)
User Manual - page 50
Issue 1.1
www.adblighting.com
Web page
Clicking on one of the functions will immediately send the order to the WARP.
Present status will indicate selected parameter and/or the status of the function. Refresh the
page information before reading the status.
Status can be:
ok:
Function is ok
Resetting:
Function is resetting
Calibrating:
Function is calibrating
Communication error: Hard- or software problem – Refresh the page. If the error remains,
contact your local ADB dealer.
www.adblighting.com
User Manual - page 51
Issue 1.1
Top box messages
7 Messages on local display
7.1 Local WARP messages
Messages on the local display regarding overall status.
Display messages
WARP
Acronym for
Explanation
WARP
WARP booting
WARP software is booting
PARK
PARK mode
WARP is in Park mode
STAL
STALL mode
WARP in Stall mode
7.2 Local calibration and reset messages
Messages on the top box display regarding calibration and reset.
Display messages
WARP
Acronym for
P CL
T CL
F CL
Z CL
S1 CL
S2 CL
S3 CL
S4 CL
A1 CL
A2 CL
Pan calibration
Tilt calibration
Focus calibration
Zoom calibration
Shutter 1 calibration
Shutter 2 calibration
Shutter 3 calibration
Shutter 4 calibration
Accessory 1 calibration
Accessory 2 calibration
PR
TR
FR
ZR
S1 R
S2 R
S3 R
S4 R
A1 R
A2 R
Pan Reset
Tilt Reset
Focus Reset
Zoom Reset
Shutter 1 Reset
Shutter 2 Reset
Shutter 3 Reset
Shutter 4 Reset
Accessory 1 Reset
Accessory 2 Reset
User Manual - page 52
Issue 1.1
Explanation
www.adblighting.com
Local messages
7.3 Local Error Messages
If a problem occurs during power up, operation or calibration, the local display will cycle
through any applicable error message(s) until the end of the list is reached and display the
error code in the top box display.
A full reset or a partial reset can be the solution to repair the encountered problem.
Display messages
WARP
Acronym for
Explanation
P NS
T NS
F NS
Z NS
S1NS
S2NS
S3NS
S4NS
A1NS
A2NS
INTE
CONT
LMPE
HOME
Pan no sense
Tilt no sense
Focus no sense
Zoom no sense
Shutter 1 no sense
Shutter 2 no sense
Shutter 3 no sense
Shutter 4 no sense
Accessory 1 no sense
Accessory 2 no sense
Internal error
Contact ADB technician
Lamp relay Error
Home
Pan sensor not found
Tilt sensor not found
Focus sensor not found
Zoom sensor not found
Shutter 1 sensor not found
Shutter 2 sensor not found
Shutter 3 sensor not found
Shutter 4 sensor not found
Accessory 1 sensor not found
Accessory 2 sensor not found
Internal communication error
-DMX
-RDM
-ETH
-ART
-ACN
DMX error
RDM error
Ethernet error
ArtNet error
ACN error
The fixture has received a Home command from the
controller; Wait for Home action to complete
www.adblighting.com
User Manual - page 53
Issue 1.1
Troubleshooting and maintenance
8 Troubleshooting and maintenance
8.1 Software Upload
In some cases, it may be desirable to upload new firmware. This process requires a PC with
an Internet browser18.
To update luminaire software:
Step 1 Download the latest software version from www.adblighting.com
Step 2 Connect the Motorised WARP to the Windows PC with an Ethernet cable (Cross-link
cable – without Ethernet Hub/Switch – Standard cable – with Ethernet Hub/Switch)
Step 3 To upload a new firmware it is necessary to change the IP address of your PC19.
We strongly recommend that before you modify any settings on the PC,
you first write down all the original settings. Your notes will come in
handy when you need to restore the original configuration of the PC.
Configure a fixed IP address on the PC
This IP address must be in the range20 2.xxx.xxx.xxx – subnet 255.0.0.0
Step 4
Step 5
Open the internet browser on the PC or the WARP Scanner
Type in the IP address or use the WARP Scanner – The webpage of the
Motorised WARP will open
Step 6
Upload the firmware with Webpage Firmware update or with WARP Scanner
Progress Messages on the WARP display during upload:
WARP display
Explanation
PROG
Start of upload
ERAS
P 00 to P 86
P OK
WARP RESTART
Erases old version
Load new version
Upload ok
WARP Reset
U100 to U199
U200 to U299
U300 to U399
U_OK
upload of the first PCB
upload of the second PCB
upload of the third PCB
Upload completed
DO NOT SWITCH OFF POWER DURING UPLOAD
18
See also WARP Scanner
This requires Windows network knowledge!
20
Not described: alternative methods with DHCP server; or with use of WARP IP addresses 198.168.0.1
or 126.xxx.xxx.xxx
19
User Manual - page 54
Issue 1.1
www.adblighting.com
Top box messages
8.2 Auto-test routine at power up
WARP executes a comprehensive set of self-tests after power up to check mechanically and
electronically functionality. Errors messages – if applicable – are displayed on the local
display; WARP Scanner and Webpage.
8.3 Cleaning WARP
Remove power from the WARP before performing maintenance.
8.3.1 Cleaning Lenses
CAUTION: Special care must be taken when cleaning the lenses, as they are easily
scratched! Wait until the luminaire has cooled down.
Use soft tissue paper or a soft cloth, in combination with distilled water and/or isopropyl
alcohol, to remove other particles that have accumulated on the lens surface.
To get access to the focus lens, first remove the diaphragm (19) by pressing the flanges
(19a) gently towards the centre of the ring. Then move the lens further forward for cleaning.
www.adblighting.com
User Manual - page 55
Issue 1.1
Troubleshooting and maintenance
8.3.2 Cleaning optical sensors and shutters
Cleaning is done with oil-free air21.
The optical sensors are situated between the motors and the wheels. Inject the air between
these two parts, as illustrated.
To clean the shutters: Use dry air to clean and a vacuum cleaner to remove dust and other
loose particles.
21
Try to keep the dry air spray vertical; otherwise thermal shock is possible.
User Manual - page 56
Issue 1.1
www.adblighting.com
Technical Specifications
9 Technical Specifications
9.1 Ranges and speed (time)
The indication for speed is the time to cover the full range, expressed in seconds.
Range
Pan Maximum
Tilt Maximum
Iris full open to close
Gobo full rotation
Shutter full rotation
Shutter in/out full stroke
Zoom
Focus
400°
275°
Speed
Fast
12
10
4
6
4
2
15
7
Speed
Quiet
12
10
6
11
8
2
25
10
Speed
Stealth
12
10
6
11
8
2
25
10
9.1.1 Weight and size
WARP/M/12-30
WARP/M/22-50
Dimensions (mm)
Weight (kg)
748 x 550 x 805
658 x 550 x 805
32
32
www.adblighting.com
User Manual - page 57
Issue 1.1
Technical Specifications
9.1.2 Construction materials
The Motorised WARP is flame retardant rated UL94-V0 for the plastic parts.
9.1.3 Electrical
1. The permanent supply cable for the lamp is fixed to the top box (3 x 1.5 mm2, loose
ends)
2. The control electronics are supplied by a PowerCon socket located on the top box.
3. Rated voltage: 230 V 50/60 Hz.
Working voltage range: 198 V – 264 V.
Rated power: 800 W for the lamp; 100 W for the control electronics.
User Manual - page 58
Issue 1.1
www.adblighting.com
Helpful tips
10 Helpful Tips
10.1 How to insert or remove an accessory
Inserting or removing an accessory needs to be done correctly.
Inserting or removing in a wrong way can damage the WARP and/or the
accessory.
Several types of actions are required
- you must teach WARP about the presence (none / gobo+iris / gobo+gobo).
- you must physically insert (or remove) the accessory
In the personality, in the local menus and on the webpage, iris and the gobo are treated as
separate functions (although they are part of one mechanical unit).
10.1.1 Convention
The standard WARP/M personality sets the front accessory slot to Iris and the rear
accessory slot to Gobo. In case two gobos are used, the rear accessory slot will be Gobo
No. 2.
10.1.2 How to insert the iris / gobo holder
First you must set both accessory rings to the insert position. This is the equivalent of the
‘click’ positions for the manual WARP.
This can be achieved in different ways.
- OR: use the CHNG function22
- OR: use the DMX console and set the DMX value to zero (for Gobo as well as for
Iris).
It might be useful to create a suitable ‘home position’ in your console.
- OR: use the local menu:
SLOT Enter FRNT Enter will automatically position both rings in the insert position;
then select the proper setting.
Repeat this for SLOT Enter REAR Enter.
Then insert the holder. Squeeze the two 'handles' towards each other to release the locking
mechanism, and insert the holder. Secure the holder’s safety cable.
Set WARP online if necessary or reconnect the data cables if necessary.
22
See Menu Functions Local Display
www.adblighting.com
User Manual - page 59
Issue 1.1
Helpful Tips
ATTENTION: when you insert the iris, it must be in the Open position.
10.1.3 How to remove iris / gobo holder
Before removing an accessory it is important to set both accessory slots to the insert
position. This is the equivalent of the ‘click’ positions for the manual WARP.
This can be achieved in different ways.
- OR: use the CHNG function
- OR: use the DMX console and set the DMX value to zero (for Gobo as well as for
Iris).
It might be useful to create a suitable ‘home position’ in your console.
- OR: use the local menu:
SLOT Enter FRNT Enter will automatically position both rings in the insert position;
then select the proper setting.
Repeat this for SLOT Enter REAR Enter.
Then remove the holder. Squeeze the two 'handles' towards each other on either side, to
release the locking mechanism, and pull out the holder.
Set WARP online if necessary or reconnect the data cables if necessary
Accessory calibration: only while no accessory is inserted
User Manual - page 60
Issue 1.1
www.adblighting.com
Helpful tips
10.2 How to add a colour scroller
Adding a scroller to the WARP requires an ADB scroller or ADB adaptation plate23.
10.2.1 Convention if not ADB scroller
•
•
The WARP/M accepts all colour scrollers with a weight up to 2,7 kg.
The XLR4 connector on the motor-house provides DMX data and Power Supply
(24Vdc / 1A). For other voltage and/or current ratings it is necessary to use an
external supply.
10.2.2 Pin out definition of the 4 Pin output connector
PIN number
1
2
3
4
Case
23
Connector
COM
DMX DMX +
24 Vdc/1A
Shield ground
ADB scroller adaptation plate : ADB reference: APL-CC/WARP
www.adblighting.com
User Manual - page 61
Issue 1.1
Helpful Tips
10.2.3 Adding the scroller
•
•
•
•
•
•
•
Screw the adapter plate to the scroller. This adapter plate fits a wide range of
different scrollers.
Insert the scroller into the WARP.
Connect the safety cable.
Connect the XLR4 cable 24.
Set the DMX address of the scroller to 1. (If dc power is necessary, wait until after the
power up of the WARP/M)
Rebalance the WARP25
Power up the WARP.
10.2.4 DMX mapping for the colour scroller
WARP/M remaps the scroller address26. The scroller becomes a part of the WARP personality.
The WARP/M DMX footprint includes 8 DMX addresses for the external output27. When the
data appears on the XLR4 connector, these addresses are shifted to a start address = 1.
User benefit: you can set all scrollers to DMX start address = 1.
Example: scroller has 3 parameters: colour, speed, fan.
External 1 becomes colour, external 2 becomes speed, …
10.2.5 Removing the scroller
After you have removed the scroller, you must rebalance the WARP/M.
24
XLR4 cable delivered with each ADB scroller and adapter plate
See chapter 3.5.1
26
Scroller address must be set to 1 for all scrollers
27
See chapter 5.1.1
25
User Manual - page 62
Issue 1.1
www.adblighting.com
Addenda
11 Addenda
11.1 Addendum 1: How to set-up a network card for ArtNet (WinXP)
Step 1: you’ll check the current setting on your PC, and write it down.
WindowsStart > Settings > Control Panel > Icon: Network and Internet connections
Icon: Internet connections > Local area connection status
www.adblighting.com
User Manual - page 63
Issue 1.1
Addenda
Click Properties. This opens a new window "Local Area Connection Properties"
Select Internet Protocol (TCP/IP) and click Properties
This opens a dialogue window "Internet Protocol (TCP/IP) Properties".
Very Important: now make careful notes of the settings as they are. You may need these
later to restore the original configuration.
Step 2: select the bullet: "Use the following IP address"
Step 3:IP address: enter an IP address, for example 2.1.1.1
Subnet Mask: 255.0.0.0
Click OK to close the window "Internet Protocol (TCP/IP) Properties".
Click OK to close the window "Local Area Connection Properties".
Close the window "Network Connections".
11.2 Addendum 2: Downloading of personalities for consoles
Personalities for various lighting consoles will be made available on the ADB website.
Contact your local distributor or [email protected] for more information.
User Manual - page 64
Issue 1.1
www.adblighting.com
Spare Parts
12 Spare Parts
This is only a small selection of the well defined spare parts for first line maintenance. A
complete list of spare parts is available in the service manual. Service manual is at the
disposal of qualified service technician’s or ADB customer service. To become a qualified
service technician’s please contact [email protected] or your local dealer.
Spare Part
ADB Reference
Code Number
G 9.5 axial bi-plane filament
halogen lamp 230V-800W-3200K
G 9.5 axial bi-plane filament
halogen lamp 230V-600W-3200K
Entrance zoom lens for
WARP/12-30
Lamp assembly
800W/G9.5/3200K
2990.40.500
600W/G9.5/3200K
2990.40.405
PC114/RC102
1001.61.300
Output zoom lens for WARP/12-30
Entrance zoom lens for
WARP/22-50
Output zoom lens for WARP/22-50
Top box Fuse – 6,3A 250V SPT
5 x 20mm
BC160/AS
BC100/AS
1001.61.310
1001.61.320
PC135/AS
Fuse Kit
1001.61.330
1001.65.300
1001.61.000
www.adblighting.com
User Manual - page 65
Issue 1.1
13 Notes
User Manual - page 66
Issue 1.1
www.adblighting.com
Subject to modifications
Belgium
N.V. ADB-TTV Technologies S.A.
(Group Headquarters) Leuvensesteenweg 585, B-1930 Zaventem
Tel : 32.2.709.32.11, Fax : 32.2.709.32.80, E-Mail : [email protected]
Deutschland ADB GmbH
Boschstrasse 3, D-61239 Ober-Mörlen
Tel : 49.6002.93.933.0, Fax : 49.6002.93.933.33, E-Mail : [email protected]
France
Sales Office: 168/170, boulevard Camélinat F-92240 Malakoff
Tel : 33.1.41.17.48.50, Fax : 33.1.42.53.54.76, E-Mail : [email protected]
ADB S.A.S.
Factory & Group Logistics Centre: Zone industrielle Rouvroy F-02100 Saint-Quentin
Tel : 33.3.23.06.35.70, Fax : 33.3.23.67.66.56, E-Mail : [email protected]
www.adblighting.com
Lighting Technologies
M-5083-E-08j
ADB - Your Partner for Light