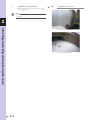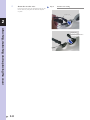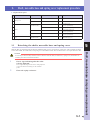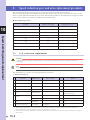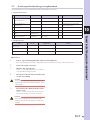
1
Cat. No. I195E-EN-01A
Washdown Delta Robot
ZX-T Series
R6Y3
Series
Delta Robot
MAINTENANCE
MANUAL
CONTENTS
R6Y3
Maintenance Manual
Safety Instructions
1. Safety Information
S-1
2. Signal words used in this manual
S-2
3. Warning labels
S-3
3.1
Warning labels
S-3
3.1.1
Contents of warning label messages
S-3
3.1.2
Supplied warning label
S-4
3.2 Warning symbols
4. Major precautions for each stage of use
4.1
Precautions for using robots
S-4
S-5
S-5
4.2 Design
S-5
4.3 Moving and installation
S-6
4.4 Safety measures
S-8
4.4.1
Safety measures
S-8
4.4.2
Installing a safety enclosure
S-9
4.5 Operation
S-10
4.5.1
Trial operation
S-10
4.5.2
Automatic operation
S-10
4.5.3
Precautions during operation
S-10
4.6 Inspection and maintenance
S-11
4.6.1
Before inspection and maintenance work
S-11
4.6.2
Precautions during service work
S-12
4.7
Disposal
S-12
5. Emergency action when a person is caught by robot
S-13
6. Using the robot safely
S-14
6.1
Robot protective functions
S-14
6.2 Residual risk
S-14
6.3 Special training for industrial robot operation
S-14
Warranty
T-1
CONTENTS
Chapter 1
Overview
1. Overview
Chapter 2
1-1
Attaching, detaching, and replacing the cover
1. Attaching, detaching and replacing the cover
2-1
1.1 Detachingorattachingtheα,β,γ-axescovers
2-1
1.1.1
α,β,γ-axiscoverremovalprocedure
1.1.2
α,βandγ-axiscoverattachmentprocedure
1.2 Detachingorattachingtheθ-axiscover
2-2
2-7
2-13
1.2.1 θ-axismotorcoverremoval
2-14
1.2.2 θ-axismotorcoverattachment
2-16
Chapter 3
Periodic inspection
1. Overview
3-1
2. Daily inspection
3-2
3. Monthly inspection
3-3
4. Six-month inspection
3-4
Chapter 4
Adjusting the origin
1. Adjusting the origin
4-1
1.1 Adjustingtheα,βandγ-axisoriginposition
4-2
1.2 Adjustingtheθ-axisoriginposition(4-axesspecificationonly)
4-5
Chapter 5
Shaft, moveable base and spring cover replacement
1. Shaft, moveable base and spring cover replacement procedure
5-1
1.1 Detachingtheshafts,moveablebaseandspringcover
5-1
1.2 Attachingtheshafts,moveablebaseandspringcovers
5-4
1.2.1 R6Y30110S03067NJ5(3-axesspecification)
5-4
1.2.2 R6Y31110L03067NJ5,R6Y31110H03067NJ5(4-axesspecification)
5-6
2. Moveable base link ball replacement
Chapter 6
1.1
5-9
Spring mechanism replacement
1. Spring mechanism replacement procedure
Spring mechanism removal
1.2 Spring mechanism attachment
T-2
R6Y3
Maintenance Manual
6-1
6-1
6-2
CONTENTS
Chapter 7
Plastic bearing replacement
1. Plastic bearing replacement procedure
1.1
R6Y3
Maintenance Manual
Removing the plastic bearing from the link ball sliding part
7-1
7-1
1.2 Attach the jig with threaded screw to the tapping hole on the end of the shaft
7-2
1.3 Spring mechanism plate plastic bearing removal
7-4
1.4
7-4
Spring mechanism plate plastic bearing attachment
2. Plastic bearing inspection
Chapter 8
7-5
θ-axis seal, O-ring replacement
1. θ-axis seal, O-ring replacement procedure
8-1
1.1 θ-axisseal,O-ringremoval
8-1
1.2 θ-axisseal,O-ringattachment
8-3
Chapter 9
Motor replacement
1. α, β, γ-axis motor replacement
1.1 α,β,γ-axismotorreplacementprocedure
9-1
9-1
1.1.1
α,β,γ-axismotorremoval
9-1
1.1.2
α,β,γ-axismotorattachment
9-3
2. θ-axis motor replacement
2.1 θ-axismotorremoval
Chapter 10
9-4
9-4
Speed reduction gear, arm replacement
1. Speed reduction gear replacement precautions
10-1
2. Speed reduction gear and arm replacement procedure
10-2
2.1 α,β,γ-axisarmreplacement
2.1.1
Work required after replacing arm link balls
10-2
10-3
2.2 α,β,γ-axisspeedreductiongearreplacement
10-4
2.3 θ-axisspeedreductiongearreplacement
10-7
Chapter 11
Maintenance parts
1. Consumable parts
11-1
2. Basic specification
11-2
T-3
Safety Instructions
Contents
1.
Safety Information
S-1
2.
Signal words used in this manual
S-2
3.
Warning labels
S-3
3.1
Warning labels
S-3
3.1.1
3.1.2
Contents of warning label messages
Supplied warning label
S-3
S-4
3.2
Warning symbols
S-4
4.
Major precautions for each stage of use
S-5
4.1
Precautions for using robots
S-5
4.2
Design
S-5
4.3
Moving and installation
S-6
4.4
Safety measures
S-8
4.4.1
4.4.2
Safety measures
Installing a safety enclosure
S-8
S-9
4.5
Operation
S-10
4.5.1
4.5.2
4.5.3
Trial operation
Automatic operation
Precautions during operation
S-10
S-10
S-10
4.6
Inspection and maintenance
S-11
4.6.1
4.6.2
Before inspection and maintenance work
Precautions during service work
S-11
S-12
4.7
Disposal
S-12
5.
Emergency action when a person is caught by robot
S-13
6.
Using the robot safely
S-14
6.1
Robot protective functions
S-14
6.2
Residual risk
S-14
6.3
Special training for industrial robot operation
S-14
1.
Safety Information
Thesafetyinstructionsandprecautionsdescribedinthe“SafetyInstructions”coveronlytherobot(mechanical
sections).Fordetailsaboutoperationofthecontrollerandsafetyprecautionsassociatedwiththecontrolleroperation,
refer to the Controller Manual.
Beforeusingthisproduct,readthismanualandrelatedmanualsandtakesafetyprecautionstoensurecorrecthandling.
The precautions listed in this manual relate to this product. To ensure the safety of the user’s final system that includes
robots,theusermusttakeappropriatesafetyconsiderations.
Touserobotssafelyandcorrectly,besuretostrictlyobservethesafetyrulesandinstructions.
• Forspecificsafetyinformationandstandards,refertotheapplicablelocalregulationsandcomplywiththe
instructions.
• WarninglabelsattachedtotherobotsarewritteninEnglish,Japanese,ChineseandKorean.Thismanualisavailable
inEnglishorJapanese(orsomepartsinChinese).Unlesstherobotoperatorsorservicepersonnelunderstand
theselanguages,donotpermitthemtohandletherobot.
• CautionsregardingtheofficiallanguageofEUcountries.
orequipmentthatwillbeinstalledinEUcountries,thelanguageusedforthemanuals,warninglabels,operation
F
screencharacters,andCEdeclarationsisEnglishonly.
WarninglabelsonlyhavepictogramsorelseincludewarningmessagesinEnglish.Inthelattercase,messagesin
Japanese or other languages might be added.
It is not possible to list all safety items in detail within the limited space of this manual. So please note that it is
essential that the user have a full knowledge of safety and also make correct judgments on safety procedures.
S-1
Safety Instructions
Industrialrobotsarehighlyprogrammable,mechanicaldevicesthatprovidealargedegreeoffreedomwhenperforming
variousmanipulativetasks.Tooperatetherobotinsaferandcorrectmanner,strictlyobservethesafetyinstructionsand
precautions stated in this "Safety Instructions" guide. Failure to take necessary safety measures or incorrect handling
mayresultintroubleordamagetotherobot,andalsomaycausepersonalinjury(toinstallationpersonnel,robot
operatororservicepersonnel)includingfatalaccidents.
2.
Signal words used in this manual
Safety Instructions
This manual uses the following safety alert symbols and signal words to provide safety instructions that must be
observedandtodescribehandlingprecautions,prohibitedactions,andcompulsoryactions.Makesureyouunderstand
the meaning of each symbol and signal word and then read this manual.
DANGER
THISINDICATESANIMMEDIATELYHAzARDOUSSITUATIONWHICH,IFNOTAvOIDED,WILLRESULTINDEATHOR
SERIOUSINJURY.
WARNING
THISINDICATESApOTENTIALLYHAzARDOUSSITUATIONWHICH,IFNOTAvOIDED,COULDRESULTINDEATHOR
SERIOUSINJURY.
CAUTION
Thisindicatesapotentiallyhazardoussituationwhich,ifnotavoided,couldresultinminorormoderateinjury,ordamagetothe
equipment.
NOTE
Explainsthekeypointintheoperationinasimpleandclearmanner.
S-2
3.
Warning labels
Warninglabelsareattachedtotherobotbody.Toensurecorrectuse,readthewarninglabelsandcomplywiththe
instructions.
Warning labels
WARNING
IFWARNINgLABELSAREREMOvEDORDIFFICULTTOSEE,THENTHENECESSARYpRECAUTIONSMAYNOTBE
TAKEN,RESULTINgINANACIDENT.
• DONOTREMOvE,ALTERORSTAINTHEWARNINgLABELSONTHEROBOTBODY.
• DONOTALLOWWARNINgLABELSTOBEHIDDENBYDEvICESINSTALLEDONTHEROBOTBYTHEUSER.
• pROvIDEpROpERLIgHTINgSOTHATTHESYMBOLSANDINSTRUCTIONSONTHEWARNINgLABELSCANBE
CLEARLYSEENFROMOUTSIDETHESAFETYENCLOSURE.
3.1.1
Contents of warning label messages
Wordmessagesonthedanger,warningandcautionlabelsareconciseandbriefinstructions.Formorespecific
instructions,readandfollowthe"Instructionsonthislabel"describedontherightofeachlabelshownbelow.
1. Warning label 1
DANGER
SERIOUSINJURYMAYRESULTFROMCONTACTWITHAMOvINgROBOT.
• KEEpOUTSIDEOFTHEROBOTSAFETYENCLOSUREDURINgOpERATION.
• pRESSTHEEMERgENCYSTOpBUTTONBEFOREENTERINgTHESAFETYENCLOSURE.
Instructions on this label
• Alwaysinstallasafetyenclosuretokeepallpersonsaway
from the robot movement range and prevent injury from
contacting the moving part of the robot.
• Install an interlock that triggers emergency stop when the
door or gate of the safety enclosure is opened.
• Thesafetyenclosureshouldbedesignedsothatnoone
canenterinsideexceptfromthedoororgateequipped
with an interlock device.
• Warninglabel1thatcomessuppliedwitharobotshould
beaffixedtoaneasy-to-seelocationonthedoororgateof
the safety enclosure.
Potential hazard to human body
Serious injury may result from contact with a moving robot.
To avoid hazard
•Keepoutsideoftherobotsafetyenclosureduringoperation.
•presstheemergencystopbuttonbeforeenteringthesafetyenclosure.
2. Warning label 2
WARNING
MOvINgpARTSCANpINCHORCRUSHHANDS.
KEEpHANDSAWAYFROMTHEMOvABLEpARTSOFTHEROBOT.
Instructions on this label
Usecautiontopreventhandsandfingersfrombeingpinched
or crushed by the movable parts of the robot when
transporting or moving the robot or during teaching.
Potential hazard to human body
Moving parts can pinch or crush hands.
To avoid hazard
Keephandsawayfromthemovablepartsoftherobot.
S-3
Safety Instructions
3.1
3. Warning label 3
Safety Instructions
WARNING
IMpROpERINSTALLATIONOROpERATIONMAYCAUSESERIOUSINJURY.
BEFOREINSTALLINgOROpERATINgTHEROBOT,READTHEMANUALANDINSTRUCTIONSONTHEWARNINg
LABELSANDUNDERSTANDTHECONTENTS.
Instructions on this label
• Besuretoreadthewarninglabelandthismanual
carefully to make you completely understand the contents
before attempting installation and operation of the robot.
• Beforestartingtherobotoperation,evenafteryouhave
readthroughthismanual,readagainthecorresponding
procedures and "Safety instructions" in this manual.
• Neverinstall,adjust,inspectorservicetherobotinany
manner that does not comply with the instructions in this
manual.
3.1.2
Potential hazard to human body
Improper installation or operation may cause serious injury.
To avoid hazard
Beforeinstallingoroperatingtherobot,readthemanualandinstructionsonthewarning
labels and understand the contents.
Supplied warning label
CAUTION
Attachthewarninglabelthathasbeenincludedintherobotatshipmenttoalegiblelocationclosetotherobot,suchasentranceofthe
safety enclosure.
3.2
Warning symbols
Warning symbols shown below are attached to the robot body to alert the operator to potential hazards. To use the
OMRON robot safely and correctly always follow the instructions and cautions indicated by the symbols.
1. Electrical shock hazard symbol
WARNING
TOUCHINgTHETERMINALBLOCKORCONNECTORMAYCAUSEELECTRICALSHOCK,SOUSECAUTION.
Instructions by this symbol
This indicates a high voltage is present.
Touching the terminal block or connector may cause
electrical shock.
2. High temperature hazard symbol
WARNING
MOTORS,HEATSINKS,ANDREgENERATIvEUNITSBECOMEHOT,SODONOTTOUCHTHEM.
Instructions by this symbol
This indicates the area around this symbol may become very
hot.
Motors,heatsinks,andregenerativeunitsbecomehotduring
and shortly after operation. To avoid burns be careful not to
touch those sections.
S-4
4.
Major precautions for each stage of use
This section describes major precautions that must be observed when using robots. Be sure to carefully read and
comply with all of these precautions even if there is no alert symbol shown.
Safety Instructions
4.1
Precautions for using robots
General precautions for using robots are described below.
1. Applications where robots cannot be used
OMRON robots are designed as general-purpose industrial equipment and cannot be used for the applications listed below.
DANGER
ROBOTSAREDESIgNEDASgENERAL-pURpOSEINDUSTRIALEqUIpMENTANDCANNOTBEUSEDFORTHE
FOllOWING APPlICATIONS.
• INMEDICALEqUIpMENTSYSTEMSWHICHARECRITICALTOHUMANLIFE
• INSYSTEMSTHATSIgNIFICANTLYAFFECTSOCIETYANDTHEgENERALpUBLIC
• INEqUIpMENTINTENDEDTOCARRYORTRANSpORTpEOpLE
• INENvIRONMENTSWHICHARESUBJECTTOvIBRATIONSUCHASONBOARDSHIpSANDvEHICLES.
2. Qualification of operators/workers
Operatorsorpersonswhohandletherobotsuchasforteaching,programming,movementcheck,inspection,adjustment,andrepair
must receive appropriate training and also have the skills needed to perform the job correctly and safely. They must read the manual
carefully to understand its contents before attempting the robot operation or maintenance.
Tasksrelatedtoindustrialrobots(teaching,programming,movementcheck,inspection,adjustment,repair,etc.)mustbeperformed
by qualified persons who meet requirements established by local regulations and standards for industrial robots.
WARNING
• THEROBOTMUSTBEOpERATEDONLYBYpERSONSWHOHAvERECEIvEDSAFETYANDOpERATIONTRAININg. OpERATIONBYANUNTRAINEDpERSONISExTREMELYHAzARDOUS.
• ADJUSTMENTANDMAINTENANCEBYREMOvINgACOvERREqUIRESpECIALIzEDTECHNICALKNOWLEDgE ANDSKILLS,ANDMAYALSOINvOLvEHAzARDSIFATTEMpTEDBYANUNSKILLEDpERSON.THESETASKS
MUSTBEpERFORMEDONLYBYpERSONSWHOHAvEENOUgHABILITYANDqUALIFICATIONSINACCORDANCE
WITHLOCALLAWSANDREgULATIONS.FORDETAILEDINFORMATION,pLEASECONTACTYOURDISTRIBUTOR WHEREYOUpURCHASEDTHEpRODUCT.
4.2
Design
1. Restricting the movement range
WARNING
SOFTLIMITFUNCTIONISNOTASAFETY-RELATEDFUNCTIONINTENDEDTOpROTECTTHEHUMANBODY.
ENSURESAFETYBYINSTALLINgASAFETYENCLOSUREANDSOON.
2. Provide safety measures for end effector (gripper, etc.)
WARNING
• ENDEFFECTORSMUSTBEDESIgNEDANDMANUFACTUREDSOTHATTHEYCAUSENOHAzARDS(SUCHASA
LOOSEWORKpIECEORLOAD)EvENIFpOWER(ELECTRICITY,AIRpRESSURE,ETC.)ISSHUTOFFORpOWER
FLUCTUATIONSOCCUR.
• IFTHEOBJECTgRIppEDBYTHEENDEFFECTORMIgHTpOSSIBLYFLYOFFORDROp,THENpROvIDE AppROpRIATESAFETYpROTECTIONTAKINgINTOACCOUNTTHEOBJECTSIzE,WEIgHT,TEMpERATURE,AND
CHEMICALpROpERTIES.
3. Provide adequate lighting
Provide enough lighting to ensure safety during work.
S-5
4. Install an operation status light
WARNING
INSTALLASIgNALLIgHT(SIgNALTOWER)ATANEASY-TO-SEEpOSITIONSOTHATTHEOpERATORWILLBEAWARE
OFTHEROBOTSTOpSTATUS(TEMpORARILYSTOppED,EMERgENCYSTOp,ERRORSTOp,ETC.).
Safety Instructions
4.3
Moving and installation
■ Installation environment
1. Do not use in strong magnetic fields
WARNING
DONOTUSETHEROBOTNEAREqUIpMENTORINLOCATIONSTHATgENERATESTRONgMAgNETICFIELDS.THE
ROBOTMAYBREAKDOWNORMALFUNCTIONIFUSEDINSUCHLOCATIONS.
2. Do not use in locations subject to possible electromagnetic interference, etc.
WARNING
DONOTUSETHEROBOTINLOCATIONSSUBJECTTOELECTROMAgNETICINTERFERENCE,ELECTROSTATIC
DISCHARgEORRADIOFREqUENCYINTERFERENCE.THEROBOTMAYMALFUNCTIONIFUSEDINSUCHLOCATIONS
CREATINgHAzARDOUSSITUATIONS.
3. Do not use in locations exposed to flammable gases
WARNING
• OMRONROBOTSARENOTDESIgNEDTOBEExpLOSION-pROOF.
• DONOTUSETHEROBOTSINLOCATIONSExpOSEDTOExpLOSIvEORINFLAMMABLEgASES,DUSTpARTICLES ORLIqUID.FAILURETOFOLLOWTHISINSTRUCTIONMAYCAUSESERIOUSACCIDENTSINvOLvINgINJURYOR DEATH,ORLEADTOFIRE.
■ Moving
1. Use caution to prevent pinching or crushing of hands or fingers
WARNING
KEEpYOURHANDAWAYFROMTHEROBOTINSTALLATIONSURFACEDURINgMOvINg.OTHERWISE,YOURHAND
ISENTANgLED,CAUSINgSERIOUSpERSONALINJURY.
AsinstructedinWarninglabel2,usecautiontopreventhandsorfingersfrombeingpinchedorcrushedbymovablepartswhen
transportingormovingtherobot.Fordetailsonwarninglabels,see"3.Warninglabels"in"Safetyinstructions."
2. Take safety measures when moving the robot
ToensuresafetywhenmovingtheDELTArobot,usetheeyeboltsthatcomewiththerobot.
Refer to the Robot Manual for details.
■ Installation
1. Protect electrical wiring and hydraulic/pneumatic hoses
Install a cover or similar item to protect the electrical wiring and hydraulic/pneumatic hoses from possible damage.
2. Cautions on arm
Intheinstallationwork,donotholdthearmbyyourhandincaseofanemergency.
S-6
■ Adjustment
1. Adjustment that requires removing a cover
■ Wiring
1. Robot cable
Aftercheckingthespecifiedcombinationsoftherobotandcontroller,connecttherobotandcontroller.
2. Wiring safety points
WARNING
ALWAYSSHUTOFFALLpHASESOFTHEpOWERSUppLYExTERNALLYBEFORESTARTINgINSTALLATIONOR
WIRINgWORK.FAILURETODOTHISMAYCAUSEELECTRICALSHOCKORpRODUCTDAMAgE.
CAUTION
• Donotapplyexcessiveimpactsorloadstotheconnectorswhenmakingcableconnections.Thismightbendtheconnectorpinsor damage the internal PC board.
• Whendisconnectingthecablefromtherobot,donotholdthecableandpullitoutbyhand.Loosenthescrewsontheconnector(if fastenedwiththescrews),andthendisconnectthecable.Tryingtodetachbypullingonthecableitselfmaydamagetheconnectoror
cables,andpoorcablecontactwillcausethecontrollerorrobottomalfunction.
3. Precautions for cable routing and installation
CAUTION
• Besuretostorethecablesconnectedtotherobotintheductorclampthemsecurelyinplace.Ifthecablesarenotstoredinaconduit
orproperlyclamped,excessiveplayormovementormistakenlypullingonthecablemaydamagetheconnectororcables,andpoor cable contact will cause the controller or robot to malfunction.
• Donotmodifythecablesanddonotplaceanyheavyobjectsonthem.Handlethemcarefullytoavoiddamage.Damagedcablesmay
cause malfunction or electrical shock.
• Ifthecablesconnectedtothecontrollermaypossiblybecomedamaged,protectthemwithanappropriatecover,etc.
• Checkthatthecontrollinesandcommunicationcablesareroutedatagapsufficientlyawayfrommainpowersupplycircuitsand powerlines,etc.Bundlingthemtogetherwithpowerlinesorclosetopowerlinesmaycausefaultyoperationduetonoise.
4. Protective measures against electrical shock
WARNING
ALWAYSgROUNDTHEROBOTBODYEARTHTERMINAL.FAILURETODOSOMAYRESULTINELECTRICSHOCK.
S-7
Safety Instructions
WARNING
ADJUSTMENTBYREMOvINgACOvERREqUIRESpECIALIzEDTECHNICALKNOWLEDgEANDSKILLS,ANDMAY
ALSOINvOLvEHAzARDSIFATEMpTEDBYANUNSKILLEDpERSON.THESETASKSMUSTBEpERFORMEDONLYBY
pERSONSWHOHAvEENOUgHABILITYANDqUALIFICATIONSINACORDANCEWITHLOCALLAWSAND
REgULATIONS.FORDETAILEDINFORMATION,pLEASECONTACTYOURDISTRIBUTORWHEREYOUpURCHASED
THEpRODUCT.
4.4
Safety measures
4.4.1
Safety measures
Safety Instructions
1. Referring to warning labels and manual
WARNING
• BEFORESTARTINgINSTALLATIONOROpERATIONOFTHEROBOT,BESURETOREADTHEWARNINgLABELS
ANDTHISMANUAL,ANDCOMpLYWITHTHEINSTRUCTIONS.
• NEvERATTEMpTANYREpAIR,pARTSREpLACEMENTANDMODIFICATIONUNLESSDESCRIBEDINTHISMANUAL.
THESETASKSREqUIRESpECIALIzEDTECHNICALKNOWLEDgEANDSKILLSANDMAYALSOINvOLvE HAzARDS.pLEASECONTACTYOURDISTRIBUTORFORADvICE.
NOTE
Fordetailsonwarninglabels,see"3.Warninglabels"in"Safetyinstructions."
2. Draw up "work instructions" and make the operators/workers understand them
WARNING
DECIDEON"WORKINSTRUCTIONS"INCASESWHEREpERSONNELMUSTWORKWITHINTHEROBOTSAFETY
ENCLOSURETOpERFORMSTARTUpORMAINTENANCEWORK.MAKESURETHEWORKERSCOMpLETELY
UNDERSTANDTHESE"WORKINSTRUCTIONS".
Decide on "work instructions" for the following items in cases where personnel must work within the robot safety enclosure to
performteaching,maintenanceorinspectiontasks.Makesuretheworkerscompletelyunderstandthese"workinstructions".
1. Robot operating procedures needed for tasks such as startup procedures and handling switches
2. Robot speeds used during tasks such as teaching
3. Methods for workers to signal each other when two or more workers perform tasks
4. Steps that the worker should take when a problem or emergency occurs
5.Stepstotakeaftertherobothascometoastopwhentheemergencystopdevicewastriggered,includingchecksforcancelling
the problem or error state and safety checks in order to restart the robot.
6.Incasesotherthanabove,thefollowingactionsshouldbetakenasneededtopreventhazardoussituationsduetosuddenor
unexpectedrobotoperationorfaultyrobotoperationaslistedbelow.
• placeadisplaysignontheoperatorpanel
• Ensurethesafetyofworkersperformingtaskswithintherobotsafetyenclosure
• Clearlyspecifypositionandpostureduringwork
Specify a position and posture where worker can constantly check robot movements and immediately move to avoid
trouble if an error/problem occurs
• Takenoisepreventionmeasures
• Usemethodsforsignalingoperatorsofrelatedequipment
• Usemethodstodecidethatanerrorhasoccurredandidentifythetypeoferror
Implementthe"workinstructions"accordingtothetypeofrobot,installationlocation,andtypeofworktask.
Whendrawingupthe"workinstructions",makeanefforttoincludeopinionsfromtheworkersinvolved,equipmentmanufacturer
technicians,andworkplacesafetyconsultants,etc.
3. Take safety measures
DANGER
• NEvERENTERTHEROBOTMOvEMENTRANgEWHILETHEROBOTISOpERATINgORTHEMAINpOWERIS
TURNEDON.FAILURETOFOLLOWTHISWARNINgMAYCAUSESERIOUSACCIDENTSINvOLvINgINJURYOR
DEATH.INSTALLASAFETYENCLOSUREORAgATEINTERLOCKWITHANAREASENSORTOKEEpALLpERSONS AWAYFROMTHEROBOTMOvEMENTRANgE.
• WHENITISNECESSARYTOOpERATETHEROBOTWHILEYOUAREWITHINTHEROBOTMOvEMENTRANgE
SUCHASFORTEACHINgORMAINTENANCE/INSpECTIONTASKS,BESURETOINSTALLANENABLEDEvICEIN THEExTERNALSAFETYCIRCUITSOTHATYOUCANIMMEDIATELYSTOpTHEROBOTOpERATIONINCASEOFAN
ABNORMALORHAzARDOUSCONDITION.ADDITIONALLY,SETTHEROBOTMOvINgSpEEDSOTHATIT
COMpLIESWITHTHEROBOTSAFETYSTANDARDS.
S-8
4. Install brake release circuit
TheDELTArobotisequippedwithabrakereleaseswitchforthemanualteachingormaintenanceinspection.
Tousethisbrakereleaseswitch,itisalsonecessarytoinstallabrakereleasecircuitontheuserside.
Fordetails,see“4.2Wiringthebrakereleasewireconnector”inChapter2oftheInstallationManual.
WARNING
WHENpERFORMINgTHETEACHINgORMAINTENANCEINSpECTIONMANUALLY,INSTALLTHEBRAKERELEASE
CIRCUITTOENSURETHESAFETY.
5. Install system
Whenconfiguringanautomatedsystemusingarobot,hazardoussituationsaremorelikelytooccurfromtheautomatedsystem
than the robot itself. So the system manufacturer should install the necessary safety measures required for the individual system.
Thesystemmanufacturershouldprovideapropermanualforsafe,correctoperationandservicingofthesystem.
WARNING
TOCHECKTHEROBOTCONTROLLEROpERATINgSTATUS,REFERTOTHERELATEDMANUALS.DESIgNAND
INSTALLTHESYSTEMINCLUDINgTHEROBOTCONTROLLERSOTHATITWILLALWAYSWORKSAFELY.
6. Do not modify
WARNING
NEvERATTEMpTTOMODIFYTHEROBOT.DONOTOpENANYCOvER.DOINgSOMAYCAUSEELECTRICALSHOCK,
BREAKDOWN,MALFUNCTION,INJURY,ORFIRE.
4.4.2
Installing a safety enclosure
Be sure to install a safety enclosure to keep anyone from entering within the movement range of the robot. The safety
enclosure will prevent the operator and other persons from coming in contact with moving parts of the robot and
suffering injury.
DANGER
SERIOUSINJURYMAYRESULTFROMCONTACTWITHAMOvINgROBOT.
•KEEpOUTSIDEOFTHEROBOTSAFETYENCLOSUREDURINgOpERATION.
•pRESSTHEEMERgENCYSTOpBUTTONBEFOREENTERINgTHESAFETYENCLOSURE.
WARNING
• INSTALLANINTERLOCKTHATTRIggERSEMERgENCYSTOpWHENTHEDOORORgATEOFTHESAFETY
ENCLOSUREISOpENED.
• THESAFETYENCLOSURESHOULDBEDESIgNEDSOTHATNOONECANENTERINSIDEExCEpTFROMTHEDOOR
ORgATEEqUIppEDWITHANINTERLOCKDEvICE.
• WARNINgLABEL1(SEE"3.WARNINgLABELS"IN"SAFETYINSTRUCTIONS")THATCOMESSUppLIEDWITHA
ROBOTSHOULDBEAFFIxEDTOANEASY-TO-SEELOCATIONONTHEDOORORgATEOFTHESAFETY ENCLOSURE.
S-9
Safety Instructions
WARNING
• DURINgSTARTUpORMAINTENANCETASKS,DISpLAYASIgNSTATINg"WORKINpROgRESS"ONTHE OpERATIONpANELORLOCKTHECOvEROFTHEOpERATIONpANELINORDERTOpREvENTANYONEOTHER
THANTHEpERSONFORTHATTASKFROMMISTAKENLYOpERATINgTHESTARTORSELECTORSWITCH.
• ALWAYSCONNECTTHEROBOTANDROBOTCONTROLLERINTHECORRECTCOMBINATION.USINgTHEMINAN INCORRECTCOMBINATIONMAYCAUSEFIREORBREAKDOWN.
4.5
Operation
Whenoperatingarobot,ignoringsafetymeasuresandchecksmayleadtoseriousaccidents.Alwaystakethefollowing
safety measures and checks to ensure safe operation.
Safety Instructions
DANGER
CHECKTHEFOLLOWINgpOINTSBEFORESTARTINgROBOTOpERATION.
•NOONEISWITHINTHEROBOTSAFETYENCLOSURE.
•THEROBOTANDpERIpHERALEqUIpMENTAREINgOODCONDITION.
4.5.1
Trial operation
Refertothecontrolleruser’smanualaftercarryingoutrobotinstallation,adjustments,inspection,maintenance,or
repair.
4.5.2
Automatic operation
Toperformtheautomaticoperation,followtheinstructionsstatedinthecontrollermanual.
4.5.3
Precautions during operation
1. When the robot is damaged or an abnormal condition occurs
WARNING
•
•
IFUNUSUALODORS,NOISEORSMOKEOCCURDURINgOpERATION,IMMEDIATELYTURNOFFpOWERTO
pREvENTpOSSIBLEELECTRICALSHOCK,FIREORBREAKDOWN.STOpUSINgTHEROBOTANDCONTACTYOUR DISTRIBUTOR.
IFANYOFTHEFOLLOWINgDAMAgEORABNORMALCONDITIONSOCCURSTHEROBOT,THENCONTINUINgTO
OpERATETHEROBOTISDANgEROUS.IMMEDIATELYSTOpUSINgTHEROBOTANDCONTACTYOUR DISTRIBUTOR.
Damage or abnormal condition
Damage to machine harness or robot cable
Type of danger
Electricalshock,robotmalfunction
Damagetorobotexterior
Damaged parts fly off during robot operation
Abnormalrobotoperation(positiondeviation,vibration,etc.)
Robot malfunction
α-axis,β-axisorγ-axisbrakemalfunction
Shaft or movable base falling or related part fly off
2. High temperature hazard
WARNING
• DONOTTOUCHTHEROBOTDURINgOpERATION.THEROBOTBODYISvERYHOTDURINgOpERATION,SO
BURNSMAYOCCURIFYOUTOUCHTHESESECTIONS.
• THEMOTORANDSpEEDREDUCTIONgEARCASINgAREvERYHOTSHORTLYAFTEROpERATION,SOBURNSMAY
OCCURIFTHESEARETOUCHED.BEFORETOUCHINgTHOSEpARTSFORINSpECTIONSORSERvICINg,TURNOFF THECONTROLLER,WAITFORAWHILEANDCHECKTHATTHEIRTEMpERATUREHASCOOLED.
3. Use caution when releasing the α-axis, β-axis or γ-axis brake
Toreleasethebrake,itisnecessarytoinstallabrakereleasecircuitontheuserside.
WARNING
THEα-AxIS,β-AxISORγ-AxISWILLSLIDEDOWNWARDWHENTHEBRAKEISRELEASED,CAUSINgAHAzARDOUS
SITUATION.TAKEADEqUATESAFETYMEASURESBYTAKINgTHEWEIgHTANDSHApEINTOACCOUNT.
• BEFORERELEASINgTHEBRAKEAFTERpRESSINgTHEEMERgENCYSTOpBUTTON,pLACEASUppORTUNDER THEα-AxIS,β-AxISORγ-AxISSOTHATITWILLNOTSLIDEDOWN.
• WHENpERFORMINgTASKS(DIRECTTEACHINg,ETC.)WITHTHEBRAKERELEASED,RELEASETHEBRAKEOF ONLYNECESSARYAxISANDBECAREFULNOTTOLETYOURBODYgETCAUgHTBETWEENTHEMOvABLEBASE
ANDTHEINSTALLATIONBASE.
S-10
4. If the α-axis, β-axis, γ-axis or θ-axis operating angle is small
4.6
Inspection and maintenance
Always perform daily and periodic inspections and make a pre-operation check to ensure there are no problems with
therobotandrelatedequipment.Ifaproblemorabnormalityisfound,thenpromptlyrepairitortakeothermeasuresas
necessary.
Keeparecordofperiodicinspectionsorrepairsandstorethisrecordforatleast3years.
4.6.1
Before inspection and maintenance work
1. Do not attempt any work or operation unless described in this manual.
Never attempt any work or operation unless described in this manual.
WARNING
NEvERATTEMpTINSpECTION,MAINTENANCE,REpAIR,ANDpARTREpLACEMENTUNLESSDESCRIBEDINTHIS
MANUAL.THESETASKSREqUIRESpECIALIzEDTECHNICALKNOWLEDgEANDSKILLSANDMAYALSOINvOLvE
HAzARDS.pLEASEBESURETOCONTACTYOURDISTRIBUTORFORADvICE.
2. Precautions during repair and parts replacement
WARNING
IFITISABSOLUTELYREqUIREDTOREpAIRORREpLACEANYpARTOFTHEROBOT,pLEASEBESURETOCONTACT
YOURDISTRIBUTORANDFOLLOWTHEINSTRUCTIONSTHEYpROvIDE.INSpECTIONANDMAINTENANCEOFTHE
ROBOTBYANUNSKILLEDORUNTRAINEDpERSONISExTREMELYHAzARDOUS.
Adjustment,maintenanceandpartsreplacementrequirespecializedtechnicalknowledgeandskills,andalsomayinvolvehazards.
These tasks must be performed only by persons who have enough ability and qualifications required by local laws and regulations.
WARNING
ADJUSTMENTANDMAINTENANCEBYREMOvINgACOvERREqUIRESpECIALIzEDTECHNICALKNOWLEDgEAND
SKILLS,ANDMAYALSOINvOLvEHAzARDSIFATTEMpTEDBYANUNSKILLEDpERSON.FORDETAILED
INFORMATION,pLEASECONTACTYOURDISTRIBUTORWHEREYOUpURCHASEDTHEpRODUCT.
3. Shut off all phases of power supply
WARNING
ALWAYSSHUTOFFALLpHASESOFTHEpOWERSUppLYExTERNALLYBEFORECLEANINgTHEROBOTAND
CONTROLLERORSECURELYTIgHTENINgTHETERMINALSCREWSETC.FAILURETODOTHISMAYCAUSE
ELECTRICALSHOCKORpRODUCTDAMAgEORMALFUNCTION.
4. Allow a waiting time after power is shut off (Allow time for temperature and voltage to drop)
WARNING
THEMOTORANDSpEEDREDUCTIONgEARCASINgAREvERYHOTSHORTLYAFTEROpERATION,SOBURNSMAY
OCCURIFTHEYARETOUCHED.BEFORETOUCHINgTHOSEpARTSFORINSpECTIONSORSERvICINg,TURNOFFTHE
CONTROLLER,WAITFORAWHILEANDCHECKTHATTHETEMpERATUREHASCOOLED.
S-11
Safety Instructions
WARNING
IFTHEα-AxIS,β-AxIS,γ-AxISORθ-AxISROTATIONANgLEISSETSMALLERTHAN5DEgREES,THENITWILL
ALWAYSMOvEWITHINTHESAMEpOSITION,IFTHEROTATIONANgLEOFTHEα-AxIS,β-AxIS,γ-AxISORθ-AxISIS
SETASSMALLERTHAN5DEgREES,MOvEMENTWILLALWAYSOCCURATTHESAMEpOSITION,MAKINgIT
DIFFICULTFORApROpEROILFILMTOFORMONTHESpEEDREDUCTIONgEAR,pOSSIBLYSHORTENINgITS
SERvICELIFE.TOpREvENTTHIS,ADDARANgEOFMOTIONSOTHATEACHAxISMOvESTHROUgHARANgEOF
120DEgREESORMOREABOUT5TIMESADAY.
4.6.2
Precautions during service work
1. Precautions when removing a motor
Safety Instructions
WARNING
THEα-AxIS,β-AxISORγ-AxISWILLSLIDEDOWNWARDWHENTHEMOTORISREMOvED,CAUSINgAHAzARDOUS
SITUATION.
• TURNOFFTHECONTROLLERANDpLACEASUppORTUNDERTHEα-AxIS,β-AxISORγ-AxISBEFOREREMOvINg THEMOTOR.
• BECAREFULNOTTOLETYOURBODYgETCAUgHTBETWEENTHEMOvABLEBASEANDTHEINSTALLATION BASE.
4.7
Disposal
Whendisposingofrobotsandrelateditems,handlethemcarefullyasindustrialwastes.Usethecorrectdisposalmethod
incompliancewithyourlocalregulations,orentrustdisposaltoalicensedindustrialwastedisposalcompany.
1. Disposal of packing boxes and materials
Whendisposingofpackingboxesandmaterials,usethecorrectdisposalmethodincompliancewithyourlocalregulations.Wedo
notcollectanddisposeoftheusedpackingboxesandmaterials.
S-12
5.
Emergency action when a person is caught by robot
Ifapersoniscaughtinbetweentherobotandmechanicalsection,suchasinstallationbase,usethebrakerelease
switchontherobotmainunittoreleasetheaxis.
Safety Instructions
Brake release switch
Brake release switch
Astherobotisputintheemergencystopstate,therobotdrivepowerisshutdown.However,theaxiscannotbemoved
sincethebrakeisactivated.So,releasethebrake,andthenpushtheaxisbyhandtomoveit.
WARNING
THEα-AxIS,β-AxISORγ-AxISWILLSLIDEDOWNWARDWHENTHEBRAKEISRELEASED,CAUSINgAHAzARDOUS
SITUATION.
• BEFORERELEASINgTHEBRAKE,BESURETOpLACEASUppORTUNDERTHEα-AxIS,β-AxISORγ-AxISSOTHAT ITWILLNOTSLIDEDOWN.
• WHENRELEASINgTHEBRAKE,BECAREFULNOTTOLETYOURBODYgETCAUgHTBETWEENTHEMOvABLE BASEANDTHEINSTALLATIONBASE.
CAUTION
Releasethebrakeaxis-by-axis.
NOTE
Fordetailsaboutthebrakereleasewireconnector,see“4.2Wiringthebrakereleasewireconnector”inChapter2oftheInstallation
Manual.
S-13
6.
Using the robot safely
6.1
Robot protective functions
Safety Instructions
1. Soft limits
Softlimitscanbesetoneachaxistolimittheworkingenvelopeinmanualoperationafterreturn-to-originandduringautomatic
operation. The working envelope is the area limited by soft limits.
WARNING
SOFTLIMITFUNCTIONISNOTASAFETY-RELATEDFUNCTIONINTENDEDTOpROTECTTHEHUMANBODY.
ENSURESAFETYBYINSTALLINgASAFETYENCLOSUREANDSOON.
2. α-axis, β-axis and γ-axis brakes
Anelectromagneticbrakeisinstalledontheα-axis,β-axisandγ-axistopreventthemfromslidingdownwardwhentheservois
OFF.
WARNING
THEα-AxIS,β-AxISORγ-AxISWILLSLIDEDOWNWARDWHENTHEBRAKEISRELEASED,CAUSINgAHAzARDOUS
SITUATION.TAKEADEqUATESAFETYMEASURESBYTAKINgTHEWEIgHTANDSHApEINTOACCOUNT.
• BEFORERELEASINgTHEBRAKEAFTERpRESSINgTHEEMERgENCYSTOpBUTTON,pLACEASUppORTUNDER THEα-AxIS,β-AxISORγ-AxISSOTHATITWILLNOTSLIDEDOWN.
• WHENpERFORMINgTASKS(DIRECTTEACHINg,ETC.)WITHTHEBRAKERELEASED,BECAREFULNOTTOLET YOURBODYgETCAUgHTBETWEENTHEMOvABLEBASEANDTHEINSTALLATIONBASE.
6.2
Residual risk
ToensuresafeandcorrectuseofOMRONrobots,Systemintegratorsand/orendusersimplementthemachinerysafety
design that conforms to ISO12100 or JIS9700-1/2.
ResidualrisksforOMRONrobotsaredescribedintheDANgERorWARNINginstructionsprovidedineachchapter
andsection.So,readthemcarefully.
6.3
Special training for industrial robot operation
Operatorsorpersonswhohandletherobotfortaskssuchasforteaching,programming,movementchecks,inspections,
adjustments,andrepairsmustreceiveappropriatetrainingandalsohavetheskillsneededtoperformthejobcorrectly
and safely. They must also read the manual carefully to understand its contents before attempting the robot operation or
maintenance.
Tasksrelatedtoindustrialrobots(teaching,programming,movementcheck,inspection,adjustment,repair,etc.)must
be performed by qualified persons who meet requirements established by local regulations and safety standards for
industrial robots.
S-14
Safety Instructions
Comparison of terms used in this manual with ISO
This manual
ISO 10218-1
Note
Maximum movement range
maximumspace
Area limited by mechanical stoppers.
Movement range
restricted space
Area limited by movable mechanical stoppers.
Working envelope
operational space
Within safety enclosure
safeguarded space
Area limited by software limits.
S-15
Warranty
Forinformationonthewarrantyperiodandterms,pleasecontactourdistributorwhereyoupurchasedtheproduct.
■ This warranty does not cover any failure caused by:
1.Installation,wiring,connectiontoothercontroldevices,operatingmethods,inspectionormaintenancethatdoesnotcomply
with industry standards or instructions specified in the OMRON manual;
2.UsagethatexceededthespecificationsorstandardperformanceshownintheOMRONmanual;
3. Product usage other than intended by OMRON;
4.Storage,operatingconditionsandutilitiesthatareoutsidetherangespecifiedinthemanual;
5. Damage due to improper shipping or shipping methods;
6. Accident or collision damage;
7. Installation of other than genuine OMRON parts and/or accessories;
8.ModificationtooriginalpartsormodificationsnotconformingtostandardspecificationsdesignatedbyOMRON,including
customizing performed by OMRON in compliance with distributor or customer requests;
9.pollution,saltdamage,condensation;
10.Firesornaturaldisasterssuchasearthquakes,tsunamis,lightningstrikes,windandflooddamage,etc;
11. Breakdown due to causes other than the above that are not the fault or responsibility of OMRON;
12.Electricalshockwhentheuserinstallstheactuator,etc.onthemovablebaseorendeffectorinthe3-axisspecifications.
■ The following cases are not covered under the warranty:
1.productswhoseserialnumberorproductiondate(month&year)cannotbeverified.
2. Changes in software or internal data such as programs or points that were created or changed by the customer.
3. Products whose trouble cannot be reproduced or identified by OMRON.
4.productsutilized,forexample,inradiologicalequipment,biologicaltestequipmentapplicationsorforotherpurposeswhose
warranty repairs are judged as hazardous by OMRON.
WARRANTY
OMRON's exclusive warranty is that the products are free from defects in materials and workmanship for a
period of one year after the date of manufacturing as shown on the product serial number plate.
OMRON MAKES NO WARRANTY OR REPRESENTATION, EXPRESS OR IMPLIED, REGARDING
NONINFRINGEMENT, MERCHANTABILITY, OR FITNESS FOR PARTICULAR PURPOSE OF THE
PRODUCTS. ANY BUYER OR USER ACKNOWLEDGES THAT THE BUYER OR USER ALONE HAS
DETERMINED THAT THE PRODUCTS WILL SUITABLY MEET THE REQUERIMENTS OF THEIR
INTENDED USE. OMRON DISCLAIMS ALL OTHER WARRANTIES, EXPRESS OR IMPLIED.
LIMITATIONS OF LIABILITY
OMRON SHALL NOT BE RESPONSIBLE FOR SPECIAL, INDIRECT OR CONSEQUENTIAL DAMAGES,
LOSS OF PROFITS OR COMERCIAL LOSS IN ANY WAY CONNECTED WITH THE PRODUCTS, WETHER
SUCH CLAIM IS BASED ON CONTRACT, WARRANTY, NEGLIGENCE OR STRICT LIABILITY.
In no event shall the responsibility of OMRON for any act exceed the individual price of the product on which
liability is asserted.
IN NO EVENT SHALL OMRON BE RESPONSIBLE FOR WARRANTY, REPAIR OR OTHER CLAIMS
REGARDING THE PRODUCTS UNLESS OMRON'S ANALYSIS CONFIRMS THAT THE PRODUCTS
WERE PROPERLY HANDLED, STORED, INSTALLED AND MAINTAINED AND NOT SUBJECT TO
CONTAMINATION, ABUSE, MISUSE OR INAPPROPIATE MODIFICATION OR REPAIR.
1
Chapter 1 Overview
Contents
1.
Overview
1-1
1.
Overview
1.USESTABLEpOSTSWHICHWILLNOTFALLOvEREASILY.
2.THEROpEORCHAINSHOULDBEEASILYvISIBLEBYEvERYONEAROUNDTHEROBOT.
3.pLACEACONSpICUOUSSIgNpROHIBITINgTHEOpERATOROROTHERpERSONNELFROMENTERINgTHE
MOvEMENTRANgEOFTHEMANIpULATOR.
• IFCHECKINgOpERATIONFOLLOWINgADJUSTMENT,REFERTOTHECONTROLLERUSER’SMANUAL.
CAUTION
Useonlythelubricantsspecifiedbyyourdistributors.
1-1
1
Overview
WARNING
• ADJUSTMENT,MAINTENANCEANDREMOvALOFARMS,SHAFTS,ORTHEθ-AxISASSEMBLYREqUIRE SpECIALIzEDTECHNICALKNOWLEDgEANDSKILLS,ANDALSOMAYINvOLvEHAzARDS.THISWORKMUSTBE CARRIEDOUTBYREFERENCINgTHISMANUALBYSUFFICIENTLYSKILLEDANDqUALIFIEDpERSONNELIN
ACCORDANCEWITHTHELAWSANDREgULATIONSOFEACHCOUNTRY.
• pLACEACONSpICUOUSSIgNINDICATINgTHEROBOTISBEINgADJUSTED,TOpREvENTOTHERSFROM
TOUCHINgTHECONTROLLERSWITCHOROpERATIONpANEL.
• IFASAFETYENCLOSUREHASNOTYETBEENpROvIDEDRIgHTAFTERINSTALLATIONOFTHEROBOT,ROpEOFF
ORCHAINOFFTHEMOvEMENTRANgEAROUNDTHEMANIpULATORINpLACEOFASAFETYENCLOSURE,AND OBSERvETHEFOLLOWINgpOINTS.
Chapter 2 Attaching, detaching and replacing the cover
Contents
1.
Attaching, detaching and replacing the cover
2-1
1.1
Detaching or attaching the α, β, γ-axes covers
2-1
1.1.1
1.1.2
α,β,γ-axiscoverremovalprocedure
α,βandγ-axiscoverattachmentprocedure
2-2
2-7
1.2
Detaching or attaching the θ-axis cover
2-13
1.2.1
1.2.2
θ-axismotorcoverremoval
θ-axismotorcoverattachment
2-14
2-16
1.
Attaching, detaching and replacing the cover
1.1
Detaching or attaching the α, β, γ-axes covers
CAUTION
Theα,β,andγ-axismotorcoverconstructiondoesnotcomplywithIp67,andthereforetheinsideofthecovershouldbecleaned
periodically. The motor and speed reduction gear inside the cover do comply with IP67.
R6Y3
θ-axis
α-axis
β-axis
Bolt
γ-axis
θ-axis
1. Replacement parts
Part Name
1
OMRON Part No.
Part No. / Specs
Q'ty
KDL-M2163-00x
2
β,γ-axes,affixedwithelectricshock
caution label
KDL-M2163-10x
1
α-axis,warninglabel
1
Motorcoverattachmentpart(*1)
2
(*1)
Motor cover
2
Remarks
3
Seal
KDL-M2138-00x
4
Cover securing bolt
97080-05008
5
Brake release switch
KDL-M4851-00x
1
(*1)
KDL-M1172-00x
1
Motorcoverupperattachment(*1)
6
Bracket
KDL-M1173-00x
1
Motorcoverlowerattachment(*1)
4
(*1)
M5,length8
7
Bracket securing bolt
91380-04020
M4,length20
8
Cap
KDL-M2165-00x
1
(*1)
9
Boot
KDL-M212A-00x
1
(*1)
*1:quantitypercover
2-1
2
Attaching, detaching and replacing the cover
WARNING
• IFTHECOvERSAREREMOvEDFORMAINTENANCEWORK,BESURETORETURNTHEMTOTHEIRORIgINAL
pOSITIONSUSINgTHEBOLTSUSEDTOSECURETHEM.
• IFANYOFTHEBOLTSBECOMELOST,USETHESpECIFIEDBOLTSANDqUANTITIESTOSECURETHECOvERS
WHILEREFERRINgTOTHEFIg.BELOW.
• IFTHECOvERSARENOTSECUREDFIRMLY,NOISEMAYOCCUR,THECOvERSMAYDROpANDFLYOUT,HANDS
MAYBECOMEENTANgLEDINTHEDRIvEUNITDURINgTEACHINg,ORCOMEINTOCONTACTWITHTHEHOT
DRIvEUNIT,CAUSINgBURNS.OBSERvETHESECAUTIONSSTRICTLYTOpREvENTSUCHTROUBLE.
1.1.1
α, β, γ-axis cover removal procedure
WARNING
WHENHANDLINgMOTORS,TAKECARETOAvOIDELECTRICSHOCKORBURNSOWINgTOTHEHEATgENERATED
BYTHEMOTORS.
2
1
Remove the duct, boot, and cap.
Step 1
Duct, boot, and cap removal
NOTE
The boot and cap are merely inserted when the robot is
shipped.
Cap
Attaching, detaching and replacing the cover
2
Disconnect the robot cable connector.
Duct
Boot
Boot removal
Cap removal
2-2
3
Remove the M5 hex bolt from the top
of the motor cover.
4
Remove the cover a little.
Step 3
Bolt removal
Grasp the rear of the cover and pull it out while
shaking it up and down to remove the cover a little.
About10mmoftherubberwillcomeout(within
5mmwhenattached).
2
M5 hex bolt
NOTE
The inside of the cover will catch and so will not come off
completely.
Temporarily removed cover
Cover
Pull out a little at a time
while shaking up and down.
10mm width
Cover bottom temporarily removed
10mm width
Cover top temporarily removed
2-3
Attaching, detaching and replacing the cover
Step 4
5
Pull the cover out further.
Make a gap between the cover and base by pulling
the cover out further.
Step 5
Temporarily removed cover
NOTE
The cover will catch at this point and so will not come off
completely.
2
Attaching, detaching and replacing the cover
Cover bottom temporarily removed
Cover top temporarily removed
2-4
6
Pull out the cover.
Grasp the sides of the cover and push both sides so
that the bottom deforms a little to pull out the cover.
The clips on the inside near the switch will come
free,makingiteasiertopulloutthecoverwithoutit
catching.
The motor connector will catch on the hole on the
sideofthecover,andsothecovershouldbeshifted
to avoid the connector. The switch on the inside will
catchonthemotorconnector,andsothecovershould
be pulled out while trying to avoid the connector.
Step 6
Pull out the cover.
2
Internal switch
2-5
Attaching, detaching and replacing the cover
Slide the cover.
■ Clip structure
The cover clips will catch on the step of the bracket under the reduction gear.
Therearetwosteps,andtheclipscatchonthesecondstep.
Clip construction
2
Reduction gear
Attaching, detaching and replacing the cover
Bracket
Clip construction on inside
Clips
Inside of removed cover
Connection cable
Brake release switch
2-6
1.1.2
α, β and γ-axis cover attachment procedure
Attach the cover using the opposite of the procedure used for removal.
WARNING
THESAMETYpEOFMOTORWIREANDENCODERWIREISUSEDFORTHEα,β,ANDγ-AxES.CONNECTTHECABLES
SOTHATTHEYMATCHTHERESpECTIvEAxESATTHECONTROLLER(DRIvER).THEROBOTWILLNOTOpERATE
CORRECTLY,RESULTINgINpOSSIBLEDANgERIFTHECABLESARECONNECTEDINCORRECTLY.
1
Insert the motor wire from smaller
hole on the boot with small hole.
Step 1
The motor wire connector is larger and should
therefore be inserted first.
The motor wire connector should still be inserted
first even if using l-shaped connectors.
Motor wire
Boot
Insert the encoder wire and brake
release wire (prepared by user) from
smaller hole on the boot.
CAUTION
The encoder wire must pass through the inside of the cover
andthereforeasufficientlengthofwireshouldbeinserted.
Step 2
3
Insert the encoder wire and brake
release wire (prepared by user).
Pull the cover internal cables from the
hole with the boot.
Encoder wire
Ontheoutsideofthecoveristhecap,andthemotor
connector part should be the boot.
4
Brake release wire
Connect the cover internal switch
connector and brake release
connector.
(prepared by user)
Store the joint inside the cover.
Boot
The cable leading from the brake release connector
should be prepared by the user.
Step 4
Switch connector and brake release
connector connection
2-7
Attaching, detaching and replacing the cover
2
2
Insert the motor wire.
5
Route the encoder wire.
Insert the encoder wire only through the hole for the
motorconnector,andpullitoutfromtheadjacent
cap hole.
Step 5
Encoder wire routing
Encoder wire
2
Attaching, detaching and replacing the cover
Encoder wire
Pull out from cap hole side.
2-8
6
Temporarily insert the motor cover.
Insert the motor cover so that the internal switch
does not interfere with the motor connector.
Pull the brake release wire and encoder wire out from
thegapnexttothemotorconnector.
Step 6
Temporary motor cover insertion
Motor cover
Motor
Internal switch
Cables removed when temporarily inserting cover
2-9
Attaching, detaching and replacing the cover
Pull out from gap.
2
7
Insert the cover so that the rubber on
the bottom fits in.
Step 7
Gap
There will be a gap when the cover catches on the
first clip.
8
2
Insert the cover so that the rubber on
the top fits in.
Gap
CAUTION
Inserttherubberalittleatatime,andavoidtryingtoforceit
in.Ifforcedin,therubberwillendupdeformed,makingit
difficulttoattachthemotorcover.
Attaching, detaching and replacing the cover
9
Gap at top of cover
Push in the motor cover from the
rear.
The rubber at the bottom of the switch should
protrudeapproximately5mm,andtherubberatthe
topoftheswitchshouldprotrudeapproximately
1mm.
Gap
Gap at bottom of cover
Step 8
Insert the rubber.
Step 9
Push in the motor cover.
Motor cover
2-10
10
Adjust the motor cover position and
then secure with the M5 hex bolt(s).
Step 10
Motor cover attachment
Adjust the motor cover position and then screw in
twoM5hexboltstosecure.
Ensurethatthemotorcoverhasbeensecurely
attached.
It will not be possible to insert the bolts if the motor
coverpositionandtappingpositionsfortheM5hex
bolts are not aligned.
2
M5 hex bolt
11
Attach the robot cable connector.
12
Attach the boot and cap to the motor
cover.
13
Attach the duct to the robot cable.
Step 12
Boot, cap attachment
Boot
Push the rubber in completely.
Insert the robot cable into the notch on the duct.
The cable can be inserted easily by inserting a thick
rod such as a flat screwdriver.
Cap
Step 13
Duct attachment
Duct
2-11
Attaching, detaching and replacing the cover
WARNING
CONNECTTHEα,β AND γ-AxISROBOTCABLESSO
THATTHEYMATCHTHERESpECTIvEAxESATTHE
CONTROLLER(DRIvER).THEROBOTWILLNOT
OpERATECORRECTLY,RESULTINgINpOSSIBLE
DANgERIFTHECABLESARECONNECTED
INCORRECTLY.
14
Attach the bracket to the robot cable.
15
Insert the bracket in the boot.
16
Insert the boot in the duct.
Step 14
Bracket attachment
2
Bracket
Boot
Attaching, detaching and replacing the cover
2-12
Step 15
Bracket insertion
Step 16
Boot insertion
1.2
Detaching or attaching the θ-axis cover
Todetachthecovers,removetheboltsandscrewsshownintheFig.below.
WARNING
• IFTHECOvERSAREREMOvEDFORMAINTENANCEWORK,BESURETORETURNTHEMTOTHEIRORIgINAL
pOSITIONSUSINgTHEBOLTSUSEDTOSECURETHEM.
• IFANYOFTHEBOLTSBECOMELOST,USETHESpECIFIEDBOLTSANDqUANTITIESTOSECURETHECOvERS
WHILEREFERRINgTOTHEFIg.BELOW.
• IFTHECOvERSARENOTSECUREDFIRMLY,NOISEMAYOCCUR,THECOvERSMAYDROpANDFLYOUT,HANDS
MAYBECOMEENTANgLEDINTHEDRIvEUNITDURINgTEACHINg,ORCOMEINTOCONTACTWITHTHEHOT
DRIvEUNIT,CAUSINgBURNS.OBSERvETHESECAUTIONSSTRICTLYTOpREvENTSUCHTROUBLE.
θ-axis motor cover
6 - M4×1.5 hex bolt
1. Replacement parts
OMRON Part No.
Part No. / Specs
Q'ty
Remarks
1
θ-axismotorcover
KDL-M182E-00x
2
θ-axismotorcoverattachment
bolt
90780-04010
3
Washer
KDL-M1861-00x
6
KDL-M4813-00x
1
Motor cable
KDL-M4814-00x
1
Encodercable
8
Secured to motor cover.
KDL-M4811-00x
1
Motor cable
KDL-M4812-00x
1
Encodercable
97980-04308
2
4
1
M4,length10
6
θ-axiscable(coverside)
5
6
θ-axiscablesecuringbolt
7
91380-03006
M3,length6
θ-axiscable(motorside)
8
9
Earthbolt
2
Attaching, detaching and replacing the cover
R6Y31110L03067NJ5 / R6Y31110H03067NJ5 θ-axis
Part Name
2-13
1.2.1
θ-axis motor cover removal
CAUTION
Whenremovingtheθ-axismotorcover,firstdisconnectthecablefromtheoutsideofthemotorcoverandthenremovethemoveable
basefromtheα,βandγ-axisshaftsbeforeproceeding.Thereisariskofbodilyinjuryifthecableisdamagedorarobotmalfunction
occurs inside the robot movement range.
2
1
Remove the M4 hex bolts securing the
θ-axis motor cover and moveable
base.
Step 1
M4 hex bolt removal
Step 2-4
Inside the motor cover
loosen with a spanner and then remove.
Attaching, detaching and replacing the cover
2
Lift the θ-axis motor cover from the
moveable base.
3
Disconnect the cable connectors
inside the cover.
Disconnect the motor cable connector and encoder
cable connector.
4
5
Remove the two earth bolts.
Remove the θ-axis motor cover.
Take care not to cover the washers attached to the
θ-axismotorcover.
Motor cable
connector
Earth bolts
2-14
Encoder cable
connector
6
Remove the cables from the inside of
the θ-axis motor cover (when
replacing the cables inside the motor
cover).
Step 6
Cable removal (motor cable side)
The motor cable and encoder cable will both be
removed.
Removethefourlength6M3hexboltsfromthe
connector connection on the outside of the θ-axis
motorcover,andpullthecablestowardtheoutside
of the cover.
2
Ifreplacingthecablesinsidethecover,alsoreplace
both of the connector O-rings.
Pull toward outside of cover.
Step 6
Cable removal (encoder cable side)
O-ring (encoder cable side)
Pull toward outside of cover.
2-15
Attaching, detaching and replacing the cover
O-ring (motor cable side)
7
Disconnect the motor cable and
encoder cable from the θ-axis motor
(when replacing the motor, speed
reduction gear).
Step 7
Motor side motor cable, encoder cable removal
Encoder cable
2
Motor cable
Attaching, detaching and replacing the cover
1.2.2
θ-axis motor cover attachment
Attach the cover using the opposite of the procedure used for removal.
CAUTION
Whenattachingtheθ-axismotorcover,firstdisconnectthe
cable from the outside of the motor cover and then remove
themoveablebasefromtheα,βandγ-axisshaftsbefore
proceeding. There is a risk of bodily injury if the cable is
damaged or a robot malfunction occurs inside the robot
movement range.
1
Step 1
Motor side motor cable, encoder cable connection
Encoder cable
Connect the motor cable and encoder
cable to the θ-axis motor (when
replacing the motor, speed reduction
gear).
Motor cable
When attaching the θ-axismotorcover,securethe
cables with cable ties to prevent them from moving.
2
Connect the cable (motor side) on the
inside of the θ-axis motor cover.
Attach the cable connector so that it is facing the
outside of the cover.
Ensurethatthemarkontheconnectorisfacing
upward.
Ifreplacingthecableontheinsideofthecover,fit
an O-ring to the connector.
Step 2
Cable connection (motor cable side)
O-ring (motor cable side)
Secure the connector connection on the outside of the
θ-axismotorcoverwiththefourlength6M3hex
bolts.
•Tighteningtorque:2Nm
CAUTION
Ifreplacingcablesontheinsideofthecover,itwillnotbe
possibletoguaranteewaterproofingpropertiesifthe
connectorO-ringsarenotfitted,andthereforecautionis
advised.
2-16
Pull toward outside of cover.
Mark
3
Connect the cable at the encoder side
in the same manner as that described
in Step 2.
Step 3
Cable connection (encoder cable side)
O-ring (encoder cable side)
Attachthecableconnectorsothatthemark(groove)
is facing upward.
CAUTION
Ifreplacingcablesontheinsideofthecover,itwillnotbe
possibletoguaranteewaterproofingpropertiesifthe
connectorO-ringsarenotfitted,andthereforecautionis
advised.
Attach connector to outside of cover.
Mark (groove)
Motor cable
connector
Encoder cable
connector
2-17
Attaching, detaching and replacing the cover
•Tighteningtorque:2Nm
2
4
Connect the cable connectors to the
inside of the cover.
Cable routing inside motor cover
Step 4-6
Connect both the motor cable connector and encoder
cable connector.
5
Attach the two earth bolts.
Encoder cable
connector
Motor cable
connector
WARNING
FAILURETOATTACHTHEEARTHBOLTSMAY
RESULTINELECTRICSHOCK.
2
6
Cable tie
Replace the θ-axis motor cover.
Earth bolt
Attaching, detaching and replacing the cover
CAUTION
• Routethecablesontheinsideoftheθ-axismotorcover
so that they do not contact the O-rings. Prolonged contact
withtheO-ringsmaycausethemtoshift,leadingtoa
possiblelossofwaterproofingproperties.
• Donotbendthecablesexcessively,orapplyexcessive
forcewhenreplacingtheθ-axismotorcover.Failureto
observe this may result in cable damage.
7
O-ring
Secure the θ-axis motor cover to the
moveable base.
Attach the washers to the θ-axismotorcover,fitthe
M4hexboltstothewashers,andthentightenwitha
spanner.
Step 7
M4 hex bolt
2-18
Washer attachment
Chapter 3 Periodic inspection
Contents
1.
Overview
3-1
2.
Daily inspection
3-2
3.
Monthly inspection
3-3
4.
Six-month inspection
3-4
1.
Overview
Daily and periodic inspection of the OMRON robot is essential in order to ensure safe and efficient operation. This
chapter describes the periodic inspection items and procedures for the R6Y3 robots.
periodicinspectionincludes:
• Dailyinspection
•Monthlyinspection
•6-monthinspection
Makesurethatyouthoroughlyunderstanddetailsoftheinspectionandfollowtheproceduresandprecautionsexplained
in this chapter.
WARNING
• WHENINSpECTIONISREqUIREDINSIDETHESAFETYENCLOSURE,ALWAYSTURNOFFTHECONTROLLERAND ALSOTHEExTERNALSWITCHBOARD.
• IFTHEINSpECTIONORMAINTENANCEpROCEDURECALLSFOROpERATIONOFTHEROBOT,STAYOUTSIDETHE
SAFETYENCLOSURE.
• pLACEASIgNINDICATINgTHEROBOTISBEINgINSpECTED,TOKEEpOTHERSFROMOpERATINgTHE CONTROLLERSWITCHOROpERATIONpANEL.
• IFCHECKINgOpERATIONFOLLOWINgINSpECTION,REFERTOTHECONTROLLERUSER’SMANUAL.
CAUTION
Useonlythelubricantsspecifiedbyyourdistributors.
3-1
Periodic inspection
WARNING
SpECIALIzEDTECHNICALKNOWLEDgEANDSKILLSAREREqUIREDWHENARMS,SHAFTSANDTHEθ-AxIS
ASSEMBLYAREDETACHEDTOADJUSTORMAINTAIN.OpERATIONSpERFORMEDBYWORKERSWHODONOT
pOSSESSTHESESpECIALKNOWLEDgEANDSKILLSMAYLEADTODANgER.THISWORKMUSTBECARRIEDOUT
BYREFERENCINgTHISMANUALBYSUFFICIENTLYSKILLEDANDqUALIFIEDpERSONNELINACCORDANCEWITH
THELAWSANDREgULATIONSOFEACHCOUNTRY.
3
2.
Daily inspection
The following is an inspection list that must be performed every day before and after operating the robot.
■ Inspection to be performed with the controller turned off
Be sure to inspect with controller power off.
3
1
Place a sign indicating the robot is being adjusted.
2
Perform the daily inspection.
placeasignindicatingtherobotisbeinginspected,tokeepothersfromoperatingthecontrollerswitch.
Enterthesafetyenclosureandcheckthefollowingpoints.
Checkpoint
Procedure
Periodic inspection
Robot cable
Usercableandwiring
Checkforscratches,dentsandexcessivebendandkinks.(Iftherobotcableisdamaged,
contactyourdistributor.)
Regulator,joints,airtube,
solenoidvalve,aircylinder
• Checkairpressure.
• Checkforairleaks.
• Checkdrain.
• Checkairfilterforcloggingordamage.
Robotexterior
Checkfordamage.(Ifadamageisfound,contactyourdistributor.)
plasticbearing(linkballslidingsurface)
• Checkfordeformation,dents.
• Checkthatwearis0.5mmorless.
plasticbearing(springmechanismplate
slidingsurface)
Checkfordeformation,breakage.(Checkforcracks.)
Shaft
Check for deformation.
Spring cover
Checkfordamage.(Checkforguideclipbreakage.)
Insidespringcover(spring,plate,etc.)
• Checkfordeformation.
• Checkthespringtoseeifitisoverstretched.
• Check for M3 screw looseness.
θ-axisassemblyseal
Check for any grease leaking from the coupling.
■ Adjustment and parts replacement
CAUTION
• Ifadjustmentorreplacementisdeemednecessaryfollowinginspection,turnoffthecontrollerpowerbeforeenteringthesafety
enclosuretocarryoutwork.Ifcheckingoperationafterworkiscomplete,dosoinaccordancewith“■ Inspection with the controller
turned off” described above.
• Ifrobotrepairorpartreplacementisdeemednecessary,contactyourdistributor.Suchrepairandpartreplacementrequires
specializedtechnicalknowledge,andmustnotbecarriedoutbytheuser.
3-2
3.
Monthly inspection
This inspection is carried out once a month.
payattentiontothefollowingifapplyinggreasetotheθ-axisassembly.
WARNING
pRECAUTIONSWHENHANDLINggREASE:
• INFLAMMATIONMAYOCCURIFTHISgETSINTHEEYES.BEFOREHANDLINgTHEgREASE,WEARYOURSAFETY
gOggLESTOENSURETHEgREASEWILLNOTCOMEINCONTACTWITHTHEEYES.
• USEFOODgREASE(CASSIDAgREASE,EpS2)WHENUSINgTHEROBOTATFOODpLANTS.
• INFLAMMATIONMAYOCCURIFTHEgREASECOMESINTOCONTACTWITHSKIN.BESURETOWEAR pROTECTIvEgLOvESTOpREvENTCONTACTWITHSKIN.
• DONOTTAKEORALLYOREAT.(EATINgWILLCAUSEDIARRHEAANDvOMITINg.)
• KEEpOUTOFTHEREACHOFCHILDREN.
• DONOTHEATTHEgREASEORpLACENEARANOpENFLAMESINCETHISCOULDLEADTOSpARKSANDFIRES.
DISpOSINgOFgREASEANDTHECONTAINER:
• pROpERDISpOSALISCOMpULSORYUNDERFEDERAL,STATEANDLOCALREgULATIONS.TAKEAppROpRIATE
MEASURESINCOMpLIANCEWITHLEgALREgULATIONS.
■ Inspection to be performed with the controller turned off
Be sure to perform the inspection with controller power off.
1
Place a sign indicating the robot is being adjusted.
2
Perform the daily inspection.
placeasignshowingthattherobotisbeinginspected,tokeepothersfromoperatingthecontrollerswitch.
Enterthesafetyenclosureandcheckthefollowingpoints.
Checkpoint
θ-axisassemblyseal
Procedure
Checkfordeformation,damage.
Istheresufficientgrease?Ifnot,lightlyapplysomegrease.
3-3
Periodic inspection
EMERgENCYTREATMENT:
• IFTHISgREASEgETSINTHEEYES,WASHLIBERALLYWITHpUREWATERFORABOUT15MINUTESAND
CONSULTApHYSICIANFORTREATMENT.
• IFTHISgREASECOMESINCONTACTWITHTHESKIN,WASHAWAYCOMpLETELYWITHSOApANDWATER.
• IFTAKENINTERNALLY,DONOTINDUCEvOMITINgBUTpROMpTLYCONSULTApHYSICIANFORTREATMENT.
3
4.
Six-month inspection
Take the following precautions when performing 6-month inspection.
■ Inspection to be performed with the controller turned off
Be sure to perform the inspection with controller power off.
3
1
Place a sign indicating the robot is being adjusted.
2
Perform the daily inspection.
placeasignshowingthattherobotisbeinginspected,tokeepothersfromoperatingthecontrollerswitch.
Enterthesafetyenclosureandcheckthefollowingpoints.
Checkpoint
Procedure
Periodic inspection
Arm
Checkfordeformation,damage.
link ball
Check for damage.
Major robot body bolts and screws
(Thoseexposedonoutside)
Checkforloosenessandtightenifnecessary.(SeetheTablebelow.)
Bolt tightening torque
Bolt size
Tightening torque (kgfcm)
Tightening torque (Nm)
M3 set screw
20
2
M3
20
2
M4
46
4.5
M44-axisspecificationα-axisarmcableclamp
20
2
M6
156
15.3
M8
380
37
M10
540
53
M12
1310
128
■ Adjustment and parts replacement
CAUTION
• Ifadjustmentorreplacementisdeemednecessaryfollowinginspection,turnoffthecontrollerpowerbeforeenteringthesafety
enclosuretocarryoutwork.Ifcheckingoperationafterworkiscomplete,dosoinaccordancewith“■ Inspection with the controller
turned off” described above.
• Ifrobotrepairorpartreplacementisdeemednecessary,contactyourdistributor.Suchrepairandpartreplacementrequires
specializedtechnicalknowledge,andmustnotbecarriedoutbytheuser.
3-4
Chapter 4 Adjusting the origin
Contents
1.
Adjusting the origin
4-1
1.1
Adjusting the α, β and γ-axis origin position
4-2
1.2
Adjusting the θ-axis origin position (4-axes specification only)
4-5
1.
Adjusting the origin
TheR6Y3usesacalibrationtooltomechanicallyadjusttheoriginpositionoftheα,β,γandθ-axes.Besuretoadjust
theoriginpositioninthefollowingcases:
1. If the origin position is lost after disconnecting the robot cable connecting the controller with robot
2.Iftheoriginpositionislostafterdisconnectingtheθ-axiscablesfromtheθ-axismotorcoverconnectorsandcontrollerside
robot cable connector
3.Ifthemotorisreplaced(samereasonasabove)
4.Ifanyoftheaxisarmsareremoved
CAUTION
• Ifanyoftheabovesituationsoccurafterpurchasingtherobot,itisnecessarytoadjusttheoriginposition(s)usingthecalibration tool.(Therobotoriginpositionsareadjustedatthefactory.)
• Alwaysusethecalibrationtooltoperformoriginpositionadjustment.Ifadjustedwithoutusingthecalibrationtool,thepositionwill
shift,resultinginabnormalrobotoperation,leadingtorobotdamageandpossiblebodilyinjury.
This manual describes the origin position adjustment method using the calibration tool.
Part Name
1
OMRON Part No.
Part No. / Specs
Q'ty
Adjusting the origin
1. Replacement parts
Remarks
KDL-M1501-YYY
1
Forα,βandγ-axes
KDL-M1176-00x
1
Forθ-axis
Origin position jig
2
3
θ-axisoriginpositionjig
securing bolt
91312-05008
M5,length8
4
2
4-1
1.1
Adjusting the α, β and γ-axis origin position
Theα,βandγ-axisoriginpositionsareshownintheFig.below.
Adjusteachaxistoitsrespectiveoriginpositionsusingthecalibrationjig.
α, β, γ-axis origin positions
155
0°
12
12
0°
Do not attach
tubing to θ-axis
cable.
4
(1067)
45
22
(673)
799
120
25
Adjusting the origin
Eyebolts (3 locations)
(46)
Detailed drawing of
installation surface
A
45°
30°
Rc1/8
65
49
View A
4-2
4-M5×0.8 depth 8
20 depth 3
.31.5
.D
P.C
15.75±0.02
45°
Joint 6
42
5H7 +0.012
depth 10
0
Calibration tool (α, β, γ-axes)
1
Post a sign indicating that the robot
is being adjusted.
4
Post a sign indicating that the robot is being adjusted
to prevent others from turning on the controller
power.
Enter the safety enclosure.
Secure the calibration tool to the
base.
Secure the end of the calibration tool to the jig
attachmentholesonthebasewiththeM12hex
socket head bolts provided.
ThearmismovedatStep5,andifithitsthe
calibrationtoolatthattime,temporarilysecurethe
tool,movethearmtoapositionabovethetoolat
Step5,applythebrake,securethetool,andthen
perform Steps 4 and 5.
4
Step 3
Securing the calibration tool
M12 hex socket head bolt
Calibration tool
Release the motor brake for α-axis .
CAUTION
Whenperformingoriginpositionadjustment,releasethe
brakeoneaxisatatime.Neverreleasethebrakeforallthree
axesatthesametime.
Doingsowillresultinadropinoriginpositionaccuracy,
leading to malfunctions.
4-3
Adjusting the origin
2
3
5
Move the arm slowly until the link
ball on the end of the arm contacts
the top of the calibration tool.
6
7
Apply the motor brake for α-axis .
Step 5
Position link ball against tool.
Calibration tool
Remove the calibration tool from the
base.
BylooseningtheM12hexsocketheadboltonthe
endofthecalibrationtool,thetoolcomesawayfrom
the arm link ball. Confirm this and then remove the
calibration tool.
8
Perform the procedure in Steps 3 to 7
for the γ and β-axes also.
Calibration tool
4
Link ball
Adjusting the origin
4-4
1.2
Adjusting the θ-axis origin position (4-axes specification only)
Theθ-axisoriginpositionreferenceisthepositioninwhichthetoolflangedowelholeisfacingtheα-axis.
Theaxisisadjustedtothereferencepositionwhenshippedfromthefactory,however,thepositionmayshiftslightly.
Wheninstallingtherobotforthefirsttime,itisnecessarytousethecalibrationtooltoadjusttheoriginposition.
CAUTION
Thetoolflangeisfixedon3-axesrobots,andthereforeitisonlynecessarytoattachthemoveablebaseinthecorrectdirection.
Referto"1.1Attachingtheshafts,moveablebase,andspringcovers"inChapter5fordetailsonattachingthemoveablebase.
Withthe4-axesrobot,itisnecessarytoadjusttheθ-axisoriginpositioninadditiontoattachingthemoveablebaseinthecorrect
direction.
Theθ-axisoriginpositionshouldgenerallyneverbechanged.Ifchanged,theaxismaynolongermoveintherightdirection.
1
Post a sign indicating that the robot is being adjusted.
2
3
Enter the safety enclosure.
Post a sign indicating that the robot is being adjusted to prevent others from turning on the controller power.
4
Secure the calibration tool.
The θ-axisoriginpositionisthepositioninwhichthetoolflangedowelholeisfacingtheα-axis.
Adjusting the origin
θ-axis origin position
Tool flange
Dowel hole
α-axis
4
Align the θ-axis calibration tool pin with the tool flange dowel hole.
4-5
5
Secure at the two tool flange M5 holes.
Securing the calibration tool
Dowel hole
Secure at these two points.
Knock-pin
θ-axis calibration tool
4
Adjusting the origin
θ-axis calibration tool
4-6
Chapter 5 Shaft, moveable base and spring cover
replacement
Contents
1.
Shaft, moveable base and spring cover replacement procedure
5-1
1.1
Detaching the shafts, moveable base and spring cover
5-1
1.2
Attaching the shafts, moveable base and spring covers
5-4
1.2.1
1.2.2
R6Y30110S03067NJ5(3-axesspecification)
R6Y31110L03067NJ5,R6Y31110H03067NJ5(4-axesspecification)
5-4
5-6
2.
Moveable base link ball replacement
5-9
1.
Shaft, moveable base and spring cover replacement procedure
1. Replacement parts
Part Name
1
OMRON Part No.
Part No. / Specs
Q'ty
Remarks
KDL-M1542-00x
2
Uppersidecover(*1)
KDL-M1543-00x
2
Lowersidecover(*1)
6
α,βandγ-axes
(3-axesspecification)
4
βandγ-axes(4-axesspecification)
Spring cover
2
3
KDL-M150A-00x
4
Shaft
5
KDL-M150E-00x
1
α-axismotorcableside
(4-axesspecification)
6
KDL-M150F-00x
1
α-axisencodercableside
(4-axesspecification)
KDL-M1562-00x
4
Shaftfillerplug(*1)
7
Cap
*1:quantityperaxis
1.1
5
Detaching the shafts, moveable base and spring cover
WiththeR6Y31110L03067NJ5andR6Y31110H03067NJ5(4-axesspecification)robots,thecableprotrudesfromthe
α-axisshaft.Shaft,moveablebase,andspringcoverdetachmentisthesameasthatforthe3-axesspecificationrobot.
1
Post a sign indicating that the robot
is being adjusted.
Post a sign indicating that the robot is being adjusted
to prevent others from turning on the controller
power.
2
Enter the safety enclosure.
5-1
Shaft, moveable base and spring cover replacement
CAUTION
Itisnecessarytoenterthesafetyenclosureinordertodetachorattachtheshafts,moveablebase,orspringcovers,andthereforethe
controller power must be turned off beforehand.
3
Remove the spring covers.
Thereareatotalofsixspringcovers:oneatthearm,
and one at the moveable base for each of the three
axes.
Thereisatopspringcoverandbottomspringcover,
with the top cover being wider.
The spring covers are held together with clips on the
inside.
Pull the bottom cover down at the arm side and pull
the top cover up at the moveable base side to remove
the spring cover.
Step 3
Spring cover removal
Spring cover attachment location
CAUTION
Usebothhandswhenremovingthespringcovers.Useone
hand for removal and the other to stop the bottom cover
falling.
Ifthespringcoverfallsandisdamaged,therobotmay
operate abnormally.
4
5
5
Top cover
Clip
Remove the end effector.
Refer to “6. Attaching the end effector” in Chapter 2
of the installation manual for details.
Bottom cover
Disconnect the air tube from the joint
on the user tubing.
Shaft, moveable base and spring cover replacement
CAUTION
Do not carry out replacement work with the air tube still
attached to the joint on the user tubing.
Bydoingso,theairtubemaybend.
6
Arm side
Ensure that the θ-axis cable can be
disconnected from the α-axis arm.
(R6Y31110L03067NJ5,
R6Y31110H03067NJ5 only)
The cable is secured at three locations on the α-axis
arm.Removethecableties,andthenremovethe
plastic block holding the cable in place.
Base side
CAUTION
Do not pull the cable too hard when removing. If pulled too
hard,thecablemaybedamaged,resultinginpossiblerobot
malfunction.
Step 6
Arm side cable
Tie band
Plastic block
5-2
7
Disconnect the cable at the moveable
base side from the motor cover.
(R6Y31110L03067NJ5,
R6Y31110H03067NJ5 only)
Step 7
Cable removal at moveable base side
The cable is disconnected by rotating the connector
as shown with the arrow on the cable side connector
and then disconnecting it from the motor cover.
8
Remove the shafts.
Remove the shafts from the arm and moveable base
link balls.
Whendoingso,thelinkballscanbestretchedby
hand at the end of the shaft as shown in the Fig. on
the right.
Whenremovingtheshaftsfromthemoveablebase,
disconnect the θ-axisrobotcablefromthemotor
beforehand.
5
Step 8
Shaft removal
Link ball
5-3
Shaft, moveable base and spring cover replacement
CAUTION
• Removethespringcoversbeforeremovingtheshafts.
The spring covers may be damaged if work is carried out
without removing them.
• Takecarenottopullthespringsontheshaftstoomuch.If
stretchedtoofar,thespringsmaynotreturntotheir
originalshape,possiblyleadingtoabnormalrobot
movement.
• WiththeR6Y31110L03067NJ5andR6Y31110H03067NJ5,
acableisattachedtotheα-axisshaft.Iftheα-axisshaftis
removed from the moveable base without disconnecting
theθ-axiscablefromthemotor,thecablewillbepulled
andpossiblydamaged,leadingtopotentialdefects.
Furthermore,careshouldbetakennottodropthe
moveable base.
1.2
Attaching the shafts, moveable base and spring covers
CAUTION
Itisnecessarytoenterthesafetyenclosureinordertodetachorattachtheshafts,moveablebase,orspringcovers,andthereforethe
controller power must be turned off beforehand.
1.2.1
R6Y30110S03067NJ5 (3-axes specification)
Thereplacementprocedurefortheshafts,moveablebase,andspringcoversisthesameasthatfortheα,βandγ-axes.
1
Post a sign indicating that the robot
is being adjusted.
Post a sign indicating that the robot is being adjusted
to prevent others from turning on the controller
power.
2
3
5
Step 3
Shaft attachment
Enter the safety enclosure.
Depression
Attach the shafts.
Attach the shafts while ensuring to hook the shaft
plastic bearings onto the arm and moveable base link
balls. The link balls can be stretched by hand at the
end of the shaft as shown in the Fig.
The depression on the shafts for spring cover
attachment should face upward.
The moveable base attachment direction is as shown in
the Fig. Refer to "1.2 Adjusting the θ-axisorigin
position" in Chapter 4 for details.
Shaft, moveable base and spring cover replacement
CAUTION
By attaching the shafts with hands placed anywhere other
thantheshaftend,thejointbetweentheshaftandshaftend
maydeform,possiblyleadingtomalfunction.Ensureto
place hands on the end of the shaft as shown in the Fig. on
the right.
Take care not to pull the springs on the shafts too much.
Ifstretchedtoofar,thespringsmaynotreturntotheir
originalshape,possiblyleadingtomalfunction.
Link ball
Moveable base side
Arm side
Link ball
α-axis
5-4
4
Attach the spring covers.
Thereareatotalofsixspringcovers:oneatthearm,
and one at the moveable base for each of the three
axes.
The top and bottom positions of the spring covers are
fixed.
IftheshaftdirectioniscorrectatStep3,thecover
attached at the top will be wide as shown in the Fig.
The spring covers come as a top and bottom set when
shipped. Attach the covers so that they snap together
at the guide clips.
Step 4
Spring cover attachment
Spring cover attachment location
5
The top of the spring cover widens.
Clip
Spring cover bottom
5-5
Shaft, moveable base and spring cover replacement
Spring cover top
1.2.2
R6Y31110L03067NJ5, R6Y31110H03067NJ5 (4-axes specification)
WiththeR6Y31110L03067NJ5andR6Y31110H03067NJ5(4-axesspecification)robots,thecableprotrudesfromthe
α-axisshaft.
Shaft,moveablebase,andspringcoverattachmentisthesameasthatforthe3-axesspecificationrobot.
1
Post a sign indicating that the robot
is being adjusted.
Step 3
Shaft attachment
Post a sign indicating that the robot is being adjusted
to prevent others from turning on the controller
power.
2
3
5
Depression
Enter the safety enclosure.
Attach the shafts.
Attach the shafts while ensuring to hook the shaft
plastic bearings onto the arm and moveable base link
balls. The link balls can be stretched by hand at the
end of the shaft as shown in the Fig.
The depression on the shafts for spring cover
attachment should face upward.
The moveable base attachment direction is as shown in
the Fig. Refer to "1.2 Adjusting the θ-axisorigin
position" in Chapter 4 for details.
CAUTION
By attaching the shafts with hands placed anywhere other
thantheshaftend,thejointbetweentheshaftandshaftend
Shaft, moveable base and spring cover replacement
maydeform,possiblyleadingtomalfunction.Ensureto
place hands on the end of the shaft as shown in the Fig. on
the right.
Take care not to pull the springs on the shafts too much.
Ifstretchedtoofar,thespringsmaynotreturntotheir
originalshape,possiblyleadingtomalfunction.
Link ball
Moveable base side
Arm side
Link ball
α-axis
5-6
4
5
Attach the spring covers.
Thereareatotalofsixspringcovers:oneatthearm,
and one at the moveable base for each of the three
axes.
The top and bottom positions of the spring covers are
fixed.
IftheshaftdirectioniscorrectatStep3,thecover
attached at the top will be wide as shown in the Fig.
below.
The spring covers come as a top and bottom set when
shipped. Attach the covers so that they snap together
at the guide clips.
Step 4
Spring cover attachment
Spring cover attachment location
Route the arm side cable and insert it
into the plastic block on the arm.
Route the cables along the α-axisarmtotherobot
base while trying not to bend them too much.
5
The top of the spring cover widens.
Clip
Spring cover bottom
Step 5
Cable routing at arm side
5-7
Shaft, moveable base and spring cover replacement
Spring cover top
6
Secure the attached cable with the
plastic block.
Step 6
Securing the cables
Thereareatotalofthreesecuringlocations.Usetwo
tiebandsforeachlocation,andsecurethecables
with the plastic block as shown.
CAUTION
Be careful not to pull the cables too much. If pulled too
much,thecablesmaybedamaged,resultinginpossible
robot malfunction.
7
Plastic block
Attach the cable at the moveable base
side to the motor cover.
Ensurethatthemoveablebaseandα-axisshaft
attachment directions are correct.
Align the arrow on the cable connector with the
connector mark on the motor cover and attach.
Attach both the motor cable and encoder cable to
their respective connectors.
Tie band
5
Shaft, moveable base and spring cover replacement
Step 7
5-8
Cable attachment at moveable base side
2.
Moveable base link ball replacement
The link ball attachment method is described below.
Remove the link balls using the opposite of the method used for attachment.
1. Replacement parts
Part Name
1
1
link ball
OMRON Part No.
Part No. / Specs
KDL-M152A-00x
Q'ty
6
Remarks
Moveable base part
Apply a thin layer of Loctite screw
lock to the link ball screw.
UseHenkelLoctite241(blue).
2
Attach a link ball at six locations on
the moveable base.
3
Tighten the link balls with a tool.
Step 2
Link ball attachment
•Tighteningtorque:20Nm
5
Tightening
5-9
Shaft, moveable base and spring cover replacement
Step 3
Chapter 6 Spring mechanism replacement
Contents
1.
Spring mechanism replacement procedure
6-1
1.1
Spring mechanism removal
6-1
1.2
Spring mechanism attachment
6-2
1.
Spring mechanism replacement procedure
1. Replacement parts
Part Name
OMRON Part No.
Part No. / Specs
Q'ty *1
1
Plate
KDL-M1534-00x
8
2
Spring
KDL-M152M-00x
4
3
Plastic block
KDL-M153A-00x
4
4
Screw
98980-03006
M3,length6
Remarks
8
*1:quantityperaxis
1.1
1
Spring mechanism removal
Remove the shaft from the arm and
moveable base.
Step 1
Shaft removed from arm and moveable base
Referto“Shaft,moveablebase,andspringcover
replacement” in Chapter 5 for details.
2
Remove the M3 screws at four
locations.
Byremovingthescrews,thesprings,plateassembly,
and plastic blocks come free of the shaft.
6
Screw
3
Remove the springs.
4
Remove the press-fit plastic bearings.
Perform this procedure only when replacing springs.
Step 2
Spring mechanism replacement
Perform this procedure only when replacing plastic
bearings.
Refer to “Plastic bearing replacement” in Chapter 7
for details.
Screw removal
Plastic bearings
6-1
1.2
1
Spring mechanism attachment
Press fit the plastic bearings into the
plate.
Step 1
Refer to “Plastic bearing replacement” in Chapter 7
for details.
Plastic bearing, plate
Plastic bearing
Plate
CAUTION
Pay attention to the attachment direction. It will not be
possible to attach the shaft if the plate and plastic bearing
directions are not as shown on the right.
2
3
Attach the spring.
Ensurethattheplatesarebilaterallysymmetrical.
Fortwoshafts,twooftheassembliesshownonthe
rightarerequiredatthearmside,andtwoassemblies
are required at the moveable base side.
Step 2
Secure the plastic blocks with M3
screws.
Asshownontheright,presstheprotrudingpartof
the plastic block against the protruding part of the
plate,andthensecurewiththescrews.
Attach the plate to the other plastic block attachment
surface on the other side after attaching to the shaft.
6
Spring attachment
Spring
CAUTION
Forceisappliedtotheplasticwhentightening,andtherefore
care should be taken to avoid over tightening.
Step 3
Spring mechanism replacement
6-2
Securing the plastic blocks
4
Attach the plate and plastic block
assembly to the shaft.
Step 4
Insert the plastic bearing attached to the plate so that
it catches on the shaft pin.
Assembly attachment locations
Pin
NOTE
The assembly is attached at both the arm side and moveable
baseside;however,theplasticblockdirectionshouldbethe
same for both.
5
Attach the other plate and spring
assembly (assembly without plastic
block) to the shaft.
6
Secure the plastic block with the M3
screws as described in Step 3.
Attach the plate and plastic
block assembly to one side
of the shaft beforehand.
Step 5
Plate and spring assembly attachment
Attach so that the plate and plastic block are level.
7
Attach the plate and plastic block
assembly on the opposite of the side
already attached using the same
procedure described in Steps 3 to 6.
Ensure that the plate and plastic
block are level.
6
Spring mechanism replacement
6-3
Chapter 7 Plastic bearing replacement
Contents
1.
Plastic bearing replacement procedure
7-1
1.1
Removing the plastic bearing from the link ball sliding part
7-1
1.2
Attach the jig with threaded screw to the tapping hole on the end of the shaft
7-2
1.3
Spring mechanism plate plastic bearing removal
7-4
1.4
Spring mechanism plate plastic bearing attachment
7-4
2.
Plastic bearing inspection
7-5
1.
Plastic bearing replacement procedure
CAUTION
Plastic bearings are consumable parts and should therefore be replaced periodically.
1. Replacement parts
Part Name
OMRON Part No.
Part No. / Specs
Q'ty
Remarks
1
Plastic bearing 1
KDL-M152K-00x
24
Spring mechanism
2
Plastic bearing 2
KDL-M152J-00x
12
Replace if wear 0.5mm or greater.
1.1
Removing the plastic bearing from the link ball sliding part
plasticbearingreplacementguideline:whenamountofwearreaches0.5mm
Whenreplacingplasticbearings,besuretocheckandtakeanoteofthebearingdepth,andperiodicallymeasurethe
amount of wear.
1
Remove the cap from the end of the
shaft.
Step 1
Cap removal
The tapping hole becomes visible when the cap is
removed.
2
Cap
Insert an M6 bolt in the tapping hole
on the end of the shaft.
The tapping hole is located on the opposite side to
that with the plastic bearing.
3
7
Push in the plastic bearing while
tightening the M6 bolt with a hex
wrench.
Step 2-3
Bolt attachment
Bolt
7-1
Plastic bearing replacement
Bypushinginwhiletightening,theplasticbearingis
pushed in and comes off.
1.2
1
Attach the jig with threaded screw to the tapping hole on the end of the shaft
Attach plastic bearing attachment jig
1.
Attach the jig with thread to the tapping hole on the
end of the shaft.
2
Step 1
Plastic bearing attachment jig 1 attachment
Plastic bearing attachment jig 1
While pressing the protruding part on
the plastic bearing attachment jig 2
against the groove on plastic bearing,
press into the plastic bearing
attachment surface on the shaft side.
Press the bearing attachment jig 2 horizontally
against the attachment surface as shown on the right
so as not to incline the plastic bearing.
Step 2
Plastic bearing attachment jig 2 attachment
Plastic bearing attachment jig 2
7
Plastic bearing replacement
Plastic bearing
7-2
3
Press in the plastic bearing with tool
capable of gripping such as a pair of
water pump pliers.
4
Remove plastic bearing attachment
jig 1 from the shaft, and then attach
the cap.
Step 3
Press in the plastic bearing.
Insert in the plastic bearing
After being pressed in (when attachment complete)
Step 4
Plastic bearing attachment condition
and cap attachment
7
Plastic bearing replacement
Cap
7-3
1.3
1
Spring mechanism plate plastic bearing removal
Push the plate down from above with
the protruding part of the plastic
bearing facing down.
Theplasticbearingwillpopup,allowingittobe
removed. If it still cannot be removed even after
poppingup,useaflatscrewdriverorsimilartoolto
remove it.
Step 1
Plastic bearing removal
Plastic bearing
CAUTION
Thebearingispressfitwhenattached,andshouldtherefore
be removed using a tool.
1.4
1
Spring mechanism plate plastic bearing attachment
Pay attention to the plastic bearing
attachment direction and attach by
press fitting.
Attach with the plastic bearing and plate facing in the
directions shown on the right.
CAUTION
It will not be possible to attach the spring cover if the
directionisincorrect,resultinginpossiblerobotmalfunction.
7
Plastic bearing replacement
7-4
Plate
Step 1
Plastic bearing attachment
2.
Plastic bearing inspection
Measure the width of the gap between the two shaft joints with calipers and so on.
Thismeasurementincludesthewidthoftwoplasticbearings,andthereforetheamountofwearforoneplasticbearing
will be half of the measured value.
(Example)Iftheinitialmeasurementvalueis149.50mmandthisvaluehasreached149.42mmwhencarryingout
periodmeasurement,theamountofwearperbearingwillbe0.04mm.
plasticbearingreplacementguideline:whenamountofwearreaches0.5mm
Whenreplacingplasticbearings,besuretocheckandtakeanoteofthemeasurementresult,andperiodicallymeasure
the amount of wear.
Measurement method
7
Plastic bearing replacement
■ Plastic bearing wear debris precautions
• Weardebrisremovalisnecessarywhencleaninginfood-relatedindustries.
• Weardebrisremovalinindustrialapplicationsshouldbecarriedoutasrequired.
7-5
Chapter 8 θ-axis seal, O-ring replacement
Contents
1.
θ-axis seal, O-ring replacement procedure
8-1
1.1
θ-axis seal, O-ring removal
8-1
1.2
θ-axis seal, O-ring attachment
8-3
1.
θ-axis seal, O-ring replacement procedure
8
1. Replacement parts
Part Name
OMRON Part No.
Part No. / Specs
Q'ty
Remarks
Seal(small)
KDL-M219K-00x
1
Insideθ-axishousing,
small side
2
Seal(large)
KDL-M219K-10x
1
Insideθ-axishousing,
large side
3
O-ring
KN5-M2144-00x
1
Housingside
4
O-ring
KN6-M1895-00x
1
θ-axismotorcoverside
5
Housing
KDL-M1811-00x
1
6
Housingsecuringbolt
91380-04020
7
Tool flange
M4,length20
6
KDL-M1843-00x
1
KDL-M1844-00x
1
8
Tool flange securing bolt
91380-04012
9
Tool flange cover
KDL-M1816-00x
M4,length12
θ-axis seal, O-ring replacement
1
2
1
Rubber cover
•θ-axissealrecommendedgrease:CASSIDAgreaseEpS2
1.1
θ-axis seal, O-ring removal
TheproceduredescribedbelowisfortheR6Y31110L03067NJ5andR6Y31110H03067NJ5(4-axesspecification).
1
Remove the θ-axis motor cover.
When removing the θ-axismotorcover,first
disconnect the θ-axiscableandthenremovethe
moveable base from the shafts before proceeding.
Refer to "1.2 Detaching or attaching the θ-axis
cover" in Chapter 2 for details.
2
Remove the O-ring from the groove in
the moveable base at the motor cover
side.
Step 2
O-ring removal
8-1
3
8
4
Remove the tool flange.
Step 3
Removetherubbercover,removetheM4hexsocket
headbolts,andthenremovethetoolflange.
Tool flange removal
Remove the six length 20 M4 hex
socket head bolts from the moveable
base.
θ-axis seal, O-ring replacement
These bolts secure the moveable base and housing.
5
Tool flange
Remove the housing from the
moveable base.
Rubber cover
The housing will still be attached to the moveable
base a little.
8-2
Step 4
M4 hex socket head bolt removal
Step 5
Housing removal
6
Remove the O-ring from the groove
on the moveable base at the housing
side.
7
Remove the two seals from the
housing.
Step 6
O-ring removal
8
Step 7
θ-axis seal, O-ring replacement
The seals can be easily removed by prizing them free
with a precision flat screw driver as shown on the
right.
Seal removal
Seal (large)
Seal (small)
1.2
θ-axis seal, O-ring attachment
Fit the seals using the opposite of the procedure used for removal.
1
2
Fit the two seals to the housing.
Step 1
Seal attachment
If unable to attach the seals properly as shown on the
right,attachbypressinginalittle,andensurethat
the seals are not twisted.
Seal (large)
Apply a thin layer of grease to the
sliding areas between the seal and
θ-axis shaft, and moveable base.
Apply a layer of grease so that the seal groove appears
slightly white.
Seal (small)
•Recommendedgrease:CASSIDAgreaseEpS2
Step 2
Grease application
Grease application
8-3
3
8
Apply a thin layer of the
recommended grease to the θ-axis
shaft and sliding part of the housing.
Step 3
Grease application
•Recommendedgrease:CASSIDAgreaseEpS2
4
Attach the O-ring to the groove in the
moveable base at the housing side.
θ-axis seal, O-ring replacement
Shaft and housing sliding part
Step 4
8-4
O-ring attachment
5
Attach the housing.
Push the housing until it is aligned with the underside
of the moveable base so that the air tube attachment
port is on the β-axisside.
Afterpushingin,tightenthesixlength20M4hex
socket head bolts.
Step 5
Housing attachment
8
•Tighteningtorque:2Nm
These surfaces should
be aligned.
8-5
θ-axis seal, O-ring replacement
CAUTION
Attach the housing with the housing side O-ring attached to
themoveablebasepart.Furthermore,ensurethatthehousing
is aligned with the underside of the moveable base.
Pickup will not be possible if the O-ring has not been
attached,orthehousinghasnotbeenattachedsufficiently.
8
6
Install the tool flange.
7
Attach the tool flange with the two
M4 hex socket head bolts.
Remove grease from the θ-axisshaft(toolflange
attachmentpart).
The tool flange is shaped so that it fits into the θ-axis
shaft groove.
Step 6-7
Tool flange installation
θ-axis seal, O-ring replacement
•Tighteningtorque:4.5Nm
CAUTION
TightenthetwoM4hexsocketheadboltsevenly.
Slippagemayoccurbetweentheθ-axisshaftandsealflange
if one bolt is tightened more than the other.
Degrease this part.
Shaft
Fit into shaft groove.
M4 hex socket head bolts,
length 12
Tool flange
8-6
8
Attach the rubber cover to the tool
flange.
9
Attach the O-ring to the groove in the
moveable base at the motor side.
10
Step 8
Rubber cover attachment
8
Attach the θ-axis motor cover.
Tool flange
Rubber cover
Step 9
O-ring attachment
8-7
θ-axis seal, O-ring replacement
Refer to "1.2 Detaching or attaching the θ-axis
cover" in Chapter 2 for details.
Chapter 9 Motor replacement
Contents
1.
α, β, γ-axis motor replacement
9-1
1.1
α, β, γ-axis motor replacement procedure
9-1
1.1.1
1.1.2
α,β,γ-axismotorremoval
α,β,γ-axismotorattachment
9-1
9-3
2.
2.1
θ-axis motor replacement
θ-axis motor removal
9-4
9-4
1.
α, β, γ-axis motor replacement
WARNING
IFREpLACINgAMOTORWITHSHAFTS,MOvEABLEBASE,ANDARMATTACHED,pLACEASUppORTUNDERTHE
MOvEABLEBASETOpREvENTITFALLINg.ANDIFREpLACINgAMOTORWITHONLYTHEARMATTACHED,pLACE
ASUppORTUNDERTHEARMORSTRApITUpWITHSOMESTRINgTOpREvENTITFALLINg.
9
1. Replacement parts
Part Name
OMRON Part No.
Q'ty *1
Part No. / Specs
Motor
R88M-K1K030T-BS2 *2
1000W,200v,withbrake
1
2
Motor securing bolt
91312-08020
M8,length20
4
3
O-ring
90200-03J850
1
Forα,βandγ-axes
Attached to speed reduction gear
groove.
*1:quantityperaxis
*2:Forinstallation,removethekey
1.1
α, β, γ-axis motor replacement procedure
1.1.1
α, β, γ-axis motor removal
NOTE
Thesameprocedureisusedtoreplacetheα,βandγ-axismotors.
1
Post a sign indicating that the robot
is being adjusted.
Post a sign indicating that the robot is being adjusted
to prevent others from turning on the controller
power.
2
3
4
Enter the safety enclosure.
Step 4
Cap bolt removal
Remove the motor cover.
Referto“1.Detaching,attaching,andreplacingthe
covers” in Chapter 2 for details.
Remove the speed reduction gear cap
bolt.
Cap bolt
If the set screw is not visible inside the hole when the
capboltisremoved,releasethemotorbrake,movethe
arm to a position at which the set screw becomes
visible,andthenadjust(ifthearmhasbeenremoved,
rotatethespeedreductiongeartoadjusttheposition.)
CAUTION
Ifremovingthemotorwiththearmstillattached,itwillfall
suddenlywhenthemotorbrakeisreleased,andmust
therefore be supported. And if removing the motor with the
shaftsandmoveablebasestillattached,themoveablebase
must be supported to prevent it dropping suddenly.
Hex socket head bolt
9-1
Motor replacement
1
Remarks
5
Loosen the M6 hex socket head bolt
connecting the speed reduction gear
and motor shaft.
6
Remove the four M8 hex socket head
bolts securing the motor to the speed
reduction gear.
Loosen the M6 hex socket head bolt.
Step 6
Hex socket head bolt removal
Step 7
Motor removal
Step 8
O-ring removal
Whenattaching,tightenwithatorqueof37Nm.
9
Motor replacement
Step 5
CAUTION
Take care to prevent the motor falling when the bolts are
removed.
7
Pull the motor from the speed
reduction gear to remove.
CAUTION
The motor is relatively heavy and should therefore be
supported with both hands when removing.
8
Attach the O-ring to the groove in the
speed reduction gear (when replacing
the O-ring).
O-ring
9-2
1.1.2
α, β, γ-axis motor attachment
Attach the motors using the opposite of the procedure used for removal.
Whendoingso,thefollowingadditionalproceduresarenecessary.
• Useawasteclothtoremoveanygreasefromthemotorshaftandspeedreductiongearattachmentsurfaces.
• Tomakeiteasiertosecurethemotorshafttothespeedreductiongear,rotatethespeedreductiongearbeforehandsothatthe
gearhexsocketheadboltisvisiblefromthecapattachmenthole.
• Whenattachingthemotor,fitanO-ringtothespeedreductiongear.
• Attachthemotorwiththeconnectorfacingtotheinside.
9
O-ring attachment
Motor replacement
O-ring
Motor attachment direction
9-3
2.
θ-axis motor replacement
1. Replacement parts
Part Name
9
1
2
OMRON Part No.
Part No. / Specs
Q'ty
Remarks
R88M-K05030T-S2 *1
50W,200v,withoutbrake
1
For R6Y31110l03067NJ5
R88M-K10030T-S2 *1
100W,200v,withoutbrake
1
ForR6Y31110H03067NJ5
91380-04014
M4,length14
2
CommontoR6Y31110L03067NJ5,
R6Y31110H03067NJ5
Motor
Motor securing bolt
Motor replacement
*1:Forinstallation,removethekey
2.1
θ-axis motor removal
Theprocedurerequiredtoreplacetheθ-axismotoronlyisdescribedbelow.Referto"2.3θ-axisspeedreductiongear
replacement" in Chapter 10 if removing the speed reduction gear also.
1
Remove the moveable base from the
shaft.
Refertothe"1.Shaft,moveablebase,andspring
cover replacement procedure" in Chapter 5 for
details.
2
Remove the θ-axis motor cover.
Refertothe"1.Shaft,moveablebase,andspring
cover replacement procedure" in Chapter 5 for
details.
3
Remove the two M4 hex socket head
bolts securing the motor to the speed
reduction gear.
4
Loosen the two speed reduction gear
set screws.
Step 3
M4 hex socket head bolt removal
Step 4
Set screw area
Remove the gasket and then loosen the set screws.
5
Remove the motor from the speed
reduction gear.
Attach the motor using the opposite of the procedure
used for removal.
Referto"2.3θ-axisspeedreductiongearreplacement"
in Chapter 10 for details.
Gasket
9-4
Chapter 10 Speed reduction gear, arm replacement
Contents
1.
Speed reduction gear replacement precautions
10-1
2.
Speed reduction gear and arm replacement procedure
10-2
2.1
α, β, γ-axis arm replacement
10-2
2.1.1
Work required after replacing arm link balls
10-3
2.2
α, β, γ-axis speed reduction gear replacement
10-4
2.3
θ-axis speed reduction gear replacement
10-7
1.
Speed reduction gear replacement precautions
Speed reduction gear replacement precautions are described below. Always read the following replacement procedures
and precautions before carrying out replacement work.
■ Speed reduction gear replacement precautions
WARNING
• THEMOTORANDSpEEDREDUCTIONgEARCASINgWILLBECOMEvERYHOTSHORTLYAFTEROpERATION,
RESULTINgINBURNSIFTOUCHED.BEFORETOUCHINgTHESEpARTS,TURNOFFTHECONTROLLER,WAITFORA
WHILE,ANDTHENCHECKTHATTHETEMpERATUREHASSUFFICIENTLYCOOLED.
EMERgENCYTREATMENT:
• IFgREASEORDETERgENTSpLATTERSANDgETSINTOTHEEYES,RINSEWITHCLEANWATERFOR15MINUTES ANDTHENCONSULTApHYSICIAN.
• IFTHISgREASECOMESINCONTACTWITHTHESKIN,WASHAWAYCOMpLETELYWITHSOApANDWATER.
• IFTAKENINTERNALLY,DONOTINDUCEvOMITINgBUTpROMpTLYCONSULTApHYSICIANFORTREATMENT.
CAUTION
About the speed reduction gear
• Donotapplystrongforcetoanyofthepartswithahammerandsoon.Furthermore,becarefulnottodropanyoftheparts,asthis mayresultinscratchesordents,leadingtolikelyspeedreductiongeardamage.
• Ifthespeedreductiongearisusedinadamagedcondition,itwillnotfunctionatitsspecifiedperformance.Furthermore,usinginthis
condition may lead to problems such as complete gear break-down.
• Thespeedreductiongearwillshiftwhenreplaced,andthereforeitisnecessarytoadjusttheoriginpositionfollowingreplacement.
10-1
10
Speed reduction gear, arm replacement
DEgREASINgANDWASHINgpRECAUTIONS
• THEEYESMAYBECOMEINFLAMEDIFExpOSEDTOgREASEORDETERgENTONTHEWASTECLOTHUSEDFOR gREASEREMOvAL.BEFOREHANDLINgTHEgREASE,WEARYOURSAFETYgOggLESTOENSURETHEgREASE WILLNOTCOMEINCONTACTWITHTHEEYES.
• INFLAMMATIONMAYOCCURIFTHEgREASECOMESINTOCONTACTWITHSKIN.BESURETOWEAR pROTECTIvEgLOvESTOpREvENTCONTACTWITHSKIN.
• DONOTTAKEORALLYOREAT.(EATINgWILLCAUSEDIARRHEAANDvOMITINg.)
• KEEpOUTOFTHEREACHOFCHILDREN.
2.
Speed reduction gear and arm replacement procedure
The replacement procedure and precautions for speed reduction gears and arms are listed below.
Refer to the following table for bolt tightening torque values required when replacing speed reduction gears or arms.
However,pleasefollowtheinstructionsgivenateachreplacementprocedureforthetighteningtorqueappliedtobolts
used to secure reduction gears and arms. OMRON bolts should be used.
■ Bolt tightening torque
Bolt size
Tightening torque (kgfcm)
Tightening torque (Nm)
M3 set screw
20
2
M3
20
2
M4
46
4.5
M44-axesspecificationα-axisarmcableclamp
20
2
M6
156
15.3
M8
380
37
M10
540
53
M12
1310
128
10
Speed reduction gear, arm replacement
Recommended"ScrewLock":LOCTITE241(madebyHenkelCorporation)
2.1
α, β, γ-axis arm replacement
WARNING
CARRYOUTREpLACEMENTAFTERREADINg“1.DETACHINg,ATTACHINg,ANDREpLACINgTHECOvERS”IN
CHApTER2.
NOTE
Thearmreplacementprocedureisthesamefortheα,βandγ-axes.
Therequirementsforα,βandγ-axisarmreplacementareasfollows.
1. Replacement parts
Part Name
OMRON Part No.
Part No. / Specs
Q'ty *1
Remarks
1
Arm
KDL-M1520-00x
2
Arm securing bolt
91312-08020
3
Cap
KDL-M1561-00x
1
4
link ball
KDL-M152A-00x
2
5
Cap
KDL-M1562-10x
3
Cable attachment part
Boltholefillerplug(*2)
KDL-M1573-00x
3
plasticblock(*3)
6
Clamp
KDL-M1574-00x
3
plasticblock(*3)
3
(*3)
3
(*3)
7
Pin
99480-03008
8
Clamp securing bracket
91312-04010
1
M8,length20
M4,length10
6
Arm attachment part
*1:quantityperaxis
*2:WiththeR6Y30110S03067NJ5(3-axesspecification),thisisnecessaryforthearmsofeachaxis.WiththeR6Y31110L03067NJ5and
R6Y31110H03067NJ5(4-axesspecification),itisnecessaryfortheβandγ-axisarms.
*3:TheseareonlyfortheR6Y31110L03067NJ5andR6Y31110H03067NJ5(4-axesspecification),andareusedwhensecuringtheθ-axiscableto
theα-axisarm.
10-2
2. Required tools
Name
Part No.
Manufacturer
Remarks
Cleaning wipe
Hexwrenchset
Thearmremovalprocedureisdescribedbelow.Usetheoppositeproceduretoperformarmattachment.
1
Post a sign indicating that the robot
is being adjusted.
Post a sign indicating that the robot is being adjusted
to prevent others from turning on the controller
power.
2
3
10
Enter the safety enclosure.
Step 3
When cap removed from arm
Speed reduction gear, arm replacement
Remove the cap (white) from each
axis arm.
Thehexsocketheadboltattachmentsurfaceis
exposedbyremovingthecap.
4
Adjust the arm position (if replacing
the speed reduction gear).
5
Remove the length 20 M8 hex socket
head bolt used to secure the arm for
each axis to its respective speed
reduction gear.
M8 hex socket head bolt
Tighten the bolts with a tightening torque of 37Nm
when attaching the arm.
6
Remove each axis arm.
2.1.1
Work required after replacing arm link balls
The link ball attachment method is described here.
1
Apply a thin layer of Loctite screw
lock to the link ball screw.
UseHenkelLoctite241(blue).
2
Attach a link ball to two locations on
each axis arm.
Step 2
Link ball attachment
Attachtoatotalofsixlocationsontheα,β and
γ-axes.
10-3
3
Tighten the link balls with a tool.
Step 3
•Tighteningtorque:20Nm
Tightening with tool
10
2.2
α, β, γ-axis speed reduction gear replacement
Speed reduction gear, arm replacement
NOTE
Thesameprocedureisusedtoreplacetheα,βandγ-axisspeedreductiongears.
Therequirementsforα,βandγ-axisspeedreductiongearreplacementareasfollows.
1. Replacement parts
Part Name
OMRON Part No.
1
Speed reduction gear
KDL-M211A-00x
2
Speed reduction gear
mounting bolt
90112-10J030
Q'ty *
Part No. / Specs
1
M10,length30
Remarks
Forα,βandγ-axes
4
*1:quantityperaxis
2. Required tools
Name
Part No.
Manufacturer
Remarks
Cleaning wipe
Hexwrenchset
Screw thread locking agent
loctite 241
Henkel
Medium-strengthtype(blue)
■ Removal
1
Post a sign indicating that the robot is being adjusted.
2
Enter the safety enclosure.
Post a sign indicating that the robot is being adjusted to prevent others from turning on the controller power.
CAUTION
Therobotbodyisextremelyheavy,andthereforecareshould
be taken when carrying out replacement work.
3
10-4
Remove the relevant axis motor.
Refer to “1.1 α,β,γ-axismotorreplacement
procedure” in Chapter 9 for details on motor
replacement.
4
Loosen the bracket hex socket head
bolts.
Step 4
Loosenthelength20M4hexsocketheadboltson
the bracket used to secure the motor cover attached
above and below the speed reduction gear.
The speed reduction gear can be easily removed by
loosening the bracket.
Remove the bracket if still difficult to remove the
speed reduction gear even after loosening.
5
6
Hex socket head bolt
Remove the M10 hex socket head
bolts used to secure the speed
reduction gear to the base.
Tighten the bolts with a tightening torque of 53Nm
when reattaching.
Loosen the M4 hex socket head bolts.
Bracket
Step 5
Speed reduction gear hex socket head bolt removal
Step 6
Speed reduction gear removal
10
Remove the speed reduction gear.
CAUTION
Donotapplyexcessiveforcetoremovethespeedreduction
gear. Doing so may result in gear malfunction.
Speed reduction gear, arm replacement
Keeptheangleofthespeedreductiongearsteady
and remove slowly while supporting with both hands.
If the angle is not kept steady and the speed reduction
gearbecomesstuckonthebase,itwillbedifficultto
remove.
If the brackets used to secure the motor cover
attached above and below the speed reduction gear
becomecaught,removethem.
10-5
■ Attachment
Attach the speed reduction gear using the opposite of the procedure used for removal.
Attach the speed reduction gear so that the cap bolts are on the outside.
CAUTION
• Thespeedreductiongearisextremelyheavyandshouldthereforebesupportedwithbothhandswhenattaching.
• Insertthespeedreductiongearslowlywhileholdingitperpendiculartothebaseatthesameangle.Itwillbedifficulttoinsertthe
reduction gear into the base if at angle.
• Tryagainifunabletoinsertthespeedreductiongearproperly.Usingexcessiveforcetoinsertthegearmaydamageit.
Speed reduction gear attachment condition
10
Arm side
Speed reduction gear, arm replacement
The bottom is wider when viewed from the side.
Motor side
The attachment condition at both the top and bottom is the same.
10-6
2.3
θ-axis speed reduction gear replacement
Therequirementsforθ-axisspeedreductiongearreplacementareasfollows.
1. Replacement parts
Part Name
1
OMRON Part No.
Q'ty *
Part No. / Specs
Remarks
KDL-M1822-00x
1
For R6Y31110l03067NJ5
KDL-M1822-10x
1
ForR6Y31110H03067NJ5
4
CommontoR6Y31110L03067NJ5,
R6Y31110H03067NJ5
Speed reduction gear
Speed reduction gear
mounting bolt
91380-03010
3
θ-axisshaft
KDL-M1870-00x
4
Shaft securing bolt
91380-03008
5
Spacer
KDL-M1830-00x
6
Spacer securing bolt
91380-04008
M3,length10
10
1
M3,length8
3
1
M4,length8
6
Speed reduction gear, arm replacement
2
2. Required tools
Name
Part No.
Manufacturer
Remarks
Cleaning wipe
Hexwrenchset
Screw thread locking agent
loctite 241
Henkel
Medium-strengthtype(blue)
■ Removal
1
Post a sign indicating that the robot is being adjusted.
2
3
Enter the safety enclosure.
4
Disconnect the air tube from the joint
on the user tubing.
Post a sign indicating that the robot is being adjusted to prevent others from turning on the controller power.
Remove the end effector.
Refer to “6. Attaching the end effector” in Chapter 2
of the installation manual for details.
CAUTION
Do not carry out replacement work with the air tube still
attachedtothejointontheusertubing.Bydoingso,theair
tube may bend.
5
Disconnect the cable from the θ-axis
motor cover.
Referto"1.Shaft,moveablebase,andspringcover
replacement procedure" in Chapter 5 for details.
CAUTION
Do not carry out replacement work with the cable still
attachedtotheθ-axismotor.Bydoingso,thecablemaybe
damaged.
10-7
6
Remove the moveable base from the
shafts.
Referto"1.Shaft,moveablebase,andspringcover
replacement procedure" in Chapter 5 for details.
7
8
9
10
Speed reduction gear, arm replacement
Step 12
Shaft removal
Step 13
Spacer removal
Step 15
M4 hex socket head bolt removal
Step 17
Speed reduction gear removal
Remove the θ-axis motor cover.
Referto“1.Detaching,attaching,andreplacingthe
covers” in Chapter 2 for details.
Remove the motor cover side O-ring.
Remove the tool flange.
Refer to “1.1 θ-axisseal,O-ringremoval”inChapter
8 for details.
10
11
Remove the housing.
12
Remove the shaft attached to the
speed reduction gear.
Remove the O-ring at the housing
side.
Insertahexwrenchthroughtheshaftthroughholeto
preventtheaxisrotating,andthenremovethesixM3
hexsocketheadbolts.
13
14
Remove the spacer.
Useaspannertopreventtheaxisrotating,andthen
removethethreeM4hexsocketheadbolts.
Pull the motor and speed reduction
gear assembly from the moveable
base.
RemovethefourM3hexsocketheadboltsfromthe
speed reduction gear brackets.
15
Remove the two M4 hex socket head
bolts securing the motor to the speed
reduction gear.
16
Loosen the two speed reduction gear
set screws.
17
Remove the motor from the speed
reduction gear.
10-8
■ Attachment
Attach the speed reduction gear using the opposite of the procedure used for removal.
1
Attach the motor to the speed
reduction gear.
2
Tighten the two speed reduction gear set
screw.
Step 1
Speed reduction gear attachment
•Tighteningtorque:69Nm
3
Attach the two length 14 M4 hex
socket head bolts used to secure the
motor to the speed reduction gear.
10
•Tighteningtorque:4.5Nm
4
Insert the motor and speed reduction
gear assembly into the moveable base.
Step 3
Bolt attachment
Step 4
Assembly attachment
WARNING
IFTHEATTACHMENTDIRECTIONISINCORRECT,IT
WILLNOTBEpOSSIBLETOpROpERLYEARTHTHE
θ-AxISMOTORCOvERWHENATTACHED,
RESULTINgINpOSSIBLEELECTRICSHOCK.
α-axis side
α-axis side
Identified by 2 punch holes
and earth bolt holes.
10-9
Speed reduction gear, arm replacement
Ensurethatthemotorconnectorsideisfacingthe
moveable base α-axisside.
5
Temporarily tighten the speed reduction
gear to the moveable base with the four
length 10 M3 hex socket head bolts.
6
Center the rotational axis.
Step 5
Temporary tightening
Step 6
Rotation centering jig attachment
Align the rotation centering jig with the center of the
speedreductiongearaxis.
Securetothemoveablebaseattwoofthesixbolt
locationswiththeM4bolts,adjusttocenterthe
θ-axis,andthenfullytightentheboltstemporarily
tightened at Step 5.
•Tighteningtorque:2Nm
10
Aftertightening,removethetwoM4boltsusedto
securethemoveablebase,andthenremovethe
rotation centering jig.
Speed reduction gear, arm replacement
Align centers.
Secure to moveable base
with M4 bolts at 2 locations,
and then center.
10-10
7
Attach the spacer.
Useaspannertopreventtheaxisrotating,andthen
attachthethreelength8M4hexsocketheadbolts.
Step 7
Spacer attachment
Step 8
Shaft attachment
Step 9
Grease application
•Tighteningtorque:4.5Nm
8
Attach the shaft.
Insertahexwrenchthroughtheshaftthroughholeto
preventtheaxisrotating,andthenattachthesix
length8M3hexsocketheadbolts.
•Tighteningtorque:2Nm
9
Apply a thin layer of the
recommended grease to the shaft and
sliding part of the housing.
•Recommendedgrease:CASSIDAgreaseEpS2
10
Attach the O-ring at the housing side.
Refer to “1.2 θ-axisseal,O-ringattachment”in
Chapter 8 for details.
Attach the housing.
Refer to “1.2 θ-axisseal,O-ringattachment”in
Chapter 8 for details.
Shaft and housing sliding part
10-11
Speed reduction gear, arm replacement
11
10
Chapter 11 Maintenance parts
Contents
1.
Consumable parts
11-1
2.
Basic specification
11-2
1.
Consumable parts
Consumable part
Q'ty
Remarks
KDL-M152K-00x
24
Plastic bearing 1
KDL-M152J-00x
12
plasticbearing2(Replaceifwear0.5mmorgreater.)
KDL-M219K-00x
1
Seal(insideθ-axishousing,smallside)
KDL-M219K-10x
1
Seal(insideθ-axishousing,largeside)
KDL-M150E-00x
1
Shaft(α-axismotorcableside,4-axesspecification)
KDL-M150F-00x
1
Shaft(α-axisencodercableside,4-axesspecification)
KDL-M211A-00x
3
Speedreductiongear(α,βandγ-axes)
KDL-M1822-00x
1
Speedreductiongear(θ-axis)
KDL-M1822-10x
1
Speedreductiongear(θ-axis)
11
Maintenance parts
• θ-axissealrecommendedgrease
CASSIDAgreaseEpS2
11-1
2.
Basic specification
Robot model
Working volume
R6Y30110S03067NJ5
R6Y31110L03067NJ5
R6Y31110H03067NJ5
x,Yaxis
Stroke
Ø1100mm
zaxis
Stroke
300mm(max.Ø1100mm)/450mm(centerØ580mm)
θaxis
Rotation range
±180°(defaultsetting,itcanbechanged)
Arm1,2,3
1000W
Servo motor
Rotationalaxis4
50W
x,Y,zaxis
100W
±0.2mm
Repeatability *1
11
θaxis
±0.1°
Maximumpayload
Maximumthrough-put *2
θaxistolerablemomentofinertia *3
Maintenance parts
Usertubing(outerdiameter)
3kg
150 CPM *4
0.01kgm 2(50W)
Ø6×1(moveabletool)
Travel limit
Soft limit
Protection class
IP67
Weight
75kg
*1:
*2:
*3:
*4:
11-2
Thisisthevalueataconstantambienttemperature.
With0.1kgpayload.Whenreciprocating305mminhorizontaland25mminverticaldirections.
Therearelimitstoaccelerationcoefficientsettings.
CpM:Cycleperminutes.Checkthenote2forthecycledefinition.
0.035kgm 2(100W)
Revision history
Amanualrevisioncodeappearsasasuffixtothecatalognumberonthefrontcovermanual.
Cat. No. I195E-EN-01
Revision code
The following table outlines the changes made to the manual during each revision.
Revision code
Date
01
June 2013
Description
Original production
Authorized Distributor:
Cat. No. I195E-EN-01A
Note: Specifications subject to change without notice.
Printed in Europe